You need to tell CloudStack about the hosts that it will manage. Hosts exist inside clusters, so before you begin adding hosts to the cloud, you must add at least one cluster.
7.5.1. Add Cluster: KVM or XenServer
These steps assume you have already installed the hypervisor on the hosts and logged in to the CloudStack UI.
In the left navigation, choose Infrastructure. In Zones, click View More, then click the zone in which you want to add the cluster.
Click the Compute tab.
In the Clusters node of the diagram, click View All.
Click Add Cluster.
Choose the hypervisor type for this cluster.
Choose the pod in which you want to create the cluster.
Enter a name for the cluster. This can be text of your choosing and is not used by CloudStack.
Click OK.
7.5.2. Add Cluster: vSphere
Host management for vSphere is done through a combination of vCenter and the CloudStack admin UI. CloudStack requires that all hosts be in a CloudStack cluster, but the cluster may consist of a single host. As an administrator you must decide if you would like to use clusters of one host or of multiple hosts. Clusters of multiple hosts allow for features like live migration. Clusters also require shared storage such as NFS or iSCSI.
For vSphere servers, we recommend creating the cluster of hosts in vCenter and then adding the entire cluster to CloudStack. Follow these requirements:
Do not put more than 8 hosts in a vSphere cluster
Make sure the hypervisor hosts do not have any VMs already running before you add them to CloudStack.
To add a vSphere cluster to CloudStack:
Create the cluster of hosts in vCenter. Follow the vCenter instructions to do this. You will create a cluster that looks something like this in vCenter.
Log in to the UI.
In the left navigation, choose Infrastructure. In Zones, click View More, then click the zone in which you want to add the cluster.
Click the Compute tab, and click View All on Pods. Choose the pod to which you want to add the cluster.
Click View Clusters.
Click Add Cluster.
In Hypervisor, choose VMware.
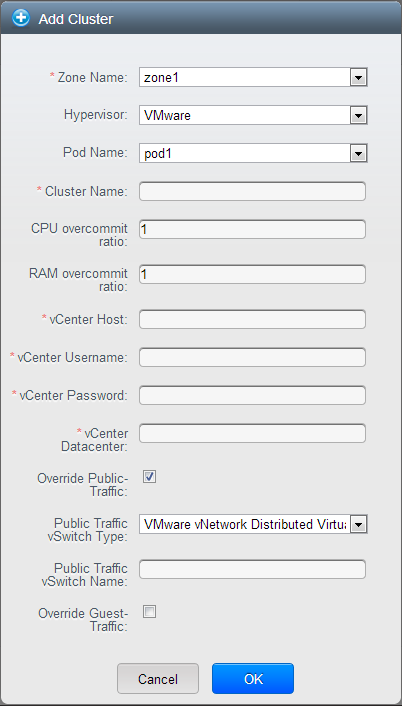
Provide the following information in the dialog. The fields below make reference to the values from vCenter.
Cluster Name: Enter the name of the cluster you created in vCenter. For example, "cloud.cluster.2.2.1"
vCenter Username: Enter the username that CloudStack should use to connect to vCenter. This user must have all the administrative privileges.
CPU overcommit ratio: Enter the CPU overcommit ratio for the cluster. The value you enter determines the CPU consumption of each VM in the selected cluster. By increasing the over-provisioning ratio, more resource capacity will be used. If no value is specified, the value is defaulted to 1, which implies no over-provisioning is done.
RAM overcommit ratio: Enter the RAM overcommit ratio for the cluster. The value you enter determines the memory consumption of each VM in the selected cluster. By increasing the over-provisioning ratio, more resource capacity will be used. If no value is specified, the value is defaulted to 1, which implies no over-provisioning is done.
vCenter Host: Enter the hostname or IP address of the vCenter server.
vCenter Password: Enter the password for the user named above.
vCenter Datacenter: Enter the vCenter datacenter that the cluster is in. For example, "cloud.dc.VM".
Override Public Traffic: Enable this option to override the zone-wide public traffic for the cluster you are creating.
Public Traffic vSwitch Type: This option is displayed only if you enable the Override Public Traffic option. Select a desirable switch. If the vmware.use.dvswitch global parameter is true, the default option will be VMware vNetwork Distributed Virtual Switch.
If you have enabled Nexus dvSwitch in the environment, the following parameters for dvSwitch configuration are displayed:
Nexus dvSwitch IP Address: The IP address of the Nexus VSM appliance.
Nexus dvSwitch Username: The username required to access the Nexus VSM appliance.
Nexus dvSwitch Password: The password associated with the username specified above.
Override Guest Traffic: Enable this option to override the zone-wide guest traffic for the cluster you are creating.
Guest Traffic vSwitch Type: This option is displayed only if you enable the Override Guest Traffic option. Select a desirable switch.
If the vmware.use.dvswitch global parameter is true, the default option will be VMware vNetwork Distributed Virtual Switch.
If you have enabled Nexus dvSwitch in the environment, the following parameters for dvSwitch configuration are displayed:
Nexus dvSwitch IP Address: The IP address of the Nexus VSM appliance.
Nexus dvSwitch Username: The username required to access the Nexus VSM appliance.
Nexus dvSwitch Password: The password associated with the username specified above.
There might be a slight delay while the cluster is provisioned. It will automatically display in the UI.