13.4. Working With Volumes
A volume provides storage to a guest VM. The volume can provide for a root disk or an additional data disk. CloudStack supports additional volumes for guest VMs.
Volumes are created for a specific hypervisor type. A volume that has been attached to guest using one hypervisor type (e.g, XenServer) may not be attached to a guest that is using another hypervisor type, for example:vSphere, KVM. This is because the different hypervisors use different disk image formats.
CloudStack defines a volume as a unit of storage available to a guest VM. Volumes are either root disks or data disks. The root disk has "/" in the file system and is usually the boot device. Data disks provide for additional storage, for example: "/opt" or "D:". Every guest VM has a root disk, and VMs can also optionally have a data disk. End users can mount multiple data disks to guest VMs. Users choose data disks from the disk offerings created by administrators. The user can create a template from a volume as well; this is the standard procedure for private template creation. Volumes are hypervisor-specific: a volume from one hypervisor type may not be used on a guest of another hypervisor type.
CloudStack supports attaching up to 13 data disks to a VM on XenServer hypervisor versions 6.0 and above. For the VMs on other hypervisor types, the data disk limit is 6.
13.4.1. Creating a New Volume
You can add more data disk volumes to a guest VM at any time, up to the limits of your storage capacity. Both CloudStack administrators and users can add volumes to VM instances. When you create a new volume, it is stored as an entity in CloudStack, but the actual storage resources are not allocated on the physical storage device until you attach the volume. This optimization allows the CloudStack to provision the volume nearest to the guest that will use it when the first attachment is made.
13.4.1.1. Using Local Storage for Data Volumes
You can create data volumes on local storage (supported with XenServer, KVM, and VMware). The data volume is placed on the same host as the VM instance that is attached to the data volume. These local data volumes can be attached to virtual machines, detached, re-attached, and deleted just as with the other types of data volume.
Local storage is ideal for scenarios where persistence of data volumes and HA is not required. Some of the benefits include reduced disk I/O latency and cost reduction from using inexpensive local disks.
In order for local volumes to be used, the feature must be enabled for the zone.
You can create a data disk offering for local storage. When a user creates a new VM, they can select this disk offering in order to cause the data disk volume to be placed in local storage.
You can not migrate a VM that has a volume in local storage to a different host, nor migrate the volume itself away to a different host. If you want to put a host into maintenance mode, you must first stop any VMs with local data volumes on that host.
13.4.1.2. To Create a New Volume
Log in to the CloudStack UI as a user or admin.
In the left navigation bar, click Storage.
In Select View, choose Volumes.
To create a new volume, click Add Volume, provide the following details, and click OK.
Name. Give the volume a unique name so you can find it later.
Availability Zone. Where do you want the storage to reside? This should be close to the VM that will use the volume.
Disk Offering. Choose the characteristics of the storage.
The new volume appears in the list of volumes with the state “Allocated.” The volume data is stored in CloudStack, but the volume is not yet ready for use
To start using the volume, continue to Attaching a Volume
13.4.2. Uploading an Existing Volume to a Virtual Machine
Existing data can be made accessible to a virtual machine. This is called uploading a volume to the VM. For example, this is useful to upload data from a local file system and attach it to a VM. Root administrators, domain administrators, and end users can all upload existing volumes to VMs.
The upload is performed using HTTP. The uploaded volume is placed in the zone's secondary storage
You cannot upload a volume if the preconfigured volume limit has already been reached. The default limit for the cloud is set in the global configuration parameter max.account.volumes, but administrators can also set per-domain limits that are different from the global default. See Setting Usage Limits
To upload a volume:
(Optional) Create an MD5 hash (checksum) of the disk image file that you are going to upload. After uploading the data disk, CloudStack will use this value to verify that no data corruption has occurred.
Log in to the CloudStack UI as an administrator or user
In the left navigation bar, click Storage.
Click Upload Volume.
Provide the following:
Name and Description. Any desired name and a brief description that can be shown in the UI.
Availability Zone. Choose the zone where you want to store the volume. VMs running on hosts in this zone can attach the volume.
Format. Choose one of the following to indicate the disk image format of the volume.
URL. The secure HTTP or HTTPS URL that CloudStack can use to access your disk. The type of file at the URL must match the value chosen in Format. For example, if Format is VHD, the URL might look like the following:
http://yourFileServerIP/userdata/myDataDisk.vhd
MD5 checksum. (Optional) Use the hash that you created in step 1.
Wait until the status of the volume shows that the upload is complete. Click Instances - Volumes, find the name you specified in step 5, and make sure the status is Uploaded.
13.4.3. Attaching a Volume
You can attach a volume to a guest VM to provide extra disk storage. Attach a volume when you first create a new volume, when you are moving an existing volume from one VM to another, or after you have migrated a volume from one storage pool to another.
Log in to the CloudStack UI as a user or admin.
In the left navigation, click Storage.
In Select View, choose Volumes.
Click the volume name in the Volumes list, then click the Attach Disk button

In the Instance popup, choose the VM to which you want to attach the volume. You will only see instances to which you are allowed to attach volumes; for example, a user will see only instances created by that user, but the administrator will have more choices.
When the volume has been attached, you should be able to see it by clicking Instances, the instance name, and View Volumes.
13.4.4. Detaching and Moving Volumes
A volume can be detached from a guest VM and attached to another guest. Both CloudStack administrators and users can detach volumes from VMs and move them to other VMs.
If the two VMs are in different clusters, and the volume is large, it may take several minutes for the volume to be moved to the new VM.
Log in to the CloudStack UI as a user or admin.
In the left navigation bar, click Storage, and choose Volumes in Select View. Alternatively, if you know which VM the volume is attached to, you can click Instances, click the VM name, and click View Volumes.
Click the name of the volume you want to detach, then click the Detach Disk button.

13.4.5. VM Storage Migration
Supported in XenServer, KVM, and VMware.
You can migrate a virtual machine’s root disk volume or any additional data disk volume from one storage pool to another in the same zone.
You can use the storage migration feature to achieve some commonly desired administration goals, such as balancing the load on storage pools and increasing the reliability of virtual machines by moving them away from any storage pool that is experiencing issues.
On XenServer and VMware, live migration of VM storage is enabled through CloudStack support for XenMotion and vMotion. Live storage migration allows VMs to be moved from one host to another, where the VMs are not located on storage shared between the two hosts. It provides the option to live migrate a VM’s disks along with the VM itself. It is possible to migrate a VM from one XenServer resource pool / VMware cluster to another, or to migrate a VM whose disks are on local storage, or even to migrate a VM’s disks from one storage repository to another, all while the VM is running.
Because of a limitation in VMware, live migration of storage for a VM is allowed only if the source and target storage pool are accessible to the source host; that is, the host where the VM is running when the live migration operation is requested.
13.4.5.1. Migrating a Data Volume to a New Storage Pool
There are two situations when you might want to migrate a disk:
Move the disk to new storage, but leave it attached to the same running VM.
Detach the disk from its current VM, move it to new storage, and attach it to a new VM.
13.4.5.1.1. Migrating Storage For a Running VM
(Supported on XenServer and VMware)
Log in to the CloudStack UI as a user or admin.
In the left navigation bar, click Instances, click the VM name, and click View Volumes.
Click the volume you want to migrate.
Click the Migrate Volume button

and choose the destination from the dropdown list.
Watch for the volume status to change to Migrating, then back to Ready.
13.4.5.1.2. Migrating Storage and Attaching to a Different VM
Log in to the CloudStack UI as a user or admin.
Click the Migrate Volume button
and choose the destination from the dropdown list.
Watch for the volume status to change to Migrating, then back to Ready. You can find the volume by clicking Storage in the left navigation bar. Make sure that Volumes is displayed at the top of the window, in the Select View dropdown.
13.4.5.2. Migrating a VM Root Volume to a New Storage Pool
(XenServer, VMware) You can live migrate a VM's root disk from one storage pool to another, without stopping the VM first.
(KVM) When migrating the root disk volume, the VM must first be stopped, and users can not access the VM. After migration is complete, the VM can be restarted.
Log in to the CloudStack UI as a user or admin.
In the left navigation bar, click Instances, and click the VM name.
(KVM only) Stop the VM.
Click the Migrate button
and choose the destination from the dropdown list.
If the VM's storage has to be migrated along with the VM, this will be noted in the host list. CloudStack will take care of the storage migration for you.
Watch for the volume status to change to Migrating, then back to Running (or Stopped, in the case of KVM). This can take some time.
(KVM only) Restart the VM.
CloudStack provides the ability to resize data disks; CloudStack controls volume size by using disk offerings. This provides CloudStack administrators with the flexibility to choose how much space they want to make available to the end users. Volumes within the disk offerings with the same storage tag can be resized. For example, if you only want to offer 10, 50, and 100 GB offerings, the allowed resize should stay within those limits. That implies if you define a 10 GB, a 50 GB and a 100 GB disk offerings, a user can upgrade from 10 GB to 50 GB, or 50 GB to 100 GB. If you create a custom-sized disk offering, then you have the option to resize the volume by specifying a new, larger size.
Additionally, using the resizeVolume API, a data volume can be moved from a static disk offering to a custom disk offering with the size specified. This functionality allows those who might be billing by certain volume sizes or disk offerings to stick to that model, while providing the flexibility to migrate to whatever custom size necessary.
This feature is supported on KVM, XenServer, and VMware hosts. However, shrinking volumes is not supported on VMware hosts.
Before you try to resize a volume, consider the following:
The VMs associated with the volume are stopped.
The data disks associated with the volume are removed.
When a volume is shrunk, the disk associated with it is simply truncated, and doing so would put its content at risk of data loss. Therefore, resize any partitions or file systems before you shrink a data disk so that all the data is moved off from that disk.
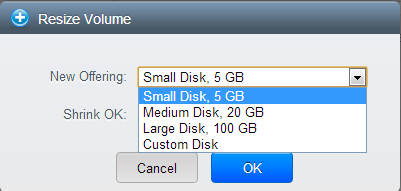
To resize a volume:
Log in to the CloudStack UI as a user or admin.
In the left navigation bar, click Storage.
In Select View, choose Volumes.
Select the volume name in the Volumes list, then click the Resize Volume button

In the Resize Volume pop-up, choose desired characteristics for the storage.
If you select Custom Disk, specify a custom size.
Click Shrink OK to confirm that you are reducing the size of a volume.
This parameter protects against inadvertent shrinking of a disk, which might lead to the risk of data loss. You must sign off that you know what you are doing.
Click OK.
13.4.7. Reset VM to New Root Disk on Reboot
You can specify that you want to discard the root disk and create a new one whenever a given VM is rebooted. This is useful for secure environments that need a fresh start on every boot and for desktops that should not retain state. The IP address of the VM will not change due to this operation.
To enable root disk reset on VM reboot:
13.4.8. Volume Deletion and Garbage Collection
The deletion of a volume does not delete the snapshots that have been created from the volume
When a VM is destroyed, data disk volumes that are attached to the VM are not deleted.
Volumes are permanently destroyed using a garbage collection process. The global configuration variables expunge.delay and expunge.interval determine when the physical deletion of volumes will occur.
expunge.delay: determines how old the volume must be before it is destroyed, in seconds
expunge.interval: determines how often to run the garbage collection check
Administrators should adjust these values depending on site policies around data retention.