

|
| Home > Apache Geronimo v1.1 > Documentation > Apache Geronimo v1.1 - User's Guide > Installation |
This article provide details about the Apache Geronimo installation. Here you will find information about what are pre requisite software, where to download Geronimo from and how to customize the installation to use custom ports other than the defaults.
In this document you will also find details about the installation and configuration of different topologies such as 2-tier with remote web server.
This article is organized in the following sections:
The source code and binaries for Geronimo v1.1 can be found at
http://geronimo.apache.org/downloads.html![]()
Uncompress the source code (.zip or tar.gz) and change the command line to the <geronimo_home> directory.
In order to do the build, type the following command
maven -Dmaven.test.skip=true -Dmaven.itest-skip=true m:rebuild-all
The two system properties will tell Maven to ignore all the test and just do a straight build.
Depending on the platform you plan to install and run Apache Geronimo download the appropriate insallation image.
Select the file compression format compatible with your system (zip, tar, gz) by clicking directly on the link, download it and expand the binary to your hard drive in a new directory. The installation of Apache Geronimo is as simple as uncompressing the .zip or .tar files.
Change the command line to the <geronimo_home> directory and start the server using the following command
java -jar server.jar
There are some of the platforms Apache Geronimo v1.1 has been tested:
| OS | Platform | Java version |
|---|---|---|
| Open Suse 10.0 | Intel 32bit | Sun Java 1.4.2_11 |
| Fedora Core v5 | Intel 32bit | Sun Java 1.4.2_11 |
| Ubuntu 6.06 | Intel 32 bit | Sun Java 1.4.2_12 |
| Debian 3.1r2 | Intel 32 bit | Sun Java 1.4.2_12 |
| Gentoo 2006.0 | Intel 32 bit | Sun Java 1.4.2_12 |
The HTTP port is the standard network that the Web container uses. This port number has to be used on any HTTP URL that calls Web applications running on Geronimo. The server and startup configuration modules of Geronimo are controlled by the config.xml file with the default port being 8080. There are several reasons for changing the network ports, namely to run multiple instances of Geronimo.
To configure the default port edit the <geronimo_home>/var/config/config.xml file. Go to the file and open in a text editor. The file will look like below:
<?xml version="1.0" encoding="UTF-8"?>

<!-- ======================================================== -->
<!-- Warning - This XML file is re-generated by Geronimo when -->
<!-- changes are made to Geronimo's configuration, therefore  -->
<!-- any comments added to this file will be lost.            -->
<!-- ======================================================== -->

<attributes xmlns="http://geronimo.apache.org/xml/ns/attributes-1.1">
    <module name="geronimo/rmi-naming/1.1-410806/car">
        <gbean name="RMIRegistry">
            <attribute name="port">1099</attribute>
        </gbean>
        <gbean name="NamingProperties">
            <!-- Check whether this really works if host name is 0.0.0.0 -->
            <attribute name="namingProviderUrl">rmi://0.0.0.0:1099</attribute>
        </gbean>
    </module>
    <module name="geronimo/j2ee-server/1.1-410806/car">
    </module>
    <module name="geronimo/j2ee-security/1.1-410806/car">
        <gbean name="JaasLoginServiceRemotingServer">
            <attribute name="host">0.0.0.0</attribute>
            <attribute name="port">4242</attribute>
        </gbean>
        <gbean name="JMXService">
          <attribute name="protocol">rmi</attribute>
          <attribute name="host">0.0.0.0</attribute>
          <attribute name="port">9999</attribute>
          <attribute name="urlPath">/jndi/rmi://0.0.0.0:1099/JMXConnector</attribute>
        </gbean>
    </module>
    <module name="geronimo/axis/1.1-410806/car"/>
    <module name="geronimo/openejb/1.1-410806/car">
        <gbean name="EJBNetworkService">
            <attribute name="host">0.0.0.0</attribute>
            <attribute name="port">4201</attribute>
        </gbean>
    </module>
    <module name="geronimo/j2ee-corba/1.1-410806/car" load="false">
        <gbean name="NameServer">
            <attribute name="dbDir">var/cosnaming.db</attribute>
            <attribute name="port">1050</attribute>
        </gbean>
        <gbean name="Server">
            <attribute name="args">-ORBInitRef, NameService=corbaloc::localhost:1050/NameService</attribute>
        </gbean>
        <gbean name="UnprotectedServer">
            <attribute name="args">-ORBInitRef, NameService=corbaloc::localhost:1050/NameService</attribute>
        </gbean>
    </module>
    <module name="geronimo/system-database/1.1-410806/car">
        <gbean name="DerbyNetwork">
            <attribute name="host">0.0.0.0</attribute>
            <attribute name="port">1527</attribute>
        </gbean>
    </module>
    <module name="geronimo/activemq-broker/1.1-410806/car">
        <gbean name="ActiveMQ.tcp.default">
            <attribute name="host">0.0.0.0</attribute>
            <attribute name="port">61616</attribute>
        </gbean>
    </module>
    <module name="geronimo/activemq/1.1-410806/car"/>
    <module name="geronimo/directory/1.1-410806/car" load="false">
        <gbean name="geronimo.server:name=DirectoryService">
            <attribute name="host">0.0.0.0</attribute>
            <attribute name="port">1389</attribute>
        </gbean>
    </module>
    <module name="geronimo/ldap-realm/1.1-410806/car" load="false"/>
    <module name="geronimo/tomcat/1.1-410806/car">
        <gbean name="TomcatEngine">
            <reference name="TomcatValveChain" />
        </gbean>
        <!-- To enable accesslogging change the load="false" below to load="true" -->
        <gbean name="FirstValve" load="false"></gbean>

        <gbean name="TomcatResources"/>
        <gbean name="TomcatWebConnector">
            <attribute name="host">0.0.0.0</attribute>
            <attribute name="port">8080</attribute>
            <attribute name="redirectPort">8443</attribute>
        </gbean>
        <gbean name="TomcatAJPConnector">
            <attribute name="host">0.0.0.0</attribute>
            <attribute name="port">8009</attribute>
            <attribute name="redirectPort">8443</attribute>
        </gbean>
        <gbean name="TomcatWebSSLConnector">
            <attribute name="host">0.0.0.0</attribute>
            <attribute name="port">8443</attribute>
        </gbean>
    </module>
    <!-- n.b. be sure the gbean deployer is explicitly loaded before j2ee-deployer so that defaultEnvironment
    overrides work properly -->
    <module name="geronimo/geronimo-gbean-deployer/1.1-410806/car"/>
    <module name="geronimo/j2ee-deployer/1.1-410806/car">
        <gbean name="WebBuilder">
            <attribute name="defaultNamespace">http://geronimo.apache.org/xml/ns/j2ee/web/tomcat-1.1</attribute>
        </gbean>
    </module>
    <module name="geronimo/openejb-deployer/1.1-410806/car">
        <gbean name="EJBBuilder">
            <attribute name="listener">?name=TomcatWebContainer</attribute>
        </gbean>
    </module>
    <module name="geronimo/client-deployer/1.1-410806/car"/>
    <module name="geronimo/axis-deployer/1.1-410806/car"/>
    <module name="geronimo/javamail/1.1-410806/car" load="false">
        <gbean name="SMTPTransport">
            <attribute name="host">localhost</attribute>
            <attribute name="port">25</attribute>
        </gbean>
    </module>

    <module name="geronimo/sharedlib/1.1-410806/car">
        <gbean name="SharedLib">
            <attribute name="classesDirs">var/shared/classes</attribute>
            <attribute name="libDirs">var/shared/lib</attribute>
        </gbean>
    </module>

    <module name="geronimo/tomcat-deployer/1.1-410806/car"/>
    <module name="geronimo/welcome-tomcat/1.1-410806/car"/>
    <module name="geronimo/webconsole-tomcat/1.1-410806/car"/>
    <module name="geronimo/uddi-tomcat/1.1-410806/car" load="false"/>
    <module name="geronimo/remote-deploy-tomcat/1.1-410806/car" />
    <module name="geronimo/hot-deployer/1.1-410806/car" />
</attributes>
In order to change the default port, scroll down to the code that looks like below in the config.xml file and change the port number.
<gbean
	load="false" name="FirstValve"/>
<gbean name="TomcatResources"/>
    <gbean name="TomcatWebConnector">
      <attribute name="host">0.0.0.0</attribute>
      <attribute name="port">9000</attribute>
      <attribute name="redirectPort">8443</attribute>
    </gbean>
<module name="geronimo/activemq/1.1/car"/>
<module name="geronimo/jetty/1.1/car">
<gbean name="JettyWebConnector">
<attribute name="host">0.0.0.0</attribute>
<attribute name="port">9000</attribute>
<attribute name="redirectPort">8443</attribute>
Save the file and after starting the Geronimo Server, point your browser to
Apache Geronimo installs with a the default username - system and password - manager.There are three options to change the default username and password.
Open the <geronimo_home>/var/security/groups.properties file and edit the contents of this file. Add any username that you require and save the file.
admin=user1,user2
Next, open the <geronimo_home>/var/security/users.properties file. You can change the password for the existing system account or add new users. When adding new users, the username has to be the same as the ones added to the groups.properties file.
user1=password1
user2=password2
In this example, two users have been added, user1 and user2. The default system account has been deleted. Both user 1 and user2 can access both the console and the command line deployment tools.
Log into the console and click on Console Realm on the console navigation panel - security folder.
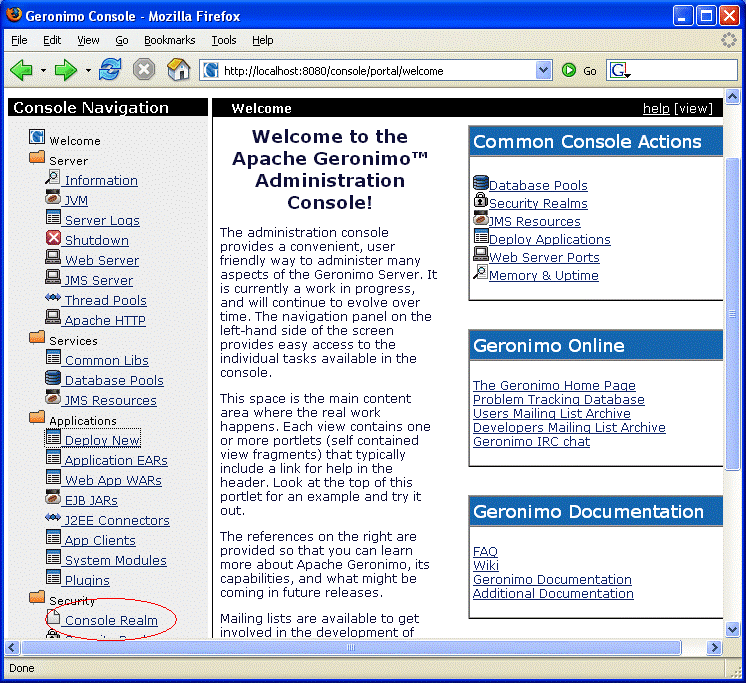
This will take you to the Console Realm Users and Groups Screen.
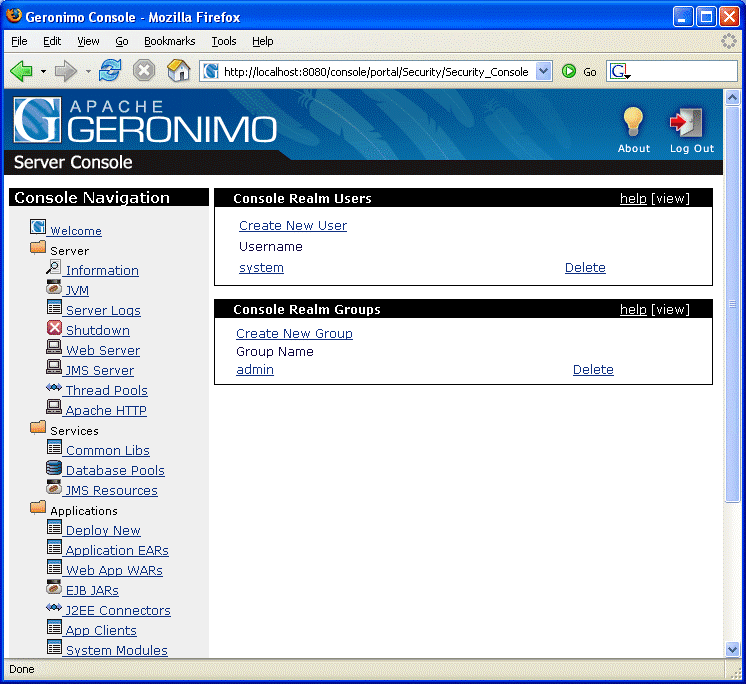
Click on the Create New User link to add a new user and on the individual user names to edit existing ones.
Click on Create New Group link to add new user to the group.
Once the new user name and password is added, log out of the console and try the new user name and password.
Creating your own security realm is being covered under adminstrative tasks under the main 1.1 documentation.
In today's globalized world, modern organizations face a lot of opportunities and challenges every day. Many of these challenges can put an onus on the organization's IT infrastructure therefore its configuration is crucial. The Apache Geronimo application server supports small-to-medium-sized enterprise applications and provides robust, secure support for the latest J2EE specification.This section will highlight the different configuration options that can be used in your production environment.
The figure below shows a client machine accessing an application hosted in the Geronimo server. Althougth the figure depicts only one client machine, several machines can be connected to the server and users on these machines can access the hosted Web applications using a standard Web browser.
The client-side application can vary from being a simple command line user interface to a full-fledged user interface such as those created using popular client-side GUI technology. These applications can access the Web tier by connecting to the server using their own HTTP connections, or they can access business and EIS tier objects through the help of the Geronimo client application container.
Features of the Geronimo application client : -
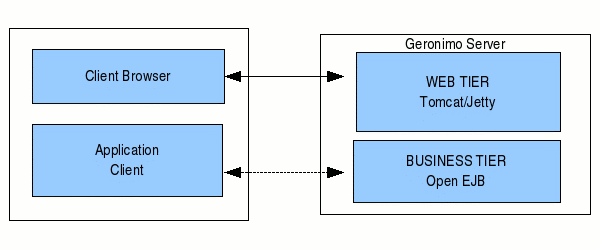
Three tier architecture system is more scalable than two tier as it supports hundreds of users and organization. It also increases flexibility and freedom.
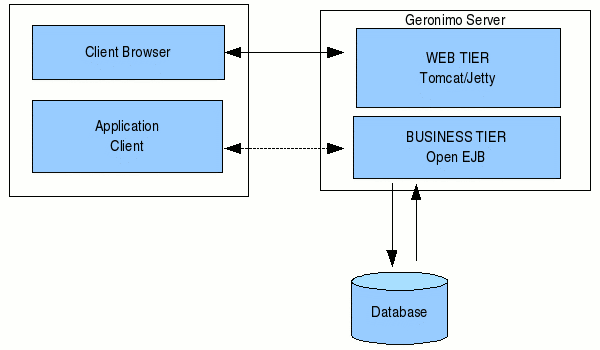
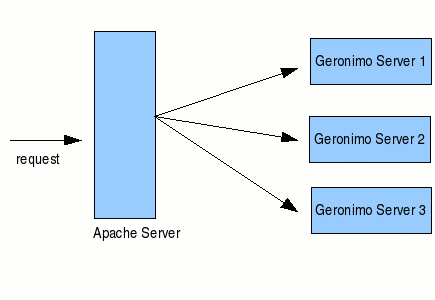
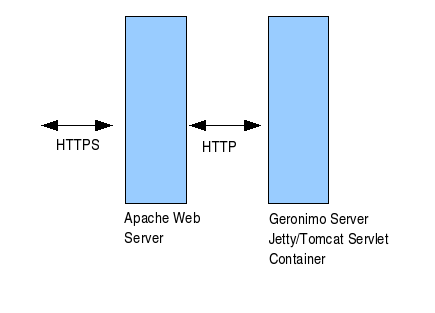
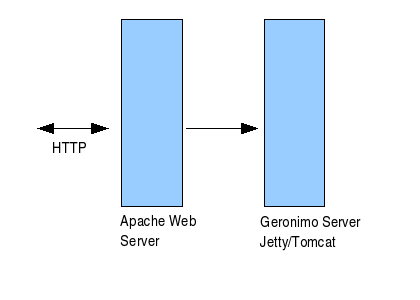
The Apache Web server is the best, and most preferred, HTTP server software in use on the Internet today. In your production enviroment using Geronimo with Apache Web server would give you some rigorous advantages as given below.
Using the Geronimo application server lets you build a secure enterprise infrastructure conforming to the latest standards and requirements.This article gave you an insight into custom configuration of the standard Geronimo installation, with several installation methods.