
|
| Home > Apache Geronimo v1.2 > Documentation > Administration > Configuring DB2 datasource |
This article shows you how to configure a DB2 datasource in Apache Geronimo v1.2. Since the release of Geronimo v1.1 you can now select multiple drivers from the creation pool wizard on the Geronimo Administration Console.
In this scenario we are creating a connection pool for a DB2 database, in order to connect to that database we will need to define at least two driver jar files. That is the JDBC driver itself and the respective license files. Depending on your implementation you will need different license files.
In this article we provide two alternatives to deploy the connection pool, the first approach we tackle is using the Geronimo Administration Console, then we explain the process for using the command line option instead.
To add the DB2 drivers and license to the Geronimo repository you will need to place those files in a particular directory structure. You will normally have two or three files to add to the repository, these files are:
These files are available in the <sqllib_home>\java directory. For additional information on the DB2 JDBC drivers and licenses visit the DB2 Information Center available at the following URL:
http://publib.boulder.ibm.com/infocenter/db2luw/v8/topic/com.ibm.db2.udb.doc/ad/t0010264.htm![]()
In order to use these files in Geronimo you will need to rename (copy and rename) as described in the following table.
| Original name | Renamed |
|---|---|
| db2jcc.jar | db2jcc-8.1.8.jar |
| db2jcc_license_cu.jar | db2jcc_license_cu-8.1.8.jar |
| db2jcc_license_cisuz.jar | db2jcc_license_cisuz-8.1.8.jar |
This means that for this particular case DB2 v8.1.8.806 was used.
At this point you are ready to add those files to the Geronimo repository, to do that you have two alternatives. You can either use any graphical or command line tool to copy the files and create the necessary directories or you use the Geronimo Administration Console and add the driver and licenses to the common libraries. Next we will cover both alternatives.
You will need to create the following directory structures under the <geronimo_home>\repository directory and copy the appropriate files to the respectives directories.
In order to use the console Apache Geronimo must be running. Access the Geronimo Administration Console by pointing your browser to the following URL:
With the drivers and license files installed you can now create a new database connection pool.
From the Geronimo Administration Console select Database Pools and create a new pool by clicking on Using the Geronimo database pool wizard.
On Step 1 of the create database pool wizard enter the pool name and database type as illustrated in the following figure and then click Next.

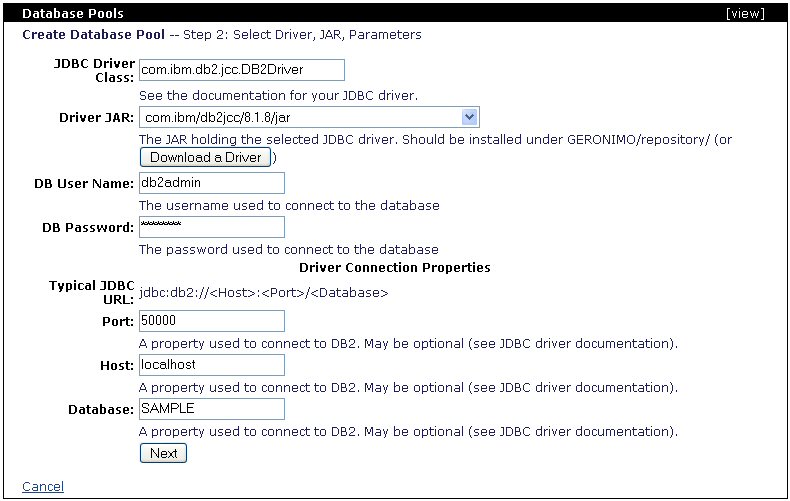
On Step 2 leave the JDBC Driver Class: field by default (com.ibm.db2.jcc.DB2Driver). If you click on the Driver JAR: pull-down menu you should now see the three com.ibm/db2... jars you copied in the repository. Since Geronimo v1.1 only allow you to select ONE jar file from this menu select the first jar on the list, com.ibm/db2jcc/8.1.8/jar which is the driver itself. You will add manually the license jars in the next steps.
Enter the remanining connection information as shown in the following figure. For this example the default db2admin user and password was used and a SAMPLE database was created via the DB2 Control Center.

Click Next.
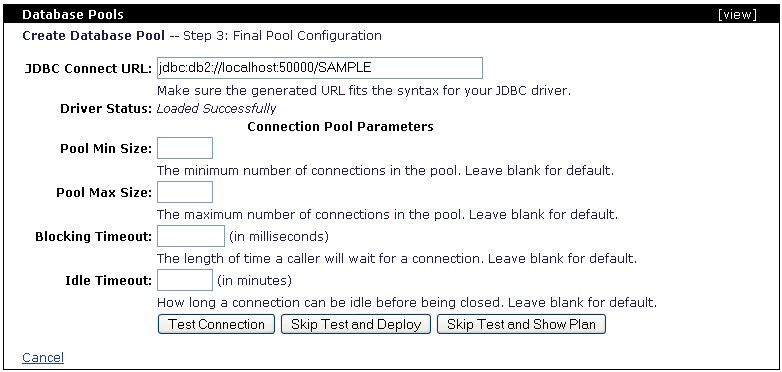
Leave the options on Step 3 by default, you should see the message Driver Status: Loaded Successfully.

Click on Test Connection, you should see a confirmation message that you are connected to DB2.

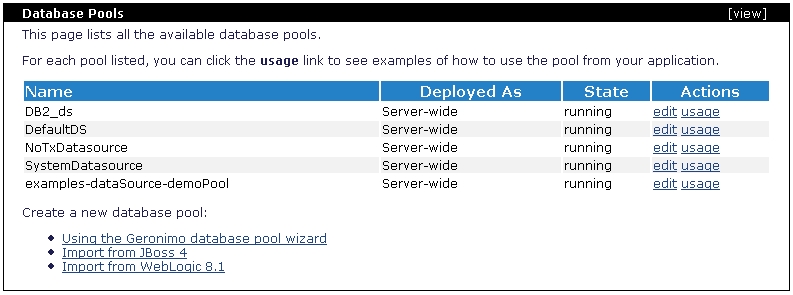
Click on Deploy. You should now have DB2_ds listed in the Database Pools portlet.

As an alternatively to the wizard you could create a deployment plan manually and deploy it using the command line based deployer tool. To use this option create a db2-plan.xml file and copy the content of the following example.
<?xml version="1.0" encoding="UTF-8"?>
<connector xmlns="http://geronimo.apache.org/xml/ns/j2ee/connector-1.2">
    <dep:environment xmlns:dep="http://geronimo.apache.org/xml/ns/deployment-1.2">
        <dep:moduleId>
            <dep:groupId>console.dbpool</dep:groupId>
            <dep:artifactId>DB2_ds</dep:artifactId>
            <dep:version>1.0</dep:version>
            <dep:type>rar</dep:type>
        </dep:moduleId>
        <dep:dependencies>
            <dep:dependency>
                <dep:groupId>com.ibm.db2</dep:groupId>
                <dep:artifactId>db2jcc</dep:artifactId>
                <dep:version>8.1.8</dep:version>
                <dep:type>jar</dep:type>
            </dep:dependency>
            <dep:dependency>
                <dep:groupId>com.ibm.db2</dep:groupId>
                <dep:artifactId>db2jcc_license_cisuz</dep:artifactId>
                <dep:version>8.1.8</dep:version>
                <dep:type>jar</dep:type>
            </dep:dependency>
            <dep:dependency>
                <dep:groupId>com.ibm.db2</dep:groupId>
                <dep:artifactId>db2jcc_license_cu</dep:artifactId>
                <dep:version>8.1.8</dep:version>
                <dep:type>jar</dep:type>
            </dep:dependency>
        </dep:dependencies>
    </dep:environment>
    <resourceadapter>
        <outbound-resourceadapter>
            <connection-definition>
                <connectionfactory-interface>javax.sql.DataSource</connectionfactory-interface>
                <connectiondefinition-instance>
                    <name>DB2_ds</name>
                    <config-property-setting name="Password">db2admin</config-property-setting>
                    <config-property-setting name="Driver">com.ibm.db2.jcc.DB2Driver</config-property-setting>
                    <config-property-setting name="UserName">db2admin</config-property-setting>
                    <config-property-setting name="ConnectionURL">jdbc:db2://localhost:50000/SAMPLE</config-property-setting>
                    <connectionmanager>
                        <local-transaction/>
                        <single-pool>
                            <max-size>10</max-size>
                            <min-size>0</min-size>
                            <match-one/>
                        </single-pool>
                    </connectionmanager>
                </connectiondefinition-instance>
            </connection-definition>
        </outbound-resourceadapter>
    </resourceadapter>
</connector>
Let's analyze this plan now. Take a look at the <dep:environment> section, there you can find the moduleId which identify the resource or component being deployed; in the Administration Console the moduleId is displayed in the Component Name column on the Database Pools portlet.
Right after the moduleId comes the definition of the dependencies. In this particular case you can find three <dep:dependency> blocks pertaining to the DB2 JDBC driver and the two lincese jars. The last "big" block in this plan is the <resourceadapter> where the connection paramenters such as driver, user and password, connection URL, etc. are defined.
To the deploy the DB2 datasource you just created run the following command from the <geronimo_home>\bin directory.
deploy --user system --password manager deploy <dep_plan_home>\db2-plan.xml ..\repository\org\tranql\tranql-connector-ra\1.3\tranql-connector-ra-1.3.rar
You should receive the following message:
D:\geronimo-jetty-j2ee-1.2\bin>deploy --user system --password manager deploy \tmp\db2-plan.xml ..\repository\org\tranql\tranql-connector-ra\1.3\tranql-connector-ra-1.3.rar
Using GERONIMO_BASE:   D:\geronimo-jetty-j2ee-1.2
Using GERONIMO_HOME:   D:\geronimo-jetty-j2ee-1.2
Using GERONIMO_TMPDIR: D:\geronimo-jetty-j2ee-1.2\var\temp
Using JRE_HOME:        C:\Java\jdk1.5.0_06\\jre
    Deployed console.dbpool/DB2_ds/1.0/rar