| 6.3. Easy Configuration and Deployment using the Console | ||
|---|---|---|
 | Chapter 6. Database Configuration [DRAFT (1.0-pre)] |  |
| 6.3. Easy Configuration and Deployment using the Console | ||
|---|---|---|
| | Chapter 6. Database Configuration [DRAFT (1.0-pre)] | |
The fastest way to configure a database pool is to use the console. The section walks through that process.
To begin with, start Geronimo and point your browser to the console, which is typically at a URL like http://localhost:8080/console/. This brings up the login screen:
The default login is username "system" and password "manager" (this can be changed in var/security/users.properties and var/security/groups.properties -- for more detail see Chapter 9, Security Configuration [DRAFT (1.0-pre)]). Once logged in, the specific path depends on what you're trying to do, as described in the following sections:
This process is used for normal JDBC drivers, which will not be used in an XA/two-phase commit environment. It works with any database that has a JDBC driver available (though some drivers that are not "type 4" may also require native libraries to be configured before they work).
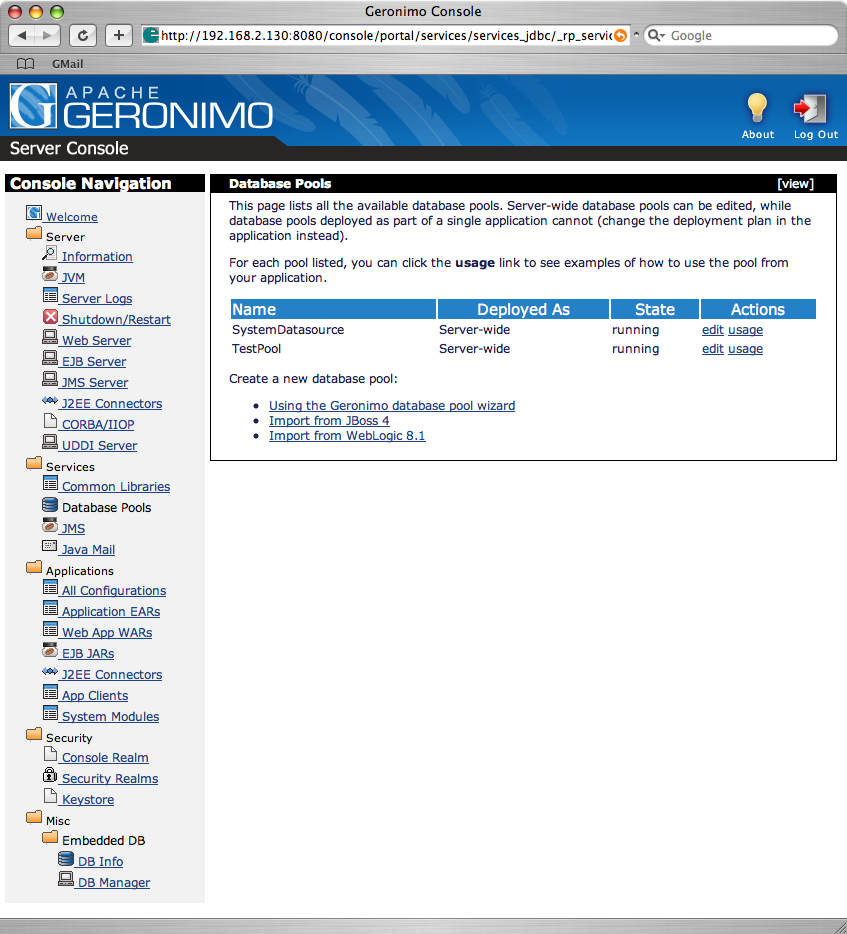
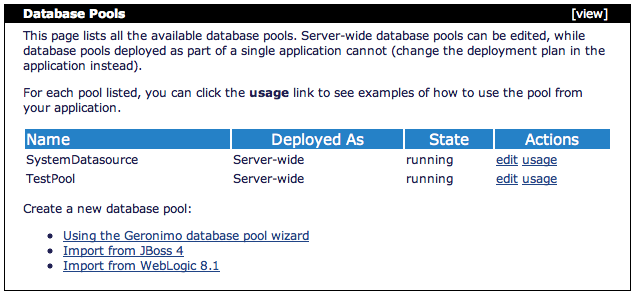
To begin the process of creating a new JDBC pool, select from the left navigation bar of the console, to bring up the database pool list screen:
Click the create a new database pool link to begin the process.
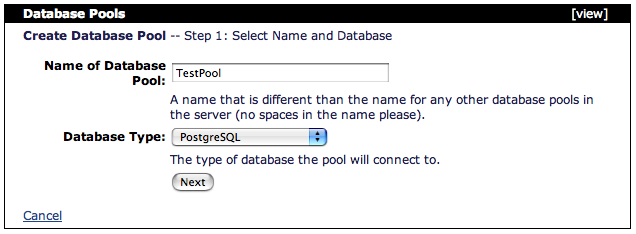
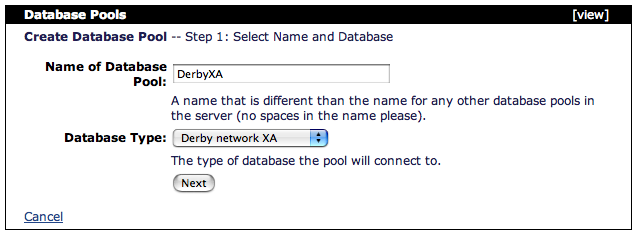
This screen lets you select the pool name and basic database type:
The fields here are:
| Field | Description |
|---|---|
| Name of Database Pool | The name that applications will use to refer to this database pool. It should be different than the name used for any other resource in the server. |
| Database Type | If the correct database type is listed here, select it. (Note that some XA drivers are present in the list, but that's covered in the next section.) If the database type is not listed, select "Other" (and see Section 6.3.1.5, “Detailed Pool Edit Screen”). |
Select to continue.
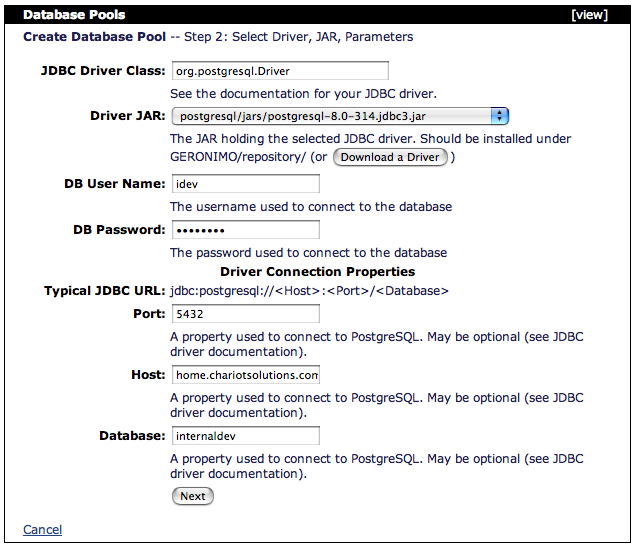
This screen handles the basic settings for the database pool:
The fields here are:
| Field | Description |
|---|---|
| JDBC Driver Class | The fully-qualified name of the JDBC driver class. Geronimo selects a default based on the database product selected. If unsure, refer to the JDBC driver documentation. |
| Driver JAR | A JAR in the Geronimo repository that holds the JDBC driver class. This will be added to the ClassPath of the database pool. The list here includes JARs available under the repository/ directory. If the correct driver JAR is not listed, either copy it into the repository and reload the page, or use the button to have Geronimo download a driver JAR for you. |
| DB User Name | The login name used to connect to the database. |
| DB Password | The password used to connect to the database. |
| Typical JDBC URL | The JDBC URL specifies the parameters needed to connect to the correct database. The form of the JDBC URL is different for every database product. This shows the outline of a normal JDBC URL for the database selected on the previous screen. Some values within the JDBC URL may need to be substituted, and the following fields on the screen let you enter values for those. |
The rest of the fields are different depending on which database was selected -- if unsure, consult the JDBC driver documentation. However, many databases use some or all of the following common fields:
| Field | Description |
|---|---|
| Host | The host name or IP address of the database server. |
| Port | The network port that the database server is listening on. |
| Database | The name of the database to connect to, if the server hosts multiple databases. |
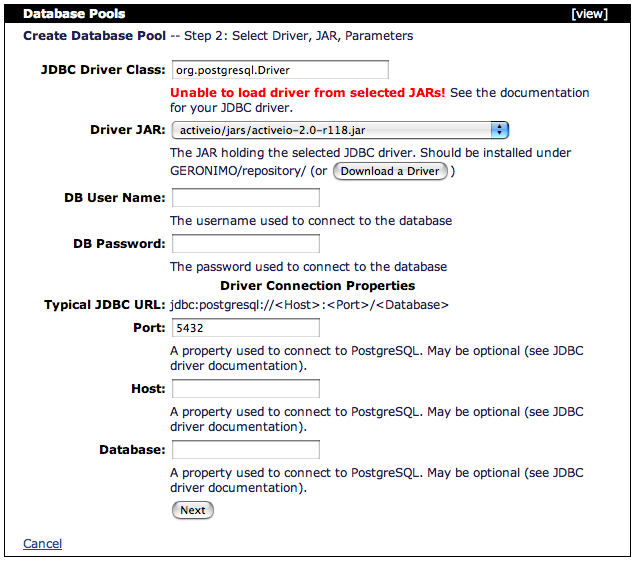
Select to continue. Note that if the select driver cannot be loaded from the selected JAR, then you'll be returned to this page with an error:
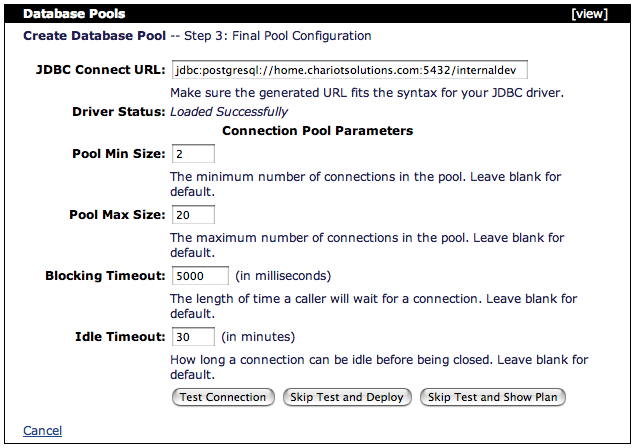
This screen confirms the JDBC URL based on the properties from the previous screen, and handles pool settings:
The fields here are:
| Field | Description |
|---|---|
| JDBC Connect URL | Confirms the JDBC URL that will be used to connect to the database. This is based on the standard URL format for this database and the values entered on the previous screen. You can tweak or override it here. |
| Driver Status | Confirms that the selected driver class could be loaded from the selected driver JAR. |
| Pool Min Size | The smallest number of connections that the database pool should have open at any time. The default is 0. |
| Pool Max Size | The largest number of connections that the database pool should have open at any time. If there are more clients than open connections, the pool will grow to its maximum size, and after that some clients will simply wait for a connection to be returned to the pool. The default is 10. |
| Blocking Timeout (milliseconds) | How long a client will wait for a connection to become available, if all connections in the pool are in use and the pool is at its maximum size. After this amount of time elapses with no connection available, the client will receive a SQLException indicating that no connections are available. The default is 5000. |
| Idle Timeout (minutes) | If a connection in the pool has gone this long without being used, it will be closed and the pool will shrink. The default is 15. |
There are three paths forward from here:
: Attempts to open a database connection using the supplied values, to make sure the server can connect successfully.
: Saves the connection pool without testing it first. After deploying, the console returns to the database pool list screen, where the new pool should be listed.
: Shows the RAR deployment plan that Geronimo will use for this pool. This is normally used if you don't want to deploy the pool server-wide, but want to copy the plan to use in an application-scoped or client-scoped pool. See Section 6.3.4, “Generate a Plan for an Application or Client Scoped Pool”.
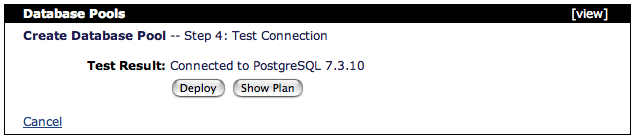
The test screen may show up one of two ways, depending on whether the test was successful.
If successful, you can select to deploy the pool and return to the database pool list screen, or select to see the Geronimo deployment plan that will be used for the pool (see Section 6.3.4, “Generate a Plan for an Application or Client Scoped Pool”).
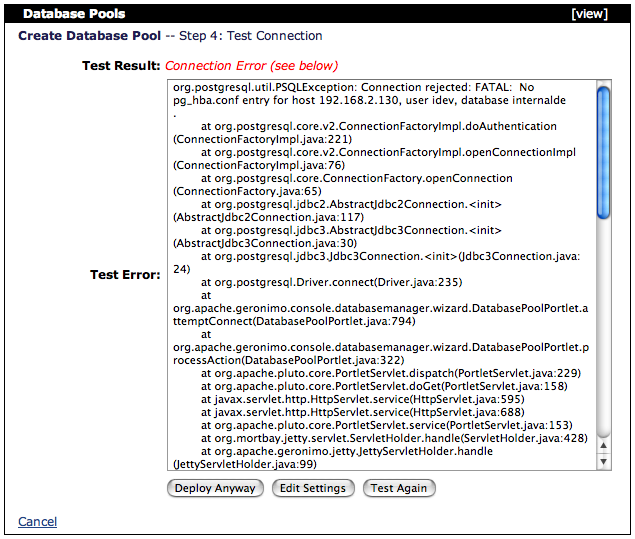
If the test failed, you have three options:
: in case the database is just temporarily unavailable (deploys the pool and returns to the database pool list screen)
: goes to the full edit screen to adjust the pool configuration (see Section 6.3.1.5, “Detailed Pool Edit Screen”)
: in case you fixed something unrelated to the pool configuration and now the connection should work (reloads this same test screen)
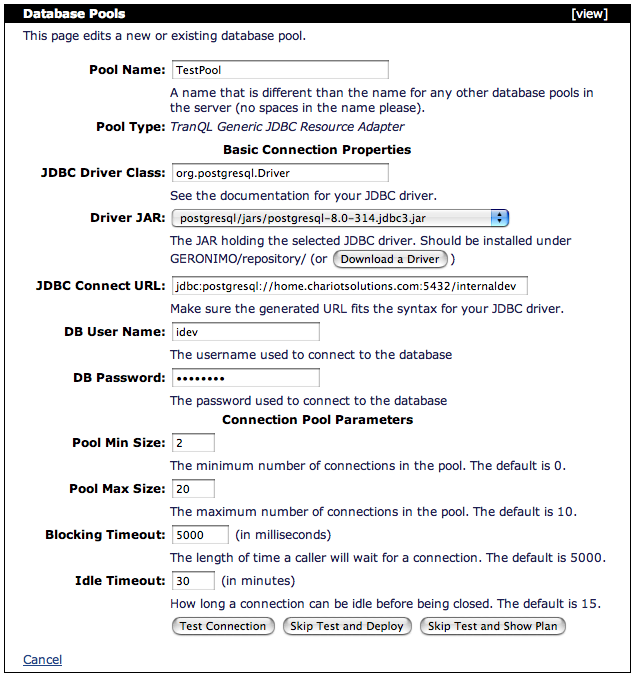
If you select a database type of "Other" or choose to edit setting after a test failure, the console loads a single screen where you can edit all the settings for the pool:
The fields here are similar to the options available from the 4-step process:
| Field | Description |
|---|---|
| Pool Name | The name that applications will use to refer to this database pool. It should be different than the name used for any other resource in the server. |
| Pool Type | Indicates which resource adapter will be used for this pool. For standard JDBC connection pools, this should be "TranQL Generic JDBC Resource Adapter" (it will be different for XA pools, and they will also have different configuration settings available on this screen). |
| JDBC Driver Class | The fully-qualified name of the JDBC driver class. Geronimo selects a default based on the database product selected. If unsure, refer to the JDBC driver documentation. |
| Driver JAR | A JAR in the Geronimo repository that holds the JDBC driver class. This will be added to the ClassPath of the database pool. The list here includes JARs available under the repository/ directory. If the correct driver JAR is not listed, either copy it into the repository and reload the page, or use the button to have Geronimo download a driver JAR for you. |
| JDBC Connect URL | Confirms the JDBC URL that will be used to connect to the database. This is based on the standard URL format for this database and the values entered on the previous screen. You can tweak or override it here. |
| DB User Name | The login name used to connect to the database. |
| DB Password | The password used to connect to the database. |
| Pool Min Size | The smallest number of connections that the database pool should have open at any time. The default is 0. |
| Pool Max Size | The largest number of connections that the database pool should have open at any time. If there are more clients than open connections, the pool will grow to its maximum size, and after that some clients will simply wait for a connection to be returned to the pool. The default is 10. |
| Blocking Timeout (milliseconds) | How long a client will wait for a connection to become available, if all connections in the pool are in use and the pool is at its maximum size. After this amount of time elapses with no connection available, the client will receive a SQLException indicating that no connections are available. The default is 5000. |
| Idle Timeout (minutes) | If a connection in the pool has gone this long without being used, it will be closed and the pool will shrink. The default is 15. |
There are three paths forward from here:
: Attempts to open a database connection using the supplied values, to make sure the server can connect successfully. Continues to the test screen (see Section 6.3.1.4, “Step 4: Test Pool”).
: Saves the connection pool without testing it first. After deploying, the console returns to the database pool list screen, where the new pool should be listed.
: Shows the RAR deployment plan that Geronimo will use for this pool. This is normally used if you don't want to deploy the pool server-wide, but want to copy the plan to use in an application-scoped or client-scoped pool. See Section 6.3.4, “Generate a Plan for an Application or Client Scoped Pool”.
Many databases support two-phase commit, also known as XA transactions. XA allows you to use more than one database, JMS connection, or other resource in a single transaction. However, this support is provided through an XADataSource, not the traditional JDBC driver. As a result, the configuration process is somewhat different.
Geronimo includes separate XA packages for each supported database (though the driver JAR is also required). The supported databases as of M5 are:
Derby embedded server
Derby network server
To configure a new XA database pool, start Geronimo, log in to the console and click the Database Pools link in the left navigation bar.
From the list of database pools on the right, select .
The fields here are:
| Field | Description |
|---|---|
| Name of Database Pool | The name that applications will use to refer to this database pool. It should be different than the name used for any other resource in the server. |
| Database Type | Select the database type, with "XA" in the name. If the XA driver for the database is not listed here, you will need to get both an XA driver for the database and a Geronimo integration package for it, and deploy the database pool at the command line. |
Select to continue.
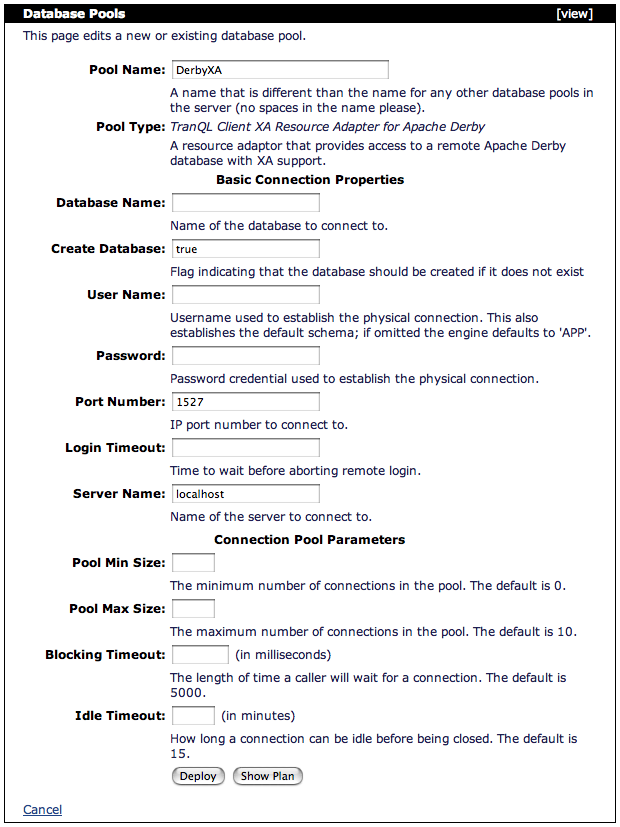
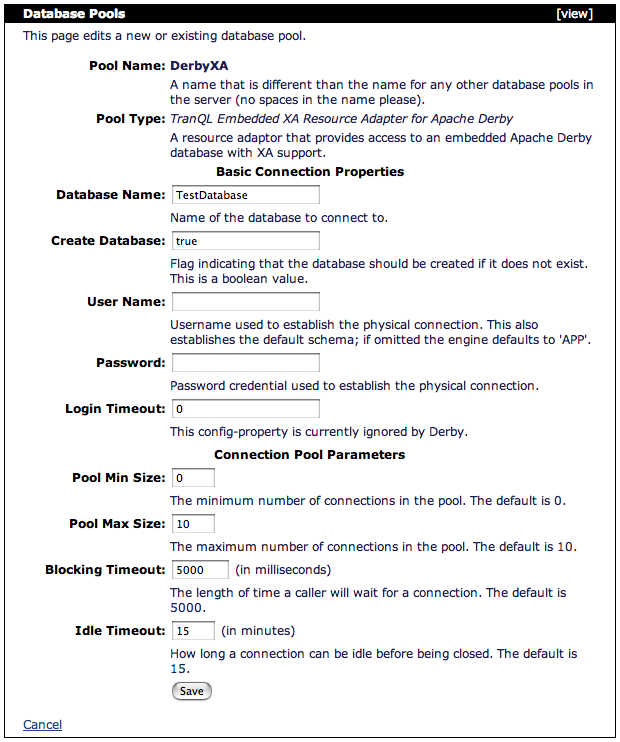
This brings up the detailed database pool edit screen, configured for the selected XA driver:
The fixed fields here (everything except the Basic Connection Properties) are:
| Field | Description |
|---|---|
| Pool Name | The name that applications will use to refer to this database pool. It should be different than the name used for any other resource in the server. The value here is what you entered on the previous screen. |
| Pool Type | Indicates which Geronimo resource adapter will be used for this pool. This will normally be different for each XA driver. |
| Pool Min Size | The smallest number of connections that the database pool should have open at any time. The default is 0. |
| Pool Max Size | The largest number of connections that the database pool should have open at any time. If there are more clients than open connections, the pool will grow to its maximum size, and after that some clients will simply wait for a connection to be returned to the pool. The default is 10. |
| Blocking Timeout (milliseconds) | How long a client will wait for a connection to become available, if all connections in the pool are in use and the pool is at its maximum size. After this amount of time elapses with no connection available, the client will receive a SQLException indicating that no connections are available. The default is 5000. |
| Idle Timeout (minutes) | If a connection in the pool has gone this long without being used, it will be closed and the pool will shrink. The default is 15. |
The remaining fields on this screen are database-specific configuration settings controlled by the XA driver implementation. If the supplied property names and descriptions are not helpful enough, consult the XA driver documentation.
The options to continue from here are (deploy the pool and return to the pool list screen) and (show the Geronimo deployment plan that would be used but don't actually deploy it yet -- see the next section for details).
Geronimo can also import database pools from other application servers. That is, if you upload or point Geronimo to a database pool configuration file for another supported server, it will let you convert the settings from that to Geronimo. The servers currently supported are:
JBoss 4.x
WebLogic 8.1
The import process starts on the pool list screen:
Select one of the links starting with to begin the import.
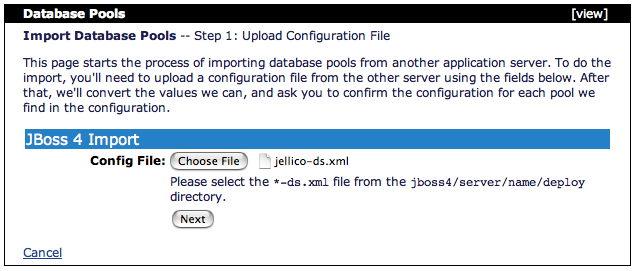
Most products let you upload a product-specific configuration file to Geronimo to begin the import. For example here is the import screen for JBoss:
Simply choose the correct database pool or server configuration file (noted above the Next button) and hit to continue. For JBoss, this is a JBoss database pool deployment file, named something-ds.xml and usually in the deploy directory.
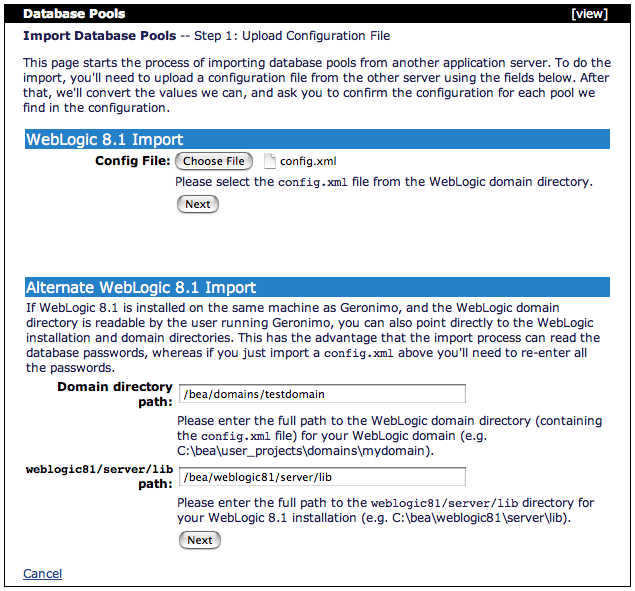
WebLogic has an additional configuration option. Uploading the config.xml as above strips out the database connection passwords. The alternative is to point the console to the WebLogic server/lib directory and WebLogic domain directory, and then Geronimo can recover the passwords along with the rest of the connectivity information. Of course, this only works if Geronimo and WebLogic are on the same machine, and if the WebLogic directory is readable to the user that started Geronimo. The WebLogic import screen looks like this:
In this case either select the config.xml file (top) or enter the directory paths (bottom) and click the corresponding button to continue.
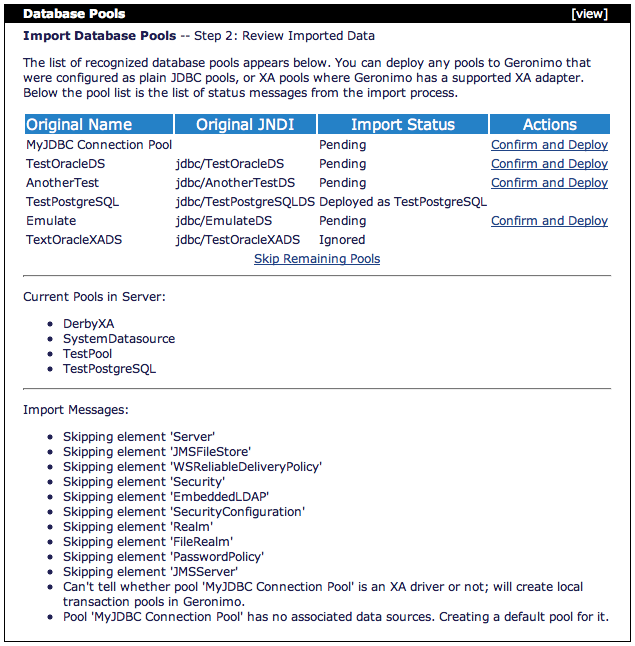
Once the configuration files have been identified and/or uploaded, Geronimo lists all the database pools it found on the import status screen:
This screen shows all the pools that were found for import on the top, then the database pools configured in Geronimo already, then any messages generated during the import (usually related to content in the configuration file that was not processed). In Figure 6.16, “Console: Database Pool -- Import Status”, 6 pools were identified. One is listed as "Ignored" because it is an XA database pool but Geronimo does not have a corresponding XA driver (in this case, for Oracle). One is listed as "Deployed as..." because it was already processed when the screen shot was taken. The others have links to , which is how you complete the import process for a database pool.
The confirm and deploy process loads the database pool edit screen (see Section 6.3.1.5, “Detailed Pool Edit Screen”) with all the settings Geronimo found in the imported database pool. Some settings may be missing if they could not be imported, and you may need to massage the imported data in any case (for example, if a WebLogic pool used the BEA driver for Oracle, it would need to be changed to the standard Oracle JDBC driver). Once you save the pool or cancel the editing process, the console returns to the import status screen.
When you've imported all the pools you're interested in, click or to return to the main database pool list screen.
The database pool features in the console can't update an application or client configuration. However, they can generate a deployment plan that can be used elsewhere to either deploy the pool with the command-line tools, or to include the plan in an application or client module. This works for both standard JDBC and XA database pools.
To do this, follow the normal process to create a pool outlined in Section 6.3.1, “Create a new JDBC Pool” or Section 6.3.2, “Create a new XA Database Pool”. From the edit, pool properties, or test screens, select the command to to bring up the plan screen.
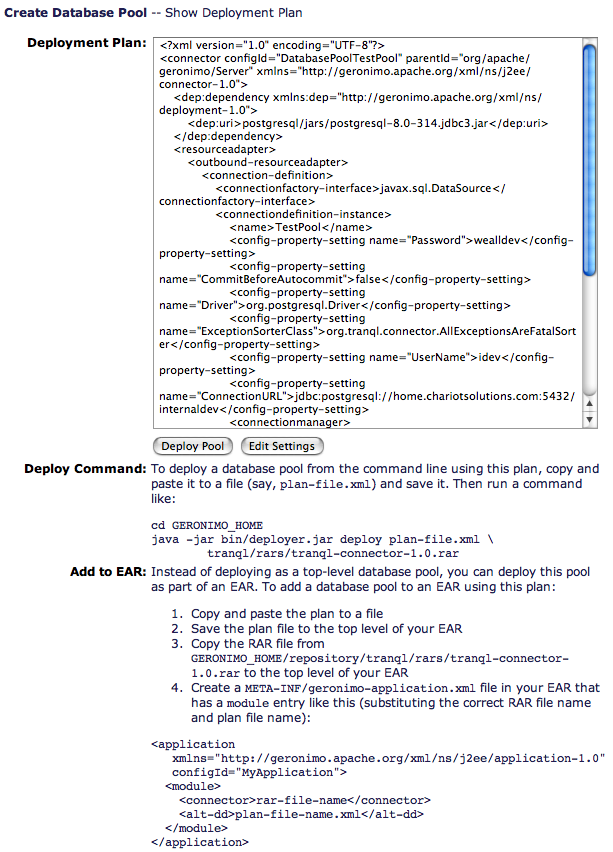
This screen shows the deployment plan that was generated based on the selections made on the previous screens. It also provides a command that could be used to deploy the pool on the command line, as well as providing a simple procedure to add the database pool to an EAR as an application-scoped pool.
The main step to take from this screen is to copy the entire contents of the Deployment Plan text area (using Ctrl-A or a similar shortcut to be sure). The next three sections discuss the different ways to use this plan.
![[Tip]](images/tip.png) | Tip |
|---|---|
If you plan to deploy more than one pool in the same server using this plan, be sure to change the configId attribute in the top connector element, and the name specified in the connectiondefinition-instance element. | |
To deploy via the command-line deploy tool, save the plan to a file on disk. Then that file can be used along with the listed RAR file to deploy the pool. (Note that the RAR file may be different for different types of pools, but the RAR file displayed on the screen in Figure 6.17, “Console: Database Pool -- Show Plan” is always the correct one based on the way the pool was configured.)
For example, if the plan was saved as GERONIMO_HOME/database-pool.xml, and it was a standard JDBC pool using the RAR file tranql/rars/tranql-connector-1.1.rar, then a deploy command might look like this:
java -jar GERONIMO_HOME/bin/deployer.jar deploy \
    GERONIMO_HOME/database-pool.xml \
GERONIMO_HOME/repository/tranql/rars/tranql-connector-1.1.rarTo deploy the pool as part of an EAR, save the plan to a file in the EAR, and copy the RAR file into the EAR as well. Again, note that the RAR file may be different for different types of pools, but the RAR file displayed on the screen in Figure 6.17, “Console: Database Pool -- Show Plan” is always the correct one based on the way the pool was configured.
The next step is to create or update the J2EE deployment descriptor and Geronimo EAR deployment plan to include the new module. The Geronimo deployment plan will also use an alt-dd element to indicate that the deployment plan for the RAR is actually in the EAR but not in the RAR file itself. For full details on this procedure, see Section 6.4.2.2, “Deploying an Application-Scoped Database Pool”.
To deploy the pool as part of an application client module, you'll need to copy the database plan content into the client deployment plan, and refer to the correct RAR file from the client deployment plan as well. Again, note that the RAR file may be different for different types of pools, but the RAR file displayed on the screen in Figure 6.17, “Console: Database Pool -- Show Plan” is always the correct one based on the way the pool was configured.
For full details on this procedure, see Section 6.4.2.3, “Deploying a Client-Scoped Database Pool”.
To edit an existing database pool (either JDBC or XA), start Geronimo, log in to the console, and select from the left navigation bar of the console. This brings up the database pool list screen:
From the list of database pools on the right, select the link next to the database pool to edit. The edit screen will be configured slightly differently depending on whether this is a JDBC pool or an XA pool; these screens are described in the next two sections.
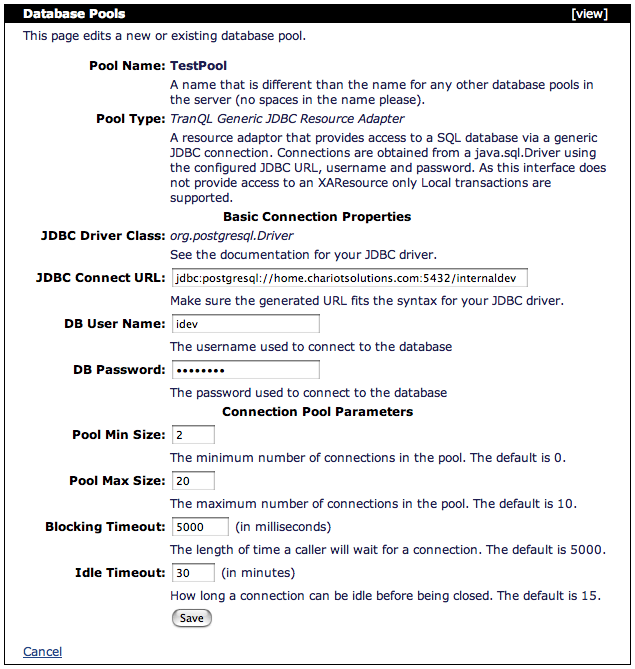
The JDBC pool edit screen looks like this:
The fields here are similar to the options available when creating a pool:
| Field | Description |
|---|---|
| Pool Name | The name that applications will use to refer to this database pool. It cannot be changed after the pool has been deployed. |
| Pool Type | Indicates which resource adapter will be used for this pool. For standard JDBC connection pools, this should be "TranQL Generic JDBC Resource Adapter" (it will be different for XA pools, and they will also have different configuration settings as described in the next section). |
| JDBC Driver Class | The fully-qualified name of the JDBC driver class. The driver class or JAR cannot be changed after the pool has been deployed (the pool would need to be redeployed manually with an updated plan). |
| JDBC Connect URL | Confirms the JDBC URL that will be used to connect to the database. If unsure of the syntax, consult the documentation for the JDBC driver. |
| DB User Name | The login name used to connect to the database. |
| DB Password | The password used to connect to the database. |
| Pool Min Size | The smallest number of connections that the database pool should have open at any time. |
| Pool Max Size | The largest number of connections that the database pool should have open at any time. If there are more clients than open connections, the pool will grow to its maximum size, and after that some clients will simply wait for a connection to be returned to the pool. |
| Blocking Timeout (milliseconds) | How long a client will wait for a connection to become available, if all connections in the pool are in use and the pool is at its maximum size. After this amount of time elapses with no connection available, the client will receive a SQLException indicating that no connections are available. |
| Idle Timeout (minutes) | If a connection in the pool has gone this long without being used, it will be closed and the pool will shrink. |
When the settings are correct, hit to save the new settings for the pool and return to the pool list screen. Currently there is no way for the console to test changes to an existing pool, though that should be added in a future release.
The XA database pool edit screen looks like this:
The fixed fields here (everything except the Basic Connection Properties) are:
| Field | Description |
|---|---|
| Pool Name | The name that applications will use to refer to this database pool. It should be different than the name used for any other resource in the server. The value here is what you entered on the previous screen. |
| Pool Type | Indicates which Geronimo resource adapter will be used for this pool. This will normally be different for each XA driver. |
| Pool Min Size | The smallest number of connections that the database pool should have open at any time. The default is 0. |
| Pool Max Size | The largest number of connections that the database pool should have open at any time. If there are more clients than open connections, the pool will grow to its maximum size, and after that some clients will simply wait for a connection to be returned to the pool. The default is 10. |
| Blocking Timeout (milliseconds) | How long a client will wait for a connection to become available, if all connections in the pool are in use and the pool is at its maximum size. After this amount of time elapses with no connection available, the client will receive a SQLException indicating that no connections are available. The default is 5000. |
| Idle Timeout (minutes) | If a connection in the pool has gone this long without being used, it will be closed and the pool will shrink. The default is 15. |
The remaining fields on this screen (the Basic Connection Properties) are database-specific configuration settings controlled by the XA driver implementation. If the supplied property names and descriptions are not helpful enough, consult the XA driver documentation.
When the settings are correct, hit to save the new settings for the pool and return to the pool list screen. Currently there is no way for the console to test changes to an existing pool, though that should be added in a future release.
| |  | |
| 6.2. Database Pools as Connectors and the TranQL RAR |  | 6.4. Manual Configuration and Deployment |