| 2.2. Geronimo Quick Start | ||
|---|---|---|
 | Chapter 2. Acquiring Geronimo & Quick Start [DRAFT (1.0)] |  |
| 2.2. Geronimo Quick Start | ||
|---|---|---|
| | Chapter 2. Acquiring Geronimo & Quick Start [DRAFT (1.0)] | |
This section gives a fast-paced walkthrough of a simple installation and customization process for Geronimo. Each of the steps here is covered in more detail in subsequent chapters.
To begin with, download the .tar.gz or .zip package.
Unpack the Geronimo install package to create a new geronimo-1.0/ installation directory. On Windows, a tool like WinZip can be used to unpack the ZIP file. On Mac or Linux, a command like tar -xzvf geronimo-1.0-jetty.tar.gz can be used to unpack the TAR file. This results in the directory structure shown in Figure 2.1, “Quick Start: Install Directory” (see Chapter 3, Installing Geronimo [DRAFT (M4)] for more details).
Open a command prompt and change to the Geronimo installation directory. Make sure Java 1.4.2 is on the current PATH. To start the server, run the command java -jar bin/server.jar (see Section 3.6, “Starting the Server” for more details).
Figure 2.2. Quick Start: Startup Output
geronimo-1.0> java -jar bin/server.jar
Booting Geronimo Kernel (in Java 1.4.2_10)...
Starting Geronimo Application Server
[*************************] 100%  37s Startup complete
  Listening on Ports:
    1099 0.0.0.0   RMI Naming
    1389 0.0.0.0   Apache Directory LDAP
    1527 0.0.0.0   Derby Connector
    4201 0.0.0.0   ActiveIO Connector EJB
    4242 0.0.0.0   Remote Login Listener
    8019 127.0.0.1 Jetty Connector AJP13
    8080 0.0.0.0   Jetty Connector HTTP
    8443 0.0.0.0   Jetty Connector HTTPS
   61616 0.0.0.0   ActiveMQ Message Broker Connector

  Started Application Modules:
    EAR: geronimo/daytrader-derby-jetty/1.0/car
    EAR: geronimo/uddi-jetty/1.0/car
    EAR: geronimo/webconsole-jetty/1.0/car
    RAR: geronimo/activemq/1.0/car
    RAR: geronimo/system-database/1.0/car
    WAR: geronimo/jmxdebug-jetty/1.0/car
    WAR: geronimo/jsp-examples-jetty/1.0/car
    WAR: geronimo/ldap-demo-jetty/1.0/car
    WAR: geronimo/remote-deploy-jetty/1.0/car
    WAR: geronimo/servlets-examples-jetty/1.0/car
    WAR: geronimo/welcome-jetty/1.0/car

  Web Applications:
    http://localhost:8080/
    http://localhost:8080/console
    http://localhost:8080/console-standard
    http://localhost:8080/daytrader
    http://localhost:8080/debug-tool
    http://localhost:8080/jsp-examples
    http://localhost:8080/juddi
    http://localhost:8080/ldap-demo
    http://localhost:8080/remote-deploy
    http://localhost:8080/servlets-examples

Geronimo Application Server started
Geronimo shows a text-based progress bar while it's starting, followed by a list of network ports it's listening on, applications that were started, and URLs to web applications that were started.
The ports in Figure 2.2, “Quick Start: Startup Output” are the standard set for Geronimo. If any of them are already taken by other programs (for example, 8080 for Tomcat), stop Geronimo, edit the file var/config/config.xml and search for the port number that's a problem, replace it with a new port number, and start Geronimo again (see Chapter 5, Core Configuration [EMPTY] for more details). Figure 2.3, “Quick Start: Editing Ports in config.xml” shows a section of config.xml where the standard HTTP listen port of 8080 has been changed to 8180.
Once Geronimo has started, point a web browser to http://localhost:8080/console (or use the host name for the machine Geronimo is installed on, if not localhost). This brings up the login screen for the Geronimo management console:
Enter the username "system" and password "manager". The default administrator account is set in the files var/security/users.properties and var/security/groups.properties in the Geronimo installation (see Chapter 9, Security Configuration [DRAFT (1.0-pre)] for more details). Hit the button to start the console.
The console has navigation options on the left, and a content area on the right.
To create a new database pool, Geronimo needs a JDBC driver. Geronimo ships with a JDBC driver for its embedded Apache Derby database, and can automatically download JDBC drivers for several popular open source databases (such as MySQL and PostgreSQL). For this quick start, we'll assume you create a Derby database pool, but you can also try configuring a pool pointing to a database of your own if you like (see Chapter 6, Database Configuration [DRAFT (1.0-pre)] for more details on creating custom database pools).
![[Tip]](images/tip.png) | Tip |
|---|---|
If you need to manually install a JDBC driver, create a directory named for the product under the repository/ directory and then a directory named jars/ under that, and copy the JDBC driver there (for example, for Oracle, create repository/oracle/jars/ and then copy the Oracle JDBC driver into there). For more information, see Section 6.1, “JDBC Drivers”. | |
To create a new Derby database:
Select in the navigation bar on the left.
Enter TestDatabase in the Create DB field, and click the button.
Make sure TestDatabase is listed in the Database List at the top of the screen.
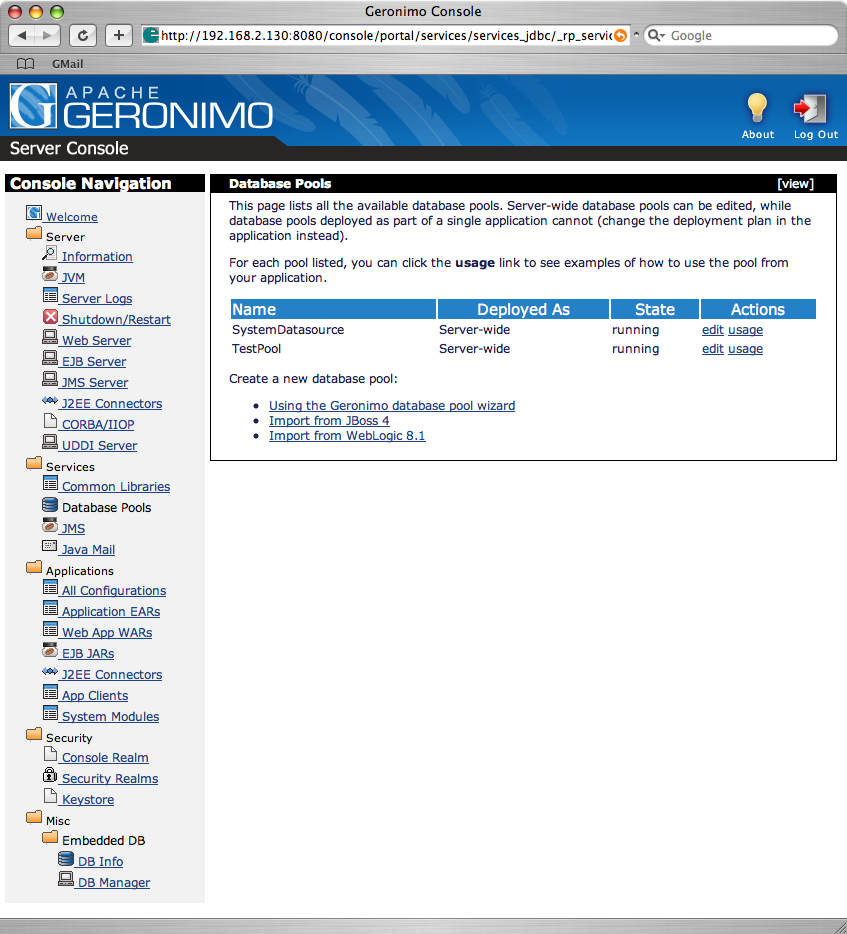
To create a new database pool:
Select in the navigation bar on the left.
Select the create pool link shown in Figure 2.5, “Quick Start: Database Pools”.
Enter TestPool in the Name of Database Pool field, and select the database product from the Database Type drop-down (select Derby Embedded if you don't have a database of your own to connect to). Click the button to continue.
Select the Driver JAR for your database. The drop-down shows encoded names for third-party JARs located in the repository/ directory of the Geronimo installation. For Derby, select org.apache.derby/derbyclient/10.1.1.0/jar as the driver JAR. (If the server has Internet access and is not behind an HTML proxy server, you can use the button to automatically download many open source database drivers.)
Enter other connection parameters to connect to the database. Many databases require a server name, database name, username, and password. (The embedded Derby driver does not require the server name, as it's always running in the same VM as the application server. You can also leave the username and password blank, though you should set the database name to, for example, TestDatabase.) Click the button to continue.
On the next page, review the JDBC Connect URL that was generated, and if it looks okay, click to try to connect to the database. If there are any problems, use the button to correct them, or else use the button to deploy the new database pool.
![[Warning]](images/warning.png) | Warning |
|---|---|
Derby lets you create a database on the fly by manipulating the connection URL, but due to a bug in Geronimo 1.0, it's not possible to configure this from the management console when the Tomcat web container is used (however, it does work in Jetty). | |
After creating the database pool, run the following SQL script to create sample tables to use to create a SQL security realm:
create table TEST_USER (
    username varchar(20) not null primary key,
    password varchar(20) not null,
    name varchar(50));
create table TEST_USER_GROUPS (
    username varchar(20) not null,
    group_name varchar(20) not null,
    primary key (username, group_name));
insert into TEST_USER values ('jdoe','secret','John Doe');
insert into TEST_USER_GROUPS values ('jdoe','Employees');
insert into TEST_USER_GROUPS values ('jdoe','Administrators'); | Tip |
|---|---|
If you're using the embedded Derby database, you can select the entry in the console to run the SQL script. Select TestDatabase under Use DB, paste the script above into the SQL Command/s window, and then click . | |
The next step is to create a sample security realm. We'll create a SQL security realm based on the database pool created above (for more details on creating security realms, see Chapter 9, Security Configuration [DRAFT (1.0-pre)]). To create the new SQL security realm:
Select from the navigation area on the left side.
Click the link to .
Enter TestRealm for the Name of Security Realm and select Database (SQL) Realm as the Realm Type. Click to continue.
Set the User SELECT SQL to select username, password from TEST_USER where username=? and set the Group SELECT SQL to select username, group_name from TEST_USER_GROUPS where username=?
Select TestPool (or whatever you called the database pool above) as the Database Pool and click to continue (the other settings on this page are only used if no database pool is specified).
Click to make sure the realm is configured correctly.
If you used the script above, enter jdoe as the Username and secret as the Password and click to test the login.
If you used the script above and the jdoe login, the next screen should show that 3 principals were generated, one GeronimoUserPrincipal with name jdoe, one GeronimoGroupPrincipal with name Employees, and one GeronimoGroupPrincipal with name Administrators.
Click to deploy the new security realm.
This step walks through deploying a very simple web application (no additional configuration required), as well as a secure web application that needs to be hooked up to the security realm created in the previous step. If you have a simple web application (with no EJB references or resource references, etc.) to use as a test, you can try that (more details on the deployment options can be found in Chapter 10, Development & Deployment Overview [DRAFT (1.0)]), you can try that (and likewise, a simple web application that uses security but no resource references).
Otherwise, you can download a copy of the Geronimo Welcome web application and the Geronimo LDAP Demo web application (basically the same as you'd see at http://localhost:8080/ and http://localhost:8080/ldap-demo/ for a typical Geronimo install). The welcome application has no security and can be deployed as-is, while the LDAP demo application uses security so we can test the security realm created above. These applications are available at: http://cvs.apache.org/repository/geronimo/wars/geronimo-welcome-1.0-SNAPSHOT.war and http://cvs.apache.org/repository/geronimo/wars/geronimo-ldap-demo-1.0-SNAPSHOT.war.
First, you can try deploying the Welcome application with no additional Geronimo customization:
java -jar bin/deployer.jar deploy \
    geronimo-welcome-1.0-SNAPSHOT.war
To make sure this is running, try connecting to http://localhost:8080/geronimo-welcome-1.0-SNAPSHOT/. This is a very small web app, so if the page comes up at all, then it worked (and that's all there is to see).
Next, create a geronimo-web.xml deployment plan that configures a custom URL prefix and security for the LDAP Demo web application. This web application is normally used to demonstrate the functionality of an LDAP security realm, but will work just as well to demonstrate the test realm created above. The plan should look like this (and see Chapter 11, Web Applications (WARs) [DRAFT (1.0)] for more details on the web application Geronimo deployment plan):
<?xml version="1.0" encoding="UTF-8"?>
<web-app xmlns="http://geronimo.apache.org/xml/ns/j2ee/web-1.0"
         configId="TestWebApplication">
    <context-root>/test-web</context-root>
    <context-priority-classloader>
        true
    </context-priority-classloader>
    <security-realm-name>TestRealm</security-realm-name>
    <security>
        <default-principal>
            <principal name="anonymous" class="org.
apache.geronimo.security.realm.providers.GeronimoUserPrincipal"
            />
        </default-principal>
        <role-mappings>
            <role role-name="content-administrator">
                <principal name="Administrators" class="org.
apache.geronimo.security.realm.providers.GeronimoGroupPrincipal"
                />
            </role>
        </role-mappings>
    </security>
</web-app>
This plan:
Sets the web application to appear at a URL starting with /test-web
Sets the security system to run any logins against the TestRealm security realm.
Sets the default principal to a user named "anonymous" for pages where security is not required but the page still calls HttpServletRequest.getUserPrincipal.
Maps all users in the "Administrators" group in the security realm to the "content-administrators" J2EE role (which is declared in the web.xml for the LDAP Demo realm).
| Warning |
|---|---|
Make sure to remove the whitespace in the principal class names in the plan listed above (2 places). The fully-qualified class names are only split across lines in that listing to fit the margins of the book -- they won't really work if entered that way. | |
To deploy the LDAP demo web application with this plan, use a command like this:
java -jar bin/deployer.jar deploy \
    geronimo-ldap-demp-1.0-SNAPSHOT.war geronimo-web.xml
To test the security realm, try connecting to http://localhost:8080/test-web/. From the front page there, click the link to force a login (and use the username "jdoe" and password "secret" if you set up the sample security realm using the SQL in this quick start). You can also try the link to make sure that pages you can't access are properly rejected with a 403 error.
That's it for the quick start. If you followed the whole thing, you:
Downloaded Geronimo
Installed Geronimo
Changed any conflicting network ports
Tried out the Geronimo management console
Created a database connection pool
Created a security realm based on the test database pool
Deployed a simple web application requiring no customization
Deployed a more complex web application, customizing it to use the test database pool and security realm
Tried a login to make sure everything worked
If there are certain areas in the quick start that you want to investigate in more detail, you can follow the cross-references in the text. Otherwise, the following chapters will introduce you to each of the features of Geronimo in more depth.
| |  | |
| Chapter 2. Acquiring Geronimo & Quick Start [DRAFT (1.0)] |  | Chapter 3. Installing Geronimo [DRAFT (M4)] |