Table of Contents
Most rendering models, including ray-tracing, assume a simplified spatial model, highly optimised for the light that enters our 'eye' in order to draw the image. You can add reflection and shadows to this model to achieve a more realistic result. Still, there's an important aspect missing! When a surface has a reflective light component, it not only shows up in our image, it also shines light at surfaces in its neighbourhood. And vice-versa. In fact, light bounces around in an environment until all light energy is absorbed (or has escaped!).
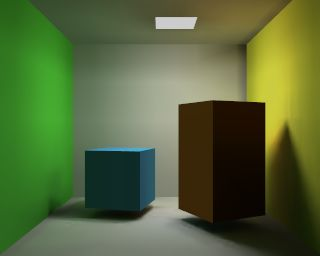
Re-irradiated light carries information about the object which has re-irradiated it, notably colour. Hence not only the shadows are 'less black' because of re-irradiated light, but also they tend to show the colour of the nearest, brightly illuminated, object. A phenomenon often referred to as 'colour leaking' (Figure 18.1, “Radiosity example”).
In closed environments, light energy is generated by 'emitters' and is accounted for by reflection or absorption of the surfaces in the environment. The rate at which energy leaves a surface is called the 'radiosity' of a surface. Unlike conventional rendering methods, Radiosity methods first calculate all light interactions in an environment in a view-independent way. Then, different views can be rendered in real-time.
In Blender, since version 2.28, Radiosity is both a rendering and a modelling tool. This means that you can enable Radiosity within a rendering or rather use Radiosity to paint vertex colours and vertex lights of your meshes, for later use.
Relevant to Blender v2.31
First, some theory! You can skip to the next section if you like, and come back here if questions arise.
During the late eighties and early nineties Radiosity was a hot topic in 3D computer graphics. Many different methods were developed, the most successful of these solutions were based on the "progressive refinement" method with an "adaptive subdivision" scheme. And this is what Blender uses.
To be able to get the most out of the Blender Radiosity method, it is important to understand the following principles:
Finite Element Method
Many computer graphics or simulation methods assume a simplification of reality with 'finite elements'. For a visually attractive (and even scientifically proven) solution, it is not always necessary to dive into a molecular level of detail. Instead, you can reduce your problem to a finite number of representative and well-described elements. It is a common fact that such systems quickly converge into a stable and reliable solution.
The Radiosity method is a typical example of a finite element method inasmuch as every face is considered a 'finite element' and its light emission considered as a whole.
Patches and Elements
In the Radiosity universe, we distinguish between two types of 3D faces:
Patches. These are triangles or squares which are able to send energy. For a fast solution it is important to have as few of these patches as possible. But, to speed things up the energy is modelled as if it were radiated by the Patch's centre; the size of the patches should then be small enough to make this a realistic energy distribution. (For example, when a small object is located above the Patch centre, all energy the Patch sends is obscured by this object, even if the patch is larger! This patch should be subdivided in smaller patches).
Elements. These are the triangles or squares which receive energy. Each Element is associated with a Patch. In fact, Patches are subdivided into many small Elements. When an Element receives energy it absorbs part of it (depending on its colour) and passes the remainder to the Patch, for further radiation. Since the Elements are also the faces that we display, it is important to have them as small as possible, to express subtle shadow boundaries and light gradients.
Progressive Refinement
This method starts with examining all available Patches. The Patch with the most 'unshot' energy is selected to shoot all its energy to the environment. The Elements in the environment receive this energy, and add this to the 'unshot' energy of their associated Patches. Then the process starts again for the Patch now having the most unshot energy. This continues for all the Patches until no energy is received anymore, or until the 'unshot' energy has converged below a certain value.
The hemicube method
The calculation of how much energy each Patch gives to an Element is done through the use of 'hemicubes'. Exactly located at the Patch's center, a hemicube (literally 'half a cube') consist of 5 small images of the environment. For each pixel in these images, a certain visible Element is color-coded, and the transmitted amount of energy can be calculated. Especially with the use of specialized hardware the hemicube method can be accelerated significantly. In Blender, however, hemicube calculations are done "in software".
This method is in fact a simplification and optimisation of the 'real' Radiosity formula (form factor differentiation). For this reason the resolution of the hemicube (the number of pixels of its images) is approximate and its careful setting is important to prevent aliasing artefacts.
Adaptive subdivision
Since the size of the patches and elements in a Mesh defines the quality of the Radiosity solution, automatic subdivision schemes have been developed to define the optimal size of Patches and Elements. Blender has two automatic subdivision methods:
1. Subdivide-shoot Patches. By shooting energy to the environment, and comparing the hemicube values with the actual mathematical 'form factor' value, errors can be detected that indicate a need for further subdivision of the Patch. The results are smaller Patches and a longer solving time, but a higher realism of the solution.
2. Subdivide-shoot Elements. By shooting energy to the environment, and detecting high energy changes (gradients) inside a Patch, the Elements of this Patch are subdivided one extra level. The results are smaller Elements and a longer solving time and maybe more aliasing, but a higher level of detail.
Display and Post Processing
Subdividing Elements in Blender is 'balanced', that means each Element differs a maximum of '1' subdivide level with its neighbours. This is important for a pleasant and correct display of the Radiosity solution with Gouraud shaded faces. Usually after solving, the solution consists of thousands of small Elements. By filtering these and removing 'doubles', the number of Elements can be reduced significantly without destroying the quality of the Radiosity solution. Blender stores the energy values in 'floating point' values. This makes settings for dramatic lighting situations possible, by changing the standard multiplying and gamma values.
Radiosity for Modelling
The final step can be replacing the input Meshes with the Radiosity solution (button
Replace Meshes). At that moment the vertex colours are converted from a 'floating point' value to a 24 bits RGB value. The old Mesh Objects are deleted and replaced with one or more new Mesh Objects. You can then delete the Radiosity data withFree Data. The new Objects get a default Material that allows immediate rendering. Two settings in a Material are important for working with vertex colours:VColPaint. This option treats vertex colours as a replacement for the normal RGB value in the Material. You have to add Lamps in order to see the Radiosity colours. In fact, you can use Blender lighting and shadowing as usual, and still have a neat Radiosity 'look' in the rendering.
VColLight. The vertexcolors are added to the light when rendering. Even without Lamps, you can see the result. With this option, the vertex colours are pre-multiplied by the Material RGB colour. This allows fine-tuning of the amount of 'Radiosity light' in the final rendering.
As with everything in Blender, Radiosity settings are stored in a datablock. It is attached to a Scene, and each Scene in Blender can have a different Radiosity 'block'. Use this facility to divide complex environments into Scenes with independent Radiosity solvers.