There are two main methods to control the soft body effect:
Goal - Soft body Goal acts like a pin on a chosen set of vertices; controlling how much of an effect soft body has on them.
With Goal fully active (1.0), the object will act like any regular animated object (no soft body effect). When setting Goal to 0.0, the object is only influenced by physical laws. By setting Goal values between 0.0 and 1.0, you can blend between having the object affected only by the animation system, and having the object affected only by the soft body effect.
Goal also serves as a memory, to make sure soft objects don't deform too much, ending up in the non-soft animated shape.
Using the Vertex Group weight system, you can define a Goal weight per vertex. To make this look more natural, spring forces can be defined to control how far vertices can move from their original position.
Springs - The Edge Spring Stiffness
defines how much edges try to keep their original sizes.
For example, by adding diagonal edges within a cube, it will
become stiffer (less "jelly like"). By tweaking the E Stiff
parameter, objects can be set to try to, more or less, keep their
original shape, but still move freely with dynamics.
Note
When you enable the Soft Body effect on an object, it will always be simulated forward in time. Moving backwards in time or jumping in steps larger than 9 frames will reset the soft body back to its original position. Use the new TimeLine window playback to make tweaking Soft Body effects interactive.
Once you're satisfied with the simulation, you can Bake
the simulation into a static animation system. A baked soft body plays
back much more quickly, and is not dependent on simulation anymore.
Note
It is recommended that you bake soft bodies when rendering animations, because the simulation doesn't work correctly for Motion Blur rendering, or for rendering in small chunks via a network render system.
Using Softbody for cloth simulation, especially with collision detection, is still in a testing stage. The current collision code requires improvements, which is scheduled for a later release. For more precise control over cloth simulation, we will also add special edge options in a later release. Currently, all edges have an equal effect on the soft body.
Since vertices in Soft Bodies are treated as particles, the options
for Force fields and Deflectors
apply for them as well. Please note that deflection (collisions)
only work on non-deformed Meshes (not using hooks, armatures,
lattices, etc). Check the release notes for more information.
The interface for the SoftBody is accessed in the
Object panel, (F7) under
the Softbody tab. See Figure 23.1, “Softbody settings.”.
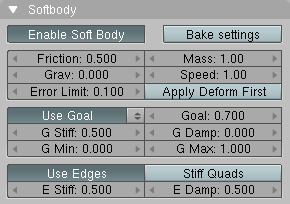
Softbody settings
Enable Soft Body - This enables the softbody system on the selected object.
Bake settings - Open up the Bake settings. See Figure 23.2, “Bake settings.”.
Friction - Sets the amount of friction the object has. A high value means that forces, for example Gravity or Wind, have easier to grab hold of the object and move it.
Grav - Gravity, the amount of force in negative Z-axis direction. Earth gravity is a value close to 9.8.
Error Limit - The Runge-Kutta limit. This defines the step size during simulation. Small values give higher accuracy, but increase calculation time.
Mass - Mass value for vertices. Larger mass slows down motion, except for gravity where the motion is constant regardless of mass.
Speed - You can control the internal timing of the softbody system with this value.
Apply Deform First - Applies the softbody calculations after other deformations, such as those caused by Lattices or Armatures.
Use Goal - Use the motion from animations in the simulation (Ipo, Deform, Parents, etc). The "Goal" is the desired end-position for vertices based on this animation. How a softbody tries to achieve this goal can be defined using stiffness forces and damping.
Goal - The default goal weight for all vertices when no Vertex Group is assigned. If a vertex group is present and assigned, this button instead shows the name of the goal vertex group.
G Stiff - The spring stiffness for Goal. A low value creates very weak springs (more flexible "attatchement" to the goal), a high value creates a strong spring (a stiffer "attatchment" to the goal).
G Damp - The friction for Goal. Higher values dampen the effect of the goal on the soft body.
G Min/GMax - When you paint the values in vertex-groups (using WeightPaint mode), you can use the GMin and Gmax to fine-tune (clamp) the weight values. The lowest vertex-weight (blue) will become GMin, the highest value (red) becomes GMax.
Use Edges - The edges in a Mesh Object (if there are, check Editing->Mesh Panel) can act as springs as well.
Stiff Quads - For quad faces, the diagonal edges are used as springs. This prevents quad faces from collapsing completely.
E Stiff - The spring stiffness for edges (how much the edges are stretched). A low value means very weak springs (a very elastic material), a high value is a strong spring (a stiffer material).
E Damp - The friction for edge springs. High values dampen the E Stiff effect.
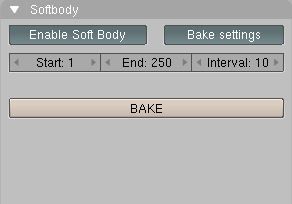
Bake settings
Start/End - Sets the range of the soft body simulation to be baked.
Interval - Sets the number of frames in between each baking "step" (the "resolution" of the baked result). Intermediate positions will be calculated using the steps as key frames, with B Spline interpolation.
Bake - Starts the Bake process. Depending on complexity, this might take a little while. You can press ESC to stop baking. Once Baked, this button changes into a "Free Bake" button. You must free the baked result to modify soft body settings.
Our example will show you a way to do a simple flag moving with the wind.
Create a plane in front view and subdivide it three times. Go to the Edit buttons F9 and activate Subsurf. Set subsurf level to 2 for the best results. Press Set Smooth.
Let's add two pins to our flag in both upper and lower corner of our plane.
Create a new Vertex Group, and set
Weightto 0. Select all vertices, and press Assign.Now, select both upper and lower corner on one side of the flag. Set
Weightto 1.0, and press Assign again. This will make these vertices stay where they are during the softbody simulation. InWeight PaintMode you should see something like this Figure 23.3, “Example Weight Setting.”.Next, exit EditMode and go to the Softbody panel in the Object Buttons F7. Click Enable Soft Body. Increase
Gravto 9.8. Activate theUse Goalbutton. Click the small button next toUse Goaland choose the name of the Vertex Group to use for the goal, in this case, the only choice should be the default name Group. Now set the edge stiffnesE Stiffto 0.9, setMassto 0.5,Frictionto 0.14 andSpeedto 2.Now, you can press ALT-A to see the flag react to gravity.

Now we will add some wind to the simulation
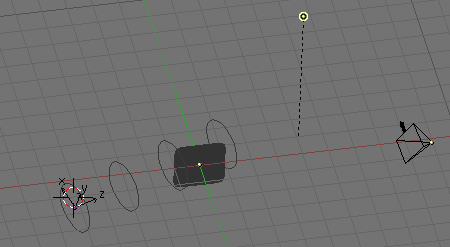
Add an empty to the scene where the source of the wind will be. Select the
Particle Interactiontab and activate theWindbutton. SetStrengthto 1. Now rotate and move the empty so that the Z axis point towards the flag. See Figure 23.4, “Example Wind setup.”.
Tip
You can temporarily increase the Strength
value so that you can more easily see the effect of the wind.
Now, you can press ALT-A to see the flag react to wind.
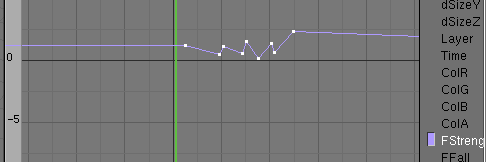
Adding an IPO curve to simulate changing wind strength will add more realism to the animation. See Figure 23.5, “Example Wind Strength IPO.”.