Block Devices and OpenStack
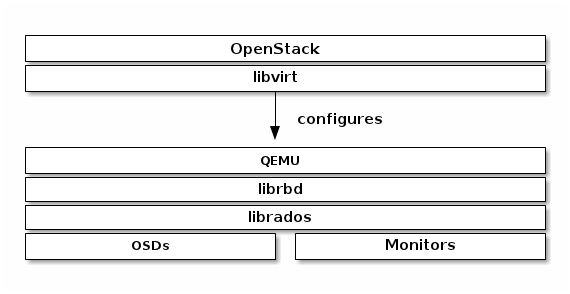
You may use Ceph Block Device images with OpenStack through libvirt, which configures the QEMU interface to librbd. Ceph stripes block device images as objects across the cluster, which means that large Ceph Block Device images have better performance than a standalone server!
To use Ceph Block Devices with OpenStack, you must install QEMU, libvirt, and OpenStack first. We recommend using a separate physical node for your OpenStack installation. OpenStack recommends a minimum of 8GB of RAM and a quad-core processor. The following diagram depicts the OpenStack/Ceph technology stack.
Important
To use Ceph Block Devices with OpenStack, you must have access to a running Ceph Storage Cluster.
Three parts of OpenStack integrate with Ceph’s block devices:
- Images: OpenStack Glance manages images for VMs. Images are immutable. OpenStack treats images as binary blobs and downloads them accordingly.
- Volumes: Volumes are block devices. OpenStack uses volumes to boot VMs, or to attach volumes to running VMs. OpenStack manages volumes using Cinder services.
- Guest Disks: Guest disks are guest operating system disks. By default, when you boot a virtual machine, its disk appears as a file on the filesystem of the hypervisor (usually under /var/lib/nova/instances/<uuid>/). Prior OpenStack Havana, the only way to boot a VM in Ceph was to use the boot from volume functionality from Cinder. However, now it is possible to directly boot every virtual machine inside Ceph without using Cinder. This is really handy because it allows us to easily perform maintenance operation with the live-migration process. On the other hand, if your hypervisor dies it is also really convenient to trigger nova evacuate and almost seamlessly run the virtual machine somewhere else.
You can use OpenStack Glance to store images in a Ceph Block Device, and you can use Cinder to boot a VM using a copy-on-write clone of an image.
The instructions below detail the setup for Glance, Cinder and Nova, although they do not have to be used together. You may store images in Ceph block devices while running VMs using a local disk, or vice versa.
Tip
This document describes using Ceph Block Devices with OpenStack Havana. For earlier versions of OpenStack see Block Devices and OpenStack (Dumpling).
Create a Pool
By default, Ceph block devices use the rbd pool. You may use any available pool. We recommend creating a pool for Cinder and a pool for Glance. Ensure your Ceph cluster is running, then create the pools.
ceph osd pool create volumes 128
ceph osd pool create images 128
ceph osd pool create backups 128
See Create a Pool for detail on specifying the number of placement groups for your pools, and Placement Groups for details on the number of placement groups you should set for your pools.
Configure OpenStack Ceph Clients
The nodes running glance-api, cinder-volume, nova-compute and cinder-backup act as Ceph clients. Each requires the ceph.conf file:
ssh {your-openstack-server} sudo tee /etc/ceph/ceph.conf </etc/ceph/ceph.conf
Install Ceph client packages
On the glance-api node, you’ll need the Python bindings for librbd:
sudo apt-get install python-ceph
sudo yum install python-ceph
On the nova-compute, cinder-backup and on the cinder-volume node, use both the Python bindings and the client command line tools:
sudo apt-get install ceph-common
sudo yum install ceph
Setup Ceph Client Authentication
If you have cephx authentication enabled, create a new user for Nova/Cinder and Glance. Execute the following:
ceph auth get-or-create client.cinder mon 'allow r' osd 'allow class-read object_prefix rbd_children, allow rwx pool=volumes, allow rx pool=images'
ceph auth get-or-create client.glance mon 'allow r' osd 'allow class-read object_prefix rbd_children, allow rwx pool=images'
ceph auth get-or-create client.cinder-backup mon 'allow r' osd 'allow class-read object_prefix rbd_children, allow rwx pool=backups'
Add the keyrings for client.cinder, client.glance, and client.cinder-backup to the appropriate nodes and change their ownership:
ceph auth get-or-create client.glance | ssh {your-glance-api-server} sudo tee /etc/ceph/ceph.client.glance.keyring
ssh {your-glance-api-server} sudo chown glance:glance /etc/ceph/ceph.client.glance.keyring
ceph auth get-or-create client.cinder | ssh {your-volume-server} sudo tee /etc/ceph/ceph.client.cinder.keyring
ssh {your-cinder-volume-server} sudo chown cinder:cinder /etc/ceph/ceph.client.cinder.keyring
ceph auth get-or-create client.cinder-backup | ssh {your-cinder-backup-server} sudo tee /etc/ceph/ceph.client.cinder-backup.keyring
ssh {your-cinder-backup-server} sudo chown cinder:cinder /etc/ceph/ceph.client.cinder-backup.keyring
Nodes running nova-compute need the keyring file for the nova-compute process. They also need to store the secret key of the client.cinder user in libvirt. The libvirt process needs it to access the cluster while attaching a block device from Cinder.
Create a temporary copy of the secret key on the nodes running nova-compute:
ceph auth get-key client.cinder | ssh {your-compute-node} tee client.cinder.key
Then, on the compute nodes, add the secret key to libvirt and remove the temporary copy of the key:
uuidgen
457eb676-33da-42ec-9a8c-9293d545c337

cat > secret.xml <<EOF
<secret ephemeral='no' private='no'>
  <uuid>457eb676-33da-42ec-9a8c-9293d545c337</uuid>
  <usage type='ceph'>
    <name>client.cinder secret</name>
  </usage>
</secret>
EOF
sudo virsh secret-define --file secret.xml
Secret 457eb676-33da-42ec-9a8c-9293d545c337 created
sudo virsh secret-set-value --secret 457eb676-33da-42ec-9a8c-9293d545c337 --base64 $(cat client.cinder.key) && rm client.cinder.key secret.xml
Save the uuid of the secret for configuring nova-compute later.
Important
You don’t necessarily need the UUID on all the compute nodes. However from a platform consistency perspective it’s better to keep the same UUID.
Configure OpenStack to use Ceph
Configuring Glance
Glance can use multiple back ends to store images. To use Ceph block devices by default, edit /etc/glance/glance-api.conf and add:
default_store=rbd
rbd_store_user=glance
rbd_store_pool=images
If want to enable copy-on-write cloning of images into volumes, also add:
show_image_direct_url=True
Note that this exposes the back end location via Glance’s API, so the endpoint with this option enabled should not be publicly accessible.
Configuring Cinder
OpenStack requires a driver to interact with Ceph block devices. You must also specify the pool name for the block device. On your OpenStack node, edit /etc/cinder/cinder.conf by adding:
volume_driver=cinder.volume.drivers.rbd.RBDDriver
rbd_pool=volumes
rbd_ceph_conf=/etc/ceph/ceph.conf
rbd_flatten_volume_from_snapshot=false
rbd_max_clone_depth=5
glance_api_version=2
If you’re using cephx authentication, also configure the user and uuid of the secret you added to libvirt as documented earlier:
rbd_user=cinder
rbd_secret_uuid=457eb676-33da-42ec-9a8c-9293d545c337
Configuring Cinder Backup
OpenStack Cinder Backup requires a specific daemon so don’t forget to install it. On your Cinder Backup node, edit /etc/cinder/cinder.conf and add:
backup_driver=cinder.backup.drivers.ceph
backup_ceph_conf=/etc/ceph/ceph.conf
backup_ceph_user=cinder-backup
backup_ceph_chunk_size=134217728
backup_ceph_pool=backups
backup_ceph_stripe_unit=0
backup_ceph_stripe_count=0
restore_discard_excess_bytes=true
Configuring Nova
In order to boot all the virtual machines directly into Ceph Nova must be configured. On every Compute nodes, edit /etc/nova/nova.conf and add:
libvirt_images_type=rbd
libvirt_images_rbd_pool=volumes
libvirt_images_rbd_ceph_conf=/etc/ceph/ceph.conf
rbd_user=cinder
rbd_secret_uuid=457eb676-33da-42ec-9a8c-9293d545c337
It is also a good practice to disable any file injection. Usually, while booting an instance Nova attempts to open the rootfs of the virtual machine. Then, it injects directly into the filesystem things like: password, ssh keys etc... At this point, it is better to rely on the metadata service and cloud-init. On every Compute nodes, edit /etc/nova/nova.conf and add:
libvirt_inject_password=false
libvirt_inject_key=false
libvirt_inject_partition=-2
Restart OpenStack
To activate the Ceph block device driver and load the block device pool name into the configuration, you must restart OpenStack. Thus, for Debian based systems execute these commands on the appropriate nodes:
sudo glance-control api restart
sudo service nova-compute restart
sudo service cinder-volume restart
sudo service cinder-backup restart
For Red Hat based systems execute:
sudo service openstack-glance-api restart
sudo service openstack-nova-compute restart
sudo service openstack-cinder-volume restart
sudo service openstack-cinder-backup restart
Once OpenStack is up and running, you should be able to create a volume and boot from it.
Booting from a Block Device
You can create a volume from an image using the Cinder command line tool:
cinder create --image-id {id of image} --display-name {name of volume} {size of volume}
Note that image must be raw format. You can use qemu-img to convert from one format to another, i.e.:
qemu-img convert -f qcow2 -O raw precise-cloudimg.img precise-cloudimg.raw
When Glance and Cinder are both using Ceph block devices, the image is a copy-on-write clone, so volume creation is very fast.
In the OpenStack dashboard you can then boot from that volume by launching a new instance, choosing the image that you created the volume from, and selecting ‘boot from volume’ and the volume you created.
![]()
Table Of Contents
- Intro to Ceph
- Installation (Quick)
- Installation (Manual)
- Ceph Storage Cluster
- Ceph Filesystem
- Ceph Block Device
- Ceph Object Gateway
- API Documentation
- Architecture
- Development
- Release Notes
- Glossary