Configuring Federated Gateways
New in version 0.67: Dumpling
In Ceph version 0.67 Dumpling and beyond, you may configure each Ceph Object Gateway to participate in a federated architecture, with multiple regions, and with multiple zones for a region.
- Region: A region represents a logical geographic area and contains one or more zones. A cluster with multiple regions must specify a master region.
- Zone: A zone is a logical grouping of one or more Ceph Object Gateway instance(s). A region has a master zone that processes client requests.
Important
Only write objects to the master zone in a region. You may read objects from secondary zones. Currently, the Gateway does not prevent you from writing to a secondary zone, but DON’T DO IT.
Background
When you deploy a Ceph Object Store service that spans geographical locales, configuring Ceph Object Gateway regions and metadata synchronization agents enables the service to maintain a global namespace, even though Ceph Object Gateway instances run in different geographic locales and potentially on different Ceph Storage Clusters. When you separate one or more Ceph Object Gateway instances within a region into separate logical containers to maintain an extra copy (or copies) of the data, configuring Ceph Object Gateway zones and data synchronization agents enables the service to maintain one or more copy(ies) of the master zone’s data. Extra copies of the data are important for failover, backup and disaster recovery.
You may deploy a single Ceph Storage Cluster with a federated architecture if you have low latency network connections (this isn’t recommended). You may also deploy one Ceph Storage Cluster per region with a separate set of pools for each zone (typical). You may also deploy a separate Ceph Storage Cluster for each zone if your requirements and resources warrant this level of redundancy.
About this Guide
In the following sections, we will demonstrate how to configure a federated cluster in two logical steps:
- Configure a Master Region: This section of the guide describes how to set up a region with multiple zones, and how to synchronize data between the master zone and the secondary zone(s) within the master region.
- Configure a Secondary Region: This section of the guide describes how to repeat the section on setting up a master region and multiple zones so that you have two regions with intra-zone synchronization in each region. Finally, you will learn how to set up a metadata synchronization agent so that you can maintain a global namespace for the regions in your cluster.
Configure a Master Region
This section provides an exemplary procedure for setting up a region, and two zones within the region. The cluster will comprise two gateway daemon instances–one per zone. This region will serve as the master region.
Naming for the Master Region
Before configuring the cluster, defining region, zone and instance names will help you manage your cluster. Let’s assume the region represents the United States, and we refer to it by its standard abbreviation.
- United States: us
Let’s assume the zones represent the Eastern and Western United States. For continuity, our naming convention will use {region name}-{zone name} format, but you can use any naming convention you prefer.
- United States, East Region: us-east
- United States, West Region: us-west
Finally, let’s assume that zones may have more than one Ceph Object Gateway instance per zone. For continuity, our naming convention will use {region name}-{zone name}-{instance} format, but you can use any naming convention you prefer.
- United States Region, Master Zone, Instance 1: us-east-1
- United States Region, Secondary Zone, Instance 1: us-west-1
Create Pools
You may have a Ceph Storage Cluster for the entire region or a Ceph Storage Cluster for each zone.
For continuity, our naming convention will use {region name}-{zone name} format prepended to the pool name, but you can use any naming convention you prefer. For example:
- .us-east.rgw.root
- .us-east.rgw.control
- .us-east.rgw.gc
- .us-east.rgw.buckets
- .us-east.rgw.buckets.index
- .us-east.rgw.buckets.extra
- .us-east.log
- .us-east.intent-log
- .us-east.usage
- .us-east.users
- .us-east.users.email
- .us-east.users.swift
- .us-east.users.uid
- .us-west.rgw.root
- .us-west.rgw.control
- .us-west.rgw.gc
- .us-west.rgw.buckets
- .us-west.rgw.buckets.index
- .us-west.rgw.buckets.extra
- .us-west.log
- .us-west.intent-log
- .us-west.usage
- .us-west.users
- .us-west.users.email
- .us-west.users.swift
- .us-west.users.uid
See Configuration Reference - Pools for details on the default pools for gateways. See Pools for details on creating pools. Execute the following to create a pool:
ceph osd pool create {poolname} {pg-num} {pgp-num} {replicated | erasure} [{erasure-code-profile}] {ruleset-name} {ruleset-number}
Tip
When adding a large number of pools, it may take some time for your cluster to return to a active + clean state.
CRUSH Maps
When deploying a Ceph Storage Cluster for the entire region, consider using a CRUSH rule for the zone such that you do NOT have overlapping failure domains. See CRUSH Map for details.
Ceph supports multiple CRUSH hierarchies and CRUSH rulesets, enabling great flexibility in the way you configure your gateway. Pools such as rgw.buckets.index may benefit from a modestly sized pool of SSDs for fast performance. Backing storage may benefit from the increased economy of erasure-coded storage, and/or the improved performance from cache tiering.
When you have completed this step, execute the following to ensure that you have created all of the foregoing pools:
rados lspools
Create a Keyring
Each instance must have a user name and key to communicate with a Ceph Storage Cluster. In the following steps, we use an admin node to create a keyring. Then, we create a client user name and key for each instance. Next, we add the keys to the Ceph Storage Cluster(s). Finally, we distribute the key ring to each node containing an instance.
Create a keyring.
sudo ceph-authtool --create-keyring /etc/ceph/ceph.client.radosgw.keyring
sudo chmod +r /etc/ceph/ceph.client.radosgw.keyring
Generate a Ceph Object Gateway user name and key for each instance.
sudo ceph-authtool /etc/ceph/ceph.client.radosgw.keyring -n client.radosgw.us-east-1 --gen-key
sudo ceph-authtool /etc/ceph/ceph.client.radosgw.keyring -n client.radosgw.us-west-1 --gen-key
Add capabilities to each key. See Configuration Reference - Pools for details on the effect of write permissions for the monitor and creating pools.
sudo ceph-authtool -n client.radosgw.us-east-1 --cap osd 'allow rwx' --cap mon 'allow rwx' /etc/ceph/ceph.client.radosgw.keyring
sudo ceph-authtool -n client.radosgw.us-west-1 --cap osd 'allow rwx' --cap mon 'allow rwx' /etc/ceph/ceph.client.radosgw.keyring
Once you have created a keyring and key to enable the Ceph Object Gateway with access to the Ceph Storage Cluster, add each key as an entry to your Ceph Storage Cluster(s). For example:
sudo ceph -k /etc/ceph/ceph.client.admin.keyring auth add client.radosgw.us-east-1 -i /etc/ceph/ceph.client.radosgw.keyring
sudo ceph -k /etc/ceph/ceph.client.admin.keyring auth add client.radosgw.us-west-1 -i /etc/ceph/ceph.client.radosgw.keyring
Note
When you use this procedure to configure the secondary region, replace us- with eu-. You will have a total of four users after you create the master region and the secondary region.
Install Apache/FastCGI
For each Ceph Node that runs a Ceph Object Gateway daemon instance, you must install Apache, FastCGI, the Ceph Object Gateway daemon (radosgw) and the Ceph Object Gateway Sync Agent (radosgw-agent). See Install Ceph Object Gateway for details.
Create Data Directories
Create data directories for each daemon instance on their respective hosts.
ssh {us-east-1}
sudo mkdir -p /var/lib/ceph/radosgw/ceph-radosgw.us-east-1

ssh {us-west-1}
sudo mkdir -p /var/lib/ceph/radosgw/ceph-radosgw.us-west-1
Note
When you use this procedure to configure the secondary region, replace us- with eu-. You will have a total of four data directories after you create the master region and the secondary region.
Create a Gateway Configuration
For each instance, create an Ceph Object Gateway configuration file under the /etc/apache2/sites-available directory on the host(s) where you installed the Ceph Object Gateway daemon(s). See below for an exemplary embodiment of a gateway configuration as discussed in the following text.
FastCgiExternalServer /var/www/s3gw.fcgi -socket /{path}/{socket-name}.sock


<VirtualHost *:80>

	ServerName {fqdn}
	<!--Remove the comment. Add a server alias with *.{fqdn} for S3 subdomains-->
	<!--ServerAlias *.{fqdn}-->
	ServerAdmin {email.address}
	DocumentRoot /var/www
	RewriteEngine On
	RewriteRule  ^/(.*) /s3gw.fcgi?%{QUERY_STRING} [E=HTTP_AUTHORIZATION:%{HTTP:Authorization},L]

	<IfModule mod_fastcgi.c>
   	<Directory /var/www>
			Options +ExecCGI
			AllowOverride All
			SetHandler fastcgi-script
			Order allow,deny
			Allow from all
			AuthBasicAuthoritative Off
		</Directory>
	</IfModule>

	AllowEncodedSlashes On
	ErrorLog /var/log/apache2/error.log
	CustomLog /var/log/apache2/access.log combined
	ServerSignature Off

</VirtualHost>
- Replace the /{path}/{socket-name} entry with path to the socket and the socket name. For example, /var/run/ceph/client.radosgw.us-east-1.sock. Ensure that you use the same path and socket name in your ceph.conf entry.
- Replace the {fqdn} entry with the fully-qualified domain name of the server.
- Replace the {email.address} entry with the email address for the server administrator.
- Add a ServerAlias if you wish to use S3-style subdomains (of course you do).
- Save the configuration to a file (e.g., rgw-us-east.conf).
Repeat the process for the secondary zone (e.g., rgw-us-west.conf).
Note
When you use this procedure to configure the secondary region, replace us- with eu-. You will have a total of four gateway configuration files on the respective nodes after you create the master region and the secondary region.
Finally, if you enabled SSL, make sure that you set the port to your SSL port (usually 443) and your configuration file includes the following:
SSLEngine on
SSLCertificateFile /etc/apache2/ssl/apache.crt
SSLCertificateKeyFile /etc/apache2/ssl/apache.key
SetEnv SERVER_PORT_SECURE 443
Enable the Configuration
For each instance, enable the gateway configuration and disable the default site.
Enable the site for the gateway configuration.
sudo a2ensite {rgw-conf-filename}Disable the default site.
sudo a2dissite default
Note
Failure to disable the default site can lead to problems.
Add a FastCGI Script
FastCGI requires a script for each Ceph Object Gateway instance to enable the S3-compatible interface. To create the script, execute the following procedures.
Go to the /var/www directory.
cd /var/www
Open an editor with the file name s3gw.fcgi. Note: The configuration file specifies this filename.
sudo vim s3gw.fcgi
Add a shell script with exec and the path to the gateway binary, the path to the Ceph configuration file, and the user name (-n; the same user name created in step 2 of Create a Keyring. Copy the following into the editor.
#!/bin/sh
exec /usr/bin/radosgw -c /etc/ceph/ceph.conf -n client.radosgw.{ID}
For example:
#!/bin/sh
exec /usr/bin/radosgw -c /etc/ceph/ceph.conf -n client.radosgw.us-east-1
Save the file.
Change the permissions on the file so that it is executable.
sudo chmod +x s3gw.fcgi
Repeat the process for the secondary zone.
Note
When you use this procedure to configure the secondary region, replace us- with eu-. You will have a total of four FastCGI scripts after you create the master region and the secondary region.
Add Instances to Ceph Config File
On an admin node, add an entry for each instance in the Ceph configuration file for your Ceph Storage Cluster(s). For example:
...

[client.radosgw.us-east-1]
rgw region = us
rgw region root pool = .us.rgw.root
rgw zone = us-east
rgw zone root pool = .us-east.rgw.root
keyring = /etc/ceph/ceph.client.radosgw.keyring
rgw dns name = {hostname}
rgw socket path = /var/run/ceph/$name.sock
host = {host-name}

[client.radosgw.us-west-1]
rgw region = us
rgw region root pool = .us.rgw.root
rgw zone = us-west
rgw zone root pool = .us-west.rgw.root
keyring = /etc/ceph/ceph.client.radosgw.keyring
rgw dns name = {hostname}
rgw socket path = /var/run/ceph/$name.sock
host = {host-name}
Then, update each Ceph Node with the updated Ceph configuration file. For example:
ceph-deploy --overwrite-conf config push {node1} {node2} {nodex}
Note
When you use this procedure to configure the secondary region, replace us with eu for the name, region, pools and zones. You will have a total of four entries after you create the master region and the secondary region.
Create a Region
Configure a region infile called us.json for the us region.
Copy the contents of the following example to a text editor. Set is_master to true. Replace {fqdn} with the fully-qualified domain name of the endpoint. It will specify a master zone as us-east and list it in the zones list along with the us-west zone. See Configuration Reference - Regions for details.:
{ "name": "us",
  "api_name": "us",
  "is_master": "true",
  "endpoints": [
        "http:\/\/{fqdn}:80\/"],
  "master_zone": "us-east",
  "zones": [
        { "name": "us-east",
          "endpoints": [
                "http:\/\/{fqdn}:80\/"],
          "log_meta": "true",
          "log_data": "true"},
        { "name": "us-west",
          "endpoints": [
                "http:\/\/{fqdn}:80\/"],
          "log_meta": "true",
          "log_data": "true"}],
  "placement_targets": [
   {
     "name": "default-placement",
     "tags": []
   }
  ],
  "default_placement": "default-placement"}
Create the us region using the us.json infile you just created.
radosgw-admin region set --infile us.json --name client.radosgw.us-east-1
Delete the default region (if it exists).
rados -p .us.rgw.root rm region_info.default
Set the us region as the default region.
radosgw-admin region default --rgw-region=us --name client.radosgw.us-east-1
Only one region can be the default region for a cluster.
Update the region map.
radosgw-admin regionmap update --name client.radosgw.us-east-1
If you use different Ceph Storage Cluster instances for regions, you should repeat steps 2, 4 and 5 in by executing them with --name client.radosgw-us-west-1. You may also export the region map from the initial gateway instance and import it followed by updating the region map.
Note
When you use this procedure to configure the secondary region, replace us with eu. You will have a total of two regions after you create the master region and the secondary region.
Create Zones
Configure a zone infile called us-east.json for the us-east zone.
Copy the contents of the following example to a text editor. This configuration uses pool names prepended with the region name and zone name. See Configuration Reference - Pools for additional details on gateway pools. See Configuration Reference - Zones for additional details on zones.
{ "domain_root": ".us-east.domain.rgw",
  "control_pool": ".us-east.rgw.control",
  "gc_pool": ".us-east.rgw.gc",
  "log_pool": ".us-east.log",
  "intent_log_pool": ".us-east.intent-log",
  "usage_log_pool": ".us-east.usage",
  "user_keys_pool": ".us-east.users",
  "user_email_pool": ".us-east.users.email",
  "user_swift_pool": ".us-east.users.swift",
  "user_uid_pool": ".us-east.users.uid",
  "system_key": { "access_key": "", "secret_key": ""},
  "placement_pools": [
    { "key": "default-placement",
      "val": { "index_pool": ".us-east.rgw.buckets.index",
               "data_pool": ".us-east.rgw.buckets"}
    }
  ]
}
Add the us-east zone using the us-east.json infile you just created in both the east and west pools by specifying their respective user names (i.e., --name).
radosgw-admin zone set --rgw-zone=us-east --infile us-east.json --name client.radosgw.us-east-1
radosgw-admin zone set --rgw-zone=us-east --infile us-east.json --name client.radosgw.us-west-1
Repeat step 1 to create a zone infile for us-west. Then add the zone using the us-west.json infile in both the east and west pools by specifying their respective user names (i.e., --name).
radosgw-admin zone set --rgw-zone=us-west --infile us-west.json --name client.radosgw.us-east-1
radosgw-admin zone set --rgw-zone=us-west --infile us-west.json --name client.radosgw.us-west-1
Delete the default zone (if it exists).
rados -p .rgw.root rm zone_info.default
Update the region map.
radosgw-admin regionmap update --name client.radosgw.us-east-1
Note
When you use this procedure to configure the secondary region, replace us- with eu-. You will have a total of four zones after you create the master zone and the secondary zone in each region.
Create Zone Users
Ceph Object Gateway stores zone users in the zone pools. So you must create zone users after configuring the zones. Copy the access_key and secret_key fields for each user so you can update your zone configuration once you complete this step.
radosgw-admin user create --uid="us-east" --display-name="Region-US Zone-East" --name client.radosgw.us-east-1 --system
radosgw-admin user create --uid="us-west" --display-name="Region-US Zone-West" --name client.radosgw.us-west-1 --system
Note
When you use this procedure to configure the secondary region, replace us- with eu-. You will have a total of four zone users after you create the master region and the secondary region and their zones. These users are different from the users created in Create a Keyring.
Update Zone Configurations
You must update the zone configuration with zone users so that the synchronization agents can authenticate with the zones.
Open your us-east.json zone configuration file and paste the contents of the access_key and secret_key fields from the step of creating zone users into the system_key field of your zone configuration infile.
{ "domain_root": ".us-east.domain.rgw",
  "control_pool": ".us-east.rgw.control",
  "gc_pool": ".us-east.rgw.gc",
  "log_pool": ".us-east.log",
  "intent_log_pool": ".us-east.intent-log",
  "usage_log_pool": ".us-east.usage",
  "user_keys_pool": ".us-east.users",
  "user_email_pool": ".us-east.users.email",
  "user_swift_pool": ".us-east.users.swift",
  "user_uid_pool": ".us-east.users.uid",
  "system_key": {
    "access_key": "{paste-access_key-here}",
    "secret_key": "{paste-secret_key-here}"
         },
  "placement_pools": [
    { "key": "default-placement",
      "val": { "index_pool": ".us-east.rgw.buckets.index",
               "data_pool": ".us-east.rgw.buckets"}
    }
  ]
}
Save the us-east.json file. Then, update your zone configuration.
radosgw-admin zone set --rgw-zone=us-east --infile us-east.json --name client.radosgw.us-east-1
radosgw-admin zone set --rgw-zone=us-east --infile us-east.json --name client.radosgw.us-west-1
Repeat step 1 to update the zone infile for us-west. Then, update your zone configuration.
radosgw-admin zone set --rgw-zone=us-west --infile us-west.json --name client.radosgw.us-east-1
radosgw-admin zone set --rgw-zone=us-west --infile us-west.json --name client.radosgw.us-west-1
Note
When you use this procedure to configure the secondary region, replace us- with eu-. You will have a total of four zones after you create the master zone and the secondary zone in each region.
Restart Services
Once you have redeployed your Ceph configuration files, we recommend restarting your Ceph Storage Cluster(s) and Apache instances.
For Ubuntu, use the following on each Ceph Node:
sudo restart ceph-all
For Red Hat/CentOS, use the following:
sudo /etc/init.d/ceph restart
To ensure that all components have reloaded their configurations, for each gateway instance we recommend restarting the apache2 service. For example:
sudo service apache2 restart
Start Gateway Instances
Start up the radosgw service.
sudo /etc/init.d/radosgw start
If you are running multiple instances on the same host, you must specify the user name.
sudo /etc/init.d/radosgw start --name client.radosgw.us-east-1
Open a browser and check the endpoints for each zone. A simple HTTP request to the domain name should return the following:
<ListAllMyBucketsResult xmlns="http://s3.amazonaws.com/doc/2006-03-01/">
        <Owner>
                <ID>anonymous</ID>
                <DisplayName/>
        </Owner>
        <Buckets/>
</ListAllMyBucketsResult>
Configure a Secondary Region
This section provides an exemplary procedure for setting up a cluster with multiple regions. Configuring a cluster that spans regions requires maintaining a global namespace, so that there are no namespace clashes among object names stored across in different regions.
This section extends the procedure in Configure a Master Region, but changes the region name and modifies a few procedures. See the following sections for details.
Naming for the Secondary Region
Before configuring the cluster, defining region, zone and instance names will help you manage your cluster. Let’s assume the region represents the European Union, and we refer to it by its standard abbreviation.
- European Union: eu
Let’s assume the zones represent the Eastern and Western European Union. For continuity, our naming convention will use {region name}-{zone name} format, but you can use any naming convention you prefer.
- European Union, East Region: eu-east
- European Union, West Region: eu-west
Finally, let’s assume that zones may have more than one Ceph Object Gateway instance per zone. For continuity, our naming convention will use {region name}-{zone name}-{instance} format, but you can use any naming convention you prefer.
- European Union Region, Master Zone, Instance 1: eu-east-1
- European Union Region, Secondary Zone, Instance 1: eu-west-1
Configuring a Secondary Region
Repeat the exemplary procedure of Configure a Master Region with the following differences:
Use Naming for the Secondary Region in lieu of Naming for the Master Region.
Create Pools using eu instead of us.
Create a Keyring and the corresponding keys using eu instead of us. You may use the same keyring if you desire, but ensure that you create the keys on the Ceph Storage Cluster for that region (or region and zone).
Create Data Directories using eu instead of us.
Create a Gateway Configuration using eu instead of us for the socket names.
Add a FastCGI Script using eu instead of us for the user names.
Add Instances to Ceph Config File using eu instead of us for the pool names.
Create a Region using eu instead of us. Set is_master to false. For consistency, create the master region in the secondary region too.
radosgw-admin region set --infile us.json --name client.radosgw.eu-east-1
Create Zones using eu instead of us. Ensure that you update the user name (i.e., --name) so that you create the zones in the correct cluster.
Update Zone Configurations using eu instead of us.
Create zones from master region in the secondary region.
radosgw-admin zone set --rgw-zone=us-east --infile us-east.json --name client.radosgw.eu-east-1
radosgw-admin zone set --rgw-zone=us-east --infile us-east.json --name client.radosgw.eu-west-1
radosgw-admin zone set --rgw-zone=us-west --infile us-west.json --name client.radosgw.eu-east-1
radosgw-admin zone set --rgw-zone=us-west --infile us-west.json --name client.radosgw.eu-west-1
Create zones from secondary region in the master region.
radosgw-admin zone set --rgw-zone=eu-east --infile eu-east.json --name client.radosgw.us-east-1
radosgw-admin zone set --rgw-zone=eu-east --infile eu-east.json --name client.radosgw.us-west-1
radosgw-admin zone set --rgw-zone=eu-west --infile eu-west.json --name client.radosgw.us-east-1
radosgw-admin zone set --rgw-zone=eu-west --infile eu-west.json --name client.radosgw.us-west-1
Multi-Site Data Replication
The data synchronization agent replicates the data of a master zone to a secondary zone. The master zone of a region is the source for the secondary zone of the region and it gets selected automatically.
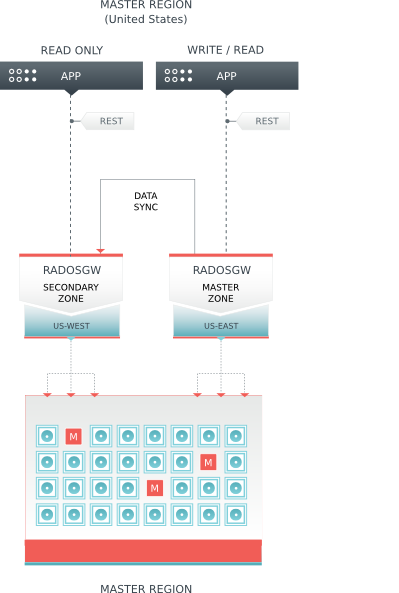
To configure the synchronization agent, retrieve the access key and secret for the source and destination, and the destination URL and port.
You may use radosgw-admin zone list to get a list of zone names. You may use radosgw-admin zone get to identify the key and secret for the zone. You may refer to the gateway configuration file you created under Create a Gateway Configuration to identify the port number.
You only need the hostname and port for a single instance (assuming all gateway instances in a region/zone access the same Ceph Storage Cluster). Specify these values in a configuration file (e.g., cluster-data-sync.conf), and include a log_file name.
For example:
src_access_key: {source-access-key}
src_secret_key: {source-secret-key}
destination: https://zone-name.fqdn.com:port
dest_access_key: {destination-access-key}
dest_secret_key: {destination-secret-key}
log_file: {log.filename}
A concrete example may look like this:
src_access_key: DG8RE354EFPZBICHIAF0
src_secret_key: i3U0HiRP8CXaBWrcF8bbh6CbsxGYuPPwRkixfFSb
destination: https://us-west.storage.net:80
dest_access_key: U60RFI6B08F32T2PD30G
dest_secret_key: W3HuUor7Gl1Ee93pA2pq2wFk1JMQ7hTrSDecYExl
log_file: /var/log/radosgw/radosgw-sync-us-east-west.log
To activate the data synchronization agent, open a terminal and execute the following:
radosgw-agent -c region-data-sync.conf
When the synchronization agent is running, you should see output indicating that the agent is synchronizing shards of data.
INFO:radosgw_agent.sync:Starting incremental sync
INFO:radosgw_agent.worker:17910 is processing shard number 0
INFO:radosgw_agent.worker:shard 0 has 0 entries after ''
INFO:radosgw_agent.worker:finished processing shard 0
INFO:radosgw_agent.worker:17910 is processing shard number 1
INFO:radosgw_agent.sync:1/64 shards processed
INFO:radosgw_agent.worker:shard 1 has 0 entries after ''
INFO:radosgw_agent.worker:finished processing shard 1
INFO:radosgw_agent.sync:2/64 shards processed
...
Note
You must have an agent for each source-destination pair.
Inter-Region Metadata Replication
The data synchronization agent replicates the metadata of master zone in the master region to a master zone in a secondary region. Metadata consists of gateway users and buckets, but not the objects within the buckets–ensuring a unified namespace across the cluster. The master zone of the master region is the source for the master zone of the secondary region and it gets selected automatically.
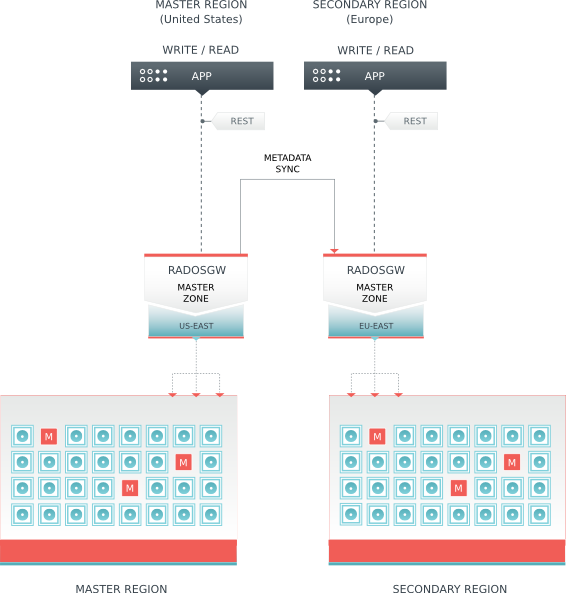
Follow the same steps in Multi-Site Data Replication by specifying the master zone of the master region as the source zone and the master zone of the secondary region as the secondary zone. When activating the radosgw-agent, specify --metadata-only so that it only copies metadata. For example:
radosgw-agent -c inter-region-data-sync.conf --metadata-only
Once you have completed the foregoing procedure, you should have a cluster consisting of a master region (us) and a secondary region (eu) where there is a unified namespace between the two regions.
![]()
Table Of Contents
- Intro to Ceph
- Installation (Quick)
- Installation (Manual)
- Ceph Storage Cluster
- Ceph Filesystem
- Ceph Block Device
- Ceph Object Gateway
- Manual Install
- Simple Configuration
- Federated Configuration
- Background
- About this Guide
- Configure a Master Region
- Naming for the Master Region
- Create Pools
- Create a Keyring
- Install Apache/FastCGI
- Create Data Directories
- Create a Gateway Configuration
- Enable the Configuration
- Add a FastCGI Script
- Add Instances to Ceph Config File
- Create a Region
- Create Zones
- Create Zone Users
- Update Zone Configurations
- Restart Services
- Start Gateway Instances
- Configure a Secondary Region
- Multi-Site Data Replication
- Inter-Region Metadata Replication
- Config Reference
- Admin Guide
- Purging Temp Data
- S3 API
- Swift API
- Admin Ops API
- OpenStack Keystone Integration
- Troubleshooting
- Manpage radosgw
- Manpage radosgw-admin
- API Documentation
- Architecture
- Development
- Release Notes
- Ceph Releases
- Glossary