Setting up an AWS Environment for Cloud Foundry with BOSH AWS Bootstrap
Page last updated: December 11, 2015
Prepare a Domain
Select a DNS domain name for your Cloud Foundry instance. For example, if you select the domain name cloud.example.com, Cloud Foundry deploys each of your applications as
APP-NAME.cloud.example.com.Create an AWS Route 53 Hosted Zone for your domain on the AWS Route 53 control panel.
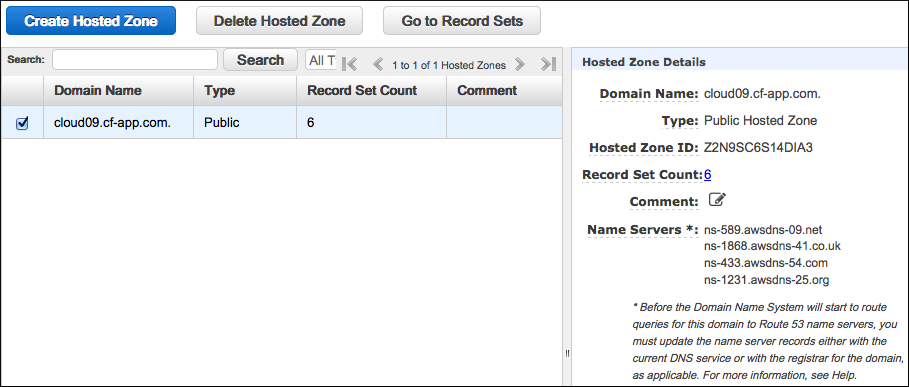
Select the checkbox for a hosted zone to view the Hosted Zone Details panel. The panel displays the Name Servers section, which contains a list of addresses to which you must delegate DNS authority for your domain. For example, if you selected the domain name
cloud.example.com, each address in Name Servers should become an NS record in the DNS server forexample.com.
Prepare the Deployment Environment
Ruby 1.9.3 or higher and Git 1.8 or higher are prerequisites for the following steps.
After you install Ruby and Git, install the
bundlerRubyGem:$ gem install bundler
Create a deployments directory with a sub-directory for your deployment.
$ mkdir deployments
$ cd deployments
$ mkdir cf-example
In the
cf-examplesub-directory, create a file namedGemfilewith the following contents:source 'https://rubygems.org' ruby "1.9.3" gem "bosh_cli_plugin_aws"Note: The Ruby version that you specify in your
Gemfilemust match the Ruby version that you have installed.Run
bundle installto install the gems you specified in theGemfile.$ bundle install
Create a file named
bosh_environmentand add the following contents, replacing the values in each line to match your configuration.
Use the following information to complete thebosh_environmentfile:- The values that you add for
BOSH_VPC_DOMAINandBOSH_VPC_SUBDOMAINmust correspond to the DNS domain name that you set up when configuring Route 53. The example below usesmy-subdomain.example.com. - Get a set of AWS access key credentials and use them for the
BOSH_AWS_ACCESS_KEY_IDandBOSH_SECRET_ACCESS_KEYproperties. The best practice is to create an IAM user rather than using your root account credentials. If you want to be extra cautious, you can restrict the IAM user to a very fine-grained set of permissions, but generally “Administrator” permissions will do. - For the
BOSH_AWS_REGIONproperty, use your AWS region. The example below usesus-east-1. - For the
BOSH_VPC_PRIMARY_AZandBOSH_VPC_SECONDARY_AZproperties, choose an availability zone that is listed as “operating normally” in the Health Status section of the AWS Console for your region. The example below usesus-east-1aandus-east-1b.
export BOSH_VPC_DOMAIN=example.com export BOSH_VPC_SUBDOMAIN=my-subdomain export BOSH_AWS_ACCESS_KEY_ID=AWS_ACCESS_KEY_ID export BOSH_AWS_SECRET_ACCESS_KEY=AWS_SECRET_ACCESS_KEY export BOSH_AWS_REGION=us-east-1 export BOSH_VPC_PRIMARY_AZ=us-east-1a export BOSH_VPC_SECONDARY_AZ=us-east-1b- The values that you add for
Run
source bosh_environmentto set the environment variables required for the AWS bootstrap tool.$ source bosh_environment
Run
bosh aws createto create a VPC Internet Gateway, VPC subnets, three RDS databases, and a NAT VM for Cloud Foundry subnet routing. This command generates two receipt files,aws_rds_receipt.ymlandaws_vpc_receipt.yml, that you use when deploying Cloud Foundry.$ bosh aws create Executing migration CreateKeyPairs allocating 1 KeyPair(s) Executing migration CreateVpc . . . details in S3 receipt: aws_rds_receipt and file: aws_rds_receipt.yml Executing migration CreateS3 creating bucket xxxx-bosh-blobstore creating bucket xxxx-bosh-artifacts
Note: RDS database creation may take 20 or more minutes.
Destroying the AWS Environment
Use
bosh aws destroyto destroy your AWS environment.WARNING: The command bosh aws destroydestroys everything in your AWS account, including all S3 buckets and all instances. Do not use this command unless you want to lose everything in your AWS account, including objects and files unrelated to your Cloud Foundry deployment.