XMLExtract
Available in Community Designer

| Short Description |
| Ports |
| Metadata |
| XMLExtract Attributes |
| Details |
| Best Practices |
| Compatibility |
| See also |
Short Description
XMLExtract reads data from XML files using SAX technology. It can also read data from compressed files, input port, and dictionary.
![[Note]](figures/note.png) | Which XML Component? |
|---|---|
Generally, use XMLExtract. It is fast and has GUI to map elements to records. It is based on SAX. XMLReader can use more complex XPath expressions than XMLExtract, e. g. it allows you you to reference siblings. On the other hand, this XMLReader is slower and needs more memory than XMLExtract. XMLReader is based on DOM. XMLReader supersedes the original XMLXPathReader. XMLXPathReader can use more complex XPath expressions than XMLExtract. XMLXPathReader uses DOM. |
| Component | Data source | Input ports | Output ports | Each to all outputs | Different to different outputs | Transformation | Transf. req. | Java | CTL | Auto-propagated metadata |
|---|---|---|---|---|---|---|---|---|---|---|
| XMLExtract | XML file | 0-1 | 1-n |  |  | | | | | |
Icon
Ports
| Port type | Number | Required | Description | Metadata |
|---|---|---|---|---|
| Input | 0 | | For port reading. See Reading from Input Port. | One field (byte,
cbyte, string) for specify input of component.
Input fields can be mapped to output.
See XMLExtract Mapping Definition for more
information. |
| Output | 0 | | For correct data records | Any [1] |
| 1-n | [2] | For correct data records | Any [1] (each port can have different metadata) | |
[1] Metadata on each output port does not need to be the same. Each metadata can use Autofilling Functions. [2] Other output ports are required if mapping requires that. | ||||
If you connect an edge to the optional input port of the component,
you must set the File URL attribute to
port:$0.FieldName[:processingType].
Metadata
XMLExtract does not propagate metadata.
XMLExtract has no metadata template.
If input port is connected, its metadata has to contain a string or byte or cbyte field. Metadata on each output port does not need to be the same. Metadata on output port may contain lists.
Each metadata can use Autofilling Functions.
XMLExtract Attributes
| Attribute | Req | Description | Possible values |
|---|---|---|---|
| Basic | |||
| File URL | yes | Attribute specifying what data source(s) will be read (XML file, input port, dictionary). See Supported File URL Formats for Readers. | |
| Charset | Encoding of records which are read. | any encoding, default system one by default | |
| Mapping | [1] | Mapping of the input XML structure to output ports. See XMLExtract Mapping Definition for more information. | |
| Mapping URL | [1] | Name of an external file, including its path which defines mapping of the input XML structure to output ports. See XMLExtract Mapping Definition for more information. | |
| Namespace Bindings | Allows using arbitrary namespace prefixes in Mapping. See Namespaces. | ||
| XML Schema | URL of the file that should be used for creating the Mapping definition. See XMLExtract Mapping Editor and XSD Schema for more information. | ||
| Use nested nodes | By default, nested elements are also mapped to output
ports automatically. If set to false, an
explicit <Mapping> tag must be
created for each such nested element. | true (default) | false | |
| Trim strings | By default, white spaces from the beginning and the end
of the elements values are removed. If set to
false, they are not removed. | true (default) | false | |
| Advanced | |||
| Validate | Enables/disables validation of the XML against a DTD. (Validation against XML schema is not implemented.) | true | false (default) | |
| XML features | Sequence of individual expressions of one of the
following form: nameM:=true or
nameN:=false, where each
nameM is an XML feature that should be
validated. These expressions are separated from each other by
semicolon. See XML Features for more
information. | ||
| Skip rows | Number of mappings to be skipped continuously throughout all source files. See Selecting Input Records. | 0-N | |
| Max number of rows to output | Maximum number of records to be read continuously throughout all source files. See Selecting Input Records. | 0-N | |
[1] One of these must be specified. If both are specified, Mapping URL has higher priority. | |||
Details
| XMLExtract Mapping Definition |
| XMLExtract Mapping Editor and XSD Schema |
| Usage of Dot In Mapping |
| Element content (text and children elements) mapping |
| Usage of useParentRecord attribute |
In XMLExtract you can map tags, attributes and input fields to the output. It can read multiple elements of same name as a list. The mapping is specified in XMLExtract Mapping Editor.
Example 48.6. Mapping in XMLExtract
<Mappings>
    <TypeOverride elementPath="/employee/child" overridingType="boy" />
    <Mapping element="employee" outPort="0" implicit="false" xmlFields="salary" cloverFields="basic_salary">
        <Mapping element="child" outPort="1" parentKey="empID" generatedKey="parentID"/>
        <Mapping element="benefits" outPort="2"
                                       parentKey="empID;jobID" generatedKey="empID;jobID"
                                       sequenceField="seqKey" sequenceId="Sequence0">
            <Mapping element="financial" outPort="3" parentKey="seqKey" generatedKey="seqKey"/>
        </Mapping>
        <Mapping element="project" outPort="4" parentKey="empID;jobID" generatedKey="empID;jobID">
            <Mapping element="customer" outPort="5"
                                       parentKey="projName;projManager;inProjectID;Start"
                                       generatedKey="joinedKey"/>
        </Mapping>
    </Mapping>
</Mappings>
XMLExtract Mapping Definition
| XMLExtract Type Override Tags |
| XMLExtract Mapping Tags |
| XMLExtract Field Mapping Tags |
| XMLExtract Mapping Tag Attributes |
Mapping is defined in the Mapping URL or Mapping attribute.
Every Mapping definition consists of a pair of the start and the end
<Mappings> tags.
The <Mappings> tag has no attributes.
This pair of <Mappings> tags
surrounds all of the nested <Mapping>
and <TypeOverride> tags.
Each of <Mapping> tags contains some
XMLExtract Mapping Tag Attributes.
See also XMLExtract Type Override Tags or
XMLExtract Mapping Tags
for more information.
XMLExtract Type Override Tags
The Type Override tag can be used to tell the mapping editor
that element on given path should be treated as if its type was actually
the overridingType.
This tag has no impact on actual processing of XML file at runtime.
Example:
<TypeOverride elementPath="/employee/child" overridingType="boy" />
elementPathRequired
Each type override tag must contain one
elementPathattribute. The value of this element must be a path from the root of an input XML structure to a node.elementPath="/[prefix:]parent/.../[prefix]nodeName"overridingTypeRequired
Each type override tag must contain one
overridingTypeattribute. The value of this element must be a type in the referenced XML schema.overridingType="[prefix:]typeName"
XMLExtract Mapping Tags
Empty Mapping Tag (Without a Child)
<Mapping
                element="[prefix:]nameOfElement"
XMLExtract Mapping Tag Attributes/>This corresponds to the following node of XML structure:
<[prefix:]nameOfElement>ValueOfTheElement</[prefix:]nameOfElement>Non-Empty Mapping Tags (Parent with a Child)
<Mapping
                element="[prefix:]nameOfElement"
XMLExtract Mapping Tag Attributes>(nested Mapping elements (only children, parents with one or more children, etc.)</Mapping>This corresponds to the following XML structure:
<[prefix:]nameOfElement
                elementAttributes>
(nested elements (only children, parents with one or more children, etc.)</[prefix:]nameOfElement>In addition to nested
<Mapping>elements, the Mapping can contain<FieldMapping>elements to map fields from input record to output record. See XMLExtract Field Mapping Tags for more information.
XMLExtract Field Mapping Tags
Field Mapping tags allows to map fields from an input record to an output record of parent Mapping element.
Example:
<FieldMapping inputField="sessionID" outputField="sessionID" />
inputFieldRequired
Specifies a field from an input record, that should be mapped to an output record.
inputField="fieldName"outputFieldRequired
Specifies a field to which a value from the input field should be stored.
outputField="fieldName"
Nested structure of <Mapping> tags
copies the nested structure of XML elements in input XML files.
See example below.
Example 48.7. From XML Structure to Mapping Structure
If XML Structure Looks Like This:
<[prefix:]nameOfElement>
    <[prefix1:]nameOfElement1>ValueOfTheElement11</[prefix1:]nameOfElement1>
    ...
    <[prefixK:]nameOfElementM>ValueOfTheElementKM</[prefixK:]nameOfElementM>
    <[prefixL:]nameOfElementN>
        <[prefixA:]nameOfElementE>ValueOfTheElementAE</[prefixA:]nameOfElementE>
        ...
        <[prefixR:]nameOfElementG>ValueOfTheElementRG</[prefixR:]nameOfElementG>
    </[prefixK:]nameOfElementN>
</[prefix:]nameOfElement>
Mapping Can Look Like This:
<Mappings>
    <Mapping element="[prefix:]nameOfElement" attributes>
        <Mapping element="[prefix1:]nameOfElement1" attributes11/>
        ...
        <Mapping element="[prefixK:]nameOfElementM" attributesKM/>
        <Mapping element="[prefixL:]nameOfElementN" attributesLN>
            <Mapping element="[prefixA:]nameOfElementE" attributesAE/>
            ...
            <Mapping element="[prefixR:]nameOfElementG" attributesRG/>
        </Mapping>
    </Mapping>
</Mappings>
However, Mapping does not need to copy
all of the XML structure, it can start at the specified level
inside the XML file. In addition, if the default setting of the
Use nested nodes attribute is used
(true), it also allows mapping of deeper nodes
without needing to create separate child
<Mapping> tags for them).
![[Important]](figures/important.png) | Important |
|---|---|
Remember that mapping of nested nodes is possible only if their names are unique within their parent and confusion is not possible. |
XMLExtract Mapping Tag Attributes
elementRequired
Each mapping tag must contain one
elementattribute. The value of this element must be a node of the input XML structure, eventually with a prefix (namespace).element="[prefix:]name"outPortOptional
Number of output port to which data is sent. If not defined, no data from this level of Mapping is sent out using such level of Mapping.
If the
<Mapping>tag does not contain anyoutPortattribute, it only serves to identify where the deeper XML nodes are located.Example:
outPort="2"Important The values from any level can also be sent out using a higher parent
<Mapping>tag (when default setting of Use nested nodes is used and their identification is unique so that confusion is not possible).useParentRecordOptional
If
truethe mapping will assign mapped values to the record generated by the nearest parent mapping element withoutPortspecified. Default value of this attribute isfalse.useParentRecord="false|true"implicitOptional
If
falsethe mapping will not automatically map XML fields to record fields with the same name. Default value of this attribute istrue.implicit="false|true"parentKeyThe
parentKeyattribute serves to identify the parent for a child.Thus,
parentKeyis a sequence of metadata fields on the next parent level separated by semicolon, colon, or pipe.These fields are used in metadata on the port specified for such higher level element, they are filled with corresponding values and this attribute (
parentKey) only says what fields should be copied from parent level to child level as the identification.For this reason, the number of these metadata fields and their data types must be the same in the
generatedKeyattribute or all values are concatenated to create a unique string value. In such a case, key has only one field.Example:
parentKey="first_name;last_name"The values of these parent clover fields are copied into clover fields specified in the
generatedKeyattribute.generatedKeyThe
generatedKeyattribute is filled with values taken from the parent element. It specifies the parent of the child.Thus,
generatedKeyis a sequence of metadata fields on the specified child level separated by semicolon, colon, or pipe.These metadata fields are used on the port specified for this child element, they are filled with values taken from parent level, in which they are sent to those metadata fields of the
parentKeyattribute specified in this child level. It only says what fields should be copied from parent level to child level as the identification.For this reason, the number of these metadata fields and their data types must be the same in the
parentKeyattribute or all values are concatenated to create a unique string value. In such a case, key has only one field.Example:
generatedKey="f_name;l_name"The values of these clover fields are taken from clover fields specified in the
parentKeyattribute.sequenceFieldSometimes a pair of
parentKeyandgeneratedKeydoes not ensure unique identification of records (the parent-child relation) - this is the case when one parent has multiple children of the same element name.In such a case, these children may be given numbers as the identification.
By default (if not defined otherwise by a created sequence), children are numbered by integer numbers starting from 1 with step 1.
This attribute is the name of metadata field of the specified level in which the distinguishing numbers are written.
It can serve as
parentKeyfor the next nested level.Example:
sequenceField="sequenceKey"sequenceIdOptional
Sometimes a pair of
parentKeyandgeneratedKeydoes not ensure unique identification of records (the parent-child relation) - this is the case when one parent has multiple children of the same element name.In such a case, these children may be given numbers as the identification.
If this sequence is defined, it can be used to give numbers to these child elements even with different starting value and different step. It can also preserve values between subsequent runs of the graph.
Id of the sequence.
Example:
sequenceId="Sequence0"Important Sometimes there may be a parent which has multiple children of the same element name. In such a case, these children cannot be identified using the parent information copied from
parentKeytogeneratedKey. Such information is not sufficient. For this reason, a sequence may be defined to give distinguishing numbers to the multiple child elements.xmlFieldsIf the names of XML nodes or attributes should be changed, it has to be done using a pair of
xmlFieldsandcloverFieldsattributes.A sequence of element or attribute names on the specified level can be separated by semicolon, colon, or pipe.
The same number of these names has to be given in the
cloverFieldsattribute.Do not forget the values have to correspond to the specified data type.
Example:
xmlFields="salary;spouse"What is more, you can reach further than the current level of XML elements and their attributes. Use the "../" string to reference "the parent of this element". See Source Tab for more information.
Important By default, XML names (element names and attribute names) are mapped to metadata fields by their name.
cloverFieldsIf the names of XML nodes or attributes should be changed, it must be done using a pair of
xmlFieldsandcloverFieldsattributes.Sequence of metadata field names on the specified level are separated by a semicolon, colon, or pipe.
The number of these names must be the same in the
xmlFieldsattribute.Also the values must correspond to the specified data type.
Example:
cloverFields="SALARY;SPOUSE"Important By default, XML names (element names and attribute names) are mapped to metadata fields by their name.
skipRowsOptional
Number of elements which must be skipped. By default, nothing is skipped.
Example:
skipRows="5"Important Remember that also nested (child) elements are skipped when their parent is skipped.
numRecordsOptional
Number of elements which should be read. By default, all are read.
Example:
numRecords="100"
XMLExtract Mapping Editor and XSD Schema
| Mapping Tab |
| Source Tab |
XMLExtract Mapping Editor lets you define mapping by drag and drop.
To be able to specify mapping you need XSD schema. The path to schema is set in the XML Schema attribute. If you do not have the schema, the component can generate it from the source file. If you have neither the schema nor a source file, you can still specify the mapping using source tab.
When using an XSD, the mapping can be performed visually in the Mapping dialog. The dialog consists of two tabs: the Mapping tab and the Source tab. The Mapping attribute can be defined in the Source tab, while in the Mapping tab you can work with your XML Schema.
| Note |
|---|---|
If you do not possess a valid XSD schema for your source XML, you can switch to the Mapping tab and click which attempts to "guess" the XSD structure from the XML. |
Mapping Tab
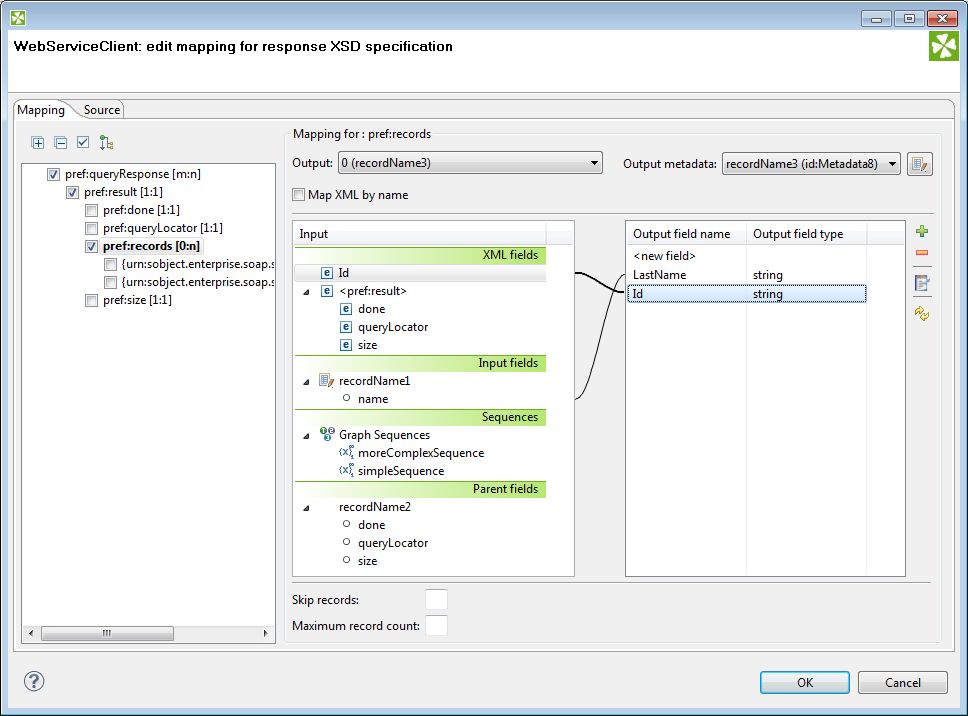 |
Figure 48.20. The Mapping Dialog for XMLExtract
In the pane on the left hand side of the Mapping tab, you can see a tree structure of the XML. Every element shows how many occurrences it has in the source file (e.g. [0:n]). In this pane, you need to check the elements that should be mapped to the output ports.
At the top, you specify Output for each selected element by choosing from a drop-down list. Possible values are:
Not mapped - the mapping will not produce a record. By using such mapping elements, you can enforce that any child mapping will be processed only if the parser encounters this element first.
Parent record - the mapping will not produce a record, but it will fill the mapped values to a parent record.
portNumber(metadata) - the mapping will generate a record and write it to a selected output port.
You can then choose from the list of metadata labeled
portNumber(metadata), e.g. "3(customer)".
On the right hand side, you can see mapping Input and Output fields. You either map them to each other according to their names (by checking the Map XML by name checkbox) or you map them yourself - explicitly. Please note that in Input - XML fields, not only elements but also their parent elements are visible (as long as parents have some fields) and can be mapped. In the picture above, the "pref:records" element is selected but we are allowed to leap over its parent element "pref:result" whose field "size" is actually mapped. Consequently, that enables you to create the whole mapping in a much easier way than if you used the Parent key and Generated key properties.
You can also map the input fields (Input fields section), fields from record produced by parent mapping (Parent fields section) or generate a unique id for record by mapping a sequence from Sequences section to one of the output fields.
| Note |
|---|---|
sequenceId and sequenceField is set if some sequence is mapped to output metadata field. However it's possible to set just sequenceField. In this case new sequence is created and mapped to the metadata field. The mapping is valid but Mapping Dialog shows warning that metadata field is mapped to non existing sequence. |
Source Tab
Once you define all elements, specify output ports, mapping and other properties, you can switch to the Source tab. The mapping code is displayed there. Its structure is the same as described in the preceding sections.
| Note |
|---|---|
If you do not possess a valid XSD schema for your source XML, you will not be able to map elements visually and you have to do it here in Source. |
| Note |
|---|---|
It's possible to map attribute or element missing at the schema. No validation warning is raised and mapping is visualized at Mapping tab. Italic font is used when displaying mapped elements and attributes missing at the schema. |
If you want to map an element to XML fields of its parents, use the "../" string (like in the file system) before the field name. Every "../" stands for "this element's parent", so "../../" would mean the element's parent's parent and so on. Examine the example below. The "../../empID" is a field of "employee" as made available to the currently selected element "customer".
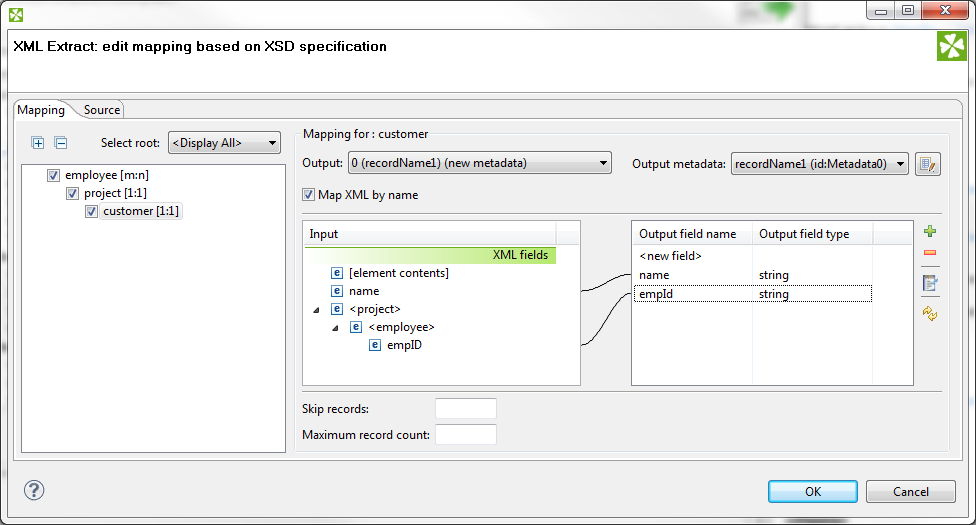 |
Figure 48.21. Parent Elements
<Mapping element="employee">
 	<Mapping element="project">
 	 	<Mapping element="customer" outPort="0"
 	 	 	xmlFields="name;../../empID"
 	 	 	cloverFields="name;empId"/>
 	</Mapping>
</Mapping>
There's one thing that one should keep in mind when referencing parent elements particularly if you rely on
the Use nested nodes property set to true: To reference
one parent level using "../" actually means to reference that ancestor element (over more parents) in the XML
which is defined in the direct parent <Mapping> of <Mapping> with the "../" parent reference.
An example is always a good thing so here it goes.
Let us recall the mapping from last example.
We will omit one of its
<Mapping> elements and notice how also the parent field reference had to be changed accordingly.
<Mapping element="employee">
 	<Mapping element="customer" outPort="0"
 	 	xmlFields="name;../empID"
 	 	cloverFields="name;empId"/>
</Mapping>
Usage of Dot In Mapping
It is possible to map the value of an element using the '.' dot syntax. The dot means 'the element itself' (its name). Every other occurrence of the element's name in mapping (as text, e.g. "customer") represents the element's subelement or attribute. (Note: Available since Clover v. 3.1.0)
The dot can be used in the xmlFields attribute just like any other XML
element/attribute name.
In the visual mapping editor, the dot is represented in the XML Fields
tree as the element's contents.
The following chunk of code maps the value of element customer on metadata field customerValue.
Next, project (i.e. customer's parent element, that is why ../.) is mapped on the projectValue field.
<Mapping element="project">
 	<Mapping element="customer" outPort="0"
 	 	xmlFields=".;../."
 	 	cloverFields="customerValue;projectValue"/>
</Mapping>
The element value consists of the text enclosed between the element's start and end tag only if it has no child elements. If the element has child element(s), then the element's value consists of the text between the element's start tag and the start tag of its first child element.
| Important |
|---|---|
Remember that element values are mapped to Clover fields by their names.
Thus, the However, if you want to rename the
<Mapping ... xmlFields="customer" cloverFields="newFieldName" />
Moreover, when you have an XML file containing an element and an attribute of the same name:
    <customer customer="JohnSmithComp">
    ...
    </customer>
you can map both the element and the attribute value to two different fields:
<Mapping element="customer" outPort="2"
 	xmlFields=".;customer"
 	cloverFields="customerElement;customerAttribute"/>
</Mapping>
Remember the explicit mapping (renaming fields) shown in the examples
has a higher priority than the implicit mapping.
The implicit mapping
can be turned off by setting |
You could even come across a more complex situation stemming from the example above - the element has an attribute and a subelement all of the same name. The only thing to do is add another mapping at the end of the construct. Notice you can optionally send the subelement to a different output port than its parent. The other option is to leave the mapping blank, but you have to handle the subelement somehow:
<Mapping element="customer" outPort="2"
 	xmlFields=".;customer"
 	cloverFields="customerElement;customerAttribute"/>
 	<Mapping element="customer" outPort="4" /> // customer's subelement called 'customer' as well
</Mapping>
Element content (text and children elements) mapping
It is possible to map content of element to field. Whole subtree of element is sent to output port in that case. To map element content, use '+' or '-' character. The difference between '+' (plus) and '-' (minus) mapping is, that '+' maps element's content and its enclosing element and '-' maps element's content, but not element itself.
If you have xml
 	<customers>
 	 	<customer>
 	 	 	<firstname>John</firstname>
 	 	 	<lastname>Smith</lastname>
 	 	 	<city>Smith</city>
 	 	</customer>
    </customers>
and you will use '+' mapping on element 'customer', you will get
 	<customer>
 	 	<firstname>John</firstname>
 	 	<lastname>Smith</lastname>
 	 	<city>Smith</city>
 	</customer>
on output.
If you will use '-' mapping on 'customer' element, you will get
 	 	<firstname>John</firstname>
 	 	<lastname>Smith</lastname>
 	 	<city>Smith</city>
on output.
| Important |
|---|---|
Mapping of element content can produce very large amount of data. It can have high impact on processing speed. |
Usage of useParentRecord attribute
If you want to map a value from nested element, but you do not want to create a separate
record for the parent and nested elements, you may consider using the useParentRecord
attribute of the Mapping element.
By setting the attribute to true, the
values mapped by the Mapping element will not be assigned to a new record, but will be
set to a parent record.
(Note: Available since Clover v.3.3.0-M3)
The following chunk of code maps the value of element project on metadata field projectValue and
value of customer element on metadata field customerValue.
The customerValue field is set in the
same record as the projectValue.
<Mapping element="project" outPort="0" xmlFields="." cloverFields="projectValue">
 	<Mapping element="customer" useParentRecord="true" xmlFields="." cloverFields="customerValue" />
</Mapping>
Templates
Source tab is the only place where templates can be used. Templates are useful when reading a lot of nested elements or recursive data in general.
A template consists of a declaration and a body.
The body stretches from the declaration on
(up to a potential template reference, see below) and can contain arbitrary mapping.
The declaration is an element containing the templateId attribute.
See example template declaration:
<Mapping element="category"  templateId="myTemplate">
 	<Mapping element="subCategory"
 	 	xmlFields="name"
 	 	cloverFields="subCategoryName"/>
</Mapping>
To use a template, fill in the templateRef attribute
with an existing templateId.
Obviously, you have to declare a template first before referencing it.
The effect of using a template is
that the whole mapping starting with the declaration
is copied to the place where the template reference appears.
The advantage is obvious: every time you need to change a code that often repeats,
you make the change on one place only - in the template.
See
a basic example
of how to reference a template in your mapping:
<Mapping templateRef="myTemplate" />
Furthermore, a template reference can appear inside a template declaration. The reference should be placed as the last element of the declaration. If you reference the same template that is being declared, you will create a recursive template.
You should always keep in mind how the source XML looks like.
Remember that if you have n levels of nested data you should set the nestedDepth
attribute to n.
Look at the example:
<Mapping element="myElement"  templateId="nestedTempl">

 	 	<!-- ... some mapping ... -->

 	<Mapping templateRef="nestedTempl" nestedDepth="3"/>

</Mapping> <!-- template declaration ends here -->
| Note |
|---|---|
The following chunk of code: <Mapping templateRef="unnestedTempl" nestedDepth="3" /> can be imagined as <Mapping templateRef="unnestedTempl"> <Mapping templateRef="unnestedTempl"> <Mapping templateRef="unnestedTempl"> </Mapping> </Mapping> </Mapping>
and you can use both ways of nesting references.
The latter one
with three nested references can produce unexpected results
when inside a template declaration, though.
As we step deeper and deeper, each <Mapping element="wrap"> <Mapping element="realElement" templateId="unnestedTempl" <!-- ... some mapping ... --> </Mapping> <!-- template declaration ends here --> </Mapping> <!-- end of wrap --> <Mapping templateRef="unnestedTempl"> <Mapping templateRef="unnestedTempl"> <Mapping templateRef="unnestedTempl"> </Mapping> </Mapping> </Mapping> |
In summary, working with nestedDepth instead of
nested template references always
grants transparent results.
Its use is recommended.
Namespaces
If you supply an XML Schema which has a namespace, the namespace is automatically extracted to Namespace Bindings and given a Name. The Name does not have to exactly match the namespace prefix in the input schema, though, as it is only a denotation. You can edit it anytime in the Namespace Bindings attribute as shown below:
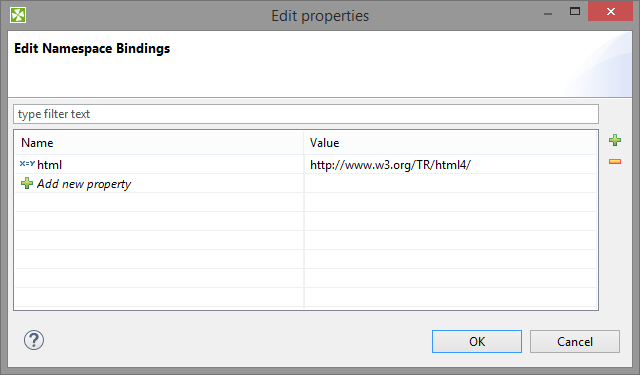
Figure 48.22. Editing Namespace Bindings in XMLExtract
After you open Mapping, namespace prefixes will appear before element and attribute names. If Name was left blank, you would see the namespace URI instead.
| Note |
|---|---|
If your XSD contains two or more namespaces, mapping elements to the output in the visual editor is not supported. You have to switch to the Source tab and handle namespaces yourself. Use the 'Add' button in Namespace Bindings to pre-prepare a namespace. You will then use it in the source code like this:
Name =
Value = lets you write
instead of
|
Selecting subtypes
Sometimes the schema defines an element to be of some generic type, but you know, what the actual specific type of the element will be in the processed XML. If the subtypes of the generic type are also defined in the schema, you may use the Select subtype action. This will open a dialog as shown below. When you choose a subtype, the element in the schema tree will be treated as if it was of the selected type. This way, you will be able to define the mapping of this element by using Mapping editor. The information will also be stored in the Mapping source - see Type Override Tags.

Figure 48.23. Selecting subtype in XMLExtract
Notes
Consider following XML file
<customer name="attribute_value">
 	<name>element_value</name>
</customer>
In this case element customer has attribute name and child element of
same name.
If both attribute name and element name shall be mapped to
output metadata, following mapping is incorrect.
<Mappings>
 	<Mapping element="customer" outPort="0"
 	 	xmlFields="{}name"
 	 	cloverFields="field1">
 	 	<Mapping element="name" useParentRecord="true">
 	 	</Mapping>
 	</Mapping>
</Mappings>
Result of this mapping is that both field1 and field2 contains value
of element name. Following mapping shall be used if we need to read value of attribute
name to some output metadata field.
<Mappings>
 	<Mapping element="customer" outPort="0"
 	 	xmlFields="{}name"
 	 	cloverFields="field2">
 	 	<Mapping element="name" useParentRecord="true"
 	 	 	xmlFields="../{}name"
 	 	 	cloverFields="field1">
 	 	</Mapping>
 	</Mapping>
</Mappings>
Best Practices
We recommend users to explicitly specify Charset.
Compatibility
Since CloverETL 4.1.0, XMLExtract reads lists.