|
|
The instructions for Variable Expansion 3 and Building CodeBlocks from sources 4 are official documentations of the CodeBlocks Wiki site and available in english only.
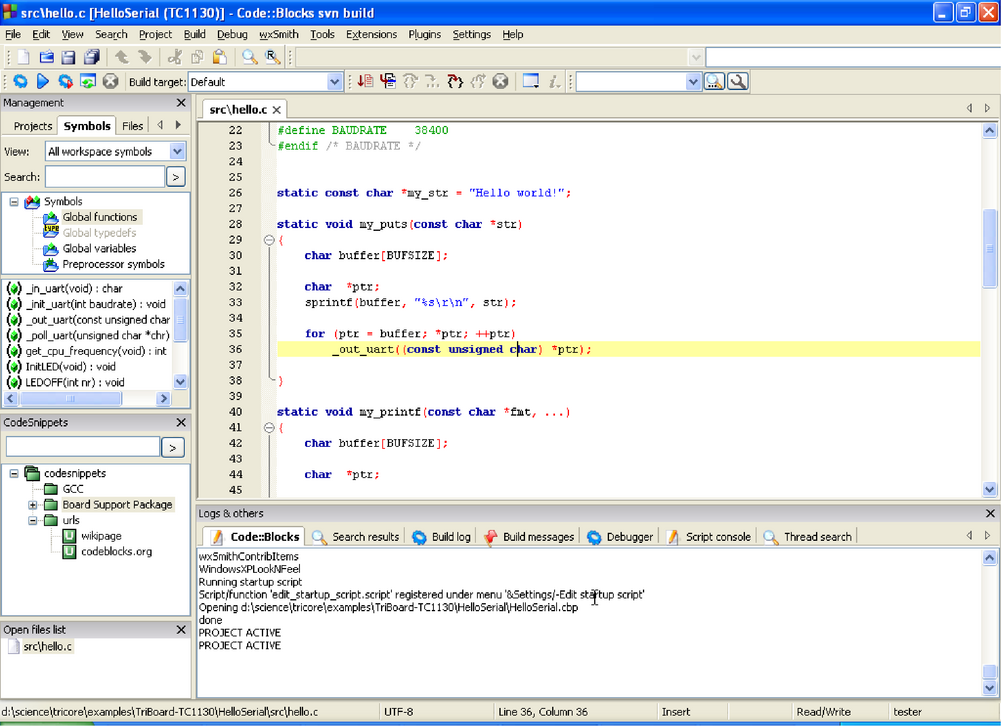
The below illustration shows the design of the CodeBlocks user interface.
|
|
The status bar gives an overview of the following settings:
CodeBlocks offers a very flexible and comprehensive project management. The following text will address only some of the features of the project management.
In CodeBlocks, the sources and the settings for the build process are stored in a project file <name>.cbp. C/C++ sources and the corresponding header files are the typical components of a project. The easiest way to create a new project is executing the command File /Project and selecting a wizard. Then you can add files to the project via the context menu Add files in the Management window. CodeBlocks governs the project files in categories according to their file extensions. These are the preset categories:
The settings for types and categories of files can be adjusted via the context menu Project tree /Edit file types & categories . Here you can also define custom categories for file extensions of your own. For example, if you wish to list linker scripts with the *.ld extension in a category called Linkerscript, you only have to create the new category.
In CodeBlocks, so-called notes can be stored for a project. These notes should contain short descriptions or hints for the corresponding project. By displaying this information during the opening of a project, other users are provided with a quick survey of the project. The display of notes can be switched on or off in the Notes tab of the Properties of a project.
CodeBlocks is supplied with a variety of project templates which are displayed when creating a new project. However, it is also possible to store custom templates for collecting your own specifications for compiler switches, the optimisation to be used, machine-specific switches etc. in templates. These templates will be stored in the Documents and Settings\<user>\Application Data\codeblocks\UserTemplates directory. If the templates are to be open to all users, they have to be copied to a corresponding directory of the CodeBlocks installation. These templates will then be displayed at the next startup of CodeBlocks under New / Project /User templates .
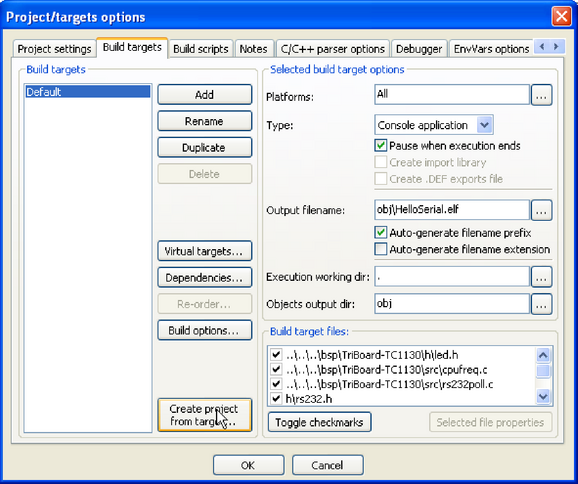
In projects it is necessary to have different variants of the project available. Variants are called Build Targets. They differ with respect to their compiler options, debug information and/or choice of files. A Build Target can also be outsourced to a separate project. To do so, click Project /Properties , select the variant from the tab Build Targets and click the Create project from target button (see Build Targets 1.2).
|
|
Projects can be further structured in CodeBlocks by so-called Virtual Targets. A frequently used project structure consists of two Build Targets, one Debug Target which contains debug information and one Release Target without this information. By adding Virtual Targets via Project /Properties /Build Targets individual Build Targets can be combined. For example, a Virtual Target All can create the Targets Debug and Release simultaneously. Virtual Targets are shown in the symbol bar of the compiler under Build Targets.
CodeBlocks makes it possible to perform additional operations before or after compiling a project. These operations are called Prebuilt or Postbuilt Steps. Typical Postbuilt Steps are:
Example
Creating a Disassembly from an object under Windows. Piping to a file requires calling cmd with the /c option.
Archiving a project can be another example for a Postbuilt Step. For this purpose, create a Build Target Archive and include the following instruction in the Postbuilt Step:
With this command, the active project and its sources, header and objects will be packed as a zip file. In doing so, the Built-in variables $(PROJECT_NAME) and $(TODAY), the project name and the current date will be extracted (see Variable Expansion 3.2). After the execution of the Target Archive, the packed file will be stored in the project directory.
In the share/codeblocks/scripts directory you will find some examples for scripts. You can add a script via menu Settings /Scripting and register in a menu. If you execute e.g. the script make_dist from the menu then all files belonging to a project will be compressed in an archive <project>.tar.gz.
CodeBlocks offers the possibility of using menu actions in scripts. The script represents another degree of freedom for controlling the generation of your project.
In CodeBlocks, multiple projects can be open. By saving open projects via File /Save workspace you can collect them in a single workspace under <name>.workspace. If you open <name>.workspace during the next startup of von CodeBlocks, all projects will show up again.
Complex software systems consist of components which are managed in different CodeBlocks projects. Furthermore, with the generation of such software systems, there are often dependencies between these projects.
Example
A project A contains fundamental functions which are made available to other projects in the form of a library. Now, if the sources of this project are modified, then the library has to be rebuilt. To maintain consistency between a project B which uses the functions and project A which implements the functions, project B has to depend on project A. The necessary information on the dependencies of projects is stored in the relevant workspace, so that each project can be created separately. The usage of dependencies makes it also possible to control the order in which the projects will be generated. The dependencies for projects can be set via the selecting the menu Project /Properties and then clicking the Projects dependencies button.
In the Management window of the Project View, Assembler files are shown in the ASM Sources category. The user can change the listing of files in categories (see chapter 1.1). Right-clicking one of the listed Assembler files will open a context menu. Select Properties to open a new window. Now select the Build tab and activate the two fields Compile file and Link file. Then select the Advanced tab and execute the following steps:
The CodeBlocks variables are marked by $ (see Variable Expansion 3.4). They are set automatically so that you only have to replace the Assembler option <asopt> by your own settings.
The companys Coding Rules require source files to have a standard design. CodeBlocks makes it possible to include a predefined content at the beginning of a file automatically when creating new C/C++ sources and headers. This predefined content is called default code. This setting can be selected under Stettings /Editor Default Code. A new file can be created via the menu File /New /File .
Example
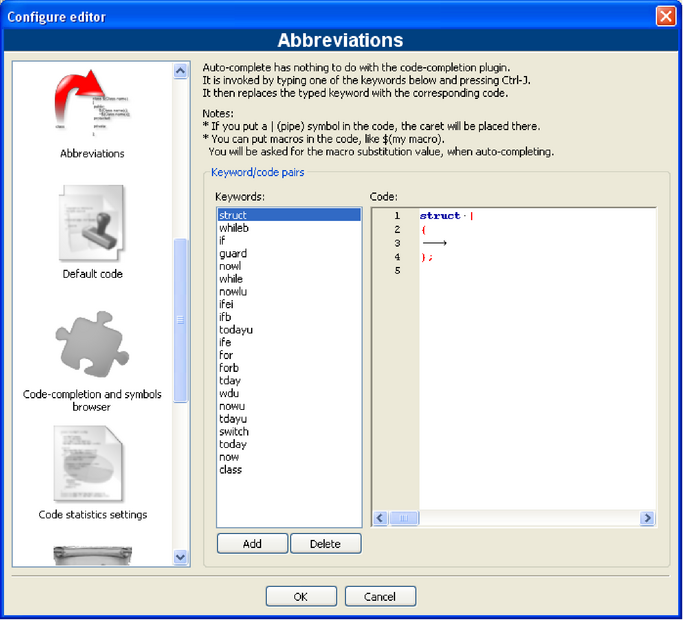
A lot of typing can be saved in CodeBlocks by defining abbreviation. This is done by selecting Settings /Editor and defining the abbreviations under the name <name>, which can then be called by the keyboard shortcut Ctrl-J (see Defining abbreviations 1.3).
|
|
Parametrisation is also possible by including variables $(NAME) in the abbreviations.
When performing the abbreviation <name> in the source text and performing Ctrl-J, the content of the variable is requested and included.
CodeBlocks settings are saved as application data in a file called <user>.conf in the codeblocks directory. This configuration file contains information such as the last opened projects, settings for the editor, display of symbol bars etc. By default, the default personality is set so that the configuration is stored in the file default.conf. If CodeBlocks is called from the command line with the parameter --personality=myuser, the settings will be stored in the file myuser.conf. If the profile does not exist already, it will automatically be created. This procedure makes it possible to create the corresponding profiles for different work steps. If you start CodeBlocks from the command line with the additional parameter--personality=ask, a selection box will be displayed for all the available profiles.
The CodeBlocks settings are stored in the default.conf profile in the codeblocks directory of your Application Data. When using personalities (see chapter 1.10.3), the configuration details will be stored in the <personality>.conf file.
The tool cb_share_conf, which can be found in the CodeBlocks installation directory, is used for managing and storing these settings.
If you wish to define standard settings for several users of a computer, the configuration file default.conf has to be stored in the directory \Documents and Settings\Default User\Application Data\codeblocks. During the first startup, CodeBlocks will copy the presettings from Default User to the application data of the current users.
To create a portable version of CodeBlocks on a USB stick, proceed as follows. Copy the CodeBlocks installation to a USB stick and store the configuration file default.conf in this directory. The configuration will be used as a global setting. Please take care that the file is writeable, otherwise changes of the configuration cannot be stored.
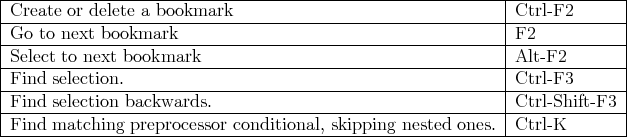
In CodeBlocks there are different ways of quick navigation between files and functions. Setting bookmarks is a typical procedure. Via the shortcut Ctrl-B a bookmark is set or deleted in the source file. Via Alt-PgUp you can jump to the previous bookmark, and via Alt-PgDn you can jump to the next bookmark.
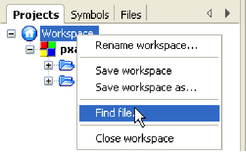
If you select the workspace or a project in the workspace in the project view you will be able to search for a file in the project. Just select Find file from the context menu, then type the name of the file and the file will be selected. If you hit return this file will be opened in the editor (see Searching for files 1.4).
|
|
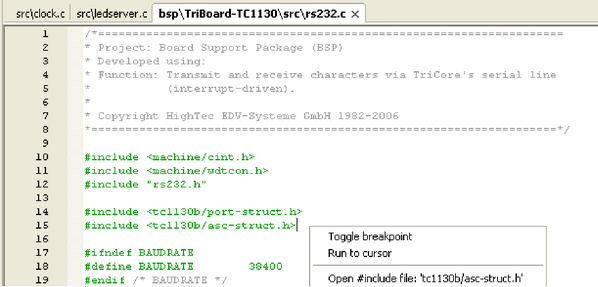
In CodeBlocks you can easily navigate between header/source files like:
|
|
CodeBlocks offeres several ways of searching within a file or directory. The dialogue box for searching is opened via Search /Find (Ctrl-F) or Find in Files (Ctrl-Shift-F).
Alt-G and Ctrl-Alt-G are another useful functions. The dialogue which will open on using this shortcut, lets you select files/functions and then jumps to the implementation of the selected function (see Search for functions 1.6) or opens the selected file in the editor. You may use wildcards like * or ? etc. for an incremental search in the dialog.
|
|
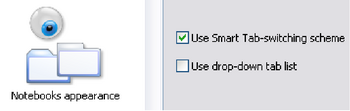
In the editor, you can switch between the tabs with the open files via Ctrl-Tab. Alternatively you can set Use Smart Tab-switching scheme in Settings /Notebook appearance , then Ctrl-Tab will bring up an Open Tabs window in which all the open files will be listed which can then be selected by mouse-click (see Settings of switching between tabs 1.7). You can use the shortcut Ctrl-Tab in the management window to switch between the different tabs.
|
|
A common procedure when developing software is to struggle with a set of functions which are implemented in different files. The Browse Tracker plugin will help you solve this problem by showing you the order in which the files were selected. You can then comfortably navigate the function calls (see Plugins 2.7).
The display of line numbers in CodeBlocks can be activated via Settings /General Settings in the field Show line numbers. The shortcut Ctrl-G or the menu command Search /Goto line will help you jump to the desired line.
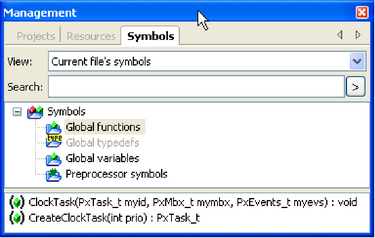
The CodeBlocks Management window offers a tree view for symbols of C/C++ sources for navigating via functions or variables. As the scope of this view, you can set the current file or project, or the whole workspace. The following categories exist for the symbols:
|
|
Structures and classes are displayed below the pre-processor symbols. If a category is selected by mouse-click, the found symbols will be displayed in the lower part of the window (see Symbol view 1.8). Double-clicking the symbol will open the file in which the symbol is defined or the function implemented, and jumps to the corresponding line.
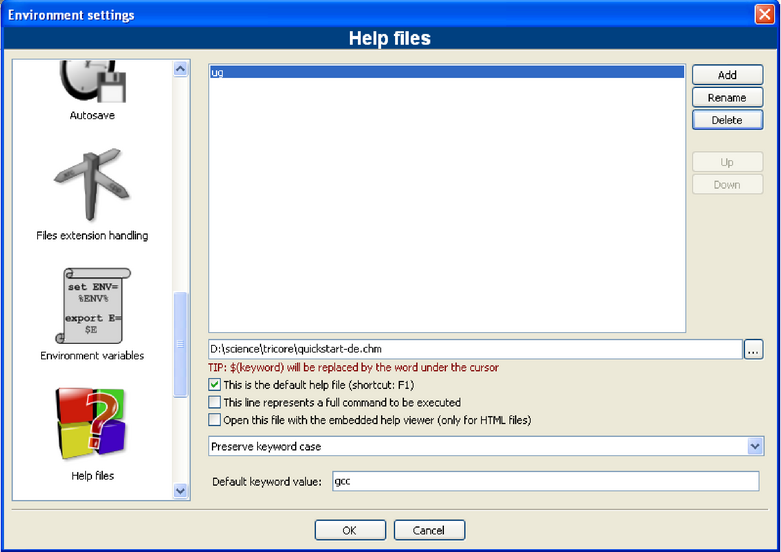
The CodeBlocks development environment supports the inclusion of external help files via the menu Settings /Environment . Include the manual of your choice in the chm format in Help Files select this is the default help file (see Settings for help files 1.9). The entry $(keyword) is a placeholder for a select item in your editor. Now you can select a function in an opened source file in CodeBlocks by mouse-click, and the corresponding documentation will appear while pressing F1.
If you have included multiple help files, you can select a term in the editor and choose a help file from the context menu Locate in for CodeBlocks to search in.
|
|
In CodeBlocks you can add even support for man pages. Just add a entry man and specify the path as follows.
CodeBlocks provides an Embedded HTML Viewer, which can be used to display simple html file and find keywords within this file. Just configure the path to the html file, which should be parsed and enable the checkbox Open this file with embedded help viewer via the menu Settings /Environment /Help Files .
|
|
Including external tools is possible in CodeBlocks via Tools /Configure Tools /Add . Built-in variables (see Variable Expansion 3.2) can also be accessed for tool parameters. Furthermore there are several kinds of launching options for starting external applications. Depending on the option, the externally started applications are stopped when CodeBlocks is quit. If the applications are to remain open after quitting CodeBlocks, the option Launch tool visible detached must be set.
In this chapter we will present some useful settings in CodeBlocks.
The configuration for an operating system is specified by so-called environmental variables. The environmental variable PATH for example contains the path to an installed compiler. The operating system will process this environmental variable from beginning to end, i.e. the entries at the end will be searched last. If different versions of a compiler or other applications are installed, the following situations can occur:
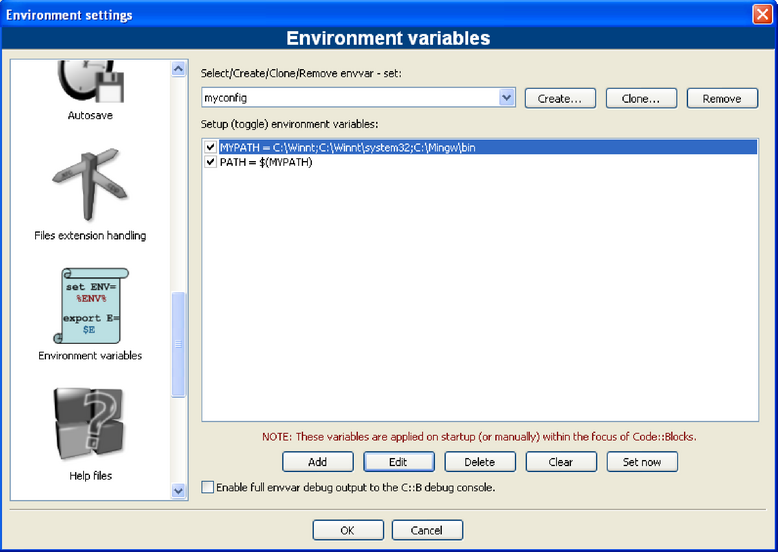
So it might be the case that different versions of a compilers or other tools are mandatory for different projects. One possibility in such a case is to change the environmental variables in the system control for every project. However, this procedure is error-prone and not flexible. For this requirement, CodeBlocks offers an elegant solution. Different configurations of environmental variables can be created which are used only internally in CodeBlocks. Additionally, you can switch between these configurations. The Environmental variables 1.11 shows the dialogue which you can open via Environment Varibales under Settings /Environment . A configuration is created via the Create button.
|
|
Access and scope of the environmental variables created here, is limited to CodeBlocks. You can expand these environmental variables just like other CodeBlocks variables via $(NAME).
Example
You can write the used environment into a postbuild Step (see chapter 1.6) in a file <project>.env and archive it within your project.
or under Linux
If several projects or files are opened at the same time, the user needs a way to switch quickly between the projects or files. CodeBlocks has a number of shortcuts for such situations.
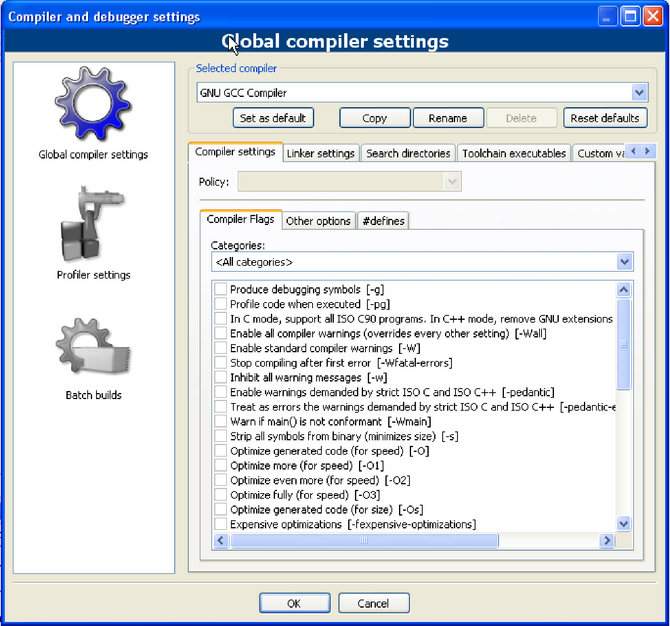
During the build process of a project, the compiler messages are displayed in the Messages window in the Build Log tab. If you wish to receive detailed information, the display can be extended. For this purpose click Settings /Compiler and Debugger and select Other Settings in the drop-down field.
|
|
Take care that the correct compiler is selected. The Full command line setting in the Compiler Logging field outputs the complete information in the Build Log. In addition, this output can be logged in a HTML file. For this purpose select Save build log to HTML file when finished. Furthermore, CodeBlocks offers a progress bar for the build process in the Build Log window which can be activated via the Display build progress bar setting.
CodeBlocks offers a very efficient editor. This editor allows you to change the size in which the opened text is displayed. If you use a mouse with a wheel, you only need to press the Ctrl key and scroll via the mouse wheel to zoom in and out of the text.
CodeBlocks supports the block select mode within the editor. Hold the key ALT and select a region with the left mouse button and copy or paste your selection. This feature is helpful if you want to select some columns e.g. of an array and copy and paste the content.
CodeBlocks supports so called cold folding. With this feature you can fold e.g. functions within the CodeBlocks editor. A folding point is marked by minus symbol in the left margin of the editor view. In the margin the beginning and the end of a folding point is visible as vertical line. If you click the minus symbol with the left mouse button the code snippet will be folded or unfolded. Via the menu Edit /Folding you can select the folding. In the editor you see folded code as continous horizontal line.
CodeBlocks provides the folding feature also for preprocessor directives. To enable this feature select Fold preprocessor commands via the menu Settings /Editor in the folding entry.
Another possibility is to set user defined folding points. The start of folding point is entered as comment with a opening bracket and the end is market with a comment with a closing bracket.
If you open a open a project in CodeBlocks the Search directories of your compiler and the project, the sources and headers of your project are parsed. In addition the keyowrds of the corresponding lexer file are parsed. The parse information is used for the auto complete feature in CodeBlocks. Please check the settings for the editor if this feature is enabled. The auto completion is accessible with the shortcut Ctrl-Space. Via the menu Settings /Editor /Syntax highlighting you can add user defined keywords to your lexer.
In the build options of a project, you can add the used libraries via the Add button in the Link libraries entry of the Linker Settings. In doing so, you can either use the absolute path to the library or just give the name without the lib prefix and file extension.
Example
For a library called <path>\libs\lib<name>.a, just write <name>. The linker with the corresponding search paths will then include the libraries correctly.
During compiling, objects name.o are created from the sources name.c/cpp. The linker then binds the individual objects into an application name.exe or for the embedded systems name.elf. In some cases, it might be desirable to predefine the order in which the objects will be linked. In CodeBlocks, this can be achieved by assigning priorities. In the context menu Properties , you can define the priorities of a file in the Build tab. A low priority will cause the file to be linked earlier.
CodeBlocks offers ways of automatically storing projects and source files, or of creating backup copies. This feature can be activated in the menu Settings /Environment /Autosave . In doing so, Save to .save file should be specified as the method for creating the backup copy.
In CodeBlocks, you can choose between several ways of treating file extensions. The settings dialogue can be opened via Settings /Files extension handling . You can either use the applications assigned by Windows for each file extension (open it with the associated application), or change the setting for each extensions in such a way that either a user-defined program will start (launch an external program), or the file will be opened in the CodeBlocks editor (open it inside Code::Blocks editor).
IDE CodeBlocks can be executed from the command line without a graphic interface. In such a case, there are several switches available for controlling the build process of a project. Since CodeBlocks is thus scriptable, the creation of executables can be integrated into your own work processes.
Specifies the project *.cbp filename or workspace *.workspace filename. For instance, <filename> may be project.cbp. Place this argument at the end of the command line, just before the output redirection if there is any.
Shows a help message regarding the command line arguments.
Dont perform any file association checks (Windows only).
Dont start a DDE server (Windows only).
Hides the splash screen while the application is loading.
Display the debug log of the application.
Sets the shared data directory prefix.
Sets the personality to use. You can use ask as the parameter to list all available personalities.
Clean and build the project or workspace.
Build the project or workspace.
Sets target for batch build. For example --target=Release.
Keeps the batch log window visible after the batch build is completed.
Shows a message after the batch build is completed.
All plugins are disabled on startup.
Placed in the very last position of the command line, this may be used to redirect standard output to log file. This is not a codeblock option as such, but just a standard DOS/*nix shell output redirection.
Even if an IDE such as CodeBlocks is mainly handled by mouse, keyboard shortcuts are nevertheless a very helpful way of speeding up and simplifying work processes. In the below table, we have collected some of the available keyboard shortcuts.
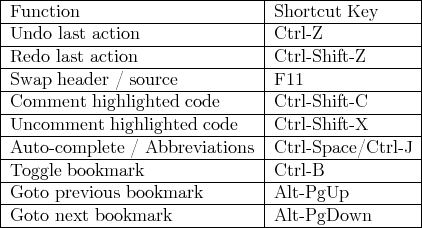
This is a list of shortcuts provided by the CodeBlocks editor component. These shortcuts cannot be rebound.