If you are reading this, you must be the impatient type who wants to kick the tyres (and light the fires) and have a look around as soon as possible. This section will provide a quick end to end tour of the steps involved (but does not go through the concepts in detail). This assumes you have installed the repository correctly, and are able to access the main login screen.
The above picture shows the main feature areas of the BRMS.
Info: This is the initial screen, with links to resources.
Rules: This is the category and business user perspective.
Package: This is where packages are configured and managed.
Deployment: this is where deployment snapshots are managed.
Admin: Administrative functions (categories, statuses, import and export)
The supported server side platforms are mentioned in the installation guide. For browsers - the major ones are supported, this includes Firefox (1.5 and up), IE6 and up, Opera, Safari etc. The preferred browser for most platforms is firefox, it is widely available and free, if you have any choice at all, Firefox is the preferred platform, followed by safari on mac.
You can also consult the wiki: http://wiki.jboss.org/wiki/Wiki.jsp?page=RulesRepository for some tutorials and user tips (it IS a wiki, so you can even contribute your own tips and examples and even upload files if you desire !).
Some initial setup is required the first time. The first time the server starts up, it will create an empty repository, then take the following steps:
Once deployed, go to "http://<your server>/drools-jbrms/" (This will show the initial info screen - or login screen depending on the configuration).
If it is a brand new repository, you will want to go to "Admin", and choose "Manage Categories"
(Add a few categories of your choosing, categories are only for classification, not for execution or anything else.)
Rules need a fact model (object model) to work off, so next you will want to go to the Package management feature. From here you can click on the icon to create a new package (give it a meaningful name, with no spaces).
To upload a model, use a jar which has the fact model (API) that you will be using in your rules and your code (go and make one now if you need to !). When you are in the model editor screen, you can upload a jar file, choose the package name from the list that you created in the previous step.
Now edit your package configuration (you just created) to import the fact types you just uploaded (add import statements), and save the changes.
At this point, the package is configured and ready to go (you generally won't have to go through that step very often).
(Note that you can also import an existing drl package - it will store the rules in the repository as individual assets).
Once you have at least one category and one package setup, you can author rules.
There are multiple rule "formats", but from the BRMS point of view, they are all "assets".
You create a rule by clicking the icon with the rules logo (the head), and from that you enter a name.
You will also have to choose one category. Categories provide a way of viewing rules that is separate to packages (and you can make rules appear in multiple packages) - think of it like tagging.
Chose the "Business rule (guided editor)" formats.
This will open a rule modeler, which is a guided editor. You can add and edit conditions and actions based on the model that is in use in the current package. Also, any DSL sentence templates setup for the package will be available.
When you are done with rule editing, you can check in the changes (save), or you can validate or "view source" (for the effective source).
You can also add/remove categories from the rule editor, and other attributes such as documentation (if you aren't sure what to do, write a document in natural language describing the rule, and check it in, that can also serve as a template later)
In terms of navigating, you can either use the Rules feature, which shows things grouped by categories, or you can use the Package feature, and view by package (and rule type). If you know the name or part of the name of an asset, you can also use the "Quick find", start typing a rule name and it will return a list of matches as you type (so if you have a sensible naming scheme, it will make it very quick to find stuff).
After you have edited some rules in a package, you can click on the package feature, open the package that you wish, and build the whole package.
If that succeeds, then you will be able to download a binary package file which can be deployed into a runtime system.
You can also take a "snapshot" of a package for deployment. This freezes the package at that point in time, so any concurrent changes to not effect the package. It also makes the package available on a URL of the form: "http://<your server>/drools-jbrms/org.drools.brms.JBRMS/packages/<packageName>/<snapshotName>" (where you can use that URL and downloads will be covered in the section on deployment).
As the BRMS can manage many different types of rules (and more), they are all classed as "assets". An asset is anything that can be stored as a version in the repository. This includes decision tables, models, DSLs and more. Sometimes the word "rule" will be used to really mean "asset" (ie the things you can do also apply to the other asset types). You can think of asset as a lot like a file in a folder. Assets are grouped together for viewing, or to make a package for deployment etc.
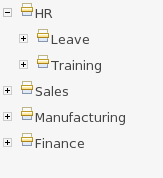
Categories allow rules (assets) to be labeled (or tagged) with any number of categories that you define. This means that you can then view a list of rules that match a specific category. Rules can belong to any number of categories. In the above diagram, you can see this can in effect create a folder/explorer like view of assets. The names can be anything you want, and are defined by the BRMS administrator (you can also remove/add new categories - you can only remove them if they are not currently in use).
Generally categories are created with meaningful name that match the area of the business the rule applies to (if the rule applies to multiple areas, multiple categories can be attached). Categories can also be used to "tag" rules as part of their life-cycle, for example to mark as "Draft" or "For Review".
The view above shows the category editor/viewer that is seen when you open an asset. In this example you can see the asset belongs to 2 categories, with a "+" button to add additional items (use the trash can item to remove them). This means that when either category is used to show a list of assets, you will see that asset.
In the above example, the first Category "Finance" is a "top level" category. The second one: "HR/Awards/QAS" is a still a single category, but its a nested category: Categories are hierarchical. This means there is a category called "HR", which contains a category "Awards" (it will in fact have more sub-categories of course), and "Awards" has a sub-category of QAS. The screen shows this as "HR/Awards/QAS" - its very much like a folder structure you would have on your hard disk (the notable exception is of course that rules can appear in multiple places).
When you open an asset to view or edit, it will show a list of categories that it currently belongs to If you make a change (remove or add a category) you will need to save the asset - this will create a new item in the version history. Changing the categories of a rule has no effect on its execution.
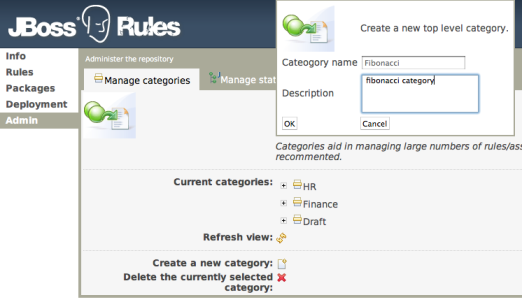
The above view shows the administration screen for setting up categories (there) are no categories in the system by default. As the categories can be hierarchical you chose the "parent" category that you want to create a sub-category for. From here categories can also be removed (but only if they are not in use by any current versions of assets).
As a general rule, an asset should only belong to 1 or 2 categories at a time. Categories are critical in cases where you have large numbers of rules. The hierarchies do not need to be too deep, but should be able to see how this can help you break down rules/assets into manageable chunks. Its ok if its not clear at first, you are free to change categories as you go.
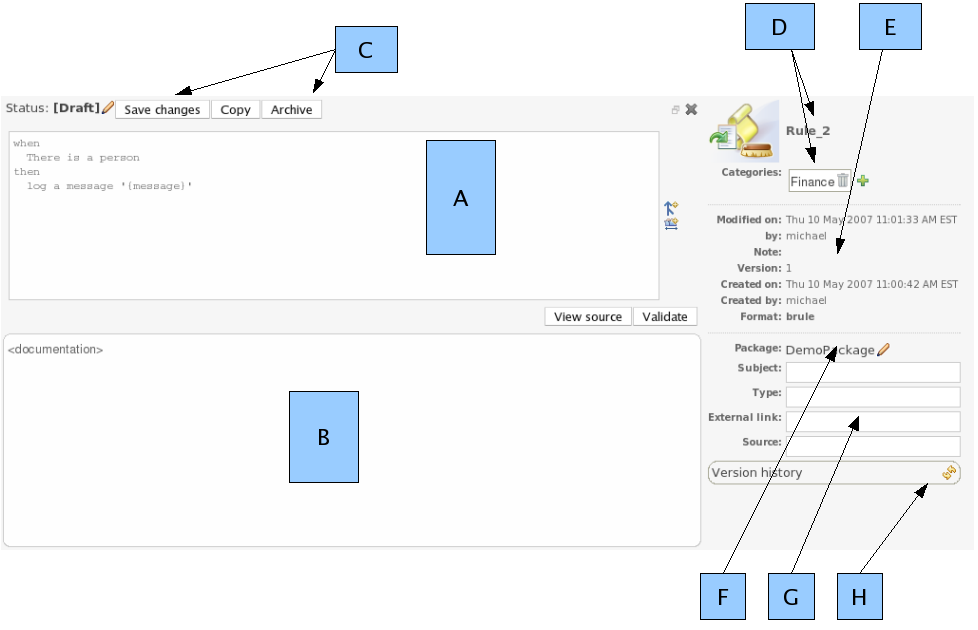
The above diagram shows the "asset editor" with some annotated areas. The asset editor is where all rule changes are made. Below is a list which describes the different parts of the editor.
A
This is where the "editor widget" lives - exactly what form the editor takes depends on the asset or rule type.
B
This is the documentation area - a free text area where descriptions of the rule can live. It is encouraged to write a plain description in the rule here before editing.
C
These are the actions - for saving, archiving, changing status etc. Archiving is the equivalent of deleting an asset.
D
This has the asset name, as well as the list of categories that the asset belongs to.
E
This section contains read-only meta data, including when changes were made, and by whom.
"Modified on:" - this is the last modified date.
"By:" - who made the last change.
"Note:" - this is the comment made when the asset was last updated (ie why a change was made)
"Version:" - this is a number which is incremented by 1 each time a change is checked in (saved).
"Created on:" - the date and time the asset was created.
"Created by:" - this initial author of the asset.
"Format:" - the short format name of the type of asset.
F
This shows what package the asset belong to (you can also change it from here).
G
This is some more (optional) meta data (taken from the Dublin Core meta data standard)
H
This will show the version history list when requested.
The BRMS supports a (growing) list of formats of assets (rules). Here the key ones are described. Some of these are covered in other parts of the manual, and the detail will not be repeated here.
Guided editor style "Business rules": (also known as "BRL format"). These rules use the guided GUI which controls and propts user input based on knowledge of the object model. This can also be augmented with DSL sentences.
IMPORTANT: to use the BRL guided editor, someone will need to have you package configured before hand.
Also note that there is a guided editor in the Eclipse plug in, most of the details in this section can also apply to it.
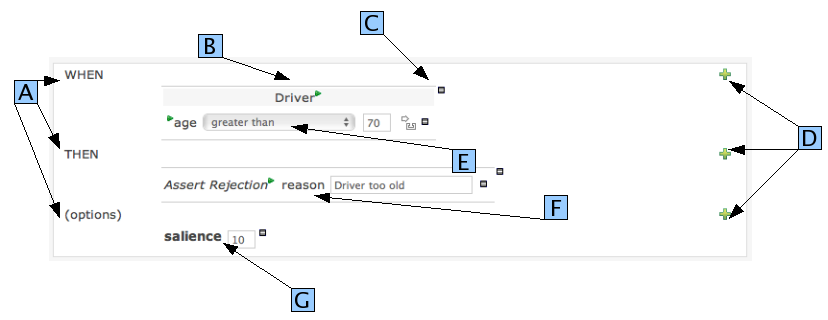
The above diagram shows the editor in action. The following description apply to the letter boxes in the diagram above:
A: The different parts of a rule. The "WHEN" part is the condition, "THEN" action, and "(options)" are optional attributes that may effect the operation of the rule.
B: This shows a pattern which is declaring that the rule is looking for a "Driver" fact (the fields are listed below, in this case just "age"). Note the green triangle, it will popup a list of options to add to the fact declaration: you can add more fields (eg their "location"), or you can assign a variable name to the fact (which you can use later on if needs be). As well as adding more fields to this pattern - you can add "multiple field" constraints - ie constraints that span across fields (eg age > 42 or risk > 2). The popup dialog shows the options.
C: The small "-" icons indicate you can remove something - in this case it would remove the whole Driver fact declaration. If its the one below, it would remove just the age constraint.
D: The "+" symbols allow you to add more patterns to the condition or the action part of the rule, or more attributes. In all cases, a popup option box is provided. For the "WHEN" part of the rule, you can choose to add a constraint on a fact (it will give you a list of facts), or you can use another conditional element, the choices which are : "There is no" - which means the fact+constraints must not exist, "There exists" - which means that there exists at least one match (but there only needs to be one - it will not trigger for each match), and "Any of" - which means that any of the patterns can match (you then add patterns to these higher level patterns). If you just put a fact (like is shown above) then all the patterns are combined together so they are all true ("and").
E: This shows the constraint for the "age" field. (Looking from left to right) the green triangle allows you to "assign" a variable name to the "age" field, which you may use later on in the rule. Next is the list of constraint operations - this list changes depending on the data type. After that is the value field - the value field will be one of: a) a literal value (eg number, text), b) a "formula" - in which case it is an expression which is calculated (this is for advanced users) or b) a variable (in which case a list will be provided to choose values from). After this there is a horizontal arrow icon, this is for "connective constraints" : these are constraints which allow you to have alternative values to check a field against, for example: "age is less than 42 or age is not equal to 39" is possibly this way.
F: This shows an "action" of the rule, a rule consists of a list of actions. In this case, we are asserting/inserting a new fact, which is a rejection (with the "reason" field set to an explanation). There are quite a few other types of actions you can use: you can modify an existing fact (which tells the engine the fact has changed) - or you can simply set a field on a fact (in which case the engine doesn't know about the change - normally because you are setting a result). You can also retract a fact. In most cases the green arrow will give you a list of fields you can add so you can change the value. The values you enter are "literal" - in the sense that what you type is what the value is. If it needs to be a calculation, then add an "=" at the start of the value - this will be interpreted as a "formula" (for advanced users only) ! and the calculation will be performed (not unlike a spreadsheet).
G: This is where the rule options live. In this case, only salience is used which is a numeric value representing the rules "priority". This would probably be the most common option to use.
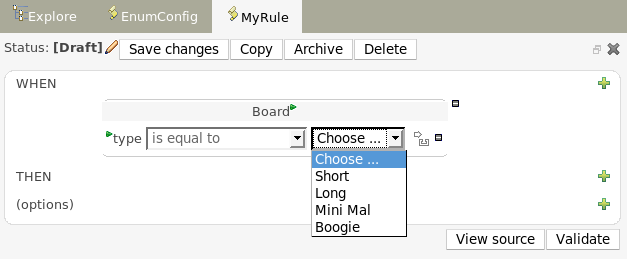
Note that is it possible to limit field values to items in a pre configured list. This list is configured as part of the package (using a data enumeration to provide values for the drop down list). These values can be a fixed list, or (for example) loaded from a database. This is useful for codes, and other fields where there are set values. It is also possible to have what is displayed on screen, in a drop down, be different to the value (or code) used in a rule. See the section on data enumerations for how these are configured.
Augmenting with DSL sentences: If the package the rule is part of has a dsl configuration, when when you add conditions or actions, then it will provide a list of "DSL Sentences" which you can choose from - when you choose one, it will add a row to the rule - where the DSL specifies values come from a user, then a edit box (text) will be shown (so it ends up looking a bit like a form). This is optional, and there is another DSL editor. Please note that the DSL capabilities in this editor are slightly less then the full set of DSL features (basically you can do [when] and [then] sections of the DSL only - which is no different to drools 3 in effect).
The following diagram shows the DSL sentences in action in the guided editor:
A more complex example:
In the above example, you can see it is using a mixture of literal values, and formulas. The second constraint on the "Person" fact, is a formula (in this case it is doing a silly calculation on the persons age, and checking something against their name - both "age" and "name" are fields of the Person fact in this case. In the 3rd line (which says "age is less than .." - it is also using a formula, although, in this case the formula does a calculation and returns a value (which is used in the comparison) - in the former case, it had to return True or False (in this case, its a value). Obvious formulas are basically pieces of code - so this is for experienced users only.
Looking at the "Board" pattern (the second pattern with the horizontal grey bar): this uses a top level conditional element ("There is no") - this means that the pattern is actually looking for the "non existence" of a fact that matches the pattern. Note the "Any of:" - this means that EITHER the "type" field constraint is matched, or the "name" field is matched (to "myname" in the case above). This is what is termed a Multiple field constraint (you can nest these, and have it as complex as you like, depending on how much you want the next person to hate you: Some paraphrased advice: Write your rules in such as way as the person who has to read/maintain them is a psychopath, has a gun, and knows where you live).
The above dialog is what you will get when you want to add constraints to the Person fact. In the top half are the simple options: you can either add a field straight away (a list of fields of the Person fact will be shown), or you can add a "Multiple field constraint" - of a given type (which is described above). The Advanced options: you can add a formula (which resolves to True or False - this is like in the example above: "age < (age * 2) ...."). You can also assign a Variable name to the Person fact (which means you can then access that variable on the action part of the rule, to set a value etc).
DSL rules are textual rules, that use a language configuration asset to control how they appear.
A dsl rule is a single rule. Referring to the picture above, you can a text editor. You can use the icons to the right to provide lists of conditions and actions to choose from (or else press Control + Space at the same time to pop up a list).
Multiple rules can be stored in a spreadsheet (each row is a rule). The details of the spreadsheet are not covered in this chapter (as there is a separate chapter for them).
To use a spreadsheet, you upload an xls (and can download the current version, as per the picture above). To create a new decision table, when you launch the rule wizard, you will get an option to create one (after that point, you can upload the xls file).
Rule flows: Rule flows allow you to visually describe the steps taken - so not all rules are evaluated at once, but there is a flow of logic. Rule flows are not covered in this chapter on the BRMS, but you can use the IDE to graphically draw ruleflows, and upload the .rfm file to the BRMS.
Similar to spreadsheets, you upload/download ruleflow files (the eclipse IDE has a graphical editor for them). The details of Rule Flows are not discussed here.
Technical (drl) rules are stored as text - they can be managed in the BRMS. A DRL can either be a whole chunk of rules, or an individual rule. if its an individual rule, no package statement or imports are required (in fact, you can skip the "rule" statement altogether, just use "when" and "then" to mark the condition and action sections respectively). Normally you would use the IDE to edit raw DRL files, since it has all the advanced tooling and content assistance and debugging, however there are times when a rule may have to deal with something fairly technical. In any typical package of rules, you generally have a been for some "technical rules" - you can mix and match all the rule types together of course.
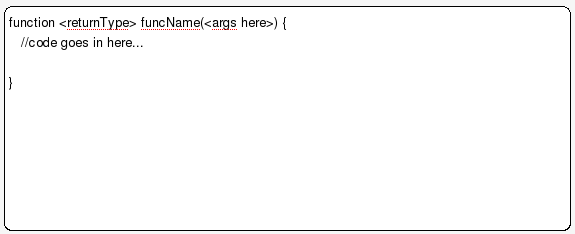
Functions are another asset type. They are NOT rules, and should only be used when necessary. The function editor is a textual editor. Functions
Data enumerations are an optional asset type that technical folk can configure to provide drop down lists for the guided editor. These are stored and edited just like any other asset, and apply to the package that they belong to.
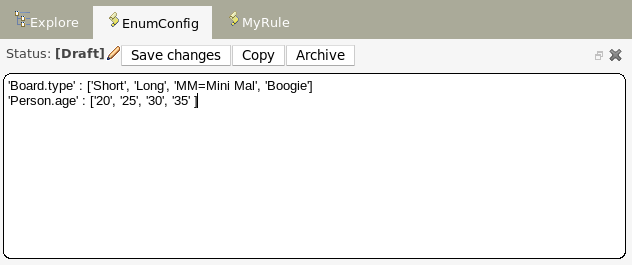
The contents of an enum config are a mapping of Fact.field to a list of values to be used in a drop down. That list can either be literal, or use a utility class (which you put on the classpath) to load a list of strings. The strings are either a value to be shown on a drop down, or a mapping from the code value (what ends up used in the rule) and a display value (see the example below, using the '=').
In the above diagram - the "MM" indicates a value that will be used in the rule, yet "Mini Mal" will be displayed in the GUI.
Getting data lists from external data sources: It is possible to have the BRMS call a piece of code which will load a list of Strings. To do this, you will need a bit of code that returns a java.util.List (of String's) to be on the classpath of the BRMS. Instead of specifying a list of values in the BRMS itself - the code can return the list of Strings (you can use the "=" inside the strings if you want to use a different display value to the rule value, as normal). For example, in the 'Person.age' line above, you could change it to:
'Person.age' : (new com.yourco.DataHelper()).getListOfAges()
This assumes you have a class called "DataHelper" which has a method "getListOfAges()" which returns a List of strings (and is on the classpath). You can of course mix these "dynamic" enumerations with fixed lists. You could for example load from a database using JDBC. The data enumerations are loaded the first time you use the guided editor in a session. If you have any guided editor sessions open - you will need to close and then open the rule to see the change. To check the enumeration is loaded - if you go to the Package configuration screen, you can "save and validate" the package - this will check it and provide any error feedback.
There are a few other advanced things you can do with data enumerations.
Drop down lists that depend on field values: Lets imagine a simple fact model, we have a class called Vehicle, which has 2 fields: "engineType" and "fuelType". We want to have a choice for the "engineType" of "Petrol" or "Diesel". Now, obviously the choice type for fuel must be dependent on the engine type (so for Petrol we have ULP and PULP, and for Diesel we have BIO and NORMAL). We can express this dependency in an enumeration as:
 'Vehicle.engineType' : ['Petrol', 'Diesel']
 'Vehicle.fuelType[engineType=Petrol]' : ['ULP', 'PULP' ]
 'Vehicle.fuelType[engineType=Diesel]' : ['BIO', 'NORMAL' ]
This shows how it is possible to make the choices dependent on other field values. Note that once you pick the engineType, the choice list for the fuelType will be determined.
Loading enums programmatically: In some cases, people may want to load their enumeration data entirely from external data source (such as a relational database). To do this, you can implement a class that returns a Map. The key of the map is a string (which is the Fact.field name as shown above), and the value is a java.util.List of Strings.
public class SampleDataSource2 {

  public Map<String>, List<String>> loadData() {
    Map data = new HashMap();

    List d = new ArrayList();
    d.add("value1");
    d.add("value2");
    data.put("Fact.field", d);

    return data;
 }

}
And in the enumeration in the brms, you put:
=(new SampleDataSource2()).loadData()
The "=" tells it to load the data by executing your code.
Tip: As you may have many similar rules, you can create rule templates, which are simply rules which are kept in an inactive package - you can then categories templates accordingly, and copy them as needed (choosing a live package as the target package).
Each asset (and also package) in the BRMS has a status flag set. The values of the status flag are set in the Administration section of the BRMS. (you can add your own status names). Similar to Categories, Statuses do NOT effect the execution in any way, and are purely informational. Unlike categories, assets only have one status AT A TIME.
Using statuses is completely optional. You can use it to manage the lifecycle of assets (which you can alternatively do with categories if you like).
You can change the status of an individual asset (like in the diagram above). Its change takes effect immediately, no separate save is needed.
You can change the status of a whole package - this sets the status flag on the package itself, but it ALSO changes the statuses on ALL the assets that belong to this package in one hit (to be the same as what you set the package to).
Configuring packages is generally something that is done once, and by someone with some experience with rules/models. Generally speaking, very few people will need to configure packages, and once they are setup, they can be copied over and over if needed. Package configuration is most definitely a technical task that requires the appropriate expertise.
All assets live in "packages" in the BRMS - a package is like a folder (it also serves as a "namespace"). A home folder for rule assets to live in. Rules in particular need to know what the fact model is, what the namespace is etc.
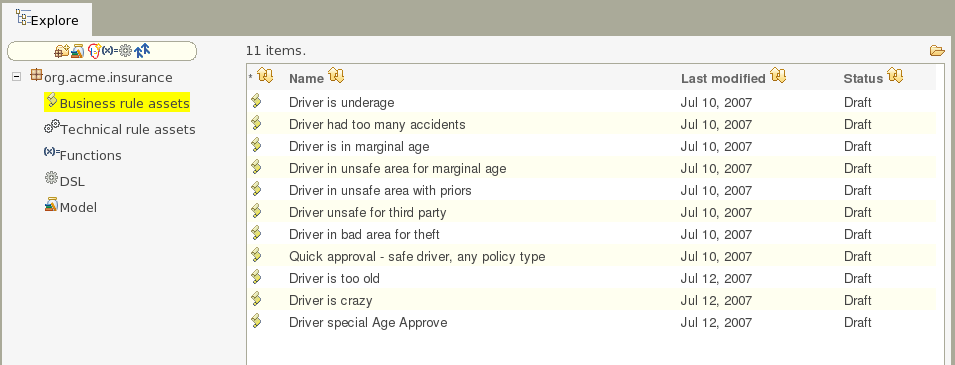
The above picture shows the package explorer. Clicking on an
asset type will show a list of matches (for packages with thousands of
rules, showing the list may take several seconds - hence the importance
of using categories to help you find your way around).
So whilst rules (and assets in general) can appear in any number of categories, they only live in one package. If you think of the BRMS as a file system, then each package is a folder, and the assets live in that folder - as one big happy list of files. When you create a deployment snapshot of a package, you are effectively copying all the assets in that "folder" into another special "folder".
The package management feature allows you to see a list of packages, and then "expand" them, to show lists of each "type" of asset (there are many assets, so some of them are grouped together):
The asset types:
Business assets: this shows a list of all "business rule" types, which include decision tables, business rules etc. etc.
Technical assets: this is a list of items that would be considered technical (eg DRL rules, data enumerations and rule flows).
Functions: In the BRMS you can also have functions defined (optionally of course).
DSL: Domain Specific Languages can also be stored as an asset. If they exist (generally there is only one), then they will be used in the appropriate editor GUIs.
Model: A package requires at least one model - for the rules.
From the package explorer you can create new rules, or new
assets. Some assets you can only create from the package explorer. The
above picture shows the icons which launch wizards for this purpose. If
you hover the mouse over them, a tooltip will tell you what they
do.
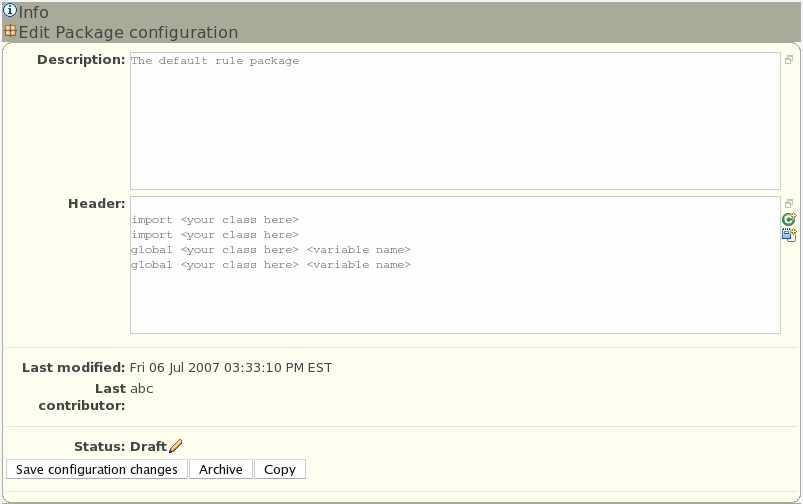
One of the most critical things you need to do is configure
packages. This is mostly importing the classes used by the rules, and
globals variables. Once you make a change, you need to save it, and that
package is then configured and ready to be built. For example, you may
add a model which has a class called "com.something.Hello", you would
then add "import com.something.Hello" in your package configuration and
save the change.
Finally you would "build" a package. Any errors caught are
then shown at this point. If the build was successful, then you will
have the option to create a snapshot for deployment. You can also view
the "drl" that this package results in. WARNING: in cases of large
numbers of rules, all these operations can take some time.
It is optional at this stage to enter the name of a "selector" - see the admin section for details on how to configure custom selectors for your system (if you need them - selecters allow you to filter down what you build into a package - if you don't know what they are for, you probably don't need to use them).
It is also possible to create a package by importing an existing "drl" file. When you choose to create a new package, you can choose an option to upload a .drl file. The BRMS will then attempt to understand that drl, break create a package for you. The rules in it will be stored as individual assets (but still as drl text content). Note that to actually build the package, you will need to upload an appropriate model (as a jar) to validate against, as a separate step.
Both assets and whole packages of assets are "versioned" in the BRMS, but the mechanism is slightly different. Individual assets are saved a bit like a version of a file in a source control system. However, packages of assets are versioned "on demand" by taking a snapshot (typically which is used for deployment). The next section talks about deployment management and snapshots.
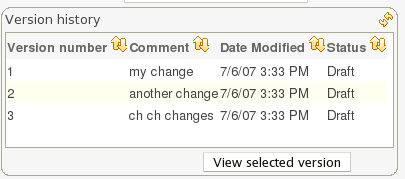
Each time you make a change to an asset, it creates a new item in the version history. This is a bit like having an unlimited undo. You can look back through the history of an individual asset like the list above, and view it (and restore it) from that point in time.
Snapshots, URLS and binary packages:
URLs are central to how built packages are provided. The BRMS provides packages via URLs (for download and use by the Rule Agent). These URLs take the form of: http://<server>/drools-jbrms/org.drools.brms.JBRMS/package/<packageName>/<packageVersion>
<packageName> is the name you gave the package. <packageVersion> is either the name of a snapshot, or "LATEST" (if its LATEST, then it will be the latest built version from the main package, not a snapshot). You can use these in the agent, or you can paste them into your browser and it will download them as a file.
Refer to the section on the Rule Agent for details on how you can use these URLs (and binary downloads) in your application, and how rules can be updated on the fly.
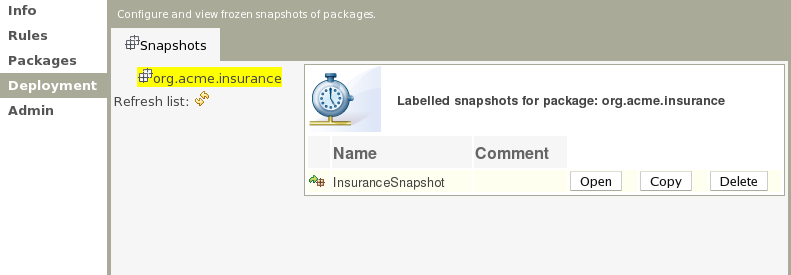
The above shows deployment snapshots view. On the left there is a list of packages. Clicking on a specific package will show you a list of snapshots for that package (if any). From there you can copy, remove or view an asset snapshot. Each snapshot is available for download or access via a URL for deployment.
The two main ways of viewing the repository are by using user-driven Categorization (tagging) as outlined above, and the package explorer view.
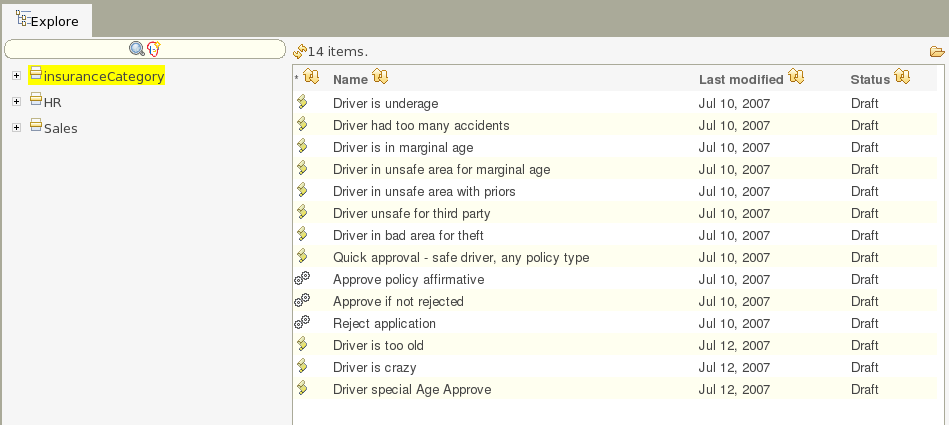
The category view provides a way to navigate your rules in a way that makes sense to your organization.
The above diagram shows categories in action. Generally under each category you should have no more then a few dozen rules, if possible.
The alternative and more technical view is to use the package explorer. This shows the rules (assets) closer to how they are actually stored in the database, and also separates rules into packages (name spaces) and their type (format, as rules can be in many different formats).
The above shows the alternate way of exploring - using packages.
You can see from this manual, that some expertise and practice is required to use the BRMS. In fact any software system in some sense requires that people be "technical" even if it has a nice looking GUI. Having said that, in the right hands the BRMS can be setup to provide a suitable environment for non technical users.
The most appropriate rule formats for this use are using the Guided editor, Decision tables and DSL rules. You can use some DSL expressions also in the guided editor (so it provides "forms" for people to enter values).
You can use categories to isolate rules and assets from non technical users. Only assets which have a category assigned will appear in the "rules" feature.
The initial setup of the BRMS will need to be done by a developer/technical person who will set the foundations for all the rules. They may also create "templates" which are rules which may be copied (they would typically live in a "dummy" package, and have a category of "template" - this can also help ease the way).
Deployment should also not be done by non technical users (as mentioned previously this happens from the "Package" feature).
Its all very interesting to manage rules, but how to you use or "consume" them in your application? This section covers the usage of the RuleAgent deployment component that automates most of this for you.
The rule agent is a component which is embedded in the core runtime of the rules engine. To use this, you don't need any extra components. In fact, if you are using the BRMS, your application should only need to include the drools-core dependencies in its classpath (drools and mvel jars only), and no other rules specific dependencies.
Note that there is also a drools-ant ant task, so you can build rules as part of an ant script (for example in cases where the rules are edited in the IDE) without using the BRMS at all - the drools-ant task will generate .pkg files the same as the BRMS.
Once you have "built" your rules in a package in the BRMS (or from the ant task), you are ready to use the agent in your target application.
To use the rule agent, you will use a call in your applications code like:
RuleAgent agent = RuleAgent.newRuleAgent("/MyRules.properties");
RuleBase rb = agent.getRuleBase();
rb.newStatefulSession....
//now assert your facts into the session and away you go !
IMPORTANT: You should only have one instance of the RuleAgent per rulebase you are using. This means you should (for example) keep the agent in a singleton, JNDI (or similar). In practice most people are using frameworks like Seam or Spring - in which case they will take care of managing this for you (in fact in Seam - it is already integrated - you can inject rulebases into Seam components). Note that the RuleBase can be used multiple times by multiple threads if needed (no need to have multiple copies of it).
This assumes that there is a MyRules.properties in the root of your classpath. You can also pass in a Properties object with the parameters set up (the parameters are discussed next).
The following shows the content of MyRules.properties:
##
## RuleAgent configuration file example
##

newInstance=true
file=/foo/bar/boo.pkg /foo/bar/boo2.pkg
dir=/my/dir
url=http://some.url/here http://some.url/here
localCacheDir=/foo/bar/cache
poll=30


name=MyConfig
You can only have one type of key in each configuration (eg only one "file", "dir" etc - even though you can specify multiple items by space separating them). Note also, instead of a discrete properties file, you can construct a java.utils.Properties object, and pass it in to the RuleBase methods.
Referring to the above example, the "keys" in the properties are:
newInstance
Setting this to "true" means that the RuleBase instance will be created fresh each time there is a change. this means you need to do agent.getRuleBase() to get the new updated rulebase (any existing ones in use will be untouched). The default is false, which means rulebases are updated "in place" - ie you don't need to keep calling getRuleBase() to make sure you have the latest rules (also any StatefulSessions will be updated automatically with rule changes).
file
This is a space-separated list of files - each file is a binary package as exported by the BRMS. You can have one or many. The name of the file is not important. Each package must be in its own file.
NOTE: it is also possible to specify .drl files - and it will compile it into the package. However, note that for this to work, you will need the drools-compiler dependencies in your applications classpath (as opposed to just the runtime dependencies).
Please note that if the path has a space in it, you will need to put double quotes around it (as the space is used to separate different items, and it will not work otherwise). Generally spaces in a path name are best to avoid.
dir
This is similar to file, except that instead of specifying a list of files you specify a directory, and it will pick up all the files in there (each one is a package) and add them to the rulebase. Each package must be in its own file.
Please note that if the path has a space in it, you will need to put double quotes around it (as the space is used to separate different items, and it will not work otherwise). Generally spaces in a path name are best to avoid.
url
This is a space separated list of URLs to the BRMS which is exposing the packages (see below for more details).
localCacheDir
This is used in conjunction with the url above, so that if the BRMS is down (the url is not accessible) then if the runtime has to start up, it can start up with the last known "good" versions of the packages.
poll
This is set to the number of seconds to check for changes to the resources (a timer is used).
name
This is used to specify the name of the agent which is used when logging events (as typically you would have multiple agents in a system).
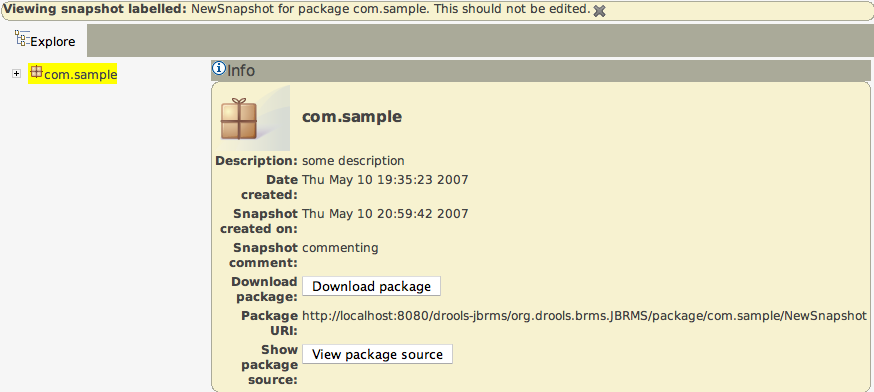
Following shows the deployment screen of the BRMS, which provides URLs and downloads of packages.
You can see the "Package URI" - this is the URL that you would copy and paste into the agent .properties file to specify that you want this package. It specifies an exact version (in this case to a snapshot) - each snapshot has its own URL. If you want the "latest" - then replace "NewSnapshot" with "LATEST".
You can also download a .pkg file from here, which you can drop in a directory and use the "file" or "dir" feature of the RuleAgent if needed (in some cases people will not want to have the runtime automatically contact the BRMS for updates - but that is generally the easiest way for many people).
This section is only needed for advanced users who are integrating deployment into their own mechanism. Normally you should use the rule agent.
For those who do not wish to use the automatic deployment of the RuleAgent, "rolling your own" is quite simple. The binary packages emitted by the BRMS are serialized Package objects. You can deserialize them and add them into any rulebase - essentially that is all you need to do.
From the BRMS, binary packages are provided either from the latest version of a package (once you have successfully validated and built a package) or from the deployment snapshots. The URLs that the BRMS web application exposes provide the binary package via http. You can also issue a "HEAD" command to get the last time a package was updated.
