Make sure the Drools Eclipse plugin is installed, which needs GEF dependency installed first. Then download and extract the drools-examples zip file, which includes an already created Eclipse project. Import that project into a new Eclipse workspace. The rules all have example classes that execute the rules. If you want to try the examples in another project (or another IDE) then you will need to setup the dependencies by hand of course. Many, but not all of the examples are documented below, enjoy :)
Name: Hello World
Main class: org.drools.examples.HelloWorldExample
Type: java application
Rules file: HelloWorld.drl
Objective: demonstrate basic rules in use
The "Hello World" example shows a simple example of rules usage, and both the MVEL and Java dialects.
In this example it will be shown how to build rulebases and sessions and how to add audit logging and debug outputs, this information is ommitted from other examples as it's all very similar. PackageBuilder is used to turn a drl source file into Package objects which the RuleBase can consume, addPackageFromDrl takes a Reader interface as the parameter. Reader can be used to retrieve a source drl file from various locations, in this case the drl file is being retrieved from the classpath as an InputStream which we turn into a Reader by wrapping it with InputStreamReader; but it could come the disk or a url. The use of the Reader interface means that Drools does not have to care. In this case we only add a single drl source file, but multiple drl files can be added and all are merged into a single Package. All drl files added to the PackageBuilder must declare themselves in the same package namespace, if you wish to build a Package in a different namespace a new instance of PackageBuilder must be created; multiple packages of differerent namespaces can be added to the same RuleBase. When all the drl files have been added we should check the builder for errors; while the RuleBase will validate the packge it will only have access to the error information as a String, so if you wish to debug the error information you should do it on the builder instance. Once we know the builder is error free get the Package, instantiate a RuleBase from the RuleBaseFactory and add the package.
Example 10.1. HelloWorld example: Creating the RuleBase and Session
//read in the source
Reader source = new InputStreamReader( HelloWorldExample.class.getResourceAsStream( "HelloWorld.drl" ) );

PackageBuilder builder = new PackageBuilder();

//this wil parse and compile in one step
builder.addPackageFromDrl( source );

// Check the builder for errors
if ( builder.hasErrors() ) {
    System.out.println( builder.getErrors().toString() );
    throw new RuntimeException( "Unable to compile \"HelloWorld.drl\".");
}

//get the compiled package (which is serializable)
Package pkg = builder.getPackage();

//add the package to a rulebase (deploy the rule package).
RuleBase ruleBase = RuleBaseFactory.newRuleBase();
ruleBase.addPackage( pkg );

StatefulSession session = ruleBase.newStatefulSession();
Drools has an event model that exposes much of whats happening internally, two default debug listeners are supplied DebugAgendaEventListener and DebugWorkingMemoryEventListener which print out debug event information to the err console, adding listeners to a session is trivial and shown below. The WorkingMemoryFileLogger provides execution auditing which can be viewed in a graphical viewer; it's actually a specialised implementation built on the agenda and working memory listeners, when the engine has finished executing logger.writeToDisk() must be called.
Most of the examples use the Audit logging features of Drools to record execution flow for later inspection.
Example 10.2. HelloWorld example: Event logging and Auditing
// setup the debug listeners
session.addEventListener( new DebugAgendaEventListener() );
session.addEventListener( new DebugWorkingMemoryEventListener() );

// setup the audit logging
WorkingMemoryFileLogger logger = new WorkingMemoryFileLogger( session );
logger.setFileName( "log/helloworld" );
The single class used in this example is very simple, it has two fields: the message, which is a String and the status which can be either the int HELLO or the int GOODBYE.
Example 10.3. HelloWorld example: Message Class
public static class Message {
    public static final int HELLO   = 0;
    public static final int GOODBYE = 1;

    private String          message;
    private int             status;
    ...
}
A single Message object is created with the message "Hello World" and status HELLO and then inserted into the engine, at which point fireAllRules() is executed. Remember all the network evaluation is done during the insert time, by the time the program execution reaches the fireAllRules() method it already knows which rules are fully matches and able to fire.
Example 10.4. HelloWorld example: Execution
Message message = new Message();
message.setMessage( "Hello World" );
message.setStatus( Message.HELLO );
session.insert( message );

session.fireAllRules();

logger.writeToDisk();

session.dispose();
To execute the example from Java.
Open the class org.drools.examples.FibonacciExample in your Eclipse IDE
Right-click the class an select "Run as..." -> "Java application"
If we put a breakpoint on the fireAllRules() method and select the session variable we can see that the "Hello World" view is already activated and on the Agenda, showing that all the pattern matching work was already done during the insert.
The may application print outs go to to System.out while the debug listener print outs go to System.err.
Example 10.6. HelloWorld example: Console.err
==>[ActivationCreated(0): rule=Hello World;
                          tuple=[fid:1:1:org.drools.examples.HelloWorldExample$Message@17cec96]]
[ObjectInserted: handle=[fid:1:1:org.drools.examples.HelloWorldExample$Message@17cec96];
                 object=org.drools.examples.HelloWorldExample$Message@17cec96]
[BeforeActivationFired: rule=Hello World;
                        tuple=[fid:1:1:org.drools.examples.HelloWorldExample$Message@17cec96]]
==>[ActivationCreated(4): rule=Good Bye;
                          tuple=[fid:1:2:org.drools.examples.HelloWorldExample$Message@17cec96]]
[ObjectUpdated: handle=[fid:1:2:org.drools.examples.HelloWorldExample$Message@17cec96];
                old_object=org.drools.examples.HelloWorldExample$Message@17cec96;
                new_object=org.drools.examples.HelloWorldExample$Message@17cec96]
[AfterActivationFired(0): rule=Hello World]
[BeforeActivationFired: rule=Good Bye;
                        tuple=[fid:1:2:org.drools.examples.HelloWorldExample$Message@17cec96]]
[AfterActivationFired(4): rule=Good Bye]
The LHS (when) section of the rule states that it will be activated for each Message object inserted into the working memory whose status is Message.HELLO. Besides that, two variable binds are created: "message" variable is bound to the message attribute and "m" variable is bound to the object matched pattern itself.
The RHS (consequence, then) section of the rule is written using the MVEL expression language, as declared by the rule's attribute dialect. After printing the content of the message bound variable to the default console, the rule changes the values of the message and status attributes of the m bound variable; using MVEL's 'modify' keyword which allows you to apply a block of setters in one statement, with the engine being automatically notified of the changes at the end of the block.
Example 10.7. HelloWorld example: rule "Hello World"
rule "Hello World"
      dialect "mvel"
  when
      m : Message( status == Message.HELLO, message : message )
  then
      System.out.println( message );
      modify ( m ) { message = "Goodbyte cruel world",
                     status = Message.GOODBYE };
end
We can add a break point into the DRL for when modify is called during the execution of the "Hello World" consequence and inspect the Agenda view again. Notice this time we "Debug As" a "Drools application" and not a "Java application".
Open the class org.drools.examples.FibonacciExample in your Eclipse IDE
Right-click the class an select "Debug as..." -> "Drools application"
Now we can see that the other rule "Good Bye" which uses the java dialect is activated and placed on the agenda.
The "Good Bye" rule is similar to the "Hello World" rule but matches Message objects whose status is Message.GOODBYE instead, printing its message to the default console, it specifies the "java" dialect.
Example 10.8. HelloWorld example: rule "Good Bye"
rule "Good Bye"
      dialect "java"
  when
      Message( status == Message.GOODBYE, message : message )
  then
      System.out.println( message );
end
If you remember at the start of this example in the java code we created a WorkingMemoryFileLogger and called logger.writeToDisk() at the end, this created an audit log file that can be shown in the Audit view. We use the audit view in many of the examples to try and understand the example execution flow. In the view below we can see the object is inserted which creates an activation for the "Hello World" rule, the activation is then executed which updated the Message object causing the "Good Bye" rule to activate, the "Good Bye" rule then also executes. When an event in the Audit view is select it highlights the origin event in green, so below the Activation created event is highlighted in greed as the origin of the Activation executed event.
This example is actually implemented in three different versions to demonstrate different ways of implementing the same basic behavior: rules forward chaining, i.e., the ability the engine has to evaluate, activate and fire rules in sequence, based on changes on the facts in the working memory.
Name: State Example
Main class: org.drools.examples.StateExampleUsingSalience
Type: java application
Rules file: StateExampleUsingSalience.drl
Objective: Demonstrates basic rule use and Conflict Resolution for rule firing priority.
Each State class has fields for its name and its current state (see org.drools.examples.State class). The two possible states for each objects are:
NOTRUN
FINISHED
Example 10.9. State Classs
public class State {
    public static final int       NOTRUN   = 0;
    public static final int       FINISHED = 1;

    private final PropertyChangeSupport changes  = new PropertyChangeSupport( this );

    private String                name;
    private int                   state;

    ... setters and getters go here...
}
Ignore the PropertyChangeSupport for now, that will be explained later. In the example we create four State objects with names: A, B, C and D. Initially all are set to state NOTRUN, which is default for the used constructor. Each instance is asserted in turn into the session and then fireAllRules() is called.
Example 10.10. Salience State Example Execution
State a = new State( "A" );
State b = new State( "B" );
State c = new State( "C" );
final State d = new State( "D" );

// By setting dynamic to TRUE, Drools will use JavaBean
// PropertyChangeListeners so you don't have to call update().
boolean dynamic = true;

session.insert( a,
                dynamic );
session.insert( b,
                dynamic );
session.insert( c,
                dynamic );
session.insert( d,
                dynamic );

session.fireAllRules();
session.dispose(); // Stateful rule session must always be disposed when finished
To execute the application:
Open the class org.drools.examples.StateExampleUsingSalience in your Eclipse IDE
Right-click the class an select "Run as..." -> "Java application"
And you will see the following output in the Eclipse console output:
There are four rules in total, first a Bootstrap rule fires setting A to state FINISHED which then causes B to change to state FINISHED. C and D are both dependent on B - causing a conflict which is resolved by setting salience values. First lets look at how this was executed
The best way to understand what is happening is to use the "Audit Log" feature to graphically see the results of each operation. The Audit log was generated when the example was previously run. To view the Audit log in Eclipse:
If the "Audit View" is not visible, click on: "Window"->"Show View"->"Other..."->"Drools"->"Audit View"
In the "Audit View" click in the "Open Log" button and select the file "<drools-examples-drl-dir>/log/state.log"
After that, the "Audit view" will look like the following screenshot.

Reading the log in the "Audit View", top to down, we see every action and the corresponding changes in the working memory. This way we see that the assertion of the State "A" object with the "NOTRUN" state activates the "Bootstrap" rule, while the assertions of the other state objects have no immediate effect.
Example 10.12. Salience State Example: Rule "Bootstrap"
rule Bootstrap
    when
        a : State(name == "A", state == State.NOTRUN )
    then
        System.out.println(a.getName() + " finished" );
        a.setState( State.FINISHED );
end
The execution of "Bootstrap" rule changes the state of "A" to "FINISHED", that in turn activates the "A to B" rule.
Example 10.13. Salience State Example: Rule "A to B"
rule "A to B"
    when
        State(name == "A", state == State.FINISHED )
        b : State(name == "B", state == State.NOTRUN )
    then
        System.out.println(b.getName() + " finished" );
        b.setState( State.FINISHED );
end
The execution of "A to B" rule changes the state of "B" to "FINISHED", which activates both rules "B to C" and "B to D", placing both Activations onto the Agenda. In this moment the two rules may fire and are said to be in conflict. The conflict resolution strategy allows the engine's Agenda to decide which rule to fire. As the "B to C" rule has a higher salience value (10 versus the default salience value of 0), it fires first, modifying the "C" object to state "FINISHED". The Audit view above shows the modification of the State object in the rule "A to B" which results in two highlighted activations being in conflict. The Agenda view can also be used to investigate the state of the Agenda, debug points can be placed in the rules themselves and the Agenda view opened; the screen shot below shows the break point in the rule "A to B" and the state of the Agenda with the two conflicting rules.

Example 10.14. Salience State Example: Rule "B to C"
rule "B to C"
        salience 10
    when
        State(name == "B", state == State.FINISHED )
        c : State(name == "C", state == State.NOTRUN )
    then
        System.out.println(c.getName() + " finished" );
        c.setState( State.FINISHED );
end
The "B to D" rule fires last, modifying the "D" object to state "FINISHED".
Example 10.15. Salience State Example: Rule "B to D"
rule "B to D"
    when
        State(name == "B", state == State.FINISHED )
        d : State(name == "D", state == State.NOTRUN )
    then
        System.out.println(d.getName() + " finished" );
        d.setState( State.FINISHED );
end
There are no more rules to execute and so the engine stops.
Another notable concept in this example is the use of dynamic facts, which is the PropertyChangeListener part. As mentioned previously in the documentation, in order for the engine to see and react to fact's properties change, the application must tell the engine that changes occurred. This can be done explicitly in the rules, by calling the update() memory action, or implicitly by letting the engine know that the facts implement PropertyChangeSupport as defined by the Javabeans specification. This example demonstrates how to use PropertyChangeSupport to avoid the need for explicit update() calls in the rules. To make use of this feature, make sure your facts implement the PropertyChangeSupport as the org.drools.example.State class does and use the following code to insert the facts into the working memory:
Example 10.16. Inserting a Dynamic Fact
// By setting dynamic to TRUE, Drools will use JavaBean
// PropertyChangeListeners so you don't have to call update().
final boolean dynamic = true;

session.insert( fact,
                dynamic );
When using PropertyChangeListeners each setter must implement a little extra code to do the notification, here is the state setter for thte org.drools.examples.State class:
Example 10.17. Setter Example with PropertyChangeSupport
public void setState(final int newState) {
    int oldState = this.state;
    this.state = newState;
    this.changes.firePropertyChange( "state",
                                     oldState,
                                     newState );
}
There are two other State examples: StateExampleUsingAgendGroup and StateExampleWithDynamicRules. Both execute from A to B to C to D, as just shown, the StateExampleUsingAgendGroup uses agenda-groups to control the rule conflict and which one fires first and StateExampleWithDynamicRules shows how an additional rule can be added to an already running WorkingMemory with all the existing data applying to it at runtime.
Agenda groups are a way to partition the agenda into groups and controlling which groups can execute. All rules by default are in the "MAIN" agenda group, by simply using the "agenda-group" attribute you specify a different agenda group for the rule. A working memory initially only has focus on the "MAIN" agenda group, only when other groups are given the focus can their rules fire; this can be achieved by either using the method setFocus() or the rule attribute "auto-focus". "auto-focus" means that the rule automatically sets the focus to it's agenda group when the rule is matched and activated. It is this "auto-focus" that enables "B to C" to fire before "B to D".
Example 10.18. Agenda Group State Example: Rule "B to C"
rule "B to C"
      agenda-group "B to C"
      auto-focus true
  when
      State(name == "B", state == State.FINISHED )
      c : State(name == "C", state == State.NOTRUN )
  then
      System.out.println(c.getName() + " finished" );
      c.setState( State.FINISHED );
      drools.setFocus( "B to D" );
end
The rule "B to C" calls "drools.setFocus( "B to D" );" which gives the agenda group "B to D" focus allowing its active rules to fire; which allows the rule "B to D" to fire.
Example 10.19. Agenda Group State Example: Rule "B to D"
rule "B to D"
      agenda-group "B to D"
  when
      State(name == "B", state == State.FINISHED )
      d : State(name == "D", state == State.NOTRUN )
  then
      System.out.println(d.getName() + " finished" );
      d.setState( State.FINISHED );
end
The example StateExampleWithDynamicRules adds another rule to the RuleBase after fireAllRules(), the rule it adds is just another State transition.
Example 10.20. Dynamic State Example: Rule "D to E"
rule "D to E"
  when
      State(name == "D", state == State.FINISHED )
      e : State(name == "E", state == State.NOTRUN )
  then
      System.out.println(e.getName() + " finished" );
      e.setState( State.FINISHED );
end
It gives the following expected output:
Name: BankingTutorial
Main class: org.drools.tutorials.banking.*
Type: java application
Rules file: org.drools.tutorials.banking.*
Objective: tutorial that builds up knowledge of pattern matching, basic sorting and calculation rules.
This tutorial will demonstrate the process of developing a complete personal banking application that will handle credits, debits, currencies and that will use a set of design patterns that have been created for the process. In order to make the examples documented here clear and modular, I will try and steer away from re-visiting existing code to add new functionality, and will instead extend and inject where appropriate.
The RuleRunner class is a simple harness to execute one or more drls against a set of data. It compiles the Packages and creates the RuleBase for each execution, this allows us to easy execute each scenario and see the outputs. In reality this is not a good solution for a production system where the RuleBase should be built just once and cached, but for the purposes of this tutorial it shall suffice.
Example 10.22. Banking Tutorial : RuleRunner
public class RuleRunner {

    public RuleRunner() {
    }

    public void runRules(String[] rules,
                         Object[] facts) throws Exception {

        RuleBase ruleBase = RuleBaseFactory.newRuleBase();
        PackageBuilder builder = new PackageBuilder();

        for ( int i = 0; i < rules.length; i++ ) {
            String ruleFile = rules[i];
            System.out.println( "Loading file: " + ruleFile );
            builder.addPackageFromDrl(new InputStreamReader( RuleRunner.class.getResourceAsStream( ruleFile ) ) );
        }

        Package pkg = builder.getPackage();
        ruleBase.addPackage( pkg );
        WorkingMemory workingMemory = ruleBase.newStatefulSession();

        for ( int i = 0; i < facts.length; i++ ) {
            Object fact = facts[i];
            System.out.println( "Inserting fact: " + fact );
            workingMemory.insert( fact );
        }

        workingMemory.fireAllRules();
    }
}
This is our first Example1.java class it loads and executes a single drl file "Example.drl" but inserts no data.
Example 10.23. Banking Tutorial : Java Example1
public class Example1 {
    public static void main(String[] args) throws Exception {
        new RuleRunner().runRules( new String[] { "Example1.drl" },
                                   new Object[0] );
    }
}
And this is the first simple rule to execute. It has a single "eval" condition that will alway be true, thus this rul will always match and fire.
Example 10.24. Banking Tutorial : Rule Example1
rule "Rule 01"
    when
        eval (1==1)
    then
        System.out.println("Rule 01 Works");
endh
The output for the rule is below, the rule matches and executes the single print statement.
The next step is to assert some simple facts and print them out.
Example 10.26. Banking Tutorial : Java Example2
public class Example2 {
    public static void main(String[] args) throws Exception {
        Number[] numbers = new Number[] {wrap(3), wrap(1), wrap(4), wrap(1), wrap(5)};
        new RuleRunner().runRules( new String[] { "Example2.drl" },
                                   numbers );
    }

    private static Integer wrap(int i) {
        return new Integer(i);
    }
}
This doesn’t use any specific facts but instead asserts a set of java.lang.Integer’s. This is not considered "best practice" as a number of a collection is not a fact, it is not a thing. A Bank acount has a number, its balance, thus the Account is the fact; but to get started asserting Integers shall suffice for demonstration purposes as the complexity is built up.
Now we will create a simple rule to print out these numbers.
Example 10.27. Banking Tutorial : Rule Example2
rule "Rule 02"
    when
        Number( $intValue : intValue )
    then
        System.out.println("Number found with value: " + $intValue);
end
Once again, this rule does nothing special. It identifies any facts that are Numbers and prints out the values. Notice the user of interfaces here, we inserted Integers but the pattern matching engine is able to match the interfaces and super classes of the asserted objects.
The output shows the drl being loaded, the facts inserted and then the matched and fired rules. We can see that each inserted number is matched and fired and thus printed.
Example 10.28. Banking Tutorial : Output Example2
Loading file: Example2.drl
Inserting fact: 3
Inserting fact: 1
Inserting fact: 4
Inserting fact: 1
Inserting fact: 5
Number found with value: 5
Number found with value: 1
Number found with value: 4
Number found with value: 1
Number found with value: 3
here are probably a hundred and one better ways to sort numbers; but we will need to apply some cashflows in date order when we start looking at banking rules so let’s look at a simple rule based example.
Example 10.29. Banking Tutorial : Java Example3
public class Example3 {
    public static void main(String[] args) throws Exception {
        Number[] numbers = new Number[] {wrap(3), wrap(1), wrap(4), wrap(1), wrap(5)};
        new RuleRunner().runRules( new String[] { "Example3.drl" },
                                   numbers );
    }

    private static Integer wrap(int i) {
        return new Integer(i);
    }
}
Again we insert our Integers as before, this time the rule is slightly different:
Example 10.30. Banking Tutorial : Rule Example3
rule "Rule 03"
    when
        $number : Number( )
        not Number( intValue < $number.intValue )
    then
        System.out.println("Number found with value: " + $number.intValue() );
        retract( $number );
end
The first line of the rules identifies a Number and extracts the value. The second line ensures that there does not exist a smaller number than the one found. By executing this rule, we might expect to find only one number - the smallest in the set. However, the retraction of the number after it has been printed, means that the smallest number has been removed, revealing the next smallest number, and so on.
So, the output we generate is, notice the numbers are now sorted numerically.
Example 10.31. Banking Tutorial : Output Example3
Loading file: Example3.drl
Inserting fact: 3
Inserting fact: 1
Inserting fact: 4
Inserting fact: 1
Inserting fact: 5
Number found with value: 1
Number found with value: 1
Number found with value: 3
Number found with value: 4
Number found with value: 5
Now we want to start moving towards our personal accounting rules. The first step is to create a Cashflow POJO.
Example 10.32. Banking Tutoria : Class Cashflow
public class Cashflow {
    private Date   date;
    private double amount;

    public Cashflow() {
    }

    public Cashflow(Date date,
                    double amount) {
        this.date = date;
        this.amount = amount;
    }

    public Date getDate() {
        return date;
    }

    public void setDate(Date date) {
        this.date = date;
    }

    public double getAmount() {
        return amount;
    }

    public void setAmount(double amount) {
        this.amount = amount;
    }

    public String toString() {
        return "Cashflow[date=" + date + ",amount=" + amount + "]";
    }
}
The Cashflow has two simple attributes, a date and an amount. I have added a toString method to print it and overloaded the constructor to set the values. The Example4 java code inserts 5 Cashflow objecst with varying dates and amounts.
Example 10.33. Banking Tutorial : Java Example4
public class Example4 {
    public static void main(String[] args) throws Exception {
        Object[] cashflows = {
            new Cashflow(new SimpleDate("01/01/2007"), 300.00),
            new Cashflow(new SimpleDate("05/01/2007"), 100.00),
            new Cashflow(new SimpleDate("11/01/2007"), 500.00),
            new Cashflow(new SimpleDate("07/01/2007"), 800.00),
            new Cashflow(new SimpleDate("02/01/2007"), 400.00),
        };

        new RuleRunner().runRules( new String[] { "Example4.drl" },
                                   cashflows );
    }
}
SimpleDate is a simple class that extends Date and takes a String as input. It allows for pre-formatted Data classes, for convienience. The code is listed below
Example 10.34. Banking Tutorial : Java SimpleDate
public class SimpleDate extends Date {
    private static final SimpleDateFormat format = new SimpleDateFormat("dd/MM/yyyy");

    public SimpleDate(String datestr) throws Exception {
        setTime(format.parse(datestr).getTime());
    }
}
Now, let’s look at rule04.drl to see how we print the sorted Cashflows:
Example 10.35. Banking Tutorial : Rule Example4
rule "Rule 04"
    when
        $cashflow : Cashflow( $date : date, $amount : amount )
        not Cashflow( date < $date)
    then
        System.out.println("Cashflow: "+$date+" :: "+$amount);
        retract($cashflow);
end
Here, we identify a Cashflow and extract the date and the amount. In the second line of the rules we ensure that there is not a Cashflow with an earlier date than the one found. In the consequences, we print the Cashflow that satisfies the rules and then retract it, making way for the next earliest Cashflow. So, the output we generate is:
Example 10.36. Banking Tutorial : Output Example4
Loading file: Example4.drl
Inserting fact: Cashflow[date=Mon Jan 01 00:00:00 GMT 2007,amount=300.0]
Inserting fact: Cashflow[date=Fri Jan 05 00:00:00 GMT 2007,amount=100.0]
Inserting fact: Cashflow[date=Thu Jan 11 00:00:00 GMT 2007,amount=500.0]
Inserting fact: Cashflow[date=Sun Jan 07 00:00:00 GMT 2007,amount=800.0]
Inserting fact: Cashflow[date=Tue Jan 02 00:00:00 GMT 2007,amount=400.0]
Cashflow: Mon Jan 01 00:00:00 GMT 2007 :: 300.0
Cashflow: Tue Jan 02 00:00:00 GMT 2007 :: 400.0
Cashflow: Fri Jan 05 00:00:00 GMT 2007 :: 100.0
Cashflow: Sun Jan 07 00:00:00 GMT 2007 :: 800.0
Cashflow: Thu Jan 11 00:00:00 GMT 2007 :: 500.0
Here we extend our Cashflow to give a TypedCashflow which can be CREDIT or DEBIT. Ideally, we would just add this to the Cashflow type, but so that we can keep all the examples simple, we will go with the extensions.
Example 10.37. Banking Tutoria : Class TypedCashflow
public class TypedCashflow extends Cashflow {
    public static final int CREDIT = 0;
    public static final int DEBIT  = 1;

    private int             type;

    public TypedCashflow() {
    }

    public TypedCashflow(Date date,
                         int type,
                         double amount) {
        super( date,
               amount );
        this.type = type;
    }

    public int getType() {
        return type;
    }

    public void setType(int type) {
        this.type = type;
    }

    public String toString() {
        return "TypedCashflow[date=" + getDate() + ",type=" + (type == CREDIT ? "Credit" : "Debit") + ",amount=" + getAmount() + "]";
    }
}
There are lots of ways to improve this code, but for the sake of the example this will do.
Nows lets create the Example5 runner.
Example 10.38. Banking Tutorial : Java Example5
public class Example5 {
    public static void main(String[] args) throws Exception {
        Object[] cashflows = {
            new TypedCashflow(new SimpleDate("01/01/2007"),
                              TypedCashflow.CREDIT, 300.00),
            new TypedCashflow(new SimpleDate("05/01/2007"),
                              TypedCashflow.CREDIT, 100.00),
            new TypedCashflow(new SimpleDate("11/01/2007"),
                              TypedCashflow.CREDIT, 500.00),
            new TypedCashflow(new SimpleDate("07/01/2007"),
                              TypedCashflow.DEBIT, 800.00),
            new TypedCashflow(new SimpleDate("02/01/2007"),
                              TypedCashflow.DEBIT, 400.00),
        };

        new RuleRunner().runRules( new String[] { "Example5.drl" },
                                   cashflows );
    }
}
Here, we simply create a set of Cashflows which are either CREDIT or DEBIT Cashflows and supply them and rule05.drl to the RuleEngine.
Now, let’s look at rule0 Example5.drl to see how we print the sorted Cashflows:
Example 10.39. Banking Tutorial : Rule Example5
rule "Rule 05"
    when
        $cashflow : TypedCashflow( $date : date,
                                   $amount : amount,
                                   type == TypedCashflow.CREDIT )
        not TypedCashflow( date < $date,
                           type == TypedCashflow.CREDIT )
    then
        System.out.println("Credit: "+$date+" :: "+$amount);
        retract($cashflow);
end
Here, we identify a Cashflow with a type of CREDIT and extract the date and the amount. In the second line of the rules we ensure that there is not a Cashflow of type CREDIT with an earlier date than the one found. In the consequences, we print the Cashflow that satisfies the rules and then retract it, making way for the next earliest Cashflow of type CREDIT.
So, the output we generate is
Example 10.40. Banking Tutorial : Output Example5
Loading file: Example5.drl
Inserting fact: TypedCashflow[date=Mon Jan 01 00:00:00 GMT 2007,type=Credit,amount=300.0]
Inserting fact: TypedCashflow[date=Fri Jan 05 00:00:00 GMT 2007,type=Credit,amount=100.0]
Inserting fact: TypedCashflow[date=Thu Jan 11 00:00:00 GMT 2007,type=Credit,amount=500.0]
Inserting fact: TypedCashflow[date=Sun Jan 07 00:00:00 GMT 2007,type=Debit,amount=800.0]
Inserting fact: TypedCashflow[date=Tue Jan 02 00:00:00 GMT 2007,type=Debit,amount=400.0]
Credit: Mon Jan 01 00:00:00 GMT 2007 :: 300.0
Credit: Fri Jan 05 00:00:00 GMT 2007 :: 100.0
Credit: Thu Jan 11 00:00:00 GMT 2007 :: 500.0
Here we are going to process both CREDITs and DEBITs on 2 bank accounts to calculate the account balance. In order to do this, I am going to create two separate Account Objects and inject them into the Cashflows before passing them to the Rule Engine. The reason for this is to provide easy access to the correct Bank Accounts without having to resort to Helper classes. Let’s take a look at the Account class first. This is a simple POJO with an account number and balance:
Example 10.41. Banking Tutoria : Class Account
public class Account {
    private long   accountNo;
    private double balance = 0;

    public Account() {
    }

    public Account(long accountNo) {
        this.accountNo = accountNo;
    }

    public long getAccountNo() {
        return accountNo;
    }

    public void setAccountNo(long accountNo) {
        this.accountNo = accountNo;
    }

    public double getBalance() {
        return balance;
    }

    public void setBalance(double balance) {
        this.balance = balance;
    }

    public String toString() {
        return "Account[" + "accountNo=" + accountNo + ",balance=" + balance + "]";
    }
}
Now let’s extend our TypedCashflow to give AllocatedCashflow (allocated to an account).
Example 10.42. Banking Tutoria : Class AllocatedCashflow
public class AllocatedCashflow extends TypedCashflow {
    private Account account;

    public AllocatedCashflow() {
    }

    public AllocatedCashflow(Account account,
                             Date date,
                             int type,
                             double amount) {
        super( date,
               type,
               amount );
        this.account = account;
    }

    public Account getAccount() {
        return account;
    }

    public void setAccount(Account account) {
        this.account = account;
    }

    public String toString() {
        return "AllocatedCashflow[" + "account=" + account + ",date=" + getDate() +
                                  ",type=" + (getType() == CREDIT ? "Credit" : "Debit") +
                                  ",amount=" + getAmount() + "]";
    }
}
Now, let’s java code for Example5 execution. Here we create two Account objects and inject one into each cashflow as appropriate. For simplicity I have simply included them in the constructor.
Example 10.43. Banking Tutorial : Java Example5
public class Example6 {
    public static void main(String[] args) throws Exception {
        Account acc1 = new Account(1);
        Account acc2 = new Account(2);

        Object[] cashflows = {
            new AllocatedCashflow(acc1,new SimpleDate("01/01/2007"),
                                  TypedCashflow.CREDIT, 300.00),
            new AllocatedCashflow(acc1,new SimpleDate("05/02/2007"),
                                  TypedCashflow.CREDIT, 100.00),
            new AllocatedCashflow(acc2,new SimpleDate("11/03/2007"),
                                  TypedCashflow.CREDIT, 500.00),
            new AllocatedCashflow(acc1,new SimpleDate("07/02/2007"),
                                  TypedCashflow.DEBIT,  800.00),
            new AllocatedCashflow(acc2,new SimpleDate("02/03/2007"),
                                  TypedCashflow.DEBIT,  400.00),
            new AllocatedCashflow(acc1,new SimpleDate("01/04/2007"),
                                  TypedCashflow.CREDIT, 200.00),
            new AllocatedCashflow(acc1,new SimpleDate("05/04/2007"),
                                  TypedCashflow.CREDIT, 300.00),
            new AllocatedCashflow(acc2,new SimpleDate("11/05/2007"),
                                  TypedCashflow.CREDIT, 700.00),
            new AllocatedCashflow(acc1,new SimpleDate("07/05/2007"),
                                  TypedCashflow.DEBIT,  900.00),
            new AllocatedCashflow(acc2,new SimpleDate("02/05/2007"),
                                  TypedCashflow.DEBIT,  100.00)
        };

        new RuleRunner().runRules( new String[] { "Example6.drl" },
                                   cashflows );
    }
}
Now, let’s look at rule Example06.drl to see how we apply each cashflow in date order and calculate and print the balance.
Example 10.44. Banking Tutorial : Rule Example6
rule "Rule 06 - Credit"
    when
        $cashflow : AllocatedCashflow( $account : account,
                                       $date : date, $amount : amount,
                                        type==TypedCashflow.CREDIT )
        not AllocatedCashflow( account == $account, date < $date)
    then
        System.out.println("Credit: " + $date + " :: " + $amount);
        $account.setBalance($account.getBalance()+$amount);
        System.out.println("Account: " + $account.getAccountNo() +
                           " - new balance: " + $account.getBalance());
        retract($cashflow);
end

rule "Rule 06 - Debit"
    when
        $cashflow : AllocatedCashflow( $account : account,
                            $date : date, $amount : amount,
                            type==TypedCashflow.DEBIT )
        not AllocatedCashflow( account == $account, date < $date)
    then
        System.out.println("Debit: " + $date + " :: " + $amount);
        $account.setBalance($account.getBalance() - $amount);
        System.out.println("Account: " + $account.getAccountNo() +
                           " - new balance: " + $account.getBalance());
        retract($cashflow);
end
Here, we have separate rules for CREDITs and DEBITs, however we do not specify a type when checking for earlier cashflows. This is so that all cashflows are applied in date order regardless of which type of cashflow type they are. In the rule section we identify the correct account to work with and in the consequences we update it with the cashflow amount.
Example 10.45. Banking Tutorial : Output Example6
Loading file: Example6.drl
Inserting fact: AllocatedCashflow[account=Account[accountNo=1,balance=0.0],date=Mon Jan 01 00:00:00 GMT 2007,type=Credit,amount=300.0]
Inserting fact: AllocatedCashflow[account=Account[accountNo=1,balance=0.0],date=Mon Feb 05 00:00:00 GMT 2007,type=Credit,amount=100.0]
Inserting fact: AllocatedCashflow[account=Account[accountNo=2,balance=0.0],date=Sun Mar 11 00:00:00 GMT 2007,type=Credit,amount=500.0]
Inserting fact: AllocatedCashflow[account=Account[accountNo=1,balance=0.0],date=Wed Feb 07 00:00:00 GMT 2007,type=Debit,amount=800.0]
Inserting fact: AllocatedCashflow[account=Account[accountNo=2,balance=0.0],date=Fri Mar 02 00:00:00 GMT 2007,type=Debit,amount=400.0]
Inserting fact: AllocatedCashflow[account=Account[accountNo=1,balance=0.0],date=Sun Apr 01 00:00:00 BST 2007,type=Credit,amount=200.0]
Inserting fact: AllocatedCashflow[account=Account[accountNo=1,balance=0.0],date=Thu Apr 05 00:00:00 BST 2007,type=Credit,amount=300.0]
Inserting fact: AllocatedCashflow[account=Account[accountNo=2,balance=0.0],date=Fri May 11 00:00:00 BST 2007,type=Credit,amount=700.0]
Inserting fact: AllocatedCashflow[account=Account[accountNo=1,balance=0.0],date=Mon May 07 00:00:00 BST 2007,type=Debit,amount=900.0]
Inserting fact: AllocatedCashflow[account=Account[accountNo=2,balance=0.0],date=Wed May 02 00:00:00 BST 2007,type=Debit,amount=100.0]
Debit: Fri Mar 02 00:00:00 GMT 2007 :: 400.0
Account: 2 - new balance: -400.0
Credit: Sun Mar 11 00:00:00 GMT 2007 :: 500.0
Account: 2 - new balance: 100.0
Debit: Wed May 02 00:00:00 BST 2007 :: 100.0
Account: 2 - new balance: 0.0
Credit: Fri May 11 00:00:00 BST 2007 :: 700.0
Account: 2 - new balance: 700.0
Credit: Mon Jan 01 00:00:00 GMT 2007 :: 300.0
Account: 1 - new balance: 300.0
Credit: Mon Feb 05 00:00:00 GMT 2007 :: 100.0
Account: 1 - new balance: 400.0
Debit: Wed Feb 07 00:00:00 GMT 2007 :: 800.0
Account: 1 - new balance: -400.0
Credit: Sun Apr 01 00:00:00 BST 2007 :: 200.0
Account: 1 - new balance: -200.0
Credit: Thu Apr 05 00:00:00 BST 2007 :: 300.0
Account: 1 - new balance: 100.0
Debit: Mon May 07 00:00:00 BST 2007 :: 900.0
Account: 1 - new balance: -800.0
Name: Fibonacci
Main class: org.drools.examples.FibonacciExample
Type: java application
Rules file: Fibonacci.drl
Objective: Demonsrates Recursion, 'not' CEs and Cross Product Matching
The Fibonacci Numbers, http://en.wikipedia.org/wiki/Fibonacci_number, invented by Leonardo of Pisa, http://en.wikipedia.org/wiki/Fibonacci, are obtained by starting with 0 and 1, and then produce the next Fibonacci number by adding the two previous Fibonacci numbers. The first Fibonacci numbers for n = 0, 1,... are: * 0, 1, 1, 2, 3, 5, 8, 13, 21, 34, 55, 89, 144, 233, 377, 610, 987, 1597, 2584, 4181, 6765, 10946... The Fibonacci Example demonstrates recursion and conflict resolution with Salience values.
A single fact Class is used in this example, Fibonacci. It has two fields, sequence and value. The sequence field is used to indicate the position of the object in the Fibonacci number sequence and the value field shows the value of that Fibonacci object for that sequence position.
Example 10.46. Fibonacci Class
public static class Fibonacci {
    private int  sequence;
    private long value;

    ... setters and getters go here...
}
Execute the example:
Open the class org.drools.examples.FibonacciExample in your Eclipse IDE
Right-click the class an select "Run as..." -> "Java application"
And the Eclipse show the following output in it's console, "...snip..." shows repeated bits removed to save space:
Example 10.47. Fibonacci Example Console Output
recurse for 50
recurse for 49
recurse for 48
recurse for 47
...snip...
recurse for 5
recurse for 4
recurse for 3
recurse for 2
1 == 1
2 == 1
3 == 2
4 == 3
5 == 5
6 == 8
...snip...
47 == 2971215073
48 == 4807526976
49 == 7778742049
50 == 12586269025
To kick this off from java we only insert a single Fibonacci object, with a sequence of 50, a recurse rule is then used to insert the other 49 Fibonacci objects. This example doesn't use PropertyChangeSupport and uses the MVEL dialect, this means we can use the modify keyword, which allows a block setter action which also notifies the engine of changes.
Example 10.48. Fibonacci Example Execution
session.insert( new Fibonacci( 50 ) );
session.fireAllRules();
The recurse rule is very simple, it matches each asserted Fibonacci object with a value of -1, it then creates and asserts a new Fibonacci object with a sequence of one less than the currently matched object. Each time a Fibonacci object is added, as long as one with a "sequence == 1" does not exist, the rule re-matches again and fires; causing the recursion. The 'not' conditional element is used to stop the rule matching once we have all 50 Fibonacci objects in memory. The rule also has a salience value, this is because we need to have all 50 Fibonacci objects asserted before we execute the Bootstrap rule.
Example 10.49. Fibonacci Example : Rule "Recurse"
rule Recurse
    salience 10
    when
        f : Fibonacci ( value == -1 )
        not ( Fibonacci ( sequence == 1 ) )
    then
        insert( new Fibonacci( f.sequence - 1 ) );
        System.out.println( "recurse for " + f.sequence );
end
The audit view shows the original assertion of the Fibonacci object with a sequence of 50, this was done from Java land. From there the audit view shows the continual recursion of the rule, each asserted Fibonacci causes the "Recurse" rule to become activate again, which then fires.
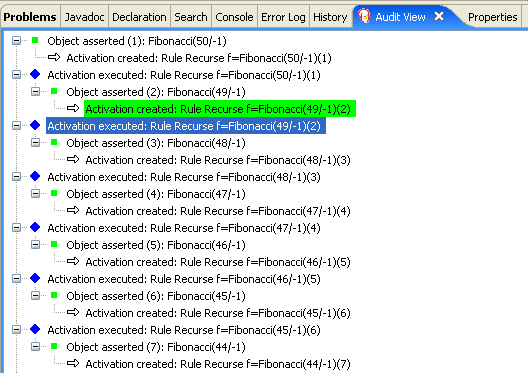
When a Fibonacci with a sequence of 2 is asserted the "Bootstrap" rule is matched and activated along with the "Recurse" rule.
Example 10.50. Fibonacci Example : Rule "Bootstrap"
rule Bootstrap
when
f : Fibonacci( sequence == 1 || == 2, value == -1 ) // this is a multi-restriction || on a single field
then
modify ( f ){ value = 1 };
System.out.println( f.sequence + " == " + f.value );
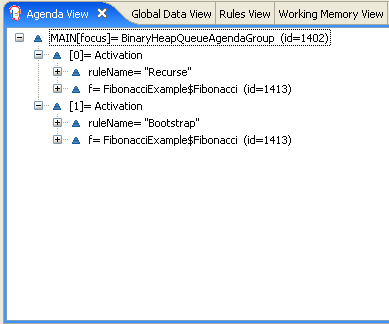
endAt this point the Agenda looks like the figure shown below. However the "Bootstrap" rule does not fire as the "Recurse" rule has a higher salience.
When a Fibonacci with a sequence of 1 is asserted the "Bootstrap" rule is matched again, causing two activations for this rule; note that the "Recurse" rule does not match and activate because the 'not conditional element stops the rule matching when a Fibonacci with a sequence of 1 exists.
Once we have two Fibonacci objects both with values not equal to -1 the "calculate" rule is able to match; remember it was the "Bootstrap" rule that set the Fibonacci's with sequences 1 and 2 to values of 1. At this point we have 50 Fibonacci objects in the Working Memory and we some how need to select the correct ones to calculate each of their values in turn. With three Fibonacci patterns in a rule with no field constriants to correctly constrain the available cross products we have 50x50x50 possible permutations, thats 125K possible rule firings. The "Calculate" rule uses the field constraints to correctly constraint the thee Fibonacci patterns and in the correct order; this technique is called "cross product matching". The first pattern finds any Fibonacci with a value != -1 and binds both the pattern and the field. The second Fibonacci does too but it adds an additional field constraint to make sure that its sequence is one greater than the Fibonacci bound to f1. When this rule first fires we know that only sequences 1 and 2 have values of 1 and the two constraints ensure that f1 references sequence 1 and f2 references sequence2. The final pattern finds the Fibonacci of a value == -1 with a sequence one greater than f2. At this point we have three Fibonacci objects correctly selected from the available cross products and we can do the maths calculating the value for Fibonacci sequence = 3.
Example 10.51. Fibonacci Example : Rule "Calculate"
rule Calculate
    when
        f1 : Fibonacci( s1 : sequence, value != -1 ) // here we bind sequence
        f2 : Fibonacci( sequence == (s1 + 1 ), value != -1 ) // here we don't, just to demonstrate the different way bindings can be used
        f3 : Fibonacci( s3 : sequence == (f2.sequence + 1 ), value == -1 )
    then
        modify ( f3 ) { value = f1.value + f2.value };
        System.out.println( s3 + " == " + f3.value ); // see how you can access pattern and field  bindings
end
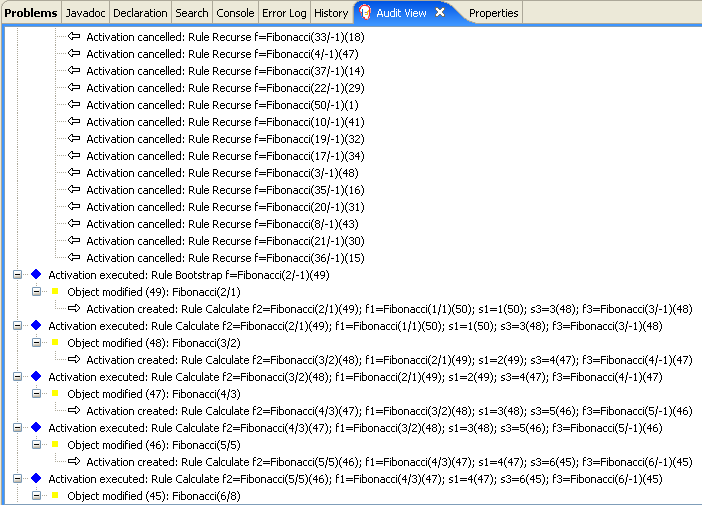
The MVEL modify keyword updated the value of the Fibonacci object bound to f3, this means we have a new Fibonacci object with a value != -1, this allows the "Calculate" rule to rematch and calculate the next Fibonacci number. The Audit view below shows the how the firing of the last "Bootstrap" modifies the Fibonacci object enabling the "Calculate" rule to match, which then modifies another Fibonacci object allowing the "Calculate" rule to rematch. This continues till the value is set for all Fibonacci objects.
Name: Golfing
Main class: org.drools.examples.GolfingExample
Type: java application
Rules file: golf.drl
Objective: Configuration example that finds the solution from a large number of available cross products
The golf example solves a "riddle" style problem that is simple enough to state in sentences, but for which a conventional algorithmic solition is not obvious. It does this by searching for a suitable combination from a "space" of possible solutions.
The problem is written as a riddle:
A foursome of golfers is standing at a tee, in a line from left to right.
Each golfer wears different colored pants; one is wearing red pants.
The golfer to Fred’s immediate right is wearing blue pants.
Joe is second in line.
Bob is wearing plaid pants.
Tom isn’t in position one or four, and he isn’t wearing the hideous orange pants.
The immediate thing about this riddle, is that a solution is not obvious (of course ! it wouldn't be a riddle otherwise !). It also isn't obvious how to write an algorithm to solve it (if it is for you - then you can take a break now, go have a coffee or someting to reward your uber intellect).
Instead of thinking about how to solve it, we can be lazy and use rules instead. So we don't attempt to solve it, we just state the problem in rules, and let the engine derive the solution.
The supporting code is in the GolfingExample.java class. There is an inner class "Golfer" which represents a golf player, it has their name, position (1 to 4 meaning left to right), and their pants color, as simple properties.
String[] names = new String[] { "Fred", "Joe", "Bob", "Tom" };
String[] colors = new String[] { "red", "blue", "plaid", "orange" };
int[] positions = new int[] { 1, 2, 3, 4 };

for ( int n = 0; n < names.length; n++ ) {
    for ( int c = 0; c < colors.length; c++ ) {
        for ( int p = 0; p < positions.length; p++ ) {
            session.insert( new Golfer( names[n], colors[c], positions[p]) );
        }
    }
}
The above listing shows the interesting part of the supporting code. Note that we have arrays representing each name, color, and position. We then go through a nested loop inserting instances of Golfer - so in the working memory we will have all combinations of name, color and position. It is then the job of the rules to find the appropriate one.
Launching the code as a java application should yield the following output:
Fred 1 orange
Joe 2 blue
Bob 4 plaid
Tom 3 red
This shows that the rule(s) have found a suitable solution.
The solution in rules is quite simple, it is a single rule which expresses the constraints as stated in the riddle. Effectively, we can interpret the riddle as a series of constraints on our object model. Given that we have enough "combinations" in the working memory, all we have to do is express the constraints in a rule and the engine will match it with a solution (we don't really care how it does it, as long as it works !).
There is one rule in the solution, in golf.drl, called "find solution". The rule is made up of 5 patterns, with constraints that map to items in the riddle.
$fred : Golfer( name == "Fred" )
In the above pattern, we are simply matching a Golfer who is called fred, and binding it to a variable called $fred. All that we know is that there is a golfer called fred.
$joe : Golfer( name == "Joe",
               position == 2,
               position != $fred.position,
               color != $fred.color )
The next pattern says that we have a golfer named Joe, in position 2 ("second in line"). Now, we also know that he must NOT be in the same position as fred (of course !) and have different color pants. So far, nothing that amazing.
$bob : Golfer( name == "Bob",
               position != $fred.position,
               position != $joe.position,
               color == "plaid",
               color != $fred.color,
               color != $joe.color )
Refering to the above, we also know there is a golfer called Bob, who wears plaid pants - once again that all we know about him. but of course, we add in the constraints that he must be in a different position to fred, joe, and also have different colored pants.
$tom : Golfer( name == "Tom",
               position != 1,
               position != 4,
               position != $fred.position,
               position != $joe.position,
               position != $bob.position,
               color != "orange,
               color != $fred.color,
               color != $joe.color,
               color != $bob.color )
(referring to the above) We also know that there is a guy called Tom, who doesn't wear the Orange pants, AND he is not in position 1, or 4. Of course we also add in the other constraints (he must be in a different position to the others so far, and have a different color).
Golfer( position == ( $fred.position + 1 ),
        color == "blue",
        this in ( $joe, $bob, $tom ) )
Finally, we know that the golfer on the right of Fred (position + 1), is in blue pants. We also add in the constraint that he must be either Joe, Bob or Tom (as Fred can't be beside himself, well he can I guess, but not in the sense we mean here !) - note the use of "this" to refer to the current pattern, we don't really care who "this" is, just who they are not. Maybe if Fred was really really happy they this wouldn't work, but lets assume otherwise for now.
Thats it ! We have expressed the rule as constraints that map to the ones expressed in the riddle, yet we haven't had to solve the riddle, the engine does that for us.
This simple example shows how you can express a problem declaratively, and let the engine solve the problem for you, by making use of combinations. This is an often useful technique, as it allows you to express rules as a statement of the problem you are trying to solve.
Of course, care must be taken. Using combinatorics like this can cause performance problems when there are large numbers of facts (eg in this case, if there were a larger number of golfers, or colors/positions etc - possibilities). When the fact count grows, the combinations the engine has to deal with can explode exponentially, making this not very efficient. However, in cases where the rules are perhaps complex, the problem is hard, but the fact numbers are relatively low, this approach can be very very useful and help you solve problems that would otherwise be very hard.
The trouble ticket example shows how to use the duration attribute for temporal rules, and also includes an alternative version using a dsl.
Name: TroubleTicket
Main class: org.drools.examples.TroubleTicketExample, org.drools.examples.TroubleTicketExampleWithDSL
Type: java application
Rules file: TroubleTicket.drl, TroubleTicketWithDSL.dslr
Objective: Show temporal rules in action
The trouble ticket example is based around the idea of raising a "ticket" (ie an issue) with a vendor (these are the vendors rules). Each customer has a subscription class assigned to it (eg Gold, Silver etc) and their class determines how the ticket is treated with respect to time, and escalating the issue. The normal drl version will be discussed here, but logically the DSL version is the same (it just uses a DSL defined language instead of the normal DRL).
We have 2 types of facts, Customer and Ticket. A Ticket belongs to one and only one customer. A Customer has a name and a "subscription" type (Gold, Silver or Platinum). A ticket also has a "status" - which determines (obviously) what state it is in. The state may be set externally, or by the rules engine (eg it starts out "New", and then the system user determines that it is "Done" at some later point). The rules exist to ensure that the tickets are escalated appropriately based on the customer subscription class.
Customers can choose Silver, Gold, or Platinum (in order of increasing responsiveness). Platinum subscriptions also come with a set of steak knives, and a personal butler to lodge the ticket for you (but obviously it costs more).
The example creates 4 customers, with their name and subscription class, it then creates 4 tickets for each of the customers, note that the ticket takes the customer in the constructor (that sets up the object relationship. The tickets and the customers are then inserted. Notice that we keep a fact handle - which we will use to notify the engine that that specific ticket changed later on. The last line has the all important fireAllRules(), which tells the engine to take action on the data it has.
Example 10.52. Trouble Ticket Example : Creating and Inserting Facts
Customer a = new Customer( "A",
                           "Gold" );
Customer b = new Customer( "B",
                           "Platinum" );
Customer c = new Customer( "C",
                           "Silver" );
Customer d = new Customer( "D",
                           "Silver" );

Ticket t1 = new Ticket( a );
Ticket t2 = new Ticket( b );
Ticket t3 = new Ticket( c );
Ticket t4 = new Ticket( d );

session.insert( a );
session.insert( b );
session.insert( c );
session.insert( d );

session.insert( t1 );
session.insert( t2 );
FactHandle ft3 = session.insert( t3 );
session.insert( t4 );

session.fireAllRules();
We have the "New Ticket" rule which has the highest priority (salience of 10 - the default is zero), The purpose of this is simply to log the fact that a new ticket has arrived in the system:
rule "New Ticket"
 salience 10
 when
  customer : Customer( )
  ticket : Ticket( customer == customer, status == "New" )
  then
 System.out.println( "New : " + ticket );
end
Note that we are "joining" the ticket fact with the customer fact. It's not really needed in this case, as we don't do anything (yet) with the customer fact. If you look in the TroubleTicketExample.java, you will also see that the facts are being inserted into the engine - note that we assert BOTH Customer and Ticket object (even though the ticket belongs to a customer - this allows the engine to join the objects together how it wants - this is what is meant by "relational" programming - we let the rule engine define what the relationships are. For instance, although the code is structured so that a ticket belongs to a customer, we may be interested in looking at tickets from different customers of the same type in the future).
If we run the rules, we should expect that the "New Ticket" rule will be activated for all tickets, so looking at the audit log view (by opening the file which was saved automatically when the rules were run):

Referring to the above audit log, we can see each customer asserted, but nothing happens. As soon as the first ticket gets asserted, it joins it with the customer, and creates some activations: one is the "new ticket" rule, the other is for the appropriate priority (which we will show below). Note that items in the above view do not mean the rule fired at that point.
Also, don't forget to use "fireAllRules()" - a common mistake ! (In this case we are using a statefull session, so this is necessary).
If we run the rules, we should expect that the "New Ticket" rule will be activated for all tickets, so looking at the audit log view (by opening the file which was saved automatically when the rules were run):
Referring to the above audit log, we can see each customer asserted, but nothing happens. As soon as the first ticket gets asserted, it joins it with the customer, and creates some activations: one is the "new ticket" rule, the other is for the appropriate priority (which we will show below). Note that items in the above view do not mean the rule fired at that point.
All the wonderful platinum customers have to get great service, so first thing to note is that as soon as a ticket arrives, we escalate if it is for a platinum customer:
rule "Platinum Priority"
 when
  customer : Customer( subscription == "Platinum" )
  ticket : Ticket( customer == customer, status == "New" )
 then;
  ticket.setStatus( "Escalate" );
  update( ticket );
end
Here we are joining Ticket to customer again (customer == customer), but we are also checking that the customer is "Platinum". When this is the case, we set the ticket status to "Escalate" and call update (which tells the engine that the ticket has changed).
For silver and gold class, its a similar story to platinum:
rule "Silver Priority"
 duration 3000
 when
  customer : Customer( subscription == "Silver" )
  ticket : Ticket( customer == customer, status == "New" )
 then
  ticket.setStatus( "Escalate" );
  update( ticket );
end

rule "Gold Priority"
 duration 1000
 when
  customer : Customer( subscription == "Gold" )
  ticket : Ticket( customer == customer, status == "New" )
 then
  ticket.setStatus( "Escalate" );
  update( ticket );
end
In this case, note the use of "duration XXX" - XXX is the number of milliseconds to wait to check that this rule holds true. Should it do so, after XXX milliseconds, then the action takes effect. So in the above case, after 3 seconds the "Silver" priority kicks in, but after 1 second "Gold" does. In both cases the tickets are escalated (just like with platinum. This is what we mean by temporal rules (rules that take effect over time).
The actual escalation of a ticket happens in a rule:
rule "Escalate"
 when
  customer : Customer( )
  ticket : Ticket( customer == customer, status == "Escalate" )
 then
  sendEscalationEmail( customer, ticket );
end
In this case, the action is to call a function which sends an email (the function is defined down the bottom of the drl file). This rule reacts to the rules which update the ticket and set its status to escalate.
In the code that launches the example, we have a "sleep" to make sure all this happens (and print out the results). Note also that after the rules are fired, we modify the status of the Customer "C" to "Done" - and then tell the engine. This causes it to evaluate and fire the rule that looks for "tickets" that are "Done" (in which is just logs a message).
Running the example (by launching the TroubleTicket.java class as an application) should yield the output:
New : [Ticket [Customer D : Silver] : New]
New : [Ticket [Customer C : Silver] : New]
New : [Ticket [Customer B : Platinum] : New]
New : [Ticket [Customer A : Gold] : New]
Email : [Ticket [Customer B : Platinum] : Escalate]
[[ Sleeping 5 seconds ]]
Email : [Ticket [Customer A : Gold] : Escalate]
Done : [Ticket [Customer C : Silver] : Done]
Email : [Ticket [Customer D : Silver] : Escalate]
[[ awake ]]
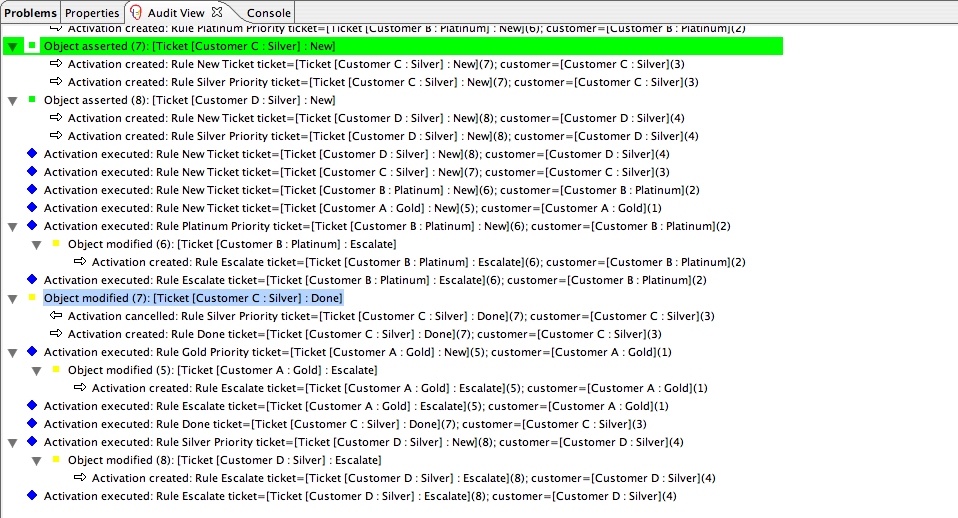
Referring to the above audit log, we can see the events as they happen. Once the rules start firing, the first items are the "Activation Executed" for the new tickets, as expected (they do nothing, just log the fact). Note the "Activation executed" item for the platinum ticket - that is the next one to go (remember it has the default salience, so it happens after the "New ticket" rule, but otherwise it is immediate - there is no "duration" delay for it). The platinum activation results in a Object modification (which is the escalation) - this in turn creates an activation record for the "escalate ticket" rule - which is what we wanted. Straight after that it executes the action to escalate the ticket.
The next event to occur is due to the:
t3.setStatus( "Done" );

session.update( ft3,
                t3 );
in the code (outside of rules) - this simulates a customer service officer maarking a ticket as done (and of course, uses the fact handle we kept from before). This results in a cancelled activation (as we no longer have a New Silvert customer ticket - it is done) and a new activation to log the fact it was done.
In all the excitement, in parallel the engine has been watching the time pass, and it happens that the Gold tickets start to escalate, and then silver (as expected).
The Pricing Rule decision table demonstrates the use of a decision table in a spreadsheet (XLS format) in calculating the retail cost of an insurance policy. The purpose of the set of rules provided is to calculate a base price, and an additional discount for a car driver applying for a specific policy. The drivers age, history and the policy type all contribute to what the basic premium is, and an additional chunk of rules deals with refining this with a subtractive percentage discount.
Name: Example Policy Pricing
Main class: org.drools.examples.PricingRuleDTExample
Type: java application
Rules file: ExamplePolicyPricing.xls
Objective: demonstrate spreadsheet based decision tables.
Open the PricingRuleDTExample.java and execute it as a Java application. It should produce the following console output:
Cheapest possible
BASE PRICE IS: 120
DISCOUNT IS: 20
The code to the execute the example is very similar to the other examples. The rules are loaded, the facts inserted and a stateless session is used. What is different is how the rules are obtained:
SpreadsheetCompiler compiler = new SpreadsheetCompiler();
String drl = compiler.compile(getSpreadsheetStream(), InputType.XLS);
Note the use of the SpreadsheetCompiler class. It is what takes the XLS (as a binary InputStream to the XLS file), and outputs ordinary DRL (which is then dealt with in the usual way). You can (if you like) also print out the DRL. If you use the BRMS, all this is of course taken care of for you.
There are 2 facts used in this example, Driver, and Policy. Both are used with their default values. The Driver is 30 years old, has had no prior claims and currently has a risk profile of LOW. The Policy being applied for is COMPREHENSIVE, and the policy has not yet been approved.
In this decision table, each row is a rule, and each column is a condition or an action.
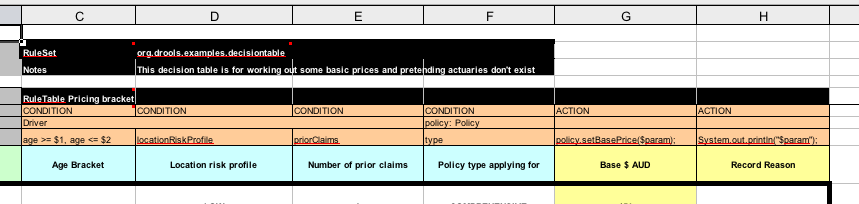
Referring to the above, we have the RuleSet declaration, which provides the package name. There are also other optional items you can have here, such as Variables for global variables, and Imports for importing classes. In this case, the namespace of the rules is the same as the fact classes we are using, so we can omit it.
Moving further down, we can see the RuleTable declaration. The name after this (Pricing bracket) is used as the prefix for all the generated rules. Below that, we have CONDITION or ACTION - this indicates the purpose of the column (ie does it form part of the condition, or an action of a rule that will be generated).
You can see there is a Driver which is spanned across 3 cells, this means the template expressions below it apply to that fact. So we look at the drivers age range (which uses $1 and $2 with comma separated values), locationRiskProfile, and priorClaims in the respective columns. In the action columns, we are setting the policy base price, and then logging a message.
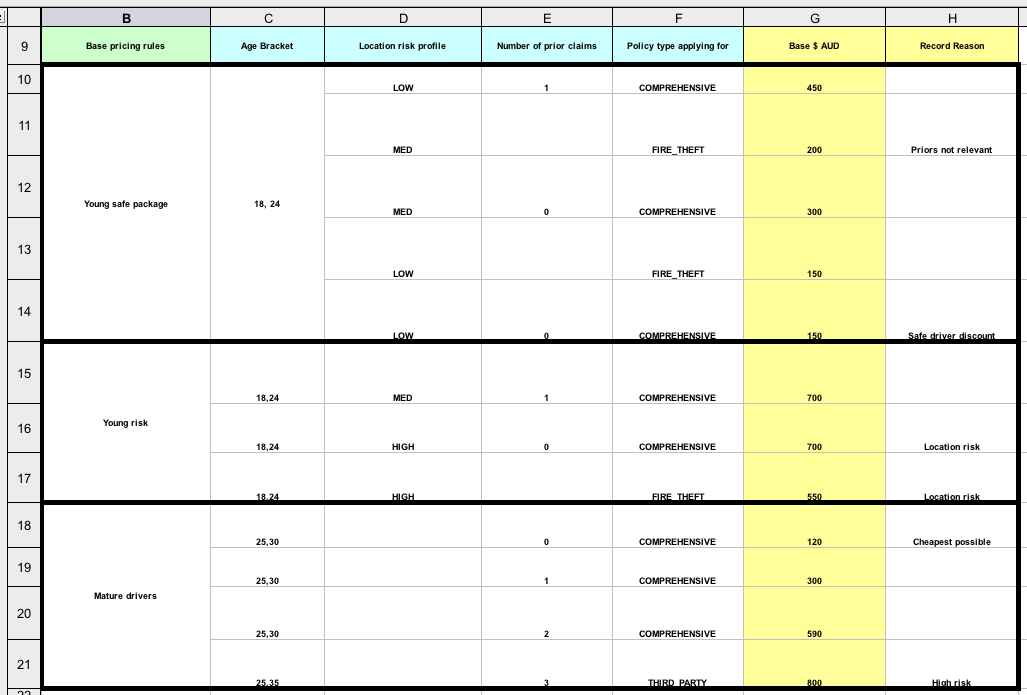
Referring to the above, we can see there are broad category brackets (indicated by the comment in the left most column). As we know the details of our driver and their policy, we can tell (with a bit of thought) that they should match row number 18, as they have no prior accidents, and are 30 years old. This gives us a base price of 120.
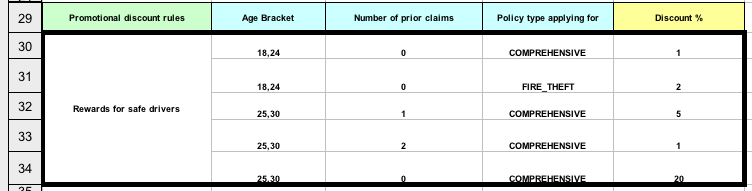
Referring to the above, we are seeing if there is any discount we can give our driver. Based on the Age bracket, number of priot claims, and the policy type, a discount is provided. In our case, the drive is 3, with no priors, and they are applying for COMPREHENSIVE, this means we can give a discount of 20%. Note that this is actually a separate table, but in the same worksheet. This different templates apply.
It is important to note that decision tables generate rules, this means they aren't simply top down logic, but more a means to capture data that generate rules (this is a subtle difference that confuses some people). The evaluation of the rules is not "top down" necessarily, all the normal indexing and mechanics of the rule engine still apply.
Name:Shopping Example
Main class: org.drools.examples.ShoppingExample
Type: java application
Rules file: Shopping.drl
Objective: demonstrate truth maintenance, accumulate
The shopping example simulates a very simple shopping cart type application, where the idea is to track a users purchases in a stateful session, and apply discounts as appropriate.
The following is a listing of the interesting parts that are used to launch the example:
Customer mark = new Customer( "mark",
                              0 );
session.insert( mark );
Product shoes = new Product( "shoes",
                             60 );
session.insert( shoes );
Product hat = new Product( "hat",
                           60 );
session.insert( hat );
session.insert( new Purchase( mark,
                              shoes ) );
FactHandle hatPurchaseHandle = session.insert( new Purchase( mark,
                                                             hat ) );
session.fireAllRules();
session.retract( hatPurchaseHandle );
System.out.println( "Customer mark has returned the hat" );
session.fireAllRules();
Refering the the above listing, we can see there is a Customer ("mark"), and there are 2 Products ("shoes" and "hat") which are available for Purchase. In this case, a Purchase combines a customer with a product (and a product has a price attribute).
Note that after we fireAllRules(), we then retract the purchase of a hat (but leave the purchase of shoes in). Running the example as a java application should see the following output:
Customer mark just purchased hat
Customer mark just purchased shoes
Customer mark now has a shopping total of 120.0
Customer mark now has a discount of 10
Customer mark has returned the hat
Customer mark now has a discount of 0
We want to give discounts to customers who purchase stuff of enough value. This discount could also be removed should the customer decide not to purchase enough to fall within the threshold.
rule "Purchase notification"
    salience 10

 when
  $c : Customer()
  $p : Purchase( customer == $c)
 then
     System.out.println( "Customer " + $c.name + " just purchased " + $p.product.name );
end

rule "Discount removed notification"
 when
     $c : Customer()
  not Discount( customer == $c )
 then
  $c.discount = 0 ;
  System.out.println( "Customer " + $c.name + " now has a discount of " + $c.discount );
end

rule "Discount awarded notification"
 when
     $c : Customer()
     $d : Discount( customer == $c )
 then
  System.out.println( "Customer " + $c.name + " now has a discount of " + $d.amount );
end
The "Purchase notification" rule simply makes note of the purchase event for a given customer. The "Discount removed notification" rule removes the customer discount (by checking for the non existence of a discount for that customer). The "Discount awarded notification" simply makes not of the fact that the discount was applied.
Calculating the discount is done with a single rule, using the higher order logic of "accumulate".
rule "Apply 10% discount if total purcahses is over 100"
 no-loop true
 dialect "java"
    when
      $c : Customer()
      $i : Double(doubleValue  > 100) from accumulate ( Purchase( customer == $c, $price : product.price ),
                                                            sum( $price ) )
    then
      $c.setDiscount( 10 );
      insertLogical( new Discount($c, 10) );
      System.out.println( "Customer " + $c.getName() + " now has a shopping total of " + $i );
end
An interesting part of this rule is the "accumulate": this is saying to accumulate a total (sum) of the $price of a product (product.price) for all Purchase facts that belong to the customer ($c). The result of this is a Double. The rule then checks to see if this total is greater then 100. If it is, it applies the discount (of 10), and then inserts a logical fact of the Discount object.
The purpose of the logical insertion of the Discount, is to automatically retract the Discount object should the total of the purchases not add up to > 100 (when the LHS is no longer satisified, restract the resulting logical assertions - this is what is meant by "truth maintenance"). The act of inserting the Discount, causes the "Discount awarded notification" rule to activate. However, should the discount fact be retracted, the "Discount removed notification" will activate, resulting in the customers discount being wiped out. In the example you can see this happen, as after the first fireAllRules(), a purchase is retracted, causing the total to fall below 100, which means the conditions that satisfied the "Apply 10% discount..." rule no longer apply, hence the logical fact of "Discount" is automatically retracted.
Name: Pet Store
Main class: org.drools.examples.PetStore
Type: Java application
Rules file: PetStore.drl
Objective: Demonstrate use of Agenda Groups, Global Variables and integration with a GUI (including callbacks from within the Rules)
The Pet Store example shows how to integrate Rules with a GUI (in this case a Swing based Desktop application). Within the rules file, it shows how to use agenda groups and auto-focus to control which of a set of rules is allowed to fire at any given time. It also shows mixing of Java and MVEL dialects within the rules, the use of accumulate functions and calling of Java functions from within the ruleset.
Like the rest of the the samples, all the Java Code is contained in one file. The PetStore.java contains the following principal classes (in addition to several minor classes to handle Swing Events)
Petstore - containing the main() method that we will look at shortly.
PetStoreUI - responsible for creating and displaying the Swing based GUI. It contains several smaller classes , mainly for responding to various GUI events such as mouse and button clicks.
TabelModel - for holding the table data. Think of it as a JavaBean that extends the Swing AbstractTableModel class.
CheckoutCallback - Allows the GUI to interact with the Rules.
Ordershow - the items that we wish to buy.
Purchase - Details of the order and the products we are buying.
Product - JavaBean holding details of the product available for purchase, and it's price.
Much of the Java code is either JavaBeans (simple enough to
understand) or Swing based. We will touch on some Swing related points
in the this tutorial , but a good place to get more Swing component
information is http://java.sun.com/docs/books/tutorial/uiswing/available
at the Sun Swing website.<citebiblioid></citebiblioid>
There are two important Rules related pieces of Java code in Petstore.java.
Example 10.53. Creating the PetStore RuleBase - extract from PetStore.java main() method
PackageBuilder builder = new PackageBuilder();
builder.addPackageFromDrl( new InputStreamReader(
PetStore.class.getResourceAsStream( "PetStore.drl" ) ) );
RuleBase ruleBase = RuleBaseFactory.newRuleBase();
ruleBase.addPackage( builder.getPackage() );

//RuleB
Vector stock = new Vector();
stock.add( new Product( "Gold Fish",5 ) );
stock.add( new Product( "Fish Tank", 25 ) );
stock.add( new Product( "Fish Food", 2 ) );

//The callback is responsible for populating working memory and
// fireing all rules
PetStoreUI ui = new PetStoreUI( stock, new CheckoutCallback( ruleBase ) );
ui.createAndShowGUI();
This code above loads the rules (drl) file from the classpath. Unlike other examples where the facts are asserted and fired straight away, this example defers this step to later. The way it does this is via the second last line where the PetStoreUI is created using a constructor the passes in the Vector called stock containing products , and an instance of the CheckoutCallback class containing the RuleBase that we have just loaded.
The actual Javacode that fires the rules is within the CheckoutCallBack.checkout() method. This is triggered (eventually) when the 'Checkout' button is pressed by the user.
Example 10.54. Firing the Rules - extract from the CheckOutCallBack.checkout() method
public String checkout(JFrame frame, List items) throws FactException {
    Order order = new Order();

    //Iterate through list and add to cart
    for ( int i = 0; i < items.size(); i++ ) {
        order.addItem( new Purchase( order, (Product) items.get( i ) ) );
    }

    //add the JFrame to the ApplicationData to allow for user interaction
    WorkingMemory workingMemory = ruleBase.newStatefulSession();
    workingMemory.setGlobal( "frame", frame );
    workingMemory.setGlobal( "textArea",  this.output );

    workingMemory.insert( new Product( "Gold Fish", 5 ) );
    workingMemory.insert( new Product( "Fish Tank", 25 ) );
    workingMemory.insert( new Product( "Fish Food",  2 ) );
    workingMemory.insert( new Product( "Fish Food Sample", 0 ) );

    workingMemory.insert( order );
    workingMemory.fireAllRules();

    //returns the state of the cart
    return order.toString();
}
Two items get passed into this method; A handle to the JFrame Swing Component surrounding the output text frame (bottom of the GUI if / when you run the component). The second item is a list of order items; this comes from the TableModel the stores the information from the 'Table' area at the top right section of the GUI.
The for() loop transforms the list of order items coming from the GUI into the Order JavaBean (also contained in the PetStore.java file). Note that it would be possible to refer to the Swing dataset directly within the rules, but it is better coding practice to do it this way (using Simple Java Objects). It means that we are not tied to Swing if we wanted to transform the sample into a Web application.
It is important to note that all state in this example is stored in the Swing components, and that the rules are effectively stateless. Each time the 'Checkout' button is pressed, this code copies the contents of the Swing TableModel into the Session / Working Memory.
Within this code, there are nine calls to the working memory. The first of these creates a new workingMemory (statefulSession) from the Rulebase - remember that we passed in this Rulebase when we created the CheckoutCallBack class in the main() method. The next two calls pass in two objects that we will hold as Gl obal variables in the rules - the Swing text area and Swing frame that we will use for writing messages later.
More inserts put information on products into the working memory, as well as the order list. The final call is the standard e fireAllRules(). Next, we look at what this method causes to happen within the Rules file.
Example 10.55. Package, Imports , Globals and Dialect - extract (1) from PetStore.drl
package org.drools.examples

import org.drools.WorkingMemory
import org.drools.examples.PetStore.Order
import org.drools.examples.PetStore.Purchase
import org.drools.examples.PetStore.Product
import java.util.ArrayList
import javax.swing.JOptionPane;

import javax.swing.JFrame

global JFrame frame
global javax.swing.JTextArea textArea

dialect "mvel"
The first part of the PetStore.drl file contains the standard package and import statement to make various Java classes available to the rules. We've seen the dialect been defaulted to "mvel" before in other examples. What is new are the two globals frame and textArea. These hold references to the Swing JFrame and Textarea components that were previous passed by the Java code calling the setGlobal() method. Unlike normal variables in Rules , which expire as soon as the rule has fired, Global variables retain their value for the lifetime of the (Stateful in this case) Session.
The next extract (below) is from the end of the PetStore.drl file. It contains two functions that are referenced by the rules that we will look at shortly.
Example 10.56. Java Functions in the Rules - extract (2) from PetStore.drl
function void doCheckout(JFrame frame, WorkingMemory workingMemory) {
    Object[] options = {"Yes",
                        "No"};

    int n = JOptionPane.showOptionDialog(frame,
                                         "Would you like to checkout?",
                                         "",
                                         JOptionPane.YES_NO_OPTION,
                                         JOptionPane.QUESTION_MESSAGE,
                                         null,
                                         options,
                                         options[0]);

    if (n == 0) {
        workingMemory.setFocus( "checkout" );
    }
}

function boolean requireTank(JFrame frame, WorkingMemory workingMemory, Order order, Product fishTank, int total) {
    Object[] options = {"Yes",
                        "No"};

    int n = JOptionPane.showOptionDialog(frame,
                                         "Would you like to buy a tank for your " + total + " fish?",
                                         "Purchase Suggestion",
                                         JOptionPane.YES_NO_OPTION,
                                         JOptionPane.QUESTION_MESSAGE,
                                         null,
                                         options,
                                         options[0]);

    System.out.print( "SUGGESTION: Would you like to buy a tank for your "
                      + total + " fish? - " );

    if (n == 0) {
        Purchase purchase = new Purchase( order, fishTank );
        workingMemory.insert( purchase );
        order.addItem( purchase );
        System.out.println( "Yes" );
    } else {
        System.out.println( "No" );
    }
    return true;
}
Having these functions in the rules file makes the PetStore sample more compact - in real life you probably have the functions in a file of their own (within the same rules package), or as a static method on a standard Java class (and import them using the import function my.package.Foo.hello syntax).
The above functions are
doCheckout() - Displays a dialog asking the user if they wish to checkout. If they do, focus is set to the checkOut agenda-group, allowing rules in that group to (potentially) fire.
requireTank() - Displays a dialog asking the user if they wish to buy a tank. If so, a new FishTank Product added to the orderlist in working memory.
We'll see later the rules that call these functions.The next set of examples are from the PetStore rules themselves. The first extract is the one that happens to fire first (partly because it has the auto-focus attibute set to true).
Example 10.57. Putting each (individual) item into working memory - extract (3) from PetStore.drl
// insert each item in the shopping cart into the Working Memory
rule "Explode Cart"
    agenda-group "init"
    auto-focus true
    salience 10
    dialect "java"
when
    $order : Order( grossTotal == -1 )
    $item : Purchase() from $order.items
then
   insert( $item );
   drools.setFocus( "show items" );
   drools.setFocus( "evaluate" );
end
This rule matches against all orders that do not yet have an Order.grossTotal calculated . It loops for each purchase item in that order. Some of the Explode Cart Rule should be familiar ; the rule name, the salience (suggesting of the order that the rules should be fired in) and the dialect set to java. There are three new items:
agenda-group "init" - the name of the agenda group. In this case, there is only one rule in the group. However, nothing in Java code / nor a rule sets the focus to this group , so it relies on the next attibute for it's chance to fire.
auto-focus true - This is the only rule in the sample, so when fireAllRules() is called from within the Java code, this rule is the first to get a chance to fire.
drools.setFocus() This sets the focus to the show items and evaluate agenda groups in turn , giving their rules a chance to fire. In practice , we loop through all items on the order, inserting them into memory, then firing the other rules after each insert.
The next two listings shows the rules within the show items and evaluate agenda groups. We look at them in the order that they are called.
Example 10.58. Show Items in the GUI extract (4) from PetStore.drl
rule "Show Items"
    agenda-group "show items"
    dialect "mvel"
when
    $order : Order( )
    $p : Purchase( order == $order )
then
   textArea.append( $p.product + "\n");
end
The show items agenda-group has only one rule, also called Show Items (note the difference in case). For each purchase on the order currently in the working memory (session) it logs details to the text area (at the bottom of the GUI). The textArea variable used to do this is one of the Global Variables we looked at earlier.
The evaluate Agenda group also gains focus from the explode cart rule above. This Agenda group has two rules (below) Free Fish Food Sample and Suggest Tank.
Example 10.59. Evaluate Agenda Group extract (5) from PetStore.drl
// Free Fish Food sample when we buy a Gold Fish if we haven't already  bought
// Fish Food and dont already have a Fish Food Sample
rule "Free Fish Food Sample"
    agenda-group "evaluate"
    dialect "mvel"
when
    $order : Order()
    not ( $p : Product( name == "Fish Food") && Purchase( product == $p ) )
    not ( $p : Product( name == "Fish Food Sample") && Purchase( product == $p ) )
    exists ( $p : Product( name == "Gold Fish") && Purchase( product == $p ) )
    $fishFoodSample : Product( name == "Fish Food Sample" );
then
    System.out.println( "Adding free Fish Food Sample to cart" );
    purchase = new Purchase($order, $fishFoodSample);
    insert( purchase );
    $order.addItem( purchase );
end

// Suggest a tank if we have bought more than 5 gold fish and dont already have one
rule "Suggest Tank"
    agenda-group "evaluate"
    dialect "java"
when
    $order : Order()
    not ( $p : Product( name == "Fish Tank") && Purchase( product == $p ) )
    ArrayList( $total : size > 5 ) from collect( Purchase( product.name == "Gold Fish" ) )
    $fishTank : Product( name == "Fish Tank" )
then
    requireTank(frame, drools.getWorkingMemory(), $order, $fishTank, $total);
end
The Free Fish Food Sample rule will only fire if
We don't already have any fish food.
We don't already have a free fish food sample.
We do have a Gold Fish in our order.
If the rule does fire, it creates a new product (Fish Food Sample), and adds it to the Order in working memory.
The Suggest Tank rule will only fire if
We don't already have a Fish Tank in our order
If we can find more than 5 Gold Fish Products in our order.
If the rule does fire, it calls the requireTank() function that we looked at earlier (showing a Dialog to the user, and adding a Tank to the order / working memory if confirmed). When calling the requireTank() function the rule passes the global frame variable so that the function has a handle to the Swing GUI.
The next rule we look at is do checkout.
Example 10.60. Doing the Checkout - extract (6) from PetStore.drl
rule "do checkout"
    dialect "java"
    when
    then
        doCheckout(frame, drools.getWorkingMemory());
end
The do checkout rule has no agenda-group set and no auto-focus attribute. As such, is is deemed part of the default (MAIN) agenda-group - the same as the other non PetStore examples where agenda groups are not used. This group gets focus by default when all the rules/agenda-groups that explicity had focus set to them have run their course.
There is no LHS to the rule, so the RHS will always call the doCheckout() function. When calling the doCheckout() function the rule passes the global frame variable so the function has a handle to the Swing GUI. As we saw earlier, the doCheckout() function shows a confirmation dialog to the user. If confirmed, the function sets the focus to the checkout agenda-group, allowing the next lot of rules to fire.
Example 10.61. Checkout Rules- extract (7) from PetStore.drl
rule "Gross Total"
    agenda-group "checkout"
    dialect "mvel"
when
   $order : Order( grossTotal == -1)
   Number( total : doubleValue ) from accumulate( Purchase( $price : product.price ),
                 sum( $price ) )
then
    modify( $order ) { grossTotal = total };
    textArea.append( "\ngross total=" + total + "\n" );
end

rule "Apply 5% Discount"
    agenda-group "checkout"
dialect "mvel"
when
   $order : Order( grossTotal >= 10 && < 20 )
then
   $order.discountedTotal = $order.grossTotal * 0.95;
   textArea.append( "discountedTotal total=" + $order.discountedTotal + "\n" );
end


rule "Apply 10% Discount"
    agenda-group "checkout"
dialect "mvel"
when
   $order : Order( grossTotal >= 20 )
then
   $order.discountedTotal = $order.grossTotal * 0.90;
   textArea.append( "discountedTotal total=" + $order.discountedTotal + "\n" );
end
There are three rules in the checkout agenda-group
Gross Total - if we haven't already calculated the gross total, accumulates the product prices into a total, puts this total into working memory, and displays it via the Swing TextArea (using the textArea global variable yet again).
Apply 5% Discount - if our gross total is between 10 and 20, then calculate the discounted total and add it to working memory / display in the text area.
Apply 10% Discount - if our gross total is equal to or greater than 20, calculate the discounted total and add it to working memory / display in the text area.
Now we've run through what happens in the code, lets have a look at what happens when we run the code for real. The PetStore.java example contains a main() method, so it can be run as a standard Java application (either from the command line or via the IDE). This assumes you have your classpath set correctly (see the start of the examples section for more information).s.
The first screen that we see is the Pet Store Demo. It has a List of available products (top left) , an empty list of selected products (top right), checkout and reset buttons (middle) and an empty system messages area (bottom).
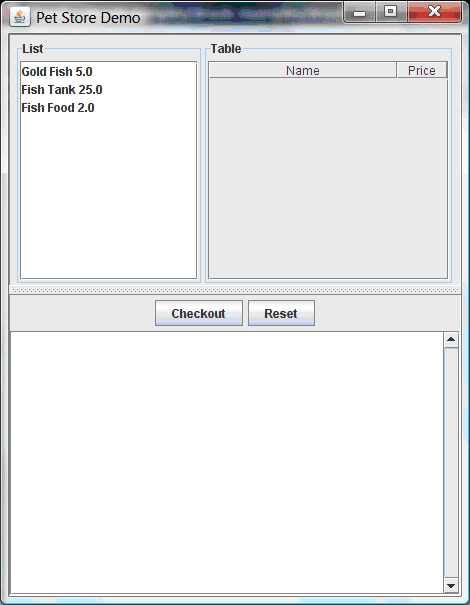
To get to this point, the following things have
happened:
The main() method has run and loaded the RuleBase but not yet fired the rules. This is the only rules related code to run so far.
A new PetStoreUI class is created and given a handle to the RuleBase (for later use).
Various Swing Components do their stuff, and the above screen is shown and waits for user input.
Clicking on various products from the list might give you a screen similar to the one below.
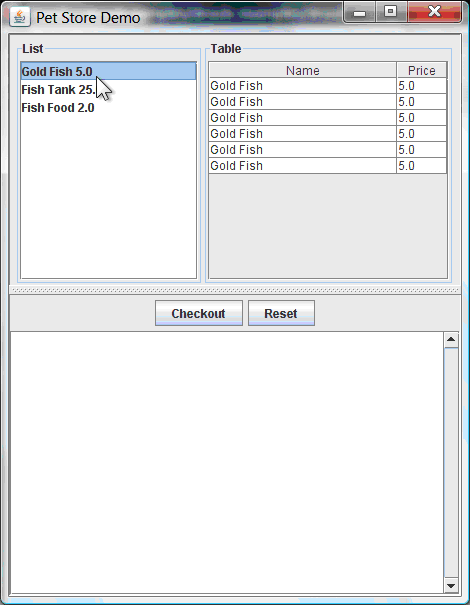
Note that no rules code has been fired
here. This is only swing code, listening for the mouse click
event, and added the clicked product to the
TableModel object for display in the top right hand
section (as an aside , this is a classic use of the Model View
Controller - MVC - design pattern).
It is only when we press the Checkout that we fire our business rules, in roughly the same order that we walked through the code earlier.
The CheckOutCallBack.checkout() method is called (eventually) by the Swing class waiting for the click on the checkout button. This inserts the data from the TableModel object (top right hand side of the GUI), and handles from the GUI into the session / working memory. It then fires the rules.
The Explode Cart rule is the first to fire, given that has auto-focus set to true. It loops through all the products in the cart, makes sure the products are in the working memory, then gives the Show Items and Evaluation agenda groups a chance to fire. The rules in these groups, add the contents of the cart to the text area (bottom), decide whether or not to give us free fish food and whether to ask if we want to buy a fish tank (Figure 3 below).
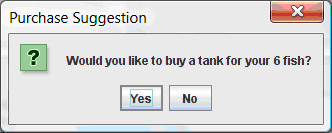
The Do Checkout rule is the next to fire as it (a) No other agenda group currently has focus and (b) it is part of the default (MAIN) agenda group. It always calls the doCheckout() function which displays a 'Would you like to Checkout?' Dialog Box.
The doCheckout() function sets the focus to the checkout agenda-group, giving the rules in that group the option to fire.
The rules in the the checkout agenda-group, display the contents of the cart and apply the appropriate discount.
Swing then waits for user input to either checkout more products (and to cause the rules to fire again) or to close the GUI - Figure 4 below.
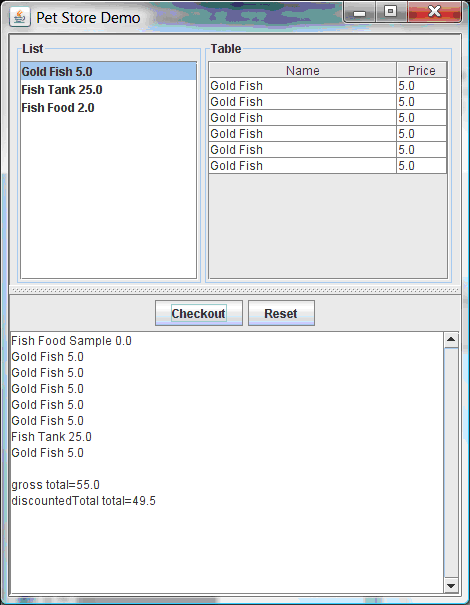
Should we choose, we could add more System.out calls to demonstrate this flow of events. The current output of the console fo the above sample is as per the listing below.
Example 10.62. Console (System.out) from running the PetStore GUI
Adding free Fish Food Sample to cart
SUGGESTION: Would you like to buy a tank for your 6 fish? - Yes
Todo : Add Audit and Agenda Views for this sample.
The honest politician example demonstrates truth maintenance with logical assertions, the basic premise is that an object can only exist while a statement is true. A rule's consequence can logical insert an object with the insertLogical method, this means the object will only remain in the working memory as long as the rule that logically inserted it remains true, when the rule is no longer true the object is automatically retracted.
In this example there is Politician class with a name and a boolean value for honest state, four politicians with honest state set to true are inserted.
Example 10.63. Politician Class
public class Politician {
    private String name;
    private boolean honest;
    ...
}
Example 10.64. Honest Politician Example Execution
Politician blair  = new Politician("blair", true);
Politician bush  = new Politician("bush", true);
Politician chirac  = new Politician("chirac", true);
Politician schroder   = new Politician("schroder", true);

session.insert( blair );
session.insert( bush );
session.insert( chirac );
session.insert( schroder );

session.fireAllRules();
The console out shows that while there is atleast one honest
polician democracy lives, however as each politician is in turn corrupted
by an evil corporation, when all politicians are dishonest democracy is
dead.
Example 10.65. Honest Politician Example Console Output
Hurrah!!! Democracy Lives
I'm an evil corporation and I have corrupted schroder
I'm an evil corporation and I have corrupted chirac
I'm an evil corporation and I have corrupted bush
I'm an evil corporation and I have corrupted blair
We are all Doomed!!! Democracy is Dead
As soon as there is one ore more honest politcians in the
working memory a new Hope object is logically asserted, this object will
only exist while there is atleast one or more honest politicians, the
moment all politicians are dishonest then the Hope object will be
automatically retracted. This rule is given a salience of 10 to make sure
it fires before any other rules, as at this stage the "Hope is Dead" rule
is actually true.
Example 10.66. Honest Politician Example : Rule "We have an honest politician"
rule "We have an honest Politician"
    salience 10
    when
        exists( Politician( honest == true ) )
    then
        insertLogical( new Hope() );
end
As soon as a Hope object exists the "Hope Lives" rule matches, and fires, it has a salience of 10 so that it takes priority over "Corrupt the Honest".
Example 10.67. Honest Politician Example : Rule "Hope Lives"
rule "Hope Lives"
    salience 10
    when
        exists( Hope() )
    then
        System.out.println("Hurrah!!! Democracy Lives");
end
Now that hope exists and we have, at the start, four honest politicians we have 4 activations for this rule all in conflict. This rule iterates over those rules firing each one in turn, corrupting each politician so that they are no longer honest. When all four politicians have been corrupted we have no politicians with the property "honest == true" thus the rule "We hvae an honest Politician" is no longer true and the object it logical inserts "new Hope()" is automatically retracted.
Example 10.68. Honest Politician Example : Rule "Corrupt the Honest"
rule "Corrupt the Honest"
    when
        politician : Politician( honest == true )
        exists( Hope() )
    then
        System.out.println( "I'm an evil corporation and I have corrupted " + politician.getName() );
        modify ( politician ) { honest = false };
end
With Hope being automatically retracted, via the truth maintenance system, then Hope no longer exists in the system and this rule will match and fire.
Example 10.69. Honest Politician Example : Rule "Hope is Dead"
rule "Hope is Dead"
    when
        not( Hope() )
    then
        System.out.println( "We are all Doomed!!! Democracy is Dead" );
end
lets take a look the audit trail for this application:
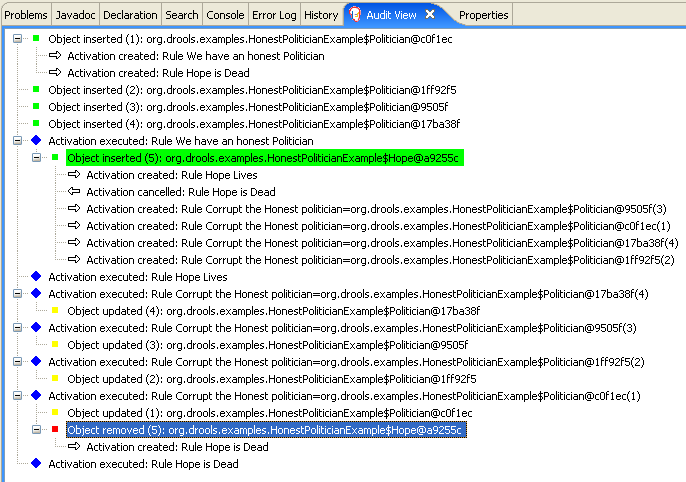
The moment we insert the first politician we have two activations, the "We have an honest Politician" is activated only once for the first inserted politician because it uses an existential 'exists' conditional element which only matches. the rule "Hope is Dead" is also activated at this stage, because as of yet we have not inserted the Hope object. "We have an honest Politician" fires first, as it has a higher salience over "Hope is Dead" which inserts the Hope object, that action is highlighted green above. The insertion of the Hope object activates "Hope Lives" and de-activates "Hope is Dead", it also actives "Corrupt the Honest" for each inserted honested politician. "Rule Hope Lives" executes printing "Hurrah!!! Democracy Lives". Then for each politician the rule "Corrupt the Honest" fires printing "I'm an evil corporation and I have corrupted X", where X is the name of the politician, and modifies the politicians honest value to false. When the last honest polician is corrupted Hope is automatically retracted, by the truth maintenance system, as shown by the blue highlighted area. The green highlighted area shows the origin of the currently selected blue highlighted area. Once Hope is retracted "Hope is dead" activates and fires printing "We are all Doomed!!! Democracy is Dead".
Name: Sudoku
Main class: org.drools.examples.sudoku.Main
Type: java application
Rules file: sudokuSolver.drl, sudokuValidator.drl
Objective: Demonstrates the solving of logic problems, and complex pattern matching.e
This example demonstrates how Drools can be used to find a solution in a large potential solution space based on a number of constraints. We use the popular puzzle of Sudoku. This example also shows how Drools can be integrated into a graphical interface and how callbacks can be used to interact with a running Drools rules engine in order to update the graphical interface based on changes in the working memory at runtime.
Sudoku is a logic-based number placement puzzle. The objective is to fill a 9x9 grid so that each column, each row, and each of the nine 3x3 zones contains the digits from 1 to 9 once and only once.
The puzzle setter provides a partially completed grid and the puzzle solver's task is to complete the grid with these constraints.
The general strategy to solve the problem is to ensure that when you insert a new number it should be unique in that particular region(blocks) and also in that particular row and column.
See
URL: http://en.wikipedia.org/wiki/Sudoku
for a more detailed description.
Download and install drools-examples as described above and then execute java org.drools.examples.sudoku.Main (this example requires Java 5).
A window will be displayed with a relatively simple partially filled grid.

Click on the Solve button and the Drools-based engine will fill out the remaining values. The console will display detailed information of the rules which are executing to solve the puzzle in a human readable form.
Rule #3 determined the value at (4,1) could not be
      4 as this value already exists in the same column at (8,1) Rule #3
      determined the value at (5,5) could not be 2 as this value already
      exists in the same row at (5,6) Rule #7 determined (3,5) is 2 as this is
      the only possible cell in the column that can have this value Rule #1
      cleared the other PossibleCellValues for (3,5) as a ResolvedCellValue of
      2 exists for this cell. Rule #1 cleared the other PossibleCellValues for
      (3,5) as a ResolvedCellValue of 2 exists for this cell. ... Rule #3
      determined the value at (1,1) could not be 1 as this value already
      exists in the same zone at (2,1) Rule #6 determined (1,7) is 1 as this
      is the only possible cell in the row that can have this value Rule #1
      cleared the other PossibleCellValues for (1,7) as a ResolvedCellValue of
      1 exists for this cell. Rule #6 determined (1,1) is 8 as this is the
      only possible cell in the row that can have this value
Once all of the activated rules for the solving logic have executed, the engine executes a second rule base to check that the solution is complete and valid. In this case it is, and the "Solve" button is disabled and displays the text "Solved (1052ms)".
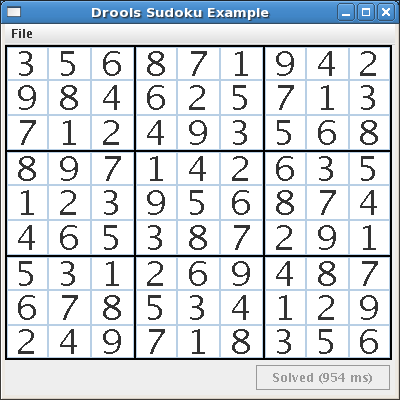
The example comes with a number of grids which can be loaded and solved. Click on File->Samples->Medium to load a more challenging grid. Note that the solve button is enabled when the new grid is loaded.

Click on the "Solve" button again to solve this new grid.

Now, let us load a Sudoku grid that is deliberately invalid. Click on File->Samples->!DELIBERATELY BROKEN!. Note that this grid starts with some issues, for example the value 5 appears twice in the first row.

Nevertheless, click on the "Solve" button to apply the solving rules to this invalid Grid. Note that the "Solve" button is relabelled to indicate that the resulting solution is invalid.

In addition, the validation rule set outputs all of the issues which are discovered to the console.
There are two cells on the same column with the same value at (6,0) and (4,0)
There are two cells on the same column with the same value at (4,0) and (6,0)
There are two cells on the same row with the same value at (2,4) and (2,2)
There are two cells on the same row with the same value at (2,2) and (2,4)
There are two cells on the same row with the same value at (6,3) and (6,8)
There are two cells on the same row with the same value at (6,8) and (6,3)
There are two cells on the same column with the same value at (7,4) and (0,4)
There are two cells on the same column with the same value at (0,4) and (7,4)
There are two cells on the same row with the same value at (0,8) and (0,0)
There are two cells on the same row with the same value at (0,0) and (0,8)
There are two cells on the same column with the same value at (1,2) and (3,2)
There are two cells on the same column with the same value at (3,2) and (1,2)
There are two cells in the same zone with the same value at (6,3) and (7,3)
There are two cells in the same zone with the same value at (7,3) and (6,3)
There are two cells on the same column with the same value at (7,3) and (6,3)
There are two cells on the same column with the same value at (6,3) and (7,3)
We will look at the solving rule set later in this section, but for the moment we should note that some theoretically solvable solutions can not be solved by the engine as it stands. Click on File->Samples->Hard 3 to load a sparsely populated Grid.

Now click on the "Solve" button and note that the current rules are unable to complete the grid, even though (if you are a Sudoku afficiando) you may be able to see a way forward with the solution.

At the present time, the solving functionality has been achieved by the use of ten rules. This rule set could be extended to enable the engine to tackle more complex logic for filling grids such as this.
The Java source code can be found in the /src/main/java/org/drools/examples/sudoku directory, with the two DRL files defining the rules located in the /src/main/rules/org/drools/examples/sudoku directory.
org.drools.examples.sudoku.swing contains a set of classes which implement a framework for Sudoku puzzles. Note that this package does not have any dependencies on the Drools libraries. SudokuGridModel defines an interface which can be implemented to store a Sudoku puzzle as a 9x9 grid of Integer values, some of which may be null, indicating that the value for the cell has not yet been resolved. SudokuGridView is a Swing component which can visualise any implementation of SudokuGridModel. SudokuGridEvent and SudokuGridListener are used to communicate state changes between the model and the view, events are fired when a cell's value is resolved or changed. If you are familiar with the model-view-controller patterns in other Swing components such as JTable then this pattern should be familiar. SudokuGridSamples provides a number of partially filled Sudoku puzzles for demo purposes.
org.drools.examples.sudoku.rules contains an implementation of SudokuGridModel which is based on Drools. Two POJOs are used, both of which extend AbstractCellValue and represent a value for a specific cell in the grid, including the row and column location of the cell, an index of the 3x3 zone the cell is contained in and the value of the cell. PossibleCellValue indicates that we do not currently know for sure what the value in a cell is. There can be 2-9 PossibleCellValues for a given cell. ResolvedCellValue indicates that we have determined what the value for a cell must be. There can only be 1 ResolvedCellValue for a given cell. DroolsSudokuGridModel implements SudokuGridModel and is responsible for converting an initial two dimensional array of partially specified cells into a set of CellValue POJOs, creating a working memory based on solverSudoku.drl and inserting the CellValue POJOs into the working memory. When the solve() method is called it calls fireAllRules() on this working memory to try to solve the puzzle. DroolsSudokuGridModel attaches a WorkingMemoryListener to the working memory, which allows it to be called back on insert() and retract() events as the puzzle is solved. When a new ResolvedCellValue is inserted into the working memory, this call back allows the implementation to fire a SudokuGridEvent to its SudokuGridListeners which can then update themselves in realtime. Once all the rules fired by the solver working memory have executed, DroolsSudokuGridModel runs a second set of rules, based on validatorSudoku.drl which works with the same set of POJOs to determine if the resulting grid is a valid and full solution.
org.drools.examples.sudoku.Main implements a Java application which hooks the components desribed above together.
org.drools.examples.sudoku contains two DRL files. solverSudoku.drl defines the rules which attempt to solve a Sudoku puzzle and validator.drl defines the rules which determin whether the current state of the working memory represents a valid solution. Both use PossibleCellValue and ResolvedCellValue POJOs as their facts and both output information to the console as their rules fire. In a real-world situation we would insert() logging information and use the WorkingMemoryListener to display this information to a user rather than use the console in this fashion.
We start with the validator rules as this rule set is shorter and simpler than the solver rule set.
The first rule simply checks that no PossibleCellValue objects remain in the working memory. Once the puzzle is solved, only ResolvedCellValue objects should be present, one for each cell.
The other three rules each match all of the ResolvedCellValue objects and store them in thenew_remote_sitetes instance variable $resolved. They then look respectively for ResolvedCellValues that contain the same value and are located, respectively, in the same row, column or 3x3 zone. If these rules are fired they add a message to a global List of Strings describing the reason the solution is invalid. DroolsSudokoGridModel injects this List before it runs the rule set and checks whether it is empty or not having called fireAllRules(). If it is not empty then it prints all the Strings in the list and sets a flag to indicate that the Grid is not solved.
Now let us look at the more complex rule set used to solve Sudoku puzzles.
Rule #1 is basically a "book-keeping" rule. Several of the other rules insert() ResolvedCellValues into the working memory at specific rows and columns once they have determined that a given cell must have a certain value. At this point, it is important to clear the working memory of any inserted PossibleCellValues at the same row and column with invalid values. This rule is therefore given a higher salience than the remaining rules to ensure that as soon as the LHS is true, activations for the rule move to the top of the agenda and are fired. In turn this prevents the spurious firing of other rules due to the combination of a ResolvedCellValue and one or more PossibleCellValues being present in the same cell. This rule also calls update() on the ResolvedCellValue, even though its value has not in fact been modified to ensure that Drools fires an event to any WorkingMemoryListeners attached to the working memory so that they can update themselves - in this case so that the GUI can display the new state of the grid.
Rule #2 identifies cells in the grid which have only one possible value. The first line of the when caluse matches all of the PossibleCellValue objects in the working memory. The second line demonstrates a use of the not keyword. This rule will only fire if no other PossibleCellValue objects exist in the working memory at the same row and column but with a different value. When the rule fires, the single PossibleCellValue at the row and column is retracted from the working memory and is replaced by a new ResolvedCellValue at the same row and column with the same value.
Rule #3 removes PossibleCellValues with a given value from a row when they have the same value as a ResolvedCellValue. In other words, when a cell is filled out with a resolved value, we need to remove the possibility of any other cell on the same row having this value. The first line of the when clause matches all ResolvedCellValue objects in the working memory. The second line matches PossibleCellValues which have both the same row and the same value as these ResolvedCellValue objects. If any are found, the rule activates and, when fired retracts the PossibleCellValue which can no longer be a solution for that cell.
Rules #4 and #5 act in the same way as Rule #3 but check for redundant PossibleCellValues in a given column and a given zone of the grid as a ResolvedCellValue respectively.
Rule #6 checks for the scenario where a possible cell value only appears once in a given row. The first line of the LHS matches against all PossibleCellValues in the working memory, storing the result in a number of local variables. The second line checks that no other PossibleCellValues with the same value exist on this row. The third to fifth lines check that there is not a ResolvedCellValue with the same value in the same zone, row or column so that this rule does not fire prematurely. Interestingly we could remove lines 3-5 and give rules #3,#4 and #5 a higher salience to make sure they always fired before rules #6,#7 and #8. When the rule fires, we know that $possible must represent the value for the cell so, as in Rule #2 we retract $possible and replace it with the equivalent, new ResolvedCellValue.
Rules #7 and #8 act in the same way as Rule #2 but check for single PossibleCellValues in a given column and a given zone of the grid respectively.
Rule #9 represents the most complex currently implemented rule. This rule implements the logic that, if we know that a pair of given values can only occur in two cells on a specific row, (for example we have determined the values of 4 and 6 can only appear in the first row in cells 0,3 and 0,5) and this pair of cells can not hold other values then, although we do not know which of the pair contains a four and which contains a six we know that the 4 and the 6 must be in these two cells and hence can remove the possibility of them occuring anywhere else in the same row (phew!). TODO: more detail here and I think the rule can be cleaned up in the DRL file before fully documenting it.
Rules #10 and #11 act in the same way as Rule #9 but check for the existance of only two possible values in a given column and zone respectively.
To solve harder grids, the rule set would need to be extended further with more complex rules that encapsulated more complex reasoning.
There are a number of ways in which this example could be developed. The reader is encouraged to consider these as excercises.
Agenda-group: agenda groups are a great declarative tool for phased execution. In this example, it is easy to see we have 2 phases: "resolution" and "validation". Right now, they are executed by creating two separate rule bases, each for one "job". I think it would be better for us to define agenda-groups for all the rules, spliting them in "resolution" rules and "validation" rules, all loaded in a single rule base. The engine executes resolution and right after that, executes validation.
Auto-focus: auto focus is a great way of handling exceptions to the regular rules execution. In our case, if we detect an inconsistency, either in the input data or in the resolution rules, why should we spend time continuing the execution if it will be invalid anyway? I think it is better to simply (and immediatly) report the inconsistency as soon as it is found. To do that, since we now have a single rulebase with all rules, we simply need to define auto-focus attribute for all rules validating puzzle consistency.
Logical insert: an inconsistency only exists while wrong data is in the working memory. As so, we could state that the the validation rules logically insert inconsistencies and as soon as the offending data is retracted, the inconsistency no longer exists.
session.iterateObjects(): although a valid use case having a global list to add the found problems, I think it would be more interesting to ask the stateful session by the desired list of problems, using session.iterateObjects( new ClassObjectFilter( Inconsistency.class ) ); Having the inconsistency class can also allow us to paint in RED the offending cells in the GUI.
drools.halt(): even reporting the error as soon as it is found, we need a way to tell the engine to stop evaluating rules. We can do that creating a rule that in the presence of Inconsistencies, calls drools.halt() to stop evaluation.
queries: looking at the method getPossibleCellValues(int row, int col) in DroolsSudokuGridModel, we see it iterating over all CellValues and looking for the few it wants. That, IMO, is a great opportunity to teach drools queries. We just define a query to return the objects we want and iterate over it. Clean and nice. Other queries may be defined as needed.
session.iterateObjects(): although a valid use case having a global list to add the found problems, I think it would be more interesting to ask the stateful session by the desired list of problems, using session.iterateObjects( new ClassObjectFilter( Inconsistency.class ) ); Having the inconsistency class can also allow us to paint in RED the offending cells in the GUI.
Globals as services: the main objective of this change is to attend the next change I will propose, but it is nice by its own I guess. :) In order to teach the use of "globals" as services, it would be nice to setup a call back, so that each rule that finds the ResolvedCellValue for a given cell can call, to notify and update the corresponding cell in the GUI, providing immediate feedback for the user. Also, the last found cell could have its number painted in a different color to facilitate the identification of the rules conclusions.
Step by step execution: now that we have immediate user feedback, we can make use of the restricted run feature in drools. I.e., we could add a button in the GUI, so that the user clicks and causes the execution of a single rule, by calling fireAllRules( 1 ). This way, the user can see, step by step, what the engine is doing.
Name: Number Guess
Main class: org.drools.examples.NumberGuessExample
Type: java application
Rules file: NumberGuess.drl
Objective: Demonstrate use of Rule Flow to organise Rules
The "Number Guess" example shows the use of RuleFlow, a way of controlling the order in which rules are fired. It uses widely understood workflow diagrams to make clear the order that groups of rules will be executed.
Example 10.70. Creating the Number Guess RuleBase - extract 1 from NumberGuessExample.java main() method
final PackageBuilder builder = new PackageBuilder();

builder.addPackageFromDrl( new InputStreamReader(
         ShoppingExample.class.getResourceAsStream( "NumberGuess.drl" ) ) );
builder.addRuleFlow( new InputStreamReader(
         ShoppingExample.class.getResourceAsStream( "NumberGuess.rfm" ) ) );

final RuleBase ruleBase = RuleBaseFactory.newRuleBase();
ruleBase.addPackage( builder.getPackage() );
The creation of the package, and the loading of the rules (using the addPackageFromDrl() method ) is the same as the previous examples. There is a additional line to add the RuleFlow (NumberGuess.rfm) as you have the option of specifying different ruleflows for the same RuleBase. Otherwise the RuleBase is created in the same manner as before .
Example 10.71. Starting the RuleFlow - extract 2 from NumberGuessExample.java main() method
final StatefulSession session = ruleBase.newStatefulSession();

session.insert( new GameRules( 100,  5 ) );
session.insert( new RandomNumber() );
session.insert( new Game() );

session.startProcess( "Number Guess" );
session.fireAllRules();

session.dispose();
Once we have a RuleBase we can use it to obtain a stateful session. Into our session we insert our facts (standard Java Objects). For simplicity in this sample, these classes are all contained within our NumberGuessExample.java file. The GameRules class provides the maximum range and the number of guesses allowed. The RandomNumber class automatically generates a number between 0 and 100 and makes it available to our rules after insertion (via the getValue() method). The Game class keeps track of the guesses we have made before, and the number of guesses we have made.
Note that before we call the standard fireAllRules() method, we also start the process that we loaded earlier (via the startProcess() method). We explain where to obtain the parameter we pass ("Number Guess" - the id of the ruleflow) when we talk about the RuleFlow file and the graphical RuleFlow editor below.
Before we finish we our Java code , we note that In 'real life' we would examine the final state of the objects (e.g. how many guesses it took, so that we could add it to a high score table). For this example we are content to ensure the working memory session is cleared by calling the dispose() method.
If you open the NumberGuess.rf file open in the Drools IDE (and have the JBoss Rules extensions installed correctly in Eclipse) you should see the above diagram, similar to a standard flowchart. Its icons are similar (but not exactly the same) as the JBoss jBPM workflow product. Should you wish to edit the diagram, a menu of available components should be available to the left of the diagram in the IDE, which is call the pallete. This diagram is saved in a (almost human) readable xml format, using xstream.
If it is not already open, ensure the properties view is visible in the IDE. It can opened by selecting Window -> Show View -> Other and then select the Properties view. If you do this before you select any item on the RuleFlow (or click on blank space in the RuleFlow) you should be presented with the following set of properties.
Keep an eye on the properties view as we progress through the example RuleFlow as it gives valuable information. In this case it provides us with the ID of the RuleFlow process that we used in our earlier code example when we called session.startprocess().
To give an overview of each of the node types (boxes) in the NumberGuess RuleFlow.
The Start and End nodes (green arrow and red box) are where the RuleFlow starts and ends.
RuleFlowGroup (simple yellow box). These map to the RuleFlowGroups in our rules (DRL) file that we will look at later. For example when the flow reaches the 'Too High' RuleFlowGroup, only those rules marked with an attribute of ruleflow-group "Too High" can potentially fire.
Action Nodes (yellow box with cog like icon). These can perform standard Java method calls. Most action nodes in this example call System.out.println to give an indication to the user of what is going on.
Split and Join Nodes (Blue Ovals) such as "Guess Correct" and "More Guesses Join" where the flow of control can split (according to various conditions) and / or rejoin.
Arrows that indicate the flow between the various nodes.
These various nodes work together with the Rules to make the Number Guess game work. For example, the "Guess" RuleFlowGroup allows only the rule "Get user Guess" to fire (details below) as only that Rule has a matching attribute of ruleflow-group "Guess"
Example 10.72. A Rule that will fire only a specific point in the RuleFlow - extract from NumberGuess.drl
rule "Get user Guess"
 ruleflow-group "Guess"
 no-loop
 when
     $r : RandomNumber()
     rules : GameRules( allowed : allowedGuesses )
     game : Game( guessCount < allowed )
     not ( Guess() )
 then
     System.out.println( "You have " + ( rules.allowedGuesses - game.guessCount )
     + " out of " + rules.allowedGuesses + " guesses left.\nPlease enter your guess
     from 0 to " + rules.maxRange );
        br = new BufferedReader( new InputStreamReader( System.in ) );
        modify ( game ) { guessCount = game.guessCount + 1 }
        i = br.readLine();
    insert( new Guess( i ) );
end
The rest of this rule is fairly standard : The LHS (when) section of the rule states that it will be activated for each RandomNumber object inserted into the working memory where guessCount is less than the allowedGuesses ( read from the GameRules Class) and where the user has not guessed the correct number.
The RHS (consequence, then) prints a message to the user, then awaits user input from System.in. After getting this input (as System.in blocks until the <return> key is pressed) it updates/modifes the guess count, the actual guess and makes both available in the working memory.
The rest of the Rules file is fairly standard ; the package declares the dialect is set to MVEL, various Java classes are imported. In total, there are five rules in this file:
Get User Guess, the Rule we examined above.
A Rule to record the highest guess.
A Rule to record the lowest guess.
A Rule to inspect the guess and retract it from memory if incorrect.
A Rule that notifies the user that all guesses have been used up.
One point of integration between the standard Rules and the RuleFlow is via the 'ruleflow-group' attribute on the rules (as dicussed above). A second point of integration between the Rules File (drl) and the Rules Flow .rf files is that the Split Nodes (the blue ovals) can use values in working memory (as updated by the Rules) to decide which flow of action to take. To see how this works click on the "Guess Correct Node" ; then within the properties view, open the constraints editor (the button at the right that appears once you click on the 'Constraints' property line). You should see something similar to the Diagram below.
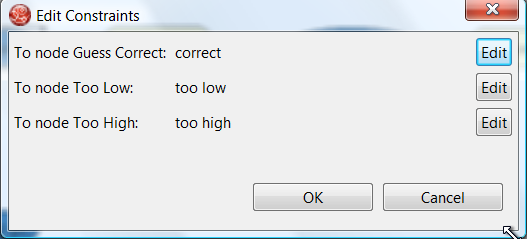
Click on 'Edit' beside 'To node Too High' and you see a dialog like the one below. The values in the 'Textual Editor' follow the standard Rule Format (LHS) and can refer to objects in working memory. The consequence (RHS) is that the flow of control follows this node (i.e. To node Too high') if the LHS expression evaluates to true.
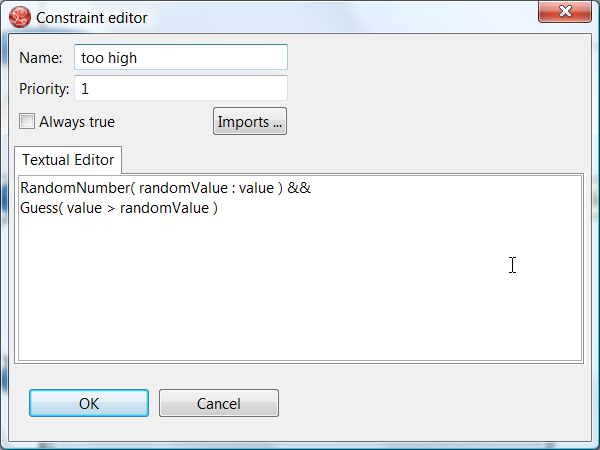
Since the NumberGuess.java example contains a main() method, it can be run as a standard Java application (either from the command line or via the IDE). A typical game might result in the interaction below (the numbers in bold are typed in by the user).
Example 10.73. Example Console output where the Number Guess Example beat the human!
You have 5 out of 5 guesses left.
Please enter your guess from 0 to 100
50
Your guess was too high
You have 4 out of 5 guesses left.
Please enter your guess from 0 to 100
25
Your guess was too low
You have 3 out of 5 guesses left.
Please enter your guess from 0 to 100
37
Your guess was too low
You have 2 out of 5 guesses left.
Please enter your guess from 0 to 100
44
Your guess was too low
You have 1 out of 5 guesses left.
Please enter your guess from 0 to 100
47
Your guess was too low
You have no more guesses
The correct guess was 48
A summary of what is happening in this sample is:
Main() method of NumberGuessExample.java loads RuleBase, gets a StatefulSession and inserts Game, GameRules and RandomNumber (containing the target number) objects into it. This method sets the process flow we are going to use, and fires all rules. Control passes to the RuleFlow.
The NumberGuess.rf RuleFlow begins at the Start node.
Control passes (via the "more guesses" join node) to the Guess Node..
At the Guess node, the appropriate RuleFlowGroup ("Get user Guess") is enabled. In this case the Rule "Guess" (in the NumberGuess.drl file) is triggered. This rule displays a message to the user, takes the response, and puts it into memory. Flow passes to the next Rule Flow Node.
At the next node , "Guess Correct", constraints inspect the current session and decide which path we take next.
If the guess in step 4 was too high / too low flow procees along a path which has (i) An action node with normal Java code prints a too high / too low statement and (ii) a RuleFlowGroup causes a highest guess / lowest guess Rule to be triggered in the Rules file. Flow passes from these nodes to step 6.
If the guess in step 4 just right we proceed along the path towards the end of the Rule Flow. Before we get there, an action node with normal Java code prints a statement "you guessed correctly". There is a join node here (just before the Rule Flow End) so that our no-more-guesses path (step 7) can also terminate the RuleFlow.
Control passes as per the RuleFlow via a join node, a guess incorrect RuleFlowGroup (triggers a rule to retract a guess from working memory) onto the "more guesses" decision node.
The "more guesses" decision node (right hand side of ruleflow) uses constraints (again looking at values that the Rules have put into the working memory) to decide if we have more guesses and if so, goto step 3. If not we proceed to the end of the workflow, via a RuleFlowGroup that triggers a rule stating "you have no more guesses".
The Loop 3-7 continues until the number is guessed correctly, or we run out of guesses.
Name: Miss Manners
Main class: org.drools.benchmark.manners.MannersBenchmark
Type: java application
Rules file: manners.drl
Objective: Advanced walkthrough on the Manners benchmark, covers Depth conflict resolution in depth.
Miss Manners is throwing a party and being the good host she wants to arrange good seating. Her initial design arranges everyone in male female pairs, but then she worries about people have things to talk about; what is a good host to do? So she decides to note the hobby of each guest so she can then arrange guests in not only male and female pairs but also ensure that a guest has someone to talk about a common hobby, from either their left or right side.

5 benchmarks were established in the 1991 paper "Effects of Database Size on Rule System Performance: Five Case Studies" by Brant, Timothy Grose, Bernie Lofaso, & Daniel P. Miranker.
Manners
Uses a depth-first search approach to determine the seating arrangements of boy/girl and one common hobby for dinner guests
Waltz
line labeling for simple scenes by constraint propagation
WaltzDB
More general version of Walts to be able to adapt to a database of facts
ARP
Route planner for a robotic air vehicle using the A* search algorithm
Weavera
VLSI router for channels and boxes using a black-board technique
Manners has become the de facto rule engine benchmark; however it's behavior is now well known and many engines optimize for this thus negating its usefulness as a benchmark which is why Waltz is becoming more favorable. These 5 benchmarks are also published at the University of Texas http://www.cs.utexas.edu/ftp/pub/ops5-benchmark-suite/.
After the first Seating arrangement has been assigned a depth-first recursion occurs which repeatedly assigns correct Seating arrangements until the last seat is assigned. Manners uses a Context instance to control execution flow; the activity diagram is partitioned to show the relation of the rule execution to the current Context state.
Before going deeper into the rules lets first take a look at the asserted data and the resulting Seating arrangement. The data is a simple set of 5 guests who should be arranged in male/female pairs with common hobbies.
The Data
Each line of the results list is printed per execution of the “Assign Seat” rule. They key bit to notice is that each line has pid one greater than the last, the significance of this will be explained in t he “Assign Seating” rule description. The 'l' and the 'r' refer to the left and right, 's' is sean and 'n' is the guest name. In my actual implementation I used longer notation, 'leftGuestName', but this is not practice in a printed article. I found the notation of left and right preferable to the original OPS5 '1' and '2
(guest (name n1) (sex m) (hobby h1) )
(guest (name n2) (sex f) (hobby h1) )
(guest (name n2) (sex f) (hobby h3) )
(guest (name n3) (sex m) (hobby h3) )
(guest (name n4) (sex m) (hobby h1) )
(guest (name n4) (sex f) (hobby h2) )
(guest (name n4) (sex f) (hobby h3) )
(guest (name n5) (sex f) (hobby h2) )
(guest (name n5) (sex f) (hobby h1) )
(last_seat (seat 5) )
The Results
[Seating id=1, pid=0, done=true, ls=1, ln=n5, rs=1, rn=n5]
[Seating id=2, pid=1, done=false, ls=1, ln=n5, rs=2, rn=n4]
[Seating id=3, pid=2, done=false, ls=2, ln=n4, rs=3, rn=n3]
[Seating id=4, pid=3, done=false, ls=3, rn=n3, rs=4, rn=n2]
[Seating id=5, pid=4, done=false, ls=4, ln=n2, rs=5, rn=n1]
Manners has been around a long time and is a contrived benchmark meant to exercise the cross product joins and agenda, many people not understanding this tweak the example to achieve better perfmance, making their use of the Manners benchmark pointless. Known cheats to Miss Manners are:
Using arrays for a guests hobbies, instead of asserting each one as a single fact. This massively reduces the cross products.
The altering of the sequence of data can also reducing the amount of matching increase execution speed
Changing NOT CE (conditional element) such that the test algorithm only uses the "first-best-match". Basically, changing the test algorithm to backward chaining. the results are only comparable to other backward chaining rule engines or ports of Manners.
Removing the context so the rule engine matches the guests and seats pre-maturely. A proper port will prevent facts from matching using the context start.
Any change which prevents the rule engine from performing combinatorial pattern matching
If no facts are retracted in the reasoning cycle, as a result of NOT CE, the port is incorrect.
Manners benchmark was written for OPS5 which has two conflict resolution strategies, LEX and MEA; LEX is a chain of several strategies including Salience, Recency, Complexity. The Recency part of the strategy drives the depth first (LIFO) firing order. The Clips manual documents the recency strategy as:
Every fact and instance is marked internally with a “time tag” to indicate its relative recency with respect to every other fact and instance in the system. The pattern entities associated with each rule activation are sorted in descending order for determining placement. An activation with a more recent pattern entities is placed before activations with less recent pattern entities. To determine the placement order of two activations, compare the sorted time tags of the two activations one by one starting with the largest time tags. The comparison should continue until one activation’s time tag is greater than the other activation’s corresponding time tag. The activation with the greater time tag is placed before the other activation on the agenda. If one activation has more pattern entities than the other activation and the compared time tags are all identical, then the activation with more time tags is placed before the other activation on the agenda. | ||
| --Clips Reference Manual | ||
However Jess and Clips both use the Depth strategy, which is simpler and lighter, which Drools also adopted. The Clips manual documents the Depth strategy as:
Newly activated rules are placed above all rules of the same salience. For example, given that fact-a activates rule-1 and rule-2 and fact-b activates rule-3 and rule-4, then if fact-a is asserted before fact-b, rule-3 and rule-4 will be above rule-1 and rule-2 on the agenda. However, the position of rule-1 relative to rule-2 and rule-3 relative to rule-4 will be arbitrary. | ||
| --Clips Reference Manual | ||
The initial Drools implementation for the Depth strategy would not work for manners without the use of salience on the "make_path" rule, the Clips support team had this to say:
The default conflict resolution strategy for CLIPS, depth, is different than the default conflict resolution strategy used by OPS5. Therefore if you directly translate an OPS5 program to CLIPS, but use the default depth conflict resolution strategy, you're only likely to get the correct behavior by coincidence. The lex and mea conflict resolution strategies are provided in CLIPS to allow you to quickly convert and correctly run an OPS5 program in CLIPS | ||
| --Clips Support Forum | ||
Investigation into the Clips code reveals there is undocumented functionality in the Depth strategy. There is an accumulated time tag used in this strategy; it's not an extensively fact by fact comparison as in the recency strategy, it simply adds the total of all the time tags for each activation and compares.
Once the context is changed to START_UP Activations are created for all asserted Guests; because all Activations are created as the result of a single Working Memory action, they all have the same Activation time tag. The last asserted Guest would have a higher fact time tag and its Activation would fire, becuase it has the highest accumulated fact time tag. The execution order in this rule has little importance, but has a big impact in the rule "Assign Seat". The Activation fires and asserts the first Seating arrangement, a Path and then sets the Context's state to create Activation for "Assign Seat".
rule assignFirstSeat
    when
        context : Context( state == Context.START_UP )
        guest : Guest()
        count : Count()
    then
        String guestName = guest.getName();

        insert( new Seating( count.getValue(), 1, true, 1, guestName, 1, guestName) );
        insert( new Path( count.getValue(), 1, guestName ) );

        count.setValue(  count.getValue() + 1 );
        update( count );
        context.setState( Context.ASSIGN_SEATS );
        update( context );
endThis rule determines each of the Seating arrangements. The Rule creates cross product solutions for ALL asserted Seating arrangements against ALL the asserted guests; accept against itself or any already assigned Chosen solutions.
rule findSeating
   when
       context : Context( state == Context.ASSIGN_SEATS )
       $s      : Seating( pathDone == true )
       $g1     : Guest( name == $s.rightGuestName )
       $g2     : Guest( sex != $g1.sex, hobby == $g1.hobby )
       count   : Count()
       not ( Path( id == $s.id, guestName == $g2.name) )
       not ( Chosen( id == $s.id, guestName == $g2.name, hobby == $g1.hobby) )
   then
       int rightSeat = $s.getRightSeat();
       int seatId = $s.getId();
       int countValue = count.getValue();

       insert( new Seating( countValue, seatId, false, rightSeat, $s.getRightGuestName(), rightSeat + 1, $g2.getName() ) );
       insert( new Path( countValue, rightSeat + 1, $g2.getName() ) );
       insert( new Chosen( seatId, $g2.getName(), $g1.getHobby() ) );

       count.setValue(  countValue + 1 );
       update( count );
       context.setState( Context.MAKE_PATH );
       update( context );
end
However, as can be seen from the printed results shown earlier, it is essential that only the Seating with the highest pid cross product be chosen – yet how can this be possible if we have Activations, of the same time tag, for nearly all existing Seating and Guests. For example on the third iteration of "Assing Seat" these are the produced Activations, remember this is from a very small data set and with larger data sets there would be many more possible Activated Seating solutions, with multiple solutions per pid:
=>[ActivationCreated(35): rule=findSeating
[fid:19:33]:[Seating id=3, pid=2, done=true, ls=2, ln=n4, rs=3, rn=n3]
[fid:4:4]:[Guest name=n3, sex=m, hobbies=h3]
[fid:3:3]:[Guest name=n2, sex=f, hobbies=h3]
=>[ActivationCreated(35): rule=findSeating
[fid:15:23]:[Seating id=2, pid=1, done=true, ls=1, ln=n5, rs=2, rn=n4]
[fid:5:5]:[Guest name=n4, sex=m, hobbies=h1]
[fid:2:2]:[Guest name=n2, sex=f, hobbies=h1]
=>[ActivationCreated(35): rule=findSeating
[fid:13:13]:[Seating id=1, pid=0, done=true, ls=1, ln=n5, rs=1, rn=n5]
[fid:9:9]:[Guest name=n5, sex=f, hobbies=h1]
[fid:1:1]:[Guest name=n1, sex=m, hobbies=h1]
The creation of all these redundant Activations might seem pointless, but it must be remembered that Manners is not about good rule design; it's purposefully designed as a bad ruleset to fully stress test the cross product matching process and the agenda, which this clearly does. Notice that each Activation has the same time tag of 35, as they were all activated by the change in Context to ASSIGN_SEATS. With OPS5 and LEX it would correctly fire the Activation with the last asserted Seating. With Depth the accumulated fact time tag ensures the Activation with the last asserted Seating fires.
"Make Path" must always fires before "Path Done". A Path is asserted for each Seating arrangement up to the last asserted Seating. Notice that "Path Done" is a subset of "Make Path", so how do we ensure that "Make Path" fires first?
rule makePath
    when
        Context( state == Context.MAKE_PATH )
        Seating( seatingId:id, seatingPid:pid, pathDone == false )
        Path( id == seatingPid, pathGuestName:guestName, pathSeat:seat )
        not Path( id == seatingId, guestName == pathGuestName )
    then
        insert( new Path( seatingId, pathSeat, pathGuestName ) );
end
rule pathDone
when
context : Context( state == Context.MAKE_PATH )
seating : Seating( pathDone == false )
then
seating.setPathDone( true );
update( seating );
context.setState( Context.CHECK_DONE );
update( context );
end
Both rules end up on the Agenda in conflict and with identical activation time tags, however the accumulate fact time tag is greater for "Make Path" so it gets priority.
"Are We Done" only activates when the last seat is assigned, at which point both rules will be activated. For the same reason that "Make Path" always wins over "Path Done" "Are We Done" will take priority over "Continue".
rule areWeDone
    when
        context : Context( state == Context.CHECK_DONE )
        LastSeat( lastSeat: seat )
        Seating( rightSeat == lastSeat )
    then
        context.setState(Context.PRINT_RESULTS );
        update( context );
end
rule continue
    when
        context : Context( state == Context.CHECK_DONE )
    then
        context.setState( Context.ASSIGN_SEATS );
        update( context );
end
Assign First seat
=>[fid:13:13]:[Seating id=1, pid=0, done=true, ls=1, ln=n5, rs=1, rn=n5]
=>[fid:14:14]:[Path id=1, seat=1, guest=n5]
==>[ActivationCreated(16): rule=findSeating
[fid:13:13]:[Seating id=1, pid=0, done=true, ls=1, ln=n5, rs=1, rn=n5]
[fid:9:9]:[Guest name=n5, sex=f, hobbies=h1]
[fid:1:1]:[Guest name=n1, sex=m, hobbies=h1]
==>[ActivationCreated(16): rule=findSeating
[fid:13:13]:[Seating id=1 , pid=0, done=true, ls=1, ln=n5, rs=1, rn=n5]
[fid:9:9]:[Guest name=n5, sex=f, hobbies=h1]
[fid:5:5]:[Guest name=n4, sex=m, hobbies=h1]*
Assign Seating
=>[fid:15:17] :[Seating id=2 , pid=1 , done=false, ls=1, lg=n5, rs=2, rn=n4]
=>[fid:16:18]:[Path id=2, seat=2, guest=n4]
=>[fid:17:19]:[Chosen id=1, name=n4, hobbies=h1]
=>[ActivationCreated(21): rule=makePath
[fid:15:17] : [Seating id=2, pid=1, done=false, ls=1, ln=n5, rs=2, rn=n4]
[fid:14:14] : [Path id=1, seat=1, guest=n5]*
==>[ActivationCreated(21): rule=pathDone
[Seating id=2, pid=1, done=false, ls=1, ln=n5, rs=2, rn=n4]*
Make Path
=>[fid:18:22:[Path id=2, seat=1, guest=n5]]
Path Done
Continue Process
=>[ActivationCreated(25): rule=findSeating
[fid:15:23]:[Seating id=2, pid=1, done=true, ls=1, ln=n5, rs=2, rn=n4]
[fid:7:7]:[Guest name=n4, sex=f, hobbies=h3]
[fid:4:4] : [Guest name=n3, sex=m, hobbies=h3]*
=>[ActivationCreated(25): rule=findSeating
[fid:15:23]:[Seating id=2, pid=1, done=true, ls=1, ln=n5, rs=2, rn=n4]
[fid:5:5]:[Guest name=n4, sex=m, hobbies=h1]
[fid:2:2]:[Guest name=n2, sex=f, hobbies=h1], [fid:12:20] : [Count value=3]
=>[ActivationCreated(25): rule=findSeating
[fid:13:13]:[Seating id=1, pid=0, done=true, ls=1, ln=n5, rs=1, rn=n5]
[fid:9:9]:[Guest name=n5, sex=f, hobbies=h1]
[fid:1:1]:[Guest name=n1, sex=m, hobbies=h1]
Assign Seating
=>[fid:19:26]:[Seating id=3, pid=2, done=false, ls=2, lnn4, rs=3, rn=n3]]
=>[fid:20:27]:[Path id=3, seat=3, guest=n3]]
=>[fid:21:28]:[Chosen id=2, name=n3, hobbies=h3}]
=>[ActivationCreated(30): rule=makePath
[fid:19:26]:[Seating id=3, pid=2, done=false, ls=2, ln=n4, rs=3, rn=n3]
[fid:18:22]:[Path id=2, seat=1, guest=n5]*
=>[ActivationCreated(30): rule=makePath
[fid:19:26]:[Seating id=3, pid=2, done=false, ls=2, ln=n4, rs=3, rn=n3]
[fid:16:18]:[Path id=2, seat=2, guest=n4]*
=>[ActivationCreated(30): rule=done
[fid:19:26]:[Seating id=3, pid=2, done=false, ls=2, ln=n4, rs=3, rn=n3]*
Make Path
=>[fid:22:31]:[Path id=3, seat=1, guest=n5]
Make Path
=>[fid:23:32] [Path id=3, seat=2, guest=n4]
Path Done
Continue Processing
=>[ActivationCreated(35): rule=findSeating
[fid:19:33]:[Seating id=3, pid=2, done=true, ls=2, ln=n4, rs=3, rn=n3]
[fid:4:4]:[Guest name=n3, sex=m, hobbies=h3]
[fid:3:3]:[Guest name=n2, sex=f, hobbies=h3], [fid:12:29]*
=>[ActivationCreated(35): rule=findSeating
[fid:15:23]:[Seating id=2, pid=1, done=true, ls=1, ln=n5, rs=2, rn=n4]
[fid:5:5]:[Guest name=n4, sex=m, hobbies=h1]
[fid:2:2]:[Guest name=n2, sex=f, hobbies=h1]
=>[ActivationCreated(35): rule=findSeating
[fid:13:13]:[Seating id=1, pid=0, done=true, ls=1, ln=n5, rs=1, rn=n5]
[fid:9:9]:[Guest name=n5, sex=f, hobbies=h1], [fid:1:1] : [Guest name=n1, sex=m, hobbies=h1]
Assign Seating
=>[fid:24:36]:[Seating id=4, pid=3, done=false, ls=3, ln=n3, rs=4, rn=n2]]
=>[fid:25:37]:[Path id=4, seat=4, guest=n2]]
=>[fid:26:38]:[Chosen id=3, name=n2, hobbies=h3]
==>[ActivationCreated(40): rule=makePath
[fid:24:36]:[Seating id=4, pid=3, done=false, ls=3, ln=n3, rs=4, rn=n2]
[fid:23:32]:[Path id=3, seat=2, guest=n4]*
==>[ActivationCreated(40): rule=makePath
[fid:24:36]:[Seating id=4, pid=3, done=false, ls=3, ln=n3, rs=4, rn=n2]
[fid:20:27]:[Path id=3, seat=3, guest=n3]*
=>[ActivationCreated(40): rule=makePath
[fid:24:36]:[Seating id=4, pid=3, done=false, ls=3, ln=n3, rs=4, rn=n2]
[fid:22:31]:[Path id=3, seat=1, guest=n5]*
=>[ActivationCreated(40): rule=done
[fid:24:36]:[Seating id=4, pid=3, done=false, ls=3, ln=n3, rs=4, rn=n2]*
Make Path
=>fid:27:41:[Path id=4, seat=2, guest=n4]
Make Path
=>fid:28:42]:[Path id=4, seat=1, guest=n5]]
Make Path
=>fid:29:43]:[Path id=4, seat=3, guest=n3]]
Path Done
Continue Processing
=>[ActivationCreated(46): rule=findSeating
[fid:15:23]:[Seating id=2, pid=1, done=true, ls=1, ln=n5, rs=2, rn=n4]
[fid:5:5]:[Guest name=n4, sex=m, hobbies=h1], [fid:2:2]
[Guest name=n2, sex=f, hobbies=h1]
=>[ActivationCreated(46): rule=findSeating
[fid:24:44]:[Seating id=4, pid=3, done=true, ls=3, ln=n3, rs=4, rn=n2]
[fid:2:2]:[Guest name=n2, sex=f, hobbies=h1]
[fid:1:1]:[Guest name=n1, sex=m, hobbies=h1]*
=>[ActivationCreated(46): rule=findSeating
[fid:13:13]:[Seating id=1, pid=0, done=true, ls=1, ln=n5, rs=1, rn=n5]
[fid:9:9]:[Guest name=n5, sex=f, hobbies=h1]
[fid:1:1]:[Guest name=n1, sex=m, hobbies=h1]
Assign Seating
=>[fid:30:47]:[Seating id=5, pid=4, done=false, ls=4, ln=n2, rs=5, rn=n1]
=>[fid:31:48]:[Path id=5, seat=5, guest=n1]
=>[fid:32:49]:[Chosen id=4, name=n1, hobbies=h1]
Name: Conways Game Of Life
Main class: org.drools.examples.conway.ConwayAgendaGroupRun org.drools.examples.conway.ConwayRuleFlowGroupRun
Type: java application
Rules file: conway-ruleflow.drl conway-agendagroup.drl
Objective: Demonstrates 'accumulate', 'collect' and 'from'
Conway's Game Of Life, http://en.wikipedia.org/wiki/Conway's_Game_of_Life http://www.math.com/students/wonders/life/life.html, is a famous cellular automaton conceived in the early 1970's by mathematician John Conway. While the system is well known as "Conway's Game Of Life", it really isn't a game at all. Conway's system is more like a life simulation. Don't be intimidated. The system is terribly simple and terribly interesting. Math and Computer Science students alike have marvelled over Conway's system for more than 30 years now. The application represented here is a Swing based implementation of Conway's Game of Life. The rules that govern the system are implemented as business rules using Drools. This document will explain the rules that drive the simulation and discuss the Drools specific parts of the implementation.
We'll first introduce the grid view, shown below, to help visualisation of the problem; this is where the life simuation takes place. Initially the grid is empty, meaning that there are no live cells in the system; ech cell can be considered "LIVE" or "DEAD", live cells have a green ball in them. Pre-selected patterns of live cells can be selected from the "Pattern" drop down or cells can be doubled-clicked to toggle them between LIVE and DEAD. It's important to understand that each cell is related to it's neighbour cells, which is a core part of the game's rules and will be explained in a moment. Neighbors include not only cells to the left, right, top and bottom but also cells that are connected diagonally. Each cell has a total of 8 neighbors except the 4 corner cells and all of the other cells along the 4 edges. Corner cells have 3 neighbors and other edge cells have 5 neighbors.
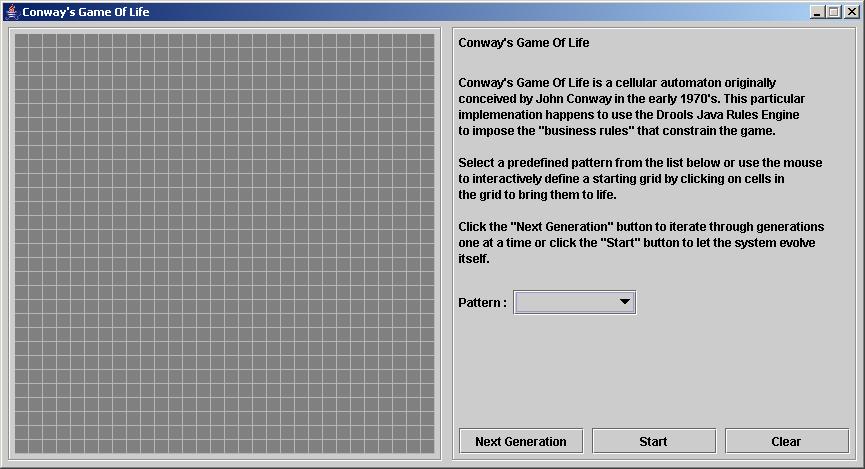
So what are the basic rules that govern this game? Each generation, i.e. completion iteration and evalution of all cells, the system evolves and cells may be born or killed, there are a very simple set of rules that govern what the next generation will look like.
If a live cell has fewer than 2 live neighbors, it dies of loneliness
If a live cell has more than 3 live neighbors, it dies from overcrowding
If a dead cell has exactly 3 live neighbors, it comes to life
That is all there is to it. Any cell that doesn't meet any of those criteria is left as is for the next generation. With those simple rules in mind, go back and play with the system a little bit more and step through some generations one at a time and notice these rules taking their effect.
The screnshot below shows an example generation, with a number of live cells. Don't worry about matching the exact patterns represented in the screen shot. Just get some groups of cells added to the grid. Once you have groups of live cells in the grid, or select a pre-designed pattern, click the "Next Generation" button and notice what happens. Some of the live cells are killed (the green ball disappears) and some dead cells come to life (a green ball appears). Cycle through several generations and see if you notice any patterns. If you click on the "Start" button, the system will evolve itself so you don't need to click the "Next Generation" button over and over. Play with the system a little and then come back here for more details of how the application works.

Now lets delve into the code, as this is an advanced example we'll assume that by now you know your way around the Drools framework and able to connect many of the dots, so we'll just focus at a hgh level overview.The example has two ways to execute, one way uses AgendaGroups to manage execution flow the other uses RuleFlowGroups to manage execution flow - so it's a great way to see the differences. - that's ConwayAgendaGroupRun and ConwayRuleFlowGroupRun respectively. For this example I'll cover the ruleflow version, as its what most people will use.
All the Cells are inserted into the session and the rules in the ruleflow-group "register neighbor" are allowed to execute by the ruleflow process. What this group of rules does is for each cell it registers the north east, north, north west and west cells using a Neighbor relation class, notice this relation is bi-drectional which is why we don't have to do any rules for southern facing cells. Note that the constraints make sure we stay one column back from the end and 1 row back from the top. By the time all activations have fired for these rules all cells are related to all their neighboring cells.
Example 10.74. Conways Example : Register all Cell Neighbour relations
rule "register north east"
    ruleflow-group "register neighbor"
when
    CellGrid( $numberOfColumns : numberOfColumns )
    $cell: Cell( $row : row > 0, $col : col < ( $numberOfColumns - 1 ) )
    $northEast : Cell( row  == ($row - 1), col == ( $col + 1 ) )
then
    insert( new Neighbor( $cell, $northEast ) );
    insert( new Neighbor( $northEast, $cell ) );
end

rule "register north"
    ruleflow-group "register neighbor"
when
    $cell: Cell( $row : row > 0, $col : col )
    $north : Cell( row  == ($row - 1), col == $col )
then
    insert( new Neighbor( $cell, $north ) );
    insert( new Neighbor( $north, $cell ) );
end

rule "register north west"
    ruleflow-group "register neighbor"
when
    $cell: Cell( $row : row > 0, $col : col > 0 )
    $northWest : Cell( row  == ($row - 1), col == ( $col - 1 ) )
then
    insert( new Neighbor( $cell, $northWest ) );
    insert( new Neighbor( $northWest, $cell ) );
end

rule "register west"
    ruleflow-group "register neighbor"
when
    $cell: Cell( $row : row >= 0, $col : col > 0 )
    $west : Cell( row  == $row, col == ( $col - 1 ) )
then
    insert( new Neighbor( $cell, $west ) );
    insert( new Neighbor( $west, $cell ) );
end
Once all the cells are inserted some java code applies the pattern to the grid setting certain cells to Live. Then when the user clicks "start" or "next generation" it executes the "Generation" ruleflow. This ruleflow is responsible for the management of all changes of cells in each generation cycle.
The ruleflow process first enters the "evaluate" group, this means any active rule in that group can fire. The rules in this group apply the main game of life rules discussed in the beginning of the example, where it determines what cells will be killed and which ones given life. We use the "phase" attribute to drives the reasoning of the Cell by specific groups of rules; typical the phase is tied to a RuleFlowGroup. in the ruleflow process definition. Notice that it doesn't actually change the state of any Cells at this point; this is because it's evaluating the Grid in turn and it must complete the full evaluation until those changes can be applied. To achieve this it sets the cell to a "phase" which is either Phase.KILL or Phase.BIRTH, which is used later to control actions applied to the Cell and when.
Example 10.75. Conways Example : Evaluate Cells with state changes
rule "Kill The Lonely"
    ruleflow-group "evaluate"
    no-loop
when
#   A live cell has fewer than 2 live neighbors
    theCell: Cell(liveNeighbors < 2, cellState == CellState.LIVE, phase == Phase.EVALUATE)
then
    theCell.setPhase(Phase.KILL);
    update( theCell );
end

rule "Kill The Overcrowded"
    ruleflow-group "evaluate"
    no-loop
when
#   A live cell has more than 3 live neighbors
    theCell: Cell(liveNeighbors > 3, cellState == CellState.LIVE, phase == Phase.EVALUATE)
then
    theCell.setPhase(Phase.KILL);
    update( theCell );
end

rule "Give Birth"
    ruleflow-group "evaluate"
    no-loop
when
#   A dead cell has 3 live neighbors
    theCell: Cell(liveNeighbors == 3, cellState == CellState.DEAD, phase == Phase.EVALUATE)
then
    theCell.setPhase(Phase.BIRTH);
    update( theCell );
end
Once all Cells in the grid have been evaluated we first clear any calculation activations, that occured from any previous data changes, via the "reset calculate" rule, which clears any activations in the "calculate" group. We then enter a split which allows any activations in the "kill" groups and "birth" groups to fire, these rules are responsible for applying the state change.
Example 10.76. Conways Example : Apply the state changes
rule "reset calculate"
    ruleflow-group "reset calculate"
when
then
    WorkingMemory wm = drools.getWorkingMemory();
    wm.clearRuleFlowGroup( "calculate" );
end

rule "kill"
    ruleflow-group "kill"
    no-loop
when
    theCell: Cell(phase == Phase.KILL)
then
    theCell.setCellState(CellState.DEAD);
    theCell.setPhase(Phase.DONE);
    update( theCell );
end

rule "birth"
    ruleflow-group "birth"
    no-loop
when
    theCell: Cell(phase == Phase.BIRTH)
then
    theCell.setCellState(CellState.LIVE);
    theCell.setPhase(Phase.DONE);
    update( theCell );
end
At this stage a number of Cells have been modified with the state changed to either LIVE or DEAD, this is where we get to see the power of the Neighbour cell and relational programming. When a cell becomes LIVE or DEAD we use the Neigbor relation drive the iteration over all surrounding Cells increasing or decreasing the LIVE neighbour count, any cell who has their count changed is also set to to the EVALUATE phase, to make sure they are reasoned over duing the evaluate stage of the ruleflow process. Notice that we don't have to do any iteration ourselves, by simpy applying the relations in the rules we can get the rule engine to do all the hard work for us in a minimal amount of code - very nice :) Once the live count for all Cells has been determiend and set the ruleflow process comes to and end; the user can either tell it to evaluate another generation, of if "start" was clicked the engine will start the ruleflow process again.
Example 10.77. Conways Example : Evaluate Cells with state changes
rule "Calculate Live"
    ruleflow-group "calculate"
    lock-on-active
when
    theCell: Cell(cellState == CellState.LIVE)
    Neighbor(cell == theCell, $neighbor : neighbor)
then
    $neighbor.setLiveNeighbors( $neighbor.getLiveNeighbors() + 1 );
    $neighbor.setPhase( Phase.EVALUATE );
    update( $neighbor );
end

rule "Calculate Dead"
    ruleflow-group "calculate"
    lock-on-active
when
    theCell: Cell(cellState == CellState.DEAD)
    Neighbor(cell == theCell, $neighbor : neighbor )
then
    $neighbor.setLiveNeighbors( $neighbor.getLiveNeighbors() - 1 );
    $neighbor.setPhase( Phase.EVALUATE );
    update( $neighbor );
end Name: drools-insurance Type: java web application Rules file: exported repository from brms, repository_export.xml Objective: Demonstrates how to use, organize, deploy and execute a rulebase from BRMS
The BRMS has many GUI editors, and textual editors. This discusses a few example rules using some of the GUI features:
The above example shows the guided editor in action. This is a slightly more complex example, as a few bound variables are used. We are binding "$driver" to the Driver fact, and also binding driverId to the id field of the driver (which is then used in the SupplementalInfo fact - to join the driverId with the actual driver id). Note the use of the ruleflow-group to specify what step of the processing this rule applies to.
The above shows the editor using a DSL. In this case the "guided editor" was used - this is not a text area, but only provides text boxes to "fill in the blanks" as specified in the DSL configuration. Note you can also use text based DSLs where there is not this restriction.
Insurance, in law and economics, is a form of risk management primarily used to hedge against the risk of a contingent loss. Insurance is defined as the equitable transfer of the risk of a loss, from one entity to another, in exchange for a premium. Insurer, in economics, is the company that sells the insurance. Insurance rate is a factor used to determine the amount, called the premium, to be charged for a certain amount of insurance coverage. Risk management, the practice of appraising and controlling risk, has evolved as a discrete field of study and practice.
If you have a poor driving record, you may need to look into high risk auto insurance. Accidents increase these rates as well. If you have a low experience for example less than 3 years as a licensed driver, insurance companies believe that the chances that you will be involved in a traffic accident are higher than someone more expert.
Who you are also plays a factor. Men are considered more of a risk than women. Teens are considered more of a risk than adults as well if you have some younger driver in family like your 20 years old son.
rule "Young male single driver"
ruleflow-group "risk assessment"
when
 $driver : Driver( genre == Driver.MALE, age < 25, maritalState == Driver.SINGLE )
then
 $driver.updateInsuranceFactor(1.6);
end

rule "no expert driver"
ruleflow-group "risk assessment"
when
 $driver : Driver ( licenceYears < 3 )
then
 $driver.updateInsuranceFactor(1.2);
end
Extra coverage over glasses, additional car and accessories, like your expansive "pimped" sound system will increase your insurance final price, not the risk factor.
ruleflow-group "insurancecalcule"
salience 20
when
 not Rejection()
 $driver : Driver ( driverID : id )
 $access : AccessoriesCoverage ( driverId == driverID)
 $policy : Policy( approved == true )
then
 $policy.setInsurancePrice( $policy.getInsurancePrice() +
  ($access.getAlarmSystemValue() * 0.10) +
  ($access.getArmorValue() * 0.20) +
  ($access.getSoundSystemValue() * 0.30 ));
This example uses the previously explained RuleFlow feature, the following diagram gives you an overview of the insurance factor and calculate logic: As you can see, we first calculate the insurance factor, if the driver matches with some rejection condition we don't execute the group that contains the Policy price calculus, just returning and not approved policy
ruleflow-group "insurancecalcule"
salience 10
when
 not Rejection()
 $driver : Driver(ifactor : insuranceFactor)
 $policy : Policy( approved == true, bp : basePrice, ip : insurancePrice )
then
 $policy.setInsurancePrice((bp * ifactor) + ip);
Download the latest version of BRMS from http://cruisecontrol.jboss.com/cc/artifacts/jboss-rules
Deploy BRMS WAR file into JBoss4.2 AS or JBossWeb, other containers can be used as well possibly with some tweaking of dependencies (check this url if you using a different application server http://wiki.jboss.org/wiki/Wiki.jsp?page=JBRMSjsfdependencies).
Check you can access and run the BRMS.
Check out the demo project from the Drools subversion repository http://anonsvn.labs.jboss.com/labs/jbossrules/trunk/drools-examples/drools-insurance/
Import the demo business rules insurance repository file into BRMS, the compressed can be found at "files" folder in the demo project. To do this, open the "files" directory, unzip the file there locally, and then go to the "Admin" section and "Manage import/export" of the BRMS, select the file, and press "Import" - follow instructions.
Navigate through the BRMS web application to see how things are placed and organized and try to create some rules.
Go to the "Packages" feature and build the package (you should see no errors).
Now go to the "Deployment" feature, when you click on the package, it will show you one snapshot (which was part of the import, you can create more if you like from the previous step).
Go into your downloaded project and execute
mvn clean package
You should see the RuleAgent downloadomg the pre-compiled package from brms, if something goes wrong and all tests fails, check if the BRMS is up and running and try rebuild the package snapshot.
Running org.acme.insurance.test.DriverTest
RuleAgent(insuranceconfig) INFO (Wed Sep 18 14:11:44 BRT 2007): Configuring with newInstance=true, secondsToRefresh=30
RuleAgent(insuranceconfig) INFO (Wed Sep 18 14:11:44 BRT 2007): Configuring package provider : URLScanner monitoring URLs:
                          http://localhost:8080/drools-jbrms/org.drools.brms.JBRMS/package/org.acme.insurance.base/InsuranceDemo

RuleAgent(insuranceconfig) INFO (Wed Sep 18 14:11:45 BRT 2007): Applying changes to the rulebase.
RuleAgent(insuranceconfig) INFO (Wed Sep 18 14:11:45 BRT 2007): Creating a new rulebase as per settings.
RuleAgent(insuranceconfig) INFO (Wed Sep 18 14:11:45 BRT 2007): Adding package called org.acme.insurance.base

... snip ...

Insurance calculate
Insurance Calcule: 0.0
Driver wants non related expenses coverage: 1.05
Driver wants glass coverage: 1.1025
Driver wants extra assistence: 1.1576250000000001
Driver wants an extra Car: 1.2155062500000002
Driver Single Young Male Driver factor: 1.9448100000000004
New Licenced driver 2.333772
approve: 0.0
Policy aproved focusing insurance calcule agenda-group
Insurance calculate
Insurance Calcule: 0.0
Night Vehicle Place: 1.44
Day Vehicle Place: 1.656
approve: 0.0
Policy aproved focusing insurance calcule agenda-group
Insurance calculate
Insurance extra itens percent: 545.0
Insurance Calcule: 545.0
Tests run: 3, Failures: 0, Errors: 0, Skipped: 0, Time elapsed: 0.028 sec

Results :
Tests run: 16, Failures: 0, Errors: 0, Skipped: 0
After running and packing you are able to deploy the war into your application server, just following the previous instructions for BRMS, then point your browser to the example url, that should be something like this http://localhost:8080/drools-insurance. Just play around the example and change some values and press the execute button, after the rules fired the result will be displayed in the bottom of the page.