User authentication
Local user authentication, including group based user management
LDAP authentication, including MS Active Directory, Novell eDirectory and OpenLDAP
Windows authentication, including Windows NT4.0 or 2000/2003 domains and Samba
RADIUS authentication
Advanced access control
Network based access control over IP and MAC addresses
Time based access restrictions
Download throttling
MIME type filter
Blocking of unauthorized browsers or client software
Group based access with groups coming from Windows active directory
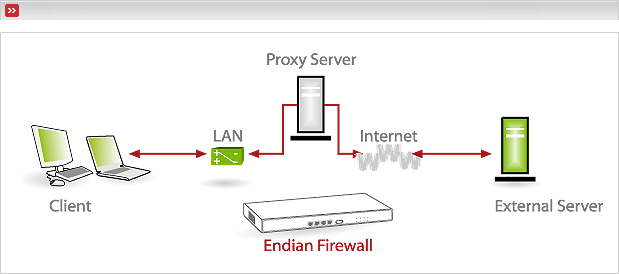
The common settings are essential parameters related to the proxy services

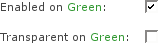
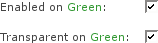
- Enabled on zone
This enables the Proxy Server to listen for requests on the selected zone (GREEN or BLUE or ORANGE).
Note
If the proxy service is disabled, all client requests will be forwarded directly to the destination address without passing the proxy service and therefore the requests will bypass all configured ACLs.
- Transparent on zone
If the transparent mode is enabled, all requests for the destination port 80 will be forwarded to the Proxy Server without the need of any special configuration changes to your clients.
Warning
Transparent mode works only for destination port 80. All other requests (e.g. port 443 for SSL) will bypass the Proxy Server.
Note
When using any type of authentication, the Proxy may not run in transparent mode.
Note
To enforce the usage of the Proxy Server in non-transparent mode, you will have to block all outgoing ports usually used for http traffic (80, 443, 8000, 8080, etc.).
- Proxy Port
This is the port the Proxy Server will listen for client requests. The default is 8080.
Note
In transparent mode, all client requests for port 80 will automatically be redirected to this port.
Warning
In non-transparent mode, make sure that your clients are configured to use this port. Otherwise they will bypass the Proxy Server and all ACLs will be ignored.
- Visible hostname
If you want to present a special hostname in error messages or for upstream proxy servers , then define this. Otherwise, the real hostname of your Endian Firewall will be used. This is optional.
- Cache administrator e-mail
This e-mail address will be shown on the Proxy Server error messages. This is optional.
- Error messages language
Select the language in which the Proxy Server error messages will be displayed to the clients.
- Contentfilter enabled
By enabling this feature you can activate different types of filters in the Content filter menu.
Note
This feature will only partially work for SSL connections, as it is not possible to do pattern matching on encrypted data. The URL filtering however will work perfectly.
- Antivirus enabled
This enables antivirus protection when browsing through the world wide web.
Warning
It is not possible to scan encrypted connections for viruses.
- Allowed ports
Only HTTP connections on one of the specified ports will pass through the proxy. The rest will be blocked
Note
When using transparent mode this feature will not work.
.
- Allowed SSL ports
Like the allowed ports option but this time for SSL encrypted HTTP (HTTPS) connections.
Note
When using transparent mode this feature will not work.
These settings may be required for chained proxy environments.
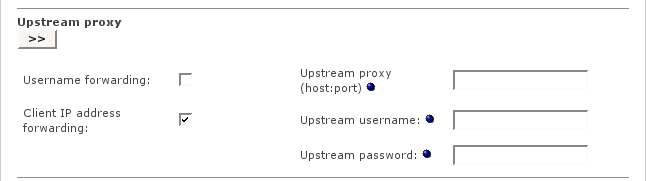
- Username forwarding
If any type of authentication is activated for HTTP Proxy, this enables the forwarding of the login name. This can be useful for user based ACLs or logging on remote proxy servers.
Note
This is for ACL or logging purposes only and doesn’t work if the upstream proxy requires a real login.
Note
The forwarding is limited to the username, the password will not be forwarded.
- Client IP address forwarding
This enables the HTTP x-forwarded-for header field. If enabled, the internal client IP address will be added to the HTTP header.
x-forwarded-for: 192.168.1.37
This can be useful for source based ACLs or logging on remote proxy servers. Instead of forwarding unknown, this field will be completely suppressed by default.
Note
If the last proxy in chain doesn’t strip this field, it will be forwarded to the destination host!
- Upstream proxy (host:port)
If you are using a parent cache, then enter the IP address and port of this upstream Proxy. If no value for port is given, the default port 80 will be used.
- Upstream username
Enter the username for the upstream Proxy Server (only if required).
Note
If you enter a password, the username forwarding (described above) will be disabled.
- Upstream password
Enter the password for the upstream Proxy Server (only if required).
Note
If you enter a password, the username forwarding (described above) will be disabled.
These options are for enabling the HTTP Proxy log files.

- Log enabled
This enables the Web Proxy logging feature. All client requests will be written to a log file and can be viewed within the GUI under Logs > Proxy Logs (See the section called “Proxy Logs Page”).
Warning
Enabling this option may be considered invasion of personal privacy of your clients in some countries and/or break other legal rules.
Before you are using this option make sure that this will be in accordance with the national law or other legal regulations.
In most countries, the user must agree that personal data will be logged. Do not enable this in a business environment without the written agreement of the workers council.
- Firewall logs outgoing connections
Tick this on if you want the firewall to log all outgoing connections.
Warning
In most countries this may be illegal!
- Log query terms
The part of the URL containing dynamic queries will be stripped by default before logging. Enabling the option Log query terms will turn this off and the complete URL will be logged.
Warning
Enabling this option may be considered invasion of personal privacy in some countries!
- Log useragents
Enabling this option will write the useragent string to the log file /var/log/squid/useragent.log. This log file option should only be activated for debugging purposes and the result is not shown within the GUI based log viewer.
The cache management settings control the caching parameters for Advanced Proxy.
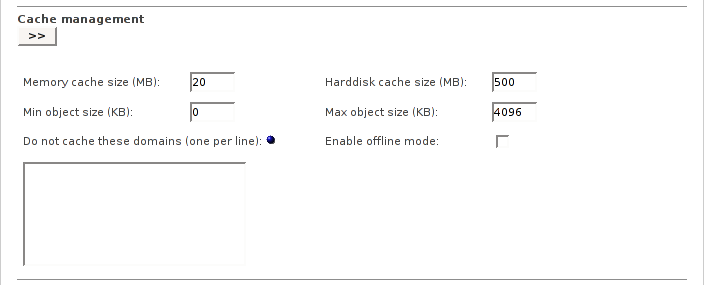
- Memory cache size
This is the amount of physical RAM to be used for negative-cached and in-transit objects. This value should not exceed more than 50% of installed RAM. The minimum for this value is 1MB, the default is 20 MB.
Note
This parameter does not specify the maximum process size. It only places a limit on how much additional RAM the Web Proxy will use as a cache of objects.
- Harddisk cache size
This is the amount of disk space (MB) to use for cached objects. The default is 500 MB. Change this to suit your configuration. Do not put the size of your disk drive here. If you want Squid to use the entire disk drive, subtract 20% of the real disk size and use that value instead.
- Min object size
Objects smaller than this size will not be saved on disk. The value is specified in kilobytes, and the default is 0 KB, which means there is no minimum.
- Max object size
Objects larger than this size will not be saved on disk. The value is specified in kilobytes, and the default is 4MB (4096KB). If you wish to increase speed at the expense of saving bandwidth you should keep this low.
- Do not cache these domains
A list of sites which cause the request not to be satisfied from the cache and the reply not to be cached. In other words, use this to force objects to never be cached. All domains must be entered with a leading dot:
.advproxy.net
.google.com
- Enable offline mode
Enabling this option will turn off the validation of cached objects. This gives access to more cached information (stale cached versions, where the origin server should have been contacted).
This defines the access control for accessing the Proxy Server based on the client network address.
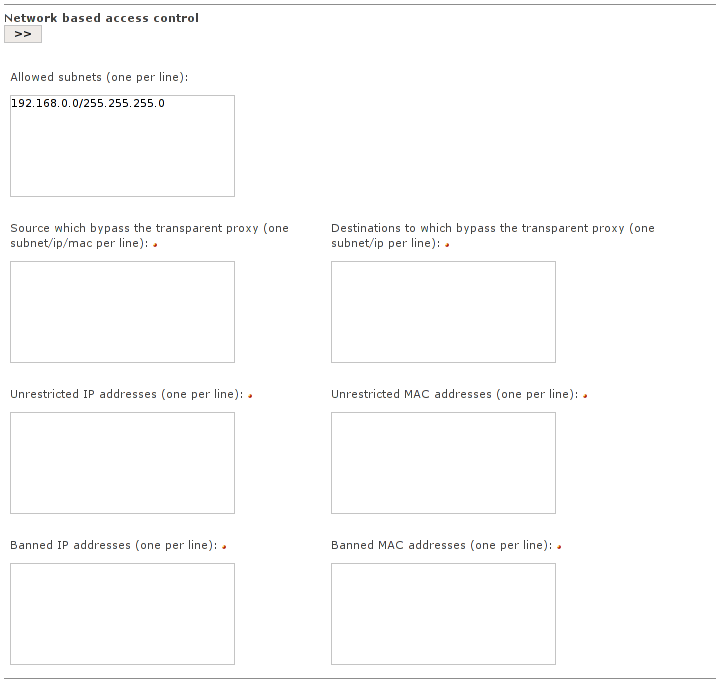
- Allowed subnets
All listed subnets are allowed to access the Proxy Server. By default, the subnets for GREEN, BLUE and ORANGE (if available) are listed here.
Warning
If you ever change the network configuration of any zone with the network wizard described in the section called “Network Configuration”, you also need to change the values also in this list, especially if a subnet will be changed.
You can add other subnets like subnets behind GREEN in larger environments to this list.
Note
All subnets not listed here will be blocked for web access.
- Sources which bypass the transparent proxy
When using the transparent proxy all subnets, IP adresses and MAC addresses that are specified here will be allowed to connect directly to the requested URLs, instead of using the proxy.
Note
MAC addresses have to be entered in the following form: 00:00:00:00:00:00
- Destinations to which the transparent proxy is bypassed
When using the transparent proxy and connecting to the subnets or IP adresses that are specified here, the connection will not go through the proxy but will be established directly.
- Unrestricted IP addresses
All client IP addresses in this list will override the following restrictions:
Time restrictions
Size limits for download requests
Download throttling
Browser check
MIME type filter
Authentication (will be required by default for these addresses, but can be turned off)
Concurrent logins per user (only available if authentication is enabled)
- Unrestricted MAC addresses
All client MAC addresses in this list will override the following restrictions:
Time restrictions
Size limits for download requests
Download throttling
Browser check
MIME type filter
Authentication (will be required by default for these addresses, but can be turned off)
Concurrent logins per user (only available if authentication is enabled)
Note
Using MAC addresses instead of IP addresses can be useful if the DHCP service is enabled without having fixed leases defined.
Note
MAC addresses can be entered in one of these forms:
00-00-00-00-00-00 or 00:00:00:00:00:00
Note
The Proxy Server can only determine MAC addresses from clients configured for the subnets of the GREEN, BLUE or ORANGE interfaces.
- Banned IP addresses or subnets
All requests from these clients (IP addresses or subnets) in this list will be blocked.
- Banned MAC addresses
All requests from these clients in this list will be blocked. Using MAC addresses instead of IP addresses can be useful if the DHCP service is enabled without having fixed leases defined.
MAC addresses can be entered in one of these forms:
00-00-00-00-00-00 or 00:00:00:00:00:00
Note
The Proxy Server can only determine MAC addresses from clients configured for the subnets of the GREEN, BLUE or ORANGE interfaces.
This defines the operational time of the Web Proxy.

The option allow allows web access and the option deny blocks web access within the selected time. The choice of allow or deny will depend on the time rules you want to apply. The default is set to allow access every day around the clock.
Note
Time restrictions will not be effective for these clients.
Sources which bypass the transparent proxy
Destinations to which the transparent proxy is bypassed
Unrestricted source IP addresses
Unrestricted source MAC addresses
Members of the group Extended if the Proxy uses Local authentication
This allows you to enter limitations of the size for each download and/or upload request.

The values are given in KB. A reason for transfer limits could be that you want to prevent downloading large files, such as CD images. The default is set to 0 KB for upload and download. This value turns off any limitation.
Note
This limits refer to each single request. It’s not the total amount for all requests.
Note
Download limits will not be effective for these clients:
Sources which bypass the transparent proxy
Destinations to which the transparent proxy is bypassed
Unrestricted source IP addresses
Unrestricted source MAC addresses
Members of the group Extended if the Proxy uses Local authentication
Note
Upload limits will be effective for all clients except:
Sources which bypass the transparent proxy
Destinations to which the transparent proxy is bypassed
The MIME type filter can be configured to block content depending on its MIME type.
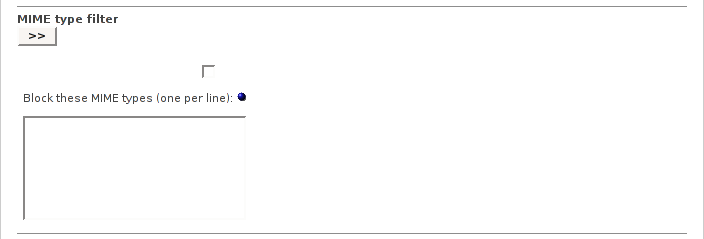
If enabled, the filter checks all incoming headers for their MIME type. If the requested MIME type is listed to be blocked, the access to this content will be denied. This way you can block content, no matter of the given file name extension.
Example 7.2. Add these MIME types if you want to block the download of MPEG and QuickTime video files:
application/pdf
video/quicktime
Note
The MIME types are processed as regular expressions. This means, the entry javascript will block all content with MIME types containing this word, like:
application/x-javascript and text/javascript
Note
MIME type blocking will not be effective for these clients:
Sources which bypass the transparent proxy
Destinations to which the transparent proxy is bypassed
Unrestricted source IP addresses
Unrestricted source MAC addresses
Members of the group Extended if the Proxy uses Local authentication
This allows you to control which client software may have access to web sites.
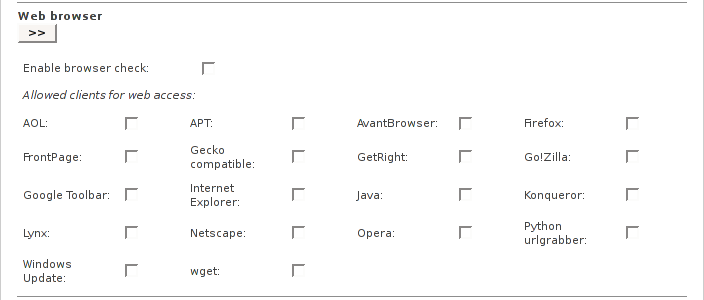
If this option is enabled, only the selected clients will be able to pass the Proxy Server. All other requests will be blocked.
Note
Browser based access control will not be effective for these clients:
Sources which bypass the transparent proxy
Destinations to which the transparent proxy is bypassed
Unrestricted source IP addresses
Unrestricted source MAC addresses
Members of the group Extended if the Proxy uses Local authentication
The most important web clients are already listed. You can create your own definitions by editing the file /var/efw/proxy/advanced/useragents and adding the browser specific information there.
Adding custom clients could be necessary if you want to allow your AntiVirus software to download updated definitions. If you don’t know the useragent of this software, you can enable the useragent logging in the section Log settings and watch the file /var/log/squid/useragent.log.
The syntax for client definitions is:
name,display,(regexp)
- name
is required for internal processing of the Advanced Proxy and should be a short name in alphanumeric capital letters without spaces.
- display
is the string which appears in the GUI list and should contain the common name for this client.
- (regexp)
is a regular expression which matches the browser useragent string and must always be enclosed by parentheses.
The values are separated by commas.
Warning
When using authentication and enabling the web proxy log files, the requesting user name will be logged in addition to the requested URL. Before enabling log files while using authentication, make sure not to violate existing laws.
Note
Authentication will not work with the transparent proxy turned on.
The Advanced Proxy offers a variety of methods for user authentication.

- None
Authentication is disabled. Users don’t need to authenticate when accessing web sites.
- Local Authentication
This authentication method is the preferred solution for SOHO environments. Users need to authenticate when accessing web sites by entering a valid username and password. The user management resides on the Endian Firewall Proxy Server. Users are categorized into three groups: Extended, Standard and Disabled.
- Authentication using LDAP
This authentication method is the preferred solution for medium and large network environments. Users will have to authenticate when accessing web sites by entering a valid username and password. The credentials are verified against an external Server using the Lightweight Directory Access Protocol (LDAP).
LDAP authentication will be useful if you already have a directory service in your network and don’t want to maintain additional user accounts and passwords for web access.
The HTTP Proxy works with these types of LDAP Servers:
Active Directory (Windows 2000 and 2003 Server)
Novell eDirectory (NetWare 5.x und NetWare 6)
LDAP Version 2 and 3 (OpenLDAP)
As an option, membership for a certain group can be required.
Note
The protocol LDAPS (Secure LDAP) is not supported.
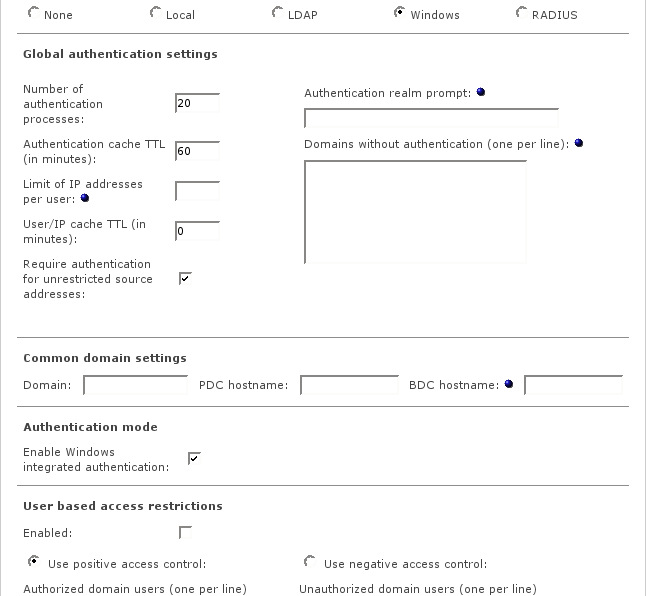
- Windows authentication
This authentication method is one of the preferred solutions for small and medium network environments. Users will have to authenticate when accessing web sites. The credentials are verified against an external Server acting as a Domain Controller. This can be a:
Windows NT 4.0 Server or Windows 2000/2003 Server (even with Active Directory enabled)
Samba 2.x / 3.x Server (running as Domain Controller)
Advanced Proxy works with Windows integrated authentication (transparent) or with standard authentication (explicit with username and password). You can maintain lists with authorized user names (whitelist) or unauthorized user names (blacklist).
Note
Workgroup based authentication may probably work, but is neither recommended nor supported.
- RADIUS authentication
This authentication method is another good solution for small and medium network environments. Users will have to authenticate when accessing web sites. The credentials are verified against an external RADIUS server. You can maintain lists with authorized user names (whitelist) or unauthorized user names (blacklist).
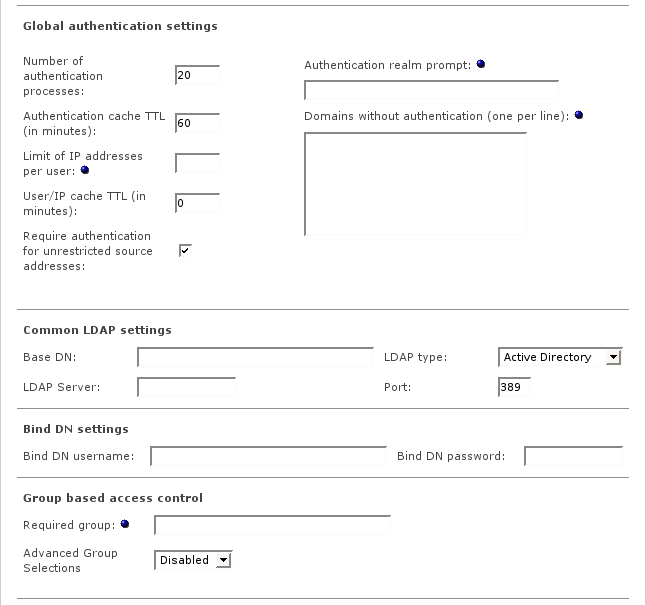
The global authentication settings are available for all authentication methods.
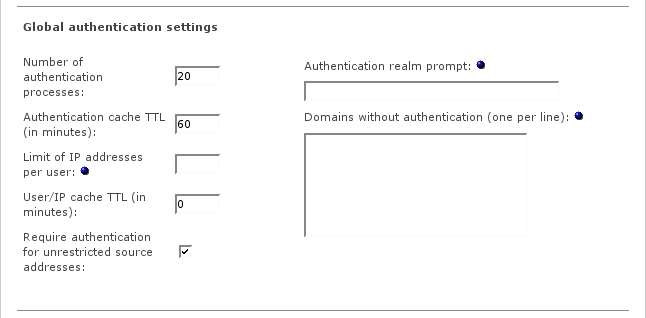
- Number of authentication processes
The number of background processes listening for requests. The default value is 5 and should be increased if authentication takes too long or Windows integrated authentication falls back to explicit authentication.
- Authentication cache TTL
Duration in minutes how long credentials will be cached for each single session. If this time expires, the user has to re-enter the credentials for this session. The default is set to 60 minutes, the minimum will be 1 minute. The TTL will always be reset when the user sends a new request to the Proxy Server within a session.
Note
If the user opens a new session, the credentials must always be entered, even if the TTL has not expired for another session.
- Limit of IP addresses per user
Number of source IP addresses a user can be logged in at a time. The IP address will be released after the time defined at User/IP cache TTL.
Note
This has no effect if running Local authentication and the user is a member of the Extended group.
- User/IP cache TTL
Duration in minutes, how long relations between each user name and the used IP address will be cached. The default value is 0 (disabled). A value greater than 0 is only reasonable when using a limit for concurrent IP addresses per user.
- Require authentication for unrestricted source addresses
By default authentication is required even for unrestricted IP addresses. If you don’t want to require authentication for these addresses, untick this box.
- Authentication realm prompt
This text will be shown in the authentication dialog.
- Domains without authentication
This allows you to define a list of domains that can be accessed without authentication.
Note
These domains are destination DNS domains and not source Windows NT domains.
Note
This works only for DNS domain names and not for IP addresses.
The Local user authentication lets you manage user accounts locally without the need for external authentication servers.
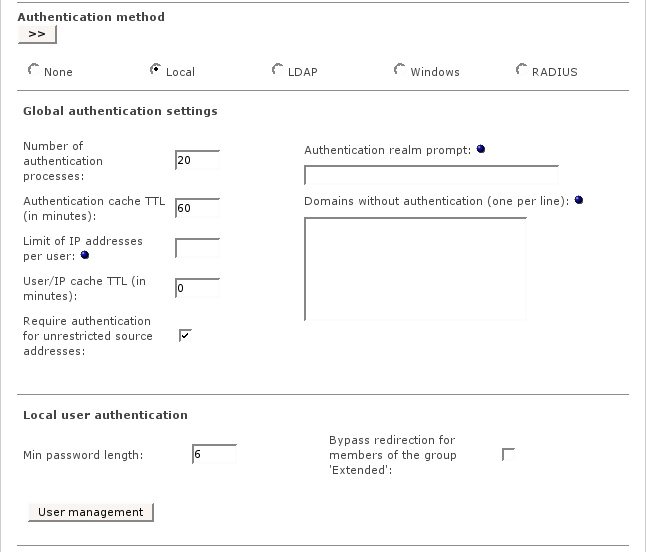
The integrated user manager can be executed from the main settings page.
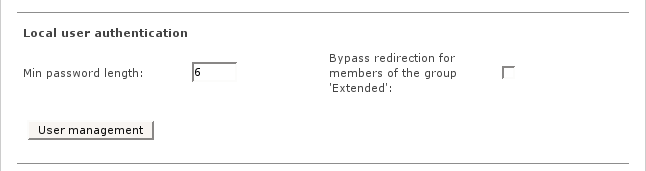
- Min password length
Enter the minimum required length for passwords. The default is set to 6 alphanumeric characters.
- User management
This button opens the local user manager.
The user manager is the interface for creating, editing and deleting user accounts.
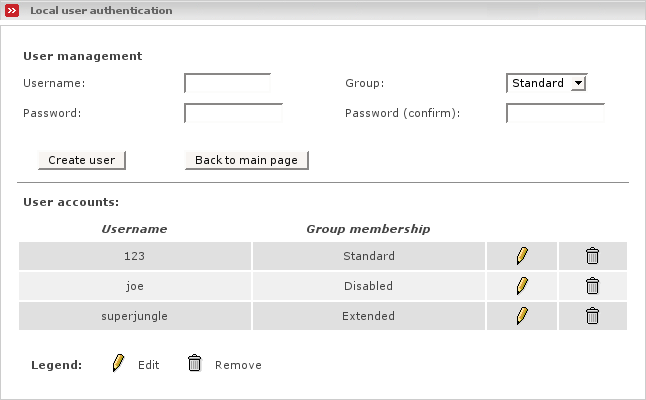
Within the user manager page, all available accounts are listed in alphabetical order.
You can select between three different groups:
- Standard
The default for all users. All given restrictions apply to this group.
- Extended
Use this group for unrestricted users. Members of this group will bypass any time- and filter-restrictions.
- Disabled
Members of this group are blocked. This can be useful if you want to disable an account temporarily without losing the password.
The following changes to user accounts will require a restart of the proxy service:
a new user account was added and the user is not a member of the Standard group
the group membership for a certain user has been changed
The following changes to user accounts will not require a restart of the proxy service:
a new user account was added and the user is a member of the Standard group
the password for a certain user has been changed
an existing user account has been deleted
- Username
Enter the username for the user. If possible, the name should contain only alphanumeric characters.
- Group
Select the group membership for this user.
- Password
Enter the password for the new account.
- Password (confirm)
Confirm the previously entered password.
- Create user
This button creates a new user account. If this username already exists, the account for this username will be updated with the new group membership and password.
- Back to main page
This button closes the user manager and returns to the Advanced Proxy main page.
A user account can be edited by clicking on the pencil icon. When editing an user account, only the group membership or password can be changed.
While editing an account, the referring entry will be marked with a yellow bar.
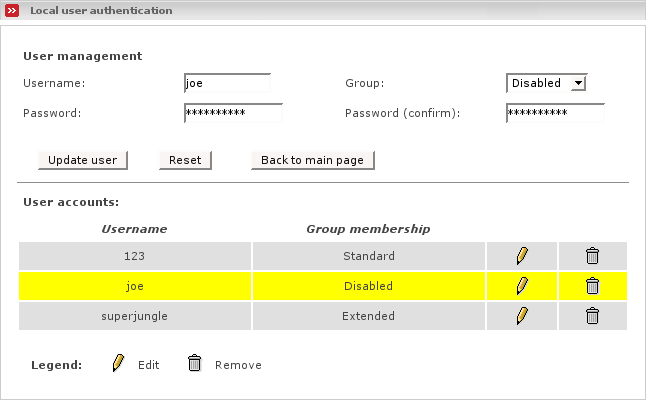
To save the changed settings, use the button Update user.
Note
The username cannot be modified. This field is read-only. If you need to rename a user, delete this user and create a new account.
A user account can be deleted by clicking the trash can icon. The account will be deleted immediately.
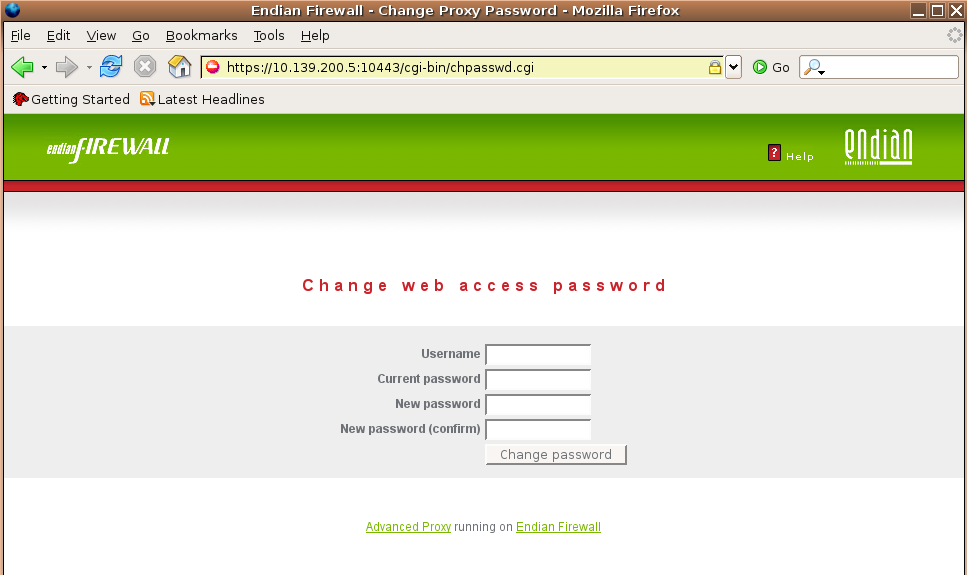
Users may change their passwords if needed. The interface can be invoked by entering this URL:
https://efw:10443/cgi-bin/chpasswd.cgi
Note
Replace efw with the GREEN IP address of your Endian Firewall.
The web page dialog requires the username, the current password and the new password (twice for confirmation):
This authentication method uses an existing directory infrastructure for user authentication.
If you are unsure about your internal directory structure, you can examine your LDAP server using the command line based ldapsearch tool.
Windows clients can use the free and easy to use Softerra LDAP browser for this: http://www.ldapbrowser.com.

- Base DN
This is the base where to start the LDAP search. All subsequent Organizational Units (OUs) will be included. Refer to your LDAP documentation for the required format of the base DN.
Example 7.4. Base DN for Active Directory
cn=users,dc=ads,dc=local
This will search for users in the group users in the domain ads.local.
Example 7.5. Base DN for eDirectory
ou=users,o=acme
This will search for users in the Organizational Unit users (and below) in the Organization acme.
Note
If the Base DN contains spaces, you must escape these spaces using a backslash.
- LDAP type
You can select between different types of LDAP implementations:
Active Directory (ADS)
Novell eDirectory (NDS)
LDAP v2 and v3
- LDAP Server
Enter the IP address of your LDAP Server.
- Port
Enter the port on which your LDAP Server is listening for LDAP requests. The default is 389.
Note
The protocol LDAPS (Secure LDAP, port 636) is not supported.

- Bind DN username
Enter the full distinguished name for a Bind DN user.
Note
A Bind DN user is required for Active Directory and eDirectory.
Note
The Bind DN user must be allowed to browse the directory and read all user attributes.
Note
If the Bind DN username contains spaces, you must escape these spaces using a backslash.
- Bind DN password
Enter the password for the Bind DN user.

- Required group (optional)
Enter the full distinguished name of a group for authorized Internet users. In addition to a correct authentication, a membership within this group will be required for web access.
Note
If the group name contains spaces, you must escape these spaces using a backslash.
- Advanced Group Selections
This authentication method uses an existing windows domain environment for user authentication.
In addition to the authentication you can define positive or negative user based access control lists.

- Domain
Enter the name of the domain you want to use for authentication. If you are running a Windows 2000 or Windows 2003 Active Directory, you’ll have to enter the NetBIOS domain name.
- PDC hostname
Enter the NetBIOS hostname of the Primary Domain Controller here. If you are running a Windows 2000 or Windows 2003 Active Directory, you can enter the name of any Domain Controller.
Note
For Windows 2000 and above the Primary Domain Controller is not assigned to a specific server. The Active Directory PDC emulator is a logical role and can be assigned to any server.
Warning
The PDC hostname must be resolvable for Endian Firewall. This can be done by adding the hostname at Network > Edit Hosts (See the section called “Host configuration (Edit Hosts)”).
- BDC hostname (optional)
Enter the NetBIOS hostname of the Backup Domain Controller here. If you are running a Windows 2000 or Windows 2003 Active Directory, you can enter the name of any Domain Controller. If the PDC doesn’t respond to authentication requests, the authentication process will ask the BDC instead.
Warning
The PDC hostname must be resolvable for Endian Firewall. This can be done by adding the hostname at Network > Edit Hosts (See the section called “Host configuration (Edit Hosts)”).

- Enable Windows integrated authentication
If enabled, the user will not be asked for username and password. The credentials of the currently logged in user will automatically be used for authentication. This option is enabled by default. If integrated authentication is disabled, the user will be requested explicitly for username and password.
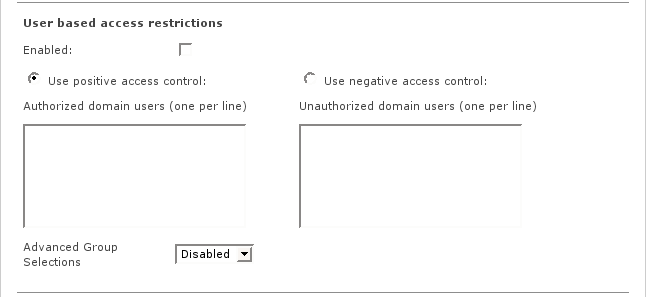
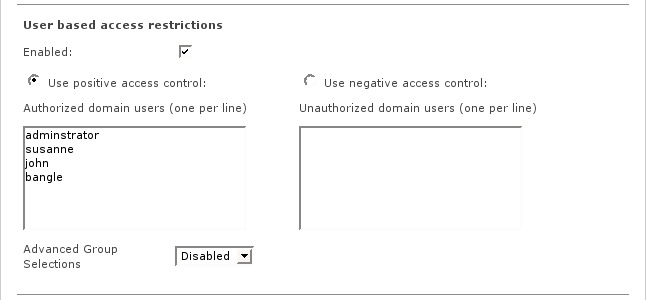
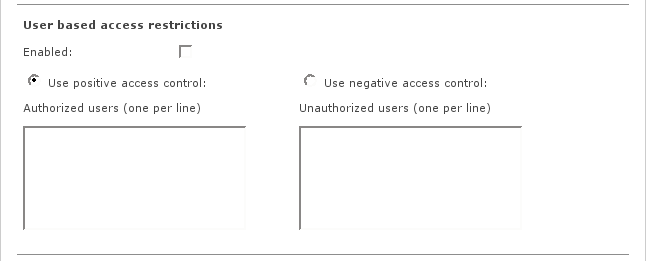
- Enabled
Enables access control lists for authorized or unauthorized users.
- Use positive access control / Authorized domain users
These listed users will be allowed for web access. For all other users, access will be denied.
- Use negative access control / Unauthorized domain users
These listed users will be blocked for web access. For all other users, access will be allowed.
Note
If Windows integrated authentication is enabled, the username must be entered with the domain name as a prefix for the username, separated by a backslash.
Example 7.7. User based access control lists using integrated authentication

Note
When using integrated authentication, the user must be logged into the domain, otherwise the name of the local workstation instead of the domain name will be added to the username.
This authentication method uses an existing RADIUS server for user authentication.
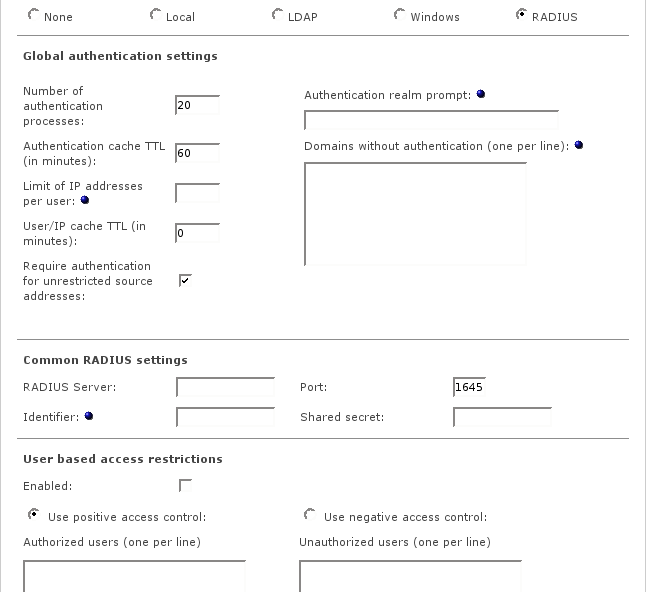
In addition to the authentication you can define positive or negative user based access control lists.
Note
This authentication method cannot handle encrypted connections. If you are running a Microsoft IAS for RADIUS you’ll have to turn off any type of encryption at your IAS.

- RADIUS Server
Enter the IP address of the RADIUS Server you want to use for authentication.
- Port
Enter the port that will be used to communicate with the RADIUS Server. The default is port 1645, some RADIUS servers may use port 1812 instead.
- Identifier
This is an optional field and can be used to identify your Endian Firewall for the RADIUS Server. If this is left empty, the IP address of your Endian Firewall will be used for identification.
- Shared secret
This is the shared secret for the authentication of your Endian Firewall against the RADIUS Server. This must be the same password that you have entered at your RADIUS Server.
- Enabled
Enables access control lists for authorized or unauthorized users.
- Use positive access control / Authorized users
These listed users will be allowed for web access. For all other users, access will be denied.
- Use negative access control / Unauthorized users
These listed users will be blocked for web access. For all other users, access will be allowed.
- Advanced Group Selections
Note
Requests from users in the extended group won't be affected by the filter as well as those from users that are allowed to bypass the proxy.
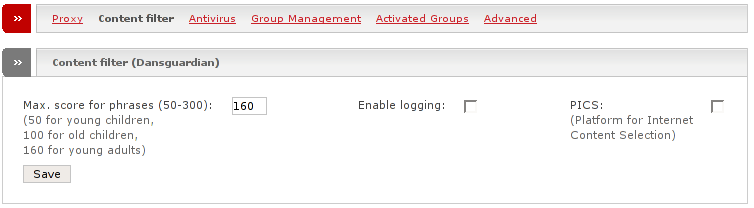
- Max. score for phrases
With this option you can customize the amount of pages that are blocked by the content filter. If many children will connect to the internet through your Endian Firewall you should set this to a lower value as more dangerous content will be filtered out then.
- Enable logging
This will turn on logging for blocked requests.
Note
If you want to see the clients' IP addresses you will have to turn on client IP address forwarding in the upstream proxy section.
- PICS
This will enable the support for the Platform for Internet Content Selection (PICS: http://www.w3.org/PICS/). PICS enables labels to be assigned with Internet content and was initially designed to help parents and teachers control their children. Today many other rating services and filtering softwares are built on PICS.
- Save
To save your settings click here.
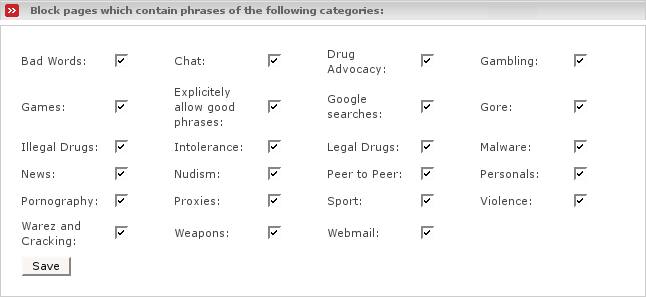
- Block pages with content from the ticked categories
When turned on all pages will be parsed and checked for patterns that correspond to the ticked categories. If one of those patterns matches, the site will be blocked.
- Save
Click here to save your settings.
Note
This feature is not available for the mini edition of Endian Firewall.
Note
This won't affect users from the extended group as well as users that bypass the proxy.
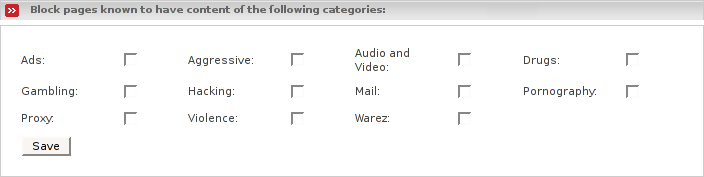
- Block pages that are known to have content of the ticked categories
By checking the boxes corresponding to the displayed categories, it will be impossible to load URLs that appear in URL list for one of the checked categories.
- Save
To save your settings click here.
Note
This won't affect users from the extended group as well as users that bypass the proxy.
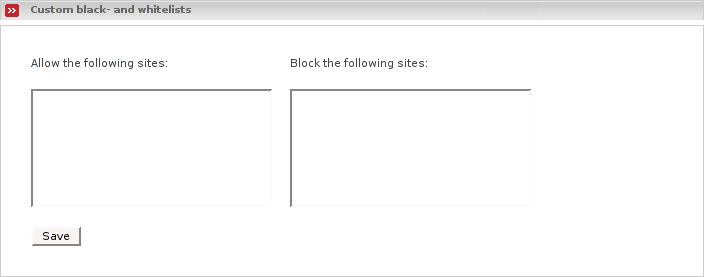
- Allow the following sites
Access to sites that are specified here will always be allowed.
- Block the following sites
Access to sites that are listed here will always be denied.
Note
This will not affect users that bypass the proxy and users in the extended group.
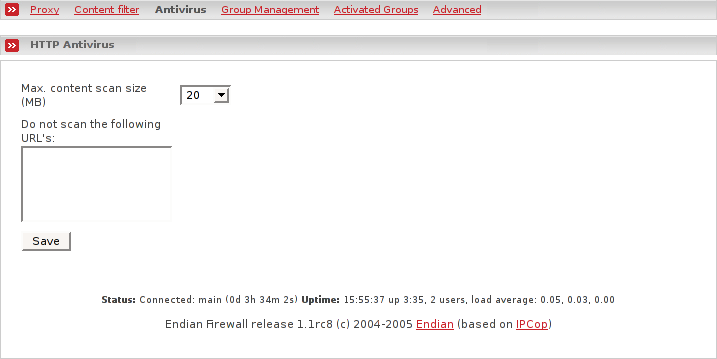
Only requests that return less than the specified size in megabytes will be scanned for viruses.
For different reasons, it may be required that all clients should be enforced to use the proxy service. The reasons could be mandatory logging, filtering or authentication.
Endian Firewall proxy settings:

Client access: Disabling the proxy service gives direct access for all clients.
Result: The proxy service will never be used. Logging, filtering and authentication will not be available.
Endian Firewall proxy settings:
Client access: All clients without explicit proxy configuration will bypass the proxy service.
Client access: All clients configured for proxy usage will use the proxy for all destination ports (80, 443, 8080, etc.) and even for browser based FTP access.
Result: It depends on the client configuration whether the proxy service will be used or not. Unconfigured clients will bypass logging, filtering and authentication.
Endian Firewall proxy settings:
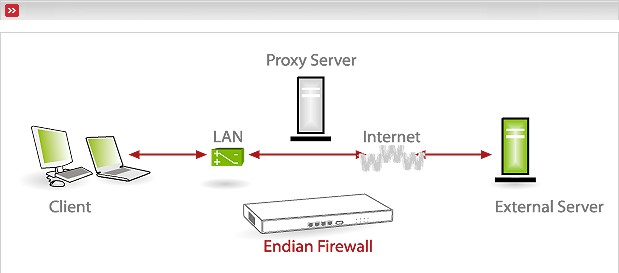
Client access: All requests with destination port 80 will be internally redirected to the proxy service. Requests with other destination ports (e.g. 443 for https) will bypass the proxy service.
Figure 7.42. Figure that displays traffic which will be transparently redirected through the HTTP proxy.
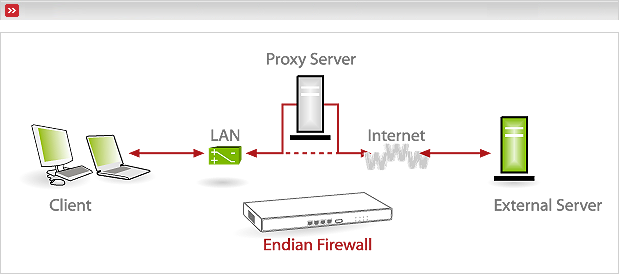
Result: Not all but most requests will pass the proxy service. Therefore filtering, logging and authentication will not be reliable.
There are different ways to configure the clients to use the Web Proxy service. Some of them are described in this section
Configuring clients by applying all proxy settings manually:
Time-consuming and unreliable
Configuration required per user
Distributing pre-configured browser clients:
Only reasonable for medium to large environments
Works only for the configured client software
IEAK for IE 6: http://www.microsoft.com/windows/ieak/
CCK for Mozilla: http://www.mozilla.org/projects/cck/
Centralized client configuration using DNS and/or DHCP:
Complex implementation
Require custom proxy.pac or wpad.dat files (dynamically created by Endian Firewall)
Flexible configuration
Most browsers support this configuration method
More info: http://www.web-cache.com/Writings/Internet-Drafts/draft-ietf-wrec-wpad-01.txt
Centralized client configuration using group policies:
Complex implementation
Only reasonable for medium to large environments
Requires a centralized network management system (Active Directory, ZENworks, etc.)
Flexible and mandatory configuration
Works only for Win32 clients and certain browser types
To enforce proxy usage, these requirements must be met:
- Proper client configuration
The client must be configured to use the proxy service.
- Correct proxy operation mode
The proxy must operate in non-transparent mode.
- Blocking of direct web access
All direct web access needs to be blocked. See the section called “Outgoing Firewall Administrative Web Page”.