FreeBSD Handbook
The FreeBSD Documentation Project
Copyright © 1995, 1996, 1997, 1998, 1999, 2000, 2001, 2002, 2003 by The FreeBSD Documentation Project
Welcome to FreeBSD! This handbook covers the installation and day to day use of FreeBSD 4.8-RELEASE and FreeBSD 5.1-RELEASE. This manual is a work in progress and is the work of many individuals. Many sections do not yet exist and some of those that do exist need to be updated. If you are interested in helping with this project, send email to the FreeBSD documentation project mailing list. The latest version of this document is always available from the FreeBSD web site. It may also be downloaded in a variety of formats and compression options from the FreeBSD FTP server or one of the numerous mirror sites. If you would prefer to have a hard copy of the handbook, you can purchase one at the FreeBSD Mall. You may also want to search the handbook.
Redistribution and use in source (SGML DocBook) and 'compiled' forms (SGML, HTML, PDF, PostScript, RTF and so forth) with or without modification, are permitted provided that the following conditions are met:
-
Redistributions of source code (SGML DocBook) must retain the above copyright notice, this list of conditions and the following disclaimer as the first lines of this file unmodified.
-
Redistributions in compiled form (transformed to other DTDs, converted to PDF, PostScript, RTF and other formats) must reproduce the above copyright notice, this list of conditions and the following disclaimer in the documentation and/or other materials provided with the distribution.
Important: THIS DOCUMENTATION IS PROVIDED BY THE FREEBSD DOCUMENTATION PROJECT "AS IS" AND ANY EXPRESS OR IMPLIED WARRANTIES, INCLUDING, BUT NOT LIMITED TO, THE IMPLIED WARRANTIES OF MERCHANTABILITY AND FITNESS FOR A PARTICULAR PURPOSE ARE DISCLAIMED. IN NO EVENT SHALL THE FREEBSD DOCUMENTATION PROJECT BE LIABLE FOR ANY DIRECT, INDIRECT, INCIDENTAL, SPECIAL, EXEMPLARY, OR CONSEQUENTIAL DAMAGES (INCLUDING, BUT NOT LIMITED TO, PROCUREMENT OF SUBSTITUTE GOODS OR SERVICES; LOSS OF USE, DATA, OR PROFITS; OR BUSINESS INTERRUPTION) HOWEVER CAUSED AND ON ANY THEORY OF LIABILITY, WHETHER IN CONTRACT, STRICT LIABILITY, OR TORT (INCLUDING NEGLIGENCE OR OTHERWISE) ARISING IN ANY WAY OUT OF THE USE OF THIS DOCUMENTATION, EVEN IF ADVISED OF THE POSSIBILITY OF SUCH DAMAGE.
FreeBSD is a registered trademark of Wind River Systems, Inc. This is expected to change soon.
3Com and HomeConnect are registered trademarks of 3Com Corporation.
3ware and Escalade are registered trademarks of 3ware Inc.
ARM is a registered trademark of ARM Limited.
Adaptec is a registered trademark of Adaptec, Inc.
Adobe, Acrobat, Acrobat Reader, and PostScript are either registered trademarks or trademarks of Adobe Systems Incorporated in the United States and/or other countries.
Apple, FireWire, Mac, Macintosh, Mac OS, Quicktime, and TrueType are trademarks of Apple Computer, Inc., registered in the United States and other countries.
Corel and WordPerfect are trademarks or registered trademarks of Corel Corporation and/or its subsidiaries in Canada, the United States and/or other countries.
Sound Blaster is a trademark of Creative Technology Ltd. in the United States and/or other countries.
Heidelberg, Helvetica, Palatino, and Times Roman are either registered trademarks or trademarks of Heidelberger Druckmaschinen AG in the U.S. and other countries.
IBM, AIX, EtherJet, Netfinity, OS/2, PowerPC, PS/2, S/390, and ThinkPad are trademarks of International Business Machines Corporation in the United States, other countries, or both.
IEEE, POSIX, and 802 are registered trademarks of Institute of Electrical and Electronics Engineers, Inc. in the United States.
Intel, Celeron, EtherExpress, i386, i486, Itanium, Pentium, and Xeon are trademarks or registered trademarks of Intel Corporation or its subsidiaries in the United States and other countries.
Intuit and Quicken are registered trademarks and/or registered service marks of Intuit Inc., or one of its subsidiaries, in the United States and other countries.
Linux is a registered trademark of Linus Torvalds in the United States.
LSI Logic, AcceleRAID, eXtremeRAID, MegaRAID and Mylex are trademarks or registered trademarks of LSI Logic Corp.
M-Systems and DiskOnChip are trademarks or registered trademarks of M-Systems Flash Disk Pioneers, Ltd.
Macromedia, Flash, and Shockwave are trademarks or registered trademarks of Macromedia, Inc. in the United States and/or other countries.
Microsoft, FrontPage, MS-DOS, Outlook, Windows, Windows Media, and Windows NT are either registered trademarks or trademarks of Microsoft Corporation in the United States and/or other countries.
Netscape and the Netscape Navigator are registered trademarks of Netscape Communications Corporation in the U.S. and other countries.
Motif, OSF/1, and UNIX are registered trademarks and IT DialTone and The Open Group are trademarks of The Open Group in the United States and other countries.
Oracle is a registered trademark of Oracle Corporation.
PowerQuest and PartitionMagic are registered trademarks of PowerQuest Corporation in the United States and/or other countries.
RealNetworks, RealPlayer, and RealAudio are the registered trademarks of RealNetworks, Inc.
Red Hat, RPM, are trademarks or registered trademarks of Red Hat, Inc. in the United States and other countries.
SAP, R/3, and mySAP are trademarks or registered trademarks of SAP AG in Germany and in several other countries all over the world.
Sun, Sun Microsystems, Java, Java Virtual Machine, JavaServer Pages, JDK, JSP, JVM, Netra, Solaris, StarOffice, Sun Blade, Sun Enterprise, Sun Fire, SunOS, and Ultra are trademarks or registered trademarks of Sun Microsystems, Inc. in the United States and other countries.
Symantec and Ghost are registered trademarks of Symantec Corporation in the United States and other countries.
MATLAB is a registered trademark of The MathWorks, Inc.
SpeedTouch is a trademark of Thomson
U.S. Robotics and Sportster are registered trademarks of U.S. Robotics Corporation.
VMware is a trademark of VMware, Inc.
Waterloo Maple and Maple are trademarks or registered trademarks of Waterloo Maple Inc.
Mathematica is a registered trademark of Wolfram Research, Inc.
XFree86 is a trademark of The XFree86 Project, Inc.
Ogg Vorbis and Xiph.Org are trademarks of Xiph.Org.
Many of the designations used by manufacturers and sellers to distinguish their products are claimed as trademarks. Where those designations appear in this document, and the FreeBSD Project was aware of the trademark claim, the designations have been followed by the ``™'' or the ``®'' symbol.
- Table of Contents
- Preface
- I. Getting Started
-
- 1 Introduction
-
- 1.1 Synopsis
- 1.2 Welcome to FreeBSD!
- 1.3 About the FreeBSD Project
- 2 Installing FreeBSD
-
- 2.1 Synopsis
- 2.2 Pre-installation Tasks
- 2.3 Starting the Installation
- 2.4 Introducing Sysinstall
- 2.5 Allocating Disk Space
- 2.6 Choosing What to Install
- 2.7 Choosing Your Installation Media
- 2.8 Committing to the Installation
- 2.9 Post-installation
- 2.10 Supported Hardware
- 2.11 Troubleshooting
- 2.12 Advanced Installation Guide
- 2.13 Preparing Your Own Installation Media
- 3 UNIX Basics
-
- 3.1 Synopsis
- 3.2 Virtual Consoles and Terminals
- 3.3 Permissions
- 3.4 Directory Structure
- 3.5 Disk Organization
- 3.6 Mounting and Unmounting File Systems
- 3.7 Processes
- 3.8 Daemons, Signals, and Killing Processes
- 3.9 Shells
- 3.10 Text Editors
- 3.11 Devices and Device Nodes
- 3.12 Binary Formats
- 3.13 For More Information
- 4 Installing Applications: Packages and Ports
- 5 The X Window System
-
- 5.1 Synopsis
- 5.2 Understanding X
- 5.3 Installing XFree86™
- 5.4 XFree86 Configuration
- 5.5 Using Fonts in XFree86
- 5.6 The X Display Manager
- 5.7 Desktop Environments
- II. System Administration
-
- 6 Configuration and Tuning
-
- 6.1 Synopsis
- 6.2 Initial Configuration
- 6.3 Core Configuration
- 6.4 Application Configuration
- 6.5 Starting Services
- 6.6 Configuring the cron Utility
- 6.7 Using rc under FreeBSD 5.X
- 6.8 Setting Up Network Interface Cards
- 6.9 Virtual Hosts
- 6.10 Configuration Files
- 6.11 Tuning with sysctl
- 6.12 Tuning Disks
- 6.13 Tuning Kernel Limits
- 6.14 Adding Swap Space
- 6.15 Power and Resource Management
- 7 The FreeBSD Booting Process
- 8 Users and Basic Account Management
-
- 8.1 Synopsis
- 8.2 Introduction
- 8.3 The Superuser Account
- 8.4 System Accounts
- 8.5 User Accounts
- 8.6 Modifying Accounts
- 8.7 Limiting Users
- 8.8 Personalizing Users
- 8.9 Groups
- 9 Configuring the FreeBSD Kernel
- 10 Security
-
- 10.1 Synopsis
- 10.2 Introduction
- 10.3 Securing FreeBSD
- 10.4 DES, MD5, and Crypt
- 10.5 One-time Passwords
- 10.6 KerberosIV
- 10.7 Kerberos5
- 10.8 Firewalls
- 10.9 OpenSSL
- 10.10 VPN over IPsec
- 10.11 OpenSSH
- 10.12 Mandatory Access Control (MAC)
- 10.13 File System Access Control Lists
- 11 Printing
-
- 11.1 Synopsis
- 11.2 Introduction
- 11.3 Basic Setup
- 11.4 Advanced Printer Setup
- 11.5 Using Printers
- 11.6 Alternatives to the Standard Spooler
- 11.7 Troubleshooting
- 12 Storage
-
- 12.1 Synopsis
- 12.2 Device Names
- 12.3 Adding Disks
- 12.4 RAID
- 12.5 Creating and Using Optical Media (CDs & DVDs)
- 12.6 Creating and Using Floppy Disks
- 12.7 Creating and Using Data Tapes
- 12.8 Backups to Floppies
- 12.9 Backup Basics
- 12.10 Network, Memory, and File-Backed File Systems
- 12.11 File System Snapshots
- 12.12 File System Quotas
- 12.13 Encrypting Disk Partitions
- 13 The Vinum Volume Manager
-
- 13.1 Synopsis
- 13.2 Disks Are Too Small
- 13.3 Access Bottlenecks
- 13.4 Data Integrity
- 13.5 Vinum Objects
- 13.6 Some Examples
- 13.7 Object Naming
- 13.8 Configuring Vinum
- 13.9 Using Vinum for the Root Filesystem
- 14 Localization - I18N/L10N Usage and Setup
-
- 14.1 Synopsis
- 14.2 The Basics
- 14.3 Using Localization
- 14.4 Compiling I18N Programs
- 14.5 Localizing FreeBSD to Specific Languages
- 15 Desktop Applications
-
- 15.1 Synopsis
- 15.2 Browsers
- 15.3 Productivity
- 15.4 Document Viewers
- 15.5 Finance
- 15.6 Summary
- 16 Multimedia
-
- 16.1 Synopsis
- 16.2 Setting Up the Sound Card
- 16.3 MP3 Audio
- 16.4 Video Playback
- 17 Serial Communications
-
- 17.1 Synopsis
- 17.2 Introduction
- 17.3 Terminals
- 17.4 Dial-in Service
- 17.5 Dial-out Service
- 17.6 Setting Up the Serial Console
- 18 PPP and SLIP
-
- 18.1 Synopsis
- 18.2 Using User PPP
- 18.3 Using Kernel PPP
- 18.4 Troubleshooting PPP Connections
- 18.5 Using PPP over Ethernet (PPPoE)
- 18.6 Using PPP over ATM (PPPoA)
- 18.7 Using SLIP
- 19 Advanced Networking
-
- 19.1 Synopsis
- 19.2 Gateways and Routes
- 19.3 Wireless Networking
- 19.4 Bridging
- 19.5 NFS
- 19.6 Diskless Operation
- 19.7 ISDN
- 19.8 NIS/YP
- 19.9 DHCP
- 19.10 DNS
- 19.11 NTP
- 19.12 Network Address Translation
- 19.13 The inetd ``Super-Server''
- 19.14 Parallel Line IP (PLIP)
- 19.15 IPv6
- 20 Electronic Mail
-
- 20.1 Synopsis
- 20.2 Using Electronic Mail
- 20.3 sendmail Configuration
- 20.4 Changing Your Mail Transfer Agent
- 20.5 Troubleshooting
- 20.6 Advanced Topics
- 20.7 SMTP with UUCP
- 20.8 Using Mail with a Dialup Connection
- 20.9 SMTP Authentication
- 21 The Cutting Edge
-
- 21.1 Synopsis
- 21.2 FreeBSD-CURRENT vs. FreeBSD-STABLE
- 21.3 Synchronizing Your Source
- 21.4 Using make world
- 21.5 Tracking for Multiple Machines
- 22 Linux Binary Compatibility
-
- 22.1 Synopsis
- 22.2 Installation
- 22.3 Installing Mathematica®
- 22.4 Installing Maple™
- 22.5 Installing MATLAB®
- 22.6 Installing Oracle®
- 22.7 Installing SAP® R/3®
- 22.8 Advanced Topics
- III. Appendices
-
- A. Obtaining FreeBSD
-
- A.1 CDROM and DVD Publishers
- A.2 FTP Sites
- A.3 Anonymous CVS
- A.4 Using CTM
- A.5 Using CVSup
- A.6 CVS Tags
- A.7 AFS Sites
- A.8 rsync Sites
- B. Bibliography
- C. Resources on the Internet
-
- C.1 Mailing Lists
- C.2 Usenet Newsgroups
- C.3 World Wide Web Servers
- C.4 Email Addresses
- C.5 Shell Accounts
- D. PGP Keys
-
- D.1 Officers
- D.2 Core Team Members
- D.3 Developers
- Colophon
- List of Tables
- 2-1. Sample Device Inventory
- 2-2. Partition Layout for First Disk
- 2-3. Partition Layout for Subsequent Disks
- 2-4. Possible Security Profiles
- 2-5. FreeBSD ISO Image Names and Meanings
- 3-1. Disk Device Codes
- 12-1. Physical Disk Naming Conventions
- 13-1. Vinum Plex Organizations
- 19-1. Wiring a Parallel Cable for Networking
- List of Figures
- 2-1. Kernel Configuration Menu
- 2-2. The Kernel Device Configuration Visual Interface
- 2-3. Expanded Driver List
- 2-4. Driver Configuration With No Conflicts
- 2-5. Sysinstall Main Menu
- 2-6. Typical Device Probe Results
- 2-7. Select Sysinstall Exit
- 2-8. Selecting Usage from Sysinstall Main Menu
- 2-9. Selecting Documentation Menu
- 2-10. Sysinstall Documentation Menu
- 2-11. Sysinstall Main Menu
- 2-12. Sysinstall Keymap Menu
- 2-13. Sysinstall Main Menu
- 2-14. Sysinstall Options
- 2-15. Begin Standard Installation
- 2-16. Select Drive for FDisk
- 2-17. Typical Fdisk Partitions before Editing
- 2-18. Fdisk Partition Using Entire Disk
- 2-19. Sysinstall Boot Manager Menu
- 2-20. Exit Select Drive
- 2-21. Sysinstall Disklabel Editor
- 2-22. Sysinstall Disklabel Editor with Auto Defaults
- 2-23. Free Space for Root Partition
- 2-24. Edit Root Partition Size
- 2-25. Choose the Root Partition Type
- 2-26. Choose the Root Mount Point
- 2-27. Sysinstall Disklabel Editor
- 2-28. Choose Distributions
- 2-29. Confirm Distributions
- 2-30. Choose Installation Media
- 2-31. Selecting an Ethernet Device
- 2-32. Set Network Configuration for ed0
- 2-33. Editing inetd.conf
- 2-34. Default Anonymous FTP Configuration
- 2-35. Edit the FTP Welcome Message
- 2-36. Editing exports
- 2-37. Security Profile Options
- 2-38. System Console Configuration Options
- 2-39. Screen Saver Options
- 2-40. Screen Saver Timeout
- 2-41. System Console Configuration Exit
- 2-42. Select Your Region
- 2-43. Select Your Country
- 2-44. Select Your Time Zone
- 2-45. Select Mouse Protocol Type
- 2-46. Set Mouse Protocol
- 2-47. Configure Mouse Port
- 2-48. Setting the Mouse Port
- 2-49. Enable the Mouse Daemon
- 2-50. Test the Mouse Daemon
- 2-51. Network Configuration Upper-level
- 2-52. Select a default MTA
- 2-53. Ntpdate Configuration
- 2-54. Network Configuration Lower-level
- 2-55. Select Configuration Method Menu
- 2-56. Select Default Desktop
- 2-57. Select Package Category
- 2-58. Select Packages
- 2-59. Install Packages
- 2-60. Confirm Package Installation
- 2-61. Select User
- 2-62. Add User Information
- 2-63. Exit User and Group Management
- 2-64. Exit Install
- 13-1. Concatenated Organization
- 13-2. Striped Organization
- 13-3. RAID-5 Organization
- 13-4. A Simple Vinum Volume
- 13-5. A Mirrored Vinum Volume
- 13-6. A Striped Vinum Volume
- 13-7. A Mirrored, Striped Vinum Volume
- List of Examples
- 2-1. Using an Existing Partition Unchanged
- 2-2. Shrinking an Existing Partition
- 3-1. Sample Disk, Slice, and Partition Names
- 3-2. Conceptual Model of a Disk
- 4-1. Downloading a Package Manually and Installing It Locally
- 6-1. Creating a Swapfile on FreeBSD 4.X
- 6-2. Creating a Swapfile on FreeBSD 5.X
- 7-1. boot0 Screenshot
- 7-2. boot2 Screenshot
- 7-3. An Insecure Console in /etc/ttys
- 8-1. Configuring adduser
- 8-2. rmuser Interactive Account Removal
- 8-3. Interactive chpass by Superuser
- 8-4. Interactive chpass by Normal User
- 8-5. Changing Your Password
- 8-6. Changing Another User's Password as the Superuser
- 8-7. Adding a Group Using pw(8)
- 8-8. Adding Somebody to a Group Using pw(8)
- 8-9. Using id(1) to Determine Group Membership
- 10-1. Using SSH to Create a Secure Tunnel for SMTP
- 12-1. Using dump over ssh
- 12-2. A Script for Creating a Bootable Floppy
- 12-3. Using vnconfig to Mount an Existing File System Image under FreeBSD 4.X
- 12-4. Creating a New File-Backed Disk with vnconfig
- 12-5. Using mdconfig to Mount an Existing File System Image under FreeBSD 5.X
- 12-6. Creating a New File-Backed Disk with mdconfig
- 12-7. md Memory Disk under FreeBSD 4.X
- 12-8. Creating a New Memory-Based Disk with mdconfig
- 12-9. Creating a New Memory-Based Disk with mdmfs
- 17-1. Adding Terminal Entries to /etc/ttys
- 19-1. Mounting an Export with amd
- 19-2. Branch Office or Home Network
- 19-3. Head Office or Other LAN
- 19-4. Sending inetd a HangUP Signal
- 20-1. Configuring the sendmail Access Database
- 20-2. Mail Aliases
- 20-3. Example Virtual Domain Mail Map
- A-1. Checking Out Something from -CURRENT (ls(1)) and Deleting It Again:
- A-2. Checking Out the Version of ls(1) in the 3.X-STABLE Branch:
- A-3. Creating a List of Changes (as Unified Diffs) to ls(1)
- A-4. Finding Out What Other Module Names Can Be Used:
Preface
Intended Audience
The FreeBSD newcomer will find that the first section of this book guides the user through the FreeBSD installation process and gently introduces the concepts and conventions that underpin UNIX®. Working through this section requires little more than the desire to explore, and the ability to take on board new concepts as they are introduced.
Once you have travelled this far, the second, far larger, section of the Handbook is a comprehensive reference to all manner of topics of interest to FreeBSD system administrators. Some of these chapters may recommend that you do some prior reading, and this is noted in the synopsis at the beginning of each chapter.
For a list of additional sources of information, please see Appendix B.
Changes from the First Edition
This second edition is the culmination of over two years of work by the dedicated members of the FreeBSD Documentation Project. The following are the major changes in this new edition:
-
A complete Index has been added.
-
All ASCII figures have been replaced by graphical diagrams.
-
A standard synopsis has been added to each chapter to give a quick summary of what information the chapter contains, and what the reader is expected to know.
-
The content has been logically reorganized into three parts: ``Getting Started'', ``System Administration'', and ``Appendices''.
-
Chapter 2 (``Installing FreeBSD'') was completely rewritten with many screenshots to make it much easier for new users to grasp the text.
-
Chapter 3 (``UNIX Basics'') has been expanded to contain additional information about processes, daemons, and signals.
-
Chapter 4 (``Installing Applications'') has been expanded to contain additional information about binary package management.
-
Chapter 5 (``The X Window System'') has been completely rewritten with an emphasis on using modern desktop technologies such as KDE and GNOME on XFree86™ 4.X.
-
Chapter 7 (``The FreeBSD Booting Process'') has been expanded.
-
Chapter 12 (``Storage'') has been written from what used to be two separate chapters on ``Disks'' and ``Backups''. We feel that the topics are easier to comprehend when presented as a single chapter. A section on RAID (both hardware and software) has also been added.
-
Chapter 17 (``Serial Communications'') has been completely reorganized and updated for FreeBSD 4.X/5.X.
-
Chapter 18 (``PPP and SLIP'') has been substantially updated.
-
Many new sections have been added to Chapter 19 (``Advanced Networking'').
-
Chapter 20 (``Electronic Mail'') has been expanded to include more information about configuring sendmail.
-
Chapter 22 (``Linux Compatibility'') has been expanded to include information about installing Oracle® and SAP® R/3®.
-
The following new topics are covered in this second edition:
-
Configuration and Tuning (Chapter 6).
-
Multimedia (Chapter 16)
-
Organization of This Book
This book is split into three logically distinct sections. The first section, Getting Started, covers the installation and basic usage of FreeBSD. It is expected that the reader will follow these chapters in sequence, possibly skipping chapters covering familiar topics. The second section, System Administration, covers a broad collection of subjects that are of interest to more advanced FreeBSD users. Each section begins with a succinct synopsis that describes what the chapter covers and what the reader is expected to already know. This is meant to allow the casual reader to skip around to find chapters of interest. The third section contains appendices of reference information.
- Chapter 1, Introduction
-
Introduces FreeBSD to a new user. It describes the history of the FreeBSD Project, its goals and development model.
- Chapter 2, Installation
-
Walks a user through the entire installation process. Some advanced installation topics, such as installing through a serial console, are also covered.
- Chapter 3, UNIX Basics
-
Covers the basic commands and functionality of the FreeBSD operating system. If you are familiar with Linux or another flavor of UNIX then you can probably skip this chapter.
- Chapter 4, Installing Applications
-
Covers the installation of third-party software with both FreeBSD's innovative ``Ports Collection'' and standard binary packages.
- Chapter 5, The X Window System
-
Describes the X Window System in general and using XFree86 on FreeBSD in particular. Also describes common desktop environments such as KDE and GNOME.
- Chapter 6, Configuration and Tuning
-
Describes the parameters available for system administrators to tune a FreeBSD system for optimum performance. Also describes the various configuration files used in FreeBSD and where to find them.
- Chapter 7, Booting Process
-
Describes the FreeBSD boot process and explains how to control this process with configuration options.
- Chapter 8, Users and Basic Account Management
-
Describes the creation and manipulation of user accounts. Also discusses resource limitations that can be set on users and other account management tasks.
- Chapter 9, Configuring the FreeBSD Kernel
-
Explains why you might need to configure a new kernel and provides detailed instructions for configuring, building, and installing a custom kernel.
- Chapter 10, Security
-
Describes many different tools available to help keep your FreeBSD system secure, including Kerberos, IPsec, OpenSSH, and network firewalls.
- Chapter 11, Printing
-
Describes managing printers on FreeBSD, including information about banner pages, printer accounting, and initial setup.
- Chapter 12, Storage
-
Describes how to manage storage media and filesystems with FreeBSD. This includes physical disks, RAID arrays, optical and tape media, memory-backed disks, and network filesystems.
- Chapter 13, Vinum
-
Describes how to use Vinum, a logical volume manager which provides device-independent logical disks, and software RAID-0, RAID-1 and RAID-5.
- Chapter 14, Localization
-
Describes how to use FreeBSD in languages other than English. Covers both system and application level localization.
- Chapter 15, Desktop Applications
-
Lists some common desktop applications, such as web browsers and productivity suites, and describes how to install them on FreeBSD.
- Chapter 16, Multimedia
-
Shows how to setup sound and video playback support for your system. Also describes some sample audio and video applications.
- Chapter 17, Serial Communications
-
Explains how to connect terminals and modems to your FreeBSD system for both dial in and dial out connections.
- Chapter 18, PPP and SLIP
-
Describes how to use PPP, SLIP, or PPP over Ethernet to connect to remote systems with FreeBSD.
- Chapter 19, Advanced Networking
-
Describes many networking topics, including sharing an Internet connection with other computers on your LAN, using network filesystems, sharing account information via NIS, setting up a name server, and much more.
- Chapter 20, Electronic Mail
-
Explains the different components of an email server and dives into simple configuration topics for the most popular mail server software: sendmail.
- Chapter 21, The Cutting Edge
-
Explains the differences between FreeBSD-STABLE, FreeBSD-CURRENT, and FreeBSD releases. Describes which users would benefit from tracking a development system and outlines that process.
- Chapter 22, Linux Binary Compatibility
-
Describes the Linux compatibility features of FreeBSD. Also provides detailed installation instructions for many popular Linux applications such as Oracle, SAP R/3, and Mathematica®.
- Appendix A, Obtaining FreeBSD
-
Lists different sources for obtaining FreeBSD media on CDROM or DVD as well as different sites on the Internet that allow you to download and install FreeBSD.
- Appendix B, Bibliography
-
This book touches on many different subjects that may leave you hungry for a more detailed explanation. The bibliography lists many excellent books that are referenced in the text.
- Appendix C, Resources on the Internet
-
Describes the many forums available for FreeBSD users to post questions and engage in technical conversations about FreeBSD.
- Appendix D, PGP Keys
-
Lists the PGP fingerprints of several FreeBSD Developers.
Conventions used in this book
To provide a consistent and easy to read text, several conventions are followed throughout the book.
Typographic Conventions
- Italic
-
An italic font is used for filenames, URLs, emphasized text, and the first usage of technical terms.
- Monospace
-
A monospaced font is used for error messages, commands, environment variables, names of ports, hostnames, user names, group names, device names, variables, and code fragments.
- Bold
-
A bold font is used for applications, commands, and keys.
User Input
Keys are shown in bold to stand out from other text. Key combinations that are meant to be typed simultaneously are shown with `+' between the keys, such as:
Ctrl+Alt+Del
Meaning the user should type the Ctrl, Alt,and Del keys at the same time.
Keys that are meant to be typed in sequence will be separated with commas, for example:
Ctrl+X, Ctrl+S
Would mean that the user is expected to type the Ctrl and X keys simultaneously and then to type the Ctrl and S keys simultaneously.
Examples
Examples starting with E:\> indicate a MS-DOS® command. Unless otherwise noted, these commands may be executed from a ``Command Prompt'' window in a modern Microsoft® Windows® environment.
E:\> tools\fdimage floppies\kern.flp A:
Examples starting with # indicate a command that must be invoked as the superuser in FreeBSD. You can login as root to type the command, or login as your normal account and use su(1) to gain superuser privileges.
# dd if=kern.flp of=/dev/fd0
Examples starting with % indicate a command that should be invoked from a normal user account. Unless otherwise noted, C-shell syntax is used for setting environment variables and other shell commands.
% top
Acknowledgments
The book you are holding represents the efforts of many hundreds of people around the world. Whether they sent in fixes for typos, or submitted complete chapters, all the contributions have been useful.
Several companies have supported the development of this document by paying authors to work on it full-time, paying for publication, etc. In particular, BSDi (subsequently acquired by Wind River Systems) paid members of the FreeBSD Documentation Project to work on improving this book full time leading up to the publication of the first printed edition in March 2000 (ISBN 1-57176-241-8). Wind River Systems then paid several additional authors to make a number of improvements to the print-output infrastructure and to add additional chapters to the text. This work culminated in the publication of the second printed edition in November 2001 (ISBN 1-57176-303-1).
I. Getting Started
This part of the FreeBSD Handbook is for users and administrators who are new to FreeBSD. These chapters:
-
Introduce you to FreeBSD.
-
Guide you through the installation process.
-
Teach you UNIX basics and fundamentals.
-
Show you how to install the wealth of third party applications available for FreeBSD.
-
Introduce you to X, the UNIX windowing system, and detail how to configure a desktop environment that makes you more productive.
We have tried to keep the number of forward references in the text to a minimum so that you can read this section of the Handbook from front to back with the minimum page flipping required.
- Table of Contents
- 1 Introduction
- 2 Installing FreeBSD
- 3 UNIX Basics
- 4 Installing Applications: Packages and Ports
- 5 The X Window System
Chapter 1 Introduction
Restructured, reorganized, and parts rewritten by Jim Mock.1.1 Synopsis
Thank you for your interest in FreeBSD! The following chapter covers various aspects of the FreeBSD Project, such as its history, goals, development model, and so on.
After reading this chapter, you will know:
-
How FreeBSD relates to other computer operating systems.
-
The history of the FreeBSD Project.
-
The goals of the FreeBSD Project.
-
The basics of the FreeBSD open-source development model.
-
And of course: where the name ``FreeBSD'' comes from.
1.2 Welcome to FreeBSD!
FreeBSD is a 4.4BSD-Lite based operating system for Intel (x86), DEC Alpha™, and Sun UltraSPARC® computers. Ports to other architectures are also underway. You can also read about the history of FreeBSD, or the current release. If you are interested in contributing something to the Project (code, hardware, unmarked bills), see the Contributing to FreeBSD article.
1.2.1 What Can FreeBSD Do?
FreeBSD has many noteworthy features. Some of these are:
-
Preemptive multitasking with dynamic priority adjustment to ensure smooth and fair sharing of the computer between applications and users, even under the heaviest of loads.
-
Multi-user facilities which allow many people to use a FreeBSD system simultaneously for a variety of things. This means, for example, that system peripherals such as printers and tape drives are properly shared between all users on the system or the network and that individual resource limits can be placed on users or groups of users, protecting critical system resources from over-use.
-
Strong TCP/IP networking with support for industry standards such as SLIP, PPP, NFS, DHCP, and NIS. This means that your FreeBSD machine can interoperate easily with other systems as well as act as an enterprise server, providing vital functions such as NFS (remote file access) and email services or putting your organization on the Internet with WWW, FTP, routing and firewall (security) services.
-
Memory protection ensures that applications (or users) cannot interfere with each other. One application crashing will not affect others in any way.
-
FreeBSD is a 32-bit operating system (64-bit on the Alpha and UltraSPARC) and was designed as such from the ground up.
-
The industry standard X Window System (X11R6) provides a graphical user interface (GUI) for the cost of a common VGA card and monitor and comes with full sources.
-
Binary compatibility with many programs built for Linux, SCO, SVR4, BSDI and NetBSD.
-
Thousands of ready-to-run applications are available from the FreeBSD ports and packages collection. Why search the net when you can find it all right here?
-
Thousands of additional and easy-to-port applications are available on the Internet. FreeBSD is source code compatible with most popular commercial UNIX systems and thus most applications require few, if any, changes to compile.
-
Demand paged virtual memory and ``merged VM/buffer cache'' design efficiently satisfies applications with large appetites for memory while still maintaining interactive response to other users.
-
SMP support for machines with multiple CPUs.
-
A full complement of C, C++, Fortran, and Perl development tools. Many additional languages for advanced research and development are also available in the ports and packages collection.
-
Source code for the entire system means you have the greatest degree of control over your environment. Why be locked into a proprietary solution at the mercy of your vendor when you can have a truly open system?
-
Extensive online documentation.
-
And many more!
FreeBSD is based on the 4.4BSD-Lite release from Computer Systems Research Group (CSRG) at the University of California at Berkeley, and carries on the distinguished tradition of BSD systems development. In addition to the fine work provided by CSRG, the FreeBSD Project has put in many thousands of hours in fine tuning the system for maximum performance and reliability in real-life load situations. As many of the commercial giants struggle to field PC operating systems with such features, performance and reliability, FreeBSD can offer them now!
The applications to which FreeBSD can be put are truly limited only by your own imagination. From software development to factory automation, inventory control to azimuth correction of remote satellite antennae; if it can be done with a commercial UNIX product then it is more than likely that you can do it with FreeBSD too! FreeBSD also benefits significantly from literally thousands of high quality applications developed by research centers and universities around the world, often available at little to no cost. Commercial applications are also available and appearing in greater numbers every day.
Because the source code for FreeBSD itself is generally available, the system can also be customized to an almost unheard of degree for special applications or projects, and in ways not generally possible with operating systems from most major commercial vendors. Here is just a sampling of some of the applications in which people are currently using FreeBSD:
-
Internet Services: The robust TCP/IP networking built into FreeBSD makes it an ideal platform for a variety of Internet services such as:
-
FTP servers
-
World Wide Web servers (standard or secure [SSL])
-
Firewalls and NAT (``IP masquerading'') gateways
-
Electronic Mail servers
-
USENET News or Bulletin Board Systems
-
And more...
With FreeBSD, you can easily start out small with an inexpensive 386 class PC and upgrade all the way up to a quad-processor Xeon with RAID storage as your enterprise grows.
-
-
Education: Are you a student of computer science or a related engineering field? There is no better way of learning about operating systems, computer architecture and networking than the hands on, under the hood experience that FreeBSD can provide. A number of freely available CAD, mathematical and graphic design packages also make it highly useful to those whose primary interest in a computer is to get other work done!
-
Research: With source code for the entire system available, FreeBSD is an excellent platform for research in operating systems as well as other branches of computer science. FreeBSD's freely available nature also makes it possible for remote groups to collaborate on ideas or shared development without having to worry about special licensing agreements or limitations on what may be discussed in open forums.
-
Networking: Need a new router? A name server (DNS)? A firewall to keep people out of your internal network? FreeBSD can easily turn that unused 386 or 486 PC sitting in the corner into an advanced router with sophisticated packet-filtering capabilities.
-
X Window workstation: FreeBSD is a fine choice for an inexpensive X terminal solution, either using the freely available XFree86 server or one of the excellent commercial servers provided by Xi Graphics. Unlike an X terminal, FreeBSD allows many applications to be run locally if desired, thus relieving the burden on a central server. FreeBSD can even boot ``diskless'', making individual workstations even cheaper and easier to administer.
-
Software Development: The basic FreeBSD system comes with a full complement of development tools including the renowned GNU C/C++ compiler and debugger.
FreeBSD is available in both source and binary form on CDROM, DVD, and via anonymous FTP. Please see Appendix A for more information about obtaining FreeBSD.
1.2.2 Who Uses FreeBSD?
FreeBSD is used to power some of the biggest sites on the Internet, including:
and many more.
1.3 About the FreeBSD Project
The following section provides some background information on the project, including a brief history, project goals, and the development model of the project.
1.3.1 A Brief History of FreeBSD
Contributed by Jordan Hubbard.The FreeBSD project had its genesis in the early part of 1993, partially as an outgrowth of the ``Unofficial 386BSD Patchkit'' by the patchkit's last 3 coordinators: Nate Williams, Rod Grimes and myself.
Our original goal was to produce an intermediate snapshot of 386BSD in order to fix a number of problems with it that the patchkit mechanism just was not capable of solving. Some of you may remember the early working title for the project being ``386BSD 0.5'' or ``386BSD Interim'' in reference to that fact.
386BSD was Bill Jolitz's operating system, which had been up to that point suffering rather severely from almost a year's worth of neglect. As the patchkit swelled ever more uncomfortably with each passing day, we were in unanimous agreement that something had to be done and decided to assist Bill by providing this interim ``cleanup'' snapshot. Those plans came to a rude halt when Bill Jolitz suddenly decided to withdraw his sanction from the project without any clear indication of what would be done instead.
It did not take us long to decide that the goal remained worthwhile, even without Bill's support, and so we adopted the name ``FreeBSD'', coined by David Greenman. Our initial objectives were set after consulting with the system's current users and, once it became clear that the project was on the road to perhaps even becoming a reality, I contacted Walnut Creek CDROM with an eye toward improving FreeBSD's distribution channels for those many unfortunates without easy access to the Internet. Walnut Creek CDROM not only supported the idea of distributing FreeBSD on CD but also went so far as to provide the project with a machine to work on and a fast Internet connection. Without Walnut Creek CDROM's almost unprecedented degree of faith in what was, at the time, a completely unknown project, it is quite unlikely that FreeBSD would have gotten as far, as fast, as it has today.
The first CDROM (and general net-wide) distribution was FreeBSD 1.0, released in December of 1993. This was based on the 4.3BSD-Lite (``Net/2'') tape from U.C. Berkeley, with many components also provided by 386BSD and the Free Software Foundation. It was a fairly reasonable success for a first offering, and we followed it with the highly successful FreeBSD 1.1 release in May of 1994.
Around this time, some rather unexpected storm clouds formed on the horizon as Novell and U.C. Berkeley settled their long-running lawsuit over the legal status of the Berkeley Net/2 tape. A condition of that settlement was U.C. Berkeley's concession that large parts of Net/2 were ``encumbered'' code and the property of Novell, who had in turn acquired it from AT&T some time previously. What Berkeley got in return was Novell's ``blessing'' that the 4.4BSD-Lite release, when it was finally released, would be declared unencumbered and all existing Net/2 users would be strongly encouraged to switch. This included FreeBSD, and the project was given until the end of July 1994 to stop shipping its own Net/2 based product. Under the terms of that agreement, the project was allowed one last release before the deadline, that release being FreeBSD 1.1.5.1.
FreeBSD then set about the arduous task of literally re-inventing itself from a completely new and rather incomplete set of 4.4BSD-Lite bits. The ``Lite'' releases were light in part because Berkeley's CSRG had removed large chunks of code required for actually constructing a bootable running system (due to various legal requirements) and the fact that the Intel port of 4.4 was highly incomplete. It took the project until November of 1994 to make this transition, at which point it released FreeBSD 2.0 to the net and on CDROM (in late December). Despite being still more than a little rough around the edges, the release was a significant success and was followed by the more robust and easier to install FreeBSD 2.0.5 release in June of 1995.
We released FreeBSD 2.1.5 in August of 1996, and it appeared to be popular enough among the ISP and commercial communities that another release along the 2.1-STABLE branch was merited. This was FreeBSD 2.1.7.1, released in February 1997 and capping the end of mainstream development on 2.1-STABLE. Now in maintenance mode, only security enhancements and other critical bug fixes will be done on this branch (RELENG_2_1_0).
FreeBSD 2.2 was branched from the development mainline (``-CURRENT'') in November 1996 as the RELENG_2_2 branch, and the first full release (2.2.1) was released in April 1997. Further releases along the 2.2 branch were done in the summer and fall of '97, the last of which (2.2.8) appeared in November 1998. The first official 3.0 release appeared in October 1998 and spelled the beginning of the end for the 2.2 branch.
The tree branched again on Jan 20, 1999, leading to the 4.0-CURRENT and 3.X-STABLE branches. From 3.X-STABLE, 3.1 was released on February 15, 1999, 3.2 on May 15, 1999, 3.3 on September 16, 1999, 3.4 on December 20, 1999, and 3.5 on June 24, 2000, which was followed a few days later by a minor point release update to 3.5.1, to incorporate some last-minute security fixes to Kerberos. This will be the final release in the 3.X branch.
There was another branch on March 13, 2000, which saw the emergence of the 4.X-STABLE branch, now considered to be the ``current -stable branch''. There have been several releases from it so far: 4.0-RELEASE was introduced in March 2000, and the most recent 4.8-RELEASE came out in March 2003. There will be additional releases along the 4.X-stable (RELENG_4) branch well into 2003.
The long-awaited 5.0-RELEASE was announced on January 19, 2003. The culmination of nearly three years of work, this release started FreeBSD on the path of advanced multiprocessor and application thread support and introduced support for the UltraSPARC and ia64 platforms. This release was followed by 5.1 in June of 2003. Besides a number of new features, the 5.X releases also contain a number of major developments in the underlying system architecture. Along with these advances, however, comes a system that incorporates a tremendous amount of new and not-widely-tested code. For this reason, the 5.X releases are considered ``New Technology'' releases, while the 4.X series function as ``Production'' releases. In time, 5.X will be declared stable and work will commence on the next development branch, 6.0-CURRENT.
For now, long-term development projects continue to take place in the 5.X-CURRENT (trunk) branch, and SNAPshot releases of 5.X on CDROM (and, of course, on the net) are continually made available from the snapshot server as work progresses.
1.3.2 FreeBSD Project Goals
Contributed by Jordan Hubbard.The goals of the FreeBSD Project are to provide software that may be used for any purpose and without strings attached. Many of us have a significant investment in the code (and project) and would certainly not mind a little financial compensation now and then, but we are definitely not prepared to insist on it. We believe that our first and foremost ``mission'' is to provide code to any and all comers, and for whatever purpose, so that the code gets the widest possible use and provides the widest possible benefit. This is, I believe, one of the most fundamental goals of Free Software and one that we enthusiastically support.
That code in our source tree which falls under the GNU General Public License (GPL) or Library General Public License (LGPL) comes with slightly more strings attached, though at least on the side of enforced access rather than the usual opposite. Due to the additional complexities that can evolve in the commercial use of GPL software we do, however, prefer software submitted under the more relaxed BSD copyright when it is a reasonable option to do so.
1.3.3 The FreeBSD Development Model
Contributed by Satoshi Asami.The development of FreeBSD is a very open and flexible process, being literally built from the contributions of hundreds of people around the world, as can be seen from our list of contributors. FreeBSD's development infrastructure allow these hundreds of developers to collaborate over the Internet. We are constantly on the lookout for new developers and ideas, and those interested in becoming more closely involved with the project need simply contact us at the FreeBSD technical discussions mailing list. The FreeBSD announcements mailing list is also available to those wishing to make other FreeBSD users aware of major areas of work.
Useful things to know about the FreeBSD project and its development process, whether working independently or in close cooperation:
- The CVS repository
-
The central source tree for FreeBSD is maintained by CVS (Concurrent Versions System), a freely available source code control tool that comes bundled with FreeBSD. The primary CVS repository resides on a machine in Santa Clara CA, USA from where it is replicated to numerous mirror machines throughout the world. The CVS tree, which contains the -CURRENT and -STABLE trees, can all be easily replicated to your own machine as well. Please refer to the Synchronizing your source tree section for more information on doing this.
- The committers list
-
The committers are the people who have write access to the CVS tree, and are authorized to make modifications to the FreeBSD source (the term ``committer'' comes from the cvs(1) commit command, which is used to bring new changes into the CVS repository). The best way of making submissions for review by the committers list is to use the send-pr(1) command. If something appears to be jammed in the system, then you may also reach them by sending mail to the FreeBSD committer's mailing list.
- The FreeBSD core team
-
The FreeBSD core team would be equivalent to the board of directors if the FreeBSD Project were a company. The primary task of the core team is to make sure the project, as a whole, is in good shape and is heading in the right directions. Inviting dedicated and responsible developers to join our group of committers is one of the functions of the core team, as is the recruitment of new core team members as others move on. The current core team was elected from a pool of committer candidates in June 2002. Elections are held every 2 years.
Some core team members also have specific areas of responsibility, meaning that they are committed to ensuring that some large portion of the system works as advertised. For a complete list of FreeBSD developers and their areas of responsibility, please see the Contributors List
Note: Most members of the core team are volunteers when it comes to FreeBSD development and do not benefit from the project financially, so ``commitment'' should also not be misconstrued as meaning ``guaranteed support.'' The ``board of directors'' analogy above is not very accurate, and it may be more suitable to say that these are the people who gave up their lives in favor of FreeBSD against their better judgment!
- Outside contributors
-
Last, but definitely not least, the largest group of developers are the users themselves who provide feedback and bug fixes to us on an almost constant basis. The primary way of keeping in touch with FreeBSD's more non-centralized development is to subscribe to the FreeBSD technical discussions mailing list where such things are discussed. See Appendix C for more information about the various FreeBSD mailing lists.
The FreeBSD Contributors List is a long and growing one, so why not join it by contributing something back to FreeBSD today?
Providing code is not the only way of contributing to the project; for a more complete list of things that need doing, please refer to the FreeBSD Project web site.
In summary, our development model is organized as a loose set of concentric circles. The centralized model is designed for the convenience of the users of FreeBSD, who are provided with an easy way of tracking one central code base, not to keep potential contributors out! Our desire is to present a stable operating system with a large set of coherent application programs that the users can easily install and use -- this model works very well in accomplishing that.
All we ask of those who would join us as FreeBSD developers is some of the same dedication its current people have to its continued success!
1.3.4 The Current FreeBSD Release
FreeBSD is a freely available, full source 4.4BSD-Lite based release for Intel i386™, i486™, Pentium®, Pentium Pro, Celeron®, Pentium II, Pentium III, Pentium 4 (or compatible), Xeon™, DEC Alpha and Sun UltraSPARC based computer systems. It is based primarily on software from U.C. Berkeley's CSRG group, with some enhancements from NetBSD, OpenBSD, 386BSD, and the Free Software Foundation.
Since our release of FreeBSD 2.0 in late 94, the performance, feature set, and stability of FreeBSD has improved dramatically. The largest change is a revamped virtual memory system with a merged VM/file buffer cache that not only increases performance, but also reduces FreeBSD's memory footprint, making a 5 MB configuration a more acceptable minimum. Other enhancements include full NIS client and server support, transaction TCP support, dial-on-demand PPP, integrated DHCP support, an improved SCSI subsystem, ISDN support, support for ATM, FDDI, Fast and Gigabit Ethernet (1000 Mbit) adapters, improved support for the latest Adaptec controllers, and many thousands of bug fixes.
In addition to the base distributions, FreeBSD offers a ported software collection with thousands of commonly sought-after programs. At the time of this printing, there were over 9,200 ports! The list of ports ranges from http (WWW) servers, to games, languages, editors, and almost everything in between. The entire ports collection requires approximately 300 MB of storage, all ports being expressed as ``deltas'' to their original sources. This makes it much easier for us to update ports, and greatly reduces the disk space demands made by the older 1.0 ports collection. To compile a port, you simply change to the directory of the program you wish to install, type make install, and let the system do the rest. The full original distribution for each port you build is retrieved dynamically off the CDROM or a local FTP site, so you need only enough disk space to build the ports you want. Almost every port is also provided as a pre-compiled ``package'', which can be installed with a simple command (pkg_add) by those who do not wish to compile their own ports from source. More information on packages and ports can be found in Chapter 4.
A number of additional documents which you may find very helpful in the process of installing and using FreeBSD may now also be found in the /usr/share/doc directory on any recent FreeBSD machine. You may view the locally installed manuals with any HTML capable browser using the following URLs:
- The FreeBSD Handbook
- The FreeBSD FAQ
You can also view the master (and most frequently updated) copies at http://www.FreeBSD.org/.
Chapter 2 Installing FreeBSD
Restructured, reorganized, and parts rewritten by Jim Mock. The sysinstall walkthrough, screenshots, and general copy by Randy Pratt.2.1 Synopsis
FreeBSD is provided with a text-based, easy to use installation program called sysinstall. This is the default installation program for FreeBSD, although vendors are free to provide their own installation suite if they wish. This chapter describes how to use sysinstall to install FreeBSD.
After reading this chapter, you will know:
-
How to create the FreeBSD installation disks.
-
How FreeBSD refers to, and subdivides, your hard disks.
-
How to start sysinstall.
-
The questions sysinstall will ask you, what they mean, and how to answer them.
Before reading this chapter, you should:
-
Read the supported hardware list that shipped with the version of FreeBSD you are installing, and verify that your hardware is supported.
Note: In general, these installation instructions are written for i386 (``PC compatible'') architecture computers. Where applicable, instructions specific to other platforms (for example, Alpha) will be listed. Although this guide is kept as up to date as possible, you may find minor differences between the installer and what is shown here. It is suggested that you use this chapter as a general guide rather than a literal installation manual.
2.2 Pre-installation Tasks
2.2.1 Inventory Your Computer
Before installing FreeBSD you should attempt to inventory the components in your computer. The FreeBSD installation routines will show you the components (hard disks, network cards, CDROM drives, and so forth) with their model number and manufacturer. FreeBSD will also attempt to determine the correct configuration for these devices, which includes information about IRQ and IO port usage. Due to the vagaries of PC hardware this process is not always completely successful, and you may need to correct FreeBSD's determination of your configuration.
If you already have another operating system installed, such as Windows or Linux, it is a good idea to use the facilities provided by those operating systems to see how your hardware is already configured. If you are not sure what settings an expansion card is using, you may find it printed on the card itself. Popular IRQ numbers are 3, 5, and 7, and IO port addresses are normally written as hexadecimal numbers, such as 0x330.
We recommend you print or write down this information before installing FreeBSD. It may help to use a table, like this:
Table 2-1. Sample Device Inventory
| Device Name | IRQ | IO port(s) | Notes |
|---|---|---|---|
| First hard disk | N/A | N/A | 40 GB, made by Seagate, first IDE master |
| CDROM | N/A | N/A | First IDE slave |
| Second hard disk | N/A | N/A | 20 GB, made by IBM, second IDE master |
| First IDE controller | 14 | 0x1f0 | |
| Network card | N/A | N/A | Intel® 10/100 |
| Modem | N/A | N/A | 3Com® 56K faxmodem, on COM1 |
| ... |
2.2.2 Backup Your Data
If the computer you will be installing FreeBSD on contains valuable data, then ensure you have it backed up, and that you have tested the backups before installing FreeBSD. The FreeBSD installation routine will prompt you before writing any data to your disk, but once that process has started it cannot be undone.
2.2.3 Decide Where to Install FreeBSD
If you want FreeBSD to use your entire hard disk, then there is nothing more to concern yourself with at this point -- you can skip this section.
However, if you need FreeBSD to co-exist with other operating systems then you need to have a rough understanding of how data is laid out on the disk, and how this affects you.
2.2.3.1 Disk Layouts for the i386™
A PC disk can be divided into discrete chunks. These chunks are called partitions. By design, the PC only supports four partitions per disk. These partitions are called primary partitions. To work around this limitation and allow more than four partitions, a new partition type was created, the extended partition. A disk may contain only one extended partition. Special partitions, called logical partitions, can be created inside this extended partition.
Each partition has a partition ID, which is a number used to identify the type of data on the partition. FreeBSD partitions have the partition ID of 165.
In general, each operating system that you use will identify partitions in a particular way. For example, DOS, and its descendants, like Windows, assign each primary and logical partition a drive letter, starting with C:.
FreeBSD must be installed into a primary partition. FreeBSD can keep all its data, including any files that you create, on this one partition. However, if you have multiple disks, then you can create a FreeBSD partition on all, or some, of them. When you install FreeBSD, you must have one partition available. This might be a blank partition that you have prepared, or it might be an existing partition that contains data that you no longer care about.
If you are already using all the partitions on all your disks, then you will have to free one of them for FreeBSD using the tools provided by the other operating systems you use (e.g., fdisk on DOS or Windows).
If you have a spare partition then you can use that. However, you may need to shrink one or more of your existing partitions first.
A minimal installation of FreeBSD takes as little as 100 MB of disk space. However, that is a very minimal install, leaving almost no space for your own files. A more realistic minimum is 250 MB without a graphical environment, and 350 MB or more if you want a graphical user interface. If you intend to install a lot of third party software as well, then you will need more space.
You can use a commercial tool such as PartitionMagic® to resize your partitions to make space for FreeBSD. The tools directory on the CDROM contains two free software tools which can carry out this task, namely FIPS and PResizer. FIPS, PResizer, and PartitionMagic can resize FAT16 and FAT32 partitions -- used in MS-DOS through Windows ME. PartitionMagic is the only known application that can resize NTFS Documentation for both of these is available in the same directory.
Warning: Incorrect use of these tools can delete the data on your disk. Be sure that you have recent, working backups before using them.
Example 2-1. Using an Existing Partition Unchanged
Suppose that you have a computer with a single 4 GB disk that already has a version of Windows installed, and you have split the disk into two drive letters, C: and D:, each of which is 2 GB in size. You have 1 GB of data on C:, and 0.5 GB of data on D:.
This means that your disk has two partitions on it, one per drive letter. You can copy all your existing data from D: to C:, which will free up the second partition, ready for FreeBSD.
Example 2-2. Shrinking an Existing Partition
Suppose that you have a computer with a single 4 GB disk that already has a version of Windows installed. When you installed Windows you created one large partition, giving you a C: drive that is 4 GB in size. You are currently using 1.5 GB of space, and want FreeBSD to have 2 GB of space.
In order to install FreeBSD you will need to either:
-
Backup your Windows data, and then reinstall Windows, asking for a 2 GB partition at install time.
-
Use one of the tools such as PartitionMagic, described above, to shrink your Windows partition.
2.2.3.2 Disk Layouts for the Alpha
You will need a dedicated disk for FreeBSD on the Alpha. It is not possible to share a disk with another operating system at this time. Depending on the specific Alpha machine you have, this disk can either be a SCSI disk or an IDE disk, as long as your machine is capable of booting from it.
Following the conventions of the Digital / Compaq manuals all SRM input is shown in uppercase. SRM is case insensitive.
To find the names and types of disks in your machine, use the SHOW DEVICE command from the SRM console prompt:
>>>SHOW DEVICE
dka0.0.0.4.0               DKA0           TOSHIBA CD-ROM XM-57  3476
dkc0.0.0.1009.0            DKC0                       RZ1BB-BS  0658
dkc100.1.0.1009.0          DKC100             SEAGATE ST34501W  0015
dva0.0.0.0.1               DVA0
ewa0.0.0.3.0               EWA0              00-00-F8-75-6D-01
pkc0.7.0.1009.0            PKC0                  SCSI Bus ID 7  5.27
pqa0.0.0.4.0               PQA0                       PCI EIDE
pqb0.0.1.4.0               PQB0                       PCI EIDE
This example is from a Digital Personal Workstation 433au and shows three disks attached to the machine. The first is a CDROM drive called DKA0 and the other two are disks and are called DKC0 and DKC100 respectively.
Disks with names of the form DKx are SCSI disks. For example DKA100 refers to a SCSI disk with SCSI target ID 1 on the first SCSI bus (A), whereas DKC300 refers to a SCSI disk with SCSI ID 3 on the third SCSI bus (C). Devicename PKx refers to the SCSI host bus adapter. As seen in the SHOW DEVICE output SCSI CDROM drives are treated as any other SCSI hard disk drive.
IDE disks have names similar to DQx, while PQx is the associated IDE controller.
2.2.4 Collect Your Network Configuration Details
If you intend to connect to a network as part of your FreeBSD installation (for example, if you will be installing from an FTP site or an NFS server), then you need to know your network configuration. You will be prompted for this information during the installation so that FreeBSD can connect to the network to complete the install.
2.2.4.1 Connecting to an Ethernet Network or Cable/DSL Modem
If you connect to an Ethernet network, or you have an Internet connection using an Ethernet adapter via cable or DSL, then you will need the following information:
-
IP address
-
IP address of the default gateway
-
Hostname
-
DNS server IP addresses
-
Subnet Mask
If you do not know this information, then ask your system administrator or service provider. They may say that this information is assigned automatically, using DHCP. If so, make a note of this.
2.2.4.2 Connecting Using a Modem
If you dial up to an ISP using a regular modem then you can still install FreeBSD over the Internet, it will just take a very long time.
You will need to know:
-
The phone number to dial for your ISP
-
The COM: port your modem is connected to
-
The username and password for your ISP account
2.2.5 Check for FreeBSD Errata
Although the FreeBSD project strives to ensure that each release of FreeBSD is as stable as possible, bugs do occasionally creep into the process. On very rare occasions those bugs affect the installation process. As these problems are discovered and fixed, they are noted in the FreeBSD Errata, which is found on the FreeBSD web site. You should check the errata before installing to make sure that there are no late-breaking problems which you should be aware of.
Information about all the releases, including the errata for each release, can be found on the release information section of the FreeBSD web site.
2.2.6 Obtain the FreeBSD Installation Files
The FreeBSD installation process can install FreeBSD from files located in the any of the following places:
Local Media
-
A CDROM or DVD
-
A DOS partition on the same computer
-
A SCSI or QIC tape
-
Floppy disks
Network
-
An FTP site, going through a firewall, or using an HTTP proxy, as necessary
-
An NFS server
-
A dedicated parallel or serial connection
If you have purchased FreeBSD on CD or DVD then you already have everything you need, and should proceed to the next section (Preparing the Boot Media).
If you have not obtained the FreeBSD installation files you should skip ahead to Section 2.13 which explains how to prepare to install FreeBSD from any of the above. After reading that section, you should come back here, and read on to Section 2.2.7.
2.2.7 Prepare the Boot Media
The FreeBSD installation process is started by booting your computer into the FreeBSD installer--it is not a program you run within another operating system. Your computer normally boots using the operating system installed on your hard disk, but it can also be configured to use a ``bootable'' floppy disk. Most modern computers can also boot from a CDROM in the CDROM drive.
Tip: If you have FreeBSD on CDROM or DVD (either one you purchased or you prepared yourself), and your computer allows you to boot from the CDROM or DVD (typically a BIOS option called ``Boot Order'' or similar), then you can skip this section. The FreeBSD CDROM and DVD images are bootable and can be used to install FreeBSD without any other special preparation.
To create boot floppy images, follow these steps:
-
Acquire the Boot Floppy Images
The boot disks are available on your installation media in the floppies/ directory, and can also be downloaded from the floppies directory for the i386 architecture and from this floppies directory for the Alpha architecture.
The floppy images have a .flp extension. The floppies/ directory contains a number of different images, and the ones you will need to use depends on the version of FreeBSD you are installing, and in some cases, the hardware you are installing to. In most cases you will just need two files, kern.flp and mfsroot.flp. Additional device drivers may be necessary for some systems. These drivers are provided on the drivers.flp image. Check README.TXT in the same directory for the most up to date information about these floppy images.
Important: Your FTP program must use binary mode to download these disk images. Some web browsers have been known to use text (or ASCII) mode, which will be apparent if you cannot boot from the disks.
-
Prepare the Floppy Disks
You must prepare one floppy disk per image file you had to download. It is imperative that these disks are free from defects. The easiest way to test this is to format the disks for yourself. Do not trust pre-formatted floppies. The format utility in Windows will not tell about the presence of bad blocks , it simply marks them as ``bad'' and ignores them. It is advised that you use brand new floppies if choosing this installation route.
Important: If you try to install FreeBSD and the installation program crashes, freezes, or otherwise misbehaves, one of the first things to suspect is the floppies. Try writing the floppy image files to new disks and try again.
-
Write the Image Files to the Floppy Disks
The .flp files are not regular files you copy to the disk. They are images of the complete contents of the disk. This means that you cannot simply copy files frm one disk to another. Instead, you must use specific tools to write the images directly to the disk.
If you are creating the floppies on a computer running MS-DOS/Windows, then we provide a tool to do this called fdimage.
If you are using the floppies from the CDROM, and your CDROM is the E: drive, then you would run this:
E:\> tools\fdimage floppies\kern.flp A:
Repeat this command for each .flp file, replacing the floppy disk each time, being sure to label the disks with the name of the file that you copied to them. Adjust the command line as necessary, depending on where you have placed the .flp files. If you do not have the CDROM, then fdimage can be downloaded from the tools directory on the FreeBSD FTP site.
If you are writing the floppies on a UNIX system (such as another FreeBSD system) you can use the dd(1) command to write the image files directly to disk. On FreeBSD, you would run:
# dd if=kern.flp of=/dev/fd0
On FreeBSD, /dev/fd0 refers to the first floppy disk (the A: drive). /dev/fd1 would be the B: drive, and so on. Other UNIX variants might have different names for the floppy disk devices, and you will need to check the documentation for the system as necessary.
You are now ready to start installing FreeBSD.
2.3 Starting the Installation
Important: By default, the installation will not make any changes to your disk(s) until you see the following message:
Last Chance: Are you SURE you want continue the installation?

If you're running this on a disk with data you wish to save then WE
STRONGLY ENCOURAGE YOU TO MAKE PROPER BACKUPS before proceeding!

We can take no responsibility for lost disk contents!
The install can be exited at any time prior to the final warning without changing the contents of the hard drive. If you are concerned that you have configured something incorrectly you can just turn the computer off before this point, and no damage will be done.
2.3.1 Booting
2.3.1.1 Booting for the i386
-
Start with your computer turned off.
-
Turn on the computer. As it starts it should display an option to enter the system set up menu, or BIOS, commonly reached by keys like F2, F10, Del, or Alt+S. Use whichever keystroke is indicated on screen. In some cases your computer may display a graphic while it starts. Typically, pressing Esc will dismiss the graphic and allow you to see the necessary messages.
-
Find the setting that controls which devices the system boots from. This is usually labeled as the ``Boot Order'' and commonly shown as a list of devices, such as Floppy, CDROM, First Hard Disk, and so on.
If you needed to prepare boot floppies, then make sure that the floppy disk is selected. If you are booting from the CDROM then make sure that that is selected instead. In case of doubt, you should consult the manual that came with your computer, and/or its motherboard.
Make the change, then save and exit. The computer should now restart.
-
If you needed to prepare boot floppies, as described in Section 2.2.7, then one of them will be the first boot disc, probably the one containing kern.flp. Put this disc in your floppy drive.
If you are booting from CDROM, then you will need to turn on the computer, and insert the CDROM at the first opportunity.
If your computer starts up as normal and loads your existing operating system, then either:
-
The disks were not inserted early enough in the boot process. Leave them in, and try restarting your computer.
-
The BIOS changes earlier did not work correctly. You should redo that step until you get the right option.
-
Your particular BIOS does not support booting from the desired media.
-
-
FreeBSD will start to boot. If you are booting from CDROM you will see a display similar to this (version information omitted):
Verifying DMI Pool Data ........
Boot from ATAPI CD-ROM :
 1. FD 2.88MB  System Type-(00)
Uncompressing ... done

BTX loader 1.00 BTX version is 1.01
Console: internal video/keyboard
BIOS drive A: is disk0
BIOS drive B: is disk1
BIOS drive C: is disk2
BIOS drive C: is disk3
BIOS 639kB/261120kB available memory

FreeBSD/i386 bootstrap loader, Revision 0.8

/kernel text=0x277391 data=0x3268c+0x332a8 |

|
Hit [Enter] to boot immediately, or any other key for command prompt.
Booting [kernel] in 9 seconds... _
If you are booting from floppy disc, you will see a display similar to this (version information omitted):
Verifying DMI Pool Data ........

BTX loader 1.00  BTX version is 1.01
Console: internal video/keyboard
BIOS drive A: is disk0
BIOS drive C: is disk1
BIOS 639kB/261120kB available memory

FreeBSD/i386 bootstrap loader, Revision 0.8

/kernel text=0x277391 data=0x3268c+0x332a8 |

Please insert MFS root floppy and press enter:
Follow these instructions by removing the kern.flp disc, insert the mfsroot.flp disc, and press Enter.
-
Whether you booted from floppy or CDROM, the boot process will then get to this point:
Hit [Enter] to boot immediately, or any other key for command prompt.
Booting [kernel] in 9 seconds... _
Either wait ten seconds, or press Enter. This will then launch the kernel configuration menu.
2.3.1.2 Booting for the Alpha
-
Start with your computer turned off.
-
Turn on the computer and wait for a boot monitor prompt.
-
If you needed to prepare boot floppies, as described in Section 2.2.7 then one of them will be the first boot disc, probably the one containing kern.flp. Put this disc in your floppy drive and type the following command to boot the disk (substituting the name of your floppy drive if necessary):
>>>BOOT DVA0 -FLAGS '' -FILE ''
If you are booting from CDROM, insert the CDROM into the drive and type the following command to start the installation (substituting the name of the appropriate CDROM drive if necessary):
>>>BOOT DKA0 -FLAGS '' -FILE ''
-
FreeBSD will start to boot. If you are booting from a floppy disc, at some point you will see the message:
Please insert MFS root floppy and press enter:
Follow these instructions by removing the kern.flp disc, insert the mfsroot.flp disc, and press Enter.
-
Whether you booted from floppy or CDROM, the boot process will then get to this point:
Hit [Enter] to boot immediately, or any other key for command prompt.
Booting [kernel] in 9 seconds... _
Either wait ten seconds, or press Enter. This will then launch the kernel configuration menu.
2.3.2 Kernel Configuration
Note: From FreeBSD versions 5.0 and later, userconfig has been depreciated in favor of the new device.hints(5) method. For more information on device.hints(5) please visit Section 7.5
The kernel is the core of the operating system. It is responsible for many things, including access to all the devices you may have on your system, such as hard disks, network cards, sound cards, and so on. Each piece of hardware supported by the FreeBSD kernel has a driver associated with it. Each driver has a two or three letter name, such as sa for the SCSI sequential access driver, or sio for the Serial I/O driver (which manages COM ports).
When the kernel starts, each driver checks the system to see whether or not the hardware it supports exists on your system. If it does, then the driver configures the hardware and makes it available to the rest of the kernel.
This checking is commonly referred to as device probing. Unfortunately, it is not always possible to do this in a safe way. Some hardware drivers do not co-exist well, and probing for one piece of hardware can sometimes leave another in an inconsistent state. This is a basic limitation of the PC design.
Many older devices are called ISA devices--as opposed to PCI devices. The ISA specification requires each device to have some information hard coded into it, typically the Interrupt Request Line number (IRQ) and IO port address that the driver uses. This information is commonly set by using physical jumpers on the card, or by using a DOS based utility.
This was often a source of problems, because it was not possible to have two devices that shared the same IRQ or port address.
Newer devices follow the PCI specification, which does not require this, as the devices are supposed to cooperate with the BIOS, and are told which IRQ and IO port addresses to use.
If you have any ISA devices in your computer then FreeBSD's driver for that device will need to be configured with the IRQ and port address that you have set the card to. This is why carrying out an inventory of your hardware (see Section 2.2.1) can be useful.
Unfortunately, the default IRQs and memory ports used by some drivers clash. This is because some ISA devices are shipped with IRQs or memory ports that clash. The defaults in FreeBSD's drivers are deliberately set to mirror the manufacturer's defaults, so that, out of the box, as many devices as possible will work.
This is almost never an issue when running FreeBSD day-to-day. Your computer will not normally contain two pieces of hardware that clash, because one of them would not work (irrespective of the operating system you are using).
It becomes an issue when you are installing FreeBSD for the first time because the kernel used to carry out the install has to contain as many drivers as possible, so that many different hardware configurations can be supported. This means that some of those drivers will have conflicting configurations. The devices are probed in a strict order, and if you own a device that is probed late in the process, but conflicted with an earlier probe, then your hardware might not function or be probed correctly when you install FreeBSD.
Because of this, the first thing you have the opportunity to do when installing FreeBSD is look at the list of drivers that are configured into the kernel, and either disable some of them, if you do not own that device, or confirm (and alter) the driver's configuration if you do own the device but the defaults are wrong.
This probably sounds much more complicated than it actually is.
Figure 2-1 shows the first kernel configuration menu. We recommend that you choose the Start kernel configuration in full-screen visual mode option, as it presents the easiest interface for the new user.
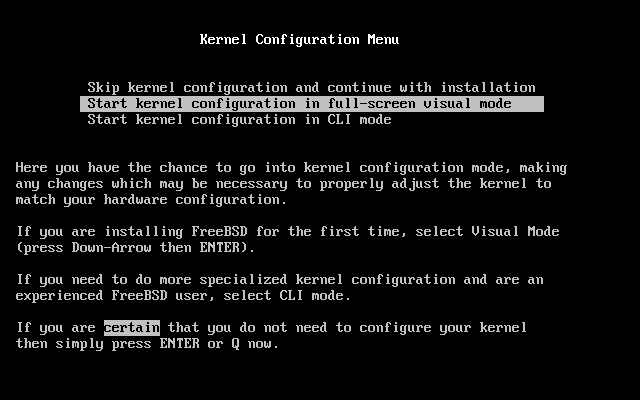
The kernel configuration screen (Figure 2-2) is then divided into four sections:
-
A collapsible list of all the drivers that are currently marked as ``active'', subdivided into groups such as Storage, and Network. Each driver is shown as a description, its two or three letter driver name, and the IRQ and memory port used by that driver. In addition, if an active driver conflicts with another active driver then CONF is shown next to the driver name. This section also shows the total number of conflicting drivers that are currently active.
-
Drivers that have been marked inactive. They remain in the kernel, but they will not probe for their device when the kernel starts. These are subdivided into groups in the same way as the active driver list.
-
More detail about the currently selected driver, including its IRQ and memory port address.
-
Information about the keystrokes that are valid at this point in time.
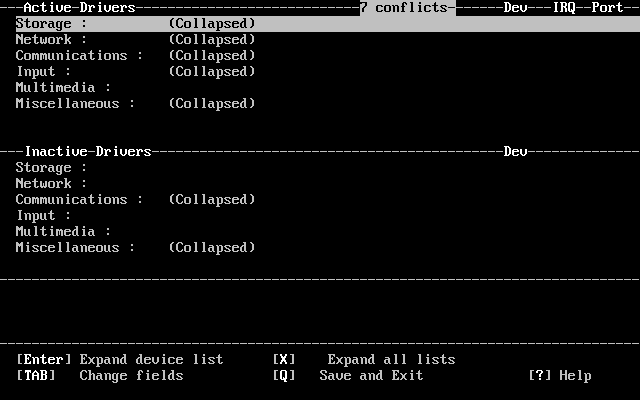
Do not worry if any conflicts are listed about this, it is to be expected; all the drivers are enabled, and as has already been explained, some of them will conflict with one another.
You now have to work through the list of drivers, resolving the conflicts.
Resolving Driver Conflicts
-
Press X. This will completely expand the list of drivers, so you can see all of them. You will need to use the arrow keys to scroll back and forth through the active driver list.
Figure 2-3 shows the result of pressing X.
-
Disable all the drivers for devices that you do not have. To disable a driver, highlight it with the arrow keys and press Del. The driver will be moved to the Inactive Drivers list.
If you inadvertently disable a device that you need then press Tab to switch to the Inactive Drivers list, select the driver that you disabled, and press Enter to move it back to the active list.
Warning: Do not disable sc0. This controls the screen, and you will need this unless you are installing over a serial cable.
Warning: Only disable atkbd0 if you are using a USB keyboard. If you have a normal keyboard then you must keep atkbd0.
-
If there are no conflicts listed then you can skip this step. Otherwise, the remaining conflicts need to be examined. If they do not have the indication of an ``allowed conflict'' in the message area, then either the IRQ/address for device probe will need to be changed, or the IRQ/address on the hardware will need to be changed.
To change the driver's configuration for IRQ and IO port address, select the device and press Enter. The cursor will move to the third section of the screen, and you can change the values. You should enter the values for IRQ and port address that you discovered when you made your hardware inventory. Press Q to finish editing the device's configuration and return to the active driver list.
If you are not sure what these figures should be then you can try using -1. Some FreeBSD drivers can safely probe the hardware to discover what the correct value should be, and a value of -1 configures them to do this.
The procedure for changing the address on the hardware varies from device to device. For some devices you may need to physically remove the card from your computer and adjust jumper settings or DIP switches. Other cards may have come with a DOS floppy that contains the programs used to reconfigure the card. In any case, you should refer to the documentation that came with the device. This will obviously entail restarting your computer, so you will need to boot back into the FreeBSD installation routine when you have reconfigured the card.
-
When all the conflicts have been resolved the screen will look similar to Figure 2-4.
As you can see, the active driver list is now much smaller, with only drivers for the hardware that actually exists being listed.
You can now save these changes, and move on to the next step of the install. Press Q to quit the device configuration interface. This message will appear:
Save these parameters before exiting? ([Y]es/[N]o/[C]ancel)
Answer Y to save the parameters to memory (it will be saved to disk if you finish the install) and the probing will start. After displaying the probe results in white on black text sysinstall will start and display its main menu (Figure 2-5).
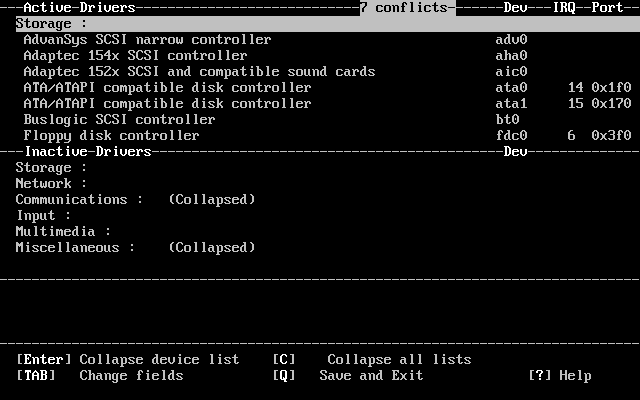

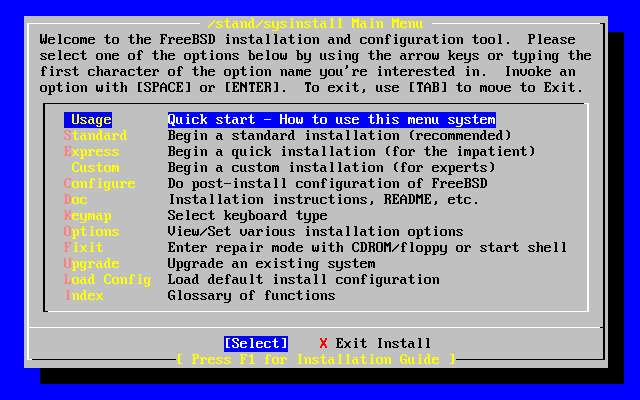
2.3.3 Reviewing the Device Probe Results
The last few hundred lines that have been displayed on screen are stored and can be reviewed.
To review the buffer, press Scroll Lock. This turns on scrolling in the display. You can then use the arrow keys, or PageUp and PageDown to view the results. Press Scroll Lock again to stop scrolling.
Do this now, to review the text that scrolled off the screen when the kernel was carrying out the device probes. You will see text similar to Figure 2-6, although the precise text will differ depending on the devices that you have in your computer.
Figure 2-6. Typical Device Probe Results
avail memory = 253050880 (247120K bytes)
Preloaded elf kernel "kernel" at 0xc0817000.
Preloaded mfs_root "/mfsroot" at 0xc0817084.
md0: Preloaded image </mfsroot> 4423680 bytes at 0xc03ddcd4

md1: Malloc disk
Using $PIR table, 4 entries at 0xc00fde60
npx0: <math processor> on motherboard
npx0: INT 16 interface
pcib0: <Host to PCI bridge> on motherboard
pci0: <PCI bus> on pcib0
pcib1:<VIA 82C598MVP (Apollo MVP3) PCI-PCI (AGP) bridge> at device 1.0 on pci0
pci1: <PCI bus> on pcib1
pci1: <Matrox MGA G200 AGP graphics accelerator> at 0.0 irq 11
isab0: <VIA 82C586 PCI-ISA bridge> at device 7.0 on pci0
isa0: <iSA bus> on isab0
atapci0: <VIA 82C586 ATA33 controller> port 0xe000-0xe00f at device 7.1 on pci0
ata0: at 0x1f0 irq 14 on atapci0
ata1: at 0x170 irq 15 on atapci0
uhci0 <VIA 83C572 USB controller> port 0xe400-0xe41f irq 10 at device 7.2 on pci
0
usb0: <VIA 83572 USB controller> on uhci0
usb0: USB revision 1.0
uhub0: VIA UHCI root hub, class 9/0, rev 1.00/1.00, addr1
uhub0: 2 ports with 2 removable, self powered
pci0: <unknown card> (vendor=0x1106, dev=0x3040) at 7.3
dc0: <ADMtek AN985 10/100BaseTX> port 0xe800-0xe8ff mem 0xdb000000-0xeb0003ff ir
q 11 at device 8.0 on pci0
dc0: Ethernet address: 00:04:5a:74:6b:b5
miibus0: <MII bus> on dc0
ukphy0: <Generic IEEE 802.3u media interface> on miibus0
ukphy0: 10baseT, 10baseT-FDX, 100baseTX, 100baseTX-FDX, auto
ed0: <NE2000 PCI Ethernet (RealTek 8029)> port 0xec00-0xec1f irq 9 at device 10.
0 on pci0
ed0 address 52:54:05:de:73:1b, type NE2000 (16 bit)
isa0: too many dependant configs (8)
isa0: unexpected small tag 14
orm0: <Option ROM> at iomem 0xc0000-0xc7fff on isa0
fdc0: <NEC 72065B or clone> at port 0x3f0-0x3f5,0x3f7 irq 6 drq2 on isa0
fdc0: FIFO enabled, 8 bytes threshold
fd0: <1440-KB 3.5" drive> on fdc0 drive 0
atkbdc0: <Keyboard controller (i8042)> at port 0x60,0x64 on isa0
atkbd0: <AT Keyboard> flags 0x1 irq1 on atkbdc0
kbd0 at atkbd0
psm0: <PS/2 Mouse> irq 12 on atkbdc0
psm0: model Generic PS/@ mouse, device ID 0
vga0: <Generic ISA VGA> at port 0x3c0-0x3df iomem 0xa0000-0xbffff on isa0
sc0: <System console> at flags 0x100 on isa0
sc0: VGA <16 virtual consoles, flags=0x300>
sio0 at port 0x3f8-0x3ff irq 4 flags 0x10 on isa0
sio0: type 16550A
sio1 at port 0x2f8-0x2ff irq 3 on isa0
sio1: type 16550A
ppc0: <Parallel port> at port 0x378-0x37f irq 7 on isa0
pppc0: SMC-like chipset (ECP/EPP/PS2/NIBBLE) in COMPATIBLE mode
ppc0: FIFO with 16/16/15 bytes threshold
plip0: <PLIP network interface> on ppbus0
ad0: 8063MB <IBM-DHEA-38451> [16383/16/63] at ata0-master UDMA33
acd0: CD-RW <LITE-ON LTR-1210B> at ata1-slave PIO4
Mounting root from ufs:/dev/md0c
/stand/sysinstall running as init on vty0
Check the probe results carefully to make sure that FreeBSD found all the devices you expected. If a device was not found, then it will not be listed. If the device's driver required configuring with the IRQ and port address then you should check that you entered them correctly.
If you need to make changes to the UserConfig device probing, it's easy to exit the sysinstall program and start over again. It's also a good way to become more familiar with the process.
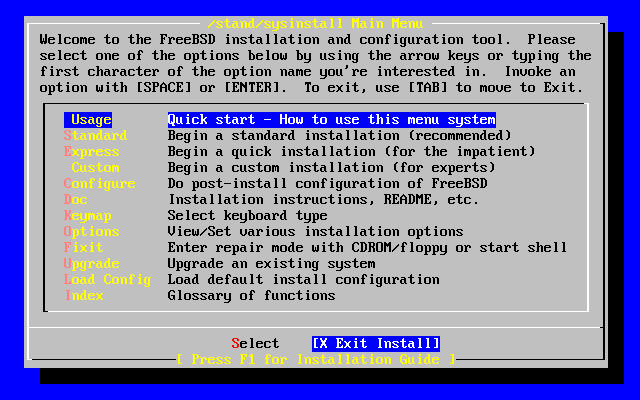
Use the arrow keys to select Exit Install from the Main Install Screen menu. The following message will display:
                      User Confirmation Requested
         Are you sure you wish to exit? The system will reboot
           (be sure to remove any floppies from the drives).

                            [ Yes ]    No
The install program will start again if the CDROM is left in the drive and [Yes] is selected.
If you are booting from floppies it will be necessary to remove the mfsroot.flp floppy and replace it with kern.flp before rebooting.
2.4 Introducing Sysinstall
The sysinstall utility is the installation application provided by the FreeBSD Project. It is console based and is divided into a number of menus and screens that you can use to configure and control the installation process.
The sysinstall menu system is controlled by the arrow keys, Enter, Space, and other keys. A detailed description of these keys and what they do is contained in sysinstall's usage information.
To review this information, ensure that the Usage entry is highlighted and that the [Select] button is selected, as shown in Figure 2-8, then press Enter.
The instructions for using the menu system will be displayed. After reviewing them, press Enter to return to the Main Menu.
2.4.1 Selecting the Documentation Menu
From the Main Menu, select Doc with the arrow keys and press Enter.
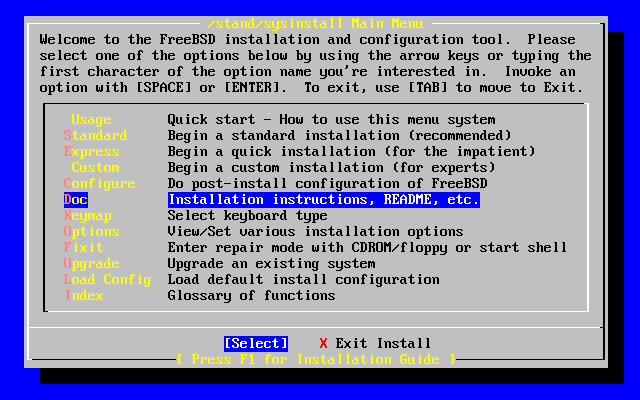
This will display the Documentation Menu.

It is important to read the documents provided.
To view a document, select it with the arrow keys and press Enter. When finished reading a document, pressing Enter will return to the Documentation Menu.
To return to the Main Installation Menu, select Exit with the arrow keys and press Enter.
2.4.2 Selecting the Keymap Menu
To change the keyboard mapping, use the arrow keys to select Keymap from the menu and press Enter. This is only required if you are using a non-standard or non-US keyboard.
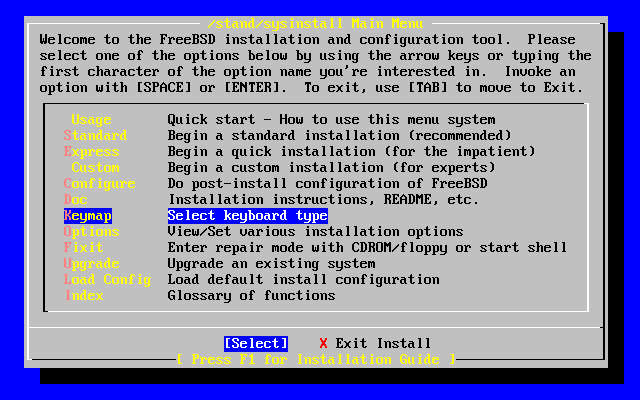
A different keyboard mapping may be chosen by selecting the menu item using up/down arrow keys and pressing Space. Pressing Space again will unselect the item. When finished, choose the [ OK ] using the arrow keys and press Enter.
Only a partial list is shown in this screen representation. Selecting [ Cancel ] by pressing Tab will use the default keymap and return to the Main Install Menu.
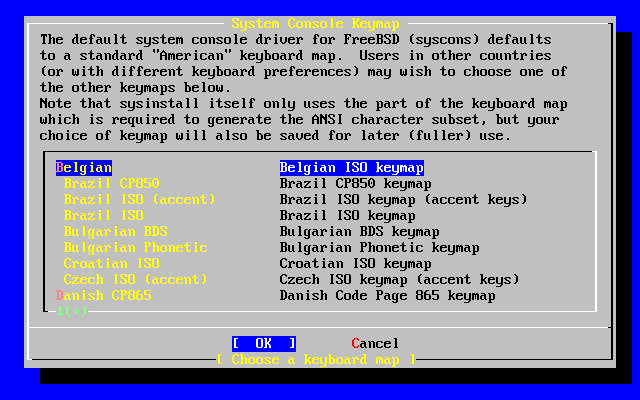
2.4.3 Installation Options Screen
Select Options and press Enter.
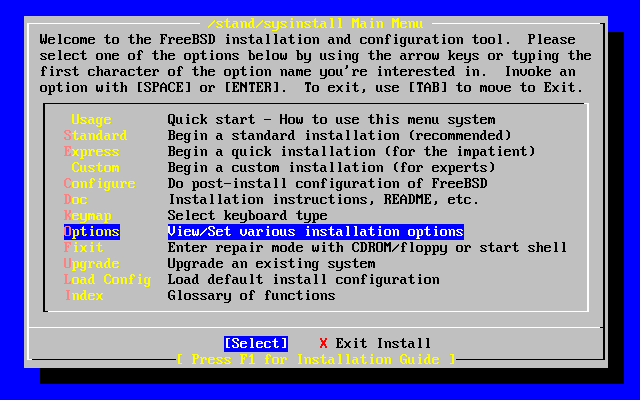
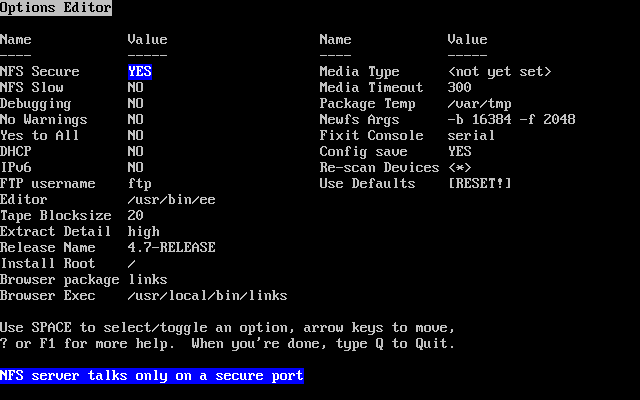
The default values are usually fine for most users and do not need to be changed. The release name will vary according to the version being installed.
The description of the selected item will appear at the bottom of the screen highlighted in blue. Notice that one of the options is Use Defaults to reset all values to startup defaults.
Press F1 to read the help screen about the various options.
Pressing Q will return to the Main Install menu.
2.4.4 Begin a Standard Installation
The Standard installation is the option recommended for those new to UNIX or FreeBSD. Use the arrow keys to select Standard and then press Enter to start the installation.
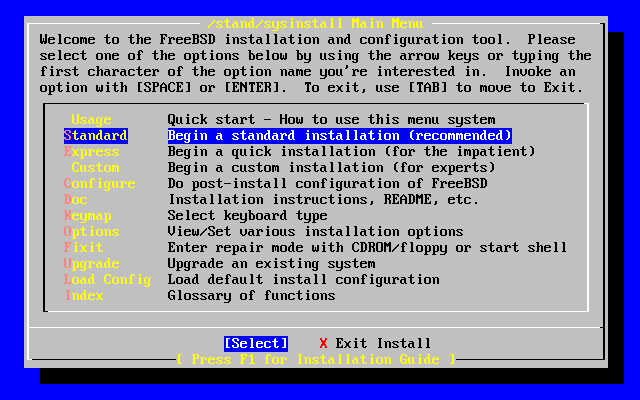
2.5 Allocating Disk Space
Your first task is to allocate disk space for FreeBSD, and label that space so that sysinstall can prepare it. In order to do this you need to know how FreeBSD expects to find information on the disk.
2.5.1 BIOS Drive Numbering
Before you install and configure FreeBSD on your system, there is an important subject that you should be aware of, especially if you have multiple hard drives.
In a PC running a BIOS-dependent operating system such as MS-DOS or Microsoft Windows, the BIOS is able to abstract the normal disk drive order, and the operating system goes along with the change. This allows the user to boot from a disk drive other than the so-called ``primary master''. This is especially convenient for some users who have found that the simplest and cheapest way to keep a system backup is to buy an identical second hard drive, and perform routine copies of the first drive to the second drive using Ghost® or XCOPY . Then, if the first drive fails, or is attacked by a virus, or is scribbled upon by an operating system defect, he can easily recover by instructing the BIOS to logically swap the drives. It is like switching the cables on the drives, but without having to open the case.
More expensive systems with SCSI controllers often include BIOS extensions which allow the SCSI drives to be re-ordered in a similar fashion for up to seven drives.
A user who is accustomed to taking advantage of these features may become surprised when the results with FreeBSD are not as expected. FreeBSD does not use the BIOS, and does not know the ``logical BIOS drive mapping''. This can lead to very perplexing situations, especially when drives are physically identical in geometry, and have also been made as data clones of one another.
When using FreeBSD, always restore the BIOS to natural drive numbering before installing FreeBSD, and then leave it that way. If you need to switch drives around, then do so, but do it the hard way, and open the case and move the jumpers and cables.
2.5.2 Creating Slices Using FDisk
Note: No changes you make at this point will be written to the disk. If you think you have made a mistake and want to start again you can use the menus to exit sysinstall and try again or press U to use the Undo option. If you get confused and can not see how to exit you can always turn your computer off.
After choosing to begin a standard installation in sysinstall you will be shown this message:
                                 Message
 In the next menu, you will need to set up a DOS-style ("fdisk")
 partitioning scheme for your hard disk. If you simply wish to devote
 all disk space to FreeBSD (overwriting anything else that might be on
 the disk(s) selected) then use the (A)ll command to select the default
 partitioning scheme followed by a (Q)uit. If you wish to allocate only
 free space to FreeBSD, move to a partition marked "unused" and use the
 (C)reate command.
                                [  OK  ]

                      [ Press enter or space ]
Press Enter as instructed. You will then be shown a list of all the hard drives that the kernel found when it carried out the device probes. Figure 2-16 shows an example from a system with two IDE disks. They have been called ad0 and ad2.

You might be wondering why ad1 is not listed here. Why has it been missed?
Consider what would happen if you had two IDE hard disks, one as the master on the first IDE controller, and one as the master on the second IDE controller. If FreeBSD numbered these as it found them, as ad0 and ad1 then everything would work.
But if you then added a third disk, as the slave device on the first IDE controller, it would now be ad1, and the previous ad1 would become ad2. Because device names (such as ad1s1a) are used to find filesystems, you may suddenly discover that some of your filesystems no longer appear correctly, and you would need to change your FreeBSD configuration.
To work around this, the kernel can be configured to name IDE disks based on where they are, and not the order in which they were found. With this scheme the master disk on the second IDE controller will always be ad2, even if there are no ad0 or ad1 devices.
This configuration is the default for the FreeBSD kernel, which is why this display shows ad0 and ad2. The machine on which this screenshot was taken had IDE disks on both master channels of the IDE controllers, and no disks on the slave channels.
You should select the disk on which you want to install FreeBSD, and then press [ OK ]. FDisk will start, with a display similar to that shown in Figure 2-17.
The FDisk display is broken into three sections.
The first section, covering the first two lines of the display, shows details about the currently selected disk, including its FreeBSD name, the disk geometry, and the total size of the disk.
The second section shows the slices that are currently on the disk, where they start and end, how large they are, the name FreeBSD gives them, and their description and sub-type. This example shows two small unused slices, which are artifacts of disk layout schemes on the PC. It also shows one large FAT slice, which almost certainly appears as C: in MS-DOS / Windows, and an extended slice, which may contain other drive letters for MS-DOS / Windows.
The third section shows the commands that are available in FDisk.

What you do now will depend on how you want to slice up your disk.
If you want to use FreeBSD for the entire disk (which will delete all the other data on this disk when you confirm that you want sysinstall to continue later in the installation process) then you can press A, which corresponds to the Use Entire Disk option. The existing slices will be removed, and replaced with a small area flagged as unused (again, an artifact of PC disk layout), and then one large slice for FreeBSD. If you do this, then you should select the newly created FreeBSD slice using the arrow keys, and press S to mark the slice as being bootable. The screen will then look very similar to Figure 2-18. Note the A in the Flags column, which indicates that this slice is active, and will be booted from.
If you will be deleting an existing slice to make space for FreeBSD then you should select the slice using the arrow keys, and then press D. You can then press C, and be prompted for size of slice you want to create. Enter the appropriate figure and press Enter. The default value in this box represents the largest possible slice you can make, which could be the largest contiguous block of unallocated space or the size of the entire hard disk.
If you have already made space for FreeBSD (perhaps by using a tool such as PartitionMagic) then you can press C to create a new slice. Again, you will be prompted for the size of slice you would like to create.
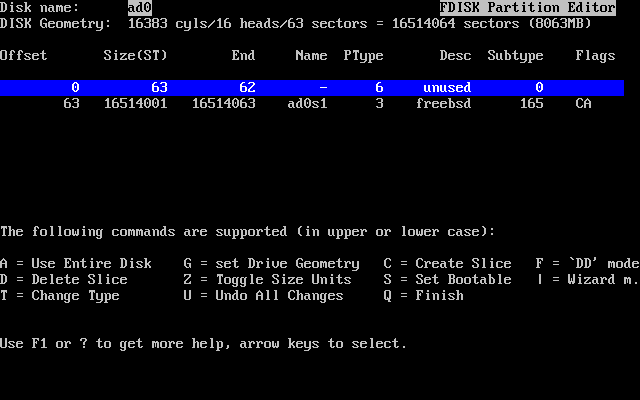
When finished, press Q. Your changes will be saved in sysinstall, but will not yet be written to disk.
2.5.3 Install a Boot Manager
You now have the option to install a boot manager. In general, you should choose to install the FreeBSD boot manager if:
-
You have more than one drive, and have installed FreeBSD onto a drive other than the first one.
-
You have installed FreeBSD alongside another operating system on the same disk, and you want to choose whether to start FreeBSD or the other operating system when you start the computer.
If FreeBSD is going to be the only operating system on this machine, installed on the first hard disk, then the Standard boot manager will suffice. Choose None if you are using a third-party boot manager capable of booting FreeBSD.
Make your choice and press Enter.
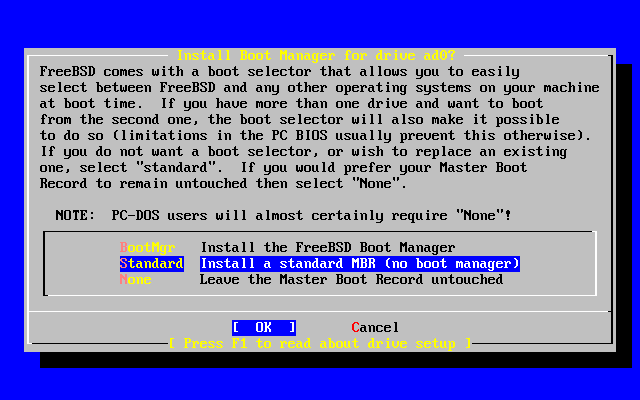
The help screen, reached by pressing F1, discusses the problems that can be encountered when trying to share the hard disk between operating systems.
2.5.4 Creating Slices on Another Drive
If there is more than one drive, it will return to the Select Drives screen after the boot manager selection. If you wish to install FreeBSD on to more than one disk, then you can select another disk here and repeat the slice process using FDisk.
Important: If you are installing FreeBSD on a drive other than your first, then the FreeBSD boot manager needs to be installed on both drives.
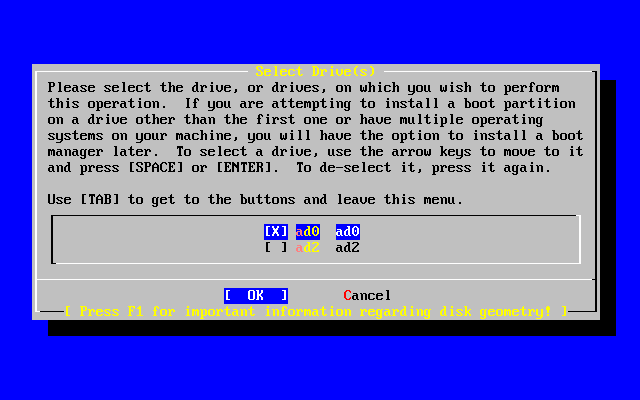
The Tab key toggles between the last drive selected, [ OK ], and [ Cancel ].
Press the Tab once to toggle to the [ OK ], then press Enter to continue with the installation.
2.5.5 Creating Partitions Using Disklabel
You must now create some partitions inside each slice that you have just created. Remember that each partition is lettered, from a through to h, and that partitions b, c, and d have conventional meanings that you should adhere to.
Certain applications can benefit from particular partition schemes, especially if you are laying out partitions across more than one disk. However, for this, your first FreeBSD installation, you do not need to give too much thought to how you partition the disk. It is more important that you install FreeBSD and start learning how to use it. You can always re-install FreeBSD to change your partition scheme when you are more familiar with the operating system.
This scheme features four partitions--one for swap space, and three for filesystems.
Table 2-2. Partition Layout for First Disk
| Partition | Filesystem | Size | Description |
|---|---|---|---|
| a | / | 100 MB | This is the root filesystem. Every other filesystem will be mounted somewhere under this one. 100 MB is a reasonable size for this filesystem. You will not be storing too much data on it, as a regular FreeBSD install will put about 40 MB of data here. The remaining space is for temporary data, and also leaves expansion space if future versions of FreeBSD need more space in /. |
| b | N/A | 2-3 x RAM |
The system's swap space is kept on this partition. Choosing the right amount of swap space can be a bit of an art. A good rule of thumb is that your swap space should be two or three times as much as the available physical memory (RAM). You should also have at least 64 MB of swap, so if you have less than 32 MB of RAM in your computer then set the swap amount to 64 MB. If you have more than one disk then you can put swap space on each disk. FreeBSD will then use each disk for swap, which effectively speeds up the act of swapping. In this case, calculate the total amount of swap you need (e.g., 128 MB), and then divide this by the number of disks you have (e.g., two disks) to give the amount of swap you should put on each disk, in this example, 64 MB of swap per disk. |
| e | /var | 50 MB | The /var directory contains files that are constantly varying; log files, and other administrative files. Many of these files are read-from or written-to extensively during FreeBSD's day-to-day running. Putting these files on another filesystem allows FreeBSD to optimize the access of these files without affecting other files in other directories that do not have the same access pattern. |
| f | /usr | Rest of disk | All your other files will typically be stored in /usr and its subdirectories. |
If you will be installing FreeBSD on to more than one disk then you must also create partitions in the other slices that you configured. The easiest way to do this is to create two partitions on each disk, one for the swap space, and one for a filesystem.
Table 2-3. Partition Layout for Subsequent Disks
| Partition | Filesystem | Size | Description |
|---|---|---|---|
| b | N/A | See description | As already discussed, you can split swap space across each disk. Even though the a partition is free, convention dictates that swap space stays on the b partition. |
| e | /diskn | Rest of disk | The rest of the disk is taken up with one big partition. This could easily be put on the a partition, instead of the e partition. However, convention says that the a partition on a slice is reserved for the filesystem that will be the root (/) filesystem. You do not have to follow this convention, but sysinstall does, so following it yourself makes the installation slightly cleaner. You can choose to mount this filesystem anywhere; this example suggests that you mount them as directories /diskn, where n is a number that changes for each disk. But you can use another scheme if you prefer. |
Having chosen your partition layout you can now create it using sysinstall. You will see this message:
                                 Message
 Now, you need to create BSD partitions inside of the fdisk
 partition(s) just created. If you have a reasonable amount of disk
 space (200MB or more) and don't have any special requirements, simply
 use the (A)uto command to allocate space automatically. If you have
 more specific needs or just don't care for the layout chosen by
 (A)uto, press F1 for more information on manual layout.

                                [  OK  ]
                          [ Press enter or space ]
Press Enter to start the FreeBSD partition editor, called Disklabel.
Figure 2-21 shows the display when you first start Disklabel. The display is divided in to three sections.
The first few lines show the name of the disk you are currently working on, and the slice that contains the partitions you are creating (at this point Disklabel calls this the Partition name rather than slice name). This display also shows the amount of free space within the slice; that is, space that was set aside in the slice, but that has not yet been assigned to a partition.
The middle of the display shows the partitions that have been created, the name of the filesystem that each partition contains, their size, and some options pertaining to the creation of the filesystem.
The bottom third of the screen shows the keystrokes that are valid in Disklabel.
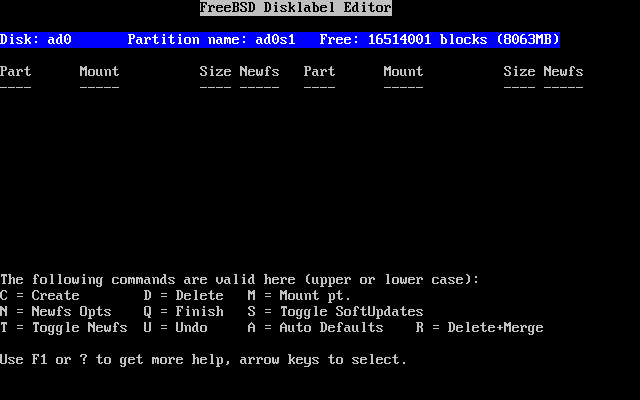
Disklabel can automatically create partitions for you and assign them default sizes. Try this now, by Pressing A. You will see a display similar to that shown in Figure 2-22. Depending on the size of the disk you are using, the defaults may or may not be appropriate. This does not matter, as you do not have to accept the defaults.
Note: Beginning with FreeBSD 4.5, the default partitioning assigns the /tmp directory its own partition instead of being part of the / partition. This helps avoid filling the / partition with temporary files.

If you choose to not use the default partitions and wish to replace them with your own, use the arrow keys to select the first partition, and press D to delete it. Repeat this to delete all the suggested partitions.
To create the first partition (a, mounted as / -- root), make sure the proper disk slice at the top of the screen is selected and press C. A dialog box will appear prompting you for the size of the new partition (as shown in Figure 2-23). You can enter the size as the number of disk blocks you want to use, or as a number followed by either M for megabytes, G for gigabytes, or C for cylinders.
Note: Beginning with FreeBSD 5.X, users can: select UFS2 using the Custom Newfs (Z) option, create labels with Auto Defaults and modify them with the Custom Newfs option or add -O 2 during the regular creation period. Do not forget to add -U for SoftUpdates if you use the Custom Newfs option!
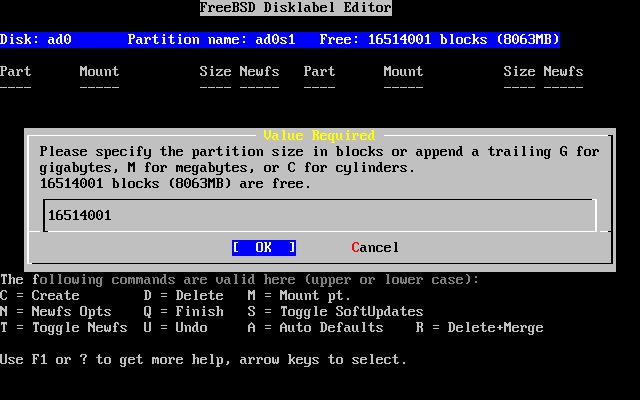
The default size shown will create a partition that takes up the rest of the slice. If you are using the partition sizes described in the earlier example, then delete the existing figure using Backspace, and then type in 64M, as shown in Figure 2-24. Then press [ OK ].
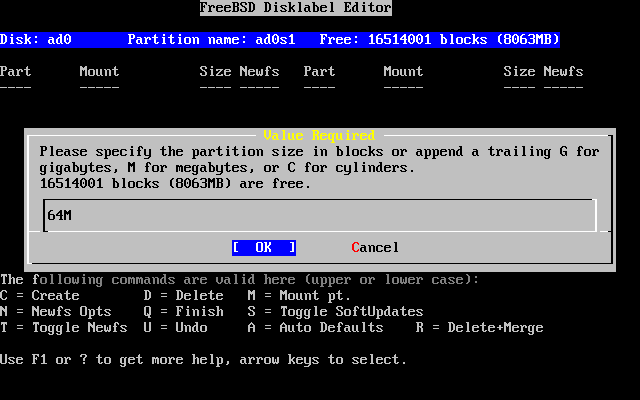
Having chosen the partition's size you will then be asked whether this partition will contain a filesystem or swap space. The dialog box is shown in Figure 2-25. This first partition will contain a filesystem, so check that FS is selected and press Enter.
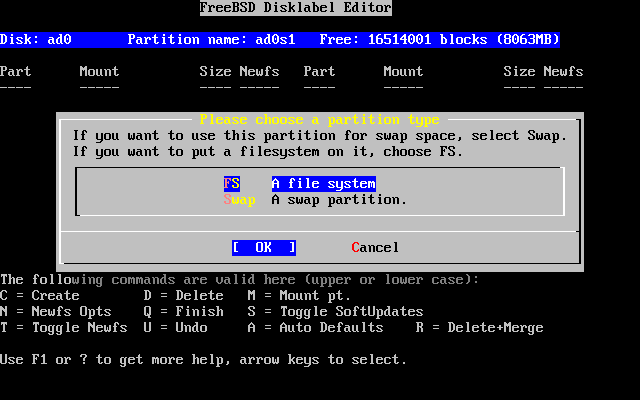
Finally, because you are creating a filesystem, you must tell Disklabel where the filesystem is to be mounted. The dialog box is shown in Figure 2-26. The root filesystem's mount point is /, so type /, and then press Enter.
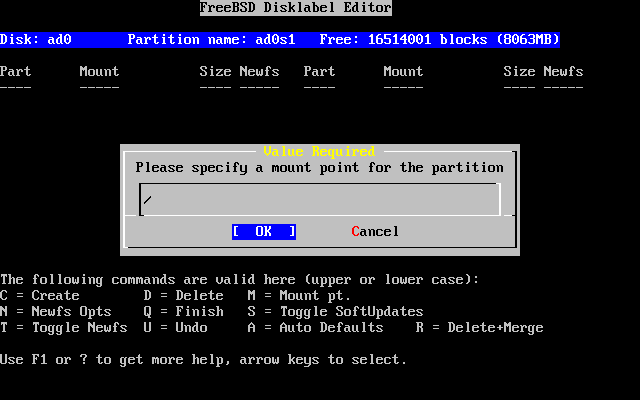
The display will then update to show you the newly created partition. You should repeat this procedure for the other partitions. When you create the swap partition, you will not be prompted for the filesystem mount point, as swap partitions are never mounted. When you create the final partition, /usr, you can leave the suggested size as is, to use the rest of the slice.
Your final FreeBSD DiskLabel Editor screen will appear similar to Figure 2-27, although your values chosen may be different. Press Q to finish.
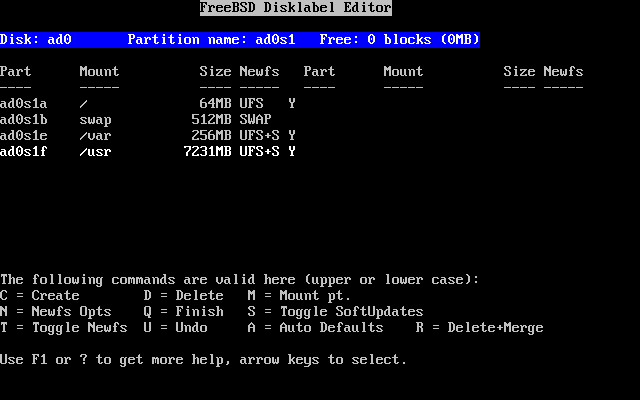
2.6 Choosing What to Install
2.6.1 Select the Distribution Set
Deciding which distribution set to install will depend largely on the intended use of the system and the amount of disk space available. The predefined options range from installing the smallest possible configuration to everything. Those who are new to UNIX and/or FreeBSD should almost certainly select one of these canned options. Customizing a distribution set is typically for the more experienced user.
Press F1 for more information on the distribution set options and what they contain. When finished reviewing the help, pressing Enter will return to the Select Distributions Menu.
If a graphical user interface is desired then a distribution set that is preceded by an X should be chosen. The configuration of XFree86 and selection of a default desktop is part of the post-installation steps.
The default version of XFree86 that is installed depends on the version of the FreeBSD that you are installing. For FreeBSD versions prior to 4.6, XFree86 3.X is installed. For FreeBSD 4.6 and later, XFree86 4.X is the default.
You should check to see whether your video card is supported at the XFree86 web site. If your video card is not supported under the default version that FreeBSD will install, you should select a distribution without X for installation. After installation, install and configure the appropriate version of XFree86 using the ports collection.
If compiling a custom kernel is anticipated, select an option which includes the source code. For more information on why a custom kernel should be built or how to build a custom kernel, see Chapter 9.
Obviously, the most versatile system is one that includes everything. If there is adequate disk space, select All as shown in Figure 2-28 by using the arrow keys and press Enter. If there is a concern about disk space consider using an option that is more suitable for the situation. Don't fret over the perfect choice, as other distributions can be added after installation.
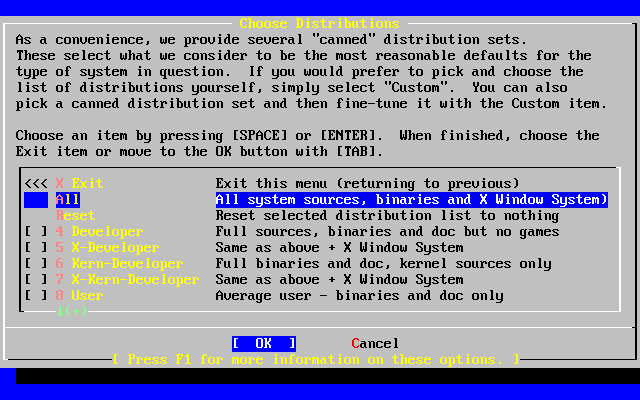
2.6.2 Installing the Ports Collection
After selecting the desired distribution, an opportunity to install the FreeBSD Ports Collection is presented. The ports collection is an easy and convenient way to install software. The ports collection does not contain the source code necessary to compile the software. Instead, it is a collection of files which automates the downloading, compiling and installation of third-party software packages. Chapter 4 discusses how to use the ports collection.
The installation program does not check to see if you have adequate space. Select this option only if you have adequate hard disk space. As of FreeBSD 5.1, the FreeBSD Ports Collection takes up about 300 MB of disk space. You can safely assume a larger value for more recent versions of FreeBSD.
                         User Confirmation Requested
 Would you like to install the FreeBSD ports collection?

 This will give you ready access to over 9,200 ported software packages,
 at a cost of around 300 MB of disk space when "clean" and possibly much
 more than that if a lot of the distribution tarballs are loaded
 (unless you have the extra CDs from a FreeBSD CD/DVD distribution
 available and can mount it on /cdrom, in which case this is far less
 of a problem).

 The ports collection is a very valuable resource and well worth having
 on your /usr partition, so it is advisable to say Yes to this option.

 For more information on the ports collection & the latest ports,
 visit:
     http://www.FreeBSD.org/ports

                              [ Yes ]     No
Select [ Yes ] with the arrow keys to install the ports collection or [ No ] to skip this option. Press Enter to continue. The Choose Distributions menu will redisplay.
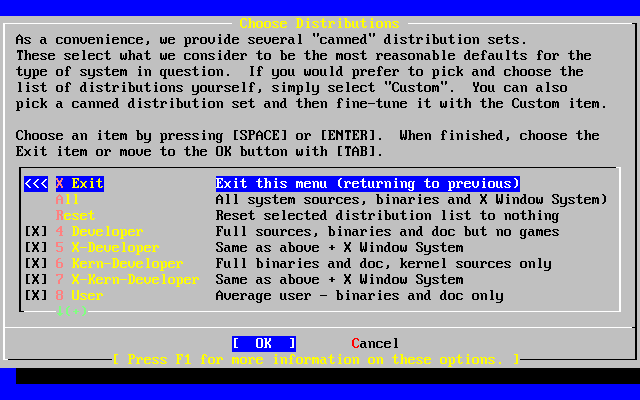
If satisfied with the options, select Exit with the arrow keys, ensure that [ OK ] is highlighted, and pressing Enter to continue.
2.7 Choosing Your Installation Media
If Installing from a CDROM or DVD, use the arrow keys to highlight Install from a FreeBSD CD/DVD. Ensure that [ OK ] is highlighted, then press Enter to proceed with the installation.
For other methods of installation, select the appropriate option and follow the instructions.
Press F1 to display the Online Help for installation media. Press Enter to return to the media selection menu.
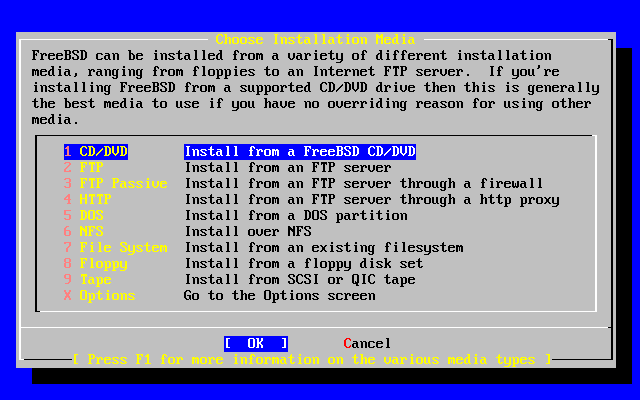
FTP Installation Modes: There are three FTP installation modes you can choose from: active FTP, passive FTP, or via a HTTP proxy.
- FTP Active: Install from an FTP server
This option will make all FTP transfers use ``Active'' mode. This will not work through firewalls, but will often work with older FTP servers that do not support passive mode. If your connection hangs with passive mode (the default), try active!
- FTP Passive: Install from an FTP server through a firewall
This option instructs sysinstall to use ``Passive'' mode for all FTP operations. This allows the user to pass through firewalls that do not allow incoming connections on random TCP ports.
- FTP via a HTTP proxy: Install from an FTP server through a http proxy
This option instructs sysinstall to use the HTTP protocol (like a web browser) to connect to a proxy for all FTP operations. The proxy will translate the requests and send them to the FTP server. This allows the user to pass through firewalls that do not allow FTP at all, but offer a HTTP proxy. In this case, you have to specify the proxy in addition to the FTP server.
For a proxy FTP server, you should usually give the name of the server you really want as a part of the username, after an ``@'' sign. The proxy server then ``fakes'' the real server. For example, assuming you want to install from ftp.FreeBSD.org, using the proxy FTP server foo.example.com, listening on port 1024.
In this case, you go to the options menu, set the FTP username to [email protected], and the password to your email address. As your installation media, you specify FTP (or passive FTP, if the proxy supports it), and the URL ftp://foo.example.com:1234/pub/FreeBSD.
Since /pub/FreeBSD from ftp.FreeBSD.org is proxied under foo.example.com, you are able to install from that machine (which will fetch the files from ftp.FreeBSD.org as your installation requests them).
2.8 Committing to the Installation
The installation can now proceed if desired. This is also the last chance for aborting the installation to prevent changes to the hard drive.
                       User Confirmation Requested
 Last Chance! Are you SURE you want to continue the installation?

 If you're running this on a disk with data you wish to save then WE
 STRONGLY ENCOURAGE YOU TO MAKE PROPER BACKUPS before proceeding!

 We can take no responsibility for lost disk contents!

                             [ Yes ]    No
Select [ Yes ] and press Enter to proceed.
The installation time will vary according to the distribution chosen, installation media, and the speed of the computer. There will be a series of messages displayed indicating the status.
The installation is complete when the following message is displayed:
                               Message

Congratulations! You now have FreeBSD installed on your system.

We will now move on to the final configuration questions.
For any option you do not wish to configure, simply select No.

If you wish to re-enter this utility after the system is up, you may
do so by typing: /stand/sysinstall .

                                 [ OK ]

                      [  Press enter to continue  ]
Press Enter to proceed with post-installation configurations.
Selecting [ No ] and pressing Enter will abort the installation so no changes will be made to your system. The following message will appear:
                                Message
Installation complete with some errors.  You may wish to scroll
through the debugging messages on VTY1 with the scroll-lock feature.
You can also choose "No" at the next prompt and go back into the
installation menus to retry whichever operations have failed.

                                 [ OK ]
This message is generated because nothing was installed. Pressing Enter will return to the Main Installation Menu to exit the installation.
2.9 Post-installation
Configuration of various options follows the successful installation. An option can be configured by re-entering the configuration options before booting the new FreeBSD system or after installation using /stand/sysinstall and selecting Configure.
2.9.1 Network Device Configuration
If you previously configured PPP for an FTP install, this screen will not display and can be configured later as described above.
For detailed information on Local Area Networks and configuring FreeBSD as a gateway/router refer to the Advanced Networking chapter.
                      User Confirmation Requested
   Would you like to configure any Ethernet or SLIP/PPP network devices?

                             [ Yes ]   No
To configure a network device, select [ Yes ] and press Enter. Otherwise, select [ No ] to continue.
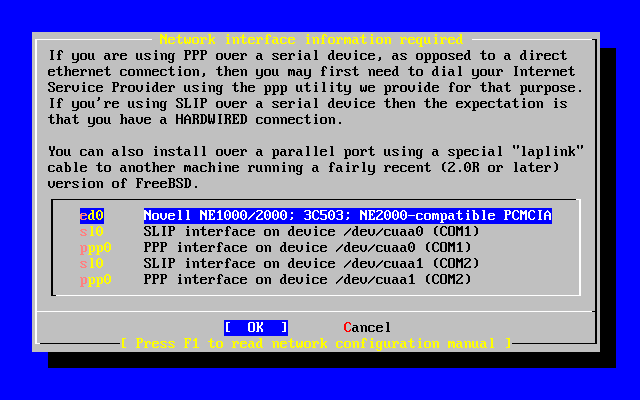
Select the interface to be configured with the arrow keys and press Enter.
                      User Confirmation Requested
       Do you want to try IPv6 configuration of the interface?

                              Yes   [ No ]
In this private local area network, the current Internet type protocol (IPv4) was sufficient and [ No ] was selected with the arrow keys and Enter pressed.
If you are connected to an existing IPv6 network with an RA server, then choose [ Yes ] and press Enter. It will take several seconds to scan for RA servers.
                             User Confirmation Requested
        Do you want to try DHCP configuration of the interface?

                              Yes   [ No ]
If DHCP (Dynamic Host Configuration Protocol) is not required select [ No ] with the arrow keys and press Enter.
Selecting [ Yes ] will execute dhclient, and if successful, will fill in the network configuration information automatically. Refer to Section 19.9 for more information.
The following Network Configuration screen shows the configuration of the Ethernet device for a system that will act as the gateway for a Local Area Network.
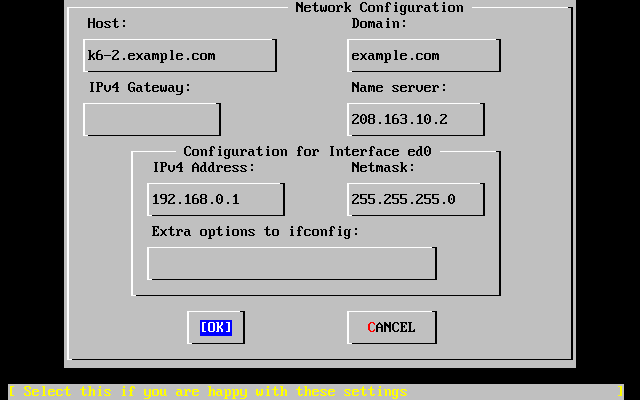
Use Tab to select the information fields and fill in appropriate information:
- Host
-
The fully-qualified hostname, such as k6-2.example.com in this case.
- Domain
-
The name of the domain that your machine is in, such as example.com for this case.
- IPv4 Gateway
-
IP address of host forwarding packets to non-local destinations. You must fill this in if the machine is a node on the network. Leave this field blank if the machine is the gateway to the Internet for the network. The IPv4 Gateway is also known as the default gateway or default route.
- Name server
-
IP address of your local DNS server. There is no local DNS server on this private local area network so the IP address of the provider's DNS server (208.163.10.2) was used.
- IPv4 address
-
The IP address to be used for this interface was 192.168.0.1
- Netmask
-
The address block being used for this local area network is a Class C block (192.168.0.0 - 192.168.255.255). The default netmask is for a Class C network (255.255.255.0).
- Extra options to ifconfig
-
Any interface-specific options to ifconfig you would like to add. There were none in this case.
Use Tab to select [ OK ] when finished and press Enter.
                      User Confirmation Requested
        Would you like to Bring Up the ed0 interface right now?

                             [ Yes ]   No
Choosing [ Yes ] and pressing Enter will bring the machine up on the network and be ready for use. However, this does not accomplish much during installation, since the machine still needs to be rebooted..
2.9.2 Configure Gateway
                       User Confirmation Requested
       Do you want this machine to function as a network gateway?

                              [ Yes ]    No
If the machine will be acting as the gateway for a local area network and forwarding packets between other machines then select [ Yes ] and press Enter. If the machine is a node on a network then select [ No ] and press Enter to continue.
2.9.3 Configure Internet Services
                      User Confirmation Requested
Do you want to configure inetd and the network services that it provides?

                               Yes   [ No ]
If [ No ] is selected, various services such telnetd will not be enabled. This means that remote users will not be able to telnet into this machine. Local users will be still be able to access remote machines with telnet.
These services can be enabled after installation by editing /etc/inetd.conf with your favorite text editor. See Section 19.13.1 for more information.
Select [ Yes ] if you wish to configure these services during install. An additional confirmation will display:
                      User Confirmation Requested
The Internet Super Server (inetd) allows a number of simple Internet
services to be enabled, including finger, ftp and telnetd.  Enabling
these services may increase risk of security problems by increasing
the exposure of your system.

With this in mind, do you wish to enable inetd?

                             [ Yes ]   No
Select [ Yes ] to continue.
                      User Confirmation Requested
inetd(8) relies on its configuration file, /etc/inetd.conf, to determine
which of its Internet services will be available.  The default FreeBSD
inetd.conf(5) leaves all services disabled by default, so they must be
specifically enabled in the configuration file before they will
function, even once inetd(8) is enabled.  Note that services for
IPv6 must be separately enabled from IPv4 services.

Select [Yes] now to invoke an editor on /etc/inetd.conf, or [No] to
use the current settings.

                             [ Yes ]   No
Selecting [ Yes ] will allow adding services by deleting the # at the beginning of a line.
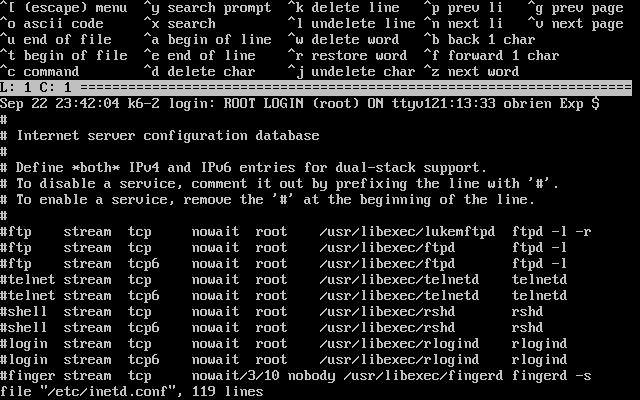
After adding the desired services, pressing Esc will display a menu which will allow exiting and saving the changes.
2.9.4 Anonymous FTP
                      User Confirmation Requested
 Do you want to have anonymous FTP access to this machine?

                              Yes    [ No ]
2.9.4.1 Deny Anonymous FTP
Selecting the default [ No ] and pressing Enter will still allow users who have accounts with passwords to use FTP to access the machine.
2.9.4.2 Allow Anonymous FTP
Anyone can access your machine if you elect to allow anonymous FTP connections. The security implications should be considered before enabling this option. For more information about security see Chapter 10.
To allow anonymous FTP, use the arrow keys to select [ Yes ] and press Enter. The following screen (or similar) will display:
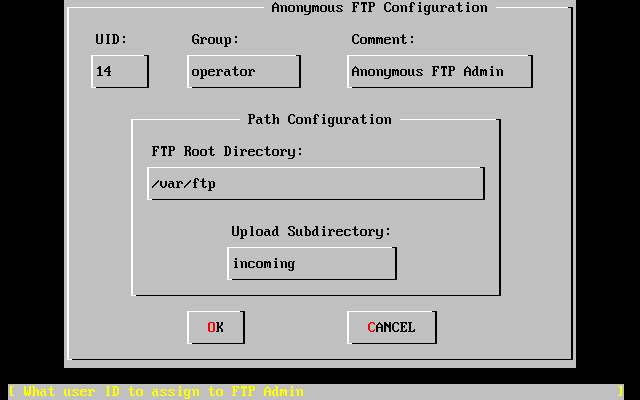
Pressing F1 will display the help:
This screen allows you to configure the anonymous FTP user.

The following configuration values are editable:

UID:     The user ID you wish to assign to the anonymous FTP user.
         All files uploaded will be owned by this ID.

Group:   Which group you wish the anonymous FTP user to be in.

Comment: String describing this user in /etc/passwd


FTP Root Directory:

        Where files available for anonymous FTP will be kept.

Upload subdirectory:

        Where files uploaded by anonymous FTP users will go.
The ftp root directory will be put in /var by default. If you do not have enough room there for the anticipated FTP needs, the /usr directory could be used by setting the FTP Root Directory to /usr/ftp.
When you are satisfied with the values, press Enter to continue.
                          User Confirmation Requested
         Create a welcome message file for anonymous FTP users?

                              [ Yes ]    No
If you select [ Yes ] and press Enter, an editor will automatically start allowing you to edit the message.
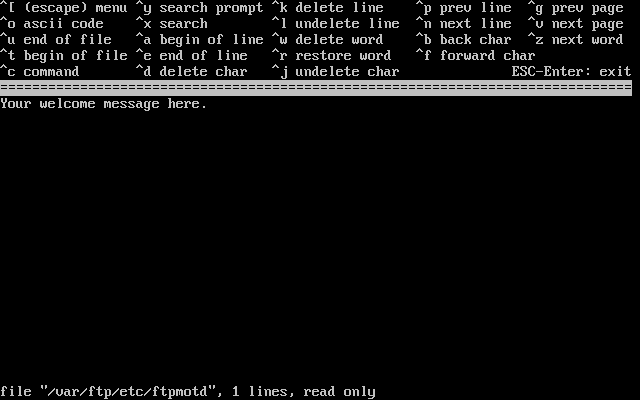
This is a text editor called ee. Use the instructions to change the message or change the message later using a text editor of your choice. Note the file name/location at the bottom of the editor screen.
Press Esc and a pop-up menu will default to a) leave editor. Press Enter to exit and continue. Press Enter again to save changes if you made any./para>
2.9.5 Configure Network File System
Network File System (NFS) allows sharing of files across a network. A machine can be configured as a server, a client, or both. Refer to Section 19.5 for a more information.
2.9.5.1 NFS Server
                       User Confirmation Requested
 Do you want to configure this machine as an NFS server?

                              Yes    [ No ]
If there is no need for a Network File System server, select [ No ] and press Enter.
If [ Yes ] is chosen, a message will pop-up indicating that the exports file must be created.
                               Message
Operating as an NFS server means that you must first configure an
/etc/exports file to indicate which hosts are allowed certain kinds of
access to your local filesystems.
Press [Enter] now to invoke an editor on /etc/exports
                               [ OK ]
Press Enter to continue. A text editor will start allowing the exports file to be created and edited.
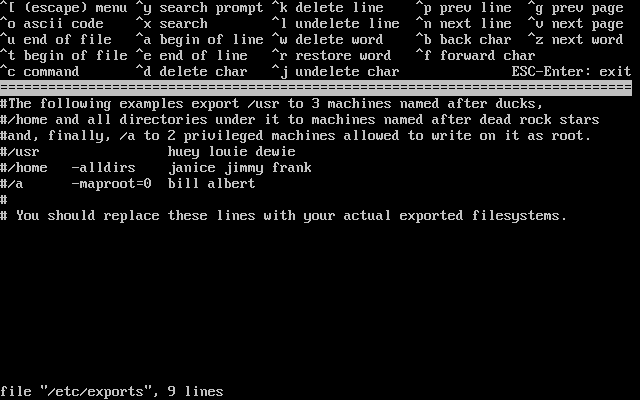
Use the instructions to add the actual exported filesystems now or later using a text editor of your choice. Note the file name/location at the bottom of the editor screen.
Press Esc and a pop-up menu will default to a) leave editor. Press Enter to exit and continue.
2.9.5.2 NFS Client
The NFS client allows your machine to access NFS servers.
                       User Confirmation Requested
 Do you want to configure this machine as an NFS client?

                              Yes   [ No ]
With the arrow keys, select [ Yes ] or [ No ] as appropriate and press Enter.
2.9.6 Security Profile
A ``security profile'' is a set of configuration options that attempts to achieve the desired ratio of security to convenience by enabling and disabling certain programs and other settings. The more severe the security profile, the fewer programs will be enabled by default. This is one of the basic principles of security: do not run anything except what you must.
Please note that the security profile is just a default setting. All programs can be enabled and disabled after you have installed FreeBSD by editing or adding the appropriate line(s) to /etc/rc.conf. For more information, please see the rc.conf(5) manual page.
The following table describes what each of the security profiles does. The columns are the choices you have for a security profile, and the rows are the program or feature that the profile enables or disables.
Table 2-4. Possible Security Profiles
| Extreme | Moderate | |
|---|---|---|
| sendmail(8) | NO | YES |
| sshd(8) | NO | YES |
| portmap(8) | NO | MAYBE [a] |
| NFS server | NO | YES |
| securelevel(8) | YES [b] | NO |
| Notes: a. The portmapper is enabled if the machine has been configured as an NFS client or server earlier in the installation. b. If you choose a security profile that sets the securelevel to ``Extreme'' or ``High'', you must be aware of the implications. Please read the init(8) manual page and pay particular attention to the meanings of the security levels, or you may have significant trouble later! |
||
                       User Confirmation Requested
 Do you want to select a default security profile for this host (select
 No for "medium" security)?

                            [ Yes ]    No
Selecting [ No ] and pressing Enter will set the security profile to medium.
Selecting [ Yes ] and pressing Enter will allow selecting a different security profile.
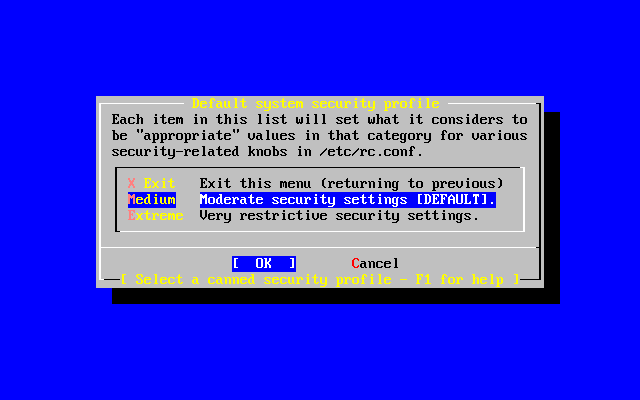
Press F1 to display the help. Press Enter to return to selection menu.
Use the arrow keys to choose Medium unless your are sure that another level is required for your needs. With [ OK ] highlighted, press Enter.
An appropriate confirmation message will display depending on which security setting was chosen.
                                 Message

Moderate security settings have been selected.

Sendmail and SSHd have been enabled, securelevels are
disabled, and NFS server setting have been left intact.
PLEASE NOTE that this still does not save you from having
to properly secure your system in other ways or exercise
due diligence in your administration, this simply picks
a standard set of out-of-box defaults to start with.

To change any of these settings later, edit /etc/rc.conf

                                  [OK]
                                 Message

Extreme security settings have been selected.

Sendmail, SSHd, and NFS services have been disabled, and
securelevels have been enabled.
PLEASE NOTE that this still does not save you from having
to properly secure your system in other ways or exercise
due diligence in your administration, this simply picks
a more secure set of out-of-box defaults to start with.

To change any of these settings later, edit /etc/rc.conf

                                  [OK]
Press Enter to continue with the post-installation configuration.
Warning: The security profile is not a silver bullet! Even if you use the extreme setting, you need to keep up with security issues by reading an appropriate mailing list, using good passwords and passphrases, and generally adhering to good security practices. It simply sets up the desired security to convenience ratio out of the box.
2.9.7 System Console Settings
There are several options available to customize the system console.
                      User Confirmation Requested
       Would you like to customize your system console settings?

                              [ Yes ]  No
To view and configure the options, select [ Yes ] and press Enter.
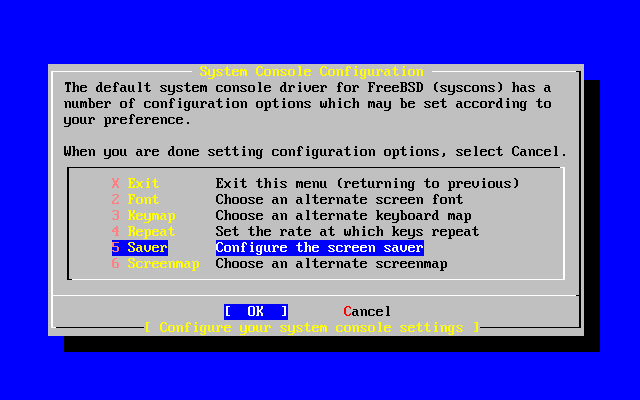
A commonly used option is the screen saver. Use the arrow keys to select Saver and then press Enter.
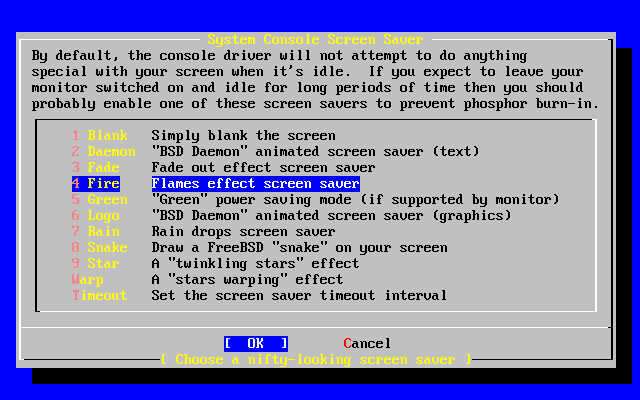
Select the desired screen saver using the arrow keys and then press Enter. The System Console Configuration menu will redisplay.
The default time interval is 300 seconds. To change the time interval, select Saver again. At the Screen Saver Options menu, select Timeout using the arrow keys and press Enter. A pop-up menu will appear:
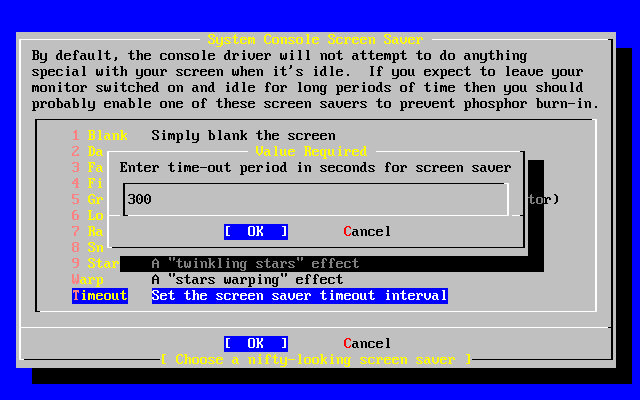
The value can be changed, then select [ OK ] and press Enter to return to the System Console Configuration menu.

Selecting Exit and pressing Enter will continue with the post-installation configurations.
2.9.8 Setting the Time Zone
Setting the time zone for your machine will allow it to automatically correct for any regional time changes and perform other time zone related functions properly.
The example shown is for a machine located in the Eastern time zone of the United States. Your selections will vary according to your geographical location.
                      User Confirmation Requested
          Would you like to set this machine's time zone now?

                            [ Yes ]   No
Select [ Yes ] and press Enter to set the time zone.
                       User Confirmation Requested
 Is this machine's CMOS clock set to UTC? If it is set to local time
 or you don't know, please choose NO here!

                              Yes   [ No ]
Select [ Yes ] or [ No ] according to how the machine's clock is configured and press Enter.
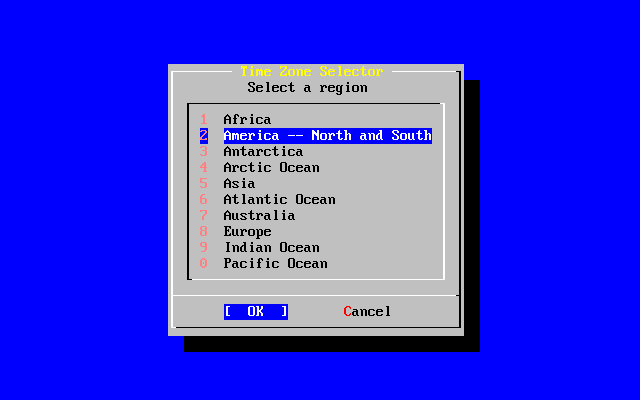
The appropriate region is selected using the arrow keys and then pressing Enter.
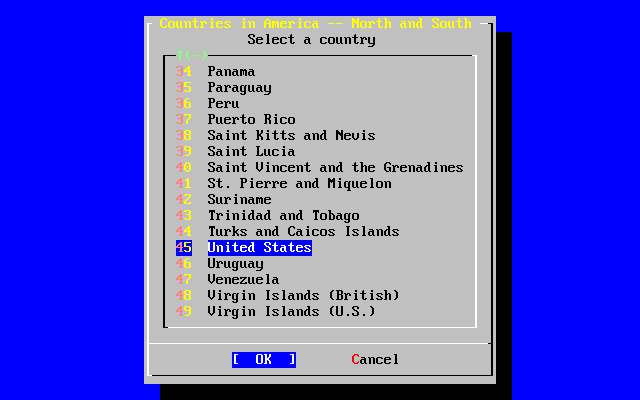
Select the appropriate country using the arrow keys and press Enter.

The appropriate time zone is selected using the arrow keys and pressing Enter.
                            Confirmation
            Does the abbreviation 'EDT' look reasonable?

                            [ Yes ]   No
Confirm the abbreviation for the time zone is correct. If it looks okay, press Enter to continue with the post-installation configuration.
2.9.9 Linux Compatibility
                      User Confirmation Requested
          Would you like to enable Linux binary compatibility?

                            [ Yes ]   No
Selecting [ Yes ] and pressing Enter will allow running Linux software on FreeBSD. The install will add the appropriate packages for Linux compatibility.
If installing by FTP, the machine will need to be connected to the Internet. Sometimes a remote ftp site will not have all the distributions like the Linux binary compatibility. This can be installed later if necessary.
2.9.10 Mouse Settings
This option will allow you to cut and paste text in the console and user programs with a 3-button mouse. If using a 2-button mouse, refer to manual page, moused(8), after installation for details on emulating the 3-button style. This example depicts a non-USB mouse configuration (such as a PS/2 or COM port mouse):
                      User Confirmation Requested
         Does this system have a non-USB mouse attached to it?

                            [ Yes ]    No
Select [ Yes ] for a non-USB mouse or [ No ] for a USB mouse and press Enter.

Use the arrow keys to select Type and press Enter.
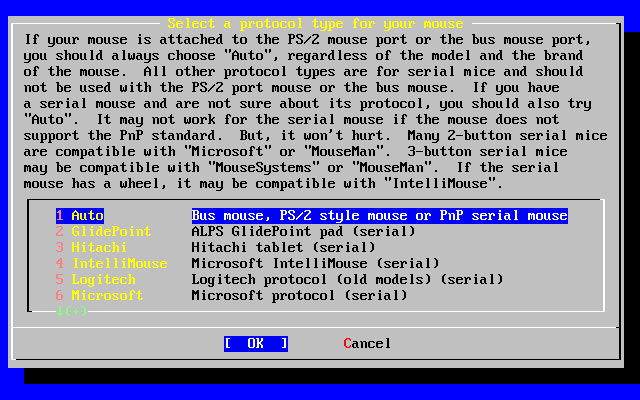
The mouse used in this example is a PS/2 type, so the default Auto was appropriate. To change protocol, use the arrow keys to select another option. Ensure that [ OK ] is highlighted and press Enter to exit this menu.
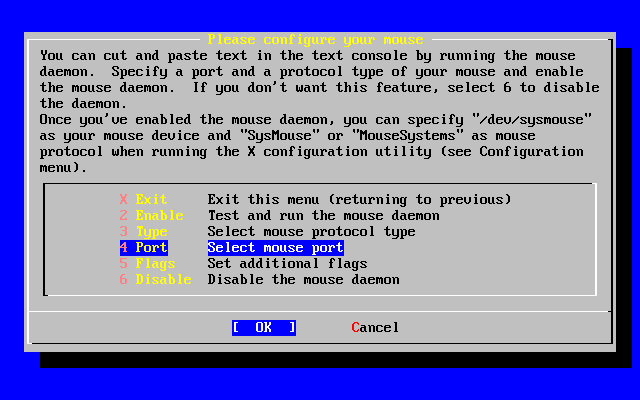
Use the arrow keys to select Port and press Enter.
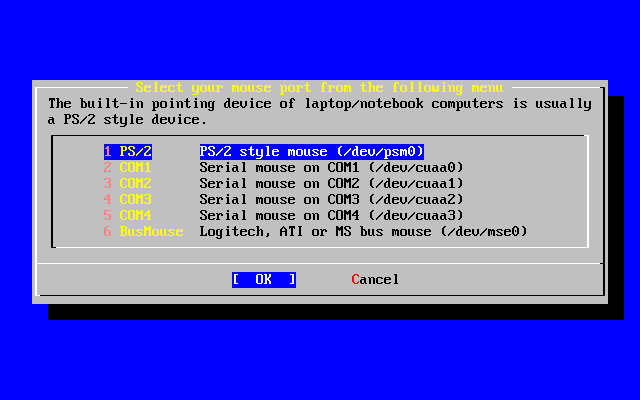
This system had a PS/2 mouse, so the default PS/2 was appropriate. To change the port, use the arrow keys and then press Enter.
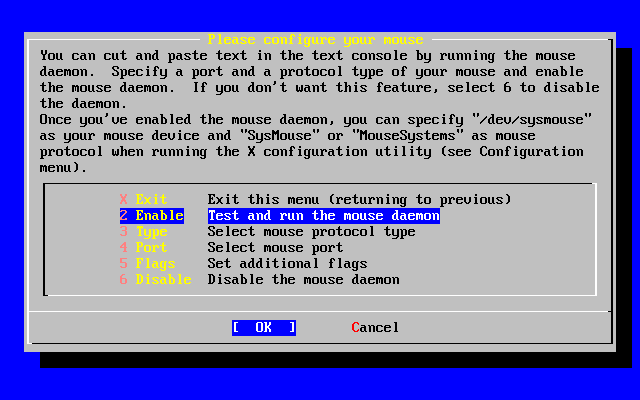
Last, use the arrow keys to select Enable, and press Enter to enable and test the mouse daemon.
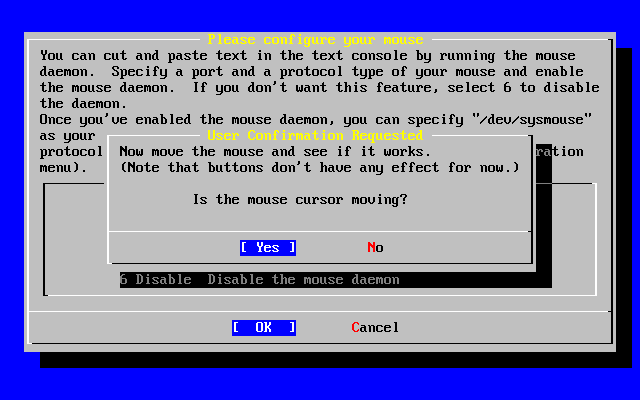
Move the mouse around the sceren and verify the cursor shown responds properly. If it does, select Yes and press Enter. If not, the mouse has not been configured correctly -- select No and try using different configuration options.
Select Exit with the arrow keys and press Enter to return to continue with the post-installation configuration.
2.9.11 Configure Additional Network Services
Configuring network services can be a daunting task for new users if they lack previous knowledge in this area. Networking, including the Internet, is critical to all modern operating systems including FreeBSD; as a result, it's very useful to have some understanding FreeBSD's extensive networking capabilities. Doing this during the installation will ensure users have some understanding of the various services available to them.
Network services are programs that accept input from anywhere on the network. Every effort is made to make sure these programs will not do anything ``harmful''. Unfortunately, programmers are not perfect and through time there have been cases where bugs in network services have been exploited by attackers to do bad things. It is important that you only enable the network services you know that you need. If in doubt it is best if you do not enable a network service until you find out that you do need it. You can always enable it later by re-running sysinstall or by using the features provided by the /etc/rc.conf file.
Selecting the ``Networking'' option will display a menu similar to the one below:
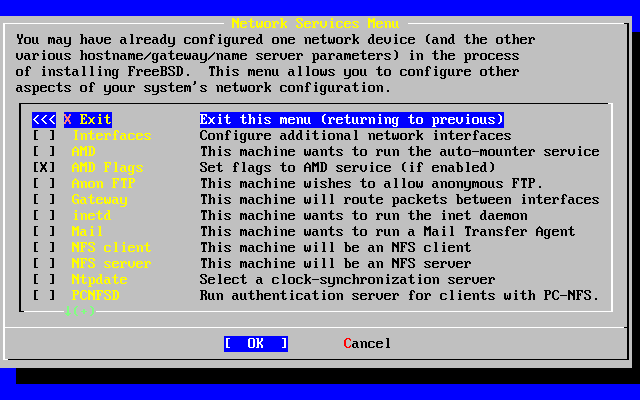
The first option, Interfaces, was previously covered during the Network Device Configuration section; thus this option can safely be ignored.
Selecting the AMD option adds support for the BSD auto mount utility. This is usually used in conjunction with the NFS protocol (see below) for automatically mounting remote file systems. No special configuration is required here.
Next in line is the AMD flags option. When selected, a menu will pop up for you to enter specific AMD flags. The menu already contains a set of default options:
-a /.amd_mnt -l syslog /host /etc/amd.map /net /etc/amd.map
The -a option sets the default mount location which is specified here as /.amd_mnt. The -l option specifies the default log file; however, when syslogd is specified all log activity will be sent to the system log daemon. The /host directory is used to mount an exported file system from a remote host, while /net directory is used to mount an exported file system from an IP address. The /etc/amd.map file defines the default options for AMD exports.
The Anon FTP permits anonymous FTP connections. Select this option to make this machine an anonymous FTP server. Be aware of the security risks involved with this option. Another menu will be displayed to explain the security risks and configuration in depth.
The Gateway configuration menu will set the machine up to be a gateway as explained previously. This can be used to unset the gateway option if you accidentally selected it during the installation process.
The Inetd option can be used to configure or completely disable the inetd(8) daemon as discussed above.
The Mail is used to configure the system's default MTA or Mail Transfer Agent. Selecting this option will bring up the following menu:
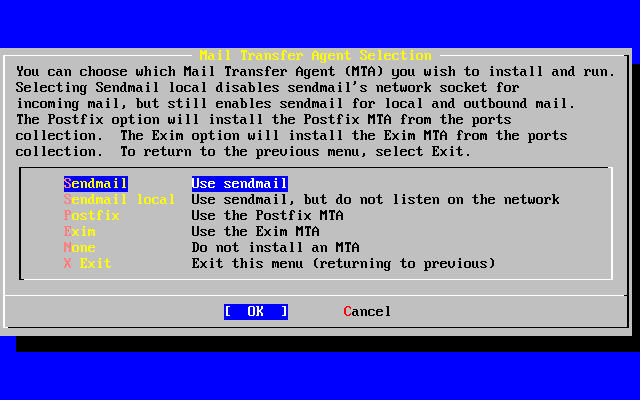
Here you are offered a choice as to which MTA to install and set as the default. An MTA is nothing more than a mail server which delivers email to users on the system or the Internet.
Selecting Sendmail will install the popular Sendmail server which is the FreeBSD default. The Sendmail local option will set Sendmail to be the default MTA, but disable its ability to receive incoming email from the Internet. The other options here, Postfix and Exim act similar to Sendmail. They both deliver email; however, some users prefer these alternatives to the Sendmail MTA.
After selecting an MTA, or choosing not to select an MTA, the network configuration menu will appear with the next option being NFS client.
The NFS client will configure the system to communicate with a server via NFS. An NFS server makes file systems available to other machines on the network via the NFS protocol. If this is a stand alone machine, this option can remain unselected. The system may require more configuration later; see Section 19.5 for more information about client and server configuration.
Below that option is the NFS server option, permitting you to set the system up as an NFS server. This adds the required information to start up the RPC remote procedure call services. RPC is used to coordinate connections between hosts and programs.
Next in line is the Ntpdate option, which deals with time synchronization. When selected, a menu like the one below shows up:
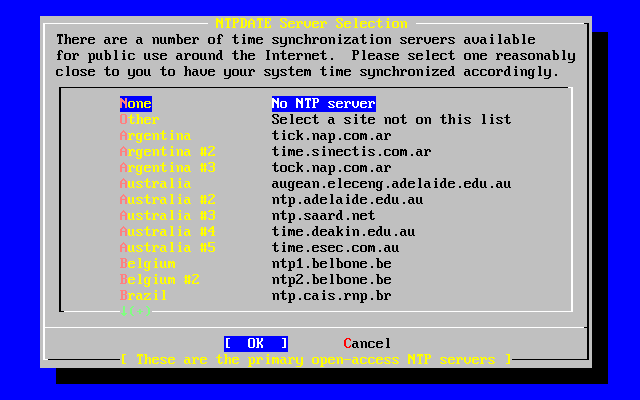
From this menu, select the server which is the closest to your location. Selecting a close one will make the time synchronization more accurate as a server further from your location may have more connection latency.
The next option is the PCNFSD selection. This option will install the net/pcnfsd package from the ports collection. This is a useful utility which provides NFS authentication services for systems which are unable to provide their own, such as Microsoft's DOS operating system.
Now you must scroll down a bit to see the other options:
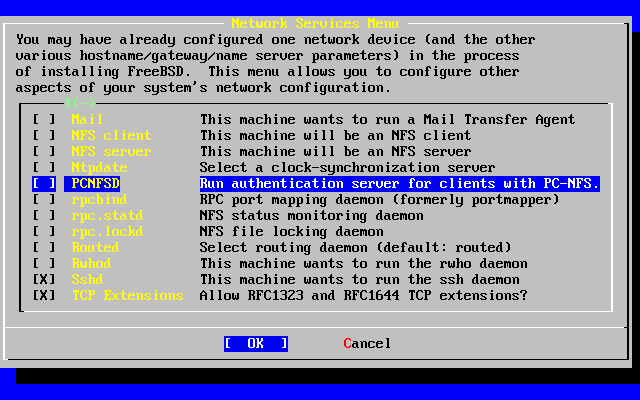
The rpcbind(8), rpc.statd(8), and rpc.lockd(8) utilities are all used for Remote Procedure Calls (RPC). The rpcbind.8 utility manages communication between NFS servers and clients, and is required for NFS servers to operate correctly. The rpc.statd daemon interacts with the rpc.statd daemon on other hosts to provide status monitoring. The reported status is usually held in the /var/db/statd.status file. The final option listed here is the rpc.lockd option, which, when selected, will provide file locking services. This is usually used with rpc.statd to monitor what hosts are requesting locks and how frequently they request them. While these last two options are marvelous for debugging, they are not required for NFS servers and clients to operate correctly.
As you progress down the list the next item here is Routed, which is the routing daemon. The routed(8) utility manages network routing tables, discovers multicast routers, and supplies a copy of the routing tables to any physically connected host on the network upon request. This is mainly used for machines which act as a gateway for the local network (see the icmp(4) and udp(4) manual pages). When selected, a menu will be presented requesting the default location of the utility. The default location is already defined for you and can be selected with the Enter key. You will then be presented with yet another menu, this time asking for the flags you wish to pass on to routed. The default is -q and it should already appear on the screen.
Next in line is the Rwhod option which, when selected, will start the rwhod(8) daemon during system initialization. The rwhod utility broadcasts system messages across the network periodically, or collects them when in ``consumer'' mode. More information can be found in the ruptime(1) and rwho(1) manual pages.
The next to the last option in the list is for the sshd(8) daemon. This is the secure shell server for OpenSSH and it is highly recommended over the standard telnet and FTP servers. The sshd server is used to create a secure connection from one host to another by using encrypted connections.
Finally there is the TCP Extensions option. This enables the TCP Extensions defined in RFC 1323 and RFC 1644. While on many hosts this can speed up connections, it can also cause some connections to be dropped. It is not recommended for servers, but may be beneficial for stand alone machines.
Now that you have configured the network services, you can scroll up to the very top item which is Exit and continue on to the next configuration section.
2.9.12 Configure X Server
In order to use a graphical user interface such as KDE, GNOME, or others, the X server will need to be configured.
Note: In order to run XFree86 as a non root user you will need to have x11/wrapper installed. This is installed by default beginning with FreeBSD 4.7. For earlier versions this can be added from the Package Selection menu.
To see whether your video card is supported, check the XFree86 web site.
                      User Confirmation Requested
        Would you like to configure your X server at this time?

                            [ Yes ]   No
Warning: It is necessary to know your monitor specifications and video card information. Equipment damage can occur if settings are incorrect. If you do not have this information, select [ No ] and perform the configuration after installation when you have the information using /stand/sysinstall, selecting Configure and then XFree86. Improper configuration of the X server at this time can leave the machine in a frozen state. It is often advised to configure the X-server once the installation has completed.
If you have graphics card and monitor information, select [ Yes ] and press Enter to proceed with configuring the X server.
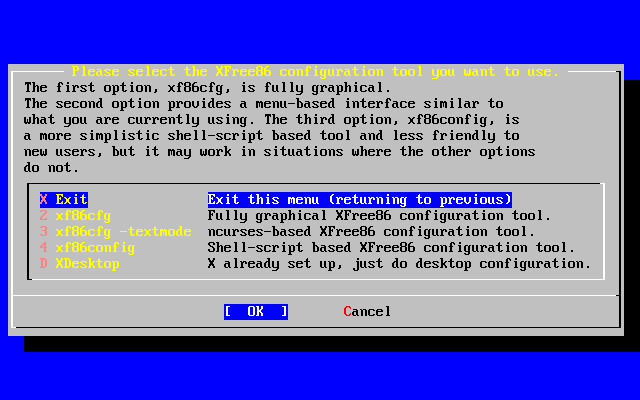
There are several ways to configure the X server. Use the arrow keys to select one of the methods and press Enter. Be sure to read all instructions carefully.
The xf86cfg and xf86cfg -textmode methods may make the screen go dark and take a few seconds to start. Be patient.
The following will illustrate the use of the xf86config configuration tool. The configuration choices you make will depend on the hardware in the system so your choices will probably be different than those shown:
                                Message
 You have configured and been running the mouse daemon.
 Choose "/dev/sysmouse" as the mouse port and "SysMouse" or
 "MouseSystems" as the mouse protocol in the X configuration utility.

                                 [ OK ]

                      [ Press enter to continue ]
This indicates that the mouse daemon previously configured has been detected. Press Enter to continue.
Starting xf86config will display a brief introduction:
This program will create a basic XF86Config file, based on menu selections you
make.

The XF86Config file usually resides in /usr/X11R6/etc/X11 or /etc/X11. A sample
XF86Config file is supplied with XFree86; it is configured for a standard
VGA card and monitor with 640x480 resolution. This program will ask for a
pathname when it is ready to write the file.

You can either take the sample XF86Config as a base and edit it for your
configuration, or let this program produce a base XF86Config file for your
configuration and fine-tune it.

Before continuing with this program, make sure you know what video card
you have, and preferably also the chipset it uses and the amount of video
memory on your video card. SuperProbe may be able to help with this.

Press enter to continue, or ctrl-c to abort.
Pressing Enter will start the mouse configuration. Be sure to follow the instructions and use ``Mouse Systems'' as the mouse protocol and /dev/sysmouse as the mouse port even if using a PS/2 mouse is shown as an illustration.
First specify a mouse protocol type. Choose one from the following list:

 1.  Microsoft compatible (2-button protocol)
 2.  Mouse Systems (3-button protocol) & FreeBSD moused protocol
 3.  Bus Mouse
 4.  PS/2 Mouse
 5.  Logitech Mouse (serial, old type, Logitech protocol)
 6.  Logitech MouseMan (Microsoft compatible)
 7.  MM Series
 8.  MM HitTablet
 9.  Microsoft IntelliMouse

If you have a two-button mouse, it is most likely of type 1, and if you have
a three-button mouse, it can probably support both protocol 1 and 2. There are
two main varieties of the latter type: mice with a switch to select the
protocol, and mice that default to 1 and require a button to be held at
boot-time to select protocol 2. Some mice can be convinced to do 2 by sending
a special sequence to the serial port (see the ClearDTR/ClearRTS options).

Enter a protocol number: 2

You have selected a Mouse Systems protocol mouse. If your mouse is normally
in Microsoft-compatible mode, enabling the ClearDTR and ClearRTS options
may cause it to switch to Mouse Systems mode when the server starts.

Please answer the following question with either 'y' or 'n'.
Do you want to enable ClearDTR and ClearRTS? n

You have selected a three-button mouse protocol. It is recommended that you
do not enable Emulate3Buttons, unless the third button doesn't work.

Please answer the following question with either 'y' or 'n'.
Do you want to enable Emulate3Buttons? y

Now give the full device name that the mouse is connected to, for example
/dev/tty00. Just pressing enter will use the default, /dev/mouse.
On FreeBSD, the default is /dev/sysmouse.

Mouse device: /dev/sysmouse
The keyboard is the next item to be configured. A generic 101-key model is shown for illustration. Any name may be used for the variant or simply press Enter to accept the default value.
Please select one of the following keyboard types that is the better
description of your keyboard. If nothing really matches,
choose 1 (Generic 101-key PC)

  1  Generic 101-key PC
  2  Generic 102-key (Intl) PC
  3  Generic 104-key PC
  4  Generic 105-key (Intl) PC
  5  Dell 101-key PC
  6  Everex STEPnote
  7  Keytronic FlexPro
  8  Microsoft Natural
  9  Northgate OmniKey 101
 10  Winbook Model XP5
 11  Japanese 106-key
 12  PC-98xx Series
 13  Brazilian ABNT2
 14  HP Internet
 15  Logitech iTouch
 16  Logitech Cordless Desktop Pro
 17  Logitech Internet Keyboard
 18  Logitech Internet Navigator Keyboard
 19  Compaq Internet
 20  Microsoft Natural Pro
 21  Genius Comfy KB-16M
 22  IBM Rapid Access
 23  IBM Rapid Access II
 24  Chicony Internet Keyboard
 25  Dell Internet Keyboard

Enter a number to choose the keyboard.

1


Please select the layout corresponding to your keyboard


  1  U.S. English
  2  U.S. English w/ ISO9995-3
  3  U.S. English w/ deadkeys
  4  Albanian
  5  Arabic
  6  Armenian
  7  Azerbaidjani
  8  Belarusian
  9  Belgian
 10  Bengali
 11  Brazilian
 12  Bulgarian
 13  Burmese
 14  Canadian
 15  Croatian
 16  Czech
 17  Czech (qwerty)
 18  Danish

Enter a number to choose the country.
Press enter for the next page

1


Please enter a variant name for 'us' layout. Or just press enter
for default variant

us


Please answer the following question with either 'y' or 'n'.
Do you want to select additional XKB options (group switcher,
group indicator, etc.)? n
Next, we proceed to the configuration for the monitor. Do not exceed the ratings of your monitor. Damage could occur. If you have any doubts, do the configuration after you have the information.
Now we want to set the specifications of the monitor. The two critical
parameters are the vertical refresh rate, which is the rate at which the
whole screen is refreshed, and most importantly the horizontal sync rate,
which is the rate at which scanlines are displayed.

The valid range for horizontal sync and vertical sync should be documented
in the manual of your monitor. If in doubt, check the monitor database
/usr/X11R6/lib/X11/doc/Monitors to see if your monitor is there.

Press enter to continue, or ctrl-c to abort.


You must indicate the horizontal sync range of your monitor. You can either
select one of the predefined ranges below that correspond to industry-
standard monitor types, or give a specific range.

It is VERY IMPORTANT that you do not specify a monitor type with a horizontal
sync range that is beyond the capabilities of your monitor. If in doubt,
choose a conservative setting.

    hsync in kHz; monitor type with characteristic modes
 1  31.5; Standard VGA, 640x480 @ 60 Hz
 2  31.5 - 35.1; Super VGA, 800x600 @ 56 Hz
 3  31.5, 35.5; 8514 Compatible, 1024x768 @ 87 Hz interlaced (no 800x600)
 4  31.5, 35.15, 35.5; Super VGA, 1024x768 @ 87 Hz interlaced, 800x600 @ 56 Hz
 5  31.5 - 37.9; Extended Super VGA, 800x600 @ 60 Hz, 640x480 @ 72 Hz
 6  31.5 - 48.5; Non-Interlaced SVGA, 1024x768 @ 60 Hz, 800x600 @ 72 Hz
 7  31.5 - 57.0; High Frequency SVGA, 1024x768 @ 70 Hz
 8  31.5 - 64.3; Monitor that can do 1280x1024 @ 60 Hz
 9  31.5 - 79.0; Monitor that can do 1280x1024 @ 74 Hz
10  31.5 - 82.0; Monitor that can do 1280x1024 @ 76 Hz
11  Enter your own horizontal sync range

Enter your choice (1-11): 6

You must indicate the vertical sync range of your monitor. You can either
select one of the predefined ranges below that correspond to industry-
standard monitor types, or give a specific range. For interlaced modes,
the number that counts is the high one (e.g. 87 Hz rather than 43 Hz).

 1  50-70
 2  50-90
 3  50-100
 4  40-150
 5  Enter your own vertical sync range

Enter your choice: 2

You must now enter a few identification/description strings, namely an
identifier, a vendor name, and a model name. Just pressing enter will fill
in default names.

The strings are free-form, spaces are allowed.
Enter an identifier for your monitor definition: Hitachi
The selection of a video card driver from a list is next. If you pass your card on the list, continue to press Enter and the list will repeat. Only an excerpt from the list is shown:
Now we must configure video card specific settings. At this point you can
choose to make a selection out of a database of video card definitions.
Because there can be variation in Ramdacs and clock generators even
between cards of the same model, it is not sensible to blindly copy
the settings (e.g. a Device section). For this reason, after you make a
selection, you will still be asked about the components of the card, with
the settings from the chosen database entry presented as a strong hint.

The database entries include information about the chipset, what driver to
run, the Ramdac and ClockChip, and comments that will be included in the
Device section. However, a lot of definitions only hint about what driver
to run (based on the chipset the card uses) and are untested.

If you can't find your card in the database, there's nothing to worry about.
You should only choose a database entry that is exactly the same model as
your card; choosing one that looks similar is just a bad idea (e.g. a
GemStone Snail 64 may be as different from a GemStone Snail 64+ in terms of
hardware as can be).

Do you want to look at the card database? y


288  Matrox Millennium G200 8MB                        mgag200
289  Matrox Millennium G200 SD 16MB                    mgag200
290  Matrox Millennium G200 SD 4MB                     mgag200
291  Matrox Millennium G200 SD 8MB                     mgag200
292  Matrox Millennium G400                            mgag400
293  Matrox Millennium II 16MB                         mga2164w
294  Matrox Millennium II 4MB                          mga2164w
295  Matrox Millennium II 8MB                          mga2164w
296  Matrox Mystique                                   mga1064sg
297  Matrox Mystique G200 16MB                         mgag200
298  Matrox Mystique G200 4MB                          mgag200
299  Matrox Mystique G200 8MB                          mgag200
300  Matrox Productiva G100 4MB                        mgag100
301  Matrox Productiva G100 8MB                        mgag100
302  MediaGX                                           mediagx
303  MediaVision Proaxcel 128                          ET6000
304  Mirage Z-128                                      ET6000
305  Miro CRYSTAL VRX                                  Verite 1000

Enter a number to choose the corresponding card definition.
Press enter for the next page, q to continue configuration.

288

Your selected card definition:

Identifier: Matrox Millennium G200 8MB
Chipset:    mgag200
Driver:     mga
Do NOT probe clocks or use any Clocks line.

Press enter to continue, or ctrl-c to abort.


Now you must give information about your video card. This will be used for
the "Device" section of your video card in XF86Config.

You must indicate how much video memory you have. It is probably a good
idea to use the same approximate amount as that detected by the server you
intend to use. If you encounter problems that are due to the used server
not supporting the amount memory you have (e.g. ATI Mach64 is limited to
1024K with the SVGA server), specify the maximum amount supported by the
server.

How much video memory do you have on your video card:

 1  256K
 2  512K
 3  1024K
 4  2048K
 5  4096K
 6  Other

Enter your choice: 6

Amount of video memory in Kbytes: 8192

You must now enter a few identification/description strings, namely an
identifier, a vendor name, and a model name. Just pressing enter will fill
in default names (possibly from a card definition).

Your card definition is Matrox Millennium G200 8MB.

The strings are free-form, spaces are allowed.
Enter an identifier for your video card definition:
Next, the video modes are set for the resolutions desired. Typically, useful ranges are 640x480, 800x600, and 1024x768 but those are a function of video card capability, monitor size, and eye comfort. When selecting a color depth, select the highest mode that your card will support.
For each depth, a list of modes (resolutions) is defined. The default
resolution that the server will start-up with will be the first listed
mode that can be supported by the monitor and card.
Currently it is set to:

"640x480" "800x600" "1024x768" "1280x1024" for 8-bit
"640x480" "800x600" "1024x768" "1280x1024" for 16-bit
"640x480" "800x600" "1024x768" "1280x1024" for 24-bit

Modes that cannot be supported due to monitor or clock constraints will
be automatically skipped by the server.

 1  Change the modes for 8-bit (256 colors)
 2  Change the modes for 16-bit (32K/64K colors)
 3  Change the modes for 24-bit (24-bit color)
 4  The modes are OK, continue.

Enter your choice: 2

Select modes from the following list:

 1  "640x400"
 2  "640x480"
 3  "800x600"
 4  "1024x768"
 5  "1280x1024"
 6  "320x200"
 7  "320x240"
 8  "400x300"
 9  "1152x864"
 a  "1600x1200"
 b  "1800x1400"
 c  "512x384"

Please type the digits corresponding to the modes that you want to select.
For example, 432 selects "1024x768" "800x600" "640x480", with a
default mode of 1024x768.

Which modes? 432

You can have a virtual screen (desktop), which is screen area that is larger
than the physical screen and which is panned by moving the mouse to the edge
of the screen. If you don't want virtual desktop at a certain resolution,
you cannot have modes listed that are larger. Each color depth can have a
differently-sized virtual screen

Please answer the following question with either 'y' or 'n'.
Do you want a virtual screen that is larger than the physical screen? n


For each depth, a list of modes (resolutions) is defined. The default
resolution that the server will start-up with will be the first listed
mode that can be supported by the monitor and card.
Currently it is set to:

"640x480" "800x600" "1024x768" "1280x1024" for 8-bit
"1024x768" "800x600" "640x480" for 16-bit
"640x480" "800x600" "1024x768" "1280x1024" for 24-bit

Modes that cannot be supported due to monitor or clock constraints will
be automatically skipped by the server.

 1  Change the modes for 8-bit (256 colors)
 2  Change the modes for 16-bit (32K/64K colors)
 3  Change the modes for 24-bit (24-bit color)
 4  The modes are OK, continue.

Enter your choice: 4


Please specify which color depth you want to use by default:

  1  1 bit (monochrome)
  2  4 bits (16 colors)
  3  8 bits (256 colors)
  4  16 bits (65536 colors)
  5  24 bits (16 million colors)

Enter a number to choose the default depth.

4
Finally, the configuration needs to be saved. Be sure to enter /etc/XF86Config as the location for saving the configuration.
I am going to write the XF86Config file now. Make sure you don't accidently
overwrite a previously configured one.

Shall I write it to /etc/X11/XF86Config? y
If the configuration fails, you can try the configuration again by selecting [ Yes ] when the following message appears:
          User Confirmation Requested
The XFree86 configuration process seems to have
failed.  Would you like to try again?

             [ Yes ]         No
If you have trouble configuring XFree86, select [ No ] and press Enter and continue with the installation process. After installation you can use xf86cfg -textmode or xf86config to access the command line configuration utilities as root. There is an additional method for configuring XFree86 described in Chapter 5. If you choose not to configure XFree86 at this time the next menu will be for package selection.
The default setting which allows the server to be killed is the hotkey sequence Ctrl+Alt+Backspace. This can be executed if something is wrong with the server settings and prevent hardware damage.
The default setting that allows video mode switching will permit changing of the mode while running X with the hotkey sequence Ctrl+Alt++ or Ctrl+Alt+-.
After installation, the display can be adjusted for height, width, or centering by using xvidtune after you have XFree86 running with xvidtune.
There are warnings that improper settings can damage your equipment. Heed them. If in doubt, do not do it. Instead, use the monitor controls to adjust the display for X Window. There may be some display differences when switching back to text mode, but it is better than damaging equipment.
Read the xvidtune(1) manual page before making any adjustments.
Following a successful XFree86 configuration, it will proceed to the selection of a default desktop.
2.9.13 Select Default X Desktop
There are a variety of window managers available. They range from very basic environments to full desktop environments with a large suite of software. Some require only minimal disk space and low memory while others with more features require much more. The best way to determine which is most suitable for you is to try a few different ones. Those are available from the ports collection or as packages and can be added after installation.
You can select one of the popular desktops to be installed and configured as the default desktop. This will allow you to start it right after installation.
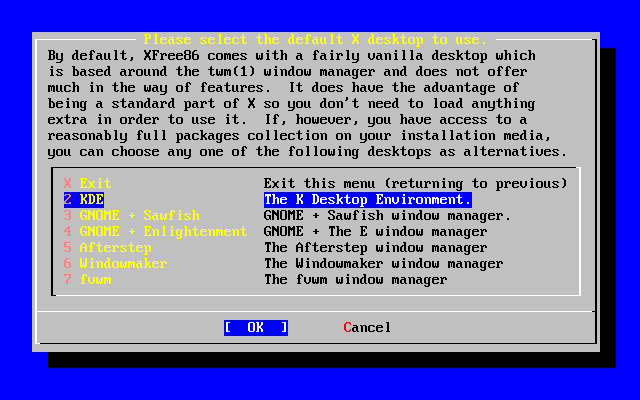
Use the arrow keys to select a desktop and press Enter. Installation of the selected desktop will proceed.
2.9.14 Install Packages
Packages are pre-compiled binaries and are a convenient way to install software.
Installation of one package is shown for purposes of illustration. Additional packages can also be added at this time if desired. After installation /stand/sysinstall can be used to add additional packages.
                     User Confirmation Requested
 The FreeBSD package collection is a collection of hundreds of
 ready-to-run applications, from text editors to games to WEB servers
 and more. Would you like to browse the collection now?

                            [ Yes ]   No
Selecting [ Yes ] and pressing Enter will be followed by the Package Selection screens:
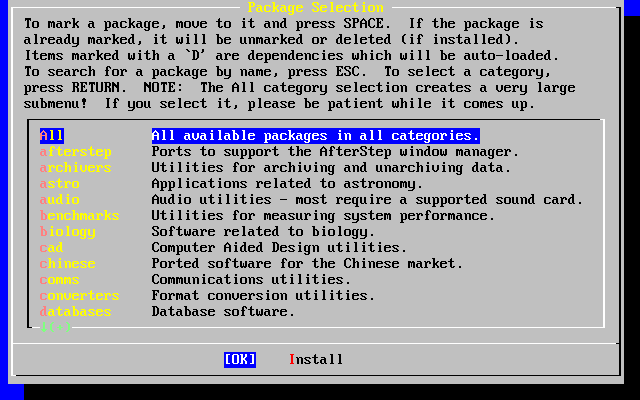
Only packages on the current installation media are available for installation at any given time.
All packages available will be displayed if All is selected or you can select a particular category. Highlight your selection with the arrow keys and press Enter.
A menu will display showing all the packages available for the selection made:
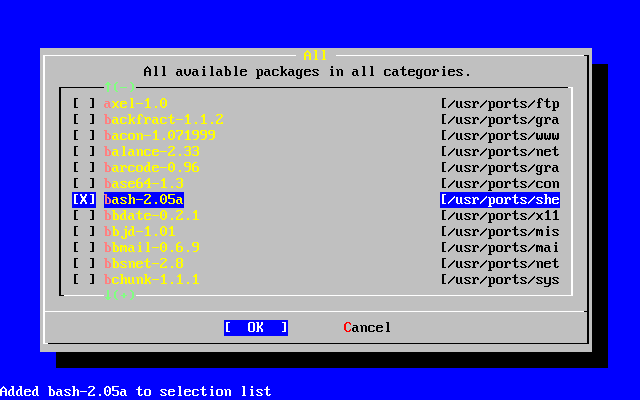
The bash shell is shown selected. Select as many as desired by highlighting the package and pressing the Space key. A short description of each package will appear in the lower left corner of the screen.
Pressing the Tab key will toggle between the last selected package, [ OK ], and [ Cancel ].
When you have finished marking the packages for installation, press Tab once to toggle to the [ OK ] and press Enter to return to the Package Selection menu.
The left and right arrow keys will also toggle between [ OK ] and [ Cancel ]. This method can also be used to select [ OK ] and press Enter to return to the Package Selection menu.
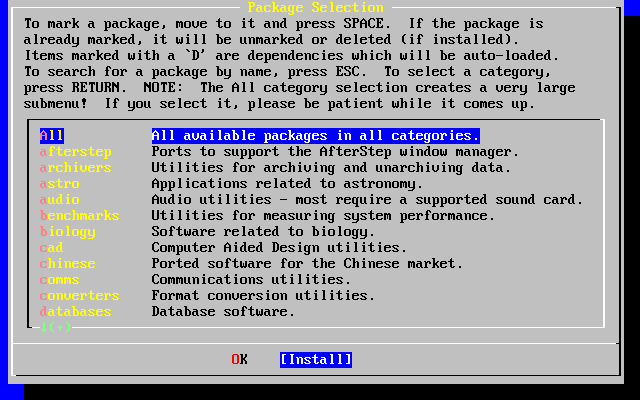
Use the tab and arrow keys to select [ Install ] and press Enter. You will then need to confirm that you want to install the packages:
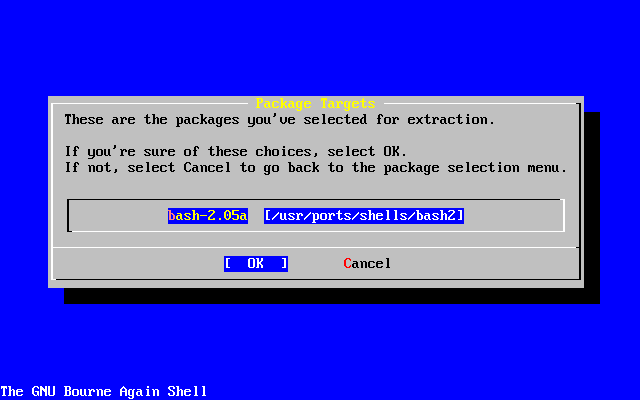
Selecting [ OK ] and pressing Enter will start the package installation. Installing messages will appear until completed. Make note if there are any error messages.
The final configuration continues after packages are installed. If you end up not selecting any packages, and wish to return to the final configuration, select Install anyways.
2.9.15 Add Users/Groups
You should add at least one user during the installation so that you can use the system without being logged in as root. The root partition is generally small and running applications as root can quickly fill it. A bigger danger is noted below:
                     User Confirmation Requested
 Would you like to add any initial user accounts to the system? Adding
 at least one account for yourself at this stage is suggested since
 working as the "root" user is dangerous (it is easy to do things which
 adversely affect the entire system).

                            [ Yes ]   No
Select [ Yes ] and press Enter to continue with adding a user.
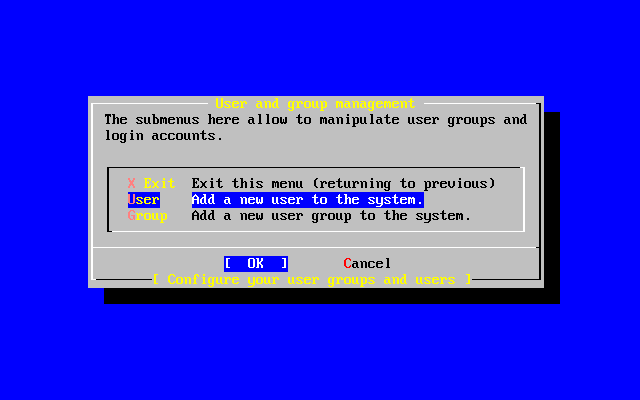
Select User with the arrow keys and press Enter.
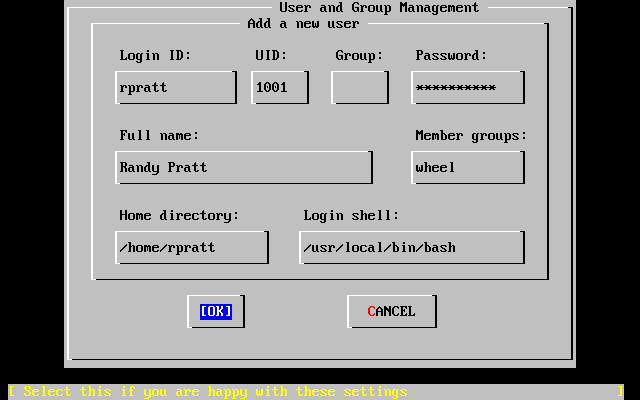
The following descriptions will appear in the lower part of the screen as the items are selected with Tab to assist with entering the required information:
- Login ID
-
The login name of the new user (mandatory).
- UID
-
The numerical ID for this user (leave blank for automatic choice).
- Group
-
The login group name for this user (leave blank for automatic choice).
- Password
-
The password for this user (enter this field with care!).
- Full name
-
The user's full name (comment).
- Member groups
-
The groups this user belongs to (i.e. gets access rights for).
- Home directory
-
The user's home directory (leave blank for default).
- Login shell
-
The user's login shell (leave blank for default, e.g. /bin/sh).
The login shell was changed from /bin/sh to /usr/local/bin/bash to use the bash shell that was previously installed as a package. Do not try to use a shell that does not exist or you will not be able to login. The most common shell used in the BSD-world is the C shell, which can be indicated as /bin/tcsh.
The user was also added to the wheel group to be able to become a superuser with root privileges.
When you are satisfied, press [ OK ] and the User and Group Management menu will redisplay:
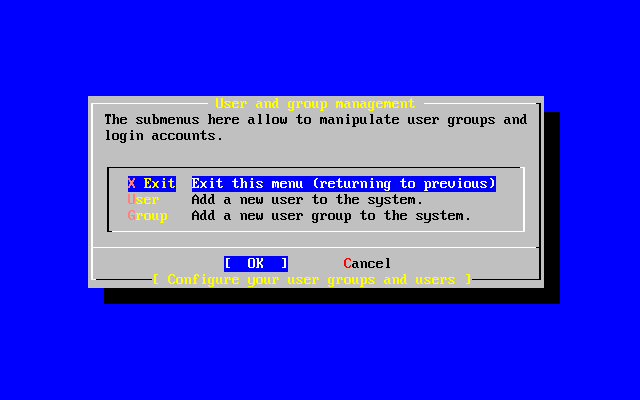
Groups can also be added at this time if specific needs are known. Otherwise, this may be accessed through using /stand/sysinstall after installation is completed.
When you are finished adding users, select Exit with the arrow keys and press Enter to continue the installation.
2.9.16 Set the root Password
                        Message
 Now you must set the system manager's password.
 This is the password you'll use to log in as "root".

                         [ OK ]

               [ Press enter to continue ]
Press Enter to set the root password.
The password will need to be typed in twice correctly. Needless to say, make sure you have a way of finding the password if you forget.
Changing local password for root.
New password :
Retype new password :
The installation will continue after the password is successfully entered.
2.9.17 Exiting Install
If you need to configure additional network devices or any other configuration, you can do it at this point or after installation with /stand/sysinstall.
                     User Confirmation Requested
 Visit the general configuration menu for a chance to set any last
 options?

                              Yes   [ No ]
Select [ No ] with the arrow keys and press Enter to return to the Main Installation Menu.

Select [X Exit Install] with the arrow keys and press Enter. You will be asked to confirm exiting the installation:
                     User Confirmation Requested
 Are you sure you wish to exit? The system will reboot (be sure to
 remove any floppies from the drives).

                            [ Yes ]   No
Select [ Yes ] and remove the floppy if booting from the floppy. The CDROM drive is locked until the machine starts to reboot. The CDROM drive is then unlocked and the disk can be removed from drive (quickly).
The system will reboot so watch for any error messages that may appear.
2.9.18 FreeBSD Bootup
2.9.18.1 FreeBSD Bootup on the i386
If everything went well, you will see messages scroll off the screen and you will arrive at a login prompt. You can view the content of the messages by pressing Scroll-Lock and using PgUp and PgDn. Pressing Scroll-Lock again will return to the prompt.
The entire message may not display (buffer limitation) but it can be viewed from the command line after logging in by typing dmesg at the prompt.
Login using the username/password you set during installation (rpratt, in this example). Avoid logging in as root except when necessary.
Typical boot messages (version information omitted):
Copyright (c) 1992-2002 The FreeBSD Project.
Copyright (c) 1979, 1980, 1983, 1986, 1988, 1989, 1991, 1992, 1993, 1994
        The Regents of the University of California. All rights reserved.

Timecounter "i8254"  frequency 1193182 Hz
CPU: AMD-K6(tm) 3D processor (300.68-MHz 586-class CPU)
  Origin = "AuthenticAMD"  Id = 0x580  Stepping = 0
  Features=0x8001bf<FPU,VME,DE,PSE,TSC,MSR,MCE,CX8,MMX>
  AMD Features=0x80000800<SYSCALL,3DNow!>
real memory  = 268435456 (262144K bytes)
config> di sn0
config> di lnc0
config> di le0
config> di ie0
config> di fe0
config> di cs0
config> di bt0
config> di aic0
config> di aha0
config> di adv0
config> q
avail memory = 256311296 (250304K bytes)
Preloaded elf kernel "kernel" at 0xc0491000.
Preloaded userconfig_script "/boot/kernel.conf" at 0xc049109c.
md0: Malloc disk
Using $PIR table, 4 entries at 0xc00fde60
npx0: <math processor> on motherboard
npx0: INT 16 interface
pcib0: <Host to PCI bridge> on motherboard
pci0: <PCI bus> on pcib0
pcib1: <VIA 82C598MVP (Apollo MVP3) PCI-PCI (AGP) bridge> at device 1.0 on pci0
pci1: <PCI bus> on pcib1
pci1: <Matrox MGA G200 AGP graphics accelerator> at 0.0 irq 11
isab0: <VIA 82C586 PCI-ISA bridge> at device 7.0 on pci0
isa0: <ISA bus> on isab0
atapci0: <VIA 82C586 ATA33 controller> port 0xe000-0xe00f at device 7.1 on pci0
ata0: at 0x1f0 irq 14 on atapci0
ata1: at 0x170 irq 15 on atapci0
uhci0: <VIA 83C572 USB controller> port 0xe400-0xe41f irq 10 at device 7.2 on pci0
usb0: <VIA 83C572 USB controller> on uhci0
usb0: USB revision 1.0
uhub0: VIA UHCI root hub, class 9/0, rev 1.00/1.00, addr 1
uhub0: 2 ports with 2 removable, self powered
chip1: <VIA 82C586B ACPI interface> at device 7.3 on pci0
ed0: <NE2000 PCI Ethernet (RealTek 8029)> port 0xe800-0xe81f irq 9 at
device 10.0 on pci0
ed0: address 52:54:05:de:73:1b, type NE2000 (16 bit)
isa0: too many dependant configs (8)
isa0: unexpected small tag 14
fdc0: <NEC 72065B or clone> at port 0x3f0-0x3f5,0x3f7 irq 6 drq 2 on isa0
fdc0: FIFO enabled, 8 bytes threshold
fd0: <1440-KB 3.5" drive> on fdc0 drive 0
atkbdc0: <keyboard controller (i8042)> at port 0x60-0x64 on isa0
atkbd0: <AT Keyboard> flags 0x1 irq 1 on atkbdc0
kbd0 at atkbd0
psm0: <PS/2 Mouse> irq 12 on atkbdc0
psm0: model Generic PS/2 mouse, device ID 0
vga0: <Generic ISA VGA> at port 0x3c0-0x3df iomem 0xa0000-0xbffff on isa0
sc0: <System console> at flags 0x1 on isa0
sc0: VGA <16 virtual consoles, flags=0x300>
sio0 at port 0x3f8-0x3ff irq 4 flags 0x10 on isa0
sio0: type 16550A
sio1 at port 0x2f8-0x2ff irq 3 on isa0
sio1: type 16550A
ppc0: <Parallel port> at port 0x378-0x37f irq 7 on isa0
ppc0: SMC-like chipset (ECP/EPP/PS2/NIBBLE) in COMPATIBLE mode
ppc0: FIFO with 16/16/15 bytes threshold
ppbus0: IEEE1284 device found /NIBBLE
Probing for PnP devices on ppbus0:
plip0: <PLIP network interface> on ppbus0
lpt0: <Printer> on ppbus0
lpt0: Interrupt-driven port
ppi0: <Parallel I/O> on ppbus0
ad0: 8063MB <IBM-DHEA-38451> [16383/16/63] at ata0-master using UDMA33
ad2: 8063MB <IBM-DHEA-38451> [16383/16/63] at ata1-master using UDMA33
acd0: CDROM <DELTA OTC-H101/ST3 F/W by OIPD> at ata0-slave using PIO4
Mounting root from ufs:/dev/ad0s1a
swapon: adding /dev/ad0s1b as swap device
Automatic boot in progress...
/dev/ad0s1a: FILESYSTEM CLEAN; SKIPPING CHECKS
/dev/ad0s1a: clean, 48752 free (552 frags, 6025 blocks, 0.9% fragmentation)
/dev/ad0s1f: FILESYSTEM CLEAN; SKIPPING CHECKS
/dev/ad0s1f: clean, 128997 free (21 frags, 16122 blocks, 0.0% fragmentation)
/dev/ad0s1g: FILESYSTEM CLEAN; SKIPPING CHECKS
/dev/ad0s1g: clean, 3036299 free (43175 frags, 374073 blocks, 1.3% fragmentation)
/dev/ad0s1e: filesystem CLEAN; SKIPPING CHECKS
/dev/ad0s1e: clean, 128193 free (17 frags, 16022 blocks, 0.0% fragmentation)
Doing initial network setup: hostname.
ed0: flags=8843<UP,BROADCAST,RUNNING,SIMPLEX,MULTICAST> mtu 1500
        inet 192.168.0.1 netmask 0xffffff00 broadcast 192.168.0.255
        inet6 fe80::5054::5ff::fede:731b%ed0 prefixlen 64 tentative scopeid 0x1
        ether 52:54:05:de:73:1b
lo0: flags=8049<UP,LOOPBACK,RUNNING,MULTICAST> mtu 16384
        inet6 fe80::1%lo0 prefixlen 64 scopeid 0x8
        inet6 ::1 prefixlen 128
        inet 127.0.0.1 netmask 0xff000000
Additional routing options: IP gateway=YES TCP keepalive=YES
routing daemons:.
additional daemons: syslogd.
Doing additional network setup:.
Starting final network daemons: creating ssh RSA host key
Generating public/private rsa1 key pair.
Your identification has been saved in /etc/ssh/ssh_host_key.
Your public key has been saved in /etc/ssh/ssh_host_key.pub.
The key fingerprint is:
cd:76:89:16:69:0e:d0:6e:f8:66:d0:07:26:3c:7e:2d [email protected]
 creating ssh DSA host key
Generating public/private dsa key pair.
Your identification has been saved in /etc/ssh/ssh_host_dsa_key.
Your public key has been saved in /etc/ssh/ssh_host_dsa_key.pub.
The key fingerprint is:
f9:a1:a9:47:c4:ad:f9:8d:52:b8:b8:ff:8c:ad:2d:e6 [email protected].
setting ELF ldconfig path: /usr/lib /usr/lib/compat /usr/X11R6/lib
/usr/local/lib
a.out ldconfig path: /usr/lib/aout /usr/lib/compat/aout /usr/X11R6/lib/aout
starting standard daemons: inetd cron sshd usbd sendmail.
Initial rc.i386 initialization:.
rc.i386 configuring syscons: blank_time screensaver moused.
Additional ABI support: linux.
Local package initialization:.
Additional TCP options:.

FreeBSD/i386 (k6-2.example.com) (ttyv0)

login: rpratt
Password:
Generating the RSA and DSA keys may take some time on slower machines. This happens only on the initial boot-up of a new installation. Subsequent boots will be faster.
If the X server has been configured and a Default Desktop chosen, it can be started by typing startx at the command line.
2.9.18.2 Bootup of FreeBSD on the Alpha
Once the install procedure has finished, you will be able to start FreeBSD by typing something like this to the SRM prompt:
>>>BOOT DKC0
This instructs the firmware to boot the specified disk. To make FreeBSD boot automatically in the future, use these commands:
>>> SET BOOT_OSFLAGS A
>>> SET BOOT_FILE ''
>>> SET BOOTDEF_DEV DKC0
>>> SET AUTO_ACTION BOOT
The boot messages will be similar (but not identical) to those produced by FreeBSD booting on the i386.
2.9.19 FreeBSD Shutdown
It is important to properly shutdown the operating system. Do not just turn off power. First, become a superuser by typing su at the command line and entering the root password. This will work only if the user is a member of the wheel group. Otherwise, login as root and use shutdown -h now.
The operating system has halted.
Please press any key to reboot.
It is safe to turn off the power after the shutdown command has been issued and the message ``Please press any key to reboot'' appears. If any key is pressed instead of turning off the power switch, the system will reboot.
You could also use the Ctrl+Alt+Del key combination to reboot the system, however this is not recommended during normal operation.
2.10 Supported Hardware
FreeBSD currently runs on a wide variety of ISA, VLB, EISA, and PCI bus-based PCs with Intel, AMD, Cyrix, or NexGen ``x86'' processors, as well as a number of machines based on the Compaq Alpha processor. Support for generic IDE or ESDI drive configurations, various SCSI controllers, PCMCIA cards, USB devices, and network and serial cards is also provided. FreeBSD also supports IBM's microchannel (MCA) bus.
A list of supported hardware is provided with each FreeBSD release in the FreeBSD Hardware Notes. This document can usually be found in a file named HARDWARE.TXT, in the top-level directory of a CDROM or FTP distribution or in sysinstall's documentation menu. It lists, for a given architecture, what hardware devices are known to be supported by each release of FreeBSD. Copies of the supported hardware list for various releases and architectures can also be found on the Release Information page of the FreeBSD Web site.
2.11 Troubleshooting
The following section covers basic installation troubleshooting, such as common problems people have reported. There are also a few questions and answers for people wishing to dual-boot FreeBSD with MS-DOS.
2.11.1 What to Do If Something Goes Wrong
Due to various limitations of the PC architecture, it is impossible for probing to be 100% reliable, however, there are a few things you can do if it fails.
Check the Hardware Notes document for your version of FreeBSD to make sure your hardware is supported.
If your hardware is supported and you still experience lock-ups or other problems, reset your computer, and when the visual kernel configuration option is given, choose it. This will allow you to go through your hardware and supply information to the system about it. The kernel on the boot disks is configured assuming that most hardware devices are in their factory default configuration in terms of IRQs, IO addresses, and DMA channels. If your hardware has been reconfigured, you will most likely need to use the configuration editor to tell FreeBSD where to find things.
It is also possible that a probe for a device not present will cause a later probe for another device that is present to fail. In that case, the probes for the conflicting driver(s) should be disabled.
Note: Some installation problems can be avoided or alleviated by updating the firmware on various hardware components, most notably the motherboard. The motherboard firmware may also be referred to as BIOS and most of the motherboard or computer manufactures have a website where the upgrades and upgrade information may be located.
Most manufacturers strongly advise against upgrading the motherboard BIOS unless there is a good reason for doing so, which could possibly be a critical update of sorts. The upgrade process can go wrong, causing permanent damage to the BIOS chip.
Warning: Do not disable any drivers you will need during the installation, such as your screen (sc0). If the installation wedges or fails mysteriously after leaving the configuration editor, you have probably removed or changed something you should not have. Reboot and try again.
In configuration mode, you can:
-
List the device drivers installed in the kernel.
-
Disable device drivers for hardware that is not present in your system.
-
Change IRQs, DRQs, and IO port addresses used by a device driver.
After adjusting the kernel to match your hardware configuration, type Q to boot with the new settings. Once the installation has completed, any changes you made in the configuration mode will be permanent so you do not have to reconfigure every time you boot. It is still highly likely that you will eventually want to build a custom kernel.
2.11.2 Dealing with Existing MS-DOS® Partitions
Many users wish to install FreeBSD on PCs inhabited by Microsoft based operating systems. For those instances, FreeBSD has a utility known as FIPS. This utility can be found in the tools directory on the install CD-ROM, or downloaded from one of various FreeBSD mirrors.
The FIPS utility allows you to split an existing MS-DOS partition into two pieces, preserving the original partition and allowing you to install onto the second free piece. You first need to defragment your MS-DOS partition using the Windows; Disk Defragmenter utility (go into Explorer, right-click on the hard drive, and choose to defrag your hard drive), or use Norton Disk Tools. Now you can run the FIPS utility. It will prompt you for the rest of the information, just follow the on screen instructions. Afterwards, you can reboot and install FreeBSD on the new free slice. See the Distributions menu for an estimate of how much free space you will need for the kind of installation you want.
There is also a very useful product from PowerQuest (http://www.powerquest.com) called PartitionMagic. This application has far more functionality than FIPS, and is highly recommended if you plan to add/remove operating systems often. It does cost money, so if you plan to install FreeBSD and keep it installed, FIPS will probably be fine for you.
2.11.3 Using MS-DOS and Windows® File Systems
At this time, FreeBSD does not support file systems compressed with the Double Space™ application. Therefore the file system will need to be uncompressed before FreeBSD can access the data. This can be done by running the Compression Agent located in the Start> Programs > System Tools menu.
FreeBSD can support MS-DOS based file systems. This requires you use the mount_msdos(8) command (in FreeBSD 5.X, the command is mount_msdosfs(8)) with the required parameters. The utilities most common usage is:
# mount_msdos /dev/ad0s1 /mnt
In this example, the MS-DOS file system is located on the first partition of the primary hard disk. Your situation may be different, check the output from the dmesg, and mount commands. They should produce enough information too give an idea of the partition layout.
Note: Extended MS-DOS file systems are usually mapped after the FreeBSD partitions. In other words, the slice number may be higher than the ones FreeBSD is using. For instance, the first MS-DOS partition may be /dev/ad0s1, the FreeBSD partition may be /dev/ad0s2, with the extended MS-DOS partition being located on /dev/ad0s3. To some, this can be confusing at first.
NTFS partitions can also be mounted in a similar manner using the mount_ntfs(8) command.
2.11.4 Alpha User's Questions and Answers
This section answers some commonly asked questions about installing FreeBSD on Alpha systems.
- 2.11.4.1. Can I boot from the ARC or Alpha BIOS Console?
- 2.11.4.2. Help, I have no space! Do I need to delete everything first?
- 2.11.4.3. Can I mount my Compaq Tru64 or VMS filesystems?
No. FreeBSD, like Compaq Tru64 and VMS, will only boot from the SRM console.
2.12 Advanced Installation Guide
Contributed by Valentino Vaschetto.This section describes how to install FreeBSD in exceptional cases.
2.12.1 Installing FreeBSD on a System without a Monitor or Keyboard
This type of installation is called a ``headless install'', because the machine that you are trying to install FreeBSD on either does not have a monitor attached to it, or does not even have a VGA output. How is this possible you ask? Using a serial console. A serial console is basically using another machine to act as the main display and keyboard for a system. To do this, just follow the steps to create installation floppies, explained in Section 2.2.7.
To modify these floppies to boot into a serial console, follow these steps:
-
Enabling the Boot Floppies to Boot into a Serial Console
If you were to boot into the floppies that you just made, FreeBSD would boot into its normal install mode. We want FreeBSD to boot into a serial console for our install. To do this, you have to mount the kern.flp floppy onto your FreeBSD system using the mount(8) command.
# mount /dev/fd0 /floppy
Now that you have the floppy mounted, you must change into the floppy directory:
# cd /floppy
Here is where you must set the floppy to boot into a serial console. You have to make a file called boot.config containing /boot/loader -h. All this does is pass a flag to the bootloader to boot into a serial console.
# echo "/boot/loader -h" > boot.config
Now that you have your floppy configured correctly, you must unmount the floppy using the umount(8) command:
# cd /
# umount /mnt
Now you can remove the floppy from the floppy drive.
-
Connecting Your Null Modem Cable
You now need to connect a null modem cable between the two machines. Just connect the cable to the serial ports of the 2 machines. A normal serial cable will not work here, you need a null modem cable because it has some of the wires inside crossed over.
-
Booting Up for the Install
It is now time to go ahead and start the install. Put the kern.flp floppy in the floppy drive of the machine you are doing the headless install on, and power on the machine.
-
Connecting to Your Headless Machine
Now you have to connect to that machine with cu(1):
# cu -l /dev/cuaa0
That's it! You should now be able to control the headless machine through your cu session. It will ask you to put in the mfsroot.flp, and then it will come up with a selection of what kind of terminal to use. Select the FreeBSD color console and proceed with your install!
2.13 Preparing Your Own Installation Media
Note: To prevent repetition, ``FreeBSD disk'' in this context means a FreeBSD CDROM or DVD that you have purchased or produced yourself.
There may be some situations in which you need to create your own FreeBSD installation media and/or source. This might be physical media, such as a tape, or a source that sysinstall can use to retrieve the files, such as a local FTP site, or an MS-DOS partition.
For example:
-
You have many machines connected to your local network, and one FreeBSD disk. You want to create a local FTP site using the contents of the FreeBSD disk, and then have your machines use this local FTP site instead of needing to connect to the Internet.
-
You have a FreeBSD disk, and FreeBSD does not recognize your CD/DVD drive, but MS-DOS/Windows does. You want to copy the FreeBSD installations files to a DOS partition on the same computer, and then install FreeBSD using those files.
-
The computer you want to install on does not have a CD/DVD drive or a network card, but you can connect a ``Laplink-style'' serial or parallel cable to a computer that does.
-
You want to create a tape that can be used to install FreeBSD.
2.13.1 Creating an Installation CDROM
As part of each release, the FreeBSD project makes available two CDROM images (``ISO images''). These images can be written (``burned'') to CDs if you have a CD writer, and then used to install FreeBSD. If you have a CD writer, and bandwidth is cheap, then this is the easiest way to install FreeBSD.
-
Download the Correct ISO Images
The ISO images for each release can be downloaded from ftp://ftp.FreeBSD.org/pub/FreeBSD/ISO-IMAGES-arch/version or the closest mirror. Substitute arch and version as appropriate.
That directory will normally contain the following images:
Table 2-5. FreeBSD ISO Image Names and Meanings
Filename Contains version-mini.iso Everything you need to install FreeBSD. version-disc1.iso Everything you need to install FreeBSD, and as many additional third party packages as would fit on the disc. version-disc2.iso A ``live filesystem'', which is used in conjunction with the ``Repair'' facility in sysinstall. A copy of the FreeBSD CVS tree. As many additional third party packages as would fit on the disc. You must download one of either the mini ISO image, or the image of disc one. Do not download both of them, since the disc one image contains everything that the mini ISO image contains.
Use the mini ISO if Internet access is cheap for you. It will let you install FreeBSD, and you can then install third party packages by downloading them using the ports/packages system (see Chapter 4) as necessary.
Use the image of disc one if you want a reasonable selection of third party packages on the disc as well.
The additional disc images are useful, but not essential, especially if you have high-speed access to the Internet.
-
Write the CDs
You must then write the CD images to disc. If you will be doing this on another FreeBSD system then see Section 12.5 for more information (in particular, Section 12.5.3 and Section 12.5.4).
If you will be doing this on another platform then you will need to use whatever utilities exist to control your CD writer on that platform. The images provided are in the standard ISO format, which many CD writing applications support.
2.13.2 Creating a Local FTP Site with a FreeBSD Disk
FreeBSD disks are laid out in the same way as the FTP site. This makes it very easy for you to create a local FTP site that can be used by other machines on your network when installing FreeBSD.
-
On the FreeBSD computer that will host the FTP site, ensure that the CDROM is in the drive, and mounted on /cdrom.
# mount /cdrom
-
Create an account for anonymous FTP in /etc/passwd. Do this by editing /etc/passwd using vipw(8) and adding this line.
ftp:*:99:99::0:0:FTP:/cdrom:/nonexistent
-
Ensure that the FTP service is enabled in /etc/inetd.conf.
Anyone with network connectivity to your machine can now chose a media type of FTP and type in ftp://your machine after picking ``Other'' in the FTP sites menu during the install.
Warning: This approach is OK for a machine that is on your local network, and that is protected by your firewall. Offering up FTP services to other machines over the Internet (and not your local network) exposes your computer to the attention of crackers and other undesirables. We strongly recommend that you follow good security practices if you do this.
2.13.3 Creating Installation Floppies
If you must install from floppy disk (which we suggest you do not do), either due to unsupported hardware or simply because you insist on doing things the hard way, you must first prepare some floppies for the installation.
At a minimum, you will need as many 1.44 MB or 1.2 MB floppies as it takes to hold all the files in the bin (binary distribution) directory. If you are preparing the floppies from DOS, then they MUST be formatted using the MS-DOS FORMAT command. If you are using Windows, use Explorer to format the disks (right-click on the A: drive, and select ``Format''.
Do not trust factory pre-formatted floppies. Format them again yourself, just to be sure. Many problems reported by our users in the past have resulted from the use of improperly formatted media, which is why we are making a point of it now.
If you are creating the floppies on another FreeBSD machine, a format is still not a bad idea, though you do not need to put a DOS filesystem on each floppy. You can use the disklabel and newfs commands to put a UFS filesystem on them instead, as the following sequence of commands (for a 3.5" 1.44 MB floppy) illustrates:
# fdformat -f 1440 fd0.1440
# disklabel -w -r fd0.1440 floppy3
# newfs -t 2 -u 18 -l 1 -i 65536 /dev/fd0
Note: Use fd0.1200 and floppy5 for 5.25" 1.2 MB disks.
Then you can mount and write to them like any other filesystem.
After you have formatted the floppies, you will need to copy the files to them. The distribution files are split into chunks conveniently sized so that five of them will fit on a conventional 1.44 MB floppy. Go through all your floppies, packing as many files as will fit on each one, until you have all of the distributions you want packed up in this fashion. Each distribution should go into a subdirectory on the floppy, e.g.: a:\bin\bin.aa, a:\bin\bin.ab, and so on.
Once you come to the Media screen during the install process, select ``Floppy'' and you will be prompted for the rest.
2.13.4 Installing from an MS-DOS Partition
To prepare for an installation from an MS-DOS partition, copy the files from the distribution into a directory called freebsd in the root directory of the partition. For example, c:\freebsd. The directory structure of the CDROM or FTP site must be partially reproduced within this directory, so we suggest using the DOS xcopy command if you are copying it from a CD. For example, to prepare for a minimal installation of FreeBSD:
C:\> md c:\freebsd
C:\> xcopy e:\bin c:\freebsd\bin\ /s
C:\> xcopy e:\manpages c:\freebsd\manpages\ /s
Assuming that C: is where you have free space and E: is where your CDROM is mounted.
If you do not have a CDROM drive, you can download the distribution from ftp.FreeBSD.org. Each distribution is in its own directory; for example, the base distribution can be found in the 5.1/base/ directory.
Note: In the 4.X and older releases of FreeBSD the ``base'' distribution is called ``bin''. Adjust the sample commands and URLs above accordingly, if you are using one of these versions.
For as many distributions you wish to install from an MS-DOS partition (and you have the free space for), install each one under c:\freebsd -- the BIN distribution is the only one required for a minimum installation.
2.13.5 Creating an Installation Tape
Installing from tape is probably the easiest method, short of an online FTP install or CDROM install. The installation program expects the files to be simply tarred onto the tape. After getting all of the distribution files you are interested in, simply tar them onto the tape:
# cd /freebsd/distdir
# tar cvf /dev/rwt0 dist1 ... dist2
When you perform the installation, you should make sure that you leave enough room in some temporary directory (which you will be allowed to choose) to accommodate the full contents of the tape you have created. Due to the non-random access nature of tapes, this method of installation requires quite a bit of temporary storage. You should expect to require as much temporary storage as you have data written on tape.
Note: When starting the installation, the tape must be in the drive before booting from the boot floppy. The installation probe may otherwise fail to find it.
2.13.6 Before Installing over a Network
There are three types of network installations available. Serial port (SLIP or PPP), Parallel port (PLIP (laplink cable)), or Ethernet (a standard Ethernet controller (includes some PCMCIA)).
The SLIP support is rather primitive, and limited primarily to hard-wired links, such as a serial cable running between a laptop computer and another computer. The link should be hard-wired as the SLIP installation does not currently offer a dialing capability; that facility is provided with the PPP utility, which should be used in preference to SLIP whenever possible.
If you are using a modem, then PPP is almost certainly your only choice. Make sure that you have your service provider's information handy as you will need to know it fairly early in the installation process.
If you use PAP or CHAP to connect your ISP (in other words, if you can connect to the ISP in Windows without using a script), then all you will need to do is type in dial at the ppp prompt. Otherwise, you will need to know how to dial your ISP using the ``AT commands'' specific to your modem, as the PPP dialer provides only a very simple terminal emulator. Please refer to the user-ppp handbook and FAQ entries for further information. If you have problems, logging can be directed to the screen using the command set log local ....
If a hard-wired connection to another FreeBSD (2.0-R or later) machine is available, you might also consider installing over a ``laplink'' parallel port cable. The data rate over the parallel port is much higher than what is typically possible over a serial line (up to 50 kbytes/sec), thus resulting in a quicker installation.
Finally, for the fastest possible network installation, an Ethernet adapter is always a good choice! FreeBSD supports most common PC Ethernet cards; a table of supported cards (and their required settings) is provided in the Hardware Notes for each release of FreeBSD. If you are using one of the supported PCMCIA Ethernet cards, also be sure that it is plugged in before the laptop is powered on! FreeBSD does not, unfortunately, currently support hot insertion of PCMCIA cards during installation.
You will also need to know your IP address on the network, the netmask value for your address class, and the name of your machine. If you are installing over a PPP connection and do not have a static IP, fear not, the IP address can be dynamically assigned by your ISP. Your system administrator can tell you which values to use for your particular network setup. If you will be referring to other hosts by name rather than IP address, you will also need a name server and possibly the address of a gateway (if you are using PPP, it is your provider's IP address) to use in talking to it. If you want to install by FTP via a HTTP proxy, you will also need the proxy's address. If you do not know the answers to all or most of these questions, then you should really probably talk to your system administrator or ISP before trying this type of installation.
2.13.6.1 Before Installing via NFS
The NFS installation is fairly straight-forward. Simply copy the FreeBSD distribution files you want onto an NFS server and then point the NFS media selection at it.
If this server supports only ``privileged port'' (as is generally the default for Sun workstations), you will need to set this option in the Options menu before installation can proceed.
If you have a poor quality Ethernet card which suffers from very slow transfer rates, you may also wish to toggle the appropriate Options flag.
In order for NFS installation to work, the server must support subdir mounts, for example., if your FreeBSD 5.1 distribution directory lives on: ziggy:/usr/archive/stuff/FreeBSD, then ziggy will have to allow the direct mounting of /usr/archive/stuff/FreeBSD, not just /usr or /usr/archive/stuff.
In FreeBSD's /etc/exports file, this is controlled by the -alldirs options. Other NFS servers may have different conventions. If you are getting ``permission denied'' messages from the server, then it is likely that you do not have this enabled properly.
Chapter 3 UNIX Basics
Rewritten by Chris Shumway.3.1 Synopsis
The following chapter will cover the basic commands and functionality of the FreeBSD operating system. Much of this material is relevant for any UNIX like operating system. Feel free to skim over this chapter if you are familiar with the material. If you are new to FreeBSD, then you will definitely want to read through this chapter carefully.
After reading this chapter, you will know:
-
How to use the ``virtual consoles'' of FreeBSD.
-
How UNIX file permissions work.
-
The default FreeBSD file system layout.
-
How to mount and unmount file systems.
-
What processes, daemons, and signals are.
-
What a shell is, and how to change your default login environment.
-
How to use basic text editors.
-
What devices and device nodes are.
-
What binary format is used under FreeBSD.
-
How to read manual pages for more information.
3.2 Virtual Consoles and Terminals
FreeBSD can be used in various ways. One of them is typing commands to a text terminal. A lot of the flexibility and power of a UNIX operating system is readily available at your hands when using FreeBSD this way. This section describes what ``terminals'' and ``consoles'' are, and how you can use them in FreeBSD.
3.2.1 The Console
If you have not configured FreeBSD to automatically start a graphical environment during startup, the system will present you with a login prompt after it boots, right after the startup scripts finish running. You will see something similar to:
Additional ABI support:.
Local package initialization:.
Additional TCP options:.

Fri Sep 20 13:01:06 EEST 2002

FreeBSD/i386 (pc3.example.org) (ttyv0)

login:
The messages might be a bit different on your system, but you will see something similar. The last two lines are what we are interested in right now. The second last line reads:
FreeBSD/i386 (pc3.example.org) (ttyv0)
This line contains some bits of information about the system you have just booted. You are looking at a ``FreeBSD'' console, running on an Intel or compatible processor of the x86 architecture[1]. The name of this machine (every UNIX machine has a name) is pc3.example.org, and you are now looking at its system console--the ttyv0 terminal.
Finally, the last line is always:
login:
This is the part where you are supposed to type in your ``username'' to log into FreeBSD. The next section describes how you can do this.
3.2.2 Logging into FreeBSD
FreeBSD is a multiuser, multiprocessing system. This is the formal description that is usually given to a system that can be used by many different people, who simultaneously run a lot of programs on a single machine.
Every multiuser system needs some way to distinguish one ``user'' from the rest. In FreeBSD (and all the UNIX like operating systems), this is accomplished by requiring that every user must ``log into'' the system before being able to run programs. Every user has a unique name (the ``username'') and a personal, secret key (the ``password''). FreeBSD will ask for these two before allowing a user to run any programs.
Right after FreeBSD boots and finishes running its startup scripts[2], it will present you with a prompt and ask for a valid username:
login:
For the sake of this example, let us assume that your username is john. Type john at this prompt and press Enter. You should then be presented with a prompt to enter a ``password'':
login: john
Password:
Type in john's password now, and press Enter. The password is not echoed! You need not worry about this right now. Suffice it to say that it is done for security reasons.
If you have typed your password correctly, you should by now be logged into FreeBSD and ready to try out all the available commands.
You should see the MOTD or message of the day followed by a command prompt (a #, $, or $ character). This indicates you have successfully logged into FreeBSD.
3.2.3 Multiple Consoles
Running UNIX commands in one console is fine, but FreeBSD can run many programs at once. Having one console where commands can be typed would be a bit of a waste when an operating system like FreeBSD can run dozens of programs at the same time. This is where ``virtual consoles'' can be very helpful.
FreeBSD can be configured to present you with many different virtual consoles. You can switch from one of them to any other virtual console by pressing a couple of keys on your keyboard. Each console has its own different output channel, and FreeBSD takes care of properly redirecting keyboard input and monitor output as you switch from one virtual console to the next.
Special key combinations have been reserved by FreeBSD for switching consoles[3]. You can use Alt-F1, Alt-F2, through Alt-F8 to switch to a different virtual console in FreeBSD.
As you are switching from one console to the next, FreeBSD takes care of saving and restoring the screen output. The result is an ``illusion'' of having multiple ``virtual'' screens and keyboards that you can use to type commands for FreeBSD to run. The programs that you launch on one virtual console do not stop running when that console is not visible. They continue running when you have switched to a different virtual console.
3.2.4 The /etc/ttys File
The default configuration of FreeBSD will start up with eight virtual consoles. This is not a hardwired setting though, and you can easily customize your installation to boot with more or fewer virtual consoles. The number and settings of the virtual consoles are configured in the /etc/ttys file.
You can use the /etc/ttys file to configure the virtual consoles of FreeBSD. Each uncommented line in this file (lines that do not start with a # character) contains settings for a single terminal or virtual console. The default version of this file that ships with FreeBSD configures nine virtual consoles, and enables eight of them. They are the lines that start with ttyv:
# name  getty                           type    status          comments
#
ttyv0   "/usr/libexec/getty Pc"         cons25  on  secure
# Virtual terminals
ttyv1   "/usr/libexec/getty Pc"         cons25  on  secure
ttyv2   "/usr/libexec/getty Pc"         cons25  on  secure
ttyv3   "/usr/libexec/getty Pc"         cons25  on  secure
ttyv4   "/usr/libexec/getty Pc"         cons25  on  secure
ttyv5   "/usr/libexec/getty Pc"         cons25  on  secure
ttyv6   "/usr/libexec/getty Pc"         cons25  on  secure
ttyv7   "/usr/libexec/getty Pc"         cons25  on  secure
ttyv8   "/usr/X11R6/bin/xdm -nodaemon"  xterm   off secure
For a detailed description of every column in this file and all the options you can use to set things up for the virtual consoles, consult the ttys(5) manual page.
3.2.5 Single User Mode Console
A detailed description of what ``single user mode'' is can be found in Section 7.6.2. It is worth noting that there is only one console when you are running FreeBSD in single user mode. There are no virtual consoles available. The settings of the single user mode console can also be found in the /etc/ttys file. Look for the line that starts with console:
# name  getty                           type    status          comments
#
# If console is marked "insecure", then init will ask for the root password
# when going to single-user mode.
console none                            unknown off secure
Note: As the comments above the console line indicate, you can edit this line and change secure to insecure. If you do that, when FreeBSD boots into single user mode, it will still ask for the root password.
Be careful when changing this to insecure If you ever forget the root password, booting into single user mode is a bit involved. It is still possible, but it might be a bit hard for someone who is not very comfortable with the FreeBSD booting process and the programs involved.
3.3 Permissions
FreeBSD, being a direct descendant of BSD UNIX, is based on several key UNIX concepts. The first and most pronounced is that FreeBSD is a multi-user operating system. The system can handle several users all working simultaneously on completely unrelated tasks. The system is responsible for properly sharing and managing requests for hardware devices, peripherals, memory, and CPU time fairly to each user.
Because the system is capable of supporting multiple users, everything the system manages has a set of permissions governing who can read, write, and execute the resource. These permissions are stored as three octets broken into three pieces, one for the owner of the file, one for the group that the file belongs to, and one for everyone else. This numerical representation works like this:
| Value | Permission | Directory Listing |
|---|---|---|
| 0 | No read, no write, no execute | --- |
| 1 | No read, no write, execute | --x |
| 2 | No read, write, no execute | -w- |
| 3 | No read, write, execute | -wx |
| 4 | Read, no write, no execute | r-- |
| 5 | Read, no write, execute | r-x |
| 6 | Read, write, no execute | rw- |
| 7 | Read, write, execute | rwx |
You can use the -l command line argument to ls(1) to view a long directory listing that includes a column with information about a file's permissions for the owner, group, and everyone else. For example, a ls -l in an arbitrary directory may show:
% ls -l
total 530
-rw-r--r--  1 root  wheel     512 Sep  5 12:31 myfile
-rw-r--r--  1 root  wheel     512 Sep  5 12:31 otherfile
-rw-r--r--  1 root  wheel    7680 Sep  5 12:31 email.txt
...
Here is how the first column of ls -l is broken up:
-rw-r--r--
The first (leftmost) character tells if this file is a regular file, a directory, a special character device, a socket, or any other special pseudo-file device. In this case, the - indicates a regular file. The next three characters, rw- in this example, give the permissions for the owner of the file. The next three characters, r--, give the permissions for the group that the file belongs to. The final three characters, r--, give the permissions for the rest of the world. A dash means that the permission is turned off. In the case of this file, the permissions are set so the owner can read and write to the file, the group can read the file, and the rest of the world can only read the file. According to the table above, the permissions for this file would be 644, where each digit represents the three parts of the file's permission.
This is all well and good, but how does the system control permissions on devices? FreeBSD actually treats most hardware devices as a file that programs can open, read, and write data to just like any other file. These special device files are stored on the /dev directory.
Directories are also treated as files. They have read, write, and execute permissions. The executable bit for a directory has a slightly different meaning than that of files. When a directory is marked executable, it means it can be traversed into, that is, it is possible to ``cd'' (change directory) into it. This also means that within the directory it is possible to access files whose names are known (subject, of course, to the permissions on the files themselves).
In particular, in order to perform a directory listing, read permission must be set on the directory, whilst to delete a file that one knows the name of, it is necessary to have write and execute permissions to the directory containing the file.
There are more permission bits, but they are primarily used in special circumstances such as setuid binaries and sticky directories. If you want more information on file permissions and how to set them, be sure to look at the chmod(1) manual page.
3.3.1 Symbolic Permissions
Contributed by Tom Rhodes.Symbolic permissions, sometimes referred to as symbolic expressions, use characters in place of octal values to assign permissions to files or directories. Symbolic expressions use the syntax of (who) (action) (permissions), where the following values are available:
| Option | Letter | Represents |
|---|---|---|
| (who) | u | User |
| (who) | g | Group owner |
| (who) | o | Other |
| (who) | a | All (``world'') |
| (action) | + | Adding permissions |
| (action) | - | Removing permissions |
| (action) | = | Explicitly set permissions |
| (permissions) | r | Read |
| (permissions) | w | Write |
| (permissions) | x | Execute |
| (permissions) | t | Sticky bit |
| (permissions) | s | Set UID or GID |
These values are used with the chmod(1) command just like before, but with letters. For an example, you could use the following command to block other users from accessing FILE:
% chmod go= FILE
A comma separated list can be provided when more than one set of changes to a file must be made. For example the following command will remove the groups and ``world'' write permission on FILE, then it adds the execute permissions for everyone:
% chmod go-w,a+x FILE
3.4 Directory Structure
The FreeBSD directory hierarchy is fundamental to obtaining an overall understanding of the system. The most important concept to grasp is that of the root directory, ``/''. This directory is the first one mounted at boot time and it contains the base system necessary to prepare the operating system for multi-user operation. The root directory also contains mount points for every other file system that you may want to mount.
A mount point is a directory where additional file systems can be grafted onto the root file system. Standard mount points include /usr, /var, /mnt, and /cdrom. These directories are usually referenced to entries in the file /etc/fstab. /etc/fstab is a table of various file systems and mount points for reference by the system. Most of the file systems in /etc/fstab are mounted automatically at boot time from the script rc(8) unless they contain the noauto option. Consult the fstab(5) manual page for more information on the format of the /etc/fstab file and the options it contains.
A complete description of the file system hierarchy is available in hier(7). For now, a brief overview of the most common directories will suffice.
| Directory | Description |
|---|---|
| / | Root directory of the file system. |
| /bin/ | User utilities fundamental to both single-user and multi-user environments. |
| /boot/ | Programs and configuration files used during operating system bootstrap. |
| /boot/defaults/ | Default bootstrapping configuration files; see loader.conf(5). |
| /dev/ | Device nodes; see intro(4). |
| /etc/ | System configuration files and scripts. |
| /etc/defaults/ | Default system configuration files; see rc(8). |
| /etc/mail/ | Configuration files for mail transport agents such as sendmail(8). |
| /etc/namedb/ | named configuration files; see named(8). |
| /etc/periodic/ | Scripts that are run daily, weekly, and monthly, via cron(8); see periodic(8). |
| /etc/ppp/ | ppp configuration files; see ppp(8). |
| /mnt/ | Empty directory commonly used by system administrators as a temporary mount point. |
| /proc/ | Process file system; see procfs(5), mount_procfs(8). |
| /root/ | Home directory for the root account. |
| /sbin/ | System programs and administration utilities fundamental to both single-user and multi-user environments. |
| /stand/ | Programs used in a standalone environment. |
| /tmp/ | Temporary files, usually a mfs(8) memory-based file system (the contents of /tmp are usually NOT preserved across a system reboot). |
| /usr/ | The majority of user utilities and applications. |
| /usr/bin/ | Common utilities, programming tools, and applications. |
| /usr/include/ | Standard C include files. |
| /usr/lib/ | Archive libraries. |
| /usr/libdata/ | Miscellaneous utility data files. |
| /usr/libexec/ | System daemons & system utilities (executed by other programs). |
| /usr/local/ | Local executables, libraries, etc. Also used as the default destination for the FreeBSD ports framework. Within /usr/local, the general layout sketched out by hier(7) for /usr should be used. Exceptions are the man directory, which is directly under /usr/local rather than under /usr/local/share, and the ports documentation is in share/doc/port. |
| /usr/obj/ | Architecture-specific target tree produced by building the /usr/src tree. |
| /usr/ports | The FreeBSD ports collection (optional). |
| /usr/sbin/ | System daemons & system utilities (executed by users). |
| /usr/share/ | Architecture-independent files. |
| /usr/src/ | BSD and/or local source files. |
| /usr/X11R6/ | X11R6 distribution executables, libraries, etc (optional). |
| /var/ | Multi-purpose log, temporary, transient, and spool files. |
| /var/log/ | Miscellaneous system log files. |
| /var/mail/ | User mailbox files. |
| /var/spool/ | Miscellaneous printer and mail system spooling directories. |
| /var/tmp/ | Temporary files that are kept between system reboots. |
| /var/yp | NIS maps. |
3.5 Disk Organization
The smallest unit of organization that FreeBSD uses to find files is the filename. Filenames are case-sensitive, which means that readme.txt and README.TXT are two separate files. FreeBSD does not use the extension (.txt) of a file to determine whether the file is program, or a document, or some other form of data.
Files are stored in directories. A directory may contain no files, or it may contain many hundreds of files. A directory can also contain other directories, allowing you to build up a hierarchy of directories within one another. This makes it much easier to organize your data.
Files and directories are referenced by giving the file or directory name, followed by a forward slash, /, followed by any other directory names that are necessary. If you have directory foo, which contains directory bar, which contains the file readme.txt, then the full name, or path to the file is foo/bar/readme.txt.
Directories and files are stored in a filesystem. Each filesystem contains exactly one directory at the very top level, called the root directory for that filesystem. This root directory can then contain other directories.
So far this is probably similar to any other operating system you may have used. There are a few differences; for example, DOS uses \ to separate file and directory names, while Mac OS® uses :.
FreeBSD does not use drive letters, or other drive names in the path. You would not write c:/foo/bar/readme.txt on FreeBSD.
Instead, one filesystem is designated the root filesystem. The root filesystem's root directory is referred to as /. Every other filesystem is then mounted under the root filesystem. No matter how many disks you have on your FreeBSD system, every directory appears to be part of the same disk.
Suppose you have three filesystems, called A, B, and C. Each filesystem has one root directory, which contains two other directories, called A1, A2 (and likewise B1, B2 and C1, C2).
Call A the root filesystem. If you used the ls command to view the contents of this directory you would see two subdirectories, A1 and A2. The directory tree looks like this:
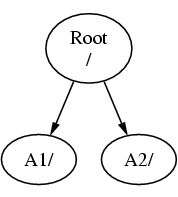
A filesystem must be mounted on to a directory in another filesystem. So now suppose that you mount filesystem B on to the directory A1. The root directory of B replaces A1, and the directories in B appear accordingly:
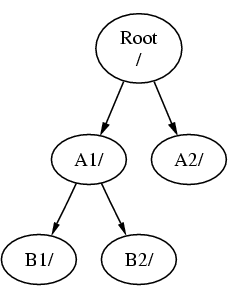
Any files that are in the B1 or B2 directories can be reached with the path /A1/B1 or /A1/B2 as necessary. Any files that were in /A1 have been temporarily hidden. They will reappear if B is unmounted from A.
If B had been mounted on A2 then the diagram would look like this:
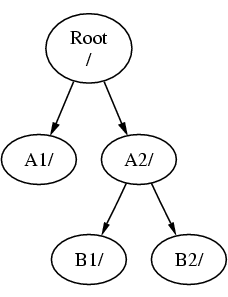
and the paths would be /A2/B1 and /A2/B2 respectively.
Filesystems can be mounted on top of one another. Continuing the last example, the C filesystem could be mounted on top of the B1 directory in the B filesystem, leading to this arrangement:
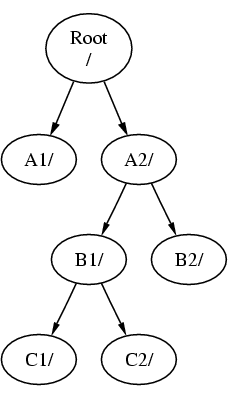
Or C could be mounted directly on to the A filesystem, under the A1 directory:
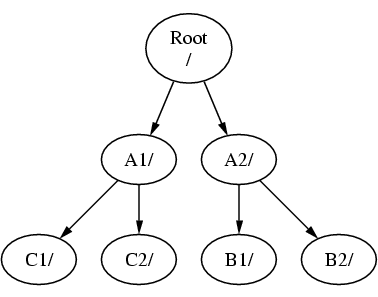
If you are familiar with DOS, this is similar, although not identical, to the join command.
This is not normally something you need to concern yourself with. Typically you create filesystems when installing FreeBSD and decide where to mount them, and then never change them unless you add a new disk.
It is entirely possible to have one large root filesystem, and not need to create any others. There are some drawbacks to this approach, and one advantage.
Benefits of Multiple Filesystems
-
Different filesystems can have different mount options. For example, with careful planning, the root filesystem can be mounted read-only, making it impossible for you to inadvertently delete or edit a critical file. Separating user-writable filesystems, such as /home, from other filesystems also allows them to be mounted nosuid; this option prevents the suid/guid bits on executables stored on the filesystem from taking effect, possibly improving security.
-
FreeBSD automatically optimizes the layout of files on a filesystem, depending on how the filesystem is being used. So a filesystem that contains many small files that are written frequently will have a different optimization to one that contains fewer, larger files. By having one big filesystem this optimization breaks down.
-
FreeBSD's filesystems are very robust should you lose power. However, a power loss at a critical point could still damage the structure of the filesystem. By splitting your data over multiple filesystems it is more likely that the system will still come up, making it easier for you to restore from backup as necessary.
Benefit of a Single Filesystem
-
Filesystems are a fixed size. If you create a filesystem when you install FreeBSD and give it a specific size, you may later discover that you need to make the partition bigger. This is not easily accomplished without backing up, recreating the filesystem with the new size, and then restoring the backed up data.
Important: FreeBSD 4.4 and later versions feature the growfs(8) command, which makes it possible to increase the size of filesystem on the fly, removing this limitation.
Filesystems are contained in partitions. This does not have the same meaning as the earlier usage of the term partition in this chapter, because of FreeBSD's UNIX heritage. Each partition is identified by a letter from a through to h. Each partition can contain only one filesystem, which means that filesystems are often described by either their typical mount point in the filesystem hierarchy, or the letter of the partition they are contained in.
FreeBSD also uses disk space for swap space. Swap space provides FreeBSD with virtual memory. This allows your computer to behave as though it has much more memory than it actually does. When FreeBSD runs out of memory it moves some of the data that is not currently being used to the swap space, and moves it back in (moving something else out) when it needs it.
Some partitions have certain conventions associated with them.
| Partition | Convention |
|---|---|
| a | Normally contains the root filesystem |
| b | Normally contains swap space |
| c | Normally the same size as the enclosing slice. This allows utilities that need to work on the entire slice (for example, a bad block scanner) to work on the c partition. You would not normally create a filesystem on this partition. |
| d | Partition d used to have a special meaning associated with it, although that is now gone. To this day, some tools may operate oddly if told to work on partition d, so sysinstall will not normally create partition d. |
Each partition-that-contains-a-filesystem is stored in what FreeBSD calls a slice. Slice is FreeBSD's term for what were earlier called partitions, and again, this is because of FreeBSD's UNIX background. Slices are numbered, starting at 1, through to 4.
Slice numbers follow the device name, prefixed with an s, starting at 1. So ``da0s1'' is the first slice on the first SCSI drive. There can only be four physical slices on a disk, but you can have logical slices inside physical slices of the appropriate type. These extended slices are numbered starting at 5, so ``ad0s5'' is the first extended slice on the first IDE disk. These devices are used by file systems that expect to occupy a slice.
Slices, ``dangerously dedicated'' physical drives, and other drives contain partitions, which are represented as letters from a to h. This letter is appended to the device name, so ``da0a'' is the a partition on the first da drive, which is ``dangerously dedicated''. ``ad1s3e'' is the fifth partition in the third slice of the second IDE disk drive.
Finally, each disk on the system is identified. A disk name starts with a code that indicates the type of disk, and then a number, indicating which disk it is. Unlike slices, disk numbering starts at 0. Common codes that you will see are listed in Table 3-1.
When referring to a partition FreeBSD requires that you also name the slice and disk that contains the partition, and when referring to a slice you should also refer to the disk name. Do this by listing the disk name, s, the slice number, and then the partition letter. Examples are shown in Example 3-1.
Example 3-2 shows a conceptual model of the disk layout that should help make things clearer.
In order to install FreeBSD you must first configure the disk slices, then create partitions within the slice you will use for FreeBSD, and then create a filesystem (or swap space) in each partition, and decide where that filesystem will be mounted.
Table 3-1. Disk Device Codes
| Code | Meaning |
|---|---|
| ad | ATAPI (IDE) disk |
| da | SCSI direct access disk |
| acd | ATAPI (IDE) CDROM |
| cd | SCSI CDROM |
| fd | Floppy disk |
Example 3-2. Conceptual Model of a Disk
This diagram shows FreeBSD's view of the first IDE disk attached to the system. Assume that the disk is 4 GB in size, and contains two 2 GB slices (DOS partitions). The first slice contains a DOS disk, C:, and the second slice contains a FreeBSD installation. This example FreeBSD installation has three partitions, and a swap partition.
The three partitions will each hold a filesystem. Partition a will be used for the root filesystem, e for the /var directory hierarchy, and f for the /usr directory hierarchy.
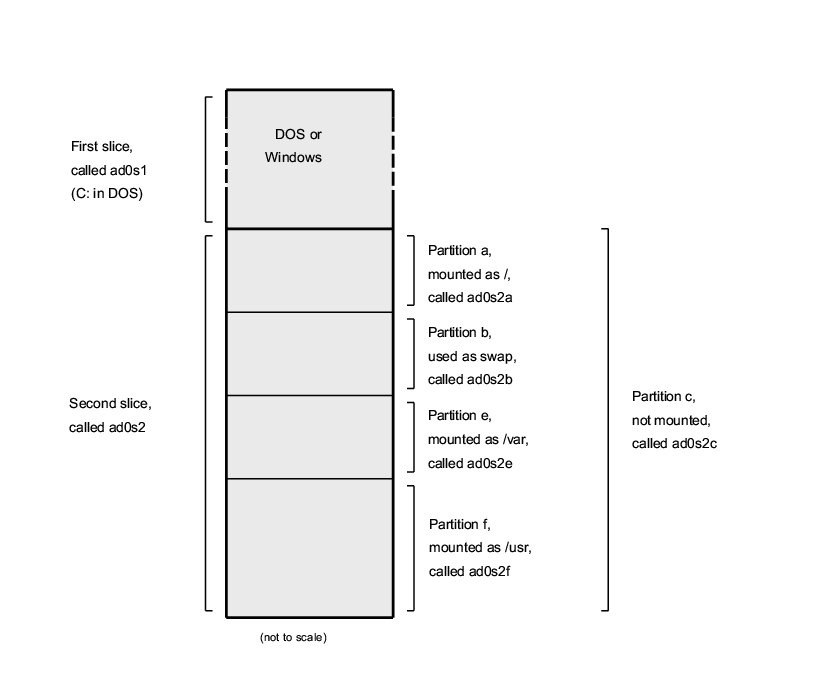
3.6 Mounting and Unmounting File Systems
The file system is best visualized as a tree, rooted, as it were, at /. /dev, /usr, and the other directories in the root directory are branches, which may have their own branches, such as /usr/local, and so on.
There are various reasons to house some of these directories on separate file systems. /var contains the directories log/, spool/, and various types of temporary files, and as such, may get filled up. Filling up the root file system is not a good idea, so splitting /var from / is often favorable.
Another common reason to contain certain directory trees on other file systems is if they are to be housed on separate physical disks, or are separate virtual disks, such as Network File System mounts, or CDROM drives.
3.6.1 The fstab File
During the boot process, file systems listed in /etc/fstab are automatically mounted (unless they are listed with the noauto option).
The /etc/fstab file contains a list of lines of the following format:
device /mount-point fstype options dumpfreq passno
- device
-
A device name (which should exist), as explained in Section 12.2.
- mount-point
-
A directory (which should exist), on which to mount the file system.
- fstype
-
The file system type to pass to mount(8). The default FreeBSD file system is ufs.
- options
-
Either rw for read-write file systems, or ro for read-only file systems, followed by any other options that may be needed. A common option is noauto for file systems not normally mounted during the boot sequence. Other options are listed in the mount(8) manual page.
- dumpfreq
-
This is used by dump(8) to determine which file systems require dumping. If the field is missing, a value of zero is assumed.
- passno
-
This determines the order in which file systems should be checked. File systems that should be skipped should have their passno set to zero. The root file system (which needs to be checked before everything else) should have it's passno set to one, and other file systems' passno should be set to values greater than one. If more than one file systems have the same passno then fsck(8) will attempt to check file systems in parallel if possible.
3.6.2 The mount Command
The mount(8) command is what is ultimately used to mount file systems.
In its most basic form, you use:
There are plenty of options, as mentioned in the mount(8) manual page, but the most common are:
Mount Options
- -a
-
Mount all the file systems listed in /etc/fstab. Except those marked as ``noauto'', excluded by the -t flag, or those that are already mounted.
- -d
-
Do everything except for the actual mount system call. This option is useful in conjunction with the -v flag to determine what mount(8) is actually trying to do.
- -f
-
Force the mount of an unclean file system (dangerous), or forces the revocation of write access when downgrading a file system's mount status from read-write to read-only.
- -r
-
Mount the file system read-only. This is identical to using the rdonly argument to the -o option.
- -t fstype
-
Mount the given file system as the given file system type, or mount only file systems of the given type, if given the -a option.
``ufs'' is the default file system type.
- -u
-
Update mount options on the file system.
- -v
-
Be verbose.
- -w
-
Mount the file system read-write.
The -o option takes a comma-separated list of the options, including the following:
- nodev
-
Do not interpret special devices on the file system. This is a useful security option.
- noexec
-
Do not allow execution of binaries on this file system. This is also a useful security option.
- nosuid
-
Do not interpret setuid or setgid flags on the file system. This is also a useful security option.
3.6.3 The umount Command
The umount(8) command takes, as a parameter, one of a mountpoint, a device name, or the -a or -A option.
All forms take -f to force unmounting, and -v for verbosity. Be warned that -f is not generally a good idea. Forcibly unmounting file systems might crash the computer or damage data on the file system.
-a and -A are used to unmount all mounted file systems, possibly modified by the file system types listed after -t. -A, however, does not attempt to unmount the root file system.
3.7 Processes
FreeBSD is a multi-tasking operating system. This means that it seems as though more than one program is running at once. Each program running at any one time is called a process. Every command you run will start at least one new process, and there are a number of system processes that run all the time, keeping the system functional.
Each process is uniquely identified by a number called a process ID, or PID, and, like files, each process also has one owner and group. The owner and group information is used to determine what files and devices the process can open, using the file permissions discussed earlier. Most processes also have a parent process. The parent process is the process that started them. For example, if you are typing commands to the shell then the shell is a process, and any commands you run are also processes. Each process you run in this way will have your shell as its parent process. The exception to this is a special process called init(8). init is always the first process, so its PID is always 1. init is started automatically by the kernel when FreeBSD starts.
Two commands are particularly useful to see the processes on the system, ps(1) and top(1). The ps command is used to show a static list of the currently running processes, and can show their PID, how much memory they are using, the command line they were started with, and so on. The top command displays all the running processes, and updates the display every few seconds, so that you can interactively see what your computer is doing.
By default, ps only shows you the commands that are running and are owned by you. For example:
% ps
  PID  TT  STAT      TIME COMMAND
  298  p0  Ss     0:01.10 tcsh
 7078  p0  S      2:40.88 xemacs mdoc.xsl (xemacs-21.1.14)
37393  p0  I      0:03.11 xemacs freebsd.dsl (xemacs-21.1.14)
48630  p0  S      2:50.89 /usr/local/lib/netscape-linux/navigator-linux-4.77.bi
48730  p0  IW     0:00.00 (dns helper) (navigator-linux-)
72210  p0  R+     0:00.00 ps
  390  p1  Is     0:01.14 tcsh
 7059  p2  Is+    1:36.18 /usr/local/bin/mutt -y
 6688  p3  IWs    0:00.00 tcsh
10735  p4  IWs    0:00.00 tcsh
20256  p5  IWs    0:00.00 tcsh
  262  v0  IWs    0:00.00 -tcsh (tcsh)
  270  v0  IW+    0:00.00 /bin/sh /usr/X11R6/bin/startx -- -bpp 16
  280  v0  IW+    0:00.00 xinit /home/nik/.xinitrc -- -bpp 16
  284  v0  IW     0:00.00 /bin/sh /home/nik/.xinitrc
  285  v0  S      0:38.45 /usr/X11R6/bin/sawfish
As you can see in this example, the output from ps(1) is organized into a number of columns. PID is the process ID discussed earlier. PIDs are assigned starting from 1, go up to 99999, and wrap around back to the beginning when you run out. The TT column shows the tty the program is running on, and can safely be ignored for the moment. STAT shows the program's state, and again, can be safely ignored. TIME is the amount of time the program has been running on the CPU--this is usually not the elapsed time since you started the program, as most programs spend a lot of time waiting for things to happen before they need to spend time on the CPU. Finally, COMMAND is the command line that was used to run the program.
ps(1) supports a number of different options to change the information that is displayed. One of the most useful sets is auxww. a displays information about all the running processes, not just your own. u displays the username of the process' owner, as well as memory usage. x displays information about daemon processes, and ww causes ps(1) to display the full command line, rather than truncating it once it gets too long to fit on the screen.
The output from top(1) is similar. A sample session looks like this:
% top
last pid: 72257;  load averages:  0.13,  0.09,  0.03    up 0+13:38:33  22:39:10
47 processes:  1 running, 46 sleeping
CPU states: 12.6% user,  0.0% nice,  7.8% system,  0.0% interrupt, 79.7% idle
Mem: 36M Active, 5256K Inact, 13M Wired, 6312K Cache, 15M Buf, 408K Free
Swap: 256M Total, 38M Used, 217M Free, 15% Inuse

  PID USERNAME PRI NICE  SIZE    RES STATE    TIME   WCPU    CPU COMMAND
72257 nik       28   0  1960K  1044K RUN      0:00 14.86%  1.42% top
 7078 nik        2   0 15280K 10960K select   2:54  0.88%  0.88% xemacs-21.1.14
  281 nik        2   0 18636K  7112K select   5:36  0.73%  0.73% XF86_SVGA
  296 nik        2   0  3240K  1644K select   0:12  0.05%  0.05% xterm
48630 nik        2   0 29816K  9148K select   3:18  0.00%  0.00% navigator-linu
  175 root       2   0   924K   252K select   1:41  0.00%  0.00% syslogd
 7059 nik        2   0  7260K  4644K poll     1:38  0.00%  0.00% mutt
...
The output is split into two sections. The header (the first five lines) shows the PID of the last process to run, the system load averages (which are a measure of how busy the system is), the system uptime (time since the last reboot) and the current time. The other figures in the header relate to how many processes are running (47 in this case), how much memory and swap space has been taken up, and how much time the system is spending in different CPU states.
Below that are a series of columns containing similar information to the output from ps(1). As before you can see the PID, the username, the amount of CPU time taken, and the command that was run. top(1) also defaults to showing you the amount of memory space taken by the process. This is split into two columns, one for total size, and one for resident size--total size is how much memory the application has needed, and the resident size is how much it is actually using at the moment. In this example you can see that Netscape® has required almost 30 MB of RAM, but is currently only using 9 MB.
top(1) automatically updates this display every two seconds; this can be changed with the s option.
3.8 Daemons, Signals, and Killing Processes
When you run an editor it is easy to control the editor, tell it to load files, and so on. You can do this because the editor provides facilities to do so, and because the editor is attached to a terminal. Some programs are not designed to be run with continuous user input, and so they disconnect from the terminal at the first opportunity. For example, a web server spends all day responding to web requests, it normally does not need any input from you. Programs that transport email from site to site are another example of this class of application.
We call these programs daemons. Daemons were characters in Greek mythology; neither good or evil, they were little attendant spirits that, by and large, did useful things for mankind. Much like the web servers and mail servers of today do useful things. This is why the BSD mascot has, for a long time, been the cheerful looking daemon with sneakers and a pitchfork.
There is a convention to name programs that normally run as daemons with a trailing ``d''. BIND is the Berkeley Internet Name Daemon (and the actual program that executes is called named), the Apache web server program is called httpd, the line printer spooling daemon is lpd and so on. This is a convention, not a hard and fast rule; for example, the main mail daemon for the Sendmail application is called sendmail, and not maild, as you might imagine.
Sometimes you will need to communicate with a daemon process. These communications are called signals, and you can communicate with a daemon (or with any other running process) by sending it a signal. There are a number of different signals that you can send--some of them have a specific meaning, others are interpreted by the application, and the application's documentation will tell you how that application interprets signals. You can only send a signal to a process that you own. If you send a signal to someone else's process with kill(1) or kill(2) permission will be denied. The exception to this is the root user, who can send signals to everyone's processes.
FreeBSD will also send applications signals in some cases. If an application is badly written, and tries to access memory that it is not supposed to, FreeBSD sends the process the Segmentation Violation signal (SIGSEGV). If an application has used the alarm(3) system call to be alerted after a period of time has elapsed then it will be sent the Alarm signal (SIGALRM), and so on.
Two signals can be used to stop a process, SIGTERM and SIGKILL. SIGTERM is the polite way to kill a process; the process can catch the signal, realize that you want it to shut down, close any log files it may have open, and generally finish whatever it is doing at the time before shutting down. In some cases a process may even ignore SIGTERM if it is in the middle of some task that can not be interrupted.
SIGKILL can not be ignored by a process. This is the ``I do not care what you are doing, stop right now'' signal. If you send SIGKILL to a process then FreeBSD will stop that process there and then[4].
The other signals you might want to use are SIGHUP, SIGUSR1, and SIGUSR2. These are general purpose signals, and different applications will do different things when they are sent.
Suppose that you have changed your web server's configuration file--you would like to tell the web server to re-read its configuration. You could stop and restart httpd, but this would result in a brief outage period on your web server, which may be undesirable. Most daemons are written to respond to the SIGHUP signal by re-reading their configuration file. So instead of killing and restarting httpd you would send it the SIGHUP signal. Because there is no standard way to respond to these signals, different daemons will have different behavior, so be sure and read the documentation for the daemon in question.
Signals are sent using the kill(1) command, as this example shows.
Sending a Signal to a Process
This example shows how to send a signal to inetd(8). The inetd configuration file is /etc/inetd.conf, and inetd will re-read this configuration file when it is sent SIGHUP.
-
Find the process ID of the process you want to send the signal to. Do this using ps(1) and grep(1). The grep(1) command is used to search through output, looking for the string you specify. This command is run as a normal user, and inetd(8) is run as root, so the ax options must be given to ps(1).
% ps -ax | grep inetd
  198  ??  IWs    0:00.00 inetd -wW
So the inetd(8) PID is 198. In some cases the grep inetd command might also occur in this output. This is because of the way ps(1) has to find the list of running processes.
-
Use kill(1) to send the signal. Because inetd(8) is being run by root you must use su(1) to become root first.
% su
Password:
# /bin/kill -s HUP 198
In common with most UNIX commands, kill(1) will not print any output if it is successful. If you send a signal to a process that you do not own then you will see ``kill: PID: Operation not permitted''. If you mistype the PID you will either send the signal to the wrong process, which could be bad, or, if you are lucky, you will have sent the signal to a PID that is not currently in use, and you will see ``kill: PID: No such process''.
Why Use /bin/kill?: Many shells provide the kill command as a built in command; that is, the shell will send the signal directly, rather than running /bin/kill. This can be very useful, but different shells have a different syntax for specifying the name of the signal to send. Rather than try to learn all of them, it can be simpler just to use the /bin/kill ... command directly.
Sending other signals is very similar, just substitute TERM or KILL in the command line as necessary.
3.9 Shells
In FreeBSD, a lot of everyday work is done in a command line interface called a shell. A shell's main job is to take commands from the input channel and execute them. A lot of shells also have built in functions to help everyday tasks such as file management, file globbing, command line editing, command macros, and environment variables. FreeBSD comes with a set of shells, such as sh, the Bourne Shell, and tcsh, the improved C-shell. Many other shells are available from the FreeBSD Ports Collection, such as zsh and bash.
Which shell do you use? It is really a matter of taste. If you are a C programmer you might feel more comfortable with a C-like shell such as tcsh. If you have come from Linux or are new to a UNIX command line interface you might try bash. The point is that each shell has unique properties that may or may not work with your preferred working environment, and that you have a choice of what shell to use.
One common feature in a shell is filename completion. Given the typing of the first few letters of a command or filename, you can usually have the shell automatically complete the rest of the command or filename by hitting the Tab key on the keyboard. Here is an example. Suppose you have two files called foobar and foo.bar. You want to delete foo.bar. So what you would type on the keyboard is: rm fo[Tab].[Tab].
The shell would print out rm foo[BEEP].bar.
The [BEEP] is the console bell, which is the shell telling me it was unable to totally complete the filename because there is more than one match. Both foobar and foo.bar start with fo, but it was able to complete to foo. If you type in ., then hit Tab again, the shell would be able to fill in the rest of the filename for you.
Another feature of the shell is the use of environment variables. Environment variables are a variable key pair stored in the shell's environment space. This space can be read by any program invoked by the shell, and thus contains a lot of program configuration. Here is a list of common environment variables and what they mean:
| Variable | Description |
|---|---|
| USER | Current logged in user's name. |
| PATH | Colon separated list of directories to search for binaries. |
| DISPLAY | Network name of the X11 display to connect to, if available. |
| SHELL | The current shell. |
| TERM | The name of the user's terminal. Used to determine the capabilities of the terminal. |
| TERMCAP | Database entry of the terminal escape codes to perform various terminal functions. |
| OSTYPE | Type of operating system. e.g., FreeBSD. |
| MACHTYPE | The CPU architecture that the system is running on. |
| EDITOR | The user's preferred text editor. |
| PAGER | The user's preferred text pager. |
| MANPATH | Colon separated list of directories to search for manual pages. |
Setting an environment variable differs somewhat from shell to shell. For example, in the C-Style shells such as tcsh and csh, you would use setenv to set environment variables. Under Bourne shells such as sh and bash, you would use export to set your current environment variables. For example, to set or modify the EDITOR environment variable, under csh or tcsh a command like this would set EDITOR to /usr/local/bin/emacs:
% setenv EDITOR /usr/local/bin/emacs
Under Bourne shells:
% export EDITOR="/usr/local/bin/emacs"
You can also make most shells expand the environment variable by placing a $ character in front of it on the command line. For example, echo $TERM would print out whatever $TERM is set to, because the shell expands $TERM and passes it on to echo.
Shells treat a lot of special characters, called meta-characters as special representations of data. The most common one is the * character, which represents any number of characters in a filename. These special meta-characters can be used to do filename globbing. For example, typing in echo * is almost the same as typing in ls because the shell takes all the files that match * and puts them on the command line for echo to see.
To prevent the shell from interpreting these special characters, they can be escaped from the shell by putting a backslash (\) character in front of them. echo $TERM prints whatever your terminal is set to. echo \$TERM prints $TERM as is.
3.9.1 Changing Your Shell
The easiest way to change your shell is to use the chsh command. Running chsh will place you into the editor that is in your EDITOR environment variable; if it is not set, you will be placed in vi. Change the ``Shell:'' line accordingly.
You can also give chsh the -s option; this will set your shell for you, without requiring you to enter an editor. For example, if you wanted to change your shell to bash, the following should do the trick:
% chsh -s /usr/local/bin/bash
Running chsh with no parameters and editing the shell from there would work also.
Note: The shell that you wish to use must be present in the /etc/shells file. If you have installed a shell from the ports collection, then this should have been done for you already. If you installed the shell by hand, you must do this.
For example, if you installed bash by hand and placed it into /usr/local/bin, you would want to:
# echo "/usr/local/bin/bash" >> /etc/shellsThen rerun chsh.
3.10 Text Editors
A lot of configuration in FreeBSD is done by editing text files. Because of this, it would be a good idea to become familiar with a text editor. FreeBSD comes with a few as part of the base system, and many more are available in the ports collection.
The easiest and simplest editor to learn is an editor called ee, which stands for easy editor. To start ee, one would type at the command line ee filename where filename is the name of the file to be edited. For example, to edit /etc/rc.conf, type in ee /etc/rc.conf. Once inside of ee, all of the commands for manipulating the editor's functions are listed at the top of the display. The caret ^ character represents the Ctrl key on the keyboard, so ^e expands to the key combination Ctrl+e. To leave ee, hit the Esc key, then choose leave editor. The editor will prompt you to save any changes if the file has been modified.
FreeBSD also comes with more powerful text editors such as vi as part of the base system, while other editors, like emacs and vim, are part of the FreeBSD Ports Collection. These editors offer much more functionality and power at the expense of being a little more complicated to learn. However if you plan on doing a lot of text editing, learning a more powerful editor such as vim or emacs will save you much more time in the long run.
3.11 Devices and Device Nodes
A device is a term used mostly for hardware-related activities in a system, including disks, printers, graphics cards, and keyboards. When FreeBSD boots, the majority of what FreeBSD displays are devices being detected. You can look through the boot messages again by viewing /var/run/dmesg.boot.
For example, acd0 is the first IDE CDROM drive, while kbd0 represents the keyboard.
Most of these devices in a UNIX operating system must be accessed through special files called device nodes, which are located in the /dev directory.
3.11.1 Creating Device Nodes
When adding a new device to your system, or compiling in support for additional devices, you may need to create one or more device nodes for the new devices.
3.11.1.1 MAKEDEV Script
On systems without DEVFS (this concerns all FreeBSD versions before 5.0), device nodes are created using the MAKEDEV(8) script as shown below:
# cd /dev
# sh MAKEDEV ad1
This example would make the proper device nodes for the second IDE drive when installed.
3.11.1.2 DEVFS (DEVice File System)
The device file system, or DEVFS, provides access to kernel's device namespace in the global file system namespace. Instead of having to create and modify device nodes, DEVFS maintains this particular file system for you.
See the devfs(5) manual page for more information.
DEVFS is used by default in FreeBSD 5.0 and above.
3.12 Binary Formats
To understand why FreeBSD uses the ELF format, you must first know a little about the three currently ``dominant'' executable formats for UNIX:
-
The oldest and ``classic'' UNIX object format. It uses a short and compact header with a magic number at the beginning that is often used to characterize the format (see a.out(5) for more details). It contains three loaded segments: .text, .data, and .bss plus a symbol table and a string table.
-
COFF
The SVR3 object format. The header now comprises a section table, so you can have more than just .text, .data, and .bss sections.
-
ELF
The successor to COFF, featuring multiple sections and 32-bit or 64-bit possible values. One major drawback: ELF was also designed with the assumption that there would be only one ABI per system architecture. That assumption is actually quite incorrect, and not even in the commercial SYSV world (which has at least three ABIs: SVR4, Solaris, SCO) does it hold true.
FreeBSD tries to work around this problem somewhat by providing a utility for branding a known ELF executable with information about the ABI it is compliant with. See the manual page for brandelf(1) for more information.
FreeBSD comes from the ``classic'' camp and used the a.out(5) format, a technology tried and proven through many generations of BSD releases, until the beginning of the 3.X branch. Though it was possible to build and run native ELF binaries (and kernels) on a FreeBSD system for some time before that, FreeBSD initially resisted the ``push'' to switch to ELF as the default format. Why? Well, when the Linux camp made their painful transition to ELF, it was not so much to flee the a.out executable format as it was their inflexible jump-table based shared library mechanism, which made the construction of shared libraries very difficult for vendors and developers alike. Since the ELF tools available offered a solution to the shared library problem and were generally seen as ``the way forward'' anyway, the migration cost was accepted as necessary and the transition made. FreeBSD's shared library mechanism is based more closely on Sun's SunOS™ style shared library mechanism and, as such, is very easy to use.
So, why are there so many different formats?
Back in the dim, dark past, there was simple hardware. This simple hardware supported a simple, small system. a.out was completely adequate for the job of representing binaries on this simple system (a PDP-11). As people ported UNIX from this simple system, they retained the a.out format because it was sufficient for the early ports of UNIX to architectures like the Motorola 68k, VAXen, etc.
Then some bright hardware engineer decided that if he could force software to do some sleazy tricks, then he would be able to shave a few gates off the design and allow his CPU core to run faster. While it was made to work with this new kind of hardware (known these days as RISC), a.out was ill-suited for this hardware, so many formats were developed to get to a better performance from this hardware than the limited, simple a.out format could offer. Things like COFF, ECOFF, and a few obscure others were invented and their limitations explored before things seemed to settle on ELF.
In addition, program sizes were getting huge and disks (and physical memory) were still relatively small so the concept of a shared library was born. The VM system also became more sophisticated. While each one of these advancements was done using the a.out format, its usefulness was stretched more and more with each new feature. In addition, people wanted to dynamically load things at run time, or to junk parts of their program after the init code had run to save in core memory and swap space. Languages became more sophisticated and people wanted code called before main automatically. Lots of hacks were done to the a.out format to allow all of these things to happen, and they basically worked for a time. In time, a.out was not up to handling all these problems without an ever increasing overhead in code and complexity. While ELF solved many of these problems, it would be painful to switch from the system that basically worked. So ELF had to wait until it was more painful to remain with a.out than it was to migrate to ELF.
However, as time passed, the build tools that FreeBSD derived their build tools from (the assembler and loader especially) evolved in two parallel trees. The FreeBSD tree added shared libraries and fixed some bugs. The GNU folks that originally write these programs rewrote them and added simpler support for building cross compilers, plugging in different formats at will, and so on. Since many people wanted to build cross compilers targeting FreeBSD, they were out of luck since the older sources that FreeBSD had for as and ld were not up to the task. The new GNU tools chain (binutils) does support cross compiling, ELF, shared libraries, C++ extensions, etc. In addition, many vendors are releasing ELF binaries, and it is a good thing for FreeBSD to run them.
ELF is more expressive than a.out and allows more extensibility in the base system. The ELF tools are better maintained, and offer cross compilation support, which is important to many people. ELF may be a little slower than a.out, but trying to measure it can be difficult. There are also numerous details that are different between the two in how they map pages, handle init code, etc. None of these are very important, but they are differences. In time support for a.out will be moved out of the GENERIC kernel, and eventually removed from the kernel once the need to run legacy a.out programs is past.
3.13 For More Information
3.13.1 Manual Pages
The most comprehensive documentation on FreeBSD is in the form of manual pages. Nearly every program on the system comes with a short reference manual explaining the basic operation and various arguments. These manuals can be viewed with the man command. Use of the man command is simple:
% man command
command is the name of the command you wish to learn about. For example, to learn more about ls command type:
% man ls
The online manual is divided up into numbered sections:
-
User commands.
-
System calls and error numbers.
-
Functions in the C libraries.
-
Device drivers.
-
File formats.
-
Games and other diversions.
-
Miscellaneous information.
-
System maintenance and operation commands.
-
Kernel developers.
In some cases, the same topic may appear in more than one section of the online manual. For example, there is a chmod user command and a chmod() system call. In this case, you can tell the man command which one you want by specifying the section:
% man 1 chmod
This will display the manual page for the user command chmod. References to a particular section of the online manual are traditionally placed in parenthesis in written documentation, so chmod(1) refers to the chmod user command and chmod(2) refers to the system call.
This is fine if you know the name of the command and simply wish to know how to use it, but what if you cannot recall the command name? You can use man to search for keywords in the command descriptions by using the -k switch:
% man -k mail
With this command you will be presented with a list of commands that have the keyword ``mail'' in their descriptions. This is actually functionally equivalent to using the apropos command.
So, you are looking at all those fancy commands in /usr/bin but do not have the faintest idea what most of them actually do? Simply do:
% cd /usr/bin
% man -f *
or
% cd /usr/bin
% whatis *
which does the same thing.
3.13.2 GNU Info Files
FreeBSD includes many applications and utilities produced by the Free Software Foundation (FSF). In addition to manual pages, these programs come with more extensive hypertext documents called info files which can be viewed with the info command or, if you installed emacs, the info mode of emacs.
To use the info(1) command, simply type:
% info
For a brief introduction, type h. For a quick command reference, type ?.
Chapter 4 Installing Applications: Packages and Ports
4.1 Synopsis
FreeBSD is bundled with a rich collection of system tools as part of the base system. However, there is only so much one can do before needing to install an additional third-party application to get real work done. FreeBSD provides two complementary technologies for installing third party software on your system: the FreeBSD Ports Collection, and binary software packages. Either system may be used to install the newest version of your favorite applications from local media or straight off the network.
After reading this chapter, you will know:
-
How to install third-party binary software packages.
-
How to build third-party software from the ports collection.
-
How to remove previously installed packages or ports.
-
How to override the default values that the ports collection uses.
-
How to upgrade your ports.
4.2 Overview of Software Installation
If you have used a UNIX system before you will know that the typical procedure for installing third party software goes something like this:
-
Download the software, which might be distributed in source code format, or as a binary.
-
Unpack the software from its distribution format (typically a tarball compressed with compress(1), gzip(1), or bzip2(1)).
-
Locate the documentation (perhaps an INSTALL or README file, or some files in a doc/ subdirectory) and read up on how to install the software.
-
If the software was distributed in source format, compile it. This may involve editing a Makefile, or running a configure script, and other work.
-
Test and install the software.
And that is only if everything goes well. If you are installing a software package that was not deliberately ported to FreeBSD you may even have to go in and edit the code to make it work properly.
Should you want to, you can continue to install software the ``traditional'' way with FreeBSD. However, FreeBSD provides two technologies which can save you a lot of effort: packages and ports. At the time of writing, over 9,200 third party applications have been made available in this way.
For any given application, the FreeBSD package for that application is a single file which you must download. The package contains pre-compiled copies of all the commands for the application, as well as any configuration files or documentation. A downloaded package file can be manipulated with FreeBSD package management commands, such as pkg_add(1), pkg_delete(1), pkg_info(1), and so on. Installing a new application can be carried out with a single command.
A FreeBSD port for an application is a collection of files designed to automate the process of compiling an application from source code.
Remember that there are a number of steps you would normally carry out if you compiled a program yourself (downloading, unpacking, patching, compiling, installing). The files that make up a port contain all the necessary information to allow the system to do this for you. You run a handful of simple commands and the source code for the application is automatically downloaded, extracted, patched, compiled, and installed for you.
In fact, the ports system can also be used to generate packages which can later be manipulated with pkg_add and the other package management commands that will be introduced shortly.
Both packages and ports understand dependencies. Suppose you want to install an application that depends on a specific library being installed. Both the application and the library have been made available as FreeBSD ports and packages. If you use the pkg_add command or the ports system to add the application, both will notice that the library has not been installed, and automatically install the library first.
Given that the two technologies are quite similar, you might be wondering why FreeBSD bothers with both. Packages and ports both have their own strengths, and which one you use will depend on your own preference.
Package Benefits
-
A compressed package tarball is typically smaller than the compressed tarball containing the source code for the application.
-
Packages do not require any additional compilation. For large applications, such as Mozilla, KDE, or GNOME this can be important, particularly if you are on a slow system.
-
Packages do not require any understanding of the process involved in compiling software on FreeBSD.
Ports Benefits
-
Packages are normally compiled with conservative options, because they have to run on the maximum number of systems. By installing from the port, you can tweak the compilation options to (for example) generate code that is specific to a Pentium IV or Athlon processor.
-
Some applications have compile time options relating to what they can and cannot do. For example, Apache can be configured with a wide variety of different built-in options. By building from the port you do not have to accept the default options, and can set them yourself.
In some cases, multiple packages will exist for the same application to specify certain settings. For example, Ghostscript is available as a ghostscript package and a ghostscript-nox11 package, depending on whether or not you have installed an X11 server. This sort of rough tweaking is possible with packages, but rapidly becomes impossible if an application has more than one or two different compile time options.
-
The licensing conditions of some software distributions forbid binary distribution. They must be distributed as source code.
-
Some people do not trust binary distributions. At least with source code, you can (in theory) read through it and look for potential problems yourself.
-
If you have local patches, you will need the source in order to apply them.
-
Some people like having code around, so they can read it if they get bored, hack it, borrow from it (license permitting, of course), and so on.
To keep track of updated ports, subscribe to the FreeBSD ports mailing list and the FreeBSD ports bugs mailing list.
The remainder of this chapter will explain how to use packages and ports to install and manage third party software on FreeBSD.
4.3 Finding Your Application
Before you can install any applications you need to know what you want, and what the application is called.
FreeBSD's list of available applications is growing all the time. Fortunately, there are a number of ways to find what you want:
-
The FreeBSD web site maintains an up-to-date searchable list of all the available applications, at http://www.FreeBSD.org/ports/. The ports are divided into categories, and you may either search for an application by name (if you know it), or see all the applications available in a category.
-
Dan Langille maintains FreshPorts, at http://www.FreshPorts.org/. FreshPorts tracks changes to the applications in the ports tree as they happen, allows you to ``watch'' one or more ports, and can send you email when they are updated.
-
If you do not know the name of the application you want, try using a site like FreshMeat (http://www.freshmeat.net/) to find an application, then check back at the FreeBSD site to see if the application has been ported yet.
4.4 Using the Packages System
Contributed by Chern Lee.4.4.1 Installing a Package
You can use the pkg_add(1) utility to install a FreeBSD software package from a local file or from a server on the network.
Example 4-1. Downloading a Package Manually and Installing It Locally
# ftp -a ftp2.FreeBSD.org
Connected to ftp2.FreeBSD.org.
220 ftp2.FreeBSD.org FTP server (Version 6.00LS) ready.
331 Guest login ok, send your email address as password.
230-
230-     This machine is in Vienna, VA, USA, hosted by Verio.
230-         Questions? E-mail [email protected].
230-
230-
230 Guest login ok, access restrictions apply.
Remote system type is UNIX.
Using binary mode to transfer files.
ftp> cd /pub/FreeBSD/ports/packages/sysutils/
250 CWD command successful.
ftp> get lsof-4.56.4.tgz
local: lsof-4.56.4.tgz remote: lsof-4.56.4.tgz
200 PORT command successful.
150 Opening BINARY mode data connection for 'lsof-4.56.4.tgz' (92375 bytes).
100% |**************************************************| 92375       00:00 ETA
226 Transfer complete.
92375 bytes received in 5.60 seconds (16.11 KB/s)
ftp> exit
# pkg_add lsof-4.56.4.tgz
If you do not have a source of local packages (such as a FreeBSD CD-ROM set) then it will probably be easier to use the -r option to pkg_add(1). This will cause the utility to automatically determine the correct object format and release and then fetch and install the package from an FTP site.
# pkg_add -r lsof
The example above would download the correct package and add it without any further user intervention. pkg_add(1) uses fetch(3) to download the files, which honors various environment variables, including FTP_PASSIVE_MODE, FTP_PROXY, and FTP_PASSWORD. You may need to set one or more of these if you are behind a firewall, or need to use an FTP/HTTP proxy. See fetch(3) for the complete list. Note that in the example above lsof is used instead of lsof-4.56.4. When the remote fetching feature is used, the version number of the package must be removed. pkg_add(1) will automatically fetch the latest version of the application.
Package files are distributed in .tgz and .tbz formats. You can find them at ftp://ftp.FreeBSD.org/pub/FreeBSD/ports/packages/, or on the FreeBSD CD-ROM distribution. Every CD on the FreeBSD 4-CD set (and the PowerPak, etc.) contains packages in the /packages directory. The layout of the packages is similar to that of the /usr/ports tree. Each category has its own directory, and every package can be found within the All directory.
The directory structure of the package system matches the ports layout; they work with each other to form the entire package/port system.
4.4.2 Managing Packages
pkg_info(1) is a utility that lists and describes the various packages installed.
# pkg_info
cvsup-16.1          A general network file distribution system optimized for CV
docbook-1.2         Meta-port for the different versions of the DocBook DTD
...
pkg_version(1) is a utility that summarizes the versions of all installed packages. It compares the package version to the current version found in the ports tree.
# pkg_version
cvsup                       =
docbook                     =
...
The symbols in the second column indicate the relative age of the installed version and the version available in the local ports tree.
| Symbol | Meaning |
|---|---|
| = | The version of the installed package matches the one found in the local ports tree. |
| < | The installed version is older than the one available in the ports tree. |
| > | The installed version is newer than the one found in the local ports tree. (The local ports tree is probably out of date.) |
| ? | The installed package cannot be found in the ports index. (This can happen, for instance, if an installed port is removed from the ports collection or renamed.) |
| * | There are multiple versions of the package. |
4.4.3 Deleting a Package
To remove a previously installed software package, use the pkg_delete(1) utility.
# pkg_delete xchat-1.7.1
4.4.4 Miscellaneous
All package information is stored within the /var/db/pkg directory. The installed file list and descriptions of each package can be found within files in this directory.
4.5 Using the Ports Collection
The following sections provide basic instructions on using the ports collection to install or remove programs from your system.
4.5.1 Obtaining the Ports Collection
Before you can install ports, you must first obtain the ports collection--which is essentially a set of Makefiles, patches, and description files placed in /usr/ports.
When installing your FreeBSD system, Sysinstall asked if you would like to install the ports collection. If you chose no, you can follow these instructions to obtain the ports collection:
Sysinstall Method
This method involves using sysinstall again to manually install the ports collection.
-
As root, run /stand/sysinstall as shown below:
# /stand/sysinstall
-
Scroll down and select Configure, press Enter.
-
Scroll down and select Distributions, press Enter.
-
Scroll down to ports, press Space.
-
Scroll up to Exit, press Enter.
-
Select your desired installation media, such as CDROM, FTP, and so on.
-
Scroll up to Exit and press Enter.
-
Press X to exit sysinstall.
The alternative method to obtain and keep your ports collection up to date is by using CVSup. Look at the ports CVSup file, /usr/share/examples/cvsup/ports-supfile. See Using CVSup (Section A.5) for more information on using CVSup and this file.
CVSup Method
This is a quick method for getting the ports collection using CVSup. If you want to keep your ports tree up to date, or learn more about CVSup, read the previously mentioned sections.
-
Install the net/cvsup port. See CVSup Installation (Section A.5.2) for more details.
-
As root, copy /usr/share/examples/cvsup/ports-supfile to a new location, such as /root or your home directory.
-
Edit ports-supfile.
-
Change CHANGE_THIS.FreeBSD.org to a CVSup server near you. See CVSup Mirrors (Section A.5.7) for a complete listing of mirror sites.
-
Run cvsup:
# cvsup -g -L 2 /root/ports-supfile
-
Running this command later will download and apply all the recent changes to your ports collection, except actually rebuilding the ports for your own system.
4.5.2 Installing Ports
The first thing that should be explained when it comes to the ports collection is what is actually meant by a ``skeleton''. In a nutshell, a port skeleton is a minimal set of files that tell your FreeBSD system how to cleanly compile and install a program. Each port skeleton includes:
-
A Makefile. The Makefile contains various statements that specify how the application should be compiled and where it should be installed on your system.
-
A distinfo file. This file contains information about the files that must be downloaded to build the port and their checksums, to verify that files have not been corrupted during the download using md5(1).
-
A files directory. This directory contains patches to make the program compile and install on your FreeBSD system. Patches are basically small files that specify changes to particular files. They are in plain text format, and basically say ``Remove line 10'' or ``Change line 26 to this ...''. Patches are also known as ``diffs'' because they are generated by the diff(1) program.
This directory may also contain other files used to build the port.
-
A pkg-descr file. This is a more detailed, often multiple-line, description of the program.
-
A pkg-plist file. This is a list of all the files that will be installed by the port. It also tells the ports system what files to remove upon deinstallation.
Some ports have other files, such as pkg-message. The ports system uses these files to handle special situations. If you want more details on these files, and on ports in general, check out the FreeBSD Porter's Handbook.
Now that you have enough background information to know what the ports collection is used for, you are ready to install your first port. There are two ways this can be done, and each is explained below.
Before we get into that, however, you will need to choose a port to install. There are a few ways to do this, with the easiest method being the ports listing on the FreeBSD web site. You can browse through the ports listed there or use the search function on the site. Each port also includes a description so you can read a bit about each port before deciding to install it.
Another method is to use the whereis(1) command. Simply type whereis file, where file is the program you want to install. If it is found on your system, you will be told where it is, as follows:
# whereis lsof
lsof: /usr/ports/sysutils/lsof
This tells us that lsof (a system utility) can be found in the /usr/ports/sysutils/lsof directory.
Yet another way to find a particular port is by using the ports collection's built-in search mechanism. To use the search feature, you will need to be in the /usr/ports directory. Once in that directory, run make search name=program-name where program-name is the name of the program you want to find. For example, if you were looking for lsof:
# cd /usr/ports
# make search name=lsof
Port:   lsof-4.56.4
Path:   /usr/ports/sysutils/lsof
Info:   Lists information about open files (similar to fstat(1))
Maint:  [email protected]
Index:  sysutils
B-deps:
R-deps:
The part of the output you want to pay particular attention to is the ``Path:'' line, since that tells you where to find the port. The other information provided is not needed in order to install the port, so it will not be covered here.
For more in-depth searching you can also use make search key=string where string is some text to search for. This searches port names, comments, descriptions and dependencies and can be used to find ports which relate to a particular subject if you don't know the name of the program you are looking for.
In both of these cases, the search string is case-insensitive. Searching for ``LSOF'' will yield the same results as searching for ``lsof''.
Note: You must be logged in as root to install ports.
Now that you have found a port you would like to install, you are ready to do the actual installation. The port includes instructions on how to build source code, but does not include the actual source code. You can get the source code from a CD-ROM or from the Internet. Source code is distributed in whatever manner the software author desires. Frequently this is a tarred and gzipped file, but it might be compressed with some other tool or even uncompressed. The program source code, whatever form it comes in, is called a ``distfile''. You can get the distfile from a CD-ROM or from the Internet.
4.5.2.1 Installing Ports from a CD-ROM
The FreeBSD Project's official CD-ROM images no longer include distfiles. They take up a lot of room that is better used for precompiled packages. CD-ROM products such as the FreeBSD PowerPak do include distfiles, and you can order these sets from a vendor such as the FreeBSD Mall. This section assumes you have such a FreeBSD CD-ROM set.
Place your FreeBSD CD-ROM in the drive. Mount it on /cdrom. (If you use a different mount point, the install will not work.) To begin, change to the directory for the port you want to install:
# cd /usr/ports/sysutils/lsof
Once inside the lsof directory, you will see the port skeleton. The next step is to compile, or ``build'', the port. This is done by simply typing make at the prompt. Once you have done so, you should see something like this:
# make
>> lsof_4.57D.freebsd.tar.gz doesn't seem to exist in /usr/ports/distfiles/.
>> Attempting to fetch from file:/cdrom/ports/distfiles/.
===>  Extracting for lsof-4.57
...
[extraction output snipped]
...
>> Checksum OK for lsof_4.57D.freebsd.tar.gz.
===>  Patching for lsof-4.57
===>  Applying FreeBSD patches for lsof-4.57
===>  Configuring for lsof-4.57
...
[configure output snipped]
...
===>  Building for lsof-4.57
...
[compilation output snipped]
...
#
Notice that once the compile is complete you are returned to your prompt. The next step is to install the port. In order to install it, you simply need to tack one word onto the make command, and that word is install:
# make install
===>  Installing for lsof-4.57
...
[installation output snipped]
...
===>   Generating temporary packing list
===>   Compressing manual pages for lsof-4.57
===>   Registering installation for lsof-4.57
===>  SECURITY NOTE:
      This port has installed the following binaries which execute with
      increased privileges.
#
Once you are returned to your prompt, you should be able to run the application you just installed. Since lsof is a program that runs with increased privileges, a security warning is shown. During the building and installation of ports, you should take heed of any other warnings that may appear.
Note: You can save an extra step by just running make install instead of make and make install as two separate steps.
Note: Some shells keep a cache of the commands that are available in the directories listed in the PATH environment variable, to speed up lookup operations for the executable file of these commands. If you are using one of these shells, you might have to use the rehash command after installing a port, before the newly installed commands can be used. This is true for both shells that are part of the base-system (such as tcsh) and shells that are available as ports (for instance, shells/zsh).
Note: Please be aware that the licenses of a few ports do not allow for inclusion on the CD-ROM. This could be because a registration form needs to be filled out before downloading or redistribution is not allowed, or for another reason. If you wish to install a port not included on the CD-ROM, you will need to be online in order to do so (see the next section).
4.5.2.2 Installing Ports from the Internet
As with the last section, this section makes an assumption that you have a working Internet connection. If you do not, you will need to perform the CD-ROM installation, or put a copy of the distfile into /usr/ports/distfiles manually.
Installing a port from the Internet is done exactly the same way as it would be if you were installing from a CD-ROM. The only difference between the two is that the distfile is downloaded from the Internet instead of read from the CD-ROM.
The steps involved are identical:
# make install
>> lsof_4.57D.freebsd.tar.gz doesn't seem to exist in /usr/ports/distfiles/.
>> Attempting to fetch from ftp://ftp.FreeBSD.org/pub/FreeBSD/ports/distfiles/.
Receiving lsof_4.57D.freebsd.tar.gz (439860 bytes): 100%
439860 bytes transferred in 18.0 seconds (23.90 kBps)
===>  Extracting for lsof-4.57
...
[extraction output snipped]
...
>> Checksum OK for lsof_4.57D.freebsd.tar.gz.
===>  Patching for lsof-4.57
===>  Applying FreeBSD patches for lsof-4.57
===>  Configuring for lsof-4.57
...
[configure output snipped]
...
===>  Building for lsof-4.57
...
[compilation output snipped]
...
===>  Installing for lsof-4.57
...
[installation output snipped]
...
===>   Generating temporary packing list
===>   Compressing manual pages for lsof-4.57
===>   Registering installation for lsof-4.57
===>  SECURITY NOTE:
      This port has installed the following binaries which execute with
      increased privileges.
#
As you can see, the only difference is the line that tells you where the system is fetching the port distfile from.
The ports system uses fetch(1) to download the files, which honors various environment variables, including FTP_PASSIVE_MODE, FTP_PROXY, and FTP_PASSWORD. You may need to set one or more of these if you are behind a firewall, or need to use an FTP/HTTP proxy. See fetch(3) for the complete list.
For users which cannot be connected all the time, the make fetch option is provided. Just run this command at the top level directory (/usr/ports) and the required files will be downloaded for you. This command will also work in the lower level categories, for example: /usr/ports/net. Note that if a port depends on libraries or other ports this will not fetch the distfiles of those ports too. Replace fetch with fetch-recursive if you want to fetch all the dependencies of a port too.
Note: You can build all the ports in a category or as a whole by running make in the top level directory, just like the aforementioned make fetch method. This is dangerous, however, as some ports cannot co-exist. In other cases, some ports can install two different files with the same filename.
In some rare cases, users may need to acquire the tarballs from a site other than the MASTER_SITES (the location where files are downloaded from). You can override the MASTER_SITES option with the following command:
# cd /usr/ports/directory
# make MASTER_SITE_OVERRIDE= \
    ftp://ftp.FreeBSD.org/pub/FreeBSD/ports/distfiles/ fetch
In this example we change the MASTER_SITES option to ftp.FreeBSD.org/pub/FreeBSD/ports/distfiles/.
Note: Some ports allow (or even require) you to provide build options which can enable/disable parts of the application which are unneeded, certain security options, and other customizations. A few which come to mind are www/mozilla, security/gpgme, and mail/sylpheed-claws. A message will be displayed when options such as these are available.
4.5.2.3 Overriding the Default Ports Directories
Sometimes it is useful (or mandatory) to use a different distfiles and ports directory. The PORTSDIR and PREFIX variables can override the default directories. For example:
# make PORTSDIR=/usr/home/example/ports install
will compile the port in /usr/home/example/ports and install everything under /usr/local.
# make PREFIX=/usr/home/example/local install
will compile it in /usr/ports and install it in /usr/home/example/local.
And of course,
# make PORTSDIR=../ports PREFIX=../local install
will combine the two (it is too long to completely write on this page, but it should give you the general idea).
Alternatively, these variables can also be set as part of your environment. Read the manual page for your shell for instructions on doing so.
4.5.2.4 Dealing with imake
Some ports that use imake (a part of the X Windows System) do not work well with PREFIX, and will insist on installing under /usr/X11R6. Similarly, some Perl ports ignore PREFIX and install in the Perl tree. Making these ports respect PREFIX is a difficult or impossible job.
4.5.3 Removing Installed Ports
Now that you know how to install ports, you are probably wondering how to remove them, just in case you install one and later on decide that you installed the wrong port. We will remove our previous example (which was lsof for those of you not paying attention). As with installing ports, the first thing you must do is change to the port directory, /usr/ports/sysutils/lsof. After you change directories, you are ready to uninstall lsof. This is done with the make deinstall command:
# cd /usr/ports/sysutils/lsof
# make deinstall
===>  Deinstalling for lsof-4.57
That was easy enough. You have removed lsof from your system. If you would like to reinstall it, you can do so by running make reinstall from the /usr/ports/sysutils/lsof directory.
The make deinstall and make reinstall sequence does not work once you have run make clean. If you want to deinstall a port after cleaning, use pkg_delete(1) as discussed in the Packages section of the Handbook.
4.5.4 Ports and Disk Space
Using the ports collection can defiantly eat up your disk space. For this reason you should always remember to clean up the work directories using the make clean option. This will remove the work directory after a port has been built, and installed. You can also remove the tar files from the distfiles directory, and remove the installed ports when their use has delimited.
Some users choose to limit the port categories by placing an entry in the refuse file. This way when they run the CVSup application, it will not download the files in that category.
4.5.5 Upgrading Ports
Keeping your ports up to date can be a tedious job. For instance, to upgrade a port you would go to the ports directory, build the port, deinstall the old port, install the new port, and then clean up after the build. Imagine doing that for five ports, tedious right? This was a large problem for system administrators to deal with, and now we have utilities which do this for us. For instance the sysutils/portupgrade utility will do everything for you! Just install it like you would any other port, using the make install clean command.
Now create a database with the pkgdb -F command. This will read the list of installed ports and create a database file in the /var/db/pkg directory. Now when you run portupgrade -a, it will read this and the ports INDEX file. Finally, portupgrade will begin to download, build, backup, install, and clean the ports which have been updated. Other utilities exist which will do this, check out the ports/sysutils directory and see what you come up with.
4.6 Post-installation Activities
After installing a new application you will normally want to read any documentation it may have included, edit any configuration files that are required, ensure that the application starts at boot time (if it is a daemon), and so on.
The exact steps you need to take to configure each application will obviously be different. However, if you have just installed a new application and are wondering ``What now?'' these tips might help:
-
Use pkg_info(1) to find out which files were installed, and where. For example, if you have just installed FooPackage version 1.0.0, then this command
# pkg_info -L foopackage-1.0.0 | less
will show all the files installed by the package. Pay special attention to files in man/ directories, which will be manual pages, etc/ directories, which will be configuration files, and doc/, which will be more comprehensive documentation.
If you are not sure which version of the application was just installed, a command like this
# pkg_info | grep -i foopackage
will find all the installed packages that have foopackage in the package name. Replace foopackage in your command line as necessary.
-
Once you have identified where the application's manual pages have been installed, review them using man(1). Similarly, look over the sample configuration files, and any additional documentation that may have been provided.
-
If the application has a web site, check it for additional documentation, frequently asked questions, and so forth. If you are not sure of the web site address it may be listed in the output from
# pkg_info foopackage-1.0.0
A WWW: line, if present, should provide a URL for the application's web site.
-
Ports that should start at boot (such as Internet servers) will usually install a sample script in /usr/local/etc/rc.d. You should review this script for correctness and edit or rename it if needed. See Starting Services for more information.
4.7 Dealing with Broken Ports
If you come across a port that does not work for you, there are a few things you can do, including:
-
Fix it! The Porter's Handbook includes detailed information on the ``Ports'' infrastructure so that you can fix the occasional broken port or even submit your own!
-
Gripe--by email only! Send email to the maintainer of the port first. Type make maintainer or read the Makefile to find the maintainer's email address. Remember to include the name and version of the port (send the $FreeBSD: line from the Makefile) and the output leading up to the error when you email the maintainer. If you do not get a response from the maintainer, you can use send-pr(1) to submit a bug report.
-
Grab the package from an FTP site near you. The ``master'' package collection is on ftp.FreeBSD.org in the packages directory, but be sure to check your local mirror first! These are more likely to work than trying to compile from source and are a lot faster as well. Use the pkg_add(1) program to install the package on your system.
Chapter 5 The X Window System
5.1 Synopsis
FreeBSD uses XFree86 to provide users with a powerful graphical user interface. XFree86 is an open-source implementation of the X Window System. This chapter will cover installation and configuration of XFree86 on a FreeBSD system. For more information on XFree86 and video hardware that it supports, check the XFree86 web site.
After reading this chapter, you will know:
-
The various components of the X Window System, and how they interoperate.
-
How to install and configure XFree86.
-
How to install and use different window managers.
-
How to use TrueType® fonts in XFree86.
-
How to setup your system for graphical logins (XDM).
Before reading this chapter, you should:
-
Know how to install additional third-party software (Chapter 4).
5.2 Understanding X
Using X for the first time can be somewhat of a shock to someone familiar with other graphical environments, such as Microsoft Windows or Mac OS.
It is not necessary to understand all of the details of various X components and how they interact; however, some basic knowledge makes it possible to take advantage of X's strengths.
5.2.1 Why X?
X is not the first window system written for UNIX, but it is the most popular. X's original development team had worked on another window system before writing X. That system's name was ``W'' (for ``Window''). X is just the next letter in the Roman alphabet.
X can be called ``X'', ``X Window System'', ``X11'', and other terms. Calling X11 ``X Windows'' can offend some people; see X(7) for a bit more insight on this.
5.2.2 The X Client/Server Model
X was designed from the beginning to be network-centric, and adopts a ``client-server'' model. In the X model, the ``X server'' runs on the computer that has the keyboard, monitor, and mouse attached. The server is responsible for managing the display, handling input from the keyboard and mouse, and so on. Each X application (such as XTerm, or Netscape) is a ``client''. A client sends messages to the server such as ``Please draw a window at these coordinates'', and the server sends back messages such as ``The user just clicked on the OK button''.
If there is only one computer involved, such as in a home or small office environment, the X server and the X clients will be running on the same computer. However, it is perfectly possible to run the X server on a less powerful desktop computer, and run X applications (the clients) on, say, the powerful and expensive machine that serves the office. In this scenario the communication between the X client and server takes place over the network.
This confuses some people, because the X terminology is exactly backward to what they expect. They expect the ``X server'' to be the big powerful machine down the hall, and the ``X client'' to be the machine on their desk.
Remember that the X server is the machine with the monitor and keyboard, and the X clients are the programs that display the windows.
There is nothing in the protocol that forces the client and server machines to be running the same operating system, or even to be running on the same type of computer. It is certainly possible to run an X server on Microsoft Windows or Apple's Mac OS, and there are various free and commercial applications available that do exactly that.
The X server that ships with FreeBSD is called XFree86, and is available for free, under a license very similar to the FreeBSD license. Commercial X servers for FreeBSD are also available.
5.2.3 The Window Manager
The X design philosophy is much like the UNIX design philosophy, ``tools, not policy''. This means that X does not try to dictate how a task is to be accomplished. Instead, tools are provided to the user, and it is the user's responsibility to decide how to use those tools.
This philosophy extends to X not dictating what windows should look like on screen, how to move them around with the mouse, what keystrokes should be used to move between windows (i.e., Alt+Tab, in the case of Microsoft Windows), what the title bars on each window should look like, whether or not they have close buttons on them, and so on.
Instead, X delegates this responsibility to an application called a ``Window Manager''. There are dozens of window managers available for X: AfterStep, Blackbox, ctwm, Enlightenment, fvwm, Sawfish, twm, Window Maker, and more. Each of these window managers provides a different look and feel; some of them support ``virtual desktops''; some of them allow customized keystrokes to manage the desktop; some have a ``Start'' button or similar device; some are ``themeable'', allowing a complete change of look-and-feel by applying a new theme. These window managers, and many more, are available in the x11-wm category of the Ports Collection.
In addition, the KDE and GNOME desktop environments both have their own window managers which integrate with the desktop.
Each window manager also has a different configuration mechanism; some expect configuration file written by hand, others feature GUI tools for most of the configuration tasks; at least one (sawfish) has a configuration file written in a dialect of the Lisp language.
Focus Policy: Another feature the window manager is responsible for is the mouse ``focus policy''. Every windowing system needs some means of choosing a window to be actively receiving keystrokes, and should visibly indicate which window is active as well.
A familiar focus policy is called ``click-to-focus''. This is the model utilized by Microsoft Windows, in which a window becomes active upon receiving a mouse click.
X does not support any particular focus policy. Instead, the window manager controls which window has the focus at any one time. Different window managers will support different focus methods. All of them support click to focus, and the majority of them support several others.
The most popular focus policies are:
- focus-follows-mouse
The window that is under the mouse pointer is the window that has the focus. This may not necessarily be the window that is on top of all the other windows. The focus is changed by pointing at another window, there is no need to click in it as well.
- sloppy-focus
This policy is a small extension to focus-follows-mouse. With focus-follows-mouse, if the mouse is moved over the root window (or background) then no window has the focus, and keystrokes are simply lost. With sloppy-focus, focus is only changed when the cursor enters a new window, and not when exiting the current window.
- click-to-focus
The active window is selected by mouse click. The window may then be ``raised'', and appear in front of all other windows. All keystrokes will now be directed to this window, even if the cursor is moved to another window.
Many window managers support other policies, as well as variations on these. Be sure to consult the documentation for the window manager itself.
5.2.4 Widgets
The X approach of providing tools and not policy extends to the widgets that seen on screen in each application.
``Widget'' is a term for all the items in the user interface that can be clicked or manipulated in some way; buttons, check boxes, radio buttons, icons, lists, and so on. Microsoft Windows calls these ``controls''.
Microsoft Windows and Apple's Mac OS both have a very rigid widget policy. Application developers are supposed to ensure that their applications share a common look and feel. With X, it was not considered sensible to mandate a particular graphical style, or set of widgets to adhere to.
As a result, do not expect X applications to have a common look and feel. There are several popular widget sets and variations, including the original Athena widget set from MIT, Motif® (on which the widget set in Microsoft Windows was modeled, all bevelled edges and three shades of grey), OpenLook, and others.
Most newer X applications today will use a modern-looking widget set, either Qt, used by KDE, or GTK, used by the GNOME project. In this respect, there is some convergence in look-and-feel of the UNIX desktop, which certainly makes things easier for the novice user.
5.3 Installing XFree86™
Before installing XFree86, decide on which version to run. XFree86 3.X is a maintenance branch of XFree86 development. It is very stable, and it supports a huge number of graphics cards. However, no new development is being done on the software. XFree86 4.X is a complete redesign of the system with many new features such as better support for fonts and anti-aliasing. Unfortunately this new architecture requires that the video drivers be rewritten, and some of the older cards that were supported in 3.X are not yet supported in 4.X. As all new developments and support for new graphics cards are done on that branch, XFree86 4.X is now the default version of the X Window System on FreeBSD.
The FreeBSD setup program offers users the opportunity to install and configure XFree86 4.X during installation (covered in Section 2.9.12). To install and run XFree86 3.X, wait until after the base FreeBSD system is installed, and then install XFree86. For example, to build and install XFree86 3.X from the ports collection:
# cd /usr/ports/x11/XFree86
# make all install clean
Alternatively, either version of XFree86 can be installed directly from the FreeBSD binaries provided on the XFree86 web site. A binary package to use with pkg_add(1) tool is also available for XFree86 4.X. When the remote fetching feature of pkg_add(1) is used, the version number of the package must be removed. pkg_add(1) will automatically fetch the latest version of the application. So to fetch and install the package of XFree86 4.X, simply type:
# pkg_add -r XFree86
You can also use the ports collection to install XFree86 4.X, for that you simply need to type the following commands:
# cd /usr/ports/x11/XFree86-4
# make install clean
Note: The examples above will install the complete XFree86 distribution including the servers, clients, fonts etc. Separate packages and ports for different parts of XFree86 4.X are also available.
The rest of this chapter will explain how to configure XFree86, and how to setup a productive desktop environment.
5.4 XFree86 Configuration
Contributed by Christopher Shumway.5.4.1 Before Starting
Before configuration of XFree86 4.X, the following information about the target system is needed:
-
Monitor specifications
-
Video Adapter chipset
-
Video Adapter memory
The specifications for the monitor are used by XFree86 to determine the resolution and refresh rate to run at. These specifications can usually be obtained from the documentation that came with the monitor or from the manufacturer's website. There are two ranges of numbers that are needed, the horizontal scan rate and the vertical synchronization rate.
The video adapter's chipset defines what driver module XFree86 uses to talk to the graphics hardware. With most chipsets, this can be automatically determined, but it is still useful to know in case the automatic detection does not work correctly.
Video memory on the graphic adapter determines the resolution and color depth which the system can run at. This is important to know so the user knows the limitations of the system.
5.4.2 Configuring XFree86 4.X
Configuration of XFree86 4.X is a multi-step process. The first step is to build an initial configuration file with the -configure option to XFree86. As the super user, simply run:
# XFree86 -configure
This will generate a skeleton XFree86 configuration file in the /root directory called XF86Config.new (in fact the directory used is the one covered by the environment variable $HOME, and it will depend from the way you got the superuser rights). The XFree86 program will attempt to probe the graphics hardware on the system and will write a configuration file to load the proper drivers for the detected hardware on the target system.
The next step is to test the existing configuration to verify that XFree86 can work with the graphics hardware on the target system. To perform this task, the user needs to run:
# XFree86 -xf86config XF86Config.new
If a black and grey grid and an X mouse cursor appear, the configuration was successful. To exit the test, just press Ctrl+Alt+Backspace simultaneously.
Note: If the mouse does not work, be sure the device has been configured. See Section 2.9.10 in the FreeBSD install chapter.
Next, tune the XF86Config.new configuration file to taste. Open the file in a text editor such as emacs(1) or ee(1). First, add the frequencies for the target system's monitor. These are usually expressed as a horizontal and vertical synchronization rate. These values are added to the XF86Config.new file under the "Monitor" section:
Section "Monitor"
        Identifier   "Monitor0"
        VendorName   "Monitor Vendor"
        ModelName    "Monitor Model"
        HorizSync    30-107
        VertRefresh  48-120
EndSection
The HorizSync and VertRefresh keywords may not exist in the configuration file. If they do not, they need to be added, with the correct horizontal synchronization rate placed after the Horizsync keyword and the vertical synchronization rate after the VertRefresh keyword. In the example above the target monitor's rates were entered.
X allows DPMS (Energy Star) features to be used with capable monitors. The xset(1) program controls the time-outs and can force standby, suspend, or off modes. If you wish to enable DPMS features for your monitor, you must add the following line to the monitor section:
Option "DPMS"
While the XF86Config.new configuration file is still open in an editor, select the default resolution and color depth desired. This is defined in the "Screen" section:
Section "Screen"
        Identifier "Screen0"
        Device     "Card0"
        Monitor    "Monitor0"
        DefaultDepth 24
        SubSection "Display"
                Depth     24
                Modes     "1024x768"
        EndSubSection
EndSection
The DefaultDepth keyword describes the color depth to run at by default. This can be overridden with the -bpp command line switch to XFree86(1). The Modes keyword describes the resolution to run at for the given color depth. Note that only VESA standard modes are supported as defined by the target system's graphics hardware. In the example above, the default color depth is twenty-four bits per pixel. At this color depth, the accepted resolution is one thousand twenty-four pixels by seven hundred and sixty-eight pixels.
Finally, write the configuration file and test it using the test mode given above. If all is well, the configuration file needs to be installed in a common location where XFree86(1) can find it. This is typically /etc/X11/XF86Config or /usr/X11R6/etc/X11/XF86Config.
# cp XF86Config.new /etc/X11/XF86Config
Once the configuration file has been placed in a common location, configuration is complete. In order to start XFree86 4.X with startx(1), install the x11/wrapper port. XFree86 4.X can also be started with xdm(1).
Note: There is also a graphical tool for configuration, xf86cfg(1), that comes with the XFree86 4.X distribution. It allows to interactively define your configuration by choosing the appropiate drivers and settings. This program can be used under console as well, just use the command xf86cfg -textmode. For more details, refer to the xf86cfg(1) manual page.
5.4.3 Advanced Configuration Topics
5.4.3.1 Configuration with Intel® i810 Graphics Chipsets
Configuration with Intel i810 integrated chipsets requires the agpgart AGP programming interface for XFree86 to drive the card. The agp(4) driver is in the GENERIC kernel since releases 4.8-RELEASE and 5.0-RELEASE. On prior releases, you will have to add the following line:
device agp
in your kernel configuration file and rebuild a new kernel. Instead, you may want to load the agp.ko kernel module automatically with the loader(8) at boot time. For that, simply add this line to /boot/loader.conf:
agp_load="YES"
Next, if you are running FreeBSD 4.X or earlier, a device node needs to be created for the programming interface. To create the AGP device node, run MAKEDEV(8) in the /dev directory:
# cd /dev
# sh MAKEDEV agpgart
Note: FreeBSD 5.X or later will use devfs(5) to allocate device nodes transparently, therefore the MAKEDEV(8) step is not required.
This will allow configuration of the hardware as any other graphics board. Note on systems without the agp(4) driver compiled in the kernel, trying to load the module with kldload(8) will not work. This driver has to be in the kernel at boot time through being compiled in or using /boot/loader.conf.
If you are using XFree86 4.1.0 (or later) and messages about unresolved symbols like fbPictureInit appear, try adding the following line after Driver "i810" in the XFree86 configuration file:
Option "NoDDC"
5.5 Using Fonts in XFree86
Contributed by Murray Stokely.5.5.1 Type1 Fonts
The default fonts that ship with XFree86 are less than ideal for typical desktop publishing applications. Large presentation fonts show up jagged and unprofessional looking, and small fonts in Netscape are almost completely unintelligible. However, there are several free, high quality Type1 (PostScript®) fonts available which can be readily used with XFree86, either version 3.X or version 4.X. For instance, the URW font collection (x11-fonts/urwfonts) includes high quality versions of standard type1 fonts (Times Roman®, Helvetica®, Palatino® and others). The Freefonts collection (x11-fonts/freefonts) includes many more fonts, but most of them are intended for use in graphics software such as the Gimp, and are not complete enough to serve as screen fonts. In addition, XFree86 can be configured to use TrueType fonts with a minimum of effort: see the section on TrueType fonts later.
To install the above Type1 font collections from the ports collection, run the following commands:
# cd /usr/ports/x11-fonts/urwfonts
# make install clean
And likewise with the freefont or other collections. To tell the X server that these fonts exist, add an appropriate line to the XF86Config file (in /etc/ for XFree86 version 3, or in /etc/X11/ for version 4), which reads:
FontPath "/usr/X11R6/lib/X11/fonts/URW/"
Alternatively, at the command line in the X session run:
% xset fp+ /usr/X11R6/lib/X11/fonts/URW
% xset fp rehash
This will work but will be lost when the X session is closed, unless it is added to the startup file (~/.xinitrc for a normal startx session, or ~/.xsession when logging in through a graphical login manager like XDM). A third way is to use the new XftConfig file: see the section on anti-aliasing.
5.5.2 TrueType® Fonts
XFree86 4.X has built in support for rendering TrueType fonts. There are two different modules that can enable this functionality. The freetype module is used in this example because it is more consistent with the other font rendering back-ends. To enable the freetype module just add the following line to the "Module" section of the /etc/X11/XF86Config file.
Load "freetype"
For XFree86 3.3.X, a separate TrueType font server is needed. Xfstt is commonly used for this purpose. To install Xfstt, simply install the port x11-servers/Xfstt.
Now make a directory for the TrueType fonts (for example, /usr/X11R6/lib/X11/fonts/TrueType) and copy all of the TrueType fonts into this directory. Keep in mind that TrueType fonts cannot be directly taken from a Macintosh®; they must be in UNIX/DOS/Windows format for use by XFree86. Once the files have been copied into this directory, use ttmkfdir to create a fonts.dir file, so that the X font renderer knows that these new files have been installed. ttmkfdir is available from the FreeBSD Ports Collection as x11-fonts/ttmkfdir.
# cd /usr/X11R6/lib/X11/fonts/TrueType
# ttmkfdir > fonts.dir
Now add the TrueType directory to the font path. This is just the same as described above for Type1 fonts, that is, use
% xset fp+ /usr/X11R6/lib/X11/fonts/TrueType
% xset fp rehash
or add a FontPath line to the XF86Config file.
That's it. Now Netscape, Gimp, StarOffice™, and all of the other X applications should now recognize the installed TrueType fonts. Extremely small fonts (as with text in a high resolution display on a web page) and extremely large fonts (within StarOffice) will look much better now.
5.5.3 Anti-Aliased Fonts
Updated for XFree86 4.3 by Joe Marcus Clarke.Anti-aliasing has been available in XFree86 since 4.0.2. However, font configuration was cumbersome before the introduction of XFree86 4.3.0. Starting in version 4.3.0, all fonts in /usr/X11R6/lib/X11/fonts/ and ~/.fonts/ are automatically made available for anti-aliasing to Xft-aware applications. Not all applications are Xft-aware yet, but many have received Xft support. Examples of Xft-aware applications include Qt 2.3 and higher (the toolkit for the KDE desktop), Gtk+ 2.0 and higher (the toolkit for the GNOME desktop), and Mozilla 1.2 and higher.
In order to control which fonts are anti-aliased, or to configure anti-aliasing properties, create (or edit, if it already exists) the file /usr/X11R6/etc/fonts/local.conf. Several advanced features of the Xft font system can be tuned using this file; this section describes only some simple possibilities. For more details, please see fonts-conf(5).
This file must be in XML format. Pay careful attention to case, and make sure all tags are properly closed. The file begins with the usual XML header followed by a DOCTYPE definition, and then the <fontconfig> tag:
      <?xml version="1.0"?>
      <!DOCTYPE fontconfig SYSTEM "fonts.dtd">
      <fontconfig>
As previously stated, all fonts in /usr/X11R6/lib/X11/fonts/ as well as ~/.fonts/ are already made available to Xft-aware applications. If you wish to add another directory outside of these two directory trees, add a line similar to the following to /usr/X11R6/etc/fonts/local.conf:
<dir>/path/to/my/fonts</dir>
After adding new fonts, and especially new font directories, you should run the following command to rebuild the font caches:
# fc-cache -f
Anti-aliasing makes borders slightly fuzzy, which makes very small text more readable and removes ``staircases'' from large text, but can cause eyestrain if applied to normal text. To exclude point sizes smaller than 14 point from anti-aliasing, include these lines:
        <match target="font">
            <test name="size" compare="less">
                <double>14</double>
            </test>
            <edit name="antialias" mode="assign">
                <bool>false</bool>
            </edit>
        </match>
Spacing for some monospaced fonts may also be inappropriate with anti-aliasing. This seems to be an issue with KDE, in particular. One possible fix for this is to force the spacing for such fonts to be 100. Add the following lines:
       <match target="pattern" name="family">
           <test qual="any" name="family">
               <string>fixed</string>
           </test>
           <edit name="family" mode="assign">
               <string>mono</string>
           </edit>
        </match>
        <match target="pattern" name="family">
            <test qual="any" name="family">
                <string>console</string>
            </test>
            <edit name="family" mode="assign">
                <string>mono</string>
            </edit>
        </match>
(this aliases the other common names for fixed fonts as "mono"), and then add:
         <match target="pattern" name="family">
             <test qual="any" name="family">
                 <string>mono</string>
             </test>
             <edit name="spacing" mode="assign">
                 <int>100</int>
             </edit>
         </match>
Certain fonts, such as Helvetica, may have a problem when anti-aliased. Usually this manifests itself as a font that seems cut in half vertically. At worst, it may cause applications such as Mozilla to crash. To avoid this, consider adding the following to local.conf:
         <match target="pattern" name="family">
             <test qual="any" name="family">
                 <string>Helvetica</string>
             </test>
             <edit name="family" mode="assign">
                 <string>sans-serif</string>
             </edit>
         </match>
Once you have finished editing local.conf make sure you end the file with the </fontconfig> tag. Not doing this will cause your changes to be ignored.
The default font set that comes with XFree86 is not very desirable when it comes to anti-aliasing. A much better set of default fonts can be found in the x11-fonts/bitstream-vera port. This port will install a /usr/X11R6/etc/fonts/local.conf file if one does not exist already. If the file does exist, the port will create a /usr/X11R6/etc/fonts/local.conf-vera file. Merge the contents of this file into /usr/X11R6/etc/fonts/local.conf, and the Bitstream fonts will automatically replace the default XFree86 Serif, Sans Serif, and Monospaced fonts.
Finally, users can add their own settings via their personal .fonts.conf files. To do this, each user should simply create a ~/.fonts.conf. This file must also be in XML format.
One last point: with an LCD screen, sub-pixel sampling may be desired. This basically treats the (horizontally separated) red, green and blue components separately to improve the horizontal resolution; the results can be dramatic. To enable this, add the line somewhere in the local.conf file:
         <match target="font">
             <test qual="all" name="rgba">
                 <const>unknown</const>
             </test>
             <edit name="rgba" mode="assign">
                 <const>rgb</const>
             </edit>
         </match>
Note: Depending on the sort of display, rgb may need to be changed to bgr, vrgb or vbgr: experiment and see which works best.
Anti-aliasing should be enabled the next time the X server is started. However, programs must know how to take advantage of it. At present, the Qt toolkit does, so the entire KDE environment can use anti-aliased fonts (see Section 5.7.3.2 on KDE for details). Gtk+ and GNOME can also be made to use anti-aliasing via the ``Font'' capplet (see Section 5.7.1.3 for details). By default, Mozilla 1.2 and greater will automatically use anti-aliasing. To disable this, rebuild Mozilla with the -DWITHOUT_XFT flag.
5.6 The X Display Manager
Contributed by Seth Kingsley.5.6.1 Overview
The X Display Manager (XDM) is an optional part of the X Window System that is used for login session management. This is useful for several types of situations, including minimal ``X Terminals'', desktops, and large network display servers. Since the X Window System is network and protocol independent, there are a wide variety of possible configurations for running X clients and servers on different machines connected by a network. XDM provides a graphical interface for choosing which display server to connect to, and entering authorization information such as a login and password combination.
Think of XDM as providing the same functionality to the user as the getty(8) utility (see Section 17.3.2 for details). That is, it performs system logins to the display being connected to and then runs a session manager on behalf of the user (usually an X window manager). XDM then waits for this program to exit, signaling that the user is done and should be logged out of the display. At this point, XDM can display the login and display chooser screens for the next user to login.
5.6.2 Using XDM
The XDM daemon program is located in /usr/X11R6/bin/xdm. This program can be run at any time as root and it will start managing the X display on the local machine. If XDM is to be run every time the machine boots up, a convenient way to do this is by adding an entry to /etc/ttys. For more information about the format and usage of this file, see Section 17.3.2.1. There is a line in the default /etc/ttys file for running the XDM daemon on a virtual terminal:
ttyv8 "/usr/X11R6/bin/xdm -nodaemon" xterm off secure
By default this entry is disabled; in order to enable it change field 5 from off to on and restart init(8) using the directions in Section 17.3.2.2. The first field, the name of the terminal this program will manage, is ttyv8. This means that XDM will start running on the 9th virtual terminal.
5.6.3 Configuring XDM
The XDM configuration directory is located in /usr/X11R6/lib/X11/xdm. In this directory there are several files used to change the behavior and appearance of XDM. Typically these files will be found:
| File | Description |
|---|---|
| Xaccess | Client authorization ruleset. |
| Xresources | Default X resource values. |
| Xservers | List of remote and local displays to manage. |
| Xsession | Default session script for logins. |
| Xsetup_* | Script to launch applications before the login interface. |
| xdm-config | Global configuration for all displays running on this machine. |
| xdm-errors | Errors generated by the server program. |
| xdm-pid | The process ID of the currently running XDM. |
Also in this directory are a few scripts and programs used to setup the desktop when XDM is running. The purpose of each of these files will be briefly described. The exact syntax and usage of all of these files is described in xdm(1).
The default configuration is a simple rectangular login window with the hostname of the machine displayed at the top in a large font and ``Login:'' and ``Password:'' prompts below. This is a good starting point for changing the look and feel of XDM screens.
5.6.3.1 Xaccess
The protocol for connecting to XDM controlled displays is called the X Display Manager Connection Protocol (XDMCP). This file is a ruleset for controlling XDMCP connections from remote machines. By default, it allows any client to connect, but that does not matter unless the xdm-config is changed to listen for remote connections.
5.6.3.2 Xresources
This is an application-defaults file for the display chooser and the login screens. This is where the appearance of the login program can be modified. The format is identical to the app-defaults file described in the XFree86 documentation.
5.6.3.4 Xsession
This is the default session script for XDM to run after a user has logged in. Normally each user will have a customized session script in ~/.xsession that overrides this script.
5.6.3.5 Xsetup_*
These will be run automatically before displaying the chooser or login interfaces. There is a script for each display being used, named Xsetup_ followed by the local display number (for instance Xsetup_0). Typically these scripts will run one or two programs in the background such as xconsole.
5.6.3.6 xdm-config
This contains settings in the form of app-defaults that are applicable to every display that this installation manages.
5.6.3.7 xdm-errors
This contains the output of the X servers that XDM is trying to run. If a display that XDM is trying to start hangs for some reason, this is a good place to look for error messages. These messages are also written to the user's ~/.xsession-errors file on a per-session basis.
5.6.4 Running a Network Display Server
In order for other clients to connect to the display server, edit the access control rules, and enable the connection listener. By default these are set to conservative values. To make XDM listen for connections, first comment out a line in the xdm-config file:
! SECURITY: do not listen for XDMCP or Chooser requests
! Comment out this line if you want to manage X terminals with xdm
DisplayManager.requestPort:     0
and then restart XDM. Remember that comments in app-defaults files begin with a ``!'' character, not the usual ``#''. More strict access controls may be desired. Look at the example entries in Xaccess, and refer to the xdm(1) manual page.
5.6.5 Replacements for XDM
Several replacements for the default XDM program exist. One of them, KDM (bundled with KDE) is described later in this chapter. KDM offers many visual improvements and cosmetic frills, as well as the functionality to allow users to choose their window manager of choice at login time.
5.7 Desktop Environments
Contributed by Valentino Vaschetto.This section describes the different desktop environments available for X on FreeBSD. A ``desktop environment'' can mean anything ranging from a simple window manager to a complete suite of desktop applications, such as KDE or GNOME.
5.7.1 GNOME
5.7.1.1 About GNOME
GNOME is a user-friendly desktop environment that enables users to easily use and configure their computers. GNOME includes a panel (for starting applications and displaying status), a desktop (where data and applications can be placed), a set of standard desktop tools and applications, and a set of conventions that make it easy for applications to cooperate and be consistent with each other. Users of other operating systems or environments should feel right at home using the powerful graphics-driven environment that GNOME provides. More information regarding GNOME on FreeBSD can be found on the FreeBSD GNOME Project's web site.
5.7.1.2 Installing GNOME
The easiest way to install GNOME is through the ``Desktop Configuration'' menu during the FreeBSD installation process as described in Section 2.9.13 of Chapter 2. It can also be easily installed from a package or the ports collection:
To install the GNOME package from the network, simply type:
# pkg_add -r gnome2
To build GNOME from source, use the ports tree:
# cd /usr/ports/x11/gnome2
# make install clean
Once GNOME is installed, the X server must be told to start GNOME instead of a default window manager. If a custom .xinitrc is already in place, simply replace the line that starts the current window manager with one that starts /usr/X11R6/bin/gnome-session instead. If nothing special has been done to configuration file, then it is enough to simply type:
% echo "/usr/X11R6/bin/gnome-session" > ~/.xinitrc
Next, type startx, and the GNOME desktop environment will be started.
Note: If a display manager, like XDM, is being used, this will not work. Instead, create an executable .xsession file with the same command in it. To do this, edit the file and replace the existing window manager command with /usr/X11R6/bin/gnome-session:
% echo "#!/bin/sh" > ~/.xsession
% echo "/usr/X11R6/bin/gnome-session" >> ~/.xsession
% chmod +x ~/.xsession
Another option is to configure the display manager to allow choosing the window manager at login time; the section on KDE details explains how to do this for kdm, the display manager of KDE.
5.7.1.3 Anti-aliased Fonts with GNOME
Starting with version 4.0.2, XFree86 supports anti-aliasing via its ``RENDER'' extension. Gtk+ 2.0 and greater (the toolkit used by GNOME) can make use of this functionality. Configuring anti-aliasing is described in Section 5.5.3. So, with up-to-date software, anti-aliasing is possible within the GNOME desktop. Just go to Applications->Desktop Preferences->Font, and select either Best shapes, Best contrast, or Subpixel smoothing (LCDs). For a Gtk+ application that is not part of the GNOME desktop, set the environment variable GDK_USE_XFT to 1 before launching the program.
5.7.2 KDE
5.7.2.1 About KDE
KDE is an easy to use contemporary desktop environment. Some of the things that KDE brings to the user are:
-
A beautiful contemporary desktop
-
A desktop exhibiting complete network transparency
-
An integrated help system allowing for convenient, consistent access to help on the use of the KDE desktop and its applications
-
Consistent look and feel of all KDE applications
-
Standardized menu and toolbars, keybindings, color-schemes, etc.
-
Internationalization: KDE is available in more than 40 languages
-
Centralized consisted dialog driven desktop configuration
-
A great number of useful KDE applications
KDE has an office application suite based on KDE's ``KParts'' technology consisting of a spread-sheet, a presentation application, an organizer, a news client and more. KDE also comes with a web browser called Konqueror, which represents a solid competitor to other existing web browsers on UNIX systems. More information on KDE can be found on the KDE website. For FreeBSD specific informations and resources on KDE, consult the FreeBSD-KDE team's website.
5.7.2.2 Installing KDE
Just as with GNOME or any other desktop environment, the easiest way to install KDE is through the ``Desktop Configuration'' menu during the FreeBSD installation process as described in Section 2.9.13 of Chapter 2. Once again, the software can be easily installed from a package or from the ports collection:
To install the KDE package from the network, simply type:
# pkg_add -r kde
pkg_add(1) will automatically fetch the latest version of the application.
To build KDE from source, use the ports tree:
# cd /usr/ports/x11/kde3
# make install clean
After KDE has been installed, the X server must be told to launch this application instead of the default window manager. This is accomplished by editing the .xinitrc file:
% echo "exec startkde" > ~/.xinitrc
Now, whenever the X Window System is invoked with startx, KDE will be the desktop.
If a display manager such as xdm is being used, the configuration is slightly different. Edit the .xsession file instead. Instructions for kdm are described later in this chapter.
5.7.3 More Details on KDE
Now that KDE is installed on the system, most things can be discovered through the help pages, or just by pointing and clicking at various menus. Windows or Mac® users will feel quite at home.
The best reference for KDE is the on-line documentation. KDE comes with its own web browser, Konqueror, dozens of useful applications, and extensive documentation. The remainder of this section discusses the technical items that are difficult to learn by random exploration.
5.7.3.1 The KDE Display Manager
An administrator of a multi-user system may wish to have a graphical login screen to welcome users. xdm can be used, as described earlier. However, KDE includes an alternative, kdm, which is designed to look more attractive and include more login-time options. In particular, users can easily choose (via a menu) which desktop environment (KDE, GNOME, or something else) to run after logging on.
To begin with, run the KDE control panel, kcontrol, as root. It is generally considered unsafe to run the entire X environment as root. Instead, run the window manager as a normal user, open a terminal window (such as xterm or KDE's konsole), become root with su (the user must be in the wheel group in /etc/group for this), and then type kcontrol.
Click on the icon on the left marked System, then on Login manager. On the right there are various configurable options, which the KDE manual will explain in greater detail. Click on sessions on the right. Click New type to add various window managers and desktop environments. These are just labels, so they can say KDE and GNOME rather than startkde or gnome-session. Include a label failsafe.
Play with the other menus as well, they are mainly cosmetic and self-explanatory. When you are done, click on Apply at the bottom, and quit the control center.
To make sure kdm understands what the labels (KDE, GNOME etc) mean, edit the files used by xdm.
Note: In KDE 2.2 this has changed: kdm now uses its own configuration files. Please see the KDE 2.2 documentation for details.
case $# in
1)
        case $1 in
        failsafe)
                exec xterm -geometry 80x24-0-0
                ;;
        esac
esac
A few lines need to be added to this section. Assuming the labels from used were ``KDE'' and ``GNOME'', use the following:
case $# in
1)
        case $1 in
        kde)
                exec /usr/local/bin/startkde
                ;;
        GNOME)
                exec /usr/X11R6/bin/gnome-session
                ;;
        failsafe)
                exec xterm -geometry 80x24-0-0
                ;;
        esac
esac
For the KDE login-time desktop background to be honored, the following line needs to be added to /usr/X11R6/lib/X11/xdm/Xsetup_0:
/usr/local/bin/kdmdesktop
Now, make sure kdm is listed in /etc/ttys to be started at the next bootup. To do this, simply follow the instructions from the previous section on xdm and replace references to the /usr/X11R6/bin/xdm program with /usr/local/bin/kdm.
5.7.3.2 Anti-aliased Fonts
Starting with version 4.0.2, XFree86 supports anti-aliasing via its ``RENDER'' extension, and starting with version 2.3, Qt (the toolkit used by KDE) supports this extension. Configuring this is described in Section 5.5.3 on antialiasing X11 fonts. So, with up-to-date software, anti-aliasing is possible on a KDE desktop. Just go to the KDE menu, go to Preferences->Look and Feel->Fonts, and click on the check box Use Anti-Aliasing for Fonts and Icons. For a Qt application which is not part of KDE, the environment variable QT_XFT needs to be set to true before starting the program.
5.7.4 XFce
5.7.4.1 About XFce
XFce is a desktop environment based on the GTK toolkit used by GNOME, but is much more lightweight and meant for those who want a simple, efficient desktop which is nevertheless easy to use and configure. Visually, it looks very much like CDE, found on commercial UNIX systems. Some of XFce's features are:
-
A simple, easy-to-handle desktop
-
Fully configurable via mouse, with drag and drop, etc
-
Main panel similar to CDE, with menus, applets and applications launchers
-
Integrated window manager, file manager, sound manager, GNOME compliance module, and other things
-
Themeable (since it uses GTK)
-
Fast, light and efficient: ideal for older/slower machines or machines with memory limitations
More information on XFce can be found on the XFce website.
5.7.4.2 Installing XFce
A binary package for XFce exists (at the time of writing). To install, simply type:
# pkg_add -r xfce
Alternatively, to build from source, use the ports collection:
# cd /usr/ports/x11-wm/xfce
# make install clean
Now, tell the X server to launch XFce the next time X is started. Simply type this:
% echo "/usr/X11R6/bin/startxfce" > ~/.xinitrc
The next time X is started, XFce will be the desktop. As before, if a display manager like xdm is being used, create an .xsession, as described in the section on GNOME, but with the /usr/X11R6/bin/startxfce command; or, configure the display manager to allow choosing a desktop at login time, as explained in the section on kdm.
II. System Administration
The remaining chapters of the FreeBSD Handbook cover all aspects of FreeBSD system administration. Each chapter starts by describing what you will learn as a result of reading the chapter, and also details what you are expected to know before tackling the material.
These chapters are designed to be read when you need the information. You do not have to read them in any particular order, nor do you need to read all of them before you can begin using FreeBSD.
- Table of Contents
- 6 Configuration and Tuning
- 7 The FreeBSD Booting Process
- 8 Users and Basic Account Management
- 9 Configuring the FreeBSD Kernel
- 10 Security
- 11 Printing
- 12 Storage
- 13 The Vinum Volume Manager
- 14 Localization - I18N/L10N Usage and Setup
- 15 Desktop Applications
- 16 Multimedia
- 17 Serial Communications
- 18 PPP and SLIP
- 19 Advanced Networking
- 20 Electronic Mail
- 21 The Cutting Edge
- 22 Linux Binary Compatibility
Chapter 6 Configuration and Tuning
Written by Chern Lee. Based on a tutorial written by Mike Smith. Also based on tuning(7) written by Matt Dillon.6.1 Synopsis
One of the important aspects of FreeBSD is system configuration. Correct system configuration will help prevent headaches during future upgrades. This chapter will explain much of the FreeBSD configuration process, including some of the parameters which can be set to tune a FreeBSD system.
After reading this chapter, you will know:
-
How to efficiently work with file systems and swap partitions.
-
The basics of rc.conf configuration and /usr/local/etc/rc.d startup systems.
-
How to configure and test a network card.
-
How to configure virtual hosts on your network devices.
-
How to use the various configuration files in /etc.
-
How to tune FreeBSD using sysctl variables.
-
How to tune disk performance and modify kernel limitations.
Before reading this chapter, you should:
-
Understand UNIX and FreeBSD basics (Chapter 3).
-
Be familiar with keeping FreeBSD sources up to date (Chapter 21), and the basics of kernel configuration/compilation (Chapter 9).
6.2 Initial Configuration
6.2.1 Partition Layout
6.2.1.1 Base Partitions
When laying out file systems with disklabel(8) or sysinstall(8), remember that hard drives transfer data faster from the outer tracks to the inner. Thus smaller and heavier-accessed file systems should be closer to the outside of the drive While larger partitions like /usr should be placed toward the inner. It is a good idea to create partitions in a similar order to: root, swap, /var, /usr.
The size of /var reflects the intended machine usage. /var is used to hold mailboxes, log files, and printer spools. Mailboxes and log files can grow to unexpected sizes depending on how many users exist and how long log files are kept. Most users would never require a gigabyte, but remember that /var/tmp must be large enough to contain packages.
The /usr partition holds much of the files required to support the system, the ports(7) collection (recommended) and the source code (optional). Both of which are optional at install time. At least 2 gigabytes would be recommended for this partition.
When selecting partition sizes, keep the space requirements in mind. Running out of space in one partition while barely using another can be a hassle.
Note: Some users have found that sysinstall(8)'s Auto-defaults partition sizer will sometimes select smaller than adequate /var and / partitions. Partition wisely and generously.
6.2.1.2 Swap Partition
As a rule of thumb, the swap partition should be about double the size of system memory (RAM). For example, if the machine has 128 megabytes of memory, the swap file should be 256 megabytes. Systems with less memory may perform better with more swap. Less than 256 megabytes of swap is not recommended and memory expansion should be considered. The kernel's VM paging algorithms are tuned to perform best when the swap partition is at least two times the size of main memory. Configuring too little swap can lead to inefficiencies in the VM page scanning code and might create issues later if more memory is added.
On larger systems with multiple SCSI disks (or multiple IDE disks operating on different controllers), it is recommend that a swap is configured on each drive (up to four drives). The swap partitions should be approximately the same size. The kernel can handle arbitrary sizes but internal data structures scale to 4 times the largest swap partition. Keeping the swap partitions near the same size will allow the kernel to optimally stripe swap space across disks. Large swap sizes are fine, even if swap is not used much. It might be easier to recover from a runaway program before being forced to reboot.
6.2.1.3 Why Partition?
Several users think a single large partition will be fine, but there are several reasons why this is a bad idea. First, each partition has different operational characteristics and separating them allows the file system to tune accordingly. For example, the root and /usr partitions are read-mostly, without much writing. While a lot of reading and writing could occur in /var and /var/tmp.
By properly partitioning a system, fragmentation introduced in the smaller write heavy partitions will not bleed over into the mostly-read partitions. Keeping the write-loaded partitions closer to the disk's edge, will increase I/O performance in the partitions where it occurs the most. Now while I/O performance in the larger partitions may be needed, shifting them more toward the edge of the disk will not lead to a significant performance improvement over moving /var to the edge. Finally, there are safety concerns. A smaller, neater root partition which is mostly read-only has a greater chance of surviving a bad crash.
6.3 Core Configuration
The principal location for system configuration information is within /etc/rc.conf. This file contains a wide range of configuration information, principally used at system startup to configure the system. Its name directly implies this; it is configuration information for the rc* files.
An administrator should make entries in the rc.conf file to override the default settings from /etc/defaults/rc.conf. The defaults file should not be copied verbatim to /etc - it contains default values, not examples. All system-specific changes should be made in the rc.conf file itself.
A number of strategies may be applied in clustered applications to separate site-wide configuration from system-specific configuration in order to keep administration overhead down. The recommended approach is to place site-wide configuration into another file, such as /etc/rc.conf.site, and then include this file into /etc/rc.conf, which will contain only system-specific information.
As rc.conf is read by sh(1) it is trivial to achieve this. For example:
-
rc.conf:
. rc.conf.site hostname="node15.example.com" network_interfaces="fxp0 lo0" ifconfig_fxp0="inet 10.1.1.1" -
rc.conf.site:
   defaultrouter="10.1.1.254"
    saver="daemon"
    blanktime="100"
The rc.conf.site file can then be distributed to every system using rsync or a similar program, while the rc.conf file remains unique.
Upgrading the system using sysinstall(8) or make world will not overwrite the rc.conf file, so system configuration information will not be lost.
6.4 Application Configuration
Typically, installed applications have their own configuration files, with their own syntax, etc. It is important that these files be kept separate from the base system, so that they may be easily located and managed by the package management tools.
Typically, these files are installed in /usr/local/etc. In the case where an application has a large number of configuration files, a subdirectory will be created to hold them.
Normally, when a port or package is installed, sample configuration files are also installed. These are usually identified with a .default suffix. If there are no existing configuration files for the application, they will be created by copying the .default files.
For example, consider the contents of the directory /usr/local/etc/apache:
-rw-r--r--  1 root  wheel   2184 May 20  1998 access.conf
-rw-r--r--  1 root  wheel   2184 May 20  1998 access.conf.default
-rw-r--r--  1 root  wheel   9555 May 20  1998 httpd.conf
-rw-r--r--  1 root  wheel   9555 May 20  1998 httpd.conf.default
-rw-r--r--  1 root  wheel  12205 May 20  1998 magic
-rw-r--r--  1 root  wheel  12205 May 20  1998 magic.default
-rw-r--r--  1 root  wheel   2700 May 20  1998 mime.types
-rw-r--r--  1 root  wheel   2700 May 20  1998 mime.types.default
-rw-r--r--  1 root  wheel   7980 May 20  1998 srm.conf
-rw-r--r--  1 root  wheel   7933 May 20  1998 srm.conf.default
The file sizes show that only the srm.conf file has been changed. A later update of the Apache port would not overwrite this changed file.
6.5 Starting Services
It is common for a system to host a number of services. These may be started in several different fashions, each having different advantages.
Software installed from a port or the packages collection will often place a script in /usr/local/etc/rc.d which is invoked at system startup with a start argument, and at system shutdown with a stop argument. This is the recommended way for starting system-wide services that are to be run as root, or that expect to be started as root. These scripts are registered as part of the installation of the package, and will be removed when the package is removed.
A generic startup script in /usr/local/etc/rc.d looks like:
#!/bin/sh
echo -n ' FooBar'

case "$1" in
start)
        /usr/local/bin/foobar
        ;;
stop)
        kill -9 `cat /var/run/foobar.pid`
        ;;
*)
        echo "Usage: `basename $0` {start|stop}" >&2
        exit 64
        ;;
esac

exit 0
The startup scripts of FreeBSD will look in /usr/local/etc/rc.d for scripts that have an .sh extension and are executable by root. Those scripts that are found are called with an option start at startup, and stop at shutdown to allow them to carry out their purpose. So if you wanted the above sample script to be picked up and run at the proper time during system startup, you should save it to a file called FooBar.sh in /usr/local/etc/rc.d and make sure it is executable. You can make a shell script executable with chmod(1) as shown below:
# chmod 755 FooBar.sh
Some services expect to be invoked by inetd(8) when a connection is received on a suitable port. This is common for mail reader servers (POP and IMAP, etc.). These services are enabled by editing the file /etc/inetd.conf. See inetd(8) for details on editing this file.
Some additional system services may not be covered by the toggles in /etc/rc.conf. These are traditionally enabled by placing the command(s) to invoke them in /etc/rc.local. As of FreeBSD 3.1 there is no default /etc/rc.local; if it is created by the administrator it will however be honored in the normal fashion. Note that rc.local is generally regarded as the location of last resort; if there is a better place to start a service, do it there.
Note: Do not place any commands in /etc/rc.conf. To start daemons, or run any commands at boot time, place a script in /usr/local/etc/rc.d instead.
It is also possible to use the cron(8) daemon to start system services. This approach has a number of advantages, not least being that because cron(8) runs these processes as the owner of the crontab, services may be started and maintained by non-root users.
This takes advantage of a feature of cron(8): the time specification may be replaced by @reboot, which will cause the job to be run when cron(8) is started shortly after system boot.
6.6 Configuring the cron Utility
Contributed by Tom Rhodes.One of the most useful utilities in FreeBSD is cron(8). The cron utility runs in the background and constantly checks the /etc/crontab file. The cron utility also checks the /var/cron/tabs directory, in search of new crontab files. These crontab files store information about specific functions which cron is supposed to perform at certain times.
Let us take a look at the /etc/crontab file:
# /etc/crontab - root's crontab for FreeBSD # # $FreeBSD: src/etc/crontab,v 1.32 2002/11/22 16:13:39 tom Exp $ ## SHELL=/bin/sh PATH=/etc:/bin:/sbin:/usr/bin:/usr/sbin
HOME=/var/log # # #minute hour mday month wday who command
# # */5 * * * * root /usr/libexec/atrun

- Like most FreeBSD configuration files, the # character represents a comment. A comment can be placed in the file as a reminder of what and why a desired action is performed. Comments cannot be on the same line as a command or else they will be interpreted as part of the command; they must be on a new line. Blank lines are ignored.
- First, the environment must be defined. The equals (=) character is used to define any environment settings, as with this example where it is used for the SHELL, PATH, and HOME options. If the shell line is omitted, cron will use the default, which is sh. If the PATH variable is omitted, no default will be used and file locations will need to be absolute. If HOME is omitted, cron will use the invoking users home directory.
- This line defines a total of seven fields. Listed here are the values minute, hour, mday, month, wday, who, and command. These are almost all self explanatory. Minute is the time in minutes the command will be run. Hour is similar to the minute option, just in hours. Mday stands for day of the month. Month is similar to hour and minute, as it designates the month. The wday options stands for day of the week. All these fields must be numeric values, and follow the twenty-four hour clock. The ``who'' field is special, and only exists in the /etc/crontab file. This field specifies which user the command should be run as. When a user installs his or her crontab file, they will not have this option. Finally, the command option is listed. This is the last field, so naturally it should designate the command to be executed.
- This last line will define the values discussed above. Notice here we have a */5 listing, followed by several more * characters. These * characters mean ``first-last'', and can be interpreted as every time. So, judging by this line, its apparent that the atrun command is to be invoked by root every five minutes regardless of what day or month it is. For more information on the atrun, see the atrun(8) manual page.
-
Commands can have any number of flags passed to them; however, commands which extend to multiple lines need to be broken with the backslash ``\'' continuation character.
This is the basic set up for every crontab file, although there is one thing different about this one. Field number six, where we specified the username, only exists in the system /etc/crontab file. This field should be omitted for individual user crontab files.
6.6.1 Installing a Crontab
To install your freshly written crontab, just use the crontab utility. The most common usage is:
# crontab crontab
There is also an option to list installed crontab files, just pass the -l to crontab and look over the output.
Users who wish to begin their own crontab file from scratch, without the use of a template, the crontab -e option is available. This will invoke the selected editor with an empty file. When the file is saved, it will be automatically installed by the crontab command.
6.7 Using rc under FreeBSD 5.X
Contributed by Tom Rhodes.FreeBSD has recently integrated the NetBSD rc.d system for system initialization. Users should notice the files listed in the /etc/rc.d directory. Many of these files are for basic services which can be controlled with the start, stop, and restart options. For instance, sshd(8) can be restarted with the following command:
# /etc/rc.d/sshd restart
This procedure is similar for other services. Of course, services are usually started automatically as specified in rc.conf(5). For example, enabling the Network Address Translation daemon at startup is as simple as adding the following line to /etc/rc.conf:
natd_enable="YES"
If a natd_enable="NO" line is already present, then simply change the NO to YES. The rc scripts will automatically load any other dependent services during the next reboot, as described below.
Since the rc.d system is primarily intended to start/stop services at system startup/shutdown time; the standard start, stop and restart options will only perform their action if the appropriate /etc/rc.conf variables are set. For instance the above sshd restart command will only work if sshd_enable is set to YES in /etc/rc.conf. To start, stop or restart a service regardless of the settings in /etc/rc.conf, the commands should be prefixed with ``force''. For instance to restart sshd regardless of the current /etc/rc.conf setting, execute the following command:
# /etc/rc.d/sshd forcerestart
It's easy to check if a service is enabled in /etc/rc.conf by running the appropriate rc.d script with the option rcvar. Thus, an administrator can check that sshd is in fact enabled in /etc/rc.conf by running:
# /etc/rc.d/sshd rcvar
# sshd
$sshd_enable=YES
Note: The second line (# sshd) is the output from the sshd command; not a root console.
To determine if a service is running, a status option is available. For instance to verify that sshd is actually started:
# /etc/rc.d/sshd status
sshd is running as pid 433.
It is also possible to reload a service. This will attempt to send a signal to an individual service, forcing the service to reload its configuration files. In most cases this means sending the service a SIGHUP signal.
The rcNG structure is not only used for network services, it also contributes to most of the system initialization. For instance, consider the bgfsck file. When this script is executed, it will print out the following message:
Starting background file system checks in 60 seconds.
Therefore this file is used for background file system checks, which are done only during system initialization.
Many system services depend on other services to function properly. For example, NIS and other RPC-based services may fail to start until after the rpcbind (portmapper) service has started. To resolve this issue, information about dependencies and other meta-data is included in the comments at the top of each startup script. The rcorder(8) program is then used to parse these comments during system initialization to determine the order in which system services should be invoked to satisfy the dependencies. The following words may be included at the top of each startup file:
-
PROVIDE: Specifies the services this file provides.
-
REQUIRE: Lists services which are required for this service. This file will run after the specified services.
-
BEFORE: Lists services which depend on this service. This file will run before the specified services.
-
KEYWORD: FreeBSD or NetBSD. This is used for *BSD dependent features.
By using this method, an administrator can easily control system services without the hassle of ``runlevels'' like some other UNIX operating systems.
Additional information about the FreeBSD 5.X rc.d system can be found in the rc(8) and rc.subr(8) manual pages.
6.8 Setting Up Network Interface Cards
Contributed by Marc Fonvieille.Nowadays we can not think about a computer without thinking about a network connection. Adding and configuring a network card is a common task for any FreeBSD administrator.
6.8.1 Locating the Correct Driver
Before you begin, you should know the model of the card you have, the chip it uses, and whether it is a PCI or ISA card. FreeBSD supports a wide variety of both PCI and ISA cards. Check the Hardware Compatibility List for your release to see if your card is supported.
Once you are sure your card is supported, you need to determine the proper driver for the card. The file /usr/src/sys/i386/conf/LINT will give you the list of network interfaces drivers with some information about the supported chipsets/cards. If you have doubts about which driver is the correct one, read the manual page of the driver. The manual page will give you more information about the supported hardware and even the possible problems that could occur.
If you own a common card, most of the time you will not have to look very hard for a driver. Drivers for common network cards are present in the GENERIC kernel, so your card should show up during boot, like so:
dc0: <82c169 PNIC 10/100BaseTX> port 0xa000-0xa0ff mem 0xd3800000-0xd38
000ff irq 15 at device 11.0 on pci0
dc0: Ethernet address: 00:a0:cc:da:da:da
miibus0: <MII bus> on dc0
ukphy0: <Generic IEEE 802.3u media interface> on miibus0
ukphy0:  10baseT, 10baseT-FDX, 100baseTX, 100baseTX-FDX, auto
dc1: <82c169 PNIC 10/100BaseTX> port 0x9800-0x98ff mem 0xd3000000-0xd30
000ff irq 11 at device 12.0 on pci0
dc1: Ethernet address: 00:a0:cc:da:da:db
miibus1: <MII bus> on dc1
ukphy1: <Generic IEEE 802.3u media interface> on miibus1
ukphy1:  10baseT, 10baseT-FDX, 100baseTX, 100baseTX-FDX, auto
In this example, we see that two cards using the dc(4) driver are present on the system.
To use your network card, you will need to load the proper driver. This may be accomplished in one of two ways. The easiest way is to simply load a kernel module for your network card with kldload(8). A module is not available for all network card drivers (ISA cards and cards using the ed(4) driver, for example). Alternatively, you may statically compile the support for your card into your kernel. Check /usr/src/sys/i386/conf/LINT and the manual page of the driver to know what to add in your kernel configuration file. For more information about recompiling your kernel, please see Chapter 9. If your card was detected at boot by your kernel (GENERIC) you do not have to build a new kernel.
6.8.2 Configuring the Network Card
Once the right driver is loaded for the network card, the card needs to be configured. As with many other things, the network card may have been configured at installation time by sysinstall.
To display the configuration for the network interfaces on your system, enter the following command:
% ifconfig
dc0: flags=8843<UP,BROADCAST,RUNNING,SIMPLEX,MULTICAST> mtu 1500
        inet 192.168.1.3 netmask 0xffffff00 broadcast 192.168.1.255
        ether 00:a0:cc:da:da:da
        media: Ethernet autoselect (100baseTX <full-duplex>)
        status: active
dc1: flags=8843<UP,BROADCAST,RUNNING,SIMPLEX,MULTICAST> mtu 1500
        inet 10.0.0.1 netmask 0xffffff00 broadcast 10.0.0.255
        ether 00:a0:cc:da:da:db
        media: Ethernet 10baseT/UTP
        status: no carrier
lp0: flags=8810<POINTOPOINT,SIMPLEX,MULTICAST> mtu 1500
lo0: flags=8049<UP,LOOPBACK,RUNNING,MULTICAST> mtu 16384
        inet 127.0.0.1 netmask 0xff000000
tun0: flags=8010<POINTOPOINT,MULTICAST> mtu 1500
Note: Old versions of FreeBSD may require the -a option following ifconfig(8), for more details about the correct syntax of ifconfig(8), please refer to the manual page. Note also that entries concerning IPv6 (inet6 etc.) were omitted in this example.
In this example, the following devices were displayed:
-
dc0: The first Ethernet interface
-
dc1: The second Ethernet interface
-
lp0: The parallel port interface
-
lo0: The loopback device
-
tun0: The tunnel device used by ppp
FreeBSD uses the driver name followed by the order in which one the card is detected at the kernel boot to name the network card. For example sis2 would be the third network card on the system using the sis(4) driver.
In this example, the dc0 device is up and running. The key indicators are:
-
UP means that the card is configured and ready.
-
The card has an Internet (inet) address (in this case 192.168.1.3).
-
It has a valid subnet mask (netmask; 0xffffff00 is the same as 255.255.255.0).
-
It has a valid broadcast address (in this case, 192.168.1.255).
-
The MAC address of the card (ether) is 00:a0:cc:da:da:da
-
The physical media selection is on autoselection mode (media: Ethernet autoselect (100baseTX <full-duplex>)). We see that dc1 was configured to run with 10baseT/UTP media. For more information on available media types for a driver, please refer to its manual page.
-
The status of the link (status) is active, i.e. the carrier is detected. For dc1, we see status: no carrier. This is normal when an ethernet cable is not plugged into the card.
If the ifconfig(8) output had shown something similar to:
dc0: flags=8843<BROADCAST,SIMPLEX,MULTICAST> mtu 1500
            ether 00:a0:cc:da:da:da
it would indicate the card has not been configured.
To configure your card, you need root privileges. The network card configuration can be done from the command line with ifconfig(8) but you would have to do it after each reboot of the system. The file /etc/rc.conf is where to add the network card's configuration.
Open /etc/rc.conf in your favorite editor. You need to add a line for each network card present on the system, for example in our case, we added these lines:
ifconfig_dc0="inet 192.168.1.3 netmask 255.255.255.0"
ifconfig_dc1="inet 10.0.0.1 netmask 255.255.255.0 media 10baseT/UTP"
You have to replace dc0, dc1, and so on, with the correct device for your cards, and the addresses with the proper ones. You should read the card driver and ifconfig(8) manual pages for more details about the allowed options and also rc.conf(5) manual page for more information on the syntax of /etc/rc.conf.
If you configured the network during installation, some lines about the network card(s) may be already present. Double check /etc/rc.conf before adding any lines.
You will also have to edit the file /etc/hosts to add the names and the IP addresses of various machines of the LAN, if they are not already there. For more information please refer to hosts(5) and to /usr/share/examples/etc/hosts.
6.8.3 Testing and Troubleshooting
Once you have made the necessary changes in /etc/rc.conf, you should reboot your system. This will allow the change(s) to the interface(s) to be applied, and verify that the system restarts without any configuration errors.
Once the system has been rebooted, you should test the network interfaces.
6.8.3.1 Testing the Ethernet Card
To verify that an Ethernet card is configured correctly, you have to try two things. First, ping the interface itself, and then ping another machine on the LAN.
First test the local interface:
% ping -c5 192.168.1.3
PING 192.168.1.3 (192.168.1.3): 56 data bytes
64 bytes from 192.168.1.3: icmp_seq=0 ttl=64 time=0.082 ms
64 bytes from 192.168.1.3: icmp_seq=1 ttl=64 time=0.074 ms
64 bytes from 192.168.1.3: icmp_seq=2 ttl=64 time=0.076 ms
64 bytes from 192.168.1.3: icmp_seq=3 ttl=64 time=0.108 ms
64 bytes from 192.168.1.3: icmp_seq=4 ttl=64 time=0.076 ms

--- 192.168.1.3 ping statistics ---
5 packets transmitted, 5 packets received, 0% packet loss
round-trip min/avg/max/stddev = 0.074/0.083/0.108/0.013 ms
Now we have to ping another machine on the LAN:
% ping -c5 192.168.1.2
PING 192.168.1.2 (192.168.1.2): 56 data bytes
64 bytes from 192.168.1.2: icmp_seq=0 ttl=64 time=0.726 ms
64 bytes from 192.168.1.2: icmp_seq=1 ttl=64 time=0.766 ms
64 bytes from 192.168.1.2: icmp_seq=2 ttl=64 time=0.700 ms
64 bytes from 192.168.1.2: icmp_seq=3 ttl=64 time=0.747 ms
64 bytes from 192.168.1.2: icmp_seq=4 ttl=64 time=0.704 ms

--- 192.168.1.2 ping statistics ---
5 packets transmitted, 5 packets received, 0% packet loss
round-trip min/avg/max/stddev = 0.700/0.729/0.766/0.025 ms
You could also use the machine name instead of 192.168.1.2 if you have set up the /etc/hosts file.
6.8.3.2 Troubleshooting
Troubleshooting hardware and software configurations is always a pain, and a pain which can be alleviated by checking the simple things first. Is your network cable plugged in? Have you properly configured the network services? Did you configure the firewall correctly? Is the card you are using supported by FreeBSD? Always check the hardware notes before sending off a bug report. Update your version of FreeBSD to the latest STABLE version. Check the mailing list archives, or perhaps search the Internet.
If the card works, yet performance is poor, it would be worthwhile to read over the tuning(7) manual page. You can also check the network configuration as incorrect network settings can cause slow connections.
Some users experience one or two ``device timeouts'', which is normal for some cards. If they continue, or are bothersome, you may wish to be sure the device is not conflicting with another device. Double check the cable connections. Perhaps you may just need to get another card.
At times, users see a few ``watchdog timeout'' errors. The first thing to do here is to check your network cable. Many cards require a PCI slot which supports Bus Mastering. On some old motherboards, only one PCI slot allows it (usually slot 0). Check the network card and the motherboard documentation to determine if that may be the problem.
``No route to host'' messages occur if the system is unable to route a packet to the destination host. This can happen if no default route is specified, or if a cable is unplugged. Check the output of netstat -rn and make sure there is a valid route to the host you are trying to reach. If there is not, read on to Chapter 19.
``ping: sendto: Permission denied'' error messages are often caused by a misconfigured firewall. If ipfw is enabled in the kernel but no rules have been defined, then the default policy is to deny all traffic, even ping requests! Read on to Section 10.8 for more information.
Sometimes performance of the card is poor, or below average. In these cases it is best to set the media selection mode from autoselect to the correct media selection. While this usually works for most hardware, it may not resolve this issue for everyone. Again, check all the network settings, and read over the tuning(7) manual page.
6.9 Virtual Hosts
A very common use of FreeBSD is virtual site hosting, where one server appears to the network as many servers. This is achieved by assigning multiple network addresses to a single interface.
A given network interface has one ``real'' address, and may have any number of ``alias'' addresses. These aliases are normally added by placing alias entries in /etc/rc.conf.
An alias entry for the interface fxp0 looks like:
ifconfig_fxp0_alias0="inet xxx.xxx.xxx.xxx netmask xxx.xxx.xxx.xxx"
Note that alias entries must start with alias0 and proceed upwards in order, (for example, _alias1, _alias2, and so on). The configuration process will stop at the first missing number.
The calculation of alias netmasks is important, but fortunately quite simple. For a given interface, there must be one address which correctly represents the network's netmask. Any other addresses which fall within this network must have a netmask of all 1s.
For example, consider the case where the fxp0 interface is connected to two networks, the 10.1.1.0 network with a netmask of 255.255.255.0 and the 202.0.75.16 network with a netmask of 255.255.255.240. We want the system to appear at 10.1.1.1 through 10.1.1.5 and at 202.0.75.17 through 202.0.75.20.
The following entries configure the adapter correctly for this arrangement:
 ifconfig_fxp0="inet 10.1.1.1 netmask 255.255.255.0"
 ifconfig_fxp0_alias0="inet 10.1.1.2 netmask 255.255.255.255"
 ifconfig_fxp0_alias1="inet 10.1.1.3 netmask 255.255.255.255"
 ifconfig_fxp0_alias2="inet 10.1.1.4 netmask 255.255.255.255"
 ifconfig_fxp0_alias3="inet 10.1.1.5 netmask 255.255.255.255"
 ifconfig_fxp0_alias4="inet 202.0.75.17 netmask 255.255.255.240"
 ifconfig_fxp0_alias5="inet 202.0.75.18 netmask 255.255.255.255"
 ifconfig_fxp0_alias6="inet 202.0.75.19 netmask 255.255.255.255"
 ifconfig_fxp0_alias7="inet 202.0.75.20 netmask 255.255.255.255"
6.10 Configuration Files
6.10.1 /etc Layout
There are a number of directories in which configuration information is kept. These include:
| /etc | Generic system configuration information; data here is system-specific. |
| /etc/defaults | Default versions of system configuration files. |
| /etc/mail | Extra sendmail(8) configuration, other MTA configuration files. |
| /etc/ppp | Configuration for both user- and kernel-ppp programs. |
| /etc/namedb | Default location for named(8) data. Normally named.conf and zone files are stored here. |
| /usr/local/etc | Configuration files for installed applications. May contain per-application subdirectories. |
| /usr/local/etc/rc.d | Start/stop scripts for installed applications. |
| /var/db | Automatically generated system-specific database files, such as the package database, the locate database, and so on |
6.10.2 Hostnames
6.10.2.1 /etc/resolv.conf
/etc/resolv.conf dictates how FreeBSD's resolver accesses the Internet Domain Name System (DNS).
The most common entries to resolv.conf are:
| nameserver | The IP address of a name server the resolver should query. The servers are queried in the order listed with a maximum of three. |
| search | Search list for hostname lookup. This is normally determined by the domain of the local hostname. |
| domain | The local domain name. |
A typical resolv.conf:
search example.com
nameserver 147.11.1.11
nameserver 147.11.100.30
Note: Only one of the search and domain options should be used.
If you are using DHCP, dhclient(8) usually rewrites resolv.conf with information received from the DHCP server.
6.10.2.2 /etc/hosts
/etc/hosts is a simple text database reminiscent of the old Internet. It works in conjunction with DNS and NIS providing name to IP address mappings. Local computers connected via a LAN can be placed in here for simplistic naming purposes instead of setting up a named(8) server. Additionally, /etc/hosts can be used to provide a local record of Internet names, reducing the need to query externally for commonly accessed names.
# $FreeBSD$
#
# Host Database
# This file should contain the addresses and aliases
# for local hosts that share this file.
# In the presence of the domain name service or NIS, this file may
# not be consulted at all; see /etc/nsswitch.conf for the resolution order.
#
#
::1                     localhost localhost.my.domain myname.my.domain
127.0.0.1               localhost localhost.my.domain myname.my.domain

#
# Imaginary network.
#10.0.0.2               myname.my.domain myname
#10.0.0.3               myfriend.my.domain myfriend
#
# According to RFC 1918, you can use the following IP networks for
# private nets which will never be connected to the Internet:
#
#       10.0.0.0        -   10.255.255.255
#       172.16.0.0      -   172.31.255.255
#       192.168.0.0     -   192.168.255.255
#
# In case you want to be able to connect to the Internet, you need
# real official assigned numbers.  PLEASE PLEASE PLEASE do not try
# to invent your own network numbers but instead get one from your
# network provider (if any) or from the Internet Registry (ftp to
# rs.internic.net, directory `/templates').
#
/etc/hosts takes on the simple format of:
[Internet address] [official hostname] [alias1] [alias2] ...
For example:
10.0.0.1 myRealHostname.example.com myRealHostname foobar1 foobar2
Consult hosts(5) for more information.
6.10.3 Log File Configuration
6.10.3.1 syslog.conf
syslog.conf is the configuration file for the syslogd(8) program. It indicates which types of syslog messages are logged to particular log files.
# $FreeBSD$
#
#       Spaces ARE valid field separators in this file. However,
#       other *nix-like systems still insist on using tabs as field
#       separators. If you are sharing this file between systems, you
#       may want to use only tabs as field separators here.
#       Consult the syslog.conf(5) manual page.
*.err;kern.debug;auth.notice;mail.crit          /dev/console
*.notice;kern.debug;lpr.info;mail.crit;news.err /var/log/messages
security.*                                      /var/log/security
mail.info                                       /var/log/maillog
lpr.info                                        /var/log/lpd-errs
cron.*                                          /var/log/cron
*.err                                           root
*.notice;news.err                               root
*.alert                                         root
*.emerg                                         *
# uncomment this to log all writes to /dev/console to /var/log/console.log
#console.info                                   /var/log/console.log
# uncomment this to enable logging of all log messages to /var/log/all.log
#*.*                                            /var/log/all.log
# uncomment this to enable logging to a remote log host named loghost
#*.*                                            @loghost
# uncomment these if you're running inn
# news.crit                                     /var/log/news/news.crit
# news.err                                      /var/log/news/news.err
# news.notice                                   /var/log/news/news.notice
!startslip
*.*                                             /var/log/slip.log
!ppp
*.*                                             /var/log/ppp.log
Consult the syslog.conf(5) manual page for more information.
6.10.3.2 newsyslog.conf
newsyslog.conf is the configuration file for newsyslog(8), a program that is normally scheduled to run by cron(8). newsyslog(8) determines when log files require archiving or rearranging. logfile is moved to logfile.0, logfile.0 is moved to logfile.1, and so on. Alternatively, the log files may be archived in gzip(1) format causing them to be named: logfile.0.gz, logfile.1.gz, and so on.
newsyslog.conf indicates which log files are to be managed, how many are to be kept, and when they are to be touched. Log files can be rearranged and/or archived when they have either reached a certain size, or at a certain periodic time/date.
# configuration file for newsyslog
# $FreeBSD$
#
# filename          [owner:group]    mode count size when [ZB] [/pid_file] [sig_num]
/var/log/cron                           600  3     100  *     Z
/var/log/amd.log                        644  7     100  *     Z
/var/log/kerberos.log                   644  7     100  *     Z
/var/log/lpd-errs                       644  7     100  *     Z
/var/log/maillog                        644  7     *    @T00  Z
/var/log/sendmail.st                    644  10    *    168   B
/var/log/messages                       644  5     100  *     Z
/var/log/all.log                        600  7     *    @T00  Z
/var/log/slip.log                       600  3     100  *     Z
/var/log/ppp.log                        600  3     100  *     Z
/var/log/security                       600  10    100  *     Z
/var/log/wtmp                           644  3     *    @01T05 B
/var/log/daily.log                      640  7     *    @T00  Z
/var/log/weekly.log                     640  5     1    $W6D0 Z
/var/log/monthly.log                    640  12    *    $M1D0 Z
/var/log/console.log                    640  5     100  *     Z
Consult the newsyslog(8) manual page for more information.
6.10.4 sysctl.conf
sysctl.conf looks much like rc.conf. Values are set in a variable=value form. The specified values are set after the system goes into multi-user mode. Not all variables are settable in this mode.
A sample sysctl.conf turning off logging of fatal signal exits and letting Linux programs know they are really running under FreeBSD:
kern.logsigexit=0       # Do not log fatal signal exits (e.g. sig 11)
compat.linux.osname=FreeBSD
compat.linux.osrelease=4.3-STABLE
6.11 Tuning with sysctl
sysctl(8) is an interface that allows you to make changes to a running FreeBSD system. This includes many advanced options of the TCP/IP stack and virtual memory system that can dramatically improve performance for an experienced system administrator. Over five hundred system variables can be read and set using sysctl(8).
At its core, sysctl(8) serves two functions: to read and to modify system settings.
To view all readable variables:
% sysctl -a
To read a particular variable, for example, kern.maxproc:
% sysctl kern.maxproc
kern.maxproc: 1044
To set a particular variable, use the intuitive variable=value syntax:
# sysctl kern.maxfiles=5000
kern.maxfiles: 2088 -> 5000
Settings of sysctl variables are usually either strings, numbers, or booleans (a boolean being 1 for yes or a 0 for no).
6.11.1 sysctl(8) Read-only
Contributed by Tom Rhodes.In some cases it may be desirable to modify read-only sysctl(8) values. While this is not recommended, it is also sometimes unavoidable.
For instance on some laptop models the cardbus(4) device will not probe memory ranges, and fail with errors which look similar to:
cbb0: Could not map register memory
device_probe_and_attach: cbb0 attach returned 12
Cases like the one above usually require the modification of some default sysctl(8) settings which are set read only. To overcome these situations a user can put sysctl(8) ``OIDs'' in their local /boot/loader.conf.local. Default settings are located in the /boot/defaults/loader.conf file.
Fixing the problem mentioned above would require a user to set hw.pci.allow_unsupported_io_range=1 in the aforementioned file. Now cardbus(4) will work properly.
6.12 Tuning Disks
6.12.1 Sysctl Variables
6.12.1.1 vfs.vmiodirenable
The vfs.vmiodirenable sysctl variable may be set to either 0 (off) or 1 (on); it is 1 by default. This variable controls how directories are cached by the system. Most directories are small, using just a single fragment (typically 1 K) in the file system and less (typically 512 bytes) in the buffer cache. However, when operating in the default mode the buffer cache will only cache a fixed number of directories even if you have a huge amount of memory. Turning on this sysctl allows the buffer cache to use the VM Page Cache to cache the directories, making all the memory available for caching directories. However, the minimum in-core memory used to cache a directory is the physical page size (typically 4 K) rather than 512 bytes. We recommend turning this option on if you are running any services which manipulate large numbers of files. Such services can include web caches, large mail systems, and news systems. Turning on this option will generally not reduce performance even with the wasted memory but you should experiment to find out.
6.12.1.2 vfs.write_behind
The vfs.write_behind sysctl variable defaults to 1 (on). This tells the file system to issue media writes as full clusters are collected, which typically occurs when writing large sequential files. The idea is to avoid saturating the buffer cache with dirty buffers when it would not benefit I/O performance. However, this may stall processes and under certain circumstances you may wish to turn it off.
6.12.1.3 vfs.hirunningspace
The vfs.hirunningspace sysctl variable determines how much outstanding write I/O may be queued to disk controllers system-wide at any given instance. The default is usually sufficient but on machines with lots of disks you may want to bump it up to four or five megabytes. Note that setting too high a value (exceeding the buffer cache's write threshold) can lead to extremely bad clustering performance. Do not set this value arbitrarily high! Higher write values may add latency to reads occurring at the same time.
There are various other buffer-cache and VM page cache related sysctls. We do not recommend modifying these values. As of FreeBSD 4.3, the VM system does an extremely good job of automatically tuning itself.
6.12.1.4 vm.swap_idle_enabled
The vm.swap_idle_enabled sysctl variable is useful in large multi-user systems where you have lots of users entering and leaving the system and lots of idle processes. Such systems tend to generate a great deal of continuous pressure on free memory reserves. Turning this feature on and tweaking the swapout hysteresis (in idle seconds) via vm.swap_idle_threshold1 and vm.swap_idle_threshold2 allows you to depress the priority of memory pages associated with idle processes more quickly then the normal pageout algorithm. This gives a helping hand to the pageout daemon. Do not turn this option on unless you need it, because the tradeoff you are making is essentially pre-page memory sooner rather than later; thus eating more swap and disk bandwidth. In a small system this option will have a determinable effect but in a large system that is already doing moderate paging this option allows the VM system to stage whole processes into and out of memory easily.
6.12.1.5 hw.ata.wc
FreeBSD 4.3 flirted with turning off IDE write caching. This reduced write bandwidth to IDE disks but was considered necessary due to serious data consistency issues introduced by hard drive vendors. The problem is that IDE drives lie about when a write completes. With IDE write caching turned on, IDE hard drives not only write data to disk out of order, but will sometimes delay writing some blocks indefinitely when under heavy disk loads. A crash or power failure may cause serious file system corruption. FreeBSD's default was changed to be safe. Unfortunately, the result was such a huge performance loss that we changed write caching back to on by default after the release. You should check the default on your system by observing the hw.ata.wc sysctl variable. If IDE write caching is turned off, you can turn it back on by setting the kernel variable back to 1. This must be done from the boot loader at boot time. Attempting to do it after the kernel boots will have no effect.
For more information, please see ata(4).
6.12.1.6 SCSI_DELAY (kern.cam.scsi_delay)
The SCSI_DELAY kernel config may be used to reduce system boot times. The defaults are fairly high and can be responsible for 15+ seconds of delay in the boot process. Reducing it to 5 seconds usually works (especially with modern drives). Newer versions of FreeBSD (5.0+) should use the kern.cam.scsi_delay boot time tunable. The tunable, and kernel config option accept values in terms of milliseconds and not seconds.
6.12.2 Soft Updates
The tunefs(8) program can be used to fine-tune a file system. This program has many different options, but for now we are only concerned with toggling Soft Updates on and off, which is done by:
# tunefs -n enable /filesystem
# tunefs -n disable /filesystem
A filesystem cannot be modified with tunefs(8) while it is mounted. A good time to enable Soft Updates is before any partitions have been mounted, in single-user mode.
Note: As of FreeBSD 4.5, it is possible to enable Soft Updates at filesystem creation time, through use of the -U option to newfs(8).
Soft Updates drastically improves meta-data performance, mainly file creation and deletion, through the use of a memory cache. We recommend to use Soft Updates on all of your file systems. There are two downsides to Soft Updates that you should be aware of: First, Soft Updates guarantees filesystem consistency in the case of a crash but could very easily be several seconds (even a minute!) behind updating the physical disk. If your system crashes you may lose more work than otherwise. Secondly, Soft Updates delays the freeing of filesystem blocks. If you have a filesystem (such as the root filesystem) which is almost full, performing a major update, such as make installworld, can cause the filesystem to run out of space and the update to fail.
6.12.2.1 More Details about Soft Updates
There are two traditional approaches to writing a file systems meta-data back to disk. (Meta-data updates are updates to non-content data like inodes or directories.)
Historically, the default behavior was to write out meta-data updates synchronously. If a directory had been changed, the system waited until the change was actually written to disk. The file data buffers (file contents) were passed through the buffer cache and backed up to disk later on asynchronously. The advantage of this implementation is that it operates safely. If there is a failure during an update, the meta-data are always in a consistent state. A file is either created completely or not at all. If the data blocks of a file did not find their way out of the buffer cache onto the disk by the time of the crash, fsck(8) is able to recognize this and repair the filesystem by setting the file length to 0. Additionally, the implementation is clear and simple. The disadvantage is that meta-data changes are slow. An rm -r, for instance, touches all the files in a directory sequentially, but each directory change (deletion of a file) will be written synchronously to the disk. This includes updates to the directory itself, to the inode table, and possibly to indirect blocks allocated by the file. Similar considerations apply for unrolling large hierarchies (tar -x).
The second case is asynchronous meta-data updates. This is the default for Linux/ext2fs and mount -o async for *BSD ufs. All meta-data updates are simply being passed through the buffer cache too, that is, they will be intermixed with the updates of the file content data. The advantage of this implementation is there is no need to wait until each meta-data update has been written to disk, so all operations which cause huge amounts of meta-data updates work much faster than in the synchronous case. Also, the implementation is still clear and simple, so there is a low risk for bugs creeping into the code. The disadvantage is that there is no guarantee at all for a consistent state of the filesystem. If there is a failure during an operation that updated large amounts of meta-data (like a power failure, or someone pressing the reset button), the filesystem will be left in an unpredictable state. There is no opportunity to examine the state of the filesystem when the system comes up again; the data blocks of a file could already have been written to the disk while the updates of the inode table or the associated directory were not. It is actually impossible to implement a fsck which is able to clean up the resulting chaos (because the necessary information is not available on the disk). If the filesystem has been damaged beyond repair, the only choice is to use newfs(8) on it and restore it from backup.
The usual solution for this problem was to implement dirty region logging, which is also referred to as journaling, although that term is not used consistently and is occasionally applied to other forms of transaction logging as well. Meta-data updates are still written synchronously, but only into a small region of the disk. Later on they will be moved to their proper location. Because the logging area is a small, contiguous region on the disk, there are no long distances for the disk heads to move, even during heavy operations, so these operations are quicker than synchronous updates. Additionally the complexity of the implementation is fairly limited, so the risk of bugs being present is low. A disadvantage is that all meta-data are written twice (once into the logging region and once to the proper location) so for normal work, a performance ``pessimization'' might result. On the other hand, in case of a crash, all pending meta-data operations can be quickly either rolled-back or completed from the logging area after the system comes up again, resulting in a fast filesystem startup.
Kirk McKusick, the developer of Berkeley FFS, solved this problem with Soft Updates: all pending meta-data updates are kept in memory and written out to disk in a sorted sequence (``ordered meta-data updates''). This has the effect that, in case of heavy meta-data operations, later updates to an item ``catch'' the earlier ones if the earlier ones are still in memory and have not already been written to disk. So all operations on, say, a directory are generally performed in memory before the update is written to disk (the data blocks are sorted according to their position so that they will not be on the disk ahead of their meta-data). If the system crashes, this causes an implicit ``log rewind'': all operations which did not find their way to the disk appear as if they had never happened. A consistent filesystem state is maintained that appears to be the one of 30 to 60 seconds earlier. The algorithm used guarantees that all resources in use are marked as such in their appropriate bitmaps: blocks and inodes. After a crash, the only resource allocation error that occurs is that resources are marked as ``used'' which are actually ``free''. fsck(8) recognizes this situation, and frees the resources that are no longer used. It is safe to ignore the dirty state of the filesystem after a crash by forcibly mounting it with mount -f. In order to free resources that may be unused, fsck(8) needs to be run at a later time. This is the idea behind the background fsck: at system startup time, only a snapshot of the filesystem is recorded. The fsck can be run later on. All file systems can then be mounted ``dirty'', so the system startup proceeds in multiuser mode. Then, background fscks will be scheduled for all file systems where this is required, to free resources that may be unused. (File systems that do not use Soft Updates still need the usual foreground fsck though.)
The advantage is that meta-data operations are nearly as fast as asynchronous updates (i.e. faster than with logging, which has to write the meta-data twice). The disadvantages are the complexity of the code (implying a higher risk for bugs in an area that is highly sensitive regarding loss of user data), and a higher memory consumption. Additionally there are some idiosyncrasies one has to get used to. After a crash, the state of the filesystem appears to be somewhat ``older''. In situations where the standard synchronous approach would have caused some zero-length files to remain after the fsck, these files do not exist at all with a Soft Updates filesystem because neither the meta-data nor the file contents have ever been written to disk. Disk space is not released until the updates have been written to disk, which may take place some time after running rm. This may cause problems when installing large amounts of data on a filesystem that does not have enough free space to hold all the files twice.
6.13 Tuning Kernel Limits
6.13.1 File/Process Limits
6.13.1.1 kern.maxfiles
kern.maxfiles can be raised or lowered based upon your system requirements. This variable indicates the maximum number of file descriptors on your system. When the file descriptor table is full, ``file: table is full'' will show up repeatedly in the system message buffer, which can be viewed with the dmesg command.
Each open file, socket, or fifo uses one file descriptor. A large-scale production server may easily require many thousands of file descriptors, depending on the kind and number of services running concurrently.
kern.maxfile's default value is dictated by the MAXUSERS option in your kernel configuration file. kern.maxfiles grows proportionally to the value of MAXUSERS. When compiling a custom kernel, it is a good idea to set this kernel configuration option according to the uses of your system. From this number, the kernel is given most of its pre-defined limits. Even though a production machine may not actually have 256 users connected at once, the resources needed may be similar to a high-scale web server.
Note: As of FreeBSD 4.5, setting MAXUSERS to 0 in your kernel configuration file will choose a reasonable default value based on the amount of RAM present in your system.
6.13.1.2 kern.ipc.somaxconn
The kern.ipc.somaxconn sysctl variable limits the size of the listen queue for accepting new TCP connections. The default value of 128 is typically too low for robust handling of new connections in a heavily loaded web server environment. For such environments, it is recommended to increase this value to 1024 or higher. The service daemon may itself limit the listen queue size (e.g. sendmail(8), or Apache) but will often have a directive in it's configuration file to adjust the queue size. Large listen queues also do a better job of avoiding Denial of Service (DoS) attacks.
6.13.2 Network Limits
The NMBCLUSTERS kernel configuration option dictates the amount of network Mbufs available to the system. A heavily-trafficked server with a low number of Mbufs will hinder FreeBSD's ability. Each cluster represents approximately 2 K of memory, so a value of 1024 represents 2 megabytes of kernel memory reserved for network buffers. A simple calculation can be done to figure out how many are needed. If you have a web server which maxes out at 1000 simultaneous connections, and each connection eats a 16 K receive and 16 K send buffer, you need approximately 32 MB worth of network buffers to cover the web server. A good rule of thumb is to multiply by 2, so 2x32 MB / 2 KB = 64 MB / 2 kB = 32768. We recommend values between 4096 and 32768 for machines with greater amounts of memory. Under no circumstances should you specify an arbitrarily high value for this parameter as it could lead to a boot time crash. The -m option to netstat(1) may be used to observe network cluster use.
kern.ipc.nmbclusters loader tunable should be used to tune this at boot time. Only older versions of FreeBSD will require you to use the NMBCLUSTERS kernel config(8) option.
For busy servers that make extensive use of the sendfile(2) system call, it may be necessary to increase the number of sendfile(2) buffers via the NSFBUFS kernel configuration option or by setting its value in /boot/loader.conf (see loader(8) for details). A common indicator that this parameter needs to be adjusted is when processes are seen in the ``sfbufa'' state. The sysctl variable kern.ipc.nsfbufs is a read-only glimpse at the kernel configured variable. This parameter nominally scales with kern.maxusers, however it may be necessary to tune accordingly.
Important: Even though a socket has been marked as non-blocking, calling sendfile(2) on the non-blocking socket may result in the sendfile(2) call blocking until enough struct sf_buf's are made available.
6.13.2.1 net.inet.ip.portrange.*
The net.inet.ip.portrange.* sysctl variables control the port number ranges automatically bound to TCP and UDP sockets. There are three ranges: a low range, a default range, and a high range. Most network programs use the default range which is controlled by the net.inet.ip.portrange.first and net.inet.ip.portrange.last, which default to 1024 and 5000, respectively. Bound port ranges are used for outgoing connections, and it is possible to run the system out of ports under certain circumstances. This most commonly occurs when you are running a heavily loaded web proxy. The port range is not an issue when running servers which handle mainly incoming connections, such as a normal web server, or has a limited number of outgoing connections, such as a mail relay. For situations where you may run yourself out of ports, it is recommended to increase net.inet.ip.portrange.last modestly. A value of 10000, 20000 or 30000 may be reasonable. You should also consider firewall effects when changing the port range. Some firewalls may block large ranges of ports (usually low-numbered ports) and expect systems to use higher ranges of ports for outgoing connections -- for this reason it is recommended that net.inet.ip.portrange.first be lowered.
6.13.2.2 TCP Bandwidth Delay Product
The TCP Bandwidth Delay Product Limiting is similar to TCP/Vegas in NetBSD. It can be enabled by setting net.inet.tcp.inflight_enable sysctl variable to 1. The system will attempt to calculate the bandwidth delay product for each connection and limit the amount of data queued to the network to just the amount required to maintain optimum throughput.
This feature is useful if you are serving data over modems, Gigabit Ethernet, or even high speed WAN links (or any other link with a high bandwidth delay product), especially if you are also using window scaling or have configured a large send window. If you enable this option, you should also be sure to set net.inet.tcp.inflight_debug to 0 (disable debugging), and for production use setting net.inet.tcp.inflight_min to at least 6144 may be beneficial. However, note that setting high minimums may effectively disable bandwidth limiting depending on the link. The limiting feature reduces the amount of data built up in intermediate route and switch packet queues as well as reduces the amount of data built up in the local host's interface queue. With fewer packets queued up, interactive connections, especially over slow modems, will also be able to operate with lower Round Trip Times. However, note that this feature only effects data transmission (uploading / server side). It has no effect on data reception (downloading).
Adjusting net.inet.tcp.inflight_stab is not recommended. This parameter defaults to 20, representing 2 maximal packets added to the bandwidth delay product window calculation. The additional window is required to stabilize the algorithm and improve responsiveness to changing conditions, but it can also result in higher ping times over slow links (though still much lower than you would get without the inflight algorithm). In such cases, you may wish to try reducing this parameter to 15, 10, or 5; and may also have to reduce net.inet.tcp.inflight_min (for example, to 3500) to get the desired effect. Reducing these parameters should be done as a last resort only.
6.14 Adding Swap Space
No matter how well you plan, sometimes a system does not run as you expect. If you find you need more swap space, it is simple enough to add. You have three ways to increase swap space: adding a new hard drive, enabling swap over NFS, and creating a swap file on an existing partition.
6.14.1 Swap on a New Hard Drive
The best way to add swap, of course, is to use this as an excuse to add another hard drive. You can always use another hard drive, after all. If you can do this, go reread the discussion of swap space from the Initial Configuration section of the Handbook for some suggestions on how to best arrange your swap.
6.14.2 Swapping over NFS
Swapping over NFS is only recommended if you do not have a local hard disk to swap to. Swapping over NFS is slow and inefficient in versions of FreeBSD prior to 4.X. It is reasonably fast and efficient in 4.0-RELEASE and newer. Even with newer versions of FreeBSD, NFS swapping will be limited by the available network bandwidth and puts an additional burden on the NFS server.
6.14.3 Swapfiles
You can create a file of a specified size to use as a swap file. In our example here we will use a 64MB file called /usr/swap0. You can use any name you want, of course.
Example 6-1. Creating a Swapfile on FreeBSD 4.X
-
Be certain that your kernel configuration includes the vnode driver. It is not in recent versions of GENERIC.
pseudo-device vn 1 #Vnode driver (turns a file into a device)
-
create a vn-device:
# cd /dev
# sh MAKEDEV vn0
-
create a swapfile (/usr/swap0):
# dd if=/dev/zero of=/usr/swap0 bs=1024k count=64
-
set proper permissions on (/usr/swap0):
# chmod 0600 /usr/swap0
-
enable the swap file in /etc/rc.conf:
swapfile="/usr/swap0" # Set to name of swapfile if aux swapfile desired.
-
Reboot the machine or to enable the swap file immediately, type:
# vnconfig -e /dev/vn0b /usr/swap0 swap
Example 6-2. Creating a Swapfile on FreeBSD 5.X
-
Be certain that your kernel configuration includes the memory disk driver (md(4)). It is default in GENERIC kernel.
device md # Memory "disks"
-
create a swapfile (/usr/swap0):
# dd if=/dev/zero of=/usr/swap0 bs=1024k count=64
-
set proper permissions on (/usr/swap0):
# chmod 0600 /usr/swap0
-
enable the swap file in /etc/rc.conf:
swapfile="/usr/swap0" # Set to name of swapfile if aux swapfile desired.
-
Reboot the machine or to enable the swap file immediately, type:
# mdconfig -a -t vnode -f /usr/swap0 -u 0 && swapon /dev/md0
6.15 Power and Resource Management
Written by Hiten Pandya and Tom Rhodes.It is very important to utilize hardware resources in an efficient manner. Before ACPI was introduced, it was very difficult and inflexible for operating systems to manage the power usage and thermal properties of a system. The hardware was controlled by some sort of BIOS embedded interface, such as Plug and Play BIOS (PNPBIOS), or Advanced Power Management (APM) and so on. Power and Resource Management is one of the key components of a modern operating system. For example, you may want an operating system to monitor system limits (and possibly alert you) in case your system temperature increased unexpectedly.
In this section of the FreeBSD Handbook, we will provide comprehensive information about ACPI. References will be provided for further reading at the end. Please be aware that ACPI is available on FreeBSD 5.X and above systems as a default kernel module. For FreeBSD 4.9, ACPI can be enabled by adding the line device acpi to a kernel configuration and rebuilding.
6.15.1 What Is ACPI?
Advanced Configuration and Power Interface (ACPI) is a standard written by an alliance of vendors to provide a standard interface for hardware resources and power management (hence the name). It is a key element in Operating System-directed configuration and Power Management, i.e.: it provides more control and flexibility to the operating system (OS). Modern systems ``stretched'' the limits of the current Plug and Play interfaces (such as APM, which is used in FreeBSD 4.X), prior to the introduction of ACPI. ACPI is the direct successor to APM (Advanced Power Management).
6.15.2 Shortcomings of Advanced Power Management (APM)
The Advanced Power Management (APM) facility control's the power usage of a system based on its activity. The APM BIOS is supplied by the (system) vendor and it is specific to the hardware platform. An APM driver in the OS mediates access to the APM Software Interface, which allows management of power levels.
There are four major problems in APM. Firstly, power management is done by the (vendor-specific) BIOS, and the OS does not have any knowledge of it. One example of this, is when the user sets idle-time values for a hard drive in the APM BIOS, that when exceeded, it (BIOS) would spin down the hard drive, without the consent of the OS. Secondly, the APM logic is embedded in the BIOS, and it operates outside the scope of the OS. This means users can only fix problems in their APM BIOS by flashing a new one into the ROM; which, is a very dangerous procedure, and if it fails, it could leave the system in an unrecoverable state. Thirdly, APM is a vendor-specific technology, which, means that there is a lot or parity (duplication of efforts) and bugs found in one vendor's BIOS, may not be solved in others. Last but not the least, the APM BIOS did not have enough room to implement a sophisticated power policy, or one that can adapt very well to the purpose of the machine.
Plug and Play BIOS (PNPBIOS) was unreliable in many situations. PNPBIOS is 16-bit technology, so the OS has to use 16-bit emulation in order to ``interface'' with PNPBIOS methods.
The FreeBSD APM driver is documented in the apm(4) manual page.
6.15.3 Configuring ACPI
The acpi.ko driver is loaded by default at start up by the loader(8) and should not be compiled into the kernel. The reasoning behind this is that modules are easier to work with, say if switching to another acpi.ko without doing a kernel rebuild. This has the advantage of making testing easier. Another reason is that starting ACPI after a system has been brought up is not too useful, and in some cases can be fatal. In doubt, just disable ACPI all together. This driver should not and can not be unloaded because the system bus uses it for various hardware interactions. ACPI can be disabled with the acpiconf(8) utility. In fact most of the interaction with ACPI can be done via acpiconf(8). Basically this means, if anything about ACPI is in the dmesg(8) output, then most likely it is already running.
Note: ACPI and APM cannot coexist and should be used separately. The last one to load will terminate if the driver notices the other running.
In the simplest form, ACPI can be used to put the system into a sleep mode with acpiconf(8), the -s flag, and a 1-5 option. Most users will only need 1. Option 5 will do a soft-off which is the same action as:
# halt -p
The other options are available. Check out the acpiconf(8) manual page for more information.
6.15.4 Debugging and Disabling ACPI
Almost everything in ACPI is transparent, until it does not work. That is usually when you as a user will know there is something not working properly. The acpi(4) driver supports many debugging options, it is even possible to selectively disable some parts of the ACPI system. For more information about debugging facilities, read the acpi(4) manual page.
Sometimes for various reasons, the acpi.ko module must be unloaded. This can only be done at boot time by the loader(8). You can type at loader(8) prompt the command unset acpi_load each time you boot the system, or to stop the autoloading of the acpi(4) driver add the following line to the /boot/loader.conf file:
exec="unset acpi_load"
FreeBSD 5.1-RELEASE and later come with a boot-time menu that controls how FreeBSD is booted. One of the proposed options is to turn off ACPI. So to disable ACPI just select 2. Boot FreeBSD with ACPI disabled in the menu.
Chapter 7 The FreeBSD Booting Process
7.1 Synopsis
The process of starting a computer and loading the operating system is referred to as ``the bootstrap process'', or simply ``booting''. FreeBSD's boot process provides a great deal of flexibility in customizing what happens when you start the system, allowing you to select from different operating systems installed on the same computer, or even different versions of the same operating system or installed kernel.
This chapter details the configuration options you can set and how to customize the FreeBSD boot process. This includes everything that happens until the FreeBSD kernel has started, probed for devices, and started init(8). If you are not quite sure when this happens, it occurs when the text color changes from bright white to grey.
After reading this chapter, you will know:
-
What the components of the FreeBSD bootstrap system are, and how they interact.
-
The options you can give to the components in the FreeBSD bootstrap to control the boot process.
-
The basics of device.hints(5).
x86 Only: This chapter only describes the boot process for FreeBSD running on Intel x86 systems.
7.2 The Booting Problem
Turning on a computer and starting the operating system poses an interesting dilemma. By definition, the computer does not know how to do anything until the operating system is started. This includes running programs from the disk. So if the computer can not run a program from the disk without the operating system, and the operating system programs are on the disk, how is the operating system started?
This problem parallels one in the book The Adventures of Baron Munchausen. A character had fallen part way down a manhole, and pulled himself out by grabbing his bootstraps, and lifting. In the early days of computing the term bootstrap was applied to the mechanism used to load the operating system, which has become shortened to ``booting''.
On x86 hardware the Basic Input/Output System (BIOS) is responsible for loading the operating system. To do this, the BIOS looks on the hard disk for the Master Boot Record (MBR), which must be located on a specific place on the disk. The BIOS has enough knowledge to load and run the MBR, and assumes that the MBR can then carry out the rest of the tasks involved in loading the operating system.
If you only have one operating system installed on your disks then the standard MBR will suffice. This MBR searches for the first bootable slice on the disk, and then runs the code on that slice to load the remainder of the operating system.
If you have installed multiple operating systems on your disks then you can install a different MBR, one that can display a list of different operating systems, and allows you to choose the one to boot from. FreeBSD comes with one such MBR which can be installed, and other operating system vendors also provide alternative MBRs.
The remainder of the FreeBSD bootstrap system is divided into three stages. The first stage is run by the MBR, which knows just enough to get the computer into a specific state and run the second stage. The second stage can do a little bit more, before running the third stage. The third stage finishes the task of loading the operating system. The work is split into these three stages because the PC standards put limits on the size of the programs that can be run at stages one and two. Chaining the tasks together allows FreeBSD to provide a more flexible loader.
The kernel is then started and it begins to probe for devices and initialize them for use. Once the kernel boot process is finished, the kernel passes control to the user process init(8), which then makes sure the disks are in a usable state. init(8) then starts the user-level resource configuration which mounts file systems, sets up network cards to communicate on the network, and generally starts all the processes that usually are run on a FreeBSD system at startup.
7.3 The MBR, and Boot Stages One, Two, and Three
7.3.1 MBR, /boot/boot0
The FreeBSD MBR is located in /boot/boot0. This is a copy of the MBR, as the real MBR must be placed on a special part of the disk, outside the FreeBSD area.
boot0 is very simple, since the program in the MBR can only be 512 bytes in size. If you have installed the FreeBSD MBR and have installed multiple operating systems on your hard disks then you will see a display similar to this one at boot time:
Other operating systems, in particular Windows 95, have been known to overwrite an existing MBR with their own. If this happens to you, or you want to replace your existing MBR with the FreeBSD MBR then use the following command:
# fdisk -B -b /boot/boot0 device
Where device is the device that you boot from, such as ad0 for the first IDE disk, ad2 for the first IDE disk on a second IDE controller, da0 for the first SCSI disk, and so on.
If you are a Linux user, however, and prefer that LILO control the boot process, you can edit the /etc/lilo.conf file for FreeBSD, or select Leave The Master Boot Record Untouched during the FreeBSD installation process. If you have installed the FreeBSD boot manager, you can boot back into Linux and modify the LILO configuration file /etc/lilo.conf and add the following option:
other=/dev/hdXY
table=/dev/hdb
loader=/boot/chain.b
label=FreeBSD
which will permit the booting of FreeBSD and Linux via LILO. In our example, we use XY to determine drive number and partition. If you are using a SCSI drive, you will want to change /dev/hdXY to read something similar to /dev/sdXY, which again uses the XY syntax. The loader=/boot/chain.b can be omitted if you have both operating systems on the same drive. You can now run /sbin/lilo -v to commit your new changes to the system, this should be verified with screen messages.
7.3.2 Stage One, /boot/boot1, and Stage Two, /boot/boot2
Conceptually the first and second stages are part of the same program, on the same area of the disk. Because of space constraints they have been split into two, but you would always install them together.
They are found on the boot sector of the boot slice, which is where boot0, or any other program on the MBR expects to find the program to run to continue the boot process. The files in the /boot directory are copies of the real files, which are stored outside of the FreeBSD file system.
boot1 is very simple, since it too can only be 512 bytes in size, and knows just enough about the FreeBSD disklabel, which stores information about the slice, to find and execute boot2.
boot2 is slightly more sophisticated, and understands the FreeBSD file system enough to find files on it, and can provide a simple interface to choose the kernel or loader to run.
Since the loader is much more sophisticated, and provides a nice easy-to-use boot configuration, boot2 usually runs it, but previously it was tasked to run the kernel directly.
If you ever need to replace the installed boot1 and boot2 use disklabel(8).
# disklabel -B diskslice
Where diskslice is the disk and slice you boot from, such as ad0s1 for the first slice on the first IDE disk.
Dangerously Dedicated Mode: If you use just the disk name, such as ad0, in the disklabel(8) command you will create a dangerously dedicated disk, without slices. This is almost certainly not what you want to do, so make sure you double check the disklabel(8) command before you press Return.
7.3.3 Stage Three, /boot/loader
The loader is the final stage of the three-stage bootstrap, and is located on the file system, usually as /boot/loader.
The loader is intended as a user-friendly method for configuration, using an easy-to-use built-in command set, backed up by a more powerful interpreter, with a more complex command set.
7.3.3.1 Loader Program Flow
During initialization, the loader will probe for a console and for disks, and figure out what disk it is booting from. It will set variables accordingly, and an interpreter is started where user commands can be passed from a script or interactively.
The loader will then read /boot/loader.rc, which by default reads in /boot/defaults/loader.conf which sets reasonable defaults for variables and reads /boot/loader.conf for local changes to those variables. loader.rc then acts on these variables, loading whichever modules and kernel are selected.
Finally, by default, the loader issues a 10 second wait for key presses, and boots the kernel if it is not interrupted. If interrupted, the user is presented with a prompt which understands the easy-to-use command set, where the user may adjust variables, unload all modules, load modules, and then finally boot or reboot.
7.3.3.2 Loader Built-In Commands
These are the most commonly used loader commands. For a complete discussion of all available commands, please see loader(8).
- autoboot seconds
-
Proceeds to boot the kernel if not interrupted within the time span given, in seconds. It displays a countdown, and the default time span is 10 seconds.
- boot [-options] [kernelname]
-
Immediately proceeds to boot the kernel, with the given options, if any, and with the kernel name given, if it is.
- boot-conf
-
Goes through the same automatic configuration of modules based on variables as what happens at boot. This only makes sense if you use unload first, and change some variables, most commonly kernel.
- help [topic]
-
Shows help messages read from /boot/loader.help. If the topic given is index, then the list of available topics is given.
- include filename ...
-
Processes the file with the given filename. The file is read in, and interpreted line by line. An error immediately stops the include command.
- load [-t type] filename
-
Loads the kernel, kernel module, or file of the type given, with the filename given. Any arguments after filename are passed to the file.
- ls [-l] [path]
-
Displays a listing of files in the given path, or the root directory, if the path is not specified. If -l is specified, file sizes will be shown too.
- lsdev [-v]
-
Lists all of the devices from which it may be possible to load modules. If -v is specified, more details are printed.
- lsmod [-v]
-
Displays loaded modules. If -v is specified, more details are shown.
- more filename
-
Displays the files specified, with a pause at each LINES displayed.
- reboot
-
Immediately reboots the system.
- set variable, set variable=value
-
Sets the loader's environment variables.
- unload
-
Removes all loaded modules.
7.3.3.3 Loader Examples
Here are some practical examples of loader usage:
-
To simply boot your usual kernel, but in single-user mode:
boot -s
-
To unload your usual kernel and modules, and then load just your old (or another) kernel:
unload
load kernel.old
You can use kernel.GENERIC to refer to the generic kernel that comes on the install disk, or kernel.old to refer to your previously installed kernel (when you have upgraded or configured your own kernel, for example).
Note: Use the following to load your usual modules with another kernel:
unload
set kernel="kernel.old"
boot-conf
-
To load a kernel configuration script (an automated script which does the things you would normally do in the kernel boot-time configurator):
load -t userconfig_script /boot/kernel.conf
7.4 Kernel Interaction During Boot
Once the kernel is loaded by either loader (as usual) or boot2 (bypassing the loader), it examines its boot flags, if any, and adjusts its behavior as necessary.
7.4.1 Kernel Boot Flags
Here are the more common boot flags:
- -a
-
during kernel initialization, ask for the device to mount as the root file system.
- -C
-
boot from CDROM.
- -c
-
run UserConfig, the boot-time kernel configurator
- -s
-
boot into single-user mode
- -v
-
be more verbose during kernel startup
Note: There are other boot flags, read boot(8) for more information on them.
7.5 Device Hints
Contributed by Tom Rhodes.Note: This is a FreeBSD 5.0 and later feature which does not exist in earlier versions.
During initial system startup, the boot loader(8) will read the device.hints(5) file. This file stores kernel boot information known as variables, sometimes referred to as ``device hints''. These ``device hints'' are used by device drivers for device configuration.
Device hints may also be specified at the Stage 3 boot loader prompt. Variables can be added using set, removed with unset, and viewed with the show commands. Variables set in the /boot/device.hints file can be overridden here also. Device hints entered at the boot loader are not permanent and will be forgotten on the next reboot.
Once the system is booted, the kenv(1) command can be used to dump all of the variables.
The syntax for the /boot/device.hints file is one variable per line, using the standard hash ``#'' as comment markers. Lines are constructed as follows:
hint.driver.unit.keyword="value"
The syntax for the Stage 3 boot loader is:
set hint.driver.unit.keyword=value
driver is the device driver name, unit is the device driver unit number, and keyword is the hint keyword. The keyword may consist of the following options:
-
at: specifies the bus which the device is attached to.
-
port: specifies the start address of the I/O to be used.
-
irq: specifies the interrupt request number to be used.
-
drq: specifies the DMA channel number.
-
maddr: specifies the physical memory address occupied by the device.
-
flags: sets various flag bits for the device.
-
disabled: if set to 1 the device is disabled.
Device drivers may accept (or require) more hints not listed here, viewing their manual page is recommended. For more information, consult the device.hints(5), kenv(1), loader.conf(5), and loader(8) manual pages.
7.6 Init: Process Control Initialization
Once the kernel has finished booting, it passes control to the user process init(8), which is located at /sbin/init, or the program path specified in the init_path variable in loader.
7.6.1 Automatic Reboot Sequence
The automatic reboot sequence makes sure that the file systems available on the system are consistent. If they are not, and fsck(8) cannot fix the inconsistencies, init(8) drops the system into single-user mode for the system administrator to take care of the problems directly.
7.6.2 Single-User Mode
This mode can be reached through the automatic reboot sequence, or by the user booting with the -s option or setting the boot_single variable in loader.
It can also be reached by calling shutdown(8) without the reboot (-r) or halt (-h) options, from multi-user mode.
If the system console is set to insecure in /etc/ttys, then the system prompts for the root password before initiating single-user mode.
Example 7-3. An Insecure Console in /etc/ttys
# name  getty                           type    status          comments
#
# If console is marked "insecure", then init will ask for the root password
# when going to single-user mode.
console none                            unknown off insecure
Note: An insecure console means that you consider your physical security to the console to be insecure, and want to make sure only someone who knows the root password may use single-user mode, and it does not mean that you want to run your console insecurely. Thus, if you want security, choose insecure, not secure.
7.6.3 Multi-User Mode
If init(8) finds your file systems to be in order, or once the user has finished in single-user mode, the system enters multi-user mode, in which it starts the resource configuration of the system.
7.6.3.1 Resource Configuration (rc)
The resource configuration system reads in configuration defaults from /etc/defaults/rc.conf, and system-specific details from /etc/rc.conf, and then proceeds to mount the system file systems mentioned in /etc/fstab, start up networking services, start up miscellaneous system daemons, and finally runs the startup scripts of locally installed packages.
The rc(8) manual page is a good reference to the resource configuration system, as is examining the scripts themselves.
7.7 Shutdown Sequence
Upon controlled shutdown, via shutdown(8), init(8) will attempt to run the script /etc/rc.shutdown, and then proceed to send all processes the TERM signal, and subsequently the KILL signal to any that do not terminate timely.
To power down a FreeBSD machine on architectures and systems that support power management, simply use the command shutdown -p now to turn the power off immediately. To just reboot a FreeBSD system, just use shutdown -r now. You need to be root or a member of operator group to run shutdown(8). The halt(8) and reboot(8) commands can also be used, please refer to their manual pages and to shutdown(8)'s one for more informations.
Chapter 8 Users and Basic Account Management
Contributed by Neil Blakey-Milner.8.1 Synopsis
FreeBSD allows multiple users to use the computer at the same time. Obviously, only one of those users can be sitting in front of the screen and keyboard at any one time [5], but any number of users can log in through the network to get their work done. To use the system every user must have an account.
After reading this chapter, you will know:
-
The differences between the various user accounts on a FreeBSD system.
-
How to add user accounts.
-
How to remove user accounts.
-
How to change account details, such as the user's full name, or preferred shell.
-
How to set limits on a per-account basis, to control the resources such as memory and CPU time that accounts and groups of accounts are allowed to access.
-
How to use groups to make account management easier.
Before reading this chapter, you should:
-
Understand the basics of UNIX and FreeBSD (Chapter 3).
8.2 Introduction
All access to the system is achieved via accounts, and all processes are run by users, so user and account management are of integral importance on FreeBSD systems.
Every account on a FreeBSD system has certain information associated with it to identify the account.
- User name
-
The user name as it would be typed at the login: prompt. User names must be unique across the computer; you may not have two users with the same user name. There are a number of rules for creating valid user names, documented in passwd(5); you would typically use user names that consist of eight or fewer all lower case characters.
- Password
-
Each account has a password associated with it. The password may be blank, in which case no password will be required to access the system. This is normally a very bad idea; every account should have a password.
- User ID (UID)
-
The UID is a number from 0 to 65536 used to uniquely identify the user to the system. Internally, FreeBSD uses the UID to identify users--any FreeBSD commands that allow you to specify a user name will convert it to the UID before working with it. This means that you can have several accounts with different user names but the same UID. As far as FreeBSD is concerned these accounts are one user. It is unlikely you will ever need to do this.
- Group ID (GID)
-
The GID is a number from 0 to 65536 used to uniquely identify the primary group that the user belongs to. Groups are a mechanism for controlling access to resources based on a user's GID rather than their UID. This can significantly reduce the size of some configuration files. A user may also be in more than one group.
- Login class
-
Login classes are an extension to the group mechanism that provide additional flexibility when tailoring the system to different users.
- Password change time
-
By default FreeBSD does not force users to change their passwords periodically. You can enforce this on a per-user basis, forcing some or all of your users to change their passwords after a certain amount of time has elapsed.
- Account expiry time
-
By default FreeBSD does not expire accounts. If you are creating accounts that you know have a limited lifespan, for example, in a school where you have accounts for the students, then you can specify when the account expires. After the expiry time has elapsed the account cannot be used to log in to the system, although the account's directories and files will remain.
- User's full name
-
The user name uniquely identifies the account to FreeBSD, but does not necessarily reflect the user's real name. This information can be associated with the account.
- Home directory
-
The home directory is the full path to a directory on the system in which the user will start when logging on to the system. A common convention is to put all user home directories under /home/username or /usr/home/username. The user would store their personal files in their home directory, and any directories they may create in there.
- User shell
-
The shell provides the default environment users use to interact with the system. There are many different kinds of shells, and experienced users will have their own preferences, which can be reflected in their account settings.
There are three main types of accounts: the Superuser, system users, and user accounts. The Superuser account, usually called root, is used to manage the system with no limitations on privileges. System users run services. Finally, user accounts are used by real people, who log on, read mail, and so forth.
8.3 The Superuser Account
The superuser account, usually called root, comes preconfigured to facilitate system administration, and should not be used for day-to-day tasks like sending and receiving mail, general exploration of the system, or programming.
This is because the superuser, unlike normal user accounts, can operate without limits, and misuse of the superuser account may result in spectacular disasters. User accounts are unable to destroy the system by mistake, so it is generally best to use normal user accounts whenever possible, unless you especially need the extra privilege.
You should always double and triple-check commands you issue as the superuser, since an extra space or missing character can mean irreparable data loss.
So, the first thing you should do after reading this chapter is to create an unprivileged user account for yourself for general usage if you have not already. This applies equally whether you are running a multi-user or single-user machine. Later in this chapter, we discuss how to create additional accounts, and how to change between the normal user and superuser.
8.4 System Accounts
System users are those used to run services such as DNS, mail, web servers, and so forth. The reason for this is security; if all services ran as the superuser, they could act without restriction.
Examples of system users are daemon, operator, bind (for the Domain Name Service), and news. Often sysadmins create httpd to run web servers they install.
nobody is the generic unprivileged system user. However, it is important to keep in mind that the more services that use nobody, the more files and processes that user will become associated with, and hence the more privileged that user becomes.
8.5 User Accounts
User accounts are the primary means of access for real people to the system, and these accounts insulate the user and the environment, preventing the users from damaging the system or other users, and allowing users to customize their environment without affecting others.
Every person accessing your system should have a unique user account. This allows you to find out who is doing what, prevent people from clobbering each others' settings or reading each others' mail, and so forth.
Each user can set up their own environment to accommodate their use of the system, by using alternate shells, editors, key bindings, and language.
8.6 Modifying Accounts
There are a variety of different commands available in the UNIX environment to manipulate user accounts. The most common commands are summarized below, followed by more detailed examples of their usage.
| Command | Summary |
|---|---|
| adduser(8) | The recommended command-line application for adding new users. |
| rmuser(8) | The recommended command-line application for removing users. |
| chpass(1) | A flexible tool to change user database information. |
| passwd(1) | The simple command-line tool to change user passwords. |
| pw(8) | A powerful and flexible tool to modify all aspects of user accounts. |
8.6.1 adduser
adduser(8) is a simple program for adding new users. It creates entries in the system passwd and group files. It will also create a home directory for the new user, copy in the default configuration files (``dotfiles'') from /usr/share/skel, and can optionally mail the new user a welcome message.
To create the initial configuration file, use adduser -s -config_create. [6] Next, we configure adduser(8) defaults, and create our first user account, since using root for normal usage is evil and nasty.
Example 8-1. Configuring adduser
# adduser -v
Use option ``-silent'' if you don't want to see all warnings and questions.
Check /etc/shells
Check /etc/master.passwd
Check /etc/group
Enter your default shell: csh date no sh tcsh zsh [sh]: zsh
Your default shell is: zsh -> /usr/local/bin/zsh
Enter your default HOME partition: [/home]:
Copy dotfiles from: /usr/share/skel no [/usr/share/skel]:
Send message from file: /etc/adduser.message no
[/etc/adduser.message]: no
Do not send message
Use passwords (y/n) [y]: y

Write your changes to /etc/adduser.conf? (y/n) [n]: y

Ok, let's go.
Don't worry about mistakes. I will give you the chance later to correct any input.
Enter username [a-z0-9_-]: jru
Enter full name []: J. Random User
Enter shell csh date no sh tcsh zsh [zsh]:
Enter home directory (full path) [/home/jru]:
Uid [1001]:
Enter login class: default []:
Login group jru [jru]:
Login group is ``jru''. Invite jru into other groups: guest no
[no]: wheel
Enter password []:
Enter password again []:

Name:     jru
Password: ****
Fullname: J. Random User
Uid:      1001
Gid:      1001 (jru)
Class:
Groups:   jru wheel
HOME:     /home/jru
Shell:    /usr/local/bin/zsh
OK? (y/n) [y]: y
Added user ``jru''
Copy files from /usr/share/skel to /home/jru
Add another user? (y/n) [y]: n
Goodbye!
#
In summary, we changed the default shell to zsh (an additional shell found in the Ports Collection), and turned off the sending of a welcome mail to added users. We then saved the configuration, created an account for jru, and made sure jru is in wheel group (so that she may assume the role of root with the su(1) command.)
Note: The password you type in is not echoed, nor are asterisks displayed. Make sure you do not mistype the password twice.
Note: Just use adduser(8) without arguments from now on, and you will not have to go through changing the defaults. If the program asks you to change the defaults, exit the program, and try the -s option.
8.6.2 rmuser
You can use rmuser(8) to completely remove a user from the system. rmuser(8) performs the following steps:
-
Removes the user's crontab(1) entry (if any).
-
Removes any at(1) jobs belonging to the user.
-
Kills all processes owned by the user.
-
Removes the user from the system's local password file.
-
Removes the user's home directory (if it is owned by the user).
-
Removes the incoming mail files belonging to the user from /var/mail.
-
Removes all files owned by the user from temporary file storage areas such as /tmp.
-
Finally, removes the username from all groups to which it belongs in /etc/group.
Note: If a group becomes empty and the group name is the same as the username, the group is removed; this complements the per-user unique groups created by adduser(8).
rmuser(8) cannot be used to remove superuser accounts, since that is almost always an indication of massive destruction.
By default, an interactive mode is used, which attempts to make sure you know what you are doing.
Example 8-2. rmuser Interactive Account Removal
# rmuser jru
Matching password entry:
jru:*:1001:1001::0:0:J. Random User:/home/jru:/usr/local/bin/zsh
Is this the entry you wish to remove? y
Remove user's home directory (/home/jru)? y
Updating password file, updating databases, done.
Updating group file: trusted (removing group jru -- personal group is empty) done.
Removing user's incoming mail file /var/mail/jru: done.
Removing files belonging to jru from /tmp: done.
Removing files belonging to jru from /var/tmp: done.
Removing files belonging to jru from /var/tmp/vi.recover: done.
#
8.6.3 chpass
chpass(1) changes user database information such as passwords, shells, and personal information.
Only system administrators, as the superuser, may change other users' information and passwords with chpass(1).
When passed no options, aside from an optional username, chpass(1) displays an editor containing user information. When the user exists from the editor, the user database is updated with the new information.
Example 8-3. Interactive chpass by Superuser
#Changing user database information for jru.
Login: jru
Password: *
Uid [#]: 1001
Gid [# or name]: 1001
Change [month day year]:
Expire [month day year]:
Class:
Home directory: /home/jru
Shell: /usr/local/bin/zsh
Full Name: J. Random User
Office Location:
Office Phone:
Home Phone:
Other information:
The normal user can change only a small subset of this information, and only for themselves.
Example 8-4. Interactive chpass by Normal User
#Changing user database information for jru.
Shell: /usr/local/bin/zsh
Full Name: J. Random User
Office Location:
Office Phone:
Home Phone:
Other information:
Note: chfn(1) and chsh(1) are just links to chpass(1), as are ypchpass(1), ypchfn(1), and ypchsh(1). NIS support is automatic, so specifying the yp before the command is not necessary. If this is confusing to you, do not worry, NIS will be covered in Chapter 19.
8.6.4 passwd
passwd(1) is the usual way to change your own password as a user, or another user's password as the superuser.
Note: Users must type in their original password before changing their password, to prevent an unauthorized person from changing their password when the user is away from their console.
Example 8-5. Changing Your Password
% passwd
Changing local password for jru.
Old password:
New password:
Retype new password:
passwd: updating the database...
passwd: done
Example 8-6. Changing Another User's Password as the Superuser
# passwd jru
Changing local password for jru.
New password:
Retype new password:
passwd: updating the database...
passwd: done
Note: As with chpass(1), yppasswd(1) is just a link to passwd(1), so NIS works with either command.
8.6.5 pw
pw(8) is a command line utility to create, remove, modify, and display users and groups. It functions as a front end to the system user and group files. pw(8) has a very powerful set of command line options that make it suitable for use in shell scripts, but new users may find it more complicated than the other commands presented here.
8.7 Limiting Users
If you have users, the ability to limit their system use may have come to mind. FreeBSD provides several ways an administrator can limit the amount of system resources an individual may use. These limits are divided into two sections: disk quotas, and other resource limits.
Disk quotas limit disk usage to users, and they provide a way to quickly check that usage without calculating it every time. Quotas are discussed in Section 12.12.
The other resource limits include ways to limit the amount of CPU, memory, and other resources a user may consume. These are defined using login classes and are discussed here.
Login classes are defined in /etc/login.conf. The precise semantics are beyond the scope of this section, but are described in detail in the login.conf(5) manual page. It is sufficient to say that each user is assigned to a login class (default by default), and that each login class has a set of login capabilities associated with it. A login capability is a name=value pair, where name is a well-known identifier and value is an arbitrary string processed accordingly depending on the name. Setting up login classes and capabilities is rather straight-forward and is also described in login.conf(5).
Resource limits are different from plain vanilla login capabilities in two ways. First, for every limit, there is a soft (current) and hard limit. A soft limit may be adjusted by the user or application, but may be no higher than the hard limit. The latter may be lowered by the user, but never raised. Second, most resource limits apply per process to a specific user, not the user as a whole. Note, however, that these differences are mandated by the specific handling of the limits, not by the implementation of the login capability framework (i.e., they are not really a special case of login capabilities).
And so, without further ado, below are the most commonly used resource limits (the rest, along with all the other login capabilities, may be found in login.conf(5)).
- coredumpsize
-
The limit on the size of a core file generated by a program is, for obvious reasons, subordinate to other limits on disk usage (e.g., filesize, or disk quotas). Nevertheless, it is often used as a less-severe method of controlling disk space consumption: since users do not generate core files themselves, and often do not delete them, setting this may save them from running out of disk space should a large program (e.g., emacs) crash.
- cputime
-
This is the maximum amount of CPU time a user's process may consume. Offending processes will be killed by the kernel.
Note: This is a limit on CPU time consumed, not percentage of the CPU as displayed in some fields by top(1) and ps(1). A limit on the latter is, at the time of this writing, not possible, and would be rather useless: a compiler--probably a legitimate task--can easily use almost 100% of a CPU for some time.
- filesize
-
This is the maximum size of a file the user may possess. Unlike disk quotas, this limit is enforced on individual files, not the set of all files a user owns.
- maxproc
-
This is the maximum number of processes a user may be running. This includes foreground and background processes alike. For obvious reasons, this may not be larger than the system limit specified by the kern.maxproc sysctl(8). Also note that setting this too small may hinder a user's productivity: it is often useful to be logged in multiple times or execute pipelines. Some tasks, such as compiling a large program, also spawn multiple processes (e.g., make(1), cc(1), and other intermediate preprocessors).
- memorylocked
-
This is the maximum amount a memory a process may have requested to be locked into main memory (e.g., see mlock(2)). Some system-critical programs, such as amd(8), lock into main memory such that in the event of being swapped out, they do not contribute to a system's trashing in time of trouble.
- memoryuse
-
This is the maximum amount of memory a process may consume at any given time. It includes both core memory and swap usage. This is not a catch-all limit for restricting memory consumption, but it is a good start.
- openfiles
-
This is the maximum amount of files a process may have open. In FreeBSD, files are also used to represent sockets and IPC channels; thus, be careful not to set this too low. The system-wide limit for this is defined by the kern.maxfiles sysctl(8).
- sbsize
-
This is the limit on the amount of network memory, and thus mbufs, a user may consume. This originated as a response to an old DoS attack by creating a lot of sockets, but can be generally used to limit network communications.
- stacksize
-
This is the maximum size a process' stack may grow to. This alone is not sufficient to limit the amount of memory a program may use; consequently, it should be used in conjunction with other limits.
There are a few other things to remember when setting resource limits. Following are some general tips, suggestions, and miscellaneous comments.
-
Processes started at system startup by /etc/rc are assigned to the daemon login class.
-
Although the /etc/login.conf that comes with the system is a good source of reasonable values for most limits, only you, the administrator, can know what is appropriate for your system. Setting a limit too high may open your system up to abuse, while setting it too low may put a strain on productivity.
-
Users of the X Window System (X11) should probably be granted more resources than other users. X11 by itself takes a lot of resources, but it also encourages users to run more programs simultaneously.
-
Remember that many limits apply to individual processes, not the user as a whole. For example, setting openfiles to 50 means that each process the user runs may open up to 50 files. Thus, the gross amount of files a user may open is the value of openfiles multiplied by the value of maxproc. This also applies to memory consumption.
For further information on resource limits and login classes and capabilities in general, please consult the relevant manual pages: cap_mkdb(1), getrlimit(2), login.conf(5).
8.8 Personalizing Users
Localization is an environment set up by the system administrator or user to accommodate different languages, character sets, date and time standards, and so on. This is discussed in the localization chapter.
8.9 Groups
A group is simply a list of users. Groups are identified by their group name and GID (Group ID). In FreeBSD (and most other UNIX like systems), the two factors the kernel uses to decide whether a process is allowed to do something is its user ID and list of groups it belongs to. Unlike a user ID, a process has a list of groups associated with it. You may hear some things refer to the ``group ID'' of a user or process; most of the time, this just means the first group in the list.
The group name to group ID map is in /etc/group. This is a plain text file with four colon-delimited fields. The first field is the group name, the second is the encrypted password, the third the group ID, and the fourth the comma-delimited list of members. It can safely be edited by hand (assuming, of course, that you do not make any syntax errors!). For a more complete description of the syntax, see the group(5) manual page.
If you do not want to edit /etc/group manually, you can use the pw(8) command to add and edit groups. For example, to add a group called teamtwo and then confirm that it exists you can use:
Example 8-7. Adding a Group Using pw(8)
# pw groupadd teamtwo
# pw groupshow teamtwo
teamtwo:*:1100:
The number 1100 above is the group ID of the group teamtwo. Right now, teamtwo has no members, and is thus rather useless. Let's change that by inviting jru to the teamtwo group.
Example 8-8. Adding Somebody to a Group Using pw(8)
# pw groupmod teamtwo -M jru
# pw groupshow teamtwo
teamtwo:*:1100:jru
The argument to the -M option is a comma-delimited list of users who are members of the group. From the preceding sections, we know that the password file also contains a group for each user. The latter (the user) is automatically added to the group list by the system; the user will not show up as a member when using the groupshow command to pw(8), but will show up when the information is queried via id(1) or similar tool. In other words, pw(8) only manipulates the /etc/group file; it will never attempt to read additionally data from /etc/passwd.
Example 8-9. Using id(1) to Determine Group Membership
% id jru
uid=1001(jru) gid=1001(jru) groups=1001(jru), 1100(teamtwo)
As you can see, jru is a member of the groups jru and teamtwo.
For more information about pw(8), see its manual page, and for more information on the format of /etc/group, consult the group(5) manual page.
Chapter 9 Configuring the FreeBSD Kernel
Updated and restructured by Jim Mock. Originally contributed by Jake Hamby.9.1 Synopsis
The kernel is the core of the FreeBSD operating system. It is responsible for managing memory, enforcing security controls, networking, disk access, and much more. While more and more of FreeBSD becomes dynamically configurable it is still occasionally necessary to reconfigure and recompile your kernel.
After reading this chapter, you will know:
-
Why you might need to build a custom kernel.
-
How to write a kernel configuration file, or alter an existing configuration file.
-
How to use the kernel configuration file to create and build a new kernel.
-
How to install the new kernel.
-
How to create any entries in /dev that may be required.
-
How to troubleshoot if things go wrong.
9.2 Why Build a Custom Kernel?
Traditionally, FreeBSD has had what is called a ``monolithic'' kernel. This means that the kernel was one large program, supported a fixed list of devices, and if you wanted to change the kernel's behavior then you had to compile a new kernel, and then reboot your computer with the new kernel.
Today, FreeBSD is rapidly moving to a model where much of the kernel's functionality is contained in modules which can be dynamically loaded and unloaded from the kernel as necessary. This allows the kernel to adapt to new hardware suddenly becoming available (such as PCMCIA cards in a laptop), or for new functionality to be brought into the kernel that was not necessary when the kernel was originally compiled. This is known as a modular kernel. Colloquially these are called KLDs.
Despite this, it is still necessary to carry out some static kernel configuration. In some cases this is because the functionality is so tied to the kernel that it can not be made dynamically loadable. In others it may simply be because no one has yet taken the time to write a dynamic loadable kernel module for that functionality yet.
Building a custom kernel is one of the most important rites of passage nearly every UNIX user must endure. This process, while time consuming, will provide many benefits to your FreeBSD system. Unlike the GENERIC kernel, which must support a wide range of hardware, a custom kernel only contains support for your PC's hardware. This has a number of benefits, such as:
-
Faster boot time. Since the kernel will only probe the hardware you have on your system, the time it takes your system to boot will decrease dramatically.
-
Less memory usage. A custom kernel often uses less memory than the GENERIC kernel, which is important because the kernel must always be present in real memory. For this reason, a custom kernel is especially useful on a system with a small amount of RAM.
-
Additional hardware support. A custom kernel allows you to add in support for devices such as sound cards, which are not present in the GENERIC kernel.
9.3 Building and Installing a Custom Kernel
First, let us take a quick tour of the kernel build directory. All directories mentioned will be relative to the main /usr/src/sys directory, which is also accessible through /sys. There are a number of subdirectories here representing different parts of the kernel, but the most important, for our purposes, are arch/conf, where you will edit your custom kernel configuration, and compile, which is the staging area where your kernel will be built. arch represents either i386, alpha, or pc98 (an alternative development branch of PC hardware, popular in Japan). Everything inside a particular architecture's directory deals with that architecture only; the rest of the code is common to all platforms to which FreeBSD could potentially be ported. Notice the logical organization of the directory structure, with each supported device, file system, and option in its own subdirectory. FreeBSD 5.X and up has support for sparc64, and a few other architectures under development.
Note: If there is not a /usr/src/sys directory on your system, then the kernel source has not been installed. The easiest way to do this is by running /stand/sysinstall as root, choosing Configure, then Distributions, then src, then sys. If you have an aversion to sysinstall and you have access to an ``official'' FreeBSD CDROM, then you can also install the source from the command line:
# mount /cdrom
# mkdir -p /usr/src/sys
# ln -s /usr/src/sys /sys
# cat /cdrom/src/ssys.[a-d]* | tar -xzvf -
Next, move to the arch/conf directory and copy the GENERIC configuration file to the name you want to give your kernel. For example:
# cd /usr/src/sys/i386/conf
# cp GENERIC MYKERNEL
Traditionally, this name is in all capital letters and, if you are maintaining multiple FreeBSD machines with different hardware, it is a good idea to name it after your machine's hostname. We will call it MYKERNEL for the purpose of this example.
Tip: Storing your kernel config file directly under /usr/src can be a bad idea. If you are experiencing problems it can be tempting to just delete /usr/src and start again. Five seconds after you do that you realize that you have deleted your custom kernel config file. Do not edit GENERIC directly, as it may get overwritten the next time you update your source tree, and your kernel modifications will be lost.
You might want to keep your kernel config file elsewhere, and then create a symbolic link to the file in the i386 directory.
For example:
# cd /usr/src/sys/i386/conf
# mkdir /root/kernels
# cp GENERIC /root/kernels/MYKERNEL
# ln -s /root/kernels/MYKERNEL
Note: You must execute these and all of the following commands under the root account or you will get permission denied errors.
Now, edit MYKERNEL with your favorite text editor. If you are just starting out, the only editor available will probably be vi, which is too complex to explain here, but is covered well in many books in the bibliography. However, FreeBSD does offer an easier editor called ee which, if you are a beginner, should be your editor of choice. Feel free to change the comment lines at the top to reflect your configuration or the changes you have made to differentiate it from GENERIC.
If you have built a kernel under SunOS or some other BSD operating system, much of this file will be very familiar to you. If you are coming from some other operating system such as DOS, on the other hand, the GENERIC configuration file might seem overwhelming to you, so follow the descriptions in the Configuration File section slowly and carefully.
Note: Be sure to always check the file /usr/src/UPDATING, before you perform any update steps, in the case you sync your source tree with the latest sources of the FreeBSD project. In this file all important issues with updating FreeBSD are typed out. /usr/src/UPDATING always fits your version of the FreeBSD source, and is therefore more accurate for new information than the handbook.
You must now compile the source code for the kernel. There are two procedures you can use to do this, and the one you will use depends on why you are rebuilding the kernel, and the version of FreeBSD you are running.
-
If you have installed only the kernel source code, use procedure 1.
-
If you are running a FreeBSD version prior to 4.0, and you are not upgrading to FreeBSD 4.0 or higher using the make world procedure, use procedure 1.
-
If you are building a new kernel without updating the source code (perhaps just to add a new option, such as IPFIREWALL) you can use either procedure.
-
If you are rebuilding the kernel as part of a make world process, use procedure 2.
Procedure 1. Building a Kernel the ``Traditional'' Way
-
Run config(8) to generate the kernel source code.
# /usr/sbin/config MYKERNEL
-
Change into the build directory. This is printed out after running the aforementioned command.
# cd ../compile/MYKERNEL
For FreeBSD version prior to 5.0, use instead:
# cd ../../compile/MYKERNEL
-
Compile the kernel.
# make depend
# make
-
Install the new kernel.
# make install
Procedure 2. Building a Kernel the ``New'' Way
-
Change to the /usr/src directory.
# cd /usr/src
-
Compile the kernel.
# make buildkernel KERNCONF=MYKERNEL
-
Install the new kernel.
# make installkernel KERNCONF=MYKERNEL
Note: In FreeBSD 4.2 and older you must replace KERNCONF= with KERNEL=. 4.2-STABLE that was fetched before Feb 2nd, 2001 does not recognize KERNCONF=.
If you have not upgraded your source tree in any way (you have not run CVSup, CTM, or used anoncvs), then you should use the config, make depend, make, make install sequence.
The new kernel will be copied to the root directory as /kernel and the old kernel will be moved to /kernel.old. Now, shutdown the system and reboot to use your new kernel. In case something goes wrong, there are some troubleshooting instructions at the end of this chapter. Be sure to read the section which explains how to recover in case your new kernel does not boot.
Note: As of FreeBSD 5.0, kernels are installed along with their modules in /boot/kernel, and old kernels will be backed up in /boot/kernel.old. Other files relating to the boot process, such as the boot loader(8) and configuration are also stored in /boot. Third party or custom modules may be placed in /boot/modules, although users should be aware that keeping modules in sync with the compiled kernel is very important. Modules not intended to run with the compiled kernel may result in instability or incorrectness.
Note: If you have added any new devices (such as sound cards) and you are running FreeBSD 4.X or previous versions, you may have to add some device nodes to your /dev directory before you can use them. For more information, take a look at Making Device Nodes section later on in this chapter.
9.4 The Configuration File
The general format of a configuration file is quite simple. Each line contains a keyword and one or more arguments. For simplicity, most lines only contain one argument. Anything following a # is considered a comment and ignored. The following sections describe each keyword, generally in the order they are listed in GENERIC, although some related keywords have been grouped together in a single section (such as Networking) even though they are actually scattered throughout the GENERIC file. An exhaustive list of options and more detailed explanations of the device lines is present in the LINT configuration file, located in the same directory as GENERIC. If you are in doubt as to the purpose or necessity of a line, check first in LINT.
Note: In FreeBSD 5.X and above the LINT is non-existent. See the NOTES file for architecture dependent options. Some options, mainly architecture independent ones, are stored in the /usr/src/sys/conf/NOTES file. It's advisable to review the options in here also.
The following is an example GENERIC kernel configuration file with various additional comments where needed for clarity. This example should match your copy in /usr/src/sys/i386/conf/GENERIC fairly closely. For details of all the possible kernel options, see /usr/src/sys/i386/conf/LINT.
#
# GENERIC -- Generic kernel configuration file for FreeBSD/i386
#
# For more information on this file, please read the handbook section on
# Kernel Configuration Files:
#
#    http://www.FreeBSD.org/doc/en_US.ISO8859-1/books/handbook/kernelconfig-config.html
#
# The handbook is also available locally in /usr/share/doc/handbook
# if you've installed the doc distribution, otherwise always see the
# FreeBSD World Wide Web server (http://www.FreeBSD.org/) for the
# latest information.
#
# An exhaustive list of options and more detailed explanations of the
# device lines is also present in the ../../conf/NOTES and NOTES files.
# If you are in doubt as to the purpose or necessity of a line, check first
# in NOTES.
#
# $FreeBSD: src/sys/i386/conf/GENERIC,v 1.380 2003/03/29 13:36:41 mdodd Exp $
The following are the mandatory keywords required in every kernel you build:
machine i386
This is the machine architecture. It must be either i386, pc98, sparc64, alpha, ia64, amd64, or powerpc.
cpu          I486_CPU
cpu          I586_CPU
cpu          I686_CPU
The above option specifies the type of CPU you have in your system. You may have multiple instances of the CPU line (i.e., you are not sure whether you should use I586_CPU or I686_CPU), however, for a custom kernel, it is best to specify only the CPU you have. If you are unsure of your CPU type, you can check the /var/run/dmesg.boot file to view your boot up messages.
Support for I386_CPU is still provided in the source of FreeBSD, but it is disabled by default in both -STABLE and -CURRENT. This means that to install FreeBSD with a 386-class cpu, you now have the following options:
-
Install an older FreeBSD release and rebuild from source as described in Section 9.3.
-
Build the userland and kernel on a newer machine and install on the 386 using the precompiled /usr/obj files (see Section 21.5 for details).
-
Roll your own release of FreeBSD which includes I386_CPU support in the kernels of the installation CD-ROM.
The first of these options is probably the easiest of all, but you will need a lot of disk space on a 386-class machine which may be difficult to find.
ident GENERIC
This is the identification of the kernel. You should change this to whatever you named your kernel, i.e. MYKERNEL if you have followed the instructions of the previous examples. The value you put in the ident string will print when you boot up the kernel, so it is useful to give the new kernel a different name if you want to keep it separate from your usual kernel (i.e. you want to build an experimental kernel).
maxusers n
The maxusers option sets the size of a number of important system tables. This number is supposed to be roughly equal to the number of simultaneous users you expect to have on your machine.
Starting with FreeBSD 4.5, the system will auto-tune this setting for you if you explicitly set it to 0[7]. In FreeBSD 5.X, maxusers will default to 0 if not specified. If you are using an version of FreeBSD earlier than 4.5, or you want to manage it yourself you will want to set maxusers to at least 4, especially if you are using the X Window System or compiling software. The reason is that the most important table set by maxusers is the maximum number of processes, which is set to 20 + 16 * maxusers, so if you set maxusers to 1, then you can only have 36 simultaneous processes, including the 18 or so that the system starts up at boot time, and the 15 or so you will probably create when you start the X Window System. Even a simple task like reading a manual page will start up nine processes to filter, decompress, and view it. Setting maxusers to 64 will allow you to have up to 1044 simultaneous processes, which should be enough for nearly all uses. If, however, you see the dreaded proc table full error when trying to start another program, or are running a server with a large number of simultaneous users (like ftp.FreeBSD.org), you can always increase the number and rebuild.
Note: maxusers does not limit the number of users which can log into your machine. It simply sets various table sizes to reasonable values considering the maximum number of users you will likely have on your system and how many processes each of them will be running. One keyword which does limit the number of simultaneous remote logins and X terminal windows is pseudo-device pty 16.
# Floating point support - do not disable.
device          npx0     at nexus? port IO_NPX irq 13
npx0 is the interface to the floating point math unit in FreeBSD, which is either the hardware co-processor or the software math emulator. This is not optional.
# Pseudo devices - the number indicates how many units to allocate.
pseudo-device   loop          # Network loopback
This is the generic loopback device for TCP/IP. If you telnet or FTP to localhost (a.k.a., 127.0.0.1) it will come back at you through this pseudo-device. This is mandatory.
Everything that follows is more or less optional. See the notes underneath or next to each option for more information.
#To statically compile in device wiring instead of /boot/device.hints
#hints          "GENERIC.hints"         #Default places to look for devices.
In FreeBSD 5.X and newer versions the device.hints(5) is used to configure options of the device drivers. The default location that loader(8) will check at boot time is /boot/device.hints. Using the hints option you can compile these hints statically into your kernel. Then there is no need to create a device.hints file in /boot.
#makeoptions DEBUG=-g #Build kernel with gdb(1) debug symbols
The normal build process of the FreeBSD does not include debugging information when building the kernel and strips most symbols after the resulting kernel is linked, to save some space at the install location. If you are going to do tests of kernels in the -CURRENT branch or develop changes of your own for the FreeBSD kernel, you might want to uncomment this line. It will enable the use of the -g option which enables debugging information when passed to gcc(1). The same can be accomplished by the config(8) -g option, if you are using the ``traditional'' way for building your kernels (See the Section 9.3 for more informations.).
options MATH_EMULATE #Support for x87 emulation
This line allows the kernel to simulate a math co-processor if your computer does not have one (386 or 486SX). If you have a 486DX, or a 386 or 486SX (with a separate 387 or 487 chip), or higher (Pentium, Pentium II, etc.), you can comment this line out.
Note: The normal math co-processor emulation routines that come with FreeBSD are not very accurate. If you do not have a math co-processor, and you need the best accuracy, it is recommended that you change this option to GPL_MATH_EMULATE to use the GNU math support, which is not included by default for licensing reasons.
In FreeBSD 5.X, math emulation is disabled by default, as older CPUs that do not have native floating point math support are far less common, and in many cases not supported by the GENERIC kernel without other additional options.
options INET #InterNETworking
Networking support. Leave this in, even if you do not plan to be connected to a network. Most programs require at least loopback networking (i.e., making network connections within your PC), so this is essentially mandatory.
options INET6 #IPv6 communications protocols
This enables the IPv6 communication protocols.
options          FFS          #Berkeley Fast Filesystem
options          FFS_ROOT     #FFS usable as root device [keep this!]
This is the basic hard drive Filesystem. Leave it in if you boot from the hard disk.
Note: In FreeBSD 5.X, FFS_ROOT is no longer required.
options UFS_ACL #Support for access control lists
This option, present only in FreeBSD 5.X, enables kernel support for access control lists. This relies on the use of extended attributes and UFS2, and the feature is described in detail in the Section 10.13. ACLs are enabled by default, and should not be disabled in the kernel if they have been used previously on a file system, as this will remove the access control lists changing the way files are protected in unpredictable ways.
options UFS_DIRHASH #Improve performance on big directories
This option includes functionality to speed up disk operations on large directories, at the expense of using additional memory. You would normally keep this for a large server, or interactive workstation, and remove it if you are using FreeBSD on a smaller system where memory is at a premium and disk access speed is less important, such as a firewall.
options SOFTUPDATES #Enable FFS Soft Updates support
This option enables Soft Updates in the kernel, this will help speed up write access on the disks. Even when this functionality is provided by the kernel, it must be turned on for specific disks. Review the output from mount(8) to see if Soft Updates is enabled for your system disks. If you do not see the soft-updates option then you will need to activate it using the tunefs(8) (for existing filesystems) or newfs(8) (for new filesystems) commands.
options          MFS          #Memory Filesystem
options          MD_ROOT      #MD is a potential root device
This is the memory-mapped Filesystem. This is basically a RAM disk for fast storage of temporary files, useful if you have a lot of swap space that you want to take advantage of. A perfect place to mount an MFS partition is on the /tmp directory, since many programs store temporary data here. To mount an MFS RAM disk on /tmp, add the following line to /etc/fstab:
Now you simply need to either reboot, or run the command mount /tmp.
Note: In FreeBSD 5.X, md(4)-backed UFS file systems are used for memory file systems rather than MFS. Information on configuring memory-backed file systems may be found in the manual pages for mdconfig(8) and mdmfs(8), and in Section 12.10. As a result, the MFS option is no longer supported.
options          NFS          #Network Filesystem
options          NFS_ROOT     #NFS usable as root device, NFS required
The network Filesystem. Unless you plan to mount partitions from a UNIX file server over TCP/IP, you can comment these out.
options MSDOSFS #MSDOS Filesystem
The MS-DOS Filesystem. Unless you plan to mount a DOS formatted hard drive partition at boot time, you can safely comment this out. It will be automatically loaded the first time you mount a DOS partition, as described above. Also, the excellent mtools software (in the ports collection) allows you to access DOS floppies without having to mount and unmount them (and does not require MSDOSFS at all).
options          CD9660       #ISO 9660 Filesystem
options          CD9660_ROOT  #CD-ROM usable as root, CD9660 required
The ISO 9660 Filesystem for CDROMs. Comment it out if you do not have a CDROM drive or only mount data CDs occasionally (since it will be dynamically loaded the first time you mount a data CD). Audio CDs do not need this Filesystem.
options PROCFS #Process filesystem
The process filesystem. This is a ``pretend'' filesystem mounted on /proc which allows programs like ps(1) to give you more information on what processes are running. In FreeBSD 5.X, use of PROCFS is not required under most circumstances, as most debugging and monitoring tools have been adapted to run without PROCFS. In addition, 5.X-CURRENT kernels making use of PROCFS must now also include support for PSEUDOFS:
options PSEUDOFS #Pseudo-filesystem framework
PSEUDOFS is not available in FreeBSD 4.X. Unlike in FreeBSD 4.X, new installations of FreeBSD 5.X will not mount the process file system by default.
options COMPAT_43 #Compatible with BSD 4.3 [KEEP THIS!]
Compatibility with 4.3BSD. Leave this in; some programs will act strangely if you comment this out.
options COMPAT_FREEBSD4 #Compatible with FreeBSD4
This option is required on FreeBSD 5.X i386 and Alpha systems to support applications compiled on older versions of FreeBSD that use older system call interfaces. It is recommended that this option be used on all i386 and Alpha systems that may run older applications; platforms that gained support only in 5.X, such as ia64 and Sparc64®, do not require this option.
options SCSI_DELAY=15000 #Delay (in ms) before probing SCSI
This causes the kernel to pause for 15 seconds before probing each SCSI device in your system. If you only have IDE hard drives, you can ignore this, otherwise you will probably want to lower this number, perhaps to 5 seconds, to speed up booting. Of course, if you do this, and FreeBSD has trouble recognizing your SCSI devices, you will have to raise it back up.
options UCONSOLE #Allow users to grab the console
Allow users to grab the console, which is useful for X users. For example, you can create a console xterm by typing xterm -C, which will display any write(1), talk(1), and any other messages you receive, as well as any console messages sent by the kernel.
Note: In FreeBSD 5.X, UCONSOLE is no longer required.
options USERCONFIG #boot -c editor
This option allows you to boot the configuration editor from the boot menu.
options VISUAL_USERCONFIG #visual boot -c editor
This option allows you to boot the visual configuration editor from the boot menu.
Note: From FreeBSD versions 5.0 and later, the USERCONFIG options has been depreciated in favor of the new device.hints(5) method. For more information on device.hints(5) please visit Section 7.5.
options KTRACE #ktrace(1) support
This enables kernel process tracing, which is useful in debugging.
options SYSVSHM #SYSV-style shared memory
This option provides for System V shared memory. The most common use of this is the XSHM extension in X, which many graphics-intensive programs will automatically take advantage of for extra speed. If you use X, you will definitely want to include this.
options SYSVSEM #SYSV-style semaphores
Support for System V semaphores. Less commonly used but only adds a few hundred bytes to the kernel.
options SYSVMSG #SYSV-style message queues
Support for System V messages. Again, only adds a few hundred bytes to the kernel.
Note: The ipcs(1) command will list any processes using each of these System V facilities.
options    P1003_1B        #Posix P1003_1B real-time extensions
options     _KPOSIX_PRIORITY_SCHEDULING
Real-time extensions added in the 1993 POSIX®. Certain applications in the ports collection use these (such as StarOffice).
Note: In FreeBSD 5.X, all of this functionality is now provided by the _KPOSIX_PRIORITY_SCHEDULING option, and P1003_1B is no longer required.
options ICMP_BANDLIM #Rate limit bad replies
This option enables ICMP error response bandwidth limiting. You typically want this option as it will help protect the machine from denial of service packet attacks.
Note: In FreeBSD 5.X, this feature is enabled by default and the ICMP_BANDLIM option is not required.
# To make an SMP kernel, the next two are needed
#options        SMP                     # Symmetric MultiProcessor Kernel
#options        APIC_IO                 # Symmetric (APIC) I/O
The above are both required for SMP support.
device isa
All PCs supported by FreeBSD have one of these. If you have an IBM PS/2 (Micro Channel Architecture), FreeBSD provides some limited support at this time. For more information about the MCA support, see /usr/src/sys/i386/conf/LINT.
device eisa
Include this if you have an EISA motherboard. This enables auto-detection and configuration support for all devices on the EISA bus.
device pci
Include this if you have a PCI motherboard. This enables auto-detection of PCI cards and gatewaying from the PCI to ISA bus.
device agp
Include this if you have an AGP card in the system. This will enable support for AGP, and AGP GART for boards which have these features.
# Floppy drives
device          fdc0        at isa? port IO_FD1 irq 6 drq 2
device          fd0         at fdc0 drive 0
device          fd1         at fdc0 drive 1
This is the floppy drive controller. fd0 is the A: floppy drive, and fd1 is the B: drive.
device ata
This driver supports all ATA and ATAPI devices. You only need one device ata line for the kernel to detect all PCI ATA/ATAPI devices on modern machines.
device atadisk # ATA disk drives
This is needed along with device ata for ATA disk drives.
device atapicd # ATAPI CDROM drives
This is needed along with device ata for ATAPI CDROM drives.
device atapifd # ATAPI floppy drives
This is needed along with device ata for ATAPI floppy drives.
device atapist # ATAPI tape drives
This is needed along with device ata for ATAPI tape drives.
options ATA_STATIC_ID #Static device numbering
This makes the controller number static (like the old driver) or else the device numbers are dynamically allocated.
# ATA and ATAPI devices
device          ata0        at isa? port IO_WD1 irq 14
device          ata1        at isa? port IO_WD2 irq 15
Use the above for older, non-PCI systems.
# SCSI Controllers
device          ahb        # EISA AHA1742 family
device          ahc        # AHA2940 and onboard AIC7xxx devices
device          amd        # AMD 53C974 (Teckram DC-390(T))
device          dpt        # DPT Smartcache - See LINT for options!
device          isp        # Qlogic family
device          ncr        # NCR/Symbios Logic
device          sym        # NCR/Symbios Logic (newer chipsets)

device          adv0       at isa?
device          adw
device          bt0        at isa?
device          aha0       at isa?
device          aic0       at isa?
SCSI controllers. Comment out any you do not have in your system. If you have an IDE only system, you can remove these altogether.
# SCSI peripherals
device          scbus      # SCSI bus (required)
device          da         # Direct Access (disks)
device          sa         # Sequential Access (tape etc)
device          cd         # CD
device          pass       # Passthrough device (direct SCSI
access)
SCSI peripherals. Again, comment out any you do not have, or if you have only IDE hardware, you can remove them completely.
# RAID controllers
device          ida        # Compaq Smart RAID
device          amr        # AMI MegaRAID
device          mlx        # Mylex DAC960 family
Supported RAID controllers. If you do not have any of these, you can comment them out or remove them.
# atkbdc0 controls both the keyboard and the PS/2 mouse
device          atkbdc0    at isa? port IO_KBD
The keyboard controller (atkbdc) provides I/O services for the AT keyboard and PS/2 style pointing devices. This controller is required by the keyboard driver (atkbd) and the PS/2 pointing device driver (psm).
device atkbd0 at atkbdc? irq 1
The atkbd driver, together with atkbdc controller, provides access to the AT 84 keyboard or the AT enhanced keyboard which is connected to the AT keyboard controller.
device psm0 at atkbdc? irq 12
Use this device if your mouse plugs into the PS/2 mouse port.
device vga0 at isa?
The video card driver.
# splash screen/screen saver
pseudo-device          splash
Splash screen at start up! Screen savers require this too.
# syscons is the default console driver, resembling an SCO console
device          sc0          at isa?
sc0 is the default console driver, which resembles a SCO console. Since most full-screen programs access the console through a terminal database library like termcap, it should not matter whether you use this or vt0, the VT220 compatible console driver. When you log in, set your TERM variable to scoansi if full-screen programs have trouble running under this console.
# Enable this and PCVT_FREEBSD for pcvt vt220 compatible console driver
#device          vt0     at isa?
#options         XSERVER          # support for X server on a vt console
#options         FAT_CURSOR       # start with block cursor
# If you have a ThinkPAD, uncomment this along with the rest of the PCVT lines
#options         PCVT_SCANSET=2   # IBM keyboards are non-std
This is a VT220-compatible console driver, backward compatible to VT100/102. It works well on some laptops which have hardware incompatibilities with sc0. Also set your TERM variable to vt100 or vt220 when you log in. This driver might also prove useful when connecting to a large number of different machines over the network, where termcap or terminfo entries for the sc0 device are often not available -- vt100 should be available on virtually any platform.
# Power management support (see LINT for more options)
device          apm0     at nexus? disable flags 0x20  # Advanced Power Management
Advanced Power Management support. Useful for laptops.
# PCCARD (PCMCIA) support
device          card
device          pcic0    at isa? irq 10 port 0x3e0 iomem 0xd0000
device          pcic1    at isa? irq 11 port 0x3e2 iomem 0xd4000 disable
PCMCIA support. You want this if you are using a laptop.
# Serial (COM) ports
device          sio0     at isa? port IO_COM1 flags 0x10 irq 4
device          sio1     at isa? port IO_COM2 irq 3
device          sio2     at isa? disable port IO_COM3 irq 5
device          sio3     at isa? disable port IO_COM4 irq 9
These are the four serial ports referred to as COM1 through COM4 in the MS-DOS/Windows world.
Note: If you have an internal modem on COM4 and a serial port at COM2, you will have to change the IRQ of the modem to 2 (for obscure technical reasons, IRQ2 = IRQ 9) in order to access it from FreeBSD. If you have a multiport serial card, check the manual page for sio(4) for more information on the proper values for these lines. Some video cards (notably those based on S3 chips) use IO addresses in the form of 0x*2e8, and since many cheap serial cards do not fully decode the 16-bit IO address space, they clash with these cards making the COM4 port practically unavailable.
Each serial port is required to have a unique IRQ (unless you are using one of the multiport cards where shared interrupts are supported), so the default IRQs for COM3 and COM4 cannot be used.
# Parallel port
device          ppc0    at isa? irq 7
This is the ISA-bus parallel port interface.
device ppbus # Parallel port bus (required)
Provides support for the parallel port bus.
device lpt # Printer
Support for parallel port printers.
Note: All three of the above are required to enable parallel printer support.
device plip # TCP/IP over parallel
This is the driver for the parallel network interface.
device ppi # Parallel port interface device
The general-purpose I/O (``geek port'') + IEEE1284 I/O.
#device vpo # Requires scbus and da
This is for an Iomega Zip drive. It requires scbus and da support. Best performance is achieved with ports in EPP 1.9 mode.
# PCI Ethernet NICs.
device          de         # DEC/Intel DC21x4x (``Tulip'')
device          fxp        # Intel EtherExpress PRO/100B (82557, 82558)
device          tx         # SMC 9432TX (83c170 ``EPIC'')
device          vx         # 3Com 3c590, 3c595 (``Vortex'')
device          wx         # Intel Gigabit Ethernet Card (``Wiseman'')
Various PCI network card drivers. Comment out or remove any of these not present in your system.
# PCI Ethernet NICs that use the common MII bus controller code.
device          miibus     # MII bus support
MII bus support is required for some PCI 10/100 Ethernet NICs, namely those which use MII-compliant transceivers or implement transceiver control interfaces that operate like an MII. Adding device miibus to the kernel config pulls in support for the generic miibus API and all of the PHY drivers, including a generic one for PHYs that are not specifically handled by an individual driver.
device          dc         # DEC/Intel 21143 and various workalikes
device          rl         # RealTek 8129/8139
device          sf         # Adaptec AIC-6915 (``Starfire'')
device          sis        # Silicon Integrated Systems SiS 900/SiS 7016
device          ste        # Sundance ST201 (D-Link DFE-550TX)
device          tl         # Texas Instruments ThunderLAN
device          vr         # VIA Rhine, Rhine II
device          wb         # Winbond W89C840F
device          xl         # 3Com 3c90x (``Boomerang'', ``Cyclone'')
Drivers that use the MII bus controller code.
# ISA Ethernet NICs.
device          ed0    at isa? port 0x280 irq 10 iomem 0xd8000
device          ex
device          ep
# WaveLAN/IEEE 802.11 wireless NICs. Note: the WaveLAN/IEEE really
# exists only as a PCMCIA device, so there is no ISA attachment needed
# and resources will always be dynamically assigned by the pccard code.
device          wi
# Aironet 4500/4800 802.11 wireless NICs. Note: the declaration below will
# work for PCMCIA and PCI cards, as well as ISA cards set to ISA PnP
# mode (the factory default). If you set the switches on your ISA
# card for a manually chosen I/O address and IRQ, you must specify
# those parameters here.
device          an
# The probe order of these is presently determined by i386/isa/isa_compat.c.
device          ie0    at isa? port 0x300 irq 10 iomem 0xd0000
device          fe0    at isa? port 0x300
device          le0    at isa? port 0x300 irq 5 iomem 0xd0000
device          lnc0   at isa? port 0x280 irq 10 drq 0
device          cs0    at isa? port 0x300
device          sn0    at isa? port 0x300 irq 10
# requires PCCARD (PCMCIA) support to be activated
#device         xe0    at isa?
ISA Ethernet drivers. See /usr/src/sys/i386/conf/LINT for which cards are supported by which driver.
pseudo-device ether # Ethernet support
ether is only needed if you have an Ethernet card. It includes generic Ethernet protocol code.
pseudo-device sl 1 # Kernel SLIP
sl is for SLIP support. This has been almost entirely supplanted by PPP, which is easier to set up, better suited for modem-to-modem connection, and more powerful. The number after sl specifies how many simultaneous SLIP sessions to support.
pseudo-device ppp 1 # Kernel PPP
This is for kernel PPP support for dial-up connections. There is also a version of PPP implemented as a userland application that uses tun and offers more flexibility and features such as demand dialing. The number after ppp specifies how many simultaneous PPP connections to support.
pseudo-device tun # Packet tunnel.
This is used by the userland PPP software. A number after tun specifies the number of simultaneous PPP sessions to support. See the PPP section of this book for more information.
pseudo-device pty # Pseudo-ttys (telnet etc)
This is a ``pseudo-terminal'' or simulated login port. It is used by incoming telnet and rlogin sessions, xterm, and some other applications such as Emacs. A number after pty indicates the number of ptys to create. If you need more than the default of 16 simultaneous xterm windows and/or remote logins, be sure to increase this number accordingly, up to a maximum of 256.
pseudo-device md # Memory ``disks''
Memory disk pseudo-devices.
pseudo-device gif
or
pseudo-device gif 4 # IPv6 and IPv4 tunneling
This implements IPv6 over IPv4 tunneling, IPv4 over IPv6 tunneling, IPv4 over IPv4 tunneling, and IPv6 over IPv6 tunneling. Beginning with FreeBSD 4.4 the gif device is ``auto-cloning'', and you should use the first example (without the number after gif). Earlier versions of FreeBSD require the number.
pseudo-device faith 1 # IPv6-to-IPv4 relaying (translation)
This pseudo-device captures packets that are sent to it and diverts them to the IPv4/IPv6 translation daemon.
# The `bpf' pseudo-device enables the Berkeley Packet Filter.
# Be aware of the administrative consequences of enabling this!
pseudo-device   bpf           # Berkeley packet filter
This is the Berkeley Packet Filter. This pseudo-device allows network interfaces to be placed in promiscuous mode, capturing every packet on a broadcast network (e.g., an Ethernet). These packets can be captured to disk and or examined with the tcpdump(1) program.
Note: The bpf pseudo-device is also used by dhclient(8) to obtain the IP address of the default router (gateway) and so on. If you use DHCP, leave this uncommented.
# USB support
#device         uhci          # UHCI PCI->USB interface
#device         ohci          # OHCI PCI->USB interface
#device         usb           # USB Bus (required)
#device         ugen          # Generic
#device         uhid          # ``Human Interface Devices''
#device         ukbd          # Keyboard
#device         ulpt          # Printer
#device         umass         # Disks/Mass storage - Requires scbus and da
#device         ums           # Mouse
# USB Ethernet, requires mii
#device         aue           # ADMtek USB ethernet
#device         cue           # CATC USB ethernet
#device         kue           # Kawasaki LSI USB ethernet
Support for various USB devices.
For more information and additional devices supported by FreeBSD, see /usr/src/sys/i386/conf/LINT.
9.4.1 Defeating Memory Limitations
In the past, FreeBSD never made use of memory beyond four gigabytes. This was termed the four gigabytes limit and was a hassle to those who owned machines which supported a memory size larger than four gigabytes. For those users, the pae(4) driver was written. The PAE driver provides for memory address extensions ultimately permitting up to sixty-four gigabytes. To make use of this feature, just add:
options PAE
to the kernel configuration file as explained above.
Note: This option is slightly experimental, and could cause minor problems. For instance, the kernel's virtual address space may need to be increased. Add the KVA_PAGES from NOTES to the kernel configuration file. The default number, 260, may need to be increased and the kern.maxvnodes may need to be decreased by using the sysctl utility. Reading the tuning(7) manual page is certainly advised.
9.5 Making Device Nodes
Note: If you are running FreeBSD 5.0 or later you can safely skip this section. These versions use devfs(5) to allocate device nodes transparently for the user.
Almost every device in the kernel has a corresponding ``node'' entry in the /dev directory. These nodes look like regular files, but are actually special entries into the kernel which programs use to access the device. The shell script /dev/MAKEDEV, which is executed when you first install the operating system, creates nearly all of the device nodes supported. However, it does not create all of them, so when you add support for a new device, it pays to make sure that the appropriate entries are in this directory, and if not, add them. Here is a simple example:
Suppose you add the IDE CD-ROM support to the kernel. The line to add is:
device acd0
This means that you should look for some entries that start with acd0 in the /dev directory, possibly followed by a letter, such as c, or preceded by the letter r, which means a ``raw'' device. It turns out that those files are not there, so you must change to the /dev directory and type:
# sh MAKEDEV acd0
When this script finishes, you will find that there are now acd0c and racd0c entries in /dev so you know that it executed correctly.
For sound cards, the following command creates the appropriate entries:
# sh MAKEDEV snd0
Note: When creating device nodes for devices such as sound cards, if other people have access to your machine, it may be desirable to protect the devices from outside access by adding them to the /etc/fbtab file. See fbtab(5) for more information.
Follow this simple procedure for any other non-GENERIC devices which do not have entries.
Note: All SCSI controllers use the same set of /dev entries, so you do not need to create these. Also, network cards and SLIP/PPP pseudo-devices do not have entries in /dev at all, so you do not have to worry about these either.
9.6 If Something Goes Wrong
There are five categories of trouble that can occur when building a custom kernel. They are:
- config fails:
-
If the config(8) command fails when you give it your kernel description, you have probably made a simple error somewhere. Fortunately, config(8) will print the line number that it had trouble with, so you can quickly skip to it with vi. For example, if you see:
config: line 17: syntax error
You can skip to the problem in vi by typing 17G in command mode. Make sure the keyword is typed correctly, by comparing it to the GENERIC kernel or another reference.
- make fails:
-
If the make command fails, it usually signals an error in your kernel description, but not severe enough for config(8) to catch it. Again, look over your configuration, and if you still cannot resolve the problem, send mail to the FreeBSD general questions mailing list with your kernel configuration, and it should be diagnosed very quickly.
- Installing the new kernel fails:
-
If the kernel compiled fine, but failed to install (the make install or make installkernel command failed), the first thing to check is if your system is running at securelevel 1 or higher (see init(8)). The kernel installation tries to remove the immutable flag from your kernel and set the immutable flag on the new one. Since securelevel 1 or higher prevents unsetting the immutable flag for any files on the system, the kernel installation needs to be performed at securelevel 0 or lower.
- The kernel does not boot:
-
If your new kernel does not boot, or fails to recognize your devices, do not panic! Fortunately, FreeBSD has an excellent mechanism for recovering from incompatible kernels. Simply choose the kernel you want to boot from at the FreeBSD boot loader. You can access this when the system counts down from 10. Hit any key except for the Enter key, type unload and then type boot kernel.old, or the filename of any other kernel that will boot properly. When reconfiguring a kernel, it is always a good idea to keep a kernel that is known to work on hand.
After booting with a good kernel you can check over your configuration file and try to build it again. One helpful resource is the /var/log/messages file which records, among other things, all of the kernel messages from every successful boot. Also, the dmesg(8) command will print the kernel messages from the current boot.
Note: If you are having trouble building a kernel, make sure to keep a GENERIC, or some other kernel that is known to work on hand as a different name that will not get erased on the next build. You cannot rely on kernel.old because when installing a new kernel, kernel.old is overwritten with the last installed kernel which may be non-functional. Also, as soon as possible, move the working kernel to the proper kernel location or commands such as ps(1) will not work properly. The proper command to ``unlock'' the kernel file that make installs (in order to move another kernel back permanently) is:
# chflags noschg /kernel
If you find you cannot do this, you are probably running at a securelevel(8) greater than zero. Edit kern_securelevel in /etc/rc.conf and set it to -1, then reboot. You can change it back to its previous setting when you are happy with your new kernel.
And, if you want to ``lock'' your new kernel into place, or any file for that matter, so that it cannot be moved or tampered with:
# chflags schg /kernel
In FreeBSD 5.X, kernels are not installed with the system immutable flag, so this is unlikely to be the source of the problem you are experiencing.
- The kernel works, but ps(1) does not work any more:
-
If you have installed a different version of the kernel from the one that the system utilities have been built with, for example, a 4.X kernel on a 3.X system, many system-status commands like ps(1) and vmstat(8) will not work any more. You must recompile the libkvm library as well as these utilities. This is one reason it is not normally a good idea to use a different version of the kernel from the rest of the operating system.
Chapter 10 Security
Much of this chapter has been taken from the security(7) manual page by Matthew Dillon.10.1 Synopsis
This chapter will provide a basic introduction to system security concepts, some general good rules of thumb, and some advanced topics under FreeBSD. A lot of the topics covered here can be applied to system and Internet security in general as well. The Internet is no longer a ``friendly'' place in which everyone wants to be your kind neighbor. Securing your system is imperative to protect your data, intellectual property, time, and much more from the hands of hackers and the like.
FreeBSD provides an array of utilities and mechanisms to ensure the integrity and security of your system and network.
After reading this chapter, you will know:
-
Basic system security concepts, in respect to FreeBSD.
-
About the various crypt mechanisms available in FreeBSD, such as DES and MD5.
-
How to set up one-time password authentication.
-
How to set up KerberosIV on FreeBSD releases prior to 5.0.
-
How to set up Kerberos5 on post FreeBSD 5.0 releases.
-
How to create firewalls using IPFW.
-
How to configure IPsec and create a VPN between FreeBSD/Windows machines.
-
How to configure and use OpenSSH, FreeBSD's SSH implementation.
-
How to configure and load access control extension modules using the TrustedBSD MAC Framework.
-
What file system ACLs are and how to use them.
Before reading this chapter, you should:
-
Understand basic FreeBSD and Internet concepts.
10.2 Introduction
Security is a function that begins and ends with the system administrator. While all BSD UNIX multi-user systems have some inherent security, the job of building and maintaining additional security mechanisms to keep those users ``honest'' is probably one of the single largest undertakings of the sysadmin. Machines are only as secure as you make them, and security concerns are ever competing with the human necessity for convenience. UNIX systems, in general, are capable of running a huge number of simultaneous processes and many of these processes operate as servers - meaning that external entities can connect and talk to them. As yesterday's mini-computers and mainframes become today's desktops, and as computers become networked and internetworked, security becomes an even bigger issue.
Security is best implemented through a layered ``onion'' approach. In a nutshell, what you want to do is to create as many layers of security as are convenient and then carefully monitor the system for intrusions. You do not want to overbuild your security or you will interfere with the detection side, and detection is one of the single most important aspects of any security mechanism. For example, it makes little sense to set the schg flags (see chflags(1)) on every system binary because while this may temporarily protect the binaries, it prevents an attacker who has broken in from making an easily detectable change that may result in your security mechanisms not detecting the attacker at all.
System security also pertains to dealing with various forms of attack, including attacks that attempt to crash, or otherwise make a system unusable, but do not attempt to compromise the root account (``break root''). Security concerns can be split up into several categories:
-
Denial of service attacks.
-
User account compromises.
-
Root compromise through accessible servers.
-
Root compromise via user accounts.
-
Backdoor creation.
A denial of service attack is an action that deprives the machine of needed resources. Typically, DoS attacks are brute-force mechanisms that attempt to crash or otherwise make a machine unusable by overwhelming its servers or network stack. Some DoS attacks try to take advantage of bugs in the networking stack to crash a machine with a single packet. The latter can only be fixed by applying a bug fix to the kernel. Attacks on servers can often be fixed by properly specifying options to limit the load the servers incur on the system under adverse conditions. Brute-force network attacks are harder to deal with. A spoofed-packet attack, for example, is nearly impossible to stop, short of cutting your system off from the Internet. It may not be able to take your machine down, but it can saturate your Internet connection.
A user account compromise is even more common than a DoS attack. Many sysadmins still run standard telnetd, rlogind, rshd, and ftpd servers on their machines. These servers, by default, do not operate over encrypted connections. The result is that if you have any moderate-sized user base, one or more of your users logging into your system from a remote location (which is the most common and convenient way to login to a system) will have his or her password sniffed. The attentive system admin will analyze his remote access logs looking for suspicious source addresses even for successful logins.
One must always assume that once an attacker has access to a user account, the attacker can break root. However, the reality is that in a well secured and maintained system, access to a user account does not necessarily give the attacker access to root. The distinction is important because without access to root the attacker cannot generally hide his tracks and may, at best, be able to do nothing more than mess with the user's files, or crash the machine. User account compromises are very common because users tend not to take the precautions that sysadmins take.
System administrators must keep in mind that there are potentially many ways to break root on a machine. The attacker may know the root password, the attacker may find a bug in a root-run server and be able to break root over a network connection to that server, or the attacker may know of a bug in a suid-root program that allows the attacker to break root once he has broken into a user's account. If an attacker has found a way to break root on a machine, the attacker may not have a need to install a backdoor. Many of the root holes found and closed to date involve a considerable amount of work by the attacker to cleanup after himself, so most attackers install backdoors. A backdoor provides the attacker with a way to easily regain root access to the system, but it also gives the smart system administrator a convenient way to detect the intrusion. Making it impossible for an attacker to install a backdoor may actually be detrimental to your security, because it will not close off the hole the attacker found to break in the first place.
Security remedies should always be implemented with a multi-layered ``onion peel'' approach and can be categorized as follows:
-
Securing root and staff accounts.
-
Securing root - root-run servers and suid/sgid binaries.
-
Securing user accounts.
-
Securing the password file.
-
Securing the kernel core, raw devices, and filesystems.
-
Quick detection of inappropriate changes made to the system.
-
Paranoia.
The next section of this chapter will cover the above bullet items in greater depth.
10.3 Securing FreeBSD
Command vs. Protocol: Throughout this document, we will use bold text to refer to a command or application. This is used for instances such as ssh, since it is a protocol as well as command.
The sections that follow will cover the methods of securing your FreeBSD system that were mentioned in the last section of this chapter.
10.3.1 Securing the root Account and Staff Accounts
First off, do not bother securing staff accounts if you have not secured the root account. Most systems have a password assigned to the root account. The first thing you do is assume that the password is always compromised. This does not mean that you should remove the password. The password is almost always necessary for console access to the machine. What it does mean is that you should not make it possible to use the password outside of the console or possibly even with the su(1) command. For example, make sure that your pty's are specified as being insecure in the /etc/ttys file so that direct root logins via telnet or rlogin are disallowed. If using other login services such as sshd, make sure that direct root logins are disabled there as well. You can do this by editing your /etc/ssh/sshd_config file, and making sure that PermitRootLogin is set to NO. Consider every access method - services such as FTP often fall through the cracks. Direct root logins should only be allowed via the system console.
Of course, as a sysadmin you have to be able to get to root, so we open up a few holes. But we make sure these holes require additional password verification to operate. One way to make root accessible is to add appropriate staff accounts to the wheel group (in /etc/group). The staff members placed in the wheel group are allowed to su to root. You should never give staff members native wheel access by putting them in the wheel group in their password entry. Staff accounts should be placed in a staff group, and then added to the wheel group via the /etc/group file. Only those staff members who actually need to have root access should be placed in the wheel group. It is also possible, when using an authentication method such as Kerberos, to use Kerberos' .k5login file in the root account to allow a ksu(1) to root without having to place anyone at all in the wheel group. This may be the better solution since the wheel mechanism still allows an intruder to break root if the intruder has gotten hold of your password file and can break into a staff account. While having the wheel mechanism is better than having nothing at all, it is not necessarily the safest option.
An indirect way to secure staff accounts, and ultimately root access is to use an alternative login access method and do what is known as ``starring'' out the encrypted password for the staff accounts. Using the vipw(8) command, one can replace each instance of an encrypted password with a single ``*'' character. This command will update the /etc/master.passwd file and user/password database to disable password-authenticated logins.
A staff account entry such as:
foobar:R9DT/Fa1/LV9U:1000:1000::0:0:Foo Bar:/home/foobar:/usr/local/bin/tcsh
Should be changed to this:
foobar:*:1000:1000::0:0:Foo Bar:/home/foobar:/usr/local/bin/tcsh
This change will prevent normal logins from occurring, since the encrypted password will never match ``*''. With this done, staff members must use another mechanism to authenticate themselves such as kerberos(1) or ssh(1) using a public/private key pair. When using something like Kerberos, one generally must secure the machines which run the Kerberos servers and your desktop workstation. When using a public/private key pair with ssh, one must generally secure the machine used to login from (typically one's workstation). An additional layer of protection can be added to the key pair by password protecting the key pair when creating it with ssh-keygen(1). Being able to ``star'' out the passwords for staff accounts also guarantees that staff members can only login through secure access methods that you have set up. This forces all staff members to use secure, encrypted connections for all of their sessions, which closes an important hole used by many intruders: sniffing the network from an unrelated, less secure machine.
The more indirect security mechanisms also assume that you are logging in from a more restrictive server to a less restrictive server. For example, if your main box is running all sorts of servers, your workstation should not be running any. In order for your workstation to be reasonably secure you should run as few servers as possible, up to and including no servers at all, and you should run a password-protected screen blanker. Of course, given physical access to a workstation an attacker can break any sort of security you put on it. This is definitely a problem that you should consider, but you should also consider the fact that the vast majority of break-ins occur remotely, over a network, from people who do not have physical access to your workstation or servers.
Using something like Kerberos also gives you the ability to disable or change the password for a staff account in one place, and have it immediately effect all the machines on which the staff member may have an account. If a staff member's account gets compromised, the ability to instantly change his password on all machines should not be underrated. With discrete passwords, changing a password on N machines can be a mess. You can also impose re-passwording restrictions with Kerberos: not only can a Kerberos ticket be made to timeout after a while, but the Kerberos system can require that the user choose a new password after a certain period of time (say, once a month).
10.3.2 Securing Root-run Servers and SUID/SGID Binaries
The prudent sysadmin only runs the servers he needs to, no more, no less. Be aware that third party servers are often the most bug-prone. For example, running an old version of imapd or popper is like giving a universal root ticket out to the entire world. Never run a server that you have not checked out carefully. Many servers do not need to be run as root. For example, the ntalk, comsat, and finger daemons can be run in special user sandboxes. A sandbox is not perfect, unless you go through a large amount of trouble, but the onion approach to security still stands: If someone is able to break in through a server running in a sandbox, they still have to break out of the sandbox. The more layers the attacker must break through, the lower the likelihood of his success. Root holes have historically been found in virtually every server ever run as root, including basic system servers. If you are running a machine through which people only login via sshd and never login via telnetd or rshd or rlogind, then turn off those services!
FreeBSD now defaults to running ntalkd, comsat, and finger in a sandbox. Another program which may be a candidate for running in a sandbox is named(8). /etc/defaults/rc.conf includes the arguments necessary to run named in a sandbox in a commented-out form. Depending on whether you are installing a new system or upgrading an existing system, the special user accounts used by these sandboxes may not be installed. The prudent sysadmin would research and implement sandboxes for servers whenever possible.
There are a number of other servers that typically do not run in sandboxes: sendmail, popper, imapd, ftpd, and others. There are alternatives to some of these, but installing them may require more work than you are willing to perform (the convenience factor strikes again). You may have to run these servers as root and rely on other mechanisms to detect break-ins that might occur through them.
The other big potential root holes in a system are the suid-root and sgid binaries installed on the system. Most of these binaries, such as rlogin, reside in /bin, /sbin, /usr/bin, or /usr/sbin. While nothing is 100% safe, the system-default suid and sgid binaries can be considered reasonably safe. Still, root holes are occasionally found in these binaries. A root hole was found in Xlib in 1998 that made xterm (which is typically suid) vulnerable. It is better to be safe than sorry and the prudent sysadmin will restrict suid binaries, that only staff should run, to a special group that only staff can access, and get rid of (chmod 000) any suid binaries that nobody uses. A server with no display generally does not need an xterm binary. Sgid binaries can be almost as dangerous. If an intruder can break an sgid-kmem binary, the intruder might be able to read /dev/kmem and thus read the encrypted password file, potentially compromising any passworded account. Alternatively an intruder who breaks group kmem can monitor keystrokes sent through pty's, including pty's used by users who login through secure methods. An intruder that breaks the tty group can write to almost any user's tty. If a user is running a terminal program or emulator with a keyboard-simulation feature, the intruder can potentially generate a data stream that causes the user's terminal to echo a command, which is then run as that user.
10.3.3 Securing User Accounts
User accounts are usually the most difficult to secure. While you can impose Draconian access restrictions on your staff and ``star'' out their passwords, you may not be able to do so with any general user accounts you might have. If you do have sufficient control, then you may win out and be able to secure the user accounts properly. If not, you simply have to be more vigilant in your monitoring of those accounts. Use of ssh and Kerberos for user accounts is more problematic, due to the extra administration and technical support required, but still a very good solution compared to a crypted password file.
10.3.4 Securing the Password File
The only sure fire way is to * out as many passwords as you can and use ssh or Kerberos for access to those accounts. Even though the encrypted password file (/etc/spwd.db) can only be read by root, it may be possible for an intruder to obtain read access to that file even if the attacker cannot obtain root-write access.
Your security scripts should always check for and report changes to the password file (see the Checking file integrity section below).
10.3.5 Securing the Kernel Core, Raw Devices, and Filesystems
If an attacker breaks root he can do just about anything, but there are certain conveniences. For example, most modern kernels have a packet sniffing device driver built in. Under FreeBSD it is called the bpf device. An intruder will commonly attempt to run a packet sniffer on a compromised machine. You do not need to give the intruder the capability and most systems do not have the need for the bpf device compiled in.
But even if you turn off the bpf device, you still have /dev/mem and /dev/kmem to worry about. For that matter, the intruder can still write to raw disk devices. Also, there is another kernel feature called the module loader, kldload(8). An enterprising intruder can use a KLD module to install his own bpf device, or other sniffing device, on a running kernel. To avoid these problems you have to run the kernel at a higher secure level, at least securelevel 1. The securelevel can be set with a sysctl on the kern.securelevel variable. Once you have set the securelevel to 1, write access to raw devices will be denied and special chflags flags, such as schg, will be enforced. You must also ensure that the schg flag is set on critical startup binaries, directories, and script files - everything that gets run up to the point where the securelevel is set. This might be overdoing it, and upgrading the system is much more difficult when you operate at a higher secure level. You may compromise and run the system at a higher secure level but not set the schg flag for every system file and directory under the sun. Another possibility is to simply mount / and /usr read-only. It should be noted that being too Draconian in what you attempt to protect may prevent the all-important detection of an intrusion.
10.3.6 Checking File Integrity: Binaries, Configuration Files, Etc.
When it comes right down to it, you can only protect your core system configuration and control files so much before the convenience factor rears its ugly head. For example, using chflags to set the schg bit on most of the files in / and /usr is probably counterproductive, because while it may protect the files, it also closes a detection window. The last layer of your security onion is perhaps the most important - detection. The rest of your security is pretty much useless (or, worse, presents you with a false sense of safety) if you cannot detect potential incursions. Half the job of the onion is to slow down the attacker, rather than stop him, in order to give the detection side of the equation a chance to catch him in the act.
The best way to detect an incursion is to look for modified, missing, or unexpected files. The best way to look for modified files is from another (often centralized) limited-access system. Writing your security scripts on the extra-secure limited-access system makes them mostly invisible to potential attackers, and this is important. In order to take maximum advantage you generally have to give the limited-access box significant access to the other machines in the business, usually either by doing a read-only NFS export of the other machines to the limited-access box, or by setting up ssh key-pairs to allow the limited-access box to ssh to the other machines. Except for its network traffic, NFS is the least visible method - allowing you to monitor the filesystems on each client box virtually undetected. If your limited-access server is connected to the client boxes through a switch, the NFS method is often the better choice. If your limited-access server is connected to the client boxes through a hub, or through several layers of routing, the NFS method may be too insecure (network-wise) and using ssh may be the better choice even with the audit-trail tracks that ssh lays.
Once you give a limited-access box, at least read access to the client systems it is supposed to monitor, you must write scripts to do the actual monitoring. Given an NFS mount, you can write scripts out of simple system utilities such as find(1) and md5(1). It is best to physically md5 the client-box files at least once a day, and to test control files such as those found in /etc and /usr/local/etc even more often. When mismatches are found, relative to the base md5 information the limited-access machine knows is valid, it should scream at a sysadmin to go check it out. A good security script will also check for inappropriate suid binaries and for new or deleted files on system partitions such as / and /usr.
When using ssh rather than NFS, writing the security script is much more difficult. You essentially have to scp the scripts to the client box in order to run them, making them visible, and for safety you also need to scp the binaries (such as find) that those scripts use. The ssh client on the client box may already be compromised. All in all, using ssh may be necessary when running over insecure links, but it is also a lot harder to deal with.
A good security script will also check for changes to user and staff members access configuration files: .rhosts, .shosts, .ssh/authorized_keys and so forth... files that might fall outside the purview of the MD5 check.
If you have a huge amount of user disk space, it may take too long to run through every file on those partitions. In this case, setting mount flags to disallow suid binaries and devices on those partitions is a good idea. The nodev and nosuid options (see mount(8)) are what you want to look into. You should probably scan them anyway, at least once a week, since the object of this layer is to detect a break-in whether or not the break-in is effective.
Process accounting (see accton(8)) is a relatively low-overhead feature of the operating system which might help as a post-break-in evaluation mechanism. It is especially useful in tracking down how an intruder has actually broken into a system, assuming the file is still intact after the break-in occurs.
Finally, security scripts should process the log files, and the logs themselves should be generated in as secure a manner as possible - remote syslog can be very useful. An intruder tries to cover his tracks, and log files are critical to the sysadmin trying to track down the time and method of the initial break-in. One way to keep a permanent record of the log files is to run the system console to a serial port and collect the information on a continuing basis through a secure machine monitoring the consoles.
10.3.7 Paranoia
A little paranoia never hurts. As a rule, a sysadmin can add any number of security features, as long as they do not effect convenience, and can add security features that do effect convenience with some added thought. Even more importantly, a security administrator should mix it up a bit - if you use recommendations such as those given by this document verbatim, you give away your methodologies to the prospective attacker who also has access to this document.
10.3.8 Denial of Service Attacks
This section covers Denial of Service attacks. A DoS attack is typically a packet attack. While there is not much you can do about modern spoofed packet attacks that saturate your network, you can generally limit the damage by ensuring that the attacks cannot take down your servers.
-
Limiting server forks.
-
Limiting springboard attacks (ICMP response attacks, ping broadcast, etc.).
-
Kernel Route Cache.
A common DoS attack is against a forking server that attempts to cause the server to eat processes, file descriptors, and memory, until the machine dies. inetd (see inetd(8)) has several options to limit this sort of attack. It should be noted that while it is possible to prevent a machine from going down, it is not generally possible to prevent a service from being disrupted by the attack. Read the inetd manual page carefully and pay specific attention to the -c, -C, and -R options. Note that spoofed-IP attacks will circumvent the -C option to inetd, so typically a combination of options must be used. Some standalone servers have self-fork-limitation parameters.
Sendmail has its -OMaxDaemonChildren option, which tends to work much better than trying to use sendmail's load limiting options due to the load lag. You should specify a MaxDaemonChildren parameter, when you start sendmail, high enough to handle your expected load, but not so high that the computer cannot handle that number of sendmails without falling on its face. It is also prudent to run sendmail in queued mode (-ODeliveryMode=queued) and to run the daemon (sendmail -bd) separate from the queue-runs (sendmail -q15m). If you still want real-time delivery you can run the queue at a much lower interval, such as -q1m, but be sure to specify a reasonable MaxDaemonChildren option for that sendmail to prevent cascade failures.
Syslogd can be attacked directly and it is strongly recommended that you use the -s option whenever possible, and the -a option otherwise.
You should also be fairly careful with connect-back services such as tcpwrapper's reverse-identd, which can be attacked directly. You generally do not want to use the reverse-ident feature of tcpwrappers for this reason.
It is a very good idea to protect internal services from external access by firewalling them off at your border routers. The idea here is to prevent saturation attacks from outside your LAN, not so much to protect internal services from network-based root compromise. Always configure an exclusive firewall, i.e., ``firewall everything except ports A, B, C, D, and M-Z''. This way you can firewall off all of your low ports except for certain specific services such as named (if you are primary for a zone), ntalkd, sendmail, and other Internet-accessible services. If you try to configure the firewall the other way - as an inclusive or permissive firewall, there is a good chance that you will forget to ``close'' a couple of services, or that you will add a new internal service and forget to update the firewall. You can still open up the high-numbered port range on the firewall, to allow permissive-like operation, without compromising your low ports. Also take note that FreeBSD allows you to control the range of port numbers used for dynamic binding, via the various net.inet.ip.portrange sysctl's (sysctl -a | fgrep portrange), which can also ease the complexity of your firewall's configuration. For example, you might use a normal first/last range of 4000 to 5000, and a hiport range of 49152 to 65535, then block off everything under 4000 in your firewall (except for certain specific Internet-accessible ports, of course).
Another common DoS attack is called a springboard attack - to attack a server in a manner that causes the server to generate responses which overloads the server, the local network, or some other machine. The most common attack of this nature is the ICMP ping broadcast attack. The attacker spoofs ping packets sent to your LAN's broadcast address with the source IP address set to the actual machine they wish to attack. If your border routers are not configured to stomp on ping's to broadcast addresses, your LAN winds up generating sufficient responses to the spoofed source address to saturate the victim, especially when the attacker uses the same trick on several dozen broadcast addresses over several dozen different networks at once. Broadcast attacks of over a hundred and twenty megabits have been measured. A second common springboard attack is against the ICMP error reporting system. By constructing packets that generate ICMP error responses, an attacker can saturate a server's incoming network and cause the server to saturate its outgoing network with ICMP responses. This type of attack can also crash the server by running it out of mbuf's, especially if the server cannot drain the ICMP responses it generates fast enough. The FreeBSD kernel has a new kernel compile option called ICMP_BANDLIM which limits the effectiveness of these sorts of attacks. The last major class of springboard attacks is related to certain internal inetd services such as the udp echo service. An attacker simply spoofs a UDP packet with the source address being server A's echo port, and the destination address being server B's echo port, where server A and B are both on your LAN. The two servers then bounce this one packet back and forth between each other. The attacker can overload both servers and their LANs simply by injecting a few packets in this manner. Similar problems exist with the internal chargen port. A competent sysadmin will turn off all of these inetd-internal test services.
Spoofed packet attacks may also be used to overload the kernel route cache. Refer to the net.inet.ip.rtexpire, rtminexpire, and rtmaxcache sysctl parameters. A spoofed packet attack that uses a random source IP will cause the kernel to generate a temporary cached route in the route table, viewable with netstat -rna | fgrep W3. These routes typically timeout in 1600 seconds or so. If the kernel detects that the cached route table has gotten too big it will dynamically reduce the rtexpire but will never decrease it to less than rtminexpire. There are two problems:
-
The kernel does not react quickly enough when a lightly loaded server is suddenly attacked.
-
The rtminexpire is not low enough for the kernel to survive a sustained attack.
If your servers are connected to the Internet via a T3 or better, it may be prudent to manually override both rtexpire and rtminexpire via sysctl(8). Never set either parameter to zero (unless you want to crash the machine). Setting both parameters to 2 seconds should be sufficient to protect the route table from attack.
10.3.9 Access Issues with Kerberos and SSH
There are a few issues with both Kerberos and ssh that need to be addressed if you intend to use them. Kerberos V is an excellent authentication protocol, but there are bugs in the kerberized telnet and rlogin applications that make them unsuitable for dealing with binary streams. Also, by default Kerberos does not encrypt a session unless you use the -x option. ssh encrypts everything by default.
ssh works quite well in every respect except that it forwards encryption keys by default. What this means is that if you have a secure workstation holding keys that give you access to the rest of the system, and you ssh to an insecure machine, your keys are usable. The actual keys themselves are not exposed, but ssh installs a forwarding port for the duration of your login, and if an attacker has broken root on the insecure machine he can utilize that port to use your keys to gain access to any other machine that your keys unlock.
We recommend that you use ssh in combination with Kerberos whenever possible for staff logins. ssh can be compiled with Kerberos support. This reduces your reliance on potentially exposable ssh keys while at the same time protecting passwords via Kerberos. ssh keys should only be used for automated tasks from secure machines (something that Kerberos is unsuited to do). We also recommend that you either turn off key-forwarding in the ssh configuration, or that you make use of the from=IP/DOMAIN option that ssh allows in its authorized_keys file to make the key only usable to entities logging in from specific machines.
10.4 DES, MD5, and Crypt
Parts rewritten and updated by Bill Swingle.Every user on a UNIX system has a password associated with their account. It seems obvious that these passwords need to be known only to the user and the actual operating system. In order to keep these passwords secret, they are encrypted with what is known as a ``one-way hash'', that is, they can only be easily encrypted but not decrypted. In other words, what we told you a moment ago was obvious is not even true: the operating system itself does not really know the password. It only knows the encrypted form of the password. The only way to get the ``plain-text'' password is by a brute force search of the space of possible passwords.
Unfortunately the only secure way to encrypt passwords when UNIX came into being was based on DES, the Data Encryption Standard. This was not such a problem for users resident in the US, but since the source code for DES could not be exported outside the US, FreeBSD had to find a way to both comply with US law and retain compatibility with all the other UNIX variants that still used DES.
The solution was to divide up the encryption libraries so that US users could install the DES libraries and use DES but international users still had an encryption method that could be exported abroad. This is how FreeBSD came to use MD5 as its default encryption method. MD5 is believed to be more secure than DES, so installing DES is offered primarily for compatibility reasons.
10.4.1 Recognizing Your Crypt Mechanism
Before FreeBSD 4.4 libcrypt.a was a symbolic link pointing to the library which was used for encryption. FreeBSD 4.4 changed libcrypt.a to provide a configurable password authentication hash library. Currently the library supports DES, MD5 and Blowfish hash functions. By default FreeBSD uses MD5 to encrypt passwords.
It is pretty easy to identify which encryption method FreeBSD is set up to use. Examining the encrypted passwords in the /etc/master.passwd file is one way. Passwords encrypted with the MD5 hash are longer than those encrypted with the DES hash and also begin with the characters $1$. Passwords starting with $2$ are encrypted with the Blowfish hash function. DES password strings do not have any particular identifying characteristics, but they are shorter than MD5 passwords, and are coded in a 64-character alphabet which does not include the $ character, so a relatively short string which does not begin with a dollar sign is very likely a DES password.
The password format used for new passwords is controlled by the passwd_format login capability in /etc/login.conf, which takes values of des, md5 or blf. See the login.conf(5) manual page for more information about login capabilities.
10.5 One-time Passwords
S/Key is a one-time password scheme based on a one-way hash function. FreeBSD uses the MD4 hash for compatibility but other systems have used MD5 and DES-MAC. S/Key has been part of the FreeBSD base system since version 1.1.5 and is also used on a growing number of other operating systems. S/Key is a registered trademark of Bell Communications Research, Inc.
From version 5.0 of FreeBSD, S/Key has been replaced with the functionally equivalent OPIE (One-time Passwords In Everything). OPIE uses the MD5 hash by default.
There are three different sorts of passwords which we will discuss below. The first is your usual UNIX style or Kerberos password; we will call this a ``UNIX password''. The second sort is the one-time password which is generated by the S/Key key program or the OPIE opiekey(1) program and accepted by the keyinit or opiepasswd(1) programs and the login prompt; we will call this a ``one-time password''. The final sort of password is the secret password which you give to the key/opiekey programs (and sometimes the keyinit/opiepasswd programs) which it uses to generate one-time passwords; we will call it a ``secret password'' or just unqualified ``password''.
The secret password does not have anything to do with your UNIX password; they can be the same but this is not recommended. S/Key and OPIE secret passwords are not limited to 8 characters like old UNIX passwords[8], they can be as long as you like. Passwords of six or seven word long phrases are fairly common. For the most part, the S/Key or OPIE system operates completely independently of the UNIX password system.
Besides the password, there are two other pieces of data that are important to S/Key and OPIE. One is what is known as the ``seed'' or ``key'', consisting of two letters and five digits. The other is what is called the ``iteration count'', a number between 1 and 100. S/Key creates the one-time password by concatenating the seed and the secret password, then applying the MD4/MD5 hash as many times as specified by the iteration count and turning the result into six short English words. These six English words are your one-time password. The authentication system (primarily PAM) keeps track of the last one-time password used, and the user is authenticated if the hash of the user-provided password is equal to the previous password. Because a one-way hash is used it is impossible to generate future one-time passwords if a successfully used password is captured; the iteration count is decremented after each successful login to keep the user and the login program in sync. When the iteration count gets down to 1, S/Key and OPIE must be reinitialized.
There are three programs involved in each system which we will discuss below. The key and opiekey programs accept an iteration count, a seed, and a secret password, and generate a one-time password or a consecutive list of one-time passwords. The keyinit and opiepasswd programs are used to initialize S/Key and OPIE respectively, and to change passwords, iteration counts, or seeds; they take either a secret passphrase, or an iteration count, seed, and one-time password. The keyinfo and opieinfo programs examine the relevant credentials files (/etc/skeykeys or /etc/opiekeys) and print out the invoking user's current iteration count and seed.
There are four different sorts of operations we will cover. The first is using keyinit or opiepasswd over a secure connection to set up one-time-passwords for the first time, or to change your password or seed. The second operation is using keyinit or opiepasswd over an insecure connection, in conjunction with key or opiekey over a secure connection, to do the same. The third is using key/opiekey to log in over an insecure connection. The fourth is using key or opiekey to generate a number of keys which can be written down or printed out to carry with you when going to some location without secure connections to anywhere.
10.5.1 Secure Connection Initialization
To initialize S/Key for the first time, change your password, or change your seed while logged in over a secure connection (e.g., on the console of a machine or via ssh), use the keyinit command without any parameters while logged in as yourself:
% keyinit
Adding unfurl:
Reminder - Only use this method if you are directly connected.
If you are using telnet or rlogin exit with no password and use keyinit -s.
Enter secret password:
Again secret password:

ID unfurl s/key is 99 to17757
DEFY CLUB PRO NASH LACE SOFT
For OPIE, opiepasswd is used instead:
% opiepasswd -c
[grimreaper] ~ $ opiepasswd -f -c
Adding unfurl:
Only use this method from the console; NEVER from remote. If you are using
telnet, xterm, or a dial-in, type ^C now or exit with no password.
Then run opiepasswd without the -c parameter.
Using MD5 to compute responses.
Enter new secret pass phrase:
Again new secret pass phrase:
ID unfurl OTP key is 499 to4268
MOS MALL GOAT ARM AVID COED
At the Enter new secret pass phrase: or Enter secret password: prompts, you should enter a password or phrase. Remember, this is not the password that you will use to login with, this is used to generate your one-time login keys. The ``ID'' line gives the parameters of your particular instance: your login name, the iteration count, and seed. When logging in the system will remember these parameters and present them back to you so you do not have to remember them. The last line gives the particular one-time password which corresponds to those parameters and your secret password; if you were to re-login immediately, this one-time password is the one you would use.
10.5.2 Insecure Connection Initialization
To initialize or change your secret password over an insecure connection, you will need to already have a secure connection to some place where you can run key or opiekey; this might be in the form of a desk accessory on a Macintosh, or a shell prompt on a machine you trust. You will also need to make up an iteration count (100 is probably a good value), and you may make up your own seed or use a randomly-generated one. Over on the insecure connection (to the machine you are initializing), use the keyinit -s command:
% keyinit -s
Updating unfurl:
Old key: to17758
Reminder you need the 6 English words from the key command.
Enter sequence count from 1 to 9999: 100
Enter new key [default to17759]:
s/key 100 to 17759
s/key access password:
s/key access password:CURE MIKE BANE HIM RACY GORE
For OPIE, you need to use opiepasswd:
% opiepasswd

Updating unfurl:
You need the response from an OTP generator.
Old secret pass phrase:
        otp-md5 498 to4268 ext
        Response: GAME GAG WELT OUT DOWN CHAT
New secret pass phrase:
        otp-md5 499 to4269
        Response: LINE PAP MILK NELL BUOY TROY

ID mark OTP key is 499 gr4269
LINE PAP MILK NELL BUOY TROY
To accept the default seed (which the keyinit program confusingly calls a key), press Return. Then before entering an access password, move over to your secure connection or S/Key desk accessory, and give it the same parameters:
% key 100 to17759
Reminder - Do not use this program while logged in via telnet or rlogin.
Enter secret password: <secret password>
CURE MIKE BANE HIM RACY GORE
Or for OPIE:
% opiekey 498 to4268
Using the MD5 algorithm to compute response.
Reminder: Don't use opiekey from telnet or dial-in sessions.
Enter secret pass phrase:
GAME GAG WELT OUT DOWN CHAT
Now switch back over to the insecure connection, and copy the one-time password generated over to the relevant program.
10.5.3 Generating a Single One-time Password
Once you have initialized S/Key or OPIE, when you login you will be presented with a prompt like this:
% telnet example.com
Trying 10.0.0.1...
Connected to example.com
Escape character is '^]'.

FreeBSD/i386 (example.com) (ttypa)

login: <username>
s/key 97 fw13894
Password:
Or for OPIE:
% telnet example.com
Trying 10.0.0.1...
Connected to example.com
Escape character is '^]'.

FreeBSD/i386 (example.com) (ttypa)

login: <username>
otp-md5 498 gr4269 ext
Password:
As a side note, the S/Key and OPIE prompts have a useful feature (not shown here): if you press Return at the password prompt, the prompter will turn echo on, so you can see what you are typing. This can be extremely useful if you are attempting to type in a password by hand, such as from a printout.
At this point you need to generate your one-time password to answer this login prompt. This must be done on a trusted system that you can run key or opiekey on. (There are versions of these for DOS, Windows and Mac OS as well.) They need both the iteration count and the seed as command line options. You can cut-and-paste these right from the login prompt on the machine that you are logging in to.
On the trusted system:
% key 97 fw13894
Reminder - Do not use this program while logged in via telnet or rlogin.
Enter secret password:
WELD LIP ACTS ENDS ME HAAG
For OPIE:
% opiekey 498 to4268
Using the MD5 algorithm to compute response.
Reminder: Don't use opiekey from telnet or dial-in sessions.
Enter secret pass phrase:
GAME GAG WELT OUT DOWN CHAT
Now that you have your one-time password you can continue logging in:
login: <username>
s/key 97 fw13894
Password: <return to enable echo>
s/key 97 fw13894
Password [echo on]: WELD LIP ACTS ENDS ME HAAG
Last login: Tue Mar 21 11:56:41 from 10.0.0.2 ...
10.5.4 Generating Multiple One-time Passwords
Sometimes you have to go places where you do not have access to a trusted machine or secure connection. In this case, it is possible to use the key and opiekey commands to generate a number of one-time passwords beforehand to be printed out and taken with you. For example:
% key -n 5 30 zz99999
Reminder - Do not use this program while logged in via telnet or rlogin.
Enter secret password: <secret password>
26: SODA RUDE LEA LIND BUDD SILT
27: JILT SPY DUTY GLOW COWL ROT
28: THEM OW COLA RUNT BONG SCOT
29: COT MASH BARR BRIM NAN FLAG
30: CAN KNEE CAST NAME FOLK BILK
Or for OPIE:
% opiekey -n 5 30 zz99999
Using the MD5 algorithm to compute response.
Reminder: Don't use opiekey from telnet or dial-in sessions.
Enter secret pass phrase: <secret password>
26: JOAN BORE FOSS DES NAY QUIT
27: LATE BIAS SLAY FOLK MUCH TRIG
28: SALT TIN ANTI LOON NEAL USE
29: RIO ODIN GO BYE FURY TIC
30: GREW JIVE SAN GIRD BOIL PHI
The -n 5 requests five keys in sequence, the 30 specifies what the last iteration number should be. Note that these are printed out in reverse order of eventual use. If you are really paranoid, you might want to write the results down by hand; otherwise you can cut-and-paste into lpr. Note that each line shows both the iteration count and the one-time password; you may still find it handy to scratch off passwords as you use them.
10.5.5 Restricting Use of UNIX® Passwords
S/Key can place restrictions on the use of UNIX passwords based on the host name, user name, terminal port, or IP address of a login session. These restrictions can be found in the configuration file /etc/skey.access. The skey.access(5) manual page has more information on the complete format of the file and also details some security cautions to be aware of before depending on this file for security.
If there is no /etc/skey.access file (this is the default on FreeBSD 4.X systems), then all users will be allowed to use UNIX passwords. If the file exists, however, then all users will be required to use S/Key unless explicitly permitted to do otherwise by configuration statements in the skey.access file. In all cases, UNIX passwords are permitted on the console.
Here is a sample skey.access configuration file which illustrates the three most common sorts of configuration statements:
permit internet 192.168.0.0 255.255.0.0
permit user fnord
permit port ttyd0
The first line (permit internet) allows users whose IP source address (which is vulnerable to spoofing) matches the specified value and mask, to use UNIX passwords. This should not be considered a security mechanism, but rather, a means to remind authorized users that they are using an insecure network and need to use S/Key for authentication.
The second line (permit user) allows the specified username, in this case fnord, to use UNIX passwords at any time. Generally speaking, this should only be used for people who are either unable to use the key program, like those with dumb terminals, or those who are uneducable.
The third line (permit port) allows all users logging in on the specified terminal line to use UNIX passwords; this would be used for dial-ups.
OPIE can restrict the use of UNIX passwords based on the IP address of a login session just like S/Key does. The relevant file is /etc/opieaccess, which is present by default on FreeBSD 5.0 and newer systems. Please check opieaccess(5) for more information on this file and which security considerations you should be aware of when using it.
Here is a sample opieaccess file:
permit 192.168.0.0 255.255.0.0
This line allows users whose IP source address (which is vulnerable to spoofing) matches the specified value and mask, to use UNIX passwords at any time.
If no rules in opieaccess are matched, the default is to deny non-OPIE logins.
10.6 KerberosIV
Contributed by Mark Murray. Based on a contribution by Mark Dapoz.Kerberos is a network add-on system/protocol that allows users to authenticate themselves through the services of a secure server. Services such as remote login, remote copy, secure inter-system file copying and other high-risk tasks are made considerably safer and more controllable.
The following instructions can be used as a guide on how to set up Kerberos as distributed for FreeBSD. However, you should refer to the relevant manual pages for a complete description.
10.6.1 Installing KerberosIV
Kerberos is an optional component of FreeBSD. The easiest way to install this software is by selecting the krb4 or krb5 distribution in sysinstall during the initial installation of FreeBSD. This will install the ``eBones'' (KerberosIV) or ``Heimdal'' (Kerberos5) implementation of Kerberos. These implementations are included because they are developed outside the USA/Canada and were thus available to system owners outside those countries during the era of restrictive export controls on cryptographic code from the USA.
Alternatively, the MIT implementation of Kerberos is available from the ports collection as security/krb5.
10.6.2 Creating the Initial Database
This is done on the Kerberos server only. First make sure that you do not have any old Kerberos databases around. You should change to the directory /etc/kerberosIV and check that only the following files are present:
# cd /etc/kerberosIV
# ls
README      krb.conf        krb.realms
If any additional files (such as principal.* or master_key) exist, then use the kdb_destroy command to destroy the old Kerberos database, or if Kerberos is not running, simply delete the extra files.
You should now edit the krb.conf and krb.realms files to define your Kerberos realm. In this case the realm will be EXAMPLE.COM and the server is grunt.example.com. We edit or create the krb.conf file:
# cat krb.conf
EXAMPLE.COM
EXAMPLE.COM grunt.example.com admin server
CS.BERKELEY.EDU okeeffe.berkeley.edu
ATHENA.MIT.EDU kerberos.mit.edu
ATHENA.MIT.EDU kerberos-1.mit.edu
ATHENA.MIT.EDU kerberos-2.mit.edu
ATHENA.MIT.EDU kerberos-3.mit.edu
LCS.MIT.EDU kerberos.lcs.mit.edu
TELECOM.MIT.EDU bitsy.mit.edu
ARC.NASA.GOV trident.arc.nasa.gov
In this case, the other realms do not need to be there. They are here as an example of how a machine may be made aware of multiple realms. You may wish to not include them for simplicity.
The first line names the realm in which this system works. The other lines contain realm/host entries. The first item on a line is a realm, and the second is a host in that realm that is acting as a ``key distribution center''. The words admin server following a host's name means that host also provides an administrative database server. For further explanation of these terms, please consult the Kerberos manual pages.
Now we have to add grunt.example.com to the EXAMPLE.COM realm and also add an entry to put all hosts in the .example.com domain in the EXAMPLE.COM realm. The krb.realms file would be updated as follows:
# cat krb.realms
grunt.example.com EXAMPLE.COM
.example.com EXAMPLE.COM
.berkeley.edu CS.BERKELEY.EDU
.MIT.EDU ATHENA.MIT.EDU
.mit.edu ATHENA.MIT.EDU
Again, the other realms do not need to be there. They are here as an example of how a machine may be made aware of multiple realms. You may wish to remove them to simplify things.
The first line puts the specific system into the named realm. The rest of the lines show how to default systems of a particular subdomain to a named realm.
Now we are ready to create the database. This only needs to run on the Kerberos server (or Key Distribution Center). Issue the kdb_init command to do this:
# kdb_init
Realm name [default  ATHENA.MIT.EDU ]: EXAMPLE.COM
You will be prompted for the database Master Password.
It is important that you NOT FORGET this password.

Enter Kerberos master key:
Now we have to save the key so that servers on the local machine can pick it up. Use the kstash command to do this:
# kstash

Enter Kerberos master key:

Current Kerberos master key version is 1.

Master key entered. BEWARE!
This saves the encrypted master password in /etc/kerberosIV/master_key.
10.6.3 Making It All Run
Two principals need to be added to the database for each system that will be secured with Kerberos. Their names are kpasswd and rcmd. These two principals are made for each system, with the instance being the name of the individual system.
These daemons, kpasswd and rcmd allow other systems to change Kerberos passwords and run commands like rcp(1), rlogin(1) and rsh(1).
Now let us add these entries:
# kdb_edit
Opening database...

Enter Kerberos master key:

Current Kerberos master key version is 1.

Master key entered.  BEWARE!
Previous or default values are in [brackets] ,
enter return to leave the same, or new value.

Principal name: passwd
Instance: grunt

<Not found>, Create [y] ? y

Principal: passwd, Instance: grunt, kdc_key_ver: 1
New Password:                    <---- enter RANDOM here
Verifying password

New Password: <---- enter RANDOM here

Random password [y] ? y

Principal's new key version = 1
Expiration date (enter yyyy-mm-dd) [ 2000-01-01 ] ?
Max ticket lifetime (*5 minutes) [ 255 ] ?
Attributes [ 0 ] ?
Edit O.K.
Principal name: rcmd
Instance: grunt

<Not found>, Create [y] ?

Principal: rcmd, Instance: grunt, kdc_key_ver: 1
New Password:       <---- enter RANDOM here
Verifying password

New Password:           <---- enter RANDOM here

Random password [y] ?

Principal's new key version = 1
Expiration date (enter yyyy-mm-dd) [ 2000-01-01 ] ?
Max ticket lifetime (*5 minutes) [ 255 ] ?
Attributes [ 0 ] ?
Edit O.K.
Principal name:         <---- null entry here will cause an exit
10.6.4 Creating the Server File
We now have to extract all the instances which define the services on each machine. For this we use the ext_srvtab command. This will create a file which must be copied or moved by secure means to each Kerberos client's /etc/kerberosIV directory. This file must be present on each server and client, and is crucial to the operation of Kerberos.
# ext_srvtab grunt
Enter Kerberos master key:

Current Kerberos master key version is 1.

Master key entered. BEWARE!
Generating 'grunt-new-srvtab'....
Now, this command only generates a temporary file which must be renamed to srvtab so that all the servers can pick it up. Use the mv(1) command to move it into place on the original system:
# mv grunt-new-srvtab srvtab
If the file is for a client system, and the network is not deemed safe, then copy the client-new-srvtab to removable media and transport it by secure physical means. Be sure to rename it to srvtab in the client's /etc/kerberosIV directory, and make sure it is mode 600:
# mv grumble-new-srvtab srvtab
# chmod 600 srvtab
10.6.5 Populating the Database
We now have to add some user entries into the database. First let us create an entry for the user jane. Use the kdb_edit command to do this:
# kdb_edit
Opening database...

Enter Kerberos master key:

Current Kerberos master key version is 1.

Master key entered.  BEWARE!
Previous or default values are in [brackets] ,
enter return to leave the same, or new value.

Principal name: jane
Instance:

<Not found>, Create [y] ? y

Principal: jane, Instance: , kdc_key_ver: 1
New Password:                <---- enter a secure password here
Verifying password

New Password:                <---- re-enter the password here
Principal's new key version = 1
Expiration date (enter yyyy-mm-dd) [ 2000-01-01 ] ?
Max ticket lifetime (*5 minutes) [ 255 ] ?
Attributes [ 0 ] ?
Edit O.K.
Principal name:          <---- null entry here will cause an exit
10.6.6 Testing It All Out
First we have to start the Kerberos daemons. Note that if you have correctly edited your /etc/rc.conf then this will happen automatically when you reboot. This is only necessary on the Kerberos server. Kerberos clients will automatically get what they need from the /etc/kerberosIV directory.
# kerberos &
Kerberos server starting
Sleep forever on error
Log file is /var/log/kerberos.log
Current Kerberos master key version is 1.

Master key entered. BEWARE!

Current Kerberos master key version is 1
Local realm: EXAMPLE.COM
# kadmind -n &
KADM Server KADM0.0A initializing
Please do not use 'kill -9' to kill this job, use a
regular kill instead

Current Kerberos master key version is 1.

Master key entered.  BEWARE!
Now we can try using the kinit command to get a ticket for the ID jane that we created above:
% kinit jane MIT Project Athena (grunt.example.com) Kerberos Initialization for "jane" Password:
Try listing the tokens using klist to see if we really have them:
% klist Ticket file: /tmp/tkt245 Principal: [email protected] Issued Expires Principal Apr 30 11:23:22 Apr 30 19:23:22 [email protected]
Now try changing the password using passwd(1) to check if the kpasswd daemon can get authorization to the Kerberos database:
% passwd realm EXAMPLE.COM Old password for jane: New Password for jane: Verifying password New Password for jane: Password changed.
10.6.7 Adding su Privileges
Kerberos allows us to give each user who needs root privileges their own separate su(1) password. We could now add an ID which is authorized to su(1) to root. This is controlled by having an instance of root associated with a principal. Using kdb_edit we can create the entry jane.root in the Kerberos database:
# kdb_edit Opening database... Enter Kerberos master key: Current Kerberos master key version is 1. Master key entered. BEWARE! Previous or default values are in [brackets] , enter return to leave the same, or new value. Principal name: jane Instance: root <Not found>, Create [y] ? y Principal: jane, Instance: root, kdc_key_ver: 1 New Password: <---- enter a SECURE password here Verifying password New Password: <---- re-enter the password here Principal's new key version = 1 Expiration date (enter yyyy-mm-dd) [ 2000-01-01 ] ? Max ticket lifetime (*5 minutes) [ 255 ] ? 12 <--- Keep this short! Attributes [ 0 ] ? Edit O.K. Principal name: <---- null entry here will cause an exit
Now try getting tokens for it to make sure it works:
# kinit jane.root MIT Project Athena (grunt.example.com) Kerberos Initialization for "jane.root" Password:
Now we need to add the user to root's .klogin file:
# cat /root/.klogin [email protected]
Now try doing the su(1):
% su Password:
and take a look at what tokens we have:
# klist Ticket file: /tmp/tkt_root_245 Principal: [email protected] Issued Expires Principal May 2 20:43:12 May 3 04:43:12 [email protected]
10.6.8 Using Other Commands
In an earlier example, we created a principal called jane with an instance root. This was based on a user with the same name as the principal, and this is a Kerberos default; that a <principal>.<instance> of the form <username>.root will allow that <username> to su(1) to root if the necessary entries are in the .klogin file in root's home directory:
# cat /root/.klogin [email protected]
Likewise, if a user has in their own home directory lines of the form:
% cat ~/.klogin [email protected] [email protected]
This allows anyone in the EXAMPLE.COM realm who has authenticated themselves as jane or jack (via kinit, see above) to access to jane's account or files on this system (grunt) via rlogin(1), rsh(1) or rcp(1).
For example, jane now logs into another system using Kerberos:
% kinit
MIT Project Athena (grunt.example.com)
Password:
% rlogin grunt
Last login: Mon May 1 21:14:47 from grumble
Copyright (c) 1980, 1983, 1986, 1988, 1990, 1991, 1993, 1994
The Regents of the University of California. All rights reserved.
FreeBSD BUILT-19950429 (GR386) #0: Sat Apr 29 17:50:09 SAT 1995
Or jack logs into jane's account on the same machine (jane having set up the .klogin file as above, and the person in charge of Kerberos having set up principal jack with a null instance):
% kinit
% rlogin grunt -l jane
MIT Project Athena (grunt.example.com)
Password:
Last login: Mon May 1 21:16:55 from grumble
Copyright (c) 1980, 1983, 1986, 1988, 1990, 1991, 1993, 1994
The Regents of the University of California. All rights reserved.
FreeBSD BUILT-19950429 (GR386) #0: Sat Apr 29 17:50:09 SAT 1995
10.7 Kerberos5
Contributed by Tillman Hodgson. Based on a contribution by Mark Murray.Every FreeBSD release beyond FreeBSD-5.1 includes support only for Kerberos5. Hence Kerberos5 is the only version included, and its configuration is similar in many aspects to that of KerberosIV. The following information only applies to Kerberos5 in post FreeBSD-5.0 releases. Users who wish to use the KerberosIV package may install the security/krb4 port.
Kerberos is a network add-on system/protocol that allows users to authenticate themselves through the services of a secure server. Services such as remote login, remote copy, secure inter-system file copying and other high-risk tasks are made considerably safer and more controllable.
Kerberos can be described as an identity-verifying proxy system. It can also be described as a trusted third-party authentication system. Kerberos provides only one function -- the secure authentication of users on the network. It does not provide authorization functions (what users are allowed to do) or auditing functions (what those users did). After a client and server have used Kerberos to prove their identity, they can also encrypt all of their communications to assure privacy and data integrity as they go about their business.
Therefore it is highly recommended that Kerberos be used with other security methods which provide authorization and audit services.
The following instructions can be used as a guide on how to set up Kerberos as distributed for FreeBSD. However, you should refer to the relevant manual pages for a complete description.
For purposes of demonstrating a Kerberos installation, the various namespaces will be handled as follows:
-
The DNS domain (``zone'') will be example.org.
-
The Kerberos realm will be EXAMPLE.ORG.
Note: Please use real domain names when setting up Kerberos even if you intend to run it internally. This avoids DNS problems and assures inter-operation with other Kerberos realms.
10.7.1 History
Kerberos was created by MIT as a solution to network security problems. The Kerberos protocol uses strong cryptography so that a client can prove its identity to a server (and vice versa) across an insecure network connection.
Kerberos is both the name of a network authentication protocol and an adjective to describe programs that implement the program (Kerberos telnet, for example). The current version of the protocol is version 5, described in RFC 1510.
Several free implementations of this protocol are available, covering a wide range of operating systems. The Massachusetts Institute of Technology (MIT), where Kerberos was originally developed, continues to develop their Kerberos package. It is commonly used in the US as a cryptography product, as such it has historically been affected by US export regulations. The MIT Kerberos is available as a port (security/krb5). Heimdal Kerberos is another version 5 implementation, and was explicitly developed outside of the US to avoid export regulations (and is thus often included in non-commercial UNIX variants). The Heimdal Kerberos distribution is available as a port (security/heimdal), and a minimal installation of it is included in the base FreeBSD install.
In order to reach the widest audience, these instructions assume the use of the Heimdal distribution included in FreeBSD.
10.7.2 Setting up a Heimdal KDC
The Key Distribution Center (KDC) is the centralized authentication service that Kerberos provides -- it is the computer that issues Kerberos tickets. The KDC is considered ``trusted'' by all other computers in the Kerberos realm, and thus has heightened security concerns.
Note that while running the Kerberos server requires very few computing resources, a dedicated machine acting only as a KDC is recommended for security reasons.
To begin setting up a KDC, ensure that your /etc/rc.conf file contains the correct settings to act as a KDC (you may need to adjust paths to reflect your own system):
kerberos5_server_enable="YES" kadmind5_server_enable="YES" kerberos_stash="YES"
Note: The kerberos_stash is only available in FreeBSD 4.X.
Next we will set up your Kerberos config file, /etc/krb5.conf:
[libdefaults]
default_realm = EXAMPLE.ORG
[realms]
EXAMPLE.ORG = {
kdc = kerberos.example.org
}
[domain_realm]
.example.org = EXAMPLE.ORG
Note that this /etc/krb5.conf file implies that your KDC will have the fully-qualified hostname of kerberos.example.org. You will need to add a CNAME (alias) entry to your zone file to accomplish this if your KDC has a different hostname.
Note: For large networks with a properly configured BIND DNS server, the above example could be trimmed to:
[libdefaults] default_realm = EXAMPLE.ORGWith the following lines being appended to the example.org zonefile:
_kerberos._udp IN SRV 01 00 88 kerberos.example.org. _kerberos._tcp IN SRV 01 00 88 kerberos.example.org. _kpasswd._udp IN SRV 01 00 464 kerberos.example.org. _kerberos-adm._tcp IN SRV 01 00 749 kerberos.example.org. _kerberos IN TXT EXAMPLE.ORG.
Next we will create the Kerberos database. This database contains the keys of all principals encrypted with a master password. You are not required to remember this password, it will be stored in a file (/var/heimdal/m-key). To create the master key, run kstash and enter a password.
Once the master key has been created, you can initialize the database using the kadmin program with the -l option (standing for ``local''). This option instructs kadmin to modify the database files directly rather than going through the kadmind network service. This handles the chicken-and-egg problem of trying to connect to the database before it is created. Once you have the kadmin prompt, use the init command to create your realms initial database.
Lastly, while still in kadmin, create your first principal using the add command. Stick to the defaults options for the principal for now, you can always change them later with the modify command. Note that you can use the ? command at any prompt to see the available options.
A sample database creation session is shown below:
# kstash
Master key: xxxxxxxx
Verifying password - Master key: xxxxxxxx
# kadmin -l
kadmin> init EXAMPLE.ORG
Realm max ticket life [unlimited]:
kadmin> add tillman
Max ticket life [unlimited]:
Max renewable life [unlimited]:
Attributes []:
Password: xxxxxxxx
Verifying password - Password: xxxxxxxx
Now it's time to start up the KDC services. Run /etc/rc.d/kerberos start and /etc/rc.d/kadmind start to bring up the services. Note that you won't have any kerberized daemons running at this point but you should be able to confirm the that the KDC is functioning by obtaining and listing a ticket for the principal (user) that you just created from the command-line of the KDC itself:
%k5init tillman
[email protected]'s Password:
%k5list
Credentials cache: FILE:/tmp/krb5cc_500
Principal: [email protected]
Issued Expires Principal
Aug 27 15:37:58 Aug 28 01:37:58 krbtgt/[email protected]
Aug 27 15:37:58 Aug 28 01:37:58 krbtgt/[email protected]
v4-ticket file: /tmp/tkt500
k5list: No ticket file (tf_util)
10.7.3 Kerberos enabling a server with Heimdal services
First, we need a copy of the Kerberos configuration file, /etc/krb5.conf. To do so, simply copy it over to the client computer from the KDC in a secure fashion (using network utilities, such as scp(1), or physically via a floppy disk).
Next you need a /etc/krb5.keytab file. This is the major difference between a server providing Kerberos enabled daemons and a workstation -- the server must have a keytab file. This file contains the servers host key, which allows it and the KDC to verify each others identity. It must be transmitted to the server in a secure fashion, as the security of the server can be broken if the key is made public. This explicitly means that transferring it via a clear text channel, such as FTP, is a very bad idea.
Typically, you transfer to the keytab to the server using the kadmin program. This is handy because you also need to create the host principal (the KDC end of the krb5.keytab) using kadmin.
Note that you must have already obtained a ticket and that this ticket must be allowed to use the kadmin interface in the kadmind.acl. See the section titled ``Remote administration'' in the Heimdal info pages (info heimdal) for details on designing access control lists. If you do not want to enable remote kadmin access, you can simply securely connect to the KDC (via local console, ssh(1) or Kerberos telnet(1)) and perform administration locally using kadmin -l.
After installing the /etc/krb5.conf file, you can use kadmin from the Kerberos server. The add --random-key command will let you add the servers host principal, and the ext command will allow you to extract the servers host principal to its own keytab. For example:
# kadmin
kadmin>add --random-key host/myserver.EXAMPLE.ORG
Max ticket life [unlimited]:
Max renewable life [unlimited]:
Attributes []:
kadmin>ext host/myserver.EXAMPLE.ORG
kadmin>exit
Note that the ext command (short for ``extract'') stores the extracted key in /etc/krb5.keytab by default.
If you do not have kadmind running on the KDC (possibly for security reasons) and thus do not have access to kadmin remotely, you can add the host principal (host/myserver.EXAMPLE.ORG) directly on the KDC and then extract it to a temporary file (to avoid over-writing the /etc/krb5.keytab on the KDC) using something like this:
# kadmin
kadmin>ext --keytab=/tmp/example.keytab host/myserver.example.org
kadmin>exit
You can then securely copy the keytab to the server computer (using scp or a floppy, for example). Be sure to specify a non-default keytab name to avoid over-writing the keytab on the KDC.
At this point your server can communicate with the KDC (due to its krb5.conf file) and it can prove its own identity (due to the krb5.keytab file). It is now ready for you to enable some Kerberos services. For this example we will enable the telnet service by putting a line like this into your /etc/inetd.conf and then restarting the inetd(8) service with /etc/rc.d/inetd restart:
telnet stream tcp nowait root /usr/libexec/telnetd telnetd -a user
The critical bit is that the -a (for authentication) type is set to user. Consult the telnetd(8) manual page for more details.
10.7.4 Kerberos enabling a client with Heimdal
Setting up a client computer is almost trivially easy. As far as Kerberos configuration goes, you only need the Kerberos configuration file, located at /etc/krb5.conf. Simply securely copy it over to the client computer from the KDC.
Test your client computer by attempting to use kinit, klist, and kdestroy from the client to obtain, show, and then delete a ticket for the principal you created above. You should also be able to use Kerberos applications to connect to Kerberos enabled servers, though if that does not work and obtaining a ticket does the problem is likely with the server and not with the client or the KDC.
When testing an application like telnet, try using a packet sniffer (such as tcpdump(1)) to confirm that your password is not sent in the clear. Try using telnet with the -x option, which encrypts the entire data stream (similar to ssh).
The core Kerberos client applications (traditionally named kinit, klist, kdestroy, and kpasswd) are installed in the base FreeBSD install. Note that FreeBSD versions prior to 5.0 renamed them to k5init, k5list, k5destroy, k5passwd, and k5stash (though it is typically only used once).
Various non-core Kerberos client applications are also installed by default. This is where the ``minimal'' nature of the base Heimdal installation is felt: telnet is the only Kerberos enabled service.
The Heimdal port adds some of the missing client applications: Kerberos enabled versions of ftp, rsh, rcp, rlogin, and a few other less common programs. The MIT port also contains a full suite of Kerberos client applications.
10.7.5 User configuration files: .k5login and .k5users
Users within a realm typically have their Kerberos principal (such as [email protected]) mapped to a local user account (such as a local account named tillman). Client applications such as telnet usually do not require a user name or a principal.
Occasionally, however, you want to grant access to a local user account to someone who does not have a matching Kerberos principal. For example, [email protected] may need access to the local user account webdevelopers. Other principals may also need access to that local account.
The .k5login and .k5users files, placed in a users home directory, can be used similar to a powerful combination of .hosts and .rhosts, solving this problem. For example, if a .k5login with the following contents:
[email protected] [email protected]
Were to be placed into the home directory of the local user webdevelopers then both principals listed would have access to that account without requiring a shared password.
Reading the man pages for these commands is recommended. Note that the ksu man page covers .k5users.
10.7.6 Kerberos Tips, Tricks, and Troubleshooting
-
When using either the Heimdal or MIT Kerberos ports ensure that your PATH environment variable lists the Kerberos versions of the client applications before the system versions.
-
Is your time in sync? Are you sure? If the time is not in sync (typically within five minutes) authentication will fail.
-
MIT and Heimdal inter-operate nicely. Except for kadmin, the protocol for which is not standardized.
-
If you change your hostname, you also need to change your host/ principal and update your keytab. This also applies to special keytab entries like the www/ principal used for Apache's www/mod_auth_kerb.
-
All hosts in your realm must be resolvable (both forwards and reverse) in DNS (or /etc/hosts as a minimum). CNAMEs will work, but the A and PTR records must be correct and in place. The error message isn't very intuitive: ``Kerberos5 refuses authentication because Read req failed: Key table entry not found''.
-
Some operating systems that may being acting as clients to your KDC do not set the permissions for ksu to be setuid root. This means that ksu does not work, which is a good security idea but annoying. This is not a KDC error.
-
With MIT Kerberos, if you want to allow a principal to have a ticket life longer than the default ten hours, you must use modify_principal in kadmin to change the maxlife of both the principal in question and the krbtgt principal. Then the principal can use the -l option with kinit to request a ticket with a longer lifetime.
-
Note: If you run a packet sniffer on your KDC to add in troubleshooting and then run kinit from a workstation, you will notice that your TGT is sent immediately upon running kinit -- even before you type your password! The explanation is that the Kerberos server freely transmits a TGT (Ticket Granting Ticket) to any unauthorized request; however, every TGT is encrypted in a key derived from the user's password. Therefore, when a user types their password it is not being sent to the KDC, it's being used to decrypt the TGT that kinit already obtained. If the decryption process results in a valid ticket with a valid time stamp, the user has valid Kerberos credentials. These credentials include a session key for establishing secure communications with the Kerberos server in the future, as well as the actual ticket-granting ticket, which is actually encrypted with the Kerberos server's own key. This second layer of encryption is unknown to the user, but it's what allows the Kerberos server to verify the authenticity of each TGT.
-
You have to keep the time in sync between all the computers in your realm. NTP is perfect for this. For more information on NTP, see Section 19.11.
-
If you want to use long ticket lifetimes (a week, for example) and you are using OpenSSH to connect to the machine where your ticket is stored, make sure that Kerberos TicketCleanup is set to no in your sshd_config or else your tickets will be deleted when you log out.
-
Remember that host principals can have a longer ticket lifetime as well. If your user principal has a lifetime of a week but the host you are connecting to has a lifetime of nine hours, you will have an expired host principal in your cache and the ticket cache will not work as expected.
-
When setting up a krb5.dict file to prevent specific bad passwords from being used (the manual page for kadmind covers this briefly), remember that it only applies to principals that have a password policy assigned to them. The krb5.dict files format is simple: one string per line. Creating a symbolic link to /usr/share/dict/words might be useful.
10.7.7 Differences with the MIT port
The major difference between the MIT and Heimdal installs relates to the kadmin program which has a different (but equivalent) set of commands and uses a different protocol. This has a large implications if your KDC is MIT as you will not be able to use the Heimdal kadmin program to administer your KDC remotely (or vice versa, for that matter).
The client applications may also take slightly different command line options to accomplish the same tasks. Following the instructions on the MIT Kerberos web site (http://web.mit.edu/Kerberos/www/) is recommended. Be careful of path issues: the MIT port installs into /usr/local/ by default, and the ``normal'' system applications may be run instead of MIT if your PATH environment variable lists the system directories first.
Note: With the MIT security/krb5 port that is provided by FreeBSD, be sure to read the /usr/local/share/doc/krb5/README.FreeBSD file installed by the port if you want to understand why logins via telnetd and klogind behave somewhat oddly. Most importantly, correcting the ``incorrect permissions on cache file'' behavior requires that the login.krb5 binary be used for authentication so that it can properly change ownership for the forwarded credentials.
10.7.8 Mitigating limitations found in Kerberos
10.7.8.1 Kerberos is an all-or-nothing approach
Every service enabled on the network must be modified to work with Kerberos (or be otherwise secured against network attacks) or else the users credentials could be stolen and re-used. An example of this would be Kerberos enabling all remote shells (via rsh and telnet, for example) but not converting the POP3 mail server which sends passwords in plaintext.
10.7.8.2 Kerberos is intended for single-user workstations
In a multi-user environment, Kerberos is less secure. This is because it stores the tickets in the /tmp directory, which is readable by all users. If a user is sharing a computer with several other people simultaneously (i.e. multi-user), it is possible that the user's tickets can be stolen (copied) by another user.
This can be overcome with the -c filename command-line option or (preferably) the KRB5CCNAME environment variable, but this is rarely done. In principal, storing the ticket in the users home directory and using simple file permissions can mitigate this problem.
10.7.8.3 The KDC is a single point of failure
By design, the KDC must be as secure as the master password database is contained on it. The KDC should have absolutely no other services running on it and should be physically secured. The danger is high because Kerberos stores all passwords encrypted with the same key (the ``master'' key), which in turn is stored as a file on the KDC.
As a side note, a compromised master key is not quite as bad as one might normally fear. The master key is only used to encrypt the Kerberos database and as a seed for the random number generator. As long as access to your KDC is secure, an attacker cannot do much with the master key.
Additionally, if the KDC is unavailable (perhaps due to a denial of service attack or network problems) the network services are unusable as authentication can not be performed, a recipe for a denial-of-service attack. This can alleviated with multiple KDCs (a single master and one or more slaves) and with careful implementation of secondary or fall-back authentication (PAM is excellent for this).
10.7.8.4 Kerberos Shortcomings
Kerberos allows users, hosts and services to authenticate between themselves. It does not have a mechanism to authenticate the KDC to the users, hosts or services. This means that a trojanned kinit (for example) could record all user names and passwords. Something like security/tripwire or other file system integrity checking tools can alleviate this.
10.8 Firewalls
Contributed by Gary Palmer and Alex Nash.Firewalls are an area of increasing interest for people who are connected to the Internet, and are even finding applications on private networks to provide enhanced security. This section will hopefully explain what firewalls are, how to use them, and how to use the facilities provided in the FreeBSD kernel to implement them.
Note: People often think that having a firewall between your internal network and the ``Big Bad Internet'' will solve all your security problems. It may help, but a poorly set up firewall system is more of a security risk than not having one at all. A firewall can add another layer of security to your systems, but it cannot stop a really determined cracker from penetrating your internal network. If you let internal security lapse because you believe your firewall to be impenetrable, you have just made the crackers job that much easier.
10.8.1 What Is a Firewall?
There are currently two distinct types of firewalls in common use on the Internet today. The first type is more properly called a packet filtering router. This type of firewall utilizes a multi-homed machine and a set of rules to determine whether to forward or block individual packets. A multi-homed machine is simply a device with multiple network interfaces. The second type, known as a proxy server, relies on daemons to provide authentication and to forward packets, possibly on a multi-homed machine which has kernel packet forwarding disabled.
Sometimes sites combine the two types of firewalls, so that only a certain machine (known as a bastion host) is allowed to send packets through a packet filtering router onto an internal network. Proxy services are run on the bastion host, which are generally more secure than normal authentication mechanisms.
FreeBSD comes with a kernel packet filter (known as IPFW), which is what the rest of this section will concentrate on. Proxy servers can be built on FreeBSD from third party software, but there is such a variety of proxy servers available that it would be impossible to cover them in this section.
10.8.1.1 Packet Filtering Routers
A router is a machine which forwards packets between two or more networks. A packet filtering router is programmed to compare each packet to a list of rules before deciding if it should be forwarded or not. Most modern IP routing software includes packet filtering functionality that defaults to forwarding all packets. To enable the filters, you need to define a set of rules.
To decide whether a packet should be passed on, the firewall looks through its set of rules for a rule which matches the contents of the packet's headers. Once a match is found, the rule action is obeyed. The rule action could be to drop the packet, to forward the packet, or even to send an ICMP message back to the originator. Only the first match counts, as the rules are searched in order. Hence, the list of rules can be referred to as a ``rule chain''.
The packet-matching criteria varies depending on the software used, but typically you can specify rules which depend on the source IP address of the packet, the destination IP address, the source port number, the destination port number (for protocols which support ports), or even the packet type (UDP, TCP, ICMP, etc).
10.8.1.2 Proxy Servers
Proxy servers are machines which have had the normal system daemons (telnetd, ftpd, etc) replaced with special servers. These servers are called proxy servers, as they normally only allow onward connections to be made. This enables you to run (for example) a proxy telnet server on your firewall host, and people can telnet in to your firewall from the outside, go through some authentication mechanism, and then gain access to the internal network (alternatively, proxy servers can be used for signals coming from the internal network and heading out).
Proxy servers are normally more secure than normal servers, and often have a wider variety of authentication mechanisms available, including ``one-shot'' password systems so that even if someone manages to discover what password you used, they will not be able to use it to gain access to your systems as the password expires immediately after the first use. As they do not actually give users access to the host machine, it becomes a lot more difficult for someone to install backdoors around your security system.
Proxy servers often have ways of restricting access further, so that only certain hosts can gain access to the servers. Most will also allow the administrator to specify which users can talk to which destination machines. Again, what facilities are available depends largely on what proxy software you choose.
10.8.2 What Does IPFW Allow Me to Do?
IPFW, the software supplied with FreeBSD, is a packet filtering and accounting system which resides in the kernel, and has a user-land control utility, ipfw(8). Together, they allow you to define and query the rules used by the kernel in its routing decisions.
There are two related parts to IPFW. The firewall section performs packet filtering. There is also an IP accounting section which tracks usage of the router, based on rules similar to those used in the firewall section. This allows the administrator to monitor how much traffic the router is getting from a certain machine, or how much WWW traffic it is forwarding, for example.
As a result of the way that IPFW is designed, you can use IPFW on non-router machines to perform packet filtering on incoming and outgoing connections. This is a special case of the more general use of IPFW, and the same commands and techniques should be used in this situation.
10.8.3 Enabling IPFW on FreeBSD
As the main part of the IPFW system lives in the kernel, you will need to add one or more options to your kernel configuration file, depending on what facilities you want, and recompile your kernel. See "Reconfiguring your Kernel" (Chapter 9) for more details on how to recompile your kernel.
Warning: IPFW defaults to a policy of deny ip from any to any. If you do not add other rules during startup to allow access, you will lock yourself out of the server upon rebooting into a firewall-enabled kernel. We suggest that you set firewall_type=open in your /etc/rc.conf file when first enabling this feature, then refining the firewall rules in /etc/rc.firewall after you have tested that the new kernel feature works properly. To be on the safe side, you may wish to consider performing the initial firewall configuration from the local console rather than via ssh. Another option is to build a kernel using both the IPFIREWALL and IPFIREWALL_DEFAULT_TO_ACCEPT options. This will change the default rule of IPFW to allow ip from any to any and avoid the possibility of a lockout.
There are currently four kernel configuration options relevant to IPFW:
- options IPFIREWALL
-
Compiles into the kernel the code for packet filtering.
- options IPFIREWALL_VERBOSE
-
Enables code to allow logging of packets through syslogd(8). Without this option, even if you specify that packets should be logged in the filter rules, nothing will happen.
- options IPFIREWALL_VERBOSE_LIMIT=10
-
Limits the number of packets logged through syslogd(8) on a per entry basis. You may wish to use this option in hostile environments in which you want to log firewall activity, but do not want to be open to a denial of service attack via syslog flooding.
When a chain entry reaches the packet limit specified, logging is turned off for that particular entry. To resume logging, you will need to reset the associated counter using the ipfw(8) utility:
# ipfw zero 4500
Where 4500 is the chain entry you wish to continue logging.
- options IPFIREWALL_DEFAULT_TO_ACCEPT
-
This changes the default rule action from ``deny'' to ``allow''. This avoids the possibility of locking yourself out if you happen to boot a kernel with IPFIREWALL support but have not configured your firewall yet. It is also very useful if you often use ipfw(8) as a filter for specific problems as they arise. Use with care though, as this opens up the firewall and changes the way it works.
Note: Previous versions of FreeBSD contained an IPFIREWALL_ACCT option. This is now obsolete as the firewall code automatically includes accounting facilities.
10.8.4 Configuring IPFW
The configuration of the IPFW software is done through the ipfw(8) utility. The syntax for this command looks quite complicated, but it is relatively simple once you understand its structure.
There are currently four different command categories used by the utility: addition/deletion, listing, flushing, and clearing. Addition/deletion is used to build the rules that control how packets are accepted, rejected, and logged. Listing is used to examine the contents of your rule set (otherwise known as the chain) and packet counters (accounting). Flushing is used to remove all entries from the chain. Clearing is used to zero out one or more accounting entries.
10.8.4.1 Altering the IPFW Rules
The syntax for this form of the command is:
ipfw [-N] command [index] action [log] protocol addresses [options]
There is one valid flag when using this form of the command:
- -N
-
Resolve addresses and service names in output.
The command given can be shortened to the shortest unique form. The valid commands are:
- add
-
Add an entry to the firewall/accounting rule list
- delete
-
Delete an entry from the firewall/accounting rule list
Previous versions of IPFW used separate firewall and accounting entries. The present version provides packet accounting with each firewall entry.
If an index value is supplied, it is used to place the entry at a specific point in the chain. Otherwise, the entry is placed at the end of the chain at an index 100 greater than the last chain entry (this does not include the default policy, rule 65535, deny).
The log option causes matching rules to be output to the system console if the kernel was compiled with IPFIREWALL_VERBOSE.
Valid actions are:
- reject
-
Drop the packet, and send an ICMP host or port unreachable (as appropriate) packet to the source.
- allow
-
Pass the packet on as normal. (aliases: pass, permit, and accept)
- deny
-
Drop the packet. The source is not notified via an ICMP message (thus it appears that the packet never arrived at the destination).
- count
-
Update packet counters but do not allow/deny the packet based on this rule. The search continues with the next chain entry.
Each action will be recognized by the shortest unambiguous prefix.
The protocols which can be specified are:
- all
-
Matches any IP packet
- icmp
-
Matches ICMP packets
- tcp
-
Matches TCP packets
- udp
-
Matches UDP packets
The address specification is:
from address/mask [port] to address/mask [port] [via interface]
You can only specify port in conjunction with protocols which support ports (UDP and TCP).
The via is optional and may specify the IP address or domain name of a local IP interface, or an interface name (e.g. ed0) to match only packets coming through this interface. Interface unit numbers can be specified with an optional wildcard. For example, ppp* would match all kernel PPP interfaces.
The syntax used to specify an address/mask is:
addressor
address/mask-bitsor
address:mask-pattern
A valid hostname may be specified in place of the IP address. mask-bits is a decimal number representing how many bits in the address mask should be set. e.g. specifying 192.216.222.1/24 will create a mask which will allow any address in a class C subnet (in this case, 192.216.222) to be matched. mask-pattern is an IP address which will be logically AND'ed with the address given. The keyword any may be used to specify ``any IP address''.
The port numbers to be blocked are specified as:
port [,port [,port [...]]]
to specify either a single port or a list of ports, orport-port
to specify a range of ports. You may also combine a single range with a list, but the range must always be specified first.The options available are:
- frag
-
Matches if the packet is not the first fragment of the datagram.
- in
-
Matches if the packet is on the way in.
- out
-
Matches if the packet is on the way out.
- ipoptions spec
-
Matches if the IP header contains the comma separated list of options specified in spec. The supported IP options are: ssrr (strict source route), lsrr (loose source route), rr (record packet route), and ts (time stamp). The absence of a particular option may be specified with a leading !.
- established
-
Matches if the packet is part of an already established TCP connection (i.e. it has the RST or ACK bits set). You can optimize the performance of the firewall by placing established rules early in the chain.
- setup
-
Matches if the packet is an attempt to establish a TCP connection (the SYN bit is set but the ACK bit is not).
- tcpflags flags
-
Matches if the TCP header contains the comma separated list of flags. The supported flags are fin, syn, rst, psh, ack, and urg. The absence of a particular flag may be indicated by a leading !.
- icmptypes types
-
Matches if the ICMP type is present in the list types. The list may be specified as any combination of ranges and/or individual types separated by commas. Commonly used ICMP types are: 0 echo reply (ping reply), 3 destination unreachable, 5 redirect, 8 echo request (ping request), and 11 time exceeded (used to indicate TTL expiration as with traceroute(8)).
10.8.4.2 Listing the IPFW Rules
The syntax for this form of the command is:
ipfw [-a] [-c] [-d] [-e] [-t] [-N] [-S] list
There are seven valid flags when using this form of the command:
- -a
-
While listing, show counter values. This option is the only way to see accounting counters.
- -c
-
List rules in compact form.
- -d
-
Show dynamic rules in addition to static rules.
- -e
-
If -d was specified, also show expired dynamic rules.
- -t
-
Display the last match times for each chain entry. The time listing is incompatible with the input syntax used by the ipfw(8) utility.
- -N
-
Attempt to resolve given addresses and service names.
- -S
-
Show the set each rule belongs to. If this flag is not specified, disabled rules will not be listed.
10.8.4.3 Flushing the IPFW Rules
The syntax for flushing the chain is:
ipfw flush
This causes all entries in the firewall chain to be removed except the fixed default policy enforced by the kernel (index 65535). Use caution when flushing rules; the default deny policy will leave your system cut off from the network until allow entries are added to the chain.
10.8.4.4 Clearing the IPFW Packet Counters
The syntax for clearing one or more packet counters is:
ipfw zero [index]
When used without an index argument, all packet counters are cleared. If an index is supplied, the clearing operation only affects a specific chain entry.
10.8.5 Example Commands for ipfw
This command will deny all packets from the host evil.crackers.org to the telnet port of the host nice.people.org:
# ipfw add deny tcp from evil.crackers.org to nice.people.org 23
The next example denies and logs any TCP traffic from the entire crackers.org network (a class C) to the nice.people.org machine (any port).
# ipfw add deny log tcp from evil.crackers.org/24 to nice.people.org
If you do not want people sending X sessions to your internal network (a subnet of a class C), the following command will do the necessary filtering:
# ipfw add deny tcp from any to my.org/28 6000 setup
To see the accounting records:
# ipfw -a listor in the short form
# ipfw -a l
You can also see the last time a chain entry was matched with:
# ipfw -at l
10.8.6 Building a Packet Filtering Firewall
Note: The following suggestions are just that: suggestions. The requirements of each firewall are different and we cannot tell you how to build a firewall to meet your particular requirements.
When initially setting up your firewall, unless you have a test bench setup where you can configure your firewall host in a controlled environment, it is strongly recommend you use the logging version of the commands and enable logging in the kernel. This will allow you to quickly identify problem areas and cure them without too much disruption. Even after the initial setup phase is complete, I recommend using the logging for `deny' as it allows tracing of possible attacks and also modification of the firewall rules if your requirements alter.
Note: If you use the logging versions of the accept command, be aware that it can generate large amounts of log data. One log entry will be generated for every packet that passes through the firewall, so large FTP/http transfers, etc, will really slow the system down. It also increases the latencies on those packets as it requires more work to be done by the kernel before the packet can be passed on. syslogd will also start using up a lot more processor time as it logs all the extra data to disk, and it could quite easily fill the partition /var/log is located on.
You should enable your firewall from /etc/rc.conf.local or /etc/rc.conf. The associated manual page explains which knobs to fiddle and lists some preset firewall configurations. If you do not use a preset configuration, ipfw list will output the current ruleset into a file that you can pass to rc.conf. If you do not use /etc/rc.conf.local or /etc/rc.conf to enable your firewall, it is important to make sure your firewall is enabled before any IP interfaces are configured.
The next problem is what your firewall should actually do! This is largely dependent on what access to your network you want to allow from the outside, and how much access to the outside world you want to allow from the inside. Some general rules are:
-
Block all incoming access to ports below 1024 for TCP. This is where most of the security sensitive services are, like finger, SMTP (mail) and telnet.
-
Block all incoming UDP traffic. There are very few useful services that travel over UDP, and what useful traffic there is, is normally a security threat (e.g. Suns RPC and NFS protocols). This has its disadvantages also, since UDP is a connectionless protocol, denying incoming UDP traffic also blocks the replies to outgoing UDP traffic. This can cause a problem for people (on the inside) using external archie (prospero) servers. If you want to allow access to archie, you will have to allow packets coming from ports 191 and 1525 to any internal UDP port through the firewall. ntp is another service you may consider allowing through, which comes from port 123.
-
Block traffic to port 6000 from the outside. Port 6000 is the port used for access to X11 servers, and can be a security threat (especially if people are in the habit of doing xhost + on their workstations). X11 can actually use a range of ports starting at 6000, the upper limit being how many X displays you can run on the machine. The upper limit as defined by RFC 1700 (Assigned Numbers) is 6063.
-
Check what ports any internal servers use (e.g. SQL servers, etc). It is probably a good idea to block those as well, as they normally fall outside the 1-1024 range specified above.
Another checklist for firewall configuration is available from CERT at http://www.cert.org/tech_tips/packet_filtering.html
As stated above, these are only guidelines. You will have to decide what filter rules you want to use on your firewall yourself. We cannot accept ANY responsibility if someone breaks into your network, even if you follow the advice given above.
10.8.7 IPFW Overhead and Optimization
Many people want to know how much overhead IPFW adds to a system. The answer to this depends mostly on your rule set and processor speed. For most applications dealing with Ethernet and small rule sets, the answer is ``negligible''. For those of you that need actual measurements to satisfy your curiosity, read on.
The following measurements were made using 2.2.5-STABLE on a 486-66. (While IPFW has changed slightly in later releases of FreeBSD, it still performs with similar speed.) IPFW was modified to measure the time spent within the ip_fw_chk routine, displaying the results to the console every 1000 packets.
Two rule sets, each with 1000 rules, were tested. The first set was designed to demonstrate a worst case scenario by repeating the rule:
# ipfw add deny tcp from any to any 55555
This demonstrates a worst case scenario by causing most of IPFW's packet check routine to be executed before finally deciding that the packet does not match the rule (by virtue of the port number). Following the 999th iteration of this rule was an allow ip from any to any.
The second set of rules were designed to abort the rule check quickly:
# ipfw add deny ip from 1.2.3.4 to 1.2.3.4
The non-matching source IP address for the above rule causes these rules to be skipped very quickly. As before, the 1000th rule was an allow ip from any to any.
The per-packet processing overhead in the former case was approximately 2.703 ms/packet, or roughly 2.7 microseconds per rule. Thus the theoretical packet processing limit with these rules is around 370 packets per second. Assuming 10 Mbps Ethernet and a ~1500 byte packet size, we would only be able to achieve 55.5% bandwidth utilization.
For the latter case each packet was processed in approximately 1.172 ms, or roughly 1.2 microseconds per rule. The theoretical packet processing limit here would be about 853 packets per second, which could consume 10 Mbps Ethernet bandwidth.
The excessive number of rules tested and the nature of those rules do not provide a real-world scenario -- they were used only to generate the timing information presented here. Here are a few things to keep in mind when building an efficient rule set:
-
Place an established rule early on to handle the majority of TCP traffic. Do not put any allow tcp statements before this rule.
-
Place heavily triggered rules earlier in the rule set than those rarely used (without changing the permissiveness of the firewall, of course). You can see which rules are used most often by examining the packet counting statistics with ipfw -a l.
10.9 OpenSSL
As of FreeBSD 4.0, the OpenSSL toolkit is a part of the base system. OpenSSL provides a general-purpose cryptography library, as well as the Secure Sockets Layer v2/v3 (SSLv2/SSLv3) and Transport Layer Security v1 (TLSv1) network security protocols.
However, one of the algorithms (specifically IDEA) included in OpenSSL is protected by patents in the USA and elsewhere, and is not available for unrestricted use. IDEA is included in the OpenSSL sources in FreeBSD, but it is not built by default. If you wish to use it, and you comply with the license terms, enable the MAKE_IDEA switch in /etc/make.conf and rebuild your sources using make world.
Today, the RSA algorithm is free for use in USA and other countries. In the past it was protected by a patent.
10.9.1 Source Code Installations
OpenSSL is part of the src-crypto and src-secure CVSup collections. See the Obtaining FreeBSD section for more information about obtaining and updating FreeBSD source code.
10.10 VPN over IPsec
Written by Nik Clayton.Creating a VPN between two networks, separated by the Internet, using FreeBSD gateways.
10.10.1 Understanding IPsec
Written by Hiten M. Pandya.This section will guide you through the process of setting up IPsec, and to use it in an environment which consists of FreeBSD and Microsoft Windows 2000/XP machines, to make them communicate securely. In order to set up IPsec, it is necessary that you are familiar with the concepts of building a custom kernel (see Chapter 9).
IPsec is a protocol which sits on top of the Internet Protocol (IP) layer. It allows two or more hosts to communicate in a secure manner (hence the name). The FreeBSD IPsec ``network stack'' is based on the KAME implementation, which has support for both protocol families, IPv4 and IPv6.
Note: FreeBSD 5.X contains a ``hardware accelerated'' IPsec stack, known as ``Fast IPsec'', that was obtained from OpenBSD. It employs cryptographic hardware (whenever possible) via the crypto(4) subsystem to optimize the performance of IPsec. This subsystem is new, and does not support all the features that are available in the KAME version of IPsec. However, in order to enable hardware-accelerated IPsec, the following kernel option has to be added to your kernel configuration file:
options FAST_IPSEC # new IPsec (cannot define w/ IPSEC)Note, that it is not currently possible to use the ``Fast IPsec'' subsystem in lue with the KAME implementation of IPsec. Consult the fast_ipsec(4) manual page for more information.
IPsec consists of two sub-protocols:
-
Encapsulated Security Payload (ESP), protects the IP packet data from third party interference, by encrypting the contents using symmetric cryptography algorithms (like Blowfish, 3DES).
-
Authentication Header (AH), protects the IP packet header from third party interference and spoofing, by computing a cryptographic checksum and hashing the IP packet header fields with a secure hashing function. This is then followed by an additional header that contains the hash, to allow the information in the packet to be authenticated.
ESP and AH can either be used together or separately, depending on the environment.
IPsec can either be used to directly encrypt the traffic between two hosts (known as Transport Mode); or to build ``virtual tunnels'' between two subnets, which could be used for secure communication between two corporate networks (known as Tunnel Mode). The latter is more commonly known as a Virtual Private Network (VPN). The ipsec(4) manual page should be consulted for detailed information on the IPsec subsystem in FreeBSD.
To add IPsec support to your kernel, add the following options to your kernel configuration file:
options IPSEC #IP security
options IPSEC_ESP #IP security (crypto; define w/ IPSEC)
If IPsec debugging support is desired, the following kernel option should also be added:
options IPSEC_DEBUG #debug for IP security
10.10.2 The Problem
There's no standard for what constitutes a VPN. VPNs can be implemented using a number of different technologies, each of which have their own strengths and weaknesses. This article presents a number of scenarios, and strategies for implementing a VPN for each scenario.
10.10.3 Scenario #1: Two networks, connected to the Internet, to behave as one
This is the scenario that caused me to first investigating VPNs. The premise is as follows:
-
You have at least two sites
-
Both sites are using IP internally
-
Both sites are connected to the Internet, through a gateway that is running FreeBSD.
-
The gateway on each network has at least one public IP address.
-
The internal addresses of the two networks can be public or private IP addresses, it doesn't matter. You can be running NAT on the gateway machine if necessary.
-
The internal IP addresses of the two networks do not collide. While I expect it is theoretically possible to use a combination of VPN technology and NAT to get this to work, I expect it to be a configuration nightmare.
If you find that you are trying to connect two networks, both of which, internally, use the same private IP address range (e.g., both of them use 192.168.1.x), then one of the networks will have to be renumbered.
The network topology might look something like this:

Notice the two public IP addresses. I'll use the letters to refer to them in the rest of this article. Anywhere you see those letters in this article, replace them with your own public IP addresses. Note also that that internally, the two gateway machines have .1 IP addresses, and that the two networks have different private IP address (192.168.1.x and 192.168.2.x respectively). All the machines on the private networks have been configured to use the .1 machine as their default gateway.
The intention is that, from a network point of view, each network should view the machines on the other network as though they were directly attached the same router -- albeit a slightly slow router with an occasional tendency to drop packets.
This means that (for example), machine 192.168.1.20 should be able to run
ping 192.168.2.34
and have it work, transparently. Windows machines should be able to see the machines on the other network, browse file shares, and so on, in exactly the same way that they can browse machines on the local network.
And the whole thing has to be secure. This means that traffic between the two networks has to be encrypted.
Creating a VPN between these two networks is a multi-step process. The stages are as follows:
-
Create a ``virtual'' network link between the two networks, across the Internet. Test it, using tools like ping(8), to make sure it works.
-
Apply security policies to ensure that traffic between the two networks is transparently encrypted and decrypted as necessary. Test this, using tools like tcpdump(1), to ensure that traffic is encrypted.
-
Configure additional software on the FreeBSD gateways, to allow Windows machines to see one another across the VPN.
10.10.3.1 Step 1: Creating and testing a ``virtual'' network link
Suppose that you were logged in to the gateway machine on network #1 (with public IP address A.B.C.D, private IP address 192.168.1.1), and you ran ping 192.168.2.1, which is the private address of the machine with IP address W.X.Y.Z. What needs to happen in order for this to work?
-
The gateway machine needs to know how to reach 192.168.2.1. In other words, it needs to have a route to 192.168.2.1.
-
Private IP addresses, such as those in the 192.168.x range are not supposed to appear on the Internet at large. Instead, each packet you send to 192.168.2.1 will need to be wrapped up inside another packet. This packet will need to appear to be from A.B.C.D, and it will have to be sent to W.X.Y.Z. This process is called encapsulation.
-
Once this packet arrives at W.X.Y.Z it will need to ``unencapsulated'', and delivered to 192.168.2.1.
You can think of this as requiring a ``tunnel'' between the two networks. The two ``tunnel mouths'' are the IP addresses A.B.C.D and W.X.Y.Z, and the tunnel must be told the addresses of the private IP addresses that will be allowed to pass through it. The tunnel is used to transfer traffic with private IP addresses across the public Internet.
This tunnel is created by using the generic interface, or gif devices on FreeBSD. As you can imagine, the gif interface on each gateway host must be configured with four IP addresses; two for the public IP addresses, and two for the private IP addresses.
Support for the gif device must be compiled in to the FreeBSD kernel on both machines. You can do this by adding the line:
pseudo-device gif
to the kernel configuration files on both machines, and then compile, install, and reboot as normal.
Configuring the tunnel is a two step process. First the tunnel must be told what the outside (or public) IP addresses are, using gifconfig(8). Then the private IP addresses must be configured using ifconfig(8).
On the gateway machine on network #1 you would run the following two commands to configure the tunnel.
gifconfig gif0 A.B.C.D W.X.Y.Z
ifconfig gif0 inet 192.168.1.1 192.168.2.1 netmask 0xffffffff
On the other gateway machine you run the same commands, but with the order of the IP addresses reversed.
gifconfig gif0 W.X.Y.Z A.B.C.D
ifconfig gif0 inet 192.168.2.1 192.168.1.1 netmask 0xffffffff
You can then run:
gifconfig gif0
to see the configuration. For example, on the network #1 gateway, you would see this:
# gifconfig gif0
gif0: flags=8011<UP,POINTTOPOINT,MULTICAST> mtu 1280
inet 192.168.1.1 --> 192.168.2.1 netmask 0xffffffff
physical address inet A.B.C.D --> W.X.Y.Z
As you can see, a tunnel has been created between the physical addresses A.B.C.D and W.X.Y.Z, and the traffic allowed through the tunnel is that between 192.168.1.1 and 192.168.2.1.
This will also have added an entry to the routing table on both machines, which you can examine with the command netstat -rn. This output is from the gateway host on network #1.
# netstat -rn
Routing tables
Internet:
Destination Gateway Flags Refs Use Netif Expire
...
192.168.2.1 192.168.1.1 UH 0 0 gif0
...
As the ``Flags'' value indicates, this is a host route, which means that each gateway knows how to reach the other gateway, but they do not know how to reach the rest of their respective networks. That problem will be fixed shortly.
It is likely that you are running a firewall on both machines. This will need to be circumvented for your VPN traffic. You might want to allow all traffic between both networks, or you might want to include firewall rules that protect both ends of the VPN from one another.
It greatly simplifies testing if you configure the firewall to allow all traffic through the VPN. You can always tighten things up later. If you are using ipfw(8) on the gateway machines then a command like
ipfw add 1 allow ip from any to any via gif0
will allow all traffic between the two end points of the VPN, without affecting your other firewall rules. Obviously you will need to run this command on both gateway hosts.
This is sufficient to allow each gateway machine to ping the other. On 192.168.1.1, you should be able to run
ping 192.168.2.1
and get a response, and you should be able to do the same thing on the other gateway machine.
However, you will not be able to reach internal machines on either network yet. This is because of the routing -- although the gateway machines know how to reach one another, they do not know how to reach the network behind each one.
To solve this problem you must add a static route on each gateway machine. The command to do this on the first gateway would be:
route add 192.168.2.0 192.168.2.1 netmask 0xffffff00
This says ``In order to reach the hosts on the network 192.168.2.0, send the packets to the host 192.168.2.1''. You will need to run a similar command on the other gateway, but with the 192.168.1.x addresses instead.
IP traffic from hosts on one network will now be able to reach hosts on the other network.
That has now created two thirds of a VPN between the two networks, in as much as it's ``virtual'' and it's a ``network''. It's not private yet. You can test this using ping(8) and tcpdump(1). Log in to the gateway host and run
tcpdump dst host 192.168.2.1
In another log in session on the same host run
ping 192.168.2.1
You will see output that looks something like this:
16:10:24.018080 192.168.1.1 > 192.168.2.1: icmp: echo request
16:10:24.018109 192.168.1.1 > 192.168.2.1: icmp: echo reply
16:10:25.018814 192.168.1.1 > 192.168.2.1: icmp: echo request
16:10:25.018847 192.168.1.1 > 192.168.2.1: icmp: echo reply
16:10:26.028896 192.168.1.1 > 192.168.2.1: icmp: echo request
16:10:26.029112 192.168.1.1 > 192.168.2.1: icmp: echo reply
As you can see, the ICMP messages are going back and forth unencrypted. If you had used the -s parameter to tcpdump(1) to grab more bytes of data from the packets you would see more information.
Obviously this is unacceptable. The next section will discuss securing the link between the two networks so that it all traffic is automatically encrypted.
Summary:
-
Configure both kernels with ``pseudo-device gif''.
-
Edit /etc/rc.conf on gateway host #1 and add the following lines (replacing IP addresses as necessary).
gifconfig_gif0="A.B.C.D W.X.Y.Z" ifconfig_gif0="inet 192.168.1.1 192.168.2.1 netmask 0xffffffff" static_routes="vpn" route_vpn="192.168.2.0 192.168.2.1 netmask 0xffffff00" -
Edit your firewall script (/etc/rc.firewall, or similar) on both hosts, and add
ipfw add 1 allow ip from any to any via gif0
-
Make similar changes to /etc/rc.conf on gateway host #2, reversing the order of IP addresses.
10.10.3.2 Step 2: Securing the link
To secure the link we will be using IPsec. IPsec provides a mechanism for two hosts to agree on an encryption key, and to then use this key in order to encrypt data between the two hosts.
The are two areas of configuration to be considered here.
-
There must be a mechanism for two hosts to agree on the encryption mechanism to use. Once two hosts have agreed on this mechanism there is said to be a ``security association'' between them.
-
There must be a mechanism for specifying which traffic should be encrypted. Obviously, you don't want to encrypt all your outgoing traffic -- you only want to encrypt the traffic that is part of the VPN. The rules that you put in place to determine what traffic will be encrypted are called ``security policies''.
Security associations and security policies are both maintained by the kernel, and can be modified by userland programs. However, before you can do this you must configure the kernel to support IPsec and the Encapsulated Security Payload (ESP) protocol. This is done by configuring a kernel with:
options IPSEC
options IPSEC_ESP
and recompiling, reinstalling, and rebooting. As before you will need to do this to the kernels on both of the gateway hosts.
You have two choices when it comes to setting up security associations. You can configure them by hand between two hosts, which entails choosing the encryption algorithm, encryption keys, and so forth, or you can use daemons that implement the Internet Key Exchange protocol (IKE) to do this for you.
I recommend the latter. Apart from anything else, it's easier to set up.
Editing and displaying security policies is carried out using setkey(8). By analogy, setkey is to the kernel's security policy tables as route(8) is to the kernel's routing tables. setkey can also display the current security associations, and to continue the analogy further, is akin to netstat -r in that respect.
There are a number of choices for daemons to manage security associations with FreeBSD. This article will describe how to use one of these, racoon. racoon is in the FreeBSD ports collection, in the security/ category, and is installed in the usual way.
racoon must be run on both gateway hosts. On each host it is configured with the IP address of the other end of the VPN, and a secret key (which you choose, and must be the same on both gateways).
The two daemons then contact one another, confirm that they are who they say they are (by using the secret key that you configured). The daemons then generate a new secret key, and use this to encrypt the traffic over the VPN. They periodically change this secret, so that even if an attacker were to crack one of the keys (which is as theoretically close to unfeasible as it gets) it won't do them much good -- by the time they've cracked the key the two daemons have chosen another one.
racoon's configuration is stored in ${PREFIX}/etc/racoon. You should find a configuration file there, which should not need to be changed too much. The other component of racoon's configuration, which you will need to change, is the ``pre-shared key''.
The default racoon configuration expects to find this in the file ${PREFIX}/etc/racoon/psk.txt. It is important to note that the pre-shared key is not the key that will be used to encrypt your traffic across the VPN link, it is simply a token that allows the key management daemons to trust one another.
psk.txt contains a line for each remote site you are dealing with. In this example, where there are two sites, each psk.txt file will contain one line (because each end of the VPN is only dealing with one other end).
On gateway host #1 this line should look like this:
W.X.Y.Z secret
That is, the public IP address of the remote end, whitespace, and a text string that provides the secret. Obviously, you shouldn't use ``secret'' as your key -- the normal rules for choosing a password apply.
On gateway host #2 the line would look like this
A.B.C.D secret
That is, the public IP address of the remote end, and the same secret key. psk.txt must be mode 0600 (i.e., only read/write to root) before racoon will run.
You must run racoon on both gateway machines. You will also need to add some firewall rules to allow the IKE traffic, which is carried over UDP to the ISAKMP (Internet Security Association Key Management Protocol) port. Again, this should be fairly early in your firewall ruleset.
ipfw add 1 allow udp from A.B.C.D to W.X.Y.Z isakmp
ipfw add 1 allow udp from W.X.Y.Z to A.B.C.D isakmp
Once racoon is running you can try pinging one gateway host from the other. The connection is still not encrypted, but racoon will then set up the security associations between the two hosts -- this might take a moment, and you may see this as a short delay before the ping commands start responding.
Once the security association has been set up you can view it using setkey(8). Run
setkey -D
on either host to view the security association information.
That's one half of the problem. They other half is setting your security policies.
To create a sensible security policy, let's review what's been set up so far. This discussions hold for both ends of the link.
Each IP packet that you send out has a header that contains data about the packet. The header includes the IP addresses of both the source and destination. As we already know, private IP addresses, such as the 192.168.x.y range are not supposed to appear on the public Internet. Instead, they must first be encapsulated inside another packet. This packet must have the public source and destination IP addresses substituted for the private addresses.
So if your outgoing packet started looking like this:
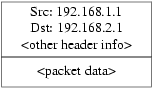
Then it will be encapsulated inside another packet, looking something like this:

This encapsulation is carried out by the gif device. As you can see, the packet now has real IP addresses on the outside, and our original packet has been wrapped up as data inside the packet that will be put out on the Internet.
Obviously, we want all traffic between the VPNs to be encrypted. You might try putting this in to words, as:
``If a packet leaves from A.B.C.D, and it is destined for W.X.Y.Z, then encrypt it, using the necessary security associations.''
``If a packet arrives from W.X.Y.Z, and it is destined for A.B.C.D, then decrypt it, using the necessary security associations.''
That's close, but not quite right. If you did this, all traffic to and from W.X.Y.Z, even traffic that was not part of the VPN, would be encrypted. That's not quite what you want. The correct policy is as follows
``If a packet leaves from A.B.C.D, and that packet is encapsulating another packet, and it is destined for W.X.Y.Z, then encrypt it, using the necessary security associations.''
``If a packet arrives from W.X.Y.Z, and that packet is encapsulating another packet, and it is destined for A.B.C.D, then encrypt it, using the necessary security associations.''
A subtle change, but a necessary one.
Security policies are also set using setkey(8). setkey(8) features a configuration language for defining the policy. You can either enter configuration instructions via stdin, or you can use the -f option to specify a filename that contains configuration instructions.
The configuration on gateway host #1 (which has the public IP address A.B.C.D) to force all outbound traffic to W.X.Y.Z to be encrypted is:
spdadd A.B.C.D/32 W.X.Y.Z/32 ipencap -P out ipsec esp/tunnel/A.B.C.D-W.X.Y.Z/require;
Put these commands in a file (e.g., /etc/ipsec.conf) and then run
# setkey -f /etc/ipsec.conf
spdadd tells setkey(8) that we want to add a rule to the secure policy database. The rest of this line specifies which packets will match this policy. A.B.C.D/32 and W.X.Y.Z/32 are the IP addresses and netmasks that identify the network or hosts that this policy will apply to. In this case, we want it to apply to traffic between these two hosts. ipencap tells the kernel that this policy should only apply to packets that encapsulate other packets. -P out says that this policy applies to outgoing packets, and ipsec says that the packet will be secured.
The second line specifies how this packet will be encrypted. esp is the protocol that will be used, while tunnel indicates that the packet will be further encapsulated in an IPsec packet. The repeated use of A.B.C.D and W.X.Y.Z is used to select the security association to use, and the final require mandates that packets must be encrypted if they match this rule.
This rule only matches outgoing packets. You will need a similar rule to match incoming packets.
spdadd W.X.Y.Z/32 A.B.C.D/32 ipencap -P in ipsec esp/tunnel/W.X.Y.Z-A.B.C.D/require;
Note the in instead of out in this case, and the necessary reversal of the IP addresses.
The other gateway host (which has the public IP address W.X.Y.Z) will need similar rules.
spdadd W.X.Y.Z/32 A.B.C.D/32 ipencap -P out ipsec esp/tunnel/W.X.Y.Z-A.B.C.D/require;
spdadd A.B.C.D/32 W.X.Y.Z/32 ipencap -P in ipsec esp/tunnel/A.B.C.D-W.X.Y.Z/require;
Finally, you need to add firewall rules to allow ESP and IPENCAP packets back and forth. These rules will need to be added to both hosts.
ipfw add 1 allow esp from A.B.C.D to W.X.Y.Z
ipfw add 1 allow esp from W.X.Y.Z to A.B.C.D
ipfw add 1 allow ipencap from A.B.C.D to W.X.Y.Z
ipfw add 1 allow ipencap from W.X.Y.Z to A.B.C.D
Because the rules are symmetric you can use the same rules on each gateway host.
Outgoing packets will now look something like this:

When they are received by the far end of the VPN they will first be decrypted (using the security associations that have been negotiated by racoon). Then they will enter the gif interface, which will unwrap the second layer, until you are left with the innermost packet, which can then travel in to the inner network.
You can check the security using the same ping(8) test from earlier. First, log in to the A.B.C.D gateway machine, and run:
tcpdump dst host 192.168.2.1
In another log in session on the same host run
ping 192.168.2.1
This time you should see output like the following:
XXX tcpdump output
Now, as you can see, tcpdump(1) shows the ESP packets. If you try and examine them with the -s option you will see (apparently) gibberish, because of the encryption.
Congratulations. You have just set up a VPN between two remote sites.
Summary
-
Configure both kernels with:
options IPSEC options IPSEC_ESP -
Install security/racoon. Edit ${PREFIX}/etc/racoon/psk.txt on both gateway hosts, adding an entry for the remote host's IP address and a secret key that they both know. Make sure this file is mode 0600.
-
Add the following lines to /etc/rc.conf on each host:
ipsec_enable="YES" ipsec_file="/etc/ipsec.conf" -
Create an /etc/ipsec.conf on each host that contains the necessary spdadd lines. On gateway host #1 this would be:
spdadd A.B.C.D/32 W.X.Y.Z/32 ipencap -P out ipsec esp/tunnel/A.B.C.D-W.X.Y.Z/require; spdadd W.X.Y.Z/32 A.B.C.D/32 ipencap -P in ipsec esp/tunnel/W.X.Y.Z-A.B.C.D/require;
On gateway host #2 this would be:
spdadd W.X.Y.Z/32 A.B.C.D/32 ipencap -P out ipsec esp/tunnel/W.X.Y.Z-A.B.C.D/require; spdadd A.B.C.D/32 W.X.Y.Z/32 ipencap -P in ipsec esp/tunnel/A.B.C.D-W.X.Y.Z/require;
-
Add firewall rules to allow IKE, ESP, and IPENCAP traffic to both hosts:
ipfw add 1 allow udp from A.B.C.D to W.X.Y.Z isakmp ipfw add 1 allow udp from W.X.Y.Z to A.B.C.D isakmp ipfw add 1 allow esp from A.B.C.D to W.X.Y.Z ipfw add 1 allow esp from W.X.Y.Z to A.B.C.D ipfw add 1 allow ipencap from A.B.C.D to W.X.Y.Z ipfw add 1 allow ipencap from W.X.Y.Z to A.B.C.D
The previous two steps should suffice to get the VPN up and running. Machines on each network will be able to refer to one another using IP addresses, and all traffic across the link will be automatically and securely encrypted.
10.11 OpenSSH
Contributed by Chern Lee.OpenSSH is a set of network connectivity tools used to access remote machines securely. It can be used as a direct replacement for rlogin, rsh, rcp, and telnet. Additionally, any other TCP/IP connections can be tunneled/forwarded securely through SSH. OpenSSH encrypts all traffic to effectively eliminate eavesdropping, connection hijacking, and other network-level attacks.
OpenSSH is maintained by the OpenBSD project, and is based upon SSH v1.2.12 with all the recent bug fixes and updates. It is compatible with both SSH protocols 1 and 2. OpenSSH has been in the base system since FreeBSD 4.0.
10.11.1 Advantages of Using OpenSSH
Normally, when using telnet(1) or rlogin(1), data is sent over the network in an clear, un-encrypted form. Network sniffers anywhere in between the client and server can steal your user/password information or data transferred in your session. OpenSSH offers a variety of authentication and encryption methods to prevent this from happening.
10.11.2 Enabling sshd
Be sure to make the following addition to your rc.conf file:
sshd_enable="YES"
This will load sshd(8), the daemon program for OpenSSH, the next time your system initializes. Alternatively, you can simply run directly the sshd daemon by typing sshd on the command line.
10.11.3 SSH Client
The ssh(1) utility works similarly to rlogin(1).
# ssh [email protected] Host key not found from the list of known hosts. Are you sure you want to continue connecting (yes/no)? yes Host 'example.com' added to the list of known hosts. [email protected]'s password: *******
The login will continue just as it would have if a session was created using rlogin or telnet. SSH utilizes a key fingerprint system for verifying the authenticity of the server when the client connects. The user is prompted to enter yes only when connecting for the first time. Future attempts to login are all verified against the saved fingerprint key. The SSH client will alert you if the saved fingerprint differs from the received fingerprint on future login attempts. The fingerprints are saved in ~/.ssh/known_hosts, or ~/.ssh/known_hosts2 for SSH v2 fingerprints.
By default, OpenSSH servers are configured to accept both SSH v1 and SSH v2 connections. The client, however, can choose between the two. Version 2 is known to be more robust and secure than its predecessor.
The ssh(1) command can be forced to use either protocol by passing it the -1 or -2 argument for v1 and v2, respectively.
10.11.4 Secure Copy
The scp(1) command works similarly to rcp(1); it copies a file to or from a remote machine, except in a secure fashion.
# scp [email protected]:/COPYRIGHT COPYRIGHT [email protected]'s password: ******* COPYRIGHT 100% |*****************************| 4735 00:00 #
Since the fingerprint was already saved for this host in the previous example, it is verified when using scp(1) here.
The arguments passed to scp(1) are similar to cp(1), with the file or files in the first argument, and the destination in the second. Since the file is fetched over the network, through SSH, one or more of the file arguments takes on the form user@host:<path_to_remote_file>.
10.11.5 Configuration
The system-wide configuration files for both the OpenSSH daemon and client reside within the /etc/ssh directory.
ssh_config configures the client settings, while sshd_config configures the daemon.
Additionally, the sshd_program (/usr/sbin/sshd by default), and sshd_flags rc.conf options can provide more levels of configuration.
10.11.6 ssh-keygen
Instead of using passwords, ssh-keygen(1) can be used to generate RSA keys to authenticate a user:
% ssh-keygen -t rsa1 Initializing random number generator... Generating p: .++ (distance 66) Generating q: ..............................++ (distance 498) Computing the keys... Key generation complete. Enter file in which to save the key (/home/user/.ssh/identity): Enter passphrase: Enter the same passphrase again: Your identification has been saved in /home/user/.ssh/identity. ...
ssh-keygen(1) will create a public and private key pair for use in authentication. The private key is stored in ~/.ssh/identity, whereas the public key is stored in ~/.ssh/identity.pub. The public key must be placed in ~/.ssh/authorized_keys of the remote machine in order for the setup to work.
This will allow connection to the remote machine based upon RSA authentication instead of passwords.
Note: The -t rsa1 option will create RSA keys for use by SSH protocol version 1. If you want to use RSA keys with the SSH protocol version 2, you have to use the command ssh-keygen -t rsa.
If a passphrase is used in ssh-keygen(1), the user will be prompted for a password each time in order to use the private key.
A SSH protocol version 2 DSA key can be created for the same purpose by using the ssh-keygen -t dsa command. This will create a public/private DSA key for use in SSH protocol version 2 sessions only. The public key is stored in ~/.ssh/id_dsa.pub, while the private key is in ~/.ssh/id_dsa.
DSA public keys are also placed in ~/.ssh/authorized_keys on the remote machine.
ssh-agent(1) and ssh-add(1) are utilities used in managing multiple passworded private keys.
Warning: The various options and files can be different according to the OpenSSH version you have on your system, to avoid problems you should consult the ssh-keygen(1) manual page.
10.11.7 SSH Tunneling
OpenSSH has the ability to create a tunnel to encapsulate another protocol in an encrypted session.
The following command tells ssh(1) to create a tunnel for telnet:
% ssh -2 -N -f -L 5023:localhost:23 [email protected] %
The ssh command is used with the following options:
- -2
-
Forces ssh to use version 2 of the protocol. (Do not use if you are working with older SSH servers)
- -N
-
Indicates no command, or tunnel only. If omitted, ssh would initiate a normal session.
- -f
-
Forces ssh to run in the background.
- -L
-
Indicates a local tunnel in localport:remotehost:remoteport fashion.
- [email protected]
-
The remote SSH server.
An SSH tunnel works by creating a listen socket on localhost on the specified port. It then forwards any connection received on the local host/port via the SSH connection to the specified remote host and port.
In the example, port 5023 on localhost is being forwarded to port 23 on localhost of the remote machine. Since 23 is telnet, this would create a secure telnet session through an SSH tunnel.
This can be used to wrap any number of insecure TCP protocols such as SMTP, POP3, FTP, etc.
Example 10-1. Using SSH to Create a Secure Tunnel for SMTP
% ssh -2 -N -f -L 5025:localhost:25 [email protected] [email protected]'s password: ***** % telnet localhost 5025 Trying 127.0.0.1... Connected to localhost. Escape character is '^]'. 220 mailserver.example.com ESMTP
This can be used in conjunction with an ssh-keygen(1) and additional user accounts to create a more seamless/hassle-free SSH tunneling environment. Keys can be used in place of typing a password, and the tunnels can be run as a separate user.
10.11.7.1 Practical SSH Tunneling Examples
10.11.7.1.1 Secure Access of a POP3 Server
At work, there is an SSH server that accepts connections from the outside. On the same office network resides a mail server running a POP3 server. The network, or network path between your home and office may or may not be completely trustable. Because of this, you need to check your e-mail in a secure manner. The solution is to create an SSH connection to your office's SSH server, and tunnel through to the mail server.
% ssh -2 -N -f -L 2110:mail.example.com:110 [email protected] [email protected]'s password: ******
When the tunnel is up and running, you can point your mail client to send POP3 requests to localhost port 2110. A connection here will be forwarded securely across the tunnel to mail.example.com.
10.11.7.1.2 Bypassing a Draconian Firewall
Some network administrators impose extremely draconian firewall rules, filtering not only incoming connections, but outgoing connections. You may be only given access to contact remote machines on ports 22 and 80 for SSH and web surfing.
You may wish to access another (perhaps non-work related) service, such as an Ogg Vorbis server to stream music. If this Ogg Vorbis server is streaming on some other port than 22 or 80, you will not be able to access it.
The solution is to create an SSH connection to a machine outside of your network's firewall, and use it to tunnel to the Ogg Vorbis server.
% ssh -2 -N -f -L 8888:music.example.com:8000 [email protected] [email protected]'s password: *******
Your streaming client can now be pointed to localhost port 8888, which will be forwarded over to music.example.com port 8000, successfully evading the firewall.
10.12 Mandatory Access Control (MAC)
Sponsored by DARPA and Network Associates Laboratories. Contributed by Robert Watson.FreeBSD 5.0 includes a new kernel security framework, the TrustedBSD MAC Framework. The MAC Framework permits compile-time, boot-time, and run-time extension of the kernel access control policy, and can be used to load support for Mandatory Access Control (MAC), and custom security modules such as hardening modules. The MAC Framework is currently considered to be an experimental feature, and should not yet be used in production environments without careful consideration. It is anticipated that the MAC Framework will be appropriate for more widespread production use by FreeBSD 5.2.
When configured into a kernel, the MAC Framework permits security modules to augment the existing kernel access control model, restricting access to system services and objects. For example, the mac_bsdextended(4) module augments file system access control, permitting administrators to provide a firewall-like ruleset constraining access to file system objects based on user ids and group membership. Some modules require little or no configuration, such as mac_seeotheruids(4), whereas others perform ubiquitous object labeling, such as mac_biba(4) and mac_mls(4), and require extensive configuration.
To enable the MAC Framework in your system kernel, you must add the following entry to your kernel configuration:
options MAC
Security policy modules shipped with the base system may be loaded using kldload(8) or in the boot loader(8) They may also be compiled directly into the kernel using the following options, if the use of modules is not desired.
Different MAC policies may be configured in different ways; frequently, MAC policy modules export configuration parameters using the sysctl(8) MIB using the security.mac namespace. Policies relying on file system or other labels may require a configuration step that involves assigning initial labels to system objects or creating a policy configuration file. For information on how to configure and use each policy module, see its man page.
A variety of tools are available to configure the MAC Framework and labels maintained by various policies. Extensions have been made to the login and credential management mechanisms (setusercontext(3)) to support initial user labeling using login.conf(5). In addition, modifications have been made to su(1), ps(1), ls(1), and ifconfig(8) to inspect and set labels on processes, files, and interfaces. In addition, several new tools have been added to manage labels on objects, including getfmac(8), setfmac(8), and setfsmac(8) to manage labels on files, and getpmac(8) and setpmac(8).
What follows is a list of policy modules shipped with FreeBSD 5.0.
10.12.1 Biba Integrity Policy (mac_biba)
Vendor: TrustedBSD Project
Module name: mac_biba.ko
Kernel option: MAC_BIBA
The Biba Integrity Policy (mac_biba(4)) provides for hierarchical and non-hierarchical labeling of all system objects with integrity data, and the strict enforcement of an information flow policy to prevent corruption of high integrity subjects and data by low-integrity subjects. Integrity is enforced by preventing high integrity subjects (generally processes) from reading low integrity objects (often files), and preventing low integrity subjects from writing to high integrity objects. This security policy is frequently used in commercial trusted systems to provide strong protection for the Trusted Code Base (TCB). Because it provides ubiquitous labeling, the Biba integrity policy must be compiled into the kernel or loaded at boot.
10.12.2 File System Firewall Policy (mac_bsdextended)
Vendor: TrustedBSD Project
Module name: mac_bsdextended.ko
Kernel option: MAC_BSDEXTENDED
The File System Firewall Policy (mac_bsdextended(4)) provides an extension to the BSD file system permission model, permitting the administrator to define a set of firewall-like rules for limiting access to file system objects owned by other users and groups. Managed using ugidfw(8), rules may limit access to files and directories based on the uid and gids of the process attempting the access, and the owner and group of the target of the access attempt. All rules are restrictive, so they may be placed in any order. This policy requires no prior configuration or labeling, and may be appropriate in multi-user environments where mandatory limits on inter-user data exchange are required. Caution should be exercised in limiting access to files owned by the super-user or other system user ids, as many useful programs and directories are owned by these users. As with a network firewall, improper application of file system firewall rules may render the system unusable. New tools to manage the rule set may be easily written using the libugidfw(3) library.
10.12.3 Interface Silencing Policy (mac_ifoff)
Vendor: TrustedBSD Project
Module name: mac_ifoff.ko
Kernel option: MAC_IFOFF
The interface silencing policy (mac_ifoff(4)) prohibits the use of network interfaces during the boot until explicitly enabled, preventing spurious stack output stack response to incoming packets. This is appropriate for use in environments where the monitoring of packets is required, but no traffic may be generated.
10.12.4 Low-Watermark Mandatory Access Control (LOMAC) (mac_lomac)
Vendor: Network Associates Laboratories
Module name: mac_lomac.ko
Kernel option: MAC_LOMAC
Similar to the Biba Integrity Policy, the LOMAC policy (mac_lomac(4)) relies on the ubiquitous labeling of all system objects with integrity labels. Unlike Biba, LOMAC permits high integrity subjects to read from low integrity objects, but then downgrades the label on the subject to prevent future writes to high integrity objects. This policy may provide for greater compatibility, as well as require less initial configuration than Biba. However, as with Biba, it ubiquitously labels objects and must therefore be compiled into the kernel or loaded at boot.
10.12.5 Multi-Level Security Policy (MLS) (mac_mls)
Vendor: TrustedBSD Project
Module name: mac_mls.ko
Kernel option: MAC_MLS
Multi-Level Security (MLS) (mac_mls(4)) provides for hierarchical and non-hierarchical labeling of all system objects with sensitivity data, and the strict enforcement of an information flow policy to prevent the leakage of confidential data to untrusted parties. The logical conjugate of the Biba Integrity Policy, MLS is frequently shipped in commercial trusted operating systems to protect data secrecy in multi-user environments. Hierarchal labels provide support for the notion of clearances and classifications in traditional parlance; non-hierarchical labels provide support for ``need-to-know.'' As with Biba, ubiquitous labeling of objects occurs, and it must therefore be compiled into the kernel or loaded at boot. As with Biba, extensive initial configuration may be required.
10.12.6 MAC Stub Policy (mac_none)
Vendor: TrustedBSD Project
Module name: mac_none.ko
Kernel option: MAC_NONE
The None policy (mac_none(4)) provides a stub sample policy for developers, implementing all entry points, but not changing the system access control policy. Running this on a production system would not be highly beneficial.
10.12.7 Process Partition Policy (mac_partition)
Vendor: TrustedBSD Project
Module name: mac_partition.ko
Kernel option: MAC_PARTITION
The Partition policy (mac_partition(4)) provides for a simple process visibility limitation, assigning labels to processes identifying what numeric system partition they are present in. If none, all other processes are visible using standard monitoring tools; if a partition identifier is present, then only other processes in the same partition are visible. This policy may be compiled into the kernel, loaded at boot, or loaded at run-time.
10.12.8 See Other Uids Policy (mac_seeotheruids)
Vendor: TrustedBSD Project
Module name: mac_seeotheruids.ko
Kernel option: MAC_SEEOTHERUIDS
The See Other Uids policy (mac_seeotheruids(4)) implements a similar process visibility model to mac_partition, except that it relies on process credentials to control visibility of processes, rather than partition labels. This policy may be configured to exempt certain users and groups, including permitting system operators to view all processes without special privilege. This policy may be compiled into the kernel, loaded at boot, or loaded at run-time.
10.12.9 MAC Framework Test Policy (mac_test)
Vendor: TrustedBSD Project
Module name: mac_test.ko
Kernel option: MAC_TEST
The Test policy (mac_test(4)) provides a regression test environment for the MAC Framework, and will cause a fail-stop in the event that internal MAC Framework assertions about proper data labeling fail. This module can be used to detect failures to properly label system objects in the kernel implementation. This policy may be compiled into the kernel, loaded at boot, or loaded at run-time.
10.13 File System Access Control Lists
Contributed by Tom Rhodes.In conjunction with file system enhancements like snapshots, FreeBSD 5.0 and later offers the security of File System Access Control Lists (ACLs).
Access Control Lists extend the standard UNIX permission model in a highly compatible (POSIX.1e) way. This feature permits an administrator to make use of and take advantage of a more sophisticated security model.
To enable ACL support for UFS file systems, the following:
options UFS_ACL
must be compiled into the kernel. If this option has not been compiled in, a warning message will be displayed when attempting to mount a file system supporting ACLs. This option is included in the GENERIC kernel. ACLs rely on extended attributes being enabled on the file system. Extended attributes are natively supported in the next generation UNIX file system, UFS2.
Note: A higher level of administrative overhead is required to configure extended attributes on UFS1 than on UFS2. The performance of extended attributes on UFS2 is also substantially higher. As a result, UFS2 is generally recommended in preference to UFS1 for use with access control lists.
ACLs are enabled by the mount-time administrative flag, acls, which may be added to /etc/fstab. The mount-time flag can also be automatically set in a persistent manner using tunefs(8) to modify a superblock ACLs flag in the file system header. In general, it is preferred to use the superblock flag for several reasons:
-
The mount-time ACLs flag cannot be changed by a remount (mount(8) -u), only by means of a complete umount(8) and fresh mount(8). This means that ACLs cannot be enabled on the root file system after boot. It also means that you cannot change the disposition of a file system once it is in use.
-
Setting the superblock flag will cause the file system to always be mounted with ACLs enabled even if there is not an fstab entry or if the devices re-order. This prevents accidental mounting of the file system without ACLs enabled, which can result in ACLs being improperly enforced, and hence security problems.
Note: We may change the ACLs behavior to allow the flag to be enabled without a complete fresh mount(8), but we consider it desirable to discourage accidental mounting without ACLs enabled, because you can shoot your feet quite nastily if you enable ACLs, then disable them, then re-enable them without flushing the extended attributes. In general, once you have enabled ACLs on a file system, they should not be disabled, as the resulting file protections may not be compatible with those intended by the users of the system, and re-enabling ACLs may re-attach the previous ACLs to files that have since had their permissions changed, resulting in other unpredictable behavior.
File systems with ACLs enabled will show a + (plus) sign in their permission settings when viewed. For example:
drwx------ 2 robert robert 512 Dec 27 11:54 private drwxrwx---+ 2 robert robert 512 Dec 23 10:57 directory1 drwxrwx---+ 2 robert robert 512 Dec 22 10:20 directory2 drwxrwx---+ 2 robert robert 512 Dec 27 11:57 directory3 drwxr-xr-x 2 robert robert 512 Nov 10 11:54 public_html
Here we see that the directory1, directory2, and directory3 directories are all taking advantage of ACLs. The public_html directory is not.
10.13.1 Making Use of ACLs
The file system ACLs can be viewed by the getfacl(1) utility. For instance, to view the ACL settings on the test file, one would use the command:
%getfacl test
#file:test
#owner:1001
#group:1001
user::rw-
group::r--
other::r--
To change the ACL settings on this file, invoke the setfacl(1) utility. Observe:
%setfacl -k test
The -k flag will remove all of the currently defined ACLs from a file or file system. The more preferable method would be to use -b as it leaves the basic fields required for ACLs to work.
%-m u:trhodes:rwx,group:web:r--,o::--- test
In the aforementioned command, the -m option was used to modify the default ACL entries. Since there were no pre-defined entries, as they were removed by the previous command, this will restore the default options and assign the options listed. Take care to notice that if you add a user or group which does not exist on the system, an ``Invalid argument'' error will be printed to stdout.
Chapter 11 Printing
Contributed by Sean Kelly. Restructured and updated by Jim Mock.11.1 Synopsis
FreeBSD can be used to print to a wide variety of printers, from the oldest impact printer to the latest laser printers, and everything in between, allowing you to produce high quality printed output from the applications you run.
FreeBSD can also be configured to act as a print server on a network; in this capacity FreeBSD can receive print jobs from a variety of other computers, including other FreeBSD computers, Windows and Mac OS hosts. FreeBSD will ensure that one job at a time is printed, and can keep statistics on which users and machines are doing the most printing, produce ``banner'' pages showing who's printout is who's, and more.
After reading this chapter, you will know:
-
How to configure the FreeBSD print spooler.
-
How to install print filters, to handle special print jobs differently, including converting incoming documents to print formats that your printers understand.
-
How to enable header, or banner pages on your printout.
-
How to print to printers connected to other computers.
-
How to print to printers connected directly to the network.
-
How to control printer restrictions, including limiting the size of print jobs, and preventing certain users from printing.
-
How to keep printer statistics, and account for printer usage.
-
How to troubleshoot printing problems.
Before reading this chapter, you should:
-
Know how to configure and install a new kernel (Chapter 9).
11.2 Introduction
In order to use printers with FreeBSD, you will need to set them up to work with the Berkeley line printer spooling system, also known as the LPD spooling system. It is the standard printer control system in FreeBSD. This chapter introduces the LPD spooling system, often simply called LPD, and will guide you through its configuration.
If you are already familiar with LPD or another printer spooling system, you may wish to skip to section Setting up the spooling system.
LPD controls everything about a host's printers. It is responsible for a number of things:
-
It controls access to attached printers and printers attached to other hosts on the network.
-
It enables users to submit files to be printed; these submissions are known as jobs.
-
It prevents multiple users from accessing a printer at the same time by maintaining a queue for each printer.
-
It can print header pages (also known as banner or burst pages) so users can easily find jobs they have printed in a stack of printouts.
-
It takes care of communications parameters for printers connected on serial ports.
-
It can send jobs over the network to a LPD spooler on another host.
-
It can run special filters to format jobs to be printed for various printer languages or printer capabilities.
-
It can account for printer usage.
Through a configuration file (/etc/printcap), and by providing the special filter programs, you can enable the LPD system to do all or some subset of the above for a great variety of printer hardware.
11.2.1 Why You Should Use the Spooler
If you are the sole user of your system, you may be wondering why you should bother with the spooler when you do not need access control, header pages, or printer accounting. While it is possible to enable direct access to a printer, you should use the spooler anyway since:
-
LPD prints jobs in the background; you do not have to wait for data to be copied to the printer.
-
LPD can conveniently run a job to be printed through filters to add date/time headers or convert a special file format (such as a TeX DVI file) into a format the printer will understand. You will not have to do these steps manually.
-
Many free and commercial programs that provide a print feature usually expect to talk to the spooler on your system. By setting up the spooling system, you will more easily support other software you may later add or already have.
11.3 Basic Setup
To use printers with the LPD spooling system, you will need to set up both your printer hardware and the LPD software. This document describes two levels of setup:
-
See section Simple Printer Setup to learn how to connect a printer, tell LPD how to communicate with it, and print plain text files to the printer.
-
See section Advanced Printer Setup to find out how to print a variety of special file formats, to print header pages, to print across a network, to control access to printers, and to do printer accounting.
11.3.1 Simple Printer Setup
This section tells how to configure printer hardware and the LPD software to use the printer. It teaches the basics:
-
Section Hardware Setup gives some hints on connecting the printer to a port on your computer.
-
Section Software Setup shows how to setup the LPD spooler configuration file (/etc/printcap).
If you are setting up a printer that uses a network protocol to accept data to print instead of a serial or parallel interface, see Printers With Networked Data Stream Interfaces.
Although this section is called ``Simple Printer Setup'', it is actually fairly complex. Getting the printer to work with your computer and the LPD spooler is the hardest part. The advanced options like header pages and accounting are fairly easy once you get the printer working.
11.3.1.1 Hardware Setup
This section tells about the various ways you can connect a printer to your PC. It talks about the kinds of ports and cables, and also the kernel configuration you may need to enable FreeBSD to speak to the printer.
If you have already connected your printer and have successfully printed with it under another operating system, you can probably skip to section Software Setup.
11.3.1.1.1 Ports and Cables
Nearly all printers you can get for a PC today support one or both of the following interfaces:
-
Serial interfaces use a serial port on your computer to send data to the printer. Serial interfaces are common in the computer industry and cables are readily available and also easy to construct. Serial interfaces sometimes need special cables and might require you to configure somewhat complex communications options.
-
Parallel interfaces use a parallel port on your computer to send data to the printer. Parallel interfaces are common in the PC market. Cables are readily available but more difficult to construct by hand. There are usually no communications options with parallel interfaces, making their configuration exceedingly simple.
Parallel interfaces are sometimes known as ``Centronics'' interfaces, named after the connector type on the printer.
In general, serial interfaces are slower than parallel interfaces. Parallel interfaces usually offer just one-way communication (computer to printer) while serial gives you two-way. Many newer parallel ports and printers can communicate in both directions under FreeBSD when a IEEE1284 compliant cable is used.
Usually, the only time you need two-way communication with the printer is if the printer speaks PostScript. PostScript printers can be very verbose. In fact, PostScript jobs are actually programs sent to the printer; they need not produce paper at all and may return results directly to the computer. PostScript also uses two-way communication to tell the computer about problems, such as errors in the PostScript program or paper jams. Your users may be appreciative of such information. Furthermore, the best way to do effective accounting with a PostScript printer requires two-way communication: you ask the printer for its page count (how many pages it has printed in its lifetime), then send the user's job, then ask again for its page count. Subtract the two values and you know how much paper to charge the user.
11.3.1.1.2 Parallel Ports
To hook up a printer using a parallel interface, connect the Centronics cable between the printer and the computer. The instructions that came with the printer, the computer, or both should give you complete guidance.
Remember which parallel port you used on the computer. The first parallel port is /dev/ppc0 to FreeBSD; the second is /dev/ppc1, and so on. The printer device name uses the same scheme: /dev/lpt0 for the printer on the first parallel ports etc.
11.3.1.1.3 Serial Ports
To hook up a printer using a serial interface, connect the proper serial cable between the printer and the computer. The instructions that came with the printer, the computer, or both should give you complete guidance.
If you are unsure what the ``proper serial cable'' is, you may wish to try one of the following alternatives:
-
A modem cable connects each pin of the connector on one end of the cable straight through to its corresponding pin of the connector on the other end. This type of cable is also known as a ``DTE-to-DCE'' cable.
-
A null-modem cable connects some pins straight through, swaps others (send data to receive data, for example), and shorts some internally in each connector hood. This type of cable is also known as a ``DTE-to-DTE'' cable.
-
A serial printer cable, required for some unusual printers, is like the null-modem cable, but sends some signals to their counterparts instead of being internally shorted.
You should also set up the communications parameters for the printer, usually through front-panel controls or DIP switches on the printer. Choose the highest bps (bits per second, sometimes baud rate) rate that both your computer and the printer can support. Choose 7 or 8 data bits; none, even, or odd parity; and 1 or 2 stop bits. Also choose a flow control protocol: either none, or XON/XOFF (also known as ``in-band'' or ``software'') flow control. Remember these settings for the software configuration that follows.
11.3.1.2 Software Setup
This section describes the software setup necessary to print with the LPD spooling system in FreeBSD.
Here is an outline of the steps involved:
-
Configure your kernel, if necessary, for the port you are using for the printer; section Kernel Configuration tells you what you need to do.
-
Set the communications mode for the parallel port, if you are using a parallel port; section Setting the Communication Mode for the Parallel Port gives details.
-
Test if the operating system can send data to the printer. Section Checking Printer Communications gives some suggestions on how to do this.
-
Set up LPD for the printer by modifying the file /etc/printcap. You will find out how to do this later in this chapter.
11.3.1.2.1 Kernel Configuration
The operating system kernel is compiled to work with a specific set of devices. The serial or parallel interface for your printer is a part of that set. Therefore, it might be necessary to add support for an additional serial or parallel port if your kernel is not already configured for one.
To find out if the kernel you are currently using supports a serial interface, type:
# grep sioN /var/run/dmesg.boot
Where N is the number of the serial port, starting from zero. If you see output similar to the following:
sio2 at port 0x3e8-0x3ef irq 5 on isa sio2: type 16550A
then the kernel supports the port.
To find out if the kernel supports a parallel interface, type:
# grep ppcN /var/run/dmesg.boot
Where N is the number of the parallel port, starting from zero. If you see output similar to the following:
ppc0: <Parallel port> at port 0x378-0x37f irq 7 on isa0 ppc0: SMC-like chipset (ECP/EPP/PS2/NIBBLE) in COMPATIBLE mode ppc0: FIFO with 16/16/8 bytes threshold
then the kernel supports the port.
You might have to reconfigure your kernel in order for the operating system to recognize and use the parallel or serial port you are using for the printer.
To add support for a serial port, see the section on kernel configuration. To add support for a parallel port, see that section and the section that follows.
11.3.1.3 Adding /dev Entries for the Ports
Note: FreeBSD 5.0 includes the devfs filesystem which automatically creates device nodes as needed. If you are running a version of FreeBSD with devfs enabled then you can safely skip this section.
Even though the kernel may support communication along a serial or parallel port, you will still need a software interface through which programs running on the system can send and receive data. That is what entries in the /dev directory are for.
To add a /dev entry for a port:
-
Become root with the su(1) command. Enter the root password when prompted.
-
Change to the /dev directory:
# cd /dev
-
Type:
# ./MAKEDEV port
Where port is the device entry for the port you want to make. Use lpt0 for the printer on the first parallel port, lpt1 for the printer on the second port, and so on; use ttyd0 for the first serial port, ttyd1 for the second, and so on.
-
Type:
# ls -l port
to make sure the device entry got created.
11.3.1.3.1 Setting the Communication Mode for the Parallel Port
When you are using the parallel interface, you can choose whether FreeBSD should use interrupt-driven or polled communication with the printer. The generic printer device driver (lpt(4)) on FreeBSD 4.X and 5.X uses the ppbus(4) system, which controls the port chipset with the ppc(4) driver.
-
The interrupt-driven method is the default with the GENERIC kernel. With this method, the operating system uses an IRQ line to determine when the printer is ready for data.
-
The polled method directs the operating system to repeatedly ask the printer if it is ready for more data. When it responds ready, the kernel sends more data.
The interrupt-driven method is usually somewhat faster but uses up a precious IRQ line. Some newer HP printers are claimed not to work correctly in interrupt mode, apparently due to some (not yet exactly understood) timing problem. These printers need polled mode. You should use whichever one works. Some printers will work in both modes, but are painfully slow in interrupt mode.
You can set the communications mode in two ways: by configuring the kernel or by using the lptcontrol(8) program.
To set the communications mode by configuring the kernel:
-
Edit your kernel configuration file. Look for an ppc0 entry. If you are setting up the second parallel port, use ppc1 instead. Use ppc2 for the third port, and so on.
-
If you want interrupt-driven mode, for FreeBSD 4.X add the irq specifier:
device ppc0 at isa? irq N
Where N is the IRQ number for your computer's parallel port.
For FreeBSD 5.X, edit the following line:
hint.ppc.0.irq="N"
in the /boot/device.hints file and replace N with the right IRQ number. The kernel configuration file must also contain the ppc(4) driver:
device ppc
-
If you want polled mode, do not add the irq specifier:
For FreeBSD 4.X, use the following line in your kernel configuration file:
device ppc0 at isa?
For FreeBSD 5.X, simply remove in your /boot/device.hints file, the following line:
hint.ppc.0.irq="N"
In some cases, this is not enough to put the port in polled mode under FreeBSD 5.X. Most of time it comes from acpi(4) driver, this latter is able to probe and attach devices, and therefore, control the access mode to the printer port. You should check your acpi(4) configuration to correct this problem.
-
-
Save the file. Then configure, build, and install the kernel, then reboot. See kernel configuration for more details.
To set the communications mode with lptcontrol(8):
-
Type:
# lptcontrol -i -d /dev/lptN
to set interrupt-driven mode for lptN.
-
Type:
# lptcontrol -p -d /dev/lptN
to set polled-mode for lptN.
You could put these commands in your /etc/rc.local file to set the mode each time your system boots. See lptcontrol(8) for more information.
11.3.1.3.2 Checking Printer Communications
Before proceeding to configure the spooling system, you should make sure the operating system can successfully send data to your printer. It is a lot easier to debug printer communication and the spooling system separately.
To test the printer, we will send some text to it. For printers that can immediately print characters sent to them, the program lptest(1) is perfect: it generates all 96 printable ASCII characters in 96 lines.
For a PostScript (or other language-based) printer, we will need a more sophisticated test. A small PostScript program, such as the following, will suffice:
%!PS 100 100 moveto 300 300 lineto stroke 310 310 moveto /Helvetica findfont 12 scalefont setfont (Is this thing working?) show showpage
The above PostScript code can be placed into a file and used as shown in the examples appearing in the following sections.
Note: When this document refers to a printer language, it is assuming a language like PostScript, and not Hewlett Packard's PCL. Although PCL has great functionality, you can intermingle plain text with its escape sequences. PostScript cannot directly print plain text, and that is the kind of printer language for which we must make special accommodations.
11.3.1.3.2.1 Checking a Parallel Printer
This section tells you how to check if FreeBSD can communicate with a printer connected to a parallel port.
To test a printer on a parallel port:
-
Become root with su(1).
-
Send data to the printer.
-
If the printer can print plain text, then use lptest(1). Type:
# lptest > /dev/lptN
Where N is the number of the parallel port, starting from zero.
-
If the printer understands PostScript or other printer language, then send a small program to the printer. Type:
# cat > /dev/lptN
Then, line by line, type the program carefully as you cannot edit a line once you have pressed RETURN or ENTER. When you have finished entering the program, press CONTROL+D, or whatever your end of file key is.
Alternatively, you can put the program in a file and type:
# cat file > /dev/lptN
Where file is the name of the file containing the program you want to send to the printer.
-
You should see something print. Do not worry if the text does not look right; we will fix such things later.
11.3.1.3.2.2 Checking a Serial Printer
This section tells you how to check if FreeBSD can communicate with a printer on a serial port.
To test a printer on a serial port:
-
Become root with su(1).
-
Edit the file /etc/remote. Add the following entry:
printer:dv=/dev/port:br#bps-rate:pa=parity
Where port is the device entry for the serial port (ttyd0, ttyd1, etc.), bps-rate is the bits-per-second rate at which the printer communicates, and parity is the parity required by the printer (either even, odd, none, or zero).
Here is a sample entry for a printer connected via a serial line to the third serial port at 19200 bps with no parity:
printer:dv=/dev/ttyd2:br#19200:pa=none
-
Connect to the printer with tip(1). Type:
# tip printer
If this step does not work, edit the file /etc/remote again and try using /dev/cuaaN instead of /dev/ttydN.
-
Send data to the printer.
-
If the printer can print plain text, then use lptest(1). Type:
% $lptest
-
If the printer understands PostScript or other printer language, then send a small program to the printer. Type the program, line by line, very carefully as backspacing or other editing keys may be significant to the printer. You may also need to type a special end-of-file key for the printer so it knows it received the whole program. For PostScript printers, press CONTROL+D.
Alternatively, you can put the program in a file and type:
% >file
Where file is the name of the file containing the program. After tip(1) sends the file, press any required end-of-file key.
-
You should see something print. Do not worry if the text does not look right; we will fix that later.
11.3.1.4 Enabling the Spooler: the /etc/printcap File
At this point, your printer should be hooked up, your kernel configured to communicate with it (if necessary), and you have been able to send some simple data to the printer. Now, we are ready to configure LPD to control access to your printer.
You configure LPD by editing the file /etc/printcap. The LPD spooling system reads this file each time the spooler is used, so updates to the file take immediate effect.
The format of the printcap(5) file is straightforward. Use your favorite text editor to make changes to /etc/printcap. The format is identical to other capability files like /usr/share/misc/termcap and /etc/remote. For complete information about the format, see the cgetent(3).
The simple spooler configuration consists of the following steps:
-
Pick a name (and a few convenient aliases) for the printer, and put them in the /etc/printcap file; see the Naming the Printer section for more information on naming.
-
Turn off header pages (which are on by default) by inserting the sh capability; see the Suppressing Header Pages section for more information.
-
Make a spooling directory, and specify its location with the sd capability; see the Making the Spooling Directory section for more information.
-
Set the /dev entry to use for the printer, and note it in /etc/printcap with the lp capability; see the Identifying the Printer Device for more information. Also, if the printer is on a serial port, set up the communication parameters with the ms# capability which is discussed in the Configuring Spooler Communications Parameters section.
-
Install a plain text input filter; see the Installing the Text Filter section for details.
-
Test the setup by printing something with the lpr(1) command. More details are available in the Trying It Out and Troubleshooting sections.
Note: Language-based printers, such as PostScript printers, cannot directly print plain text. The simple setup outlined above and described in the following sections assumes that if you are installing such a printer you will print only files that the printer can understand.
Users often expect that they can print plain text to any of the printers installed on your system. Programs that interface to LPD to do their printing usually make the same assumption. If you are installing such a printer and want to be able to print jobs in the printer language and print plain text jobs, you are strongly urged to add an additional step to the simple setup outlined above: install an automatic plain-text-to-PostScript (or other printer language) conversion program. The section entitled Accommodating Plain Text Jobs on PostScript Printers tells how to do this.
11.3.1.4.1 Naming the Printer
The first (easy) step is to pick a name for your printer It really does not matter whether you choose functional or whimsical names since you can also provide a number of aliases for the printer.
At least one of the printers specified in the /etc/printcap should have the alias lp. This is the default printer's name. If users do not have the PRINTER environment variable nor specify a printer name on the command line of any of the LPD commands, then lp will be the default printer they get to use.
Also, it is common practice to make the last alias for a printer be a full description of the printer, including make and model.
Once you have picked a name and some common aliases, put them in the /etc/printcap file. The name of the printer should start in the leftmost column. Separate each alias with a vertical bar and put a colon after the last alias.
In the following example, we start with a skeletal /etc/printcap that defines two printers (a Diablo 630 line printer and a Panasonic KX-P4455 PostScript laser printer):
# # /etc/printcap for host rose # rattan|line|diablo|lp|Diablo 630 Line Printer: bamboo|ps|PS|S|panasonic|Panasonic KX-P4455 PostScript v51.4:
In this example, the first printer is named rattan and has as aliases line, diablo, lp, and Diablo 630 Line Printer. Since it has the alias lp, it is also the default printer. The second is named bamboo, and has as aliases ps, PS, S, panasonic, and Panasonic KX-P4455 PostScript v51.4.
11.3.1.4.2 Suppressing Header Pages
The LPD spooling system will by default print a header page for each job. The header page contains the user name who requested the job, the host from which the job came, and the name of the job, in nice large letters. Unfortunately, all this extra text gets in the way of debugging the simple printer setup, so we will suppress header pages.
To suppress header pages, add the sh capability to the entry for the printer in /etc/printcap. Here is an example /etc/printcap with sh added:
#
# /etc/printcap for host rose - no header pages anywhere
#
rattan|line|diablo|lp|Diablo 630 Line Printer:\
:sh:
bamboo|ps|PS|S|panasonic|Panasonic KX-P4455 PostScript v51.4:\
:sh:
Note how we used the correct format: the first line starts in the leftmost column, and subsequent lines are indented with a single TAB. Every line in an entry except the last ends in a backslash character.
11.3.1.4.3 Making the Spooling Directory
The next step in the simple spooler setup is to make a spooling directory, a directory where print jobs reside until they are printed, and where a number of other spooler support files live.
Because of the variable nature of spooling directories, it is customary to put these directories under /var/spool. It is not necessary to backup the contents of spooling directories, either. Recreating them is as simple as running mkdir(1).
It is also customary to make the directory with a name that is identical to the name of the printer, as shown below:
# mkdir /var/spool/printer-name
However, if you have a lot of printers on your network, you might want to put the spooling directories under a single directory that you reserve just for printing with LPD. We will do this for our two example printers rattan and bamboo:
# mkdir /var/spool/lpd # mkdir /var/spool/lpd/rattan # mkdir /var/spool/lpd/bamboo
Note: If you are concerned about the privacy of jobs that users print, you might want to protect the spooling directory so it is not publicly accessible. Spooling directories should be owned and be readable, writable, and searchable by user daemon and group daemon, and no one else. We will do this for our example printers:
# chown daemon:daemon /var/spool/lpd/rattan # chown daemon:daemon /var/spool/lpd/bamboo # chmod 770 /var/spool/lpd/rattan # chmod 770 /var/spool/lpd/bamboo
Finally, you need to tell LPD about these directories using the /etc/printcap file. You specify the pathname of the spooling directory with the sd capability:
#
# /etc/printcap for host rose - added spooling directories
#
rattan|line|diablo|lp|Diablo 630 Line Printer:\
:sh:sd=/var/spool/lpd/rattan:
bamboo|ps|PS|S|panasonic|Panasonic KX-P4455 PostScript v51.4:\
:sh:sd=/var/spool/lpd/bamboo:
Note that the name of the printer starts in the first column but all other entries describing the printer should be indented with a tab and each line escaped with a backslash.
If you do not specify a spooling directory with sd, the spooling system will use /var/spool/lpd as a default.
11.3.1.4.4 Identifying the Printer Device
In the Adding /dev Entries for the Ports section, we identified which entry in the /dev directory FreeBSD will use to communicate with the printer. Now, we tell LPD that information. When the spooling system has a job to print, it will open the specified device on behalf of the filter program (which is responsible for passing data to the printer).
List the /dev entry pathname in the /etc/printcap file using the lp capability.
In our running example, let us assume that rattan is on the first parallel port, and bamboo is on a sixth serial port; here are the additions to /etc/printcap:
#
# /etc/printcap for host rose - identified what devices to use
#
rattan|line|diablo|lp|Diablo 630 Line Printer:\
:sh:sd=/var/spool/lpd/rattan:\
:lp=/dev/lpt0:
bamboo|ps|PS|S|panasonic|Panasonic KX-P4455 PostScript v51.4:\
:sh:sd=/var/spool/lpd/bamboo:\
:lp=/dev/ttyd5:
If you do not specify the lp capability for a printer in your /etc/printcap file, LPD uses /dev/lp as a default. /dev/lp currently does not exist in FreeBSD.
If the printer you are installing is connected to a parallel port, skip to the section entitled, Installing the Text Filter. Otherwise, be sure to follow the instructions in the next section.
11.3.1.4.5 Configuring Spooler Communication Parameters
For printers on serial ports, LPD can set up the bps rate, parity, and other serial communication parameters on behalf of the filter program that sends data to the printer. This is advantageous since:
-
It lets you try different communication parameters by simply editing the /etc/printcap file; you do not have to recompile the filter program.
-
It enables the spooling system to use the same filter program for multiple printers which may have different serial communication settings.
The following /etc/printcap capabilities control serial communication parameters of the device listed in the lp capability:
- br#bps-rate
-
Sets the communications speed of the device to bps-rate, where bps-rate can be 50, 75, 110, 134, 150, 200, 300, 600, 1200, 1800, 2400, 4800, 9600, 19200, 38400, 57600, or 115200 bits-per-second.
- ms#stty-mode
-
Sets the options for the terminal device after opening the device. stty(1) explains the available options.
When LPD opens the device specified by the lp capability, it sets the characteristics of the device to those specified with the ms# capability. Of particular interest will be the parenb, parodd, cs5, cs6, cs7, cs8, cstopb, crtscts, and ixon modes, which are explained in the stty(1) manual page.
Let us add to our example printer on the sixth serial port. We will set the bps rate to 38400. For the mode, we will set no parity with -parenb, 8-bit characters with cs8, no modem control with clocal and hardware flow control with crtscts:
bamboo|ps|PS|S|panasonic|Panasonic KX-P4455 PostScript v51.4:\
:sh:sd=/var/spool/lpd/bamboo:\
:lp=/dev/ttyd5:ms#-parenb cs8 clocal crtscts:
11.3.1.4.6 Installing the Text Filter
We are now ready to tell LPD what text filter to use to send jobs to the printer. A text filter, also known as an input filter, is a program that LPD runs when it has a job to print. When LPD runs the text filter for a printer, it sets the filter's standard input to the job to print, and its standard output to the printer device specified with the lp capability. The filter is expected to read the job from standard input, perform any necessary translation for the printer, and write the results to standard output, which will get printed. For more information on the text filter, see the Filters section.
For our simple printer setup, the text filter can be a small shell script that just executes /bin/cat to send the job to the printer. FreeBSD comes with another filter called lpf that handles backspacing and underlining for printers that might not deal with such character streams well. And, of course, you can use any other filter program you want. The filter lpf is described in detail in section entitled lpf: a Text Filter.
First, let us make the shell script /usr/local/libexec/if-simple be a simple text filter. Put the following text into that file with your favorite text editor:
#!/bin/sh # # if-simple - Simple text input filter for lpd # Installed in /usr/local/libexec/if-simple # # Simply copies stdin to stdout. Ignores all filter arguments. /bin/cat && exit 0 exit 2
Make the file executable:
# chmod 555 /usr/local/libexec/if-simple
And then tell LPD to use it by specifying it with the if capability in /etc/printcap. We will add it to the two printers we have so far in the example /etc/printcap:
#
# /etc/printcap for host rose - added text filter
#
rattan|line|diablo|lp|Diablo 630 Line Printer:\
:sh:sd=/var/spool/lpd/rattan:\ :lp=/dev/lpt0:\
:if=/usr/local/libexec/if-simple:
bamboo|ps|PS|S|panasonic|Panasonic KX-P4455 PostScript v51.4:\
:sh:sd=/var/spool/lpd/bamboo:\
:lp=/dev/ttyd5:ms#-parenb cs8 clocal crtscts:\
:if=/usr/local/libexec/if-simple:
11.3.1.4.7 Turn on LPD
lpd(8) is run from /etc/rc, controlled by the lpd_enable variable. This variable defaults to NO. If you have not done so already, add the line:
lpd_enable="YES"
to /etc/rc.conf, and then either restart your machine, or just run lpd(8).
# lpd
11.3.1.4.8 Trying It Out
You have reached the end of the simple LPD setup. Unfortunately, congratulations are not quite yet in order, since we still have to test the setup and correct any problems. To test the setup, try printing something. To print with the LPD system, you use the command lpr(1), which submits a job for printing.
You can combine lpr(1) with the lptest(1) program, introduced in section Checking Printer Communications to generate some test text.
To test the simple LPD setup:
Type:
# lptest 20 5 | lpr -Pprinter-name
Where printer-name is a the name of a printer (or an alias) specified in /etc/printcap. To test the default printer, type lpr(1) without any -P argument. Again, if you are testing a printer that expects PostScript, send a PostScript program in that language instead of using lptest(1). You can do so by putting the program in a file and typing lpr file.
For a PostScript printer, you should get the results of the program. If you are using lptest(1), then your results should look like the following:
!"#$%&'()*+,-./01234 "#$%&'()*+,-./012345 #$%&'()*+,-./0123456 $%&'()*+,-./01234567 %&'()*+,-./012345678
To further test the printer, try downloading larger programs (for language-based printers) or running lptest(1) with different arguments. For example, lptest 80 60 will produce 60 lines of 80 characters each.
If the printer did not work, see the Troubleshooting section.
11.4 Advanced Printer Setup
This section describes filters for printing specially formatted files, header pages, printing across networks, and restricting and accounting for printer usage.
11.4.1 Filters
Although LPD handles network protocols, queuing, access control, and other aspects of printing, most of the real work happens in the filters. Filters are programs that communicate with the printer and handle its device dependencies and special requirements. In the simple printer setup, we installed a plain text filter--an extremely simple one that should work with most printers (section Installing the Text Filter).
However, in order to take advantage of format conversion, printer accounting, specific printer quirks, and so on, you should understand how filters work. It will ultimately be the filter's responsibility to handle these aspects. And the bad news is that most of the time you have to provide filters yourself. The good news is that many are generally available; when they are not, they are usually easy to write.
Also, FreeBSD comes with one, /usr/libexec/lpr/lpf, that works with many printers that can print plain text. (It handles backspacing and tabs in the file, and does accounting, but that is about all it does.) There are also several filters and filter components in the FreeBSD Ports Collection.
Here is what you will find in this section:
-
Section How Filters Work, tries to give an overview of a filter's role in the printing process. You should read this section to get an understanding of what is happening ``under the hood'' when LPD uses filters. This knowledge could help you anticipate and debug problems you might encounter as you install more and more filters on each of your printers.
-
LPD expects every printer to be able to print plain text by default. This presents a problem for PostScript (or other language-based printers) which cannot directly print plain text. Section Accommodating Plain Text Jobs on PostScript Printers tells you what you should do to overcome this problem. You should read this section if you have a PostScript printer.
-
PostScript is a popular output format for many programs. Even some people (myself included) write PostScript code directly. But PostScript printers are expensive. Section Simulating PostScript on Non PostScript Printers tells how you can further modify a printer's text filter to accept and print PostScript data on a non PostScript printer. You should read this section if you do not have a PostScript printer.
-
Section Conversion Filters tells about a way you can automate the conversion of specific file formats, such as graphic or typesetting data, into formats your printer can understand. After reading this section, you should be able to set up your printers such that users can type lpr -t to print troff data, or lpr -d to print TeX DVI data, or lpr -v to print raster image data, and so forth. I recommend reading this section.
-
Section Output Filters tells all about a not often used feature of LPD: output filters. Unless you are printing header pages (see Header Pages), you can probably skip that section altogether.
-
Section lpf: a Text Filter describes lpf, a fairly complete if simple text filter for line printers (and laser printers that act like line printers) that comes with FreeBSD. If you need a quick way to get printer accounting working for plain text, or if you have a printer which emits smoke when it sees backspace characters, you should definitely consider lpf.
11.4.1.1 How Filters Work
As mentioned before, a filter is an executable program started by LPD to handle the device-dependent part of communicating with the printer.
When LPD wants to print a file in a job, it starts a filter program. It sets the filter's standard input to the file to print, its standard output to the printer, and its standard error to the error logging file (specified in the lf capability in /etc/printcap, or /dev/console by default).
Which filter LPD starts and the filter's arguments depend on what is listed in the /etc/printcap file and what arguments the user specified for the job on the lpr(1) command line. For example, if the user typed lpr -t, LPD would start the troff filter, listed in the tf capability for the destination printer. If the user wanted to print plain text, it would start the if filter (this is mostly true: see Output Filters for details).
There are three kinds of filters you can specify in /etc/printcap:
-
The text filter, confusingly called the input filter in LPD documentation, handles regular text printing. Think of it as the default filter. LPD expects every printer to be able to print plain text by default, and it is the text filter's job to make sure backspaces, tabs, or other special characters do not confuse the printer. If you are in an environment where you have to account for printer usage, the text filter must also account for pages printed, usually by counting the number of lines printed and comparing that to the number of lines per page the printer supports. The text filter is started with the following argument list:
filter-name [-c] -wwidth -llength -iindent -n login -h host acct-file
where- -c
-
appears if the job is submitted with lpr -l
- width
-
is the value from the pw (page width) capability specified in /etc/printcap, default 132
- length
-
is the value from the pl (page length) capability, default 66
- indent
-
is the amount of the indentation from lpr -i, default 0
- login
-
is the account name of the user printing the file
- host
-
is the host name from which the job was submitted
- acct-file
-
is the name of the accounting file from the af capability.
-
A conversion filter converts a specific file format into one the printer can render onto paper. For example, ditroff typesetting data cannot be directly printed, but you can install a conversion filter for ditroff files to convert the ditroff data into a form the printer can digest and print. Section Conversion Filters tells all about them. Conversion filters also need to do accounting, if you need printer accounting. Conversion filters are started with the following arguments:
filter-name -xpixel-width -ypixel-height -n login -h host acct-file
where pixel-width is the value from the px capability (default 0) and pixel-height is the value from the py capability (default 0).
-
The output filter is used only if there is no text filter, or if header pages are enabled. In my experience, output filters are rarely used. Section Output Filters describe them. There are only two arguments to an output filter:
filter-name -wwidth -llength
which are identical to the text filters -w and -l arguments.
Filters should also exit with the following exit status:
- exit 0
-
If the filter printed the file successfully.
- exit 1
-
If the filter failed to print the file but wants LPD to try to print the file again. LPD will restart a filter if it exits with this status.
- exit 2
-
If the filter failed to print the file and does not want LPD to try again. LPD will throw out the file.
The text filter that comes with the FreeBSD release, /usr/libexec/lpr/lpf, takes advantage of the page width and length arguments to determine when to send a form feed and how to account for printer usage. It uses the login, host, and accounting file arguments to make the accounting entries.
If you are shopping for filters, see if they are LPD-compatible. If they are, they must support the argument lists described above. If you plan on writing filters for general use, then have them support the same argument lists and exit codes.
11.4.1.2 Accommodating Plain Text Jobs on PostScript® Printers
If you are the only user of your computer and PostScript (or other language-based) printer, and you promise to never send plain text to your printer and to never use features of various programs that will want to send plain text to your printer, then you do not need to worry about this section at all.
But, if you would like to send both PostScript and plain text jobs to the printer, then you are urged to augment your printer setup. To do so, we have the text filter detect if the arriving job is plain text or PostScript. All PostScript jobs must start with %! (for other printer languages, see your printer documentation). If those are the first two characters in the job, we have PostScript, and can pass the rest of the job directly. If those are not the first two characters in the file, then the filter will convert the text into PostScript and print the result.
How do we do this?
If you have got a serial printer, a great way to do it is to install lprps. lprps is a PostScript printer filter which performs two-way communication with the printer. It updates the printer's status file with verbose information from the printer, so users and administrators can see exactly what the state of the printer is (such as ``toner low'' or ``paper jam''). But more importantly, it includes a program called psif which detects whether the incoming job is plain text and calls textps (another program that comes with lprps) to convert it to PostScript. It then uses lprps to send the job to the printer.
lprps is part of the FreeBSD Ports Collection (see The Ports Collection). You can fetch, build and install it yourself, of course. After installing lprps, just specify the pathname to the psif program that is part of lprps. If you installed lprps from the ports collection, use the following in the serial PostScript printer's entry in /etc/printcap:
:if=/usr/local/libexec/psif:
You should also specify the rw capability; that tells LPD to open the printer in read-write mode.
If you have a parallel PostScript printer (and therefore cannot use two-way communication with the printer, which lprps needs), you can use the following shell script as the text filter:
#!/bin/sh
#
# psif - Print PostScript or plain text on a PostScript printer
# Script version; NOT the version that comes with lprps
# Installed in /usr/local/libexec/psif
#
IFS="" read -r first_line
first_two_chars=`expr "$first_line" : '\(..\)'`
if [ "$first_two_chars" = "%!" ]; then
#
# PostScript job, print it.
#
echo "$first_line" && cat && printf "\004" && exit 0
exit 2
else
#
# Plain text, convert it, then print it.
#
( echo "$first_line"; cat ) | /usr/local/bin/textps && printf "\004" && exit 0
exit 2
fi
In the above script, textps is a program we installed separately to convert plain text to PostScript. You can use any text-to-PostScript program you wish. The FreeBSD Ports Collection (see The Ports Collection) includes a full featured text-to-PostScript program called a2ps that you might want to investigate.
11.4.1.3 Simulating PostScript on Non PostScript Printers
PostScript is the de facto standard for high quality typesetting and printing. PostScript is, however, an expensive standard. Thankfully, Aladdin Enterprises has a free PostScript work-alike called Ghostscript that runs with FreeBSD. Ghostscript can read most PostScript files and can render their pages onto a variety of devices, including many brands of non-PostScript printers. By installing Ghostscript and using a special text filter for your printer, you can make your non PostScript printer act like a real PostScript printer.
Ghostscript is in the FreeBSD Ports Collection, if you would like to install it from there. You can fetch, build, and install it quite easily yourself, as well.
To simulate PostScript, we have the text filter detect if it is printing a PostScript file. If it is not, then the filter will pass the file directly to the printer; otherwise, it will use Ghostscript to first convert the file into a format the printer will understand.
Here is an example: the following script is a text filter for Hewlett Packard DeskJet 500 printers. For other printers, substitute the -sDEVICE argument to the gs (Ghostscript) command. (Type gs -h to get a list of devices the current installation of Ghostscript supports.)
#!/bin/sh
#
# ifhp - Print Ghostscript-simulated PostScript on a DeskJet 500
# Installed in /usr/local/libexec/ifhp
#
# Treat LF as CR+LF:
#
printf "\033&k2G" || exit 2
#
# Read first two characters of the file
#
IFS="" read -r first_line
first_two_chars=`expr "$first_line" : '\(..\)'`
if [ "$first_two_chars" = "%!" ]; then
#
# It is PostScript; use Ghostscript to scan-convert and print it.
#
# Note that PostScript files are actually interpreted programs,
# and those programs are allowed to write to stdout, which will
# mess up the printed output. So, we redirect stdout to stderr
# and then make descriptor 3 go to stdout, and have Ghostscript
# write its output there. Exercise for the clever reader:
# capture the stderr output from Ghostscript and mail it back to
# the user originating the print job.
#
exec 3>&1 1>&2
/usr/local/bin/gs -dSAFER -dNOPAUSE -q -sDEVICE=djet500 \
-sOutputFile=/dev/fd/3 - && exit 0
else
#
# Plain text or HP/PCL, so just print it directly; print a form feed
# at the end to eject the last page.
#
echo "$first_line" && cat && printf "\033&l0H" &&
exit 0
fi
exit 2
Finally, you need to notify LPD of the filter via the if capability:
:if=/usr/local/libexec/ifhp:
That is it. You can type lpr plain.text and lpr whatever.ps and both should print successfully.
11.4.1.4 Conversion Filters
After completing the simple setup described in Simple Printer Setup, the first thing you will probably want to do is install conversion filters for your favorite file formats (besides plain ASCII text).
11.4.1.4.1 Why Install Conversion Filters?
Conversion filters make printing various kinds of files easy. As an example, suppose we do a lot of work with the TeX typesetting system, and we have a PostScript printer. Every time we generate a DVI file from TeX, we cannot print it directly until we convert the DVI file into PostScript. The command sequence goes like this:
% dvips seaweed-analysis.dvi % lpr seaweed-analysis.ps
By installing a conversion filter for DVI files, we can skip the hand conversion step each time by having LPD do it for us. Now, each time we get a DVI file, we are just one step away from printing it:
% lpr -d seaweed-analysis.dvi
We got LPD to do the DVI file conversion for us by specifying the -d option. Section Formatting and Conversion Options lists the conversion options.
For each of the conversion options you want a printer to support, install a conversion filter and specify its pathname in /etc/printcap. A conversion filter is like the text filter for the simple printer setup (see section Installing the Text Filter) except that instead of printing plain text, the filter converts the file into a format the printer can understand.
11.4.1.4.2 Which Conversions Filters Should I Install?
You should install the conversion filters you expect to use. If you print a lot of DVI data, then a DVI conversion filter is in order. If you have got plenty of troff to print out, then you probably want a troff filter.
The following table summarizes the filters that LPD works with, their capability entries for the /etc/printcap file, and how to invoke them with the lpr command:
| File type | /etc/printcap capability | lpr option |
|---|---|---|
| cifplot | cf | -c |
| DVI | df | -d |
| plot | gf | -g |
| ditroff | nf | -n |
| FORTRAN text | rf | -f |
| troff | tf | -f |
| raster | vf | -v |
| plain text | if | none, -p, or -l |
In our example, using lpr -d means the printer needs a df capability in its entry in /etc/printcap.
Despite what others might contend, formats like FORTRAN text and plot are probably obsolete. At your site, you can give new meanings to these or any of the formatting options just by installing custom filters. For example, suppose you would like to directly print Printerleaf files (files from the Interleaf desktop publishing program), but will never print plot files. You could install a Printerleaf conversion filter under the gf capability and then educate your users that lpr -g mean ``print Printerleaf files.''
11.4.1.4.3 Installing Conversion Filters
Since conversion filters are programs you install outside of the base FreeBSD installation, they should probably go under /usr/local. The directory /usr/local/libexec is a popular location, since they are specialized programs that only LPD will run; regular users should not ever need to run them.
To enable a conversion filter, specify its pathname under the appropriate capability for the destination printer in /etc/printcap.
In our example, we will add the DVI conversion filter to the entry for the printer named bamboo. Here is the example /etc/printcap file again, with the new df capability for the printer bamboo.
#
# /etc/printcap for host rose - added df filter for bamboo
#
rattan|line|diablo|lp|Diablo 630 Line Printer:\
:sh:sd=/var/spool/lpd/rattan:\
:lp=/dev/lpt0:\
:if=/usr/local/libexec/if-simple:
bamboo|ps|PS|S|panasonic|Panasonic KX-P4455 PostScript v51.4:\
:sh:sd=/var/spool/lpd/bamboo:\
:lp=/dev/ttyd5:ms#-parenb cs8 clocal crtscts:rw:\
:if=/usr/local/libexec/psif:\
:df=/usr/local/libexec/psdf:
The DVI filter is a shell script named /usr/local/libexec/psdf. Here is that script:
#!/bin/sh # # psdf - DVI to PostScript printer filter # Installed in /usr/local/libexec/psdf # # Invoked by lpd when user runs lpr -d # exec /usr/local/bin/dvips -f | /usr/local/libexec/lprps "$@"
This script runs dvips in filter mode (the -f argument) on standard input, which is the job to print. It then starts the PostScript printer filter lprps (see section Accommodating Plain Text Jobs on PostScript Printers) with the arguments LPD passed to this script. lprps will use those arguments to account for the pages printed.
11.4.1.4.4 More Conversion Filter Examples
Since there is no fixed set of steps to install conversion filters, let me instead provide more examples. Use these as guidance to making your own filters. Use them directly, if appropriate.
This example script is a raster (well, GIF file, actually) conversion filter for a Hewlett Packard LaserJet III-Si printer:
#!/bin/sh
#
# hpvf - Convert GIF files into HP/PCL, then print
# Installed in /usr/local/libexec/hpvf
PATH=/usr/X11R6/bin:$PATH; export PATH
giftopnm | ppmtopgm | pgmtopbm | pbmtolj -resolution 300 \
&& exit 0 \
|| exit 2
It works by converting the GIF file into a portable anymap, converting that into a portable graymap, converting that into a portable bitmap, and converting that into LaserJet/PCL-compatible data.
Here is the /etc/printcap file with an entry for a printer using the above filter:
#
# /etc/printcap for host orchid
#
teak|hp|laserjet|Hewlett Packard LaserJet 3Si:\
:lp=/dev/lpt0:sh:sd=/var/spool/lpd/teak:mx#0:\
:if=/usr/local/libexec/hpif:\
:vf=/usr/local/libexec/hpvf:
The following script is a conversion filter for troff data from the groff typesetting system for the PostScript printer named bamboo:
#!/bin/sh # # pstf - Convert groff's troff data into PS, then print. # Installed in /usr/local/libexec/pstf # exec grops | /usr/local/libexec/lprps "$@"
The above script makes use of lprps again to handle the communication with the printer. If the printer were on a parallel port, we would use this script instead:
#!/bin/sh # # pstf - Convert groff's troff data into PS, then print. # Installed in /usr/local/libexec/pstf # exec grops
That is it. Here is the entry we need to add to /etc/printcap to enable the filter:
:tf=/usr/local/libexec/pstf:
Here is an example that might make old hands at FORTRAN blush. It is a FORTRAN-text filter for any printer that can directly print plain text. We will install it for the printer teak:
#!/bin/sh # # hprf - FORTRAN text filter for LaserJet 3si: # Installed in /usr/local/libexec/hprf # printf "\033&k2G" && fpr && printf "\033&l0H" && exit 0 exit 2
And we will add this line to the /etc/printcap for the printer teak to enable this filter:
:rf=/usr/local/libexec/hprf:
Here is one final, somewhat complex example. We will add a DVI filter to the LaserJet printer teak introduced earlier. First, the easy part: updating /etc/printcap with the location of the DVI filter:
:df=/usr/local/libexec/hpdf:
Now, for the hard part: making the filter. For that, we need a DVI-to-LaserJet/PCL conversion program. The FreeBSD Ports Collection (see The Ports Collection) has one: dvi2xx is the name of the package. Installing this package gives us the program we need, dvilj2p, which converts DVI into LaserJet IIp, LaserJet III, and LaserJet 2000 compatible codes.
dvilj2p makes the filter hpdf quite complex since dvilj2p cannot read from standard input. It wants to work with a filename. What is worse, the filename has to end in .dvi so using /dev/fd/0 for standard input is problematic. We can get around that problem by linking (symbolically) a temporary file name (one that ends in .dvi) to /dev/fd/0, thereby forcing dvilj2p to read from standard input.
The only other fly in the ointment is the fact that we cannot use /tmp for the temporary link. Symbolic links are owned by user and group bin. The filter runs as user daemon. And the /tmp directory has the sticky bit set. The filter can create the link, but it will not be able clean up when done and remove it since the link will belong to a different user.
Instead, the filter will make the symbolic link in the current working directory, which is the spooling directory (specified by the sd capability in /etc/printcap). This is a perfect place for filters to do their work, especially since there is (sometimes) more free disk space in the spooling directory than under /tmp.
Here, finally, is the filter:
#!/bin/sh
#
# hpdf - Print DVI data on HP/PCL printer
# Installed in /usr/local/libexec/hpdf
PATH=/usr/local/bin:$PATH; export PATH
#
# Define a function to clean up our temporary files. These exist
# in the current directory, which will be the spooling directory
# for the printer.
#
cleanup() {
rm -f hpdf$$.dvi
}
#
# Define a function to handle fatal errors: print the given message
# and exit 2. Exiting with 2 tells LPD to do not try to reprint the
# job.
#
fatal() {
echo "$@" 1>&2
cleanup
exit 2
}
#
# If user removes the job, LPD will send SIGINT, so trap SIGINT
# (and a few other signals) to clean up after ourselves.
#
trap cleanup 1 2 15
#
# Make sure we are not colliding with any existing files.
#
cleanup
#
# Link the DVI input file to standard input (the file to print).
#
ln -s /dev/fd/0 hpdf$$.dvi || fatal "Cannot symlink /dev/fd/0"
#
# Make LF = CR+LF
#
printf "\033&k2G" || fatal "Cannot initialize printer"
#
# Convert and print. Return value from dvilj2p does not seem to be
# reliable, so we ignore it.
#
dvilj2p -M1 -q -e- dfhp$$.dvi
#
# Clean up and exit
#
cleanup
exit 0
11.4.1.4.5 Automated Conversion: an Alternative to Conversion Filters
All these conversion filters accomplish a lot for your printing environment, but at the cost forcing the user to specify (on the lpr(1) command line) which one to use. If your users are not particularly computer literate, having to specify a filter option will become annoying. What is worse, though, is that an incorrectly specified filter option may run a filter on the wrong type of file and cause your printer to spew out hundreds of sheets of paper.
Rather than install conversion filters at all, you might want to try having the text filter (since it is the default filter) detect the type of file it has been asked to print and then automatically run the right conversion filter. Tools such as file can be of help here. Of course, it will be hard to determine the differences between some file types--and, of course, you can still provide conversion filters just for them.
The FreeBSD Ports Collection has a text filter that performs automatic conversion called apsfilter. It can detect plain text, PostScript, and DVI files, run the proper conversions, and print.
11.4.1.5 Output Filters
The LPD spooling system supports one other type of filter that we have not yet explored: an output filter. An output filter is intended for printing plain text only, like the text filter, but with many simplifications. If you are using an output filter but no text filter, then:
-
LPD starts an output filter once for the entire job instead of once for each file in the job.
-
LPD does not make any provision to identify the start or the end of files within the job for the output filter.
-
LPD does not pass the user's login or host to the filter, so it is not intended to do accounting. In fact, it gets only two arguments:
filter-name -wwidth -llength
Where width is from the pw capability and length is from the pl capability for the printer in question.
Do not be seduced by an output filter's simplicity. If you would like each file in a job to start on a different page an output filter will not work. Use a text filter (also known as an input filter); see section Installing the Text Filter. Furthermore, an output filter is actually more complex in that it has to examine the byte stream being sent to it for special flag characters and must send signals to itself on behalf of LPD.
However, an output filter is necessary if you want header pages and need to send escape sequences or other initialization strings to be able to print the header page. (But it is also futile if you want to charge header pages to the requesting user's account, since LPD does not give any user or host information to the output filter.)
On a single printer, LPD allows both an output filter and text or other filters. In such cases, LPD will start the output filter to print the header page (see section Header Pages) only. LPD then expects the output filter to stop itself by sending two bytes to the filter: ASCII 031 followed by ASCII 001. When an output filter sees these two bytes (031, 001), it should stop by sending SIGSTOP to itself. When LPD's done running other filters, it will restart the output filter by sending SIGCONT to it.
If there is an output filter but no text filter and LPD is working on a plain text job, LPD uses the output filter to do the job. As stated before, the output filter will print each file of the job in sequence with no intervening form feeds or other paper advancement, and this is probably not what you want. In almost all cases, you need a text filter.
The program lpf, which we introduced earlier as a text filter, can also run as an output filter. If you need a quick-and-dirty output filter but do not want to write the byte detection and signal sending code, try lpf. You can also wrap lpf in a shell script to handle any initialization codes the printer might require.
11.4.1.6 lpf: a Text Filter
The program /usr/libexec/lpr/lpf that comes with FreeBSD binary distribution is a text filter (input filter) that can indent output (job submitted with lpr -i), allow literal characters to pass (job submitted with lpr -l), adjust the printing position for backspaces and tabs in the job, and account for pages printed. It can also act like an output filter.
lpf is suitable for many printing environments. And although it has no capability to send initialization sequences to a printer, it is easy to write a shell script to do the needed initialization and then execute lpf.
In order for lpf to do page accounting correctly, it needs correct values filled in for the pw and pl capabilities in the /etc/printcap file. It uses these values to determine how much text can fit on a page and how many pages were in a user's job. For more information on printer accounting, see Accounting for Printer Usage.
11.4.2 Header Pages
If you have lots of users, all of them using various printers, then you probably want to consider header pages as a necessary evil.
Header pages, also known as banner or burst pages identify to whom jobs belong after they are printed. They are usually printed in large, bold letters, perhaps with decorative borders, so that in a stack of printouts they stand out from the real documents that comprise users' jobs. They enable users to locate their jobs quickly. The obvious drawback to a header page is that it is yet one more sheet that has to be printed for every job, their ephemeral usefulness lasting not more than a few minutes, ultimately finding themselves in a recycling bin or rubbish heap. (Note that header pages go with each job, not each file in a job, so the paper waste might not be that bad.)
The LPD system can provide header pages automatically for your printouts if your printer can directly print plain text. If you have a PostScript printer, you will need an external program to generate the header page; see Header Pages on PostScript Printers.
11.4.2.1 Enabling Header Pages
In the Simple Printer Setup section, we turned off header pages by specifying sh (meaning ``suppress header'') in the /etc/printcap file. To enable header pages for a printer, just remove the sh capability.
Sounds too easy, right?
You are right. You might have to provide an output filter to send initialization strings to the printer. Here is an example output filter for Hewlett Packard PCL-compatible printers:
#!/bin/sh # # hpof - Output filter for Hewlett Packard PCL-compatible printers # Installed in /usr/local/libexec/hpof printf "\033&k2G" || exit 2 exec /usr/libexec/lpr/lpf
Specify the path to the output filter in the of capability. See the Output Filters section for more information.
Here is an example /etc/printcap file for the printer teak that we introduced earlier; we enabled header pages and added the above output filter:
#
# /etc/printcap for host orchid
#
teak|hp|laserjet|Hewlett Packard LaserJet 3Si:\
:lp=/dev/lpt0:sd=/var/spool/lpd/teak:mx#0:\
:if=/usr/local/libexec/hpif:\
:vf=/usr/local/libexec/hpvf:\
:of=/usr/local/libexec/hpof:
Now, when users print jobs to teak, they get a header page with each job. If users want to spend time searching for their printouts, they can suppress header pages by submitting the job with lpr -h; see the Header Page Options section for more lpr(1) options.
Note: LPD prints a form feed character after the header page. If your printer uses a different character or sequence of characters to eject a page, specify them with the ff capability in /etc/printcap.
11.4.2.2 Controlling Header Pages
By enabling header pages, LPD will produce a long header, a full page of large letters identifying the user, host, and job. Here is an example (kelly printed the job named outline from host rose):
k ll ll
k l l
k l l
k k eeee l l y y
k k e e l l y y
k k eeeeee l l y y
kk k e l l y y
k k e e l l y yy
k k eeee lll lll yyy y
y
y y
yyyy
ll
t l i
t l
oooo u u ttttt l ii n nnn eeee
o o u u t l i nn n e e
o o u u t l i n n eeeeee
o o u u t l i n n e
o o u uu t t l i n n e e
oooo uuu u tt lll iii n n eeee
r rrr oooo ssss eeee
rr r o o s s e e
r o o ss eeeeee
r o o ss e
r o o s s e e
r oooo ssss eeee
Job: outline
Date: Sun Sep 17 11:04:58 1995
LPD appends a form feed after this text so the job starts on a new page (unless you have sf (suppress form feeds) in the destination printer's entry in /etc/printcap).
If you prefer, LPD can make a short header; specify sb (short banner) in the /etc/printcap file. The header page will look like this:
rose:kelly Job: outline Date: Sun Sep 17 11:07:51 1995
Also by default, LPD prints the header page first, then the job. To reverse that, specify hl (header last) in /etc/printcap.
11.4.2.3 Accounting for Header Pages
Using LPD's built-in header pages enforces a particular paradigm when it comes to printer accounting: header pages must be free of charge.
Why?
Because the output filter is the only external program that will have control when the header page is printed that could do accounting, and it is not provided with any user or host information or an accounting file, so it has no idea whom to charge for printer use. It is also not enough to just ``add one page'' to the text filter or any of the conversion filters (which do have user and host information) since users can suppress header pages with lpr -h. They could still be charged for header pages they did not print. Basically, lpr -h will be the preferred option of environmentally-minded users, but you cannot offer any incentive to use it.
It is still not enough to have each of the filters generate their own header pages (thereby being able to charge for them). If users wanted the option of suppressing the header pages with lpr -h, they will still get them and be charged for them since LPD does not pass any knowledge of the -h option to any of the filters.
So, what are your options?
You can:
-
Accept LPD's paradigm and make header pages free.
-
Install an alternative to LPD, such as LPRng. Section Alternatives to the Standard Spooler tells more about other spooling software you can substitute for LPD.
-
Write a smart output filter. Normally, an output filter is not meant to do anything more than initialize a printer or do some simple character conversion. It is suited for header pages and plain text jobs (when there is no text (input) filter). But, if there is a text filter for the plain text jobs, then LPD will start the output filter only for the header pages. And the output filter can parse the header page text that LPD generates to determine what user and host to charge for the header page. The only other problem with this method is that the output filter still does not know what accounting file to use (it is not passed the name of the file from the af capability), but if you have a well-known accounting file, you can hard-code that into the output filter. To facilitate the parsing step, use the sh (short header) capability in /etc/printcap. Then again, all that might be too much trouble, and users will certainly appreciate the more generous system administrator who makes header pages free.
11.4.2.4 Header Pages on PostScript Printers
As described above, LPD can generate a plain text header page suitable for many printers. Of course, PostScript cannot directly print plain text, so the header page feature of LPD is useless--or mostly so.
One obvious way to get header pages is to have every conversion filter and the text filter generate the header page. The filters should use the user and host arguments to generate a suitable header page. The drawback of this method is that users will always get a header page, even if they submit jobs with lpr -h.
Let us explore this method. The following script takes three arguments (user login name, host name, and job name) and makes a simple PostScript header page:
#!/bin/sh
#
# make-ps-header - make a PostScript header page on stdout
# Installed in /usr/local/libexec/make-ps-header
#
#
# These are PostScript units (72 to the inch). Modify for A4 or
# whatever size paper you are using:
#
page_width=612
page_height=792
border=72
#
# Check arguments
#
if [ $# -ne 3 ]; then
echo "Usage: `basename $0` <user> <host> <job>" 1>&2
exit 1
fi
#
# Save these, mostly for readability in the PostScript, below.
#
user=$1
host=$2
job=$3
date=`date`
#
# Send the PostScript code to stdout.
#
exec cat <<EOF
%!PS
%
% Make sure we do not interfere with user's job that will follow
%
save
%
% Make a thick, unpleasant border around the edge of the paper.
%
$border $border moveto
$page_width $border 2 mul sub 0 rlineto
0 $page_height $border 2 mul sub rlineto
currentscreen 3 -1 roll pop 100 3 1 roll setscreen
$border 2 mul $page_width sub 0 rlineto closepath
0.8 setgray 10 setlinewidth stroke 0 setgray
%
% Display user's login name, nice and large and prominent
%
/Helvetica-Bold findfont 64 scalefont setfont
$page_width ($user) stringwidth pop sub 2 div $page_height 200 sub moveto
($user) show
%
% Now show the boring particulars
%
/Helvetica findfont 14 scalefont setfont
/y 200 def
[ (Job:) (Host:) (Date:) ] {
200 y moveto show /y y 18 sub def }
forall
/Helvetica-Bold findfont 14 scalefont setfont
/y 200 def
[ ($job) ($host) ($date) ] {
270 y moveto show /y y 18 sub def
} forall
%
% That is it
%
restore
showpage
EOF
Now, each of the conversion filters and the text filter can call this script to first generate the header page, and then print the user's job. Here is the DVI conversion filter from earlier in this document, modified to make a header page:
#!/bin/sh
#
# psdf - DVI to PostScript printer filter
# Installed in /usr/local/libexec/psdf
#
# Invoked by lpd when user runs lpr -d
#
orig_args="$@"
fail() {
echo "$@" 1>&2
exit 2
}
while getopts "x:y:n:h:" option; do
case $option in
x|y) ;; # Ignore
n) login=$OPTARG ;;
h) host=$OPTARG ;;
*) echo "LPD started `basename $0` wrong." 1>&2
exit 2
;;
esac
done
[ "$login" ] || fail "No login name"
[ "$host" ] || fail "No host name"
( /usr/local/libexec/make-ps-header $login $host "DVI File"
/usr/local/bin/dvips -f ) | eval /usr/local/libexec/lprps $orig_args
Notice how the filter has to parse the argument list in order to determine the user and host name. The parsing for the other conversion filters is identical. The text filter takes a slightly different set of arguments, though (see section How Filters Work).
As we have mentioned before, the above scheme, though fairly simple, disables the ``suppress header page'' option (the -h option) to lpr. If users wanted to save a tree (or a few pennies, if you charge for header pages), they would not be able to do so, since every filter's going to print a header page with every job.
To allow users to shut off header pages on a per-job basis, you will need to use the trick introduced in section Accounting for Header Pages: write an output filter that parses the LPD-generated header page and produces a PostScript version. If the user submits the job with lpr -h, then LPD will not generate a header page, and neither will your output filter. Otherwise, your output filter will read the text from LPD and send the appropriate header page PostScript code to the printer.
If you have a PostScript printer on a serial line, you can make use of lprps, which comes with an output filter, psof, which does the above. Note that psof does not charge for header pages.
11.4.3 Networked Printing
FreeBSD supports networked printing: sending jobs to remote printers. Networked printing generally refers to two different things:
-
Accessing a printer attached to a remote host. You install a printer that has a conventional serial or parallel interface on one host. Then, you set up LPD to enable access to the printer from other hosts on the network. Section Printers Installed on Remote Hosts tells how to do this.
-
Accessing a printer attached directly to a network. The printer has a network interface in addition (or in place of) a more conventional serial or parallel interface. Such a printer might work as follows:
-
It might understand the LPD protocol and can even queue jobs from remote hosts. In this case, it acts just like a regular host running LPD. Follow the same procedure in section Printers Installed on Remote Hosts to set up such a printer.
-
It might support a data stream network connection. In this case, you ``attach'' the printer to one host on the network by making that host responsible for spooling jobs and sending them to the printer. Section Printers with Networked Data Stream Interfaces gives some suggestions on installing such printers.
-
11.4.3.1 Printers Installed on Remote Hosts
The LPD spooling system has built-in support for sending jobs to other hosts also running LPD (or are compatible with LPD). This feature enables you to install a printer on one host and make it accessible from other hosts. It also works with printers that have network interfaces that understand the LPD protocol.
To enable this kind of remote printing, first install a printer on one host, the printer host, using the simple printer setup described in the Simple Printer Setup section. Do any advanced setup in Advanced Printer Setup that you need. Make sure to test the printer and see if it works with the features of LPD you have enabled. Also ensure that the local host has authorization to use the LPD service in the remote host (see Restricting Jobs from Remote Printers).
If you are using a printer with a network interface that is compatible with LPD, then the printer host in the discussion below is the printer itself, and the printer name is the name you configured for the printer. See the documentation that accompanied your printer and/or printer-network interface.
Tip: If you are using a Hewlett Packard Laserjet then the printer name text will automatically perform the LF to CRLF conversion for you, so you will not require the hpif script.
Then, on the other hosts you want to have access to the printer, make an entry in their /etc/printcap files with the following:
-
Name the entry anything you want. For simplicity, though, you probably want to use the same name and aliases as on the printer host.
-
Leave the lp capability blank, explicitly (:lp=:).
-
Make a spooling directory and specify its location in the sd capability. LPD will store jobs here before they get sent to the printer host.
-
Place the name of the printer host in the rm capability.
-
Place the printer name on the printer host in the rp capability.
That is it. You do not need to list conversion filters, page dimensions, or anything else in the /etc/printcap file.
Here is an example. The host rose has two printers, bamboo and rattan. We will enable users on the host orchid to print to those printers. Here is the /etc/printcap file for orchid (back from section Enabling Header Pages). It already had the entry for the printer teak; we have added entries for the two printers on the host rose:
#
# /etc/printcap for host orchid - added (remote) printers on rose
#
#
# teak is local; it is connected directly to orchid:
#
teak|hp|laserjet|Hewlett Packard LaserJet 3Si:\
:lp=/dev/lpt0:sd=/var/spool/lpd/teak:mx#0:\
:if=/usr/local/libexec/ifhp:\
:vf=/usr/local/libexec/vfhp:\
:of=/usr/local/libexec/ofhp:
#
# rattan is connected to rose; send jobs for rattan to rose:
#
rattan|line|diablo|lp|Diablo 630 Line Printer:\
:lp=:rm=rose:rp=rattan:sd=/var/spool/lpd/rattan:
#
# bamboo is connected to rose as well:
#
bamboo|ps|PS|S|panasonic|Panasonic KX-P4455 PostScript v51.4:\
:lp=:rm=rose:rp=bamboo:sd=/var/spool/lpd/bamboo:
Then, we just need to make spooling directories on orchid:
# mkdir -p /var/spool/lpd/rattan /var/spool/lpd/bamboo # chmod 770 /var/spool/lpd/rattan /var/spool/lpd/bamboo # chown daemon:daemon /var/spool/lpd/rattan /var/spool/lpd/bamboo
Now, users on orchid can print to rattan and bamboo. If, for example, a user on orchid typed
% lpr -P bamboo -d sushi-review.dvithe LPD system on orchid would copy the job to the spooling directory /var/spool/lpd/bamboo and note that it was a DVI job. As soon as the host rose has room in its bamboo spooling directory, the two LPDs would transfer the file to rose. The file would wait in rose's queue until it was finally printed. It would be converted from DVI to PostScript (since bamboo is a PostScript printer) on rose.
11.4.3.2 Printers with Networked Data Stream Interfaces
Often, when you buy a network interface card for a printer, you can get two versions: one which emulates a spooler (the more expensive version), or one which just lets you send data to it as if you were using a serial or parallel port (the cheaper version). This section tells how to use the cheaper version. For the more expensive one, see the previous section Printers Installed on Remote Hosts.
The format of the /etc/printcap file lets you specify what serial or parallel interface to use, and (if you are using a serial interface), what baud rate, whether to use flow control, delays for tabs, conversion of newlines, and more. But there is no way to specify a connection to a printer that is listening on a TCP/IP or other network port.
To send data to a networked printer, you need to develop a communications program that can be called by the text and conversion filters. Here is one such example: the script netprint takes all data on standard input and sends it to a network-attached printer. We specify the hostname of the printer as the first argument and the port number to which to connect as the second argument to netprint. Note that this supports one-way communication only (FreeBSD to printer); many network printers support two-way communication, and you might want to take advantage of that (to get printer status, perform accounting, etc.).
#!/usr/bin/perl
#
# netprint - Text filter for printer attached to network
# Installed in /usr/local/libexec/netprint
#
$#ARGV eq 1 || die "Usage: $0 <printer-hostname> <port-number>";
$printer_host = $ARGV[0];
$printer_port = $ARGV[1];
require 'sys/socket.ph';
($ignore, $ignore, $protocol) = getprotobyname('tcp');
($ignore, $ignore, $ignore, $ignore, $address)
= gethostbyname($printer_host);
$sockaddr = pack('S n a4 x8', &AF_INET, $printer_port, $address);
socket(PRINTER, &PF_INET, &SOCK_STREAM, $protocol)
|| die "Can't create TCP/IP stream socket: $!";
connect(PRINTER, $sockaddr) || die "Can't contact $printer_host: $!";
while (<STDIN>) { print PRINTER; }
exit 0;
We can then use this script in various filters. Suppose we had a Diablo 750-N line printer connected to the network. The printer accepts data to print on port number 5100. The host name of the printer is scrivener. Here is the text filter for the printer:
#!/bin/sh # # diablo-if-net - Text filter for Diablo printer `scrivener' listening # on port 5100. Installed in /usr/local/libexec/diablo-if-net # exec /usr/libexec/lpr/lpf "$@" | /usr/local/libexec/netprint scrivener 5100
11.4.4 Restricting Printer Usage
This section gives information on restricting printer usage. The LPD system lets you control who can access a printer, both locally or remotely, whether they can print multiple copies, how large their jobs can be, and how large the printer queues can get.
11.4.4.1 Restricting Multiple Copies
The LPD system makes it easy for users to print multiple copies of a file. Users can print jobs with lpr -#5 (for example) and get five copies of each file in the job. Whether this is a good thing is up to you.
If you feel multiple copies cause unnecessary wear and tear on your printers, you can disable the -# option to lpr(1) by adding the sc capability to the /etc/printcap file. When users submit jobs with the -# option, they will see:
lpr: multiple copies are not allowed
Note that if you have set up access to a printer remotely (see section Printers Installed on Remote Hosts), you need the sc capability on the remote /etc/printcap files as well, or else users will still be able to submit multiple-copy jobs by using another host.
Here is an example. This is the /etc/printcap file for the host rose. The printer rattan is quite hearty, so we will allow multiple copies, but the laser printer bamboo is a bit more delicate, so we will disable multiple copies by adding the sc capability:
#
# /etc/printcap for host rose - restrict multiple copies on bamboo
#
rattan|line|diablo|lp|Diablo 630 Line Printer:\
:sh:sd=/var/spool/lpd/rattan:\
:lp=/dev/lpt0:\
:if=/usr/local/libexec/if-simple:
bamboo|ps|PS|S|panasonic|Panasonic KX-P4455 PostScript v51.4:\
:sh:sd=/var/spool/lpd/bamboo:sc:\
:lp=/dev/ttyd5:ms#-parenb cs8 clocal crtscts:rw:\
:if=/usr/local/libexec/psif:\
:df=/usr/local/libexec/psdf:
Now, we also need to add the sc capability on the host orchid's /etc/printcap (and while we are at it, let us disable multiple copies for the printer teak):
#
# /etc/printcap for host orchid - no multiple copies for local
# printer teak or remote printer bamboo
teak|hp|laserjet|Hewlett Packard LaserJet 3Si:\
:lp=/dev/lpt0:sd=/var/spool/lpd/teak:mx#0:sc:\
:if=/usr/local/libexec/ifhp:\
:vf=/usr/local/libexec/vfhp:\
:of=/usr/local/libexec/ofhp:
rattan|line|diablo|lp|Diablo 630 Line Printer:\
:lp=:rm=rose:rp=rattan:sd=/var/spool/lpd/rattan:
bamboo|ps|PS|S|panasonic|Panasonic KX-P4455 PostScript v51.4:\
:lp=:rm=rose:rp=bamboo:sd=/var/spool/lpd/bamboo:sc:
By using the sc capability, we prevent the use of lpr -#, but that still does not prevent users from running lpr(1) multiple times, or from submitting the same file multiple times in one job like this:
% lpr forsale.sign forsale.sign forsale.sign forsale.sign forsale.sign
There are many ways to prevent this abuse (including ignoring it) which you are free to explore.
11.4.4.2 Restricting Access to Printers
You can control who can print to what printers by using the UNIX group mechanism and the rg capability in /etc/printcap. Just place the users you want to have access to a printer in a certain group, and then name that group in the rg capability.
Users outside the group (including root) will be greeted with ``lpr: Not a member of the restricted group'' if they try to print to the controlled printer.
As with the sc (suppress multiple copies) capability, you need to specify rg on remote hosts that also have access to your printers, if you feel it is appropriate (see section Printers Installed on Remote Hosts).
For example, we will let anyone access the printer rattan, but only those in group artists can use bamboo. Here is the familiar /etc/printcap for host rose:
#
# /etc/printcap for host rose - restricted group for bamboo
#
rattan|line|diablo|lp|Diablo 630 Line Printer:\
:sh:sd=/var/spool/lpd/rattan:\
:lp=/dev/lpt0:\
:if=/usr/local/libexec/if-simple:
bamboo|ps|PS|S|panasonic|Panasonic KX-P4455 PostScript v51.4:\
:sh:sd=/var/spool/lpd/bamboo:sc:rg=artists:\
:lp=/dev/ttyd5:ms#-parenb cs8 clocal crtscts:rw:\
:if=/usr/local/libexec/psif:\
:df=/usr/local/libexec/psdf:
Let us leave the other example /etc/printcap file (for the host orchid) alone. Of course, anyone on orchid can print to bamboo. It might be the case that we only allow certain logins on orchid anyway, and want them to have access to the printer. Or not.
Note: There can be only one restricted group per printer.
11.4.4.3 Controlling Sizes of Jobs Submitted
If you have many users accessing the printers, you probably need to put an upper limit on the sizes of the files users can submit to print. After all, there is only so much free space on the filesystem that houses the spooling directories, and you also need to make sure there is room for the jobs of other users.
LPD enables you to limit the maximum byte size a file in a job can be with the mx capability. The units are in BUFSIZ blocks, which are 1024 bytes. If you put a zero for this capability, there will be no limit on file size; however, if no mx capability is specified, then a default limit of 1000 blocks will be used.
Note: The limit applies to files in a job, and not the total job size.
LPD will not refuse a file that is larger than the limit you place on a printer. Instead, it will queue as much of the file up to the limit, which will then get printed. The rest will be discarded. Whether this is correct behavior is up for debate.
Let us add limits to our example printers rattan and bamboo. Since those artists' PostScript files tend to be large, we will limit them to five megabytes. We will put no limit on the plain text line printer:
#
# /etc/printcap for host rose
#
#
# No limit on job size:
#
rattan|line|diablo|lp|Diablo 630 Line Printer:\
:sh:mx#0:sd=/var/spool/lpd/rattan:\
:lp=/dev/lpt0:\
:if=/usr/local/libexec/if-simple:
#
# Limit of five megabytes:
#
bamboo|ps|PS|S|panasonic|Panasonic KX-P4455 PostScript v51.4:\
:sh:sd=/var/spool/lpd/bamboo:sc:rg=artists:mx#5000:\
:lp=/dev/ttyd5:ms#-parenb cs8 clocal crtscts:rw:\
:if=/usr/local/libexec/psif:\
:df=/usr/local/libexec/psdf:
Again, the limits apply to the local users only. If you have set up access to your printers remotely, remote users will not get those limits. You will need to specify the mx capability in the remote /etc/printcap files as well. See section Printers Installed on Remote Hosts for more information on remote printing.
There is another specialized way to limit job sizes from remote printers; see section Restricting Jobs from Remote Printers.
11.4.4.4 Restricting Jobs from Remote Printers
The LPD spooling system provides several ways to restrict print jobs submitted from remote hosts:
- Host restrictions
-
You can control from which remote hosts a local LPD accepts requests with the files /etc/hosts.equiv and /etc/hosts.lpd. LPD checks to see if an incoming request is from a host listed in either one of these files. If not, LPD refuses the request.
The format of these files is simple: one host name per line. Note that the file /etc/hosts.equiv is also used by the ruserok(3) protocol, and affects programs like rsh(1) and rcp(1), so be careful.
For example, here is the /etc/hosts.lpd file on the host rose:
orchid violet madrigal.fishbaum.de
This means rose will accept requests from the hosts orchid, violet, and madrigal.fishbaum.de. If any other host tries to access rose's LPD, the job will be refused.
- Size restrictions
-
You can control how much free space there needs to remain on the filesystem where a spooling directory resides. Make a file called minfree in the spooling directory for the local printer. Insert in that file a number representing how many disk blocks (512 bytes) of free space there has to be for a remote job to be accepted.
This lets you insure that remote users will not fill your filesystem. You can also use it to give a certain priority to local users: they will be able to queue jobs long after the free disk space has fallen below the amount specified in the minfree file.
For example, let us add a minfree file for the printer bamboo. We examine /etc/printcap to find the spooling directory for this printer; here is bamboo's entry:
bamboo|ps|PS|S|panasonic|Panasonic KX-P4455 PostScript v51.4:\ :sh:sd=/var/spool/lpd/bamboo:sc:rg=artists:mx#5000:\ :lp=/dev/ttyd5:ms#-parenb cs8 clocal crtscts:rw:mx#5000:\ :if=/usr/local/libexec/psif:\ :df=/usr/local/libexec/psdf:The spooling directory is given in the sd capability. We will make three megabytes (which is 6144 disk blocks) the amount of free disk space that must exist on the filesystem for LPD to accept remote jobs:
# echo 6144 > /var/spool/lpd/bamboo/minfree - User restrictions
-
You can control which remote users can print to local printers by specifying the rs capability in /etc/printcap. When rs appears in the entry for a locally-attached printer, LPD will accept jobs from remote hosts if the user submitting the job also has an account of the same login name on the local host. Otherwise, LPD refuses the job.
This capability is particularly useful in an environment where there are (for example) different departments sharing a network, and some users transcend departmental boundaries. By giving them accounts on your systems, they can use your printers from their own departmental systems. If you would rather allow them to use only your printers and not your computer resources, you can give them ``token'' accounts, with no home directory and a useless shell like /usr/bin/false.
11.4.5 Accounting for Printer Usage
So, you need to charge for printouts. And why not? Paper and ink cost money. And then there are maintenance costs--printers are loaded with moving parts and tend to break down. You have examined your printers, usage patterns, and maintenance fees and have come up with a per-page (or per-foot, per-meter, or per-whatever) cost. Now, how do you actually start accounting for printouts?
Well, the bad news is the LPD spooling system does not provide much help in this department. Accounting is highly dependent on the kind of printer in use, the formats being printed, and your requirements in charging for printer usage.
To implement accounting, you have to modify a printer's text filter (to charge for plain text jobs) and the conversion filters (to charge for other file formats), to count pages or query the printer for pages printed. You cannot get away with using the simple output filter, since it cannot do accounting. See section Filters.
Generally, there are two ways to do accounting:
-
Periodic accounting is the more common way, possibly because it is easier. Whenever someone prints a job, the filter logs the user, host, and number of pages to an accounting file. Every month, semester, year, or whatever time period you prefer, you collect the accounting files for the various printers, tally up the pages printed by users, and charge for usage. Then you truncate all the logging files, starting with a clean slate for the next period.
-
Timely accounting is less common, probably because it is more difficult. This method has the filters charge users for printouts as soon as they use the printers. Like disk quotas, the accounting is immediate. You can prevent users from printing when their account goes in the red, and might provide a way for users to check and adjust their ``print quotas.'' But this method requires some database code to track users and their quotas.
The LPD spooling system supports both methods easily: since you have to provide the filters (well, most of the time), you also have to provide the accounting code. But there is a bright side: you have enormous flexibility in your accounting methods. For example, you choose whether to use periodic or timely accounting. You choose what information to log: user names, host names, job types, pages printed, square footage of paper used, how long the job took to print, and so forth. And you do so by modifying the filters to save this information.
11.4.5.1 Quick and Dirty Printer Accounting
FreeBSD comes with two programs that can get you set up with simple periodic accounting right away. They are the text filter lpf, described in section lpf: a Text Filter, and pac(8), a program to gather and total entries from printer accounting files.
As mentioned in the section on filters (Filters), LPD starts the text and the conversion filters with the name of the accounting file to use on the filter command line. The filters can use this argument to know where to write an accounting file entry. The name of this file comes from the af capability in /etc/printcap, and if not specified as an absolute path, is relative to the spooling directory.
LPD starts lpf with page width and length arguments (from the pw and pl capabilities). lpf uses these arguments to determine how much paper will be used. After sending the file to the printer, it then writes an accounting entry in the accounting file. The entries look like this:
2.00 rose:andy 3.00 rose:kelly 3.00 orchid:mary 5.00 orchid:mary 2.00 orchid:zhang
You should use a separate accounting file for each printer, as lpf has no file locking logic built into it, and two lpfs might corrupt each other's entries if they were to write to the same file at the same time. An easy way to insure a separate accounting file for each printer is to use af=acct in /etc/printcap. Then, each accounting file will be in the spooling directory for a printer, in a file named acct.
When you are ready to charge users for printouts, run the pac(8) program. Just change to the spooling directory for the printer you want to collect on and type pac. You will get a dollar-centric summary like the following:
Login pages/feet runs price orchid:kelly 5.00 1 $ 0.10 orchid:mary 31.00 3 $ 0.62 orchid:zhang 9.00 1 $ 0.18 rose:andy 2.00 1 $ 0.04 rose:kelly 177.00 104 $ 3.54 rose:mary 87.00 32 $ 1.74 rose:root 26.00 12 $ 0.52 total 337.00 154 $ 6.74
These are the arguments pac(8) expects:
- -Pprinter
-
Which printer to summarize. This option works only if there is an absolute path in the af capability in /etc/printcap.
- -c
-
Sort the output by cost instead of alphabetically by user name.
- -m
-
Ignore host name in the accounting files. With this option, user smith on host alpha is the same user smith on host gamma. Without, they are different users.
- -pprice
-
Compute charges with price dollars per page or per foot instead of the price from the pc capability in /etc/printcap, or two cents (the default). You can specify price as a floating point number.
- -r
-
Reverse the sort order.
- -s
-
Make an accounting summary file and truncate the accounting file.
- name ...
-
Print accounting information for the given user names only.
In the default summary that pac(8) produces, you see the number of pages printed by each user from various hosts. If, at your site, host does not matter (because users can use any host), run pac -m, to produce the following summary:
Login pages/feet runs price andy 2.00 1 $ 0.04 kelly 182.00 105 $ 3.64 mary 118.00 35 $ 2.36 root 26.00 12 $ 0.52 zhang 9.00 1 $ 0.18 total 337.00 154 $ 6.74
To compute the dollar amount due, pac(8) uses the pc capability in the /etc/printcap file (default of 200, or 2 cents per page). Specify, in hundredths of cents, the price per page or per foot you want to charge for printouts in this capability. You can override this value when you run pac(8) with the -p option. The units for the -p option are in dollars, though, not hundredths of cents. For example,
# pac -p1.50makes each page cost one dollar and fifty cents. You can really rake in the profits by using this option.
Finally, running pac -s will save the summary information in a summary accounting file, which is named the same as the printer's accounting file, but with _sum appended to the name. It then truncates the accounting file. When you run pac(8) again, it rereads the summary file to get starting totals, then adds information from the regular accounting file.
11.4.5.2 How Can You Count Pages Printed?
In order to perform even remotely accurate accounting, you need to be able to determine how much paper a job uses. This is the essential problem of printer accounting.
For plain text jobs, the problem is not that hard to solve: you count how many lines are in a job and compare it to how many lines per page your printer supports. Do not forget to take into account backspaces in the file which overprint lines, or long logical lines that wrap onto one or more additional physical lines.
The text filter lpf (introduced in lpf: a Text Filter) takes into account these things when it does accounting. If you are writing a text filter which needs to do accounting, you might want to examine lpf's source code.
How do you handle other file formats, though?
Well, for DVI-to-LaserJet or DVI-to-PostScript conversion, you can have your filter parse the diagnostic output of dvilj or dvips and look to see how many pages were converted. You might be able to do similar things with other file formats and conversion programs.
But these methods suffer from the fact that the printer may not actually print all those pages. For example, it could jam, run out of toner, or explode--and the user would still get charged.
So, what can you do?
There is only one sure way to do accurate accounting. Get a printer that can tell you how much paper it uses, and attach it via a serial line or a network connection. Nearly all PostScript printers support this notion. Other makes and models do as well (networked Imagen laser printers, for example). Modify the filters for these printers to get the page usage after they print each job and have them log accounting information based on that value only. There is no line counting nor error-prone file examination required.
Of course, you can always be generous and make all printouts free.
11.5 Using Printers
This section tells you how to use printers you have setup with FreeBSD. Here is an overview of the user-level commands:
There is also an administrative command, lpc(8), described in the section Administering the LPD Spooler, used to control printers and their queues.
All three of the commands lpr(1), lprm(1), and lpq(1) accept an option -P printer-name to specify on which printer/queue to operate, as listed in the /etc/printcap file. This enables you to submit, remove, and check on jobs for various printers. If you do not use the -P option, then these commands use the printer specified in the PRINTER environment variable. Finally, if you do not have a PRINTER environment variable, these commands default to the printer named lp.
Hereafter, the terminology default printer means the printer named in the PRINTER environment variable, or the printer named lp when there is no PRINTER environment variable.
11.5.1 Printing Jobs
To print files, type:
% lpr filename ...
This prints each of the listed files to the default printer. If you list no files, lpr(1) reads data to print from standard input. For example, this command prints some important system files:
% lpr /etc/host.conf /etc/hosts.equiv
To select a specific printer, type:
% lpr -P printer-name filename ...
This example prints a long listing of the current directory to the printer named rattan:
% ls -l | lpr -P rattan
Because no files were listed for the lpr(1) command, lpr read the data to print from standard input, which was the output of the ls -l command.
The lpr(1) command can also accept a wide variety of options to control formatting, apply file conversions, generate multiple copies, and so forth. For more information, see the section Printing Options.
11.5.2 Checking Jobs
When you print with lpr(1), the data you wish to print is put together in a package called a ``print job'', which is sent to the LPD spooling system. Each printer has a queue of jobs, and your job waits in that queue along with other jobs from yourself and from other users. The printer prints those jobs in a first-come, first-served order.
To display the queue for the default printer, type lpq(1). For a specific printer, use the -P option. For example, the command
% lpq -P bambooshows the queue for the printer named bamboo. Here is an example of the output of the lpq command:
bamboo is ready and printing Rank Owner Job Files Total Size active kelly 9 /etc/host.conf, /etc/hosts.equiv 88 bytes 2nd kelly 10 (standard input) 1635 bytes 3rd mary 11 ... 78519 bytes
This shows three jobs in the queue for bamboo. The first job, submitted by user kelly, got assigned ``job number'' 9. Every job for a printer gets a unique job number. Most of the time you can ignore the job number, but you will need it if you want to cancel the job; see section Removing Jobs for details.
Job number nine consists of two files; multiple files given on the lpr(1) command line are treated as part of a single job. It is the currently active job (note the word active under the ``Rank'' column), which means the printer should be currently printing that job. The second job consists of data passed as the standard input to the lpr(1) command. The third job came from user mary; it is a much larger job. The pathname of the file she is trying to print is too long to fit, so the lpq(1) command just shows three dots.
The very first line of the output from lpq(1) is also useful: it tells what the printer is currently doing (or at least what LPD thinks the printer is doing).
The lpq(1) command also support a -l option to generate a detailed long listing. Here is an example of lpq -l:
waiting for bamboo to become ready (offline ?)
kelly: 1st [job 009rose]
/etc/host.conf 73 bytes
/etc/hosts.equiv 15 bytes
kelly: 2nd [job 010rose]
(standard input) 1635 bytes
mary: 3rd [job 011rose]
/home/orchid/mary/research/venus/alpha-regio/mapping 78519 bytes
11.5.3 Removing Jobs
If you change your mind about printing a job, you can remove the job from the queue with the lprm(1) command. Often, you can even use lprm(1) to remove an active job, but some or all of the job might still get printed.
To remove a job from the default printer, first use lpq(1) to find the job number. Then type:
% lprm job-number
To remove the job from a specific printer, add the -P option. The following command removes job number 10 from the queue for the printer bamboo:
% lprm -P bamboo 10
The lprm(1) command has a few shortcuts:
- lprm -
-
Removes all jobs (for the default printer) belonging to you.
- lprm user
-
Removes all jobs (for the default printer) belonging to user. The superuser can remove other users' jobs; you can remove only your own jobs.
- lprm
-
With no job number, user name, or - appearing on the command line, lprm(1) removes the currently active job on the default printer, if it belongs to you. The superuser can remove any active job.
Just use the -P option with the above shortcuts to operate on a specific printer instead of the default. For example, the following command removes all jobs for the current user in the queue for the printer named rattan:
% lprm -P rattan -
Note: If you are working in a networked environment, lprm(1) will let you remove jobs only from the host from which the jobs were submitted, even if the same printer is available from other hosts. The following command sequence demonstrates this:
% lpr -P rattan myfile % rlogin orchid % lpq -P rattan Rank Owner Job Files Total Size active seeyan 12 ... 49123 bytes 2nd kelly 13 myfile 12 bytes % lprm -P rattan 13 rose: Permission denied % logout % lprm -P rattan 13 dfA013rose dequeued cfA013rose dequeued
11.5.4 Beyond Plain Text: Printing Options
The lpr(1) command supports a number of options that control formatting text, converting graphic and other file formats, producing multiple copies, handling of the job, and more. This section describes the options.
11.5.4.1 Formatting and Conversion Options
The following lpr(1) options control formatting of the files in the job. Use these options if the job does not contain plain text or if you want plain text formatted through the pr(1) utility.
For example, the following command prints a DVI file (from the TeX typesetting system) named fish-report.dvi to the printer named bamboo:
% lpr -P bamboo -d fish-report.dvi
These options apply to every file in the job, so you cannot mix (say) DVI and ditroff files together in a job. Instead, submit the files as separate jobs, using a different conversion option for each job.
Note: All of these options except -p and -T require conversion filters installed for the destination printer. For example, the -d option requires the DVI conversion filter. Section Conversion Filters gives details.
- -c
-
Print cifplot files.
- -d
-
Print DVI files.
- -f
-
Print FORTRAN text files.
- -g
-
Print plot data.
- -i number
-
Indent the output by number columns; if you omit number, indent by 8 columns. This option works only with certain conversion filters.
Note: Do not put any space between the -i and the number.
- -l
-
Print literal text data, including control characters.
- -n
-
Print ditroff (device independent troff) data.
- -p
-
Format plain text with pr(1) before printing. See pr(1) for more information.
- -T title
-
Use title on the pr(1) header instead of the file name. This option has effect only when used with the -p option.
- -t
-
Print troff data.
- -v
-
Print raster data.
Here is an example: this command prints a nicely formatted version of the ls(1) manual page on the default printer:
% zcat /usr/share/man/man1/ls.1.gz | troff -t -man | lpr -t
The zcat(1) command uncompresses the source of the ls(1) manual page and passes it to the troff(1) command, which formats that source and makes GNU troff output and passes it to lpr(1), which submits the job to the LPD spooler. Because we used the -t option to lpr(1), the spooler will convert the GNU troff output into a format the default printer can understand when it prints the job.
11.5.4.2 Job Handling Options
The following options to lpr(1) tell LPD to handle the job specially:
- -# copies
-
Produce a number of copies of each file in the job instead of just one copy. An administrator may disable this option to reduce printer wear-and-tear and encourage photocopier usage. See section Restricting Multiple Copies.
This example prints three copies of parser.c followed by three copies of parser.h to the default printer:
% lpr -#3 parser.c parser.h
- -m
-
Send mail after completing the print job. With this option, the LPD system will send mail to your account when it finishes handling your job. In its message, it will tell you if the job completed successfully or if there was an error, and (often) what the error was.
- -s
-
Do not copy the files to the spooling directory, but make symbolic links to them instead.
If you are printing a large job, you probably want to use this option. It saves space in the spooling directory (your job might overflow the free space on the filesystem where the spooling directory resides). It saves time as well since LPD will not have to copy each and every byte of your job to the spooling directory.
There is a drawback, though: since LPD will refer to the original files directly, you cannot modify or remove them until they have been printed.
Note: If you are printing to a remote printer, LPD will eventually have to copy files from the local host to the remote host, so the -s option will save space only on the local spooling directory, not the remote. It is still useful, though.
- -r
-
Remove the files in the job after copying them to the spooling directory, or after printing them with the -s option. Be careful with this option!
11.5.4.3 Header Page Options
These options to lpr(1) adjust the text that normally appears on a job's header page. If header pages are suppressed for the destination printer, these options have no effect. See section Header Pages for information about setting up header pages.
- -C text
-
Replace the hostname on the header page with text. The hostname is normally the name of the host from which the job was submitted.
- -J text
-
Replace the job name on the header page with text. The job name is normally the name of the first file of the job, or stdin if you are printing standard input.
- -h
-
Do not print any header page.
Note: At some sites, this option may have no effect due to the way header pages are generated. See Header Pages for details.
11.5.5 Administering Printers
As an administrator for your printers, you have had to install, set up, and test them. Using the lpc(8) command, you can interact with your printers in yet more ways. With lpc(8), you can
-
Start and stop the printers
-
Enable and disable their queues
-
Rearrange the order of the jobs in each queue.
First, a note about terminology: if a printer is stopped, it will not print anything in its queue. Users can still submit jobs, which will wait in the queue until the printer is started or the queue is cleared.
If a queue is disabled, no user (except root) can submit jobs for the printer. An enabled queue allows jobs to be submitted. A printer can be started for a disabled queue, in which case it will continue to print jobs in the queue until the queue is empty.
In general, you have to have root privileges to use the lpc(8) command. Ordinary users can use the lpc(8) command to get printer status and to restart a hung printer only.
Here is a summary of the lpc(8) commands. Most of the commands take a printer-name argument to tell on which printer to operate. You can use all for the printer-name to mean all printers listed in /etc/printcap.
- abort printer-name
-
Cancel the current job and stop the printer. Users can still submit jobs if the queue is enabled.
- clean printer-name
-
Remove old files from the printer's spooling directory. Occasionally, the files that make up a job are not properly removed by LPD, particularly if there have been errors during printing or a lot of administrative activity. This command finds files that do not belong in the spooling directory and removes them.
- disable printer-name
-
Disable queuing of new jobs. If the printer is running, it will continue to print any jobs remaining in the queue. The superuser (root) can always submit jobs, even to a disabled queue.
This command is useful while you are testing a new printer or filter installation: disable the queue and submit jobs as root. Other users will not be able to submit jobs until you complete your testing and re-enable the queue with the enable command.
- down printer-name message
-
Take a printer down. Equivalent to disable followed by stop. The message appears as the printer's status whenever a user checks the printer's queue with lpq(1) or status with lpc status.
- enable printer-name
-
Enable the queue for a printer. Users can submit jobs but the printer will not print anything until it is started.
- help command-name
-
Print help on the command command-name. With no command-name, print a summary of the commands available.
- restart printer-name
-
Start the printer. Ordinary users can use this command if some extraordinary circumstance hangs LPD, but they cannot start a printer stopped with either the stop or down commands. The restart command is equivalent to abort followed by start.
- start printer-name
-
Start the printer. The printer will print jobs in its queue.
- stop printer-name
-
Stop the printer. The printer will finish the current job and will not print anything else in its queue. Even though the printer is stopped, users can still submit jobs to an enabled queue.
- topq printer-name job-or-username
-
Rearrange the queue for printer-name by placing the jobs with the listed job numbers or the jobs belonging to username at the top of the queue. For this command, you cannot use all as the printer-name.
- up printer-name
-
Bring a printer up; the opposite of the down command. Equivalent to start followed by enable.
lpc(8) accepts the above commands on the command line. If you do not enter any commands, lpc(8) enters an interactive mode, where you can enter commands until you type exit, quit, or end-of-file.
11.6 Alternatives to the Standard Spooler
If you have been reading straight through this manual, by now you have learned just about everything there is to know about the LPD spooling system that comes with FreeBSD. You can probably appreciate many of its shortcomings, which naturally leads to the question: ``What other spooling systems are out there (and work with FreeBSD)?''
- LPRng
-
LPRng, which purportedly means ``LPR: the Next Generation'' is a complete rewrite of PLP. Patrick Powell and Justin Mason (the principal maintainer of PLP) collaborated to make LPRng. The main site for LPRng is http://www.astart.com/lprng/LPRng.html.
11.7 Troubleshooting
After performing the simple test with lptest(1), you might have gotten one of the following results instead of the correct printout:
- It worked, after awhile; or, it did not eject a full sheet.
-
The printer printed the above, but it sat for awhile and did nothing. In fact, you might have needed to press a PRINT REMAINING or FORM FEED button on the printer to get any results to appear.
If this is the case, the printer was probably waiting to see if there was any more data for your job before it printed anything. To fix this problem, you can have the text filter send a FORM FEED character (or whatever is necessary) to the printer. This is usually sufficient to have the printer immediately print any text remaining in its internal buffer. It is also useful to make sure each print job ends on a full sheet, so the next job does not start somewhere on the middle of the last page of the previous job.
The following replacement for the shell script /usr/local/libexec/if-simple prints a form feed after it sends the job to the printer:
#!/bin/sh # # if-simple - Simple text input filter for lpd # Installed in /usr/local/libexec/if-simple # # Simply copies stdin to stdout. Ignores all filter arguments. # Writes a form feed character (\f) after printing job. /bin/cat && printf "\f" && exit 0 exit 2
- It produced the ``staircase effect.''
-
You got the following on paper:
!"#$%&'()*+,-./01234 "#$%&'()*+,-./012345 #$%&'()*+,-./0123456You have become another victim of the staircase effect, caused by conflicting interpretations of what characters should indicate a new line. UNIX style operating systems use a single character: ASCII code 10, the line feed (LF). MS-DOS, OS/2®, and others uses a pair of characters, ASCII code 10 and ASCII code 13 (the carriage return or CR). Many printers use the MS-DOS convention for representing new-lines.
When you print with FreeBSD, your text used just the line feed character. The printer, upon seeing a line feed character, advanced the paper one line, but maintained the same horizontal position on the page for the next character to print. That is what the carriage return is for: to move the location of the next character to print to the left edge of the paper.
Here is what FreeBSD wants your printer to do:
Here are some ways to achieve this:
-
Use the printer's configuration switches or control panel to alter its interpretation of these characters. Check your printer's manual to find out how to do this.
Note: If you boot your system into other operating systems besides FreeBSD, you may have to reconfigure the printer to use a an interpretation for CR and LF characters that those other operating systems use. You might prefer one of the other solutions, below.
-
Have FreeBSD's serial line driver automatically convert LF to CR+LF. Of course, this works with printers on serial ports only. To enable this feature, use the ms# capability and set the onlcr mode in the /etc/printcap file for the printer.
-
Send an escape code to the printer to have it temporarily treat LF characters differently. Consult your printer's manual for escape codes that your printer might support. When you find the proper escape code, modify the text filter to send the code first, then send the print job.
Here is an example text filter for printers that understand the Hewlett-Packard PCL escape codes. This filter makes the printer treat LF characters as a LF and CR; then it sends the job; then it sends a form feed to eject the last page of the job. It should work with nearly all Hewlett Packard printers.
#!/bin/sh # # hpif - Simple text input filter for lpd for HP-PCL based printers # Installed in /usr/local/libexec/hpif # # Simply copies stdin to stdout. Ignores all filter arguments. # Tells printer to treat LF as CR+LF. Ejects the page when done. printf "\033&k2G" && cat && printf "\033&l0H" && exit 0 exit 2
Here is an example /etc/printcap from a host called orchid. It has a single printer attached to its first parallel port, a Hewlett Packard LaserJet 3Si named teak. It is using the above script as its text filter:
# # /etc/printcap for host orchid # teak|hp|laserjet|Hewlett Packard LaserJet 3Si:\ :lp=/dev/lpt0:sh:sd=/var/spool/lpd/teak:mx#0:\ :if=/usr/local/libexec/hpif:
-
- It overprinted each line.
-
The printer never advanced a line. All of the lines of text were printed on top of each other on one line.
This problem is the ``opposite'' of the staircase effect, described above, and is much rarer. Somewhere, the LF characters that FreeBSD uses to end a line are being treated as CR characters to return the print location to the left edge of the paper, but not also down a line.
Use the printer's configuration switches or control panel to enforce the following interpretation of LF and CR characters:
- The printer lost characters.
-
While printing, the printer did not print a few characters in each line. The problem might have gotten worse as the printer ran, losing more and more characters.
The problem is that the printer cannot keep up with the speed at which the computer sends data over a serial line (this problem should not occur with printers on parallel ports). There are two ways to overcome the problem:
-
If the printer supports XON/XOFF flow control, have FreeBSD use it by specifying the ixon mode in the ms# capability.
-
If the printer supports carrier flow control, specify the crtscts mode in the ms# capability. Make sure the cable connecting the printer to the computer is correctly wired for carrier flow control.
-
- It printed garbage.
-
The printer printed what appeared to be random garbage, but not the desired text.
This is usually another symptom of incorrect communications parameters with a serial printer. Double-check the bps rate in the br capability, and the parity setting in the ms# capability; make sure the printer is using the same settings as specified in the /etc/printcap file.
- Nothing happened.
-
If nothing happened, the problem is probably within FreeBSD and not the hardware. Add the log file (lf) capability to the entry for the printer you are debugging in the /etc/printcap file. For example, here is the entry for rattan, with the lf capability:
rattan|line|diablo|lp|Diablo 630 Line Printer:\ :sh:sd=/var/spool/lpd/rattan:\ :lp=/dev/lpt0:\ :if=/usr/local/libexec/if-simple:\ :lf=/var/log/rattan.logThen, try printing again. Check the log file (in our example, /var/log/rattan.log) to see any error messages that might appear. Based on the messages you see, try to correct the problem.
If you do not specify a lf capability, LPD uses /dev/console as a default.
Chapter 12 Storage
12.1 Synopsis
This chapter covers the use of disks in FreeBSD. This includes memory-backed disks, network-attached disks, and standard SCSI/IDE storage devices.
After reading this chapter, you will know:
-
The terminology FreeBSD uses to describe the organization of data on a physical disk (partitions and slices).
-
How to add additional hard disks to your system.
-
How to setup virtual file systems, such as memory disks.
-
How to use quotas to limit disk space usage.
-
How to encrypt disks to secure them against attackers.
-
How to create and burn CDs and DVDs on FreeBSD.
-
The various storage media options for backups.
-
How to use backup programs available under FreeBSD.
-
How to backup to floppy disks.
-
What snapshots are and how to use them efficiently.
12.2 Device Names
The following is a list of physical storage devices supported in FreeBSD, and the device names associated with them.
Table 12-1. Physical Disk Naming Conventions
| Drive type | Drive device name |
|---|---|
| IDE hard drives | ad |
| IDE CDROM drives | acd |
| SCSI hard drives and USB Mass storage devices | da |
| SCSI CDROM drives | cd |
| Assorted non-standard CDROM drives | mcd for Mitsumi CD-ROM, scd for Sony CD-ROM, matcd for Matsushita/Panasonic CD-ROM [a] |
| Floppy drives | fd |
| SCSI tape drives | sa |
| IDE tape drives | ast |
| Flash drives | fla for DiskOnChip® Flash device |
| RAID drives | aacd for Adaptec® AdvancedRAID, mlxd and mlyd for Mylex®, amrd for AMI MegaRAID®, idad for Compaq Smart RAID, twed for 3ware® RAID. |
| Notes: a. The matcd(4) driver has been removed in FreeBSD 4.X branch since October 5th, 2002 and does not exist in FreeBSD 5.0 and 5.1 releases. However this driver is back in the FreeBSD 5.X branch since June 16th, 2003. |
|
12.3 Adding Disks
Originally contributed by David O'Brien.Lets say we want to add a new SCSI disk to a machine that currently only has a single drive. First turn off the computer and install the drive in the computer following the instructions of the computer, controller, and drive manufacturer. Due to the wide variations of procedures to do this, the details are beyond the scope of this document.
Login as user root. After you have installed the drive, inspect /var/run/dmesg.boot to ensure the new disk was found. Continuing with our example, the newly added drive will be da1 and we want to mount it on /1 (if you are adding an IDE drive, the device name will be wd1 in pre-4.0 systems, or ad1 in most 4.X systems).
Because FreeBSD runs on IBM-PC compatible computers, it must take into account the PC BIOS partitions. These are different from the traditional BSD partitions. A PC disk has up to four BIOS partition entries. If the disk is going to be truly dedicated to FreeBSD, you can use the dedicated mode. Otherwise, FreeBSD will have to live within one of the PC BIOS partitions. FreeBSD calls the PC BIOS partitions slices so as not to confuse them with traditional BSD partitions. You may also use slices on a disk that is dedicated to FreeBSD, but used in a computer that also has another operating system installed. This is to not confuse the fdisk utility of the other operating system.
In the slice case the drive will be added as /dev/da1s1e. This is read as: SCSI disk, unit number 1 (second SCSI disk), slice 1 (PC BIOS partition 1), and e BSD partition. In the dedicated case, the drive will be added simply as /dev/da1e.
12.3.1 Using sysinstall(8)
-
Navigating Sysinstall
You may use /stand/sysinstall to partition and label a new disk using its easy to use menus. Either login as user root or use the su command. Run /stand/sysinstall and enter the Configure menu. Within the FreeBSD Configuration Menu, scroll down and select the Fdisk option.
-
fdisk Partition Editor
Once inside fdisk, we can type A to use the entire disk for FreeBSD. When asked if you want to ``remain cooperative with any future possible operating systems'', answer YES. Write the changes to the disk using W. Now exit the FDISK editor by typing q. Next you will be asked about the Master Boot Record. Since you are adding a disk to an already running system, choose None.
-
Disk Label Editor
Next, you need to exit sysinstall and start it again. Follow the directions above, although this time choose the Label option. This will enter the Disk Label Editor. This is where you will create the traditional BSD partitions. A disk can have up to eight partitions, labeled a-h. A few of the partition labels have special uses. The a partition is used for the root partition (/). Thus only your system disk (e.g, the disk you boot from) should have an a partition. The b partition is used for swap partitions, and you may have many disks with swap partitions. The c partition addresses the entire disk in dedicated mode, or the entire FreeBSD slice in slice mode. The other partitions are for general use.
sysinstall's Label editor favors the e partition for non-root, non-swap partitions. Within the Label editor, create a single file system by typing C. When prompted if this will be a FS (file system) or swap, choose FS and type in a mount point (e.g, /mnt). When adding a disk in post-install mode, sysinstall will not create entries in /etc/fstab for you, so the mount point you specify is not important.
You are now ready to write the new label to the disk and create a file system on it. Do this by typing W. Ignore any errors from sysinstall that it could not mount the new partition. Exit the Label Editor and sysinstall completely.
-
Finish
The last step is to edit /etc/fstab to add an entry for your new disk.
12.3.2 Using Command Line Utilities
12.3.2.1 Using Slices
This setup will allow your disk to work correctly with other operating systems that might be installed on your computer and will not confuse other operating systems' fdisk utilities. It is recommended to use this method for new disk installs. Only use dedicated mode if you have a good reason to do so!
# dd if=/dev/zero of=/dev/da1 bs=1k count=1 # fdisk -BI da1 #Initialize your new disk # disklabel -B -w -r da1s1 auto #Label it. # disklabel -e da1s1 # Edit the disklabel just created and add any partitions. # mkdir -p /1 # newfs /dev/da1s1e # Repeat this for every partition you created. # mount /dev/da1s1e /1 # Mount the partition(s) # vi /etc/fstab # Add the appropriate entry/entries to your /etc/fstab.
If you have an IDE disk, substitute ad for da. On pre-4.X systems use wd.
12.3.2.2 Dedicated
If you will not be sharing the new drive with another operating system, you may use the dedicated mode. Remember this mode can confuse Microsoft operating systems; however, no damage will be done by them. IBM's OS/2 however, will ``appropriate'' any partition it finds which it does not understand.
# dd if=/dev/zero of=/dev/da1 bs=1k count=1 # disklabel -Brw da1 auto # disklabel -e da1 # create the `e' partition # newfs -d0 /dev/da1e # mkdir -p /1 # vi /etc/fstab # add an entry for /dev/da1e # mount /1
An alternate method is:
# dd if=/dev/zero of=/dev/da1 count=2 # disklabel /dev/da1 | disklabel -BrR da1 /dev/stdin # newfs /dev/da1e # mkdir -p /1 # vi /etc/fstab # add an entry for /dev/da1e # mount /1
Note: Since FreeBSD 5.1-RELEASE, the bsdlabel(8) utility replaces the old disklabel(8) program. With bsdlabel(8) a number of obsolete options and parameters have been retired; in the examples above the option -r should be removed with bsdlabel(8). For more information, please refer to the bsdlabel(8) manual page.
12.4 RAID
12.4.1 Software RAID
12.4.1.1 Concatenated Disk Driver (CCD) Configuration
Original work by Christopher Shumway. Revised by Jim Brown.When choosing a mass storage solution the most important factors to consider are speed, reliability, and cost. It is rare to have all three in balance; normally a fast, reliable mass storage device is expensive, and to cut back on cost either speed or reliability must be sacrificed.
In designing the system described below, cost was chosen as the most important factor, followed by speed, then reliability. Data transfer speed for this system is ultimately constrained by the network. And while reliability is very important, the CCD drive described below serves online data that is already fully backed up on CD-R's and can easily be replaced.
Defining your own requirements is the first step in choosing a mass storage solution. If your requirements prefer speed or reliability over cost, your solution will differ from the system described in this section.
12.4.1.1.1 Installing the Hardware
In addition to the IDE system disk, three Western Digital 30GB, 5400 RPM IDE disks form the core of the CCD disk described below providing approximately 90GB of online storage. Ideally, each IDE disk would have its own IDE controller and cable, but to minimize cost, additional IDE controllers were not used. Instead the disks were configured with jumpers so that each IDE controller has one master, and one slave.
Upon reboot, the system BIOS was configured to automatically detect the disks attached. More importantly, FreeBSD detected them on reboot:
ad0: 19574MB <WDC WD205BA> [39770/16/63] at ata0-master UDMA33 ad1: 29333MB <WDC WD307AA> [59598/16/63] at ata0-slave UDMA33 ad2: 29333MB <WDC WD307AA> [59598/16/63] at ata1-master UDMA33 ad3: 29333MB <WDC WD307AA> [59598/16/63] at ata1-slave UDMA33
Note: If FreeBSD does not detect all the disks, ensure that you have jumpered them correctly. Most IDE drives also have a ``Cable Select'' jumper. This is not the jumper for the master/slave relationship. Consult the drive documentation for help in identifying the correct jumper.
Next, consider how to attach them as part of the file system. You should research both vinum(8) (Chapter 13) and ccd(4). In this particular configuration, ccd(4) was chosen.
12.4.1.1.2 Setting Up the CCD
The driver ccd(4) allows you to take several identical disks and concatenate them into one logical file system. In order to use ccd(4), you need a kernel with ccd(4) support built in. Add this line to your kernel configuration file, rebuild, and reinstall the kernel:
pseudo-device ccd 4
On 5.X systems, you have to use instead the following line:
device ccd
Note: In FreeBSD 5.X, it is not necessary to specify a number of ccd(4) devices, as the ccd(4) device driver is now self-cloning -- new device instances will automatically be created on demand.
The ccd(4) support can also be loaded as a kernel loadable module in FreeBSD 3.0 or later.
To set up ccd(4), you must first use disklabel(8) to label the disks:
disklabel -r -w ad1 auto disklabel -r -w ad2 auto disklabel -r -w ad3 auto
This creates a disklabel for ad1c, ad2c and ad3c that spans the entire disk.
Note: Since FreeBSD 5.1-RELEASE, the bsdlabel(8) utility replaces the old disklabel(8) program. With bsdlabel(8) a number of obsolete options and parameters have been retired; in the examples above the option -r should be removed. For more information, please refer to the bsdlabel(8) manual page.
The next step is to change the disk label type. You can use disklabel(8) to edit the disks:
disklabel -e ad1 disklabel -e ad2 disklabel -e ad3
This opens up the current disk label on each disk with the editor specified by the EDITOR environment variable, typically vi(1).
An unmodified disk label will look something like this:
8 partitions: # size offset fstype [fsize bsize bps/cpg] c: 60074784 0 unused 0 0 0 # (Cyl. 0 - 59597)
Add a new e partition for ccd(4) to use. This can usually be copied from the c partition, but the fstype must be 4.2BSD. The disk label should now look something like this:
8 partitions: # size offset fstype [fsize bsize bps/cpg] c: 60074784 0 unused 0 0 0 # (Cyl. 0 - 59597) e: 60074784 0 4.2BSD 0 0 0 # (Cyl. 0 - 59597)
12.4.1.1.3 Building the File System
The device node for ccd0c may not exist yet, so to create it, perform the following commands:
cd /dev sh MAKEDEV ccd0
Note: In FreeBSD 5.0, devfs(5) will automatically manage device nodes in /dev, so use of MAKEDEV is not necessary.
Now that you have all of the disks labeled, you must build the ccd(4). To do that, use ccdconfig(8), with options similar to the following:
ccdconfig ccd0
The use and meaning of each option is shown below:
- The first argument is the device to configure, in this case, /dev/ccd0c. The /dev/ portion is optional.
- The interleave for the file system. The interleave defines the size of a stripe in disk blocks, each normally 512 bytes. So, an interleave of 32 would be 16,384 bytes.
- Flags for ccdconfig(8). If you want to enable drive mirroring, you can specify a flag here. This configuration does not provide mirroring for ccd(4), so it is set at 0 (zero).
- The final arguments to ccdconfig(8) are the devices to place into the array. Use the complete pathname for each device.
After running ccdconfig(8) the ccd(4) is configured. A file system can be installed. Refer to newfs(8) for options, or simply run:
newfs /dev/ccd0c
12.4.1.1.4 Making it All Automatic
Generally, you will want to mount the ccd(4) upon each reboot. To do this, you must configure it first. Write out your current configuration to /etc/ccd.conf using the following command:
ccdconfig -g > /etc/ccd.conf
During reboot, the script /etc/rc runs ccdconfig -C if /etc/ccd.conf exists. This automatically configures the ccd(4) so it can be mounted.
Note: If you are booting into single user mode, before you can mount(8) the ccd(4), you need to issue the following command to configure the array:
ccdconfig -C
To automatically mount the ccd(4), place an entry for the ccd(4) in /etc/fstab so it will be mounted at boot time:
/dev/ccd0c /media ufs rw 2 2
12.4.1.2 The Vinum Volume Manager
The Vinum Volume Manager is a block device driver which implements virtual disk drives. It isolates disk hardware from the block device interface and maps data in ways which result in an increase in flexibility, performance and reliability compared to the traditional slice view of disk storage. vinum(8) implements the RAID-0, RAID-1 and RAID-5 models, both individually and in combination.
See Chapter 13 for more information about vinum(8).
12.4.2 Hardware RAID
FreeBSD also supports a variety of hardware RAID controllers. These devices control a RAID subsystem without the need for FreeBSD specific software to manage the array.
Using an on-card BIOS, the card controls most of the disk operations itself. The following is a brief setup description using a Promise IDE RAID controller. When this card is installed and the system is started up, it displays a prompt requesting information. Follow the instructions to enter the card's setup screen. From here, you have the ability to combine all the attached drives. After doing so, the disk(s) will look like a single drive to FreeBSD. Other RAID levels can be set up accordingly.
12.4.3 Rebuilding ATA RAID1 Arrays
FreeBSD allows you to hot-replace a failed disk in an array. This requires that you catch it before you reboot.
You will probably see something like the following in /var/log/messages or in the dmesg(8) output:
ad6 on monster1 suffered a hard error. ad6: READ command timeout tag=0 serv=0 - resetting ad6: trying fallback to PIO mode ata3: resetting devices .. done ad6: hard error reading fsbn 1116119 of 0-7 (ad6 bn 1116119; cn 1107 tn 4 sn 11) status=59 error=40 ar0: WARNING - mirror lost
Using atacontrol(8), check for further information:
# atacontrol list
ATA channel 0:
Master: no device present
Slave: acd0 <HL-DT-ST CD-ROM GCR-8520B/1.00> ATA/ATAPI rev 0
ATA channel 1:
Master: no device present
Slave: no device present
ATA channel 2:
Master: ad4 <MAXTOR 6L080J4/A93.0500> ATA/ATAPI rev 5
Slave: no device present
ATA channel 3:
Master: ad6 <MAXTOR 6L080J4/A93.0500> ATA/ATAPI rev 5
Slave: no device present
# atacontrol status ar0
ar0: ATA RAID1 subdisks: ad4 ad6 status: DEGRADED
-
You will first need to detach the disk from the array so that you can safely remove it:
# atacontrol detach 3
-
Replace the disk.
-
Reattach the disk as a spare:
# atacontrol attach 3 Master: ad6 <MAXTOR 6L080J4/A93.0500> ATA/ATAPI rev 5 Slave: no device present
-
Rebuild the array:
# atacontrol rebuild ar0
-
The rebuild command hangs until complete. However, it is possible to open another terminal (using Alt+Fn) and check on the progress by issuing the following command:
# dmesg | tail -10 [output removed] ad6: removed from configuration ad6: deleted from ar0 disk1 ad6: inserted into ar0 disk1 as spare # atacontrol status ar0 ar0: ATA RAID1 subdisks: ad4 ad6 status: REBUILDING 0% completed
-
Wait until this operation completes.
12.5 Creating and Using Optical Media (CDs & DVDs)
Contributed by Mike Meyer.12.5.1 Introduction
CDs have a number of features that differentiate them from conventional disks. Initially, they were not writable by the user. They are designed so that they can be read continuously without delays to move the head between tracks. They are also much easier to transport between systems than similarly sized media were at the time.
CDs do have tracks, but this refers to a section of data to be read continuously and not a physical property of the disk. To produce a CD on FreeBSD, you prepare the data files that are going to make up the tracks on the CD, then write the tracks to the CD.
The ISO 9660 file system was designed to deal with these differences. It unfortunately codifies file system limits that were common then. Fortunately, it provides an extension mechanism that allows properly written CDs to exceed those limits while still working with systems that do not support those extensions.
The sysutils/mkisofs program is used to produce a data file containing an ISO 9660 file system. It has options that support various extensions, and is described below. You can install it with the sysutils/mkisofs port.
Which tool to use to burn the CD depends on whether your CD burner is ATAPI or something else. ATAPI CD burners use the burncd program that is part of the base system. SCSI and USB CD burners should use cdrecord from the sysutils/cdrtools port.
burncd has a limited number of supported drives. To find out if a drive is supported, see the CD-R/RW supported drives list.
Note: If you run FreeBSD 5.X, FreeBSD 4.8-RELEASE version or higher, it will be possible to use cdrecord and other tools for SCSI drives on an ATAPI hardware with the ATAPI/CAM module.
12.5.2 mkisofs
sysutils/mkisofs produces an ISO 9660 file system that is an image of a directory tree in the UNIX file system name space. The simplest usage is:
# mkisofs -o imagefile.iso /path/to/tree
This command will create an imagefile.iso containing an ISO 9660 file system that is a copy of the tree at /path/to/tree. In the process, it will map the file names to names that fit the limitations of the standard ISO 9660 file system, and will exclude files that have names uncharacteristic of ISO file systems.
A number of options are available to overcome those restrictions. In particular, -R enables the Rock Ridge extensions common to UNIX systems, -J enables Joliet extensions used by Microsoft systems, and -hfs can be used to create HFS file systems used by Mac OS.
For CDs that are going to be used only on FreeBSD systems, -U can be used to disable all filename restrictions. When used with -R, it produces a file system image that is identical to the FreeBSD tree you started from, though it may violate the ISO 9660 standard in a number of ways.
The last option of general use is -b. This is used to specify the location of the boot image for use in producing an ``El Torito'' bootable CD. This option takes an argument which is the path to a boot image from the top of the tree being written to the CD. So, given that /tmp/myboot holds a bootable FreeBSD system with the boot image in /tmp/myboot/boot/cdboot, you could produce the image of an ISO 9660 file system in /tmp/bootable.iso like so:
# mkisofs -U -R -b boot/cdboot -o /tmp/bootable.iso /tmp/myboot
Having done that, if you have vn (FreeBSD 4.X), or md (FreeBSD 5.X) configured in your kernel, you can mount the file system with:
# vnconfig -e vn0c /tmp/bootable.iso # mount -t cd9660 /dev/vn0c /mnt
for FreeBSD 4.X, and for FreeBSD 5.X:
# mdconfig -a -t vnode -f /tmp/bootable.iso -u 0 # mount -t cd9660 /dev/md0 /mnt
At which point you can verify that /mnt and /tmp/myboot are identical.
There are many other options you can use with sysutils/mkisofs to fine-tune its behavior. In particular: modifications to an ISO 9660 layout and the creation of Joliet and HFS discs. See the mkisofs(8) manual page for details.
12.5.3 burncd
If you have an ATAPI CD burner, you can use the burncd command to burn an ISO image onto a CD. burncd is part of the base system, installed as /usr/sbin/burncd. Usage is very simple, as it has few options:
# burncd -f cddevice data imagefile.iso fixate
Will burn a copy of imagefile.iso on cddevice. The default device is /dev/acd0c. See burncd(8) for options to set the write speed, eject the CD after burning, and write audio data.
12.5.4 cdrecord
If you do not have an ATAPI CD burner, you will have to use cdrecord to burn your CDs. cdrecord is not part of the base system; you must install it from either the port at sysutils/cdrtools or the appropriate package. Changes to the base system can cause binary versions of this program to fail, possibly resulting in a ``coaster''. You should therefore either upgrade the port when you upgrade your system, or if you are tracking -STABLE, upgrade the port when a new version becomes available.
While cdrecord has many options, basic usage is even simpler than burncd. Burning an ISO 9660 image is done with:
# cdrecord dev=device imagefile.iso
The tricky part of using cdrecord is finding the dev to use. To find the proper setting, use the -scanbus flag of cdrecord, which might produce results like this:
# cdrecord -scanbus
Cdrecord 1.9 (i386-unknown-freebsd4.2) Copyright (C) 1995-2000 Jörg Schilling
Using libscg version 'schily-0.1'
scsibus0:
0,0,0 0) 'SEAGATE ' 'ST39236LW ' '0004' Disk
0,1,0 1) 'SEAGATE ' 'ST39173W ' '5958' Disk
0,2,0 2) *
0,3,0 3) 'iomega ' 'jaz 1GB ' 'J.86' Removable Disk
0,4,0 4) 'NEC ' 'CD-ROM DRIVE:466' '1.26' Removable CD-ROM
0,5,0 5) *
0,6,0 6) *
0,7,0 7) *
scsibus1:
1,0,0 100) *
1,1,0 101) *
1,2,0 102) *
1,3,0 103) *
1,4,0 104) *
1,5,0 105) 'YAMAHA ' 'CRW4260 ' '1.0q' Removable CD-ROM
1,6,0 106) 'ARTEC ' 'AM12S ' '1.06' Scanner
1,7,0 107) *
This lists the appropriate dev value for the devices on the list. Locate your CD burner, and use the three numbers separated by commas as the value for dev. In this case, the CRW device is 1,5,0, so the appropriate input would be dev=1,5,0. There are easier ways to specify this value; see cdrecord(1) for details. That is also the place to look for information on writing audio tracks, controlling the speed, and other things.
12.5.5 Duplicating Audio CDs
You can duplicate an audio CD by extracting the audio data from the CD to a series of files, and then writing these files to a blank CD. The process is slightly different for ATAPI and SCSI drives.
SCSI Drives
-
Use cdda2wav to extract the audio.
% cdda2wav -v255 -D2,0 -B -Owav
-
Use cdrecord to write the .wav files.
% cdrecord -v dev=2,0 -dao -useinfo *.wav
Make sure that 2.0 is set appropriately, as described in Section 12.5.4.
ATAPI Drives
-
The ATAPI CD driver makes each track available as /dev/acddtnn, where d is the drive number, and nn is the track number written with two decimal digits, prefixed with zero as needed. So the first track on the first disk is /dev/acd0t01, the second is /dev/acd0t02, the third is /dev/acd0t03, and so on.
Make sure the appropriate files exist in /dev.
# cd /dev # sh MAKEDEV acd0t99
Note: In FreeBSD 5.0, devfs(5) will automatically create and manage entries in /dev for you, so it is not necessary to use MAKEDEV.
-
Extract each track using dd(1). You must also use a specific block size when extracting the files.
# dd if=/dev/acd0t01 of=track1.cdr bs=2352 # dd if=/dev/acd0t02 of=track2.cdr bs=2352 ...
-
Burn the extracted files to disk using burncd. You must specify that these are audio files, and that burncd should fixate the disk when finished.
# burncd -f /dev/acd0c audio track1.cdr track2.cdr ... fixate
12.5.6 Duplicating Data CDs
You can copy a data CD to a image file that is functionally equivalent to the image file created with sysutils/mkisofs, and you can use it to duplicate any data CD. The example given here assumes that your CDROM device is acd0. Substitute your correct CDROM device. A c must be appended to the end of the device name to indicate the entire partition or, in the case of CDROMs, the entire disc.
# dd if=/dev/acd0c of=file.iso bs=2048
Now that you have an image, you can burn it to CD as described above.
12.5.7 Using Data CDs
Now that you have created a standard data CDROM, you probably want to mount it and read the data on it. By default, mount(8) assumes that a file system is of type ufs. If you try something like:
# mount /dev/cd0c /mnt
you will get a complaint about ``Incorrect super block'', and no mount. The CDROM is not a UFS file system, so attempts to mount it as such will fail. You just need to tell mount(8) that the file system is of type ISO9660, and everything will work. You do this by specifying the -t cd9660 option mount(8). For example, if you want to mount the CDROM device, /dev/cd0c, under /mnt, you would execute:
# mount -t cd9660 /dev/cd0c /mnt
Note that your device name (/dev/cd0c in this example) could be different, depending on the interface your CDROM uses. Also, the -t cd9660 option just executes mount_cd9660(8). The above example could be shortened to:
# mount_cd9660 /dev/cd0c /mnt
You can generally use data CDROMs from any vendor in this way. Disks with certain ISO 9660 extensions might behave oddly, however. For example, Joliet disks store all filenames in two-byte Unicode characters. The FreeBSD kernel does not speak Unicode (yet!), so non-English characters show up as question marks. (If you are running FreeBSD 4.3 or later, the CD9660 driver includes hooks to load an appropriate Unicode conversion table on the fly. Modules for some of the common encodings are available via the sysutils/cd9660_unicode port.)
Occasionally, you might get ``Device not configured'' when trying to mount a CDROM. This usually means that the CDROM drive thinks that there is no disk in the tray, or that the drive is not visible on the bus. It can take a couple of seconds for a CDROM drive to realize that it has been fed, so be patient.
Sometimes, a SCSI CDROM may be missed because it didn't have enough time to answer the bus reset. If you have a SCSI CDROM please add the following option to your kernel configuration and rebuild your kernel.
options SCSI_DELAY=15000
This tells your SCSI bus to pause 15 seconds during boot, to give your CDROM drive every possible chance to answer the bus reset.
12.5.8 Burning Raw Data CDs
You can choose to burn a file directly to CD, without creating an ISO 9660 file system. Some people do this for backup purposes. This runs more quickly than burning a standard CD:
# burncd -f /dev/acd1c -s 12 data archive.tar.gz fixate
In order to retrieve the data burned to such a CD, you must read data from the raw device node:
# tar xzvf /dev/acd1c
You cannot mount this disk as you would a normal CDROM. Such a CDROM cannot be read under any operating system except FreeBSD. If you want to be able to mount the CD, or share data with another operating system, you must use sysutils/mkisofs as described above.
12.5.9 Using the ATAPI/CAM Driver
This driver allows ATAPI devices (CD-ROM, CD-RW, DVD drives etc...) to be accessed through the SCSI subsystem, and so allows the use of applications like sysutils/cdrdao or cdrecord(1).
To use this driver, you will need to add the following lines to your kernel configuration file:
device atapicam device scbus device cd device pass
You also need the following lines in your kernel configuration file:
device ata device atapicd
Both of which should already be present.
Then rebuild, install your new kernel, and reboot your machine. During the boot process, your burner should show up, like so:
acd0: CD-RW <MATSHITA CD-RW/DVD-ROM UJDA740> at ata1-master PIO4 cd0 at ata1 bus 0 target 0 lun 0 cd0: <MATSHITA CDRW/DVD UJDA740 1.00> Removable CD-ROM SCSI-0 device cd0: 16.000MB/s transfers cd0: Attempt to query device size failed: NOT READY, Medium not present - tray closed
The drive could now be accessed via the /dev/cd0 device name, for example to mount a CD-ROM on /mnt, just type the following:
# mount -t cd9660 /dev/cd0c /mnt
As root, you can run the following command to get the SCSI address of the burner:
# camcontrol devlist <MATSHITA CDRW/DVD UJDA740 1.00> at scbus1 target 0 lun 0 (pass0,cd0)
So 1,0,0 will be the SCSI address to use with cdrecord(1) and other SCSI application.
For more information about ATAPI/CAM and SCSI system, refer to the atapicam(4) and cam(4) manual pages.
12.6 Creating and Using Floppy Disks
Original work by Julio Merino. Rewritten by Martin Karlsson.Storing data on floppy disks is sometimes useful, for example when one does not have any other removable storage media or when one needs to transfer small amounts of data to another computer.
This section will explain how to use floppy disks in FreeBSD. It will primarily cover formatting and usage of 3.5inch DOS floppies, but the concepts are similar for other floppy disk formats.
12.6.1 Formatting Floppies
12.6.1.1 The Device
Floppy disks are accessed through entries in /dev, just like other devices. To access the raw floppy disk in 4.X and earlier releases, one uses /dev/fdN, where N stands for the drive number, usually 0, or /dev/fdNX, where X stands for a letter.
In 5.0 or newer releases, simply use /dev/fdN.
12.6.1.1.1 The Disk Size in 4.X and Earlier Releases
There are also /dev/fdN.size devices, where size is a floppy disk size in kilobytes. These entries are used at low-level format time to determine the disk size. 1440kB is the size that will be used in the following examples.
Sometimes the entries under /dev will have to be (re)created. To do that, issue:
# cd /dev && ./MAKEDEV "fd*"
12.6.1.1.2 The Disk Size in 5.0 and Newer Releases
In 5.0, devfs(5) will automatically manage device nodes in /dev, so use of MAKEDEV is not necessary.
The desired disk size is passed to fdformat(1) through the -f flag. Supported sizes are listed in fdcontrol(8), but be advised that 1440kB is what works best.
12.6.1.2 Formatting
A floppy disk needs to be low-level formated before it can be used. This is usually done by the vendor, but formatting is a good way to check media integrity. Although it is possible to force larger (or smaller) disk sizes, 1440kB is what most floppy disks are designed for.
To low-level format the floppy disk you need to use fdformat(1). This utility expects the device name as an argument.
Make note of any error messages, as these can help determine if the disk is good or bad.
12.6.1.2.1 Formatting in 4.X and Earlier Releases
Use the /dev/fdN.size devices to format the floppy. Insert a new 3.5inch floppy disk in your drive and issue:
# /usr/sbin/fdformat /dev/fd0.1440
12.6.1.2.2 Formatting in 5.0 and Newer Releases
Use the /dev/fdN devices to format the floppy. Insert a new 3.5inch floppy disk in your drive and issue:
# /usr/sbin/fdformat -f 1440 /dev/fd0
12.6.2 The Disk Label
After low-level formatting the disk, you will need to place a disk label on it. This disk label will be destroyed later, but it is needed by the system to determine the size of the disk and its geometry later.
The new disk label will take over the whole disk, and will contain all the proper information about the geometry of the floppy. The geometry values for the disk label are listed in /etc/disktab.
You can run now disklabel(8) like so:
# /sbin/disklabel -B -r -w /dev/fd0 fd1440
Note: Since FreeBSD 5.1-RELEASE, the bsdlabel(8) utility replaces the old disklabel(8) program. With bsdlabel(8) a number of obsolete options and parameters have been retired; in the example above the option -r should be removed. For more information, please refer to the bsdlabel(8) manual page.
12.6.3 The File System
Now the floppy is ready to be high-level formated. This will place a new file system on it, which will let FreeBSD read and write to the disk. After creating the new file system, the disk label is destroyed, so if you want to reformat the disk, you will have to recreate the disk label.
The floppy's file system can be either UFS or FAT. FAT is generally a better choice for floppies.
To put a new file system on the floppy, issue:
# /sbin/newfs_msdos /dev/fd0
The disk is now ready for use.
12.6.4 Using the Floppy
To use the floppy, mount it with mount_msdos(8) (in 4.X and earlier releases) or mount_msdosfs(8) (in 5.0 or newer releases). One can also use emulators/mtools from the ports collection.
12.7 Creating and Using Data Tapes
The major tape media are the 4mm, 8mm, QIC, mini-cartridge and DLT.
12.7.1 4mm (DDS: Digital Data Storage)
4mm tapes are replacing QIC as the workstation backup media of choice. This trend accelerated greatly when Conner purchased Archive, a leading manufacturer of QIC drives, and then stopped production of QIC drives. 4mm drives are small and quiet but do not have the reputation for reliability that is enjoyed by 8mm drives. The cartridges are less expensive and smaller (3 x 2 x 0.5 inches, 76 x 51 x 12 mm) than 8mm cartridges. 4mm, like 8mm, has comparatively short head life for the same reason, both use helical scan.
Data throughput on these drives starts ~150 kB/s, peaking at ~500 kB/s. Data capacity starts at 1.3 GB and ends at 2.0 GB. Hardware compression, available with most of these drives, approximately doubles the capacity. Multi-drive tape library units can have 6 drives in a single cabinet with automatic tape changing. Library capacities reach 240 GB.
The DDS-3 standard now supports tape capacities up to 12 GB (or 24 GB compressed).
4mm drives, like 8mm drives, use helical-scan. All the benefits and drawbacks of helical-scan apply to both 4mm and 8mm drives.
Tapes should be retired from use after 2,000 passes or 100 full backups.
12.7.2 8mm (Exabyte)
8mm tapes are the most common SCSI tape drives; they are the best choice of exchanging tapes. Nearly every site has an Exabyte 2 GB 8mm tape drive. 8mm drives are reliable, convenient and quiet. Cartridges are inexpensive and small (4.8 x 3.3 x 0.6 inches; 122 x 84 x 15 mm). One downside of 8mm tape is relatively short head and tape life due to the high rate of relative motion of the tape across the heads.
Data throughput ranges from ~250 kB/s to ~500 kB/s. Data sizes start at 300 MB and go up to 7 GB. Hardware compression, available with most of these drives, approximately doubles the capacity. These drives are available as single units or multi-drive tape libraries with 6 drives and 120 tapes in a single cabinet. Tapes are changed automatically by the unit. Library capacities reach 840+ GB.
The Exabyte ``Mammoth'' model supports 12 GB on one tape (24 GB with compression) and costs approximately twice as much as conventional tape drives.
Data is recorded onto the tape using helical-scan, the heads are positioned at an angle to the media (approximately 6 degrees). The tape wraps around 270 degrees of the spool that holds the heads. The spool spins while the tape slides over the spool. The result is a high density of data and closely packed tracks that angle across the tape from one edge to the other.
12.7.3 QIC
QIC-150 tapes and drives are, perhaps, the most common tape drive and media around. QIC tape drives are the least expensive ``serious'' backup drives. The downside is the cost of media. QIC tapes are expensive compared to 8mm or 4mm tapes, up to 5 times the price per GB data storage. But, if your needs can be satisfied with a half-dozen tapes, QIC may be the correct choice. QIC is the most common tape drive. Every site has a QIC drive of some density or another. Therein lies the rub, QIC has a large number of densities on physically similar (sometimes identical) tapes. QIC drives are not quiet. These drives audibly seek before they begin to record data and are clearly audible whenever reading, writing or seeking. QIC tapes measure (6 x 4 x 0.7 inches; 15.2 x 10.2 x 1.7 mm). Mini-cartridges, which also use 1/4" wide tape are discussed separately. Tape libraries and changers are not available.
Data throughput ranges from ~150 kB/s to ~500 kB/s. Data capacity ranges from 40 MB to 15 GB. Hardware compression is available on many of the newer QIC drives. QIC drives are less frequently installed; they are being supplanted by DAT drives.
Data is recorded onto the tape in tracks. The tracks run along the long axis of the tape media from one end to the other. The number of tracks, and therefore the width of a track, varies with the tape's capacity. Most if not all newer drives provide backward-compatibility at least for reading (but often also for writing). QIC has a good reputation regarding the safety of the data (the mechanics are simpler and more robust than for helical scan drives).
Tapes should be retired from use after 5,000 backups.
12.7.5 DLT
DLT has the fastest data transfer rate of all the drive types listed here. The 1/2" (12.5mm) tape is contained in a single spool cartridge (4 x 4 x 1 inches; 100 x 100 x 25 mm). The cartridge has a swinging gate along one entire side of the cartridge. The drive mechanism opens this gate to extract the tape leader. The tape leader has an oval hole in it which the drive uses to ``hook'' the tape. The take-up spool is located inside the tape drive. All the other tape cartridges listed here (9 track tapes are the only exception) have both the supply and take-up spools located inside the tape cartridge itself.
Data throughput is approximately 1.5 MB/s, three times the throughput of 4mm, 8mm, or QIC tape drives. Data capacities range from 10 GB to 20 GB for a single drive. Drives are available in both multi-tape changers and multi-tape, multi-drive tape libraries containing from 5 to 900 tapes over 1 to 20 drives, providing from 50 GB to 9 TB of storage.
With compression, DLT Type IV format supports up to 70 GB capacity.
Data is recorded onto the tape in tracks parallel to the direction of travel (just like QIC tapes). Two tracks are written at once. Read/write head lifetimes are relatively long; once the tape stops moving, there is no relative motion between the heads and the tape.
12.7.6 AIT
AIT is a new format from Sony, and can hold up to 50 GB (with compression) per tape. The tapes contain memory chips which retain an index of the tape's contents. This index can be rapidly read by the tape drive to determine the position of files on the tape, instead of the several minutes that would be required for other tapes. Software such as SAMS:Alexandria can operate forty or more AIT tape libraries, communicating directly with the tape's memory chip to display the contents on screen, determine what files were backed up to which tape, locate the correct tape, load it, and restore the data from the tape.
Libraries like this cost in the region of $20,000, pricing them a little out of the hobbyist market.
12.7.7 Using a New Tape for the First Time
The first time that you try to read or write a new, completely blank tape, the operation will fail. The console messages should be similar to:
sa0(ncr1:4:0): NOT READY asc:4,1 sa0(ncr1:4:0): Logical unit is in process of becoming ready
The tape does not contain an Identifier Block (block number 0). All QIC tape drives since the adoption of QIC-525 standard write an Identifier Block to the tape. There are two solutions:
-
mt fsf 1 causes the tape drive to write an Identifier Block to the tape.
-
Use the front panel button to eject the tape.
Re-insert the tape and dump data to the tape.
dump will report ``DUMP: End of tape detected'' and the console will show: ``HARDWARE FAILURE info:280 asc:80,96''.
rewind the tape using: mt rewind.
Subsequent tape operations are successful.
12.8 Backups to Floppies
12.8.1 Can I Use Floppies for Backing Up My Data?
Floppy disks are not really a suitable media for making backups as:
-
The media is unreliable, especially over long periods of time.
-
Backing up and restoring is very slow.
-
They have a very limited capacity (the days of backing up an entire hard disk onto a dozen or so floppies has long since passed).
However, if you have no other method of backing up your data then floppy disks are better than no backup at all.
If you do have to use floppy disks then ensure that you use good quality ones. Floppies that have been lying around the office for a couple of years are a bad choice. Ideally use new ones from a reputable manufacturer.
12.8.2 So How Do I Backup My Data to Floppies?
The best way to backup to floppy disk is to use tar(1) with the -M (multi volume) option, which allows backups to span multiple floppies.
To backup all the files in the current directory and sub-directory use this (as root):
# tar Mcvf /dev/fd0 *
When the first floppy is full tar(1) will prompt you to insert the next volume (because tar(1) is media independent it refers to volumes; in this context it means floppy disk).
Prepare volume #2 for /dev/fd0 and hit return:
This is repeated (with the volume number incrementing) until all the specified files have been archived.
12.8.3 Can I Compress My Backups?
Unfortunately, tar(1) will not allow the -z option to be used for multi-volume archives. You could, of course, gzip(1) all the files, tar(1) them to the floppies, then gunzip(1) the files again!
12.8.4 How Do I Restore My Backups?
To restore the entire archive use:
# tar Mxvf /dev/fd0
There are two ways that you can use to restore only specific files. First, you can start with the first floppy and use:
# tar Mxvf /dev/fd0 filename
The utility tar(1) will prompt you to insert subsequent floppies until it finds the required file.
Alternatively, if you know which floppy the file is on then you can simply insert that floppy and use the same command as above. Note that if the first file on the floppy is a continuation from the previous one then tar(1) will warn you that it cannot restore it, even if you have not asked it to!
12.9 Backup Basics
The three major backup programs are dump(8), tar(1), and cpio(1).
12.9.1 Dump and Restore
The traditional UNIX backup programs are dump and restore. They operate on the drive as a collection of disk blocks, below the abstractions of files, links and directories that are created by the file systems. dump backs up an entire file system on a device. It is unable to backup only part of a file system or a directory tree that spans more than one file system. dump does not write files and directories to tape, but rather writes the raw data blocks that comprise files and directories.
Note: If you use dump on your root directory, you would not back up /home, /usr or many other directories since these are typically mount points for other file systems or symbolic links into those file systems.
dump has quirks that remain from its early days in Version 6 of AT&T UNIX (circa 1975). The default parameters are suitable for 9-track tapes (6250 bpi), not the high-density media available today (up to 62,182 ftpi). These defaults must be overridden on the command line to utilize the capacity of current tape drives.
It is also possible to backup data across the network to a tape drive attached to another computer with rdump and rrestore. Both programs rely upon rcmd and ruserok to access the remote tape drive. Therefore, the user performing the backup must be listed in the .rhosts file on the remote computer. The arguments to rdump and rrestore must be suitable to use on the remote computer. When rdumping from a FreeBSD computer to an Exabyte tape drive connected to a Sun called komodo, use:
# /sbin/rdump 0dsbfu 54000 13000 126 komodo:/dev/nsa8 /dev/da0a 2>&1
Beware: there are security implications to allowing .rhosts authentication. Evaluate your situation carefully.
It is also possible to use dump and restore in a more secure fashion over ssh.
Example 12-1. Using dump over ssh
# /sbin/dump -0uan -f - /usr | gzip -2 | ssh1 -c blowfish \
[email protected] dd of=/mybigfiles/dump-usr-l0.gz
12.9.2 tar
tar(1) also dates back to Version 6 of AT&T UNIX (circa 1975). tar operates in cooperation with the file system; tar writes files and directories to tape. tar does not support the full range of options that are available from cpio(1), but tar does not require the unusual command pipeline that cpio uses.
Most versions of tar do not support backups across the network. The GNU version of tar, which FreeBSD utilizes, supports remote devices using the same syntax as rdump. To tar to an Exabyte tape drive connected to a Sun called komodo, use:
# /usr/bin/tar cf komodo:/dev/nsa8 . 2>&1
For versions without remote device support, you can use a pipeline and rsh to send the data to a remote tape drive.
# tar cf - . | rsh hostname dd of=tape-device obs=20b
If you are worried about the security of backing up over a network you should use the ssh command instead of rsh.
12.9.3 cpio
cpio(1) is the original UNIX file interchange tape program for magnetic media. cpio has options (among many others) to perform byte-swapping, write a number of different archive formats, and pipe the data to other programs. This last feature makes cpio an excellent choice for installation media. cpio does not know how to walk the directory tree and a list of files must be provided through stdin.
cpio does not support backups across the network. You can use a pipeline and rsh to send the data to a remote tape drive.
# for f in directory_list; do find $f >> backup.list done # cpio -v -o --format=newc < backup.list | ssh user@host "cat > backup_device"
Where directory_list is the list of directories you want to back up, user@host is the user/hostname combination that will be performing the backups, and backup_device is where the backups should be written to (e.g., /dev/nsa0).
12.9.4 pax
pax(1) is IEEE/POSIX's answer to tar and cpio. Over the years the various versions of tar and cpio have gotten slightly incompatible. So rather than fight it out to fully standardize them, POSIX created a new archive utility. pax attempts to read and write many of the various cpio and tar formats, plus new formats of its own. Its command set more resembles cpio than tar.
12.9.5 Amanda
Amanda (Advanced Maryland Network Disk Archiver) is a client/server backup system, rather than a single program. An Amanda server will backup to a single tape drive any number of computers that have Amanda clients and a network connection to the Amanda server. A common problem at sites with a number of large disks is that the length of time required to backup to data directly to tape exceeds the amount of time available for the task. Amanda solves this problem. Amanda can use a ``holding disk'' to backup several file systems at the same time. Amanda creates ``archive sets'': a group of tapes used over a period of time to create full backups of all the file systems listed in Amanda's configuration file. The ``archive set'' also contains nightly incremental (or differential) backups of all the file systems. Restoring a damaged file system requires the most recent full backup and the incremental backups.
The configuration file provides fine control of backups and the network traffic that Amanda generates. Amanda will use any of the above backup programs to write the data to tape. Amanda is available as either a port or a package, it is not installed by default.
12.9.6 Do Nothing
``Do nothing'' is not a computer program, but it is the most widely used backup strategy. There are no initial costs. There is no backup schedule to follow. Just say no. If something happens to your data, grin and bear it!
If your time and your data is worth little to nothing, then ``Do nothing'' is the most suitable backup program for your computer. But beware, UNIX is a useful tool, you may find that within six months you have a collection of files that are valuable to you.
``Do nothing'' is the correct backup method for /usr/obj and other directory trees that can be exactly recreated by your computer. An example is the files that comprise the HTML or PostScript version of this Handbook. These document formats have been created from SGML input files. Creating backups of the HTML or PostScript files is not necessary. The SGML files are backed up regularly.
12.9.7 Which Backup Program Is Best?
dump(8) Period. Elizabeth D. Zwicky torture tested all the backup programs discussed here. The clear choice for preserving all your data and all the peculiarities of UNIX file systems is dump. Elizabeth created file systems containing a large variety of unusual conditions (and some not so unusual ones) and tested each program by doing a backup and restore of those file systems. The peculiarities included: files with holes, files with holes and a block of nulls, files with funny characters in their names, unreadable and unwritable files, devices, files that change size during the backup, files that are created/deleted during the backup and more. She presented the results at LISA V in Oct. 1991. See torture-testing Backup and Archive Programs.
12.9.8 Emergency Restore Procedure
12.9.8.1 Before the Disaster
There are only four steps that you need to perform in preparation for any disaster that may occur.
First, print the disklabel from each of your disks (e.g. disklabel da0 | lpr), your file system table (/etc/fstab) and all boot messages, two copies of each.
Second, determine that the boot and fix-it floppies (boot.flp and fixit.flp) have all your devices. The easiest way to check is to reboot your machine with the boot floppy in the floppy drive and check the boot messages. If all your devices are listed and functional, skip on to step three.
Otherwise, you have to create two custom bootable floppies which have a kernel that can mount all of your disks and access your tape drive. These floppies must contain: fdisk, disklabel, newfs, mount, and whichever backup program you use. These programs must be statically linked. If you use dump, the floppy must contain restore.
Third, create backup tapes regularly. Any changes that you make after your last backup may be irretrievably lost. Write-protect the backup tapes.
Fourth, test the floppies (either boot.flp and fixit.flp or the two custom bootable floppies you made in step two.) and backup tapes. Make notes of the procedure. Store these notes with the bootable floppy, the printouts and the backup tapes. You will be so distraught when restoring that the notes may prevent you from destroying your backup tapes (How? In place of tar xvf /dev/sa0, you might accidentally type tar cvf /dev/sa0 and over-write your backup tape).
For an added measure of security, make bootable floppies and two backup tapes each time. Store one of each at a remote location. A remote location is NOT the basement of the same office building. A number of firms in the World Trade Center learned this lesson the hard way. A remote location should be physically separated from your computers and disk drives by a significant distance.
Example 12-2. A Script for Creating a Bootable Floppy
#!/bin/sh
#
# create a restore floppy
#
# format the floppy
#
PATH=/bin:/sbin:/usr/sbin:/usr/bin
fdformat -q fd0
if [ $? -ne 0 ]
then
echo "Bad floppy, please use a new one"
exit 1
fi
# place boot blocks on the floppy
#
disklabel -w -B /dev/fd0c fd1440
#
# newfs the one and only partition
#
newfs -t 2 -u 18 -l 1 -c 40 -i 5120 -m 5 -o space /dev/fd0a
#
# mount the new floppy
#
mount /dev/fd0a /mnt
#
# create required directories
#
mkdir /mnt/dev
mkdir /mnt/bin
mkdir /mnt/sbin
mkdir /mnt/etc
mkdir /mnt/root
mkdir /mnt/mnt # for the root partition
mkdir /mnt/tmp
mkdir /mnt/var
#
# populate the directories
#
if [ ! -x /sys/compile/MINI/kernel ]
then
cat << EOM
The MINI kernel does not exist, please create one.
Here is an example config file:
#
# MINI -- A kernel to get FreeBSD onto a disk.
#
machine "i386"
cpu "I486_CPU"
ident MINI
maxusers 5
options INET # needed for _tcp _icmpstat _ipstat
# _udpstat _tcpstat _udb
options FFS #Berkeley Fast File System
options FAT_CURSOR #block cursor in syscons or pccons
options SCSI_DELAY=15 #Be pessimistic about Joe SCSI device
options NCONS=2 #1 virtual consoles
options USERCONFIG #Allow user configuration with -c XXX
config kernel root on da0 swap on da0 and da1 dumps on da0
device isa0
device pci0
device fdc0 at isa? port "IO_FD1" bio irq 6 drq 2 vector fdintr
device fd0 at fdc0 drive 0
device ncr0
device scbus0
device sc0 at isa? port "IO_KBD" tty irq 1 vector scintr
device npx0 at isa? port "IO_NPX" irq 13 vector npxintr
device da0
device da1
device da2
device sa0
pseudo-device loop # required by INET
pseudo-device gzip # Exec gzipped a.out's
EOM
exit 1
fi
cp -f /sys/compile/MINI/kernel /mnt
gzip -c -best /sbin/init > /mnt/sbin/init
gzip -c -best /sbin/fsck > /mnt/sbin/fsck
gzip -c -best /sbin/mount > /mnt/sbin/mount
gzip -c -best /sbin/halt > /mnt/sbin/halt
gzip -c -best /sbin/restore > /mnt/sbin/restore
gzip -c -best /bin/sh > /mnt/bin/sh
gzip -c -best /bin/sync > /mnt/bin/sync
cp /root/.profile /mnt/root
cp -f /dev/MAKEDEV /mnt/dev
chmod 755 /mnt/dev/MAKEDEV
chmod 500 /mnt/sbin/init
chmod 555 /mnt/sbin/fsck /mnt/sbin/mount /mnt/sbin/halt
chmod 555 /mnt/bin/sh /mnt/bin/sync
chmod 6555 /mnt/sbin/restore
#
# create the devices nodes
#
cd /mnt/dev
./MAKEDEV std
./MAKEDEV da0
./MAKEDEV da1
./MAKEDEV da2
./MAKEDEV sa0
./MAKEDEV pty0
cd /
#
# create minimum file system table
#
cat > /mnt/etc/fstab <<EOM
/dev/fd0a / ufs rw 1 1
EOM
#
# create minimum passwd file
#
cat > /mnt/etc/passwd <<EOM
root:*:0:0:Charlie &:/root:/bin/sh
EOM
cat > /mnt/etc/master.passwd <<EOM
root::0:0::0:0:Charlie &:/root:/bin/sh
EOM
chmod 600 /mnt/etc/master.passwd
chmod 644 /mnt/etc/passwd
/usr/sbin/pwd_mkdb -d/mnt/etc /mnt/etc/master.passwd
#
# umount the floppy and inform the user
#
/sbin/umount /mnt
echo "The floppy has been unmounted and is now ready."
12.9.8.2 After the Disaster
The key question is: did your hardware survive? You have been doing regular backups so there is no need to worry about the software.
If the hardware has been damaged, the parts should be replaced before attempting to use the computer.
If your hardware is okay, check your floppies. If you are using a custom boot floppy, boot single-user (type -s at the boot: prompt). Skip the following paragraph.
If you are using the boot.flp and fixit.flp floppies, keep reading. Insert the boot.flp floppy in the first floppy drive and boot the computer. The original install menu will be displayed on the screen. Select the Fixit--Repair mode with CDROM or floppy. option. Insert the fixit.flp when prompted. restore and the other programs that you need are located in /mnt2/stand.
Recover each file system separately.
Try to mount (e.g. mount /dev/da0a /mnt) the root partition of your first disk. If the disklabel was damaged, use disklabel to re-partition and label the disk to match the label that you printed and saved. Use newfs to re-create the file systems. Re-mount the root partition of the floppy read-write (mount -u -o rw /mnt). Use your backup program and backup tapes to recover the data for this file system (e.g. restore vrf /dev/sa0). Unmount the file system (e.g. umount /mnt). Repeat for each file system that was damaged.
Once your system is running, backup your data onto new tapes. Whatever caused the crash or data loss may strike again. Another hour spent now may save you from further distress later.
12.10 Network, Memory, and File-Backed File Systems
Reorganized and enhanced by Marc Fonvieille.Aside from the disks you physically insert into your computer: floppies, CDs, hard drives, and so forth; other forms of disks are understood by FreeBSD - the virtual disks.
These include network file systems such as the Network File System and Coda, memory-based file systems and file-backed file systems.
According to the FreeBSD version you run, you will have to use different tools for creation and use of file-backed and memory-based file systems.
Note: The FreeBSD 4.X users will have to use MAKEDEV(8) to create the required devices. FreeBSD 5.0 and later use devfs(5) to allocate device nodes transparently for the user.
12.10.1 File-Backed File System under FreeBSD 4.X
The utility vnconfig(8) configures and enables vnode pseudo-disk devices. A vnode is a representation of a file, and is the focus of file activity. This means that vnconfig(8) uses files to create and operate a file system. One possible use is the mounting of floppy or CD images kept in files.
To use vnconfig(8), you need vn(4) support in your kernel configuration file:
pseudo-device vn
To mount an existing file system image:
Example 12-3. Using vnconfig to Mount an Existing File System Image under FreeBSD 4.X
# vnconfig vn0 diskimage # mount /dev/vn0c /mnt
To create a new file system image with vnconfig(8):
Example 12-4. Creating a New File-Backed Disk with vnconfig
# dd if=/dev/zero of=newimage bs=1k count=5k
5120+0 records in
5120+0 records out
# vnconfig -s labels -c vn0 newimage
# disklabel -r -w vn0 auto
# newfs vn0c
Warning: 2048 sector(s) in last cylinder unallocated
/dev/vn0c: 10240 sectors in 3 cylinders of 1 tracks, 4096 sectors
5.0MB in 1 cyl groups (16 c/g, 32.00MB/g, 1280 i/g)
super-block backups (for fsck -b #) at:
32
# mount /dev/vn0c /mnt
# df /mnt
Filesystem 1K-blocks Used Avail Capacity Mounted on
/dev/vn0c 4927 1 4532 0% /mnt
12.10.2 File-Backed File System under FreeBSD 5.X
The utility mdconfig(8) is used to configure and enable memory disks, md(4), under FreeBSD 5.X. To use mdconfig(8), you have to load md(4) module or to add the support in your kernel configuration file:
device md
The mdconfig(8) command supports three kinds of memory backed virtual disks: memory disks allocated with malloc(9), memory disks using a file or swap space as backing. One possible use is the mounting of floppy or CD images kept in files.
To mount an existing file system image:
Example 12-5. Using mdconfig to Mount an Existing File System Image under FreeBSD 5.X
# mdconfig -a -t vnode -f diskimage -u 0 # mount /dev/md0c /mnt
To create a new file system image with mdconfig(8):
Example 12-6. Creating a New File-Backed Disk with mdconfig
# dd if=/dev/zero of=newimage bs=1k count=5k
5120+0 records in
5120+0 records out
# mdconfig -a -t vnode -f newimage -u 0
# disklabel -r -w md0 auto
# newfs md0c
/dev/md0c: 5.0MB (10240 sectors) block size 16384, fragment size 2048
using 4 cylinder groups of 1.27MB, 81 blks, 256 inodes.
super-block backups (for fsck -b #) at:
32, 2624, 5216, 7808
# mount /dev/md0c /mnt
# df /mnt
Filesystem 1K-blocks Used Avail Capacity Mounted on
/dev/md0c 4846 2 4458 0% /mnt
If you do not specify the unit number with the -u option, mdconfig(8) will use the md(4) automatic allocation to select an unused device. The name of the allocated unit will be output on stdout like md4. For more details about mdconfig(8), please refer to the manual page.
Note: Since FreeBSD 5.1-RELEASE, the bsdlabel(8) utility replaces the old disklabel(8) program. With bsdlabel(8) a number of obsolete options and parameters have been retired; in the example above the option -r should be removed. For more information, please refer to the bsdlabel(8) manual page.
The utility mdconfig(8) is very useful, however it asks many command lines to create a file-backed file system. FreeBSD 5.0 also comes with a tool called mdmfs(8), this program configures a md(4) disk using mdconfig(8), puts a UFS file system on it using newfs(8), and mounts it using mount(8). For example, if you want to create and mount the same file system image as above, simply type the following:
# dd if=/dev/zero of=newimage bs=1k count=5k 5120+0 records in 5120+0 records in 5120+0 records out # mdmfs -F newimage -s 5m md0 /mnt # df /mnt Filesystem 1K-blocks Used Avail Capacity Mounted on /dev/md0 4846 2 4458 0% /mnt
If you use the option md without unit number, mdmfs(8) will use md(4) auto-unit feature to automatically select an unused device. For more details about mdmfs(8), please refer to the manual page.
12.10.3 Memory-Based File System under FreeBSD 4.X
The md(4) driver is a simple, efficient means to create memory file systems under FreeBSD 4.X. malloc(9) is used to allocate the memory.
Simply take a file system you have prepared with, for example, vnconfig(8), and:
Example 12-7. md Memory Disk under FreeBSD 4.X
# dd if=newimage of=/dev/md0 5120+0 records in 5120+0 records out # mount /dev/md0c /mnt # df /mnt Filesystem 1K-blocks Used Avail Capacity Mounted on /dev/md0c 4927 1 4532 0% /mnt
For more details, please refer to md(4) manual page.
12.10.4 Memory-Based File System under FreeBSD 5.X
The same tools are used for memory-based and file-backed file systems: mdconfig(8) or mdmfs(8). The storage for memory-based file system is allocated with malloc(9).
Example 12-8. Creating a New Memory-Based Disk with mdconfig
# mdconfig -a -t malloc -s 5m -u 1
# newfs -U md1
/dev/md1: 5.0MB (10240 sectors) block size 16384, fragment size 2048
using 4 cylinder groups of 1.27MB, 81 blks, 256 inodes.
with soft updates
super-block backups (for fsck -b #) at:
32, 2624, 5216, 7808
# mount /dev/md1 /mnt
# df /mnt
Filesystem 1K-blocks Used Avail Capacity Mounted on
/dev/md1 4846 2 4458 0% /mnt
Example 12-9. Creating a New Memory-Based Disk with mdmfs
# mdmfs -M -s 5m md2 /mnt # df /mnt Filesystem 1K-blocks Used Avail Capacity Mounted on /dev/md2 4846 2 4458 0% /mnt
Instead of using a malloc(9) backed file system, it is possible to use swap, for that just replace malloc with swap in the command line of mdconfig(8). The mdmfs(8) utility by default (without -M) creates a swap-based disk. For more details, please refer to mdconfig(8) and mdmfs(8) manual pages.
12.10.5 Detaching a Memory Disk from the System
When a memory-based or file-based file system is not used, you should release all resources to the system. The first thing to do is to unmount the file system, then use mdconfig(8) to detach the disk from the system and release the resources.
For example to detach and free all resources used by /dev/md4:
# mdconfig -d -u 4
It is possible to list information about configured md(4) devices in using the command mdconfig -l.
For FreeBSD 4.X, vnconfig(8) is used to detach the device. For example to detach and free all resources used by /dev/vn4:
# vnconfig -u vn4
12.11 File System Snapshots
Contributed by Tom Rhodes.FreeBSD 5.0 offers a new feature in conjunction with Soft Updates: File system snapshots.
Snapshots allow a user to create images of specified file systems, and treat them as a file. Snapshot files must be created in the file system that the action is performed on, and a user may create no more than 20 snapshots per file system. Active snapshots are recorded in the superblock so they are persistent across unmount and remount operations along with system reboots. When a snapshot is no longer required, it can be removed with the standard rm(1) command. Snapshots may be removed in any order, however all the used space may not be acquired because another snapshot will possibly claim some of the released blocks.
During initial creation, the schg flag (see the chflags(1) manual page) is set to ensure that even root cannot write to the snapshot. The unlink(1) command makes an exception for snapshot files since it allows them to be removed with the schg flag set, so it is not necessary to clear the schg flag before removing a snapshot file.
Snapshots are created with the mount(8) command. To place a snapshot of /var in the file /var/snapshot/snap use the following command:
# mount -u -o snapshot /var/snapshot/snap /var
Once a snapshot has been created, they have several uses:
-
Some administrators will use a snapshot file for backup purposes, because the snapshot can be transfered to CDs or tape.
-
File integrity, fsck(8) may be ran on the snapshot. Assuming that the file system was clean when it was mounted, you should always get a clean (and unchanging) result. This is essentially what the background fsck(8) process does.
-
Run the dump(8) utility on the snapshot. A dump will be returned that is consistent with the file system and the timestamp of the snapshot. dump(8) can also take a snapshot, create a dump image and then remove the snapshot in one command using the -L flag.
-
mount(8) the snapshot as a frozen image of the file system. To mount(8) the snapshot /var/snapshot/snap run:
# mdconfig -a -t vnode -f /var/snapshot/snap -u 4
# mount -r /dev/md4 /mnt
You can now walk the hierarchy of your frozen /var file system mounted at /mnt. Everything will be in the same state it was during the snapshot creation time. The only exception is that any earlier snapshots will appear as zero length files. When the use of a snapshot has delimited, it can be unmounted with:
# umount /mnt
# mdconfig -d -u 4
For more information about softupdates and file system snapshots, including technical papers, you can visit Marshall Kirk McKusick's website at http://www.mckusick.com.
12.12 File System Quotas
Quotas are an optional feature of the operating system that allow you to limit the amount of disk space and/or the number of files a user or members of a group may allocate on a per-file system basis. This is used most often on timesharing systems where it is desirable to limit the amount of resources any one user or group of users may allocate. This will prevent one user or group of users from consuming all of the available disk space.
12.12.1 Configuring Your System to Enable Disk Quotas
Before attempting to use disk quotas, it is necessary to make sure that quotas are configured in your kernel. This is done by adding the following line to your kernel configuration file:
options QUOTA
The stock GENERIC kernel does not have this enabled by default, so you will have to configure, build and install a custom kernel in order to use disk quotas. Please refer to Chapter 9 for more information on kernel configuration.
Next you will need to enable disk quotas in /etc/rc.conf. This is done by adding the line:
enable_quotas="YES"
For finer control over your quota startup, there is an additional configuration variable available. Normally on bootup, the quota integrity of each file system is checked by the quotacheck(8) program. The quotacheck(8) facility insures that the data in the quota database properly reflects the data on the file system. This is a very time consuming process that will significantly affect the time your system takes to boot. If you would like to skip this step, a variable in /etc/rc.conf is made available for the purpose:
check_quotas="NO"
If you are running FreeBSD prior to 3.2-RELEASE, the configuration is simpler, and consists of only one variable. Set the following in your /etc/rc.conf:
check_quotas="YES"
Finally you will need to edit /etc/fstab to enable disk quotas on a per-file system basis. This is where you can either enable user or group quotas or both for all of your file systems.
To enable per-user quotas on a file system, add the userquota option to the options field in the /etc/fstab entry for the file system you want to enable quotas on. For example:
/dev/da1s2g /home ufs rw,userquota 1 2
Similarly, to enable group quotas, use the groupquota option instead of userquota. To enable both user and group quotas, change the entry as follows:
/dev/da1s2g /home ufs rw,userquota,groupquota 1 2
By default, the quota files are stored in the root directory of the file system with the names quota.user and quota.group for user and group quotas respectively. See fstab(5) for more information. Even though the fstab(5) manual page says that you can specify an alternate location for the quota files, this is not recommended because the various quota utilities do not seem to handle this properly.
At this point you should reboot your system with your new kernel. /etc/rc will automatically run the appropriate commands to create the initial quota files for all of the quotas you enabled in /etc/fstab, so there is no need to manually create any zero length quota files.
In the normal course of operations you should not be required to run the quotacheck(8), quotaon(8), or quotaoff(8) commands manually. However, you may want to read their manual pages just to be familiar with their operation.
12.12.2 Setting Quota Limits
Once you have configured your system to enable quotas, verify that they really are enabled. An easy way to do this is to run:
# quota -v
You should see a one line summary of disk usage and current quota limits for each file system that quotas are enabled on.
You are now ready to start assigning quota limits with the edquota(8) command.
You have several options on how to enforce limits on the amount of disk space a user or group may allocate, and how many files they may create. You may limit allocations based on disk space (block quotas) or number of files (inode quotas) or a combination of both. Each of these limits are further broken down into two categories: hard and soft limits.
A hard limit may not be exceeded. Once a user reaches his hard limit he may not make any further allocations on the file system in question. For example, if the user has a hard limit of 500 blocks on a file system and is currently using 490 blocks, the user can only allocate an additional 10 blocks. Attempting to allocate an additional 11 blocks will fail.
Soft limits, on the other hand, can be exceeded for a limited amount of time. This period of time is known as the grace period, which is one week by default. If a user stays over his or her soft limit longer than the grace period, the soft limit will turn into a hard limit and no further allocations will be allowed. When the user drops back below the soft limit, the grace period will be reset.
The following is an example of what you might see when you run the edquota(8) command. When the edquota(8) command is invoked, you are placed into the editor specified by the EDITOR environment variable, or in the vi editor if the EDITOR variable is not set, to allow you to edit the quota limits.
# edquota -u test
Quotas for user test:
/usr: blocks in use: 65, limits (soft = 50, hard = 75)
inodes in use: 7, limits (soft = 50, hard = 60)
/usr/var: blocks in use: 0, limits (soft = 50, hard = 75)
inodes in use: 0, limits (soft = 50, hard = 60)
You will normally see two lines for each file system that has quotas enabled. One line for the block limits, and one line for inode limits. Simply change the value you want updated to modify the quota limit. For example, to raise this user's block limit from a soft limit of 50 and a hard limit of 75 to a soft limit of 500 and a hard limit of 600, change:
/usr: blocks in use: 65, limits (soft = 50, hard = 75)
to:
/usr: blocks in use: 65, limits (soft = 500, hard = 600)
The new quota limits will be in place when you exit the editor.
Sometimes it is desirable to set quota limits on a range of UIDs. This can be done by use of the -p option on the edquota(8) command. First, assign the desired quota limit to a user, and then run edquota -p protouser startuid-enduid. For example, if user test has the desired quota limits, the following command can be used to duplicate those quota limits for UIDs 10,000 through 19,999:
# edquota -p test 10000-19999
For more information see edquota(8) manual page.
12.12.3 Checking Quota Limits and Disk Usage
You can use either the quota(1) or the repquota(8) commands to check quota limits and disk usage. The quota(1) command can be used to check individual user or group quotas and disk usage. A user may only examine his own quota, and the quota of a group he is a member of. Only the super-user may view all user and group quotas. The repquota(8) command can be used to get a summary of all quotas and disk usage for file systems with quotas enabled.
The following is some sample output from the quota -v command for a user that has quota limits on two file systems.
Disk quotas for user test (uid 1002):
Filesystem blocks quota limit grace files quota limit grace
/usr 65* 50 75 5days 7 50 60
/usr/var 0 50 75 0 50 60
On the /usr file system in the above example, this user is currently 15 blocks over the soft limit of 50 blocks and has 5 days of the grace period left. Note the asterisk * which indicates that the user is currently over his quota limit.
Normally file systems that the user is not using any disk space on will not show up in the output from the quota(1) command, even if he has a quota limit assigned for that file system. The -v option will display those file systems, such as the /usr/var file system in the above example.
12.12.4 Quotas over NFS
Quotas are enforced by the quota subsystem on the NFS server. The rpc.rquotad(8) daemon makes quota information available to the quota(1) command on NFS clients, allowing users on those machines to see their quota statistics.
Enable rpc.rquotad in /etc/inetd.conf like so:
rquotad/1 dgram rpc/udp wait root /usr/libexec/rpc.rquotad rpc.rquotad
Now restart inetd:
# kill -HUP `cat /var/run/inetd.pid`
12.13 Encrypting Disk Partitions
Contributed by Lucky Green.FreeBSD offers excellent online protections against unauthorized data access. File permissions and Mandatory Access Control (MAC) (see Section 10.12) help prevent unauthorized third-parties from accessing data while the operating system is active and the computer is powered up. However, the permissions enforced by the operating system are irrelevant if an attacker has physical access to a computer and can simply move the computer's hard drive to another system to copy and analyze the sensitive data.
Regardless of how an attacker may have come into possession of a hard drive or powered-down computer, GEOM Based Disk Encryption (gbde) can protect the data on the computer's file systems against even highly-motivated attackers with significant resources. Unlike cumbersome encryption methods that encrypt only individual files, gbde transparently encrypts entire file systems. No cleartext ever touches the hard drive's platter.
12.13.1 Enabling gbde in the Kernel
-
Become root
Configuring gbde requires super-user privileges.
% su - Password:
-
Verify the Operating System Version
gbde(4) requires FreeBSD 5.0 or higher.
# uname -r 5.0-RELEASE
-
Add gbde(4) Support to the Kernel Configuration File
Using your favorite text editor, add the following line to your kernel configuration file:
options GEOM_BDE
Configure, recompile, and install the FreeBSD kernel. This process is described in Chapter 9.
Reboot into the new kernel.
12.13.2 Preparing the Encrypted Hard Drive
The following example assumes that you are adding a new hard drive to your system that will hold a single encrypted partition. This partition will be mounted as /private. gbde can also be used to encrypt /home and /var/mail, but this requires more complex instructions which exceed the scope of this introduction.
-
Add the New Hard Drive
Install the new drive to the system as explained in Section 12.3. For the purposes of this example, a new hard drive partition has been added as /dev/ad4s1c. The /dev/ad0s1* devices represent existing standard FreeBSD partitions on the example system.
# ls /dev/ad* /dev/ad0 /dev/ad0s1b /dev/ad0s1e /dev/ad4s1 /dev/ad0s1 /dev/ad0s1c /dev/ad0s1f /dev/ad4s1c /dev/ad0s1a /dev/ad0s1d /dev/ad4
-
Create a Directory to Hold gbde Lock Files
# mkdir /etc/gbde
The gbde lock file contains information that gbde requires to access encrypted partitions. Without access to the lock file, gbde will not be able to decrypt the data contained in the encrypted partition without significant manual intervention which is not supported by the software. Each encrypted partition uses a separate lock file.
-
Initialize the gbde Partition
A gbde partition must be initialized before it can be used. This initialization needs to be performed only once:
# gbde init /dev/ad4s1c -i -L /etc/gbde/ad4s1c
gbde(8) will open your editor, permitting you to set various configuration options in a template. For use with UFS1 or UFS2, set the sector_size to 2048:
$FreeBSD: src/sbin/gbde/template.txt,v 1.1 2002/10/20 11:16:13 phk Exp $ # # Sector size is the smallest unit of data which can be read or written. # Making it too small decreases performance and decreases available space. # Making it too large may prevent filesystems from working. 512 is the # minimum and always safe. For UFS, use the fragment size # sector_size = 2048 [...]
gbde(8) will ask you twice to type the passphrase that should be used to secure the data. The passphrase must be the same both times. gbde's ability to protect your data depends entirely on the quality of the passphrase that you choose. [9]
The gbde init command creates a lock file for your gbde partition that in this example is stored as /etc/gbde/ad4s1c.
Caution: gbde lock files must be backed up together with the contents of any encrypted partitions. While deleting a lock file alone cannot prevent a determined attacker from decrypting a gbde partition, without the lock file, the legitimate owner will be unable to access the data on the encrypted partition without a significant amount of work that is totally unsupported by gbde(8) and its designer.
-
Attach the Encrypted Partition to the Kernel
# gbde attach /dev/ad4s1c -l /etc/gbde/ad4s1c
You will be asked to provide the passphrase that you selected during the initialization of the encrypted partition. The new encrypted device will show up in /dev as /dev/device_name.bde:
# ls /dev/ad* /dev/ad0 /dev/ad0s1b /dev/ad0s1e /dev/ad4s1 /dev/ad0s1 /dev/ad0s1c /dev/ad0s1f /dev/ad4s1c /dev/ad0s1a /dev/ad0s1d /dev/ad4 /dev/ad4s1c.bde
-
Create a File System on the Encrypted Device
Once the encrypted device has been attached to the kernel, you can create a file system on the device. To create a file system on the encrypted device, use newfs(8). Since it is much faster to initialize a new UFS2 file system than it is to initialize the old UFS1 file system, using newfs(8) with the -O2 option is recommended.
Note: The -O2 option is the default with FreeBSD 5.1-RELEASE and later.
# newfs -U -O2 /dev/ad4s1c.bde
Note: The newfs(8) command must be performed on an attached gbde partition which is identified by a *.bde extension to the device name.
-
Mount the Encrypted Partition
Create a mount point for the encrypted file system.
# mkdir /private
Mount the encrypted file system.
# mount /dev/ad4s1c.bde /private
-
Verify That the Encrypted File System is Available
The encrypted file system should now be visible to df(1) and be available for use.
% df -H Filesystem Size Used Avail Capacity Mounted on /dev/ad0s1a 1037M 72M 883M 8% / /devfs 1.0K 1.0K 0B 100% /dev /dev/ad0s1f 8.1G 55K 7.5G 0% /home /dev/ad0s1e 1037M 1.1M 953M 0% /tmp /dev/ad0s1d 6.1G 1.9G 3.7G 35% /usr /dev/ad4s1c.bde 150G 4.1K 138G 0% /private
12.13.3 Mounting Existing Encrypted File Systems
After each boot, any encrypted file systems must be re-attached to the kernel, checked for errors, and mounted, before the file systems can be used. The required commands must be executed as user root.
-
Attach the gbde Partition to the Kernel
# gbde attach /dev/ad4s1c -l /etc/gbde/ad4s1c
You will be asked to provide the passphrase that you selected during initialization of the encrypted gbde partition.
-
Check the File System for Errors
Since encrypted file systems cannot yet be listed in /etc/fstab for automatic mounting, the file systems must be checked for errors by running fsck(8) manually before mounting.
# fsck -p -t ffs /dev/ad4s1c.bde
-
Mount the Encrypted File System
# mount /dev/ad4s1c.bde /private
The encrypted file system is now available for use.
12.13.3.1 Automatically Mounting Encrypted Partitions
It is possible to create a script to automatically attach, check, and mount an encrypted partition, but for security reasons the script should not contain the gbde(8) password. Instead, it is recommended that such scripts be run manually while providing the password via the console or ssh(1).
12.13.4 Cryptographic Protections Employed by gbde
gbde(8) encrypts the sector payload using 128-bit AES in CBC mode. Each sector on the disk is encrypted with a different AES key. For more information on gbde's cryptographic design, including how the sector keys are derived from the user-supplied passphrase, see gbde(4).
12.13.5 Compatibility Issues
sysinstall(8) is incompatible with gbde-encrypted devices. All *.bde devices must be detached from the kernel before starting sysinstall(8) or it will crash during its initial probing for devices. To detach the encrypted device used in our example, use the following command:
# gbde detach /dev/ad4s1c
Also note that, as vinum(4) does not use the geom(4) subsystem, you cannot use gbde with vinum volumes.
Chapter 13 The Vinum Volume Manager
13.1 Synopsis
No matter what disks you have, there will always be limitations:
-
They can be too small.
-
They can be too slow.
-
They can be too unreliable.
13.2 Disks Are Too Small
Originally written by Greg Lehey.Vinum is a so-called Volume Manager, a virtual disk driver that addresses these three problems. Let us look at them in more detail. Various solutions to these problems have been proposed and implemented:
Disks are getting bigger, but so are data storage requirements. Often you will find you want a file system that is bigger than the disks you have available. Admittedly, this problem is not as acute as it was ten years ago, but it still exists. Some systems have solved this by creating an abstract device which stores its data on a number of disks.
13.3 Access Bottlenecks
Modern systems frequently need to access data in a highly concurrent manner. For example, large FTP or HTTP servers can maintain thousands of concurrent sessions and have multiple 100 Mbit/s connections to the outside world, well beyond the sustained transfer rate of most disks.
Current disk drives can transfer data sequentially at up to 70 MB/s, but this value is of little importance in an environment where many independent processes access a drive, where they may achieve only a fraction of these values. In such cases it is more interesting to view the problem from the viewpoint of the disk subsystem: the important parameter is the load that a transfer places on the subsystem, in other words the time for which a transfer occupies the drives involved in the transfer.
In any disk transfer, the drive must first position the heads, wait for the first sector to pass under the read head, and then perform the transfer. These actions can be considered to be atomic: it does not make any sense to interrupt them.
Consider a typical transfer of about 10 kB: the current generation of high-performance disks can position the heads in an average of 3.5 ms. The fastest drives spin at 15,000 rpm, so the average rotational latency (half a revolution) is 2 ms. At 70 MB/s, the transfer itself takes about 150 μs, almost nothing compared to the positioning time. In such a case, the effective transfer rate drops to a little over 1 MB/s and is clearly highly dependent on the transfer size.
The traditional and obvious solution to this bottleneck is ``more spindles'': rather than using one large disk, it uses several smaller disks with the same aggregate storage space. Each disk is capable of positioning and transferring independently, so the effective throughput increases by a factor close to the number of disks used.
The exact throughput improvement is, of course, smaller than the number of disks involved: although each drive is capable of transferring in parallel, there is no way to ensure that the requests are evenly distributed across the drives. Inevitably the load on one drive will be higher than on another.
The evenness of the load on the disks is strongly dependent on the way the data is shared across the drives. In the following discussion, it is convenient to think of the disk storage as a large number of data sectors which are addressable by number, rather like the pages in a book. The most obvious method is to divide the virtual disk into groups of consecutive sectors the size of the individual physical disks and store them in this manner, rather like taking a large book and tearing it into smaller sections. This method is called concatenation and has the advantage that the disks are not required to have any specific size relationships. It works well when the access to the virtual disk is spread evenly about its address space. When access is concentrated on a smaller area, the improvement is less marked. Figure 13-1 illustrates the sequence in which storage units are allocated in a concatenated organization.
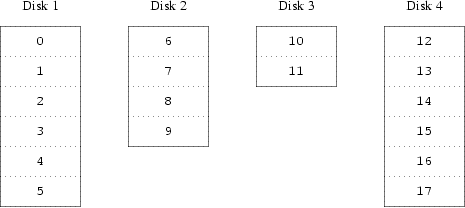
An alternative mapping is to divide the address space into smaller, equal-sized components and store them sequentially on different devices. For example, the first 256 sectors may be stored on the first disk, the next 256 sectors on the next disk and so on. After filling the last disk, the process repeats until the disks are full. This mapping is called striping or RAID-0 [10]. Striping requires somewhat more effort to locate the data, and it can cause additional I/O load where a transfer is spread over multiple disks, but it can also provide a more constant load across the disks. Figure 13-2 illustrates the sequence in which storage units are allocated in a striped organization.
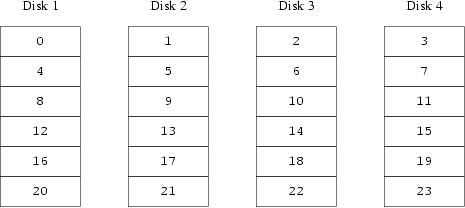
13.4 Data Integrity
The final problem with current disks is that they are unreliable. Although disk drive reliability has increased tremendously over the last few years, they are still the most likely core component of a server to fail. When they do, the results can be catastrophic: replacing a failed disk drive and restoring data to it can take days.
The traditional way to approach this problem has been mirroring, keeping two copies of the data on different physical hardware. Since the advent of the RAID levels, this technique has also been called RAID level 1 or RAID-1. Any write to the volume writes to both locations; a read can be satisfied from either, so if one drive fails, the data is still available on the other drive.
Mirroring has two problems:
-
The price. It requires twice as much disk storage as a non-redundant solution.
-
The performance impact. Writes must be performed to both drives, so they take up twice the bandwidth of a non-mirrored volume. Reads do not suffer from a performance penalty: it even looks as if they are faster.
An alternative solution is parity, implemented in the RAID levels 2, 3, 4 and 5. Of these, RAID-5 is the most interesting. As implemented in Vinum, it is a variant on a striped organization which dedicates one block of each stripe to parity of the other blocks. As implemented by Vinum, a RAID-5 plex is similar to a striped plex, except that it implements RAID-5 by including a parity block in each stripe. As required by RAID-5, the location of this parity block changes from one stripe to the next. The numbers in the data blocks indicate the relative block numbers.
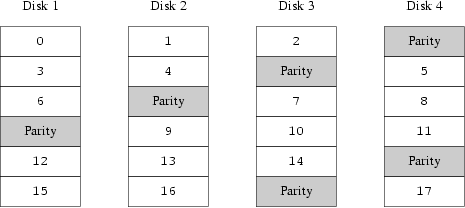
Compared to mirroring, RAID-5 has the advantage of requiring significantly less storage space. Read access is similar to that of striped organizations, but write access is significantly slower, approximately 25% of the read performance. If one drive fails, the array can continue to operate in degraded mode: a read from one of the remaining accessible drives continues normally, but a read from the failed drive is recalculated from the corresponding block from all the remaining drives.
13.5 Vinum Objects
In order to address these problems, Vinum implements a four-level hierarchy of objects:
-
The most visible object is the virtual disk, called a volume. Volumes have essentially the same properties as a UNIX disk drive, though there are some minor differences. They have no size limitations.
-
Volumes are composed of plexes, each of which represent the total address space of a volume. This level in the hierarchy thus provides redundancy. Think of plexes as individual disks in a mirrored array, each containing the same data.
-
Since Vinum exists within the UNIX disk storage framework, it would be possible to use UNIX partitions as the building block for multi-disk plexes, but in fact this turns out to be too inflexible: UNIX disks can have only a limited number of partitions. Instead, Vinum subdivides a single UNIX partition (the drive) into contiguous areas called subdisks, which it uses as building blocks for plexes.
-
Subdisks reside on Vinum drives, currently UNIX partitions. Vinum drives can contain any number of subdisks. With the exception of a small area at the beginning of the drive, which is used for storing configuration and state information, the entire drive is available for data storage.
The following sections describe the way these objects provide the functionality required of Vinum.
13.5.1 Volume Size Considerations
Plexes can include multiple subdisks spread over all drives in the Vinum configuration. As a result, the size of an individual drive does not limit the size of a plex, and thus of a volume.
13.5.2 Redundant Data Storage
Vinum implements mirroring by attaching multiple plexes to a volume. Each plex is a representation of the data in a volume. A volume may contain between one and eight plexes.
Although a plex represents the complete data of a volume, it is possible for parts of the representation to be physically missing, either by design (by not defining a subdisk for parts of the plex) or by accident (as a result of the failure of a drive). As long as at least one plex can provide the data for the complete address range of the volume, the volume is fully functional.
13.5.3 Performance Issues
Vinum implements both concatenation and striping at the plex level:
-
A concatenated plex uses the address space of each subdisk in turn.
-
A striped plex stripes the data across each subdisk. The subdisks must all have the same size, and there must be at least two subdisks in order to distinguish it from a concatenated plex.
13.5.4 Which Plex Organization?
The version of Vinum supplied with FreeBSD 5.1 implements two kinds of plex:
-
Concatenated plexes are the most flexible: they can contain any number of subdisks, and the subdisks may be of different length. The plex may be extended by adding additional subdisks. They require less CPU time than striped plexes, though the difference in CPU overhead is not measurable. On the other hand, they are most susceptible to hot spots, where one disk is very active and others are idle.
-
The greatest advantage of striped (RAID-0) plexes is that they reduce hot spots: by choosing an optimum sized stripe (about 256 kB), you can even out the load on the component drives. The disadvantages of this approach are (fractionally) more complex code and restrictions on subdisks: they must be all the same size, and extending a plex by adding new subdisks is so complicated that Vinum currently does not implement it. Vinum imposes an additional, trivial restriction: a striped plex must have at least two subdisks, since otherwise it is indistinguishable from a concatenated plex.
Table 13-1 summarizes the advantages and disadvantages of each plex organization.
13.6 Some Examples
Vinum maintains a configuration database which describes the objects known to an individual system. Initially, the user creates the configuration database from one or more configuration files with the aid of the vinum(8) utility program. Vinum stores a copy of its configuration database on each disk slice (which Vinum calls a device) under its control. This database is updated on each state change, so that a restart accurately restores the state of each Vinum object.
13.6.1 The Configuration File
The configuration file describes individual Vinum objects. The definition of a simple volume might be:
drive a device /dev/da3h
volume myvol
plex org concat
sd length 512m drive a
This file describes four Vinum objects:
-
The drive line describes a disk partition (drive) and its location relative to the underlying hardware. It is given the symbolic name a. This separation of the symbolic names from the device names allows disks to be moved from one location to another without confusion.
-
The volume line describes a volume. The only required attribute is the name, in this case myvol.
-
The plex line defines a plex. The only required parameter is the organization, in this case concat. No name is necessary: the system automatically generates a name from the volume name by adding the suffix .px, where x is the number of the plex in the volume. Thus this plex will be called myvol.p0.
-
The sd line describes a subdisk. The minimum specifications are the name of a drive on which to store it, and the length of the subdisk. As with plexes, no name is necessary: the system automatically assigns names derived from the plex name by adding the suffix .sx, where x is the number of the subdisk in the plex. Thus Vinum gives this subdisk the name myvol.p0.s0.
After processing this file, vinum(8) produces the following output:
# vinum -> create config1
Configuration summary
Drives: 1 (4 configured)
Volumes: 1 (4 configured)
Plexes: 1 (8 configured)
Subdisks: 1 (16 configured)
D a State: up Device /dev/da3h Avail: 2061/2573 MB (80%)
V myvol State: up Plexes: 1 Size: 512 MB
P myvol.p0 C State: up Subdisks: 1 Size: 512 MB
S myvol.p0.s0 State: up PO: 0 B Size: 512 MB
This output shows the brief listing format of vinum(8). It is represented graphically in Figure 13-4.
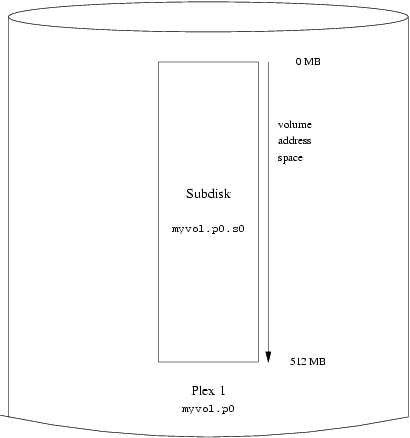
This figure, and the ones which follow, represent a volume, which contains the plexes, which in turn contain the subdisks. In this trivial example, the volume contains one plex, and the plex contains one subdisk.
This particular volume has no specific advantage over a conventional disk partition. It contains a single plex, so it is not redundant. The plex contains a single subdisk, so there is no difference in storage allocation from a conventional disk partition. The following sections illustrate various more interesting configuration methods.
13.6.2 Increased Resilience: Mirroring
The resilience of a volume can be increased by mirroring. When laying out a mirrored volume, it is important to ensure that the subdisks of each plex are on different drives, so that a drive failure will not take down both plexes. The following configuration mirrors a volume:
drive b device /dev/da4h
volume mirror
plex org concat
sd length 512m drive a
plex org concat
sd length 512m drive b
In this example, it was not necessary to specify a definition of drive a again, since Vinum keeps track of all objects in its configuration database. After processing this definition, the configuration looks like:
Drives: 2 (4 configured)
Volumes: 2 (4 configured)
Plexes: 3 (8 configured)
Subdisks: 3 (16 configured)
D a State: up Device /dev/da3h Avail: 1549/2573 MB (60%)
D b State: up Device /dev/da4h Avail: 2061/2573 MB (80%)
V myvol State: up Plexes: 1 Size: 512 MB
V mirror State: up Plexes: 2 Size: 512 MB
P myvol.p0 C State: up Subdisks: 1 Size: 512 MB
P mirror.p0 C State: up Subdisks: 1 Size: 512 MB
P mirror.p1 C State: initializing Subdisks: 1 Size: 512 MB
S myvol.p0.s0 State: up PO: 0 B Size: 512 MB
S mirror.p0.s0 State: up PO: 0 B Size: 512 MB
S mirror.p1.s0 State: empty PO: 0 B Size: 512 MB
Figure 13-5 shows the structure graphically.
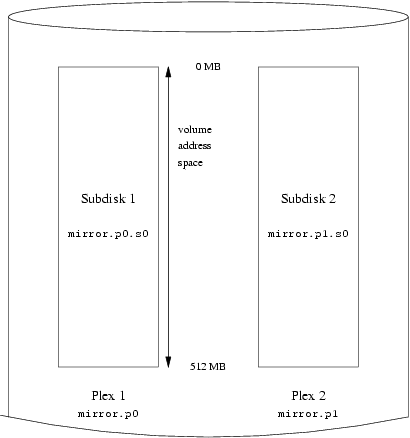
In this example, each plex contains the full 512 MB of address space. As in the previous example, each plex contains only a single subdisk.
13.6.3 Optimizing Performance
The mirrored volume in the previous example is more resistant to failure than an unmirrored volume, but its performance is less: each write to the volume requires a write to both drives, using up a greater proportion of the total disk bandwidth. Performance considerations demand a different approach: instead of mirroring, the data is striped across as many disk drives as possible. The following configuration shows a volume with a plex striped across four disk drives:
drive c device /dev/da5h
drive d device /dev/da6h
volume stripe
plex org striped 512k
sd length 128m drive a
sd length 128m drive b
sd length 128m drive c
sd length 128m drive d
As before, it is not necessary to define the drives which are already known to Vinum. After processing this definition, the configuration looks like:
Drives: 4 (4 configured)
Volumes: 3 (4 configured)
Plexes: 4 (8 configured)
Subdisks: 7 (16 configured)
D a State: up Device /dev/da3h Avail: 1421/2573 MB (55%)
D b State: up Device /dev/da4h Avail: 1933/2573 MB (75%)
D c State: up Device /dev/da5h Avail: 2445/2573 MB (95%)
D d State: up Device /dev/da6h Avail: 2445/2573 MB (95%)
V myvol State: up Plexes: 1 Size: 512 MB
V mirror State: up Plexes: 2 Size: 512 MB
V striped State: up Plexes: 1 Size: 512 MB
P myvol.p0 C State: up Subdisks: 1 Size: 512 MB
P mirror.p0 C State: up Subdisks: 1 Size: 512 MB
P mirror.p1 C State: initializing Subdisks: 1 Size: 512 MB
P striped.p1 State: up Subdisks: 1 Size: 512 MB
S myvol.p0.s0 State: up PO: 0 B Size: 512 MB
S mirror.p0.s0 State: up PO: 0 B Size: 512 MB
S mirror.p1.s0 State: empty PO: 0 B Size: 512 MB
S striped.p0.s0 State: up PO: 0 B Size: 128 MB
S striped.p0.s1 State: up PO: 512 kB Size: 128 MB
S striped.p0.s2 State: up PO: 1024 kB Size: 128 MB
S striped.p0.s3 State: up PO: 1536 kB Size: 128 MB
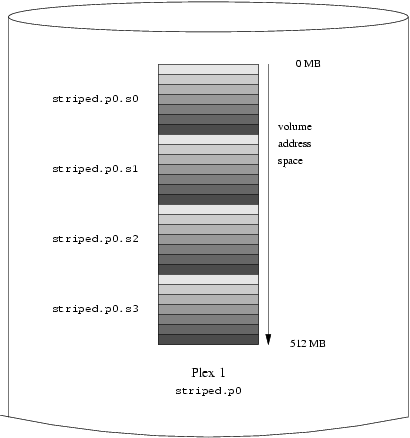
This volume is represented in Figure 13-6. The darkness of the stripes indicates the position within the plex address space: the lightest stripes come first, the darkest last.
13.6.4 Resilience and Performance
With sufficient hardware, it is possible to build volumes which show both increased resilience and increased performance compared to standard UNIX partitions. A typical configuration file might be:
volume raid10
plex org striped 512k
sd length 102480k drive a
sd length 102480k drive b
sd length 102480k drive c
sd length 102480k drive d
sd length 102480k drive e
plex org striped 512k
sd length 102480k drive c
sd length 102480k drive d
sd length 102480k drive e
sd length 102480k drive a
sd length 102480k drive b
The subdisks of the second plex are offset by two drives from those of the first plex: this helps ensure that writes do not go to the same subdisks even if a transfer goes over two drives.
Figure 13-7 represents the structure of this volume.
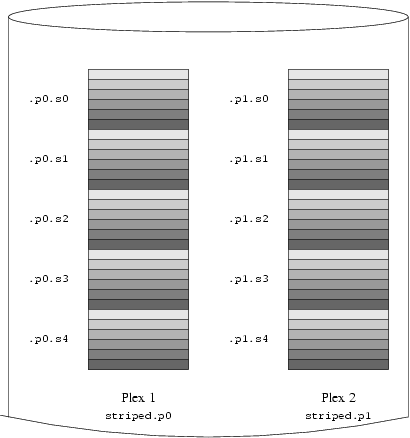
13.7 Object Naming
As described above, Vinum assigns default names to plexes and subdisks, although they may be overridden. Overriding the default names is not recommended: experience with the VERITAS volume manager, which allows arbitrary naming of objects, has shown that this flexibility does not bring a significant advantage, and it can cause confusion.
Names may contain any non-blank character, but it is recommended to restrict them to letters, digits and the underscore characters. The names of volumes, plexes and subdisks may be up to 64 characters long, and the names of drives may be up to 32 characters long.
Vinum objects are assigned device nodes in the hierarchy /dev/vinum. The configuration shown above would cause Vinum to create the following device nodes:
-
The control devices /dev/vinum/control and /dev/vinum/controld, which are used by vinum(8) and the Vinum daemon respectively.
-
Block and character device entries for each volume. These are the main devices used by Vinum. The block device names are the name of the volume, while the character device names follow the BSD tradition of prepending the letter r to the name. Thus the configuration above would include the block devices /dev/vinum/myvol, /dev/vinum/mirror, /dev/vinum/striped, /dev/vinum/raid5 and /dev/vinum/raid10, and the character devices /dev/vinum/rmyvol, /dev/vinum/rmirror, /dev/vinum/rstriped, /dev/vinum/rraid5 and /dev/vinum/rraid10. There is obviously a problem here: it is possible to have two volumes called r and rr, but there will be a conflict creating the device node /dev/vinum/rr: is it a character device for volume r or a block device for volume rr? Currently Vinum does not address this conflict: the first-defined volume will get the name.
-
A directory /dev/vinum/drive with entries for each drive. These entries are in fact symbolic links to the corresponding disk nodes.
-
A directory /dev/vinum/volume with entries for each volume. It contains subdirectories for each plex, which in turn contain subdirectories for their component subdisks.
-
The directories /dev/vinum/plex, /dev/vinum/sd, and /dev/vinum/rsd, which contain block device nodes for each plex and block and character device nodes respectively for each subdisk.
For example, consider the following configuration file:
drive drive1 device /dev/sd1h
drive drive2 device /dev/sd2h
drive drive3 device /dev/sd3h
drive drive4 device /dev/sd4h
volume s64 setupstate
plex org striped 64k
sd length 100m drive drive1
sd length 100m drive drive2
sd length 100m drive drive3
sd length 100m drive drive4
After processing this file, vinum(8) creates the following structure in /dev/vinum:
brwx------ 1 root wheel 25, 0x40000001 Apr 13 16:46 Control
brwx------ 1 root wheel 25, 0x40000002 Apr 13 16:46 control
brwx------ 1 root wheel 25, 0x40000000 Apr 13 16:46 controld
drwxr-xr-x 2 root wheel 512 Apr 13 16:46 drive
drwxr-xr-x 2 root wheel 512 Apr 13 16:46 plex
crwxr-xr-- 1 root wheel 91, 2 Apr 13 16:46 rs64
drwxr-xr-x 2 root wheel 512 Apr 13 16:46 rsd
drwxr-xr-x 2 root wheel 512 Apr 13 16:46 rvol
brwxr-xr-- 1 root wheel 25, 2 Apr 13 16:46 s64
drwxr-xr-x 2 root wheel 512 Apr 13 16:46 sd
drwxr-xr-x 3 root wheel 512 Apr 13 16:46 vol
/dev/vinum/drive:
total 0
lrwxr-xr-x 1 root wheel 9 Apr 13 16:46 drive1 -> /dev/sd1h
lrwxr-xr-x 1 root wheel 9 Apr 13 16:46 drive2 -> /dev/sd2h
lrwxr-xr-x 1 root wheel 9 Apr 13 16:46 drive3 -> /dev/sd3h
lrwxr-xr-x 1 root wheel 9 Apr 13 16:46 drive4 -> /dev/sd4h
/dev/vinum/plex:
total 0
brwxr-xr-- 1 root wheel 25, 0x10000002 Apr 13 16:46 s64.p0
/dev/vinum/rsd:
total 0
crwxr-xr-- 1 root wheel 91, 0x20000002 Apr 13 16:46 s64.p0.s0
crwxr-xr-- 1 root wheel 91, 0x20100002 Apr 13 16:46 s64.p0.s1
crwxr-xr-- 1 root wheel 91, 0x20200002 Apr 13 16:46 s64.p0.s2
crwxr-xr-- 1 root wheel 91, 0x20300002 Apr 13 16:46 s64.p0.s3
/dev/vinum/rvol:
total 0
crwxr-xr-- 1 root wheel 91, 2 Apr 13 16:46 s64
/dev/vinum/sd:
total 0
brwxr-xr-- 1 root wheel 25, 0x20000002 Apr 13 16:46 s64.p0.s0
brwxr-xr-- 1 root wheel 25, 0x20100002 Apr 13 16:46 s64.p0.s1
brwxr-xr-- 1 root wheel 25, 0x20200002 Apr 13 16:46 s64.p0.s2
brwxr-xr-- 1 root wheel 25, 0x20300002 Apr 13 16:46 s64.p0.s3
/dev/vinum/vol:
total 1
brwxr-xr-- 1 root wheel 25, 2 Apr 13 16:46 s64
drwxr-xr-x 3 root wheel 512 Apr 13 16:46 s64.plex
/dev/vinum/vol/s64.plex:
total 1
brwxr-xr-- 1 root wheel 25, 0x10000002 Apr 13 16:46 s64.p0
drwxr-xr-x 2 root wheel 512 Apr 13 16:46 s64.p0.sd
/dev/vinum/vol/s64.plex/s64.p0.sd:
total 0
brwxr-xr-- 1 root wheel 25, 0x20000002 Apr 13 16:46 s64.p0.s0
brwxr-xr-- 1 root wheel 25, 0x20100002 Apr 13 16:46 s64.p0.s1
brwxr-xr-- 1 root wheel 25, 0x20200002 Apr 13 16:46 s64.p0.s2
brwxr-xr-- 1 root wheel 25, 0x20300002 Apr 13 16:46 s64.p0.s3
Although it is recommended that plexes and subdisks should not be allocated specific names, Vinum drives must be named. This makes it possible to move a drive to a different location and still recognize it automatically. Drive names may be up to 32 characters long.
13.7.1 Creating File Systems
Volumes appear to the system to be identical to disks, with one exception. Unlike UNIX drives, Vinum does not partition volumes, which thus do not contain a partition table. This has required modification to some disk utilities, notably newfs(8), which previously tried to interpret the last letter of a Vinum volume name as a partition identifier. For example, a disk drive may have a name like /dev/ad0a or /dev/da2h. These names represent the first partition (a) on the first (0) IDE disk (ad) and the eighth partition (h) on the third (2) SCSI disk (da) respectively. By contrast, a Vinum volume might be called /dev/vinum/concat, a name which has no relationship with a partition name.
Normally, newfs(8) interprets the name of the disk and complains if it cannot understand it. For example:
# newfs /dev/vinum/concat newfs: /dev/vinum/concat: can't figure out file system partition
Note: The following is only valid for FreeBSD versions prior to 5.0:
In order to create a file system on this volume, use the -v option to newfs(8):
# newfs -v /dev/vinum/concat
13.8 Configuring Vinum
The GENERIC kernel does not contain Vinum. It is possible to build a special kernel which includes Vinum, but this is not recommended. The standard way to start Vinum is as a kernel module (kld). You do not even need to use kldload(8) for Vinum: when you start vinum(8), it checks whether the module has been loaded, and if it is not, it loads it automatically.
13.8.1 Startup
Vinum stores configuration information on the disk slices in essentially the same form as in the configuration files. When reading from the configuration database, Vinum recognizes a number of keywords which are not allowed in the configuration files. For example, a disk configuration might contain the following text:
volume myvol state up volume bigraid state down plex name myvol.p0 state up org concat vol myvol plex name myvol.p1 state up org concat vol myvol plex name myvol.p2 state init org striped 512b vol myvol plex name bigraid.p0 state initializing org raid5 512b vol bigraid sd name myvol.p0.s0 drive a plex myvol.p0 state up len 1048576b driveoffset 265b plexoffset 0b sd name myvol.p0.s1 drive b plex myvol.p0 state up len 1048576b driveoffset 265b plexoffset 1048576b sd name myvol.p1.s0 drive c plex myvol.p1 state up len 1048576b driveoffset 265b plexoffset 0b sd name myvol.p1.s1 drive d plex myvol.p1 state up len 1048576b driveoffset 265b plexoffset 1048576b sd name myvol.p2.s0 drive a plex myvol.p2 state init len 524288b driveoffset 1048841b plexoffset 0b sd name myvol.p2.s1 drive b plex myvol.p2 state init len 524288b driveoffset 1048841b plexoffset 524288b sd name myvol.p2.s2 drive c plex myvol.p2 state init len 524288b driveoffset 1048841b plexoffset 1048576b sd name myvol.p2.s3 drive d plex myvol.p2 state init len 524288b driveoffset 1048841b plexoffset 1572864b sd name bigraid.p0.s0 drive a plex bigraid.p0 state initializing len 4194304b driveoff set 1573129b plexoffset 0b sd name bigraid.p0.s1 drive b plex bigraid.p0 state initializing len 4194304b driveoff set 1573129b plexoffset 4194304b sd name bigraid.p0.s2 drive c plex bigraid.p0 state initializing len 4194304b driveoff set 1573129b plexoffset 8388608b sd name bigraid.p0.s3 drive d plex bigraid.p0 state initializing len 4194304b driveoff set 1573129b plexoffset 12582912b sd name bigraid.p0.s4 drive e plex bigraid.p0 state initializing len 4194304b driveoff set 1573129b plexoffset 16777216b
The obvious differences here are the presence of explicit location information and naming (both of which are also allowed, but discouraged, for use by the user) and the information on the states (which are not available to the user). Vinum does not store information about drives in the configuration information: it finds the drives by scanning the configured disk drives for partitions with a Vinum label. This enables Vinum to identify drives correctly even if they have been assigned different UNIX drive IDs.
13.8.1.1 Automatic Startup
In order to start Vinum automatically when you boot the system, ensure that you have the following line in your /etc/rc.conf:
start_vinum="YES" # set to YES to start vinum
If you do not have a file /etc/rc.conf, create one with this content. This will cause the system to load the Vinum kld at startup, and to start any objects mentioned in the configuration. This is done before mounting file systems, so it is possible to automatically fsck(8) and mount file systems on Vinum volumes.
When you start Vinum with the vinum start command, Vinum reads the configuration database from one of the Vinum drives. Under normal circumstances, each drive contains an identical copy of the configuration database, so it does not matter which drive is read. After a crash, however, Vinum must determine which drive was updated most recently and read the configuration from this drive. It then updates the configuration if necessary from progressively older drives.
13.9 Using Vinum for the Root Filesystem
For a machine that has fully-mirrored filesystems using Vinum, it is desirable to also mirror the root filesystem. Setting up such a configuration is less trivial than mirroring an arbitrary filesystem because:
-
The root filesystem must be available very early during the boot process, so the Vinum infrastructure must already be available at this time.
-
The volume containing the root filesystem also contains the system bootstrap and the kernel, which must be read using the host system's native utilities (e. g. the BIOS on PC-class machines) which often cannot be taught about the details of Vinum.
In the following sections, the term ``root volume'' is generally used to describe the Vinum volume that contains the root filesystem. It is probably a good idea to use the name "root" for this volume, but this is not technically required in any way. All command examples in the following sections assume this name though.
13.9.1 Starting up Vinum Early Enough for the Root Filesystem
There are several measures to take for this to happen:
-
Vinum must be available in the kernel at boot-time. Thus, the method to start Vinum automatically described in Section 13.8.1.1 is not applicable to accomplish this task, and the start_vinum parameter must actually not be set when the following setup is being arranged. The first option would be to compile Vinum statically into the kernel, so it is available all the time, but this is usually not desirable. There is another option as well, to have /boot/loader (Section 7.3.3) load the vinum kernel module early, before starting the kernel. This can be accomplished by putting the line
vinum_load="YES"
into the file /boot/loader.conf.
-
Vinum must be initialized early since it needs to supply the volume for the root filesystem. By default, the Vinum kernel part is not looking for drives that might contain Vinum volume information until the administrator (or one of the startup scripts) issues a vinum start command.
Note: The following paragraphs are outlining the steps needed for FreeBSD 5.x and above. The setup required for FreeBSD 4.x differs, and is described below in Section 13.9.5.
By placing the line:
vinum.autostart="YES"
into /boot/loader.conf, Vinum is instructed to automatically scan all drives for Vinum information as part of the kernel startup.
Note that it is not necessary to instruct the kernel where to look for the root filesystem. /boot/loader looks up the name of the root device in /etc/fstab, and passes this information on to the kernel. When it comes to mount the root filesystem, the kernel figures out from the devicename provided which driver to ask to translate this into the internal device ID (major/minor number).
13.9.2 Making a Vinum-based Root Volume Accessible to the Bootstrap
Since the current FreeBSD bootstrap is only 7.5 KB of code, and already has the burden of reading files (like /boot/loader) from the UFS filesystem, it is sheer impossible to also teach it about internal Vinum structures so it could parse the Vinum configuration data, and figure out about the elements of a boot volume itself. Thus, some tricks are necessary to provide the bootstrap code with the illusion of a standard "a" partition that contains the root filesystem.
For this to be possible at all, the following requirements must be met for the root volume:
-
The root volume must not be striped or RAID-5.
-
The root volume must not contain more than one concatenated subdisk per plex.
Note that it is desirable and possible that there are multiple plexes, each containing one replica of the root filesystem. The bootstrap process will, however, only use one of these replica for finding the bootstrap and all the files, until the kernel will eventually mount the root filesystem itself. Each single subdisk within these plexes will then need its own "a" partition illusion, for the respective device to become bootable. It is not strictly needed that each of these faked "a" partitions is located at the same offset within its device, compared with other devices containing plexes of the root volume. However, it is probably a good idea to create the Vinum volumes that way so the resulting mirrored devices are symmetric, to avoid confusion.
In order to setup these "a" partitions, for each device containing part of the root volume, the following needs to be done:
-
The location (offset from the beginning of the device) and size of this device's subdisk that is part of the root volume need to be examined, using the command
vinum l -rv root
Note that Vinum offsets and sizes are measured in bytes. They must be divided by 512 in order to obtain the block numbers that are to be used in the disklabel command.
-
Run the command
disklabel -e devname
for each device that participates in the root volume. devname must be either the name of the disk (like da0) for disks without a slice (aka. fdisk) table, or the name of the slice (like ad0s1).
If there is already an "a" partition on the device (presumably, containing a pre-Vinum root filesystem), it should be renamed to something else, so it remains accessible (just in case), but will no longer be used by default to bootstrap the system. Note that active partitions (like a root filesystem currently mounted) cannot be renamed, so this must be executed either when being booted from a ``Fixit'' medium, or in a two-step process, where (in a mirrored situation) the disk that has not been currently booted is being manipulated first.
Then, the offset the Vinum partition on this device (if any) must be added to the offset of the respective root volume subdisk on this device. The resulting value will become the "offset" value for the new "a" partition. The "size" value for this partition can be taken verbatim from the calculation above. The "fstype" should be 4.2BSD. The "fsize", "bsize", and "cpg" values should best be chosen to match the actual filesystem, though they are fairly unimportant within this context.
That way, a new "a" partition will be established that overlaps the Vinum partition on this device. Note that the disklabel will only allow for this overlap if the Vinum partition has properly been marked using the "vinum" fstype.
-
That's all! A faked "a" partition does exist now on each device that has one replica of the root volume. It is highly recommendable to verify the result again, using a command like
fsck -n /dev/devnamea
It should be remembered that all files containing control information must be relative to the root filesystem in the Vinum volume which, when setting up a new Vinum root volume, might not match the root filesystem that is currently active. So in particular, the files /etc/fstab and /boot/loader.conf need to be taken care of.
At next reboot, the bootstrap should figure out the appropriate control information from the new Vinum-based root filesystem, and act accordingly. At the end of the kernel initialization process, after all devices have been announced, the prominent notice that shows the success of this setup is a message like:
Mounting root from ufs:/dev/vinum/root
13.9.3 Example of a Vinum-based Root Setup
After the Vinum root volume has been set up, the output of vinum l -rv root could look like:
...
Subdisk root.p0.s0:
Size: 125829120 bytes (120 MB)
State: up
Plex root.p0 at offset 0 (0 B)
Drive disk0 (/dev/da0h) at offset 135680 (132 kB)
Subdisk root.p1.s0:
Size: 125829120 bytes (120 MB)
State: up
Plex root.p1 at offset 0 (0 B)
Drive disk1 (/dev/da1h) at offset 135680 (132 kB)
The values to note are 135680 for the offset (relative to partition /dev/da0h). This translates to 265 512-byte disk blocks in disklabel's terms. Likewise, the size of this root volume is 245760 512-byte blocks. /dev/da1h, containing the second replica of this root volume, has a symmetric setup.
The disklabel for these devices might look like:
... 8 partitions: # size offset fstype [fsize bsize bps/cpg] a: 245760 281 4.2BSD 2048 16384 0 # (Cyl. 0*- 15*) c: 71771688 0 unused 0 0 # (Cyl. 0 - 4467*) h: 71771672 16 vinum # (Cyl. 0*- 4467*)
It can be observed that the "size" parameter for the faked "a" partition matches the value outlined above, while the "offset" parameter is the sum of the offset within the Vinum partition "h", and the offset of this partition within the device (or slice). This is a typical setup that is necessary to avoid the problem described in Section 13.9.4.3. It can also be seen that the entire "a" partition is completely within the "h" partition containing all the Vinum data for this device.
Note that in the above example, the entire device is dedicated to Vinum, and there is no leftover pre-Vinum root partition, since this has been a newly set-up disk that was only meant to be part of a Vinum configuration, ever.
13.9.4 Troubleshooting
If something goes wrong, a way is needed to recover from the situation. The following list contains few known pitfalls and solutions.
13.9.4.1 System Bootstrap Loads, but System Does Not Boot
If for any reason the system does not continue to boot, the bootstrap can be interrupted with by pressing the space key at the 10-seconds warning. The loader variables (like vinum.autostart) can be examined using the show, and manipulated using set or unset commands.
If the only problem was that the Vinum kernel module was not yet in the list of modules to load automatically, a simple load vinum will help.
When ready, the boot process can be continued with a boot -as. The options -as will request the kernel to ask for the root filesystem to mount (-a), and make the boot process stop in single-user mode (-s), where the root filesystem is mounted read-only. That way, even if only one plex of a multi-plex volume has been mounted, no data inconsistency between plexes is being risked.
At the prompt asking for a root filesystem to mount, any device that contains a valid root filesystem can be entered. If /etc/fstab had been set up correctly, the default should be something like ufs:/dev/vinum/root. A typical alternate choice would be something like ufs:da0d which could be a hypothetical partition that contains the pre-Vinum root filesystem. Care should be taken if one of the alias "a" partitions are entered here that are actually reference to the subdisks of the Vinum root device, because in a mirrored setup, this would only mount one piece of a mirrored root device. If this filesystem is to be mounted read-write later on, it is necessary to remove the other plex(es) of the Vinum root volume since these plexes would otherwise carry inconsistent data.
13.9.4.2 Only Primary Bootstrap Loads
If /boot/loader fails to load, but the primary bootstrap still loads (visible by a single dash in the left column of the screen right after the boot process starts), an attempt can be made to interrupt the primary bootstrap at this point, using the space key. This will make the bootstrap stop in stage two, see Section 7.3.2. An attempt can be made here to boot off an alternate partition, like the partition containing the previous root filesystem that has been moved away from "a" above.
13.9.4.3 Nothing Boots, the Bootstrap Panics
This situation will happen if the bootstrap had been destroyed by the Vinum installation. Unfortunately, Vinum accidentally currently leaves only 4 KB at the beginning of its partition free before starting to write its Vinum header information. However, the stage one and two bootstraps plus the disklabel embedded between them currently require 8 KB. So if a Vinum partition was started at offset 0 within a slice or disk that was meant to be bootable, the Vinum setup will trash the bootstrap.
Similarly, if the above situation has been recovered, for example by booting from a ``Fixit'' medium, and the bootstrap has been re-installed using disklabel -B as described in Section 7.3.2, the bootstrap will trash the Vinum header, and Vinum will no longer find its disk(s). Though no actual Vinum configuration data or data in Vinum volumes will be trashed by this, and it would be possible to recover all the data by entering exact the same Vinum configuration data again, the situation is hard to fix at all. It would be necessary to move the entire Vinum partition by at least 4 KB off, in order to have the Vinum header and the system bootstrap no longer collide.
13.9.5 Differences for FreeBSD 4.x
Under FreeBSD 4.x, some internal functions required to make Vinum automatically scan all disks are missing, and the code that figures out the internal ID of the root device is not smart enough to handle a name like /dev/vinum/root automatically. Therefore, things are a little different here.
Vinum must explicitly be told which disks to scan, using a line like the following one in /boot/loader.conf:
vinum.drives="/dev/da0 /dev/da1"
It is important that all drives are mentioned that could possibly contain Vinum data. It does not harm if more drives are listed, nor is it necessary to add each slice and/or partition explicitly, since Vinum will scan all slices and partitions of the named drives for valid Vinum headers.
Since the routines used to parse the name of the root filesystem, and derive the device ID (major/minor number) are only prepared to handle ``classical'' device names like /dev/ad0s1a, they cannot make any sense out of a root volume name like /dev/vinum/root. For that reason, Vinum itself needs to pre-setup the internal kernel parameter that holds the ID of the root device during its own initialization. This is requested by passing the name of the root volume in the loader variable vinum.root. The entry in /boot/loader.conf to accomplish this looks like:
vinum.root="root"
Now, when the kernel initialization tries to find out the root device to mount, it sees whether some kernel module has already pre-initialized the kernel parameter for it. If that is the case, and the device claiming the root device matches the major number of the driver as figured out from the name of the root device string being passed (that is, "vinum" in our case), it will use the pre-allocated device ID, instead of trying to figure out one itself. That way, during the usual automatic startup, it can continue to mount the Vinum root volume for the root filesystem.
However, when boot -a has been requesting to ask for entering the name of the root device manually, it must be noted that this routine still cannot actually parse a name entered there that refers to a Vinum volume. If any device name is entered that does not refer to a Vinum device, the mismatch between the major numbers of the pre-allocated root parameter and the driver as figured out from the given name will make this routine enter its normal parser, so entering a string like ufs:da0d will work as expected. Note that if this fails, it is however no longer possible to re-enter a string like ufs:vinum/root again, since it cannot be parsed. The only way out is to reboot again, and start over then. (At the ``askroot'' prompt, the initial /dev/ can always be omitted.)
Chapter 14 Localization - I18N/L10N Usage and Setup
Contributed by Andrey A. Chernov. Rewritten by Michael C. Wu.14.1 Synopsis
FreeBSD is a very distributed project with users and contributors located all over the world. This chapter discusses the internationalization and localization features of FreeBSD that allow non-English speaking users to get real work done. There are many aspects of the i18n implementation in both the system and application levels, so where applicable we refer the reader to more specific sources of documentation.
After reading this chapter, you will know:
-
How different languages and locales are encoded on modern operating systems.
-
How to set the locale for your login shell.
-
How to configure your console for non-English languages.
-
How to use X Windows effectively with different languages.
-
Where to find more information about writing i18n-compliant applications.
Before reading this chapter, you should:
-
Know how to install additional third-party applications (Chapter 4).
14.2 The Basics
14.2.1 What Is I18N/L10N?
Developers shortened internationalization into the term I18N, counting the number of letters between the first and the last letters of internationalization. L10N uses the same naming scheme, coming from ``localization''. Combined together, I18N/L10N methods, protocols, and applications allow users to use languages of their choice.
I18N applications are programmed using I18N kits under libraries. It allows for developers to write a simple file and translate displayed menus and texts to each language. We strongly encourage programmers to follow this convention.
14.2.2 Why Should I Use I18N/L10N?
I18N/L10N is used whenever you wish to either view, input, or process data in non-English languages.
14.2.3 What Languages Are Supported in the I18N Effort?
I18N and L10N are not FreeBSD specific. Currently, one can choose from most of the major languages of the World, including but not limited to: Chinese, German, Japanese, Korean, French, Russian, Vietnamese and others.
14.3 Using Localization
In all its splendor, I18N is not FreeBSD-specific and is a convention. We encourage you to help FreeBSD in following this convention.
Localization settings are based on three main terms: Language Code, Country Code, and Encoding. Locale names are constructed from these parts as follows:
LanguageCode_CountryCode.Encoding
14.3.1 Language and Country Codes
In order to localize a FreeBSD system to a specific language (or any other I18N-supporting UNIX like systems), the user needs to find out the codes for the specify country and language (country codes tell applications what variation of given language to use). In addition, web browsers, SMTP/POP servers, web servers, etc. make decisions based on them. The following are examples of language/country codes:
14.3.2 Encodings
Some languages use non-ASCII encodings that are 8-bit, wide or multibyte characters, see multibyte(3) for more details. Older applications do not recognize them and mistake them for control characters. Newer applications usually do recognize 8-bit characters. Depending on the implementation, users may be required to compile an application with wide or multibyte characters support, or configure it correctly. To be able to input and process wide or multibyte characters, the FreeBSD Ports collection has provided each language with different programs. Refer to the I18N documentation in the respective FreeBSD Port.
Specifically, the user needs to look at the application documentation to decide on how to configure it correctly or to pass correct values into the configure/Makefile/compiler.
Some things to keep in mind are:
-
Language specific single C chars character sets (see multibyte(3)), i.e., ISO-8859-1, ISO-8859-15, KOI8-R, CP437.
-
Wide or multibyte encodings, i.e. EUC, Big5.
You can check the active list of character sets at the IANA Registry.
Note: FreeBSD versions 4.5 and up use X11-compatible locale encodings instead.
14.3.3 I18N Applications
In the FreeBSD Ports and Package system, I18N applications have been named with I18N in their names for easy identification. However, they do not always support the language needed.
14.3.4 Setting Locale
Usually it is sufficient to export the value of the locale name as LANG in the login shell. This could be done in the user's ~/.login_conf file or in the startup file of the user's shell (~/.profile, ~/.bashrc, ~/.cshrc). There is no need to set the locale subsets such as LC_CTYPE, LC_CTIME. Please refer to language-specific FreeBSD documentation for more information.
You should set the following two environment variables in your configuration files:
-
LANG for POSIX setlocale(3) family functions
-
MM_CHARSET for applications' MIME character set
This includes the user shell configuration, the specific application configuration, and the X11 configuration.
14.3.4.1 Setting Locale Methods
There are two methods for setting locale, and both are described below. The first (recommended one) is by assigning the environment variables in login class, and the second is by adding the environment variable assignments to the system's shell startup file.
14.3.4.1.1 Login Classes Method
This method allows environment variables needed for locale name and MIME character sets to be assigned once for every possible shell instead of adding specific shell assignments to each shell's startup file. User Level Setup can be done by an user himself and Administrator Level Setup require superuser privileges.
14.3.4.1.1.1 User Level Setup
Here is a minimal example of a .login_conf file in user's home directory which has both variables set for Latin-1 encoding:
me:\
:charset=ISO-8859-1:\
:lang=de_DE.ISO8859-1:
Here is an example of a .login_conf that sets the variables for Traditional Chinese in BIG-5 encoding. Notice the many more variables set because some software does not respect locale variables correctly for Chinese, Japanese, and Korean.
#Users who do not wish to use monetary units or time formats
#of Taiwan can manually change each variable
me:\
lang=zh_TW.Big5:\
lc_all=zh_TW.Big:\
lc_collate=zh_TW.Big5:\
lc_ctype=zh_TW.Big5:\
lc_messages=zh_TW.Big5:\
lc_monetary=zh_TW.Big5:\
lc_numeric=zh_TW.Big5:\
lc_time=zh_TW.Big5:\
charset=big5:\
xmodifiers="@im=xcin": #Setting the XIM Input Server
See Administrator Level Setup and login.conf(5) for more details.
14.3.4.1.1.2 Administrator Level Setup
Verify that the user's login class in /etc/login.conf sets the correct language. Make sure these settings appear in /etc/login.conf:
language_name:accounts_title:\
:charset=MIME_charset:\
:lang=locale_name:\
:tc=default:
So sticking with our previous example using Latin-1, it would look like this:
german:German Users Accounts:\
:charset=ISO-8859-1:\
:lang=de_DE.ISO8859-1:\
:tc=default:
Changing Login Classes with vipw(8)
Use vipw to add new users, and make the entry look like this:
user:password:1111:11:language:0:0:User Name:/home/user:/bin/sh
Changing Login Classes with adduser(8)
Use adduser to add new users, and do the following:
-
Set defaultclass = language in /etc/adduser.conf. Keep in mind you must enter a default class for all users of other languages in this case.
-
An alternative variant is answering the specified language each time that
Enter login class: default []:
appears from adduser(8).
-
Another alternative is to use the following for each user of a different language that you wish to add:
# adduser -class language
Changing Login Classes with pw(8)
If you use pw(8) for adding new users, call it in this form:
# pw useradd user_name -L language
14.3.4.1.2 Shell Startup File Method
Note: This method is not recommended because it requires a different setup for each possible shell program chosen. Use the Login Class Method instead.
To add the locale name and MIME character set, just set the two environment variables shown below in the /etc/profile and/or /etc/csh.login shell startup files. We will use the German language as an example below:
In /etc/profile:
LANG=de_DE.ISO8859-1; export LANG MM_CHARSET=ISO-8859-1; export MM_CHARSET
Or in /etc/csh.login:
setenv LANG de_DE.ISO8859-1 setenv MM_CHARSET ISO-8859-1
Alternatively, you can add the above instructions to /usr/share/skel/dot.profile (similar to what was used in /etc/profile above), or /usr/share/skel/dot.login (similar to what was used in /etc/csh.login above).
For X11:
In $HOME/.xinitrc:
LANG=de_DE.ISO8859-1; export LANG
Or:
setenv LANG de_DE.ISO8859-1
Depending on your shell (see above).
14.3.5 Console Setup
For all single C chars character sets, set the correct console fonts in /etc/rc.conf for the language in question with:
font8x16=font_name font8x14=font_name font8x8=font_name
The font_name here is taken from the /usr/share/syscons/fonts directory, without the .fnt suffix.
Also be sure to set the correct keymap and screenmap for your single C chars character set through /stand/sysinstall. Once inside sysinstall, choose Configure, then Console. Alternatively, you can add the following to /etc/rc.conf:
scrnmap=screenmap_name keymap=keymap_name keychange="fkey_number sequence"
The screenmap_name here is taken from the /usr/share/syscons/scrnmaps directory, without the .scm suffix. A screenmap with a corresponding mapped font is usually needed as a workaround for expanding bit 8 to bit 9 on a VGA adapter's font character matrix in pseudographics area, i.e., to move letters out of that area if screen font uses a bit 8 column.
If you have the moused daemon enabled by setting the following in your /etc/rc.conf:
moused_enable="YES"
then examine the mouse cursor information in the next paragraph.
By default the mouse cursor of the syscons(4) driver occupies the 0xd0-0xd3 range in the character set. If your language uses this range, you need to move the cursor's range outside of it. To enable the workaround for FreeBSD versions before 5.0, insert the following line into your kernel configuration:
options SC_MOUSE_CHAR=0x03
For the FreeBSD versions 4.4 and up insert the following line into /etc/rc.conf:
mousechar_start=3
The keymap_name here is taken from the /usr/share/syscons/keymaps directory, without the .kbd suffix. If you're uncertain which keymap to use, you use can kbdmap(1) to test keymaps without rebooting.
The keychange is usually needed to program function keys to match the selected terminal type because function key sequences cannot be defined in the key map.
Also be sure to set the correct console terminal type in /etc/ttys for all ttyv* entries. Current pre-defined correspondences are:
| Character Set | Terminal Type |
|---|---|
| ISO-8859-1 or ISO-8859-15 | cons25l1 |
| ISO-8859-2 | cons25l2 |
| ISO-8859-7 | cons25l7 |
| KOI8-R | cons25r |
| KOI8-U | cons25u |
| CP437 (VGA default) | cons25 |
| US-ASCII | cons25w |
For wide or multibyte characters languages, use the correct FreeBSD port in your /usr/ports/language directory. Some ports appear as console while the system sees it as serial vtty's, hence you must reserve enough vtty's for both X11 and the pseudo-serial console. Here is a partial list of applications for using other languages in console:
| Language | Location |
|---|---|
| Traditional Chinese (BIG-5) | chinese/big5con |
| Japanese | japanese/ja-kon2-* or japanese/Mule_Wnn |
| Korean | korean/ko-han |
14.3.6 X11 Setup
Although X11 is not part of the FreeBSD Project, we have included some information here for FreeBSD users. For more details, refer to the XFree86 web site or whichever X11 Server you use.
In ~/.Xresources, you can additionally tune application specific I18N settings (e.g., fonts, menus, etc.).
14.3.6.1 Displaying Fonts
Install the X11 TrueType Common server (x11-servers/XttXF86srv-common) and install the language TrueType fonts. Setting the correct locale should allow you to view your selected language in menus and such.
14.3.6.2 Inputting Non-English Characters
The X11 Input Method (XIM) Protocol is a new standard for all X11 clients. All X11 applications should be written as XIM clients that take input from XIM Input servers. There are several XIM servers available for different languages.
14.3.7 Printer Setup
Some single C chars character sets are usually hardware coded into printers. Wide or multibyte character sets require special setup and we recommend using apsfilter. You may also convert the document to PostScript or PDF formats using language specific converters.
14.3.8 Kernel and File Systems
The FreeBSD fast filesystem (FFS) is 8-bit clean, so it can be used with any single C chars character set (see multibyte(3)), but there is no character set name stored in the filesystem; i.e., it is raw 8-bit and does not know anything about encoding order. Officially, FFS does not support any form of wide or multibyte character sets yet. However, some wide or multibyte character sets have independent patches for FFS enabling such support. They are only temporary unportable solutions or hacks and we have decided to not include them in the source tree. Refer to respective languages' web sites for more informations and the patch files.
The FreeBSD MS-DOS filesystem has the configurable ability to convert between MS-DOS, Unicode character sets and chosen FreeBSD filesystem character sets. See mount_msdos(8) for details.
14.4 Compiling I18N Programs
Many FreeBSD Ports have been ported with I18N support. Some of them are marked with -I18N in the port name. These and many other programs have built in support for I18N and need no special consideration.
However, some applications such as MySQL need to be have the Makefile configured with the specific charset. This is usually done in the Makefile or done by passing a value to configure in the source.
14.5 Localizing FreeBSD to Specific Languages
14.5.1 Russian Language (KOI8-R Encoding)
Originally contributed by Andrey A. Chernov.For more information about KOI8-R encoding, see the KOI8-R References (Russian Net Character Set).
14.5.1.1 Locale Setup
Put the following lines into your ~/.login_conf file:
me:My Account:\
:charset=KOI8-R:\
:lang=ru_RU.KOI8-R:
See earlier in this chapter for examples of setting up the locale.
14.5.1.2 Console Setup
-
For the FreeBSD versions before 5.0 add the following line to your kernel configuration file:
options SC_MOUSE_CHAR=0x03
For the FreeBSD versions 4.4 and up insert the following line into /etc/rc.conf:
mousechar_start=3
-
Use following settings in /etc/rc.conf:
keymap="ru.koi8-r" scrnmap="koi8-r2cp866" font8x16="cp866b-8x16" font8x14="cp866-8x14" font8x8="cp866-8x8"
-
For each ttyv* entry in /etc/ttys, use cons25r as the terminal type.
See earlier in this chapter for examples of setting up the console.
14.5.1.3 Printer Setup
Since most printers with Russian characters come with hardware code page CP866, a special output filter is needed to convert from KOI8-R to CP866. Such a filter is installed by default as /usr/libexec/lpr/ru/koi2alt. A Russian printer /etc/printcap entry should look like:
lp|Russian local line printer:\
:sh:of=/usr/libexec/lpr/ru/koi2alt:\
:lp=/dev/lpt0:sd=/var/spool/output/lpd:lf=/var/log/lpd-errs:
See printcap(5) for a detailed description.
14.5.1.4 MS-DOS FS and Russian Filenames
The following example fstab(5) entry enables support for Russian filenames in mounted MS-DOS filesystems:
/dev/ad0s2 /dos/c msdos rw,-Wkoi2dos,-Lru_RU.KOI8-R 0 0
The option -L selects the locale name used, and -W sets the character conversion table. To use the -W option, be sure to mount /usr before the MS-DOS partition because the conversion tables are located in /usr/libdata/msdosfs. For more informations, see the mount_msdos(8) manual page.
14.5.1.5 X11 Setup
-
Do non-X locale setup first as described.
-
Go to the russian/X.language directory and issue the following command:
# make install
The above port installs the latest version of the KOI8-R fonts. XFree86 3.3 already has some KOI8-R fonts, but these are scaled better.
Check the "Files" section in your /etc/XF86Config file. The following lines must be added before any other FontPath entries:
FontPath "/usr/X11R6/lib/X11/fonts/cyrillic/misc" FontPath "/usr/X11R6/lib/X11/fonts/cyrillic/75dpi" FontPath "/usr/X11R6/lib/X11/fonts/cyrillic/100dpi"
If you use a high resolution video mode, swap the 75 dpi and 100 dpi lines.
-
To activate a Russian keyboard, add the following to the "Keyboard" section of your XF86Config file.
For XFree86 3.X:
XkbLayout "ru" XkbOptions "grp:caps_toggle"
For XFree86 4.X:
Option "XkbLayout" "ru" Option "XkbOptions" "grp:caps_toggle"
Also make sure that XkbDisable is turned off (commented out) there.
The RUS/LAT switch will be CapsLock. The old CapsLock function is still available via Shift+CapsLock (in LAT mode only).
If you have ``Windows'' keys on your keyboard, and notice that some non-alphabetical keys are mapped incorrectly in RUS mode, add the following line in your XF86Config file.
For XFree86 3.X:
XkbVariant "winkeys"
For XFree86 4.X:
Option "XkbVariant" "winkeys"
Note: The Russian XKB keyboard may not work with old XFree86 versions, see the above note for more information. The Russian XKB keyboard may also not work with non-localized applications as well. Minimally localized applications should call a XtSetLanguageProc (NULL, NULL, NULL); function early in the program. See KOI8-R for X Window for more instructions on localizing X11 applications.
14.5.2 Traditional Chinese Localization for Taiwan
The FreeBSD-Taiwan Project has an I18N/L10N tutorial for FreeBSD at http://freebsd.sinica.edu.tw/~ncvs/zh-l10n-tut/ using many Chinese ports. The editor for the zh-L10N-tut is Clive Lin <[email protected]>. You can also cvsup the following collections at freebsd.sinica.edu.tw:
| Collection | Description |
|---|---|
| outta-port tag=. | Beta-quality ports collection for Chinese |
| zh-L10N-tut tag=. | Localizing FreeBSD Tutorial in BIG-5 Traditional Chinese |
| zh-doc tag=. | FreeBSD Documentation Translation to BIG-5 Traditional Chinese |
Chuan-Hsing Shen <[email protected]> has created the Chinese FreeBSD Collection (CFC) using FreeBSD-Taiwan's zh-L10N-tut. The packages and the script files are available at ftp://ftp.csie.ncu.edu.tw/OS/FreeBSD/taiwan/CFC/.
14.5.3 German Language Localization (for All ISO 8859-1 Languages)
Slaven Rezic <[email protected]> wrote a tutorial how to use umlauts on a FreeBSD machine. The tutorial is written in German and available at http://www.de.FreeBSD.org/de/umlaute/.
14.5.4 Japanese and Korean Language Localization
For Japanese, refer to http://www.jp.FreeBSD.org/, and for Korean, refer to http://www.kr.FreeBSD.org/.
14.5.5 Non-English FreeBSD Documentation
Some FreeBSD contributors have translated parts of FreeBSD to other languages. They are available through links on the main site or in /usr/share/doc.
Chapter 15 Desktop Applications
Contributed by Christophe Juniet.15.1 Synopsis
FreeBSD can run a wide variety of desktop applications, such as browsers and word processors. Most of these are available as packages or can be automatically built from the ports collection. Many new users expect to find these kinds of applications on their desktop. This chapter will show you how to install some popular desktop applications effortlessly, either from their packages or from the ports collection.
Note that when installing programs from the ports, they are compiled from source. This can take a very long time, depending on what you are compiling and the processing power of your machine(s). If building from source takes a prohibitively long amount of time for you, you can install most of the programs of the ports collection from pre-built packages.
As FreeBSD features Linux binary compatibility, many applications originally developed for Linux are available for your desktop. It is strongly recommended that you read Chapter 22 before installing any of the Linux applications. Many of the ports using the Linux binary compatibility start with ``linux-''. Remember this when you search for a particular port, for instance with whereis(1). In the following text, it is assumed that you have enabled Linux binary compatibility before installing any of the Linux applications.
Here are the categories covered by this chapter:
-
Browsers (such as Mozilla, Netscape, Opera)
-
Productivity (such as KOffice, AbiWord, The GIMP, OpenOffice.org)
-
Document Viewers (such as Acrobat Reader®, gv, Xpdf, GQview)
-
Finance (such as GnuCash, Gnumeric, Abacus)
Before reading this chapter, you should:
-
Know how to install additional third-party software (Chapter 4).
-
Know how to install additional Linux software (Chapter 22).
For information on how to get a multimedia environment, read Chapter 16. If you want to setup and use electronic mail, please refer to Chapter 20.
15.2 Browsers
FreeBSD does not come with a particular browser pre-installed. Instead, the www directory of the ports collection contains a lot of browsers ready to be installed. If you do not have time to compile everything (this can take a very long time in some cases) many of them are available as packages.
KDE and GNOME already provide HTML browsers. Please refer to Section 5.7 for more information on how to setup these complete desktops.
If you are looking for light-weight browsers, you should investigate the ports collection for www/dillo, www/links, or www/w3m.
This section covers these applications:
| Application Name | Resources Needed | Installation from Ports | Major Dependencies |
|---|---|---|---|
| Mozilla | heavy | heavy | Gtk+ |
| Netscape | heavy | light | Linux Binary Compatibility |
| Opera | light | light | FreeBSD version: None. Linux version: Linux Binary Compatibility and linux-openmotif |
15.2.1 Mozilla
Mozilla is perhaps the most suitable browser for your FreeBSD Desktop. It is modern, stable, and fully ported to FreeBSD. It features a very standards-compliant HTML display engine. It provides a mail and news reader. It even has a HTML composer if you plan to write some web pages yourself. Users of Netscape will recognize the similarities with Communicator suite, as both browsers shared the same basis.
On slow machines, with a CPU speed less than 233MHz or with less than 64MB of RAM, Mozilla can be too resource-consuming to be fully usable. You may want to look at the Opera browser instead, described a little later in this chapter.
If you cannot or do not want to compile Mozilla for any reason, the FreeBSD GNOME team has already done this for you. Just install the package from the network by:
# pkg_add -r mozilla
If the package is not available, and you have enough time and disk space, you can get the source for Mozilla, compile it and install it on your system. This is accomplished by:
# cd /usr/ports/www/mozilla # make install clean
The Mozilla port ensures a correct initialization by running the chrome registry setup with root privileges. However, if you want to fetch some add-ons like mouse gestures, you must run Mozilla as root to get them properly installed.
Once you have completed the installation of Mozilla, you do not need to be root any longer. You can start Mozilla as a browser by typing:
% mozilla
You can start it directly as a mail and news reader as shown below:
% mozilla -mail
15.2.2 Mozilla, Java™, and Macromedia® Flash™
Contributed by Tom Rhodes.Installing Mozilla is simple, but unfortunately installing Mozilla with support for add-ons like Java™ and Macromedia® Flash™ consumes both time and disk space.
The first thing is to download the files which will be used with Mozilla. Take your current web browser up to http://www.sun.com/software/java2/download.html and create an account on their website. Remember to save the username and password from here as it may be needed in the future. Download a copy of the file j2sdk-1_3_1-src.tar.gz and place this in /usr/ports/distfiles/ as the port will not fetch it automatically. This is due to license restrictions. While we are here, download the ``java environment'' from http://java.sun.com/webapps/download/Display?BundleId=7905. The filename is j2sdk-1_3_1_08-linux-i586.bin and is large (about 25 megabytes!). Like before, this file must be placed into /usr/ports/distfiles/. Finally download a copy of the ``java patchkit'' from http://www.eyesbeyond.com/freebsddom/java/ and place it into /usr/ports/distfiles/.
Install the java/jdk13 port with the standard make install clean and then install the www/flashpluginwrapper port. This port requires emulators/linux_base which is a large port. True that other Flash plugins exist, however they have not worked for me.
Install the www/mozilla port, if Mozilla is not already installed.
Now copy the Flash plug-in files with:
# cp /usr/local/lib/flash/libflashplayer.so \
/usr/X11R6/lib/browser_plugins/libflashplayer_linux.so
# cp /usr/local/lib/flash/ShockwaveFlash.class \
/usr/X11R6/lib/browser_plugins/
Note: If you are using www/mozilla-devel, the destination directories will be different.
Now add the following lines to the top of (but right under #!/bin/sh) Mozilla startup script: /usr/X11R6/bin/mozilla.
LD_PRELOAD=/usr/local/lib/libflashplayer.so.1 export LD_PRELOAD
This will enable the Flash plug-in.
Now just start Mozilla with:
% mozilla &
And access the About Plug-ins option from the Help menu. A list should appear with all the currently available plugins. Java and Shockwave® Flash should both be listed.
15.2.3 Netscape®
The ports collection contains several versions of the Netscape browser. Since the native FreeBSD ones contain a serious security bug, installing them is strongly discouraged. Instead, use a more recent Linux or DIGITAL UNIX version.
The latest stable release of the Netscape browser is Netscape 7. It can be installed from the ports collection:
# cd /usr/ports/www/netscape7 # make install clean
There are localized versions in the French, German, and Japanese categories.
Caution: Netscape 4.x versions are not recommended because they are not compliant with today's standards. However, Netscape 7.x and newer versions are only available for the i386 platform.
15.2.4 Opera
Opera is a very fast, full-featured, and standards-compliant browser. It comes in two favors: a ``native'' FreeBSD version and a version that runs under Linux emulation. For each operating system, there is a no-cost version of the browser that displays advertising and an ad-free version that can be purchased on the Opera web site.
To browse the Web with the FreeBSD version of Opera, install the package:
# pkg_add -r opera
Some FTP sites do not have all the packages, but the same result can be obtained with the ports collection by typing:
# cd /usr/ports/www/opera # make install clean
To install the Linux version of Opera, substitute linux-opera in place of opera in the examples above. The Linux version is useful in situations requiring the use of plug-ins that are only available for Linux, such as Adobe Acrobat Reader. In all other respects, the FreeBSD and Linux versions appear to be functionally identical.
15.3 Productivity
When it comes to productivity, new users often look for a good office suite or a friendly word processor. While some desktop environments like KDE already provide an office suite, there is no default application. FreeBSD provides all that is needed, regardless of your desktop environment.
This section covers these applications:
| Application Name | Resources Needed | Installation from Ports | Major Dependencies |
|---|---|---|---|
| KOffice | light | heavy | KDE |
| AbiWord | light | light | Gtk+ or GNOME |
| The Gimp | light | heavy | Gtk+ |
| OpenOffice.org | heavy | huge | GCC 3.1, JDK™ 1.3, Mozilla |
15.3.1 KOffice
The KDE community has provided its desktop environment with an office suite which can be used outside KDE. It includes the four standard components that can be found in other office suites. KWord is the word processor, KSpread is the spreadsheet program, KPresenter manages slide presentations, and Kontour lets you draw graphical documents.
Before installing the latest KOffice, make sure you have an up-to-date version of KDE.
To install KOffice as a package, issue the following command:
# pkg_add -r koffice
If the package is not available, you can use the ports collection. For instance, to install KOffice for KDE3, do:
# cd /usr/ports/editors/koffice-kde3 # make install clean
15.3.2 AbiWord
AbiWord is a free word processing program similar in look and feel to Microsoft Word. It is suitable for typing papers, letters, reports, memos, and so forth. It is very fast, contains many features, and is very user-friendly.
AbiWord can import or export many file formats, including some proprietary ones like Microsoft .doc.
AbiWord is available as a package. You can install it by:
# pkg_add -r AbiWord-gnome
If the package is not available, it can be compiled from the ports collection. The ports collection should be more up to date. It can be done as follows:
# cd /usr/ports/editors/AbiWord # make install clean
15.3.3 The GIMP
For image authoring or picture retouching, The GIMP is a very sophisticated image manipulation program. It can be used as a simple paint program or as a quality photo retouching suite. It supports a large number of plug-ins and features a scripting interface. The GIMP can read and write a wide range of file formats. It supports interfaces with scanners and tablets.
You can install the package by issuing this command:
# pkg_add -r gimp
If your FTP site does not have this package, you can use the ports collection. The graphics directory of the ports collection also contains The Gimp Manual. Here is how to get them installed:
# cd /usr/ports/graphics/gimp1 # make install clean # cd /usr/ports/graphics/gimp-manual-pdf # make install clean
Note: The graphics directory of the ports collection holds the development version of The GIMP in graphics/gimp-devel. HTML and PostScript versions of The Gimp Manual are in graphics/gimp-manual-html and graphics/gimp-manual-ps.
15.3.4 OpenOffice.org
OpenOffice.org includes all of the mandatory applications in a complete office productivity suite: a word processor, a spreadsheet, a presentation manager, and a drawing program. Its user interface is very similar to other office suites, and it can import and export in various popular file formats. It is available in a number of different languages including interfaces, spell checkers, and dictionaries.
The word processor of OpenOffice.org uses a native XML file format for increased portability and flexibility. The spreadsheet program features a macro language and it can be interfaced with external databases. OpenOffice.org is already stable and runs natively on Windows, Solaris™, Linux, FreeBSD, and Mac OS X. More information about OpenOffice.org can be found on the OpenOffice web site. For FreeBSD specific information, and to directly download packages use the FreeBSD OpenOffice Porting Team's web site.
To install OpenOffice.org, do:
# pkg_add -r openoffice
Once the package is installed, you must run the setup program and choose a standard workstation installation. Run this command as the user who will use OpenOffice.org:
% openoffice-setup
If the OpenOffice.org packages are not available, you still have the option to compile the port. However, you must bear in mind that it requires a lot of disk space and a fairly long time to compile.
# cd /usr/ports/editors/openoffice # make install clean
Once this is done, run the setup as the user who will use OpenOffice.org and choose a standard workstation installation by:
% cd /usr/ports/editors/openoffice % make install-user
If you want to use a localized version, here are the available ports:
| Language | Port |
|---|---|
| Arabic | editors/openoffice-ar |
| Danish | editors/openoffice-dk |
| Spanish | editors/openoffice-es |
| Greek | editors/openoffice-gr |
| Italian | editors/openoffice-it |
| Dutch | editors/openoffice-nl |
| Swedish | editors/openoffice-se |
| Turkish | editors/openoffice-tr |
| French | french/openoffice |
| German | german/openoffice |
| Japanese | japanese/openoffice |
| Korean | korean/openoffice |
| Polish | polish/openoffice |
| Portuguese | portuguese/openoffice |
| Russian | russian/openoffice |
15.4 Document Viewers
Some new document formats have recently gained popularity. The standard viewers they require may not be available in the base system. We will see how to install them in this section.
This section covers these applications:
| Application Name | Resources Needed | Installation from Ports | Major Dependencies |
|---|---|---|---|
| Acrobat Reader | light | light | Linux Binary Compatibility |
| gv | light | light | Xaw3d |
| Xpdf | light | light | FreeType |
| GQview | light | light | Gtk+ or GNOME |
15.4.1 Acrobat Reader®
Many documents are now distributed as PDF files, which stands for ``Portable Document Format''. One of the recommended viewers for these types of files is Acrobat Reader, released by Adobe for Linux. As FreeBSD can run Linux binaries, it is also available for FreeBSD.
To install the Acrobat Reader 5 package, do:
# pkg_add -r acroread5
As usual, if the package is not available or you want the latest version, you can use the ports collection as well:
# cd /usr/ports/print/acroread5 # make install clean
Note: Acrobat Reader is available in several different versions. At this time of writing, there are: print/acroread (version 3.0.2), print/acroread4 (version 4.0.5), and print/acroread5 (version 5.0.6). They may not all have been packaged for your version of FreeBSD. The ports collection will always contain the latest versions.
15.4.2 gv
gv is a PostScript and PDF viewer. It is originally based on ghostview but it has a nicer look thanks to the Xaw3d library. It is fast and its interface is clean. gv has many features like orientation, paper size, scale, or antialias. Almost any operation can be done either from the keyboard or the mouse.
To install gv as a package, do:
# pkg_add -r gv
If you cannot get the package, you can use the ports collection:
# cd /usr/ports/print/gv # make install clean
15.4.3 Xpdf
If you want a small FreeBSD PDF viewer, Xpdf is a light-weight and efficient viewer. It requires very few resources and is very stable. It uses the standard X fonts and does not require Motif or any other X toolkit.
To install the Xpdf package, issue this command:
# pkg_add -r xpdf
If the package is not available or you prefer to use the ports collection, do:
# cd /usr/ports/graphics/xpdf # make install clean
Once the installation is complete, you can launch Xpdf and use the right mouse button to activate the menu.
15.4.4 GQview
GQview is an image manager. You can view a file with a single click, launch an external editor, get thumbnail previews, and much more. It also features a slideshow mode and some basic file operations. You can manage image collections and easily find duplicates. GQview can do full screen viewing and supports internationalization.
If you want to install the GQview package, do:
# pkg_add -r gqview
If the package is not available or you prefer to use the ports collection, do:
# cd /usr/ports/graphics/gqview # make install clean
15.5 Finance
If, for any reason, you would like to manage your personal finances on your FreeBSD Desktop, there are some powerful and easy to use applications ready to be installed. Some of them are compatible with widespread file formats like those of Quicken® or Excel documents.
This section covers these applications:
| Application Name | Resources Needed | Installation from Ports | Major Dependencies |
|---|---|---|---|
| GnuCash | light | heavy | GNOME |
| Gnumeric | light | heavy | GNOME |
| Abacus | light | light | Tcl/Tk |
15.5.1 GnuCash
GnuCash is part of the GNOME effort to provide user-friendly yet powerful applications to end-users. With GnuCash, you can keep track of your income and expenses, your bank accounts, or your stocks. It features an intuitive interface while remaining very professional.
GnuCash provides a smart register, a hierarchical system of accounts, many keyboard accelerators and auto-completion methods. It can split a single transaction into several more detailed pieces. GnuCash can import and merge Quicken QIF files. It also handles most international date and currency formats.
To install GnuCash on your system, do:
# pkg_add -r gnucash
If the package is not available, you can use the ports collection:
# cd /usr/ports/finance/gnucash # make install clean
15.5.2 Gnumeric
Gnumeric is a spreadsheet, part of the GNOME desktop environment. It features convenient automatic ``guessing'' of user input according to the cell format and an autofill system for many sequences. It can import files in a number of popular formats like those of Excel, Lotus 1-2-3, or Quattro Pro. Gnumeric supports graphs through the math/guppi graphing program. It has a large number of built-in functions and allows all of the usual cell formats such as number, currency, date, time, and much more.
To install Gnumeric as a package, type in:
# pkg_add -r gnumeric
If the package is not available, you can use the ports collection by doing:
# cd /usr/ports/math/gnumeric # make install clean
15.5.3 Abacus
Abacus is a small and easy to use spreadsheet. It includes many built-in functions useful in several domains such as statistics, finances, and mathematics. It can import and export the Excel file format. Abacus can produce PostScript output.
To install Abacus from its package, do:
# pkg_add -r abacus
If the package is not available, you can use the ports collection by doing:
# cd /usr/ports/deskutils/abacus # make install clean
15.6 Summary
While FreeBSD is popular among ISPs for its performance and stability, it is quite ready for day-to-day use as a desktop. With several thousand applications available as packages or ports, you can build a perfect desktop that suits all your needs.
Once you have achieved the installation of your desktop, you may want to go one step further with misc/instant-workstation. This ``meta-port'' allows you to build a typical set of ports for a workstation. You can customize it by editing /usr/ports/misc/instant-workstation/Makefile. Follow the syntax used for the default set to add or remove ports, and build it with the usual procedure. Eventually, you will be able to create a big package that corresponds to your very own desktop and install it to your other workstations!
Here is a quick review of all the desktop applications covered in this chapter:
| Application Name | Package Name | Ports Name |
|---|---|---|
| Mozilla | mozilla | www/mozilla |
| Netscape | linux-netscape7 | www/netscape7 |
| Opera | linux-opera | www/linux-opera |
| KOffice | koffice-kde3 | editors/koffice-kde3 |
| AbiWord | AbiWord-gnome | editors/AbiWord |
| The GIMP | gimp | graphics/gimp1 |
| OpenOffice.org | openoffice | editors/openoffice |
| Acrobat Reader | acroread5 | print/acroread5 |
| gv | gv | print/gv |
| Xpdf | xpdf | graphics/xpdf |
| GQview | gqview | graphics/gqview |
| GnuCash | gnucash | finance/gnucash |
| Gnumeric | gnumeric | math/gnumeric |
| Abacus | abacus | deskutils/abacus |
Chapter 16 Multimedia
Edited by Ross Lippert.16.1 Synopsis
FreeBSD supports a wide variety of sound cards, allowing you to enjoy high fidelity output from your computer. This includes the ability to record and playback audio in the MPEG Audio Layer 3 (MP3), WAV, and Ogg Vorbis formats as well as many other formats. The FreeBSD Ports Collection also contains applications allowing you to edit your recorded audio, add sound effects, and control attached MIDI devices.
With some willingness to experiment, FreeBSD can support playback of video files and DVD's. The number of applications to encode, convert, and playback various video media is more limited than the number of sound applications. For example as of this writing, there is no good re-encoding application in the FreeBSD Ports Collection, which could be use to convert between formats, as there is with audio/sox. However, the software landscape in this area is changing rapidly.
This chapter will describe the necessary steps to configure your sound card. The configuration and installation of XFree86 (Chapter 5) has already taken care of the hardware issues for your video card, though there may be some tweaks to apply for better playback.
After reading this chapter, you will know:
-
How to configure your system so that your sound card is recognized.
-
Methods to test that your card is working using sample applications.
-
How to troubleshoot your sound setup.
-
How to playback and encode MP3s and other audio.
-
How video is supported by XFree86.
-
Some video player/encoder ports which give good results.
-
How to playback DVD's, .mpg and .avi files.
-
How to rip CD and DVD information into files.
Before reading this chapter, you should:
-
Know how to configure and install a new kernel (Chapter 9).
For the video sections, it is assumed that XFree86 4.X (x11/XFree86-4) has been installed. XFree86 3.X may work, but it has not been tested with what is described in this chapter. If you find that something described here does work with XFree86 3.X please let us know.
Warning: Trying to mount an audio CD or a video DVD with the mount(8) command will result in an error, at least, and a kernel panic, at worst. These media have specialized encodings which differ from the usual ISO-filesystem.
16.2 Setting Up the Sound Card
Contributed by Moses Moore.16.2.1 Locating the Correct Device
Before you begin, you should know the model of the card you have, the chip it uses, and whether it is a PCI or ISA card. FreeBSD supports a wide variety of both PCI and ISA cards. If you do not see your card in the following list, check the pcm(4) manual page. This is not a complete list; however, it does list some of the most common cards.
-
Crystal 4237, 4236, 4232, 4231
-
Yamaha OPL-SAx
-
OPTi931
-
Ensoniq AudioPCI 1370/1371
-
ESS Solo-1/1E
-
NeoMagic 256AV/ZX
-
SoundBlaster® Pro, 16, 32, AWE64, AWE128, Live
-
Creative ViBRA16
-
Advanced Asound 100, 110, and Logic ALS120
-
ES 1868, 1869, 1879, 1888
-
Gravis UltraSound
-
Aureal Vortex 1 or 2
To use your sound device, you will need to load the proper device driver. This may be accomplished in one of two ways. The easiest way is to simply load a kernel module for your sound card with kldload(8). Alternatively, you may statically compile in support for your sound card in your kernel. The sections below provide the information you need to add support for your hardware in this manner. For more information about recompiling your kernel, please see Chapter 9.
16.2.1.1 Creative, Advance, and ESS Sound Cards
If you have one of the above cards, you will need to add:
device pcm
to your kernel configuration file. If you have a PnP ISA card, you will also need to add:
device sbc
For a non-PnP ISA card, add:
device pcm device sbc0 at isa? port 0x220 irq 5 drq 1 flags 0x15
to your kernel configuration file. The settings shown above are the defaults. You may need to change the IRQ or the other settings to match your card. See the sbc(4) manual page for more information.
Note: The Sound Blaster Live is not supported under FreeBSD 4.0 without a patch, which this section will not cover. It is recommended that you update to the latest -STABLE before trying to use this card.
16.2.1.2 Gravis UltraSound Cards
For a PnP ISA card, you will need to add:
device pcm device gusc
to your kernel configuration file. If you have a non-PnP ISA card, you will need to add:
device pcm device gus0 at isa? port 0x220 irq 5 drq 1 flags 0x13
to your kernel configuration file. You may need to change the IRQ or the other settings to match your card. See the gusc(4) manual page for more information.
16.2.1.3 Crystal Sound Cards
For Crystal cards, you will need to add:
device pcm device csa
to your kernel configuration file.
16.2.1.4 Generic Support
For PnP ISA or PCI cards, you will need to add:
device pcm
to your kernel configuration file. If you have a non-PnP ISA sound card that does not have a bridge driver, you will need to add:
device pcm0 at isa? irq 10 drq 1 flags 0x0
to your kernel configuration file. You may need to change the IRQ or the other settings to match your card.
16.2.1.5 Onboard Sound
Some systems with built-in motherboard sound devices may require the following option in your kernel configuration:
options PNPBIOS
16.2.2 Creating and Testing the Device Nodes
After you reboot, log in and check for the device in the /var/run/dmesg.boot file, as shown below:
# grep pcm /var/run/dmesg.boot pcm0: <SB16 DSP 4.11> on sbc0
The output from your system may look different. If no pcm devices show up, something went wrong earlier. If that happens, go through your kernel configuration file again and make sure you chose the correct device. Common problems are listed in Section 16.2.2.1.
Note: If you are running FreeBSD 5.0 or later, you can safely skip the rest of this section. These versions use devfs(5) to automatically create devices nodes.
If the previous command returned pcm0, you will have to run the following as root:
# cd /dev # sh MAKEDEV snd0
If the command returned pcm1, follow the same steps as shown above, replacing snd0 with snd1.
Note: The above commands will not create a /dev/snd device!
MAKEDEV will create a group of device nodes, including:
| Device | Description |
|---|---|
| /dev/audio | Sparc® compatible audio device |
| /dev/dsp | Digitized voice device |
| /dev/dspW | Like /dev/dsp, but 16 bits per sample |
| /dev/midi | Raw midi access device |
| /dev/mixer | Control port mixer device |
| /dev/music | Level 2 sequencer interface |
| /dev/sequencer | Sequencer device |
| /dev/pss | Programmable device interface |
If all goes well, you should now have a functioning sound card. If your CD-ROM or DVD-ROM drive is properly coupled to your sound card, you can put a CD in the drive and play it with cdcontrol(1):
% cdcontrol -f /dev/acd0c play 1
Various applications, such as audio/workman offer a better interface. You may want to install an application such as audio/mpg123 to listen to MP3 audio files.
16.2.2.1 Common Problems
| Error | Solution |
|---|---|
| ``unsupported subdevice XX'' |
One or more of the device nodes was not created correctly. Repeat the steps above. |
| ``sb_dspwr(XX) timed out'' |
The I/O port is not set correctly. |
| ``bad irq XX'' |
The IRQ is set incorrectly. Make sure that the set IRQ and the sound IRQ are the same. |
| ``xxx: gus pcm not attached, out of memory'' |
There is not enough available memory to use the device. |
| ``xxx: can't open /dev/dsp!'' |
Check with fstat | grep dsp if another application is holding the device open. Noteworthy troublemakers are esound and KDE's sound support. |
16.2.3 Utilizing Multiple Sound Sources
Contributed by Munish Chopra.It is often desirable to have multiple sources of sound that are able to play simultaneously, such as when esound or artsd do not support sharing of the sound device with a certain application.
FreeBSD lets you do this through Virtual Sound Channels, which can be set with the sysctl(8) facility. Virtual channels allow you to multiplex your sound card's playback channels by mixing sound in the kernel.
To set the number of virtual channels, there are two sysctl knobs which, if you are the root user, can be set like this:
# sysctl hw.snd.pcm0.vchans=4 # sysctl hw.snd.maxautovchans=4
The above example allocates four virtual channels, which is a practical number for everyday use. hw.snd.pcm0.vchans is the number of virtual channels pcm0 has, and is configurable once a device has been attached. hw.snd.maxautovchans is the number of virtual channels a new audio device is given when it is attached using kldload(8). Since the pcm module can be loaded independently of the hardware drivers, hw.snd.maxautovchans can store how many virtual channels any devices which are attached later will be given.
If you are not using devfs(5), you will have to point your applications at /dev/dsp0.x, where x is 0 to 3 if hw.snd.pcm.0.vchans is set to 4 as in the above example. On a system using devfs(5), the above will automatically be allocated transparently to the user.
16.3 MP3 Audio
Contributed by Chern Lee.MP3 (MPEG Layer 3 Audio) accomplishes near CD-quality sound, leaving no reason to let your FreeBSD workstation fall short of its offerings.
16.3.1 MP3 Players
By far, the most popular XFree86 MP3 player is XMMS (X Multimedia System). Winamp skins can be used with XMMS since the GUI is almost identical to that of Nullsoft's Winamp. XMMS also has native plug-in support.
XMMS can be installed from the multimedia/xmms port or package.
XMMS' interface is intuitive, with a playlist, graphic equalizer, and more. Those familiar with Winamp will find XMMS simple to use.
The audio/mpg123 port is an alternative, command-line MP3 player.
mpg123 can be run by specifying the sound device and the MP3 file on the command line, as shown below:
# mpg123 -a /dev/dsp1.0 Foobar-GreatestHits.mp3 High Performance MPEG 1.0/2.0/2.5 Audio Player for Layer 1, 2 and 3. Version 0.59r (1999/Jun/15). Written and copyrights by Michael Hipp. Uses code from various people. See 'README' for more! THIS SOFTWARE COMES WITH ABSOLUTELY NO WARRANTY! USE AT YOUR OWN RISK! Playing MPEG stream from BT - Foobar-GreastHits.mp3 ... MPEG 1.0 layer III, 128 kbit/s, 44100 Hz joint-stereo
/dev/dsp1.0 should be replaced with the dsp device entry on your system.
16.3.2 Ripping CD Audio Tracks
Before encoding a CD or CD track to MP3, the audio data on the CD must be ripped onto the hard drive. This is done by copying the raw CDDA (CD Digital Audio) data to WAV files.
The cdda2wav tool, which is a part of the sysutils/cdrtools suite, is used for ripping audio information from CDs and the information associated with them.
With the audio CD in the drive, the following command can be issued (as root) to rip an entire CD into individual (per track) WAV files:
# cdda2wav -D 0,1,0 -B
cdda2wav will support ATAPI (IDE) CDROM drives. To rip from an IDE drive, specify the device name in place of the SCSI unit numbers. For example, to rip track 7 from an IDE drive:
# cdda2wav -D /dev/acd0a -t 7
The -D 0,1,0 indicates the SCSI device 0,1,0, which corresponds to the output of cdrecord -scanbus.
To rip individual tracks, make use of the -t option as shown:
# cdda2wav -D 0,1,0 -t 7
This example rips track seven of the audio CDROM. To rip a range of tracks, for example, track one to seven, specify a range:
# cdda2wav -D 0,1,0 -t 1+7
The utility dd(1) can also be used to extract audio tracks on ATAPI drives, read Section 12.5.5 for more information on that possibility.
16.3.3 Encoding MP3s
Nowadays, the mp3 encoder of choice is lame. Lame can be found at audio/lame in the ports tree.
Using the ripped WAV files, the following command will convert audio01.wav to audio01.mp3:
# lame -h -b 128 \ --tt "Foo Song Title" \ --ta "FooBar Artist" \ --tl "FooBar Album" \ --ty "2001" \ --tc "Ripped and encoded by Foo" \ --tg "Genre" \ audio01.wav audio01.mp3
128 kbits seems to be the standard MP3 bitrate in use. Many enjoy the higher quality 160, or 192. The higher the bitrate, the more disk space the resulting MP3 will consume--but the quality will be higher. The -h option turns on the ``higher quality but a little slower'' mode. The options beginning with --t indicate ID3 tags, which usually contain song information, to be embedded within the MP3 file. Additional encoding options can be found by consulting the lame man page.
16.3.4 Decoding MP3s
In order to burn an audio CD from MP3s, they must be converted to a non-compressed WAV format. Both XMMS and mpg123 support the output of MP3 to an uncompressed file format.
Writing to Disk in XMMS:
-
Launch XMMS.
-
Right-click on the window to bring up the XMMS menu.
-
Select Preference under Options.
-
Change the Output Plugin to ``Disk Writer Plugin''.
-
Press Configure.
-
Enter (or choose browse) a directory to write the uncompressed files to.
-
Load the MP3 file into XMMS as usual, with volume at 100% and EQ settings turned off.
-
Press Play -- XMMS will appear as if it is playing the MP3, but no music will be heard. It is actually playing the MP3 to a file.
-
Be sure to set the default Output Plugin back to what it was before in order to listen to MP3s again.
Writing to stdout in mpg123:
-
Run mpg123 -s audio01.mp3 > audio01.pcm
XMMS writes a file in the WAV format, while mpg123 converts the MP3 into raw PCM audio data. Both of these formats can be used with cdrecord to create audio CDs. You have to use raw PCM with burncd(8). If you use WAV files, you will notice a small tick sound at the beginning of each track, this sound is the header of the WAV file. You can simply remove the header of a WAV file with the utility SoX (it can be installed from the audio/sox port or package):
% sox -t wav -r 44100 -s -w -c 2 track.wav track.raw
Read Section 12.5 for more information on using a CD burner in FreeBSD.
16.4 Video Playback
Contributed by Ross Lippert.Video playback is a very new and rapidly developing application area. Be patient. Not everything is going to work as smoothly as it did with sound.
Before you begin, you should know the model of the video card you have and the chip it uses. While XFree86 supports a wide variety of video cards, fewer give good playback performance. To obtain a list of extensions supported by the X server using your card use the command xdpyinfo(1) while X11 is running.
It is a good idea to have a short MPEG file which can be treated as a test file for evaluating various players and options. Since some DVD players will look for DVD media in /dev/dvd by default, or have this device name hardcoded in them, you might find it useful to make symbolic links to the proper devices:
# ln -sf /dev/acd0c /dev/dvd # ln -sf /dev/racd0c /dev/rdvd
On FreeBSD 5.X, which uses devfs(5) there is a slightly different set of recommended links:
# ln -sf /dev/acd0c /dev/dvd # ln -sf /dev/acd0c /dev/rdvd
Additionally, DVD decryption, which requires invoking special DVD-ROM functions, requires write permission on the DVD devices.
Some of the ports discussed rely on the following kernel options to build correctly. Before attempting to build, add these options to the kernel configuration file, build a new kernel, and reboot:
option CPU_ENABLE_SSE option USER_LDT
To enhance the shared memory X11 interface, it is recommended that the values of some sysctl(8) variables should be increased:
kern.ipc.shmmax=67108864 kern.ipc.shmall=32768
16.4.1 Determining Video Capabilities
There are several possible ways to display video under X11. What will really work is largely hardware dependent. Each method described below will have varying quality across different hardware. Secondly, the rendering of video in X11 is a topic receiving a lot of attention lately, and with each version of XFree86 there may be significant improvement.
A list of common video interfaces:
-
X11: normal X11 output using shared memory.
-
XVideo: an extension to the X11 interface which supports video in any X11 drawable.
-
SDL: the Simple Directmedia Layer.
-
DGA: the Direct Graphics Access.
-
SVGAlib: low level console graphics layer.
16.4.1.1 XVideo
XFree86 4.X has an extension called XVideo (aka Xvideo, aka Xv, aka xv) which allows video to be directly displayed in drawable objects through a special acceleration. This extension provides very good quality playback even on low-end machines (for example my PIII 400 Mhz laptop). Unfortunately, the list of cards in which this feature is supported ``out of the box'' is currently:
-
3DFX Voodoo 3
-
Intel i810 and i815
-
some S3 chips (such as Savage/IX and Savage/MX)
If your card is not one of these, do not be disappointed yet. XFree86 4.X adds new xv capabilities with each release [11]. To check whether the extension is running, use xvinfo:
% xvinfo
XVideo is supported for your card if the result looks like:
X-Video Extension version 2.2
screen #0
Adaptor #0: "Savage Streams Engine"
number of ports: 1
port base: 43
operations supported: PutImage
supported visuals:
depth 16, visualID 0x22
depth 16, visualID 0x23
number of attributes: 5
"XV_COLORKEY" (range 0 to 16777215)
client settable attribute
client gettable attribute (current value is 2110)
"XV_BRIGHTNESS" (range -128 to 127)
client settable attribute
client gettable attribute (current value is 0)
"XV_CONTRAST" (range 0 to 255)
client settable attribute
client gettable attribute (current value is 128)
"XV_SATURATION" (range 0 to 255)
client settable attribute
client gettable attribute (current value is 128)
"XV_HUE" (range -180 to 180)
client settable attribute
client gettable attribute (current value is 0)
maximum XvImage size: 1024 x 1024
Number of image formats: 7
id: 0x32595559 (YUY2)
guid: 59555932-0000-0010-8000-00aa00389b71
bits per pixel: 16
number of planes: 1
type: YUV (packed)
id: 0x32315659 (YV12)
guid: 59563132-0000-0010-8000-00aa00389b71
bits per pixel: 12
number of planes: 3
type: YUV (planar)
id: 0x30323449 (I420)
guid: 49343230-0000-0010-8000-00aa00389b71
bits per pixel: 12
number of planes: 3
type: YUV (planar)
id: 0x36315652 (RV16)
guid: 52563135-0000-0000-0000-000000000000
bits per pixel: 16
number of planes: 1
type: RGB (packed)
depth: 0
red, green, blue masks: 0x1f, 0x3e0, 0x7c00
id: 0x35315652 (RV15)
guid: 52563136-0000-0000-0000-000000000000
bits per pixel: 16
number of planes: 1
type: RGB (packed)
depth: 0
red, green, blue masks: 0x1f, 0x7e0, 0xf800
id: 0x31313259 (Y211)
guid: 59323131-0000-0010-8000-00aa00389b71
bits per pixel: 6
number of planes: 3
type: YUV (packed)
id: 0x0
guid: 00000000-0000-0000-0000-000000000000
bits per pixel: 0
number of planes: 0
type: RGB (packed)
depth: 1
red, green, blue masks: 0x0, 0x0, 0x0
Also note that the formats listed (YUV2, YUV12, etc) are not present with every implementation of XVideo and their absence may hinder some players.
If the result looks like:
X-Video Extension version 2.2 screen #0 no adaptors present
Then XVideo is probably not supported for your card.
If XVideo is not supported for your card, this only means that it will be more difficult for your display to meet the computational demands of rendering video. Depending on your video card and processor, though, you might still be able to have a satisfying experience. You should probably read about ways of improving performance in the advanced reading Section 16.4.3.
16.4.1.2 Simple Directmedia Layer
The Simple Directmedia Layer, SDL, was intended to be a porting layer between Microsoft Windows, BeOS, and UNIX, allowing cross-platform applications to be developed which made efficient use of sound and graphics. The SDL layer provides a low-level abstraction to the hardware which can sometimes be more efficient than the X11 interface.
The SDL can be found at devel/sdl12
16.4.1.3 Direct Graphics Access
Direct Graphics Access is an XFree86 extension which allows a program to bypass the X server and directly alter the framebuffer. Because it relies on a low level memory mapping to effect this sharing, programs using it must must be run as root.
The DGA extension can be tested and benchmarked by dga(1). When dga is running, it changes the colors of the display whenever a key is pressed. To quit, use q.
16.4.2 Ports and Packages Dealing with Video
This section discusses the software available from the FreeBSD Ports Collection which can be used for video playback. Video playback is a very active area of software development, and the capabilities of various applications are bound to diverge somewhat from the descriptions given here.
Firstly, it is important to know that many of the video applications which run on FreeBSD were developed as Linux applications. Many of these applications are still beta-quality. Some of the problems that you may encounter with video packages on FreeBSD include :
-
An application cannot playback a file which another application produced.
-
An application cannot playback a file which the application itself produced.
-
The same application on two different machines, rebuilt on each machine for that machine, plays back the same file differently.
-
A seemingly trivial filter like rescaling of the image size results in very bad artifacts from a buggy rescaling routine.
-
An application frequently dumps core.
-
Documentation is not installed with the port and can be found either on the web or under the port's 'work' directory.
Many of these applications may also exhibit ``Linux-isms''. That is, there may be issues resulting from the way some standard libraries are implemented in the Linux distributions, or some features of the Linux kernel which have been assumed by the authors of the applications. These issues are not always noticed and worked around by the port maintainers, which can lead to problems like these:
-
The use of /proc/cpuinfo to detect processor characteristics.
-
A misuse of threads which causes a program to hang upon completion instead of truly terminating.
-
Software not yet in the FreeBSD Ports Collection which is commonly used in conjunction with the application.
So far, these application developers have been cooperative with port maintainers to minimize the work-arounds needed for port-ing.
16.4.2.1 MPlayer
MPlayer is a recently developed and rapidly developing video player. The goals of the MPlayer team are speed and flexibility on Linux and other Unices. The project was started when the team founder got fed up with bad playback performance on then available players. Some would say that the graphical interface has been sacrificed for a streamlined design. However, once you get used to the command line options and the key-stroke controls, it works very well.
16.4.2.1.1 Building MPlayer
MPlayer resides in multimedia/mplayer. MPlayer performs a variety of hardware checks during the build process, resulting in a binary which will not be portable from one system to another. Therefore, it is important to build it from ports and not to use a binary package. Additionally, a number of options can be specified in the make command line, as described at the start of the build.
# cd /usr/ports/multimedia/mplayer # make You can enable additional compilation optimizations by defining WITH_OPTIMIZED_CFLAGS You can enable GTK GUI by defining WITH_GUI. You can enable DVD support by defining WITH_DVD. You can enable SVGALIB support by defining WITH_SVGALIB. You can enable VORBIS sound support by defining WITH_VORBIS. You can enable XAnim DLL support by defining WITH_XANIM.
If you have x11-toolkits/gtk12 installed, then you might as well enable the GUI. Otherwise, it is not worth the effort. If you intend to play (possibly CSS encoded) DVD's with MPlayer you must enable the DVD support option here [12]. Some reasonable options are:
# make WITH_DVD=yes WITH_SVGALIB=yes
As of this writing, the MPlayer port will build its HTML documentation and one executable, mplayer. It can also be made to build an encoder, mencoder, which is a tool for re-encoding video. A modification to the Makefile can enable it. It may be enabled by default in subsequent versions of the port.
The HTML documentation for MPlayer is very informative. If the reader finds the information on video hardware and interfaces in this chapter lacking, the MPlayer documentation is a very thorough supplement. You should definitely take the time to read the MPlayer documentation if you are looking for information about video support in UNIX.
16.4.2.1.2 Using MPlayer
Any user of MPlayer must set up a .mplayer subdirectory of her home directory. To create this necessary subdirectory, you can type the following:
% cd /usr/ports/multimedia/mplayer % make install-user
The command options for mplayer are listed in the manual page. For even more detail there is HTML documentation. In this section, we will describe only a few common uses.
To play a file, such as testfile.avi, through one of the various video interfaces set the -vo option:
% mplayer -vo xv testfile.avi
% mplayer -vo sdl testfile.avi
% mplayer -vo x11 testfile.avi
# mplayer -vo dga testfile.avi
# mplayer -vo 'sdl:dga' testfile.avi
It is worth trying all of these options, as their relative performance depends on many factors and will vary significantly with hardware.
To play from a DVD, replace the testfile.avi with -dvd <N> DEVICE where <N> is the title number to play and DEVICE is the device node for the DVD-ROM. For example, to play title 3 from /dev/dvd:
# mplayer -vo dga -dvd 2 /dev/dvd
To stop, pause, advance and so on, consult the keybindings, which are output by running mplayer -h or read the manual page.
Additional important options for playback are: -fs -zoom which engages the fullscreen mode and -framedrop which helps performance.
In order for the mplayer command line to not become too large, the user can create a file .mplayer/config and set default options there:
vo=xv fs=yes zoom=yes
Finally, mplayer can be used to rip a DVD title into a .vob file. To dump out the second title from a DVD, type this:
# mplayer -dumpstream -dumpfile out.vob -dvd 2 /dev/dvd
The output file, out.vob, will be MPEG and can be manipulated by the other packages described in this section.
16.4.2.1.3 mencoder
If you opt to install mencoder when you build MPlayer, be forewarned that it is still an experimental component. Before using mencoder it is a good idea to familiarize yourself with the options from the HTML documentation. There is a manual page, but it is not very useful without the HTML documentation. There are innumerable ways to improve quality, lower bitrate, and change formats, and some of these tricks may make the difference between good or bad performance. Here are a couple of examples to get you going. First a simple copy:
% mencoder input.avi -oac copy -ovc copy -o output.avi
Improper combinations of command line options can yield output files that are unplayable even by mplayer. Thus, if you just want to rip to a file, stick to the -dumpfile in mplayer.
To convert input.avi to the MPEG4 codec with MPEG3 audio encoding (audio/lame is required):
% mencoder input.avi -oac mp3lame -lameopts br=192 \
-ovc lavc -lavcopts vcodec=mpeg4:vhq -o output.avi
This has produced output playable by mplayer and xine.
input.avi can be replaced with -dvd 1 /dev/dvd and run as root to re-encode a DVD title directly. Since you are likely to be dissatisfied with your results the first time around, it is recommended you dump the title to a file and work on the file.
16.4.2.2 The xine Video Player
The xine video player is a project of wide scope aiming not only at being an all in one video solution, but also in producing a reusable base library and a modular executable which can be extended with plugins. It comes both as a package and as a port, multimedia/xine.
The xine player is still very rough around the edges, but it is clearly off to a good start. In practice, xine requires either a fast CPU with a fast video card, or support for the XVideo extension. The GUI is usable, but a bit clumsy.
As of this writing, there is no input module shipped with xine which will play CSS encoded DVD's. There are third party builds which do have modules for this built in them, but none of these are in the FreeBSD Ports Collection.
Compared to MPlayer, xine does more for the user, but at the same time, takes some of the more fine-grained control away from the user. The xine video player performs best on XVideo interfaces.
By default, xine player will start up in a graphical user interface. The menus can then be used to open a specific file:
% xine
Alternatively, it may be invoked to play a file immediately without the GUI interface with the command:
% xine -g -p mymovie.avi
16.4.2.3 The transcode Utilities
The software transcode is not a player, but a suite of tools for re-encoding .avi and .mpg files. With transcode, one has the ability to merge video files, repair broken files, using command line tools with stdin/stdout stream interfaces.
Like MPlayer, transcode is very experimental software which must be build from the port multimedia/transcode. Using a great many options to the make command. I recommend:
# make WITH_LIBMPEG2=yes
If you plan to install multimedia/avifile, then add the WITH_AVIFILE option to your make command line, as shown here:
# make WITH_AVIFILE=yes WITH_LIBMPEG2=yes
Here are two examples of using transcode for video conversion which produce rescaled output. The first encodes the output to an openDIVX AVI file, while the second encodes to the much more portable MPEG format.
% transcode -i input.vob -x vob -V -Z 320x240 \ -y opendivx -N 0x55 -o output.avi
% transcode -i input.vob -x vob -V -Z 320x240 \ -y mpeg -N 0x55 -o output.tmp % tcmplex -o output.mpg -i output.tmp.m1v -p output.tmp.mpa -m 1
There is a manual page for transcode, but there is little documentation for the various tc* utilities (such as tcmplex) which are also installed. However, the -h command line option can always be given to get curt usage instructions for a command.
In comparison, transcode runs significantly slower than mencoder, but it has a better chance of producing a more widely playable file. MPEGs created by transcode have been known to play on older copies of Windows Media® Player and Apple's Quicktime®, for example.
16.4.3 Further Reading
The various video software packages for FreeBSD are developing rapidly. It is quite possible that in the near future many of the problems discussed here will have been resolved. In the mean time, those who want to get the very most out of FreeBSD's A/V capabilities will have to cobble together knowledge from several FAQs and tutorials and use a few different applications. This section exists to give the reader pointers to such additional information.
The MPlayer documentation is very technically informative. These documents should probably be consulted by anyone wishing to obtain a high level of expertise with UNIX video. The MPlayer mailing list is hostile to anyone who has not bothered to read the documentation, so if you plan on making bug reports to them, RTFM.
The xine HOWTO contains a chapter on performance improvement which is general to all players.
Finally, there are some other promising applications which the reader may try:
-
Avifile which is also a port multimedia/avifile.
-
Ogle which is also a port multimedia/ogle.
Chapter 17 Serial Communications
17.1 Synopsis
UNIX has always had support for serial communications. In fact, the very first UNIX machines relied on serial lines for user input and output. Things have changed a lot from the days when the average ``terminal'' consisted of a 10-character-per-second serial printer and a keyboard. This chapter will cover some of the ways in which FreeBSD uses serial communications.
After reading this chapter, you will know:
-
How to connect terminals to your FreeBSD system.
-
How to use a modem to dial out to remote hosts.
-
How to allow remote users to login to your system with a modem.
-
How to boot your system from a serial console.
Before reading this chapter, you should:
17.2 Introduction
17.2.1 Terminology
- bps
-
Bits per Second -- the rate at which data is transmitted
- DTE
-
Data Terminal Equipment -- for example, your computer
- DCE
-
Data Communications Equipment -- your modem
- RS-232
-
EIA standard for hardware serial communications
When talking about communications data rates, this section does not use the term ``baud''. Baud refers to the number of electrical state transitions that may be made in a period of time, while ``bps'' (bits per second) is the correct term to use (at least it does not seem to bother the curmudgeons quite as much).
17.2.2 Cables and Ports
To connect a modem or terminal to your FreeBSD system, you will need a serial port on your computer and the proper cable to connect to your serial device. If you are already familiar with your hardware and the cable it requires, you can safely skip this section.
17.2.2.1 Cables
There are several different kinds of serial cables. The two most common types for our purposes are null-modem cables and standard (``straight'') RS-232 cables. The documentation for your hardware should describe the type of cable required.
17.2.2.1.1 Null-modem Cables
A null-modem cable passes some signals, such as ``signal ground'', straight through, but switches other signals. For example, the ``send data'' pin on one end goes to the ``receive data'' pin on the other end.
If you like making your own cables, you can construct a null-modem cable for use with terminals. This table shows the RS-232C signal names and the pin numbers on a DB-25 connector.
| Signal | Pin # | Pin # | Signal | |
|---|---|---|---|---|
| SG | 7 | connects to | 7 | SG |
| TxD | 2 | connects to | 3 | RxD |
| RxD | 3 | connects to | 2 | TxD |
| RTS | 4 | connects to | 5 | CTS |
| CTS | 5 | connects to | 4 | RTS |
| DTR | 20 | connects to | 6 | DSR |
| DCD | 8 | 6 | DSR | |
| DSR | 6 | connects to | 20 | DTR |
Note: Connect ``Data Set Ready'' (DSR) and ``Data Carrier Detect'' (DCD) internally in the connector hood, and then to ``Data Terminal Ready'' (DTR) in the remote hood.
17.2.2.1.2 Standard RS-232C Cables
A standard serial cable passes all the RS-232C signals straight-through. That is, the ``send data'' pin on one end of the cable goes to the ``send data'' pin on the other end. This is the type of cable to use to connect a modem to your FreeBSD system, and is also appropriate for some terminals.
17.2.2.2 Ports
Serial ports are the devices through which data is transferred between the FreeBSD host computer and the terminal. This section describes the kinds of ports that exist and how they are addressed in FreeBSD.
17.2.2.2.1 Kinds of Ports
Several kinds of serial ports exist. Before you purchase or construct a cable, you need to make sure it will fit the ports on your terminal and on the FreeBSD system.
Most terminals will have DB25 ports. Personal computers, including PCs running FreeBSD, will have DB25 or DB9 ports. If you have a multiport serial card for your PC, you may have RJ-12 or RJ-45 ports.
See the documentation that accompanied the hardware for specifications on the kind of port in use. A visual inspection of the port often works too.
17.2.2.2.2 Port Names
In FreeBSD, you access each serial port through an entry in the /dev directory. There are two different kinds of entries:
-
Call-in ports are named /dev/ttydN where N is the port number, starting from zero. Generally, you use the call-in port for terminals. Call-in ports require that the serial line assert the data carrier detect (DCD) signal to work correctly.
-
Call-out ports are named /dev/cuaaN. You usually do not use the call-out port for terminals, just for modems. You may use the call-out port if the serial cable or the terminal does not support the carrier detect signal.
If you have connected a terminal to the first serial port (COM1 in MS-DOS), then you will use /dev/ttyd0 to refer to the terminal. If the terminal is on the second serial port (also known as COM2), use /dev/ttyd1, and so forth.
17.2.3 Kernel Configuration
FreeBSD supports four serial ports by default. In the MS-DOS world, these are known as COM1, COM2, COM3, and COM4. FreeBSD currently supports ``dumb'' multiport serial interface cards, such as the BocaBoard 1008 and 2016, as well as more intelligent multi-port cards such as those made by Digiboard and Stallion Technologies. However, the default kernel only looks for the standard COM ports.
To see if your kernel recognizes any of your serial ports, watch for messages while the kernel is booting, or use the /sbin/dmesg command to replay the kernel's boot messages. In particular, look for messages that start with the characters sio.
Tip: To view just the messages that have the word sio, use the command:
# /sbin/dmesg | grep 'sio'
For example, on a system with four serial ports, these are the serial-port specific kernel boot messages:
sio0 at 0x3f8-0x3ff irq 4 on isa sio0: type 16550A sio1 at 0x2f8-0x2ff irq 3 on isa sio1: type 16550A sio2 at 0x3e8-0x3ef irq 5 on isa sio2: type 16550A sio3 at 0x2e8-0x2ef irq 9 on isa sio3: type 16550A
If your kernel does not recognize all of your serial ports, you will probably need to configure a custom FreeBSD kernel for your system. For detailed information on configuring your kernel, please see Chapter 9.
The relevant device lines for your kernel configuration file would look like this, for FreeBSD 4.X:
device sio0 at isa? port IO_COM1 irq 4 device sio1 at isa? port IO_COM2 irq 3 device sio2 at isa? port IO_COM3 irq 5 device sio3 at isa? port IO_COM4 irq 9
and like this, for FreeBSD 5.X:
device sio
You can comment-out or completely remove lines for devices you do not have in the case of FreeBSD 4.X; for FreeBSD 5.X you have to edit your /boot/device.hints file to configure your serial ports. Please refer to the sio(4) manual page for more information on serial ports and multiport boards configuration. Be careful if you are using a configuration file that was previously used for a different version of FreeBSD because the device flags and the syntax have changed between versions.
Note: port IO_COM1 is a substitution for port 0x3f8, IO_COM2 is 0x2f8, IO_COM3 is 0x3e8, and IO_COM4 is 0x2e8, which are fairly common port addresses for their respective serial ports; interrupts 4, 3, 5, and 9 are fairly common interrupt request lines. Also note that regular serial ports cannot share interrupts on ISA-bus PCs (multiport boards have on-board electronics that allow all the 16550A's on the board to share one or two interrupt request lines).
17.2.4 Device Special Files
Most devices in the kernel are accessed through ``device special files'', which are located in the /dev directory. The sio devices are accessed through the /dev/ttydN (dial-in) and /dev/cuaaN (call-out) devices. FreeBSD also provides initialization devices (/dev/ttyidN and /dev/cuaiaN) and locking devices (/dev/ttyldN and /dev/cualaN). The initialization devices are used to initialize communications port parameters each time a port is opened, such as crtscts for modems which use RTS/CTS signaling for flow control. The locking devices are used to lock flags on ports to prevent users or programs changing certain parameters; see the manual pages termios(4), sio(4), and stty(1) for information on the terminal settings, locking and initializing devices, and setting terminal options, respectively.
17.2.4.1 Making Device Special Files
Note: FreeBSD 5.0 includes the devfs(5) filesystem which automatically creates device nodes as needed. If you are running a version of FreeBSD with devfs enabled then you can safely skip this section.
A shell script called MAKEDEV in the /dev directory manages the device special files. To use MAKEDEV to make dial-up device special files for COM1 (port 0), cd to /dev and issue the command MAKEDEV ttyd0. Likewise, to make dial-up device special files for COM2 (port 1), use MAKEDEV ttyd1.
MAKEDEV not only creates the /dev/ttydN device special files, but also the /dev/cuaaN, /dev/cuaiaN, /dev/cualaN, /dev/ttyldN, and /dev/ttyidN nodes.
After making new device special files, be sure to check the permissions on the files (especially the /dev/cua* files) to make sure that only users who should have access to those device special files can read and write on them -- you probably do not want to allow your average user to use your modems to dial-out. The default permissions on the /dev/cua* files should be sufficient:
crw-rw---- 1 uucp dialer 28, 129 Feb 15 14:38 /dev/cuaa1 crw-rw---- 1 uucp dialer 28, 161 Feb 15 14:38 /dev/cuaia1 crw-rw---- 1 uucp dialer 28, 193 Feb 15 14:38 /dev/cuala1
These permissions allow the user uucp and users in the group dialer to use the call-out devices.
17.2.5 Serial Port Configuration
The ttydN (or cuaaN) device is the regular device you will want to open for your applications. When a process opens the device, it will have a default set of terminal I/O settings. You can see these settings with the command
# stty -a -f /dev/ttyd1
When you change the settings to this device, the settings are in effect until the device is closed. When it is reopened, it goes back to the default set. To make changes to the default set, you can open and adjust the settings of the ``initial state'' device. For example, to turn on CLOCAL mode, 8 bit communication, and XON/XOFF flow control by default for ttyd5, type:
# stty -f /dev/ttyid5 clocal cs8 ixon ixoff
System-wide initialization of the serial devices is controlled in /etc/rc.serial. This file affects the default settings of serial devices.
To prevent certain settings from being changed by an application, make adjustments to the ``lock state'' device. For example, to lock the speed of ttyd5 to 57600 bps, type:
# stty -f /dev/ttyld5 57600
Now, an application that opens ttyd5 and tries to change the speed of the port will be stuck with 57600 bps.
Naturally, you should make the initial state and lock state devices writable only by the root account.
17.3 Terminals
Contributed by Sean Kelly.Terminals provide a convenient and low-cost way to access your FreeBSD system when you are not at the computer's console or on a connected network. This section describes how to use terminals with FreeBSD.
17.3.1 Uses and Types of Terminals
The original UNIX systems did not have consoles. Instead, people logged in and ran programs through terminals that were connected to the computer's serial ports. It is quite similar to using a modem and terminal software to dial into a remote system to do text-only work.
Today's PCs have consoles capable of high quality graphics, but the ability to establish a login session on a serial port still exists in nearly every UNIX style operating system today; FreeBSD is no exception. By using a terminal attached to an unused serial port, you can log in and run any text program that you would normally run on the console or in an xterm window in the X Window System.
For the business user, you can attach many terminals to a FreeBSD system and place them on your employees' desktops. For a home user, a spare computer such as an older IBM PC or a Macintosh can be a terminal wired into a more powerful computer running FreeBSD. You can turn what might otherwise be a single-user computer into a powerful multiple user system.
For FreeBSD, there are three kinds of terminals:
The remaining subsections describe each kind.
17.3.1.1 Dumb Terminals
Dumb terminals are specialized pieces of hardware that let you connect to computers over serial lines. They are called ``dumb'' because they have only enough computational power to display, send, and receive text. You cannot run any programs on them. It is the computer to which you connect them that has all the power to run text editors, compilers, email, games, and so forth.
There are hundreds of kinds of dumb terminals made by many manufacturers, including Digital Equipment Corporation's VT-100 and Wyse's WY-75. Just about any kind will work with FreeBSD. Some high-end terminals can even display graphics, but only certain software packages can take advantage of these advanced features.
Dumb terminals are popular in work environments where workers do not need access to graphical applications such as those provided by the X Window System.
17.3.1.2 PCs Acting as Terminals
If a dumb terminal has just enough ability to display, send, and receive text, then certainly any spare personal computer can be a dumb terminal. All you need is the proper cable and some terminal emulation software to run on the computer.
Such a configuration is popular in homes. For example, if your spouse is busy working on your FreeBSD system's console, you can do some text-only work at the same time from a less powerful personal computer hooked up as a terminal to the FreeBSD system.
17.3.1.3 X Terminals
X terminals are the most sophisticated kind of terminal available. Instead of connecting to a serial port, they usually connect to a network like Ethernet. Instead of being relegated to text-only applications, they can display any X application.
We introduce X terminals just for the sake of completeness. However, this chapter does not cover setup, configuration, or use of X terminals.
17.3.2 Configuration
This section describes what you need to configure on your FreeBSD system to enable a login session on a terminal. It assumes you have already configured your kernel to support the serial port to which the terminal is connected--and that you have connected it.
Recall from Chapter 7 that the init process is responsible for all process control and initialization at system startup. One of the tasks performed by init is to read the /etc/ttys file and start a getty process on the available terminals. The getty process is responsible for reading a login name and starting the login program.
Thus, to configure terminals for your FreeBSD system the following steps should be taken as root:
-
Add a line to /etc/ttys for the entry in the /dev directory for the serial port if it is not already there.
-
Specify that /usr/libexec/getty be run on the port, and specify the appropriate getty type from the /etc/gettytab file.
-
Specify the default terminal type.
-
Set the port to ``on.''
-
Specify whether the port should be ``secure.''
-
Force init to reread the /etc/ttys file.
As an optional step, you may wish to create a custom getty type for use in step 2 by making an entry in /etc/gettytab. This chapter does not explain how to do so; you are encouraged to see the gettytab(5) and the getty(8) manual pages for more information.
17.3.2.1 Adding an Entry to /etc/ttys
The /etc/ttys file lists all of the ports on your FreeBSD system where you want to allow logins. For example, the first virtual console ttyv0 has an entry in this file. You can log in on the console using this entry. This file also contains entries for the other virtual consoles, serial ports, and pseudo-ttys. For a hardwired terminal, just list the serial port's /dev entry without the /dev part (for example, /dev/ttyv0 would be listed as ttyv0).
A default FreeBSD install includes an /etc/ttys file with support for the first four serial ports: ttyd0 through ttyd3. If you are attaching a terminal to one of those ports, you do not need to add another entry.
Example 17-1. Adding Terminal Entries to /etc/ttys
Suppose we would like to connect two terminals to the system: a Wyse-50 and an old 286 IBM PC running Procomm terminal software emulating a VT-100 terminal. We connect the Wyse to the second serial port and the 286 to the sixth serial port (a port on a multiport serial card). The corresponding entries in the /etc/ttys file would look like this:
ttyd1ttyd5 "/usr/libexec/getty std.19200" vt100 on insecure
- The first field normally specifies the name of the terminal special file as it is found in /dev.
- The second field is the command to execute for this line, which is usually getty(8). getty initializes and opens the line, sets the speed, prompts for a user name and then executes the login(1) program.
-
The getty program accepts one (optional) parameter on its command line, the getty type. A getty type configures characteristics on the terminal line, like bps rate and parity. The getty program reads these characteristics from the file /etc/gettytab.
-
The file /etc/gettytab contains lots of entries for terminal lines both old and new. In almost all cases, the entries that start with the text std will work for hardwired terminals. These entries ignore parity. There is a std entry for each bps rate from 110 to 115200. Of course, you can add your own entries to this file. The gettytab(5) manual page provides more information.
-
When setting the getty type in the /etc/ttys file, make sure that the communications settings on the terminal match.
-
For our example, the Wyse-50 uses no parity and connects at 38400 bps. The 286 PC uses no parity and connects at 19200 bps.
- The third field is the type of terminal usually connected to that tty line. For dial-up ports, unknown or dialup is typically used in this field since users may dial up with practically any type of terminal or software. For hardwired terminals, the terminal type does not change, so you can put a real terminal type from the termcap(5) database file in this field.
-
For our example, the Wyse-50 uses the real terminal type while the 286 PC running Procomm will be set to emulate at VT-100.
- The fourth field specifies if the port should be enabled. Putting on here will have the init process start the program in the second field, getty. If you put off in this field, there will be no getty, and hence no logins on the port.
- The final field is used to specify whether the port is secure. Marking a port as secure means that you trust it enough to allow the root account (or any account with a user ID of 0) to login from that port. Insecure ports do not allow root logins. On an insecure port, users must login from unprivileged accounts and then use su(1) or a similar mechanism to gain superuser privileges.
-
It is highly recommended that you use ``insecure'' even for terminals that are behind locked doors. It is quite easy to login and use su if you need superuser privileges.
17.3.2.2 Force init to Reread /etc/ttys
After making the necessary changes to the /etc/ttys file you should send a SIGHUP (hangup) signal to the init process to force it to re-read its configuration file. For example:
# kill -HUP 1
Note: init is always the first process run on a system, therefore it will always have PID 1.
If everything is set up correctly, all cables are in place, and the terminals are powered up, then a getty process should be running on each terminal and you should see login prompts on your terminals at this point.
17.3.3 Troubleshooting Your Connection
Even with the most meticulous attention to detail, something could still go wrong while setting up a terminal. Here is a list of symptoms and some suggested fixes.
17.3.3.1 No Login Prompt Appears
Make sure the terminal is plugged in and powered up. If it is a personal computer acting as a terminal, make sure it is running terminal emulation software on the correct serial port.
Make sure the cable is connected firmly to both the terminal and the FreeBSD computer. Make sure it is the right kind of cable.
Make sure the terminal and FreeBSD agree on the bps rate and parity settings. If you have a video display terminal, make sure the contrast and brightness controls are turned up. If it is a printing terminal, make sure paper and ink are in good supply.
Make sure that a getty process is running and serving the terminal. For example, to get a list of running getty processes with ps, type:
# ps -axww|grep getty
You should see an entry for the terminal. For example, the following display shows that a getty is running on the second serial port ttyd1 and is using the std.38400 entry in /etc/gettytab:
22189 d1 Is+ 0:00.03 /usr/libexec/getty std.38400 ttyd1
If no getty process is running, make sure you have enabled the port in /etc/ttys. Also remember to run kill -HUP 1 after modifying the ttys file.
If the getty process is running but the terminal still does not display a login prompt, or if it displays a prompt but will not allow you to type, your terminal or cable may not support hardware handshaking. Try changing the entry in /etc/ttys from std.38400 to 3wire.38400 remember to run kill -HUP 1 after modifying /etc/ttys). The 3wire entry is similar to std, but ignores hardware handshaking. You may need to reduce the baud rate or enable software flow control when using 3wire to prevent buffer overflows.
17.3.3.2 If Garbage Appears Instead of a Login Prompt
Make sure the terminal and FreeBSD agree on the bps rate and parity settings. Check the getty processes to make sure the correct getty type is in use. If not, edit /etc/ttys and run kill -HUP 1.
17.3.3.3 Characters Appear Doubled; the Password Appears When Typed
Switch the terminal (or the terminal emulation software) from ``half duplex'' or ``local echo'' to ``full duplex.''
17.4 Dial-in Service
Contributed by Guy Helmer. Additions by Sean Kelly.Configuring your FreeBSD system for dial-in service is very similar to connecting terminals except that you are dealing with modems instead of terminals.
17.4.1 External vs. Internal Modems
External modems seem to be more convenient for dial-up, because external modems often can be semi-permanently configured via parameters stored in non-volatile RAM and they usually provide lighted indicators that display the state of important RS-232 signals. Blinking lights impress visitors, but lights are also very useful to see whether a modem is operating properly.
Internal modems usually lack non-volatile RAM, so their configuration may be limited only to setting DIP switches. If your internal modem has any signal indicator lights, it is probably difficult to view the lights when the system's cover is in place.
17.4.1.1 Modems and Cables
If you are using an external modem, then you will of course need the proper cable. A standard RS-232C serial cable should suffice as long as all of the normal signals are wired:
-
Transmitted Data (SD)
-
Received Data (RD)
-
Request to Send (RTS)
-
Clear to Send (CTS)
-
Data Set Ready (DSR)
-
Data Terminal Ready (DTR)
-
Carrier Detect (CD)
-
Signal Ground (SG)
FreeBSD needs the RTS and CTS signals for flow-control at speeds above 2400 bps, the CD signal to detect when a call has been answered or the line has been hung up, and the DTR signal to reset the modem after a session is complete. Some cables are wired without all of the needed signals, so if you have problems, such as a login session not going away when the line hangs up, you may have a problem with your cable.
Like other UNIX like operating systems, FreeBSD uses the hardware signals to find out when a call has been answered or a line has been hung up and to hangup and reset the modem after a call. FreeBSD avoids sending commands to the modem or watching for status reports from the modem. If you are familiar with connecting modems to PC-based bulletin board systems, this may seem awkward.
17.4.2 Serial Interface Considerations
FreeBSD supports NS8250-, NS16450-, NS16550-, and NS16550A-based EIA RS-232C (CCITT V.24) communications interfaces. The 8250 and 16450 devices have single-character buffers. The 16550 device provides a 16-character buffer, which allows for better system performance. (Bugs in plain 16550's prevent the use of the 16-character buffer, so use 16550A's if possible). Because single-character-buffer devices require more work by the operating system than the 16-character-buffer devices, 16550A-based serial interface cards are much preferred. If the system has many active serial ports or will have a heavy load, 16550A-based cards are better for low-error-rate communications.
17.4.3 Quick Overview
As with terminals, init spawns a getty process for each configured serial port for dial-in connections. For example, if a modem is attached to /dev/ttyd0, the command ps ax might show this:
4850 ?? I 0:00.09 /usr/libexec/getty V19200 ttyd0
When a user dials the modem's line and the modems connect, the CD (Carrier Detect) line is reported by the modem. The kernel notices that carrier has been detected and completes getty's open of the port. getty sends a login: prompt at the specified initial line speed. getty watches to see if legitimate characters are received, and, in a typical configuration, if it finds junk (probably due to the modem's connection speed being different than getty's speed), getty tries adjusting the line speeds until it receives reasonable characters.
After the user enters his/her login name, getty executes /usr/bin/login, which completes the login by asking for the user's password and then starting the user's shell.
17.4.4 Configuration Files
There are three system configuration files in the /etc directory that you will probably need to edit to allow dial-up access to your FreeBSD system. The first, /etc/gettytab, contains configuration information for the /usr/libexec/getty daemon. Second, /etc/ttys holds information that tells /sbin/init what tty devices should have getty processes running on them. Lastly, you can place port initialization commands in the /etc/rc.serial script.
There are two schools of thought regarding dial-up modems on UNIX. One group likes to configure their modems and systems so that no matter at what speed a remote user dials in, the local computer-to-modem RS-232 interface runs at a locked speed. The benefit of this configuration is that the remote user always sees a system login prompt immediately. The downside is that the system does not know what a user's true data rate is, so full-screen programs like Emacs will not adjust their screen-painting methods to make their response better for slower connections.
The other school configures their modems' RS-232 interface to vary its speed based on the remote user's connection speed. For example, V.32bis (14.4 Kbps) connections to the modem might make the modem run its RS-232 interface at 19.2 Kbps, while 2400 bps connections make the modem's RS-232 interface run at 2400 bps. Because getty does not understand any particular modem's connection speed reporting, getty gives a login: message at an initial speed and watches the characters that come back in response. If the user sees junk, it is assumed that they know they should press the Enter key until they see a recognizable prompt. If the data rates do not match, getty sees anything the user types as ``junk'', tries going to the next speed and gives the login: prompt again. This procedure can continue ad nauseam, but normally only takes a keystroke or two before the user sees a good prompt. Obviously, this login sequence does not look as clean as the former ``locked-speed'' method, but a user on a low-speed connection should receive better interactive response from full-screen programs.
This section will try to give balanced configuration information, but is biased towards having the modem's data rate follow the connection rate.
17.4.4.1 /etc/gettytab
/etc/gettytab is a termcap(5)-style file of configuration information for getty(8). Please see the gettytab(5) manual page for complete information on the format of the file and the list of capabilities.
17.4.4.1.1 Locked-speed Config
If you are locking your modem's data communications rate at a particular speed, you probably will not need to make any changes to /etc/gettytab.
17.4.4.1.2 Matching-speed Config
You will need to setup an entry in /etc/gettytab to give getty information about the speeds you wish to use for your modem. If you have a 2400 bps modem, you can probably use the existing D2400 entry.
#
# Fast dialup terminals, 2400/1200/300 rotary (can start either way)
#
D2400|d2400|Fast-Dial-2400:\
:nx=D1200:tc=2400-baud:
3|D1200|Fast-Dial-1200:\
:nx=D300:tc=1200-baud:
5|D300|Fast-Dial-300:\
:nx=D2400:tc=300-baud:
If you have a higher speed modem, you will probably need to add an entry in /etc/gettytab; here is an entry you could use for a 14.4 Kbps modem with a top interface speed of 19.2 Kbps:
#
# Additions for a V.32bis Modem
#
um|V300|High Speed Modem at 300,8-bit:\
:nx=V19200:tc=std.300:
un|V1200|High Speed Modem at 1200,8-bit:\
:nx=V300:tc=std.1200:
uo|V2400|High Speed Modem at 2400,8-bit:\
:nx=V1200:tc=std.2400:
up|V9600|High Speed Modem at 9600,8-bit:\
:nx=V2400:tc=std.9600:
uq|V19200|High Speed Modem at 19200,8-bit:\
:nx=V9600:tc=std.19200:
This will result in 8-bit, no parity connections.
The example above starts the communications rate at 19.2 Kbps (for a V.32bis connection), then cycles through 9600 bps (for V.32), 2400 bps, 1200 bps, 300 bps, and back to 19.2 Kbps. Communications rate cycling is implemented with the nx= (``next table'') capability. Each of the lines uses a tc= (``table continuation'') entry to pick up the rest of the ``standard'' settings for a particular data rate.
If you have a 28.8 Kbps modem and/or you want to take advantage of compression on a 14.4 Kbps modem, you need to use a higher communications rate than 19.2 Kbps. Here is an example of a gettytab entry starting a 57.6 Kbps:
#
# Additions for a V.32bis or V.34 Modem
# Starting at 57.6 Kbps
#
vm|VH300|Very High Speed Modem at 300,8-bit:\
:nx=VH57600:tc=std.300:
vn|VH1200|Very High Speed Modem at 1200,8-bit:\
:nx=VH300:tc=std.1200:
vo|VH2400|Very High Speed Modem at 2400,8-bit:\
:nx=VH1200:tc=std.2400:
vp|VH9600|Very High Speed Modem at 9600,8-bit:\
:nx=VH2400:tc=std.9600:
vq|VH57600|Very High Speed Modem at 57600,8-bit:\
:nx=VH9600:tc=std.57600:
If you have a slow CPU or a heavily loaded system and do not have 16550A-based serial ports, you may receive ``sio'' ``silo'' errors at 57.6 Kbps.
17.4.4.2 /etc/ttys
Configuration of the /etc/ttys file was covered in Example 17-1. Configuration for modems is similar but we must pass a different argument to getty and specify a different terminal type. The general format for both locked-speed and matching-speed configurations is:
ttyd0 "/usr/libexec/getty xxx" dialup on
The first item in the above line is the device special file for this entry -- ttyd0 means /dev/ttyd0 is the file that this getty will be watching. The second item, "/usr/libexec/getty xxx" (xxx will be replaced by the initial gettytab capability) is the process init will run on the device. The third item, dialup, is the default terminal type. The fourth parameter, on, indicates to init that the line is operational. There can be a fifth parameter, secure, but it should only be used for terminals which are physically secure (such as the system console).
The default terminal type (dialup in the example above) may depend on local preferences. dialup is the traditional default terminal type on dial-up lines so that users may customize their login scripts to notice when the terminal is dialup and automatically adjust their terminal type. However, the author finds it easier at his site to specify vt102 as the default terminal type, since the users just use VT102 emulation on their remote systems.
After you have made changes to /etc/ttys, you may send the init process a HUP signal to re-read the file. You can use the command
# kill -HUP 1to send the signal. If this is your first time setting up the system, you may want to wait until your modem(s) are properly configured and connected before signaling init.
17.4.4.2.1 Locked-speed Config
For a locked-speed configuration, your ttys entry needs to have a fixed-speed entry provided to getty. For a modem whose port speed is locked at 19.2 Kbps, the ttys entry might look like this:
ttyd0 "/usr/libexec/getty std.19200" dialup on
If your modem is locked at a different data rate, substitute the appropriate value for std.speed instead of std.19200. Make sure that you use a valid type listed in /etc/gettytab.
17.4.4.2.2 Matching-speed Config
In a matching-speed configuration, your ttys entry needs to reference the appropriate beginning ``auto-baud'' (sic) entry in /etc/gettytab. For example, if you added the above suggested entry for a matching-speed modem that starts at 19.2 Kbps (the gettytab entry containing the V19200 starting point), your ttys entry might look like this:
ttyd0 "/usr/libexec/getty V19200" dialup on
17.4.4.3 /etc/rc.serial
High-speed modems, like V.32, V.32bis, and V.34 modems, need to use hardware (RTS/CTS) flow control. You can add stty commands to /etc/rc.serial to set the hardware flow control flag in the FreeBSD kernel for the modem ports.
For example to set the termios flag crtscts on serial port #1's (COM2) dial-in and dial-out initialization devices, the following lines could be added to /etc/rc.serial:
# Serial port initial configuration stty -f /dev/ttyid1 crtscts stty -f /dev/cuaia1 crtscts
17.4.5 Modem Settings
If you have a modem whose parameters may be permanently set in non-volatile RAM, you will need to use a terminal program (such as Telix under MS-DOS or tip under FreeBSD) to set the parameters. Connect to the modem using the same communications speed as the initial speed getty will use and configure the modem's non-volatile RAM to match these requirements:
-
CD asserted when connected
-
DTR asserted for operation; dropping DTR hangs up line and resets modem
-
CTS transmitted data flow control
-
Disable XON/XOFF flow control
-
RTS received data flow control
-
Quiet mode (no result codes)
-
No command echo
Please read the documentation for your modem to find out what commands and/or DIP switch settings you need to give it.
For example, to set the above parameters on a U.S. Robotics® Sportster® 14,400 external modem, one could give these commands to the modem:
ATZ AT&C1&D2&H1&I0&R2&W
You might also want to take this opportunity to adjust other settings in the modem, such as whether it will use V.42bis and/or MNP5 compression.
The U.S. Robotics Sportster 14,400 external modem also has some DIP switches that need to be set; for other modems, perhaps you can use these settings as an example:
-
Switch 1: UP -- DTR Normal
-
Switch 2: N/A (Verbal Result Codes/Numeric Result Codes)
-
Switch 3: UP -- Suppress Result Codes
-
Switch 4: DOWN -- No echo, offline commands
-
Switch 5: UP -- Auto Answer
-
Switch 6: UP -- Carrier Detect Normal
-
Switch 7: UP -- Load NVRAM Defaults
-
Switch 8: N/A (Smart Mode/Dumb Mode)
Result codes should be disabled/suppressed for dial-up modems to avoid problems that can occur if getty mistakenly gives a login: prompt to a modem that is in command mode and the modem echoes the command or returns a result code. This sequence can result in a extended, silly conversation between getty and the modem.
17.4.5.1 Locked-speed Config
For a locked-speed configuration, you will need to configure the modem to maintain a constant modem-to-computer data rate independent of the communications rate. On a U.S. Robotics Sportster 14,400 external modem, these commands will lock the modem-to-computer data rate at the speed used to issue the commands:
ATZ AT&B1&W
17.4.5.2 Matching-speed Config
For a variable-speed configuration, you will need to configure your modem to adjust its serial port data rate to match the incoming call rate. On a U.S. Robotics Sportster 14,400 external modem, these commands will lock the modem's error-corrected data rate to the speed used to issue the commands, but allow the serial port rate to vary for non-error-corrected connections:
ATZ AT&B2&W
17.4.5.3 Checking the Modem's Configuration
Most high-speed modems provide commands to view the modem's current operating parameters in a somewhat human-readable fashion. On the U.S. Robotics Sportster 14,400 external modems, the command ATI5 displays the settings that are stored in the non-volatile RAM. To see the true operating parameters of the modem (as influenced by the modem's DIP switch settings), use the commands ATZ and then ATI4.
If you have a different brand of modem, check your modem's manual to see how to double-check your modem's configuration parameters.
17.4.6 Troubleshooting
Here are a few steps you can follow to check out the dial-up modem on your system.
17.4.6.1 Checking Out the FreeBSD System
Hook up your modem to your FreeBSD system, boot the system, and, if your modem has status indication lights, watch to see whether the modem's DTR indicator lights when the login: prompt appears on the system's console -- if it lights up, that should mean that FreeBSD has started a getty process on the appropriate communications port and is waiting for the modem to accept a call.
If the DTR indicator does not light, login to the FreeBSD system through the console and issue a ps ax to see if FreeBSD is trying to run a getty process on the correct port. You should see lines like these among the processes displayed:
114 ?? I 0:00.10 /usr/libexec/getty V19200 ttyd0 115 ?? I 0:00.10 /usr/libexec/getty V19200 ttyd1
If you see something different, like this:
114 d0 I 0:00.10 /usr/libexec/getty V19200 ttyd0
and the modem has not accepted a call yet, this means that getty has completed its open on the communications port. This could indicate a problem with the cabling or a mis-configured modem, because getty should not be able to open the communications port until CD (carrier detect) has been asserted by the modem.
If you do not see any getty processes waiting to open the desired ttydN port, double-check your entries in /etc/ttys to see if there are any mistakes there. Also, check the log file /var/log/messages to see if there are any log messages from init or getty regarding any problems. If there are any messages, triple-check the configuration files /etc/ttys and /etc/gettytab, as well as the appropriate device special files /dev/ttydN, for any mistakes, missing entries, or missing device special files.
17.4.6.2 Try Dialing In
Try dialing into the system; be sure to use 8 bits, no parity, and 1 stop bit on the remote system. If you do not get a prompt right away, or get garbage, try pressing Enter about once per second. If you still do not see a login: prompt after a while, try sending a BREAK. If you are using a high-speed modem to do the dialing, try dialing again after locking the dialing modem's interface speed (via AT&B1 on a U.S. Robotics Sportster modem, for example).
If you still cannot get a login: prompt, check /etc/gettytab again and double-check that
-
The initial capability name specified in /etc/ttys for the line matches a name of a capability in /etc/gettytab
-
Each nx= entry matches another gettytab capability name
-
Each tc= entry matches another gettytab capability name
If you dial but the modem on the FreeBSD system will not answer, make sure that the modem is configured to answer the phone when DTR is asserted. If the modem seems to be configured correctly, verify that the DTR line is asserted by checking the modem's indicator lights (if it has any).
If you have gone over everything several times and it still does not work, take a break and come back to it later. If it still does not work, perhaps you can send an electronic mail message to the FreeBSD general questions mailing list describing your modem and your problem, and the good folks on the list will try to help.
17.5 Dial-out Service
The following are tips for getting your host to be able to connect over the modem to another computer. This is appropriate for establishing a terminal session with a remote host.
This is useful to log onto a BBS.
This kind of connection can be extremely helpful to get a file on the Internet if you have problems with PPP. If you need to FTP something and PPP is broken, use the terminal session to FTP it. Then use zmodem to transfer it to your machine.
17.5.1 My Stock Hayes Modem Is Not Supported, What Can I Do?
Actually, the manual page for tip is out of date. There is a generic Hayes dialer already built in. Just use at=hayes in your /etc/remote file.
The Hayes driver is not smart enough to recognize some of the advanced features of newer modems--messages like BUSY, NO DIALTONE, or CONNECT 115200 will just confuse it. You should turn those messages off when you use tip (using ATX0&W).
Also, the dial timeout for tip is 60 seconds. Your modem should use something less, or else tip will think there is a communication problem. Try ATS7=45&W.
Note: As shipped, tip does not yet support Hayes modems fully. The solution is to edit the file tipconf.h in the directory /usr/src/usr.bin/tip/tip. Obviously you need the source distribution to do this.
Edit the line #define HAYES 0 to #define HAYES 1. Then make and make install. Everything works nicely after that.
17.5.2 How Am I Expected to Enter These AT Commands?
Make what is called a ``direct'' entry in your /etc/remote file. For example, if your modem is hooked up to the first serial port, /dev/cuaa0, then put in the following line:
cuaa0:dv=/dev/cuaa0:br#19200:pa=none
Use the highest bps rate your modem supports in the br capability. Then, type tip cuaa0 and you will be connected to your modem.
If there is no /dev/cuaa0 on your system, do this:
# cd /dev # sh MAKEDEV cuaa0
Or use cu as root with the following command:
# cu -lline -sspeed
line is the serial port (e.g./dev/cuaa0) and speed is the speed (e.g.57600). When you are done entering the AT commands hit ~. to exit.
17.5.3 The @ Sign for the pn Capability Does Not Work!
The @ sign in the phone number capability tells tip to look in /etc/phones for a phone number. But the @ sign is also a special character in capability files like /etc/remote. Escape it with a backslash:
pn=\@
17.5.4 How Can I Dial a Phone Number on the Command Line?
Put what is called a ``generic'' entry in your /etc/remote file. For example:
tip115200|Dial any phone number at 115200 bps:\
:dv=/dev/cuaa0:br#115200:at=hayes:pa=none:du:
tip57600|Dial any phone number at 57600 bps:\
:dv=/dev/cuaa0:br#57600:at=hayes:pa=none:du:
Then you can do things like:
# tip -115200 5551234
If you prefer cu over tip, use a generic cu entry:
cu115200|Use cu to dial any number at 115200bps:\
:dv=/dev/cuaa1:br#57600:at=hayes:pa=none:du:
and type:
# cu 5551234 -s 115200
17.5.5 Do I Have to Type in the bps Rate Every Time I Do That?
Put in an entry for tip1200 or cu1200, but go ahead and use whatever bps rate is appropriate with the br capability. tip thinks a good default is 1200 bps which is why it looks for a tip1200 entry. You do not have to use 1200 bps, though.
17.5.6 I Access a Number of Hosts Through a Terminal Server
Rather than waiting until you are connected and typing CONNECT <host> each time, use tip's cm capability. For example, these entries in /etc/remote:
pain|pain.deep13.com|Forrester's machine:\
:cm=CONNECT pain\n:tc=deep13:
muffin|muffin.deep13.com|Frank's machine:\
:cm=CONNECT muffin\n:tc=deep13:
deep13:Gizmonics Institute terminal server:\
:dv=/dev/cuaa2:br#38400:at=hayes:du:pa=none:pn=5551234:
will let you type tip pain or tip muffin to connect to the hosts pain or muffin, and tip deep13 to get to the terminal server.
17.5.7 Can Tip Try More Than One Line for Each Site?
This is often a problem where a university has several modem lines and several thousand students trying to use them.
Make an entry for your university in /etc/remote and use @ for the pn capability:
big-university:\
:pn=\@:tc=dialout
dialout:\
:dv=/dev/cuaa3:br#9600:at=courier:du:pa=none:
Then, list the phone numbers for the university in /etc/phones:
big-university 5551111 big-university 5551112 big-university 5551113 big-university 5551114
tip will try each one in the listed order, then give up. If you want to keep retrying, run tip in a while loop.
17.5.8 Why Do I Have to Hit Ctrl+P Twice to Send Ctrl+P Once?
Ctrl+P is the default ``force'' character, used to tell tip that the next character is literal data. You can set the force character to any other character with the ~s escape, which means ``set a variable.''
Type ~sforce=single-char followed by a newline. single-char is any single character. If you leave out single-char, then the force character is the nul character, which you can get by typing Ctrl+2 or Ctrl+Space. A pretty good value for single-char is Shift+Ctrl+6, which is only used on some terminal servers.
You can have the force character be whatever you want by specifying the following in your $HOME/.tiprc file:
force=<single-char>
17.5.9 Suddenly Everything I Type Is in Upper Case??
You must have pressed Ctrl+A, tip's ``raise character,'' specially designed for people with broken caps-lock keys. Use ~s as above and set the variable raisechar to something reasonable. In fact, you can set it to the same as the force character, if you never expect to use either of these features.
Here is a sample .tiprc file perfect for Emacs users who need to type Ctrl+2 and Ctrl+A a lot:
force=^^ raisechar=^^
The ^^ is Shift+Ctrl+6.
17.5.10 How Can I Do File Transfers with tip?
If you are talking to another UNIX system, you can send and receive files with ~p (put) and ~t (take). These commands run cat and echo on the remote system to accept and send files. The syntax is:
~p local-file [remote-file]
~t remote-file [local-file]
There is no error checking, so you probably should use another protocol, like zmodem.
17.5.11 How Can I Run zmodem with tip?
To receive files, start the sending program on the remote end. Then, type ~C rz to begin receiving them locally.
To send files, start the receiving program on the remote end. Then, type ~C sz files to send them to the remote system.
17.6 Setting Up the Serial Console
Contributed by Kazutaka YOKOTA. Based on a document by Bill Paul.17.6.1 Introduction
FreeBSD has the ability to boot on a system with only a dumb terminal on a serial port as a console. Such a configuration should be useful for two classes of people: system administrators who wish to install FreeBSD on machines that have no keyboard or monitor attached, and developers who want to debug the kernel or device drivers.
As described in Chapter 7, FreeBSD employs a three stage bootstrap. The first two stages are in the boot block code which is stored at the beginning of the FreeBSD slice on the boot disk. The boot block will then load and run the boot loader (/boot/loader) as the third stage code.
In order to set up the serial console you must configure the boot block code, the boot loader code and the kernel.
17.6.2 Serial Console Configuration
-
Prepare a serial cable.
You will need either a null-modem cable or a standard serial cable and a null-modem adapter. See Section 17.2.2 for a discussion on serial cables.
-
Unplug your keyboard.
Most PC systems probe for the keyboard during the Power-On Self-Test (POST) and will generate an error if the keyboard is not detected. Some machines complain loudly about the lack of a keyboard and will not continue to boot until it is plugged in.
If your computer complains about the error, but boots anyway, then you do not have to do anything special. (Some machines with Phoenix BIOS installed merely say ``Keyboard failed'' and continue to boot normally.)
If your computer refuses to boot without a keyboard attached then you will have to configure the BIOS so that it ignores this error (if it can). Consult your motherboard's manual for details on how to do this.
Tip: Setting the keyboard to ``Not installed'' in the BIOS setup does not mean that you will not be able to use your keyboard. All this does is tell the BIOS not to probe for a keyboard at power-on, so it will not complain if the keyboard is not plugged in. You can leave the keyboard plugged in even with this flag set to ``Not installed'' and the keyboard will still work.
Note: If your system has a PS/2® mouse, chances are very good that you may have to unplug your mouse as well as your keyboard. This is because PS/2 mice share some hardware with the keyboard and leaving the mouse plugged in can fool the keyboard probe into thinking the keyboard is still there. It is said that a Gateway 2000 Pentium 90 MHz system with an AMI BIOS that behaves this way. In general, this is not a problem since the mouse is not much good without the keyboard anyway.
-
Plug a dumb terminal into COM1 (sio0).
If you do not have a dumb terminal, you can use an old PC/XT with a modem program, or the serial port on another UNIX box. If you do not have a COM1 (sio0), get one. At this time, there is no way to select a port other than COM1 for the boot blocks without recompiling the boot blocks. If you are already using COM1 for another device, you will have to temporarily remove that device and install a new boot block and kernel once you get FreeBSD up and running. (It is assumed that COM1 will be available on a file/compute/terminal server anyway; if you really need COM1 for something else (and you cannot switch that something else to COM2 (sio1)), then you probably should not even be bothering with all this in the first place.)
-
Make sure the configuration file of your kernel has appropriate flags set for COM1 (sio0).
Relevant flags are:
- 0x10
-
Enables console support for this unit. The other console flags are ignored unless this is set. Currently, at most one unit can have console support; the first one (in config file order) with this flag set is preferred. This option alone will not make the serial port the console. Set the following flag or use the -h option described below, together with this flag.
- 0x20
-
Forces this unit to be the console (unless there is another higher priority console), regardless of the -h option discussed below. This flag replaces the COMCONSOLE option in FreeBSD versions 2.X. The flag 0x20 must be used together with the 0x10 flag.
- 0x40
-
Reserves this unit (in conjunction with 0x10) and makes the unit unavailable for normal access. You should not set this flag to the serial port unit which you want to use as the serial console. The only use of this flag is to designate the unit for kernel remote debugging. See The Developer's Handbook for more information on remote debugging.
Note: In FreeBSD 4.0 or later the semantics of the flag 0x40 are slightly different and there is another flag to specify a serial port for remote debugging.
Example:
device sio0 at isa? port IO_COM1 flags 0x10 irq 4
See the sio(4) manual page for more details.
If the flags were not set, you need to run UserConfig (on a different console) or recompile the kernel.
-
Create boot.config in the root directory of the a partition on the boot drive.
This file will instruct the boot block code how you would like to boot the system. In order to activate the serial console, you need one or more of the following options--if you want multiple options, include them all on the same line:
- -h
-
Toggles internal and serial consoles. You can use this to switch console devices. For instance, if you boot from the internal (video) console, you can use -h to direct the boot loader and the kernel to use the serial port as its console device. Alternatively, if you boot from the serial port, you can use the -h to tell the boot loader and the kernel to use the video display as the console instead.
- -D
-
Toggles single and dual console configurations. In the single configuration the console will be either the internal console (video display) or the serial port, depending on the state of the -h option above. In the dual console configuration, both the video display and the serial port will become the console at the same time, regardless of the state of the -h option. However, note that the dual console configuration takes effect only during the boot block is running. Once the boot loader gets control, the console specified by the -h option becomes the only console.
- -P
-
Makes the boot block probe the keyboard. If no keyboard is found, the -D and -h options are automatically set.
Note: Due to space constraints in the current version of the boot blocks, the -P option is capable of detecting extended keyboards only. Keyboards with less than 101 keys (and without F11 and F12 keys) may not be detected. Keyboards on some laptop computers may not be properly found because of this limitation. If this is the case with your system, you have to abandon using the -P option. Unfortunately there is no workaround for this problem.
Use either the -P option to select the console automatically, or the -h option to activate the serial console.
You may include other options described in boot(8) as well.
The options, except for -P, will be passed to the boot loader (/boot/loader). The boot loader will determine which of the internal video or the serial port should become the console by examining the state of the -h option alone. This means that if you specify the -D option but not the -h option in /boot.config, you can use the serial port as the console only during the boot block; the boot loader will use the internal video display as the console.
-
Boot the machine.
When you start your FreeBSD box, the boot blocks will echo the contents of /boot.config to the console. For example:
/boot.config: -P Keyboard: no
The second line appears only if you put -P in /boot.config and indicates presence/absence of the keyboard. These messages go to either serial or internal console, or both, depending on the option in /boot.config.
Options Message goes to none internal console -h serial console -D serial and internal consoles -Dh serial and internal consoles -P, keyboard present internal console -P, keyboard absent serial console After the above messages, there will be a small pause before the boot blocks continue loading the boot loader and before any further messages printed to the console. Under normal circumstances, you do not need to interrupt the boot blocks, but you may want to do so in order to make sure things are set up correctly.
Hit any key, other than Enter, at the console to interrupt the boot process. The boot blocks will then prompt you for further action. You should now see something like:
>> FreeBSD/i386 BOOT Default: 0:wd(0,a)/boot/loader boot:
Verify the above message appears on either the serial or internal console or both, according to the options you put in /boot.config. If the message appears in the correct console, hit Enter to continue the boot process.
If you want the serial console but you do not see the prompt on the serial terminal, something is wrong with your settings. In the meantime, you enter -h and hit Enter/Return (if possible) to tell the boot block (and then the boot loader and the kernel) to choose the serial port for the console. Once the system is up, go back and check what went wrong.
After the boot loader is loaded and you are in the third stage of the boot process you can still switch between the internal console and the serial console by setting appropriate environment variables in the boot loader. See Section 17.6.5.
17.6.3 Summary
Here is the summary of various settings discussed in this section and the console eventually selected.
17.6.3.1 Case 1: You Set the Flags to 0x10 for sio0
device sio0 at isa? port IO_COM1 flags 0x10 irq 4
| Options in /boot.config | Console during boot blocks | Console during boot loader | Console in kernel |
|---|---|---|---|
| nothing | internal | internal | internal |
| -h | serial | serial | serial |
| -D | serial and internal | internal | internal |
| -Dh | serial and internal | serial | serial |
| -P, keyboard present | internal | internal | internal |
| -P, keyboard absent | serial and internal | serial | serial |
17.6.3.2 Case 2: You Set the Flags to 0x30 for sio0
device sio0 at isa? port IO_COM1 flags 0x30 irq 4
| Options in /boot.config | Console during boot blocks | Console during boot loader | Console in kernel |
|---|---|---|---|
| nothing | internal | internal | serial |
| -h | serial | serial | serial |
| -D | serial and internal | internal | serial |
| -Dh | serial and internal | serial | serial |
| -P, keyboard present | internal | internal | serial |
| -P, keyboard absent | serial and internal | serial | serial |
17.6.4 Tips for the Serial Console
17.6.4.1 Setting a Faster Serial Port Speed
By default, the serial port settings are: 9600 baud, 8 bits, no parity, and 1 stop bit. If you wish to change the speed, you need to recompile at least the boot blocks. Add the following line to /etc/make.conf and compile new boot blocks:
BOOT_COMCONSOLE_SPEED=19200
If the serial console is configured in some other way than by booting with -h, or if the serial console used by the kernel is different from the one used by the boot blocks, then you must also add the following option to the kernel configuration file and compile a new kernel:
options CONSPEED=19200
17.6.4.2 Using Serial Port Other Than sio0 for the Console
Using a port other than sio0 as the console requires some recompiling. If you want to use another serial port for whatever reasons, recompile the boot blocks, the boot loader and the kernel as follows.
-
Get the kernel source. (See Chapter 21)
-
Edit /etc/make.conf and set BOOT_COMCONSOLE_PORT to the address of the port you want to use (0x3F8, 0x2F8, 0x3E8 or 0x2E8). Only sio0 through sio3 (COM1 through COM4) can be used; multiport serial cards will not work. No interrupt setting is needed.
-
Create a custom kernel configuration file and add appropriate flags for the serial port you want to use. For example, if you want to make sio1 (COM2) the console:
device sio1 at isa? port IO_COM2 flags 0x10 irq 3
or
device sio1 at isa? port IO_COM2 flags 0x30 irq 3
The console flags for the other serial ports should not be set.
-
Recompile and install the boot blocks and the boot loader:
# cd /sys/boot # make # make install
-
Rebuild and install the kernel.
-
Write the boot blocks to the boot disk with disklabel(8) and boot from the new kernel.
17.6.4.3 Entering the DDB Debugger from the Serial Line
If you wish to drop into the kernel debugger from the serial console (useful for remote diagnostics, but also dangerous if you generate a spurious BREAK on the serial port!) then you should compile your kernel with the following options:
options BREAK_TO_DEBUGGER options DDB
17.6.4.4 Getting a Login Prompt on the Serial Console
While this is not required, you may wish to get a login prompt over the serial line, now that you can see boot messages and can enter the kernel debugging session through the serial console. Here is how to do it.
Open the file /etc/ttys with an editor and locate the lines:
ttyd0 "/usr/libexec/getty std.9600" unknown off secure ttyd1 "/usr/libexec/getty std.9600" unknown off secure ttyd2 "/usr/libexec/getty std.9600" unknown off secure ttyd3 "/usr/libexec/getty std.9600" unknown off secure
ttyd0 through ttyd3 corresponds to COM1 through COM4. Change off to on for the desired port. If you have changed the speed of the serial port, you need to change std.9600 to match the current setting, e.g. std.19200.
You may also want to change the terminal type from unknown to the actual type of your serial terminal.
After editing the file, you must kill -HUP 1 to make this change take effect.
17.6.5 Changing Console from the Boot Loader
Previous sections described how to set up the serial console by tweaking the boot block. This section shows that you can specify the console by entering some commands and environment variables in the boot loader. As the boot loader is invoked at the third stage of the boot process, after the boot block, the settings in the boot loader will override the settings in the boot block.
17.6.5.1 Setting Up the Serial Console
You can easily specify the boot loader and the kernel to use the serial console by writing just one line in /boot/loader.rc:
set console=comconsole
This will take effect regardless of the settings in the boot block discussed in the previous section.
You had better put the above line as the first line of /boot/loader.rc so as to see boot messages on the serial console as early as possible.
Likewise, you can specify the internal console as:
set console=vidconsole
If you do not set the boot loader environment variable console, the boot loader, and subsequently the kernel, will use whichever console indicated by the -h option in the boot block.
In versions 3.2 or later, you may specify the console in /boot/loader.conf.local or /boot/loader.conf, rather than in /boot/loader.rc. In this method your /boot/loader.rc should look like:
include /boot/loader.4th start
Then, create /boot/loader.conf.local and put the following line there.
console=comconsole
or
console=vidconsole
See loader.conf(5) for more information.
Note: At the moment, the boot loader has no option equivalent to the -P option in the boot block, and there is no provision to automatically select the internal console and the serial console based on the presence of the keyboard.
17.6.5.2 Using a Serial Port Other Than sio0 for the Console
You need to recompile the boot loader to use a serial port other than sio0 for the serial console. Follow the procedure described in Section 17.6.4.2.
17.6.6 Caveats
The idea here is to allow people to set up dedicated servers that require no graphics hardware or attached keyboards. Unfortunately, while most systems will let you boot without a keyboard, there are quite a few that will not let you boot without a graphics adapter. Machines with AMI BIOSes can be configured to boot with no graphics adapter installed simply by changing the ``graphics adapter'' setting in the CMOS configuration to ``Not installed.''
However, many machines do not support this option and will refuse to boot if you have no display hardware in the system. With these machines, you will have to leave some kind of graphics card plugged in, (even if it is just a junky mono board) although you will not have to attach a monitor. You might also try installing an AMI BIOS.
Chapter 18 PPP and SLIP
Restructured, reorganized, and updated by Jim Mock.18.1 Synopsis
FreeBSD has a number of ways to link one computer to another. To establish a network or Internet connection through a dial-up modem, or to allow others to do so through you, requires the use of PPP or SLIP. This chapter describes setting up these modem-based communication services in detail.
After reading this chapter, you will know:
-
How to setup User PPP.
-
How to setup Kernel PPP.
-
How to setup PPPoE (PPP over Ethernet).
-
How to setup PPPoA (PPP over ATM).
-
How to configure and setup a SLIP client and server.
Before reading this chapter, you should:
-
Be familiar with basic network terminology.
-
Understand the basics and purpose of a dialup connection and PPP and/or SLIP.
You may be wondering what the main difference is between User PPP and kernel PPP. The answer is simple; user PPP processes the inbound and outbound data in userland rather than in the kernel. This is expensive in terms of copying the data between the kernel and userland, but allows a far more feature-rich ppp implementation. User PPP uses the tun device to communicate with the outside world whereas kernel-ppp uses the ppp device.
Note: Throughout in this chapter, user ppp will simply be referred to as ppp unless a distinction needs to be made between it and any other PPP software such as pppd. Unless otherwise stated, all of the commands explained in this section should be executed as root.
18.2 Using User PPP
Updated and enhanced by Tom Rhodes. Originally contributed by Brian Somers. With input from Nik Clayton, Dirk Fr�mberg, and Peter Childs.18.2.1 User PPP
18.2.1.1 Assumptions
This document assumes you have the following:
-
An account with an Internet Service Provider (ISP) which you connect to using PPP.
-
You have a modem or other device connected to your system and configured correctly which allows you to connect to your ISP.
-
The dial-up number(s) of your ISP.
-
Your login name and password. (Either a regular UNIX style login and password pair, or a PAP or CHAP login and password pair.)
-
The IP address of one or more name servers. Normally, you will be given two IP addresses by your ISP to use for this. If they have not given you at least one, then you can use the enable dns command in ppp.conf and ppp will set the name servers for you. This feature depends on your ISPs PPP implementation supporting DNS negotiation.
The following information may be supplied by your ISP, but is not completely necessary:
-
The IP address of your ISP's gateway. The gateway is the machine to which you will connect and will be set up as your default route. If you do not have this information, we can make one up and your ISP's PPP server will tell us the correct value when we connect.
This IP number is referred to as HISADDR by ppp.
-
The netmask you should use. If your ISP has not provided you with one, you can safely use 255.255.255.255.
-
If your ISP provides you with a static IP address and hostname, you can enter it. Otherwise, we simply let the peer assign whatever IP address it sees fit.
If you do not have any of the required information, contact your ISP.
Note: Throughout this section, many of the examples showing the contents of configuration files are numbered by line. These numbers serve to aid in the presentation and discussion only and are not meant to be placed in the actual file. Proper indentation with tab and space characters is also important.
18.2.1.2 Creating PPP Device Nodes
Under normal circumstances, most users will only need one tun device (/dev/tun0). References to tun0 below may be changed to tunN where N is any unit number corresponding to your system.
For FreeBSD installations that do not have devfs(5) enabled (FreeBSD 4.X and earlier), the existence of the tun0 device should be verified (this is not necessary if devfs(5) is enabled as device nodes will be created on demand).
The easiest way to make sure that the tun0 device is configured correctly is to remake the device. To remake the device, do the following:
# cd /dev
# sh MAKEDEV tun0
If you need 16 tunnel devices in your kernel, you will need to create them. This can be done by executing the following commands:
# cd /dev
# sh MAKEDEV tun15
18.2.1.3 Automatic PPP Configuration
Both ppp and pppd (the kernel level implementation of PPP) use the configuration files located in the /etc/ppp directory. Examples for user ppp can be found in /usr/share/examples/ppp/.
Configuring ppp requires that you edit a number of files, depending on your requirements. What you put in them depends to some extent on whether your ISP allocates IP addresses statically (i.e., you get given one IP address, and always use that one) or dynamically (i.e., your IP address changes each time you connect to your ISP).
18.2.1.3.1 PPP and Static IP Addresses
You will need to edit the /etc/ppp/ppp.conf configuration file. It should look similar to the example below.
Note: Lines that end in a : start in the first column (beginning of the line)-- all other lines should be indented as shown using spaces or tabs.
1 default: 2 set log Phase Chat LCP IPCP CCP tun command 3 ident user-ppp VERSION (built COMPILATIONDATE) 4 set device /dev/cuaa0 5 set speed 115200 6 set dial "ABORT BUSY ABORT NO\\sCARRIER TIMEOUT 5 \ 7 \"\" AT OK-AT-OK ATE1Q0 OK \\dATDT\\T TIMEOUT 40 CONNECT" 8 set timeout 180 9 enable dns 10 11 provider: 12 set phone "(123) 456 7890" 13 set authname foo 14 set authkey bar 15 set login "TIMEOUT 10 \"\" \"\" gin:--gin: \\U word: \\P col: ppp" 16 set timeout 300 17 set ifaddr x.x.x.x y.y.y.y 255.255.255.255 0.0.0.0 18 add default HISADDR
- Line 1:
-
Identifies the default entry. Commands in this entry are executed automatically when ppp is run.
- Line 2:
-
Enables logging parameters. When the configuration is working satisfactorily, this line should be reduced to saying
set log phase tun
in order to avoid excessive log file sizes.
- Line 3:
-
Tells PPP how to identify itself to the peer. PPP identifies itself to the peer if it has any trouble negotiating and setting up the link, providing information that the peers administrator may find useful when investigating such problems.
- Line 4:
-
Identifies the device to which the modem is connected. COM1 is /dev/cuaa0 and COM2 is /dev/cuaa1.
- Line 5:
-
Sets the speed you want to connect at. If 115200 does not work (it should with any reasonably new modem), try 38400 instead.
- Line 6 & 7:
-
The dial string. User PPP uses an expect-send syntax similar to the chat(8) program. Refer to the manual page for information on the features of this language.
Note that this command continues onto the next line for readability. Any command in ppp.conf may do this if the last character on the line is a ``\'' character.
- Line 8:
-
Sets the idle timeout for the link. 180 seconds is the default, so this line is purely cosmetic.
- Line 9:
-
Tells PPP to ask the peer to confirm the local resolver settings. If you run a local name server, this line should be commented out or removed.
- Line 10:
-
A blank line for readability. Blank lines are ignored by PPP.
- Line 11:
-
Identifies an entry for a provider called ``provider''. This could be changed to the name of your ISP so that later you can use the load ISP to start the connection.
- Line 12:
-
Sets the phone number for this provider. Multiple phone numbers may be specified using the colon (:) or pipe character (|)as a separator. The difference between the two separators is described in ppp(8). To summarize, if you want to rotate through the numbers, use a colon. If you want to always attempt to dial the first number first and only use the other numbers if the first number fails, use the pipe character. Always quote the entire set of phone numbers as shown.
You must enclose the phone number in quotation marks (") if there is any intention on using spaces in the phone number. This can cause a simple, yet subtle error.
- Line 13 & 14:
-
Identifies the user name and password. When connecting using a UNIX style login prompt, these values are referred to by the set login command using the \U and \P variables. When connecting using PAP or CHAP, these values are used at authentication time.
- Line 15:
-
If you are using PAP or CHAP, there will be no login at this point, and this line should be commented out or removed. See PAP and CHAP authentication for further details.
The login string is of the same chat-like syntax as the dial string. In this example, the string works for a service whose login session looks like this:
J. Random Provider login: foo password: bar protocol: ppp
You will need to alter this script to suit your own needs. When you write this script for the first time, you should ensure that you have enabled ``chat'' logging so you can determine if the conversation is going as expected.
- Line 16:
-
Sets the default idle timeout (in seconds) for the connection. Here, the connection will be closed automatically after 300 seconds of inactivity. If you never want to timeout, set this value to zero or use the -ddial command line switch.
- Line 17:
-
Sets the interface addresses. The string x.x.x.x should be replaced by the IP address that your provider has allocated to you. The string y.y.y.y should be replaced by the IP address that your ISP indicated for their gateway (the machine to which you connect). If your ISP has not given you a gateway address, use 10.0.0.2/0. If you need to use a ``guessed'' address, make sure that you create an entry in /etc/ppp/ppp.linkup as per the instructions for PPP and Dynamic IP addresses. If this line is omitted, ppp cannot run in -auto mode.
- Line 18:
-
Adds a default route to your ISP's gateway. The special word HISADDR is replaced with the gateway address specified on line 9. It is important that this line appears after line 9, otherwise HISADDR will not yet be initialized.
If you do not wish to run ppp in -auto, this line should be moved to the ppp.linkup file.
It is not necessary to add an entry to ppp.linkup when you have a static IP address and are running ppp in -auto mode as your routing table entries are already correct before you connect. You may however wish to create an entry to invoke programs after connection. This is explained later with the sendmail example.
Example configuration files can be found in the /usr/share/examples/ppp/ directory.
18.2.1.3.2 PPP and Dynamic IP Addresses
If your service provider does not assign static IP addresses, ppp can be configured to negotiate the local and remote addresses. This is done by ``guessing'' an IP address and allowing ppp to set it up correctly using the IP Configuration Protocol (IPCP) after connecting. The ppp.conf configuration is the same as PPP and Static IP Addresses, with the following change:
17 set ifaddr 10.0.0.1/0 10.0.0.2/0 255.255.255.255
Again, do not include the line number, it is just for reference. Indentation of at least one space is required.
- Line 17:
-
The number after the / character is the number of bits of the address that ppp will insist on. You may wish to use IP numbers more appropriate to your circumstances, but the above example will always work.
The last argument (0.0.0.0) tells PPP to start negotiations using address 0.0.0.0 rather than 10.0.0.1 and is necessary for some ISPs. Do not use 0.0.0.0 as the first argument to set ifaddr as it prevents PPP from setting up an initial route in -auto mode.
If you are not running in -auto mode, you will need to create an entry in /etc/ppp/ppp.linkup. ppp.linkup is used after a connection has been established. At this point, ppp will have assigned the interface addresses and it will now be possible to add the routing table entries:
1 provider: 2 add default HISADDR
- Line 1:
-
On establishing a connection, ppp will look for an entry in ppp.linkup according to the following rules: First, try to match the same label as we used in ppp.conf. If that fails, look for an entry for the IP address of our gateway. This entry is a four-octet IP style label. If we still have not found an entry, look for the MYADDR entry.
- Line 2:
-
This line tells ppp to add a default route that points to HISADDR. HISADDR will be replaced with the IP number of the gateway as negotiated by the IPCP.
See the pmdemand entry in the files /usr/share/examples/ppp/ppp.conf.sample and /usr/share/examples/ppp/ppp.linkup.sample for a detailed example.
18.2.1.3.3 Receiving Incoming Calls
When you configure ppp to receive incoming calls on a machine connected to a LAN, you must decide if you wish to forward packets to the LAN. If you do, you should allocate the peer an IP number from your LAN's subnet, and use the command enable proxy in your /etc/ppp/ppp.conf file. You should also confirm that the /etc/rc.conf file contains the following:
gateway_enable="YES"
18.2.1.3.4 Which getty?
Configuring FreeBSD for Dial-up Services provides a good description on enabling dial-up services using getty(8).
An alternative to getty is mgetty, a smarter version of getty designed with dial-up lines in mind.
The advantages of using mgetty is that it actively talks to modems, meaning if port is turned off in /etc/ttys then your modem will not answer the phone.
Later versions of mgetty (from 0.99beta onwards) also support the automatic detection of PPP streams, allowing your clients script-less access to your server.
Refer to Mgetty and AutoPPP for more information on mgetty.
18.2.1.3.5 PPP Permissions
The ppp command must normally be run as the root user. If however, you wish to allow ppp to run in server mode as a normal user by executing ppp as described below, that user must be given permission to run ppp by adding them to the network group in /etc/group.
You will also need to give them access to one or more sections of the configuration file using the allow command:
allow users fred mary
If this command is used in the default section, it gives the specified users access to everything.
18.2.1.3.6 PPP Shells for Dynamic-IP Users
Create a file called /etc/ppp/ppp-shell containing the following:
#!/bin/sh
IDENT=`echo $0 | sed -e 's/^.*-\(.*\)$/\1/'`
CALLEDAS="$IDENT"
TTY=`tty`
if [ x$IDENT = xdialup ]; then
IDENT=`basename $TTY`
fi
echo "PPP for $CALLEDAS on $TTY"
echo "Starting PPP for $IDENT"
exec /usr/sbin/ppp -direct $IDENT
This script should be executable. Now make a symbolic link called ppp-dialup to this script using the following commands:
# ln -s ppp-shell /etc/ppp/ppp-dialup
You should use this script as the shell for all of your dialup users. This is an example from /etc/password for a dialup PPP user with username pchilds (remember do not directly edit the password file, use vipw).
pchilds:*:1011:300:Peter Childs PPP:/home/ppp:/etc/ppp/ppp-dialup
Create a /home/ppp directory that is world readable containing the following 0 byte files:
-r--r--r-- 1 root wheel 0 May 27 02:23 .hushlogin -r--r--r-- 1 root wheel 0 May 27 02:22 .rhosts
which prevents /etc/motd from being displayed.
18.2.1.3.7 PPP Shells for Static-IP Users
Create the ppp-shell file as above, and for each account with statically assigned IPs create a symbolic link to ppp-shell.
For example, if you have three dialup customers, fred, sam, and mary, that you route class C networks for, you would type the following:
# ln -s /etc/ppp/ppp-shell /etc/ppp/ppp-fred # ln -s /etc/ppp/ppp-shell /etc/ppp/ppp-sam # ln -s /etc/ppp/ppp-shell /etc/ppp/ppp-mary
Each of these users dialup accounts should have their shell set to the symbolic link created above (for example, mary's shell should be /etc/ppp/ppp-mary).
18.2.1.3.8 Setting Up ppp.conf for Dynamic-IP Users
The /etc/ppp/ppp.conf file should contain something along the lines of:
default: set debug phase lcp chat set timeout 0 ttyd0: set ifaddr 203.14.100.1 203.14.100.20 255.255.255.255 enable proxy ttyd1: set ifaddr 203.14.100.1 203.14.100.21 255.255.255.255 enable proxy
Note: The indenting is important.
The default: section is loaded for each session. For each dialup line enabled in /etc/ttys create an entry similar to the one for ttyd0: above. Each line should get a unique IP address from your pool of IP addresses for dynamic users.
18.2.1.3.9 Setting Up ppp.conf for Static-IP Users
Along with the contents of the sample /usr/share/examples/ppp/ppp.conf above you should add a section for each of the statically assigned dialup users. We will continue with our fred, sam, and mary example.
fred: set ifaddr 203.14.100.1 203.14.101.1 255.255.255.255 sam: set ifaddr 203.14.100.1 203.14.102.1 255.255.255.255 mary: set ifaddr 203.14.100.1 203.14.103.1 255.255.255.255
The file /etc/ppp/ppp.linkup should also contain routing information for each static IP user if required. The line below would add a route for the 203.14.101.0 class C via the client's ppp link.
fred: add 203.14.101.0 netmask 255.255.255.0 HISADDR sam: add 203.14.102.0 netmask 255.255.255.0 HISADDR mary: add 203.14.103.0 netmask 255.255.255.0 HISADDR
18.2.1.3.10 mgetty and AutoPPP
Configuring and compiling mgetty with the AUTO_PPP option enabled allows mgetty to detect the LCP phase of PPP connections and automatically spawn off a ppp shell. However, since the default login/password sequence does not occur it is necessary to authenticate users using either PAP or CHAP.
This section assumes the user has successfully configured, compiled, and installed a version of mgetty with the AUTO_PPP option (v0.99beta or later).
Make sure your /usr/local/etc/mgetty+sendfax/login.config file has the following in it:
/AutoPPP/ - - /etc/ppp/ppp-pap-dialup
This will tell mgetty to run the ppp-pap-dialup script for detected PPP connections.
Create a file called /etc/ppp/ppp-pap-dialup containing the following (the file should be executable):
#!/bin/sh exec /usr/sbin/ppp -direct pap$IDENT
For each dialup line enabled in /etc/ttys, create a corresponding entry in /etc/ppp/ppp.conf. This will happily co-exist with the definitions we created above.
pap: enable pap set ifaddr 203.14.100.1 203.14.100.20-203.14.100.40 enable proxy
Each user logging in with this method will need to have a username/password in /etc/ppp/ppp.secret file, or alternatively add the following option to authenticate users via PAP from /etc/password file.
enable passwdauth
If you wish to assign some users a static IP number, you can specify the number as the third argument in /etc/ppp/ppp.secret. See /usr/share/examples/ppp/ppp.secret.sample for examples.
18.2.1.3.11 MS Extensions
It is possible to configure PPP to supply DNS and NetBIOS nameserver addresses on demand.
To enable these extensions with PPP version 1.x, the following lines might be added to the relevant section of /etc/ppp/ppp.conf.
enable msext set ns 203.14.100.1 203.14.100.2 set nbns 203.14.100.5
And for PPP version 2 and above:
accept dns set dns 203.14.100.1 203.14.100.2 set nbns 203.14.100.5
This will tell the clients the primary and secondary name server addresses, and a NetBIOS nameserver host.
In version 2 and above, if the set dns line is omitted, PPP will use the values found in /etc/resolv.conf.
18.2.1.3.12 PAP and CHAP Authentication
Some ISPs set their system up so that the authentication part of your connection is done using either of the PAP or CHAP authentication mechanisms. If this is the case, your ISP will not give a login: prompt when you connect, but will start talking PPP immediately.
PAP is less secure than CHAP, but security is not normally an issue here as passwords, although being sent as plain text with PAP, are being transmitted down a serial line only. There is not much room for crackers to ``eavesdrop''.
Referring back to the PPP and Static IP addresses or PPP and Dynamic IP addresses sections, the following alterations must be made:
7 set login ... 12 set authname MyUserName 13 set authkey MyPassword
- Line 7:
-
Your ISP will not normally require that you log into the server if you are using PAP or CHAP. You must therefore disable your ``set login'' string.
- Line 12:
-
This line specifies your PAP/CHAP user name. You will need to insert the correct value for MyUserName.
- Line 13:
-
This line specifies your PAP/CHAP password. You will need to insert the correct value for MyPassword. You may want to add an additional line, such as:
15 accept PAP
or
15 accept CHAP
to make it obvious that this is the intention, but PAP and CHAP are both accepted by default.
18.2.1.3.13 Changing Your ppp Configuration on the Fly
It is possible to talk to the ppp program while it is running in the background, but only if a suitable diagnostic port has been set up. To do this, add the following line to your configuration:
set server /var/run/ppp-tun%d DiagnosticPassword 0177
This will tell PPP to listen to the specified UNIX domain socket, asking clients for the specified password before allowing access. The %d in the name is replaced with the tun device number that is in use.
Once a socket has been set up, the pppctl(8) program may be used in scripts that wish to manipulate the running program.
18.2.1.4 Using PPP Network Address Translation Capability
PPP has ability to use internal NAT without kernel diverting capabilities. This functionality may be enabled by the following line in /etc/ppp/ppp.conf:
nat enable yes
Alternatively, PPP NAT may be enabled by command-line option -nat. There is also /etc/rc.conf knob named ppp_nat, which is enabled by default.
If you use this feature, you may also find useful the following /etc/ppp/ppp.conf options to enable incoming connections forwarding:
nat port tcp 10.0.0.2:ftp ftp nat port tcp 10.0.0.2:http http
or do not trust the outside at all
nat deny_incoming yes
18.2.1.5 Final System Configuration
You now have ppp configured, but there are a few more things to do before it is ready to work. They all involve editing the /etc/rc.conf file.
Working from the top down in this file, make sure the hostname= line is set, e.g.:
hostname="foo.example.com"
If your ISP has supplied you with a static IP address and name, it is probably best that you use this name as your host name.
Look for the network_interfaces variable. If you want to configure your system to dial your ISP on demand, make sure the tun0 device is added to the list, otherwise remove it.
network_interfaces="lo0 tun0" ifconfig_tun0=
Note: The ifconfig_tun0 variable should be empty, and a file called /etc/start_if.tun0 should be created. This file should contain the line:
ppp -auto mysystemThis script is executed at network configuration time, starting your ppp daemon in automatic mode. If you have a LAN for which this machine is a gateway, you may also wish to use the -alias switch. Refer to the manual page for further details.
Set the router program to NO with following line in your /etc/rc.conf:
router_enable="NO"
It is important that the routed daemon is not started (it is started by default), as routed tends to delete the default routing table entries created by ppp.
It is probably worth your while ensuring that the sendmail_flags line does not include the -q option, otherwise sendmail will attempt to do a network lookup every now and then, possibly causing your machine to dial out. You may try:
sendmail_flags="-bd"
The downside of this is that you must force sendmail to re-examine the mail queue whenever the ppp link is up by typing:
# /usr/sbin/sendmail -q
You may wish to use the !bg command in ppp.linkup to do this automatically:
1 provider: 2 delete ALL 3 add 0 0 HISADDR 4 !bg sendmail -bd -q30m
If you do not like this, it is possible to set up a ``dfilter'' to block SMTP traffic. Refer to the sample files for further details.
Now the only thing left to do is reboot the machine.
All that is left is to reboot the machine. After rebooting, you can now either type:
# ppp
and then dial provider to start the PPP session, or, if you want ppp to establish sessions automatically when there is outbound traffic (and you have not created the start_if.tun0 script), type:
# ppp -auto provider
18.2.1.6 Summary
To recap, the following steps are necessary when setting up ppp for the first time:
Client side:
-
Ensure that the tun device is built into your kernel.
-
Ensure that the tunN device file is available in the /dev directory.
-
Create an entry in /etc/ppp/ppp.conf. The pmdemand example should suffice for most ISPs.
-
If you have a dynamic IP address, create an entry in /etc/ppp/ppp.linkup.
-
Update your /etc/rc.conf file.
-
Create a start_if.tun0 script if you require demand dialing.
Server side:
-
Ensure that the tun device is built into your kernel.
-
Ensure that the tunN device file is available in the /dev directory.
-
Create an entry in /etc/passwd (using the vipw(8) program).
-
Create a profile in this users home directory that runs ppp -direct direct-server or similar.
-
Create an entry in /etc/ppp/ppp.conf. The direct-server example should suffice.
-
Create an entry in /etc/ppp/ppp.linkup.
-
Update your /etc/rc.conf file.
18.3 Using Kernel PPP
Parts originally contributed by Gennady B. Sorokopud and Robert Huff.18.3.1 Setting Up Kernel PPP
Before you start setting up PPP on your machine, make sure that pppd is located in /usr/sbin and the directory /etc/ppp exists.
pppd can work in two modes:
-
As a ``client'' -- you want to connect your machine to the outside world via a PPP serial connection or modem line.
-
As a ``server'' -- your machine is located on the network, and is used to connect other computers using PPP.
In both cases you will need to set up an options file (/etc/ppp/options or ~/.ppprc if you have more than one user on your machine that uses PPP).
You will also need some modem/serial software (preferably kermit), so you can dial and establish a connection with the remote host.
18.3.2 Using pppd as a Client
Based on information provided by Trev Roydhouse.The following /etc/ppp/options might be used to connect to a Cisco terminal server PPP line.
crtscts # enable hardware flow control
modem # modem control line
noipdefault # remote PPP server must supply your IP address.
# if the remote host does not send your IP during IPCP
# negotiation, remove this option
passive # wait for LCP packets
domain ppp.foo.com # put your domain name here
:<remote_ip> # put the IP of remote PPP host here
# it will be used to route packets via PPP link
# if you didn't specified the noipdefault option
# change this line to <local_ip>:<remote_ip>
defaultroute # put this if you want that PPP server will be your
# default router
To connect:
-
Dial to the remote host using kermit (or some other modem program), and enter your user name and password (or whatever is needed to enable PPP on the remote host).
-
Exit kermit (without hanging up the line).
-
Enter the following:
# /usr/src/usr.sbin/pppd.new/pppd /dev/tty01 19200
Be sure to use the appropriate speed and device name.
Now your computer is connected with PPP. If the connection fails, you can add the debug option to the /etc/ppp/options file, and check console messages to track the problem.
Following /etc/ppp/pppup script will make all 3 stages automatic:
#!/bin/sh
ps ax |grep pppd |grep -v grep
pid=`ps ax |grep pppd |grep -v grep|awk '{print $1;}'`
if [ "X${pid}" != "X" ] ; then
echo 'killing pppd, PID=' ${pid}
kill ${pid}
fi
ps ax |grep kermit |grep -v grep
pid=`ps ax |grep kermit |grep -v grep|awk '{print $1;}'`
if [ "X${pid}" != "X" ] ; then
echo 'killing kermit, PID=' ${pid}
kill -9 ${pid}
fi
ifconfig ppp0 down
ifconfig ppp0 delete
kermit -y /etc/ppp/kermit.dial
pppd /dev/tty01 19200
/etc/ppp/kermit.dial is a kermit script that dials and makes all necessary authorization on the remote host (an example of such a script is attached to the end of this document).
Use the following /etc/ppp/pppdown script to disconnect the PPP line:
#!/bin/sh
pid=`ps ax |grep pppd |grep -v grep|awk '{print $1;}'`
if [ X${pid} != "X" ] ; then
echo 'killing pppd, PID=' ${pid}
kill -TERM ${pid}
fi
ps ax |grep kermit |grep -v grep
pid=`ps ax |grep kermit |grep -v grep|awk '{print $1;}'`
if [ "X${pid}" != "X" ] ; then
echo 'killing kermit, PID=' ${pid}
kill -9 ${pid}
fi
/sbin/ifconfig ppp0 down
/sbin/ifconfig ppp0 delete
kermit -y /etc/ppp/kermit.hup
/etc/ppp/ppptest
Check to see if PPP is still running by executing /usr/etc/ppp/ppptest, which should look like this:
#!/bin/sh
pid=`ps ax| grep pppd |grep -v grep|awk '{print $1;}'`
if [ X${pid} != "X" ] ; then
echo 'pppd running: PID=' ${pid-NONE}
else
echo 'No pppd running.'
fi
set -x
netstat -n -I ppp0
ifconfig ppp0
To hang up the modem, execute /etc/ppp/kermit.hup, which should contain:
set line /dev/tty01 ; put your modem device here set speed 19200 set file type binary set file names literal set win 8 set rec pack 1024 set send pack 1024 set block 3 set term bytesize 8 set command bytesize 8 set flow none pau 1 out +++ inp 5 OK out ATH0\13 echo \13 exit
Here is an alternate method using chat instead of kermit.
The following two files are sufficient to accomplish a pppd connection.
/etc/ppp/options:
/dev/cuaa1 115200
crtscts # enable hardware flow control
modem # modem control line
connect "/usr/bin/chat -f /etc/ppp/login.chat.script"
noipdefault # remote PPP serve must supply your IP address.
# if the remote host doesn't send your IP during
# IPCP negotiation, remove this option
passive # wait for LCP packets
domain <your.domain> # put your domain name here
: # put the IP of remote PPP host here
# it will be used to route packets via PPP link
# if you didn't specified the noipdefault option
# change this line to <local_ip>:<remote_ip>
defaultroute # put this if you want that PPP server will be
# your default router
/etc/ppp/login.chat.script:
Note: The following should go on a single line.
ABORT BUSY ABORT 'NO CARRIER' "" AT OK ATDT<phone.number> CONNECT "" TIMEOUT 10 ogin:-\\r-ogin: <login-id> TIMEOUT 5 sword: <password>
Once these are installed and modified correctly, all you need to do is run pppd, like so:
# pppd
18.3.3 Using pppd as a Server
/etc/ppp/options should contain something similar to the following:
crtscts # Hardware flow control
netmask 255.255.255.0 # netmask ( not required )
192.114.208.20:192.114.208.165 # ip's of local and remote hosts
# local ip must be different from one
# you assigned to the ethernet ( or other )
# interface on your machine.
# remote IP is ip address that will be
# assigned to the remote machine
domain ppp.foo.com # your domain
passive # wait for LCP
modem # modem line
The following /etc/ppp/pppserv script will enable tell pppd to behave as a server:
#!/bin/sh
ps ax |grep pppd |grep -v grep
pid=`ps ax |grep pppd |grep -v grep|awk '{print $1;}'`
if [ "X${pid}" != "X" ] ; then
echo 'killing pppd, PID=' ${pid}
kill ${pid}
fi
ps ax |grep kermit |grep -v grep
pid=`ps ax |grep kermit |grep -v grep|awk '{print $1;}'`
if [ "X${pid}" != "X" ] ; then
echo 'killing kermit, PID=' ${pid}
kill -9 ${pid}
fi
# reset ppp interface
ifconfig ppp0 down
ifconfig ppp0 delete
# enable autoanswer mode
kermit -y /etc/ppp/kermit.ans
# run ppp
pppd /dev/tty01 19200
Use this /etc/ppp/pppservdown script to stop the server:
#!/bin/sh
ps ax |grep pppd |grep -v grep
pid=`ps ax |grep pppd |grep -v grep|awk '{print $1;}'`
if [ "X${pid}" != "X" ] ; then
echo 'killing pppd, PID=' ${pid}
kill ${pid}
fi
ps ax |grep kermit |grep -v grep
pid=`ps ax |grep kermit |grep -v grep|awk '{print $1;}'`
if [ "X${pid}" != "X" ] ; then
echo 'killing kermit, PID=' ${pid}
kill -9 ${pid}
fi
ifconfig ppp0 down
ifconfig ppp0 delete
kermit -y /etc/ppp/kermit.noans
The following kermit script (/etc/ppp/kermit.ans) will enable/disable autoanswer mode on your modem. It should look like this:
set line /dev/tty01
set speed 19200
set file type binary
set file names literal
set win 8
set rec pack 1024
set send pack 1024
set block 3
set term bytesize 8
set command bytesize 8
set flow none
pau 1
out +++
inp 5 OK
out ATH0\13
inp 5 OK
echo \13
out ATS0=1\13 ; change this to out ATS0=0\13 if you want to disable
; autoanswer mod
inp 5 OK
echo \13
exit
A script named /etc/ppp/kermit.dial is used for dialing and authenticating on the remote host. You will need to customize it for your needs. Put your login and password in this script; you will also need to change the input statement depending on responses from your modem and remote host.
;
; put the com line attached to the modem here:
;
set line /dev/tty01
;
; put the modem speed here:
;
set speed 19200
set file type binary ; full 8 bit file xfer
set file names literal
set win 8
set rec pack 1024
set send pack 1024
set block 3
set term bytesize 8
set command bytesize 8
set flow none
set modem hayes
set dial hangup off
set carrier auto ; Then SET CARRIER if necessary,
set dial display on ; Then SET DIAL if necessary,
set input echo on
set input timeout proceed
set input case ignore
def \%x 0 ; login prompt counter
goto slhup
:slcmd ; put the modem in command mode
echo Put the modem in command mode.
clear ; Clear unread characters from input buffer
pause 1
output +++ ; hayes escape sequence
input 1 OK\13\10 ; wait for OK
if success goto slhup
output \13
pause 1
output at\13
input 1 OK\13\10
if fail goto slcmd ; if modem doesn't answer OK, try again
:slhup ; hang up the phone
clear ; Clear unread characters from input buffer
pause 1
echo Hanging up the phone.
output ath0\13 ; hayes command for on hook
input 2 OK\13\10
if fail goto slcmd ; if no OK answer, put modem in command mode
:sldial ; dial the number
pause 1
echo Dialing.
output atdt9,550311\13\10 ; put phone number here
assign \%x 0 ; zero the time counter
:look
clear ; Clear unread characters from input buffer
increment \%x ; Count the seconds
input 1 {CONNECT }
if success goto sllogin
reinput 1 {NO CARRIER\13\10}
if success goto sldial
reinput 1 {NO DIALTONE\13\10}
if success goto slnodial
reinput 1 {\255}
if success goto slhup
reinput 1 {\127}
if success goto slhup
if < \%x 60 goto look
else goto slhup
:sllogin ; login
assign \%x 0 ; zero the time counter
pause 1
echo Looking for login prompt.
:slloop
increment \%x ; Count the seconds
clear ; Clear unread characters from input buffer
output \13
;
; put your expected login prompt here:
;
input 1 {Username: }
if success goto sluid
reinput 1 {\255}
if success goto slhup
reinput 1 {\127}
if success goto slhup
if < \%x 10 goto slloop ; try 10 times to get a login prompt
else goto slhup ; hang up and start again if 10 failures
:sluid
;
; put your userid here:
;
output ppp-login\13
input 1 {Password: }
;
; put your password here:
;
output ppp-password\13
input 1 {Entering SLIP mode.}
echo
quit
:slnodial
echo \7No dialtone. Check the telephone line!\7
exit 1
; local variables:
; mode: csh
; comment-start: "; "
; comment-start-skip: "; "
; end:
18.4 Troubleshooting PPP Connections
Contributed by Tom Rhodes.This section covers a few issues which may arise when using PPP over a modem connection. For instance, perhaps you need to know exactly what prompts the system you are dialing into will present. Some ISPs present the ssword prompt, and others will present password; if the ppp script is not written accordingly, the login attempt will fail. The most common way to debug ppp connections is by connecting manually. The following information will walk you through a manual connection step by step.
18.4.1 Check the Device Nodes
If you reconfigured your kernel then you recall the sio device. If you did not configure your kernel, there is no reason to worry. Just check the dmesg output for the modem device with:
#dmesg | grep sio
You should get some pertinent output about the sio devices. These are the COM ports we need. If your modem acts like a standard serial port then you should see it listed on sio1, or COM2. If so, you are not required to rebuild the kernel, you just need to make the serial device. You can do this by changing your directory to /dev and running the MAKEDEV script like above. Now make the serial devices with:
# sh MAKEDEV cuaa0 cuaa1 cuaa2 cuaa3
which will create the serial devices for your system. When matching up sio modem is on sio1 or COM2 if you are in DOS, then your modem device would be /dev/cuaa1.
18.4.2 Connecting Manually
Connecting to the Internet by manually controlling ppp is quick, easy, and a great way to debug a connection or just get information on how your ISP treats ppp client connections. Lets start PPP from the command line. Note that in all of our examples we will use example as the hostname of the machine running PPP. You start ppp by just typing ppp:
# ppp
We have now started ppp.
ppp ON example> set device /dev/cuaa1
We set our modem device, in this case it is cuaa1.
ppp ON example> set speed 115200
Set the connection speed, in this case we are using 115,200 kbps.
ppp ON example> enable dns
Tell ppp to configure our resolver and add the nameserver lines to /etc/resolv.conf. If ppp cannot determine our hostname, we can set one manually later.
ppp ON example> term
Switch to ``terminal'' mode so that we can manually control the modem.
deflink: Entering terminal mode on /dev/cuaa1 type '~h' for help
at
OK
atdt123456789
Use at to initialize the modem, then use atdt and the number for your ISP to begin the dial in process.
CONNECT
Confirmation of the connection, if we are going to have any connection problems, unrelated to hardware, here is where we will attempt to resolve them.
ISP Login:myusername
Here you are prompted for a username, return the prompt with the username that was provided by the ISP.
ISP Pass:mypassword
This time we are prompted for a password, just reply with the password that was provided by the ISP. Just like logging into FreeBSD, the password will not echo.
Shell or PPP:ppp
Depending on your ISP this prompt may never appear. Here we are being asked if we wish to use a shell on the provider, or to start ppp. In this example, we have chosen to use ppp as we want an Internet connection.
Ppp ON example>
Notice that in this example the first p has been capitalized. This shows that we have successfully connected to the ISP.
PPp ON example>
We have successfully authenticated with our ISP and are waiting for the assigned IP address.
PPP ON example>
We have made an agreement on an IP address and successfully completed our connection.
PPP ON example>add default HISADDR
Here we add our default route, we need to do this before we can talk to the outside world as currently the only established connection is with the peer. If this fails due to existing routes you can put a bang character ! in front of the add. Alternatively, you can set this before making the actual connection and it will negotiate a new route accordingly.
If everything went good we should now have an active connection to the Internet, which could be thrown into the background using CTRL+z If you notice the PPP return to ppp then we have lost our connection. This is good to know because it shows our connection status. Capital P's show that we have a connection to the ISP and lowercase p's show that the connection has been lost for whatever reason. ppp only has these 2 states.
18.4.2.1 Debugging
If you have a direct line and cannot seem to make a connection, then turn hardware flow CTS/RTS to off with the set ctsrts off. This is mainly the case if you are connected to some PPP capable terminal servers, where PPP hangs when it tries to write data to your communication link, so it would be waiting for a CTS, or Clear To Send signal which may never come. If you use this option however, you should also use the set accmap option, which may be required to defeat hardware dependent on passing certain characters from end to end, most of the time XON/XOFF. See the ppp(8) manual page for more information on this option, and how it is used.
If you have an older modem, you may need to use the set parity even. Parity is set at none be default, but is used for error checking (with a large increase in traffic) on older modems and some ISPs. You may need this option for the Compuserve ISP.
PPP may not return to the command mode, which is usually a negotiation error where the ISP is waiting for your side to start negotiating. At this point, using the ~p command will force ppp to start sending the configuration information.
If you never obtain a login prompt, then most likely you need to use PAP or CHAP authentication instead of the UNIX style in the example above. To use PAP or CHAP just add the following options to PPP before going into terminal mode:
ppp ON example> set authname myusername
Where myusername should be replaced with the username that was assigned by the ISP.
ppp ON example> set authkey mypassword
Where mypassword should be replaced with the password that was assigned by the ISP.
If you connect fine, but cannot seem to find any domain name, try to use ping(8) with an IP address and see if you can get any return information. If you experience 100 percent (100%) packet loss, then its most likely that you were not assigned a default route. Double check that the option add default HISADDR was set during the connection. If you can connect to a remote IP address then it is possible that a resolver address has not been added to the /etc/resolv.conf. This file should look like:
domain example.com nameserver x.x.x.x nameserver y.y.y.y
Where x.x.x.x and y.y.y.y should be replaced with the IP address of your ISP's DNS servers. This information may or may not have been provided when you signed up, but a quick call to your ISP should remedy that.
You could also have syslog(3) provide a logging function for your PPP connection. Just add:
!ppp *.* /var/log/ppp.log
to /etc/syslog.conf. In most cases, this functionality already exists.
18.5 Using PPP over Ethernet (PPPoE)
Contributed (from http://node.to/freebsd/how-tos/how-to-freebsd-pppoe.html) by Jim Mock.This section describes how to set up PPP over Ethernet (PPPoE).
18.5.1 Configuring the Kernel
No kernel configuration is necessary for PPPoE any longer. If the necessary netgraph support is not built into the kernel, it will be dynamically loaded by ppp.
18.5.2 Setting Up ppp.conf
Here is an example of a working ppp.conf:
default: set log Phase tun command # you can add more detailed logging if you wish set ifaddr 10.0.0.1/0 10.0.0.2/0 name_of_service_provider: set device PPPoE:xl1 # replace xl1 with your ethernet device set authname YOURLOGINNAME set authkey YOURPASSWORD set dial set login add default HISADDR
18.5.4 Starting PPP at Boot
Add the following to your /etc/rc.conf file:
ppp_enable="YES" ppp_mode="ddial" ppp_nat="YES" # if you want to enable nat for your local network, otherwise NO ppp_profile="name_of_service_provider"
18.5.5 Using a PPPoE Service Tag
Sometimes it will be necessary to use a service tag to establish your connection. Service tags are used to distinguish between different PPPoE servers attached to a given network.
You should have been given any required service tag information in the documentation provided by your ISP. If you cannot locate it there, ask your ISP's tech support personnel.
As a last resort, you could try the method suggested by the Roaring Penguin PPPoE program which can be found in the ports collection. Bear in mind however, this may de-program your modem and render it useless, so think twice before doing it. Simply install the program shipped with the modem by your provider. Then, access the System menu from the program. The name of your profile should be listed there. It is usually ISP.
The profile name (service tag) will be used in the PPPoE configuration entry in ppp.conf as the provider part of the set device command (see the ppp(8) manual page for full details). It should look like this:
set device PPPoE:xl1:ISP
Do not forget to change xl1 to the proper device for your Ethernet card.
Do not forget to change ISP to the profile you have just found above.
For additional information, see:
-
Cheaper Broadband with FreeBSD on DSL by Renaud Waldura.
-
Nutzung von T-DSL und T-Online mit FreeBSD by Udo Erdelhoff (in German).
18.5.6 PPPoE with a 3Com® HomeConnect® ADSL Modem Dual Link
This modem does not follow RFC 2516 (A Method for transmitting PPP over Ethernet (PPPoE), written by L. Mamakos, K. Lidl, J. Evarts, D. Carrel, D. Simone, and R. Wheeler). Instead, different packet type codes have been used for the Ethernet frames. Please complain to 3Com if you think it should comply with the PPPoE specification.
In order to make FreeBSD capable of communicating with this device, a sysctl must be set. This can be done automatically at boot time by updating /etc/sysctl.conf:
net.graph.nonstandard_pppoe=1
or can be done for immediate effect with the command sysctl net.graph.nonstandard_pppoe=1.
Unfortunately, because this is a system-wide setting, it is not possible to talk to a normal PPPoE client or server and a 3Com HomeConnect® ADSL Modem at the same time.
18.6 Using PPP over ATM (PPPoA)
The following describes how to set up PPP over ATM (PPPoA). PPPoA is a popular choice among European DSL providers.
18.6.1 Using PPPoA with the Alcatel SpeedTouch™ USB
PPPoA support for this device is supplied as a port in FreeBSD because the firmware is distributed under Alcatel's license agreement and can not be redistributed freely with the base system of FreeBSD.
To install the software, simply use the ports collection. Install the net/pppoa port and follow the instructions provided with it.
Like many USB devices, the Alcatel SpeedTouch™ USB needs to download firmware from the host computer to operate properly. It is possible to automate this process in FreeBSD so that this transfer takes place whenever the device is plugged into a USB port. The following information can be added to the /etc/usbd.conf file to enable this automatic firmware transfer. This file must be edited as the root user.
device "Alcatel SpeedTouch USB"
devname "ugen[0-9]+"
vendor 0x06b9
product 0x4061
attach "/usr/local/sbin/modem_run -f /usr/local/libdata/mgmt.o"
To enable the USB daemon, usbd, put the following the line into /etc/rc.conf:
usbd_enable="YES"
It is also possible to set up PPP to dial up at startup. To do this add the following lines to /etc/rc.conf. Again, for this procedure you will need to be logged in as the root user.
ppp_enable="YES" ppp_mode="ddial" ppp_profile="adsl"
For this to work correctly you will need to have used the sample ppp.conf which is supplied with the net/pppoa port.
18.6.2 Using mpd
You can use mpd to connect to a variety of services, in particular PPTP services. You can find mpd in the ports collection, net/mpd. Many ADSL modems require that a PPTP tunnel is created between the modem and computer, one such modem is the Alcatel SpeedTouch Home.
First you must install the port, and then you can configure mpd to suit your requirements and provider settings. The port places a set of sample configuration files which are well documented in PREFIX/etc/mpd/. Note here that PREFIX means the directory into which your ports are installed, this defaults to /usr/local/. A complete guide to configuring mpd is available in HTML format once the port has been installed. It is placed in PREFIX/share/mpd/. Here is a sample configuration for connecting to an ADSL service with mpd. The configuration is spread over two files, first the mpd.conf.
default:
load adsl
adsl:
new -i ng0 adsl adsl
set bundle authname username
set bundle password password
set bundle disable multilink
set link no pap acfcomp protocomp
set link disable chap
set link accept chap
set link keep-alive 30 10
set ipcp no vjcomp
set ipcp ranges 0.0.0.0/0 0.0.0.0/0
set iface route default
set iface disable on-demand
set iface enable proxy-arp
set iface idle 0
open
- The username used to authenticate with your ISP.
- The password used to authenticate with your ISP.
The mpd.links file contains information about the link, or links, you wish to establish. An example mpd.links to accompany the above example is given beneath.
adsl:
set link type pptp
set pptp mode active
set pptp enable originate incoming outcall
set pptp self 10.0.0.1
set pptp peer 10.0.0.138
- The IP address of your FreeBSD computer which you will be using mpd from.
- The IP address of your ADSL modem. For the Alcatel SpeedTouch Home this address defaults to 10.0.0.138.
It is possible to initialize the connection easily by issuing the following command as root.
# mpd -b adsl
You can see the status of the connection with the following command.
% ifconfig ng0
ng0: flags=88d1<UP,POINTOPOINT,RUNNING,NOARP,SIMPLEX,MULTICAST> mtu 1500
inet 216.136.204.117 --> 204.152.186.171 netmask 0xffffffff
Using mpd is the recommended way to connect to an ADSL service with FreeBSD.
18.6.3 Using pptpclient
It is also possible to use FreeBSD to connect to other PPPoA services using net/pptpclient.
To use net/pptpclient to connect to a DSL service, install the port or package and edit your /etc/ppp/ppp.conf. You will need to be root to perform both of these operations. An example section of ppp.conf is given below. For further information on ppp.conf options consult the ppp manual page, ppp(8).
adsl: set log phase chat lcp ipcp ccp tun command set timeout 0 enable dns set authname username
- The username of your account with the DSL provider.
- The password for your account.
Warning: Because you must put your account's password in the ppp.conf file in plain text form you should make sure than nobody can read the contents of this file. The following series of commands will make sure the file is only readable by the root account. Refer to the manuals pages for chmod(1) and chown(8) for further information.
# chown root:wheel /etc/ppp/ppp.conf # chmod 600 /etc/ppp/ppp.conf
This will open a tunnel for a PPP session to your DSL router. Ethernet DSL modems have a preconfigured LAN IP address which you connect to. In the case of the Alcatel SpeedTouch Home this address is 10.0.0.138. Your routers documentation should tell you which address your device uses. To open the tunnel and start a ppp session execute the following command.
# pptp address isp
Tip: You may wish to add an ampersand (``&'') to the end of the previous command because pptp will not return your prompt to you otherwise.
A tun virtual tunnel device will be created for interaction between the pptp and ppp processes. Once you have been returned to your prompt, or the pptp process has confirmed a connection you can examine the tunnel like so.
% ifconfig tun0
tun0: flags=8051<UP,POINTOPOINT,RUNNING,MULTICAST> mtu 1500
inet 216.136.204.21 --> 204.152.186.171 netmask 0xffffff00
Opened by PID 918
If you are unable to connect, check the configuration of your router, which is usually accessible via telnet or with a web browser. If you still cannot connect you should examine the output of the pptp command and the contents of the ppp log file, /var/log/ppp.log for clues.
18.7 Using SLIP
Originally contributed by Satoshi Asami. With input from Guy Helmer and Piero Serini.18.7.1 Setting Up a SLIP Client
The following is one way to set up a FreeBSD machine for SLIP on a static host network. For dynamic hostname assignments (your address changes each time you dial up), you probably need to have a more complex setup.
First, determine which serial port your modem is connected to. Many people setup a symbolic link, such as /dev/modem, to point to the real device name, /dev/cuaaN. This allows you to abstract the actual device name should you ever need to move the modem to a different port. It can become quite cumbersome when you need to fix a bunch of files in /etc and .kermrc files all over the system!
Note: /dev/cuaa0 is COM1, cuaa1 is COM2, etc.
Make sure you have the following in your kernel configuration file:
pseudo-device sl 1
It is included in the GENERIC kernel, so this should not be a problem unless you have deleted it.
18.7.1.1 Things You Have to Do Only Once
-
Add your home machine, the gateway and nameservers to your /etc/hosts file. Mine looks like this:
127.0.0.1 localhost loghost 136.152.64.181 water.CS.Example.EDU water.CS water 136.152.64.1 inr-3.CS.Example.EDU inr-3 slip-gateway 128.32.136.9 ns1.Example.EDU ns1 128.32.136.12 ns2.Example.EDU ns2
-
Make sure you have hosts before bind in your /etc/host.conf on FreeBSD versions prior to 5.0. Since FreeBSD 5.0, the system uses the file /etc/nsswitch.conf instead, make sure you have files before dns in the hosts line of this file. Without these parameters funny things may happen.
-
Edit the /etc/rc.conf file.
-
Set your hostname by editing the line that says:
hostname="myname.my.domain"
Your machine's full Internet hostname should be placed here.
-
Add sl0 to the list of network interfaces by changing the line that says:
network_interfaces="lo0"
to:
network_interfaces="lo0 sl0"
-
Set the startup flags of sl0 by adding a line:
ifconfig_sl0="inet ${hostname} slip-gateway netmask 0xffffff00 up" -
Designate the default router by changing the line:
defaultrouter="NO"
to:
defaultrouter="slip-gateway"
-
-
Make a file /etc/resolv.conf which contains:
domain CS.Example.EDU nameserver 128.32.136.9 nameserver 128.32.136.12
As you can see, these set up the nameserver hosts. Of course, the actual domain names and addresses depend on your environment.
-
Set the password for root and toor (and any other accounts that do not have a password).
-
Reboot your machine and make sure it comes up with the correct hostname.
18.7.1.2 Making a SLIP Connection
-
Dial up, type slip at the prompt, enter your machine name and password. What is required to be entered depends on your environment. If you use kermit, you can try a script like this:
# kermit setup set modem hayes set line /dev/modem set speed 115200 set parity none set flow rts/cts set terminal bytesize 8 set file type binary # The next macro will dial up and login define slip dial 643-9600, input 10 =>, if failure stop, - output slip\x0d, input 10 Username:, if failure stop, - output silvia\x0d, input 10 Password:, if failure stop, - output ***\x0d, echo \x0aCONNECTED\x0a
Of course, you have to change the hostname and password to fit yours. After doing so, you can just type slip from the kermit prompt to connect.
Note: Leaving your password in plain text anywhere in the filesystem is generally a bad idea. Do it at your own risk.
-
Leave the kermit there (you can suspend it by Ctrl-z) and as root, type:
# slattach -h -c -s 115200 /dev/modem
If you are able to ping hosts on the other side of the router, you are connected! If it does not work, you might want to try -a instead of -c as an argument to slattach.
18.7.1.3 How to Shutdown the Connection
Do the following:
# kill -INT `cat /var/run/slattach.modem.pid`
to kill slattach. Keep in mind you must be root to do the above. Then go back to kermit (by running fg if you suspended it) and exit from it (q).
The slattach manual page says you have to use ifconfig sl0 down to mark the interface down, but this does not seem to make any difference for me. (ifconfig sl0 reports the same thing.)
Some times, your modem might refuse to drop the carrier (mine often does). In that case, simply start kermit and quit it again. It usually goes out on the second try.
18.7.1.4 Troubleshooting
If it does not work, feel free to ask me. The things that people tripped over so far:
-
Not using -c or -a in slattach (This should not be fatal, but some users have reported that this solves their problems.)
-
Using s10 instead of sl0 (might be hard to see the difference on some fonts).
-
Try ifconfig sl0 to see your interface status. For example, you might get:
# ifconfig sl0 sl0: flags=10<POINTOPOINT> inet 136.152.64.181 --> 136.152.64.1 netmask ffffff00 -
If you get ``no route to host'' messages from ping, there may be a problem with your routing table. You can use the netstat -r command to display the current routes :
# netstat -r Routing tables Destination Gateway Flags Refs Use IfaceMTU Rtt Netmasks: (root node) (root node) Route Tree for Protocol Family inet: (root node) => default inr-3.Example.EDU UG 8 224515 sl0 - - localhost.Exampl localhost.Example. UH 5 42127 lo0 - 0.438 inr-3.Example.ED water.CS.Example.E UH 1 0 sl0 - - water.CS.Example localhost.Example. UGH 34 47641234 lo0 - 0.438 (root node)
The preceding examples are from a relatively busy system. The numbers on your system will vary depending on network activity.
18.7.2 Setting Up a SLIP Server
This document provides suggestions for setting up SLIP Server services on a FreeBSD system, which typically means configuring your system to automatically startup connections upon login for remote SLIP clients.
18.7.2.1 Prerequisites
This section is very technical in nature, so background knowledge is required. It is assumed that you are familiar with the TCP/IP network protocol, and in particular, network and node addressing, network address masks, subnetting, routing, and routing protocols, such as RIP. Configuring SLIP services on a dial-up server requires a knowledge of these concepts, and if you are not familiar with them, please read a copy of either Craig Hunt's TCP/IP Network Administration published by O'Reilly & Associates, Inc. (ISBN Number 0-937175-82-X), or Douglas Comer's books on the TCP/IP protocol.
It is further assumed that you have already setup your modem(s) and configured the appropriate system files to allow logins through your modems. If you have not prepared your system for this yet, please see the tutorial for configuring dialup services; if you have a World-Wide Web browser available, browse the list of tutorials at http://www.FreeBSD.org/. You may also want to check the manual pages for sio(4) for information on the serial port device driver and ttys(5), gettytab(5), getty(8), & init(8) for information relevant to configuring the system to accept logins on modems, and perhaps stty(1) for information on setting serial port parameters (such as clocal for directly-connected serial interfaces).
18.7.2.2 Quick Overview
In its typical configuration, using FreeBSD as a SLIP server works as follows: a SLIP user dials up your FreeBSD SLIP Server system and logs in with a special SLIP login ID that uses /usr/sbin/sliplogin as the special user's shell. The sliplogin program browses the file /etc/sliphome/slip.hosts to find a matching line for the special user, and if it finds a match, connects the serial line to an available SLIP interface and then runs the shell script /etc/sliphome/slip.login to configure the SLIP interface.
18.7.2.2.1 An Example of a SLIP Server Login
For example, if a SLIP user ID were Shelmerg, Shelmerg's entry in /etc/master.passwd would look something like this:
Shelmerg:password:1964:89::0:0:Guy Helmer - SLIP:/usr/users/Shelmerg:/usr/sbin/sliplogin
When Shelmerg logs in, sliplogin will search /etc/sliphome/slip.hosts for a line that had a matching user ID; for example, there may be a line in /etc/sliphome/slip.hosts that reads:
Shelmerg dc-slip sl-helmer 0xfffffc00 autocomp
sliplogin will find that matching line, hook the serial line into the next available SLIP interface, and then execute /etc/sliphome/slip.login like this:
/etc/sliphome/slip.login 0 19200 Shelmerg dc-slip sl-helmer 0xfffffc00 autocomp
If all goes well, /etc/sliphome/slip.login will issue an ifconfig for the SLIP interface to which sliplogin attached itself (slip interface 0, in the above example, which was the first parameter in the list given to slip.login) to set the local IP address (dc-slip), remote IP address (sl-helmer), network mask for the SLIP interface (0xfffffc00), and any additional flags (autocomp). If something goes wrong, sliplogin usually logs good informational messages via the daemon syslog facility, which usually logs to /var/log/messages (see the manual pages for syslogd(8) and syslog.conf(5) and perhaps check /etc/syslog.conf to see to what syslogd is logging and where it is logging to).
OK, enough of the examples -- let us dive into setting up the system.
18.7.2.3 Kernel Configuration
FreeBSD's default kernels usually come with two SLIP interfaces defined (sl0 and sl1); you can use netstat -i to see whether these interfaces are defined in your kernel.
Sample output from netstat -i:
Name Mtu Network Address Ipkts Ierrs Opkts Oerrs Coll ed0 1500 <Link>0.0.c0.2c.5f.4a 291311 0 174209 0 133 ed0 1500 138.247.224 ivory 291311 0 174209 0 133 lo0 65535 <Link> 79 0 79 0 0 lo0 65535 loop localhost 79 0 79 0 0 sl0* 296 <Link> 0 0 0 0 0 sl1* 296 <Link> 0 0 0 0 0
The sl0 and sl1 interfaces shown from netstat -i indicate that there are two SLIP interfaces built into the kernel. (The asterisks after the sl0 and sl1 indicate that the interfaces are ``down''.)
However, FreeBSD's default kernel does not come configured to forward packets (by default, your FreeBSD machine will not act as a router) due to Internet RFC requirements for Internet hosts (see RFCs 1009 [Requirements for Internet Gateways], 1122 [Requirements for Internet Hosts -- Communication Layers], and perhaps 1127 [A Perspective on the Host Requirements RFCs]). If you want your FreeBSD SLIP Server to act as a router, you will have to edit the /etc/rc.conf file and change the setting of the gateway_enable variable to YES.
You will then need to reboot for the new settings to take effect.
You will notice that near the end of the default kernel configuration file (/sys/i386/conf/GENERIC) is a line that reads:
pseudo-device sl 2
This is the line that defines the number of SLIP devices available in the kernel; the number at the end of the line is the maximum number of SLIP connections that may be operating simultaneously.
Please refer to Chapter 9 on Configuring the FreeBSD Kernel for help in reconfiguring your kernel.
18.7.2.4 Sliplogin Configuration
As mentioned earlier, there are three files in the /etc/sliphome directory that are part of the configuration for /usr/sbin/sliplogin (see sliplogin(8) for the actual manual page for sliplogin): slip.hosts, which defines the SLIP users and their associated IP addresses; slip.login, which usually just configures the SLIP interface; and (optionally) slip.logout, which undoes slip.login's effects when the serial connection is terminated.
18.7.2.4.1 slip.hosts Configuration
/etc/sliphome/slip.hosts contains lines which have at least four items separated by whitespace:
-
SLIP user's login ID
-
Local address (local to the SLIP server) of the SLIP link
-
Remote address of the SLIP link
-
Network mask
The local and remote addresses may be host names (resolved to IP addresses by /etc/hosts or by the domain name service, depending on your specifications in the file /etc/nsswitch.conf on FreeBSD 5.X, in /etc/host.conf if you use FreeBSD 4.X), and the network mask may be a name that can be resolved by a lookup into /etc/networks. On a sample system, /etc/sliphome/slip.hosts looks like this:
# # login local-addr remote-addr mask opt1 opt2 # (normal,compress,noicmp) # Shelmerg dc-slip sl-helmerg 0xfffffc00 autocomp
At the end of the line is one or more of the options.
-
normal -- no header compression
-
compress -- compress headers
-
autocomp -- compress headers if the remote end allows it
-
noicmp -- disable ICMP packets (so any ``ping'' packets will be dropped instead of using up your bandwidth)
Your choice of local and remote addresses for your SLIP links depends on whether you are going to dedicate a TCP/IP subnet or if you are going to use ``proxy ARP'' on your SLIP server (it is not ``true'' proxy ARP, but that is the terminology used in this section to describe it). If you are not sure which method to select or how to assign IP addresses, please refer to the TCP/IP books referenced in the SLIP Prerequisites (Section 18.7.2.1) and/or consult your IP network manager.
If you are going to use a separate subnet for your SLIP clients, you will need to allocate the subnet number out of your assigned IP network number and assign each of your SLIP client's IP numbers out of that subnet. Then, you will probably need to configure a static route to the SLIP subnet via your SLIP server on your nearest IP router.
Otherwise, if you will use the ``proxy ARP'' method, you will need to assign your SLIP client's IP addresses out of your SLIP server's Ethernet subnet, and you will also need to adjust your /etc/sliphome/slip.login and /etc/sliphome/slip.logout scripts to use arp(8) to manage the proxy-ARP entries in the SLIP server's ARP table.
18.7.2.4.2 slip.login Configuration
The typical /etc/sliphome/slip.login file looks like this:
#!/bin/sh - # # @(#)slip.login 5.1 (Berkeley) 7/1/90 # # generic login file for a slip line. sliplogin invokes this with # the parameters: # 1 2 3 4 5 6 7-n # slipunit ttyspeed loginname local-addr remote-addr mask opt-args # /sbin/ifconfig sl$1 inet $4 $5 netmask $6
This slip.login file merely runs ifconfig for the appropriate SLIP interface with the local and remote addresses and network mask of the SLIP interface.
If you have decided to use the ``proxy ARP'' method (instead of using a separate subnet for your SLIP clients), your /etc/sliphome/slip.login file will need to look something like this:
#!/bin/sh - # # @(#)slip.login 5.1 (Berkeley) 7/1/90 # # generic login file for a slip line. sliplogin invokes this with # the parameters: # 1 2 3 4 5 6 7-n # slipunit ttyspeed loginname local-addr remote-addr mask opt-args # /sbin/ifconfig sl$1 inet $4 $5 netmask $6 # Answer ARP requests for the SLIP client with our Ethernet addr /usr/sbin/arp -s $5 00:11:22:33:44:55 pub
The additional line in this slip.login, arp -s $5 00:11:22:33:44:55 pub, creates an ARP entry in the SLIP server's ARP table. This ARP entry causes the SLIP server to respond with the SLIP server's Ethernet MAC address whenever another IP node on the Ethernet asks to speak to the SLIP client's IP address.
When using the example above, be sure to replace the Ethernet MAC address (00:11:22:33:44:55) with the MAC address of your system's Ethernet card, or your ``proxy ARP'' will definitely not work! You can discover your SLIP server's Ethernet MAC address by looking at the results of running netstat -i; the second line of the output should look something like:
ed0 1500 <Link>0.2.c1.28.5f.4a 191923 0 129457 0 116
This indicates that this particular system's Ethernet MAC address is 00:02:c1:28:5f:4a -- the periods in the Ethernet MAC address given by netstat -i must be changed to colons and leading zeros should be added to each single-digit hexadecimal number to convert the address into the form that arp(8) desires; see the manual page on arp(8) for complete information on usage.
Note: When you create /etc/sliphome/slip.login and /etc/sliphome/slip.logout, the ``execute'' bit (chmod 755 /etc/sliphome/slip.login /etc/sliphome/slip.logout) must be set, or sliplogin will be unable to execute it.
18.7.2.4.3 slip.logout Configuration
/etc/sliphome/slip.logout is not strictly needed (unless you are implementing ``proxy ARP''), but if you decide to create it, this is an example of a basic slip.logout script:
#!/bin/sh - # # slip.logout # # logout file for a slip line. sliplogin invokes this with # the parameters: # 1 2 3 4 5 6 7-n # slipunit ttyspeed loginname local-addr remote-addr mask opt-args # /sbin/ifconfig sl$1 down
If you are using ``proxy ARP'', you will want to have /etc/sliphome/slip.logout remove the ARP entry for the SLIP client:
#!/bin/sh - # # @(#)slip.logout # # logout file for a slip line. sliplogin invokes this with # the parameters: # 1 2 3 4 5 6 7-n # slipunit ttyspeed loginname local-addr remote-addr mask opt-args # /sbin/ifconfig sl$1 down # Quit answering ARP requests for the SLIP client /usr/sbin/arp -d $5
The arp -d $5 removes the ARP entry that the ``proxy ARP'' slip.login added when the SLIP client logged in.
It bears repeating: make sure /etc/sliphome/slip.logout has the execute bit set after you create it (ie, chmod 755 /etc/sliphome/slip.logout).
18.7.2.5 Routing Considerations
If you are not using the ``proxy ARP'' method for routing packets between your SLIP clients and the rest of your network (and perhaps the Internet), you will probably have to add static routes to your closest default router(s) to route your SLIP client subnet via your SLIP server.
18.7.2.5.1 Static Routes
Adding static routes to your nearest default routers can be troublesome (or impossible if you do not have authority to do so...). If you have a multiple-router network in your organization, some routers, such as those made by Cisco and Proteon, may not only need to be configured with the static route to the SLIP subnet, but also need to be told which static routes to tell other routers about, so some expertise and troubleshooting/tweaking may be necessary to get static-route-based routing to work.
18.7.2.5.2 Running gated
Note: gated is proprietary software now and will not be available as source code to the public anymore (more info on the gated website). This section only exists to ensure backwards compatibility for those that are still using an older version.
An alternative to the headaches of static routes is to install gated on your FreeBSD SLIP server and configure it to use the appropriate routing protocols (RIP/OSPF/BGP/EGP) to tell other routers about your SLIP subnet. You'll need to write a /etc/gated.conf file to configure your gated; here is a sample, similar to what the author used on a FreeBSD SLIP server:
#
# gated configuration file for dc.dsu.edu; for gated version 3.5alpha5
# Only broadcast RIP information for xxx.xxx.yy out the ed Ethernet interface
#
#
# tracing options
#
traceoptions "/var/tmp/gated.output" replace size 100k files 2 general ;
rip yes {
interface sl noripout noripin ;
interface ed ripin ripout version 1 ;
traceoptions route ;
} ;
#
# Turn on a bunch of tracing info for the interface to the kernel:
kernel {
traceoptions remnants request routes info interface ;
} ;
#
# Propagate the route to xxx.xxx.yy out the Ethernet interface via RIP
#
export proto rip interface ed {
proto direct {
xxx.xxx.yy mask 255.255.252.0 metric 1; # SLIP connections
} ;
} ;
#
# Accept routes from RIP via ed Ethernet interfaces
import proto rip interface ed {
all ;
} ;
The above sample gated.conf file broadcasts routing information regarding the SLIP subnet xxx.xxx.yy via RIP onto the Ethernet; if you are using a different Ethernet driver than the ed driver, you will need to change the references to the ed interface appropriately. This sample file also sets up tracing to /var/tmp/gated.output for debugging gated's activity; you can certainly turn off the tracing options if gated works OK for you. You will need to change the xxx.xxx.yy's into the network address of your own SLIP subnet (be sure to change the net mask in the proto direct clause as well).
Once you have installed and configured gated on your system, you will need to tell the FreeBSD startup scripts to run gated in place of routed. The easiest way to accomplish this is to set the router and router_flags variables in /etc/rc.conf. Please see the manual page for gated for information on command-line parameters.
Chapter 19 Advanced Networking
19.1 Synopsis
This chapter will cover some of the more frequently used network services on UNIX systems. We will cover how to define, setup, test and maintain all of the network services that FreeBSD utilizes. In addition, there have been example configuration files included throughout this chapter for you to benefit from.
After reading this chapter, you will know:
-
The basics of gateways and routes.
-
How to make FreeBSD act as a bridge.
-
How to setup a network filesystem.
-
How to setup network booting on a diskless machine.
-
How to setup a network information server for sharing user accounts.
-
How to setup automatic network settings using DHCP.
-
How to setup a domain name server.
-
How to synchronize the time and date, and setup a time server, with the NTP protocol.
-
How to setup network address translation.
-
How to manage the inetd daemon.
-
How to connect two computers via PLIP.
-
How to setup IPv6 on a FreeBSD machine.
Before reading this chapter, you should:
-
Understand the basics of the /etc/rc scripts.
-
Be familiar with basic network terminology.
19.2 Gateways and Routes
Contributed by Coranth Gryphon.For one machine to be able to find another over a network, there must be a mechanism in place to describe how to get from one to the other. This is called routing. A ``route'' is a defined pair of addresses: a ``destination'' and a ``gateway''. The pair indicates that if you are trying to get to this destination, communicate through this gateway. There are three types of destinations: individual hosts, subnets, and ``default''. The ``default route'' is used if none of the other routes apply. We will talk a little bit more about default routes later on. There are also three types of gateways: individual hosts, interfaces (also called ``links''), and Ethernet hardware addresses (MAC addresses).
19.2.1 An Example
To illustrate different aspects of routing, we will use the following example from netstat:
% netstat -r Routing tables Destination Gateway Flags Refs Use Netif Expire default outside-gw UGSc 37 418 ppp0 localhost localhost UH 0 181 lo0 test0 0:e0:b5:36:cf:4f UHLW 5 63288 ed0 77 10.20.30.255 link#1 UHLW 1 2421 example.com link#1 UC 0 0 host1 0:e0:a8:37:8:1e UHLW 3 4601 lo0 host2 0:e0:a8:37:8:1e UHLW 0 5 lo0 => host2.example.com link#1 UC 0 0 224 link#1 UC 0 0
The first two lines specify the default route (which we will cover in the next section) and the localhost route.
The interface (Netif column) that this routing table specifies to use for localhost is lo0, also known as the loopback device. This says to keep all traffic for this destination internal, rather than sending it out over the LAN, since it will only end up back where it started.
The next thing that stands out are the addresses beginning with 0:e0:. These are Ethernet hardware addresses, which are also known as MAC addresses. FreeBSD will automatically identify any hosts (test0 in the example) on the local Ethernet and add a route for that host, directly to it over the Ethernet interface, ed0. There is also a timeout (Expire column) associated with this type of route, which is used if we fail to hear from the host in a specific amount of time. When this happens, the route to this host will be automatically deleted. These hosts are identified using a mechanism known as RIP (Routing Information Protocol), which figures out routes to local hosts based upon a shortest path determination.
FreeBSD will also add subnet routes for the local subnet (10.20.30.255 is the broadcast address for the subnet 10.20.30, and example.com is the domain name associated with that subnet). The designation link#1 refers to the first Ethernet card in the machine. You will notice no additional interface is specified for those.
Both of these groups (local network hosts and local subnets) have their routes automatically configured by a daemon called routed. If this is not run, then only routes which are statically defined (i.e. entered explicitly) will exist.
The host1 line refers to our host, which it knows by Ethernet address. Since we are the sending host, FreeBSD knows to use the loopback interface (lo0) rather than sending it out over the Ethernet interface.
The two host2 lines are an example of what happens when we use an ifconfig(8) alias (see the section on Ethernet for reasons why we would do this). The => symbol after the lo0 interface says that not only are we using the loopback (since this address also refers to the local host), but specifically it is an alias. Such routes only show up on the host that supports the alias; all other hosts on the local network will simply have a link#1 line for such routes.
The final line (destination subnet 224) deals with multicasting, which will be covered in another section.
Finally, various attributes of each route can be seen in the Flags column. Below is a short table of some of these flags and their meanings:
| U | Up: The route is active. |
| H | Host: The route destination is a single host. |
| G | Gateway: Send anything for this destination on to this remote system, which will figure out from there where to send it. |
| S | Static: This route was configured manually, not automatically generated by the system. |
| C | Clone: Generates a new route based upon this route for machines we connect to. This type of route is normally used for local networks. |
| W | WasCloned: Indicated a route that was auto-configured based upon a local area network (Clone) route. |
| L | Link: Route involves references to Ethernet hardware. |
19.2.2 Default Routes
When the local system needs to make a connection to a remote host, it checks the routing table to determine if a known path exists. If the remote host falls into a subnet that we know how to reach (Cloned routes), then the system checks to see if it can connect along that interface.
If all known paths fail, the system has one last option: the ``default'' route. This route is a special type of gateway route (usually the only one present in the system), and is always marked with a c in the flags field. For hosts on a local area network, this gateway is set to whatever machine has a direct connection to the outside world (whether via PPP link, DSL, cable modem, T1, or another network interface).
If you are configuring the default route for a machine which itself is functioning as the gateway to the outside world, then the default route will be the gateway machine at your Internet Service Provider's (ISP) site.
Let us look at an example of default routes. This is a common configuration:
[Local2] <--ether--> [Local1] <--PPP--> [ISP-Serv] <--ether--> [T1-GW]
The hosts Local1 and Local2 are at your site. Local1 is connected to an ISP via a dial up PPP connection. This PPP server computer is connected through a local area network to another gateway computer through an external interface to the ISPs Internet feed.
The default routes for each of your machines will be:
A common question is ``Why (or how) would we set the T1-GW to be the default gateway for Local1, rather than the ISP server it is connected to?''.
Remember, since the PPP interface is using an address on the ISP's local network for your side of the connection, routes for any other machines on the ISP's local network will be automatically generated. Hence, you will already know how to reach the T1-GW machine, so there is no need for the intermediate step of sending traffic to the ISP server.
As a final note, it is common to use the address X.X.X.1 as the gateway address for your local network. So (using the same example), if your local class-C address space was 10.20.30 and your ISP was using 10.9.9 then the default routes would be:
19.2.3 Dual Homed Hosts
There is one other type of configuration that we should cover, and that is a host that sits on two different networks. Technically, any machine functioning as a gateway (in the example above, using a PPP connection) counts as a dual-homed host. But the term is really only used to refer to a machine that sits on two local-area networks.
In one case, the machine has two Ethernet cards, each having an address on the separate subnets. Alternately, the machine may only have one Ethernet card, and be using ifconfig(8) aliasing. The former is used if two physically separate Ethernet networks are in use, the latter if there is one physical network segment, but two logically separate subnets.
Either way, routing tables are set up so that each subnet knows that this machine is the defined gateway (inbound route) to the other subnet. This configuration, with the machine acting as a router between the two subnets, is often used when we need to implement packet filtering or firewall security in either or both directions.
If you want this machine to actually forward packets between the two interfaces, you need to tell FreeBSD to enable this ability.
19.2.4 Building a Router
A network router is simply a system that forwards packets from one interface to another. Internet standards and good engineering practice prevent the FreeBSD Project from enabling this by default in FreeBSD. You can enable this feature by changing the following variable to YES in rc.conf(5):
gateway_enable=YES # Set to YES if this host will be a gateway
This option will set the sysctl(8) variable net.inet.ip.forwarding to 1. If you should need to stop routing temporarily, you can reset this to 0 temporarily.
Your new router will need routes to know where to send the traffic. If your network is simple enough you can use static routes. FreeBSD also comes with the standard BSD routing daemon routed(8), which speaks RIP (both version 1 and version 2) and IRDP. Support for BGP v4, OSPF v2, and other sophisticated routing protocols is available with the net/zebra package. Commercial products such as gated are also available for more complex network routing solutions.
Even when FreeBSD is configured in this way, it does not completely comply with the Internet standard requirements for routers. It comes close enough for ordinary use, however.
19.2.5 Routing Propagation
We have already talked about how we define our routes to the outside world, but not about how the outside world finds us.
We already know that routing tables can be set up so that all traffic for a particular address space (in our examples, a class-C subnet) can be sent to a particular host on that network, which will forward the packets inbound.
When you get an address space assigned to your site, your service provider will set up their routing tables so that all traffic for your subnet will be sent down your PPP link to your site. But how do sites across the country know to send to your ISP?
There is a system (much like the distributed DNS information) that keeps track of all assigned address-spaces, and defines their point of connection to the Internet Backbone. The ``Backbone'' are the main trunk lines that carry Internet traffic across the country, and around the world. Each backbone machine has a copy of a master set of tables, which direct traffic for a particular network to a specific backbone carrier, and from there down the chain of service providers until it reaches your network.
It is the task of your service provider to advertise to the backbone sites that they are the point of connection (and thus the path inward) for your site. This is known as route propagation.
19.2.6 Troubleshooting
Sometimes, there is a problem with routing propagation, and some sites are unable to connect to you. Perhaps the most useful command for trying to figure out where routing is breaking down is the traceroute(8) command. It is equally useful if you cannot seem to make a connection to a remote machine (i.e. ping(8) fails).
The traceroute(8) command is run with the name of the remote host you are trying to connect to. It will show the gateway hosts along the path of the attempt, eventually either reaching the target host, or terminating because of a lack of connection.
For more information, see the manual page for traceroute(8).
19.2.7 Multicast Routing
FreeBSD supports both multicast applications and multicast routing natively. Multicast applications do not require any special configuration of FreeBSD; applications will generally run out of the box. Multicast routing requires that support be compiled into the kernel:
options MROUTING
In addition, the multicast routing daemon, mrouted(8) must be configured to set up tunnels and DVMRP via /etc/mrouted.conf. More details on multicast configuration may be found in the man pages for mrouted.
19.3 Wireless Networking
Written by Eric Anderson.19.3.1 Introduction
It can be very useful to be able to use a computer without the annoyance of having a network cable attached at all times. FreeBSD can be used as a wireless client, and even as a wireless ``access point''.
19.3.2 Wireless Modes of Operation
There are two different ways to configure 802.11 wireless devices: BSS and IBSS.
19.3.2.1 BSS Mode
BSS mode is the mode that typically is used. BSS mode is also called infrastructure mode. In this mode, a number of wireless access points are connected to a wired network. Each wireless network has its own name. This name is called the SSID of the network.
Wireless clients connect to these wireless access points. The IEEE 802.11 standard defines the protocol that wireless networks use to connect. A wireless client can be tied to a specific network, when a SSID is set. A wireless client can also attach to any network by not explicitly setting a SSID.
19.3.2.2 IBSS Mode
IBSS mode, also called ad-hoc mode, is designed for point to point connections. There are actually two types of ad-hoc mode. One is IBSS mode, also called ad-hoc or IEEE ad-hoc mode. This mode is defined by the IEEE 802.11 standards. The second is called demo ad-hoc mode or Lucent ad-hoc mode (and sometimes, confusingly, ad-hoc mode). This is the old, pre-802.11 ad-hoc mode and should only be used for legacy installations. We will not cover either of the ad-hoc modes further.
19.3.3 Infrastructure Mode
19.3.3.1 Access Points
Access points are wireless networking devices that allow one or more wireless clients to use the device as a central hub. When using an access point, all clients communicate through the access point. Multiple access points are often used to cover a complete area such as a house, business, or park with a wireless network.
Access points typically have multiple network connections: the wireless card, and one or more wired Ethernet adapters for connection to the rest of the network.
Access points can either be purchased prebuilt, or you can build your own with FreeBSD and a supported wireless card. Several vendors make wireless access points and wireless cards with various features.
19.3.3.2 Building a FreeBSD Access Point
19.3.3.2.1 Requirements
In order to set up a wireless access point with FreeBSD, you need to have a compatible wireless card. Currently, only cards with the Prism chipset are supported. You will also need a wired network card that is supported by FreeBSD (this should not be difficult to find, FreeBSD supports a lot of different devices). For this guide, we will assume you want to bridge(4) all traffic between the wireless device and the network attached to the wired network card.
The hostap functionality that FreeBSD uses to implement the access point works best with certain versions of firmware. Prism 2 cards should use firmware version 1.3.4 or newer. Prism 2.5 and Prism 3 cards should use firmware 1.4.9. Older versions of the firmware way or may not function correctly. At this time, the only way to update cards is with Windows firmware update utilities available from your card's manufacturer.
19.3.3.2.2 Setting It Up
First, make sure your system can see the wireless card:
# ifconfig -a
wi0: flags=8843<UP,BROADCAST,RUNNING,SIMPLEX,MULTICAST> mtu 1500
inet6 fe80::202:2dff:fe2d:c938%wi0 prefixlen 64 scopeid 0x7
inet 0.0.0.0 netmask 0xff000000 broadcast 255.255.255.255
ether 00:09:2d:2d:c9:50
media: IEEE 802.11 Wireless Ethernet autoselect (DS/2Mbps)
status: no carrier
ssid ""
stationname "FreeBSD Wireless node"
channel 10 authmode OPEN powersavemode OFF powersavesleep 100
wepmode OFF weptxkey 1
Do not worry about the details now, just make sure it shows you something to indicate you have a wireless card installed. If you have trouble seeing the wireless interface, and you are using a PC Card, you may want to check out pccardc(8) and pccardd(8) manual pages for more information.
Next, you will need to load a module in order to get the bridging part of FreeBSD ready for the access point. In order to load the bridge(4) module, simply run the following command:
# kldload bridge
It should not have produced any errors when loading the module. If it did, you may need to compile the bridge(4) code into your kernel. The Bridging section of the handbook should be able to help you accomplish that task.
Now that you have the bridging stuff done, we need to tell the FreeBSD kernel which interfaces to bridge together. We do that by using sysctl(8):
# sysctl net.link.ether.bridge=1 # sysctl net.link.ether.bridge_cfg="wi0 xl0" # sysctl net.inet.ip.forwarding=1
Now it is time for the wireless card setup.
The following command will set the card into an access point:
# ifconfig wi0 ssid my_net channel 11 media DS/11Mbps mediaopt hostap up stationname "FreeBSD AP"
The ifconfig(8) line brings the wi0 interface up, sets its SSID to my_net, and sets the station name to FreeBSD AP. The media DS/11Mbps sets the card into 11Mbps mode and is needed for any mediaopt to take effect. The mediaopt hostap option places the interface into access point mode. The channel 11 option sets the 802.11b channel to use. The wicontrol(8) man page has valid channel options for your regulatory domain.
Now you should have a complete functioning access point up and running. You are encouraged to read wicontrol(8), ifconfig(8), and wi(4) for further information.
It is also suggested that you read the section on encryption that follows.
19.3.3.2.3 Status Information
Once the access point is configured and operational, operators will want to see the clients that are associated with the access point. At any time, the operator may type:
# wicontrol -l 1 station: 00:09:b7:7b:9d:16 asid=04c0, flags=3<ASSOC,AUTH>, caps=1<ESS>, rates=f<1M,2M,5.5M,11M>, sig=38/15
This shows that there's one station associated, along with its parameters. The signal indicated should be used as a relative indication of strength only. Its translation to dBm or other units varies between different firmware revisions.
19.3.3.3 Clients
A wireless client is a system that accesses an access point or another client directly.
Typically, wireless clients only have one network device, the wireless networking card.
There are a few different ways to configure a wireless client. These are based on the different wireless modes, generally BSS (infrastructure mode, which requires an access point), and IBSS (ad-hoc, or peer-to-peer mode). In our example, we will use the most popular of the two, BSS mode, to talk to an access point.
19.3.3.3.1 Requirements
There is only one real requirement for setting up FreeBSD as a wireless client. You will need a wireless card that is supported by FreeBSD.
19.3.3.3.2 Setting Up a Wireless FreeBSD Client
You will need to know a few things about the wireless network you are joining before you start. In this example, we are joining a network that has a name of my_net, and encryption turned off.
Note: In this example, we are not using encryption, which is a dangerous situation. In the next section, you will learn how to turn on encryption, and why it is important to do so, and why some encryption technologies still do not completely protect you.
Make sure your card is recognized by FreeBSD:
# ifconfig -a
wi0: flags=8843<UP,BROADCAST,RUNNING,SIMPLEX,MULTICAST> mtu 1500
inet6 fe80::202:2dff:fe2d:c938%wi0 prefixlen 64 scopeid 0x7
inet 0.0.0.0 netmask 0xff000000 broadcast 255.255.255.255
ether 00:09:2d:2d:c9:50
media: IEEE 802.11 Wireless Ethernet autoselect (DS/2Mbps)
status: no carrier
ssid ""
stationname "FreeBSD Wireless node"
channel 10 authmode OPEN powersavemode OFF powersavesleep 100
wepmode OFF weptxkey 1
Now, we will set the card to the correct settings for our network:
# ifconfig wi0 inet 192.168.0.20 netmask 255.255.255.0 ssid my_net
Replace 192.168.0.20 and 255.255.255.0 with a valid IP address and netmask on your wired network. Remember, our access point is bridging the data between the wireless network, and the wired network, so it will appear to the other devices on your network that you are on the wired network just as they are.
Once you have done that, you should be able to ping hosts on the wired network just as if you were connected using a standard wired connection.
If you are experiencing problems with your wireless connection, check to make sure that your are associated (connected) to the access point:
# ifconfig wi0
should return some information, and you should see:
status: associated
If it does not show associated, then you may be out of range of the access point, do not have encryption on, or possibly have a configuration problem.
19.3.3.4 Encryption
Encryption on a wireless network is important because you no longer have the ability to keep the network contained in a well protected area. Your wireless data will be broadcast across your entire neighborhood, so anyone who cares to read it can. This is where encryption comes in. By encrypting the data that is sent over the airwaves, you make it much more difficult for any interested party to grab your data right out of the air.
The two most common ways to encrypt the data between your client and the access point, are WEP, and ipsec(4).
19.3.3.4.1 WEP
WEP is an abbreviation for Wired Equivalency Protocol. WEP is an attempt to make wireless networks as safe and secure as a wired network. Unfortunately, it has been cracked, and is fairly trivial to break. This also means it is not something to rely on when it comes to encrypting sensitive data.
It is better than nothing, so use the following to turn on WEP on your new FreeBSD access point:
# ifconfig wi0 inet up ssid my_net wepmode on wepkey 0x1234567890 media DS/11Mbps mediaopt hostap
And you can turn on WEP on a client with this command:
# ifconfig wi0 inet 192.168.0.20 netmask 255.255.255.0 ssid my_net wepmode on wepkey 0x1234567890
Note that you should replace the 0x1234567890 with a more unique key.
19.3.3.4.2 IPsec
ipsec(4) is a much more robust and powerful tool for encrypting data across a network. This is definitely the preferred way to encrypt wireless data over a network. You can read more about ipsec(4) security and how to implement it in the IPsec section of the handbook.
19.3.3.5 Tools
There are a small number of tools available for use in debugging and setting up your wireless network, and here we will attempt to describe some of them and what they do.
19.3.3.5.1 The bsd-airtools Package
The bsd-airtools package is a complete toolset that includes wireless auditing tools for WEP key cracking, access point detection, etc.
The bsd-airtools utilities can be installed from the net/bsd-airtools port. Information on installing ports can be found in Chapter 4 of the handbook.
The program dstumbler is the packaged tool that allows for access point discovery and signal to noise ratio graphing. If you are having a hard time getting your access point up and running, dstumbler may help you get started.
To test your wireless network security, you may choose to use ``dweputils'' (dwepcrack, dwepdump and dwepkeygen) to help you determine if WEP is the right solution to your wireless security needs.
19.3.3.5.2 The wicontrol, ancontrol and raycontrol Utilities
These are the tools you use to control how your wireless card behaves on the wireless network. In the examples above, we have chosen to use wicontrol(8), since our wireless card is a wi0 interface. If you had a Cisco wireless device, it would come up as an0, and therefore you would use ancontrol(8).
19.3.3.5.3 The ifconfig Command
ifconfig(8) can be used to do many of the same options as wicontrol(8), however it does lack a few options. Check ifconfig(8) for command line parameters and options.
19.3.3.6 Supported Cards
19.3.3.6.1 Access Points
The only cards that are currently supported for BSS (as an access point) mode are devices based on the Prism 2, 2.5, or 3 chipsets. For a complete list, look at wi(4).
19.3.3.6.2 Clients
Almost all 802.11b wireless cards are currently supported under FreeBSD. Most cards based on Prism, Spectrum24, Hermes, Aironet, and Raylink will work as a wireless network card in IBSS (ad-hoc, peer-to-peer, and BSS) mode.
19.4 Bridging
Written by Steve Peterson.19.4.1 Introduction
It is sometimes useful to divide one physical network (such as an Ethernet segment) into two separate network segments without having to create IP subnets and use a router to connect the segments together. A device that connects two networks together in this fashion is called a ``bridge''. A FreeBSD system with two network interface cards can act as a bridge.
The bridge works by learning the MAC layer addresses (Ethernet addresses) of the devices on each of its network interfaces. It forwards traffic between two networks only when its source and destination are on different networks.
In many respects, a bridge is like an Ethernet switch with very few ports.
19.4.2 Situations Where Bridging Is Appropriate
There are two common situations in which a bridge is used today.
19.4.2.1 High Traffic on a Segment
Situation one is where your physical network segment is overloaded with traffic, but you do not want for whatever reason to subnet the network and interconnect the subnets with a router.
Let us consider an example of a newspaper where the Editorial and Production departments are on the same subnetwork. The Editorial users all use server A for file service, and the Production users are on server B. An Ethernet is used to connect all users together, and high loads on the network are slowing things down.
If the Editorial users could be segregated on one network segment and the Production users on another, the two network segments could be connected with a bridge. Only the network traffic destined for interfaces on the ``other'' side of the bridge would be sent to the other network, reducing congestion on each network segment.
19.4.2.2 Filtering/Traffic Shaping Firewall
The second common situation is where firewall functionality is needed without IP Masquerading (NAT).
An example is a small company that is connected via DSL or ISDN to their ISP. They have a 13 globally-accessible IP addresses from their ISP and have 10 PCs on their network. In this situation, using a router-based firewall is difficult because of subnetting issues.
A bridge-based firewall can be configured and dropped into the path just downstream of their DSL/ISDN router without any IP numbering issues.
19.4.3 Configuring a Bridge
19.4.3.1 Network Interface Card Selection
A bridge requires at least two network cards to function. Unfortunately, not all network interface cards as of FreeBSD 4.0 support bridging. Read bridge(4) for details on the cards that are supported.
Install and test the two network cards before continuing.
19.4.3.2 Kernel Configuration Changes
To enable kernel support for bridging, add the:
options BRIDGE
statement to your kernel configuration file, and rebuild your kernel.
19.4.3.3 Firewall Support
If you are planning to use the bridge as a firewall, you will need to add the IPFIREWALL option as well. Read Section 10.8 for general information on configuring the bridge as a firewall.
If you need to allow non-IP packets (such as ARP) to flow through the bridge, there is an undocumented firewall option that must be set. This option is IPFIREWALL_DEFAULT_TO_ACCEPT. Note that this changes the default rule for the firewall to accept any packet. Make sure you know how this changes the meaning of your ruleset before you set it.
19.4.3.4 Traffic Shaping Support
If you want to use the bridge as a traffic shaper, you will need to add the DUMMYNET option to your kernel configuration. Read dummynet(4) for further information.
19.4.4 Enabling the Bridge
Add the line:
net.link.ether.bridge=1
to /etc/sysctl.conf to enable the bridge at runtime, and the line:
net.link.ether.bridge_cfg=if1,if2
to enable bridging on the specified interfaces (replace if1 and if2 with the names of your two network interfaces). If you want the bridged packets to be filtered by ipfw(8), you should add:
net.link.ether.bridge_ipfw=1
as well.
19.4.5 Other Information
If you want to be able to telnet into the bridge from the network, it is OK to assign one of the network cards an IP address. The consensus is that assigning both cards an address is a bad idea.
If you have multiple bridges on your network, there cannot be more than one path between any two workstations. Technically, this means that there is no support for spanning tree link management.
A bridge can add latency to your ping times, especially for traffic from one segment to another.
19.5 NFS
Reorganized and enhanced by Tom Rhodes. Written by Bill Swingle.Among the many different filesystems that FreeBSD supports is the Network File System, also known as NFS. NFS allows a system to share directories and files with others over a network. By using NFS, users and programs can access files on remote systems almost as if they were local files.
Some of the most notable benefits that NFS can provide are:
-
Local workstations use less disk space because commonly used data can be stored on a single machine and still remain accessible to others over the network.
-
There is no need for users to have separate home directories on every network machine. Home directories could be setup on the NFS server and made available throughout the network.
-
Storage devices such as floppy disks, CDROM drives, and ZIP drives can be used by other machines on the network. This may reduce the number of removable media drives throughout the network.
19.5.1 How NFS Works
NFS consists of at least two main parts: a server and one or more clients. The client remotely accesses the data that is stored on the server machine. In order for this to function properly a few processes have to be configured and running:
Note: In FreeBSD 5.X, the portmap utility has been replaced with the rpcbind utility. Thus, in FreeBSD 5.X the user is required to replace every instance of portmap with rpcbind in the forthcoming examples.
The server has to be running the following daemons:
| Daemon | Description |
|---|---|
| nfsd | The NFS daemon which services requests from the NFS clients. |
| mountd | The NFS mount daemon which carries out the requests that nfsd(8) passes on to it. |
| portmap | The portmapper daemon allows NFS clients to discover which port the NFS server is using. |
The client can also run a daemon, known as nfsiod. The nfsiod daemon services the requests from the NFS server. This is optional, and improves performance, but is not required for normal and correct operation. See the nfsiod(8) manual page for more information.
19.5.2 Configuring NFS
NFS configuration is a relatively straightforward process. The processes that need to be running can all start at boot time with a few modifications to your /etc/rc.conf file.
On the NFS server, make sure that the following options are configured in the /etc/rc.conf file:
portmap_enable="YES" nfs_server_enable="YES" mountd_flags="-r"
mountd runs automatically whenever the NFS server is enabled.
On the client, make sure this option is present in /etc/rc.conf:
nfs_client_enable="YES"
The /etc/exports file specifies which filesystems NFS should export (sometimes referred to as ``share''). Each line in /etc/exports specifies a filesystem to be exported and which machines have access to that filesystem. Along with what machines have access to that filesystem, access options may also be specified. There are many such options that can be used in this file but only a few will be mentioned here. You can easily discover other options by reading over the exports(5) manual page.
Here are a few example /etc/exports entries:
The following examples give an idea of how to export filesystems, although the settings may be different depending on your environment and network configuration. For instance, to export the /cdrom directory to three example machines that have the same domain name as the server (hence the lack of a domain name for each) or have entries in your /etc/hosts file. The -ro flag makes the exported filesystem read-only. With this flag, the remote system will not be able to write any changes to the exported filesystem.
/cdrom -ro host1 host2 host3
The following line exports /home to three hosts by IP address. This is a useful setup if you have a private network without a DNS server configured. Optionally the /etc/hosts file could be configured for internal hostnames; please review hosts(5) for more information. The -alldirs flag allows the subdirectories to be mount points. In other words, it will not mount the subdirectories but permit the client to mount only the directories that are required or needed.
/home -alldirs 10.0.0.2 10.0.0.3 10.0.0.4
The following line exports /a so that two clients from different domains may access the filesystem. The -maproot=root flag allows the root user on the remote system to write data on the exported filesystem as root. If the -maproot=root flag is not specified, then even if a user has root access on the remote system, they will not be able to modify files on the exported filesystem.
/a -maproot=root host.example.com box.example.org
In order for a client to access an exported filesystem, the client must have permission to do so. Make sure the client is listed in your /etc/exports file.
In /etc/exports, each line represents the export information for one filesystem to one host. A remote host can only be specified once per filesystem, and may only have one default entry. For example, assume that /usr is a single filesystem. The following /etc/exports would be invalid:
/usr/src client /usr/ports client
One filesystem, /usr, has two lines specifying exports to the same host, client. The correct format for this situation is:
/usr/src /usr/ports client
The properties of one filesystem exported to a given host must all occur on one line. Lines without a client specified are treated as a single host. This limits how you can export filesystems, but for most people this is not an issue.
The following is an example of a valid export list, where /usr and /exports are local filesystems:
# Export src and ports to client01 and client02, but only # client01 has root privileges on it /usr/src /usr/ports -maproot=root client01 /usr/src /usr/ports client02 # The client machines have root and can mount anywhere # on /exports. Anyone in the world can mount /exports/obj read-only /exports -alldirs -maproot=root client01 client02 /exports/obj -ro
You must restart mountd whenever you modify /etc/exports so the changes can take effect. This can be accomplished by sending the HUP signal to the mountd process:
# kill -HUP `cat /var/run/mountd.pid`
Alternatively, a reboot will make FreeBSD set everything up properly. A reboot is not necessary though. Executing the following commands as root should start everything up.
On the NFS server:
# portmap # nfsd -u -t -n 4 # mountd -r
On the NFS client:
# nfsiod -n 4
Now everything should be ready to actually mount a remote file system. In these examples the server's name will be server and the client's name will be client. If you only want to temporarily mount a remote filesystem or would rather test the configuration, just execute a command like this as root on the client:
# mount server:/home /mnt
This will mount the /home directory on the server at /mnt on the client. If everything is set up correctly you should be able to enter /mnt on the client and see all the files that are on the server.
If you want to automatically mount a remote filesystem each time the computer boots, add the filesystem to the /etc/fstab file. Here is an example:
server:/home /mnt nfs rw 0 0
The fstab(5) manual page lists all the available options.
19.5.3 Practical Uses
NFS has many practical uses. Some of the more common ones are listed below:
-
Set several machines to share a CDROM or other media among them. This is cheaper and often a more convenient method to install software on multiple machines.
-
On large networks, it might be more convenient to configure a central NFS server in which to store all the user home directories. These home directories can then be exported to the network so that users would always have the same home directory, regardless of which workstation they log in to.
-
Several machines could have a common /usr/ports/distfiles directory. That way, when you need to install a port on several machines, you can quickly access the source without downloading it on each machine.
19.5.4 Automatic Mounts with amd
Contributed by Wylie Stilwell. Rewritten by Chern Lee.amd(8) (the automatic mounter daemon) automatically mounts a remote filesystem whenever a file or directory within that filesystem is accessed. Filesystems that are inactive for a period of time will also be automatically unmounted by amd. Using amd provides a simple alternative to permanent mounts, as permanent mounts are usually listed in /etc/fstab.
amd operates by attaching itself as an NFS server to the /host and /net directories. When a file is accessed within one of these directories, amd looks up the corresponding remote mount and automatically mounts it. /net is used to mount an exported filesystem from an IP address, while /host is used to mount an export from a remote hostname.
An access to a file within /host/foobar/usr would tell amd to attempt to mount the /usr export on the host foobar.
Example 19-1. Mounting an Export with amd
You can view the available mounts of a remote host with the showmount command. For example, to view the mounts of a host named foobar, you can use:
% showmount -e foobar Exports list on foobar: /usr 10.10.10.0 /a 10.10.10.0 % cd /host/foobar/usr
As seen in the example, the showmount shows /usr as an export. When changing directories to /host/foobar/usr, amd attempts to resolve the hostname foobar and automatically mount the desired export.
amd can be started by the startup scripts by placing the following lines in /etc/rc.conf:
amd_enable="YES"
Additionally, custom flags can be passed to amd from the amd_flags option. By default, amd_flags is set to:
amd_flags="-a /.amd_mnt -l syslog /host /etc/amd.map /net /etc/amd.map"
The /etc/amd.map file defines the default options that exports are mounted with. The /etc/amd.conf file defines some of the more advanced features of amd.
Consult the amd(8) and amd.conf(5) manual pages for more information.
19.5.5 Problems Integrating with Other Systems
Contributed by John Lind.Certain Ethernet adapters for ISA PC systems have limitations which can lead to serious network problems, particularly with NFS. This difficulty is not specific to FreeBSD, but FreeBSD systems are affected by it.
The problem nearly always occurs when (FreeBSD) PC systems are networked with high-performance workstations, such as those made by Silicon Graphics, Inc., and Sun Microsystems, Inc. The NFS mount will work fine, and some operations may succeed, but suddenly the server will seem to become unresponsive to the client, even though requests to and from other systems continue to be processed. This happens to the client system, whether the client is the FreeBSD system or the workstation. On many systems, there is no way to shut down the client gracefully once this problem has manifested itself. The only solution is often to reset the client, because the NFS situation cannot be resolved.
Though the ``correct'' solution is to get a higher performance and capacity Ethernet adapter for the FreeBSD system, there is a simple workaround that will allow satisfactory operation. If the FreeBSD system is the server, include the option -w=1024 on the mount from the client. If the FreeBSD system is the client, then mount the NFS filesystem with the option -r=1024. These options may be specified using the fourth field of the fstab entry on the client for automatic mounts, or by using the -o parameter of the mount command for manual mounts.
It should be noted that there is a different problem, sometimes mistaken for this one, when the NFS servers and clients are on different networks. If that is the case, make certain that your routers are routing the necessary UDP information, or you will not get anywhere, no matter what else you are doing.
In the following examples, fastws is the host (interface) name of a high-performance workstation, and freebox is the host (interface) name of a FreeBSD system with a lower-performance Ethernet adapter. Also, /sharedfs will be the exported NFS filesystem (see exports(5)), and /project will be the mount point on the client for the exported filesystem. In all cases, note that additional options, such as hard or soft and bg may be desirable in your application.
Examples for the FreeBSD system (freebox) as the client in /etc/fstab on freebox:
fastws:/sharedfs /project nfs rw,-r=1024 0 0
As a manual mount command on freebox:
# mount -t nfs -o -r=1024 fastws:/sharedfs /project
Examples for the FreeBSD system as the server in /etc/fstab on fastws:
freebox:/sharedfs /project nfs rw,-w=1024 0 0
As a manual mount command on fastws:
# mount -t nfs -o -w=1024 freebox:/sharedfs /project
Nearly any 16-bit Ethernet adapter will allow operation without the above restrictions on the read or write size.
For anyone who cares, here is what happens when the failure occurs, which also explains why it is unrecoverable. NFS typically works with a ``block'' size of 8 k (though it may do fragments of smaller sizes). Since the maximum Ethernet packet is around 1500 bytes, the NFS ``block'' gets split into multiple Ethernet packets, even though it is still a single unit to the upper-level code, and must be received, assembled, and acknowledged as a unit. The high-performance workstations can pump out the packets which comprise the NFS unit one right after the other, just as close together as the standard allows. On the smaller, lower capacity cards, the later packets overrun the earlier packets of the same unit before they can be transferred to the host and the unit as a whole cannot be reconstructed or acknowledged. As a result, the workstation will time out and try again, but it will try again with the entire 8 K unit, and the process will be repeated, ad infinitum.
By keeping the unit size below the Ethernet packet size limitation, we ensure that any complete Ethernet packet received can be acknowledged individually, avoiding the deadlock situation.
Overruns may still occur when a high-performance workstations is slamming data out to a PC system, but with the better cards, such overruns are not guaranteed on NFS ``units''. When an overrun occurs, the units affected will be retransmitted, and there will be a fair chance that they will be received, assembled, and acknowledged.
19.6 Diskless Operation
Updated by Jean-Fran�ois Dock�s.A FreeBSD machine can boot over the network and operate without a local disk, using filesystems mounted from an NFS server. No system modification is necessary, beyond standard configuration files. Such a system is easy to set up because all the necessary elements are readily available:
-
There are at least two possible methods to load the kernel over the network:
-
PXE: The Intel Preboot Execution Environment system is a form of smart boot ROM built into some networking cards or motherboards. See pxeboot(8) for more details.
-
The etherboot port (net/etherboot) produces ROM-able code to boot kernels over the network. The code can be either burnt into a boot PROM on a network card, or loaded from a local floppy (or hard) disk drive, or from a running MS-DOS system. Many network cards are supported.
-
-
A sample script (/usr/share/examples/diskless/clone_root) eases the creation and maintenance of the workstation's root filesystem on the server. The script will probably require a little customization but it will get you started very quickly.
-
Standard system startup files exist in /etc to detect and support a diskless system startup.
-
Swapping, if needed, can be done either to an NFS file or to a local disk.
There are many ways to set up diskless workstations. Many elements are involved, and most can be customized to suit local taste. The following will describe the setup of a complete system, emphasizing simplicity and compatibility with the standard FreeBSD startup scripts. The system described has the following characteristics:
-
The diskless workstations use a shared read-only root filesystem, and a shared read-only /usr.
The root filesystem is a copy of a standard FreeBSD root (typically the server's), with some configuration files overridden by ones specific to diskless operation or, possibly, to the workstation they belong to.
The parts of the root which have to be writable are overlaid with mfs(8) filesystems. Any changes will be lost when the system reboots.
-
The kernel is loaded by etherboot , using DHCP (or BOOTP) and TFTP.
Caution: As described, this system is insecure. It should live in a protected area of a network, and be untrusted by other hosts.
19.6.1 Setup Instructions
19.6.1.1 Configuring DHCP/BOOTP
There are two protocols that are commonly used to boot a workstation that retrieves its configuration over the network: BOOTP and DHCP. They are used at several points in the workstation bootstrap:
-
etherboot uses DHCP (by default) or BOOTP (needs a configuration option) to find the kernel. (PXE uses DHCP).
-
The kernel uses BOOTP to locate the NFS root.
It is possible to configure a system to use only BOOTP. The bootpd(8) server program is included in the base FreeBSD system.
However, DHCP has a number of advantages over BOOTP (nicer configuration files, possibility of using PXE, plus many others not directly related to diskless operation), and we shall describe both a pure BOOTP, and a BOOTP+DHCP configuration, with an emphasis on the latter, which will use the ISC DHCP software package.
19.6.1.1.1 Configuration Using ISC DHCP
The isc-dhcp server can answer both BOOTP and DHCP requests.
As of release 4.4, isc-dhcp 3.0 is not part of the base system. You will first need to install the net/isc-dhcp3 port or the corresponding package. Please refer to Chapter 4 for general information about ports and packages.
Once isc-dhcp is installed, it needs a configuration file to run, (normally named /usr/local/etc/dhcpd.conf). Here follows a commented example:
default-lease-time 600;
max-lease-time 7200;
authoritative;
option domain-name "example.com";
option domain-name-servers 192.168.4.1;
option routers 192.168.4.1;
subnet 192.168.4.0 netmask 255.255.255.0 {
use-host-decl-names on;
option subnet-mask 255.255.255.0;
option broadcast-address 192.168.4.255;
host margaux {
hardware ethernet 01:23:45:67:89:ab;
fixed-address margaux.example.com;
next-server 192.168.4.4;
filename "/tftpboot/kernel.diskless";
option root-path "192.168.4.4:/data/misc/diskless";
}
}
- This option tells dhcpd to send the value in the host declarations as the hostname for the diskless host. An alternate way would be to add an option host-name margaux inside the host declarations.
- The next-server directive designates the TFTP server (the default is to use the same host as the DHCP server).
- The filename directive defines the file that etherboot will load as a kernel.
Note: PXE appears to prefer a relative file name, and it loads pxeboot, not the kernel (option filename "pxeboot").
- The root-path option defines the path to the root filesystem, in usual NFS notation.
19.6.1.1.2 Configuration Using BOOTP
Here follows an equivalent bootpd configuration. This would be found in /etc/bootptab.
Please note that etherboot must be compiled with the non-default option NO_DHCP_SUPPORT in order to use BOOTP, and that PXE needs DHCP. The only obvious advantage of bootpd is that it exists in the base system.
.def100:\
:hn:ht=1:sa=192.168.4.4:vm=rfc1048:\
:sm=255.255.255.0:\
:ds=192.168.4.1:\
:gw=192.168.4.1:\
:hd="/tftpboot":\
:bf="/kernel.diskless":\
:rp="192.168.4.4:/data/misc/diskless":
margaux:ha=0123456789ab:tc=.def100
19.6.1.2 Preparing a Boot Program with Etherboot
Etherboot's Web site contains extensive documentation mainly intended for Linux systems, but nonetheless containing useful information. The following will just outline how you would use etherboot on a FreeBSD system.
You must first install the net/etherboot package or port. The etherboot port can normally be found in /usr/ports/net/etherboot. If the ports tree is installed on your system, just typing make in this directory should take care of everything. Else refer to Chapter 4 for information about ports and packages.
For our setup, we shall use a boot floppy. For other methods (PROM, or dos program), please refer to the etherboot documentation.
To make a boot floppy, insert a floppy in the drive on the machine where you installed etherboot, then change your current directory to the src directory in the etherboot tree and type:
# gmake bin32/devicetype.fd0
devicetype depends on the type of the Ethernet card in the diskless workstation. Refer to the NIC file in the same directory to determine the right devicetype.
19.6.1.3 Configuring the TFTP and NFS Servers
You need to enable tftpd on the TFTP server:
-
Create a directory from which tftpd will serve the files, e.g. /tftpboot.
-
Add this line to your /etc/inetd.conf:
tftp dgram udp wait root /usr/libexec/tftpd tftpd -s /tftpboot
Note: It appears that at least some PXE versions want the TCP version of TFTP. In this case, add a second line, replacing dgram udp with stream tcp.
-
Tell inetd to reread its configuration file:
# kill -HUP `cat /var/run/inetd.pid`
You can place the tftpboot directory anywhere on the server. Make sure that the location is set in both inetd.conf and dhcpd.conf.
You also need to enable NFS and export the appropriate filesystem on the NFS server.
-
Add this to /etc/rc.conf:
nfs_server_enable="YES"
-
Export the filesystem where the diskless root directory is located by adding the following to /etc/exports (adjust the volume mount point and replace margaux with the name of the diskless workstation):
/data/misc -alldirs -ro margaux
-
Tell mountd to reread its configuration file. If you actually needed to enable NFS in /etc/rc.conf at the first step, you probably want to reboot instead.
# kill -HUP `cat /var/run/mountd.pid`
19.6.1.4 Building a Diskless Kernel
Create a kernel configuration file for the diskless client with the following options (in addition to the usual ones):
options BOOTP # Use BOOTP to obtain IP address/hostname
options BOOTP_NFSROOT # NFS mount root filesystem using BOOTP info
options BOOTP_COMPAT # Workaround for broken bootp daemons.
You may also want to use BOOTP_NFSV3 and BOOTP_WIRED_TO (refer to LINT).
Build the kernel (See Chapter 9), and copy it to the tftp directory, under the name listed in dhcpd.conf.
19.6.1.5 Preparing the Root Filesystem
You need to create a root filesystem for the diskless workstations, in the location listed as root-path in dhcpd.conf.
The easiest way to do this is to use the /usr/share/examples/diskless/clone_root shell script. This script needs customization, at least to adjust the place where the filesystem will be created (the DEST variable).
Refer to the comments at the top of the script for instructions. They explain how the base filesystem is built, and how files may be selectively overridden by versions specific to diskless operation, to a subnetwork, or to an individual workstation. They also give examples for the diskless /etc/fstab and /etc/rc.conf files.
The README files in /usr/share/examples/diskless contain a lot of interesting background information, but, together with the other examples in the diskless directory, they actually document a configuration method which is distinct from the one used by clone_root and /etc/rc.diskless[12], which is a little confusing. Use them for reference only, except if you prefer the method that they describe, in which case you will need customized rc scripts.
19.6.1.6 Configuring Swap
If needed, a swap file located on the server can be accessed via NFS. The exact bootptab or dhcpd.conf options are not clearly documented at this time. The following configuration suggestions have been reported to work in some installations using isc-dhcp 3.0rc11.
-
Add the following lines to dhcpd.conf:
# Global section option swap-path code 128 = string; option swap-size code 129 = integer 32; host margaux { ... # Standard lines, see above option swap-path "192.168.4.4:/netswapvolume/netswap"; option swap-size 64000; }The idea is that, at least for a FreeBSD client, DHCP/BOOTP option code 128 is the path to the NFS swap file, and option code 129 is the swap size in kilobytes. Older versions of dhcpd allowed a syntax of option option-128 "..., which does not seem to work any more.
/etc/bootptab would use the following syntax instead:
T128="192.168.4.4:/netswapvolume/netswap":T129=64000
-
On the NFS swap file server, create the swap file(s)
# mkdir /netswapvolume/netswap # cd /netswapvolume/netswap # dd if=/dev/zero bs=1024 count=64000 of=swap.192.168.4.6 # chmod 0600 swap.192.168.4.6192.168.4.6 is the IP address for the diskless client.
-
On the NFS swap file server, add the following line to /etc/exports:
/netswapvolume -maproot=0:10 -alldirs margauxThen tell mountd to reread the exports file, as above.
19.6.1.7 Miscellaneous Issues
19.6.1.7.1 Running with a Read-only /usr
If the diskless workstation is configured to run X, you will have to adjust the xdm configuration file, which puts the error log on /usr by default.
19.6.1.7.2 Using a Non-FreeBSD Server
When the server for the root filesystem is not running FreeBSD, you will have to create the root filesystem on a FreeBSD machine, then copy it to its destination, using tar or cpio.
In this situation, there are sometimes problems with the special files in /dev, due to differing major/minor integer sizes. A solution to this problem is to export a directory from the non-FreeBSD server, mount this directory onto a FreeBSD machine, and run MAKEDEV on the FreeBSD machine to create the correct device entries (FreeBSD 5.0 and later use devfs(5) to allocate device nodes transparently for the user, running MAKEDEV on these versions is useless).
19.7 ISDN
A good resource for information on ISDN technology and hardware is Dan Kegel's ISDN Page.
A quick simple road map to ISDN follows:
-
If you live in Europe you might want to investigate the ISDN card section.
-
If you are planning to use ISDN primarily to connect to the Internet with an Internet Provider on a dial-up non-dedicated basis, you might look into Terminal Adapters. This will give you the most flexibility, with the fewest problems, if you change providers.
-
If you are connecting two LANs together, or connecting to the Internet with a dedicated ISDN connection, you might consider the stand alone router/bridge option.
Cost is a significant factor in determining what solution you will choose. The following options are listed from least expensive to most expensive.
19.7.1 ISDN Cards
Contributed by Hellmuth Michaelis.FreeBSD's ISDN implementation supports only the DSS1/Q.931 (or Euro-ISDN) standard using passive cards. Starting with FreeBSD 4.4, some active cards are supported where the firmware also supports other signaling protocols; this also includes the first supported Primary Rate (PRI) ISDN card.
Isdn4bsd allows you to connect to other ISDN routers using either IP over raw HDLC or by using synchronous PPP: either by using kernel PPP with isppp, a modified sppp driver, or by using userland ppp(8). By using userland ppp(8), channel bonding of two or more ISDN B-channels is possible. A telephone answering machine application is also available as well as many utilities such as a software 300 Baud modem.
Some growing number of PC ISDN cards are supported under FreeBSD and the reports show that it is successfully used all over Europe and in many other parts of the world.
The passive ISDN cards supported are mostly the ones with the Infineon (formerly Siemens) ISAC/HSCX/IPAC ISDN chipsets, but also ISDN cards with chips from Cologne Chip (ISA bus only), PCI cards with Winbond W6692 chips, some cards with the Tiger300/320/ISAC chipset combinations and some vendor specific chipset based cards such as the AVM Fritz!Card PCI V.1.0 and the AVM Fritz!Card PnP.
Currently the active supported ISDN cards are the AVM B1 (ISA and PCI) BRI cards and the AVM T1 PCI PRI cards.
For documentation on isdn4bsd, have a look at /usr/share/examples/isdn/ directory on your FreeBSD system or at the homepage of isdn4bsd which also has pointers to hints, erratas and much more documentation such as the isdn4bsd handbook.
In case you are interested in adding support for a different ISDN protocol, a currently unsupported ISDN PC card or otherwise enhancing isdn4bsd, please get in touch with Hellmuth Michaelis <[email protected]>.
For questions regarding the installation, configuration and troubleshooting isdn4bsd, a freebsd-isdn mailing list is available.
19.7.2 ISDN Terminal Adapters
Terminal adapters(TA), are to ISDN what modems are to regular phone lines.
Most TA's use the standard hayes modem AT command set, and can be used as a drop in replacement for a modem.
A TA will operate basically the same as a modem except connection and throughput speeds will be much faster than your old modem. You will need to configure PPP exactly the same as for a modem setup. Make sure you set your serial speed as high as possible.
The main advantage of using a TA to connect to an Internet Provider is that you can do Dynamic PPP. As IP address space becomes more and more scarce, most providers are not willing to provide you with a static IP anymore. Most stand-alone routers are not able to accommodate dynamic IP allocation.
TA's completely rely on the PPP daemon that you are running for their features and stability of connection. This allows you to upgrade easily from using a modem to ISDN on a FreeBSD machine, if you already have PPP setup. However, at the same time any problems you experienced with the PPP program and are going to persist.
If you want maximum stability, use the kernel PPP option, not the user-land iijPPP.
The following TA's are known to work with FreeBSD.
-
Motorola BitSurfer and Bitsurfer Pro
-
Adtran
Most other TA's will probably work as well, TA vendors try to make sure their product can accept most of the standard modem AT command set.
The real problem with external TA's is that, like modems, you need a good serial card in your computer.
You should read the FreeBSD Serial Hardware tutorial for a detailed understanding of serial devices, and the differences between asynchronous and synchronous serial ports.
A TA running off a standard PC serial port (asynchronous) limits you to 115.2 Kbs, even though you have a 128 Kbs connection. To fully utilize the 128 Kbs that ISDN is capable of, you must move the TA to a synchronous serial card.
Do not be fooled into buying an internal TA and thinking you have avoided the synchronous/asynchronous issue. Internal TA's simply have a standard PC serial port chip built into them. All this will do is save you having to buy another serial cable and find another empty electrical socket.
A synchronous card with a TA is at least as fast as a stand-alone router, and with a simple 386 FreeBSD box driving it, probably more flexible.
The choice of sync/TA v.s. stand-alone router is largely a religious issue. There has been some discussion of this in the mailing lists. I suggest you search the archives for the complete discussion.
19.7.3 Stand-alone ISDN Bridges/Routers
ISDN bridges or routers are not at all specific to FreeBSD or any other operating system. For a more complete description of routing and bridging technology, please refer to a Networking reference book.
In the context of this page, the terms router and bridge will be used interchangeably.
As the cost of low end ISDN routers/bridges comes down, it will likely become a more and more popular choice. An ISDN router is a small box that plugs directly into your local Ethernet network, and manages its own connection to the other bridge/router. It has built in software to communicate via PPP and other popular protocols.
A router will allow you much faster throughput than a standard TA, since it will be using a full synchronous ISDN connection.
The main problem with ISDN routers and bridges is that interoperability between manufacturers can still be a problem. If you are planning to connect to an Internet provider, you should discuss your needs with them.
If you are planning to connect two LAN segments together, such as your home LAN to the office LAN, this is the simplest lowest maintenance solution. Since you are buying the equipment for both sides of the connection you can be assured that the link will work.
For example to connect a home computer or branch office network to a head office network the following setup could be used.
Example 19-2. Branch Office or Home Network
Network uses a bus based topology with 10 base 2 Ethernet (``thinnet''). Connect router to network cable with AUI/10BT transceiver, if necessary.
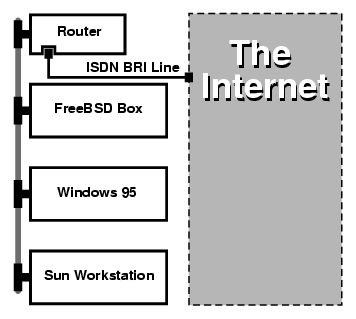
If your home/branch office is only one computer you can use a twisted pair crossover cable to connect to the stand-alone router directly.
Example 19-3. Head Office or Other LAN
Network uses a star topology with 10 base T Ethernet (``Twisted Pair'').
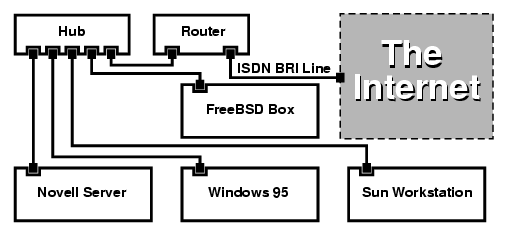
One large advantage of most routers/bridges is that they allow you to have 2 separate independent PPP connections to 2 separate sites at the same time. This is not supported on most TA's, except for specific (usually expensive) models that have two serial ports. Do not confuse this with channel bonding, MPP, etc.
This can be a very useful feature if, for example, you have an dedicated ISDN connection at your office and would like to tap into it, but do not want to get another ISDN line at work. A router at the office location can manage a dedicated B channel connection (64 Kbps) to the Internet and use the other B channel for a separate data connection. The second B channel can be used for dial-in, dial-out or dynamically bonding (MPP, etc.) with the first B channel for more bandwidth.
An Ethernet bridge will also allow you to transmit more than just IP traffic. You can also send IPX/SPX or whatever other protocols you use.
19.8 NIS/YP
Written by Bill Swingle. Enhanced by Eric Ogren and Udo Erdelhoff.19.8.1 What Is It?
NIS, which stands for Network Information Services, was developed by Sun Microsystems to centralize administration of UNIX (originally SunOS) systems. It has now essentially become an industry standard; all major UNIX like systems (Solaris, HP-UX, AIX®, Linux, NetBSD, OpenBSD, FreeBSD, etc) support NIS.
NIS was formerly known as Yellow Pages, but because of trademark issues, Sun changed the name. The old term (and yp) is still often seen and used.
It is a RPC-based client/server system that allows a group of machines within an NIS domain to share a common set of configuration files. This permits a system administrator to set up NIS client systems with only minimal configuration data and add, remove or modify configuration data from a single location.
It is similar to the Windows NT® domain system; although the internal implementation of the two are not at all similar, the basic functionality can be compared.
19.8.2 Terms/Processes You Should Know
There are several terms and several important user processes that you will come across when attempting to implement NIS on FreeBSD, whether you are trying to create an NIS server or act as an NIS client:
| Term | Description |
|---|---|
| NIS domainname | An NIS master server and all of its clients (including its slave servers) have a NIS domainname. Similar to an Windows NT domain name, the NIS domainname does not have anything to do with DNS. |
| portmap | Must be running in order to enable RPC (Remote Procedure Call, a network protocol used by NIS). If portmap is not running, it will be impossible to run an NIS server, or to act as an NIS client. |
| ypbind | ``Binds'' an NIS client to its NIS server. It will take the NIS domainname from the system, and using RPC, connect to the server. ypbind is the core of client-server communication in an NIS environment; if ypbind dies on a client machine, it will not be able to access the NIS server. |
| ypserv | Should only be running on NIS servers; this is the NIS server process itself. If ypserv(8) dies, then the server will no longer be able to respond to NIS requests (hopefully, there is a slave server to take over for it). There are some implementations of NIS (but not the FreeBSD one), that do not try to reconnect to another server if the server it used before dies. Often, the only thing that helps in this case is to restart the server process (or even the whole server) or the ypbind process on the client. |
| rpc.yppasswdd | Another process that should only be running on NIS master servers; this is a daemon that will allow NIS clients to change their NIS passwords. If this daemon is not running, users will have to login to the NIS master server and change their passwords there. |
19.8.3 How Does It Work?
There are three types of hosts in an NIS environment: master servers, slave servers, and clients. Servers act as a central repository for host configuration information. Master servers hold the authoritative copy of this information, while slave servers mirror this information for redundancy. Clients rely on the servers to provide this information to them.
Information in many files can be shared in this manner. The master.passwd, group, and hosts files are commonly shared via NIS. Whenever a process on a client needs information that would normally be found in these files locally, it makes a query to the NIS server that it is bound to instead.
19.8.3.1 Machine Types
-
A NIS master server. This server, analogous to a Windows NT primary domain controller, maintains the files used by all of the NIS clients. The passwd, group, and other various files used by the NIS clients live on the master server.
Note: It is possible for one machine to be an NIS master server for more than one NIS domain. However, this will not be covered in this introduction, which assumes a relatively small-scale NIS environment.
-
NIS slave servers. Similar to the Windows NT backup domain controllers, NIS slave servers maintain copies of the NIS master's data files. NIS slave servers provide the redundancy, which is needed in important environments. They also help to balance the load of the master server: NIS Clients always attach to the NIS server whose response they get first, and this includes slave-server-replies.
-
NIS clients. NIS clients, like most Windows NT workstations, authenticate against the NIS server (or the Windows NT domain controller in the Windows NT Workstation case) to log on.
19.8.4 Using NIS/YP
This section will deal with setting up a sample NIS environment.
Note: This section assumes that you are running FreeBSD 3.3 or later. The instructions given here will probably work for any version of FreeBSD greater than 3.0, but there are no guarantees that this is true.
19.8.4.1 Planning
Let us assume that you are the administrator of a small university lab. This lab, which consists of 15 FreeBSD machines, currently has no centralized point of administration; each machine has its own /etc/passwd and /etc/master.passwd. These files are kept in sync with each other only through manual intervention; currently, when you add a user to the lab, you must run adduser on all 15 machines. Clearly, this has to change, so you have decided to convert the lab to use NIS, using two of the machines as servers.
Therefore, the configuration of the lab now looks something like:
| Machine name | IP address | Machine role |
|---|---|---|
| ellington | 10.0.0.2 | NIS master |
| coltrane | 10.0.0.3 | NIS slave |
| basie | 10.0.0.4 | Faculty workstation |
| bird | 10.0.0.5 | Client machine |
| cli[1-11] | 10.0.0.[6-17] | Other client machines |
If you are setting up a NIS scheme for the first time, it is a good idea to think through how you want to go about it. No matter what the size of your network, there are a few decisions that need to be made.
19.8.4.1.1 Choosing a NIS Domain Name
This might not be the ``domainname'' that you are used to. It is more accurately called the ``NIS domainname''. When a client broadcasts its requests for info, it includes the name of the NIS domain that it is part of. This is how multiple servers on one network can tell which server should answer which request. Think of the NIS domainname as the name for a group of hosts that are related in some way.
Some organizations choose to use their Internet domainname for their NIS domainname. This is not recommended as it can cause confusion when trying to debug network problems. The NIS domainname should be unique within your network and it is helpful if it describes the group of machines it represents. For example, the Art department at Acme Inc. might be in the ``acme-art'' NIS domain. For this example, assume you have chosen the name test-domain.
However, some operating systems (notably SunOS) use their NIS domain name as their Internet domain name. If one or more machines on your network have this restriction, you must use the Internet domain name as your NIS domain name.
19.8.4.1.2 Physical Server Requirements
There are several things to keep in mind when choosing a machine to use as a NIS server. One of the unfortunate things about NIS is the level of dependency the clients have on the server. If a client cannot contact the server for its NIS domain, very often the machine becomes unusable. The lack of user and group information causes most systems to temporarily freeze up. With this in mind you should make sure to choose a machine that will not be prone to being rebooted regularly, or one that might be used for development. The NIS server should ideally be a stand alone machine whose sole purpose in life is to be an NIS server. If you have a network that is not very heavily used, it is acceptable to put the NIS server on a machine running other services, just keep in mind that if the NIS server becomes unavailable, it will affect all of your NIS clients adversely.
19.8.4.2 NIS Servers
The canonical copies of all NIS information are stored on a single machine called the NIS master server. The databases used to store the information are called NIS maps. In FreeBSD, these maps are stored in /var/yp/[domainname] where [domainname] is the name of the NIS domain being served. A single NIS server can support several domains at once, therefore it is possible to have several such directories, one for each supported domain. Each domain will have its own independent set of maps.
NIS master and slave servers handle all NIS requests with the ypserv daemon. ypserv is responsible for receiving incoming requests from NIS clients, translating the requested domain and map name to a path to the corresponding database file and transmitting data from the database back to the client.
19.8.4.2.1 Setting Up a NIS Master Server
Setting up a master NIS server can be relatively straight forward, depending on your needs. FreeBSD comes with support for NIS out-of-the-box. All you need is to add the following lines to /etc/rc.conf, and FreeBSD will do the rest for you.
-
nisdomainname="test-domain"
This line will set the NIS domainname to test-domain upon network setup (e.g. after reboot).
-
nis_server_enable="YES"
This will tell FreeBSD to start up the NIS server processes when the networking is next brought up.
-
nis_yppasswdd_enable="YES"
This will enable the rpc.yppasswdd daemon which, as mentioned above, will allow users to change their NIS password from a client machine.
Note: Depending on your NIS setup, you may need to add further entries. See the section about NIS servers that are also NIS clients, below, for details.
Now, all you have to do is to run the command /etc/netstart as superuser. It will set up everything for you, using the values you defined in /etc/rc.conf.
19.8.4.2.2 Initializing the NIS Maps
The NIS maps are database files, that are kept in the /var/yp directory. They are generated from configuration files in the /etc directory of the NIS master, with one exception: the /etc/master.passwd file. This is for a good reason; you do not want to propagate passwords to your root and other administrative accounts to all the servers in the NIS domain. Therefore, before we initialize the NIS maps, you should:
# cp /etc/master.passwd /var/yp/master.passwd # cd /var/yp # vi master.passwd
You should remove all entries regarding system accounts (bin, tty, kmem, games, etc), as well as any accounts that you do not want to be propagated to the NIS clients (for example root and any other UID 0 (superuser) accounts).
Note: Make sure the /var/yp/master.passwd is neither group nor world readable (mode 600)! Use the chmod command, if appropriate.
When you have finished, it is time to initialize the NIS maps! FreeBSD includes a script named ypinit to do this for you (see its manual page for more information). Note that this script is available on most UNIX Operating Systems, but not on all. On Digital UNIX/Compaq Tru64 UNIX it is called ypsetup. Because we are generating maps for an NIS master, we are going to pass the -m option to ypinit. To generate the NIS maps, assuming you already performed the steps above, run:
ellington# ypinit -m test-domain Server Type: MASTER Domain: test-domain Creating an YP server will require that you answer a few questions. Questions will all be asked at the beginning of the procedure. Do you want this procedure to quit on non-fatal errors? [y/n: n] n Ok, please remember to go back and redo manually whatever fails. If you don't, something might not work. At this point, we have to construct a list of this domains YP servers. rod.darktech.org is already known as master server. Please continue to add any slave servers, one per line. When you are done with the list, type a <control D>. master server : ellington next host to add: coltrane next host to add: ^D The current list of NIS servers looks like this: ellington coltrane Is this correct? [y/n: y] y [..output from map generation..] NIS Map update completed. ellington has been setup as an YP master server without any errors.
ypinit should have created /var/yp/Makefile from /var/yp/Makefile.dist. When created, this file assumes that you are operating in a single server NIS environment with only FreeBSD machines. Since test-domain has a slave server as well, you must edit /var/yp/Makefile:
ellington# vi /var/yp/Makefile
You should comment out the line that says
NOPUSH = "True"
(if it is not commented out already).
19.8.4.2.3 Setting up a NIS Slave Server
Setting up an NIS slave server is even more simple than setting up the master. Log on to the slave server and edit the file /etc/rc.conf as you did before. The only difference is that we now must use the -s option when running ypinit. The -s option requires the name of the NIS master be passed to it as well, so our command line looks like:
coltrane# ypinit -s ellington test-domain Server Type: SLAVE Domain: test-domain Master: ellington Creating an YP server will require that you answer a few questions. Questions will all be asked at the beginning of the procedure. Do you want this procedure to quit on non-fatal errors? [y/n: n] n Ok, please remember to go back and redo manually whatever fails. If you don't, something might not work. There will be no further questions. The remainder of the procedure should take a few minutes, to copy the databases from ellington. Transferring netgroup... ypxfr: Exiting: Map successfully transferred Transferring netgroup.byuser... ypxfr: Exiting: Map successfully transferred Transferring netgroup.byhost... ypxfr: Exiting: Map successfully transferred Transferring master.passwd.byuid... ypxfr: Exiting: Map successfully transferred Transferring passwd.byuid... ypxfr: Exiting: Map successfully transferred Transferring passwd.byname... ypxfr: Exiting: Map successfully transferred Transferring group.bygid... ypxfr: Exiting: Map successfully transferred Transferring group.byname... ypxfr: Exiting: Map successfully transferred Transferring services.byname... ypxfr: Exiting: Map successfully transferred Transferring rpc.bynumber... ypxfr: Exiting: Map successfully transferred Transferring rpc.byname... ypxfr: Exiting: Map successfully transferred Transferring protocols.byname... ypxfr: Exiting: Map successfully transferred Transferring master.passwd.byname... ypxfr: Exiting: Map successfully transferred Transferring networks.byname... ypxfr: Exiting: Map successfully transferred Transferring networks.byaddr... ypxfr: Exiting: Map successfully transferred Transferring netid.byname... ypxfr: Exiting: Map successfully transferred Transferring hosts.byaddr... ypxfr: Exiting: Map successfully transferred Transferring protocols.bynumber... ypxfr: Exiting: Map successfully transferred Transferring ypservers... ypxfr: Exiting: Map successfully transferred Transferring hosts.byname... ypxfr: Exiting: Map successfully transferred coltrane has been setup as an YP slave server without any errors. Don't forget to update map ypservers on ellington.
You should now have a directory called /var/yp/test-domain. Copies of the NIS master server's maps should be in this directory. You will need to make sure that these stay updated. The following /etc/crontab entries on your slave servers should do the job:
20 * * * * root /usr/libexec/ypxfr passwd.byname 21 * * * * root /usr/libexec/ypxfr passwd.byuid
These two lines force the slave to sync its maps with the maps on the master server. Although these entries are not mandatory, since the master server attempts to ensure any changes to its NIS maps are communicated to its slaves and because password information is vital to systems depending on the server, it is a good idea to force the updates. This is more important on busy networks where map updates might not always complete.
Now, run the command /etc/netstart on the slave server as well, which again starts the NIS server.
19.8.4.3 NIS Clients
An NIS client establishes what is called a binding to a particular NIS server using the ypbind daemon. ypbind checks the system's default domain (as set by the domainname command), and begins broadcasting RPC requests on the local network. These requests specify the name of the domain for which ypbind is attempting to establish a binding. If a server that has been configured to serve the requested domain receives one of the broadcasts, it will respond to ypbind, which will record the server's address. If there are several servers available (a master and several slaves, for example), ypbind will use the address of the first one to respond. From that point on, the client system will direct all of its NIS requests to that server. ypbind will occasionally ``ping'' the server to make sure it is still up and running. If it fails to receive a reply to one of its pings within a reasonable amount of time, ypbind will mark the domain as unbound and begin broadcasting again in the hopes of locating another server.
19.8.4.3.1 Setting Up a NIS Client
Setting up a FreeBSD machine to be a NIS client is fairly straightforward.
-
Edit the file /etc/rc.conf and add the following lines in order to set the NIS domainname and start ypbind upon network startup:
nisdomainname="test-domain" nis_client_enable="YES"
-
To import all possible password entries from the NIS server, remove all user accounts from your /etc/master.passwd file and use vipw to add the following line to the end of the file:
+:::::::::
Note: This line will afford anyone with a valid account in the NIS server's password maps an account. There are many ways to configure your NIS client by changing this line. See the netgroups section below for more information. For more detailed reading see O'Reilly's book on Managing NFS and NIS.
Note: You should keep at least one local account (i.e. not imported via NIS) in your /etc/master.passwd and this account should also be a member of the group wheel. If there is something wrong with NIS, this account can be used to log in remotely, become root, and fix things.
-
To import all possible group entries from the NIS server, add this line to your /etc/group file:
+:*::
After completing these steps, you should be able to run ypcat passwd and see the NIS server's passwd map.
19.8.5 NIS Security
In general, any remote user can issue an RPC to ypserv(8) and retrieve the contents of your NIS maps, provided the remote user knows your domainname. To prevent such unauthorized transactions, ypserv(8) supports a feature called securenets which can be used to restrict access to a given set of hosts. At startup, ypserv(8) will attempt to load the securenets information from a file called /var/yp/securenets.
Note: This path varies depending on the path specified with the -p option. This file contains entries that consist of a network specification and a network mask separated by white space. Lines starting with ``#'' are considered to be comments. A sample securenets file might look like this:
# allow connections from local host -- mandatory 127.0.0.1 255.255.255.255 # allow connections from any host # on the 192.168.128.0 network 192.168.128.0 255.255.255.0 # allow connections from any host # between 10.0.0.0 to 10.0.15.255 # this includes the machines in the testlab 10.0.0.0 255.255.240.0
If ypserv(8) receives a request from an address that matches one of these rules, it will process the request normally. If the address fails to match a rule, the request will be ignored and a warning message will be logged. If the /var/yp/securenets file does not exist, ypserv will allow connections from any host.
The ypserv program also has support for Wietse Venema's tcpwrapper package. This allows the administrator to use the tcpwrapper configuration files for access control instead of /var/yp/securenets.
Note: While both of these access control mechanisms provide some security, they, like the privileged port test, are vulnerable to ``IP spoofing'' attacks. All NIS-related traffic should be blocked at your firewall.
Servers using /var/yp/securenets may fail to serve legitimate NIS clients with archaic TCP/IP implementations. Some of these implementations set all host bits to zero when doing broadcasts and/or fail to observe the subnet mask when calculating the broadcast address. While some of these problems can be fixed by changing the client configuration, other problems may force the retirement of the client systems in question or the abandonment of /var/yp/securenets.
Using /var/yp/securenets on a server with such an archaic implementation of TCP/IP is a really bad idea and will lead to loss of NIS functionality for large parts of your network.
The use of the tcpwrapper package increases the latency of your NIS server. The additional delay may be long enough to cause timeouts in client programs, especially in busy networks or with slow NIS servers. If one or more of your client systems suffers from these symptoms, you should convert the client systems in question into NIS slave servers and force them to bind to themselves.
19.8.6 Barring Some Users from Logging On
In our lab, there is a machine basie that is supposed to be a faculty only workstation. We do not want to take this machine out of the NIS domain, yet the passwd file on the master NIS server contains accounts for both faculty and students. What can we do?
There is a way to bar specific users from logging on to a machine, even if they are present in the NIS database. To do this, all you must do is add -username to the end of the /etc/master.passwd file on the client machine, where username is the username of the user you wish to bar from logging in. This should preferably be done using vipw, since vipw will sanity check your changes to /etc/master.passwd, as well as automatically rebuild the password database when you finish editing. For example, if we wanted to bar user bill from logging on to basie we would:
basie# vipw [add -bill to the end, exit] vipw: rebuilding the database... vipw: done basie# cat /etc/master.passwd root:[password]:0:0::0:0:The super-user:/root:/bin/csh toor:[password]:0:0::0:0:The other super-user:/root:/bin/sh daemon:*:1:1::0:0:Owner of many system processes:/root:/sbin/nologin operator:*:2:5::0:0:System &:/:/sbin/nologin bin:*:3:7::0:0:Binaries Commands and Source,,,:/:/sbin/nologin tty:*:4:65533::0:0:Tty Sandbox:/:/sbin/nologin kmem:*:5:65533::0:0:KMem Sandbox:/:/sbin/nologin games:*:7:13::0:0:Games pseudo-user:/usr/games:/sbin/nologin news:*:8:8::0:0:News Subsystem:/:/sbin/nologin man:*:9:9::0:0:Mister Man Pages:/usr/share/man:/sbin/nologin bind:*:53:53::0:0:Bind Sandbox:/:/sbin/nologin uucp:*:66:66::0:0:UUCP pseudo-user:/var/spool/uucppublic:/usr/libexec/uucp/uucico xten:*:67:67::0:0:X-10 daemon:/usr/local/xten:/sbin/nologin pop:*:68:6::0:0:Post Office Owner:/nonexistent:/sbin/nologin nobody:*:65534:65534::0:0:Unprivileged user:/nonexistent:/sbin/nologin +::::::::: -bill basie#
19.8.7 Using Netgroups
Contributed by Udo Erdelhoff.The method shown in the previous section works reasonably well if you need special rules for a very small number of users and/or machines. On larger networks, you will forget to bar some users from logging onto sensitive machines, or you may even have to modify each machine separately, thus losing the main benefit of NIS, centralized administration.
The NIS developers' solution for this problem is called netgroups. Their purpose and semantics can be compared to the normal groups used by UNIX file systems. The main differences are the lack of a numeric id and the ability to define a netgroup by including both user accounts and other netgroups.
Netgroups were developed to handle large, complex networks with hundreds of users and machines. On one hand, this is a Good Thing if you are forced to deal with such a situation. On the other hand, this complexity makes it almost impossible to explain netgroups with really simple examples. The example used in the remainder of this section demonstrates this problem.
Let us assume that your successful introduction of NIS in your laboratory caught your superiors' interest. Your next job is to extend your NIS domain to cover some of the other machines on campus. The two tables contain the names of the new users and new machines as well as brief descriptions of them.
| User Name(s) | Description |
|---|---|
| alpha, beta | Normal employees of the IT department |
| charlie, delta | The new apprentices of the IT department |
| echo, foxtrott, golf, ... | Ordinary employees |
| able, baker, ... | The current interns |
| Machine Name(s) | Description |
|---|---|
| war, death, famine, pollution | Your most important servers. Only the IT employees are allowed to log onto these machines. |
| pride, greed, envy, wrath, lust, sloth | Less important servers. All members of the IT department are allowed to login onto these machines. |
| one, two, three, four, ... | Ordinary workstations. Only the real employees are allowed to use these machines. |
| trashcan | A very old machine without any critical data. Even the intern is allowed to use this box. |
If you tried to implement these restrictions by separately blocking each user, you would have to add one -user line to each system's passwd for each user who is not allowed to login onto that system. If you forget just one entry, you could be in trouble. It may be feasible to do this correctly during the initial setup, however you will eventually forget to add the lines for new users during day-to-day operations. After all, Murphy was an optimist.
Handling this situation with netgroups offers several advantages. Each user need not be handled separately; you assign a user to one or more netgroups and allow or forbid logins for all members of the netgroup. If you add a new machine, you will only have to define login restrictions for netgroups. If a new user is added, you will only have to add the user to one or more netgroups. Those changes are independent of each other; no more ``for each combination of user and machine do...'' If your NIS setup is planned carefully, you will only have to modify exactly one central configuration file to grant or deny access to machines.
The first step is the initialization of the NIS map netgroup. FreeBSD's ypinit(8) does not create this map by default, but its NIS implementation will support it once it has been created. To create an empty map, simply type
ellington# vi /var/yp/netgroup
and start adding content. For our example, we need at least four netgroups: IT employees, IT apprentices, normal employees and interns.
IT_EMP (,alpha,test-domain) (,beta,test-domain)
IT_APP (,charlie,test-domain) (,delta,test-domain)
USERS (,echo,test-domain) (,foxtrott,test-domain) \
(,golf,test-domain)
INTERNS (,able,test-domain) (,baker,test-domain)
IT_EMP, IT_APP etc. are the names of the netgroups. Each bracketed group adds one or more user accounts to it. The three fields inside a group are:
-
The name of the host(s) where the following items are valid. If you do not specify a hostname, the entry is valid on all hosts. If you do specify a hostname, you will enter a realm of darkness, horror and utter confusion.
-
The name of the account that belongs to this netgroup.
-
The NIS domain for the account. You can import accounts from other NIS domains into your netgroup if you are one of the unlucky fellows with more than one NIS domain.
Each of these fields can contain wildcards. See netgroup(5) for details.
Note: Netgroup names longer than 8 characters should not be used, especially if you have machines running other operating systems within your NIS domain. The names are case sensitive; using capital letters for your netgroup names is an easy way to distinguish between user, machine and netgroup names.
Some NIS clients (other than FreeBSD) cannot handle netgroups with a large number of entries. For example, some older versions of SunOS start to cause trouble if a netgroup contains more than 15 entries. You can circumvent this limit by creating several sub-netgroups with 15 users or less and a real netgroup that consists of the sub-netgroups:
BIGGRP1 (,joe1,domain) (,joe2,domain) (,joe3,domain) [...] BIGGRP2 (,joe16,domain) (,joe17,domain) [...] BIGGRP3 (,joe31,domain) (,joe32,domain) BIGGROUP BIGGRP1 BIGGRP2 BIGGRP3You can repeat this process if you need more than 225 users within a single netgroup.
Activating and distributing your new NIS map is easy:
ellington# cd /var/yp ellington# make
This will generate the three NIS maps netgroup, netgroup.byhost and netgroup.byuser. Use ypcat(1) to check if your new NIS maps are available:
ellington% ypcat -k netgroup ellington% ypcat -k netgroup.byhost ellington% ypcat -k netgroup.byuser
The output of the first command should resemble the contents of /var/yp/netgroup. The second command will not produce output if you have not specified host-specific netgroups. The third command can be used to get the list of netgroups for a user.
The client setup is quite simple. To configure the server war, you only have to start vipw(8) and replace the line
+:::::::::
with
+@IT_EMP:::::::::
Now, only the data for the users defined in the netgroup IT_EMP is imported into war's password database and only these users are allowed to login.
Unfortunately, this limitation also applies to the ~ function of the shell and all routines converting between user names and numerical user IDs. In other words, cd ~user will not work, ls -l will show the numerical id instead of the username and find . -user joe -print will fail with ``No such user''. To fix this, you will have to import all user entries without allowing them to login onto your servers.
This can be achieved by adding another line to /etc/master.passwd. This line should contain:
+:::::::::/sbin/nologin, meaning ``Import all entries but replace the shell with /sbin/nologin in the imported entries''. You can replace any field in the passwd entry by placing a default value in your /etc/master.passwd.
Warning: Make sure that the line +:::::::::/sbin/nologin is placed after +@IT_EMP:::::::::. Otherwise, all user accounts imported from NIS will have /sbin/nologin as their login shell.
After this change, you will only have to change one NIS map if a new employee joins the IT department. You could use a similar approach for the less important servers by replacing the old +::::::::: in their local version of /etc/master.passwd with something like this:
+@IT_EMP::::::::: +@IT_APP::::::::: +:::::::::/sbin/nologin
The corresponding lines for the normal workstations could be:
+@IT_EMP::::::::: +@USERS::::::::: +:::::::::/sbin/nologin
And everything would be fine until there is a policy change a few weeks later: The IT department starts hiring interns. The IT interns are allowed to use the normal workstations and the less important servers; and the IT apprentices are allowed to login onto the main servers. You add a new netgroup IT_INTERN, add the new IT interns to this netgroup and start to change the config on each and every machine... As the old saying goes: ``Errors in centralized planning lead to global mess''.
NIS' ability to create netgroups from other netgroups can be used to prevent situations like these. One possibility is the creation of role-based netgroups. For example, you could create a netgroup called BIGSRV to define the login restrictions for the important servers, another netgroup called SMALLSRV for the less important servers and a third netgroup called USERBOX for the normal workstations. Each of these netgroups contains the netgroups that are allowed to login onto these machines. The new entries for your NIS map netgroup should look like this:
BIGSRV IT_EMP IT_APP SMALLSRV IT_EMP IT_APP ITINTERN USERBOX IT_EMP ITINTERN USERS
This method of defining login restrictions works reasonably well if you can define groups of machines with identical restrictions. Unfortunately, this is the exception and not the rule. Most of the time, you will need the ability to define login restrictions on a per-machine basis.
Machine-specific netgroup definitions are the other possibility to deal with the policy change outlined above. In this scenario, the /etc/master.passwd of each box contains two lines starting with ``+''. The first of them adds a netgroup with the accounts allowed to login onto this machine, the second one adds all other accounts with /sbin/nologin as shell. It is a good idea to use the ALL-CAPS version of the machine name as the name of the netgroup. In other words, the lines should look like this:
+@BOXNAME::::::::: +:::::::::/sbin/nologin
Once you have completed this task for all your machines, you will not have to modify the local versions of /etc/master.passwd ever again. All further changes can be handled by modifying the NIS map. Here is an example of a possible netgroup map for this scenario with some additional goodies.
# Define groups of users first IT_EMP (,alpha,test-domain) (,beta,test-domain) IT_APP (,charlie,test-domain) (,delta,test-domain) DEPT1 (,echo,test-domain) (,foxtrott,test-domain) DEPT2 (,golf,test-domain) (,hotel,test-domain) DEPT3 (,india,test-domain) (,juliet,test-domain) ITINTERN (,kilo,test-domain) (,lima,test-domain) D_INTERNS (,able,test-domain) (,baker,test-domain) # # Now, define some groups based on roles USERS DEPT1 DEPT2 DEPT3 BIGSRV IT_EMP IT_APP SMALLSRV IT_EMP IT_APP ITINTERN USERBOX IT_EMP ITINTERN USERS # # And a groups for a special tasks # Allow echo and golf to access our anti-virus-machine SECURITY IT_EMP (,echo,test-domain) (,golf,test-domain) # # machine-based netgroups # Our main servers WAR BIGSRV FAMINE BIGSRV # User india needs access to this server POLLUTION BIGSRV (,india,test-domain) # # This one is really important and needs more access restrictions DEATH IT_EMP # # The anti-virus-machine mentioned above ONE SECURITY # # Restrict a machine to a single user TWO (,hotel,test-domain) # [...more groups to follow]
If you are using some kind of database to manage your user accounts, you should be able to create the first part of the map with your database's report tools. This way, new users will automatically have access to the boxes.
One last word of caution: It may not always be advisable to use machine-based netgroups. If you are deploying a couple of dozen or even hundreds of identical machines for student labs, you should use role-based netgroups instead of machine-based netgroups to keep the size of the NIS map within reasonable limits.
19.8.8 Important Things to Remember
There are still a couple of things that you will need to do differently now that you are in an NIS environment.
-
Every time you wish to add a user to the lab, you must add it to the master NIS server only, and you must remember to rebuild the NIS maps. If you forget to do this, the new user will not be able to login anywhere except on the NIS master. For example, if we needed to add a new user ``jsmith'' to the lab, we would:
# pw useradd jsmith # cd /var/yp # make test-domain
You could also run adduser jsmith instead of pw useradd jsmith.
-
Keep the administration accounts out of the NIS maps. You do not want to be propagating administrative accounts and passwords to machines that will have users that should not have access to those accounts.
-
Keep the NIS master and slave secure, and minimize their downtime. If somebody either hacks or simply turns off these machines, they have effectively rendered many people without the ability to login to the lab.
This is the chief weakness of any centralized administration system. If you do not protect your NIS servers, you will have a lot of angry users!
19.8.9 NIS v1 Compatibility
FreeBSD's ypserv has some support for serving NIS v1 clients. FreeBSD's NIS implementation only uses the NIS v2 protocol, however other implementations include support for the v1 protocol for backwards compatibility with older systems. The ypbind daemons supplied with these systems will try to establish a binding to an NIS v1 server even though they may never actually need it (and they may persist in broadcasting in search of one even after they receive a response from a v2 server). Note that while support for normal client calls is provided, this version of ypserv does not handle v1 map transfer requests; consequently, it cannot be used as a master or slave in conjunction with older NIS servers that only support the v1 protocol. Fortunately, there probably are not any such servers still in use today.
19.8.10 NIS Servers That Are Also NIS Clients
Care must be taken when running ypserv in a multi-server domain where the server machines are also NIS clients. It is generally a good idea to force the servers to bind to themselves rather than allowing them to broadcast bind requests and possibly become bound to each other. Strange failure modes can result if one server goes down and others are dependent upon it. Eventually all the clients will time out and attempt to bind to other servers, but the delay involved can be considerable and the failure mode is still present since the servers might bind to each other all over again.
You can force a host to bind to a particular server by running ypbind with the -S flag. If you do not want to do this manually each time you reboot your NIS server, you can add the following lines to your /etc/rc.conf:
nis_client_enable="YES" # run client stuff as well nis_client_flags="-S NIS domain,server"
See ypbind(8) for further information.
19.8.11 Password Formats
One of the most common issues that people run into when trying to implement NIS is password format compatibility. If your NIS server is using DES encrypted passwords, it will only support clients that are also using DES. For example, if you have Solaris NIS clients in your network, then you will almost certainly need to use DES encrypted passwords.
To check which format your servers and clients are using, look at /etc/login.conf. If the host is configured to use DES encrypted passwords, then the default class will contain an entry like this:
default:\
:passwd_format=des:\
:copyright=/etc/COPYRIGHT:\
[Further entries elided]
Other possible values for the passwd_format capability include blf and md5 (for Blowfish and MD5 encrypted passwords, respectively).
If you have made changes to /etc/login.conf, you will also need to rebuild the login capability database, which is achieved by running the following command as root:
# cap_mkdb /etc/login.conf
Note: The format of passwords already in /etc/master.passwd will not be updated until a user changes their password for the first time after the login capability database is rebuilt.
Next, in order to ensure that passwords are encrypted with the format that you have chosen, you should also check that the crypt_default in /etc/auth.conf gives precedence to your chosen password format. To do this, place the format that you have chosen first in the list. For example, when using DES encrypted passwords, the entry would be:
crypt_default = des blf md5
Having followed the above steps on each of the FreeBSD based NIS servers and clients, you can be sure that they all agree on which password format is used within your network. If you have trouble authenticating on an NIS client, this is a pretty good place to start looking for possible problems. Remember: if you want to deploy an NIS server for a heterogenous network, you will probably have to use DES on all systems because it is the lowest common standard.
19.9 DHCP
Written by Greg Sutter.19.9.1 What Is DHCP?
DHCP, the Dynamic Host Configuration Protocol, describes the means by which a system can connect to a network and obtain the necessary information for communication upon that network. FreeBSD uses the ISC (Internet Software Consortium) DHCP implementation, so all implementation-specific information here is for use with the ISC distribution.
19.9.2 What This Section Covers
This section describes both the client-side and server-side components of the ISC DHCP system. The client-side program, dhclient, comes integrated within FreeBSD, and the server-side portion is available from the net/isc-dhcp3 port. The dhclient(8), dhcp-options(5), and dhclient.conf(5) manual pages, in addition to the references below, are useful resources.
19.9.3 How It Works
When dhclient, the DHCP client, is executed on the client machine, it begins broadcasting requests for configuration information. By default, these requests are on UDP port 68. The server replies on UDP 67, giving the client an IP address and other relevant network information such as netmask, router, and DNS servers. All of this information comes in the form of a DHCP ``lease'' and is only valid for a certain time (configured by the DHCP server maintainer). In this manner, stale IP addresses for clients no longer connected to the network can be automatically reclaimed.
DHCP clients can obtain a great deal of information from the server. An exhaustive list may be found in dhcp-options(5).
19.9.4 FreeBSD Integration
FreeBSD fully integrates the ISC DHCP client, dhclient. DHCP client support is provided within both the installer and the base system, obviating the need for detailed knowledge of network configurations on any network that runs a DHCP server. dhclient has been included in all FreeBSD distributions since 3.2.
DHCP is supported by sysinstall. When configuring a network interface within sysinstall, the first question asked is, ``Do you want to try DHCP configuration of this interface?'' Answering affirmatively will execute dhclient, and if successful, will fill in the network configuration information automatically.
There are two things you must do to have your system use DHCP upon startup:
-
Make sure that the bpf device is compiled into your kernel. To do this, add pseudo-device bpf to your kernel configuration file, and rebuild the kernel. For more information about building kernels, see Chapter 9.
The bpf device is already part of the GENERIC kernel that is supplied with FreeBSD, so if you do not have a custom kernel, you should not need to create one in order to get DHCP working.
Note: For those who are particularly security conscious, you should be warned that bpf is also the device that allows packet sniffers to work correctly (although they still have to be run as root). bpf is required to use DHCP, but if you are very sensitive about security, you probably should not add bpf to your kernel in the expectation that at some point in the future you will be using DHCP.
-
Edit your /etc/rc.conf to include the following:
ifconfig_fxp0="DHCP"
Note: Be sure to replace fxp0 with the designation for the interface that you wish to dynamically configure, as described in Section 6.8.
If you are using a different location for dhclient, or if you wish to pass additional flags to dhclient, also include the following (editing as necessary):
dhcp_program="/sbin/dhclient" dhcp_flags=""
The DHCP server, dhcpd, is included as part of the net/isc-dhcp3 port in the ports collection. This port contains the full ISC DHCP distribution, consisting of client, server, relay agent and documentation.
19.9.5 Files
-
/etc/dhclient.conf
dhclient requires a configuration file, /etc/dhclient.conf. Typically the file contains only comments, the defaults being reasonably sane. This configuration file is described by the dhclient.conf(5) manual page.
-
/sbin/dhclient
dhclient is statically linked and resides in /sbin. The dhclient(8) manual page gives more information about dhclient.
-
/sbin/dhclient-script
dhclient-script is the FreeBSD-specific DHCP client configuration script. It is described in dhclient-script(8), but should not need any user modification to function properly.
-
/var/db/dhclient.leases
The DHCP client keeps a database of valid leases in this file, which is written as a log. dhclient.leases(5) gives a slightly longer description.
19.9.6 Further Reading
The DHCP protocol is fully described in RFC 2131. An informational resource has also been set up at dhcp.org.
19.9.7 Installing and Configuring a DHCP Server
19.9.7.1 What This Section Covers
This section provides information on how to configure a FreeBSD system to act as a DHCP server using the ISC (Internet Software Consortium) implementation of the DHCP suite.
The server portion of the suite is not provided as part of FreeBSD, and so you will need to install the net/isc-dhcp3 port to provide this service. See Chapter 4 for more information on using the ports collection.
19.9.7.2 DHCP Server Installation
In order to configure your FreeBSD system as a DHCP server, you will need to ensure that the bpf(4) device is compiled into your kernel. To do this, add pseudo-device bpf to your kernel configuration file, and rebuild the kernel. For more information about building kernels, see Chapter 9.
The bpf device is already part of the GENERIC kernel that is supplied with FreeBSD, so you do not need to create a custom kernel in order to get DHCP working.
Note: Those who are particularly security conscious should note that bpf is also the device that allows packet sniffers to work correctly (although such programs still need privileged access). bpf is required to use DHCP, but if you are very sensitive about security, you probably should not include bpf in your kernel purely because you expect to use DHCP at some point in the future.
The next thing that you will need to do is edit the sample dhcpd.conf which was installed by the net/isc-dhcp3 port. By default, this will be /usr/local/etc/dhcpd.conf.sample, and you should copy this to /usr/local/etc/dhcpd.conf before proceeding to make changes.
19.9.7.3 Configuring the DHCP Server
dhcpd.conf is comprised of declarations regarding subnets and hosts, and is perhaps most easily explained using an example :
option domain-name "example.com";subnet 192.168.4.0 netmask 255.255.255.0 { range 192.168.4.129 192.168.4.254;
option routers 192.168.4.1;
} host mailhost { hardware ethernet 02:03:04:05:06:07;
fixed-address mailhost.example.com;
}
- This option specifies the domain that will be provided to clients as the default search domain. See resolv.conf(5) for more information on what this means.
- This option specifies a comma separated list of DNS servers that the client should use.
- The netmask that will be provided to clients.
- A client may request a specific length of time that a lease will be valid. Otherwise the server will assign a lease with this expiry value (in seconds).
- This is the maximum length of time that the server will lease for. Should a client request a longer lease, a lease will be issued, although it will only be valid for max-lease-time seconds.
- This option specifies whether the DHCP server should attempt to update DNS when a lease is accepted or released. In the ISC implementation, this option is required.
- This denotes which IP addresses should be used in the pool reserved for allocating to clients. IP addresses between, and including, the ones stated are handed out to clients.
- Declares the default gateway that will be provided to clients.
- The hardware MAC address of a host (so that the DHCP server can recognize a host when it makes a request).
- Specifies that the host should always be given the same IP address. Note that a hostname is OK here, since the DHCP server will resolve the hostname itself before returning the lease information.
Once you have finished writing your dhcpd.conf, you can proceed to start the server by issuing the following command:
# /usr/local/etc/rc.d/isc-dhcpd.sh start
Should you need to make changes to the configuration of your server in the future, it is important to note that sending a SIGHUP signal to dhcpd does not result in the configuration being reloaded, as it does with most daemons. You will need to send a SIGTERM signal to stop the process, and then restart it using the command above.
19.9.7.4 Files
-
/usr/local/sbin/dhcpd
dhcpd is statically linked and resides in /usr/local/sbin. The dhcpd(8) manual page installed with the port gives more information about dhcpd.
-
/usr/local/etc/dhcpd.conf
dhcpd requires a configuration file, /usr/local/etc/dhcpd.conf before it will start providing service to clients. This file needs to contain all the information that should be provided to clients that are being serviced, along with information regarding the operation of the server. This configuration file is described by the dhcpd.conf(5) manual page installed by the port.
-
/var/db/dhcpd.leases
The DHCP server keeps a database of leases it has issued in this file, which is written as a log. The manual page dhcpd.leases(5), installed by the port gives a slightly longer description.
-
/usr/local/sbin/dhcrelay
dhcrelay is used in advanced environments where one DHCP server forwards a request from a client to another DHCP server on a separate network. The dhcrelay(8) manual page provided with the port contains more detail.
19.10 DNS
Contributed by Chern Lee.19.10.1 Overview
FreeBSD utilizes, by default, a version of BIND (Berkeley Internet Name Domain), which is the most common implementation of the DNS protocol. DNS is the protocol through which names are mapped to IP addresses, and vice versa. For example, a query for www.FreeBSD.org will receive a reply with the IP address of The FreeBSD Project's web server, whereas, a query for ftp.FreeBSD.org will return the IP address of the corresponding FTP machine. Likewise, the opposite can happen. A query for an IP address can resolve its hostname. It is not necessary to run a name server to perform DNS lookups on a system.
DNS is coordinated across the Internet through a somewhat complex system of authoritative root name servers, and other smaller-scale name servers who host and cache individual domain information.
This document refers to BIND 8.x, as it is the stable version used in FreeBSD. BIND 9.x in FreeBSD can be installed through the net/bind9 port.
RFC1034 and RFC1035 dictate the DNS protocol.
Currently, BIND is maintained by the Internet Software Consortium (www.isc.org).
19.10.2 Terminology
To understand this document, some terms related to DNS must be understood.
| Term | Definition |
|---|---|
| Forward DNS | Mapping of hostnames to IP addresses |
| Origin | Refers to the domain covered in a particular zone file |
| named, BIND, name server | Common names for the BIND name server package within FreeBSD |
| Resolver | A system process through which a machine queries a name server for zone information |
| Reverse DNS | The opposite of forward DNS; mapping of IP addresses to hostnames |
| Root zone | The beginning of the Internet zone hierarchy. All zones fall under the root zone, similar to how all files in a file system fall under the root directory. |
| Zone | An individual domain, subdomain, or portion of the DNS administered by the same authority |
Examples of zones:
-
. is the root zone
-
org. is a zone under the root zone
-
example.org is a zone under the org. zone
-
foo.example.org. is a subdomain, a zone under the example.org. zone
-
1.2.3.in-addr.arpa is a zone referencing all IP addresses which fall under the 3.2.1.* IP space.
As one can see, the more specific part of a hostname appears to its left. For example, example.org. is more specific than org., as org. is more specific than the root zone. The layout of each part of a hostname is much like a filesystem: the /dev directory falls within the root, and so on.
19.10.3 Reasons to Run a Name Server
Name servers usually come in two forms: an authoritative name server, and a caching name server.
An authoritative name server is needed when:
-
one wants to serve DNS information to the world, replying authoritatively to queries.
-
a domain, such as example.org, is registered and IP addresses need to be assigned to hostnames under it.
-
an IP address block requires reverse DNS entries (IP to hostname).
-
a backup name server, called a slave, must reply to queries when the primary is down or inaccessible.
A caching name server is needed when:
-
a local DNS server may cache and respond more quickly than querying an outside name server.
-
a reduction in overall network traffic is desired (DNS traffic has been measured to account for 5% or more of total Internet traffic).
When one queries for www.FreeBSD.org, the resolver usually queries the uplink ISP's name server, and retrieves the reply. With a local, caching DNS server, the query only has to be made once to the outside world by the caching DNS server. Every additional query will not have to look to the outside of the local network, since the information is cached locally.
19.10.4 How It Works
In FreeBSD, the BIND daemon is called named for obvious reasons.
| File | Description |
|---|---|
| named | the BIND daemon |
| ndc | name daemon control program |
| /etc/namedb | directory where BIND zone information resides |
| /etc/namedb/named.conf | daemon configuration file |
Zone files are usually contained within the /etc/namedb directory, and contain the DNS zone information served by the name server.
19.10.5 Starting BIND
Since BIND is installed by default, configuring it all is relatively simple.
To ensure the named daemon is started at boot, put the following modifications in /etc/rc.conf:
named_enable="YES"
To start the daemon manually (after configuring it)
# ndc start
19.10.6 Configuration Files
19.10.6.1 Using make-localhost
Be sure to:
# cd /etc/namedb # sh make-localhost
to properly create the local reverse DNS zone file in /etc/namedb/localhost.rev.
19.10.6.2 /etc/namedb/named.conf
// $FreeBSD$
//
// Refer to the named(8) manual page for details. If you are ever going
// to setup a primary server, make sure you've understood the hairy
// details of how DNS is working. Even with simple mistakes, you can
// break connectivity for affected parties, or cause huge amount of
// useless Internet traffic.
options {
directory "/etc/namedb";
// In addition to the "forwarders" clause, you can force your name
// server to never initiate queries of its own, but always ask its
// forwarders only, by enabling the following line:
//
// forward only;
// If you've got a DNS server around at your upstream provider, enter
// its IP address here, and enable the line below. This will make you
// benefit from its cache, thus reduce overall DNS traffic in the
Internet.
/*
forwarders {
127.0.0.1;
};
*/
Just as the comment says, to benefit from an uplink's cache, forwarders can be enabled here. Under normal circumstances, a name server will recursively query the Internet looking at certain name servers until it finds the answer it is looking for. Having this enabled will have it query the uplink's name server (or name server provided) first, taking advantage of its cache. If the uplink name server in question is a heavily trafficked, fast name server, enabling this may be worthwhile.
Warning: 127.0.0.1 will not work here. Change this IP address to a name server at your uplink.
/*
* If there is a firewall between you and name servers you want
* to talk to, you might need to uncomment the query-source
* directive below. Previous versions of BIND always asked
* questions using port 53, but BIND 8.1 uses an unprivileged
* port by default.
*/
// query-source address * port 53;
/*
* If running in a sandbox, you may have to specify a different
* location for the dumpfile.
*/
// dump-file "s/named_dump.db";
};
// Note: the following will be supported in a future release.
/*
host { any; } {
topology {
127.0.0.0/8;
};
};
*/
// Setting up secondaries is way easier and the rough picture for this
// is explained below.
//
// If you enable a local name server, don't forget to enter 127.0.0.1
// into your /etc/resolv.conf so this server will be queried first.
// Also, make sure to enable it in /etc/rc.conf.
zone "." {
type hint;
file "named.root";
};
zone "0.0.127.IN-ADDR.ARPA" {
type master;
file "localhost.rev";
};
zone
"0.0.0.0.0.0.0.0.0.0.0.0.0.0.0.0.0.0.0.0.0.0.0.0.0.0.0.0.0.0.0.IP6.INT" {
type master;
file "localhost.rev";
};
// NB: Do not use the IP addresses below, they are faked, and only
// serve demonstration/documentation purposes!
//
// Example secondary config entries. It can be convenient to become
// a secondary at least for the zone where your own domain is in. Ask
// your network administrator for the IP address of the responsible
// primary.
//
// Never forget to include the reverse lookup (IN-ADDR.ARPA) zone!
// (This is the first bytes of the respective IP address, in reverse
// order, with ".IN-ADDR.ARPA" appended.)
//
// Before starting to setup a primary zone, better make sure you fully
// understand how DNS and BIND works, however. There are sometimes
// unobvious pitfalls. Setting up a secondary is comparably simpler.
//
// NB: Don't blindly enable the examples below. :-) Use actual names
// and addresses instead.
//
// NOTE!!! FreeBSD runs bind in a sandbox (see named_flags in rc.conf).
// The directory containing the secondary zones must be write accessible
// to bind. The following sequence is suggested:
//
// mkdir /etc/namedb/s
// chown bind:bind /etc/namedb/s
// chmod 750 /etc/namedb/s
For more information on running BIND in a sandbox, see Running named in a sandbox.
/*
zone "example.com" {
type slave;
file "s/example.com.bak";
masters {
192.168.1.1;
};
};
zone "0.168.192.in-addr.arpa" {
type slave;
file "s/0.168.192.in-addr.arpa.bak";
masters {
192.168.1.1;
};
};
*/
In named.conf, these are examples of slave entries for a forward and reverse zone.
For each new zone served, a new zone entry must be added to named.conf
For example, the simplest zone entry for example.org can look like:
zone "example.org" {
type master;
file "example.org";
};
The zone is a master, as indicated by the type statement, holding its zone information in /etc/namedb/example.org indicated by the file statement.
zone "example.org" {
type slave;
file "example.org";
};
In the slave case, the zone information is transferred from the master name server for the particular zone, and saved in the file specified. If and when the master server dies or is unreachable, the slave name server will have the transferred zone information and will be able to serve it.
19.10.6.3 Zone Files
An example master zone file for example.org (existing within /etc/namedb/example.org) is as follows:
$TTL 3600
example.org. IN SOA ns1.example.org. admin.example.org. (
5 ; Serial
10800 ; Refresh
3600 ; Retry
604800 ; Expire
86400 ) ; Minimum TTL
; DNS Servers
@ IN NS ns1.example.org.
@ IN NS ns2.example.org.
; Machine Names
localhost IN A 127.0.0.1
ns1 IN A 3.2.1.2
ns2 IN A 3.2.1.3
mail IN A 3.2.1.10
@ IN A 3.2.1.30
; Aliases
www IN CNAME @
; MX Record
@ IN MX 10 mail.example.org.
Note that every hostname ending in a ``.'' is an exact hostname, whereas everything without a trailing ``.'' is referenced to the origin. For example, www is translated into www + origin. In our fictitious zone file, our origin is example.org., so www would translate to www.example.org.
The format of a zone file follows:
recordname IN recordtype value
The most commonly used DNS records:
- SOA
-
start of zone authority
- NS
-
an authoritative name server
- A
-
A host address
- CNAME
-
the canonical name for an alias
- MX
-
mail exchanger
- PTR
-
a domain name pointer (used in reverse DNS)
example.org. IN SOA ns1.example.org. admin.example.org. (
5 ; Serial
10800 ; Refresh after 3 hours
3600 ; Retry after 1 hour
604800 ; Expire after 1 week
86400 ) ; Minimum TTL of 1 day
- example.org.
-
the domain name, also the origin for this zone file.
- ns1.example.org.
-
the primary/authoritative name server for this zone
- admin.example.org.
-
the responsible person for this zone, email address with @ replaced. (<[email protected]> becomes admin.example.org)
- 5
-
the serial number of the file. this must be incremented each time the zone file is modified. Nowadays, many admins prefer a yyyymmddrr format for the serial number. 2001041002 would mean last modified 04/10/2001, the latter 02 being the second time the zone file has been modified this day. The serial number is important as it alerts slave name servers for a zone when it is updated.
@ IN NS ns1.example.org.
This is an NS entry. Every name server that is going to reply authoritatively for the zone must have one of these entries. The @ as seen here could have been example.org. The @ translates to the origin.
localhost IN A 127.0.0.1 ns1 IN A 3.2.1.2 ns2 IN A 3.2.1.3 mail IN A 3.2.1.10 @ IN A 3.2.1.30
The A record indicates machine names. As seen above, ns1.example.org would resolve to 3.2.1.2. Again, the origin symbol, @, is used here, thus meaning example.org would resolve to 3.2.1.30.
www IN CNAME @
The canonical name record is usually used for giving aliases to a machine. In the example, www is aliased to the machine addressed to the origin, or example.org (3.2.1.30). CNAMEs can be used to provide alias hostnames, or round robin one hostname among multiple machines.
@ IN MX 10 mail.example.org.
The MX record indicates which mail servers are responsible for handling incoming mail for the zone. mail.example.org is the hostname of the mail server, and 10 being the priority of that mail server.
One can have several mail servers, with priorities of 3, 2, 1. A mail server attempting to deliver to example.org would first try the highest priority MX, then the second highest, etc, until the mail can be properly delivered.
For in-addr.arpa zone files (reverse DNS), the same format is used, except with PTR entries instead of A or CNAME.
$TTL 3600
1.2.3.in-addr.arpa. IN SOA ns1.example.org. admin.example.org. (
5 ; Serial
10800 ; Refresh
3600 ; Retry
604800 ; Expire
3600 ) ; Minimum
@ IN NS ns1.example.org.
@ IN NS ns2.example.org.
2 IN PTR ns1.example.org.
3 IN PTR ns2.example.org.
10 IN PTR mail.example.org.
30 IN PTR example.org.
This file gives the proper IP address to hostname mappings of our above fictitious domain.
19.10.7 Caching Name Server
A caching name server is a name server that is not authoritative for any zones. It simply asks queries of its own, and remembers them for later use. To set one up, just configure the name server as usual, omitting any inclusions of zones.
19.10.8 Running named in a Sandbox
For added security you may want to run named(8) as an unprivileged user, and configure it to chroot(8) into a sandbox directory. This makes everything outside of the sandbox inaccessible to the named daemon. Should named be compromised, this will help to reduce the damage that can be caused. By default, FreeBSD has a user and a group called bind, intended for this use.
Note: Various people would recommend that instead of configuring named to chroot, you should run named inside a jail(8). This section does not attempt to cover this situation.
Since named will not be able to access anything outside of the sandbox (such as shared libraries, log sockets, and so on), there are a number of steps that need to be followed in order to allow named to function correctly. In the following checklist, it is assumed that the path to the sandbox is /etc/namedb and that you have made no prior modifications to the contents of this directory. Perform the following steps as root.
-
Create all directories that named expects to see:
# cd /etc/namedb # mkdir -p bin dev etc var/tmp var/run master slave # chown bind:bind slave var/*
- named only needs write access to these directories, so that is all we give it.
-
Rearrange and create basic zone and configuration files:
# cp /etc/localtime etc
# mv named.conf etc && ln -sf etc/named.conf
# mv named.root master
# sh make-localhost && mv localhost.rev localhost-v6.rev master
# cat > master/named.localhost
$ORIGIN localhost.
$TTL 6h
@ IN SOA localhost. postmaster.localhost. (
1 ; serial
3600 ; refresh
1800 ; retry
604800 ; expiration
3600 ) ; minimum
IN NS localhost.
IN A 127.0.0.1
^D
- This allows named to log the correct time to syslogd(8)
-
If you are running a version of FreeBSD prior to 4.9-RELEASE, build a statically linked copy of named-xfer, and copy it into the sandbox:
# cd /usr/src/lib/libisc # make cleandir && make cleandir && make depend && make all # cd /usr/src/lib/libbind # make cleandir && make cleandir && make depend && make all # cd /usr/src/libexec/named-xfer # make cleandir && make cleandir && make depend && make NOSHARED=yes all # cp named-xfer /etc/namedb/bin && chmod 555 /etc/namedb/bin/named-xfer
After your statically linked named-xfer is installed some cleaning up is required, to avoid leaving stale copies of libraries or programs in your source tree:
# cd /usr/src/lib/libisc # make cleandir # cd /usr/src/lib/libbind # make cleandir # cd /usr/src/libexec/named-xfer # make cleandir
- This step has been reported to fail occasionally. If this happens to you, then issue the command:
-
# cd /usr/src && make cleandir && make cleandir
-
and delete your /usr/obj tree:
-
# rm -fr /usr/obj && mkdir /usr/obj
-
This will clean out any ``cruft'' from your source tree, and retrying the steps above should then work.
If you are running FreeBSD version 4.9-RELEASE or later, then the copy of named-xfer in /usr/libexec is statically linked by default, and you can simply use cp(1) to copy it into your sandbox.
-
Make a dev/null that named can see and write to:
# cd /etc/namedb/dev && mknod null c 2 2 # chmod 666 null
-
Symlink /var/run/ndc to /etc/namedb/var/run/ndc:
# ln -sf /etc/namedb/var/run/ndc /var/run/ndc
Note: This simply avoids having to specify the -c option to ndc(8) every time you run it. Since the contents of /var/run are deleted on boot, if this is something that you find useful you may wish to add this command to root's crontab, making use of the @reboot option. See crontab(5) for more information regarding this.
-
Configure syslogd(8) to create an extra log socket that named can write to. To do this, add -l /etc/namedb/dev/log to the syslogd_flags variable in /etc/rc.conf.
-
Arrange to have named start and chroot itself to the sandbox by adding the following to /etc/rc.conf:
named_enable="YES" named_flags="-u bind -g bind -t /etc/namedb /etc/named.conf"
Note: Note that the configuration file /etc/named.conf is denoted by a full pathname relative to the sandbox, i.e. in the line above, the file referred to is actually /etc/namedb/etc/named.conf.
The next step is to edit /etc/namedb/etc/named.conf so that named knows which zones to load and where to find them on the disk. There follows a commented example (anything not specifically commented here is no different from the setup for a DNS server not running in a sandbox):
options {
directory "/";
named-xfer "/bin/named-xfer";
version ""; // Don't reveal BIND version
query-source address * port 53;
};
// ndc control socket
controls {
unix "/var/run/ndc" perm 0600 owner 0 group 0;
};
// Zones follow:
zone "localhost" IN {
type master;
file "master/named.localhost";
allow-transfer { localhost; };
notify no;
};
zone "0.0.127.in-addr.arpa" IN {
type master;
file "master/localhost.rev";
allow-transfer { localhost; };
notify no;
};
zone "0.0.0.0.0.0.0.0.0.0.0.0.0.0.0.0.0.0.0.0.0.0.0.0.0.0.0.0.0.0.0.ip6.int" {
type master;
file "master/localhost-v6.rev";
allow-transfer { localhost; };
notify no;
};
zone "." IN {
type hint;
file "master/named.root";
};
zone "private.example.net" in {
type master;
file "master/private.example.net.db";
allow-transfer { 192.168.10.0/24; };
};
zone "10.168.192.in-addr.arpa" in {
type slave;
masters { 192.168.10.2; };
file "slave/192.168.10.db";
};
- The directory statement is specified as /, since all files that named needs are within this directory (recall that this is equivalent to a ``normal'' user's /etc/namedb.
- Specifies the full path to the named-xfer binary (from named's frame of reference). This is necessary since named is compiled to look for named-xfer in /usr/libexec by default.
- Specifies the filename (relative to the directory statement above) where named can find the zonefile for this zone.
- Specifies the filename (relative to the directory statement above) where named should write a copy of the zonefile for this zone after successfully transferring it from the master server. This is why we needed to change the ownership of the directory slave to bind in the setup stages above.
After completing the steps above, either reboot your server or restart syslogd(8) and start named(8), making sure to use the new options specified in syslogd_flags and named_flags. You should now be running a sandboxed copy of named!
19.10.9 Security
Although BIND is the most common implementation of DNS, there is always the issue of security. Possible and exploitable security holes are sometimes found.
It is a good idea to subscribe to CERT and freebsd-security-notifications to stay up to date with the current Internet and FreeBSD security issues.
Tip: If a problem arises, keeping sources up to date and having a fresh build of named would not hurt.
19.11 NTP
Contributed by Tom Hukins.19.11.1 Overview
Over time, a computer's clock is prone to drift. As time passes, the computer's clock becomes less accurate. NTP (Network Time Protocol) is one way to ensure your clock is right.
Many Internet services rely on, or greatly benefit from, computers' clocks being accurate. For example, a Web server may receive requests to send a file if it has modified since a certain time. Services such as cron(8) run commands at a given time. If the clock is inaccurate, these commands may not run when expected.
FreeBSD ships with the ntpd(8) NTP server which can be used to query other NTP servers to set the clock on your machine or provide time services to others.
19.11.2 Choosing Appropriate NTP Servers
In order to synchronize your clock, you will need to find one or more NTP servers to use. Your network administrator or ISP may have setup an NTP server for this purpose--check their documentation to see if this is the case. There is a list of publicly accessible NTP servers which you can use to find an NTP server near to you. Make sure you are aware of the policy for any servers you choose, and ask for permission if required.
Choosing several unconnected NTP servers is a good idea in case one of the servers you are using becomes unreachable or its clock is unreliable. ntpd(8) uses the responses it receives from other servers intelligently--it will favor unreliable servers less than reliable ones.
19.11.3 Configuring Your Machine
19.11.3.1 Basic Configuration
If you only wish to synchronize your clock when the machine boots up, you can use ntpdate(8). This may be appropriate for some desktop machines which are frequently rebooted and only require infrequent synchronization, but most machines should run ntpd(8).
Using ntpdate(8) at boot time is also a good idea for machines that run ntpd(8). ntpd(8) changes the clock gradually, whereas ntpdate(8) sets the clock, no matter how great the difference between a machine's current clock setting and the correct time.
To enable ntpdate(8) at boot time, add
ntpdate_enable="YES"to /etc/rc.conf. You will also need to specify all servers you wish to synchronize with and any flags to be passed to ntpdate(8) in ntpdate_flags.
19.11.3.2 General Configuration
NTP is configured by the /etc/ntp.conf file in the format described in ntp.conf(5). Here is a simple example:
server ntplocal.example.com prefer server timeserver.example.org server ntp2a.example.net driftfile /var/db/ntp.drift
The server option specifies which servers are to be used, with one server listed on each line. If a server is specified with the prefer argument, as with ntplocal.example.com, that server is preferred over other servers. A response from a preferred server will be discarded if it differs significantly from other servers' responses, otherwise it will be used without any consideration to other responses. The prefer argument is normally used for NTP servers that are known to be highly accurate, such as those with special time monitoring hardware.
The driftfile option specifies which file is used to store the system clock's frequency offset. ntpd(8) uses this to automatically compensate for the clock's natural drift, allowing it to maintain a reasonably correct setting even if it is cut off from all external time sources for a period of time.
The driftfile option specifies which file is used to store information about previous responses from the NTP servers you are using. This file contains internal information for NTP. It should not be modified by any other process.
19.11.3.3 Controlling Access to Your Server
By default, your NTP server will be accessible to all hosts on the Internet. The restrict option in ntp.conf(5) allows you to control which machines can access your server.
If you want to deny all machines from accessing your NTP server, add the following line to /etc/ntp.conf
restrict default ignore
If you only want to allow machines within your own network to synchronize their clocks with your server, but ensure they are not allowed to configure the server or used as peers to synchronize against, add
restrict 192.168.1.0 mask 255.255.255.0 notrust nomodify notrap
instead, where 192.168.1.0 is an IP address on your network and 255.255.255.0 is your network's netmask.
/etc/ntp.conf can contain multiple restrict options. For more details, see the Access Control Support subsection of ntp.conf(5).
19.11.4 Running the NTP Server
To ensure the NTP server is started at boot time, add the line
xntpd_enable="YES"to /etc/rc.conf. If you wish to pass additional flags to ntpd(8) edit the xntpd_flags parameter in /etc/rc.conf.
To start the server without rebooting your machine, run ntpd being sure to specify any additional parameters from xntpd_flags in /etc/rc.conf. For example:
# ntpd -p /var/run/ntpd.pid
19.11.5 Using ntpd(8) with a Temporary Internet Connection
ntpd does not need a permanent connection to the Internet to function properly. However, if you have a temporary connection that is configured to dial out on demand, it is a good idea to prevent NTP traffic from triggering a dial out or keeping the connection alive. If you are using user PPP, you can use filter directives in /etc/ppp/ppp.conf. For example:
set filter dial 0 deny udp src eq 123 # Prevent NTP traffic from initiating dial out set filter dial 1 permit 0 0 set filter alive 0 deny udp src eq 123 # Prevent incoming NTP traffic from keeping the connection open set filter alive 1 deny udp dst eq 123 # Prevent outgoing NTP traffic from keeping the connection open set filter alive 2 permit 0/0 0/0
For more details see the PACKET FILTERING section in ppp(8) and the examples in /usr/share/examples/ppp/.
Note: Some Internet access providers block low-numbered ports, preventing NTP from functioning since replies never reach your machine.
19.11.6 Further Information
Documentation for the NTP server can be found in /usr/share/doc/ntp/ in HTML format.
19.12 Network Address Translation
Contributed by Chern Lee.19.12.1 Overview
FreeBSD's Network Address Translation daemon, commonly known as natd(8) is a daemon that accepts incoming raw IP packets, changes the source to the local machine and re-injects these packets back into the outgoing IP packet stream. natd does this by changing the source IP address and port such that when data is received back, it is able to determine the original location of the data and forward it back to its original requester.
The most common use of NAT is to perform what is commonly known as Internet Connection Sharing.
19.12.2 Setup
Due to the diminishing IP space in IPv4, and the increased number of users on high-speed consumer lines such as cable or DSL, people are increasingly in need of an Internet Connection Sharing solution. The ability to connect several computers online through one connection and IP address makes natd(8) a reasonable choice.
Most commonly, a user has a machine connected to a cable or DSL line with one IP address and wishes to use this one connected computer to provide Internet access to several more over a LAN.
To do this, the FreeBSD machine on the Internet must act as a gateway. This gateway machine must have two NICs--one for connecting to the Internet router, the other connecting to a LAN. All the machines on the LAN are connected through a hub or switch.
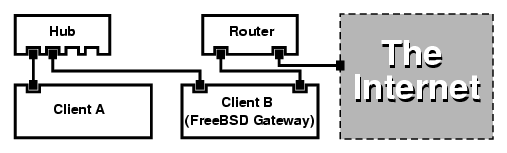
A setup like this is commonly used to share an Internet connection. One of the LAN machines is connected to the Internet. The rest of the machines access the Internet through that ``gateway'' machine.
19.12.3 Configuration
The following options must be in the kernel configuration file:
options IPFIREWALL options IPDIVERT
Additionally, at choice, the following may also be suitable:
options IPFIREWALL_DEFAULT_TO_ACCEPT options IPFIREWALL_VERBOSE
The following must be in /etc/rc.conf:
gateway_enable="YES" firewall_enable="YES" firewall_type="OPEN" natd_enable="YES" natd_interface="fxp0" natd_flags=""
| gateway_enable="YES" | Sets up the machine to act as a gateway. Running sysctl net.inet.ip.forwarding=1 would have the same effect. |
| firewall_enable="YES" | Enables the firewall rules in /etc/rc.firewall at boot. |
| firewall_type="OPEN" | This specifies a predefined firewall ruleset that allows anything in. See /etc/rc.firewall for additional types. |
| natd_interface="fxp0" | Indicates which interface to forward packets through (the interface connected to the Internet). |
| natd_flags="" | Any additional configuration options passed to natd(8) on boot. |
Having the previous options defined in /etc/rc.conf would run natd -interface fxp0 at boot. This can also be run manually.
Each machine and interface behind the LAN should be assigned IP address numbers in the private network space as defined by RFC 1918 and have a default gateway of the natd machine's internal IP address.
For example, client a and b behind the LAN have IP addresses of 192.168.0.2 and 192.168.0.3, while the natd machine's LAN interface has an IP address of 192.168.0.1. Client a and b's default gateway must be set to that of the natd machine, 192.168.0.1. The natd machine's external, or Internet interface does not require any special modification for natd to work.
19.12.4 Port Redirection
The drawback with natd is that the LAN clients are not accessible from the Internet. Clients on the LAN can make outgoing connections to the world but cannot receive incoming ones. This presents a problem if trying to run Internet services on one of the LAN client machines. A simple way around this is to redirect selected Internet ports on the natd machine to a LAN client.
For example, an IRC server runs on Client A, and a web server runs on Client B. For this to work properly, connections received on ports 6667 (IRC) and 80 (web) must be redirected to the respective machines.
The -redirect_port must be passed to natd(8) with the proper options. The syntax is as follows:
-redirect_port proto targetIP:targetPORT[-targetPORT]
[aliasIP:]aliasPORT[-aliasPORT]
[remoteIP[:remotePORT[-remotePORT]]]
In the above example, the argument should be:
-redirect_port tcp 192.168.0.2:6667 6667
-redirect_port tcp 192.168.0.3:80 80
This will redirect the proper tcp
ports to the LAN client machines. The -redirect_port argument can be used to indicate port ranges over individual ports. For example, tcp 192.168.0.2:2000-3000 2000-3000 would redirect all connections received on ports 2000 to 3000 to ports 2000 to 3000 on Client A.
These options can be used when directly running natd(8) or placed within the
natd_flags=""option in /etc/rc.conf.
For further configuration options, consult natd(8)
19.12.5 Address Redirection
Address redirection is useful if several IP addresses are available, yet they must be on one machine. With this, natd(8) can assign each LAN client its own external IP address. natd(8) then rewrites outgoing packets from the LAN clients with the proper external IP address and redirects all traffic incoming on that particular IP address back to the specific LAN client. This is also known as static NAT. For example, the IP addresses 128.1.1.1, 128.1.1.2, and 128.1.1.3 belong to the natd gateway machine. 128.1.1.1 can be used as the natd gateway machine's external IP address, while 128.1.1.2 and 128.1.1.3 are forwarded back to LAN clients A and B.
The -redirect_address syntax is as follows:
-redirect_address localIP publicIP
| localIP | The internal IP address of the LAN client. |
| publicIP | The external IP address corresponding to the LAN client. |
In the example, this argument would read:
-redirect_address 192.168.0.2 128.1.1.2 -redirect_address 192.168.0.3 128.1.1.3
Like -redirect_port, these arguments are also placed within natd_flags of /etc/rc.conf. With address redirection, there is no need for port redirection since all data received on a particular IP address is redirected.
The external IP addresses on the natd machine must be active and aliased to the external interface. Look at rc.conf(5) to do so.
19.13 The inetd ``Super-Server''
Contributed by Chern Lee.19.13.1 Overview
inetd(8) is referred to as the ``Internet Super-Server'' because it manages connections for several daemons. Programs that provide network service are commonly known as daemons. inetd serves as a managing server for other daemons. When a connection is received by inetd, it determines which daemon the connection is destined for, spawns the particular daemon and delegates the socket to it. Running one instance of inetd reduces the overall system load as compared to running each daemon individually in stand-alone mode.
Primarily, inetd is used to spawn other daemons, but several trivial protocols are handled directly, such as chargen, auth, and daytime.
This section will cover the basics in configuring inetd through its command-line options and its configuration file, /etc/inetd.conf.
19.13.2 Settings
inetd is initialized through the /etc/rc.conf system. The inetd_enable option is set to ``NO'' by default, but is often times turned on by sysinstall with the medium security profile. Placing:
inetd_enable="YES"or
inetd_enable="NO"into /etc/rc.conf can enable or disable inetd starting at boot time.
Additionally, different command-line options can be passed to inetd via the inetd_flags option.
19.13.3 Command-Line Options
inetd synopsis:
inetd [-d] [-l] [-w] [-W] [-c maximum] [-C rate] [-a address | hostname] [-p filename] [-R rate] [configuration file]
- -d
-
Turn on debugging.
- -l
-
Turn on logging of successful connections.
- -w
-
Turn on TCP Wrapping for external services (on by default).
- -W
-
Turn on TCP Wrapping for internal services which are built into inetd (on by default).
- -c maximum
-
Specify the default maximum number of simultaneous invocations of each service; the default is unlimited. May be overridden on a per-service basis with the max-child parameter.
- -C rate
-
Specify the default maximum number of times a service can be invoked from a single IP address in one minute; the default is unlimited. May be overridden on a per-service basis with the max-connections-per-ip-per-minute parameter.
- -R rate
-
Specify the maximum number of times a service can be invoked in one minute; the default is 256. A rate of 0 allows an unlimited number of invocations.
- -a
-
Specify one specific IP address to bind to. Alternatively, a hostname can be specified, in which case the IPv4 or IPv6 address which corresponds to that hostname is used. Usually a hostname is specified when inetd is run inside a jail(8), in which case the hostname corresponds to the jail(8) environment.
When hostname specification is used and both IPv4 and IPv6 bindings are desired, one entry with the appropriate protocol type for each binding is required for each service in /etc/inetd.conf. For example, a TCP-based service would need two entries, one using ``tcp4'' for the protocol and the other using ``tcp6''.
- -p
-
Specify an alternate file in which to store the process ID.
These options can be passed to inetd using the inetd_flags option in /etc/rc.conf. By default, inetd_flags is set to ``-wW'', which turns on TCP wrapping for inetd's internal and external services. For novice users, these parameters usually do not need to be modified or even entered in /etc/rc.conf.
Note: An external service is a daemon outside of inetd, which is invoked when a connection is received for it. On the other hand, an internal service is one that inetd has the facility of offering within itself.
19.13.4 inetd.conf
Configuration of inetd is controlled through the /etc/inetd.conf file.
When a modification is made to /etc/inetd.conf, inetd can be forced to re-read its configuration file by sending a HangUP signal to the inetd process as shown:
Each line of the configuration file specifies an individual daemon. Comments in the file are preceded by a ``#''. The format of /etc/inetd.conf is as follows:
service-name
socket-type
protocol
{wait|nowait}[/max-child[/max-connections-per-ip-per-minute]]
user[:group][/login-class]
server-program
server-program-arguments
An example entry for the ftpd daemon using IPv4:
ftp stream tcp nowait root /usr/libexec/ftpd ftpd -l
- service-name
-
This is the service name of the particular daemon. It must correspond to a service listed in /etc/services. This determines which port inetd must listen to. If a new service is being created, it must be placed in /etc/services first.
- socket-type
-
Either stream, dgram, raw, or seqpacket. stream must be used for connection-based, TCP daemons, while dgram is used for daemons utilizing the UDP transport protocol.
- protocol
-
One of the following:
- {wait|nowait}[/max-child[/max-connections-per-ip-per-minute]]
-
wait|nowait indicates whether the daemon invoked from inetd is able to handle its own socket or not. dgram socket types must use the wait option, while stream socket daemons, which are usually multi-threaded, should use nowait. wait usually hands off multiple sockets to a single daemon, while nowait spawns a child daemon for each new socket.
The maximum number of child daemons inetd may spawn can be set using the max-child option. If a limit of ten instances of a particular daemon is needed, a /10 would be placed after nowait.
In addition to max-child, another option limiting the maximum connections from a single place to a particular daemon can be enabled. max-connections-per-ip-per-minute does just this. A value of ten here would limit any particular IP address connecting to a particular service to ten attempts per minute. This is useful to prevent intentional or unintentional resource consumption and Denial of Service (DoS) attacks to a machine.
In this field, wait or nowait is mandatory. max-child and max-connections-per-ip-per-minute are optional.
A stream-type multi-threaded daemon without any max-child or max-connections-per-ip-per-minute limits would simply be: nowait
The same daemon with a maximum limit of ten daemons would read: nowait/10
Additionally, the same setup with a limit of twenty connections per IP address per minute and a maximum total limit of ten child daemons would read: nowait/10/20
These options are all utilized by the default settings of the fingerd daemon, as seen here:
finger stream tcp nowait/3/10 nobody /usr/libexec/fingerd fingerd -s
- user
-
The user is the username that the particular daemon should run as. Most commonly, daemons run as the root user. For security purposes, it is common to find some servers running as the daemon user, or the least privileged nobody user.
- server-program
-
The full path of the daemon to be executed when a connection is received. If the daemon is a service provided by inetd internally, then internal should be used.
- server-program-arguments
-
This works in conjunction with server-program by specifying the arguments, starting with argv[0], passed to the daemon on invocation. If mydaemon -d is the command line, mydaemon -d would be the value of server program arguments. Again, if the daemon is an internal service, use internal here.
19.13.5 Security
Depending on the security profile chosen at install, many of inetd's daemons may be enabled by default. If there is no apparent need for a particular daemon, disable it! Place a ``#'' in front of the daemon in question, and send a hangup signal to inetd. Some daemons, such as fingerd, may not be desired at all because they provide an attacker with too much information.
Some daemons are not security-conscious and have long, or non-existent timeouts for connection attempts. This allows an attacker to slowly send connections to a particular daemon, thus saturating available resources. It may be a good idea to place ip-per-minute and max-child limitations on certain daemons.
By default, TCP wrapping is turned on. Consult the hosts_access(5) manual page for more information on placing TCP restrictions on various inetd invoked daemons.
19.13.6 Miscellaneous
daytime, time, echo, discard, chargen, and auth are all internally provided services of inetd.
The auth service provides identity (ident, identd) network services, and is configurable to a certain degree.
Consult the inetd(8) manual page for more in-depth information.
19.14 Parallel Line IP (PLIP)
PLIP lets us run TCP/IP between parallel ports. It is useful on machines without network cards, or to install on laptops. In this section, we will discuss:
-
Creating a parallel (laplink) cable.
-
Connecting two computers with PLIP.
19.14.1 Creating a Parallel Cable
You can purchase a parallel cable at most computer supply stores. If you cannot do that, or you just want to know how it is done, the following table shows how to make one out of a normal parallel printer cable.
Table 19-1. Wiring a Parallel Cable for Networking
| A-name | A-End | B-End | Descr. | Post/Bit |
|---|---|---|---|---|
|
DATA0 |
2 |
15 |
Data |
0/0x01 |
|
DATA1 |
3 |
13 |
Data |
0/0x02 |
|
DATA2 |
4 |
12 |
Data |
0/0x04 |
|
DATA3 |
5 |
10 |
Strobe |
0/0x08 |
|
DATA4 |
6 |
11 |
Data |
0/0x10 |
| GND | 18-25 | 18-25 | GND | - |
19.14.2 Setting Up PLIP
Get a laplink cable.
Confirm that both computers have a kernel with lpt(4) driver support.
# grep lp /var/run/dmesg.boot lpt0 at 0x378-0x37f irq 7 on isa lpt0: Interrupt-driven lp0: TCP/IP capable interface
Plug in the laplink cable into the parallel interface on both computers.
Configure the network interface parameters for lp0 on both sites as root. For example, if you want connect the host host1 with host2:
host1 <-----> host2
IP Address 10.0.0.1 10.0.0.2
Configure the interface on host1 by doing:
# ifconfig lp0 10.0.0.1 10.0.0.2
Configure the interface on host2 by doing:
# ifconfig lp0 10.0.0.2 10.0.0.1
You now should have a working connection. Please read the manual pages lp(4) and lpt(4) for more details.
You should also add both hosts to /etc/hosts:
127.0.0.1 localhost.my.domain localhost 10.0.0.1 host1.my.domain host1 10.0.0.2 host2.my.domain
To confirm the connection works, go to each host and ping the other. For example, on host1:
# ifconfig lp0
lp0: flags=8851<UP,POINTOPOINT,RUNNING,SIMPLEX,MULTICAST> mtu 1500
inet 10.0.0.1 --> 10.0.0.2 netmask 0xff000000
# netstat -r
Routing tables
Internet:
Destination Gateway Flags Refs Use Netif Expire
host2 host1 UH 4 127592 lp0
# ping -c 4 host2
PING host2 (10.0.0.2): 56 data bytes
64 bytes from 10.0.0.2: icmp_seq=0 ttl=255 time=2.774 ms
64 bytes from 10.0.0.2: icmp_seq=1 ttl=255 time=2.530 ms
64 bytes from 10.0.0.2: icmp_seq=2 ttl=255 time=2.556 ms
64 bytes from 10.0.0.2: icmp_seq=3 ttl=255 time=2.714 ms
--- host2 ping statistics ---
4 packets transmitted, 4 packets received, 0% packet loss
round-trip min/avg/max/stddev = 2.530/2.643/2.774/0.103 ms
19.15 IPv6
Originally Written by Aaron Kaplan. Restructured and Added by Tom Rhodes.IPv6 (also know as IPng ``IP next generation'') is the new version of the well known IP protocol (also know as IPv4). Like the other current *BSD systems, FreeBSD includes the KAME IPv6 reference implementation. So your FreeBSD system comes with all you will need to experiment with IPv6. This section focuses on getting IPv6 configured and running.
In the early 1990s, people became aware of the rapidly diminishing address space of IPv4. Given the expansion rate of the Internet there were two major concerns:
-
Running out of addresses. Today this is not so much of a concern anymore since private address spaces (10.0.0.0/8, 192.168.0.0/24, etc.) and Network Address Translation (NAT) are being employed.
-
Router table entries were getting too large. This is still a concern today.
IPv6 deals with these and many other issues:
-
128 bit address space. In other words theoretically there are 340,282,366,920,938,463,463,374,607,431,768,211,456 addresses available. This means there are approximately 6.67 * 10^27 IPv6 addresses per square meter on our planet.
-
Routers will only store network aggregation addresses in their routing tables thus reducing the average space of a routing table to 8192 entries.
There are also lots of other useful features of IPv6 such as:
-
Address autoconfiguration (RFC2462)
-
Anycast addresses (``one-out-of many'')
-
Mandatory multicast addresses
-
IPsec (IP security)
-
Simplified header structure
-
Mobile IP
-
IPv4-to-IPv6 transition mechanisms
For more information see:
19.15.1 Background on IPv6 Addresses
There are different types of IPv6 addresses: Unicast, Anycast and Multicast.
Unicast addresses are the well known addresses. A packet sent to a unicast address arrives exactly at the interface belonging to the address.
Anycast addresses are syntactically indistinguishable from unicast addresses but they address a group of interfaces. The packet destined for an anycast address will arrive at the nearest (in router metric) interface. Anycast addresses may only be used by routers.
Multicast addresses identify a group of interfaces. A packet destined for a multicast address will arrive at all interfaces belonging to the multicast group.
Note: The IPv4 broadcast address (usually xxx.xxx.xxx.255) is expressed by multicast addresses in IPv6.
Reserved IPv6 addresses:
ipv6-address prefixlength(Bits) description Notes
:: 128 Bits unspecified cf. 0.0.0.0 in IPv4 address
::1 128 Bits loopback address cf. 127.0.0.1 in IPv4
::00:xx:xx:xx:xx 96 Bits embedded IPv4 The lower 32 bits are the
address IPv4 address. Also called
``IPv4 compatible IPv6
address''
::ff:xx:xx:xx:xx 96 Bits IPv4 mapped The lower 32 bits are the
IPv6 address IPv4 address. For hosts
which do not support IPv6
fe80:: - feb:: 10 Bits link-local cf. loopback address in
IPv4
fec0:: - fef:: 10 Bits site-local
ff:: 8 Bits multicast
001 (base 2) 3 Bits global unicast All global unicast
addresses are assigned from
this pool. The first 3 Bits
are ``001''.
19.15.2 Reading IPv6 Addresses
The canonical form is represented as: x:x:x:x:x:x:x:x, each ``x'' being a 16 Bit hex value. For example FEBC:A574:382B:23C1:AA49:4592:4EFE:9982
Often an address will have long substrings of all zeros therefore each such substring can be abbreviated by ``::''. For example fe80::1 corresponds to the canonical form fe80:0000:0000:0000:0000:0000:0000:0001
A third form is to write the last 32 Bit part in the well known (decimal) IPv4 style with dots ``.'' as separators. For example 2002::10.0.0.1 corresponds to the (hexadecimal) canonical representation 2002:0000:0000:0000:0000:0000:0a00:0001 which in turn is equivalent to writing 2002::a00:1
By now the reader should be able to understand the following:
# ifconfig
rl0: flags=8943<UP,BROADCAST,RUNNING,PROMISC,SIMPLEX,MULTICAST> mtu 1500
inet 10.0.0.10 netmask 0xffffff00 broadcast 10.0.0.255
inet6 fe80::200:21ff:fe03:8e1%rl0 prefixlen 64 scopeid 0x1
ether 00:00:21:03:08:e1
media: Ethernet autoselect (100baseTX )
status: active
fe80::200:21ff:fe03:8e1%rl0 is an auto configured link-local address. It includes the scrambled Ethernet MAC as part of the auto configuration.
For further information on the structure of IPv6 addresses see RFC2373.
19.15.3 Getting Connected
Currently there are four ways to connect to other IPv6 hosts and networks:
-
Join the experimental 6bone
-
Getting an IPv6 network from your upstream provider. Talk to your Internet provider for instructions.
-
Tunnel via 6-to-4
-
Use the freenet6 port if you are on a dial-up connection.
Here we will talk on how to connect to the 6bone since it currently seems to be the most popular way.
First take a look at the 6bone site and find a 6bone connection nearest to you. Write to the responsible person and with a little bit of luck you will be given instructions on how to set up your connection. Usually this involves setting up a GRE (gif) tunnel.
Here is a typical example on setting up a gif(4) tunnel:
# ifconfig gif0 create # ifconfig gif0 gif0: flags=8010<POINTOPOINT,MULTICAST> mtu 1280 # ifconfig gif0 tunnel MY_IPv4_ADDR HIS_IPv4_ADDR # ifconfig gif0 inet6 alias MY_ASSIGNED_IPv6_TUNNEL_ENDPOINT_ADDR
Replace the capitalized words by the information you received from the upstream 6bone node.
This establishes the tunnel. Check if the tunnel is working by ping6(8) 'ing ff02::1%gif0. You should receive two ping replies.
Note: In case you are intrigued by the address ff02:1%gif0, this is a multicast address. %gif0 states that the multicast address at network interface gif0 is to be used. Since we ping a multicast address the other endpoint of the tunnel should reply as well).
By now setting up a route to your 6bone uplink should be rather straightforward:
# route add -inet6 default -interface gif0 # ping6 -n MY_UPLINK
# traceroute6 www.jp.FreeBSD.org
(3ffe:505:2008:1:2a0:24ff:fe57:e561) from 3ffe:8060:100::40:2, 30 hops max, 12 byte packets
1 atnet-meta6 14.147 ms 15.499 ms 24.319 ms
2 6bone-gw2-ATNET-NT.ipv6.tilab.com 103.408 ms 95.072 ms *
3 3ffe:1831:0:ffff::4 138.645 ms 134.437 ms 144.257 ms
4 3ffe:1810:0:6:290:27ff:fe79:7677 282.975 ms 278.666 ms 292.811 ms
5 3ffe:1800:0:ff00::4 400.131 ms 396.324 ms 394.769 ms
6 3ffe:1800:0:3:290:27ff:fe14:cdee 394.712 ms 397.19 ms 394.102 ms
This output will differ from machine to machine. By now you should be able to reach the IPv6 site www.kame.net and see the dancing tortoise - that is if you have a IPv6 enabled browser such as mozilla.
19.15.4 DNS in the IPv6 World
There are two new types of DNS records for IPv6:
-
AAAA records,
-
A6 records
Using AAAA records is straightforward. Assign your hostname to the new IPv6 address you just got by adding:
MYHOSTNAME AAAA MYIPv6ADDR
To your primary zone DNS file. In case you do not serve your own DNS zones ask your DNS provider. Current versions of bind (version 8.3 and 9) support AAAA records.
Chapter 20 Electronic Mail
Original work by Bill Lloyd. Rewritten by Jim Mock.20.1 Synopsis
``Electronic Mail'', better known as email, is one of the most widely used forms of communication today. This chapter provides a basic introduction to running a mail server on FreeBSD. However, it is not a complete reference and in fact many important considerations are omitted. For more complete coverage of the subject, the reader is referred to the many excellent books listed in Appendix B.
After reading this chapter, you will know:
-
What software components are involved in sending and receiving electronic mail.
-
Where basic sendmail configuration files are located in FreeBSD.
-
How to block spammers from illegally using your mail server as a relay.
-
How to install and configure an alternate mail transfer agent on your system, replacing sendmail.
-
How to troubleshoot common mail server problems.
-
How to use SMTP with UUCP.
-
How to use mail with a dialup connection.
-
How to configure SMTP Authentication for added security.
Before reading this chapter, you should:
-
Properly setup your network connection (Chapter 19).
-
Properly setup the DNS information for your mail host (Chapter 19).
-
Know how to install additional third-party software (Chapter 4).
20.2 Using Electronic Mail
There are five major parts involved in an email exchange. They are: the user program, the server daemon, DNS, a POP or IMAP daemon, and of course, the mailhost itself.
20.2.1 The User Program
This includes command line programs such as mutt, pine, elm, and mail, and GUI programs such as balsa, xfmail to name a few, and something more ``sophisticated'' like a WWW browser. These programs simply pass off the email transactions to the local ``mailhost'', either by calling one of the server daemons available or delivering it over TCP.
20.2.2 Mailhost Server Daemon
This is usually sendmail (by default with FreeBSD) or one of the other mail server daemons such as qmail, postfix, or exim. There are others, but those are the most widely used.
The server daemon usually has two functions--it looks after receiving incoming mail and delivers outgoing mail. It does not allow you to connect to it via POP or IMAP to read your mail. You need an additional daemon for that.
Be aware that some older versions of sendmail have some serious security problems, however as long as you run a current version of it you should not have any problems. As always, it is a good idea to stay up-to-date with any software you run.
20.2.3 Email and DNS
The Domain Name System (DNS) and its daemon named play a large role in the delivery of email. In order to deliver mail from your site to another, the server daemon will look up the site in the DNS to determine the host that will receive mail for the destination.
It works the same way when you have mail sent to you. The DNS contains the database mapping hostname to an IP address, and a hostname to mailhost. The IP address is specified in an A record. The MX (Mail eXchanger) record specifies the mailhost that will receive mail for you. If you do not have an MX record for your hostname, the mail will be delivered directly to your host.
20.2.4 Receiving Mail
Receiving mail for your domain is done by the mail host. It will collect mail sent to you and store it for reading or pickup. In order to pick the stored mail up, you will need to connect to the mail host. This is done by either using POP or IMAP. If you want to read mail directly on the mail host, then a POP or IMAP server is not needed.
If you want to run a POP or IMAP server, there are two things you need to do:
-
Get a POP or IMAP daemon from the ports collection and install it on your system.
-
Modify /etc/inetd.conf to load the POP or IMAP server.
20.2.5 The Mail Host
The mail host is the name given to a server that is responsible for delivering and receiving mail for your host, and possibly your network.
20.3 sendmail Configuration
Contributed by Christopher Shumway.sendmail(8) is the default Mail Transfer Agent (MTA) in FreeBSD. sendmail's job is to accept mail from Mail User Agents (MUA) and deliver it to the appropriate mailer as defined by its configuration file. sendmail can also accept network connections and deliver mail to local mailboxes or deliver it to another program.
sendmail uses the following configuration files:
| Filename | Function |
|---|---|
| /etc/mail/access | sendmail access database file |
| /etc/mail/aliases | Mailbox aliases |
| /etc/mail/local-host-names | Lists of hosts sendmail accepts mail for |
| /etc/mail/mailer.conf | Mailer program configuration |
| /etc/mail/mailertable | Mailer delivery table |
| /etc/mail/sendmail.cf | sendmail master configuration file |
| /etc/mail/virtusertable | Virtual users and domain tables |
20.3.1 /etc/mail/access
The access database defines what host(s) or IP addresses have access to the local mail server and what kind of access they have. Hosts can be listed as OK, REJECT, RELAY or simply passed to sendmail's error handling routine with a given mailer error. Hosts that are listed as OK, which is the default, are allowed to send mail to this host as long as the mail's final destination is the local machine. Hosts that are listed as REJECT are rejected for all mail connections. Hosts that have the RELAY option for their hostname are allowed to send mail for any destination through this mail server.
Example 20-1. Configuring the sendmail Access Database
cyberspammer.com 550 We don't accept mail from spammers FREE.STEALTH.MAILER@ 550 We don't accept mail from spammers another.source.of.spam REJECT okay.cyberspammer.com OK 128.32 RELAY
In this example we have five entries. Mail senders that match the left hand side of the table are affected by the action on the right side of the table. The first two examples give an error code to sendmail's error handling routine. The message is printed to the remote host when a mail matches the left hand side of the table. The next entry rejects mail from a specific host on the Internet, another.source.of.spam. The next entry accepts mail connections from a host okay.cyberspammer.com, which is more exact than the cyberspammer.com line above. More specific matches override less exact matches. The last entry allows relaying of electronic mail from hosts with an IP address that begins with 128.32. These hosts would be able to send mail through this mail server that are destined for other mail servers.
When this file is updated, you need to run make in /etc/mail/ to update the database.
20.3.2 /etc/mail/aliases
The aliases database contains a list of virtual mailboxes that are expanded to other user(s), files, programs or other aliases. Here are a few examples that can be used in /etc/mail/aliases:
Example 20-2. Mail Aliases
root: localuser ftp-bugs: joe,eric,paul bit.bucket: /dev/null procmail: "|/usr/local/bin/procmail"
The file format is simple; the mailbox name on the left side of the colon is expanded to the target(s) on the right. The first example simply expands the mailbox root to the mailbox localuser, which is then looked up again in the aliases database. If no match is found, then the message is delivered to the local user localuser. The next example shows a mail list. Mail to the mailbox ftp-bugs is expanded to the three local mailboxes joe, eric, and paul. Note that a remote mailbox could be specified as [email protected]. The next example shows writing mail to a file, in this case /dev/null. The last example shows sending mail to a program, in this case the mail message is written to the standard input of /usr/local/bin/procmail through a UNIX pipe.
When this file is updated, you need to run make in /etc/mail/ to update the database.
20.3.3 /etc/mail/local-host-names
This is a list of hostnames sendmail(8) is to accept as the local host name. Place any domains or hosts that sendmail is to be receiving mail for. For example, if this mail server was to accept mail for the domain example.com and the host mail.example.com, its local-host-names might look something like this:
example.com mail.example.com
When this file is updated, sendmail(8) needs to be restarted to read the changes.
20.3.4 /etc/mail/sendmail.cf
sendmail's master configuration file, sendmail.cf controls the overall behavior of sendmail, including everything from rewriting e-mail addresses to printing rejection messages to remote mail servers. Naturally, with such a diverse role, this configuration file is quite complex and its details are a bit out of the scope of this section. Fortunately, this file rarely needs to be changed for standard mail servers.
The master sendmail configuration file can be built from m4(1) macros that define the features and behavior of sendmail. Please see /usr/src/contrib/sendmail/cf/README for some of the details.
When changes to this file are made, sendmail needs to be restarted for the changes to take effect.
20.3.5 /etc/mail/virtusertable
The virtusertable maps mail addresses for virtual domains and mailboxes to real mailboxes. These mailboxes can be local, remote, aliases defined in /etc/mail/aliases or files.
Example 20-3. Example Virtual Domain Mail Map
[email protected] root [email protected] [email protected] @example.com joe
In the above example, we have a mapping for a domain example.com. This file is processed in a first match order down the file. The first item maps [email protected] to the local mailbox root. The next entry maps [email protected] to the mailbox postmaster on the host noc.example.net. Finally, if nothing from example.com has matched so far, it will match the last mapping, which matches every other mail message addressed to someone at example.com. This will be mapped to the local mailbox joe.
20.4 Changing Your Mail Transfer Agent
Written by Andrew Boothman. Information taken from e-mails written by Gregory Neil Shapiro.As already mentioned, FreeBSD comes with sendmail already installed as your MTA (Mail Transfer Agent). Therefore by default it is in charge of your outgoing and incoming mail.
However, for a variety of reasons, some system administrators want to change their system's MTA. These reasons range from simply wanting to try out another MTA to needing a specific feature or package which relies on another mailer. Fortunately, whatever the reason, FreeBSD makes it easy to make the change.
20.4.1 Install a New MTA
You have a wide choice of MTAs available. A good starting point is the FreeBSD Ports Collection where you will be able to find many. Of course you are free to use any MTA you want from any location, as long as you can make it run under FreeBSD.
Start by installing your new MTA. Once it is installed it gives you a chance to decide if it really fulfills your needs, and also gives you the opportunity to configure your new software before getting it to take over from sendmail. When doing this, you should be sure that installing the new software will not attempt to overwrite system binaries such as /usr/bin/sendmail. Otherwise, your new mail software has essentially been put into service before you have configured it.
Please refer to your chosen MTA's documentation for information on how to configure the software you have chosen.
20.4.2 Disable sendmail
The procedure used to start sendmail changed significantly between 4.5-RELEASE and 4.6-RELEASE. Therefore, the procedure used to disable it is subtly different.
20.4.2.1 FreeBSD 4.5-STABLE before 2002/4/4 and Earlier (Including 4.5-RELEASE and Earlier)
Enter:
sendmail_enable="NO"
into /etc/rc.conf. This will disable sendmail's incoming mail service, but if /etc/mail/mailer.conf (see below) is not changed, sendmail will still be used to send e-mail.
20.4.2.2 FreeBSD 4.5-STABLE after 2002/4/4 (Including 4.6-RELEASE and Later)
In order to completely disable sendmail you must use
sendmail_enable="NONE"
in /etc/rc.conf.
Warning: If you disable sendmail's outgoing mail service in this way, it is important that you replace it with a fully working alternative mail delivery system. If you choose not to, system functions such as periodic(8) will be unable to deliver their results by e-mail as they would normally expect to. Many parts of your system may expect to have a functional sendmail-compatible system. If applications continue to use sendmail's binaries to try and send e-mail after you have disabled them, mail could go into an inactive sendmail queue, and never be delivered.
If you only want to disable sendmail's incoming mail service, you should set
sendmail_enable="NO"
in /etc/rc.conf. More information on sendmail's startup options is available from the rc.sendmail(8) manual page.
20.4.3 Running Your New MTA on Boot
You may have a choice of two methods for running your new MTA on boot, again depending on what version of FreeBSD you are running.
20.4.3.1 FreeBSD 4.5-STABLE before 2002/4/11 (Including 4.5-RELEASE and Earlier)
Add a script to /usr/local/etc/rc.d/ that ends in .sh and is executable by root. The script should accept start and stop parameters. At startup time the system scripts will execute the command
/usr/local/etc/rc.d/supermailer.sh start
which you can also use to manually start the server. At shutdown time, the system scripts will use the stop option, running the command
/usr/local/etc/rc.d/supermailer.sh stop
which you can also use to manually stop the server while the system is running.
20.4.3.2 FreeBSD 4.5-STABLE after 2002/4/11 (Including 4.6-RELEASE and Later)
With later versions of FreeBSD, you can use the above method or you can set
mta_start_script="filename"
in /etc/rc.conf, where filename is the name of some script that you want executed at boot to start your MTA.
20.4.4 Replacing sendmail as the System's Default Mailer
The program sendmail is so ubiquitous as standard software on UNIX systems that some software just assumes it is already installed and configured. For this reason, many alternative MTA's provide their own compatible implementations of the sendmail command-line interface; this facilitates using them as ``drop-in'' replacements for sendmail.
Therefore, if you are using an alternative mailer, you will need to make sure that software trying to execute standard sendmail binaries such as /usr/bin/sendmail actually executes your chosen mailer instead. Fortunately, FreeBSD provides a system called mailwrapper(8) that does this job for you.
When sendmail is operating as installed, you will find something like the following in /etc/mail/mailer.conf:
sendmail /usr/libexec/sendmail/sendmail send-mail /usr/libexec/sendmail/sendmail mailq /usr/libexec/sendmail/sendmail newaliases /usr/libexec/sendmail/sendmail hoststat /usr/libexec/sendmail/sendmail purgestat /usr/libexec/sendmail/sendmail
This means that when any of these common commands (such as sendmail itself) are run, the system actually invokes a copy of mailwrapper named sendmail, which checks mailer.conf and executes /usr/libexec/sendmail/sendmail instead. This system makes it easy to change what binaries are actually executed when these default sendmail functions are invoked.
Therefore if you wanted /usr/local/supermailer/bin/sendmail-compat to be run instead of sendmail, you could change /etc/mail/mailer.conf to read:
sendmail /usr/local/supermailer/bin/sendmail-compat send-mail /usr/local/supermailer/bin/sendmail-compat mailq /usr/local/supermailer/bin/mailq-compat newaliases /usr/local/supermailer/bin/newaliases-compat hoststat /usr/local/supermailer/bin/hoststat-compat purgestat /usr/local/supermailer/bin/purgestat-compat
20.4.5 Finishing
Once you have everything configured the way you want it, you should either kill the sendmail processes that you no longer need and start the processes belonging to your new software, or simply reboot. Rebooting will also give you the opportunity to ensure that you have correctly configured your system to start your new MTA automatically on boot.
20.5 Troubleshooting
- 20.5.1. Why do I have to use the FQDN for hosts on my site?
- 20.5.2. sendmail says ``mail loops back to myself''
- 20.5.3. How can I run a mail server on a dial-up PPP host?
- 20.5.4. Why do I keep getting ``Relaying Denied'' errors when sending mail from other hosts?
You will probably find that the host is actually in a different domain; for example, if you are in foo.bar.edu and you wish to reach a host called mumble in the bar.edu domain, you will have to refer to it by the fully-qualified domain name, mumble.bar.edu, instead of just mumble.
Traditionally, this was allowed by BSD BIND resolvers. However the current version of BIND that ships with FreeBSD no longer provides default abbreviations for non-fully qualified domain names other than the domain you are in. So an unqualified host mumble must either be found as mumble.foo.bar.edu, or it will be searched for in the root domain.
This is different from the previous behavior, where the search continued across mumble.bar.edu, and mumble.edu. Have a look at RFC 1535 for why this was considered bad practice, or even a security hole.
As a good workaround, you can place the line:
search foo.bar.edu bar.eduinstead of the previous:
domain foo.bar.eduinto your /etc/resolv.conf. However, make sure that the search order does not go beyond the ``boundary between local and public administration'', as RFC 1535 calls it.
This is answered in the sendmail FAQ as follows:
I am getting ``Local configuration error'' messages, such as: 553 relay.domain.net config error: mail loops back to myself 554 <[email protected]>... Local configuration error How can I solve this problem? You have asked mail to the domain (e.g., domain.net) to be forwarded to a specific host (in this case, relay.domain.net) by using an MX record, but the relay machine does not recognize itself as domain.net. Add domain.net to /etc/mail/local-host-names (if you are using FEATURE(use_cw_file)) or add ``Cw domain.net'' to /etc/mail/sendmail.cf.
The sendmail FAQ can be found at http://www.sendmail.org/faq/ and is recommended reading if you want to do any ``tweaking'' of your mail setup.
You want to connect a FreeBSD box on a LAN to the Internet. The FreeBSD box will be a mail gateway for the LAN. The PPP connection is non-dedicated.
There are at least two ways to do this. One way is to use UUCP.
Another way is to get a full-time Internet server to provide secondary MX services for your domain. For example, if your company's domain is example.com and your Internet service provider has set example.net up to provide secondary MX services to your domain:
example.com. MX 10 example.com.
MX 20 example.net.
Only one host should be specified as the final recipient (add Cw example.com in /etc/mail/sendmail.cf on example.com).
When the sending sendmail is trying to deliver the mail it will try to connect to you (example.com) over the modem link. It will most likely time out because you are not online. The program sendmail will automatically deliver it to the secondary MX site, i.e. your Internet provider (example.net). The secondary MX site will then periodically try to connect to your host and deliver the mail to the primary MX host (example.com).
You might want to use something like this as a login script:
#!/bin/sh # Put me in /usr/local/bin/pppmyisp ( sleep 60 ; /usr/sbin/sendmail -q ) & /usr/sbin/ppp -direct pppmyisp
If you are going to create a separate login script for a user you could use sendmail -qRexample.com instead in the script above. This will force all mail in your queue for example.com to be processed immediately.
A further refinement of the situation is as follows:
Message stolen from the FreeBSD Internet service provider's mailing list.
> we provide the secondary MX for a customer. The customer connects to > our services several times a day automatically to get the mails to > his primary MX (We do not call his site when a mail for his domains > arrived). Our sendmail sends the mailqueue every 30 minutes. At the > moment he has to stay 30 minutes online to be sure that all mail is > gone to the primary MX. > > Is there a command that would initiate sendmail to send all the mails > now? The user has not root-privileges on our machine of course. In the ``privacy flags'' section of sendmail.cf, there is a definition Opgoaway,restrictqrun Remove restrictqrun to allow non-root users to start the queue processing. You might also like to rearrange the MXs. We are the 1st MX for our customers like this, and we have defined: # If we are the best MX for a host, try directly instead of generating # local config error. OwTrue That way a remote site will deliver straight to you, without trying the customer connection. You then send to your customer. Only works for ``hosts'', so you need to get your customer to name their mail machine ``customer.com'' as well as ``hostname.customer.com'' in the DNS. Just put an A record in the DNS for ``customer.com''.
In default FreeBSD installations, sendmail is configured to only send mail from the host it is running on. For example, if a POP3 server is installed, then users will be able to check mail from school, work, or other remote locations but they still will not be able to send outgoing emails from outside locations. Typically, a few moments after the attempt, an email will be sent from MAILER-DAEMON with a ``5.7 Relaying Denied'' error message.
There are several ways to get around this. The most straightforward solution is to put your ISP's address in a relay-domains file at /etc/mail/relay-domains. A quick way to do this would be:
# echo "your.isp.example.com" > /etc/mail/relay-domains
After creating or editing this file you must restart sendmail. This works great if you are a server administrator and do not wish to send mail locally, or would like to use a point and click client/system on another machine or even another ISP. It is also very useful if you only have one or two email accounts set up. If there is a large number of addresses to add, you can simply open this file in your favorite text editor and then add the domains, one per line:
your.isp.example.com other.isp.example.net users-isp.example.org www.example.org
Now any mail sent through your system, by any host in this list (provided the user has an account on your system), will succeed. This is a very nice way to allow users to send mail from your system remotely without allowing people to send SPAM through your system.
20.6 Advanced Topics
The following section covers more involved topics such as mail configuration and setting up mail for your entire domain.
20.6.1 Basic Configuration
Out of the box, you should be able to send email to external hosts as long as you have set up /etc/resolv.conf or are running your own name server. If you would like to have mail for your host delivered to the MTA (e.g., sendmail) on your own FreeBSD host, there are two methods:
-
Run your own name server and have your own domain. For example, FreeBSD.org
-
Get mail delivered directly to your host. This is done by delivering mail directly to the current DNS name for your machine. For example, example.FreeBSD.org.
Regardless of which of the above you choose, in order to have mail delivered directly to your host, it must have a permanent static IP address (not a dynamic address, as with most PPP dial-up configurations). If you are behind a firewall, it must pass SMTP traffic on to you. If you want to receive mail directly at your host, you need to be sure of either of two things:
-
Make sure that the (lowest-numbered) MX record in your DNS points to your host's IP address.
-
Make sure there is no MX entry in your DNS for your host.
Either of the above will allow you to receive mail directly at your host.
Try this:
# hostname example.FreeBSD.org # host example.FreeBSD.org example.FreeBSD.org has address 204.216.27.XX
If that is what you see, mail directly to <[email protected]> should work without problems (assuming sendmail is running correctly on example.FreeBSD.org).
If instead you see something like this:
# host example.FreeBSD.org example.FreeBSD.org has address 204.216.27.XX example.FreeBSD.org mail is handled (pri=10) by hub.FreeBSD.org
All mail sent to your host (example.FreeBSD.org) will end up being collected on hub under the same username instead of being sent directly to your host.
The above information is handled by your DNS server. The DNS record that carries mail routing information is the Mail eXchange entry. If no MX record exists, mail will be delivered directly to the host by way of its IP address.
The MX entry for freefall.FreeBSD.org at one time looked like this:
freefall MX 30 mail.crl.net freefall MX 40 agora.rdrop.com freefall MX 10 freefall.FreeBSD.org freefall MX 20 who.cdrom.com
As you can see, freefall had many MX entries. The lowest MX number is the host that receives mail directly if available; if it's not accessible for some reason, the others (sometimes called ``backup MXes'') accept messages temporarily, and pass it along when a lower-numbered host becomes available, eventually to the lowest-numbered host.
Alternate MX sites should have separate Internet connections from your own in order to be most useful. Your ISP or another friendly site should have no problem providing this service for you.
20.6.2 Mail for Your Domain
In order to set up a ``mailhost'' (a.k.a. mail server) you need to have any mail sent to various workstations directed to it. Basically, you want to ``claim'' any mail for any hostname in your domain (in this case *.FreeBSD.org) and divert it to your mail server so your users can receive their mail on the master mail server.
To make life easiest, a user account with the same username should exist on both machines. Use adduser(8) to do this.
The mailhost you will be using must be the designated mail exchanger for each workstation on the network. This is done in your DNS configuration like so:
example.FreeBSD.org A 204.216.27.XX ; Workstation
MX 10 hub.FreeBSD.org ; Mailhost
This will redirect mail for the workstation to the mailhost no matter where the A record points. The mail is sent to the MX host.
You cannot do this yourself unless you are running a DNS server. If you are not, or cannot run your own DNS server, talk to your ISP or whoever provides your DNS.
If you are doing virtual email hosting, the following information will come in handy. For this example, we will assume you have a customer with his own domain, in this case customer1.org, and you want all the mail for customer1.org sent to your mailhost, mail.myhost.com. The entry in your DNS should look like this:
customer1.org MX 10 mail.myhost.com
You do not need an A record for customer1.org if you only want to handle email for that domain.
Note: Be aware that pinging customer1.org will not work unless an A record exists for it.
The last thing that you must do is tell sendmail on your mailhost what domains and/or hostnames it should be accepting mail for. There are a few different ways this can be done. Either of the following will work:
-
Add the hosts to your /etc/mail/local-host-names file if you are using the FEATURE(use_cw_file). If you are using a version of sendmail earlier than 8.10, the file is /etc/sendmail.cw.
-
Add a Cwyour.host.com line to your /etc/sendmail.cf or /etc/mail/sendmail.cf if you are using sendmail 8.10 or higher.
20.7 SMTP with UUCP
The sendmail configuration that ships with FreeBSD is designed for sites that connect directly to the Internet. Sites that wish to exchange their mail via UUCP must install another sendmail configuration file.
Tweaking /etc/mail/sendmail.cf manually is an advanced topic. sendmail version 8 generates config files via m4(1) preprocessing, where the actual configuration occurs on a higher abstraction level. The m4(1) configuration files can be found under /usr/src/usr.sbin/sendmail/cf.
If you did not install your system with full sources, the sendmail config stuff has been broken out into a separate source distribution tarball. Assuming you have your FreeBSD source code CDROM mounted, do:
# cd /cdrom/src # cat scontrib.?? | tar xzf - -C /usr/src/contrib/sendmail
This extracts to only a few hundred kilobytes. The file README in the cf directory can serve as a basic introduction to m4 configuration.
The best way to support UUCP delivery is to use the mailertable feature. This creates a database that sendmail can use to make routing decisions.
First, you have to create your .mc file. The directory /usr/src/usr.sbin/sendmail/cf/cf contains a few examples. Assuming you have named your file foo.mc, all you need to do in order to convert it into a valid sendmail.cf is:
# cd /usr/src/usr.sbin/sendmail/cf/cf # make foo.cf # cp foo.cf /etc/mail/sendmail.cf
A typical .mc file might look like:
VERSIONID(`Your version number') OSTYPE(bsd4.4) FEATURE(accept_unresolvable_domains) FEATURE(nocanonify) FEATURE(mailertable, `hash -o /etc/mail/mailertable') define(`UUCP_RELAY', your.uucp.relay) define(`UUCP_MAX_SIZE', 200000) define(`confDONT_PROBE_INTERFACES') MAILER(local) MAILER(smtp) MAILER(uucp) Cw your.alias.host.name Cw youruucpnodename.UUCP
The lines containing accept_unresolvable_domains, nocanonify, and confDONT_PROBE_INTERFACES features will prevent any usage of the DNS during mail delivery. The UUCP_RELAY clause is needed to support UUCP delivery. Simply put an Internet hostname there that is able to handle .UUCP pseudo-domain addresses; most likely, you will enter the mail relay of your ISP there.
Once you have this, you need an /etc/mail/mailertable file. If you have only one link to the outside that is used for all your mails, the following file will suffice:
# # makemap hash /etc/mail/mailertable.db < /etc/mail/mailertable . uucp-dom:your.uucp.relay
A more complex example might look like this:
# # makemap hash /etc/mail/mailertable.db < /etc/mail/mailertable # horus.interface-business.de uucp-dom:horus .interface-business.de uucp-dom:if-bus interface-business.de uucp-dom:if-bus .heep.sax.de smtp8:%1 horus.UUCP uucp-dom:horus if-bus.UUCP uucp-dom:if-bus . uucp-dom:
The first three lines handle special cases where domain-addressed mail should not be sent out to the default route, but instead to some UUCP neighbor in order to ``shortcut'' the delivery path. The next line handles mail to the local Ethernet domain that can be delivered using SMTP. Finally, the UUCP neighbors are mentioned in the .UUCP pseudo-domain notation, to allow for a uucp-neighbor !recipient override of the default rules. The last line is always a single dot, matching everything else, with UUCP delivery to a UUCP neighbor that serves as your universal mail gateway to the world. All of the node names behind the uucp-dom: keyword must be valid UUCP neighbors, as you can verify using the command uuname.
As a reminder that this file needs to be converted into a DBM database file before use. The command line to accomplish this is best placed as a comment at the top of the mailertable. You always have to execute this command each time you change your mailertable.
Final hint: if you are uncertain whether some particular mail routing would work, remember the -bt option to sendmail. It starts sendmail in address test mode; simply enter 3,0, followed by the address you wish to test for the mail routing. The last line tells you the used internal mail agent, the destination host this agent will be called with, and the (possibly translated) address. Leave this mode by typing Ctrl+D.
% sendmail -bt ADDRESS TEST MODE (ruleset 3 NOT automatically invoked) Enter <ruleset> <address> > 3,0 [email protected] canonify input: foo @ example . com ... parse returns: $# uucp-dom $@ your.uucp.relay $: foo < @ example . com . > > ^D
20.8 Using Mail with a Dialup Connection
If you have a static IP address, you should not need to adjust anything from the defaults. Set your host name to your assigned Internet name and sendmail will do the rest.
If you have a dynamically assigned IP number and use a dialup PPP connection to the Internet, you will probably have a mailbox on your ISPs mail server. Let's assume your ISP's domain is example.net, and that your user name is user, you have called your machine bsd.home, and your ISP has told you that you may use relay.example.net as a mail relay.
In order to retrieve mail from your mailbox, you must install a retrieval agent. The fetchmail utility is a good choice as it supports many different protocols. Usually, your ISP will provide POP3. If you are using user-PPP, you can automatically fetch your mail when an Internet connection is established with the following entry in /etc/ppp/ppp.linkup:
MYADDR: !bg su user -c fetchmail
If you are using sendmail (as shown below) to deliver mail to non-local accounts, you probably want to have sendmail process your mailqueue as soon as your Internet connection is established. To do this, put this command after the fetchmail command in /etc/ppp/ppp.linkup.
!bg su user -c "sendmail -q"
Assume that you have an account for user on bsd.home. In the home directory of user on bsd.home, create a .fetchmailrc file:
poll example.net protocol pop3 fetchall pass MySecret
This file should not be readable by anyone except user as it contains the password MySecret.
In order to send mail with the correct from: header, you must tell sendmail to use [email protected] rather than [email protected]. You may also wish to tell sendmail to send all mail via relay.example.net, allowing quicker mail transmission.
The following .mc file should suffice:
VERSIONID(`bsd.home.mc version 1.0') OSTYPE(bsd4.4)dnl FEATURE(nouucp)dnl MAILER(local)dnl MAILER(smtp)dnl Cwlocalhost Cwbsd.home MASQUERADE_AS(`example.net')dnl FEATURE(allmasquerade)dnl FEATURE(masquerade_envelope)dnl FEATURE(nocanonify)dnl FEATURE(nodns)dnl define(`SMART_HOST', `relay.example.net') Dmbsd.home define(`confDOMAIN_NAME',`bsd.home')dnl define(`confDELIVERY_MODE',`deferred')dnl
Refer to the previous section for details of how to turn this .mc file into a sendmail.cf file. Also, do not forget to restart sendmail after updating sendmail.cf.
20.9 SMTP Authentication
Having SMTP Authentication in place on your mail server has a number of benefits. SMTP Authentication can add another layer of security to sendmail, and has the benefit of giving mobile users who switch hosts the ability to use the same mail server without the need to reconfigure their mail client settings each time.
-
Install security/cyrus-sasl from the ports. You can find this port in security/cyrus-sasl. security/cyrus-sasl has a number of compile time options to choose from and, for the method we will be using here, make sure to select the pwcheck option.
-
After installing security/cyrus-sasl, edit /usr/local/lib/sasl/Sendmail.conf (or create it if it does not exist) and add the following line:
pwcheck_method: passwd
This method will enable sendmail to authenticate against your FreeBSD passwd database. This saves the trouble of creating a new set of usernames and passwords for each user that needs to use SMTP authentication, and keeps the login and mail password the same.
-
Now edit /etc/make.conf and add the following lines:
SENDMAIL_CFLAGS=-I/usr/local/include/sasl1 -DSASL SENDMAIL_LDFLAGS=-L/usr/local/lib SENDMAIL_LDADD=-lsasl
These lines will give sendmail the proper configuration options for linking to cyrus-sasl at compile time. Make sure that cyrus-sasl has been installed before recompiling sendmail.
-
Recompile sendmail by executing the following commands:
# cd /usr/src/usr.sbin/sendmail # make cleandir # make obj # make # make install
The compile of sendmail should not have any problems if /usr/src has not been changed extensively and the shared libraries it needs are available.
-
After sendmail has been compiled and reinstalled, edit your /etc/mail/freebsd.mc file (or whichever file you use as your .mc file. Many administrators choose to use the output from hostname(1) as the .mc file for uniqueness). Add these lines to it:
dnl set SASL options TRUST_AUTH_MECH(`GSSAPI DIGEST-MD5 CRAM-MD5 LOGIN')dnl define(`confAUTH_MECHANISMS', `GSSAPI DIGEST-MD5 CRAM-MD5 LOGIN')dnl define(`confDEF_AUTH_INFO', `/etc/mail/auth-info')dnl
These options configure the different methods available to sendmail for authenticating users. If you would like to use a method other than pwcheck, please see the included documentation.
-
Finally, run make(1) while in /etc/mail. That will run your new .mc file and create a .cf file named freebsd.cf (or whatever name you have used for your .mc file). Then use the command make install restart, which will copy the file to sendmail.cf, and will properly restart sendmail. For more information about this process, you should refer to /etc/mail/Makefile.
If all has gone correctly, you should be able to enter your login information into the mail client and send a test message. For further investigation, set the LogLevel of sendmail to 13 and watch /var/log/maillog for any errors.
You may wish to add the following lines to /etc/rc.conf so this service will be available after every system boot:
sasl_pwcheck_enable="YES" sasl_pwcheck_program="/usr/local/sbin/pwcheck"
This will ensure the initialization of SMTP_AUTH upon system boot.
For more information, please see the sendmail page regarding SMTP authentication.
Chapter 21 The Cutting Edge
Restructured, reorganized, and parts updated by Jim Mock. Original work by Jordan Hubbard, Poul-Henning Kamp, John Polstra, and Nik Clayton.21.1 Synopsis
FreeBSD is under constant development between releases. For people who want to be on the cutting edge, there are several easy mechanisms for keeping your system in sync with the latest developments. Be warned--the cutting edge is not for everyone! This chapter will help you decide if you want to track the development system, or stick with one of the released versions.
After reading this chapter, you will know:
-
The difference between the two development branches: FreeBSD-STABLE and FreeBSD-CURRENT.
-
How to keep your system up to date with CVSup, CVS, or CTM.
-
How to rebuild and reinstall the entire base system with make world.
Before reading this chapter, you should:
-
Properly setup your network connection (Chapter 19).
-
Know how to install additional third-party software (Chapter 4).
21.2 FreeBSD-CURRENT vs. FreeBSD-STABLE
There are two development branches to FreeBSD: FreeBSD-CURRENT and FreeBSD-STABLE. This section will explain a bit about each and describe how to keep your system up-to-date with each respective tree. FreeBSD-CURRENT will be discussed first, then FreeBSD-STABLE.
21.2.1 Staying Current with FreeBSD
As you read this, keep in mind that FreeBSD-CURRENT is the ``bleeding edge'' of FreeBSD development. FreeBSD-CURRENT users are expected to have a high degree of technical skill, and should be capable of solving difficult system problems on their own. If you are new to FreeBSD, think twice before installing it.
21.2.1.1 What Is FreeBSD-CURRENT?
FreeBSD-CURRENT is the latest working sources for FreeBSD. This includes work in progress, experimental changes, and transitional mechanisms that might or might not be present in the next official release of the software. While many FreeBSD developers compile the FreeBSD-CURRENT source code daily, there are periods of time when the sources are not buildable. These problems are resolved as expeditiously as possible, but whether or not FreeBSD-CURRENT brings disaster or greatly desired functionality can be a matter of which exact moment you grabbed the source code in!
21.2.1.2 Who Needs FreeBSD-CURRENT?
FreeBSD-CURRENT is made available for 3 primary interest groups:
-
Members of the FreeBSD group who are actively working on some part of the source tree and for whom keeping ``current'' is an absolute requirement.
-
Members of the FreeBSD group who are active testers, willing to spend time solving problems in order to ensure that FreeBSD-CURRENT remains as sane as possible. These are also people who wish to make topical suggestions on changes and the general direction of FreeBSD, and submit patches to implement them.
-
Those who merely wish to keep an eye on things, or to use the current sources for reference purposes (e.g. for reading, not running). These people also make the occasional comment or contribute code.
21.2.1.3 What Is FreeBSD-CURRENT Not?
-
A fast-track to getting pre-release bits because you heard there is some cool new feature in there and you want to be the first on your block to have it. Being the first on the block to get the new feature means that you're the first on the block to get the new bugs.
-
A quick way of getting bug fixes. Any given version of FreeBSD-CURRENT is just as likely to introduce new bugs as to fix existing ones.
-
In any way ``officially supported''. We do our best to help people genuinely in one of the 3 ``legitimate'' FreeBSD-CURRENT groups, but we simply do not have the time to provide tech support. This is not because we are mean and nasty people who do not like helping people out (we would not even be doing FreeBSD if we were). We simply cannot answer hundreds messages a day and work on FreeBSD! Given the choice between improving FreeBSD and answering lots of questions on experimental code, the developers opt for the former.
21.2.1.4 Using FreeBSD-CURRENT
-
Join the freebsd-current and the cvs-all lists. This is not just a good idea, it is essential. If you are not on the freebsd-current list, you will not see the comments that people are making about the current state of the system and thus will probably end up stumbling over a lot of problems that others have already found and solved. Even more importantly, you will miss out on important bulletins which may be critical to your system's continued health.
The cvs-all list will allow you to see the commit log entry for each change as it is made along with any pertinent information on possible side-effects.
To join these lists, or one of the others available go to http://lists.FreeBSD.org/mailman/listinfo and click on the list that you wish to subscribe to. Instructions on the rest of the procedure are available there.
-
Grab the sources from a FreeBSD mirror site. You can do this in one of two ways:
-
Use the cvsup program with the supfile named standard-supfile available from /usr/share/examples/cvsup. This is the most recommended method, since it allows you to grab the entire collection once and then only what has changed from then on. Many people run cvsup from cron and keep their sources up-to-date automatically. You have to customize the sample supfile above, and configure cvsup for your environment.
-
Use the CTM facility. If you have very bad connectivity (high price connections or only email access) CTM is an option. However, it is a lot of hassle and can give you broken files. This leads to it being rarely used, which again increases the chance of it not working for fairly long periods of time. We recommend using CVSup for anybody with a 9600 bps modem or faster connection.
-
-
If you are grabbing the sources to run, and not just look at, then grab all of FreeBSD-CURRENT, not just selected portions. The reason for this is that various parts of the source depend on updates elsewhere, and trying to compile just a subset is almost guaranteed to get you into trouble.
Before compiling FreeBSD-CURRENT, read the Makefile in /usr/src carefully. You should at least run a make world the first time through as part of the upgrading process. Reading the FreeBSD-CURRENT mailing list and /usr/src/UPDATING will keep you up-to-date on other bootstrapping procedures that sometimes become necessary as we move toward the next release.
-
Be active! If you are running FreeBSD-CURRENT, we want to know what you have to say about it, especially if you have suggestions for enhancements or bug fixes. Suggestions with accompanying code are received most enthusiastically!
21.2.2 Staying Stable with FreeBSD
21.2.2.1 What Is FreeBSD-STABLE?
FreeBSD-STABLE is our development branch from which major releases are made. Changes go into this branch at a different pace, and with the general assumption that they have first gone into FreeBSD-CURRENT for testing. This is still a development branch, however, and this means that at any given time, the sources for FreeBSD-STABLE may or may not be suitable for any particular purpose. It is simply another engineering development track, not a resource for end-users.
21.2.2.2 Who Needs FreeBSD-STABLE?
If you are interested in tracking or contributing to the FreeBSD development process, especially as it relates to the next ``point'' release of FreeBSD, then you should consider following FreeBSD-STABLE.
While it is true that security fixes also go into the FreeBSD-STABLE branch, you do not need to track FreeBSD-STABLE to do this. Every security advisory for FreeBSD explains how to fix the problem for the releases it affects [13] , and tracking an entire development branch just for security reasons is likely to bring in a lot of unwanted changes as well.
Although we endeavor to ensure that the FreeBSD-STABLE branch compiles and runs at all times, this cannot be guaranteed. In addition, while code is developed in FreeBSD-CURRENT before including it in FreeBSD-STABLE, more people run FreeBSD-STABLE than FreeBSD-CURRENT, so it is inevitable that bugs and corner cases will sometimes be found in FreeBSD-STABLE that were not apparent in FreeBSD-CURRENT.
For these reasons, we do not recommend that you blindly track FreeBSD-STABLE, and it is particularly important that you do not update any production servers to FreeBSD-STABLE without first thoroughly testing the code in your development environment.
If you do not have the resources to do this then we recommend that you run the most recent release of FreeBSD, and use the binary update mechanism to move from release to release.
21.2.2.3 Using FreeBSD-STABLE
-
Join the freebsd-stable list. This will keep you informed of build-dependencies that may appear in FreeBSD-STABLE or any other issues requiring special attention. Developers will also make announcements in this mailing list when they are contemplating some controversial fix or update, giving the users a chance to respond if they have any issues to raise concerning the proposed change.
The cvs-all list will allow you to see the commit log entry for each change as it is made along with any pertinent information on possible side-effects.
To join these lists, or one of the others available go to http://lists.FreeBSD.org/mailman/listinfo and click on the list that you wish to subscribe to. Instructions on the rest of the procedure are available there.
-
If you are installing a new system and want it to be as stable as possible, you can simply grab the latest dated branch snapshot from ftp://releng4.FreeBSD.org/pub/FreeBSD/ and install it like any other release.
If you are already running a previous release of FreeBSD and wish to upgrade via sources then you can easily do so from FreeBSD mirror site. This can be done in one of two ways:
-
Use the cvsup program with the supfile named stable-supfile from the directory /usr/share/examples/cvsup. This is the most recommended method, since it allows you to grab the entire collection once and then only what has changed from then on. Many people run cvsup from cron to keep their sources up-to-date automatically. You have to customize the sample supfile above, and configure cvsup for your environment.
-
Use the CTM facility. If you do not have a fast and inexpensive connection to the Internet, this is the method you should consider using.
-
-
Essentially, if you need rapid on-demand access to the source and communications bandwidth is not a consideration, use cvsup or ftp. Otherwise, use CTM.
-
Before compiling FreeBSD-STABLE, read the Makefile in /usr/src carefully. You should at least run a make world the first time through as part of the upgrading process. Reading the FreeBSD-STABLE mailing list and /usr/src/UPDATING will keep you up-to-date on other bootstrapping procedures that sometimes become necessary as we move toward the next release.
21.3 Synchronizing Your Source
There are various ways of using an Internet (or email) connection to stay up-to-date with any given area of the FreeBSD project sources, or all areas, depending on what interests you. The primary services we offer are Anonymous CVS, CVSup, and CTM.
Warning: While it is possible to update only parts of your source tree, the only supported update procedure is to update the entire tree and recompile both userland (i.e., all the programs that run in user space, such as those in /bin and /sbin) and kernel sources. Updating only part of your source tree, only the kernel, or only userland will often result in problems. These problems may range from compile errors to kernel panics or data corruption.
Anonymous CVS and CVSup use the pull model of updating sources. In the case of CVSup the user (or a cron script) invokes the cvsup program, and it interacts with a cvsupd server somewhere to bring your files up-to-date. The updates you receive are up-to-the-minute and you get them when, and only when, you want them. You can easily restrict your updates to the specific files or directories that are of interest to you. Updates are generated on the fly by the server, according to what you have and what you want to have. Anonymous CVS is quite a bit more simplistic than CVSup in that it is just an extension to CVS which allows it to pull changes directly from a remote CVS repository. CVSup can do this far more efficiently, but Anonymous CVS is easier to use.
CTM, on the other hand, does not interactively compare the sources you have with those on the master archive or otherwise pull them across. Instead, a script which identifies changes in files since its previous run is executed several times a day on the master CTM machine, any detected changes being compressed, stamped with a sequence-number and encoded for transmission over email (in printable ASCII only). Once received, these ``CTM deltas'' can then be handed to the ctm_rmail(1) utility which will automatically decode, verify and apply the changes to the user's copy of the sources. This process is far more efficient than CVSup, and places less strain on our server resources since it is a push rather than a pull model.
There are other trade-offs, of course. If you inadvertently wipe out portions of your archive, CVSup will detect and rebuild the damaged portions for you. CTM will not do this, and if you wipe some portion of your source tree out (and do not have it backed up) then you will have to start from scratch (from the most recent CVS ``base delta'') and rebuild it all with CTM or, with Anonymous CVS, simply delete the bad bits and resync.
21.4 Using make world
Once you have synchronized your local source tree against a particular version of FreeBSD (FreeBSD-STABLE, FreeBSD-CURRENT, and so on) you can then use the source tree to rebuild the system.
Take a Backup: It cannot be stressed enough how important it is to take a backup of your system before you do this. While rebuilding the world is (as long as you follow these instructions) an easy task to do, there will inevitably be times when you make mistakes, or when mistakes made by others in the source tree render your system unbootable.
Make sure you have taken a backup. And have a fixit floppy to hand. You will probably never have to use it, but it is better to be safe than sorry!
Subscribe to the Right Mailing List: The FreeBSD-STABLE and FreeBSD-CURRENT branches are, by their nature, in development. People that contribute to FreeBSD are human, and mistakes occasionally happen.
Sometimes these mistakes can be quite harmless, just causing your system to print a new diagnostic warning. Or the change may be catastrophic, and render your system unbootable or destroy your file systems (or worse).
If problems like these occur, a ``heads up'' is posted to the appropriate mailing list, explaining the nature of the problem and which systems it affects. And an ``all clear'' announcement is posted when the problem has been solved.
If you try to track FreeBSD-STABLE or FreeBSD-CURRENT and do not read the FreeBSD-STABLE mailing list or the FreeBSD-CURRENT mailing list respectively, then you are asking for trouble.
21.4.1 Read /usr/src/UPDATING
Before you do anything else, read /usr/src/UPDATING (or the equivalent file wherever you have a copy of the source code). This file should contain important information about problems you might encounter, or specify the order in which you might have to run certain commands. If UPDATING contradicts something you read here, UPDATING takes precedence.
Important: Reading UPDATING is not an acceptable substitute for subscribing to the correct mailing list, as described previously. The two requirements are complementary, not exclusive.
21.4.2 Check /etc/make.conf
Examine the files /etc/defaults/make.conf and /etc/make.conf. The first contains some default defines - most of which are commented out. To make use of them when you rebuild your system from source, add them to /etc/make.conf. Keep in mind that anything you add to /etc/make.conf is also used every time you run make, so it is a good idea to set them to something sensible for your system.
A typical user will probably want to copy the CFLAGS and NOPROFILE lines found in /etc/defaults/make.conf to /etc/make.conf and uncomment them.
Examine the other definitions (COPTFLAGS, NOPORTDOCS and so on) and decide if they are relevant to you.
21.4.3 Update the Files in /etc
The /etc directory contains a large part of your system's configuration information, as well as scripts that are run at system startup. Some of these scripts change from version to version of FreeBSD.
Some of the configuration files are also used in the day to day running of the system. In particular, /etc/group.
There have been occasions when the installation part of ``make world'' has expected certain usernames or groups to exist. When performing an upgrade it is likely that these users or groups did not exist. This caused problems when upgrading.
A recent example of this is when the smmsp user was added. Users had the installation process fail for them when mtree(8) was trying to create /var/spool/clientmqueue.
The solution is to examine /usr/src/etc/group and compare its list of groups with your own. If there are any groups in the new file that are not in your file then copy them over. Similarly, you should rename any groups in /etc/group which have the same GID but a different name to those in /usr/src/etc/group.
Since 4.6-RELEASE you can run mergemaster(8) in pre-buildworld mode by providing the -p option. This will compare only those files that are essential for the success of buildworld or installworld. If your old version of mergemaster does not support -p, use the new version in the source tree when running for the first time:
# cd /usr/src/usr.sbin/mergemaster # ./mergemaster.sh -p
Tip: If you are feeling particularly paranoid, you can check your system to see which files are owned by the group you are renaming or deleting:
# find / -group GID -printwill show all files owned by group GID (which can be either a group name or a numeric group ID).
21.4.4 Drop to Single User Mode
You may want to compile the system in single user mode. Apart from the obvious benefit of making things go slightly faster, reinstalling the system will touch a lot of important system files, all the standard system binaries, libraries, include files and so on. Changing these on a running system (particularly if you have active users on the system at the time) is asking for trouble.
Another method is to compile the system in multi-user mode, and then drop into single user mode for the installation. If you would like to do it this way, simply hold off on the following steps until the build has completed. You can postpone dropping to single user mode until you have to installkernel or installworld.
As the superuser, you can execute:
# shutdown now
from a running system, which will drop it to single user mode.
Alternatively, reboot the system, and at the boot prompt, enter the -s flag. The system will then boot single user. At the shell prompt you should then run:
# fsck -p # mount -u / # mount -a -t ufs # swapon -a
This checks the file systems, remounts / read/write, mounts all the other UFS file systems referenced in /etc/fstab and then turns swapping on.
Note: If your CMOS clock is set to local time and not to GMT (this is true if the output of the date(1) command does not show the correct time and zone), you may also need to run the following command:
# adjkerntz -iThis will make sure that your local time-zone settings get set up correctly -- without this, you may later run into some problems.
21.4.5 Remove /usr/obj
As parts of the system are rebuilt they are placed in directories which (by default) go under /usr/obj. The directories shadow those under /usr/src.
You can speed up the ``make world'' process, and possibly save yourself some dependency headaches by removing this directory as well.
Some files below /usr/obj may have the immutable flag set (see chflags(1) for more information) which must be removed first.
# cd /usr/obj # chflags -R noschg * # rm -rf *
21.4.6 Recompile the Source
21.4.6.1 Saving the Output
It is a good idea to save the output you get from running make(1) to another file. If something goes wrong you will have a copy of the error message. While this might not help you in diagnosing what has gone wrong, it can help others if you post your problem to one of the FreeBSD mailing lists.
The easiest way to do this is to use the script(1) command, with a parameter that specifies the name of the file to save all output to. You would do this immediately before rebuilding the world, and then type exit when the process has finished.
# script /var/tmp/mw.out
Script started, output file is /var/tmp/mw.out
# make TARGET
... compile, compile, compile ...
# exit
Script done, ...
If you do this, do not save the output in /tmp. This directory may be cleared next time you reboot. A better place to store it is in /var/tmp (as in the previous example) or in root's home directory.
21.4.6.2 Compile the Base System
You must be in the /usr/src directory:
# cd /usr/src
(unless, of course, your source code is elsewhere, in which case change to that directory instead).
To rebuild the world you use the make(1) command. This command reads instructions from the Makefile, which describes how the programs that comprise FreeBSD should be rebuilt, the order in which they should be built, and so on.
The general format of the command line you will type is as follows:
# make -x -DVARIABLE target
In this example, -x is an option that you would pass to make(1). See the make(1) manual page for an example of the options you can pass.
-DVARIABLE passes a variable to the Makefile. The behavior of the Makefile is controlled by these variables. These are the same variables as are set in /etc/make.conf, and this provides another way of setting them.
# make -DNOPROFILE target
is another way of specifying that profiled libraries should not be built, and corresponds with the
NOPROFILE= true # Avoid compiling profiled libraries
line in /etc/make.conf.
target tells make(1) what you want to do. Each Makefile defines a number of different ``targets'', and your choice of target determines what happens.
Some targets are listed in the Makefile, but are not meant for you to run. Instead, they are used by the build process to break out the steps necessary to rebuild the system into a number of sub-steps.
Most of the time you will not need to pass any parameters to make(1), and so your command like will look like this:
# make target
Beginning with version 2.2.5 of FreeBSD (actually, it was first created on the FreeBSD-CURRENT branch, and then retrofitted to FreeBSD-STABLE midway between 2.2.2 and 2.2.5) the world target has been split in two: buildworld and installworld.
As the names imply, buildworld builds a complete new tree under /usr/obj, and installworld installs this tree on the current machine.
This is very useful for 2 reasons. First, it allows you to do the build safe in the knowledge that no components of your running system will be affected. The build is ``self hosted''. Because of this, you can safely run buildworld on a machine running in multi-user mode with no fear of ill-effects. It is still recommended that you run the installworld part in single user mode, though.
Secondly, it allows you to use NFS mounts to upgrade multiple machines on your network. If you have three machines, A, B and C that you want to upgrade, run make buildworld and make installworld on A. B and C should then NFS mount /usr/src and /usr/obj from A, and you can then run make installworld to install the results of the build on B and C.
Although the world target still exists, you are strongly encouraged not to use it.
Run
# make buildworld
It is now possible to specify a -j option to make which will cause it to spawn several simultaneous processes. This is most useful on multi-CPU machines. However, since much of the compiling process is IO bound rather than CPU bound it is also useful on single CPU machines.
On a typical single-CPU machine you would run:
# make -j4 buildworld
make(1) will then have up to 4 processes running at any one time. Empirical evidence posted to the mailing lists shows this generally gives the best performance benefit.
If you have a multi-CPU machine and you are using an SMP configured kernel try values between 6 and 10 and see how they speed things up.
Be aware that this is still somewhat experimental, and commits to the source tree may occasionally break this feature. If the world fails to compile using this parameter try again without it before you report any problems.
21.4.6.3 Timings
Many factors influence the build time, but currently a 500 MHz Pentium III with 128 MB of RAM takes about 2 hours to build the FreeBSD-STABLE tree, with no tricks or shortcuts used during the process. A FreeBSD-CURRENT tree will take somewhat longer.
21.4.7 Compile and Install a New Kernel
To take full advantage of your new system you should recompile the kernel. This is practically a necessity, as certain memory structures may have changed, and programs like ps(1) and top(1) will fail to work until the kernel and source code versions are the same.
The simplest, safest way to do this is to build and install a kernel based on GENERIC. While GENERIC may not have all the necessary devices for your system, it should contain everything necessary to boot your system back to single user mode. This is a good test that the new system works properly. After booting from GENERIC and verifying that your system works you can then build a new kernel based on your normal kernel configuration file.
If you are upgrading to FreeBSD 4.0 or above then the old kernel build procedure (as described in Chapter 9) is deprecated. Instead, you should run these commands after you have built the world with buildworld.
Note: If you want to build a custom kernel, and already have a configuration file, just use KERNCONF=MYKERNEL like this:
# cd /usr/src # make buildkernel KERNCONF=MYKERNEL # make installkernel KERNCONF=MYKERNELIn FreeBSD 4.2 and older you must replace KERNCONF= with KERNEL=. 4.2-STABLE that was fetched before Feb 2nd, 2001 does not recognize KERNCONF=.
Note that if you have raised kern.securelevel above 1 and you have set either the noschg or similar flags to your kernel binary, you might find it necessary to drop into single user mode to use installkernel. Otherwise you should be able to run both these commands from multi user mode without problems. See init(8) for details about kern.securelevel and chflags(1) for details about the various file flags.
If you are upgrading to a version of FreeBSD below 4.0 you should use the old kernel build procedure. However, it is recommended that you use the new version of config(8), using a command line like this.
# /usr/obj/usr/src/usr.sbin/config/config KERNELNAME
21.4.8 Reboot into Single User Mode
You should reboot into single user mode to test the new kernel works. Do this by following the instructions in Section 21.4.4.
21.4.9 Install the New System Binaries
If you were building a version of FreeBSD recent enough to have used make buildworld then you should now use installworld to install the new system binaries.
Run
# cd /usr/src # make installworld
Note: If you specified variables on the make buildworld command line, you must specify the same variables in the make installworld command line. This does not necessarily hold true for other options; for example, -j must never be used with installworld.
For example, if you ran:
# make -DNOPROFILE buildworldyou must install the results with:
# make -DNOPROFILE installworldotherwise it would try to install profiled libraries that had not been built during the make buildworld phase.
21.4.10 Update Files Not Updated by make world
Remaking the world will not update certain directories (in particular, /etc, /var and /usr) with new or changed configuration files.
The simplest way to update these files is to use mergemaster(8), though it is possible to do it manually if you would prefer to do that. Regardless of which way you choose, be sure to make a backup of /etc in case anything goes wrong.
21.4.10.1 mergemaster
Contributed by Tom Rhodes.The mergemaster(8) utility is a Bourne script that will aid you in determining the differences between your configuration files in /etc, and the configuration files in the source tree /usr/src/etc. This is the recommended solution for keeping the system configuration files up to date with those located in the source tree.
mergemaster was integrated into the FreeBSD base system between 3.3-RELEASE and 3.4-RELEASE, which means it is present in all -STABLE and -CURRENT systems since 3.3.
To begin simply type mergemaster at your prompt, and watch it start going. mergemaster will then build a temporary root environment, from / down, and populate it with various system configuration files. Those files are then compared to the ones currently installed in your system. At this point, files that differ will be shown in diff(1) format, with the + sign representing added or modified lines, and - representing lines that will be either removed completely, or replaced with a new line. See the diff(1) manual page for more information about the diff(1) syntax and how file differences are shown.
mergemaster(8) will then show you each file that displays variances, and at this point you will have the option of either deleting the new file (referred to as the temporary file), installing the temporary file in its unmodified state, merging the temporary file with the currently installed file, or viewing the diff(1) results again.
Choosing to delete the temporary file will tell mergemaster(8) that we wish to keep our current file unchanged, and to delete the new version. This option is not recommended, unless you see no reason to change the current file. You can get help at any time by typing ? at the mergemaster(8) prompt. If the user chooses to skip a file, it will be presented again after all other files have been dealt with.
Choosing to install the unmodified temporary file will replace the current file with the new one. For most unmodified files, this is the best option.
Choosing to merge the file will present you with a text editor, and the contents of both files. You can now merge them by reviewing both files side by side on the screen, and choosing parts from both to create a finished product. When the files are compared side by side, the l key will select the left contents and the r key will select contents from your right. The final output will be a file consisting of both parts, which can then be installed. This option is customarily used for files where settings have been modified by the user.
Choosing to view the diff(1) results again will show you the file differences just like mergemaster(8) did before prompting you for an option.
After mergemaster(8) is done with the system files you will be prompted for other options. mergemaster(8) may ask if you want to rebuild the password file and/or run MAKEDEV(8) if you run a FreeBSD version prior to 5.0, and will finish up with an option to remove left-over temporary files.
21.4.10.2 Manual Update
If you wish to do the update manually, however, you cannot just copy over the files from /usr/src/etc to /etc and have it work. Some of these files must be ``installed'' first. This is because the /usr/src/etc directory is not a copy of what your /etc directory should look like. In addition, there are files that should be in /etc that are not in /usr/src/etc.
If you are using mergemaster(8) (as recommended), you can skip forward to the next section.
The simplest way to do this by hand is to install the files into a new directory, and then work through them looking for differences.
Backup Your Existing /etc: Although, in theory, nothing is going to touch this directory automatically, it is always better to be sure. So copy your existing /etc directory somewhere safe. Something like:
# cp -Rp /etc /etc.old-R does a recursive copy, -p preserves times, ownerships on files and suchlike.
You need to build a dummy set of directories to install the new /etc and other files into. /var/tmp/root is a reasonable choice, and there are a number of subdirectories required under this as well.
# mkdir /var/tmp/root # cd /usr/src/etc # make DESTDIR=/var/tmp/root distrib-dirs distribution
This will build the necessary directory structure and install the files. A lot of the subdirectories that have been created under /var/tmp/root are empty and should be deleted. The simplest way to do this is to:
# cd /var/tmp/root # find -d . -type d | xargs rmdir 2>/dev/null
This will remove all empty directories. (Standard error is redirected to /dev/null to prevent the warnings about the directories that are not empty.)
/var/tmp/root now contains all the files that should be placed in appropriate locations below /. You now have to go through each of these files, determining how they differ with your existing files.
Note that some of the files that will have been installed in /var/tmp/root have a leading ``.''. At the time of writing the only files like this are shell startup files in /var/tmp/root/ and /var/tmp/root/root/, although there may be others (depending on when you are reading this). Make sure you use ls -a to catch them.
The simplest way to do this is to use diff(1) to compare the two files:
# diff /etc/shells /var/tmp/root/etc/shells
This will show you the differences between your /etc/shells file and the new /var/tmp/root/etc/shells file. Use these to decide whether to merge in changes that you have made or whether to copy over your old file.
Name the New Root Directory (/var/tmp/root) with a Time Stamp, so You Can Easily Compare Differences Between Versions: Frequently rebuilding the world means that you have to update /etc frequently as well, which can be a bit of a chore.
You can speed this process up by keeping a copy of the last set of changed files that you merged into /etc. The following procedure gives one idea of how to do this.
Make the world as normal. When you want to update /etc and the other directories, give the target directory a name based on the current date. If you were doing this on the 14th of February 1998 you could do the following:
# mkdir /var/tmp/root-19980214 # cd /usr/src/etc # make DESTDIR=/var/tmp/root-19980214 \ distrib-dirs distributionMerge in the changes from this directory as outlined above.
Do not remove the /var/tmp/root-19980214 directory when you have finished.
When you have downloaded the latest version of the source and remade it, follow step 1. This will give you a new directory, which might be called /var/tmp/root-19980221 (if you wait a week between doing updates).
You can now see the differences that have been made in the intervening week using diff(1) to create a recursive diff between the two directories:
# cd /var/tmp # diff -r root-19980214 root-19980221Typically, this will be a much smaller set of differences than those between /var/tmp/root-19980221/etc and /etc. Because the set of differences is smaller, it is easier to migrate those changes across into your /etc directory.
You can now remove the older of the two /var/tmp/root-* directories:
# rm -rf /var/tmp/root-19980214Repeat this process every time you need to merge in changes to /etc.
You can use date(1) to automate the generation of the directory names:
# mkdir /var/tmp/root-`date "+%Y%m%d"`
21.4.11 Update /dev
Note: If you are running FreeBSD 5.0 or later you can safely skip this section. These versions use devfs(5) to allocate device nodes transparently for the user.
In most cases, the mergemaster(8) tool will realize when it is necessary to update the device nodes, and offer to complete it automatically. These instructions tell how to update the device nodes manually.
For safety's sake, this is a multi-step process.
-
Copy /var/tmp/root/dev/MAKEDEV to /dev:
# cp /var/tmp/root/dev/MAKEDEV /dev
If you used mergemaster(8) to update /etc, then your MAKEDEV script should have been updated already, though it cannot hurt to check (with diff(1)) and copy it manually if necessary.
-
Now, take a snapshot of your current /dev. This snapshot needs to contain the permissions, ownerships, major and minor numbers of each filename, but it should not contain the time stamps. The easiest way to do this is to use awk(1) to strip out some of the information:
# cd /dev # ls -l | awk '{print $1, $2, $3, $4, $5, $6, $NF}' > /var/tmp/dev.out -
Remake all the device nodes:
# sh MAKEDEV all
-
Write another snapshot of the directory, this time to /var/tmp/dev2.out. Now look through these two files for any device node that you missed creating. There should not be any, but it is better to be safe than sorry.
# diff /var/tmp/dev.out /var/tmp/dev2.out
You are most likely to notice disk slice discrepancies which will involve commands such as:
# sh MAKEDEV sd0s1
to recreate the slice entries. Your precise circumstances may vary.
21.4.12 Update /stand
Note: This step is included only for completeness. It can safely be omitted.
For the sake of completeness, you may want to update the files in /stand as well. These files consist of hard links to the /stand/sysinstall binary. This binary should be statically linked, so that it can work when no other file systems (and in particular /usr) have been mounted.
# cd /usr/src/release/sysinstall # make all install
21.4.13 Rebooting
You are now done. After you have verified that everything appears to be in the right place you can reboot the system. A simple fastboot(8) should do it:
# fastboot
21.4.14 Finished
You should now have successfully upgraded your FreeBSD system. Congratulations.
If things went slightly wrong, it is easy to rebuild a particular piece of the system. For example, if you accidentally deleted /etc/magic as part of the upgrade or merge of /etc, the file(1) command will stop working. In this case, the fix would be to run:
# cd /usr/src/usr.bin/file # make all install
21.4.15 Questions
- 21.4.15.1. Do I need to re-make the world for every change?
- 21.4.15.2. My compile failed with lots of signal 11 (or other signal number) errors. What has happened?
- 21.4.15.3. Can I remove /usr/obj when I have finished?
- 21.4.15.4. Can interrupted builds be resumed?
- 21.4.15.5. How can I speed up making the world?
- 21.4.15.6. What do I do if something goes wrong?
There is no easy answer to this one, as it depends on the nature of the change. For example, if you just ran CVSup, and it has shown the following files as being updated:
src/games/cribbage/instr.c src/games/sail/pl_main.c src/release/sysinstall/config.c src/release/sysinstall/media.c src/share/mk/bsd.port.mk
it probably is not worth rebuilding the entire world. You could just go to the appropriate sub-directories and make all install, and that's about it. But if something major changed, for example src/lib/libc/stdlib then you should either re-make the world, or at least those parts of it that are statically linked (as well as anything else you might have added that is statically linked).
At the end of the day, it is your call. You might be happy re-making the world every fortnight say, and let changes accumulate over that fortnight. Or you might want to re-make just those things that have changed, and be confident you can spot all the dependencies.
And, of course, this all depends on how often you want to upgrade, and whether you are tracking FreeBSD-STABLE or FreeBSD-CURRENT.
21.4.15.2. My compile failed with lots of signal 11 (or other signal number) errors. What has happened?
This is normally indicative of hardware problems. (Re)making the world is an effective way to stress test your hardware, and will frequently throw up memory problems. These normally manifest themselves as the compiler mysteriously dying on receipt of strange signals.
A sure indicator of this is if you can restart the make and it dies at a different point in the process.
In this instance there is little you can do except start swapping around the components in your machine to determine which one is failing.
The short answer is yes.
/usr/obj contains all the object files that were produced during the compilation phase. Normally, one of the first steps in the ``make world'' process is to remove this directory and start afresh. In this case, keeping /usr/obj around after you have finished makes little sense, and will free up a large chunk of disk space (currently about 340 MB).
However, if you know what you are doing you can have ``make world'' skip this step. This will make subsequent builds run much faster, since most of sources will not need to be recompiled. The flip side of this is that subtle dependency problems can creep in, causing your build to fail in odd ways. This frequently generates noise on the FreeBSD mailing lists, when one person complains that their build has failed, not realizing that it is because they have tried to cut corners.
This depends on how far through the process you got before you found a problem.
In general (and this is not a hard and fast rule) the ``make world'' process builds new copies of essential tools (such as gcc(1), and make(1)) and the system libraries. These tools and libraries are then installed. The new tools and libraries are then used to rebuild themselves, and are installed again. The entire system (now including regular user programs, such as ls(1) or grep(1)) is then rebuilt with the new system files.
If you are at the last stage, and you know it (because you have looked through the output that you were storing) then you can (fairly safely) do:
... fix the problem ...
# cd /usr/src
# make -DNOCLEAN all
This will not undo the work of the previous ``make world''.
If you see the message:
-------------------------------------------------------------- Building everything.. --------------------------------------------------------------
in the ``make world'' output then it is probably fairly safe to do so.
If you do not see that message, or you are not sure, then it is always better to be safe than sorry, and restart the build from scratch.
-
Run in single user mode.
-
Put the /usr/src and /usr/obj directories on separate file systems held on separate disks. If possible, put these disks on separate disk controllers.
-
Better still, put these file systems across multiple disks using the ccd(4) (concatenated disk driver) device.
-
Turn off profiling (set ``NOPROFILE=true'' in /etc/make.conf). You almost certainly do not need it.
-
Also in /etc/make.conf, set CFLAGS to something like -O -pipe. The optimization -O2 is much slower, and the optimization difference between -O and -O2 is normally negligible. -pipe lets the compiler use pipes rather than temporary files for communication, which saves disk access (at the expense of memory).
-
Pass the -jn option to make(1) to run multiple processes in parallel. This usually helps regardless of whether you have a single or a multi processor machine.
-
The file system holding /usr/src can be mounted (or remounted) with the noatime option. This prevents the file system from recording the file access time. You probably do not need this information anyway.
# mount -u -o noatime /usr/src
Warning: The example assumes /usr/src is on its own file system. If it is not (if it is a part of /usr for example) then you will need to use that file system mount point, and not /usr/src.
-
The file system holding /usr/obj can be mounted (or remounted) with the async option. This causes disk writes to happen asynchronously. In other words, the write completes immediately, and the data is written to the disk a few seconds later. This allows writes to be clustered together, and can be a dramatic performance boost.
Warning: Keep in mind that this option makes your file system more fragile. With this option there is an increased chance that, should power fail, the file system will be in an unrecoverable state when the machine restarts.
If /usr/obj is the only thing on this file system then it is not a problem. If you have other, valuable data on the same file system then ensure your backups are fresh before you enable this option.
# mount -u -o async /usr/obj
Warning: As above, if /usr/obj is not on its own file system, replace it in the example with the name of the appropriate mount point.
Make absolutely sure your environment has no extraneous cruft from earlier builds. This is simple enough.
# chflags -R noschg /usr/obj/usr # rm -rf /usr/obj/usr # cd /usr/src # make cleandir # make cleandir
Yes, make cleandir really should be run twice.
Then restart the whole process, starting with make buildworld.
If you still have problems, send the error and the output of uname -a to FreeBSD general questions mailing list. Be prepared to answer other questions about your setup!
21.5 Tracking for Multiple Machines
Contributed by Mike Meyer.If you have multiple machines that you want to track the same source tree, then having all of them download sources and rebuild everything seems like a waste of resources: disk space, network bandwidth, and CPU cycles. It is, and the solution is to have one machine do most of the work, while the rest of the machines mount that work via NFS. This section outlines a method of doing so.
21.5.1 Preliminaries
First, identify a set of machines that is going to run the same set of binaries, which we will call a build set. Each machine can have a custom kernel, but they will be running the same userland binaries. From that set, choose a machine to be the build machine. It is going to be the machine that the world and kernel are built on. Ideally, it should be a fast machine that has sufficient spare CPU to run make world. You will also want to choose a machine to be the test machine, which will test software updates before they are put into production. This must be a machine that you can afford to have down for an extended period of time. It can be the build machine, but need not be.
All the machines in this build set need to mount /usr/obj and /usr/src from the same machine, and at the same point. Ideally, those are on two different drives on the build machine, but they can be NFS mounted on that machine as well. If you have multiple build sets, /usr/src should be on one build machine, and NFS mounted on the rest.
Finally make sure that /etc/make.conf on all the machines in the build set agrees with the build machine. That means that the build machine must build all the parts of the base system that any machine in the build set is going to install. Also, each build machine should have its kernel name set with KERNCONF in /etc/make.conf, and the build machine should list them all in KERNCONF, listing its own kernel first. The build machine must have the kernel configuration files for each machine in /usr/src/sys/arch/conf if it is going to build their kernels.
21.5.2 The Base System
Now that all that is done, you are ready to build everything. Build the kernel and world as described in Section 21.4.6.2 on the build machine, but do not install anything. After the build has finished, go to the test machine, and install the kernel you just built. If this machine mounts /usr/src and /usr/obj via NFS, when you reboot to single user you will need to enable the network and mount them. The easiest way to do this is to boot to multi-user, then run shutdown now to go to single user mode. Once there, you can install the new kernel and world and run mergemaster just as you normally would. When done, reboot to return to normal multi-user operations for this machine.
After you are certain that everything on the test machine is working properly, use the same procedure to install the new software on each of the other machines in the build set.
21.5.3 Ports
The same ideas can be used for the ports tree. The first critical step is mounting /usr/ports from the same machine to all the machines in the build set. You can then set up /etc/make.conf properly to share distfiles. You should set DISTDIR to a common shared directory that is writable by whichever user root is mapped to by your NFS mounts. Each machine should set WRKDIRPREFIX to a local build directory. Finally, if you are going to be building and distributing packages, you should set PACKAGES to a directory similar to DISTDIR.
Chapter 22 Linux Binary Compatibility
Restructured and parts updated by Jim Mock. Originally contributed by Brian N. Handy and Rich Murphey.22.1 Synopsis
FreeBSD provides binary compatibility with several other UNIX like operating systems, including Linux. At this point, you may be asking yourself why exactly, does FreeBSD need to be able to run Linux binaries? The answer to that question is quite simple. Many companies and developers develop only for Linux, since it is the latest ``hot thing'' in the computing world. That leaves the rest of us FreeBSD users bugging these same companies and developers to put out native FreeBSD versions of their applications. The problem is, that most of these companies do not really realize how many people would use their product if there were FreeBSD versions too, and most continue to only develop for Linux. So what is a FreeBSD user to do? This is where the Linux binary compatibility of FreeBSD comes into play.
In a nutshell, the compatibility allows FreeBSD users to run about 90% of all Linux applications without modification. This includes applications such as StarOffice, the Linux version of Netscape, Adobe® Acrobat®, RealPlayer® 5 and 7, VMware™, Oracle, WordPerfect®, Doom, Quake, and more. It is also reported that in some situations, Linux binaries perform better on FreeBSD than they do under Linux.
There are, however, some Linux-specific operating system features that are not supported under FreeBSD. Linux binaries will not work on FreeBSD if they overly use the Linux /proc file system (which is different from FreeBSD's /proc file system), or i386 specific calls, such as enabling virtual 8086 mode.
After reading this chapter, you will know:
-
How to enable Linux binary compatibility on your system.
-
How to install additional Linux shared libraries.
-
How to install Linux applications on your FreeBSD system.
-
The implementation details of Linux compatibility in FreeBSD.
Before reading this chapter, you should:
-
Know how to install additional third-party software (Chapter 4).
22.2 Installation
Linux binary compatibility is not turned on by default. The easiest way to enable this functionality is to load the linux KLD object (``Kernel LoaDable object''). You can load this module by simply typing linux at the command prompt.
If you would like Linux compatibility to always be enabled, then you should add the following line to /etc/rc.conf:
linux_enable="YES"
The kldstat(8) command can be used to verify that the KLD is loaded:
% kldstat Id Refs Address Size Name 1 2 0xc0100000 16bdb8 kernel 7 1 0xc24db000 d000 linux.ko
If for some reason you do not want to or cannot load the KLD, then you may statically link Linux binary compatibility into the kernel by adding options LINUX to your kernel configuration file. Then install your new kernel as described in Chapter 9.
22.2.1 Installing Linux Runtime Libraries
This can be done one of two ways, either by using the linux_base port, or by installing them manually.
22.2.1.1 Installing Using the linux_base Port
This is by far the easiest method to use when installing the runtime libraries. It is just like installing any other port from the ports collection. Simply do the following:
# cd /usr/ports/emulators/linux_base # make install distclean
You should now have working Linux binary compatibility. Some programs may complain about incorrect minor versions of the system libraries. In general, however, this does not seem to be a problem.
Note: There may be multiple versions of the emulators/linux_base port available, corresponding to different versions of various Linux distributions. You should install the port most closely resembling the requirements of the Linux applications you would like to install.
22.2.1.2 Installing Libraries Manually
If you do not have the ``ports'' collection installed, you can install the libraries by hand instead. You will need the Linux shared libraries that the program depends on and the runtime linker. Also, you will need to create a ``shadow root'' directory, /compat/linux, for Linux libraries on your FreeBSD system. Any shared libraries opened by Linux programs run under FreeBSD will look in this tree first. So, if a Linux program loads, for example, /lib/libc.so, FreeBSD will first try to open /compat/linux/lib/libc.so, and if that does not exist, it will then try /lib/libc.so. Shared libraries should be installed in the shadow tree /compat/linux/lib rather than the paths that the Linux ld.so reports.
Generally, you will need to look for the shared libraries that Linux binaries depend on only the first few times that you install a Linux program on your FreeBSD system. After a while, you will have a sufficient set of Linux shared libraries on your system to be able to run newly imported Linux binaries without any extra work.
22.2.1.3 How to Install Additional Shared Libraries
What if you install the linux_base port and your application still complains about missing shared libraries? How do you know which shared libraries Linux binaries need, and where to get them? Basically, there are 2 possibilities (when following these instructions you will need to be root on your FreeBSD system).
If you have access to a Linux system, see what shared libraries the application needs, and copy them to your FreeBSD system. Look at the following example:
Let us assume you used FTP to get the Linux binary of Doom, and put it on a Linux system you have access to. You then can check which shared libraries it needs by running ldd linuxdoom, like so:
% ldd linuxdoom libXt.so.3 (DLL Jump 3.1) => /usr/X11/lib/libXt.so.3.1.0 libX11.so.3 (DLL Jump 3.1) => /usr/X11/lib/libX11.so.3.1.0 libc.so.4 (DLL Jump 4.5pl26) => /lib/libc.so.4.6.29
You would need to get all the files from the last column, and put them under /compat/linux, with the names in the first column as symbolic links pointing to them. This means you eventually have these files on your FreeBSD system:
/compat/linux/usr/X11/lib/libXt.so.3.1.0 /compat/linux/usr/X11/lib/libXt.so.3 -> libXt.so.3.1.0 /compat/linux/usr/X11/lib/libX11.so.3.1.0 /compat/linux/usr/X11/lib/libX11.so.3 -> libX11.so.3.1.0 /compat/linux/lib/libc.so.4.6.29 /compat/linux/lib/libc.so.4 -> libc.so.4.6.29
Note: Note that if you already have a Linux shared library with a matching major revision number to the first column of the ldd output, you will not need to copy the file named in the last column to your system, the one you already have should work. It is advisable to copy the shared library anyway if it is a newer version, though. You can remove the old one, as long as you make the symbolic link point to the new one. So, if you have these libraries on your system:
/compat/linux/lib/libc.so.4.6.27 /compat/linux/lib/libc.so.4 -> libc.so.4.6.27and you find a new binary that claims to require a later version according to the output of ldd:
libc.so.4 (DLL Jump 4.5pl26) -> libc.so.4.6.29If it is only one or two versions out of date in the in the trailing digit then do not worry about copying /lib/libc.so.4.6.29 too, because the program should work fine with the slightly older version. However, if you like, you can decide to replace the libc.so anyway, and that should leave you with:
/compat/linux/lib/libc.so.4.6.29 /compat/linux/lib/libc.so.4 -> libc.so.4.6.29
Note: The symbolic link mechanism is only needed for Linux binaries. The FreeBSD runtime linker takes care of looking for matching major revision numbers itself and you do not need to worry about it.
22.2.2 Installing Linux ELF Binaries
ELF binaries sometimes require an extra step of ``branding''. If you attempt to run an unbranded ELF binary, you will get an error message like the following:
% ./my-linux-elf-binary ELF binary type not known Abort
To help the FreeBSD kernel distinguish between a FreeBSD ELF binary from a Linux binary, use the brandelf(1) utility.
% brandelf -t Linux my-linux-elf-binary
The GNU toolchain now places the appropriate branding information into ELF binaries automatically, so this step should become increasingly unnecessary in the future.
22.2.3 Configuring the Hostname Resolver
If DNS does not work or you get this message:
resolv+: "bind" is an invalid keyword resolv+: "hosts" is an invalid keyword
You will need to configure a /compat/linux/etc/host.conf file containing:
order hosts, bind multi on
The order here specifies that /etc/hosts is searched first and DNS is searched second. When /compat/linux/etc/host.conf is not installed, Linux applications find FreeBSD's /etc/host.conf and complain about the incompatible FreeBSD syntax. You should remove bind if you have not configured a name server using the /etc/resolv.conf file.
22.3 Installing Mathematica®
Updated for Mathematica 4.X by Murray Stokely. Merged with work by Bojan Bistrovic.This document describes the process of installing the Linux version of Mathematica 4.X onto a FreeBSD system.
The Linux version of Mathematica runs perfectly under FreeBSD however the binaries shipped by Wolfram need to be branded so that FreeBSD knows to use the Linux ABI to execute them.
The Linux version of Mathematica or Mathematica for Students can be ordered directly from Wolfram at http://www.wolfram.com/.
22.3.1 Branding the Linux Binaries
The Linux binaries are located in the Unix directory of the Mathematica CDROM distributed by Wolfram. You need to copy this directory tree to your local hard drive so that you can brand the Linux binaries with brandelf(1) before running the installer:
# mount /cdrom # cp -rp /cdrom/Unix/ /localdir/ # brandelf -t Linux /localdir/Files/SystemFiles/Kernel/Binaries/Linux/* # brandelf -t Linux /localdir/Files/SystemFiles/FrontEnd/Binaries/Linux/* # brandelf -t Linux /localdir/Files/SystemFiles/Installation/Binaries/Linux/* # brandelf -t Linux /localdir/Files/SystemFiles/Graphics/Binaries/Linux/* # brandelf -t Linux /localdir/Files/SystemFiles/Converters/Binaries/Linux/* # brandelf -t Linux /localdir/Files/SystemFiles/LicenseManager/Binaries/Linux/mathlm # cd /localdir/Installers/Linux/ # ./MathInstaller
Alternatively, you can simply set the default ELF brand to Linux for all unbranded binaries with the command:
# sysctl kern.fallback_elf_brand=3
This will make FreeBSD assume that unbranded ELF binaries use the Linux ABI and so you should be able to run the installer straight from the CDROM.
22.3.2 Obtaining Your Mathematica Password
Before you can run Mathematica you will have to obtain a password from Wolfram that corresponds to your ``machine ID''.
Once you have installed the Linux compatibility runtime libraries and unpacked Mathematica you can obtain the ``machine ID'' by running the program mathinfo in the installation directory. This machine ID is based solely on the MAC address of your first Ethernet card.
# cd /localdir/Files/SystemFiles/Installation/Binaries/Linux # mathinfo disco.example.com 7115-70839-20412
When you register with Wolfram, either by email, phone or fax, you will give them the ``machine ID'' and they will respond with a corresponding password consisting of groups of numbers. You can then enter this information when you attempt to run Mathematica for the first time exactly as you would for any other Mathematica platform.
22.3.3 Running the Mathematica Frontend over a Network
Mathematica uses some special fonts to display characters not present in any of the standard font sets (integrals, sums, Greek letters, etc.). The X protocol requires these fonts to be install locally. This means you will have to copy these fonts from the CDROM or from a host with Mathematica installed to your local machine. These fonts are normally stored in /cdrom/Unix/Files/SystemFiles/Fonts on the CDROM, or /usr/local/mathematica/SystemFiles/Fonts on your hard drive. The actual fonts are in the subdirectories Type1 and X. There are several ways to use them, as described below.
The first way is to copy them into one of the existing font directories in /usr/X11R6/lib/X11/fonts. This will require editing the fonts.dir file, adding the font names to it, and changing the number of fonts on the first line. Alternatively, you should also just be able to run mkfontdir(1) in the directory you have copied them to.
The second way to do this is to copy the directories to /usr/X11R6/lib/X11/fonts:
# cd /usr/X11R6/lib/X11/fonts # mkdir X # mkdir MathType1 # cd /cdrom/Unix/Files/SystemFiles/Fonts # cp X/* /usr/X11R6/lib/X11/fonts/X # cp Type1/* /usr/X11R6/lib/X11/fonts/MathType1 # cd /usr/X11R6/lib/X11/fonts/X # mkfontdir # cd ../MathType1 # mkfontdir
Now add the new font directories to your font path:
# xset fp+ /usr/X11R6/lib/X11/fonts/X # xset fp+ /usr/X11R6/lib/X11/fonts/MathType1 # xset fp rehash
If you are using the XFree86 server, you can have these font directories loaded automatically by adding them to your XF86Config file.
If you do not already have a directory called /usr/X11R6/lib/X11/fonts/Type1, you can change the name of the MathType1 directory in the example above to Type1.
22.4 Installing Maple™
Contributed by Aaron Kaplan. Thanks to Robert Getschmann.Maple™ is a commercial mathematics program similar to Mathematica. You must purchase this software from http://www.maplesoft.com/ and then register there for a license file. To install this software on FreeBSD, please follow these simple steps.
-
Execute the INSTALL shell script from the product distribution. Choose the ``RedHat'' option when prompted by the installation program. A typical installation directory might be /usr/local/maple.
-
If you have not done so, order a license for Maple from Maple Waterloo Software (http://register.maplesoft.com/) and copy it to /usr/local/maple/license/license.dat.
-
Install the FLEXlm license manager by running the INSTALL_LIC install shell script that comes with Maple. Specify the primary hostname for your machine for the license server.
-
Patch the /usr/local/maple/bin/maple.system.type file with the following:
----- snip ------------------ *** maple.system.type.orig Sun Jul 8 16:35:33 2001 --- maple.system.type Sun Jul 8 16:35:51 2001 *************** *** 72,77 **** --- 72,78 ---- # the IBM RS/6000 AIX case MAPLE_BIN="bin.IBM_RISC_UNIX" ;; + "FreeBSD"|\ "Linux") # the Linux/x86 case # We have two Linux implementations, one for Red Hat and ----- snip end of patch -----Please note that after the "FreeBSD"|\ no other whitespace should be present.
This patch instructs Maple to recognize ``FreeBSD'' as a type of Linux system. The bin/maple shell script calls the bin/maple.system.type shell script which in turn calls uname -a to find out the operating system name. Depending on the OS name it will find out which binaries to use.
-
Start the license server.
The following script, installed as /usr/local/etc/rc.d/lmgrd.sh is a convenient way to start up lmgrd:
----- snip ------------ #! /bin/sh PATH=/usr/local/sbin:/usr/local/bin:/sbin:/bin:/usr/sbin:/usr/bin:/usr/X11R6/bin PATH=${PATH}:/usr/local/maple/bin:/usr/local/maple/FLEXlm/UNIX/LINUX export PATH LICENSE_FILE=/usr/local/maple/license/license.dat LOG=/var/log/lmgrd.log case "$1" in start) lmgrd -c ${LICENSE_FILE} 2>> ${LOG} 1>&2 echo -n " lmgrd" ;; stop) lmgrd -c ${LICENSE_FILE} -x lmdown 2>> ${LOG} 1>&2 ;; *) echo "Usage: `basename $0` {start|stop}" 1>&2 exit 64 ;; esac exit 0 ----- snip ------------ -
Test-start Maple:
% cd /usr/local/maple/bin % ./xmaple
You should be up and running. Make sure to write Maplesoft to let them know you would like a native FreeBSD version!
22.4.1 Common Pitfalls
-
The FLEXlm license manager can be a difficult tool to work with. Additional documentation on the subject can be found at http://www.globetrotter.com/.
-
lmgrd is known to be very picky about the license file and to core dump if there are any problems. A correct license file should look like this:
# ======================================================= # License File for UNIX Installations ("Pointer File") # ======================================================= SERVER chillig ANY #USE_SERVER VENDOR maplelmg FEATURE Maple maplelmg 2000.0831 permanent 1 XXXXXXXXXXXX \ PLATFORMS=i86_r ISSUER="Waterloo Maple Inc." \ ISSUED=11-may-2000 NOTICE=" Technische Universitat Wien" \ SN=XXXXXXXXXNote: Serial number and key 'X''ed out. chillig is a hostname.
Editing the license file works as long as you do not touch the ``FEATURE'' line (which is protected by the license key).
22.5 Installing MATLAB®
Contributed by Dan Pelleg.This document describes the process of installing the Linux version of MATLAB® version 6.5 onto a FreeBSD system. It works quite well, with the exception of the Java Virtual Machine™ (see Section 22.5.5).
The Linux version of MATLAB can be ordered directly from The MathWorks at http://www.mathworks.com. Make sure you also get the license file or instructions how to create it. While you are there, let them know you would like a native FreeBSD version of their software.
22.5.1 Installing MATLAB
To install MATLAB, do the following:
-
Insert the installation CD and mount it. Become root, as recommended by the installation script. To start the installation script type:
# /compat/linux/bin/sh /cdrom/install
Tip: The installer is graphical. If you get errors about not being able to open a display, type setenv HOME ~USER, where USER is the user you did a su(1) as.
-
When asked for the MATLAB root directory, type: /compat/linux/usr/local/matlab.
Tip: For easier typing on the rest of the installation process, type this at your shell prompt: set MATLAB=/compat/linux/usr/local/matlab
-
Edit the license file as instructed when obtaining the MATLAB license.
Tip: You can prepare this file in advance using your favorite editor, and copy it to $MATLAB/license.dat before the installer asks you to edit it.
-
Complete the installation process.
At this point your MATLAB installation is complete. The following steps apply ``glue'' to connect it to your FreeBSD system.
22.5.2 License Manager Startup
-
Create symlinks for the license manager scripts:
# ln -s $MATLAB/etc/lmboot /usr/local/etc/lmboot_TMW # ln -s $MATLAB/etc/lmdown /usr/local/etc/lmdown_TMW
-
Create a startup file at /usr/local/etc/rc.d/flexlm.sh. The example below is a modified version of the distributed $MATLAB/etc/rc.lm.glnx86. The changes are file locations, and startup of the license manager under Linux emulation.
#!/bin/sh case "$1" in start) if [ -f /usr/local/etc/lmboot_TMW ]; then /compat/linux/bin/sh /usr/local/etc/lmboot_TMW -u username && echo 'MATLAB_lmgrd' fi ;; stop) if [ -f /usr/local/etc/lmdown_TMW ]; then /compat/linux/bin/sh /usr/local/etc/lmdown_TMW > /dev/null 2>&1 fi ;; *) echo "Usage: $0 {start|stop}" exit 1 ;; esac exit 0Important: The file must be made executable:
# chmod +x /usr/local/etc/rc.d/flexlm.sh
You must also replace username above with the name of a valid user on your system (and not root).
-
Start the license manager with the command:
# /usr/local/etc/rc.d/flexlm.sh start
22.5.3 Linking the Java Runtime Environment
Change the Java Runtime Environment (JRE) link to one working under FreeBSD:
# cd $MATLAB/sys/java/jre/glnx86/ # unlink jre; ln -s ./jre1.1.8 ./jre
22.5.4 Creating a MATLAB Startup Script
-
Place the following startup script in /usr/local/bin/matlab:
#!/bin/sh /compat/linux/bin/sh /compat/linux/usr/local/matlab/bin/matlab "$@"
-
Then type the command chmod +x /usr/local/bin/matlab.
Tip: Depending on your version of emulators/linux_base, you may run into errors when running this script. To avoid that, edit the file /compat/linux/usr/local/matlab/bin/matlab, and change the line that says:
if [ `expr "$lscmd" : '.*->.*'` -ne 0 ]; then(in version 13.0.1 it is on line 410) to this line:
if test -L $newbase; then
22.5.5 Using MATLAB
At this point you are ready to type matlab and start using it. Note that the version of Java shipped with MATLAB does not work well under FreeBSD. It will make it hard to quit MATLAB and you will have to kill -9 it. If you do not use Java at all, you can avoid this nuisance by starting MATLAB with the -nojvm switch.
22.6 Installing Oracle®
Contributed by Marcel Moolenaar.22.6.1 Preface
This document describes the process of installing Oracle 8.0.5 and Oracle 8.0.5.1 Enterprise Edition for Linux onto a FreeBSD machine.
22.6.2 Installing the Linux Environment
Make sure you have both emulators/linux_base and devel/linux_devtools from the ports collection installed. If you run into difficulties with these ports, you may have to use the packages or older versions available in the ports collection.
If you want to run the intelligent agent, you will also need to install the Red Hat Tcl package: tcl-8.0.3-20.i386.rpm. The general command for installing packages with the official RPM port (archivers/rpm) is:
# rpm -i --ignoreos --root /compat/linux --dbpath /var/lib/rpm package
Installation of the package should not generate any errors.
22.6.3 Creating the Oracle Environment
Before you can install Oracle, you need to set up a proper environment. This document only describes what to do specially to run Oracle for Linux on FreeBSD, not what has been described in the Oracle installation guide.
22.6.3.1 Kernel Tuning
As described in the Oracle installation guide, you need to set the maximum size of shared memory. Do not use SHMMAX under FreeBSD. SHMMAX is merely calculated out of SHMMAXPGS and PGSIZE. Therefore define SHMMAXPGS. All other options can be used as described in the guide. For example:
options SHMMAXPGS=10000 options SHMMNI=100 options SHMSEG=10 options SEMMNS=200 options SEMMNI=70 options SEMMSL=61
Set these options to suit your intended use of Oracle.
Also, make sure you have the following options in your kernel configuration file:
options SYSVSHM #SysV shared memory options SYSVSEM #SysV semaphores options SYSVMSG #SysV interprocess communication
22.6.3.2 Oracle Account
Create an oracle account just as you would create any other account. The oracle account is special only that you need to give it a Linux shell. Add /compat/linux/bin/bash to /etc/shells and set the shell for the oracle account to /compat/linux/bin/bash.
22.6.3.3 Environment
Besides the normal Oracle variables, such as ORACLE_HOME and ORACLE_SID you must set the following environment variables:
| Variable | Value |
|---|---|
| LD_LIBRARY_PATH | $ORACLE_HOME/lib |
| CLASSPATH | $ORACLE_HOME/jdbc/lib/classes111.zip |
| PATH | /compat/linux/bin /compat/linux/sbin /compat/linux/usr/bin /compat/linux/usr/sbin /bin /sbin /usr/bin /usr/sbin /usr/local/bin $ORACLE_HOME/bin |
It is advised to set all the environment variables in .profile. A complete example is:
ORACLE_BASE=/oracle; export ORACLE_BASE ORACLE_HOME=/oracle; export ORACLE_HOME LD_LIBRARY_PATH=$ORACLE_HOME/lib export LD_LIBRARY_PATH ORACLE_SID=ORCL; export ORACLE_SID ORACLE_TERM=386x; export ORACLE_TERM CLASSPATH=$ORACLE_HOME/jdbc/lib/classes111.zip export CLASSPATH PATH=/compat/linux/bin:/compat/linux/sbin:/compat/linux/usr/bin PATH=$PATH:/compat/linux/usr/sbin:/bin:/sbin:/usr/bin:/usr/sbin PATH=$PATH:/usr/local/bin:$ORACLE_HOME/bin export PATH
22.6.4 Installing Oracle
Due to a slight inconsistency in the Linux emulator, you need to create a directory named .oracle in /var/tmp before you start the installer. Either make it world writable or let it be owned by the oracle user. You should be able to install Oracle without any problems. If you have problems, check your Oracle distribution and/or configuration first! After you have installed Oracle, apply the patches described in the next two subsections.
A frequent problem is that the TCP protocol adapter is not installed right. As a consequence, you cannot start any TCP listeners. The following actions help solve this problem:
# cd $ORACLE_HOME/network/lib # make -f ins_network.mk ntcontab.o # cd $ORACLE_HOME/lib # ar r libnetwork.a ntcontab.o # cd $ORACLE_HOME/network/lib # make -f ins_network.mk install
Do not forget to run root.sh again!
22.6.4.1 Patching root.sh
When installing Oracle, some actions, which need to be performed as root, are recorded in a shell script called root.sh. This script is written in the orainst directory. Apply the following patch to root.sh, to have it use to proper location of chown or alternatively run the script under a Linux native shell.
*** orainst/root.sh.orig Tue Oct 6 21:57:33 1998 --- orainst/root.sh Mon Dec 28 15:58:53 1998 *************** *** 31,37 **** # This is the default value for CHOWN # It will redefined later in this script for those ports # which have it conditionally defined in ss_install.h ! CHOWN=/bin/chown # # Define variables to be used in this script --- 31,37 ---- # This is the default value for CHOWN # It will redefined later in this script for those ports # which have it conditionally defined in ss_install.h ! CHOWN=/usr/sbin/chown # # Define variables to be used in this script
When you do not install Oracle from CD, you can patch the source for root.sh. It is called rthd.sh and is located in the orainst directory in the source tree.
22.6.4.2 Patching genclntsh
The script genclntsh is used to create a single shared client library. It is used when building the demos. Apply the following patch to comment out the definition of PATH:
*** bin/genclntsh.orig Wed Sep 30 07:37:19 1998 --- bin/genclntsh Tue Dec 22 15:36:49 1998 *************** *** 32,38 **** # # Explicit path to ensure that we're using the correct commands #PATH=/usr/bin:/usr/ccs/bin export PATH ! PATH=/usr/local/bin:/bin:/usr/bin:/usr/X11R6/bin export PATH # # each product MUST provide a $PRODUCT/admin/shrept.lst --- 32,38 ---- # # Explicit path to ensure that we're using the correct commands #PATH=/usr/bin:/usr/ccs/bin export PATH ! #PATH=/usr/local/bin:/bin:/usr/bin:/usr/X11R6/bin export PATH # # each product MUST provide a $PRODUCT/admin/shrept.lst
22.6.5 Running Oracle
When you have followed the instructions, you should be able to run Oracle as if it was run on Linux itself.
22.7 Installing SAP® R/3®
Contributed by Holger Kipp. Original version converted to SGML by Valentino Vaschetto.Installations of SAP Systems using FreeBSD will not be supported by the SAP support team -- they only offer support for certified platforms.
22.7.1 Preface
This document describes a possible way of installing a SAP R/3 System with Oracle Database for Linux onto a FreeBSD machine, including the installation of FreeBSD and Oracle. Two different configurations will be described:
-
SAP R/3 4.6B (IDES) with Oracle 8.0.5 on FreeBSD 4.3-STABLE
-
SAP R/3 4.6C with Oracle 8.1.7 on FreeBSD 4.5-STABLE
Even though this document tries to describe all important steps in a greater detail, it is not intended as a replacement for the Oracle and SAP R/3 installation guides.
Please see the documentation that comes with the SAP R/3 Linux edition for SAP and Oracle specific questions, as well as resources from Oracle and SAP OSS.
22.7.2 Software
The following CD-ROMs have been used for SAP installations:
22.7.2.1 SAP R/3 4.6B, Oracle 8.0.5
| Name | Number | Description |
|---|---|---|
| KERNEL | 51009113 | SAP Kernel Oracle / Installation / AIX, Linux, Solaris |
| RDBMS | 51007558 | Oracle / RDBMS 8.0.5.X / Linux |
| EXPORT1 | 51010208 | IDES / DB-Export / Disc 1 of 6 |
| EXPORT2 | 51010209 | IDES / DB-Export / Disc 2 of 6 |
| EXPORT3 | 51010210 | IDES / DB-Export / Disc 3 of 6 |
| EXPORT4 | 51010211 | IDES / DB-Export / Disc 4 of 6 |
| EXPORT5 | 51010212 | IDES / DB-Export / Disc 5 of 6 |
| EXPORT6 | 51010213 | IDES / DB-Export / Disc 6 of 6 |
Additionally, we used the Oracle 8 Server (Pre-production version 8.0.5 for Linux, Kernel Version 2.0.33) CD which is not really necessary, and FreeBSD 4.3-STABLE (it was only a few days past 4.3 RELEASE).
22.7.2.2 SAP R/3 4.6C SR2, Oracle 8.1.7
| Name | Number | Description |
|---|---|---|
| KERNEL | 51014004 | SAP Kernel Oracle / SAP Kernel Version 4.6D / DEC, Linux |
| RDBMS | 51012930 | Oracle 8.1.7/ RDBMS / Linux |
| EXPORT1 | 51013953 | Release 4.6C SR2 / Export / Disc 1 of 4 |
| EXPORT1 | 51013953 | Release 4.6C SR2 / Export / Disc 2 of 4 |
| EXPORT1 | 51013953 | Release 4.6C SR2 / Export / Disc 3 of 4 |
| EXPORT1 | 51013953 | Release 4.6C SR2 / Export / Disc 4 of 4 |
| LANG1 | 51013954 | Release 4.6C SR2 / Language / DE, EN, FR / Disc 1 of 3 |
Depending on the languages you would like to install, additional language CDs might be necessary. Here we are just using DE and EN, so the first language CD is the only one needed. As a little note, the numbers for all four EXPORT CDs are identical. All three language CDs also have the same number (this is different from the 4.6B IDES release CD numbering). At the time of writing this installation is running on FreeBSD 4.5-STABLE (20.03.2002).
22.7.3 SAP Notes
The following notes should be read before installing SAP R/3 and proved to be useful during installation:
22.7.3.1 SAP R/3 4.6B, Oracle 8.0.5
| Number | Title |
|---|---|
| 0171356 | SAP Software on Linux: Essential Comments |
| 0201147 | INST: 4.6C R/3 Inst. on UNIX - Oracle |
| 0373203 | Update / Migration Oracle 8.0.5 --> 8.0.6/8.1.6 LINUX |
| 0072984 | Release of Digital UNIX 4.0B for Oracle |
| 0130581 | R3SETUP step DIPGNTAB terminates |
| 0144978 | Your system has not been installed correctly |
| 0162266 | Questions and tips for R3SETUP on Windows NT / W2K |
22.7.3.2 SAP R/3 4.6C, Oracle 8.1.7
| Number | Title |
|---|---|
| 0015023 | Initializing table TCPDB (RSXP0004) (EBCDIC) |
| 0045619 | R/3 with several languages or typefaces |
| 0171356 | SAP Software on Linux: Essential Comments |
| 0195603 | RedHat 6.1 Enterprise version: Known problems |
| 0212876 | The new archiving tool SAPCAR |
| 0300900 | Linux: Released DELL Hardware |
| 0377187 | RedHat 6.2: important remarks |
| 0387074 | INST: R/3 4.6C SR2 Installation on UNIX |
| 0387077 | INST: R/3 4.6C SR2 Inst. on UNIX - Oracle |
| 0387078 | SAP Software on UNIX: OS Dependencies 4.6C SR2 |
22.7.4 Hardware Requirements
The following equipment is sufficient for the installation of a SAP R/3 System. For production use, a more exact sizing is of course needed:
| Component | 4.6B | 4.6C |
|---|---|---|
| Processor | 2 x 800MHz Pentium III | 2 x 800MHz Pentium III |
| Memory | 1GB ECC | 2GB ECC |
| Hard Disk Space | 50-60GB (IDES) | 50-60GB (IDES) |
For use in production, Xeon Processors with large cache, high-speed disk access (SCSI, RAID hardware controller), USV and ECC-RAM is recommended. The large amount of hard disk space is due to the preconfigured IDES System, which creates 27 GB of database files during installation. This space is also sufficient for initial production systems and application data.
22.7.4.1 SAP R/3 4.6B, Oracle 8.0.5
The following off-the-shelf hardware was used: a dual processor board with 2 800 MHz Pentium III processors, Adaptec 29160 Ultra160 SCSI adapter (for accessing a 40/80 GB DLT tape drive and CDROM), Mylex AcceleRAID™ (2 channels, firmware 6.00-1-00 with 32 MB RAM). To the Mylex RAID controller are attached two 17 GB hard disks (mirrored) and four 36 GB hard disks (RAID level 5).
22.7.4.2 SAP R/3 4.6C, Oracle 8.1.7
For this installation a Dell™ PowerEdge™ 2500 was used: a dual processor board with two 1000 MHz Pentium III processors (256 kB Cache), 2 GB PC133 ECC SDRAM, PERC/3 DC PCI RAID Controller with 128 MB, and an EIDE DVD-ROM drive. To the RAID controller are attached two 18 GB hard disks (mirrored) and four 36 GB hard disks (RAID level 5).
22.7.5 Installation of FreeBSD
First you have to install FreeBSD. There are several ways to do this (FreeBSD 4.3 was installed via FTP, FreeBSD 4.5 directly from the RELEASE CD) for more informations read the Section 2.13.
22.7.5.1 Disk Layout
To keep it simple, the same disk layout both for the SAP R/3 46B and SAP R/3 46C SR2 installation was used. Only the device names changed, as the installations were on different hardware (/dev/da and /dev/amr respectively, so if using an AMI MegaRAID, one will see /dev/amr0s1a instead of /dev/da0s1a):
| File system | Size (1k-blocks) | Size (GB) | Mounted on |
|---|---|---|---|
| /dev/da0s1a | 1.016.303 | 1 | / |
| /dev/da0s1b | 6 | swap | |
| /dev/da0s1e | 2.032.623 | 2 | /var |
| /dev/da0s1f | 8.205.339 | 8 | /usr |
| /dev/da1s1e | 45.734.361 | 45 | /compat/linux/oracle |
| /dev/da1s1f | 2.032.623 | 2 | /compat/linux/sapmnt |
| /dev/da1s1g | 2.032.623 | 2 | /compat/linux/usr/sap |
Configure and initialize the two logical drives with the Mylex or PERC/3 RAID software beforehand. The software can be started during the BIOS boot phase.
Please note that this disk layout differs slightly from the SAP recommendations, as SAP suggests mounting the Oracle subdirectories (and some others) separately -- we decided to just create them as real subdirectories for simplicity.
22.7.5.2 make world and a New Kernel
Download the latest -STABLE sources. Rebuild world and your custom kernel after configuring your kernel configuration file. Here you should also include the kernel parameters which are required for both SAP R/3 and Oracle.
22.7.6 Installing the Linux Environment
22.7.6.1 Installing the Linux Base System
First the linux_base port needs to be installed (as root):
# cd /usr/ports/emulators/linux_base # make install distclean
22.7.6.2 Installing Linux Development Environment
The Linux development environment is needed, if you want to install Oracle on FreeBSD according to the Section 22.6:
# cd /usr/ports/devel/linux_devtools # make install distclean
The Linux development environment has only been installed for the SAP R/3 46B IDES installation. It is not needed, if the Oracle DB is not relinked on the FreeBSD system. This is the case if you are using the Oracle tarball from a Linux system.
22.7.6.3 Installing the Necessary RPMs
To start the R3SETUP program, PAM support is needed. During the first SAP Installation on FreeBSD 4.3-STABLE we tried to install PAM with all the required packages and finally forced the installation of the PAM package, which worked. For SAP R/3 4.6C SR2 we directly forced the installation of the PAM RPM, which also works, so it seems the dependent packages are not needed:
# rpm -i --ignoreos --nodeps --root /compat/linux --dbpath /var/lib/rpm \ pam-0.68-7.i386.rpm
For Oracle 8.0.5 to run the intelligent agent, we also had to install the RedHat Tcl package tcl-8.0.5-30.i386.rpm (otherwise the relinking during Oracle installation will not work). There are some other issues regarding relinking of Oracle, but that is a Oracle Linux issue, not FreeBSD specific.
22.7.6.4 Some Additional Hints
It might also be a good idea to add linprocfs to /etc/fstab, for more informations, see the linprocfs(5) manual page. Another parameter to set is kern.fallback_elf_brand=3 which is done in the file /etc/sysctl.conf.
22.7.7 Creating the SAP R/3 Environment
22.7.7.1 Creating the Necessary File Systems and Mountpoints
For a simple installation, it is sufficient to create the following file systems:
| mount point | size in GB |
|---|---|
| /compat/linux/oracle | 45 GB |
| /compat/linux/sapmnt | 2 GB |
| /compat/linux/usr/sap | 2 GB |
It is also necessary to created some links. Otherwise the SAP Installer will complain, as it is checking the created links:
# ln -s /compat/linux/oracle /oracle # ln -s /compat/linux/sapmnt /sapmnt # ln -s /compat/linux/usr/sap /usr/sap
Possible error message during installation (here with System PRD and the SAP R/3 4.6C SR2 installation):
INFO 2002-03-19 16:45:36 R3LINKS_IND_IND SyLinkCreate:200
Checking existence of symbolic link /usr/sap/PRD/SYS/exe/dbg to
/sapmnt/PRD/exe. Creating if it does not exist...
WARNING 2002-03-19 16:45:36 R3LINKS_IND_IND SyLinkCreate:400
Link /usr/sap/PRD/SYS/exe/dbg exists but it points to file
/compat/linux/sapmnt/PRD/exe instead of /sapmnt/PRD/exe. The
program cannot go on as long as this link exists at this
location. Move the link to another location.
ERROR 2002-03-19 16:45:36 R3LINKS_IND_IND Ins_SetupLinks:0
can not setup link '/usr/sap/PRD/SYS/exe/dbg' with content
'/sapmnt/PRD/exe'
22.7.7.2 Creating Users and Directories
SAP R/3 needs two users and three groups. The user names depend on the SAP system ID (SID) which consists of three letters. Some of these SIDs are reserved by SAP (for example SAP and NIX. For a complete list please see the SAP documentation). For the IDES installation we used IDS, for the 4.6C SR2 installation PRD, as that system is intended for production use. We have therefore the following groups (group IDs might differ, these are just the values we used with our installation):
| group ID | group name | description |
|---|---|---|
| 100 | dba | Data Base Administrator |
| 101 | sapsys | SAP System |
| 102 | oper | Data Base Operator |
For a default Oracle installation, only group dba is used. As oper group, one also uses group dba (see Oracle and SAP documentation for further information).
We also need the following users:
| user ID | user name | generic name | group | additional groups | description |
|---|---|---|---|---|---|
| 1000 | idsadm/prdadm | sidadm | sapsys | oper | SAP Administrator |
| 1002 | oraids/oraprd | orasid | dba | oper | Oracle Administrator |
Adding the users with adduser(8) requires the following (please note shell and home directory) entries for ``SAP Administrator'':
Name: sidadm Password: ****** Fullname: SAP Administrator SID Uid: 1000 Gid: 101 (sapsys) Class: Groups: sapsys dba HOME: /home/sidadm Shell: bash (/compat/linux/bin/bash)
and for ``Oracle Administrator'':
Name: orasid Password: ****** Fullname: Oracle Administrator SID Uid: 1002 Gid: 100 (dba) Class: Groups: dba HOME: /oracle/sid Shell: bash (/compat/linux/bin/bash)
This should also include group oper in case you are using both groups dba and oper.
22.7.7.3 Creating Directories
These directories are usually created as separate file systems. This depends entirely on your requirements. We choose to create them as simple directories, as they are all located on the same RAID 5 anyway:
First we will set owners and rights of some directories (as user root):
# chmod 775 /oracle # chmod 777 /sapmnt # chown root:dba /oracle # chown sidadm:sapsys /compat/linux/usr/sap # chmod 775 /compat/linux/usr/sap
Second we will create directories as user orasid. These will all be subdirectories of /oracle/SID:
# su - orasid # cd /oracle/SID # mkdir mirrlogA mirrlogB origlogA origlogB # mkdir sapdata1 sapdata2 sapdata3 sapdata4 sapdata5 sapdata6 # mkdir saparch sapreorg # exit
For the Oracle 8.1.7 installation some additional directories are needed:
# su - orasid # cd /oracle # mkdir 805_32 # mkdir client stage # mkdir client/80x_32 # mkdir stage/817_32 # cd /oracle/SID # mkdir 817_32
Note: The directory client/80x_32 is used with exactly this name. Do not replace the x with some number or anything.
In the third step we create directories as user sidadm:
# su - sidadm # cd /usr/sap # mkdir SID # mkdir trans # exit
22.7.7.4 Entries in /etc/services
SAP R/3 requires some entries in file /etc/services, which will not be set correctly during installation under FreeBSD. Please add the following entries (you need at least those entries corresponding to the instance number -- in this case, 00. It will do no harm adding all entries from 00 to 99 for dp, gw, sp and ms). If you are going to use a SAProuter or need to access SAP OSS, you also need 99, as port 3299 is usually used for the SAProuter process on the target system:
sapdp00 3200/tcp # SAP Dispatcher. 3200 + Instance-Number sapgw00 3300/tcp # SAP Gateway. 3300 + Instance-Number sapsp00 3400/tcp # 3400 + Instance-Number sapms00 3500/tcp # 3500 + Instance-Number sapmsSID 3600/tcp # SAP Message Server. 3600 + Instance-Number sapgw00s 4800/tcp # SAP Secure Gateway 4800 + Instance-Number
22.7.7.5 Necessary Locales
SAP requires at least two locales that are not part of the default RedHat installation. SAP offers the required RPMs as download from their FTP server (which is only accessible if you are a customer with OSS access). See note 0171356 for a list of RPMs you need.
It is also possible to just create appropriate links (for example from de_DE and en_US ), but we would not recommend this for a production system (so far it worked with the IDES system without any problems, though). The following locales are needed:
de_DE.ISO-8859-1 en_US.ISO-8859-1
Create the links like this:
# cd /compat/linux/usr/share/locale # ln -s de_DE de_DE.ISO-8859-1 # ln -s en_US en_US.ISO-8859-1
If they are not present, there will be some problems during the installation. If these are then subsequently ignored (by setting the status of the offending steps to OK in file CENTRDB.R3S), it will be impossible to log onto the SAP system without some additional effort.
22.7.7.6 Kernel Tuning
SAP R/3 systems need a lot of resources. We therefore added the following parameters to the kernel configuration file:
# Set these for memory pigs (SAP and Oracle): options MAXDSIZ="(1024*1024*1024)" options DFLDSIZ="(1024*1024*1024)" # System V options needed. options SYSVSHM #SYSV-style shared memory options SHMMAXPGS=262144 #max amount of shared mem. pages #options SHMMAXPGS=393216 #use this for the 46C inst.parameters options SHMMNI=256 #max number of shared memory ident if. options SHMSEG=100 #max shared mem.segs per process options SYSVMSG #SYSV-style message queues options MSGSEG=32767 #max num. of mes.segments in system options MSGSSZ=32 #size of msg-seg. MUST be power of 2 options MSGMNB=65535 #max char. per message queue options MSGTQL=2046 #max amount of msgs in system options SYSVSEM #SYSV-style semaphores options SEMMNU=256 #number of semaphore UNDO structures options SEMMNS=1024 #number of semaphores in system options SEMMNI=520 #number of semaphore identifiers options SEMUME=100 #number of UNDO keys
The minimum values are specified in the documentation that comes from SAP. As there is no description for Linux, see the HP-UX section (32-bit) for further information. As the system for the 4.6C SR2 installation has more main memory, the shared segments can be larger both for SAP and Oracle, therefore choose a larger number of shared memory pages.
Note: With the default installation of FreeBSD 4.5 on i386, leave MAXDSIZ and DFLDSIZ at 1 GB maximum. Otherwise, strange errors like ``ORA-27102: out of memory'' and ``Linux Error: 12: Cannot allocate memory'' might happen.
22.7.8 Installing SAP R/3
22.7.8.1 Preparing SAP CDROMs
There are many CDROMs to mount and unmount during the installation. Assuming you have enough CDROM drives, you can just mount them all. We decided to copy the CDROMs contents to corresponding directories:
/oracle/SID/sapreorg/cd-name
where cd-name was one of KERNEL, RDBMS, EXPORT1, EXPORT2, EXPORT3, EXPORT4, EXPORT5 and EXPORT6 for the 4.6B/IDES installation, and KERNEL, RDBMS, DISK1, DISK2, DISK3, DISK4 and LANG for the 4.6C SR2 installation. All the filenames on the mounted CDs should be in capital letters, otherwise use the -g option for mounting. So use the following commands:
# mount_cd9660 -g /dev/cd0a /mnt # cp -R /mnt/* /oracle/SID/sapreorg/cd-name # umount /mnt
22.7.8.2 Running the Installation Script
First you have to prepare an install directory:
# cd /oracle/SID/sapreorg # mkdir install # cd install
Then the installation script is started, which will copy nearly all the relevant files into the install directory:
# /oracle/SID/sapreorg/KERNEL/UNIX/INSTTOOL.SH
The IDES installation (4.6B) comes with a fully customized SAP R/3 demonstration system, so there are six instead of just three EXPORT CDs. At this point the installation template CENTRDB.R3S is for installing a standard central instance (R/3 and database), not the IDES central instance, so one needs to copy the corresponding CENTRDB.R3S from the EXPORT1 directory, otherwise R3SETUP will only ask for three EXPORT CDs.
The newer SAP 4.6C SR2 release comes with four EXPORT CDs. The parameter file that controls the installation steps is CENTRAL.R3S. Contrary to earlier releases there are no separate installation templates for a central instance with or without database. SAP is using a separate template for database installation. To restart the installation later it is however sufficient to restart with the original file.
During and after installation, SAP requires hostname to return the computer name only, not the fully qualified domain name. So either set the hostname accordingly, or set an alias with alias hostname='hostname -s' for both orasid and sidadm (and for root at least during installation steps performed as root). It is also possible to adjust the installed .profile and .login files of both users that are installed during SAP installation.
22.7.8.3 Start R3SETUP 4.6B
Make sure LD_LIBRARY_PATH is set correctly:
# export LD_LIBRARY_PATH=/oracle/IDS/lib:/sapmnt/IDS/exe:/oracle/805_32/lib
Start R3SETUP as root from installation directory:
# cd /oracle/IDS/sapreorg/install # ./R3SETUP -f CENTRDB.R3S
The script then asks some questions (defaults in brackets, followed by actual input):
| Question | Default | Input |
|---|---|---|
| Enter SAP System ID | [C11] | IDSEnter |
| Enter SAP Instance Number | [00] | Enter |
| Enter SAPMOUNT Directory | [/sapmnt] | Enter |
| Enter name of SAP central host | [troubadix.domain.de] | Enter |
| Enter name of SAP db host | [troubadix] | Enter |
| Select character set | [1] (WE8DEC) | Enter |
| Enter Oracle server version (1) Oracle 8.0.5, (2) Oracle 8.0.6, (3) Oracle 8.1.5, (4) Oracle 8.1.6 | 1Enter | |
| Extract Oracle Client archive | [1] (Yes, extract) | Enter |
| Enter path to KERNEL CD | [/sapcd] | /oracle/IDS/sapreorg/KERNEL |
| Enter path to RDBMS CD | [/sapcd] | /oracle/IDS/sapreorg/RDBMS |
| Enter path to EXPORT1 CD | [/sapcd] | /oracle/IDS/sapreorg/EXPORT1 |
| Directory to copy EXPORT1 CD | [/oracle/IDS/sapreorg/CD4_DIR] | Enter |
| Enter path to EXPORT2 CD | [/sapcd] | /oracle/IDS/sapreorg/EXPORT2 |
| Directory to copy EXPORT2 CD | [/oracle/IDS/sapreorg/CD5_DIR] | Enter |
| Enter path to EXPORT3 CD | [/sapcd] | /oracle/IDS/sapreorg/EXPORT3 |
| Directory to copy EXPORT3 CD | [/oracle/IDS/sapreorg/CD6_DIR] | Enter |
| Enter path to EXPORT4 CD | [/sapcd] | /oracle/IDS/sapreorg/EXPORT4 |
| Directory to copy EXPORT4 CD | [/oracle/IDS/sapreorg/CD7_DIR] | Enter |
| Enter path to EXPORT5 CD | [/sapcd] | /oracle/IDS/sapreorg/EXPORT5 |
| Directory to copy EXPORT5 CD | [/oracle/IDS/sapreorg/CD8_DIR] | Enter |
| Enter path to EXPORT6 CD | [/sapcd] | /oracle/IDS/sapreorg/EXPORT6 |
| Directory to copy EXPORT6 CD | [/oracle/IDS/sapreorg/CD9_DIR] | Enter |
| Enter amount of RAM for SAP + DB | 850Enter (in Megabytes) | |
| Service Entry Message Server | [3600] | Enter |
| Enter Group-ID of sapsys | [101] | Enter |
| Enter Group-ID of oper | [102] | Enter |
| Enter Group-ID of dba | [100] | Enter |
| Enter User-ID of sidadm | [1000] | Enter |
| Enter User-ID of orasid | [1002] | Enter |
| Number of parallel procs | [2] | Enter |
If you had not copied the CDs to the different locations, then the SAP installer cannot find the CD needed (identified by the LABEL.ASC file on the CD) and would then ask you to insert and mount the CD and confirm or enter the mount path.
The CENTRDB.R3S might not be error free. In our case, it requested EXPORT4 CD again but indicated the correct key (6_LOCATION, then 7_LOCATION etc.), so one can just continue with entering the correct values.
Apart from some problems mentioned below, everything should go straight through up to the point where the Oracle database software needs to be installed.
22.7.8.4 Start R3SETUP 4.6C SR2
Make sure LD_LIBRARY_PATH is set correctly. This is a different value from the 4.6B installation with Oracle 8.0.5:
# export LD_LIBRARY_PATH=/sapmnt/PRD/exe:/oracle/PRD/817_32/lib
Start R3SETUP as user root from installation directory:
# cd /oracle/PRD/sapreorg/install # ./R3SETUP -f CENTRAL.R3S
The script then asks some questions (defaults in brackets, followed by actual input):
| Question | Default | Input |
|---|---|---|
| Enter SAP System ID | [C11] | PRDEnter |
| Enter SAP Instance Number | [00] | Enter |
| Enter SAPMOUNT Directory | [/sapmnt] | Enter |
| Enter name of SAP central host | [majestix] | Enter |
| Enter Database System ID | [PRD] | PRDEnter |
| Enter name of SAP db host | [majestix] | Enter |
| Select character set | [1] (WE8DEC) | Enter |
| Enter Oracle server version (2) Oracle 8.1.7 | 2Enter | |
| Extract Oracle Client archive | [1] (Yes, extract) | Enter |
| Enter path to KERNEL CD | [/sapcd] | /oracle/PRD/sapreorg/KERNEL |
| Enter amount of RAM for SAP + DB | 2044 | 1800Enter (in Megabytes) |
| Service Entry Message Server | [3600] | Enter |
| Enter Group-ID of sapsys | [100] | Enter |
| Enter Group-ID of oper | [101] | Enter |
| Enter Group-ID of dba | [102] | Enter |
| Enter User-ID of oraprd | [1002] | Enter |
| Enter User-ID of prdadm | [1000] | Enter |
| LDAP support | 3Enter (no support) | |
| Installation step completed | [1] (continue) | Enter |
| Choose installation service | [1] (DB inst,file) | Enter |
So far, creation of users gives an error during installation in phases OSUSERDBSID_IND_ORA (for creating user orasid) and OSUSERSIDADM_IND_ORA (creating user sidadm).
Apart from some problems mentioned below, everything should go straight through up to the point where the Oracle database software needs to be installed.
22.7.9 Installing Oracle 8.0.5
Please see the corresponding SAP Notes and Oracle Readmes regarding Linux and Oracle DB for possible problems. Most if not all problems stem from incompatible libraries.
For more information on installing Oracle, refer to the Installing Oracle chapter.
22.7.9.1 Installing the Oracle 8.0.5 with orainst
If Oracle 8.0.5 is to be used, some additional libraries are needed for successfully relinking, as Oracle 8.0.5 was linked with an old glibc (RedHat 6.0), but RedHat 6.1 already uses a new glibc. So you have to install the following additional packages to ensure that linking will work:
compat-libs-5.2-2.i386.rpm
compat-glibc-5.2-2.0.7.2.i386.rpm
compat-egcs-5.2-1.0.3a.1.i386.rpm
compat-egcs-c++-5.2-1.0.3a.1.i386.rpm
compat-binutils-5.2-2.9.1.0.23.1.i386.rpm
See the corresponding SAP Notes or Oracle Readmes for further information. If this is no option (at the time of installation we did not have enough time to check this), one could use the original binaries, or use the relinked binaries from an original RedHat system.
For compiling the intelligent agent, the RedHat Tcl package must be installed. If you cannot get tcl-8.0.3-20.i386.rpm, a newer one like tcl-8.0.5-30.i386.rpm for RedHat 6.1 should also do.
Apart from relinking, the installation is straightforward:
# su - oraids # export TERM=xterm # export ORACLE_TERM=xterm # export ORACLE_HOME=/oracle/IDS # cd /ORACLE_HOME/orainst_sap # ./orainst
Confirm all screens with Enter until the software is installed, except that one has to deselect the Oracle On-Line Text Viewer, as this is not currently available for Linux. Oracle then wants to relink with i386-glibc20-linux-gcc instead of the available gcc, egcs or i386-redhat-linux-gcc .
Due to time constrains we decided to use the binaries from an Oracle 8.0.5 PreProduction release, after the first attempt at getting the version from the RDBMS CD working, failed, and finding and accessing the correct RPMs was a nightmare at that time.
22.7.9.2 Installing the Oracle 8.0.5 Pre-production Release for Linux (Kernel 2.0.33)
This installation is quite easy. Mount the CD, start the installer. It will then ask for the location of the Oracle home directory, and copy all binaries there. We did not delete the remains of our previous RDBMS installation tries, though.
Afterwards, Oracle Database could be started with no problems.
22.7.10 Installing the Oracle 8.1.7 Linux Tarball
Take the tarball oracle81732.tgz you produced from the installation directory on a Linux system and untar it to /oracle/SID/817_32/.
22.7.11 Continue with SAP R/3 Installation
First check the environment settings of users idsamd (sidadm) and oraids (orasid). They should now both have the files .profile, .login and .cshrc which are all using hostname. In case the system's hostname is the fully qualified name, you need to change hostname to hostname -s within all three files.
22.7.11.1 Database Load
Afterwards, R3SETUP can either be restarted or continued (depending on whether exit was chosen or not). R3SETUP then creates the tablespaces and loads the data (for 46B IDES, from EXPORT1 to EXPORT6, for 46C from DISK1 to DISK4) with R3load into the database.
When the database load is finished (might take a few hours), some passwords are requested. For test installations, one can use the well known default passwords (use different ones if security is an issue!):
| Question | Input |
|---|---|
| Enter Password for sapr3 | sapEnter |
| Confirum Password for sapr3 | sapEnter |
| Enter Password for sys | change_on_installEnter |
| Confirm Password for sys | change_on_installEnter |
| Enter Password for system | managerEnter |
| Confirm Password for system | managerEnter |
At this point We had a few problems with dipgntab during the 4.6B installation.
22.7.11.2 Listener
Start the Oracle Listener as user orasid as follows:
% umask 0; lsnrctl start
Otherwise you might get ORA-12546 as the sockets will not have the correct permissions. See SAP note 072984.
22.7.11.3 Updating MNLS Tables
If you plan to import non-Latin-1 languages into the SAP system, you have to update the Multi National Language Support tables. This is described in the SAP OSS Notes 15023 and 45619. Otherwise, you can skip this question during SAP installation.
Note: If you do not need MNLS, it is still necessary to check the table TCPDB and initializing it if this has not been done. See SAP note 0015023 and 0045619 for further information.
22.7.12 Post-installation Steps
22.7.12.1 Request SAP R/3 License Key
You have to request your SAP R/3 License Key. This is needed, as the temporary license that was installed during installation is only valid for four weeks. First get the hardware key. Log on as user idsadm and call saplicense:
# /sapmnt/IDS/exe/saplicense -get
Calling saplicense without options gives a list of options. Upon receiving the license key, it can be installed using:
# /sapmnt/IDS/exe/saplicense -install
You are then required to enter the following values:
SAP SYSTEM ID = SID, 3 chars CUSTOMER KEY = hardware key, 11 chars INSTALLATION NO = installation, 10 digits EXPIRATION DATE = yyyymmdd, usually "99991231" LICENSE KEY = license key, 24 chars
22.7.12.2 Creating Users
Create a user within client 000 (for some tasks required to be done within client 000, but with a user different from users sap* and ddic). As a user name, I usually choose wartung (or service in English). Profiles required are sap_new and sap_all. For additional safety the passwords of default users within all clients should be changed (this includes users sap* and ddic).
22.7.12.3 Configure Transport System, Profile, Operation Modes, Etc.
Within client 000, user different from ddic and sap*, do at least the following:
| Task | Transaction |
|---|---|
| Configure Transport System, eg as Stand-Alone Transport Domain Entity | STMS |
| Create / Edit Profile for System | RZ10 |
| Maintain Operation Modes and Instances | RZ04 |
These and all the other post-installation steps are thoroughly described in SAP installation guides.
22.7.12.4 Edit initsid.sap (initIDS.sap)
The file /oracle/IDS/dbs/initIDS.sap contains the SAP backup profile. Here the size of the tape to be used, type of compression and so on need to be defined. To get this running with sapdba / brbackup, I changed the following values:
compress = hardware archive_function = copy_delete_save cpio_flags = "-ov --format=newc --block-size=128 --quiet" cpio_in_flags = "-iuv --block-size=128 --quiet" tape_size = 38000M tape_address = /dev/nsa0 tape_address_rew = /dev/sa0
Explanations:
compress The tape I use is a HP DLT1 which does hardware compression.
archive_function This defines the default behavior for saving Oracle archive logs: New logfiles are saved to tape, already saved logfiles are saved again and are then deleted. This prevents lots of trouble if you need to recover the database, and one of the archive-tapes has gone bad.
cpio_flags Default is to use -B which sets block size to 5120 Bytes. For DLT-Tapes, HP recommends at least 32 K block size, so I used --block-size=128 for 64 K. --format=newc is needed I have inode numbers greater than 65535. The last option --quiet is needed as otherwise brbackup complains as soon as cpio outputs the numbers of blocks saved.
cpio_in_flags Flags needed for loading data back from tape. Format is recognized automatically.
tape_size This usually gives the raw storage capability of the tape. For security reason (we use hardware compression), the value is slightly lower than the actual value.
tape_address The non-rewindable device to be used with cpio.
tape_address_rew The rewindable device to be used with cpio.
22.7.12.5 Configuration Issues after Installation
The following SAP parameters should be tuned after installation (examples for IDES 46B, 1 GB memory):
| Name | Value |
|---|---|
| ztta/roll_extension | 250000000 |
| abap/heap_area_dia | 300000000 |
| abap/heap_area_nondia | 400000000 |
| em/initial_size_MB | 256 |
| em/blocksize_kB | 1024 |
| ipc/shm_psize_40 | 70000000 |
SAP Note 0013026:
SAP Note 0157246:
Note: With the above parameters, on a system with 1 gigabyte of memory, one may find memory consumption similar to:
Mem: 547M Active, 305M Inact, 109M Wired, 40M Cache, 112M Buf, 3492K Free
22.7.13 Problems during Installation
22.7.13.1 Restart R3SETUP after Fixing a Problem
R3SETUP stops if it encounters an error. If you have looked at the corresponding logfiles and fixed the error, you have to start R3SETUP again, usually selecting REPEAT as option for the last step R3SETUP complained about.
To restart R3SETUP, just start it with the corresponding R3S-file:
# ./R3SETUP -f CENTRDB.R3Sfor 4.6B, or with
# ./R3SETUP -f CENTRAL.R3Sfor 4.6C, no matter whether the error occurred with CENTRAL.R3S or DATABASE.R3S.
Note: At some stages, R3SETUP assumes that both database- and SAP processes are up and running (as those were steps it already completed). Should errors occur and for example the database could not be started, you have to start both database and SAP by hand after you fixed the errors and before starting R3SETUP again.
Don't forget to also start the oracle listener again (as orasid with umask 0; lsnrctl start) if it was also stopped (for example due to a necessary reboot of the system).
22.7.13.2 OSUSERSIDADM_IND_ORA during R3SETUP
If R3SETUP complains at this stage, edit the template file R3SETUP used at that time (CENTRDB.R3S (4.6B) or either CENTRAL.R3S or DATABASE.R3S (4.6C)). Locate [OSUSERSIDADM_IND_ORA] or search for the only STATUS=ERROR-entry and edit the following values:
HOME=/home/sidadm (was empty)
STATUS=OK (had status ERROR)
Then you can restart R3SETUP again.
22.7.13.3 OSUSERDBSID_IND_ORA during R3SETUP
Possibly R3SETUP also complains at this stage. The error here is similar to the one in phase OSUSERSIDADM_IND_ORA. Just edit the template file R3SETUP used at that time (CENTRDB.R3S (4.6B) or either CENTRAL.R3S or DATABASE.R3S (4.6C)). Locate [OSUSERDBSID_IND_ORA] or search for the only STATUS=ERROR-entry and edit the following value in that section:
STATUS=OK
Then restart R3SETUP.
22.7.13.4 ``oraview.vrf FILE NOT FOUND'' during Oracle Installation
You have not deselected Oracle On-Line Text Viewer before starting the installation. This is marked for installation even though this option is currently not available for Linux. Deselect this product inside the Oracle installation menu and restart installation.
22.7.13.5 ``TEXTENV_INVALID'' during R3SETUP, RFC or SAPGUI Start
If this error is encountered, the correct locale is missing. SAP note 0171356 lists the necessary RPMs that need be installed (eg saplocales-1.0-3, saposcheck-1.0-1 for RedHat 6.1). In case you ignored all the related errors and set the corresponding status from ERROR to OK (in CENTRDB.R3S) every time R3SETUP complained and just restarted R3SETUP, the SAP System will not be properly configured and you will then not be able to connect to the system with a sapgui, even though the system can be started. Trying to connect with the old Linux sapgui gave the following messages:
Sat May 5 14:23:14 2001 *** ERROR => no valid userarea given [trgmsgo. 0401] Sat May 5 14:23:22 2001 *** ERROR => ERROR NR 24 occured [trgmsgi. 0410] *** ERROR => Error when generating text environment. [trgmsgi. 0435] *** ERROR => function failed [trgmsgi. 0447] *** ERROR => no socket operation allowed [trxio.c 3363] Speicherzugriffsfehler
This behavior is due to SAP R/3 being unable to correctly assign a locale and also not being properly configured itself (missing entries in some database tables). To be able to connect to SAP, add the following entries to file DEFAULT.PFL (see note 0043288):
abap/set_etct_env_at_new_mode = 0 install/collate/active = 0 rscp/TCP0B = TCP0B
Restart the SAP system. Now you can connect to the system, even though country-specific language settings might not work as expected. After correcting country-settings (and providing the correct locales), these entries can be removed from DEFAULT.PFL and the SAP system can be restarted.
22.7.13.6 ORA-00001
This error only happened with Oracle 8.1.7 on FreeBSD 4.5. The reason was that the Oracle database could not initialize itself properly and crashed, leaving semaphores and shared memory on the system. The next try to start the database then returned ORA-00001.
Find them with ipcs -a and remove them with ipcrm.
22.7.13.7 ORA-00445 (Background Process PMON Did Not Start)
This error happened with Oracle 8.1.7. This error is reported if the Database is started with the usual startsap-script (for example startsap_majestix_00) as user prdadm.
A possible workaround is to start the database as user oraprd instead with svrmgrl:
% svrmgrl SVRMGR> connect internal; SVRMGR> startup; SVRMGR> exit
22.7.13.8 ORA-12546 (Start Listener with Correct Permissions)
Start the Oracle Listener as user oraids with the following commands:
# umask 0; lsnrctl start
Otherwise you might get ORA-12546 as the sockets will not have the correct permissions. See SAP note 0072984.
22.7.13.9 ORA-27102 (Out of Memory)
This error happened whilst trying to use values for MAXDSIZ and DFLDSIZ greater than 1 GB (1024x1024x1024). Additionally, I got ``Linux Error 12: Cannot allocate memory''.
22.7.13.10 [DIPGNTAB_IND_IND] during R3SETUP
In general, see SAP note 0130581 (R3SETUP step DIPGNTAB terminates). During the IDES-specific installation, for some reasons the installation process was not using the proper SAP system name ``IDS'', but the empty string "" instead. This lead to some minor problems with accessing directories, as the paths are generated dynamically using SID (in this case IDS). So instead of accessing:
/usr/sap/IDS/SYS/... /usr/sap/IDS/DVMGS00
the following paths were used:
/usr/sap//SYS/... /usr/sap/D00
To continue with the installation, I created a link and an additional directory:
# pwd /compat/linux/usr/sap # ls -l total 4 drwxr-xr-x 3 idsadm sapsys 512 May 5 11:20 D00 drwxr-x--x 5 idsadm sapsys 512 May 5 11:35 IDS lrwxr-xr-x 1 root sapsys 7 May 5 11:35 SYS -> IDS/SYS drwxrwxr-x 2 idsadm sapsys 512 May 5 13:00 tmp drwxrwxr-x 11 idsadm sapsys 512 May 4 14:20 trans
I also found SAP notes (0029227 and 0008401) describing this behavior. I did not encounter any of these problems with the SAP 4.6C installation.
22.7.13.11 [RFCRSWBOINI_IND_IND] during R3SETUP
During installation of SAP 4.6C, this error was just the result of another error happening earlier during installation. In this case, you have to look through the corresponding logfiles and correct the real problem.
If after looking through the logfiles this error is indeed the correct one (check the SAP notes), you can set STATUS of the offending step from ERROR to OK (file CENTRDB.R3S) and restart R3SETUP. After installation, you have to execute the report RSWBOINS from transaction SE38. See SAP note 0162266 for additional information about phase RFCRSWBOINI and RFCRADDBDIF.
22.7.13.12 [RFCRADDBDIF_IND_IND] during R3SETUP
Here the same restrictions apply: Make sure by looking through the logfiles, that this error is not caused by some previous problems.
If you can confirm that SAP Note 0162266 applies, just set STATUS of the offending step from ERROR to OK (file CENTRDB.R3S) and restart R3SETUP. After installation, you have to execute the report RADDBDIF from transaction SE38.
22.7.13.13 sigaction sig31: File size limit exceeded
This error occurred during start of SAP processes disp+work. If starting SAP with the startsap-script, subprocesses are then started which detach and do the dirty work of starting all other SAP processes. As a result, the script itself won't notice if something goes wrong.
To check whether the SAP processes did start properly, have a look at the process status with ps ax | grep SID, which will give you a list of all Oracle and SAP processes. If it looks like some processes are missing or if you can't connect to the SAP System, look at the corresponding logfiles which can be found at /usr/sap/SID/DVEBMGSnr/work/. The files to look at are dev_ms and dev_disp.
Signal 31 happens here if the amount of shared memory used by Oracle and SAP exceed the one defined within the kernel configuration file and could be resolved by using a larger value:
# larger value for 46C production systems: options SHMMAXPGS=393216 # smaller value sufficient for 46B: #options SHMMAXPGS=262144
22.7.13.14 Start of saposcol Failed
There are some problems with Program saposcol (version 4.6D). The SAP System is using saposcol to collect data about the system performance. This program is not needed to use the SAP System, so this problem can be considered a minor one. The older versions (4.6B) does work, but doesn't collect all the data (many calls will just return 0, for example for CPU usage).
22.8 Advanced Topics
If you are curious as to how the Linux binary compatibility works, this is the section you want to read. Most of what follows is based heavily on an email written to FreeBSD chat mailing list by Terry Lambert <[email protected]> (Message ID: <[email protected]>).
22.8.1 How Does It Work?
FreeBSD has an abstraction called an ``execution class loader''. This is a wedge into the execve(2) system call.
What happens is that FreeBSD has a list of loaders, instead of a single loader with a fallback to the #! loader for running any shell interpreters or shell scripts.
Historically, the only loader on the UNIX platform examined the magic number (generally the first 4 or 8 bytes of the file) to see if it was a binary known to the system, and if so, invoked the binary loader.
If it was not the binary type for the system, the execve(2) call returned a failure, and the shell attempted to start executing it as shell commands.
The assumption was a default of ``whatever the current shell is''.
Later, a hack was made for sh(1) to examine the first two characters, and if they were :\n, then it invoked the csh(1) shell instead (we believe SCO first made this hack).
What FreeBSD does now is go through a list of loaders, with a generic #! loader that knows about interpreters as the characters which follow to the next whitespace next to last, followed by a fallback to /bin/sh.
For the Linux ABI support, FreeBSD sees the magic number as an ELF binary (it makes no distinction between FreeBSD, Solaris, Linux, or any other OS which has an ELF image type, at this point).
The ELF loader looks for a specialized brand, which is a comment section in the ELF image, and which is not present on SVR4/Solaris ELF binaries.
For Linux binaries to function, they must be branded as type Linux; from brandelf(1):
# brandelf -t Linux file
When this is done, the ELF loader will see the Linux brand on the file.
When the ELF loader sees the Linux brand, the loader replaces a pointer in the proc structure. All system calls are indexed through this pointer (in a traditional UNIX system, this would be the sysent[] structure array, containing the system calls). In addition, the process is flagged for special handling of the trap vector for the signal trampoline code, and several other (minor) fix-ups that are handled by the Linux kernel module.
The Linux system call vector contains, among other things, a list of sysent[] entries whose addresses reside in the kernel module.
When a system call is called by the Linux binary, the trap code dereferences the system call function pointer off the proc structure, and gets the Linux, not the FreeBSD, system call entry points.
In addition, the Linux mode dynamically reroots lookups; this is, in effect, what the union option to FS mounts (not the unionfs!) does. First, an attempt is made to lookup the file in the /compat/linux/original-path directory, then only if that fails, the lookup is done in the /original-path directory. This makes sure that binaries that require other binaries can run (e.g., the Linux toolchain can all run under Linux ABI support). It also means that the Linux binaries can load and exec FreeBSD binaries, if there are no corresponding Linux binaries present, and that you could place a uname(1) command in the /compat/linux directory tree to ensure that the Linux binaries could not tell they were not running on Linux.
In effect, there is a Linux kernel in the FreeBSD kernel; the various underlying functions that implement all of the services provided by the kernel are identical to both the FreeBSD system call table entries, and the Linux system call table entries: file system operations, virtual memory operations, signal delivery, System V IPC, etc... The only difference is that FreeBSD binaries get the FreeBSD glue functions, and Linux binaries get the Linux glue functions (most older OS's only had their own glue functions: addresses of functions in a static global sysent[] structure array, instead of addresses of functions dereferenced off a dynamically initialized pointer in the proc structure of the process making the call).
Which one is the native FreeBSD ABI? It does not matter. Basically the only difference is that (currently; this could easily be changed in a future release, and probably will be after this) the FreeBSD glue functions are statically linked into the kernel, and the Linux glue functions can be statically linked, or they can be accessed via a kernel module.
Yeah, but is this really emulation? No. It is an ABI implementation, not an emulation. There is no emulator (or simulator, to cut off the next question) involved.
So why is it sometimes called ``Linux emulation''? To make it hard to sell FreeBSD! Really, it is because the historical implementation was done at a time when there was really no word other than that to describe what was going on; saying that FreeBSD ran Linux binaries was not true, if you did not compile the code in or load a module, and there needed to be a word to describe what was being loaded--hence ``the Linux emulator''.
III. Appendices
- Table of Contents
- A. Obtaining FreeBSD
- B. Bibliography
- C. Resources on the Internet
- D. PGP Keys
Appendix A. Obtaining FreeBSD
A.1 CDROM and DVD Publishers
A.1.1 Retail Boxed Products
FreeBSD is available as a boxed product (FreeBSD CDs, additional software, and printed documentation) from several retailers:
-
CompUSA
WWW: http://www.compusa.com/
-
Frys Electronics
WWW: http://www.frys.com/
A.1.2 CD and DVD Sets
FreeBSD CD and DVD sets are available from many online retailers:
-
Daemon News Mall
560 South State Street, Suite A2
Orem, UT 84058
USA
Phone: +1 800 407-5170
Fax: +1 1 801 765-0877
Email: <[email protected]>
WWW: http://www.bsdmall.com/freebsd1.html
-
FreeBSD Mall, Inc.
3623 Sanford Street
Concord, CA 94520-1405
USA
Phone: +1 925 674-0783
Fax: +1 925 674-0821
Email: <[email protected]>
WWW: http://www.freebsdmall.com/
-
FreeBSD Services Ltd
11 Lapwing Close
Bicester
OX26 6XR
United Kingdom
WWW: http://www.freebsd-services.com/
-
Hinner EDV
St. Augustinus-Str. 10
D-81825 München
Germany
Phone: (089) 428 419
WWW: http://www.hinner.de/linux/freebsd.html
-
Ikarios
22-24 rue Voltaire
92000 Nanterre
France
WWW: http://ikarios.com/form/#freebsd
-
Ingram Micro
1600 E. St. Andrew Place
Santa Ana, CA 92705-4926
USA
Phone: 1 (800) 456-8000
WWW: http://www.ingrammicro.com/
-
JMC Software
Ireland
Phone: 353 1 6291282
WWW: http://www.thelinuxmall.com
-
The Linux Emporium
Hilliard House, Lester Way
Wallingford
OX10 9TA
United Kingdom
Phone: +44 1491 837010
Fax: +44 1491 837016
WWW: http://www.linuxemporium.co.uk/bsd.html#FreeBSD
-
Linux System Labs Australia
21 Ray Drive
Balwyn North
VIC - 3104
Australia
Phone: +61 3 9857 5918
Fax: +61 3 9857 8974
WWW: http://www.lsl.com.au
-
UNIXDVD.COM LTD
57 Primrose Avenue
Sheffield
S5 6FS
United Kingdom
WWW: http://www.unixdvd.com/
A.1.3 Distributors
If you are a reseller and want to carry FreeBSD CDROM products, please contact a distributor:
-
Cylogistics
2672 Bayshore Parkway, Suite 610
Mountain View, CA 94043
USA
Phone: +1 650 694-4949
Fax: +1 650 694-4953
Email: <[email protected]>
WWW: http://www.cylogistics.com/
-
FreeBSD Services Ltd
11 Lapwing Close
Bicester
OX26 6XR
United Kingdom
WWW: http://www.freebsd-services.com/
-
Kudzu, LLC
7375 Washington Ave. S.
Edina, MN 55439
USA
Phone: +1 952 947-0822
Fax: +1 952 947-0876
Email: <[email protected]>
-
Navarre Corp
7400 49th Ave South
New Hope, MN 55428
USA
Phone: +1 763 535-8333
Fax: +1 763 535-0341
WWW: http://www.navarre.com/
A.2 FTP Sites
The official sources for FreeBSD are available via anonymous FTP from a worldwide set of mirror sites. The site ftp://ftp.FreeBSD.org/pub/FreeBSD/ is well connected and allows a large number of connections to it, but you are probably better off finding a ``closer'' mirror site (especially if you decide to set up some sort of mirror site).
The FreeBSD mirror sites database is more accurate than the mirror listing in the Handbook, as it gets its information from the DNS rather than relying on static lists of hosts.
Additionally, FreeBSD is available via anonymous FTP from the following mirror sites. If you choose to obtain FreeBSD via anonymous FTP, please try to use a site near you. The mirror sites listed as ``Primary Mirror Sites'' typically have the entire FreeBSD archive (all the currently available versions for each of the architectures) but you will probably have faster download times from a site that is in your country. The sites in each country carry the most recent versions for the most popular architecture(s) but might not carry the entire FreeBSD archive. All sites provide access via anonymous FTP but some sites also provide access via other methods. The access methods available for each site are provided for the sites in each country.
Primary Mirror Sites Argentina, Australia, Austria, Brazil, Bulgaria, Canada, China, Croatia, Czech Republic, Denmark, Estonia, Finland, France, Germany, Greece, Hong Kong, Hungary, Iceland, Ireland, Italy, Japan, Korea, Lithuania, Netherlands, Norway, Poland, Portugal, Romania, Russia, Saudi Arabia, Singapore, Slovak Republic, Slovenia, South Africa, Spain, Sweden, Switzerland, Taiwan, Ukraine, United Kingdom, USA.
- Primary Mirror Sites
-
In case of problems, please contact the hostmaster <[email protected]> for this domain.
- Argentina
-
In case of problems, please contact the hostmaster <[email protected]> for this domain.
- Australia
-
In case of problems, please contact the hostmaster <[email protected]> for this domain.
- Austria
-
In case of problems, please contact the hostmaster <[email protected]> for this domain.
-
ftp://ftp.at.FreeBSD.org/pub/FreeBSD/ (ftp/cvsup/http)
-
ftp://ftp2.at.FreeBSD.org/pub/FreeBSD/ (ftp/rsync/cvsup/http)
-
- Brazil
-
In case of problems, please contact the hostmaster <[email protected]> for this domain.
-
ftp://ftp.br.FreeBSD.org/pub/FreeBSD/ (ftp/http)
-
ftp://ftp3.br.FreeBSD.org/pub/FreeBSD/ (ftp/rsync/http)
-
- Bulgaria
-
In case of problems, please contact the hostmaster <[email protected]> for this domain.
- Canada
-
In case of problems, please contact the hostmaster <[email protected]> for this domain.
- China
-
In case of problems, please contact the hostmaster <[email protected]> for this domain.
- Croatia
-
In case of problems, please contact the hostmaster <[email protected]> for this domain.
- Czech Republic
-
In case of problems, please contact the hostmaster <[email protected]> for this domain.
-
ftp://ftp.cz.FreeBSD.org/pub/FreeBSD/ (ftp/rsync/http)
-
- Denmark
-
In case of problems, please contact the hostmaster <[email protected]> for this domain.
- Estonia
-
In case of problems, please contact the hostmaster <[email protected]> for this domain.
- Finland
-
In case of problems, please contact the hostmaster <[email protected]> for this domain.
- France
-
In case of problems, please contact the hostmaster <[email protected]> for this domain.
- Germany
-
In case of problems, please contact the mirror admins <[email protected] > for this domain.
-
ftp://ftp2.de.FreeBSD.org/pub/FreeBSD/ (ftp/rsync/http)
-
ftp://ftp4.de.FreeBSD.org/pub/FreeBSD/ (ftp/rsync/http)
-
ftp://ftp7.de.FreeBSD.org/pub/FreeBSD/ (ftp/http)
- Greece
-
In case of problems, please contact the hostmaster <[email protected]> for this domain.
- Hong Kong
- Hungary
-
In case of problems, please contact the hostmaster <[email protected]> for this domain.
-
ftp://ftp.hu.FreeBSD.org/pub/FreeBSD/ (ftp/rsync/http)
-
- Iceland
-
In case of problems, please contact the hostmaster <[email protected]> for this domain.
-
ftp://ftp.is.FreeBSD.org/pub/FreeBSD/ (ftp/rsync/cvsup/http)
-
- Ireland
-
In case of problems, please contact the hostmaster <[email protected]> for this domain.
-
ftp://ftp2.ie.FreeBSD.org/pub/FreeBSD/ (ftp/rsync/http)
-
ftp://ftp3.ie.FreeBSD.org/pub/FreeBSD/ (ftp/rsync/http)
- Italy
-
In case of problems, please contact the hostmaster <[email protected]> for this domain.
- Japan
-
In case of problems, please contact the hostmaster <[email protected]> for this domain.
- Korea
-
In case of problems, please contact the hostmaster <[email protected]> for this domain.
-
ftp://ftp.kr.FreeBSD.org/pub/FreeBSD/ (ftp/rsync)
-
- Lithuania
-
In case of problems, please contact the hostmaster <[email protected]> for this domain.
- Netherlands
-
In case of problems, please contact the hostmaster <[email protected]> for this domain.
-
ftp://ftp2.nl.FreeBSD.org/pub/FreeBSD/ (ftp/cvsup/http)
- Norway
-
In case of problems, please contact the hostmaster <[email protected]> for this domain.
-
ftp://ftp.no.FreeBSD.org/pub/FreeBSD/ (ftp/rsync)
-
- Poland
-
In case of problems, please contact the hostmaster <[email protected]> for this domain.
- Portugal
-
In case of problems, please contact the hostmaster <[email protected]> for this domain.
- Romania
-
In case of problems, please contact the hostmaster <[email protected]> for this domain.
- Russia
-
In case of problems, please contact the hostmaster <[email protected]> for this domain.
- Saudi Arabia
-
In case of problems, please contact <[email protected]>
- Singapore
-
In case of problems, please contact the hostmaster <[email protected]> for this domain.
-
ftp://ftp.sg.FreeBSD.org/pub/FreeBSD/ (ftp/rsync/http)
-
- Slovak Republic
-
In case of problems, please contact the hostmaster <[email protected]> for this domain.
- Slovenia
-
In case of problems, please contact the hostmaster <[email protected]> for this domain.
- South Africa
-
In case of problems, please contact the hostmaster <[email protected]> for this domain.
- Spain
-
In case of problems, please contact the hostmaster <[email protected]> for this domain.
- Sweden
-
In case of problems, please contact the hostmaster <[email protected]> for this domain.
-
ftp://ftp5.se.FreeBSD.org/pub/FreeBSD/ (ftp/rsync/cvsup/http)
- Switzerland
-
In case of problems, please contact the hostmaster <[email protected]> for this domain.
- Taiwan
-
In case of problems, please contact the hostmaster <[email protected]> for this domain.
-
ftp://ftp2.tw.FreeBSD.org/pub/FreeBSD/ (ftp/rsync/http)
-
ftp://ftp6.tw.FreeBSD.org/pub/FreeBSD/ (ftp/rsync/http)
-
ftp://ftp11.tw.FreeBSD.org/pub/FreeBSD/ (ftp/http)
- Ukraine
- United Kingdom
-
In case of problems, please contact the hostmaster <[email protected]> for this domain.
- USA
-
In case of problems, please contact the hostmaster <[email protected]> for this domain.
-
ftp://ftp1.us.FreeBSD.org/pub/FreeBSD/ (ftp/rsync/http)
-
ftp://ftp3.us.FreeBSD.org/pub/FreeBSD/ (ftp/rsync/cvsup/http)
-
ftp://ftp5.us.FreeBSD.org/pub/FreeBSD/ (ftp/rsync)
-
ftp://ftp6.us.FreeBSD.org/pub/FreeBSD/ (ftp/http)
-
ftp://ftp7.us.FreeBSD.org/pub/FreeBSD/ (ftp/rsync/http)
-
ftp://ftp9.us.FreeBSD.org/pub/FreeBSD/ (ftp/http)
-
ftp://ftp10.us.FreeBSD.org/pub/FreeBSD/ (ftp/cvsup)
-
ftp://ftp12.us.FreeBSD.org/pub/FreeBSD/ (ftp/rsync)
-
ftp://ftp13.us.FreeBSD.org/pub/FreeBSD/ (ftp/rsync/http)
-
A.3 Anonymous CVS
A.3.1 Introduction
Anonymous CVS (or, as it is otherwise known, anoncvs) is a feature provided by the CVS utilities bundled with FreeBSD for synchronizing with a remote CVS repository. Among other things, it allows users of FreeBSD to perform, with no special privileges, read-only CVS operations against one of the FreeBSD project's official anoncvs servers. To use it, one simply sets the CVSROOT environment variable to point at the appropriate anoncvs server, provides the well-known password ``anoncvs'' with the cvs login command, and then uses the cvs(1) command to access it like any local repository.
Note: The cvs login command, stores the passwords that are used for authenticating to the CVS server in a file called .cvspass in your HOME directory. If this file does not exist, you might get an error when trying to use cvs login for the first time. Just make an empty .cvspass file, and retry to login.
While it can also be said that the CVSup and anoncvs services both perform essentially the same function, there are various trade-offs which can influence the user's choice of synchronization methods. In a nutshell, CVSup is much more efficient in its usage of network resources and is by far the most technically sophisticated of the two, but at a price. To use CVSup, a special client must first be installed and configured before any bits can be grabbed, and then only in the fairly large chunks which CVSup calls collections.
Anoncvs, by contrast, can be used to examine anything from an individual file to a specific program (like ls or grep) by referencing the CVS module name. Of course, anoncvs is also only good for read-only operations on the CVS repository, so if it is your intention to support local development in one repository shared with the FreeBSD project bits then CVSup is really your only option.
A.3.2 Using Anonymous CVS
Configuring cvs(1) to use an Anonymous CVS repository is a simple matter of setting the CVSROOT environment variable to point to one of the FreeBSD project's anoncvs servers. At the time of this writing, the following servers are available:
-
USA: :pserver:[email protected]:/home/ncvs (Use cvs login and enter the password ``anoncvs'' when prompted.)
-
Germany: :pserver:[email protected]:/home/ncvs (Use cvs login and enter the password ``anoncvs'' when prompted.)
-
Germany: :pserver:[email protected]:/home/ncvs (rsh, pserver, ssh, ssh/2022)
-
Japan: :pserver:[email protected]:/home/ncvs (Use cvs login and enter the password ``anoncvs'' when prompted.)
-
Austria: :pserver:[email protected]:/home/ncvs (Use cvs login and enter any password when prompted.)
Since CVS allows one to ``check out'' virtually any version of the FreeBSD sources that ever existed (or, in some cases, will exist), you need to be familiar with the revision (-r) flag to cvs(1) and what some of the permissible values for it in the FreeBSD Project repository are.
There are two kinds of tags, revision tags and branch tags. A revision tag refers to a specific revision. Its meaning stays the same from day to day. A branch tag, on the other hand, refers to the latest revision on a given line of development, at any given time. Because a branch tag does not refer to a specific revision, it may mean something different tomorrow than it means today.
Section A.6 contains revision tags that users might be interested in. Again, none of these are valid for the ports collection since the ports collection does not have multiple revisions.
When you specify a branch tag, you normally receive the latest versions of the files on that line of development. If you wish to receive some past version, you can do so by specifying a date with the -D date flag. See the cvs(1) manual page for more details.
A.3.3 Examples
While it really is recommended that you read the manual page for cvs(1) thoroughly before doing anything, here are some quick examples which essentially show how to use Anonymous CVS:
Example A-1. Checking Out Something from -CURRENT (ls(1)) and Deleting It Again:
% setenv CVSROOT :pserver:[email protected]:/home/ncvs % cvs login At the prompt, enter the password ``anoncvs''. % cvs co ls % cvs release -d ls % cvs logout
Example A-2. Checking Out the Version of ls(1) in the 3.X-STABLE Branch:
% setenv CVSROOT :pserver:[email protected]:/home/ncvs % cvs login At the prompt, enter the password ``anoncvs''. % cvs co -rRELENG_3 ls % cvs release -d ls % cvs logout
Example A-3. Creating a List of Changes (as Unified Diffs) to ls(1)
% setenv CVSROOT :pserver:[email protected]:/home/ncvs % cvs login At the prompt, enter the password ``anoncvs''. % cvs rdiff -u -rRELENG_3_0_0_RELEASE -rRELENG_3_4_0_RELEASE ls % cvs logout
Example A-4. Finding Out What Other Module Names Can Be Used:
% setenv CVSROOT :pserver:[email protected]:/home/ncvs % cvs login At the prompt, enter the password ``anoncvs''. % cvs co modules % more modules/modules % cvs release -d modules % cvs logout
A.3.4 Other Resources
The following additional resources may be helpful in learning CVS:
-
CVS Tutorial from Cal Poly.
-
CVS Home, the CVS development and support community.
-
CVSweb is the FreeBSD Project web interface for CVS.
A.4 Using CTM
CTM is a method for keeping a remote directory tree in sync with a central one. It has been developed for usage with FreeBSD's source trees, though other people may find it useful for other purposes as time goes by. Little, if any, documentation currently exists at this time on the process of creating deltas, so talk to Poul-Henning Kamp <[email protected]> for more information should you wish to use CTM for other things.
A.4.1 Why Should I Use CTM?
CTM will give you a local copy of the FreeBSD source trees. There are a number of ``flavors'' of the tree available. Whether you wish to track the entire CVS tree or just one of the branches, CTM can provide you the information. If you are an active developer on FreeBSD, but have lousy or non-existent TCP/IP connectivity, or simply wish to have the changes automatically sent to you, CTM was made for you. You will need to obtain up to three deltas per day for the most active branches. However, you should consider having them sent by automatic email. The sizes of the updates are always kept as small as possible. This is typically less than 5K, with an occasional (one in ten) being 10-50K and every now and then a large 100K+ or more coming around.
You will also need to make yourself aware of the various caveats related to working directly from the development sources rather than a pre-packaged release. This is particularly true if you choose the ``current'' sources. It is recommended that you read Staying current with FreeBSD.
A.4.2 What Do I Need to Use CTM?
You will need two things: The CTM program, and the initial deltas to feed it (to get up to ``current'' levels).
The CTM program has been part of FreeBSD ever since version 2.0 was released, and lives in /usr/src/usr.sbin/ctm if you have a copy of the source available.
If you are running a pre-2.0 version of FreeBSD, you can fetch the current CTM sources directly from:
http://www.freebsd.org/cgi/cvsweb.cgi/src/usr.sbin/ctm/
The ``deltas'' you feed CTM can be had two ways, FTP or email. If you have general FTP access to the Internet then the following FTP sites support access to CTM:
ftp://ftp.FreeBSD.org/pub/FreeBSD/CTM/
or see section mirrors.
FTP the relevant directory and fetch the README file, starting from there.
If you wish to get your deltas via email:
Subscribe to one of the CTM distribution lists. ctm-cvs-cur supports the entire CVS tree. ctm-src-cur supports the head of the development branch. ctm-src-4 supports the 4.X release branch, etc.. (If you do not know how to subscribe yourself to a list, click on the list name above or go to http://lists.FreeBSD.org/mailman/listinfo and click on the list that you wish to subscribe to. The list page should contain all of the necessary subscription instructions.)
When you begin receiving your CTM updates in the mail, you may use the ctm_rmail program to unpack and apply them. You can actually use the ctm_rmail program directly from a entry in /etc/aliases if you want to have the process run in a fully automated fashion. Check the ctm_rmail manual page for more details.
Note: No matter what method you use to get the CTM deltas, you should subscribe to the ctm-announce mailing list. In the future, this will be the only place where announcements concerning the operations of the CTM system will be posted. Click on the list name above and follow the instructions to subscribe to the list.
A.4.3 Using CTM for the First Time
Before you can start using CTM deltas, you will need to get to a starting point for the deltas produced subsequently to it.
First you should determine what you already have. Everyone can start from an ``empty'' directory. You must use an initial ``Empty'' delta to start off your CTM supported tree. At some point it is intended that one of these ``started'' deltas be distributed on the CD for your convenience, however, this does not currently happen.
Since the trees are many tens of megabytes, you should prefer to start from something already at hand. If you have a -RELEASE CD, you can copy or extract an initial source from it. This will save a significant transfer of data.
You can recognize these ``starter'' deltas by the X appended to the number (src-cur.3210XEmpty.gz for instance). The designation following the X corresponds to the origin of your initial ``seed''. Empty is an empty directory. As a rule a base transition from Empty is produced every 100 deltas. By the way, they are large! 70 to 80 Megabytes of gzip'd data is common for the XEmpty deltas.
Once you have picked a base delta to start from, you will also need all deltas with higher numbers following it.
A.4.4 Using CTM in Your Daily Life
To apply the deltas, simply say:
# cd /where/ever/you/want/the/stuff # ctm -v -v /where/you/store/your/deltas/src-xxx.*
CTM understands deltas which have been put through gzip, so you do not need to gunzip them first, this saves disk space.
Unless it feels very secure about the entire process, CTM will not touch your tree. To verify a delta you can also use the -c flag and CTM will not actually touch your tree; it will merely verify the integrity of the delta and see if it would apply cleanly to your current tree.
There are other options to CTM as well, see the manual pages or look in the sources for more information.
That is really all there is to it. Every time you get a new delta, just run it through CTM to keep your sources up to date.
Do not remove the deltas if they are hard to download again. You just might want to keep them around in case something bad happens. Even if you only have floppy disks, consider using fdwrite to make a copy.
A.4.5 Keeping Your Local Changes
As a developer one would like to experiment with and change files in the source tree. CTM supports local modifications in a limited way: before checking for the presence of a file foo, it first looks for foo.ctm. If this file exists, CTM will operate on it instead of foo.
This behavior gives us a simple way to maintain local changes: simply copy the files you plan to modify to the corresponding file names with a .ctm suffix. Then you can freely hack the code, while CTM keeps the .ctm file up-to-date.
A.4.6 Other Interesting CTM Options
A.4.6.1 Finding Out Exactly What Would Be Touched by an Update
You can determine the list of changes that CTM will make on your source repository using the -l option to CTM.
This is useful if you would like to keep logs of the changes, pre- or post- process the modified files in any manner, or just are feeling a tad paranoid.
A.4.6.2 Making Backups Before Updating
Sometimes you may want to backup all the files that would be changed by a CTM update.
Specifying the -B backup-file option causes CTM to backup all files that would be touched by a given CTM delta to backup-file.
A.4.6.3 Restricting the Files Touched by an Update
Sometimes you would be interested in restricting the scope of a given CTM update, or may be interested in extracting just a few files from a sequence of deltas.
You can control the list of files that CTM would operate on by specifying filtering regular expressions using the -e and -x options.
For example, to extract an up-to-date copy of lib/libc/Makefile from your collection of saved CTM deltas, run the commands:
# cd /where/ever/you/want/to/extract/it/ # ctm -e '^lib/libc/Makefile' ~ctm/src-xxx.*
For every file specified in a CTM delta, the -e and -x options are applied in the order given on the command line. The file is processed by CTM only if it is marked as eligible after all the -e and -x options are applied to it.
A.4.7 Future Plans for CTM
Tons of them:
-
Use some kind of authentication into the CTM system, so as to allow detection of spoofed CTM updates.
-
Clean up the options to CTM, they became confusing and counter intuitive.
A.4.8 Miscellaneous Stuff
There is a sequence of deltas for the ports collection too, but interest has not been all that high yet.
A.4.9 CTM Mirrors
CTM/FreeBSD is available via anonymous FTP from the following mirror sites. If you choose to obtain CTM via anonymous FTP, please try to use a site near you.
In case of problems, please contact Poul-Henning Kamp <[email protected]>.
- California, Bay Area, official source
- South Africa, backup server for old deltas
- Taiwan/R.O.C.
If you did not find a mirror near to you or the mirror is incomplete, try to use a search engine such as alltheweb.
A.5 Using CVSup
A.5.1 Introduction
CVSup is a software package for distributing and updating source trees from a master CVS repository on a remote server host. The FreeBSD sources are maintained in a CVS repository on a central development machine in California. With CVSup, FreeBSD users can easily keep their own source trees up to date.
CVSup uses the so-called pull model of updating. Under the pull model, each client asks the server for updates, if and when they are wanted. The server waits passively for update requests from its clients. Thus all updates are instigated by the client. The server never sends unsolicited updates. Users must either run the CVSup client manually to get an update, or they must set up a cron job to run it automatically on a regular basis.
The term CVSup, capitalized just so, refers to the entire software package. Its main components are the client cvsup which runs on each user's machine, and the server cvsupd which runs at each of the FreeBSD mirror sites.
As you read the FreeBSD documentation and mailing lists, you may see references to sup. Sup was the predecessor of CVSup, and it served a similar purpose. CVSup is used much in the same way as sup and, in fact, uses configuration files which are backward-compatible with sup's. Sup is no longer used in the FreeBSD project, because CVSup is both faster and more flexible.
A.5.2 Installation
The easiest way to install CVSup is to use the precompiled net/cvsup package from the FreeBSD packages collection. If you prefer to build CVSup from source, you can use the net/cvsup port instead. But be forewarned: the net/cvsup port depends on the Modula-3 system, which takes a substantial amount of time and disk space to download and build.
Note: If you are going to be using CVSup on a machine which will not have XFree86 installed, such as a server, be sure to use the port which does not include the CVSup GUI, net/cvsup-without-gui.
If you do not know anything about CVSup at all and want a single package which will install it, set up the configuration file and start the transfer via a pointy-clicky type of interface, then get the net/cvsupit package. Just hand it to pkg_add(1) and it will lead you through the configuration process in a menu-oriented fashion.
A.5.3 CVSup Configuration
CVSup's operation is controlled by a configuration file called the supfile. There are some sample supfiles in the directory /usr/share/examples/cvsup/.
The information in a supfile answers the following questions for CVSup:
In the following sections, we will construct a typical supfile by answering each of these questions in turn. First, we describe the overall structure of a supfile.
A supfile is a text file. Comments begin with # and extend to the end of the line. Lines that are blank and lines that contain only comments are ignored.
Each remaining line describes a set of files that the user wishes to receive. The line begins with the name of a ``collection'', a logical grouping of files defined by the server. The name of the collection tells the server which files you want. After the collection name come zero or more fields, separated by white space. These fields answer the questions listed above. There are two types of fields: flag fields and value fields. A flag field consists of a keyword standing alone, e.g., delete or compress. A value field also begins with a keyword, but the keyword is followed without intervening white space by = and a second word. For example, release=cvs is a value field.
A supfile typically specifies more than one collection to receive. One way to structure a supfile is to specify all of the relevant fields explicitly for each collection. However, that tends to make the supfile lines quite long, and it is inconvenient because most fields are the same for all of the collections in a supfile. CVSup provides a defaulting mechanism to avoid these problems. Lines beginning with the special pseudo-collection name *default can be used to set flags and values which will be used as defaults for the subsequent collections in the supfile. A default value can be overridden for an individual collection, by specifying a different value with the collection itself. Defaults can also be changed or augmented in mid-supfile by additional *default lines.
With this background, we will now proceed to construct a supfile for receiving and updating the main source tree of FreeBSD-CURRENT.
-
Which files do you want to receive?
The files available via CVSup are organized into named groups called ``collections''. The collections that are available are described in the following section. In this example, we wish to receive the entire main source tree for the FreeBSD system. There is a single large collection src-all which will give us all of that. As a first step toward constructing our supfile, we simply list the collections, one per line (in this case, only one line):
src-all
-
Which version(s) of them do you want?
With CVSup, you can receive virtually any version of the sources that ever existed. That is possible because the cvsupd server works directly from the CVS repository, which contains all of the versions. You specify which one of them you want using the tag= and date= value fields.
Warning: Be very careful to specify any tag= fields correctly. Some tags are valid only for certain collections of files. If you specify an incorrect or misspelled tag, CVSup will delete files which you probably do not want deleted. In particular, use only tag=. for the ports-* collections.
The tag= field names a symbolic tag in the repository. There are two kinds of tags, revision tags and branch tags. A revision tag refers to a specific revision. Its meaning stays the same from day to day. A branch tag, on the other hand, refers to the latest revision on a given line of development, at any given time. Because a branch tag does not refer to a specific revision, it may mean something different tomorrow than it means today.
Section A.6 contains branch tags that users might be interested in. When specifying a tag in CVSup's configuration file, it must be preceded with tag= (RELENG_4 will become tag=RELENG_4). Keep in mind that only the tag=. is relevant for the ports collection.
Warning: Be very careful to type the tag name exactly as shown. CVSup cannot distinguish between valid and invalid tags. If you misspell the tag, CVSup will behave as though you had specified a valid tag which happens to refer to no files at all. It will delete your existing sources in that case.
When you specify a branch tag, you normally receive the latest versions of the files on that line of development. If you wish to receive some past version, you can do so by specifying a date with the date= value field. The cvsup(1) manual page explains how to do that.
For our example, we wish to receive FreeBSD-CURRENT. We add this line at the beginning of our supfile:
*default tag=.
There is an important special case that comes into play if you specify neither a tag= field nor a date= field. In that case, you receive the actual RCS files directly from the server's CVS repository, rather than receiving a particular version. Developers generally prefer this mode of operation. By maintaining a copy of the repository itself on their systems, they gain the ability to browse the revision histories and examine past versions of files. This gain is achieved at a large cost in terms of disk space, however.
-
Where do you want to get them from?
We use the host= field to tell cvsup where to obtain its updates. Any of the CVSup mirror sites will do, though you should try to select one that is close to you in cyberspace. In this example we will use a fictional FreeBSD distribution site, cvsup666.FreeBSD.org:
*default host=cvsup666.FreeBSD.org
You will need to change the host to one that actually exists before running CVSup. On any particular run of cvsup, you can override the host setting on the command line, with -h hostname.
-
Where do you want to put them on your own machine?
The prefix= field tells cvsup where to put the files it receives. In this example, we will put the source files directly into our main source tree, /usr/src. The src directory is already implicit in the collections we have chosen to receive, so this is the correct specification:
*default prefix=/usr
-
Where should cvsup maintain its status files?
The CVSup client maintains certain status files in what is called the ``base'' directory. These files help CVSup to work more efficiently, by keeping track of which updates you have already received. We will use the standard base directory, /usr/local/etc/cvsup:
*default base=/usr/local/etc/cvsup
This setting is used by default if it is not specified in the supfile, so we actually do not need the above line.
If your base directory does not already exist, now would be a good time to create it. The cvsup client will refuse to run if the base directory does not exist.
-
Miscellaneous supfile settings:
There is one more line of boiler plate that normally needs to be present in the supfile:
*default release=cvs delete use-rel-suffix compress
release=cvs indicates that the server should get its information out of the main FreeBSD CVS repository. This is virtually always the case, but there are other possibilities which are beyond the scope of this discussion.
delete gives CVSup permission to delete files. You should always specify this, so that CVSup can keep your source tree fully up-to-date. CVSup is careful to delete only those files for which it is responsible. Any extra files you happen to have will be left strictly alone.
use-rel-suffix is ... arcane. If you really want to know about it, see the cvsup(1) manual page. Otherwise, just specify it and do not worry about it.
compress enables the use of gzip-style compression on the communication channel. If your network link is T1 speed or faster, you probably should not use compression. Otherwise, it helps substantially.
-
Putting it all together:
Here is the entire supfile for our example:
*default tag=. *default host=cvsup666.FreeBSD.org *default prefix=/usr *default base=/usr/local/etc/cvsup *default release=cvs delete use-rel-suffix compress src-all
A.5.3.1 The refuse File
As mentioned above, CVSup uses a pull method. Basically, this means that you connect to the CVSup server, and it says, ``Here is what you can download from me...'', and your client responds ``OK, I will take this, this, this, and this.'' In the default configuration, the CVSup client will take every file associated with the collection and tag you chose in the configuration file. However, this is not always what you want, especially if you are synching the doc, ports, or www trees -- most people cannot read four or five languages, and therefore they do not need to download the language-specific files. If you are CVSuping the ports collection, you can get around this by specifying each collection individually (e.g., ports-astrology, ports-biology, etc instead of simply saying ports-all). However, since the doc and www trees do not have language-specific collections, you must use one of CVSup's many nifty features: the refuse file.
The refuse file essentially tells CVSup that it should not take every single file from a collection; in other words, it tells the client to refuse certain files from the server. The refuse file can be found (or, if you do not yet have one, should be placed) in base/sup/. base is defined in your supfile; by default, base is /usr/local/etc/cvsup, which means that by default the refuse file is /usr/local/etc/cvsup/sup/refuse.
The refuse file has a very simple format; it simply contains the names of files or directories that you do not wish to download. For example, if you cannot speak any languages other than English and some German, and you do not feel the need to use the German applications (or applications for any other languages, except for English), you can put the following in your refuse file:
ports/chinese ports/french ports/german ports/hebrew ports/hungarian ports/japanese ports/korean ports/polish ports/portuguese ports/russian ports/ukrainian ports/vietnamese doc/da_* doc/de_* doc/el_* doc/es_* doc/fr_* doc/it_* doc/ja_* doc/nl_* doc/no_* doc/pl_* doc/pt_* doc/ru_* doc/sr_* doc/zh_*
and so forth for the other languages (you can find the full list by browsing the FreeBSD CVS repository).
With this very useful feature, those users who are on slow links or pay by the minute for their Internet connection will be able to save valuable time as they will no longer need to download files that they will never use. For more information on refuse files and other neat features of CVSup, please view its manual page.
A.5.4 Running CVSup
You are now ready to try an update. The command line for doing this is quite simple:
# cvsup supfile
where supfile is of course the name of the supfile you have just created. Assuming you are running under X11, cvsup will display a GUI window with some buttons to do the usual things. Press the go button, and watch it run.
Since you are updating your actual /usr/src tree in this example, you will need to run the program as root so that cvsup has the permissions it needs to update your files. Having just created your configuration file, and having never used this program before, that might understandably make you nervous. There is an easy way to do a trial run without touching your precious files. Just create an empty directory somewhere convenient, and name it as an extra argument on the command line:
# mkdir /var/tmp/dest # cvsup supfile /var/tmp/dest
The directory you specify will be used as the destination directory for all file updates. CVSup will examine your usual files in /usr/src, but it will not modify or delete any of them. Any file updates will instead land in /var/tmp/dest/usr/src. CVSup will also leave its base directory status files untouched when run this way. The new versions of those files will be written into the specified directory. As long as you have read access to /usr/src, you do not even need to be root to perform this kind of trial run.
If you are not running X11 or if you just do not like GUIs, you should add a couple of options to the command line when you run cvsup:
# cvsup -g -L 2 supfile
The -g tells CVSup not to use its GUI. This is automatic if you are not running X11, but otherwise you have to specify it.
The -L 2 tells CVSup to print out the details of all the file updates it is doing. There are three levels of verbosity, from -L 0 to -L 2. The default is 0, which means total silence except for error messages.
There are plenty of other options available. For a brief list of them, type cvsup -H. For more detailed descriptions, see the manual page.
Once you are satisfied with the way updates are working, you can arrange for regular runs of CVSup using cron(8). Obviously, you should not let CVSup use its GUI when running it from cron(8).
A.5.5 CVSup File Collections
The file collections available via CVSup are organized hierarchically. There are a few large collections, and they are divided into smaller sub-collections. Receiving a large collection is equivalent to receiving each of its sub-collections. The hierarchical relationships among collections are reflected by the use of indentation in the list below.
The most commonly used collections are src-all, and ports-all. The other collections are used only by small groups of people for specialized purposes, and some mirror sites may not carry all of them.
- cvs-all release=cvs
-
The main FreeBSD CVS repository, including the cryptography code.
- distrib release=cvs
-
Files related to the distribution and mirroring of FreeBSD.
- doc-all release=cvs
-
Sources for the FreeBSD Handbook and other documentation. This does not include files for the FreeBSD web site.
- ports-all release=cvs
-
The FreeBSD Ports Collection.
Important: If you do not want to update the whole of ports-all (the whole ports tree), but use one of the subcollections listed below, make sure that you always update the ports-base subcollection! Whenever something changes in the ports build infrastructure represented by ports-base, it is virtually certain that those changes will be used by ``real'' ports real soon. Thus, if you only update the ``real'' ports and they use some of the new features, there is a very high chance that their build will fail with some mysterious error message. The very first thing to do in this case is to make sure that your ports-base subcollection is up to date.
- ports-archivers release=cvs
-
Archiving tools.
- ports-astro release=cvs
-
Astronomical ports.
- ports-audio release=cvs
-
Sound support.
- ports-base release=cvs
-
The Ports Collection build infrastructure - various files located in the Mk/ and Tools/ subdirectories of /usr/ports.
Note: Please see the important warning above: you should always update this subcollection, whenever you update any part of the FreeBSD Ports Collection!
- ports-benchmarks release=cvs
-
Benchmarks.
- ports-biology release=cvs
-
Biology.
- ports-cad release=cvs
-
Computer aided design tools.
- ports-chinese release=cvs
-
Chinese language support.
- ports-comms release=cvs
-
Communication software.
- ports-converters release=cvs
-
character code converters.
- ports-databases release=cvs
-
Databases.
- ports-deskutils release=cvs
-
Things that used to be on the desktop before computers were invented.
- ports-devel release=cvs
-
Development utilities.
- ports-dns release=cvs
-
DNS related software.
- ports-editors release=cvs
-
Editors.
- ports-emulators release=cvs
-
Emulators for other operating systems.
- ports-finance release=cvs
-
Monetary, financial and related applications.
- ports-ftp release=cvs
-
FTP client and server utilities.
- ports-games release=cvs
-
Games.
- ports-german release=cvs
-
German language support.
- ports-graphics release=cvs
-
Graphics utilities.
- ports-hungarian release=cvs
-
Hungarian language support.
- ports-irc release=cvs
-
Internet Relay Chat utilities.
- ports-japanese release=cvs
-
Japanese language support.
- ports-java release=cvs
-
Java utilities.
- ports-korean release=cvs
-
Korean language support.
- ports-lang release=cvs
-
Programming languages.
- ports-mail release=cvs
-
Mail software.
- ports-math release=cvs
-
Numerical computation software.
- ports-mbone release=cvs
-
MBone applications.
- ports-misc release=cvs
-
Miscellaneous utilities.
- ports-multimedia release=cvs
-
Multimedia software.
- ports-net release=cvs
-
Networking software.
- ports-news release=cvs
-
USENET news software.
- ports-palm release=cvs
-
Software support for Palm™ series.
- ports-polish release=cvs
-
Polish language support.
- ports-portuguese release=cvs
-
Portuguese language support.
- ports-print release=cvs
-
Printing software.
- ports-russian release=cvs
-
Russian language support.
- ports-security release=cvs
-
Security utilities.
- ports-shells release=cvs
-
Command line shells.
- ports-sysutils release=cvs
-
System utilities.
- ports-textproc release=cvs
-
text processing utilities (does not include desktop publishing).
- ports-vietnamese release=cvs
-
Vietnamese language support.
- ports-www release=cvs
-
Software related to the World Wide Web.
- ports-x11 release=cvs
-
Ports to support the X window system.
- ports-x11-clocks release=cvs
-
X11 clocks.
- ports-x11-fm release=cvs
-
X11 file managers.
- ports-x11-fonts release=cvs
-
X11 fonts and font utilities.
- ports-x11-toolkits release=cvs
-
X11 toolkits.
- ports-x11-servers
-
X11 servers.
- ports-x11-wm
-
X11 window managers.
- src-all release=cvs
-
The main FreeBSD sources, including the cryptography code.
- src-base release=cvs
-
Miscellaneous files at the top of /usr/src.
- src-bin release=cvs
-
User utilities that may be needed in single-user mode (/usr/src/bin).
- src-contrib release=cvs
-
Utilities and libraries from outside the FreeBSD project, used relatively unmodified (/usr/src/contrib).
- src-crypto release=cvs
-
Cryptography utilities and libraries from outside the FreeBSD project, used relatively unmodified (/usr/src/crypto).
- src-eBones release=cvs
-
Kerberos and DES (/usr/src/eBones). Not used in current releases of FreeBSD.
- src-etc release=cvs
-
System configuration files (/usr/src/etc).
- src-games release=cvs
-
Games (/usr/src/games).
- src-gnu release=cvs
-
Utilities covered by the GNU Public License (/usr/src/gnu).
- src-include release=cvs
-
Header files (/usr/src/include).
- src-kerberos5 release=cvs
-
Kerberos5 security package (/usr/src/kerberos5).
- src-kerberosIV release=cvs
-
KerberosIV security package (/usr/src/kerberosIV).
- src-lib release=cvs
-
Libraries (/usr/src/lib).
- src-libexec release=cvs
-
System programs normally executed by other programs (/usr/src/libexec).
- src-release release=cvs
-
Files required to produce a FreeBSD release (/usr/src/release).
- src-sbin release=cvs
-
System utilities for single-user mode (/usr/src/sbin).
- src-secure release=cvs
-
Cryptographic libraries and commands (/usr/src/secure).
- src-share release=cvs
-
Files that can be shared across multiple systems (/usr/src/share).
- src-sys release=cvs
-
The kernel (/usr/src/sys).
- src-sys-crypto release=cvs
-
Kernel cryptography code (/usr/src/sys/crypto).
- src-tools release=cvs
-
Various tools for the maintenance of FreeBSD (/usr/src/tools).
- src-usrbin release=cvs
-
User utilities (/usr/src/usr.bin).
- src-usrsbin release=cvs
-
System utilities (/usr/src/usr.sbin).
- www release=cvs
-
The sources for the FreeBSD WWW site.
- distrib release=self
-
The CVSup server's own configuration files. Used by CVSup mirror sites.
- gnats release=current
-
The GNATS bug-tracking database.
- mail-archive release=current
-
FreeBSD mailing list archive.
- www release=current
-
The pre-processed FreeBSD WWW site files (not the source files). Used by WWW mirror sites.
A.5.6 For More Information
For the CVSup FAQ and other information about CVSup, see The CVSup Home Page.
Most FreeBSD-related discussion of CVSup takes place on the FreeBSD technical discussions mailing list. New versions of the software are announced there, as well as on the FreeBSD announcements mailing list.
Questions and bug reports should be addressed to the author of the program at <[email protected]>.
A.5.7 CVSup Sites
CVSup servers for FreeBSD are running at the following sites:
- Primary Mirror Sites
-
-
cvsup1.FreeBSD.org
-
cvsup2.FreeBSD.org
-
cvsup3.FreeBSD.org
-
cvsup4.FreeBSD.org
-
cvsup5.FreeBSD.org
-
cvsup6.FreeBSD.org
-
cvsup7.FreeBSD.org
-
cvsup8.FreeBSD.org
-
cvsup9.FreeBSD.org
-
cvsup10.FreeBSD.org
-
cvsup11.FreeBSD.org
-
cvsup12.FreeBSD.org
-
cvsup13.FreeBSD.org
-
cvsup14.FreeBSD.org
-
cvsup15.FreeBSD.org
-
cvsup16.FreeBSD.org
-
cvsup18.FreeBSD.org
-
- Argentina
-
-
cvsup.ar.FreeBSD.org
-
- Australia
-
-
cvsup.au.FreeBSD.org
-
cvsup2.au.FreeBSD.org
-
cvsup3.au.FreeBSD.org
-
cvsup4.au.FreeBSD.org
-
cvsup5.au.FreeBSD.org
-
cvsup6.au.FreeBSD.org
-
cvsup7.au.FreeBSD.org
-
- Austria
-
-
cvsup.at.FreeBSD.org
-
cvsup2.at.FreeBSD.org
-
- Brazil
-
-
cvsup.br.FreeBSD.org
-
cvsup2.br.FreeBSD.org
-
cvsup3.br.FreeBSD.org
-
cvsup4.br.FreeBSD.org
-
cvsup5.br.FreeBSD.org
-
- Bulgaria
-
-
cvsup.bg.FreeBSD.org
-
- Canada
-
-
cvsup.ca.FreeBSD.org
-
- China
-
-
cvsup.cn.FreeBSD.org
-
- Czech Republic
-
-
cvsup.cz.FreeBSD.org
-
- Denmark
-
-
cvsup.dk.FreeBSD.org
-
- Estonia
-
-
cvsup.ee.FreeBSD.org
-
- Finland
-
-
cvsup.fi.FreeBSD.org
-
cvsup2.fi.FreeBSD.org
-
- France
-
-
cvsup.fr.FreeBSD.org
-
cvsup2.fr.FreeBSD.org
-
cvsup3.fr.FreeBSD.org
-
cvsup4.fr.FreeBSD.org
-
cvsup5.fr.FreeBSD.org
-
cvsup8.fr.FreeBSD.org
-
- Germany
-
-
cvsup.de.FreeBSD.org
-
cvsup2.de.FreeBSD.org
-
cvsup3.de.FreeBSD.org
-
cvsup4.de.FreeBSD.org
-
cvsup5.de.FreeBSD.org
-
cvsup6.de.FreeBSD.org
-
cvsup7.de.FreeBSD.org
-
- Greece
-
-
cvsup.gr.FreeBSD.org
-
cvsup2.gr.FreeBSD.org
-
- Hungary
-
-
cvsup.hu.FreeBSD.org
-
- Iceland
-
-
cvsup.is.FreeBSD.org
-
- Ireland
-
-
cvsup.ie.FreeBSD.org
-
- Japan
-
-
cvsup.jp.FreeBSD.org
-
cvsup2.jp.FreeBSD.org
-
cvsup3.jp.FreeBSD.org
-
cvsup4.jp.FreeBSD.org
-
cvsup5.jp.FreeBSD.org
-
cvsup6.jp.FreeBSD.org
-
- Korea
-
-
cvsup.kr.FreeBSD.org
-
cvsup2.kr.FreeBSD.org
-
cvsup3.kr.FreeBSD.org
-
- Kuwait
-
-
cvsup1.kw.FreeBSD.org
-
- Latvia
-
-
cvsup.lv.FreeBSD.org
-
- Lithuania
-
-
cvsup.lt.FreeBSD.org
-
cvsup2.lt.FreeBSD.org
-
- Netherlands
-
-
cvsup.nl.FreeBSD.org
-
cvsup2.nl.FreeBSD.org
-
cvsup3.nl.FreeBSD.org
-
cvsup4.nl.FreeBSD.org
-
cvsup5.nl.FreeBSD.org
-
- New Zealand
-
-
cvsup.nz.FreeBSD.org
-
- Norway
-
-
cvsup.no.FreeBSD.org
-
- Philippines
-
-
cvsup1.ph.FreeBSD.org
-
- Poland
-
-
cvsup.pl.FreeBSD.org
-
cvsup2.pl.FreeBSD.org
-
cvsup3.pl.FreeBSD.org
-
- Portugal
-
-
cvsup.pt.FreeBSD.org
-
cvsup2.pt.FreeBSD.org
-
- Romania
-
-
cvsup.ro.FreeBSD.org
-
cvsup2.ro.FreeBSD.org
-
cvsup3.ro.FreeBSD.org
-
- Russia
-
-
cvsup.ru.FreeBSD.org
-
cvsup2.ru.FreeBSD.org
-
cvsup3.ru.FreeBSD.org
-
cvsup4.ru.FreeBSD.org
-
cvsup5.ru.FreeBSD.org
-
cvsup6.ru.FreeBSD.org
-
- San Marino
-
-
cvsup.sm.FreeBSD.org
-
- Singapore
-
-
cvsup.sg.FreeBSD.org
-
- Slovak Republic
-
-
cvsup.sk.FreeBSD.org
-
cvsup2.sk.FreeBSD.org
-
- Slovenia
-
-
cvsup.si.FreeBSD.org
-
cvsup2.si.FreeBSD.org
-
- South Africa
-
-
cvsup.za.FreeBSD.org
-
cvsup2.za.FreeBSD.org
-
- Spain
-
-
cvsup.es.FreeBSD.org
-
cvsup2.es.FreeBSD.org
-
cvsup3.es.FreeBSD.org
-
- Sweden
-
-
cvsup.se.FreeBSD.org
-
- Switzerland
-
-
cvsup.ch.FreeBSD.org
-
- Taiwan
-
-
cvsup.tw.FreeBSD.org
-
cvsup3.tw.FreeBSD.org
-
cvsup4.tw.FreeBSD.org
-
cvsup5.tw.FreeBSD.org
-
cvsup6.tw.FreeBSD.org
-
cvsup7.tw.FreeBSD.org
-
cvsup8.tw.FreeBSD.org
-
cvsup9.tw.FreeBSD.org
-
cvsup10.tw.FreeBSD.org
-
cvsup11.tw.FreeBSD.org
-
cvsup12.tw.FreeBSD.org
-
cvsup13.tw.FreeBSD.org
-
- Turkey
-
-
cvsup.tr.FreeBSD.org
-
- Ukraine
-
-
cvsup2.ua.FreeBSD.org
-
cvsup3.ua.FreeBSD.org
-
cvsup4.ua.FreeBSD.org
-
cvsup5.ua.FreeBSD.org
-
cvsup6.ua.FreeBSD.org
-
cvsup7.ua.FreeBSD.org
-
- United Kingdom
-
-
cvsup.uk.FreeBSD.org
-
cvsup2.uk.FreeBSD.org
-
cvsup3.uk.FreeBSD.org
-
cvsup4.uk.FreeBSD.org
-
- USA
-
-
cvsup1.us.FreeBSD.org
-
cvsup2.us.FreeBSD.org
-
cvsup3.us.FreeBSD.org
-
cvsup4.us.FreeBSD.org
-
cvsup5.us.FreeBSD.org
-
cvsup6.us.FreeBSD.org
-
cvsup7.us.FreeBSD.org
-
cvsup8.us.FreeBSD.org
-
cvsup9.us.FreeBSD.org
-
cvsup10.us.FreeBSD.org
-
cvsup11.us.FreeBSD.org
-
cvsup12.us.FreeBSD.org
-
cvsup13.us.FreeBSD.org
-
cvsup14.us.FreeBSD.org
-
cvsup15.us.FreeBSD.org
-
cvsup16.us.FreeBSD.org
-
cvsup18.us.FreeBSD.org
-
A.6 CVS Tags
When obtaining or updating sources from cvs and CVSup a revision tag (reference to a date in time) must be specified.
A revision tag refers to either a particular line of FreeBSD development, or a specific point in time. The first type are called ``branch tags'', the second type are called ``release tags''.
A.6.1 Branch Tags
All of these, with the exception of HEAD (which is always a valid tag), only apply to the src/ tree. The ports/, doc/, and www/ trees are not branched.
- HEAD
-
Symbolic name for the main line, or FreeBSD-CURRENT. Also the default when no revision is specified.
In CVSup, this tag is represented by a . (not punctuation, but a literal . character).
Note: In CVS, this is the default when no revision tag is specified. It is usually not a good idea to checkout or update to CURRENT sources on a STABLE machine, unless that is your intent.
- RELENG_5_1
-
The release branch for FreeBSD-5.1, used only for security advisories and other seriously critical fixes.
- RELENG_5_0
-
The release branch for FreeBSD-5.0, used only for security advisories and other seriously critical fixes.
- RELENG_4
-
The line of development for FreeBSD-4.X, also known as FreeBSD-STABLE.
- RELENG_4_8
-
The release branch for FreeBSD-4.8, used only for security advisories and other seriously critical fixes.
- RELENG_4_7
-
The release branch for FreeBSD-4.7, used only for security advisories and other seriously critical fixes.
- RELENG_4_6
-
The release branch for FreeBSD-4.6 and FreeBSD-4.6.2, used only for security advisories and other seriously critical fixes.
- RELENG_4_5
-
The release branch for FreeBSD-4.5, used only for security advisories and other seriously critical fixes.
- RELENG_4_4
-
The release branch for FreeBSD-4.4, used only for security advisories and other seriously critical fixes.
- RELENG_4_3
-
The release branch for FreeBSD-4.3, used only for security advisories and other seriously critical fixes.
- RELENG_3
-
The line of development for FreeBSD-3.X, also known as 3.X-STABLE.
- RELENG_2_2
-
The line of development for FreeBSD-2.2.X, also known as 2.2-STABLE. This branch is mostly obsolete.
A.6.2 Release Tags
These tags correspond to the FreeBSD src/ tree (and ports/, doc/, and www/ trees) at a specific point in time, when a particular version of FreeBSD was released.
- RELENG_5_1_0_RELEASE
-
FreeBSD 5.1
- RELENG_4_8_0_RELEASE
-
FreeBSD 4.8
- RELENG_5_0_0_RELEASE
-
FreeBSD 5.0
- RELENG_4_7_0_RELEASE
-
FreeBSD 4.7
- RELENG_4_6_2_RELEASE
-
FreeBSD 4.6.2
- RELENG_4_6_1_RELEASE
-
FreeBSD 4.6.1
- RELENG_4_6_0_RELEASE
-
FreeBSD 4.6
- RELENG_4_5_0_RELEASE
-
FreeBSD 4.5
- RELENG_4_4_0_RELEASE
-
FreeBSD 4.4
- RELENG_4_3_0_RELEASE
-
FreeBSD 4.3
- RELENG_4_2_0_RELEASE
-
FreeBSD 4.2
- RELENG_4_1_1_RELEASE
-
FreeBSD 4.1.1
- RELENG_4_1_0_RELEASE
-
FreeBSD 4.1
- RELENG_4_0_0_RELEASE
-
FreeBSD 4.0
- RELENG_3_5_0_RELEASE
-
FreeBSD-3.5
- RELENG_3_4_0_RELEASE
-
FreeBSD-3.4
- RELENG_3_3_0_RELEASE
-
FreeBSD-3.3
- RELENG_3_2_0_RELEASE
-
FreeBSD-3.2
- RELENG_3_1_0_RELEASE
-
FreeBSD-3.1
- RELENG_3_0_0_RELEASE
-
FreeBSD-3.0
- RELENG_2_2_8_RELEASE
-
FreeBSD-2.2.8
- RELENG_2_2_7_RELEASE
-
FreeBSD-2.2.7
- RELENG_2_2_6_RELEASE
-
FreeBSD-2.2.6
- RELENG_2_2_5_RELEASE
-
FreeBSD-2.2.5
- RELENG_2_2_2_RELEASE
-
FreeBSD-2.2.2
- RELENG_2_2_1_RELEASE
-
FreeBSD-2.2.1
- RELENG_2_2_0_RELEASE
-
FreeBSD-2.2.0
A.7 AFS Sites
AFS servers for FreeBSD are running at the following sites:
- Sweden
-
The path to the files are: /afs/stacken.kth.se/ftp/pub/FreeBSD/
stacken.kth.se # Stacken Computer Club, KTH, Sweden 130.237.234.43 #hot.stacken.kth.se 130.237.237.230 #fishburger.stacken.kth.se 130.237.234.3 #milko.stacken.kth.se
Maintainer <[email protected]>
A.8 rsync Sites
The following sites make FreeBSD available through the rsync protocol. The rsync utility works in much the same way as the rcp(1) command, but has more options and uses the rsync remote-update protocol which transfers only the differences between two sets of files, thus greatly speeding up the synchronization over the network. This is most useful if you are a mirror site for the FreeBSD FTP server, or the CVS repository. The rsync suite is available for many operating systems, on FreeBSD, see the net/rsync port or use the package.
- Czech Republic
-
rsync://ftp.cz.FreeBSD.org/
Available collections:
-
ftp: A partial mirror of the FreeBSD FTP server.
-
FreeBSD: A full mirror of the FreeBSD FTP server.
-
- Germany
-
rsync://grappa.unix-ag.uni-kl.de/
Available collections:
-
freebsd-cvs: The full FreeBSD CVS repository.
This machine also mirrors the CVS repositories of the NetBSD and the OpenBSD projects, among others.
-
- Netherlands
-
rsync://ftp.nl.FreeBSD.org/
Available collections:
-
vol/3/freebsd-core: A full mirror of the FreeBSD FTP server.
-
- United Kingdom
-
rsync://rsync.mirror.ac.uk/
Available collections:
-
ftp.FreeBSD.org: A full mirror of the FreeBSD FTP server.
-
- United States of America
-
rsync://ftp-master.FreeBSD.org/
This server may only be used by FreeBSD primary mirror sites.
Available collections:
-
FreeBSD: The master archive of the FreeBSD FTP server.
-
acl: The FreeBSD master ACL list.
rsync://ftp13.FreeBSD.org/
Available collections:
-
FreeBSD: A full mirror of the FreeBSD FTP server.
-
Appendix B. Bibliography
While the manual pages provide the definitive reference for individual pieces of the FreeBSD operating system, they are notorious for not illustrating how to put the pieces together to make the whole operating system run smoothly. For this, there is no substitute for a good book on UNIX system administration and a good users' manual.
B.1 Books & Magazines Specific to FreeBSD
International books & Magazines:
-
Using FreeBSD (in Chinese).
-
FreeBSD for PC 98'ers (in Japanese), published by SHUWA System Co, LTD. ISBN 4-87966-468-5 C3055 P2900E.
-
FreeBSD (in Japanese), published by CUTT. ISBN 4-906391-22-2 C3055 P2400E.
-
Complete Introduction to FreeBSD (in Japanese), published by Shoeisha Co., Ltd. ISBN 4-88135-473-6 P3600E.
-
Personal UNIX Starter Kit FreeBSD (in Japanese), published by ASCII. ISBN 4-7561-1733-3 P3000E.
-
FreeBSD Handbook (Japanese translation), published by ASCII. ISBN 4-7561-1580-2 P3800E.
-
FreeBSD mit Methode (in German), published by Computer und Literatur Verlag/Vertrieb Hanser, 1998. ISBN 3-932311-31-0.
-
FreeBSD 4 - Installieren, Konfigurieren, Administrieren (in German), published by Computer und Literatur Verlag, 2001. ISBN 3-932311-88-4.
-
FreeBSD 5 - Installieren, Konfigurieren, Administrieren (in German), published by Computer und Literatur Verlag, 2003. ISBN 3-936546-06-1.
-
FreeBSD Install and Utilization Manual (in Japanese), published by Mainichi Communications Inc..
-
Onno W Purbo, Dodi Maryanto, Syahrial Hubbany, Widjil Widodo Building Internet Server with FreeBSD (in Indonesia Language), published by Elex Media Komputindo.
English language books & Magazines:
-
Absolute BSD: The Ultimate Guide to FreeBSD, published by No Starch Press, 2002. ISBN: 1886411743
-
The Complete FreeBSD, published by O'Reilly, 2003. ISBN: 0596005164
-
The FreeBSD Corporate Networker's Guide, published by Addison-Wesley, 2000. ISBN: 0201704811
-
FreeBSD: An Open-Source Operating System for Your Personal Computer, published by The Bit Tree Press, 2001. ISBN: 0971204500
-
Teach Yourself FreeBSD in 24 Hours, published by Sams, 2002. ISBN: 0672324245
-
FreeBSD unleashed, published by Sams, 2002. ISBN: 0672324563
-
FreeBSD: The Complete Reference, published by McGrawHill, 2003. ISBN: 0072224096
B.2 Users' Guides
-
Computer Systems Research Group, UC Berkeley. 4.4BSD User's Reference Manual. O'Reilly & Associates, Inc., 1994. ISBN 1-56592-075-9
-
Computer Systems Research Group, UC Berkeley. 4.4BSD User's Supplementary Documents. O'Reilly & Associates, Inc., 1994. ISBN 1-56592-076-7
-
UNIX in a Nutshell. O'Reilly & Associates, Inc., 1990. ISBN 093717520X
-
Mui, Linda. What You Need To Know When You Can't Find Your UNIX System Administrator. O'Reilly & Associates, Inc., 1995. ISBN 1-56592-104-6
-
Ohio State University has written a UNIX Introductory Course which is available online in HTML and PostScript format.
-
Jpman Project, Japan FreeBSD Users Group. FreeBSD User's Reference Manual (Japanese translation). Mainichi Communications Inc., 1998. ISBN4-8399-0088-4 P3800E.
-
Edinburgh University has written an Online Guide for newcomers to the UNIX environment.
B.3 Administrators' Guides
-
Albitz, Paul and Liu, Cricket. DNS and BIND, 4th Ed. O'Reilly & Associates, Inc., 2001. ISBN 1-59600-158-4
-
Computer Systems Research Group, UC Berkeley. 4.4BSD System Manager's Manual. O'Reilly & Associates, Inc., 1994. ISBN 1-56592-080-5
-
Costales, Brian, et al. Sendmail, 2nd Ed. O'Reilly & Associates, Inc., 1997. ISBN 1-56592-222-0
-
Frisch, Æleen. Essential System Administration, 2nd Ed. O'Reilly & Associates, Inc., 1995. ISBN 1-56592-127-5
-
Hunt, Craig. TCP/IP Network Administration, 2nd Ed. O'Reilly & Associates, Inc., 1997. ISBN 1-56592-322-7
-
Nemeth, Evi. UNIX System Administration Handbook. 3rd Ed. Prentice Hall, 2000. ISBN 0-13-020601-6
-
Stern, Hal Managing NFS and NIS O'Reilly & Associates, Inc., 1991. ISBN 0-937175-75-7
-
Jpman Project, Japan FreeBSD Users Group. FreeBSD System Administrator's Manual (Japanese translation). Mainichi Communications Inc., 1998. ISBN4-8399-0109-0 P3300E.
-
Dreyfus, Emmanuel. Cahiers de l'Admin: BSD (in French), Eyrolles, 2003. ISBN 2-212-11244-0
B.4 Programmers' Guides
-
Asente, Paul, Converse, Diana, and Swick, Ralph. X Window System Toolkit. Digital Press, 1998. ISBN 1-55558-178-1
-
Computer Systems Research Group, UC Berkeley. 4.4BSD Programmer's Reference Manual. O'Reilly & Associates, Inc., 1994. ISBN 1-56592-078-3
-
Computer Systems Research Group, UC Berkeley. 4.4BSD Programmer's Supplementary Documents. O'Reilly & Associates, Inc., 1994. ISBN 1-56592-079-1
-
Harbison, Samuel P. and Steele, Guy L. Jr. C: A Reference Manual. 4rd ed. Prentice Hall, 1995. ISBN 0-13-326224-3
-
Kernighan, Brian and Dennis M. Ritchie. The C Programming Language.. PTR Prentice Hall, 1988. ISBN 0-13-110362-9
-
Lehey, Greg. Porting UNIX Software. O'Reilly & Associates, Inc., 1995. ISBN 1-56592-126-7
-
Plauger, P. J. The Standard C Library. Prentice Hall, 1992. ISBN 0-13-131509-9
-
Spinellis, Diomidis. Code Reading: The Open Source Perspective. Addison-Wesley, 2003. ISBN 0-201-79940-5
-
Stevens, W. Richard. Advanced Programming in the UNIX Environment. Reading, Mass. : Addison-Wesley, 1992. ISBN 0-201-56317-7
-
Stevens, W. Richard. UNIX Network Programming. 2nd Ed, PTR Prentice Hall, 1998. ISBN 0-13-490012-X
-
Wells, Bill. ``Writing Serial Drivers for UNIX''. Dr. Dobb's Journal. 19(15), December 1994. pp68-71, 97-99.
B.5 Operating System Internals
-
Andleigh, Prabhat K. UNIX System Architecture. Prentice-Hall, Inc., 1990. ISBN 0-13-949843-5
-
Jolitz, William. ``Porting UNIX to the 386''. Dr. Dobb's Journal. January 1991-July 1992.
-
Leffler, Samuel J., Marshall Kirk McKusick, Michael J Karels and John Quarterman The Design and Implementation of the 4.3BSD UNIX Operating System. Reading, Mass. : Addison-Wesley, 1989. ISBN 0-201-06196-1
-
Leffler, Samuel J., Marshall Kirk McKusick, The Design and Implementation of the 4.3BSD UNIX Operating System: Answer Book. Reading, Mass. : Addison-Wesley, 1991. ISBN 0-201-54629-9
-
McKusick, Marshall Kirk, Keith Bostic, Michael J Karels, and John Quarterman. The Design and Implementation of the 4.4BSD Operating System. Reading, Mass. : Addison-Wesley, 1996. ISBN 0-201-54979-4
(Chapter 2 of this book is available online as part of the FreeBSD Documentation Project, and chapter 9 here.)
-
Stevens, W. Richard. TCP/IP Illustrated, Volume 1: The Protocols. Reading, Mass. : Addison-Wesley, 1996. ISBN 0-201-63346-9
-
Schimmel, Curt. Unix Systems for Modern Architectures. Reading, Mass. : Addison-Wesley, 1994. ISBN 0-201-63338-8
-
Stevens, W. Richard. TCP/IP Illustrated, Volume 3: TCP for Transactions, HTTP, NNTP and the UNIX Domain Protocols. Reading, Mass. : Addison-Wesley, 1996. ISBN 0-201-63495-3
-
Vahalia, Uresh. UNIX Internals -- The New Frontiers. Prentice Hall, 1996. ISBN 0-13-101908-2
-
Wright, Gary R. and W. Richard Stevens. TCP/IP Illustrated, Volume 2: The Implementation. Reading, Mass. : Addison-Wesley, 1995. ISBN 0-201-63354-X
B.6 Security Reference
-
Cheswick, William R. and Steven M. Bellovin. Firewalls and Internet Security: Repelling the Wily Hacker. Reading, Mass. : Addison-Wesley, 1995. ISBN 0-201-63357-4
-
Garfinkel, Simson and Gene Spafford. Practical UNIX & Internet Security. 2nd Ed. O'Reilly & Associates, Inc., 1996. ISBN 1-56592-148-8
-
Garfinkel, Simson. PGP Pretty Good Privacy O'Reilly & Associates, Inc., 1995. ISBN 1-56592-098-8
B.7 Hardware Reference
-
Anderson, Don and Tom Shanley. Pentium Processor System Architecture. 2nd Ed. Reading, Mass. : Addison-Wesley, 1995. ISBN 0-201-40992-5
-
Ferraro, Richard F. Programmer's Guide to the EGA, VGA, and Super VGA Cards. 3rd ed. Reading, Mass. : Addison-Wesley, 1995. ISBN 0-201-62490-7
-
Intel Corporation publishes documentation on their CPUs, chipsets and standards on their developer web site, usually as PDF files.
-
Shanley, Tom. 80486 System Architecture. 3rd ed. Reading, Mass. : Addison-Wesley, 1995. ISBN 0-201-40994-1
-
Shanley, Tom. ISA System Architecture. 3rd ed. Reading, Mass. : Addison-Wesley, 1995. ISBN 0-201-40996-8
-
Shanley, Tom. PCI System Architecture. 4th ed. Reading, Mass. : Addison-Wesley, 1999. ISBN 0-201-30974-2
-
Van Gilluwe, Frank. The Undocumented PC, 2nd Ed. Reading, Mass: Addison-Wesley Pub. Co., 1996. ISBN 0-201-47950-8
-
Messmer, Hans-Peter. The Indispensable PC Hardware Book, 4th Ed. Reading, Mass: Addison-Wesley Pub. Co., 2002. ISBN 0-201-59616-4
B.8 UNIX History
-
Lion, John Lion's Commentary on UNIX, 6th Ed. With Source Code. ITP Media Group, 1996. ISBN 1573980137
-
Raymond, Eric S. The New Hacker's Dictionary, 3rd edition. MIT Press, 1996. ISBN 0-262-68092-0. Also known as the Jargon File
-
Salus, Peter H. A quarter century of UNIX. Addison-Wesley Publishing Company, Inc., 1994. ISBN 0-201-54777-5
-
Simon Garfinkel, Daniel Weise, Steven Strassmann. The UNIX-HATERS Handbook. IDG Books Worldwide, Inc., 1994. ISBN 1-56884-203-1
-
Don Libes, Sandy Ressler Life with UNIX -- special edition. Prentice-Hall, Inc., 1989. ISBN 0-13-536657-7
-
The BSD family tree. http://www.freebsd.org/cgi/cvsweb.cgi/src/share/misc/bsd-family-tree or /usr/share/misc/bsd-family-tree on a modern FreeBSD machine.
-
The BSD Release Announcements collection. 1997. http://www.de.FreeBSD.org/de/ftp/releases/
-
Networked Computer Science Technical Reports Library. http://www.ncstrl.org/
-
Old BSD releases from the Computer Systems Research group (CSRG). http://www.mckusick.com/csrg/: The 4CD set covers all BSD versions from 1BSD to 4.4BSD and 4.4BSD-Lite2 (but not 2.11BSD, unfortunately). As well, the last disk holds the final sources plus the SCCS files.
B.9 Magazines and Journals
-
The C/C++ Users Journal. R&D Publications Inc. ISSN 1075-2838
-
Sys Admin -- The Journal for UNIX System Administrators Miller Freeman, Inc., ISSN 1061-2688
-
freeX -- Das Magazin für Linux - BSD - UNIX (in German) Computer- und Literaturverlag GmbH, ISSN 1436-7033
Appendix C. Resources on the Internet
The rapid pace of FreeBSD progress makes print media impractical as a means of following the latest developments. Electronic resources are the best, if not often the only, way stay informed of the latest advances. Since FreeBSD is a volunteer effort, the user community itself also generally serves as a ``technical support department'' of sorts, with electronic mail and USENET news being the most effective way of reaching that community.
The most important points of contact with the FreeBSD user community are outlined below. If you are aware of other resources not mentioned here, please send them to the FreeBSD documentation project mailing list so that they may also be included.
C.1 Mailing Lists
Though many of the FreeBSD development members read USENET, we cannot always guarantee that we will get to your questions in a timely fashion (or at all) if you post them only to one of the comp.unix.bsd.freebsd.* groups. By addressing your questions to the appropriate mailing list you will reach both us and a concentrated FreeBSD audience, invariably assuring a better (or at least faster) response.
The charters for the various lists are given at the bottom of this document. Please read the charter before joining or sending mail to any list. Most of our list subscribers now receive many hundreds of FreeBSD related messages every day, and by setting down charters and rules for proper use we are striving to keep the signal-to-noise ratio of the lists high. To do less would see the mailing lists ultimately fail as an effective communications medium for the project.
Archives are kept for all of the mailing lists and can be searched using the FreeBSD World Wide Web server. The keyword searchable archive offers an excellent way of finding answers to frequently asked questions and should be consulted before posting a question.
C.1.1 List Summary
General lists: The following are general lists which anyone is free (and encouraged) to join:
| List | Purpose |
|---|---|
| cvs-all | Changes made to the FreeBSD source tree |
| freebsd-advocacy | FreeBSD Evangelism |
| freebsd-announce | Important events and project milestones |
| freebsd-arch | Architecture and design discussions |
| freebsd-bugbusters | Discussions pertaining to the maintenance of the FreeBSD problem report database and related tools |
| freebsd-bugs | Bug reports |
| freebsd-chat | Non-technical items related to the FreeBSD community |
| freebsd-config | Development of FreeBSD installation and configuration tools |
| freebsd-current | Discussion concerning the use of FreeBSD-CURRENT |
| freebsd-isp | Issues for Internet Service Providers using FreeBSD |
| freebsd-jobs | FreeBSD employment and consulting opportunities |
| freebsd-newbies | New FreeBSD users activities and discussions |
| freebsd-policy | FreeBSD Core team policy decisions. Low volume, and read-only |
| freebsd-questions | User questions and technical support |
| freebsd-security-notifications | Security notifications |
| freebsd-stable | Discussion concerning the use of FreeBSD-STABLE |
| freebsd-test | Where to send your test messages instead of one of the actual lists |
Technical lists: The following lists are for technical discussion. You should read the charter for each list carefully before joining or sending mail to one as there are firm guidelines for their use and content.
| List | Purpose |
|---|---|
| freebsd-afs | Porting AFS to FreeBSD |
| freebsd-aic7xxx | Developing drivers for the Adaptec AIC 7xxx |
| freebsd-alpha | Porting FreeBSD to the Alpha |
| freebsd-amd64 | Porting FreeBSD to AMD64 systems |
| freebsd-arm | Porting FreeBSD to ARM® processors |
| freebsd-atm | Using ATM networking with FreeBSD |
| freebsd-audit | Source code audit project |
| freebsd-binup | Design and development of the binary update system |
| freebsd-cluster | Using FreeBSD in a clustered environment |
| freebsd-cvsweb | CVSweb maintenance |
| freebsd-database | Discussing database use and development under FreeBSD |
| freebsd-doc | Creating FreeBSD related documents |
| freebsd-emulation | Emulation of other systems such as Linux/DOS/Windows |
| freebsd-firewire | FreeBSD FireWire® (iLink, IEEE 1394) technical discussion |
| freebsd-fs | File systems |
| freebsd-gnome | Porting GNOME and GNOME applications |
| freebsd-hackers | General technical discussion |
| freebsd-hardware | General discussion of hardware for running FreeBSD |
| freebsd-i18n | FreeBSD Internationalization |
| freebsd-ia32 | FreeBSD on the IA-32 (Intel x86) platform |
| freebsd-ia64 | Porting FreeBSD to Intel's upcoming IA64 systems |
| freebsd-ipfw | Technical discussion concerning the redesign of the IP firewall code |
| freebsd-isdn | ISDN developers |
| freebsd-java | Java developers and people porting JDKs to FreeBSD |
| freebsd-kde | Porting KDE and KDE applications |
| freebsd-lfs | Porting LFS to FreeBSD |
| freebsd-libh | The second generation installation and package system |
| freebsd-mips | Porting FreeBSD to MIPS® |
| freebsd-mobile | Discussions about mobile computing |
| freebsd-mozilla | Porting Mozilla to FreeBSD |
| freebsd-multimedia | Multimedia applications |
| freebsd-new-bus | Technical discussions about bus architecture |
| freebsd-net | Networking discussion and TCP/IP source code |
| freebsd-openoffice | Porting OpenOffice.org and StarOffice to FreeBSD |
| freebsd-performance | Performance tuning questions for high performance/load installations |
| freebsd-platforms | Concerning ports to non-Intel architecture platforms |
| freebsd-ports | Discussion of the ports collection |
| freebsd-ports-bugs | Discussion of the ports bugs/PRs |
| freebsd-ppc | Porting FreeBSD to the PowerPC® |
| freebsd-qa | Discussion of Quality Assurance, usually pending a release |
| freebsd-realtime | Development of realtime extensions to FreeBSD |
| freebsd-scsi | The SCSI subsystem |
| freebsd-security | Security issues affecting FreeBSD |
| freebsd-small | Using FreeBSD in embedded applications |
| freebsd-smp | Design discussions for [A]Symmetric MultiProcessing |
| freebsd-sparc64 | Porting FreeBSD to Sparc based systems |
| freebsd-standards | FreeBSD's conformance to the C99 and the POSIX standards |
| freebsd-threads | Threading in FreeBSD |
| freebsd-testing | FreeBSD Performance and Stability Tests |
| freebsd-tokenring | Support Token Ring in FreeBSD |
Limited lists: The following lists are for more specialized (and demanding) audiences and are probably not of interest to the general public. It is also a good idea to establish a presence in the technical lists before joining one of these limited lists so that you will understand the communications etiquette involved.
| List | Purpose |
|---|---|
| freebsd-hubs | People running mirror sites (infrastructural support) |
| freebsd-user-groups | User group coordination |
| freebsd-vendors | Vendors pre-release coordination |
| freebsd-www | Maintainers of www.FreeBSD.org |
Digest lists: All of the above lists are available in a digest format. Once subscribed to a list, you can change your digest options in your account options section.
CVS lists: The following lists are for people interested in seeing the log messages for changes to various areas of the source tree. They are Read-Only lists and should not have mail sent to them.
| List | Source area | Area Description (source for) |
|---|---|---|
| cvs-all | /usr/(CVSROOT|doc|ports|projects|src) | All changes to any place in the tree (superset of other cvs commit lists) |
| cvs-doc | /usr/doc | All changes to the doc tree |
| cvs-ports | /usr/ports | All changes to the ports tree |
| cvs-projects | /usr/projects | All changes to the projects tree |
| cvs-src | /usr/src | All changes to the src tree |
C.1.2 How to Subscribe
To subscribe to a list, click on the list name above or go to http://lists.FreeBSD.org/mailman/listinfo and click on the list that you are interested in. The list page should contain all of the necessary subscription instructions.
To actually post to a given list you simply send mail to <listname@FreeBSD.org>. It will then be redistributed to mailing list members world-wide.
To unsubscribe yourself from a list, click on the URL found at the bottom of every email received from the list. It is also possible to send an email to freebsd-[listname][email protected] to unsubscribe yourself.
Again, we would like to request that you keep discussion in the technical mailing lists on a technical track. If you are only interested in important announcements then it is suggested that you join the FreeBSD announcements mailing list, which is intended only for infrequent traffic.
C.1.3 List Charters
All FreeBSD mailing lists have certain basic rules which must be adhered to by anyone using them. Failure to comply with these guidelines will result in two (2) written warnings from the FreeBSD Postmaster <[email protected]>, after which, on a third offense, the poster will removed from all FreeBSD mailing lists and filtered from further posting to them. We regret that such rules and measures are necessary at all, but today's Internet is a pretty harsh environment, it would seem, and many fail to appreciate just how fragile some of its mechanisms are.
Rules of the road:
-
The topic of any posting should adhere to the basic charter of the list it is posted to, e.g. if the list is about technical issues then your posting should contain technical discussion. Ongoing irrelevant chatter or flaming only detracts from the value of the mailing list for everyone on it and will not be tolerated. For free-form discussion on no particular topic, the FreeBSD chat mailing list is freely available and should be used instead.
-
No posting should be made to more than 2 mailing lists, and only to 2 when a clear and obvious need to post to both lists exists. For most lists, there is already a great deal of subscriber overlap and except for the most esoteric mixes (say ``-stable & -scsi''), there really is no reason to post to more than one list at a time. If a message is sent to you in such a way that multiple mailing lists appear on the Cc line then the Cc line should also be trimmed before sending it out again. You are still responsible for your own cross-postings, no matter who the originator might have been.
-
Personal attacks and profanity (in the context of an argument) are not allowed, and that includes users and developers alike. Gross breaches of netiquette, like excerpting or reposting private mail when permission to do so was not and would not be forthcoming, are frowned upon but not specifically enforced. However, there are also very few cases where such content would fit within the charter of a list and it would therefore probably rate a warning (or ban) on that basis alone.
-
Advertising of non-FreeBSD related products or services is strictly prohibited and will result in an immediate ban if it is clear that the offender is advertising by spam.
Individual list charters:
- freebsd-afs
-
Andrew File System
This list is for discussion on porting and using AFS from CMU/Transarc
- freebsd-announce
-
Important events / milestones
This is the mailing list for people interested only in occasional announcements of significant FreeBSD events. This includes announcements about snapshots and other releases. It contains announcements of new FreeBSD capabilities. It may contain calls for volunteers etc. This is a low volume, strictly moderated mailing list.
- freebsd-arch
-
Architecture and design discussions
This list is for discussion of the FreeBSD architecture. Messages will mostly be kept strictly technical in nature. Examples of suitable topics are:
-
How to re-vamp the build system to have several customized builds running at the same time.
-
What needs to be fixed with VFS to make Heidemann layers work.
-
How do we change the device driver interface to be able to use the same drivers cleanly on many buses and architectures.
-
How to write a network driver.
-
- freebsd-audit
-
Source code audit project
This is the mailing list for the FreeBSD source code audit project. Although this was originally intended for security-related changes, its charter has been expanded to review any code changes.
This list is very heavy on patches, and is probably of no interest to the average FreeBSD user. Security discussions not related to a particular code change are held on freebsd-security. Conversely, all developers are encouraged to send their patches here for review, especially if they touch a part of the system where a bug may adversely affect the integrity of the system.
- freebsd-binup
-
FreeBSD Binary Update Project
This list exists to provide discussion for the binary update system, or binup. Design issues, implementation details, patches, bug reports, status reports, feature requests, commit logs, and all other things related to binup are fair game.
- freebsd-bugbusters
-
Coordination of the Problem Report handling effort
The purpose of this list is to serve as a coordination and discussion forum for the Bugmeister, his Bugbusters, and any other parties who have a genuine interest in the PR database. This list is not for discussions about specific bugs, patches or PRs.
- freebsd-bugs
-
Bug reports
This is the mailing list for reporting bugs in FreeBSD. Whenever possible, bugs should be submitted using the send-pr(1) command or the WEB interface to it.
- freebsd-chat
-
Non technical items related to the FreeBSD community
This list contains the overflow from the other lists about non-technical, social information. It includes discussion about whether Jordan looks like a toon ferret or not, whether or not to type in capitals, who is drinking too much coffee, where the best beer is brewed, who is brewing beer in their basement, and so on. Occasional announcements of important events (such as upcoming parties, weddings, births, new jobs, etc) can be made to the technical lists, but the follow ups should be directed to this -chat list.
- freebsd-core
-
FreeBSD core team
This is an internal mailing list for use by the core members. Messages can be sent to it when a serious FreeBSD-related matter requires arbitration or high-level scrutiny.
- freebsd-current
-
Discussions about the use of FreeBSD-CURRENT
This is the mailing list for users of FreeBSD-CURRENT. It includes warnings about new features coming out in -CURRENT that will affect the users, and instructions on steps that must be taken to remain -CURRENT. Anyone running ``CURRENT'' must subscribe to this list. This is a technical mailing list for which strictly technical content is expected.
- freebsd-cvsweb
-
FreeBSD CVSweb Project
Technical discussions about use, development and maintenance of FreeBSD-CVSweb.
- freebsd-doc
-
Documentation project
This mailing list is for the discussion of issues and projects related to the creation of documentation for FreeBSD. The members of this mailing list are collectively referred to as ``The FreeBSD Documentation Project''. It is an open list; feel free to join and contribute!
- freebsd-firewire
-
FireWire (iLink, IEEE 1394)
This is a mailing list for discussion of the design and implementation of a FireWire (aka IEEE 1394 aka iLink) subsystem for FreeBSD. Relevant topics specifically include the standards, bus devices and their protocols, adapter boards/cards/chips sets, and the architecture and implementation of code for their proper support.
- freebsd-fs
-
File systems
Discussions concerning FreeBSD file systems. This is a technical mailing list for which strictly technical content is expected.
- freebsd-gnome
-
GNOME
Discussions concerning The GNOME Desktop Environment for FreeBSD systems. This is a technical mailing list for which strictly technical content is expected.
- freebsd-ipfw
-
IP Firewall
This is the forum for technical discussions concerning the redesign of the IP firewall code in FreeBSD. This is a technical mailing list for which strictly technical content is expected.
- freebsd-ia64
-
Porting FreeBSD to IA64
This is a technical mailing list for individuals actively working on porting FreeBSD to the IA-64 platform from Intel, to bring up problems or discuss alternative solutions. Individuals interested in following the technical discussion are also welcome.
- freebsd-isdn
-
ISDN Communications
This is the mailing list for people discussing the development of ISDN support for FreeBSD.
- freebsd-java
-
Java Development
This is the mailing list for people discussing the development of significant Java applications for FreeBSD and the porting and maintenance of JDKs.
- freebsd-kde
-
KDE
Discussions concerning KDE on FreeBSD systems. This is a technical mailing list for which strictly technical content is expected.
- freebsd-hackers
-
Technical discussions
This is a forum for technical discussions related to FreeBSD. This is the primary technical mailing list. It is for individuals actively working on FreeBSD, to bring up problems or discuss alternative solutions. Individuals interested in following the technical discussion are also welcome. This is a technical mailing list for which strictly technical content is expected.
- freebsd-hardware
-
General discussion of FreeBSD hardware
General discussion about the types of hardware that FreeBSD runs on, various problems and suggestions concerning what to buy or avoid.
- freebsd-hubs
-
Mirror sites
Announcements and discussion for people who run FreeBSD mirror sites.
- freebsd-isp
-
Issues for Internet Service Providers
This mailing list is for discussing topics relevant to Internet Service Providers (ISPs) using FreeBSD. This is a technical mailing list for which strictly technical content is expected.
- freebsd-newbies
-
Newbies activities discussion
We cover any of the activities of newbies that are not already dealt with elsewhere, including: independent learning and problem solving techniques, finding and using resources and asking for help elsewhere, how to use mailing lists and which lists to use, general chat, making mistakes, boasting, sharing ideas, stories, moral (but not technical) support, and taking an active part in the FreeBSD community. We take our problems and support questions to freebsd-questions, and use freebsd-newbies to meet others who are doing the same things that we do as newbies.
- freebsd-openoffice
-
OpenOffice.org
Discussions concerning the porting and maintenance of OpenOffice.org and StarOffice.
- freebsd-performance
-
Discussions about tuning or speeding up FreeBSD
This mailing list exists to provide a place for hackers, administrators, and/or concerned parties to discuss performance related topics pertaining to FreeBSD. Acceptable topics includes talking about FreeBSD installations that are either under high load, are experiencing performance problems, or are pushing the limits of FreeBSD. Concerned parties that are willing to work toward improving the performance of FreeBSD are highly encouraged to subscribe to this list. This is a highly technical list ideally suited for experienced FreeBSD users, hackers, or administrators interested in keeping FreeBSD fast, robust, and scalable. This list is not a question-and-answer list that replaces reading through documentation, but it is a place to make contributions or inquire about unanswered performance related topics.
- freebsd-platforms
-
Porting to Non Intel platforms
Cross-platform FreeBSD issues, general discussion and proposals for non Intel FreeBSD ports. This is a technical mailing list for which strictly technical content is expected.
- freebsd-policy
-
Core team policy decisions
This is a low volume, read-only mailing list for FreeBSD Core Team Policy decisions.
- freebsd-ports
-
Discussion of ``ports''
Discussions concerning FreeBSD's ``ports collection'' (/usr/ports), ports infrastructure, and general ports coordination efforts. This is a technical mailing list for which strictly technical content is expected.
- freebsd-ports-bugs
-
Discussion of ``ports'' bugs
Discussions concerning problem reports for FreeBSD's ``ports collection'' (/usr/ports), proposed ports, or modifications to ports. This is a technical mailing list for which strictly technical content is expected.
- freebsd-questions
-
User questions
This is the mailing list for questions about FreeBSD. You should not send ``how to'' questions to the technical lists unless you consider the question to be pretty technical.
- freebsd-scsi
-
SCSI subsystem
This is the mailing list for people working on the SCSI subsystem for FreeBSD. This is a technical mailing list for which strictly technical content is expected.
- freebsd-security
-
Security issues
FreeBSD computer security issues (DES, Kerberos, known security holes and fixes, etc). This is a technical mailing list for which strictly technical discussion is expected. Note that this is not a question-and-answer list, but that contributions (BOTH question AND answer) to the FAQ are welcome.
- freebsd-security-notifications
-
Security Notifications
Notifications of FreeBSD security problems and fixes. This is not a discussion list. The discussion list is FreeBSD-security.
- freebsd-small
-
Using FreeBSD in embedded applications
This list discusses topics related to unusually small and embedded FreeBSD installations. This is a technical mailing list for which strictly technical content is expected.
- freebsd-stable
-
Discussions about the use of FreeBSD-STABLE
This is the mailing list for users of FreeBSD-STABLE. It includes warnings about new features coming out in -STABLE that will affect the users, and instructions on steps that must be taken to remain -STABLE. Anyone running ``STABLE'' should subscribe to this list. This is a technical mailing list for which strictly technical content is expected.
- freebsd-standards
-
C99 & POSIX Conformance
This is a forum for technical discussions related to FreeBSD Conformance to the C99 and the POSIX standards.
- freebsd-user-groups
-
User Group Coordination List
This is the mailing list for the coordinators from each of the local area Users Groups to discuss matters with each other and a designated individual from the Core Team. This mail list should be limited to meeting synopsis and coordination of projects that span User Groups.
- freebsd-vendors
-
Vendors
Coordination discussions between The FreeBSD Project and Vendors of software and hardware for FreeBSD.
C.1.4 Filtering on the Mailing Lists
The FreeBSD mailing lists are filtered in multiple ways to avoid the distribution of spam, viruses, and other unwanted emails. The filtering actions described in this section do not include all those used to protect the mailing lists.
Only certain types of attachments are allowed on the mailing lists. All attachments with a MIME content type not found in the list below will be stripped before an email is distributed on the mailing lists.
-
application/octet-stream
-
application/pdf
-
application/pgp-signature
-
application/x-pkcs7-signature
-
message/rfc822
-
multipart/alternative
-
multipart/related
-
multipart/signed
-
text/html
-
text/plain
-
text/x-diff
-
text/x-patch
Note: Some of the mailing lists might allow attachments of other MIME content types, but the above list should be applicable for most of the mailing lists.
If an email contains both an HTML and a plain text version, the HTML version will be removed. If an email contains only an HTML version, it will be converted to plain text.
C.2 Usenet Newsgroups
In addition to two FreeBSD specific newsgroups, there are many others in which FreeBSD is discussed or are otherwise relevant to FreeBSD users. Keyword searchable archives are available for some of these newsgroups from courtesy of Warren Toomey <[email protected]>.
C.3 World Wide Web Servers
-
http://www.FreeBSD.org/ -- Central Server.
-
http://www2.at.FreeBSD.org/ -- IPv6 Austria.
-
http://www.dk.FreeBSD.org/ -- IPv6 Denmark.
-
http://www2.de.FreeBSD.org/ -- IPv6 Germany.
-
http://www.jp.FreeBSD.org/www.FreeBSD.org/ -- IPv6 (6bone) Japan.
-
http://www2.no.FreeBSD.org/ -- IPv6 Norway.
-
http://www1.uk.FreeBSD.org/ -- IPv6 UK.
-
http://www4.us.FreeBSD.org/ -- IPv6 USA/1.
-
http://www5.us.FreeBSD.org/ -- IPv6 USA/2.
-
http://www.ar.FreeBSD.org/ -- Argentina.
-
http://www.au.FreeBSD.org/ -- Australia/1.
-
http://www2.au.FreeBSD.org/ -- Australia/2.
-
http://www.at.FreeBSD.org/ -- Austria/1.
-
http://www2.at.FreeBSD.org/ -- Austria/2.
-
http://freebsd.unixtech.be/ -- Belgium.
-
http://www.br.FreeBSD.org/ -- Brazil/1.
-
http://www2.br.FreeBSD.org/www.freebsd.org/ -- Brazil/2.
-
http://www3.br.FreeBSD.org/ -- Brazil/3.
-
http://www.bg.FreeBSD.org/ -- Bulgaria.
-
http://www.ca.FreeBSD.org/ -- Canada/1.
-
http://www2.ca.FreeBSD.org/ -- Canada/2.
-
http://www.cn.FreeBSD.org/ -- China.
-
http://www.cz.FreeBSD.org/ -- Czech Republic.
-
http://www.dk.FreeBSD.org/ -- Denmark/1.
-
http://www3.dk.FreeBSD.org/ -- Denmark/2.
-
http://www.ee.FreeBSD.org/ -- Estonia.
-
http://www.fi.FreeBSD.org/ -- Finland/1.
-
http://www2.fi.FreeBSD.org/ -- Finland/2.
-
http://www.fr.FreeBSD.org/ -- France.
-
http://www.de.FreeBSD.org/ -- Germany/1.
-
http://www1.de.FreeBSD.org/ -- Germany/2.
-
http://www2.de.FreeBSD.org/ -- Germany/3.
-
http://www.gr.FreeBSD.org/ -- Greece/1.
-
http://www.FreeBSD.gr/ -- Greece/2.
-
http://www.hk.FreeBSD.org/ -- Hong Kong.
-
http://www.hu.FreeBSD.org/ -- Hungary/1.
-
http://www2.hu.FreeBSD.org/ -- Hungary/2.
-
http://www.is.FreeBSD.org/ -- Iceland.
-
http://www.ie.FreeBSD.org/ -- Ireland/1.
-
http://www2.ie.FreeBSD.org/ -- Ireland/2.
-
http://www.it.FreeBSD.org/ -- Italy/1.
-
http://www.gufi.org/mirrors/www.freebsd.org/data/ -- Italy/2.
-
http://www.kr.FreeBSD.org/ -- Korea/1.
-
http://www2.kr.FreeBSD.org/ -- Korea/2.
-
http://www3.kr.FreeBSD.org/ -- Korea/3.
-
http://www.lv.FreeBSD.org/ -- Latvia.
-
http://www.lt.FreeBSD.org/ -- Lithuania.
-
http://www.nl.FreeBSD.org/ -- Netherlands/1.
-
http://www2.nl.FreeBSD.org/ -- Netherlands/2.
-
http://www.nz.FreeBSD.org/ -- New Zealand.
-
http://www.no.FreeBSD.org/ -- Norway/1.
-
http://www2.no.FreeBSD.org/ -- Norway/2.
-
http://www.FreeBSD.org.ph/ -- Philippines.
-
http://www.pl.FreeBSD.org/ -- Poland/1.
-
http://www2.pl.FreeBSD.org/ -- Poland/2.
-
http://www.pt.FreeBSD.org/ -- Portugal/1.
-
http://www4.pt.FreeBSD.org/ -- Portugal/2.
-
http://www5.pt.FreeBSD.org/ -- Portugal/3.
-
http://www.ro.FreeBSD.org/ -- Romania/1.
-
http://www2.ro.FreeBSD.org/ -- Romania/2.
-
http://www3.ro.FreeBSD.org/ -- Romania/3.
-
http://www4.ro.FreeBSD.org/ -- Romania/4.
-
http://www.ru.FreeBSD.org/ -- Russia/1.
-
http://www2.ru.FreeBSD.org/ -- Russia/2.
-
http://www3.ru.FreeBSD.org/ -- Russia/3.
-
http://www4.ru.FreeBSD.org/ -- Russia/4.
-
http://www.sm.FreeBSD.org/ -- San Marino.
-
http://www2.sg.FreeBSD.org/ -- Singapore.
-
http://www.sk.FreeBSD.org/ -- Slovak Republic/1.
-
http://www2.sk.FreeBSD.org/ -- Slovak Republic/2.
-
http://www.si.FreeBSD.org/ -- Slovenia/1.
-
http://www2.si.FreeBSD.org/ -- Slovenia/2.
-
http://www.es.FreeBSD.org/ -- Spain/1.
-
http://www2.es.FreeBSD.org/ -- Spain/2.
-
http://www3.es.FreeBSD.org/ -- Spain/3.
-
http://www.za.FreeBSD.org/ -- South Africa/1.
-
http://www2.za.FreeBSD.org/ -- South Africa/2.
-
http://www.se.FreeBSD.org/ -- Sweden/1.
-
http://www2.se.FreeBSD.org/ -- Sweden/2.
-
http://www.ch.FreeBSD.org/ -- Switzerland/1.
-
http://www2.ch.FreeBSD.org/ -- Switzerland/2.
-
http://www.tw.FreeBSD.org/ -- Taiwan/1.
-
http://www2.tw.FreeBSD.org/ -- Taiwan/2.
-
http://www3.tw.FreeBSD.org/ -- Taiwan/3.
-
http://www4.tw.FreeBSD.org/ -- Taiwan/4.
-
http://www.tr.FreeBSD.org/ -- Turkey/1.
-
http://www2.tr.FreeBSD.org/ -- Turkey/2.
-
http://www.enderunix.org/freebsd/ -- Turkey/3.
-
http://www.ua.FreeBSD.org/ -- Ukraine/1.
-
http://www2.ua.FreeBSD.org/ -- Ukraine/2.
-
http://www5.ua.FreeBSD.org/ -- Ukraine/3.
-
http://www4.ua.FreeBSD.org/ -- Ukraine/Crimea.
-
http://www.uk.FreeBSD.org/ -- United Kingdom/1.
-
http://www2.uk.FreeBSD.org/ -- United Kingdom/2.
-
http://www3.uk.FreeBSD.org/ -- United Kingdom/3.
-
http://www4.uk.FreeBSD.org/ -- United Kingdom/4.
-
http://www1.uk.FreeBSD.org/ -- United Kingdom/5.
-
http://www2.us.FreeBSD.org/ -- USA/1.
-
http://www4.FreeBSD.org/ -- USA/2.
-
http://www5.FreeBSD.org/ -- USA/3.
C.4 Email Addresses
The following user groups provide FreeBSD related email addresses for their members. The listed administrator reserves the right to revoke the address if it is abused in any way.
| Domain | Facilities | User Group | Administrator |
|---|---|---|---|
| ukug.uk.FreeBSD.org | Forwarding only | <[email protected]> | Lee Johnston <[email protected]> |
C.5 Shell Accounts
The following user groups provide shell accounts for people who are actively supporting the FreeBSD project. The listed administrator reserves the right to cancel the account if it is abused in any way.
| Host | Access | Facilities | Administrator |
|---|---|---|---|
| storm.uk.FreeBSD.org | SSH only | Read-only cvs, personal web space, email | Brian Somers <[email protected]> |
| dogma.freebsd-uk.eu.org | Telnet/FTP/SSH | Email, Web space, Anonymous FTP | Lee Johnston <[email protected]> |
Appendix D. PGP Keys
In case you need to verify a signature or send encrypted email to one of the officers or developers a number of keys are provided here for your convenience. A complete keyring of FreeBSD.org users is available for download from http://www.FreeBSD.org/doc/pgpkeyring.txt.
D.1 Officers
D.1.1 Security Officer Team <[email protected]>
pub 1024D/CA6CDFB2 2002-08-27 FreeBSD Security Officer <[email protected]> Key fingerprint = C374 0FC5 69A6 FBB1 4AED B131 15D6 8804 CA6C DFB2 sub 2048g/A3071809 2002-08-27 pub 1024R/73D288A5 1996-04-22 FreeBSD Security Officer (Deprecated key) <[email protected]> Key fingerprint = 41 08 4E BB DB 41 60 71 F9 E5 0E 98 73 AF 3F 11 uid FreeBSD Security Officer <[email protected]>
-----BEGIN PGP PUBLIC KEY BLOCK----- Version: GnuPG v1.2.1 (FreeBSD) mQCNAzF7MY4AAAEEAK7qBgPuBejER5HQbQlsOldk3ZVWXlRj54raz3IbuAUrDrQL h3g57T9QY++f3Mot2LAf5lDJbsMfWrtwPrPwCCFRYQd6XH778a+l4ju5axyjrt/L Ciw9RrOC+WaPv3lIdLuqYge2QRC1LvKACIPNbIcgbnLeRGLovFUuHi5z0oilAAUR tDdGcmVlQlNEIFNlY3VyaXR5IE9mZmljZXIgPHNlY3VyaXR5LW9mZmljZXJAZnJl ZWJzZC5vcmc+iEYEEBECAAYFAjfiQC8ACgkQFtfJqCKlyMHelACgobxZJb04iYuX x3yvcRM9eDYvrDUAoPlQ7FYV3Ap0q1x9ugtvtkY9RKutiQCVAwUQMXybPR9/qQgD WPy9AQGZlwP9ERpQ8NHHqqvVdFCUyzql+A0oTCcqZxTNAsK8oGdhgaYPnJ08vEI9 IWc9w+2FpRvnNWAxON+NLZ+QSJGu5rh24ZGCo3jFjtVECwhB4xIhME5l4Fll/ahr 022J2vk+6ZL25D1u919Yymx6aTYxpEb0FKjLla/LxXFE5hhTClPwJ/aIRgQQEQIA BgUCOe6FUgAKCRAgFTHVhF3+3cYOAJ4ob3xPYBvXMUJ4763hiYmjcxxwMwCbBt7f JjLgFLrl0GTHI+3XUy863ayIRgQQEQIABgUCOe6FBQAKCRAj54bpvu2Ubg8VAJ4/ mFaHeMESmKaecUgWGmOEO9eTnACgitWpFs6CyYxVi9njRacLcq3YEjiIRgQQEQIA BgUCN9UduQAKCRAojl0PRLxF41/4AKCTeNh4mqqf8tdjnR85pFpskRx+ywCg9H92 2R3agFx51m/rDVZrQdQMNbeIRgQQEQIABgUCOa1GIgAKCRAspFpPH4BUqIexAJ9G yK5hxOu1r3hP06vsCY+JlT5+qgCfbXM/Jwyqa4hT957KuKMCb8YoGAyIRgQQEQIA BgUCNiYypgAKCRAxg9ffzPDDsO1TAKDaacCVpo7H3Utc4S/tcDWJSnunpgCfe+Yx Ckq7TFz7/ViNE7VC21xbDSeJAJUDBRAx7Wi/MhwicC+17akBATfFBADQuniqeM1V ABbbrauyJa0Ke+W13IrG9dj6Vwgck36FAjvpHhoNAflf7w3L8hC9gDcAHYq6WYvy fp36xViFLe3za/7UtobAglyCbvDZUEMrtZ0SglZG5yssV0c5oww1fIAcdBev2On4 bhN2Jbw2RM2ocOYsZVDm9b3BWBavvZ1onIkAlQMFEDRYThY8c7aEztUBTQEBqLAD /1lki/c7seXvJN3nw1hB9NCTzNdMGrWxZkZESKX2xIwC0vdUw43rIiSXQnJpLOCq Yr4QhzUepuZ2fDqlGReLhG5lXSjt5GT751seh3jAUPNSXSb30XqYXfn+PrSAo/vK Qni9mNsnnMv+RM7C1XrAJACNfzQEYvFTbviiwNTGPbwyiQCVAwUwN9FJ3kQipELW Y93hAQHJwAP+JCvN/+QqOQBhiXycrstlM0AI8OazaWJzVLk/d5B3egxbZ9CL17rJ yh4aHIFA6c7V0PfLljOtNmsOt/1IViDq3Jvy1Y1gBQKdytH/9eDA6XFK9VzLiiQR NykKx9F8GoUPZ4P5dPZbAPrSZks1glcC2d+fbOxR2nqcsgrHOvFkaJaJAJUDBRAx ezKXVS4eLnPSiKUBAc5OBACIXTlKqQC3B53qt7bNMV46m81fuw1PhKaJEI033mCD ovzyEFFQeOyRXeu25Jg9Bq0Sn37ynISucHSmt2tUD5W0+p1MUGyTqnfqejMUWBzO v4Xhp6a8RtDdUMBOTtro16iulGiRrCKxzVgEl4i+9Z0ZiE6BWlg5AetoF5n3mGk1 l4kAmQMFEDjSd7Ba/qoe5tAA+QEBYl8EH0xvXHC98JOYhuI/LRJfKlJs+UKtz8NP y6PJR4lFqowz+0zCL0i3kCzAZ6/DQu3QGd9U12wUgk1HFkKa3+4uEWI9UztMv+P7 PMxAWXmU1D6JrsLEhMoZGAXITM2xA7SjYJ8PmTxC7arxbcBtcHML7UC/VOOTXYpt 32RPpag0y1vZl0atPohGBBARAgAGBQI2UXtRAAoJEF5tclhkX8VaXSgAn07nfstE SQXUj0sViiGSb4FKYchNAKCa8XqqtwRyxakgsn52S5igUPunAokAlQMFEDkjJqtl YKmsNPn51QEBW0wD/j4AalJ2e8j9nwU18PhpilklLbERzJEVXPuZS5Md9alubqW2 j4uQr/0sBsjM76HmxpG9a+51v4OaCJpIy5aHPxRd7/iYfYsKgTsrq+p73JTiOHEo hwjPDTvX81Ery22h7UdzpcU0EIAE20avOMjPExbH7QZcyHMUM9Q5l0WkJ6CqiQCV AwUQMXsyqWtaZ42Bsqd5AQHKjAQAvolI30Nyu3IyTfNeCb/DvOe9tlOn/o+VUDNJ iE/PuBe1s2Y94a/PBfcohpKC2kza3NiW6lLTp00OWQsuu0QAPc02vYOyseZWy4y3 Phnw60pWzLcFdemT0GiYS5Xm1o9nAhPFciybn9j1q8UadIlIq0wbqWgdInBT8YI/ l4f5sf6IPwMFEDkjJrdvyNq9f5qbohEC7xgAnRXRli2CYnKoOrvXD7tTk3/GPkNL AJsFCjrH/0qD8/NnXvT/FXjj84Ft7ohGBBARAgAGBQI30UzwAAoJEHJKc3ExfTQY sGEAn2u6OWlrZTTzj6MboRu07IQht3ABAJ9aNjgwJEnUbB6eeS5FpjGYaJF+84g/ AwUQOf5IWnfOKcWPoS4gEQIybgCfY6SVwbn1YU9D8zvrPLFk6iTf7ZEAnR0QI7g2 ZxmURl9t3pPw4Q5OZxmmiEYEEBECAAYFAjkqNr8ACgkQepCyp+DZIIGh1wCdEUoD Ma64Eay5Bt2Eaov4EAIe7rQAoLxRqUQyJ/RvwIboi8UhYxVBn0WBiD8DBRA1dRak fQDZrrPROmsRAnhtAKCt7CuwVJNbQJsw5SKB9PLhRhwPlQCcCr91DLaOtQdamp3J ZifymLWGc4+JAJUDBRA0BHssm2EaIrv47QkBAa3SA/0QCsvyCpfEFgTBt3OX/Tup FJDsSFZ98ZDfXzm1XnFhQMxmy/cirpXyvgBCqHWbJGHJ4xr/hYSIy8CVJwFJ3chx x0JX8nYmWYJA6velIK7gNvz0yXq6KezGd6emd0agmfSYJ+nVxv+aygQLkzhLRCph xeBoHB25516sPlDVuG6ooYg/AwUQNJSllKIbI7NOXbhsEQL/AgCg9+pOStYd53RD OSn7VDW/0mE34kkAn2vvMS6VKjaTlFzn3vkre1oHb1YhiQEVAwUQN+KpMKIvqXu3 4+9rAQE5sQf7BFcSN2BUGBUFO8Jo0cqMhZsAKHJ64ISlbtn70by126ClGos5p9hZ bjgh15YWXXjcYbtOZxeB1sbaa23v96NsG1Z8FJnUlotH/gZnJ0pYfrF29txDnOWF qrZq1zXfibsx40fyAPWVIYd/JihCYgacJP25iuqwcyz+pDV1CP19nkvLu8mvGZ6c Bjoa5CNa1uVjZnpMJ5Bjk/HDkohqWMNIVrViXeUs+3vZYhL7dqFw4YG+ai2wGjZT ZpfRWbnbLECgu1d2U6CpzHaM1iWzxIq7h24660sdyiB23Pu1qGpqLKtjQRkQf5xi 67Z6hRTd7jPedU9rhXGYa7zmEE3pjR10LIkAdQMFEDLg3pKizUSa5yVKmQEBkrID AIpRqAzbw3zOk8jC3Uh3HP2ip62u5lNelM4DvNstV1ShCAcTQeMHg2Gfz7LIas0z PhctHiEJ3pT81Kt8GlFs7tMKnnYUYtIDvzF4lnKN3Lnk6t8PfzDGju+0eIT00jhX SokAlQMFEDGfZ/CzWmLrWZ8yPQEB4xED/jQ6g1g1ZRSojfgoco1PtuBEdDIQ11kf RBYSTLue519gFf6/uRK9JCv0nQ13Kp/RLsemJGaVTgbfkyQ4mL40t08oAYhj3Kf1 pKvCNj4ULSsRuGbmQgb7Hbdq9sVpRFEQ0P5o1MHNRKJfmz6fFMRsw4qiKJCw3Td+ A27+lGUNalyEiEYEEBECAAYFAjoZ9l8ACgkQvhpT6zI73uZ5ygCeN2uwNIKNlve8 H1RPzE5idKHVd2UAn2xncU4MzWVWB0p3stKDapNrSlr6iEYEEBECAAYFAjnujiAA CgkQwvyGqiU5RouNEwCdHretFlx87kkxYyzVqAW4DnJTIM8AoPH5SPHBvCaa/nVe iqxb752bTswqiEYEEBECAAYFAjlkC98ACgkQw3VnhvzhGZgzfQCeKMs/5WEFSH0I /Z7XHnWjdPvrqyAAn2soSnYJxm7W9ozGV3bPBEBUfJj0iEYEEBECAAYFAjjg+GYA CgkQyeNSMMVCfNQbDQCeLv3GKIr/uWaIeExQ+ck+3xMgL0YAoPfMptfM4MUFdQx3 9P2H1t6NeHbuiD8DBRA2JKPDyhH+2E0KVusRAtsAAJ43gdM5/1PuLfG3JYJXBRAg MaLBmQCghhbRGNi1rNpsqgsgA30ECOz0YWSIRgQQEQIABgUCOa4l9AAKCRDUBrWy gK0U3TWTAJ9GriAZl/AJBRxs6qLZPJ7ezQCM4ACdF1ToITPrucbcP2A7zbfQG7I3 ky+JAJUDBRAxfrKs4mCk8tmdCOsBAfKjBADU2/YBjy8kit2na21XpFS1kFicjuBM 7ewULZuEgewK99VTcmmF+pZDsCdNdwPbI+MZxyFR9z8RwvW1KWpbjLs8w/gYdmn2 8eiDU0CyAsL1jU//Vw566FnSkOllnnPFOjpNBwIGNADoqGIEU/hMmqXeiUV88GHc H9O7d2qYRtJam4hGBBARAgAGBQI40nYsAAoJEPBy4C68JkYN4WcAn2yP3RUpNcC5 n+uHoqJkIH8N0XpnAJwKoGX+9iMIErz2QY4Jk5TrUJDYIohGBBARAgAGBQI6hUyi AAoJEPOkM758VsXvl3UAni+nwdDl2L+tpbrPwfFRT5UwstotAKDgbjkbZxiEDnXK jvXXhGENSNo+rIkAlQMFEDF7PcL1FVv7jlQtXQEBqTwD/0kgb+NElrNBsqibrAzD znYL9nSoEsnLsp03fTT33MyNBh4L0+eWRnRRKNDhNKkLxR6ti/oh+FWc1jqDIXYf HgJsQWWimd8DVzjLG1cq2LWRI3rAHL+SLdKaq18OE9DhDfWnrdxJ7kDdqgdyO9a6 o8ulbhtra4dUoY/eDtJK3oA5iEYEEBECAAYFAjkE2ckACgkQ9hzIta7zOEd+HQCg ulFl6qEpTzmaxe3dBc13g9XgC/UAoJtc2bNVLocyNcHlaAr1akdcHhZliEYEEBEC AAYFAjwHqEoACgkQjDKM/xYG25XGowCgksB5KdBw9oNI5g82Bj41FKrqVNYAmwQd 6GVrjPoEIOrWivHvGZyu6wq1iQEVAwUTPWui5GfCgI8zwWJ7AQGtGwf/R03RRTkb y3D1YzGPSiSMeLXlW8niVq3+TheFs5tt7WqRAOKzslbD4r1O9wZRj9WfmhX1O/cV HIqDAi/31dkCYpd9xU7FcLTHccLNsQB5px7VIrm5xKLuLRr/dknQE5ovRboeTY/Z R6c/X6xxl5kE08SddpSZTigvRsjM7seR4KrIhM3xNbJv+oArp2ZzlUwWJSjgaQ9y rEkHi/YSXO7Ki5yt5zROyZta7uBVnSnLd3Cpo+6PiGruZzeBUYmqtQgvELI0QxQb 4R7ATiIUIcV+Q0pHyo62ZQB8buvV4Kmg6JveCMFEGm0j7tQr7AP9tnqvFi82ZFyI Ns32Cg9jTbesiYhGBBMRAgAGBQI9a+o8AAoJEGxj2gSE0Nfn+poAnAgvb0XQ2ZZu gJXWrrRBAvFFbPNOAKCrc9LNn2jyy5OyURFM7AQdnCzWr4kAlQMFEDmo02XqTy5M MrtfyQEB14ED/1kbHNETBdwOk6FMQMMxchst6eOjT18X/OG+awka2rHURVTa0+/E pbW0prdCK6bf28J6+sf6qJE2DgOso6ezWaYEM8w+TUpTDWkxPLFucr6e4lYTVNS1 qUZ7XWR/DLx1mmkNwJxcYmQvKqhrI+S84DY0OCGxuQM20meEVBv92HaoiEYEEBEC AAYFAjsMnzoACgkQ95iIH0zVZquoQgCfdDL+GxaivCWGHqsTa84xbD/0nhUAnj3U w9mBn61RMnMet1ghr/wYPjGaiEYEExECAAYFAj1seq0ACgkQhDa3C3+GgmjeMgCg ji9fKD9tx2rarNVA7kHGEdaFL5EAn3ZZZg/NPh9Tq/gl+J6FquY1ihAliEYEEBEC AAYFAjoayscACgkQB5oFL6O4NUlLTwCfSRr/sxT4mkN9MMMnPgM9BMuX91kAn16I J4I4BkzhruhVw57EmfZJ2hV3iQCVAwUQOiFULh0dUWPziF9ZAQF7KAQAz3C4uevJ 52l8DcQIyvbDsJ1F1moSM4VyTGlQ3h/yCvhMNCV8AeO3HzPv/trlRo0tH0S9vIK0 jIlS+Sluu867zFmV7ElC4g7FlWCD4Q+v6D2aeVGKwQMtq5nphHJe/f/6fcQUsUik n+KGWqCxPr4cCP0nZ+vo3xusZrCefgJGHuyIRgQQEQIABgUCOc5FigAKCRA5fJvC 92JfhAHRAJ4zAbRQThtxHKJvnaJn1MTOHNk8tgCgqjVuMOMyzCv7qH5I5RfFwesm dOSJARUDBRA6Gsqkv8plHjvdG4cBAfhHB/9lCTNpMvNSiDndGIr09xtau3AZfPtM qI6GhbkhTxJsrYjvx03Fob3cRyAK8Fe2rs4tTbsXJHziBuGNjPjE57dvZ2fjdD82 FN+CV0uTkfDD5FfI6inN2x+DSd5319hCQHfDmrL+ynWY8v7zym5uZvoNFM3n1JJr ZEWIeeviqk+Kceyr1Pvhs1wopJR/Iidl4M8GohpgmMWHnkJE6p47ogiz+RblR1zZ bfg+OeW4p6e29Cc7ZZj1gPuiwzxyVUJYUSvGEv77mOH4HC1/i7JQQEFlO2iqHz41 Y1NPNw+d0jGlVYrTmOyD64h7PPx8BfqckzExLm+O0En2hTtxf8FMIPJwiEYEExEC AAYFAj1tVTAACgkQObaG4P6BelBynACgn57QztSMmAfIoEipyN1sFe9T2F8AoIu/ 5QivbleDhJLkAh6AGnJmn4TBiEYEEBECAAYFAjwQPIcACgkQCTTdoJNYh+fWQQCg v277iDrWOe34Sz3jBlYM0ejqj1sAoNxTBSCu1vpSuvkNF8/rK8WJWhKaiEYEEhEC AAYFAj1s3rcACgkQEaIhGlu+jgUTigCgjznq60x8YncZwdMxSOM/WSE/X4wAnRv8 dAPcaTi3oUoBD4czwtqIqLdmiEYEEBECAAYFAjtnG00ACgkQE8+QKAmQvcdkqgCf SJRTUZqxpVmnsQ7TC3PoxGkkoUkAoL+iPA9pJct3X6wAoS4zZan0QQBkiEYEEBEC AAYFAjsUMXQACgkQFaBUcqVWZFxRaQCePkMGXm1mJt4QLV7CFQPMLWIXcRIAnRGv gqJskKdX/WDMOm0Qzcv1e9tUiD8DBRA4T+PeKAta5RwC46oRAiICAKDSCzHYiyZY FIIG/cJlN55iEVPywwCgkwdIotEBPGV/cFcm09Ldr0I7RCCIRgQQEQIABgUCPRiz qwAKCRAvl2lRs9uJ1iRcAJ0bwKQd6Ww8HBBfAoP0Oi916+lxAQCfTTGVk71LC6Tl uEfCmQAfL4fR8GaIRgQQEQIABgUCPdRjLAAKCRA6DX7EO+8AaRSvAKDHbhFKpO7/ hfnv6pPrmqEiK2Cz6ACgi5EcyF/0WTt35jT1cOsrgGj0x4GIRgQQEQIABgUCO1L8 wwAKCRBAAWnsI1FlKf48AJ9wYVYNIlcpM/7d72hdnyKMhzIJ1ACg7QsIGI309dnc l4my/xoQEIvLfOuJARUDBRA6hSicRc070KWhbSMBAasECACX9eR0AnXP6QOSOxyA ACm29K9F9rkGckeC18hoq5upBZgJ4grdByGOB5MjtcnU6N5xjZO6p9dlRn9H53L+ CywBx0IHwj9z/lJWxp35NZCK0vd7RVUOEGXQEycTV1BFdKU8JrojE7cHoeqNLdXB X1qKJUe0eGx4t4l9lXmvGXaXbqGdP8Bbk+/SyAoPUH2Uq4zVAw2a83NqRhD/SwFC D3xhtfx+Sbfqt/0OYRO1yyl+Q5W7qYIn8vNsn4eZnMx+uR00IZZSzIqqeij6X9dP 3teNDVM4umysS4ihP9AT9omC5KE4DgIFYMrAJi2DeE5VZ0RVg9jKezB77ZPEcdul tIkGiQIVAwUQPMSF0UlJvp4u2fuEAQFlRBAAhYeVJqb5rPap1Kyv7tB6hANjzk4W JP5tJQAEZq7mfmQOVNn34yqKfiQ3B12k0QuVMVbSfwQjJHTNO/pjMa6XyvRpelNr DKRKSnbHCD6PYm3P7DkVEhEyY0anSqp07aqVwJOpBjS/xUKBEjIsR7W1B1zWuAQG lHZAZvwW6H8Wodeq1VZ0KO+UDdkil8wv3nngmqyrd6vDG5Hfe4bpFHV7AnDBD0VW T9A92ljxA7241ixbE5OQdB9+zbC4j3z1tUQNuu90amLuEGhP8VEvduroY1b2PR4j AHhOPvAhMer8o7f3NJvGtzYPm6QGtZ/zQGY3KsCFqjMpNyOLipBSpAml40CY7c9C NQbv6CLmFaDNZeKxTdfsr2M87twRC9INoQ7kDU2ODiC7c22SY5OSSUHxkN5hpSSO kwa9TtgIzb9a5kRNit0sbrM1pxAIfyM3/a3IqS3jYQ09kBSBhHiJaDbFIGa9IAoR pxQ8FbqSjArP0AzB7sTd3HznzE2w3OG4yC9zUnGi3rAswS3gD0rM1q/FbLCWIXaK vX8/zXvZwqLrga1/jfWfzJ2jaxOTACr9MhxDaLenhJdOzdUGZ7LM/6UgcDulXDMv Uqt3ZQN1EBJWSn+c2ot2EAND8BwxTv5Qe2gKSuQDcSdDYCF5jq2sUB7uLXeb/PHn Ppf4DSh4s2aQjnaJAJUDBRA50qu1TVYoIXkFDBEBAWXJA/9P/WacgreWsXDLdTVG oLGj75w8mYawJOWe8g2AR62hDMYXaYfy4r+BuTB0pffQ+p7YATwqkSkfrrTpDKEG L+AX0qOk1WA/rCya3X9tI34+mS35jC6ojuawuhd7YeQL7JSLVHwnIUOi/PyzJ+Ap kiN/U47brTg3bUtXMCPJobkbVIhQBBARAgAQBQI9mi59BQMAAqMAAwUBeAAKCRBS QdLADYP+M3bNAJwJpH1OvIb4kt47z35rXlTO88Ip6gCg13zMNIaC5nC185eO3sJJ MuA4LZaJAJUDBRA5n5ZdVS4eLnPSiKUBAa8/A/9xDi1zq1Ub8VgD/Xd7ig4Zuyly yzIR+D2NPWcRyL8/P2yCD9WYAUDP8tVdg7PdURZbcrzIkn7ki2q2Yfe97+z49Uu+ Hwyy0J8ohEA+wPXNmzgQzAbx/+9ApQNBqF4ZSNfMucDop8usT6ONHfy9Vd1d9+uD maeIe9bphQdJIxDnJYhGBBARAgAGBQI73m0jAAoJEFWR4sBmZMB4FZ4AmwQ6L4oL sShzLvvj0kyf3zRoXexXAJ9+3dg0qnv/kf+Q1NBQLAB4VuH8zohGBBARAgAGBQI6 g5XfAAoJEFq8tAVo6ECl+CQAnRhDTZB3XhOHwXk0yIkM/Kqxvd17AJoDpPaovyR9 vrPtHfqmz7iUQArY1YhGBBARAgAGBQI87EuPAAoJEGfdjD7N+KUK5oMAoI+HPDlR oK0xE5sZcWkF74KKN1GDAJ4oQDcVouLhlvEmwNI4DPOBECH+JohGBBARAgAGBQI6 keKRAAoJEHEfJglGqGuu4V8AoMsy5j9fHhFYNHeZElZCItIXer4/AJ0bB5XGw8wv mVnv4rCZSByP+xX+g4hGBBARAgAGBQI8PavhAAoJEHS2WFCIDrVmKAYAn1LPbOk3 v8Pbb/oEGM1tcPa6irFIAKCfXhJT5ShZp8HbzHV0Jmdiv8P3aYg/AwUQPEZhhXfz abWdRACkEQJ5RACeJM8eZ6nABXWKLGgJrnoQWsFSPnwAniof45bqdIbpnKDRw2j7 YSZrY2Q5iEYEEBECAAYFAjvoww8ACgkQepDwSertcktWiQCfVgjSt4c7jer66Ata zdy6sL/H4ywAoN8OO0ZPdhFq9IVqDv+IqzRZ9jCMiEYEEBECAAYFAj2Ex64ACgkQ euww0n4YeemmjgCg84S9yrDES6Ml2YBJCJyjXCNJjPQAnRVMe2cHFOyuqdJVrA3c WE0wTfv9iEYEEBECAAYFAjp4qRAACgkQfUTY4vIZ/ccq+ACbBHkeVWJXKW6urP10 o1YBieTK1UcAnAyCeb/LVtpBi/RlBHEngHYK20JxiEYEEBECAAYFAjq6sXMACgkQ hmlBlxFfa5NPcgCeN/pXimuBfl1DiX/K4zUYPr9WUDkAn1GdMcTeT7UXEGKT3jbN uL7oOe8liEUEEBECAAYFAjuWX80ACgkQjTp4hdER50u5QQCfYFhtQBOH3R010GPp zC9mTn2P834AmKuZutBRW2NFZk6ZEKMv3aBeoVOIRgQSEQIABgUCPU6ueQAKCRCb 9T8LrWaKouu4AKChGgLqkmjKX7LuA7a8/+5+uo3cewCg9e7cI5+qXXiNUdx8vdaH KELrnAGIRgQQEQIABgUCPEl7cgAKCRCm6I/CQOyAO4tMAKDgGO2uPKlxtJ9Y5RdA 10eni+Bt6ACgptiMFY9Yxb3gRg1rqBCYbELpVjGIRgQQEQIABgUCO28s+QAKCRCp cFIQKmzwwCfMAKDiSpttF+yAizedkAoX2Fas2j9ROACg/HCl/TiTBmyy05lpEhI6 G2T7gCGIRgQQEQIABgUCOonjrAAKCRCqrYybu1fa7lmYAJ94JLonN4Xfl7ck4nYC VNm/9s7skgCgsgjXasEExY+35S7VdKMnTiNB4lOIRgQQEQIABgUCO59Z5AAKCRCw ZtrP3uDb3nOxAJwIbNw+1rMNoZPjqtrlJkHZBggpAQCg1ZQMlrQ3Yzq3FtfstaID uB/eCnOIRgQQEQIABgUCO12xWAAKCRC8k7efLMFKzqZIAJ4xJ10+/DHqFKMslq/l Qqv4a9npvgCgyfdTifzpMkRDWLA5cvFuX6zOuwyIRgQQEQIABgUCPT1CKAAKCRC+ cflyjQMZd9toAJ9GsKnJOdWyxOxz37mdIIO2C233rACg3u9Xwg0eRClWXLAddXTU VaCuMaOIRgQTEQIABgUCPPPoUgAKCRC+ikG7DCBTdyiQAKDctcty8HQzzCw+M38p zwhR8v5EjwCgiesJsy6FduHIHHj+li2qCzuCiF+IRgQQEQIABgUCO4p+KgAKCRC/ S9DmBJ24eVS/AJ9hSDvNeKYYGX/LtnKXDdCUddBLFACg9DcD/bwElcFHmhuiLYSq LES9Ek2IRgQQEQIABgUCOpmdiQAKCRC/wGh+drn2FjcZAJ4jipKoY68oUy5y2txI gHQZ5ZoOmQCfaIqj+FqqE/eyXO0nWRecMJO0qHOISQQwEQIACQUCPWY7JQIdAAAK CRDAKzUo/QATuEpCAKClg8i2KTHtnDbLIxwWP9+cRku8hQCfWkO8FtH9tV2qcLvi UiRRpje6/HKIRgQQEQIABgUCPRcSCwAKCRDGrxdsbST9r8WrAJ45VbHyFFe0gAmp Hn/HOTwuDP9sTACdEGPWZUbdh3cwkq1bU4XsTWsx9aiIaAQwEQIAKAUCPQpUgCEd AHRoaXMgSUQgZG9lc24ndCByZXF1aXJlIG15IHNpZ24ACgkQx5l2mgr/Abx+2QCg mm7ing8UokrMjIqNdfwGiGmv0V4AoMieEC9PK3S3HCwErz1phzwNKBJxiEwEEBEC AAwFAjqK7pMFAwHhM4AACgkQy1M9HLXPwF1XpwCgxJRBu9iubUiz8qTq8colVw8q ZQUAoLA+r1MPjpPZ9x+Oyk4yEQ2MB8KHiEYEEBECAAYFAj2E1awACgkQ0FID31Px APeGsgCffM9cpQKRVuEHjfj15F7SCdMbEYYAnjscecrZHQV/Cn2H4Av3xna/+tz8 iEYEEBECAAYFAjnQtQgACgkQ2kAhn3EUhVMejACgjgbJTYPwBt/zyrOTchRO3OxW 63sAn2lW01yqpA1W9GvdBWpM7gAncPc4iEYEEBECAAYFAjsPOkgACgkQ5HbjyvLK aPKsXgCgoBwbAibH7cvEou1SR0F+hkAMqPgAn21tReHxconK6qS64Uze+0Qv/LlF iQCVAwUwPQpUe+pPLkwyu1/JAQE+zwP/Vi88jdeklETlX89KbQDLE0D0pczfe71b 32EkKQdShPWbfr6QHVgHTbls3aZEc6vnifpw1F9kffZia4BUJ0xICFld9DdDOI4A H1TRcwn8uLzfVJyfH66yiiZ7yhL/dSUj6RH/pgj4tpN30/bAE/myZLZQdlhdulV4 TT9h6kZ0RUCIRgQQEQIABgUCOw+IMQAKCRDvT2MngQxPCROYAJ4pocwXqoIYzT4j Ts4Yjbk0iG4BfwCfR4rTYhtHLyvp8kr7PCHrHR3tUf6IRgQQEQIABgUCO/58hgAK CRDxZkDCvkLcpse6AJ9hayam/L1c637DajRqya4TRvYzAgCdHoo1I4ic1P5ipXyY MncqCmvOCiyIRgQQEQIABgUCOn6aIQAKCRD/5T+BYHw1KSl5AKDFB/Q+xg2hiXYJ SB2AHVv6oOFkvACgwz08fpZjZrDtzK9W7U7Tx6zD2PmJAJUDBRM93Uya4clLRt8d 1HEBATp7BACacOWsAspqZ8P4FGq76On4XxVDJAL/lNMtOSFYDOnVKnVWPpWiFJ0q r8XPjzn8Bket5esa+F6f7XLT/6CZ2QPqsfjAxMu46tACv60ig354pfDHko2a3+99 7Ql94Zd2+DVyzuYL+izIeVwOazVNWiFQUQ2/U+KG/M8Tf9OKwjcuH7RIRnJlZUJT RCBTZWN1cml0eSBPZmZpY2VyIChEZXByZWNhdGVkIGtleSkgPHNlY3VyaXR5LW9m ZmljZXJAZnJlZWJzZC5vcmc+iQCVAwUTPWuhVFUuHi5z0oilAQFDUQP+IXKfGLfl gZ3yqy7YYxvZd/k1NGuWplDBAbwz+LJDgnCRx2N9lYNxXyKkm5l6WrMw/YGj9OV2 hf4Si3A9kn/hkDLcKMWcvzNzVWOO3Di6tfWcYdsHEOQ74FKMBYyktN4UKepJjHet lK7XLyFW1jKFY56d5n4pB3HXX9wY3PpXjnSIRgQTEQIABgUCPWuioQAKCRCMMoz/ FgbblQcxAKCM4oadmrK0TvW9swS4hj0AYKLcUQCdGg+W2XKcWUydR3c0JuNqp5Rv FjSJARUDBRM9a6LpZ8KAjzPBYnsBAZIOB/9X8cwxvLjPnk9Jzr9SKg8f9CeyQK/U zZuWeTw68savh4xLuKj5zt/krk7o8QhlZjKdE97jmLsf81UtBaj4apTxdJS8QQg6 o3fNX42KDlLjqRTZmoA/mEFiFZPic4M0C1FYlgl/2ofgC6vdPVwB4E+aqcfqZPvR G/23LStNczdSIifXT+H1q7C9EuWS9INRw2oW5fyWOBbBGq9JV9HNG8xnKlbbsUAN DDaW0X510CKeoJl4fCljlVO5KwOTVMJMzDFYeURVG5CIz1tnTCPtehQ6JczjyCzI 15DH+8Fa9GFNXnF5czJFb703et4nY5/FYoIGhxXJIEQitr/enpKxOnCJiEYEExEC AAYFAj1r6kAACgkQbGPaBITQ1+e9IwCghokf2ncxn4BLzeIXMEi2E1gGHMoAoNJ3 f25bqInx8jL91/TXiPB8511aiEYEExECAAYFAj1serMACgkQhDa3C3+Ggmh58ACf eFM+/srMh9uyJhWahBFfMp+oyTYAoJA39vEVbvkwqvBJvgJCZj7vNk91iEYEExEC AAYFAj1tVTYACgkQObaG4P6BelCVrQCfcdtxFK1VKKo0/CBUveJaAYw4rtgAoIpc okCD4QrULhkwKOPFIfrkqLcwmQGiBD1rpGQRBACJ1CQS7VnTTvH3wjscXQed2Roe Vi+n3HtxaF9ApJbxb77dXk+/DL1ZR0bcZ8s7uQ1D5BkrqSHevoA9FlEN02MM9qyI erXter2/ZEporVOG+/XMkIiVrd3AgVwUnawhOMKTlYmttcOpADKr9RkYvCT6QMqF DXJssbW7gPlEqOzhYwCgoIdDygZ5RdfXm/hBnp+oTWadeIED/2WvL/Iy0YheRTSm TvEdK+Cd4xPhmY2SrrvF2+lEoFIn94C0fJhqKhJp+wGXmQ/h3yF0gcr1NfFBm6y1 iztEz2n0ciaEmMf1tu0Y+u+YE0/1Igpoj9Kj5xxRJD5wYyDi0qzxP8BhvJ6sKJtO +f6/OIgZ0ITYWakim7d3RrNV0ditA/0XUvDgdEB0hm7iqR8FbwKNmS8DVKGs+CYr FwSBJ0vUH65WFapbdWbi2uwm8CDKgSWpS16/PVr/ql84ePWdiVhHYmkkjuWPUFHS UcDiYL8YG9rnymw6Enx3NyyrewiUOJFzWN6/u3O4x2M9ljrQQ1FmmAbw9R4KT/KH OyBC0W+xHbQ3RnJlZUJTRCBTZWN1cml0eSBPZmZpY2VyIDxzZWN1cml0eS1vZmZp Y2VyQEZyZWVCU0Qub3JnPohaBBMRAgAaBQI9a6RkBQsHAwIBAxUCAwMWAgECHgEC F4AACgkQFdaIBMps37J/wQCgje4X7iqjNbVDgwpk+98vc+/HoE4An1usSnfAlNcE cd+05ksTw1gPh+h2iEYEExECAAYFAj1rq0oACgkQjDKM/xYG25XUdgCfU5F3sYm4 1Hf28rIlSZzQMat0thcAoI9gCvTZQ9bKEQbwtFVWIk2weU8ViJwEEwEBAAYFAj1r q2sACgkQVS4eLnPSiKWIFQP/UYR/wbAka7y0ck0ILV1RRdG2XSnmcb4MSWf/LZwM fmaQ53MC+pHbRWbMZqZVlwrIRSown9qRvmFT0p47RdJ5ToKS8G8HI9vVJ/tjNU2b YfdtelrwZPvjOJ6Mn4+rzkbL3OzUOZLqJC0LKvPoBMmTNzsW7Q2gyEMfIujBbnhv z3aJARwEEwEBAAYFAj1rr20ACgkQZ8KAjzPBYnu5NQf/eSvFPfkLpwQ2HGG5/2n3 dfecW+U2FBHh1eULNkREtX+/AixPveY5wJ6Nl3z1vYqelZN2xw/+ujE92bjEIZPQ WM8y2xGZ2ynJPcIsITob2mOQv+UePgCun3E3xPRCo+Ob0jhuT45MSoSFYeTw1xgM LbCGN7LowTAG3gzytyJALGGuawv+V9dUgp6H5GVv7ukTN0OODFg9G9ePbLnkr2/T SjZP9KIth4AYLAOmYqHcssuW/UCHbzQvoDmo7LZ3lSwlmoTjZ6/Z6QCbHvX0vdP0 mDGx/PwXEaVR0+kxtScKHun1noBBA48AwMNNtZrEHPRVH1vxaSTGYqLtnBV1z+b6 UohGBBIRAgAGBQI9a+m2AAoJEGxj2gSE0Nfn5VUAoMSonGArly+4U9yM/4uWCvL8 mcv2AJ0acJM2ymhDJ1czJ7JnhTE8Xo7HsYhGBBMRAgAGBQI9bIKkAAoJEIQ2twt/ hoJob64An1BABq6aK4reFRv8XXTX9984uYxSAJ4gnZLCSdA4U3pHyBsQTr8KtDYd b4hGBBMRAgAGBQI9bVVoAAoJEDm2huD+gXpQmA0AoJ8lWlK+7PzyYSWKcItueryf x2uBAJ9Sm0elnPCWc7+gYfol5MD+X74FYIkAlQMFED3TIstNVigheQUMEQEBa+YD /15yHDEuNRD+6KAeUNLYe0EgbSxQmrkQqIm+7ipjjOUX37UJUlar5yzpKyBXv/Wv YkvUxklK6YSRd3c7XL7ad9Fc7II2efTUSOzZYP/xUeK3tFBSn94Lx5cmGjHf4WHP DODQz2nAKqEo2zMMlwCCh1Kz2GY/hCzqmltplrERjUFAiJwEEwECAAYFAj3dTLAA CgkQ4clLRt8d1HE69AP+PDOtc2wCs5idJB2fkOrLF7QW9QnfGEglBqpa+4vi78iY HQfnm8lM81xPCjnpLSI8Y8tE7VU4LGRPGC1vxHaCyqGumcPgUCi7lMR/8RGs+5Wt 5DsK11zlZ5gN81qys1xRU2qmhX/HXXQm+Yif39GmnwTXaHGlKYUsqCWcMlaOGdm5 Ag0EPWukaRAIAPJl4g1DI4Cw9fI6Q9Hk46Pwtpgiz4jDe+Yqd0bSUoP4kFD7D6PO 4cgLqOz619lMszKVsO1PDzXm1p2tSJPjIauknqJ4pbUWEhIB7+CkK0B8inVbzY3z DXh1U8ENUrIBrzDkG92TWIQqTIto0y31gVW+S8HUMqBvKotmnBgTq8I+BWzI+4LG oMnOD57ZwwdKI6Vjn0NJ6wCvRRwNjBWfErSnlv8JrFcoIsBiTUQkgru/lJYc6x4i 07Bq5Lz4R+ug0Ns5/H0crwBpt0vK7YEHmAGFUiNKZuyUBSWzbiYxhEYec6vKx72A IbnrGxFa8vpjsm1+fOfyVQJdzpxnr2de2qMAAwUH/0hStQ91RUSp3KwQJ3U0GgnU O0hwRkZEJs40LWkpwblAZW36IUBteNmQd7KTDaPcNH2PBF5wcu2Ag6+DtIp/zDX3 nyJ9naw+arzKHf5vyrGLAEaqrIonrm/29v1TylFjGpFemOH9JnKHGJ6o95ZSgtl7 JYXRD/vSfGNznnMeoJnrlsvECcxYutNO+qFGbVpgvOeufMrhWg9ye/bNMGtJOqO/ FrZl3kR6/TaTI83lbK5HsSqUQ3zUjIIwUOKKxRglBQyy6rqDp4zBV18V9kdrb30Q 23qUWHmX244nQTZTk/V69V9tW3Gx1hEkC5kWbztBLWBHEYae0begIT/y+94EeC2I RgQYEQIABgUCPWukaQAKCRAV1ogEymzfsrpOAJ4oQy5hHzOhKmce9YvLgdzcTNl9 3QCeKRrlaWusbYfqZn4BQsSpYw90evo= =DbL2 -----END PGP PUBLIC KEY BLOCK-----
D.1.2 Core Team Secretary <[email protected]>
pub 1024R/FF8AE305 2002-01-08 [email protected] Key fingerprint = CE EF 8A 48 70 00 B5 A9 55 69 DE 87 E3 9A E1 CD
-----BEGIN PGP PUBLIC KEY BLOCK----- Version: GnuPG v1.0.6 (FreeBSD) Comment: For info see http://www.gnupg.org mQCNAzw7fN4AAAEEALL1ENfbFYcAEmS6Hrb7CV7sWrbG+HlIwYvUUuqvr8+D3axd XuRJGFaWk8zNrTrwWROnlMMlctG3iXNsKzQNxAE6N64rbrUbKI5PzihfEsJW5/io XGXrRGdXvwob/Qdnd6mIlm3IJduChV7Nf3K2WbimUNkFeXrrh/ymwUj/iuMFAAUR tBpjb3JlLXNlY3JldGFyeUBGcmVlQlNELm9yZ4kAlQMFEDw7fN78psFI/4rjBQEB U4ID/1N6haUd+k+tzwNpX6pKnlCuTCJvJ619Lp83T8pRDGZom/uSLrfMrzvmKPeE abXGnreM41JRLAbGOclsONVBCLvwc/v+VVXTm24J1rdS1qY/SD+LE87pxPL6Ncyt Ug2sxPSo8fDVKu+MdcGK5zwP5ekNHDl+DB1mMsYDkZHTp9FMiQCVAwUQPDt+RafG T4fq3uQJAQFKvAQAl6+XaXQ1GzfqJoGqaTVW2O1OaodyBJjLxgRsVv7ps5Z4M4nl uYoe5ih+Lk3BVD9Y18QKUrnAPlbXDr1Ld0arq8uFkFsVzNDb2asg6tgcQe7mQ9lA QZPgVOU+siTmEuolSvxwsjxn/szBYBPv5EnU6lSmGf/RDJnbFXC9Z/LgPFU= =tMn4 -----END PGP PUBLIC KEY BLOCK-----
D.2 Core Team Members
D.2.1 Warner Losh <[email protected]>
pub 1024R/F6A8F561 1996-01-10 M. Warner Losh <[email protected]> Key fingerprint = D4 31 FD B9 F7 90 17 E8 37 C5 E7 7F CF A6 C1 B9
-----BEGIN PGP PUBLIC KEY BLOCK----- Version: GnuPG v1.0.6 (FreeBSD) Comment: For info see http://www.gnupg.org mQCNAzDzTiAAAAEEAK8D7KWEbVFUrmlqhUEnAvphNIqHEbqqT8s+c5f5c2uHtlcH V4mV2TlUaDSVBN4+/D70oHmZc4IgiQwMPCWRrSezg9z/MaKlWhaslc8YT6Xc1q+o EP/fAdKUrq49H0QQbkQk6Ks5wKW6v9AOvdmsS6ZJEcet6d9G4dxynu/2qPVhAAUR tCBNLiBXYXJuZXIgTG9zaCA8aW1wQHZpbGxhZ2Uub3JnPokAlQMFEDM/SK1VLh4u c9KIpQEBFPsD/1n0YuuUPvD4CismZ9bx9M84y5sxLolgFEfP9Ux196ZSeaPpkA0g C9YX/IyIy5VHh3372SDWN5iVSDYPwtCmZziwIV2YxzPtZw0nUu82P/Fn8ynlCSWB 5povLZmgrWijTJdnUWI0ApVBUTQoiW5MyrNN51H3HLWXGoXMgQFZXKWYiQCVAwUQ MzmhkfUVW/uOVC1dAQG3+AP/T1HL/5EYF0ij0yQmNTzt1cLt0b1e3N3zN/wPFFWs BfrQ+nsv1zw7cEgxLtktk73wBGM9jUIdJu8phgLtl5a0m9UjBq5oxrJaNJr6UTxN a+sFkapTLT1g84UFUO/+8qRB12v+hZr2WeXMYjHAFUT18mp3xwjW9DUV+2fW1Wag YDKJAJUDBRAzOYK1s1pi61mfMj0BARBbA/930CHswOF0HIr+4YYUs1ejDnZ2J3zn icTZhl9uAfEQq++Xor1x476j67Z9fESxyHltUxCmwxsJ1uOJRwzjyEoMlyFrIN4C dE0C8g8BF+sRTt7VLURLERvlBvFrVZueXSnXvmMoWFnqpSpt3EmN6TNaLe8Cm87a k6EvQy0dpnkPKokAlQMFEDD9Lorccp7v9qj1YQEBrRUD/3N4cCMWjzsIFp2Vh9y+ RzUrblyF84tJyA7Rr1p+A7dxf7je3Zx5QMEXosWL1WGnS5vC9YH2WZwv6sCU61gU rSy9z8KHlBEHh+Z6fdRMrjd9byPf+n3cktT0NhS23oXB1ZhNZcB2KKhVPlNctMqO 3gTYx+Nlo6xqjR+J2NnBYU8p =7fQV -----END PGP PUBLIC KEY BLOCK-----
D.2.2 Jun Kuriyama <[email protected]>
pub 1024D/FE3B59CD 1998-11-23 Jun Kuriyama <[email protected]> Key fingerprint = 5219 55CE AC84 C296 3A3B B076 EE3C 4DBB FE3B 59CD uid Jun Kuriyama <[email protected]> uid Jun Kuriyama <[email protected]> sub 2048g/1CF20D27 1998-11-23
-----BEGIN PGP PUBLIC KEY BLOCK----- Version: GnuPG v1.0.6 (FreeBSD) Comment: For info see http://www.gnupg.org mQGiBDZZXiQRBACWc1PcCjIpTl6aCyOMVfz4jlRSKblwib2s07TBwbgR1zMhbPie O2K4ZJqTcG4EnbMLEyYMbYwvNdOfUIjMW3VI1PJhRwWthTcbUjubzTu8Zxw+sKME ansth0xZW7Ax29UWQcTPxs4SRsCPFO8t+aWwZOm6z0fb5l1vMmKNJuw1+wCg3ZZB qK93hQPaOObwglnAIrgNpScD/j0VCEeC8fTMk+ZIo+z0+bUGPGU5cq+4XVXABYLn wMfR6Wr5Ys/3VCx4Oyzzgp/HBzcE5HxJukJ2ur3m9IE+uFfY4+HEFiwL++Ke4TWU 7rn4rKjJYhGJ6iqGFwuxwmHdjcBh/38X0kmrCxyPYpt6xO+sJBP+QOABw3PFlMkF PUY5A/9RGU4mm6K7cteNdbHDI8yFNorQs8W8fRb8yP8bw1T8qB5+/rQ5jxAfA5sr FCuZsKNFdph9z/I3eFYVW4P8+9gmI2FAAAocWheSyKttAFHx63JRyBqXq9xmHKST kuaoQVXeFycSULAPkV67j0/zDL2mis6bRpPopINGgjkia16u6LQjSnVuIEt1cml5 YW1hIDxrdXJpeWFtYUBGcmVlQlNELm9yZz6IVwQTEQIAFwUCOmRRlgULBwoDBAMV AwIDFgIBAheAAAoJEO48Tbv+O1nN4+YAoKeQztEcbPBbbX7DZAHOsGZLrZ2NAJ9a WEoFGMT3keQDjtjUI9c8IMh/l7QmSnVuIEt1cml5YW1hIDxrdXJpeWFtYUBqcC5G cmVlQlNELm9yZz6IVwQTEQIAFwUCPE3sswULBwoDBAMVAwIDFgIBAheAAAoJEO48 Tbv+O1nNMp4An22RFzdv9zdNLlcY9GLPFyUrniqiAJ9F9Rhic6qBaXynksNw51Do +cLWkbQkSnVuIEt1cml5YW1hIDxrdXJpeWFtYUBpbWdzcmMuY28uanA+iFcEExEC ABcFAjxN7RoFCwcKAwQDFQMCAxYCAQIXgAAKCRDuPE27/jtZzYFdAJ9BFckSo4/r SMe9UqbRMPK+8FUumwCfYH1pt4t6jFlulLk+9wYA9wISL3e5Ag0ENllesBAIAMSU hrKdEdKzQXHzkoE4Nzl3hb6dtDmjgYr+3X95wBkUvtrk2CeYG3RC1PNwd1sEFEWp IiSzOaQDzxZmtBGpMkQ1It+CW4sC5Cs2TQ59VHLFw7HWSYMNj+RchWuWkhwipnX5 8wu6To12Mu2MnyLszX2QIUxrQme7UpKkJgCct60C1DZLoQuZmfEZEyXmSfJsizeq eeJuusZwOWDH0ixuFVK/5A2RwaWFMftdhh/Vw0EkxdQnMJ+7zJ/hbY64VR7uz8oI 5smfjVe0yqXMACREUzXmqn+Dc6Pz6ESVTv2XwIy0UxqxiYk1J98Cf3ffi5+e/q1d rej2PzArpfzaygu88uMAAwUIAI/IiiQJupz9BaCws/K6j4Qs5iWRiSB7vaZfgCr9 c6vx+mIXX1Pblity5TOn9qXMv7vUM/dgmWSBbkkrvfD++H4ybJjpcOZN+peeGd0G /UfiQFMarsj9MozAmhzI5L00JqLOf4u/XBv0rh5HOX6t+M9MfZYL3C7bn/LxmDif prT8jxoA2SC+lPGSzI+M+ay/mz8kDmGD7fCS+uAFo5T1kjU+ed2dhXnl16gRR8NO 6yAdURIC+xs6P+7L8uOiZfuk0gzn5RC6CYrEKiGZf9VqTRA2vcirPNEZR44jYXS3 nL7x9pIsHyCyxEvojut7iGWO6qbaW/c+MRjcA8jgp9OuFROIRgQYEQIABgUCNlle sAAKCRDuPE27/jtZzZksAKDbznARmDIIxZjHfAry2UJFBPQbvgCgl/ERQfF++Uvw hLaVfesP/NCIt5Y= =AoU9 -----END PGP PUBLIC KEY BLOCK-----
D.2.3 Murray Stokely <[email protected]>
pub 1024D/0E451F7D 2001-02-12 Murray Stokely <[email protected]> Key fingerprint = E2CA 411D DD44 53FD BB4B 3CB5 B4D7 10A2 0E45 1F7D sub 1024g/965A770C 2001-02-12
-----BEGIN PGP PUBLIC KEY BLOCK----- Comment: For info see http://www.gnupg.org mQGiBDqHuqsRBACMfFOo/NFWEADUNcCq/6yvGLAZL1V4okeB+zTlIf/NJCiA/AT2 AKiFNd4T3lYLlUjm44/OcPhelAqFSrtgmBLovWJibt7nva0dlOIXStQQSikzMOzV 4tgtiQF2ONXIqFlGcEfKo5/fcxrsJ2EpQqNX7ujGtsKHpsZpkqrcL74GowCgzuwK PxnD+AHoa6YiX6LIhZA3ciMEAIS1vMlXFQJD1m7831ej8gBtdRVqYVHS3RohJmyY 91eGsVdDnDtywmWUA3sg/LTRRU77zx36MbAp40XZJJeSfLUp3UeKrcxSoxpI3L/V C/V6BBnOLDQ5GcUiRwQTSClh8Ck2Hyi1msA00FZJxTdgPpa+CJANwAM5M+y3DJ6+ uZSpA/9/CNa8aRcI/OPfs5SeTA/m9SSV+ITSAIfcaVYflquqQwnNh+c7SJ+3Poys BUahaTVcFHRrRmrVGUytek18i77cNe4ZItlUn1qu/yZwbVyTdGek8Zbv3pGIzP8r 8r57HwL8Gi252Yv5ovCRThzsshEfN5yQizbKgHiWWmr/1FEyUbQjTXVycmF5IFN0 b2tlbHkgPG11cnJheUBmcmVlYnNkLm9yZz6JAJUDBRA7PNuWDu2852ZqdCEBAbUv A/9SDqoqWGmNNtNG9prUMqe+Rx3HqkukymKicFzvEkCjULQa1sH2TeM7ZxfqDh86 hbtJEzF2/AsbYIhk6fg7adEV4+8WfZs3TRCHxBlWY2BXEW/9zWmSL/4YNox+BQSQ yo7ue4S2K2wfk2JgJeh1e/rEuBk1oR+G9NxfT7eKNT8W4IhGBBARAgAGBQI7cIWo AAoJEA9QMphcQTsIRsEAn0QX5oqWK3a6wPhbNHPjkhUH6jfFAJ9+kLllZ+J8AkVl LwTQ+owZAVuSA4hGBBARAgAGBQI6r/ZnAAoJECAVMdWEXf7dtnoAnj373ngJc4AU WJ+B6QXGhLmBJ988AJ4+qzDA2FJQqDUr+u+iW50y0QAYAIhGBBARAgAGBQI8XEdU AAoJECjR4s8DTnOXdFcAoO9z1mz2n/TRMnWu9TbnOBEoWxDZAJ912Q+CPxILPTWf 0vZNhA/86cW354kAlQMFEDqeC5tlYKmsNPn51QEB+cMEAKc0MMTo/JO7QRQEqBTi VWRLXfCjPaA0XCXtw8/oc1OY2wpECRg8baemNZKnpXy1y6iQdUfJGXU8UfiK0Tvg e10Rr7v7AdLugriggcElksLLYhgfALy8C6dr5yCcT/gcQN6qCJ4/144eBIry8EaZ MYdxqIM7/5Exb8E7wK2gY2wviEYEEBECAAYFAjtNN/gACgkQbCk0DjIZ+YLIQACd Fk/ofe08SuTTYiTGHY0lCeSfIicAn2WzGB3b8n2lcA2q6xZhFVGCjXbUiD8DBRA7 PMC4d84pxY+hLiARAncDAKC/Ote5mlNMwt/N6uJAJEnVLk6fMgCfXXwjERQ4uNfT btsBo3oR93gSuLOIRgQQEQIABgUCOzub0QAKCRCTqAdkLDfjdVI2AJ0QHSmZV7v+ Vf5ZL/iydysCTabdpgCeP3/6CAiw7KjlAYhMatYRwIUSpFCIVwQTEQIAFwUCOoe6 qwULBwoDBAMVAwIDFgIBAheAAAoJELTXEKIORR995IcAniQ+bgl1JAocyhGbknOz z55c9i+XAJ0Q4/tU3vPZ3TkrU8xK8Zct2qvkNIhGBBARAgAGBQI7jq3rAAoJEMiT /MUn0FXbpeoAnA3VZSq+WIMQWoBffOxa3qQ4gZaqAKDVf3cq9j8JxhINE55bNjpw 6HLiAohGBBARAgAGBQI7c/gUAAoJEOd14yTbQbOH8ksAnR4yNm3N9dlHZzG8SG2h 6jVXStWgAKCFQPVqEYS072jmEQc+pwhoKE5aN4kAlQMFEDqdf131FVv7jlQtXQEB YWQD/jEXwixBkuVVuLboFETpUCdMeVc6BpPzrHdfa52aPFKHqt416fAeeeXRly6l AxMDdJPxU2ZG3abR4iiaqDKWwiluFkEwLBL0AE2Qx2R/nNZqEYNB0BSUQNPH/Q// kG6mLOAVVvRLAL5R3MEeK/Y0ErH/7JXn8JPrl/rKqwCbIsL1iQCVAwUQPMskr22D N4pRurLtAQGBKwQAiXOCEjXh0ItyqSJltkb/6Z2DYJw6ypRikRJ+yTypNHD1EobE s1wOQS0EHzyXyIu7y2lj9pMhf4aVdYnMObBarg2IDx20qUkCKVEr+evccPxIsXt6 CZh9Q6D5eaSyjziS0RuHpEubzVPY+raR0u90VJKU4YNzmht9D+ZNKRuTupiIRgQQ EQIABgUCPMskzAAKCRDTST7w0perjoE8AJ4uqL6O5gfCXSPKxcGF4scxAu9nQACc DpJ7Vx5Y7fMJMmDWAiox1+uHE9m5AQ0EOoe6rRAEAPF15Mz5Kg25Az3g+7OB37Qf ZukClm8gdjR9ziTS+rkjYxeP+j+BmrQNyqdyM+dNGiEk+TgJiBy6otjE3RSQHuVw xin9yMIuTxa6xh0PX+sV5aW03YUViglWkevdMDLTAaEUwc0y2fZv1as6Huk4k5LK NanNMRnU2giytGuCTyq7AAMFA/wMMI9Px5Q0/p3iNDXZ5YQ6zbDR/aC/q2lxN38F UJOEnMaSpZvD/EE/gpmI2naHQuGS5C3RrCrX3/7IGGEVE9U0dl+krreVDDxz/yXY hX2D+5ZvriekJZHPmek20gT9i9gm3xLl2e0zS1zQ6BcYCtX5kVwIW5PTs09/MVvw scShNohGBBgRAgAGBQI6h7qtAAoJELTXEKIORR99rLsAn2+OxqxPJK8ZmYPKX1JK qN+IdvKuAKC6p9c3lJBbYHFlhxPDhBvgBaSOKw== =WyeV -----END PGP PUBLIC KEY BLOCK-----
D.2.4 Peter Wemm <[email protected]>
pub 1024R/D89CE319 1995-04-02 Peter Wemm <[email protected]> Key fingerprint = 47 05 04 CA 4C EE F8 93 F6 DB 02 92 6D F5 58 8A uid Peter Wemm <[email protected]> uid Peter Wemm <[email protected]> uid Peter Wemm <[email protected]>
-----BEGIN PGP PUBLIC KEY BLOCK----- Version: GnuPG v1.0.6 (FreeBSD) Comment: For info see http://www.gnupg.org mQCNAy9/FJwAAAEEALxs9dE9tFd0Ru1TXdq301KfEoe5uYKKuldHRBOacG2Wny6/ W3Ill57hOi2+xmq5X/mHkapywxvy4cyLdt31i4GEKDvxpDvEzAYcy2n9dIup/eg2 kEhRBX9G5k/LKM4NQsRIieaIEGGgCZRm0lINqw495aZYrPpO4EqGN2HYnOMZAAUT tB5QZXRlciBXZW1tIDxwZXRlckBGcmVlQlNELm9yZz6JAJUDBRAxsRJdSoY3Ydic 4xkBAZJUA/4i/NWHz5LIH/R4IF/3V3LleFyMFr5EPFY0/4mcv2v+ju9gbrOEM/xd 4LlPrx1XqPeZ74JQ6K9mHR64RhKR7ZJJ9A+12yr5dVqihe911KyLKab94qZUHYi3 6WQu2VtLGnw/t8Jg44fQSzbBF5q9iTzcfNOYhRkSD3BdDrC3llywO7QlUGV0ZXIg V2VtbSA8cGV0ZXJAaGF5d2lyZS5kaWFsaXguY29tPokAlQMFEDGxE+pKhjdh2Jzj GQEBtYsD/2rUV2eeTi6ekZCwbfVBu2vgDNpAPmb8kcjiBGZKZuPqW4kyA0bd+k7T oZ39nu7HIIkHylOy3ZrwL+WM5hnFZP7m5LORBd4yLlxhwjWxltSmQe2ao9brbeGv U8HdksDVMhxNtBb43MmzFDU9zpcb18aRP1ZdBbdeF60A/6O5VMCEiQCVAwUQMwWT cXW7bjh2o/exAQEFkQP+LIx5zKlYp1uR24xGApMFNrNtjh+iDIWnxxb2M2Kb6x4G 9z6OmbUCoDTGrX9SSL2Usm2RD0BZfyv9D9QRWC2TSOPkPRqQgIycc11vgbLolJJN eixqsxlFeKLGEx9eRQCCbo3dQIUjc2yaOe484QamhsK1nL5xpoNWI1P9zIOpDiG0 JVBldGVyIFdlbW0gPHBldGVyQHBlcnRoLmRpYWxpeC5vei5hdT6JAJUDBRAxsRQh SoY3Ydic4xkBAel5A/9hzsH7ha50FLXcBT1JILRKjXkq+uI0NzGs/MYBLW2sP8pt T24WwpN9dVFkKuPos2RNsZLR0xQpSX2jJ8VSH26D8rokhffSh4lp3/xrKXrdEu5v /kVyMGYtakqrwGp8TIgO5CoBUgpnIc2rPE0HMslx7Z/4Jfb9JISZG/3790dtG7Ql UGV0ZXIgV2VtbSA8cGV0ZXJAc3Bpbm5lci5kaWFsaXguY29tPokAlQMFEDGxEi1K hjdh2JzjGQEBdA4EAKmNFlj8RF9HQsoI3UabnvYqAWN5wCwEB4u+Zf8zq6OHic23 TzoK1SPlmSdBE1dXXQGS6aiDkLT+xOdeewNs7nfUIcH/DBjSuklAOJzKliXPQW7E kuKNwy4eq5bl+j3HB27i+WBXhn6OaNNQY674LGaR41EGq44Wo5ATcIicig/z =hkSq -----END PGP PUBLIC KEY BLOCK-----
D.2.5 Wes Peters <[email protected]>
pub 1024D/AD10C6C4 2000-10-19 Wes Peters <[email protected]> Key fingerprint = 76C4 753C 83FF D982 C57D 3A2A 7387 E292 AD10 C6C4 uid Wes Peters <[email protected]> sub 1024g/237A5EF9 2000-10-19
-----BEGIN PGP PUBLIC KEY BLOCK----- Version: GnuPG v1.0.6 (FreeBSD) Comment: For info see http://www.gnupg.org mQGiBDnubLMRBACzBJP6rUq+ruNhVttH8vMFy3IQIWgoMNbzGsa6O26y3wFXV6xr gLGYo0Yb621CWKpO5/bfRbfPobcgVbInsx0cVJITNeLwLbvZP8Yd9GkUy5B8DomW ptrKd61NRG4NjGoXNG3Z1KaPYEmbQG7hOeilq2cIcNlSDhILrpRlzbboSwCg+cbC zRXEcCiGUKUgwD9E/58vKFkD+wdbVXdjRlAZ0uzs9+B1zTuR4CqFe7mOE2ZwEz+0 eI1X639jr5CFNlruWXbT4ZzcqPdAe4Z5G1SqucG8a+hOqfzybi4D04fsnM99f6IK P4M4ejwmKQnrsUXuoyEOGhxtziXbuX7AfftDd9CcmFJi9ix4MT8JNVCmf2AnG3oU +/WPA/9RmCW9XrnKGFzuJPrj5f+FlF0yyOfnGBtCluDg0bGWlncOoVdaHajdpTzk 2es8vDDn17vX4KDGJhai4/lgvdoIIu6VZ9gbDvjkhBPRZID2PBtRA3PqJrHAe8OK PkP78wceHncrjH7PGOvB6K7zgkolBhbigBQxxqyJpiwlLsJYmrQdV2VzIFBldGVy cyA8d2VzQHNvZnR3ZXlyLmNvbT6IVgQTEQIAFgUCOe5sswQLCgQDAxUDAgMWAgEC F4AACgkQc4fikq0QxsRqSgCg5U4czx4fZBpgKXkSUwqN12NUTDgAoN6nLEpYOwax 3CZSxOHKIM0OaQaCiEYEEBECAAYFAjnuga8ACgkQXVIcjOaxUBbcsQCfU7yEZGRh fd27HoAoCaoesLs3DDAAoNFYihZhlddiaAsSRFEdl5YLRXMKtBxXZXMgUGV0ZXJz IDx3ZXNAZnJlZWJzZC5vcmc+iFcEExECABcFAj2QxXYFCwcKAwQDFQMCAxYCAQIX gAAKCRBzh+KSrRDGxPC2AKDE+pC6kiHzVt/N+O+J887lxRi+MACggx0g0bc+XakU F9uTA/Mem/EGc9S5AQ0EOe5svRAEAK6sihIm3ua+pbbXwHBq/3KP1mnR5TumcuqY VMJH0h+Snaps/seA5332YrlYlzGZot7u/yK+oNj9HAt1b3bqRjxVpcQkkVqO5beN vtJ2l0VDVtdynNL/p6pIj/w/tQlbMYjwDtEbner76IG0RZvwrREz5Dr5FUEcSJuN l4sOaJ3nAAMFBACCbceKau0sxw7mymEgXlCQmj/uF4e8DaPmgPJxncccbv78GEeV NQbLYsKKxts43vmhHKNQI0SUSN3kpqIGAP/Z1FwaxsL2UAZvGzL+o2Eb0mhfe9iI N8MPaxLWFZevSE/e9EWsb5o3d6xZJqhuaLzMGi0yqR18ZUAUMhAeIK1hAYhGBBgR AgAGBQI57my9AAoJEHOH4pKtEMbEIHkAn2jVNUFiT5HelooOTkOL36zXxALOAJ9K ni2QSv6GouiphI2WO/b+d0STFg== =oTDt -----END PGP PUBLIC KEY BLOCK-----
D.3 Developers
D.3.1 Will Andrews <[email protected]>
pub 1024D/F81672C5 2000-05-22 Will Andrews <[email protected]> Key fingerprint = 661F BBF7 9F5D 3D02 C862 5F6C 178E E274 F816 72C5 uid Will Andrews (Key for official matters) <[email protected]> uid Will Andrews <[email protected]> uid Will Andrews <[email protected]> uid Will Andrews <[email protected]> uid Will Andrews <[email protected]> uid Will Andrews <[email protected]> sub 1024g/55472804 2000-05-22
-----BEGIN PGP PUBLIC KEY BLOCK----- Version: GnuPG v1.0.6 (FreeBSD) Comment: For info see http://www.gnupg.org mQGiBDkpEQ4RBAC9OidsAMYXkcTy2/Vb0/YO4X06+pwtKVPbYRHt0wSvmoeUhr8k W7YIZpORNycc4v/0p4U/vD3fNL4bb07gnkijJWC+RrLVsxp/HkAy+XPy1TlBg/g9 rgT+eNnmIudIbIFGgfNYR9pcjdBvDYYzn0rKCxZ3bUqQv1iY1Szd6XBVYwCgmRt/ TtV14iuuWTXcCB9ZM118W/sEAKxMqiMnqr4VZ43Dr2EPOjmWTU+rqWhLQsfPj0MO r1Fm3kCr2kf+k5o8o/Ry6a9bNaufrO9LsR7yvPEia/J8ofAAonWM5VHywK5V/+D2 ZSXqscdpGN74cRu33vAs8V5Wcnc2EaRk7t3yBk8Cdek2If9pOTVWD7Jjhmaqxp59 rCh6A/9NNpxhBQkCRaixGrqNae9ASQdtZAe32+ZxQ3cvhfNb8y11dHVWG6ft3vZi lUgBKCwWJ8y7rcpmUg0mQEGgGLpA0pdtOn0r20Re+WgeBiO1afi80JYbpICjtToN +9bK1GWwkyoXcHDCoCyGkk3ZJx486YjlZ+g8CqbYjqclisBRALQ6V2lsbCBBbmRy ZXdzIChLZXkgZm9yIG9mZmljaWFsIG1hdHRlcnMpIDx3aWxsQEZyZWVCU0Qub3Jn PohWBBMRAgAWBQI5KREOBAsKBAMDFQMCAxYCAQIXgAAKCRAXjuJ0+BZyxXK9AJ98 8qcbCXD8dbu5UElIXyVgtCpSxQCePH23d1468zNXLosSjAM/9h0liSyJAJUDBRA5 74f6TVYoIXkFDBEBAUkXA/4vTZbVHINxXv8ibNOwc8zRT08qo/+Iw9bk+VZT1Xjn A87pDJyH1k5TlikkMcTZvuKgssosymef60Nmn2/De+PBO8zvKHcTVu05aNVa73tg trwTl7ENt+W1DapWy13F/tX+STmZJpwJyNnc9LXe/purKQeNvcm5tOg4F/YG8d2e fohGBBARAgAGBQI5+H4QAAoJEK9FHtaSnhLg6gsAniX8LUlfBDyl91aWd2NRUzbg N5WhAKCCLiFZq9VNOkWvvDgjZzgAXj76W4hGBBARAgAGBQI6ouoFAAoJEFfKvVMG TqYaWVkAnAmGUup4WCbHu8c4wXvGswYDyYNXAJ0XIIJCKOFyKlof+v2Rm/J5IbP0 NYhGBBARAgAGBQI6omaOAAoJEH5rTE5yo9FXsNcAoJHYIQi/k1v0FlYAZnYikG94 LV67AJ9bb+qeiYkHgnAYqMLuk8pv1So6e4hGBBARAgAGBQI6oZ+kAAoJEFZ+so+o kYHJj8MAnAz2IpK9Bt3Kf+5tMZZar8GyciAnAJ4nbeQGuBXTZd1dtAAHCsHPvDpo TYhGBBARAgAGBQI6oY8UAAoJENuTRJDtZOBHC3UAoKJGpnx5MKT07nrg/tLcHDIr RILoAJ9WNsiSA+a4Pk8RXN7TT8NMXR1PDYhGBBARAgAGBQI6oYMLAAoJEGThPMPL m56Bj9EAn06SAivn1Ll5AOjpHcv+lyHu3Y2LAKCVY9ejgWzNsAXkyk1zzr/w65m6 2IhGBBARAgAGBQI6oVEPAAoJENHLaIZZSoFYtqEAn1fiWA5C6foEV71UnZ9jAslP zFulAKCmyH5S32XA2oZiXOO2dh87tD3ku4hGBBARAgAGBQI6oVWbAAoJEH2lYKC2 NiUF8WIAn2ov1kKivbanjlmkhqUfhJ4UgnmaAKCKbDev7w9A/x165BOa0gY4lsuo jYhGBBARAgAGBQI6YhEMAAoJEH7GRFHr0ksD+6EAn3xlIX9koN/aZmgzghEn01dV L5QVAJ9vHUwP4LTEYVe+oYPzFNW9Dx9fm4hGBBARAgAGBQI6YhIuAAoJEKU/65aE ev7dTGQAnRFFYj6VafoBDbi7cuuNddL4viwTAJ9Auv+fan1RWaUIVZzq5qgXsrcQ B4hGBBARAgAGBQI6oV6FAAoJEMPcgjWRkSGbbHgAnjXsGyCZ3Lf0MAq7ZzWZYQP9 YjeqAJwKtrO440YlW1IyuYXQ6Ysgj76MF4hGBBARAgAGBQI6tTL5AAoJEIiAJody 7R5edJ8An3LrnEhtPiweCq2cVStw0PSJb/brAJ45SNjE11cqZSYlPMd3z2S8UtEH OIhGBBARAgAGBQI6wMZ3AAoJEMiQcw+j+eMOCOMAnjkJqTQn42X9UHkPkTj/eGCk 5qzbAJ9nPnHucrIC+M88X15gKCatzhgJTohGBBARAgAGBQI6wLzDAAoJENyUJSW9 K5HzWmEAn1Xgz5P2xkoKTi/ng+UQHNPuhKIuAJ0VF4FFlwV7lEm0a/JiXObAJ64L x4hGBBARAgAGBQI6wqe7AAoJEAEFOAfY6XLYVyoAn0yPuCPxhW+LvRHxgtHGhEGn ZzacAJ4j5x2xiI/yL73mtapioHK7VGa2+4hGBBARAgAGBQI7XVoIAAoJECAVMdWE Xf7doRQAnjUgJRPvmV3Ypl3KdWmZbRpAOr3oAJ9FoKRpWLZ8coLzWm52jwn5q6TF /7QmV2lsbCBBbmRyZXdzIDx3aWxsQHBoeXNpY3MucHVyZHVlLmVkdT6IVwQTEQIA FwUCOmFc1AULBwoDBAMVAwIDFgIBAheAAAoJEBeO4nT4FnLFUjoAn0Ks6AlwN8H1 i8imyQ1UDEFpxe3aAJ44hhl/Ta/Z5KgiKoNUUg8oRNQFFYhGBBARAgAGBQI6ouoW AAoJEFfKvVMGTqYayQkAoISw+fWv05EiYQ9xkwJu5XtTokjWAJ42ZCjgrXATuX9c SVzTMZY/FLKolohGBBARAgAGBQI6omaUAAoJEH5rTE5yo9FXnNAAoMg3JWMIB2ut ++mWLBlAuEIOIihLAKC7E0ST0zeH5NnsYb36+WArLT5CjYhGBBARAgAGBQI6oZ+n AAoJEFZ+so+okYHJ3qwAn3G9EK1LlPeNoaODc4svKocgCSaPAJwID4VnVmt1fy7f VwEmJtESEFe0e4hGBBARAgAGBQI6oY8jAAoJENuTRJDtZOBH/QYAoLgGSFEQ4KKN Fo2oB1rtMXj/2wVFAKCT5DscciHxrEsnMXfvi4Hgyqgdb4hGBBARAgAGBQI6oYMQ AAoJEGThPMPLm56BN9MAn2//so0qo5P67lP2nlSmhUmU/ak3AJ9j1P74ZRFCIwy6 z0na+KpxbEEgkIhGBBARAgAGBQI6oVEeAAoJENHLaIZZSoFY8l0AoKkG8dRzB8FE EPgv7FMT+M5PiuUXAKDs0G3bfbJOToLFO4HwB423NeCY2ohGBBARAgAGBQI6oV6J AAoJEMPcgjWRkSGb5J0AoJvPVCSA82Sng0c/5CL90eB/9Us6AJ9MZVTutJi90A4d Ej2Ju1HojNfArYhGBBARAgAGBQI6tTMHAAoJEIiAJody7R5edPkAoIynoLSyLyZ2 3VSx4whOWHHAnPMJAJ0UArDeP+hl3pF5jiOo3Q6mgSGfLIhGBBARAgAGBQI6wMZ/ AAoJEMiQcw+j+eMO2OUAnjLKCBmwGHJmOY4shJD1uEvARSrQAJ0XeOy8ksaL9F6U Gaye9Ane2/Gmz4hGBBARAgAGBQI6wLzLAAoJENyUJSW9K5HzTJYAnArbbEZByEsk DTu6xv9w6EeWv/qsAJ4yZ6Xa8m+Om14k980SljIr179sGYhGBBARAgAGBQI6wqe/ AAoJEAEFOAfY6XLYTtMAoItO7hyYJDHeanjfn1wx7mxk+iZjAJ9xb2cSYhCqtUVp 2BEUX9hEBpxeqIhFBBARAgAGBQI7XVoMAAoJECAVMdWEXf7dwb0AljtygumQ0wdN +DdcwHTjQlBNraAAn2AY8PE0pDLDOTkfUasbXvQrnHBltCVXaWxsIEFuZHJld3Mg PHdpbGxAcHVjay5maXJlcGlwZS5uZXQ+iFcEExECABcFAjph7b4FCwcKAwQDFQMC AxYCAQIXgAAKCRAXjuJ0+BZyxaSZAJ463jv/8StSS6sTGHJeeFCaMjjsPwCfS1Xq Ofh94xthubJXu9JVXLihr8GIRgQQEQIABgUCOqLqFgAKCRBXyr1TBk6mGpnyAJ0a IvukpkaXxX4+YbemzZtL35e8ogCfXDn4AfHH2pcUik51HJztAP4uMjWIRgQQEQIA BgUCOqJmkwAKCRB+a0xOcqPRV70dAJ44Sj05MWRXejmpUnCDfTvSYDOl1ACgxBCq j5HU9q93wCWSm7jkyQCdyqWIRgQQEQIABgUCOqGfpwAKCRBWfrKPqJGByVmsAKCS R6stZ46tv6HH8T4UbVZ1D3ahKwCfcw0bZ9iwWm13XKHgsPgg6oTSkWKIRgQQEQIA BgUCOqGPIwAKCRDbk0SQ7WTgRy6RAKChSfVJZJUkriSPQYyvMyIzv8cu/wCdFJVG iV6NJEbqm3zgqBZU6fmZb8aIRgQQEQIABgUCOqGDEAAKCRBk4TzDy5uegT5mAKCO YiW6R794cm6egu47a3F1ThFvSACg0rTYV4uUlRvhzMbp8y/83miS2weIRgQQEQIA BgUCOqFRHgAKCRDRy2iGWUqBWLWJAKCp9bST0vneQ42PxKYY5Im1XoUnGQCfbVMc oYQ49LJzxooxEZRSwpUnW9aIRgQQEQIABgUCOqFeiQAKCRDD3II1kZEhm9fqAJ4t g9TFZCUVTI7PxdgkdjnMtg9z7wCgsdLX47No15Q4XvNrOF5vAWFVsQyIRgQQEQIA BgUCOrUzBwAKCRCIgCaHcu0eXu64AJsGKUDWwDY/YmJ8ToBk+IeIiz1ctQCgmhhF UT1Q/aycv1OlLHuWnOxIijCIRgQQEQIABgUCOsDGfwAKCRDIkHMPo/njDtycAJ9W NlCcTFcC/iwBbUa4rDNi28YQ+QCfZNFsgVb4LYsYMk2X/XNB5KUMtaSIRgQQEQIA BgUCOsC8ywAKCRDclCUlvSuR80xTAKC3wninDyrCJZU1QNFYAayG/+9ElQCfcxTb 3HzyR5QkzhL2ha/DjVgjzk+IRgQQEQIABgUCOsKnvwAKCRABBTgH2Oly2BaZAJ0a WV2vB5m1SeqX4UNL4jtoiDGs2ACfY95Y/JJyAAtRxQo5OS8Q5AfZPSWIRgQQEQIA BgUCO11aDAAKCRAgFTHVhF3+3bszAJ40tCGFPMFb1xVFRVzwmpaTK0rymACfYN+f cTQe0RnzdFIZQxRByo5sRMG0HFdpbGwgQW5kcmV3cyA8d2lsbEBjLTYwLm9yZz6I VwQTEQIAFwUCOmHvCwULBwoDBAMVAwIDFgIBAheAAAoJEBeO4nT4FnLFaKsAmgPf 3/QBkroWW1eO/WgukmayUt0tAJ4qbbxTK/gfKzGELTO59UFJP2Er3IhGBBARAgAG BQI6oZ+nAAoJEFZ+so+okYHJ7qgAn0m+76ujVzwwD/u9E4PhaEfkDmQAAJ0dkVUg umpkpjk9fpqKssmQU3JFJIhGBBARAgAGBQI6ouoWAAoJEFfKvVMGTqYapTAAnjCX akV4vQGQstAYSvAjICBLym6jAJ9Venry4yuIH8XnoV3iIcXc7z5m4ohGBBARAgAG BQI6oYMQAAoJEGThPMPLm56Bm/gAnRsSXOXz11SDQ42BQ7uo67vGIKZ9AJ9EUfvs JwyJf27FOzA/cX0LucNLeohGBBARAgAGBQI6omaTAAoJEH5rTE5yo9FXb/kAn1me OMewOLy6EaDaXIYewaDjU0hvAJ9L2op8cmMUWzMgPVPiNricewy2aYhGBBARAgAG BQI6tTMHAAoJEIiAJody7R5eMgoAmwe/j2cgFJ85wYshF49MYyI4sUjrAJ9cPOko XJf53E5m3epPqO6OJCllN4hGBBARAgAGBQI6oV6JAAoJEMPcgjWRkSGbgjgAoLm/ CwPxGyWrYeGBs6aVLeu9X2ZBAKCNt35+w73W34X7dDQu5pRvMRqgFYhGBBARAgAG BQI6wMZ/AAoJEMiQcw+j+eMOSnkAnjYPNK3I8YPt4QxpL5Fboh40NZ6zAJ9JpK9c DY+9J7HuozLNV7rEk3APBIhGBBARAgAGBQI6oVEeAAoJENHLaIZZSoFYi40AoNdK qQQXGp1la/g1TjyFQH4Px3mfAKC8qzPXJ9HG8LIgWRsbEdXfM0kSpYhGBBARAgAG BQI6oY8jAAoJENuTRJDtZOBHP00An3i64632kOF419ucUgktB6aKSSvMAJ9YASdC OHDqEc1ft2Kg65H5SCyHJIhGBBARAgAGBQI6wLzLAAoJENyUJSW9K5Hzrz8Ani38 pLJMbNlRWPBKtFBgHK4qesE2AJ4zBUy8fzv3NuiumBdSoGSWzdg5HYhGBBARAgAG BQI6wqe/AAoJEAEFOAfY6XLYlAEAn0LTm9xSUIR8+pQt5uTrgKhH5/pmAJ42AOoD FAJmz3PhB+w2VuzLz+9ksIhGBBARAgAGBQI7XVoMAAoJECAVMdWEXf7dD5QAn2Sp RbBQSG/3SrgV1K/3eDNhqlIbAJ9GPxXig3FhSqKzTq2jZ4OXIidPErQgV2lsbCBB bmRyZXdzIDx3aWxsQGNzb2NpZXR5Lm9yZz6IVwQTEQIAFwUCOmFc7gULBwoDBAMV AwIDFgIBAheAAAoJEBeO4nT4FnLFeNIAn0jJNx9gOHkPCXJ5ueGr0WiKLiAEAJ0d N6NV0N8is6tSO1DhNYPKm2HKFohGBBARAgAGBQI6oZ+nAAoJEFZ+so+okYHJ2BUA nRwvqQw5OlaTZJCWRvmZT+wmBfkyAJ9Yco39ExUfBqTzB0DT0ASAJANPgohGBBAR AgAGBQI6ouoWAAoJEFfKvVMGTqYaKMUAnjn/BmkLBi/q0Wz6iV50XPqlTAu1AJwM dJJLkHvzwJ0rimQ0vkF+ts4Dt4hGBBARAgAGBQI6oYMQAAoJEGThPMPLm56BH60A oNoc7tB9hvUeV1v/k3L35/GotSjQAKDL2FeS5sU0qqlEFaHIQGL48IACW4hGBBAR AgAGBQI6omaTAAoJEH5rTE5yo9FXjQEAoOFJ9wV70Iz9lSfF2gc59DMP37+oAJ9Q eqL/M5y1haDv7HvqHlJdxXuqSohGBBARAgAGBQI6tTMHAAoJEIiAJody7R5eCuAA oKNrzURee2AeAmGT/yxKAhRO9vuAAKC2PjEgfp5BJRwfOrRd3waUSDbuf4hGBBAR AgAGBQI6oV6JAAoJEMPcgjWRkSGbH1YAmwdWIXIYO7OeuHdpUx/IPuoXoMUyAJ0Y vqNh002VQ2s/k86up0JAj+5q1ohGBBARAgAGBQI6wMZ/AAoJEMiQcw+j+eMO25sA nRXeJ6f+MgI3LAnZGmQBdMM1LbVHAJ9ZWI7dR0UOqxjMoKmQDOvu60l2KohGBBAR AgAGBQI6oVEeAAoJENHLaIZZSoFYFXwAoJVxEgk+U2tsxgqIUsr+KBQF6y8KAKDi mhL1XO6yORKFYCpU2f3RrLEi2YhGBBARAgAGBQI6oY8jAAoJENuTRJDtZOBHgh8A n1EVP8YjI5k44QilkCBigExydCDOAKC8/fnk89hOt6pajQUOBLE5p8NZlohGBBAR AgAGBQI6wLzLAAoJENyUJSW9K5HzQZkAnAw0AYfxkuwDJswn+T3GWhrNh2wrAJ9H pvXlVycXIEG1YhmJ3TBQk8X/nIhGBBARAgAGBQI6wqe/AAoJEAEFOAfY6XLYYxkA n2yy6cAVPsGTzc/dGJtipV3Kb7I5AJ464mj5s+at+r/ntf+TYKinH43rSIhGBBAR AgAGBQI7XVoMAAoJECAVMdWEXf7dOBcAn2iSn3oYdU9nYw40pmCUyPyh5mO3AJ9f Cb1cAK6Gkx/qzO4nkslQnS4V7bQrV2lsbCBBbmRyZXdzIDx3aWxsQGNzb2NpZXR5 LmVjbi5wdXJkdWUuZWR1PohXBBMRAgAXBQI6YVzgBQsHCgMEAxUDAgMWAgECF4AA CgkQF47idPgWcsV8eQCeLZDAwnHeiyqsPr912V909Vmi8TEAn2DKfOosXMv/77qU J92PQABPxVhGiEYEEBECAAYFAjqhn6cACgkQVn6yj6iRgclZIgCcDQRhKSNml5kO QG6mSDaXyBVzMIgAniMJ/06JL7ChXpwHCpWgSsRoc/07iEYEEBECAAYFAjqi6hYA CgkQV8q9UwZOphruagCgp3JEce++dnwBe1Mm2LPCbDBQzT8AoKLvEWkJSQhWUFut cjj4f/9IV2GdiEYEEBECAAYFAjqhgxAACgkQZOE8w8ubnoEujACgvNmhySr/loZe 2hl31lt5ch/uevYAnR382EzZIQELscaVI3+OJdAvlxFZiEYEEBECAAYFAjqiZpQA CgkQfmtMTnKj0VfCigCg2zanGnQnI3ODxbuWVsqbeFlP3X0AoNTXXAvZT9zeMQFP N2zwGBg5X29wiEYEEBECAAYFAjq1MwcACgkQiIAmh3LtHl6cdwCfZeDVnW+KNT96 ldKQ8UZ1TNRI/VEAn0rsLC2+YJTYh4zbU5/FzbU3hpIFiEYEEBECAAYFAjqhXokA CgkQw9yCNZGRIZsqDQCgnwrT/qGLBbjM+YMQTJbP8V0MVX0AnR1OS0KfkEWxz8YS 0WgBPxljjVSeiEYEEBECAAYFAjrAxn8ACgkQyJBzD6P54w5G7QCfbJ3lbs8HrNyo mcNSdlLuvjHH+s0AnAkhuHKfytgX6AVHkA9e4EhpImdNiEYEEBECAAYFAjqhUR8A CgkQ0ctohllKgVg2yQCeI+tHM7cKfuS84Wn6+vVwahzjUBsAnRh0zefTOVcuAv4Q kNmhldr4VceciEYEEBECAAYFAjqhjyMACgkQ25NEkO1k4EfCWgCgnozCwNsWYVls 4RcxHpoDqJLW6+wAmgJGwM5p3aa9Xu4oabxZaD27DiWwiEYEEBECAAYFAjrAvMsA CgkQ3JQlJb0rkfORcACgtCatF5Bk4Fk4kh1ggvuezwMdHP8An09hBBOv/KiMs0Cj GcykhO2o0wvtiEYEEBECAAYFAjrCp78ACgkQAQU4B9jpctjKCwCgjQi36LkNwq6j mQ34+J6QltM6a9IAn2H0s2Mj090bpSRMGCMoN3WXlFG4iEYEEBECAAYFAjtdWgwA CgkQIBUx1YRd/t0lkgCfUQjNWnBNeQkQguDY1KVQAkyFtOsAn1WJkoThOxy+xFEa sw3zL6rCSHoetC5XaWxsIEFuZHJld3MgPHdpbGxAdGVscGVyaW9uLm9wZW5wYWNr YWdlcy5vcmc+iFYEExECABcFAjphXQIFCwcKAwQDFQMCAxYCAQIXgAAKCRAXjuJ0 +BZyxRn5AJ9xe5apwsgy6BVT6E1viSwztaHSzACYpl04fEa4+cTNkvEA13WaH6hl QYhGBBARAgAGBQI6oZ+oAAoJEFZ+so+okYHJq0gAniQ5abFEHwanRC3kK4CogJeH 5vpuAJ949p96eOPgyU2cD1cv/fcuvtgi9YhGBBARAgAGBQI6ouoWAAoJEFfKvVMG TqYaZncAn1s/eHKiImDYUpmPrt35AkRe1u/HAJ9sjFEuzRA+0ZxYY2nVr2FGyMte P4hGBBARAgAGBQI6oYMQAAoJEGThPMPLm56BsugAnRjp9Vpxzm5NcYLYDwt3C7ao XRK8AKCYZPkdfctFd8pJiJec8d6II7B/rYhGBBARAgAGBQI6omaUAAoJEH5rTE5y o9FX4OEAoJePcPCFTCKvUyjTllw3itCabgCwAKCkjEtkgvDDQ/WKSvNULhBxPmtD FohGBBARAgAGBQI6tTMIAAoJEIiAJody7R5eMvMAoM8HEEqabAVhrTQTOpSQ42jS Tf07AJ46AcFa5qLFdpeTF64RzFntz8euqohGBBARAgAGBQI6oV6JAAoJEMPcgjWR kSGbymYAn2+IegPaSKhqPGZTP+ZhQV4mwWcNAKCoXwVJLm79KfPl7vy0yRDpAHjV uohGBBARAgAGBQI6wMZ/AAoJEMiQcw+j+eMO324An1UEHpVM5XpQA1VMfub+eWUW Xz9kAJ9mgV9FFDb5RSfHKmTkcPZB3wK7bYhGBBARAgAGBQI6oVEfAAoJENHLaIZZ SoFYZboAn2amUsp1rt7/CK5ovyPP3/iPBvnJAJ0UgkE/DpPbaJEdmxDcre3uzY7F 4YhGBBARAgAGBQI6oY8jAAoJENuTRJDtZOBHDwgAoKz+TinN8DByaCxJZAUbWOWe MHMPAKCLwJaPL0E4TChQaAyI1Ax3sEVhUIhGBBARAgAGBQI6wLzLAAoJENyUJSW9 K5HzWyoAn29IhcdgAV4bQfMhCEUqfGAcc4AOAKCXdf56iByXs1LnR4bqxk/5GS0f lohGBBARAgAGBQI6wqe/AAoJEAEFOAfY6XLYVsQAmwR7rhy1CEJ7qWTuP+TsMjLd HhtMAJwPDltOZCnXWXBeSxTCHwhZT4i0W4hGBBARAgAGBQI7XVoMAAoJECAVMdWE Xf7dOWcAnArsTz+b6K25HmuplRysjFmtXfU4AJ0Y05ObkYsys7svjLhTTwq9GAou H7kBDQQ5KRElEAQAn+ccBMM3InmnB8D648wIgCdV9OKmhJlUoBgCrjBk3CQ5ObPc lIZUblgYs1fsJk8dyGMfjndjPD84TfApMdVgHLISAdyPKG5cdfrI6Hnw/HCLhLZp LHaZy6+XzZBGpsbzvEch/As4r8ot5Ost/8amRUro3XKFaxz2PpIQZNm3M2MAAwUE AIlD3dU1SCHXw0dBWvo/2plvlvoG22yt4vdLAwRA8Sjkwa9NIod8tjpzie9ABk98 mk9s7ufNNIvpGYWgN9D5uNwjbz9r9TngJe/MUurJLTvylh4a1l9rEa1/ZoG8NOCJ 5wzQeUDo9ibvRSDucMNXMBG7HxkX4NkTPpTfajWgiszEiEYEGBECAAYFAjkpESUA CgkQF47idPgWcsXsegCeLXN4Zpz3xpajZjqSyOsFR48fh3QAn1omQT4mGcXmSDe6 2GBOZGTkO3F/ =Wc5F -----END PGP PUBLIC KEY BLOCK-----
D.3.2 Mathieu Arnold <[email protected]>
pub 1024D/6CFFBE67 2003-07-21 Mathieu Arnold <[email protected]> Key fingerprint = 1A5F 2DBB 56F5 817E 8AFF 51B2 A986 29CC 6CFF BE67 uid Mathieu Arnold <[email protected]> uid Mathieu Arnold <[email protected]> uid Mathieu Arnold <[email protected]> uid Mathieu Arnold <[email protected]> sub 1024g/830CAC4B 2003-07-21
-----BEGIN PGP PUBLIC KEY BLOCK----- mQGiBD8b52gRBACnJRUiBdVq3saAgJ5qEcnkiTkM2oVAIBZCqGxen9hjjYCk+pCw aikiH1BGf2yirSW32zg1Bb6aTNEjMi+eckzO7lbkPJF5GHCxbZ3xzryjA+axBR/j sdeT+24mpDWFdlyNJhwcCoJZYWbqQSh9ornd/Sz/PjMVxgKgctIi+bnKYwCgp69f PeD0/shInDbxn+57nhmb2vkEAI4xslU8Da7T18GAs3vl7pbDnCft4Sz/dKZvFLCp pgUygjD5eKPuhCQqCIpAdlhYZ7+JzG/fVrigmZftfFpFhBOeUUHqGI+5zmulveGI TqfiKT9vogH8mMUc6yoNsMarI60z39GQdaD//8RWOQ+7bGgfvsOgOjE8niZYTlP1 6hFGA/4kQAnx9TFLwfBIcol+k23EA9yj8nzAJO5jto/oym9/guQuHqCu+mx8FAxQ QZzNMowfwBNtraHIE2KfgVOE92rZZFKMa7dh8d4Bw5F/XuNDI4cxPPCAi7hRC35J 3Mop2Aag9rsJco/yLbAOdYI+RFb0rpYmNDIpXVZAaVx9vRjWnLQgTWF0aGlldSBB cm5vbGQgPG1AYWJzb2xpZ2h0Lm5ldD6IWwQTEQIAGwUCPxvnaAYLCQgHAwIDFQID AxYCAQIeAQIXgAAKCRCphinMbP++Z1CrAKCAglsJYK7lQI8J9iUrWNGO7uqaIQCe JO2BDR91ZfQLfByNnb+OByM0eDmIXgQTEQIAHgYLCQgHAwIDFQIDAxYCAQIeAQIX gAUCPzn1yAIZAQAKCRCphinMbP++Z3CyAJsG507ZoUO+KKrUL+PvfnMxTJWUJQCe PExQkv2xcjN9wy5UIFVPOTNgmA2IWwQTEQIAGwYLCQgHAwIDFQIDAxYCAQIeAQIX gAUCPz1FEgAKCRCphinMbP++Z/HiAJ9cstdS2KzsV4/6iHConqRJyw8ZlgCfWElp kSPDTXwYHhrJHmJecIWWP4e0G01hdGhpZXUgQXJub2xkIDxtYXRAbWF0LmNjPohe BBMRAgAeBQI/G+fkAhsDBgsJCAcDAgMVAgMDFgIBAh4BAheAAAoJEKmGKcxs/75n yNMAoJiMinwl2AwXWnhmVgfRlyPT7iM5AJ9eD/DBjCOk6Q5V9hWuuRcrEIBVf7Qk TWF0aGlldSBBcm5vbGQgPGFybi1tYXRAbWljcm9uZXQuZnI+iF4EExECAB4FAj83 f6oCGwMGCwkIBwMCAxUCAwMWAgECHgECF4AACgkQqYYpzGz/vmdTkgCdEgTD2DAB CdvkzqAIhwkNqUkKU5QAniw2dwSZaIPsZsLCDK+fexs86R1BtClNYXRoaWV1IEFy bm9sZCA8YXJuX21hdEBjbHViLWludGVybmV0LmZyPoheBBMRAgAeBQI/N395AhsD BgsJCAcDAgMVAgMDFgIBAh4BAheAAAoJEKmGKcxs/75nfkgAnRmkjBna1tR0TTVB 7crOHeToxcM0AKCBYqEGMz09oRuzv/1l5LNdVqpgBLQgTWF0aGlldSBBcm5vbGQg PG1hdEBGcmVlQlNELm9yZz6IYQQTEQIAIQIbAwYLCQgHAwIDFQIDAxYCAQIeAQIX gAUCPz1FFAIZAQAKCRCphinMbP++Zw1kAJ952gjTwO9/u3WGXEMzqNcsKyChLACg oKd43m4tcpCoSv76dw9o8/oiguK5AQ0EPxvnbRAEAMULKTGB9kp+Jg/R+Y9aFvYo DHeC2HXD8hEH/T3A6qRBdQdRslWTBOwBE3rjkbUkKid1oZtqynzK0wP5oD7EbOB9 nongHditId/kD4HlbYltRRGHyGIqH8qnKYpHK35JZeOPxhXt/D7YFLpkkMRJ8aSw xgMVatViVdWcuRzvC0lnAAMFBACYOnL2dyDLcuFcwVTsDcZmkDIMsGu/puJWZ3a6 LrdnYWVQ91yO4wXjWfsIxnuk9ecoOB73tGg2lKT+PO3cFSv9KJhTl6ukXR/tvdUT 6AOexgDAxOpYkzRfPJ0WeyAT7zSupnpigfSnFRsPJLNl+aJs9ra1uX36B2em0hIu 0gMLeIhGBBgRAgAGBQI/G+dtAAoJEKmGKcxs/75niJUAnAhHWeYx+FgXWnCR1PnA 0UUQlczaAKClwVDBgo8tLRlAodRzm9DV9JluNA== =DM7P -----END PGP PUBLIC KEY BLOCK-----
D.3.3 Satoshi Asami <[email protected]>
pub 1024R/1E08D889 1997-07-23 Satoshi Asami <[email protected]> Key fingerprint = EB 3C 68 9E FB 6C EB 3F DB 2E 0F 10 8F CE 79 CA uid Satoshi Asami <[email protected]>
-----BEGIN PGP PUBLIC KEY BLOCK----- Version: GnuPG v1.0.6 (FreeBSD) Comment: For info see http://www.gnupg.org mQCNAzPVyoQAAAEEAL7W+kipxB171Z4SVyyL9skaA7hG3eRsSOWk7lfvfUBLtPog f3OKwrApoc/jwLf4+Qpdzv5DLEt/6Hd/clskhJ+q1gMNHyZ5ABmUxrTRRNvJMTrb 3fPU3oZj7sL/MyiFaT1zF8EaMP/iS2ZtcFsbYOqGeA8E/58uk4NA0SoeCNiJAAUR tCVTYXRvc2hpIEFzYW1pIDxhc2FtaUBjcy5iZXJrZWxleS5lZHU+iQCVAwUQM/AT +EqGN2HYnOMZAQF11QP/eSXb2FuTb1yX5yoo1Im8YnIk1SEgCGbyEbOMMBznVNDy 5g2TAD0ofLxPxy5Vodjg8rf+lfMVtO5amUH6aNcORXRncE83T10JmeM6JEp0T6jw zOHKz8jRzygYLBayGsNIJ4BGxa4LeaGxJpO1ZEvRlNkPH/YEXK5oQmq9/DlrtYOJ AEUDBRAz42JT8ng6GBbVvu0BAU8nAYCsJ8PiJpRUGlrz6rxjX8hqM1v3vqFHLcG+ G52nVMBSy+RZBgzsYIPwI5EZtWAKb22JAJUDBRAz4QBWdbtuOHaj97EBAaQPA/46 +NLUp+Wubl90JoonoXocwAg88tvAUVSzsxPXj0lvypAiSI2AJKsmn+5PuQ+/IoQy lywRsxiQ5GD7C72SZ1yw2WI9DWFeAi+qa4b8n9fcLYrnHpyCY+zxEpu4pam8FJ7H JocEUZz5HRoKKOLHErzXDiuTkkm72b1glmCqAQvnB4kAlQMFEDPZ3gyDQNEqHgjY iQEBFfUEALu2C0uo+1Z7C5+xshWRYY5xNCzK20O6bANVJ+CO2fih96KhwsMof3lw fDso5HJSwgFd8WT/sR+Wwzz6BAE5UtgsQq5GcsdYQuGI1yIlCYUpDp5sgswNm+OA bX5a+r4F/ZJqrqT1J56Mer0VVsNfe5nIRsjd/rnFAFVfjcQtaQmjiQCVAwUQM9uV mcdm8Q+/vPRJAQELHgP9GqNiMpLQlZig17fDnCJ73P0e5t/hRLFehZDlmEI2TK7j Yeqbw078nZgyyuljZ7YsbstRIsWVCxobX5eH1kX+hIxuUqCAkCsWUY4abG89kHJr XGQn6X1CX7xbZ+b6b9jLK+bJKFcLSfyqR3M2eCyscSiZYkWKQ5l3FYvbUzkeb6K0 IVNhdG9zaGkgQXNhbWkgPGFzYW1pQEZyZWVCU0QuT1JHPg== =39SC -----END PGP PUBLIC KEY BLOCK-----
D.3.4 Doug Barton <[email protected]>
pub 1024D/D5B2F0FB 2003-01-16 Doug Barton <[email protected]> Key fingerprint = 9DD1 E44C 8660 ADA6 580F 83B6 C886 A42B D5B2 F0FB uid Doug Barton <[email protected]> sub 4096g/2DBB3F89 2003-01-16
-----BEGIN PGP PUBLIC KEY BLOCK-----
Version: GnuPG v1.2.1 (FreeBSD)
Comment: Public key for DougB@{DougBarton.net|FreeBSD.org}
mQGiBD4mlDMRBAC0iRjdwnYWGl2pP6W8MbxLHnZpBNAnEUaz8VfC5w3HAyFUV3jp
t5Lwerd6Xfxl9YziXC9yI3nQNMJtGLlHpAv6kgGAO581PPzS5ruXS5LBwsts7ioe
KFBv2QKVxVPgZfgowqAW7EBZN+PclrApi5e61evbr+CYFiR4OISrvo0N7wCg/sqB
X9yb5NjWLtEDEPeFWOcz1rcD/RcW6Hu0Pm6UWHmT9QT/43yC2MD/8CHpeMO2tKGx
H04nbWZIt26ViSdt6jniIDau+H9/gzshTB+rghLzuvHpupiUp0uwuAHd00bAkB5E
lBXXvDEDlI1w4EBdoRFWpnLRYtNbHmYelCFWntvgrlgw8sm7KFneZQWbK68RLHAs
vRcLBACNaC55OuDz5GqhMLp8q3pFI06a7jsTnRtH2DoMxbgkFbktNuu/yWWan8Jb
QddYcrRxZIiOq2yu0deZHAyoRpGQg8Xa0lHQrrU3APMA2m1CTUviLTb2X1SNitJI
ukkOxPlx4uM0yxYTjHJx950WxmdVCBWdEdOx7YFa5xZTkYrxVLQiRG91ZyBCYXJ0
b24gPERvdWdCQERvdWdCYXJ0b24ubmV0PohfBBMRAgAfAhsDBAsHAwIDFQIDAxYC
AQIeAQIXgAIZAQUCPi5fQAAKCRDIhqQr1bLw+w8wAKDuQOYpukaW4Ahp/04r7baX
IuWBEACgmmAKqyhOSsVoZrdeeqDR7tRCx1KIRgQTEQIABgUCPjO3qQAKCRDNC4o1
+1fXk55pAJ4pniJfx/AFTujC+yKQAcUCWYhLcgCfdp1tGz8jpjXprglPYV3I62vB
pTO0H0RvdWcgQmFydG9uIDxEb3VnQkBGcmVlQlNELm9yZz6IXAQTEQIAHAUCPi5g
KgIbAwQLBwMCAxUCAwMWAgECHgECF4AACgkQyIakK9Wy8PsDHwCg4RBH/3+NaCJm
aVeLP94Lkwyo8+UAoLPGft0n4X6XjJGvj2ScnLVfDyRbiEYEExECAAYFAj4zt7AA
CgkQzQuKNftX15M49QCguzpV+pjCG2J3HRPK3cSLQX+iBFIAoKqqZiVTwLNtB0S8
zV8lYl6pU8fYuQQNBD4mm6sQEADez0pSrDq+q+HxHipgs95jEX8UJ0R+DnuYteUy
vlZYTdwJxUkZ2lcuHqhzFhrDkOULPpq2xyr/DgtOgyh3M2jWd5i/qlAPvRHyHSzp
RZInWR/yS/DirnsFGcLZqK3v7vuiNOgLzQTtW5QCj8klCmRRxIm8VT5HXCcFKHiR
gtYu0p7TQvMfSXIIKaBSIMVpoJGQ7FbgXU3Jv4rFindszyIyNDmoDUI44qRXa1vY
+eLo21M+pKqZDGIx9azE710f90lyLrtwY2Sw8cJHj89pGG1WpCpQ52vsJ2LAI6T/
rnzOy1HZZsODh1Ct4q5xfspzf7CbttA+oPO3ujYl3tk3+NnjWVORBqJ0Q7QJLVAY
X6qIYy8Qt5Fh5lkOkg1eaWjleapqYjBZx1VSIR9gyma+uWhAbTBuVB5t0mhGT2EG
s/NXj0Auoy2Knebx/qAeh64kN6WGfVx68vpLbjRoWtI1dbLKwcJvpFgxbEtousOq
QAf2Ax7zLGzgR+XzxqQn6oiTOILHWUjOvVJbNXHH47Vzd60UrPXKWMeGJONy70zq
H7b9xhgBQPxp8fTRly+ssoBP0QB0g9dFIhI7jSywkyzReSXkpMUM2S++67HBruXZ
kK91ssFdkTwpLsJO6hPxeHbw7IcTWLp2dRXAiqI3F5rALH6HyDYwpQY7f8R1qNoB
PeounwAECw/8DeoxOwFFElKOpNqsYeANUUcnABxa0cvvI46v1tINdctNiDbqkW1Y
9fqIWj7w1sCOL18z1PmB4fGydyKj6f21zwewx5QfCFHUJyD9EciNYkbpwJa3GT2q
PAjOvhbyiVaran9yePKB+3JLAn0TjLhe4/CVXnKHDs/VN6S8V0MZjczsr8LsQTCg
7ZABSQetvPaUex3/CNfsfKzCSwlcd45olYKF69SwXkz06FgDaCwiVtGSk7d/Q7Ut
rwjeKHXuiAgz6Gkx2cIPmrnPmTPRaNxGB2bUny0uavXPdA6nmz5jksc5U05KwDPr
pSqlo0GPDR2vPyY72YiPgz+L8vrSbjv0bEM9T1JE7puKnBBD1ZUDxhCg8/es6zsb
ZvHE15EY+M/6WyX37YI93sCaMgJWoVdPJk5eUSlQ8LIlKUuqx98EFAv4lrCZ7uld
e248441nGYg/2jtZvtO9uX4asH3yRicXirv7Ee7JSn/nNKYoQTxDB7xCAbOUn3BE
d/jBSh+ZnsAM5/mGcJ3XEQ3tTQuFLNYzf/S2dd742QVvtWddjj4t49LlXWBMwbJg
xHJXISb/dUgUNCGAaUuH8dBipCbp3Cj7EW2lA3Py/GuN5vaRBFBOGP3tU72HxyRh
bQNP6GzSFODMLF8fCGNsGDOodH6gbjAzSKNLBDgmRdrfLwMyDD/aYz+IRgQYEQIA
BgUCPiabqwAKCRDIhqQr1bLw+2EZAJ4jfMwOGDSgaA31ZCkSfZBeEH0Y6QCgtv03
3aTBA//4QnkllJNaP4YZYp0=
=79FQ
-----END PGP PUBLIC KEY BLOCK-----
D.3.5 Anton Berezin <[email protected]>
pub 1024D/7A7BA3C0 2000-05-25 Anton Berezin <[email protected]> Key fingerprint = CDD8 560C 174B D8E5 0323 83CE 22CA 584C 7A7B A3C0 uid Anton Berezin <[email protected]> uid Anton Berezin <[email protected]> sub 1024g/ADC71E87 2000-05-25
-----BEGIN PGP PUBLIC KEY BLOCK----- Version: GnuPG v1.0.6 (FreeBSD) Comment: For info see http://www.gnupg.org mQGiBDks22ERBACsqOob/YoPnaI/xubQKn/CCUFsaEMqL14TZ+FSlCphq3uZ7Y0W Qg2eqaTp97lG2NTVNEzF7K0yr/C3ofEQmTINQTd7DmEj04DDlR+t8BMFe6Xz2sBI WlEPD54ZfJVqhEX5P6T0xe9hiqjXKwQHHl1skKniKeO07o3K/4bCDDMfKwCg5DY1 /2j/Gid0YmxsJCIlg9kzRGMD/1lkSkQ0KrPH3RVPMrkRWE3rvvMES/F7jYNfKDQj X5lJDKoIQyWh1JwAmW/O10V+24Vl6JEFNQ4QJ7ix9hlkI59YS4TERxCUGGDpl3jr Lae6FFxYc1D5H8LLpiTSApmZcLxUE8CFoZJLySHgjp8qzvA60wMOjkfkWMgw3BpE N8DVA/9UF+5ue4bLHsPn7Jv5NzOkzaTgC/9O3UZUj/jYOp/vkI+0wPnP0U5f304P iLpYl1tlCEpciWF88MS5k3+8zsk8trqorss/XQfFzhHVtvRtgVxj87V0Z01E2ZZr YlqrnzHKQZOAKM2X9FiRZOAkndkkpeB+7SSeXDP62I56B+690LQfQW50b24gQmVy ZXppbiA8dG9iZXpAdG9iZXoub3JnPohWBBMRAgAWBQI5LNthBAsKBAMDFQMCAxYC AQIXgAAKCRAiylhMenujwBepAKCCtVcVRS40E9SY4Su8GTOBVoH4UwCgu3gK3zMy /QhZnnhmTKaguG6XopqIRgQQEQIABgUCOSz5ngAKCRCBvdPEDh+beRnEAJ9xU+6P TJrLGk8PKtO+UY8Zt7MTxgCdHYzFsXZ81j9HY0Z4EaHkQBXv1JmITAQQEQIADAUC OS6PpwUDCWdTAAAKCRDXjLzlZqdLMXMaAJwOE+6Jh5PnfHc09x3JKN4/a0v63wCg 6GdysmObSBQXATzYBuhy/0eFCCC0IUFudG9uIEJlcmV6aW4gPHRvYmV6QEZyZWVC U0Qub3JnPohXBBMRAgAXBQI7JNTmBQsHCgMEAxUDAgMWAgECF4AACgkQIspYTHp7 o8CQ3wCeI+P8VsHzHpfmUMa5kCzjBeqj3zcAoKYmyZUSxhV9TBQPo2WQ7zF3zcoB tCFBbnRvbiBCZXJlemluIDx0b2JlekBjYXRwaXBlLm5ldD6IVwQTEQIAFwUCOyTV DwULBwoDBAMVAwIDFgIBAheAAAoJECLKWEx6e6PATIsAn3clXqExEiP/Q/IDQb7e /yolgMrRAKDPw+6ZxTOJFba2HWEto0PwQ/COE7kBDQQ5LNt+EAQAjHltp9g75EOw pEDSUvK/B0aRUsjoIyAokRuW9Tg8S0xIhtV8ogcklvcXjQbjiEsAiO13hX7zmdmb yH7xLiSjea/m/whmNr9K094BS1K5i7mmUqNEFOyPB7VkPbRs5gF0dCkHT5uVgqFJ HSbss3zPyGYEBi8uDokIfOt4o5CEMYsAAwUD/269N/UwZkO4+NYivNX0ZpcUouqV YDPQ8YLwSrkwWpG7UNvNHd1HS43OWwAOy585SkLpZkjlW58NqyXJuWVC0xJtdTrI MKTZ3IJNXMK2wdK+nBuTL4IvJwkf04pwFel80F2NtgUjR3ZgIlRNvFtvtCkNPg0j t7J8pPvL2vU5hz7HiEYEGBECAAYFAjks234ACgkQIspYTHp7o8Bj7wCfSZsld8vv iM02pWobJy/VvsBJKU8An2auT0HLmVLClDph/fQa+k1R2qsR =ISZ3 -----END PGP PUBLIC KEY BLOCK-----
D.3.6 Martin Blapp <[email protected]>
pub 1024D/D300551E 2001-12-20 Martin Blapp <[email protected]> Key fingerprint = B434 53FC C87C FE7B 0A18 B84C 8686 EF22 D300 551E sub 1024g/998281C8 2001-12-20
-----BEGIN PGP PUBLIC KEY BLOCK----- Version: GnuPG v1.0.6 (FreeBSD) Comment: For info see http://www.gnupg.org mQGiBDwhwB0RBACelK3FYxd6cT5ukbiSdVLHPLfzgH3F34JfS6Q4FMXgEAPtx7iy U4Lc8A4Z2gCq1ZHBZTzKc61U+nzHe+eUWtAj0h3qDP4DOd7JCZbh4SW6dMIC7MAM /9J5br6e2fIIn3rzbROXSW7CJPox2D/zZcT1b727Wgy5NHUob3qej/zhwwCgrZ0o KBapUXgnKhesQzKlH2wWCJkD/3njAzJsFS7nDdTssMtd7ip9W97uNOFLuJ1/Sg5S 332BUby73hNzSXlS4rhtQB6NVBRLfGASuEYBJQIEz6aao/lDprIxTusCTrO/EGqa Dy5y4XE1ClIyZ0yVw05UJiTOZ7Mu/kUTBBzQ2i15lxjzXBt9pNifvtcKBhcDmdzQ zepQA/9Jio4IBFmjPDsl3kpvA8KqP7VXKFMMBVT9SztYVIeiFgbvff/YCqzkE5RD 0PWUFPF3o8rzsCovlpySfUNLUlfqxEZ+5+/5ky7AbJ6Vmyn7Tl+mBSZs4mTV7ktN 526ngUaW2j+aO2SdWao/di+sRutrgRjJqyvgGn1YGnrSoKbMJ7QYTWFydGluIEJs YXBwIDxtYkBpbXAuY2g+iFcEExECABcFAjwhwB0FCwcKAwQDFQMCAxYCAQIXgAAK CRCGhu8i0wBVHh3IAKCDMueq8RCcRO+3Lc+uQyXqDKCf3QCgpVWa7oS6lTiNxwSP enZ7+4g+TkK5AQ0EPCHAIhAEAI3iAhZEDBjyJvPS74CXq1ypWvXfQUCYADCc/Cuv 3xrr1p4ff3oYc+IIVdeOQktKWRP1dK7v1JLmqFsNQQIs+NtgHyO+azyX5vJGVRTg aCIuMMTnrDBC7VbAnWXtTHF5VKmmd891Y+nk68p5YVnRPc/fReXEY6dA9lqW0bN2 f2jLAAMGA/9rMbPpnRy+uvaAQChkHvOV1RnDAhN2R+U9u3d0uNnv7sWa/TJrcdig KNUsUvXqIXVkqEMrYHTbCVC4mLMd51MLARiIKOaHeynRZYkEmdi5X7EiBLS9dCUe 7+vMz4jV6MRIGyr8TBy3CEFIdAnpY6EIVd326PzYIgx8UZw3oEvjGIhGBBgRAgAG BQI8IcAiAAoJEIaG7yLTAFUetM4AoJg56qwlr8E1iEs0F33G6POGCWnCAJ4mW9E3 25TD51pcom8Plwy1BkuBSw== =oE+K -----END PGP PUBLIC KEY BLOCK-----
D.3.7 Hartmut Brandt <[email protected]>
pub 1024D/5920099F 2003-01-29 Hartmut Brandt <[email protected]> Key fingerprint = F60D 09A0 76B7 31EE 794B BB91 082F 291D 5920 099F uid Hartmut Brandt <[email protected]> sub 1024g/21D30205 2003-01-29
-----BEGIN PGP PUBLIC KEY BLOCK----- Version: GnuPG v1.2.1 (FreeBSD) mQGiBD43wzYRBACpuUuayKjLpf+tMndpkOwxmpaPkLFxiA/dI1iWjY8I9ItDLZyM LqgYXemOOga6vbTvIUq7Bjzl3oR72kjNX3J1EljsMj7dxksoY5lflEMdxAyzdVoI +/cu+cWiP0Z9unKpYmTk8S13sUTtZc0+ixioaUvHzSJ0nxQMpIW7dqCDewCgmSVR 6i2aK4oImAa9+ZbCxg7fCxcD/2xgAAwJSmaiaV/0As3A6IO0eSkbkzFSkMF+ms7C OtrHr1zmdM7h8MaGg/jw0Z6eZalYD7AclLvXDW0rxCMFwh06SC2axUTk+aE+vcys fuSk/HJtnktHUxZDgb28jf4X6zfcdTKE5dt5a9w3XHHPgdTXjGn7+sQNR4CWDcvq 1qNQBACOqNxJdCC9tDLycRoupNSwzldMKVBZ2/JdQjfCIq6d8HPMNVLU8PGlDjoy RN4QkMZLbwV9Gaigk2DR6vvi8meARADt53x4OjS4W3O/Pc/Aj8rsUcF2mRU/wiJC 8VkQsnaci5GuaYAssgKroOTZQzxHkOjbk4FeQ70C+wxovRsTh7QrSGFydG11dCBC cmFuZHQgPGJyYW5kdEBmb2t1cy5mcmF1bmhvZmVyLmRlPohfBBMRAgAfAhsDBAsH AwIDFQIDAxYCAQIeAQIXgAIZAQUCPjlTfwAKCRAILykdWSAJnxpyAJ9eHCdgiEt/ +Z5Ms8Qe3ekWTYTy1gCfdVWLF2MrZNL/MYOgBhhex70gKzu0IkhhcnRtdXQgQnJh bmR0IDxoYXJ0aUBmcmVlYnNkLm9yZz6IXAQTEQIAHAUCPjlT2QIbAwQLBwMCAxUC AwMWAgECHgECF4AACgkQCC8pHVkgCZ+BBQCeMpgFMMm4siEtrzqdisrRaxJJvosA nA7UDwOVoHDZaAkFD0HNcUsTkO3KuQENBD43wzcQBADsEH8o/9tD01ScNfhoMbK4 N7GsIJNFwQf0+MQuplpXQx4eBpI9ST1ZoAUXeM1j4jk5PIAMJzt8w6BAGgcU4iUG Un0R/QMTTXVkfovdSe9FW7/QtUjRtTQz3QOfZTkekYauFIiW+lSmH3BDwRXhpKgM e19eQZYOPRfLCnLLwqdr9wADBQQA5tIdzlDS80CNZxxoFDKlvOghtrIzPG/wIwGV at2clZMLhXESxDxDkpwT7XP1GRLyN/Plh/4k2vwxni7nOJ8BIch7rRh3E48TJat1 iZ99SFc9iibED5hY/HrKlc/kphFnUuEr/kk82UCv9p4/d2V1+8v1N+Cy2jCGvrip IQ6v2fOIRgQYEQIABgUCPjfDNwAKCRAILykdWSAJn0J4AJwMsjovUA6jCJRMEzOS kIakJgqJvgCeNLKyNEkyJZh0wZUcEg1zYLRYp/w= =+h/9 -----END PGP PUBLIC KEY BLOCK-----
D.3.8 Oliver Braun <[email protected]>
pub 1024D/EF25B1BA 2001-05-06 Oliver Braun <[email protected]> Key fingerprint = 6A3B 042A 732E 17E4 B6E7 3EAF C0B1 6B7D EF25 B1BA uid Oliver Braun <[email protected]> uid Oliver Braun <[email protected]> uid Oliver Braun <[email protected]> uid Oliver Braun <[email protected]> sub 1024g/09D28582 2001-05-06
-----BEGIN PGP PUBLIC KEY BLOCK----- mQGiBDr1p9kRBADrTCmhk/+XY9Jc34z36wp8zy1rbxGBy80enJM+aFPHks/iYPxR WA1tB8BEdGPJliUMYcNGeo+ZX3As1+xxo7NJCc7Zd7Gfs1+fMOXPwKGt02mr+Nje +nF9XMfdGPP0IcK9lzkVeEdH2JP41pS2SmrMwsTE/eGv9pFEnnmRxeuFcwCg1RYc f8freOk8v68+J99mCUUAGl8EANePcxWbRYgH5KulTzE5nYIt9WBn247T7goE3yn1 R2VddSXXGhs0byRxXpNAcrysyGshIQY0nnZSB5AUt27tZJucoT1p/BtBFQ6hLCQe kaIRL0sdXrVJZn3/Q1G7vJWD6wwS35dro5PsYYPDI+qL1tISlWHZNQ2Y6jGdqhc4 Len0A/4nV78yB7cLvHksxwvbdtVVn8eVo1B2U+/b4cXhevHAl8AmNN+usmEodxxe 8FYWV8jY323xiYSMrCpYT9FuD3r2qORMOGWpg0zth6BkhdgH1z2i7koKkGIfc4mV 6oea3ep5uaU82r1sGe7/cVzMGUwzZq9xizwODfbmSW6E+vdAjLQgT2xpdmVyIEJy YXVuIDxvYnJhdW5AdW5zYW5lLm9yZz6IXwQTEQIAHwIbAwQLBwMCAxUCAwMWAgEC HgECF4ACGQEFAj4YDoEACgkQwLFrfe8lsbr7rgCg1K0Zl8CPgrQG7BEaZqzSiIM6 IZAAnjz5ifN2xHJSOJiLYloidZsikNFQtDJPbGl2ZXIgQnJhdW4gPG9icmF1bkBp bmZvcm1hdGlrLnVuaWJ3LW11ZW5jaGVuLmRlPohXBBMRAgAXBQsHCgMEAxUDAgMW AgECF4AFAjr1p9sACgkQwLFrfe8lsbpa3gCggfubCGJb0C/SzhtAPGOfVDk5+yEA nRCQuSNQiQrGMSLdS2GSlJ0dDOTptCBPbGl2ZXIgQnJhdW4gPG9icmF1bkBvYnJh dW4ubmV0PohcBBMRAgAcBQI9Y1sqAhsDBAsHAwIDFQIDAxYCAQIeAQIXgAAKCRDA sWt97yWxuv0CAJ9lUDzKKdaCp/8mJjlXLjlSZaaJTgCfXIqQr58p5MSFkVdLhLbK 1P1l8FK0IU9saXZlciBCcmF1biA8b2JyYXVuQGZyZWVic2Qub3JnPohcBBMRAgAc BQI9Y1tFAhsDBAsHAwIDFQIDAxYCAQIeAQIXgAAKCRDAsWt97yWxukHLAJ9uoP9c IdBXldt7XfQ/5xK2fUsHPgCdFIR7cK0l0spO2xjzbzhoPPVShbq0H09saXZlciBC cmF1biA8b2JyYXVuQHVuc2FuZS5kZT6IXAQTEQIAHAUCPdtMqQIbAwQLBwMCAxUC AwMWAgECHgECF4AACgkQwLFrfe8lsbppAACfVZCawNvBrIR/0f4ysfVyK4/2xLsA n0XWznsjuox2JEbS+4U3J4iNSQVkuQENBDr1p9oQBACVo3NfeqX5d8uhsAAhZb9N 1j1iHqvR8UWgrYx23q+6eBaHNJZvrcOmtERfJbWTpBs9DEv6kB94JhmhdC40GaxS k7VefpWIQZF3ncPTuw0l8GsT/nDeHAv5z2VZImW3S8crMW08Cap6cF18DR+z1p+J 7DaweGT+PP8UDBZycXhoLwADBQP/S6kVocRmx/yxWZIR7Dm0C1nqLfHNoGOFoO/e xihvNrntLyZdiGxwr6c0fHds/TfrAnTPzKmpvmgKobNZSSP06lhmzS5NumVr8ygI j03UKHwt9CRY+69iMcXotJjfClkpo1Z95k8KYxPlc+qO7EMHWkKacBQ6LMvKKZlT Zjy19BaIRgQYEQIABgUCOvWn2gAKCRDAsWt97yWxuqZ+AJ9+ASG9q7XURShmaR2f NSDatspidACfV9Ur1ONaclZD9gM6f2GYxlZiOJs= =Z7Q6 -----END PGP PUBLIC KEY BLOCK-----
D.3.9 Jonathan M. Bresler <[email protected]>
pub 1024R/97E638DD 1996-06-05 Jonathan M. Bresler <[email protected]> Key fingerprint = 31 57 41 56 06 C1 40 13 C5 1C E3 E5 DC 62 0E FB uid Jonathan M. Bresler <[email protected]> uid Jonathan M. Bresler uid Jonathan M. Bresler <[email protected]> uid Jonathan M. Bresler <[email protected]>
-----BEGIN PGP PUBLIC KEY BLOCK----- Version: GnuPG v1.0.6 (FreeBSD) Comment: For info see http://www.gnupg.org mQCNAzG2GToAAAEEANI6+4SJAAgBpl53XcfEr1M9wZyBqC0tzpie7Zm4vhv3hO8s o5BizSbcJheQimQiZAY4OnlrCpPxijMFSaihshs/VMAz1qbisUYAMqwGEO/T4QIB nWNo0Q/qOniLMxUrxS1RpeW5vbghErHBKUX9GVhxbiVfbwc4wAHbXdKX5jjdAAUR tCVKb25hdGhhbiBNLiBCcmVzbGVyIDxqbWJARnJlZUJTRC5PUkc+iQCVAwUQNbtI gAHbXdKX5jjdAQHamQP+OQr10QRknamIPmuHmFYJZ0jU9XPIvTTMuOiUYLcXlTdn GyTUuzhbEywgtOldW2V5iA8platXThtqC68NsnN/xQfHA5xmFXVbayNKn8H5stDY 2s/4+CZ06mmJfqYmONF1RCbUk/M84rVT3Gn2tydsxFh4Pm32lf4WREZWRiLqmw+J AJUDBRA44g2RH3+pCANY/L0BASF9A/0apMb/yMyQgcBLRPI+MO1QjiLxIXeh1nsK jWpqSUojzNmosasXU9WnY3AaYv1tkXGHd031Jlhooi7W9Cr8y2Ou8cYF3kZmxTN/ cDkSWAijoduK3209QjpzdkfNZQyeWrXewRBohgt2b1jKuz3CMtmu8yV187vdITBQ /m1Ed/uONog/AwUQNd6r4j1NsS003qvIEQJxcQCffcdAPWYz04JfuMnTVGiOAbvF CnYAoPCa7zqkrz4C+NNZWv6naUq28Z1TiQCVAwUQNAtxKFUuHi5z0oilAQEm/gP/ eYOsPQwz0Rg5W7JeKTdQZUjyq5g0D0StVwt23XQ2NhzXpUjYc6dhWA9FqDda3tbz CVdKGmiR8L+8I23t/kmBF/yHZrX8yNDG2UP7j8mzyTsYtrneguifphBiTfYgQp7G gs/AhE7gvYEdZrcbMcklI/ZpNH8Sn3T+kt0A67+gkNSJAJUDBRA4uR++V8m5SpXB F3EBARc5A/9jtM4Ds4ppcEwOyn5+QbncmqIZ1pkolASMWypkOb0sRVB4rw4Qcufv cq9NFy7cOVzMGqU7t6Xt+JwBSAXhT6ftkgqz4Z3z9X/uDXXLNl9xwG+prcioHysJ AuuPhyUgaQCICTf1+2LKxV11aVfNn1eVJ5NNHg6+CIVl+We/7Iyt3ohGBBARAgAG BQI2CQVCAAoJEGNKpdi6XK7SitoAnjShEqJHD2ALvwkUBGlEUhskuHxkAKDexPfc e6H7zFSdQXvddPpvU3Lec4kAlQMFEDWiXlNlYKmsNPn51QEBPNcD/2H9lS6GhEpN ZWJqKy0Yl9aLboUH8qbmcNAGv8SvDdeSxAIzBMvIS6CDp1qFDW71jkTm0o/FsHr1 4X7sldUcT/PfOLNHpUvex1HHvhM9pw+x2FlGMKERBzSG0stgA+QmsU9UDMCVKWbu p34xd/x8mi9CzrE+1kle6RC6Q82WGpn3iD8DBRA0h/5BeLVyoGs5bW8RAn5OAKDv lWhVX4LlJFl9dKT0kn7z8jyqogCeMZ/EUiHtbbZp6pJAzIS4dNJio5SIRgQQEQIA BgUCOEVR4AAKCRCWrNRNg2cM0c1qAKCtP5zsLVfZQTruoogvyp25ocJ6sACgsF7c v4sg8sPgs4HE3EVogHl1VhmJAJUDBRAyrIvQs1pi61mfMj0BAXblA/0YVeEGvPa2 JbPb7SBZulwY2fJlt+xWMXqiMYN2ayMkzJYIbDj1dH+88pgglj0Riji3j0YhqNGQ hJA02IjPbZ8ECNPa5j1iW+dMn00mV4x8evh3JujugQpgxZaKNDMaOp/abzB/05pq h8QrAFfqfFxFsqzGb8FUspzMZiXde2ORy4kAlQMFEDQN8X31FVv7jlQtXQEBxnQE AILJ2JJQbVVHRrkMFwd22KfaJkw+wlQ9Gom1a8/pV4jw4Wk1ZDgtboRMC+ffkfFX aQJxAzKG3WQwP4oQnPuvxVv3hNLsq1mc2+TYPVdTHwuhyPrF6Xlz8ufOWeensGnV dsmPa783MJplDR5gF0/+TtEtgFgdBCWfnHsE66JEk1VTiEYEEBECAAYFAjnufrgA CgkQI+eG6b7tlG7qMwCeKE+mmecBnRdF6KTmUNRuf/xMANIAni8Wju9074WOiUlj wCBWrvBMtwafiQCVAwUQOe6AHU1WKCF5BQwRAQEBBAP/REth5Qb//1T+a6jvv+Rw VayyzlE24W/McZRyL1pXDzbRuRx9wPiMS9yq8kwwozFQZbeHLLJkxSO661W6Fn1t LA3+Rn02ooZ8uvrqk1GM6TvlLdzOU/2pOcUkFICu8xTPCSySVjQgFr811YwHYVZK 1uhessQyqlFROgdQ4lcJo2eIRgQQEQIABgUCOe57PAAKCRBdUhyM5rFQFtNqAKCQ iOJTUg+XEzw4kJT6GrBjmb1MNQCdHo/p1MhqvDg8W5f2yEVWsshuvvSIRgQQEQIA BgUCOe6DBQAKCRAgFTHVhF3+3ScPAJ9XLuCarFLgNYtc5XuT2jN0nLq5GwCfXwmK wiwnzbOFlbSITRfBDXnbAVeJAJUDBRA57pqgfEtnbaAOFWMBAV8YBADLjY62KZgj XJyLSkZtvJzgnKUCzeUAA/mO0i0aQd4QrlU4lvORGX49CzfWpPUoEIz6/slj9IrS w5x4+W6/F2wgWneOMKkmkROtrxfkK/JiDF17cC+zA6W4MSZj3WfcZ1Cx5czh1zS7 KZt4X+AALhlgP9IdoYZ6aYguva44haoyUYhGBBARAgAGBQI57ppjAAoJEML8hqol OUaLZC0AoPIjsOAF9TVLJH+n0uWKzSiQ6tPrAJ4+fHCwBQbZ+HcjeP5yNaWsxlZ3 S4kAlQMFEDnumqzW4KH+T74q3QEBZvsEALkknigcjnZcLz4q86YQIPSwinmLiEgW cggrYVCUC3J246VCaJKcsJF03W2Yhp2MJuFhElcOZEfRSozk3O9QsuaAx+hmB/Ww mrQD7Aq7KleNSEoNLeao8vB1VlWVRSWjmtwtDj7kLo0DwJQPwr7RbsrkTKMC/DXr evAR8Q+V37bEiEYEEBECAAYFAjxI8Y4ACgkQDJkTa5SHS1Q7ogCgk/vN0Ojp2f5r vJSCuMXnfbwMQcAAn3h3QmTwBFLyExCGnRqGgkiyJNtOtBNKb25hdGhhbiBNLiBC cmVzbGVyiQCVAwUQMbYtYQHbXdKX5jjdAQHEHwP/fEaQoTi7zKD1U/5kW2YPIBUy MTpLiO9QOr4stYjJvhHh4EjwfGvMIhbFrPKtxSNH1s3m4jAXKXiQBDCz17IIzL4n 8dlunxNGE5MHcsmpWzggyIg4zbPqPOcg4gLFEWsEkr2o0akwzIGa3tbCvC+ITaX/ rdlWV1jaQjTqSNyPZBOIPwMFEDSH/lx4tXKgazltbxECmXgAoLaWM3SvE67viXkq S2MMO8UHqG1MAKCsCyhLvqh9cmQDKs8hwJ6MBzoRPYhGBBARAgAGBQI57ns/AAoJ EF1SHIzmsVAWAxoAoMaEEZ9kUqSwFm6sPsslETsnrHy6AKDgNz2bZ8N+X8MGwFZh vuLIlymSHYhGBBARAgAGBQI57oLRAAoJECAVMdWEXf7dc9YAn3hfo8kvuWZA2YuT BE6mPp0DKY9pAKCFzsfQRhqdZhPaK5MqochPkd3Mq4kAlQMFEDnumqV8S2dtoA4V YwEB0JID/0r92+qOLTZns+hFzAfi1vdqJ7nSNsG8ESIVMq4wVNVUf+b0A+5pNLAY ZgrQjL8CbgQT1h03uvvudmMwNY7nhRKYbkdtwIOUId+9XCLkepo0aScRhL4esuSC jcWI+MgSzZxJeyqsavoCx5L+rLe1l1s1+vvazq8liQeSyXlcU1VwiEYEEBECAAYF AjnummUACgkQwvyGqiU5Rou3UQCeLAOGkBiAovJemwQx0gTc3qhxdoYAnj+x/ACW iaekxgwmyTmG0lLxFnuBiQCVAwUQOe6ardbgof5PvirdAQFRUgQAstd65wbZWxGF VDmMVmJNR62SZGburDLq8SvX/vvjoac6/2zBg/u6sZaji7DJCcAto8MCKj6pbvq3 fTZdfwve52XhDk6EMM50i5Hqc2fPWJYB6JuOjCWyutnTXj9odg8Y1o5cUSuaxsOh TGmDXmmyT1vsf7j3FMDDzYuWXAfEWp6IRgQQEQIABgUCPEjxlgAKCRAMmRNrlIdL VAYsAJ9R5CD4T/m59oJ5fZDFZBDEqxyAQQCggPB/NYegHZZFqe8UvIwDawvzRp+0 LkpvbmF0aGFuIE0uIEJyZXNsZXIgPEpvbmF0aGFuLkJyZXNsZXJAVVNpLm5ldD6J AJUDBRA123UpAdtd0pfmON0BAVf+A/0SyTU67QKidQE8V1r/YPAq9/2BdBk5seXS KyTqQbqe3kkpojPwS/SLOGDLKFW1wiP/E6gOu0zCAr6t+T2VOMG6EAfA6gQK/oEP Oe/DOxJMNTgBeiV2OgBdj/JO4THFQXFTgAhCz0/zcjzQchuUEQ6DZpbKJCWllP9p bOEEgWWZW4g/AwUQNhlqDT1NsS003qvIEQK37wCbB3PS9GfrxsuQ4AkE011KsdYz tnkAn1lv/gOBbRuI7cpzaugzUXAXTvaniEYEEBECAAYFAjYJB1kACgkQY0ql2Lpc rtK/kgCgsUMJ5Te8teWc5975HtaCbsFBymkAoNl01D0GgAqY2RcVUdm8HwqkB1oI iEYEEBECAAYFAjkGAQgACgkQf0/uBDn7eUQ4EQCfQZlhYxtvbvpKk/xxMf8E1uZT kW8AnAhzff+mTJ1odLahcdnZj3RCLog6iD8DBRA2ikVNsmH2M6yqReURAvvgAKDm eL5BkG+s9r7u4EynZlHsLsZ8RwCcC9556M1OwODG8ONZ1G1ylBSeBUSJAJUDBRA5 7oAxTVYoIXkFDBEBAfM1A/9RzuGwZkpx7fusQBmiLkDdNuLq3bNqWRdpEsrBB6qH YxZgQ2egYS1UNLPkISVHd2aJjLnaE53pq1fEMig3wnhnIGkHdb9w9HPIbFklOej2 0VJEocEc46pPxa3gx8SK696JDoXS0dWiYHX77Do/ro73U5hJJWeIZnXNufKsE4BG u4hGBBARAgAGBQI57ns/AAoJEF1SHIzmsVAWB+4AoOrr1fhnul1zpfTLn/iN/n1K jWl0AKDHMaBsSOUgNPueiB7HNZt1aqZhiohGBBARAgAGBQI57oMIAAoJECAVMdWE Xf7dbB4AoI3GO8yAvh0uF66bD9B+NlHpUal3AKCGaHKa0Q5j1EZBFI+4bSney4Pw qIkAlQMFEDnumqV8S2dtoA4VYwEB8zcEAKpk/Dz50tcyMH5Rf6fsqOJEEavuWiIT ghf3qyI99E5L7gi1Tiy2aJmLbgbKK2p2uSMoV3H+p9dGEaVpCIxHrAn77iljw3uX 9M/5jhO8dcDOxXBbDTUEYkGHe2oU3af+/JbyX8a4jQLLHQtQmW/9j5H/QKQC4IVT +wEQAQpqGG7LiEYEEBECAAYFAjnummUACgkQwvyGqiU5RotGwACfezC2rPY51SLA SP5vQrMpQVkYvbcAoIYINz1Bpz9OXuyHpi4AqaDnR58RiQCVAwUQOe6ardbgof5P virdAQFfWQP8C+ciH9S5Zm0parEgVPGjn3/uBCOJuz8aiiCY7SaFZxjcjRdHU1m4 rNqwmPlsMZlqrqo7JRJOQ76cCW0jSscicqCfeKWuc8RhtIxjPL3C80l3WMrSS5Qf cq8nXga6FFOx8XQgS/gBLcqSb1RM1Jf46WlgAOMU8i8CSjEjHV2zn02IRgQQEQIA BgUCPEjxlgAKCRAMmRNrlIdLVDRTAKCHydMKzwB7GwbQJiGmYl2kQOwdRwCeIgjs m13E8ArGGqGUkA6SuQqv0Gm0IUpvbmF0aGFuIE0uIEJyZXNsZXIgPGptYkBGcmIu R09WPokAlQMFEDWiXnxlYKmsNPn51QEBzcMD/3UZQwz2npbOtOvX3tJmmiPS6zyN 0lzCWUiKYrK2wGEVnqXbsDD67eH7yRPHfrRPlQOSa+UC9ssNYwzI7qcTqDruDcMp Sn9jH40fhl2YGli9wcPoNy4B6uKXd9N/AgOiQTDEn4xs4C/NlG1o93lU3QCY5SXG xAKWyCtePWVY6BrGiD8DBRA0h/51eLVyoGs5bW8RAtMpAJ487dbxFRAtp/MptpJC 6PBxXBvKsACg1EIMJZw9fB2Te+bKPT53vnxjt6q0JUpvbmF0aGFuIE0uIEJyZXNs ZXIgPGptYkBCcmVzbGVyLm9yZz6JAJUDBRA7OHatAdtd0pfmON0BAaNEA/9VjhJZ kBrKgKtuLzzLcPnMVWDM41ZCyCCy7brN01DTLwaEVpl966PRqt+uOs3onanWI3wG /EP95akELBsrgcwG58huk7PjVNYNaCrJYMiSKY95bGxYUGXInU9mH1dSzvksZ6iR pX25BMHqkEMHAxahVagzguPetlTIHxHGRSH3lg== =ttzj -----END PGP PUBLIC KEY BLOCK-----
D.3.10 Christian Brüffer <[email protected]>
pub 1024D/A0ED982D 2002-10-14 Christian Brueffer <[email protected]> Key fingerprint = A5C8 2099 19FF AACA F41B B29B 6C76 178C A0ED 982D uid Christian Brueffer <[email protected]> uid Christian Brueffer <[email protected]> sub 4096g/1DCC100F 2002-10-14
-----BEGIN PGP PUBLIC KEY BLOCK----- mQGiBD2rQOwRBADLcEUFT8eaPCGT7y4xMjj7DY6CTI7t3TNjgTPj2tATbxOo3No8 R0E8PR4MMMpccKTG71n1aNMag5r6y7FtbDyO5sgGKnoCOz8H5/kDVPoEAw8fKYI/ Q/j05sLuNUShvV+IEHDx4aGdaQOZEnFMyxpXXxsaPIfI/rJ5K8i73+31JwCg/7rr OjDVEnXDNUZx12ujNyD9vq0D/jVhCxyKm6f7V6u2Lq3lKUmFFQsYBJmh2p1Inwsq tMMdYdT5onCi2EHhBw0nW4ysn7XfdN+Cri7Yk/EAx1DOwIem8mEQG2FcCJ5yOqVV p7sz3+bp7vmUzwOmXe1E8QWwcqyRFX+yqcGGxrD6ehgr9llVD3pCApD6N+e9d0vl ORy4A/46IvrNPVYlDiDekeQLH4MzXlnVGhX98Lq1o9LIFwl7hUPhqVpG6UatA24B K/azip0AMUeD3MeMsKuxFb0qqn/rZ85dW5SSz9cg3rVzmhuYfBdEm6xEWg+BoZpL 8tFeoCVcX95q4lqjiHgE/d3/VQSRwoWVVG8DmmZFMnnmIt1WoLQoQ2hyaXN0aWFu IEJydWVmZmVyIDxjaHJpc0B1bml4cGFnZXMub3JnPohYBBARAgAYBQI9q0DtCAsJ CAcDAgEKAhkBBRsDAAAAAAoJEGx2F4yg7Zgt9tgAniNgDKTb5ZAQjBL/doFKFT7m s6c7AJ49RwfYfT4be7obYp2ZZ7aEJr+tmIhGBBIRAgAGBQI9tHFTAAoJED4s35lZ GelGqJEAoI8CT8/26OAozq7WpOpDQZLH2aI/AKCGizY0oJBtzMdEyYj303NFClV0 IohGBBMRAgAGBQI9tIqxAAoJENSNEHJ4+KjUFf0AoOcwwaNv48o0G9OvnKVVGY9b edo+AJ9UCnX+rTiQOahO/tCiOOVnHgZEM4hGBBIRAgAGBQI99O1xAAoJEJcogidD tsgARQsAoNBxaBPOUhAN34qG6g9C+0oXHTC1AJ9vt7I/GfQcGCtPNnHxEm3AoXwh 5YhGBBARAgAGBQI99RB+AAoJEKZaJJONqkR/Mi0AnRn/99VRozdca285prO+NPkA Cg/TAKDdL5bQLQei1SyloKlTqkuWAfVdIohGBBMRAgAGBQI99PpWAAoJEN+hCDdk 3bohrC8AoKj1SB884tTunr9OdnKrfCtVVeQaAJ9QTSJf6yg0JMPYUI7T06zP0L/f B4hGBBARAgAGBQI99SgwAAoJELxQScEjmqjoyjsAoLPAcXFZOhXru+oOE465+lLq bgv0AJ44FB8ZXbw6u9neEPX7G1beX7yJV4hGBBARAgAGBQI99mg6AAoJEIMfett9 H+vdYTUAoMeEBU2FdOB475V7CNUwpYJT+bRzAJ4/r+Q0qv8BVF1qJmokm0E+Bg/8 YohGBBARAgAGBQI+QCnWAAoJEJWnRNJ6HmtfIP8AoOCcpXoIDXIOTZNckhICJQan s3wQAJwPyYCVxDZU+WQbNR8upItgo7s1fIhGBBMRAgAGBQI+QCWlAAoJEGxG8ZwW /bKYF6gAn3bT7wTVBIj8qdi7lspqagL4a285AJ4wJNnmqSOHaxGn/4c5p5DaAaJT hIkBHAQSAQEABgUCPkA0WAAKCRC1rDlKuf8qEU6sB/0RUUYV6tktIznR7MmiSTGn EEEdT/t//Il4ivTZorHBI1ULXaprpHFannSSB6KHUxj8aTOdTcnfTGY5fviuJ1X6 cqL8vMMH+rKSohOfOzyvwS5Zl23cnNSrbCBr/nQnt1ml1yLDn0JSGf4bky9cso8u zqVcD+K3YlMhaEE3Zw+9j7bVB7EGTvagdEP7c+GnhOeL2bVsW/7BzKlfA6lMMkfb tw1ugYkNPvqON2ginJ5p+CAHytlcN/Hnh6jXchVkS4Xqinjg3pNeBlHeJE/mt9cE cZFa1iRo83INwXo2rRhhyXIE7AFYWpbhj4rRqGYPsQgwsv2luCeUSINxXj/vi6Cs iEYEExECAAYFAj5AStgACgkQlI/WoOEPUC6I7wCg0LPlcqHSoNJ8qnb/krs/TRvf N8MAn3JxT01fwnIbPsn3NUpPGxublJ5hiEYEEBECAAYFAj5ARsgACgkQHI0nZIQ3 4x9UaACgqYp8Zm9oEGLlqJKl0jme36AD+9wAnjMSyiirb8IPdfTNakxbjzjQiQ1q iEYEEBECAAYFAj5AVSkACgkQgGcShyMVr6O0CACghtDd/756Qt8yRdA0fhiyER3k UzYAoMY4QyfLBvOTIaVLdg82XQjpUc5XiJwEEwECAAYFAj5AWbcACgkQhqAIGyKy lR0OSwQAsSzI3Jcqcv1cjX0IXh0h7SyUUDO8mxmeyv1YVk8Y/zuer8yclgrI8WXs DdoUpekxLcyDxlbVZTiP8Ou0/gbege4PZk+j1LXQMUK0QREtkFXDYkqoe9T8AfH4 jHzPrE8oxZv5tEiH1DXGui1FVgYu43dj3iiPTXlGYfIXWaVkaQuIRgQTEQIABgUC PkCsmwAKCRBiSEuPG0iN6mH5AJ9TgzqSmdJwKuI8vs0JJX+NB4DeXgCg4836cQM5 r4MHlS1cUdr+72vNxTSIRgQTEQIABgUCPkCqBgAKCRCuUcxBI0Z68Q2IAKCaIreJ /zUexMSd4HK0yFHuqNCixgCgnzFQgJGDnHTgvuXD4vP4Okd085mIRgQTEQIABgUC PkDJGQAKCRDVVqZgiOPvV2XRAJ4uhqgTVrMnAUY8Gp1HESewRT+IrQCfbgB5zcul S/zWaJxOOrl0eB2B9MWIRgQTEQIABgUCPkDghQAKCRA5o8lM/cSo/edaAJ9KGbXK FC8ndJQvQWaoFvePYu6cmQCfSQqYvPij62WG+toaZIhM6Ea9Y4SIRgQTEQIABgUC PkFUywAKCRC0deIHurWCKaWyAKCyeLFGK0Ng2gtDju8JFu9oXBqtRwCg5k/sK1St bay9MSi0Mb3iqtiroc2ITAQQEQIADAUCPkFeMwUDAeEzgAAKCRBPg4y3JqCoFhqY AJ9XaocRc8QsdRtLa17x6DRTPvUEkwCgkE8NaLHnYXtI3fSlv0QIO9s//qmIRgQT EQIABgUCPkGUsQAKCRDwJO+CNVGeqEl6AJ9kAk5RKEbYfC1KmMGR9jiZgfRylQCe KrhgE4mRczH0/gfRv4Q410kSPuCIRgQTEQIABgUCPkEWygAKCRDcNnQ35arLNExK AJ4npmE4HzSiX9hRypiUrpvFiAV2KQCeL1zn1FXYoHJb9o7QxPZPorixJyWIRgQT EQIABgUCPkFcSgAKCRAHJZTVR7A166TAAJoD4/EEobBLgMWcyjBkzzsQt61CcQCf eDUP4YPiXnOMWEHb6niniX2QMh6IRgQTEQIABgUCPkFcXQAKCRA/V8xvnmt231O1 AKCUP6yVSLTUYArTYUDhbOtSK2EtpQCfS0jDuX3itbNFWAfY3IY1sBNJAveIRgQT EQIABgUCPkF1zQAKCRBBGPb8lSbpxfkTAJ4tO5Vy+EQue6JCYXIR8Apm9ox//ACb Bvt28q0wHMHKDRn6F39wutTcegOIRgQTEQIABgUCPkFzRQAKCRDQ5Ee9ESjyXz+K AJ4lZEVUWgVtQdna0Q1pvBLN/wXpMACfSSGBnPibuFJHmk5WAcJ0gExg4XSIRgQT EQIABgUCPkFzXQAKCRBrphakwVE7DH5IAJ9pLWlp71EvtZpk2KEvSceTQDX6swCg sMVAUl9aS57pfF0Z/bgDjsLdTUOIRgQTEQIABgUCPkEMYQAKCRDHON/LNYa6cfMR AKC66PdcgDznO/cpgjHPU8h5f4/9iACdETmErSDKXiqZpIR7b3RpXMaO/72IRgQQ EQIABgUCPkF6lgAKCRBueUUCoBl5wGR2AJ98AT0VpUCAg+qzzzT9aOuN42y53gCg 37700zFkeQQoKMM4RRMnjNwTwaSIRgQQEQIABgUCPkF6pQAKCRCjGM7Esm5qufhS AJ9qt0EDKCtGjnXJqE+erVgLtbt2ogCdHke6r3Zky8VQFgh9fdfpiBIeV0GITAQQ EQIADAUCPkDKfgUDAeEzgAAKCRB1E6I2ExAs9WO5AKDnENHrOy8mgyRfgTIbMaHj sHKb1ACfWcSnEa8ABNE3v1mWS4zrSCAmBzqIRgQTEQIABgUCPkKmEAAKCRBADB62 okjOY9vnAKCWd3f7VJFj3ffKNIqM63buaBFWagCfbshGLwLcdDyNhGE+aF16xY99 neeIRgQTEQIABgUCPkQyogAKCRCwxLn3mg2CqeOMAJwLwFHjq4esWWMvVF9D9PUe 7SZ5UQCdEOo13vMqocdwfRcKsv8gw1y4B9+InAQTAQIABgUCPkRPHgAKCRAS6T6J P9G2taeABACXK/ImUOOyX019EStwiXtS1HguI+Z4TjPJrxlSFWu6vdE+DhAREDSr OLFKAAmgHN2exOYGzJy54TwB3+Ka3FWVGicP3v0atQAmqkvF6v0z/LMdm6NNMOuc Kgn2L0aT4jEUwXuvC2+YNDhpRXnpNQiDSg6BYwpkuJrEJ77QZtDNCohGBBARAgAG BQI+RYMeAAoJEFv8diRAZaHa9YQAoI2Zih3rCykaUGKYBWvLS0TqawPCAKDboE5E U8y4Q5uRvqEfwIHxcgOc7ohGBBMRAgAGBQI+QY9dAAoJEC9KXfQQ64+oHEUAn2wo Kp8h/4YDJtM9Dnnoc+eXcLJuAJ4tWRDvtGyVAAnBP4tqRCUrWGuENIhGBBARAgAG BQI+RsZ1AAoJEJ71dopqzj+soRMAn1xrXwJJyYciiAa/UPfE0Vr9bhxZAJ92lOJS Hwe1fjxJcPv8eYYbYU3FeIhGBBARAgAGBQI+QFwRAAoJEGoCMg2CoDJeZ10An0mx yh+/gaAPt7s4yHch7b/7dVErAKDDfVJBxaLinkOYKDSXYYWHGZVH4IhGBBMRAgAG BQI+RsY3AAoJEOpKzVz2XGjNPxgAn3h2DoQFHXt140bwi9SR7SKDHcMqAKC97iDJ Xt550JBePnL4eGJH0j1lG4icBBMBAgAGBQI+Rs/1AAoJEEC/HpEdDdC5pVcD/3UD +r2NORap3l00GJgf63ljEgRH58o2u8909YF9BokreuY3s2mm5p8wljqe/4HkzLgK MFofakrriI71hYLwrxF4WHEc8jqU1m3fKTcRSFhFRkuAUJiiFwyMVLUdC9XJELZR oZhAl8KO4evsBisQPDQLgGYFeRfBUWvChNc/eiJ6iEYEEBECAAYFAj5H0HgACgkQ EMun3/wGpS3BbwCfajF2ODH35UF9TQS48rWxreb/Dz4AoKuT3EUMOUS4RVWj4Q0Z 2UYmF7tJiEYEExECAAYFAj5IZ7kACgkQmpTNb38U76TgbgCfQlKPRZ4RBZfWlSjX B20sJlbYSUcAoIjHZYrroyuwb17VTh81Uf2iBip3iEYEExECAAYFAj5IaS8ACgkQ v7s1Bo4lI/2YkQCfR6M2yrdGc+79fKnSQpiD5sn63B8An1zzPpAh5HHqdtW01745 j362VSmniEYEExECAAYFAj5JZJ0ACgkQ3uEZ6Jp2yaOK9ACeJ2bfNOX07BwChMzW UCZNyTS0h9sAnjLV+ObIWS57lTNwGdbVMPXgplBWiEYEExECAAYFAj5PlXMACgkQ cieKIj7SkS6LzwCeJPx3d2X5PXxmAsVIwF80r67SMhYAoII7hB+XhLyHAT5PW/BQ pCScXc6MiEkEExECAAkFAj7wz8ICBwAACgkQDbEkl9DbWrbO9QCfT4U7xi30Vt0A MPo8H8c0Lba+GWkAnR9vF6/1TzSu4EagOAtCSAIaWOd2iEYEEhECAAYFAj8IRKUA CgkQnIUccvEtoGX6CQCglL9GYYqEZbyv5dny2bEc6xNqj00AoK2EyoGeh7/cs29t G4vEa8anP6QDiEYEEBECAAYFAj8QSoMACgkQ1vr63ZUvP/+aFQCgrQmu2/c478cK KjkPMrlCzdZx+NoAoO5J+QmjnQDUekLYWwDB8i3TOsieiQEcBBMBAQAGBQI/EH+U AAoJEEAGFQ5ACertVIUH/Azn8fXwLlzayHQT3wQVmCHw6YfrZApvwVVLoeJI+8a6 M9jpoNqNzljPNAeTjB37q7dlZvxnzFwl4BotfPAm4ngNUwXwlmKv3K+KEcvbRofW Mx/zJ8cn31LELBKbt+Qllppj1cWXQ5ChdOmGTu6lUPQLcwkh+e27DXHgf55XwuQg TtrhGQ+bq6oJags1XK2UHF2tByX9uZC/hLIu636ihUCglVWHYuyNhopQXiAT4sVf t9I7W/e08tqAwmk5iuMCYEcYh1sKg2JuceGyekW5KYGigZUEfpN3RYD6zuHdviwW QuZB1Xwq+Y1kkvYS1xu6QPNcVsd/CG+FPb7Vww0bSxOIRgQTEQIABgUCPw2/zQAK CRB8IsOfgHrFOkY9AJ96QFRLl+sl+pFfu2JJave2fV649QCfadnfBkTUPA6StFMA EDWvJ1ICzySIRgQTEQIABgUCPw6kogAKCRBN/6N0Q4ZdAUH0AKDp5kvDex6HCAnq fmybUAR9whYLQgCfbKFsDSX+qZL4Qq2HvUliDmwKJw6IRgQTEQIABgUCPxAeRgAK CRDhhSLXfHEryzoEAJ984Gzh3bKTkdDH08s2SWAJkCMMkQCfRNjYGcZNIUzYue/1 7APruMSC5R+IRgQTEQIABgUCPxAotQAKCRCzNNMIli/S3m98AKC19CVUObRp4qR2 JkYj09bxYFr/lACglnLd6Gz/LyTPGA9rvms+3KbIkcGIRgQTEQIABgUCPxD7LAAK CRDFwMXHIY0Y13QlAJ4xY/2Y+xuXIBbqhZl6Y+Jx7ZwS1ACdGIyyvrlPboGw4lqv KgpGA8TsLh6IRgQTEQIABgUCPxFJKAAKCRDqIZlBJHfK+J6bAJ4geeSsc4JL60AZ bkM1YN7A7FZB4wCgoiZScishDdFGVjb+QrBzc8sXu2eIRgQTEQIABgUCPxFcuAAK CRAZ/tg84r6jQUSoAJwN0bCkjnYRW6DWGGZWqSO8glSZCQCfft+I/6HvKRUuRdGf 29xsLRTFNjaJARwEEAECAAYFAj8RQWQACgkQCen5CopyTkXXDwf/QiR+bCozEnSd Vi9DlLAaZzp7S8g0Vp+5xSd8e6Jq4/DqjNPx+r7Z6VtPt0sjcPb+d21NO3G+/wWg IfNc793nC3ICFVMb7oOiCLVZIy1N3gOT4hDB8p8lRxkfGjxUzHsMMAZi3Y2iGYUo jECY4N/mJC3UtJEwOKIAowkeB2U/wfHltDEaTI/SzbnkHykOChGIRIeih/E1/lA1 q42ID3Zjsj2m4lUWkT91bb0AoZBlO6Ok01MC+2JgLUG4fBl36+ZsG28P8gv13SVy 55R78N9A7tuUtITJ0OYTPPhlsrc0gFSGbTmY35pQtdsZEc5QkTO5E9pg47al8+hq s4MuStvIN4hGBBARAgAGBQI/EScLAAoJEPVrJqOmOZ5zz64Anj3t4jqCRQVOEm3T RuemkVOyeP83AKDHv8q6JjDeaEIi9oHd7aNTAoYTM4hGBBMRAgAGBQI/El8bAAoJ EKCQ+9OXGZ/Du/YAn129Pm1Iqj4Krj6OUM02FUP/79EjAKCL564QetVLIRjdb7dt mt+z9R0Fx4hGBBMRAgAGBQI/Eo7JAAoJEFZtNizuCXfoB4UAnAl1zmeSu4RDdxlb mqwZ5FBYW49pAKCfoRrxG+zqOPJUxiRWM7KL5QvabIhGBBMRAgAGBQI/EpRGAAoJ EI+5mXFO6zHxS1oAoNu5slCe2MxIcTOGSDq33CWkDB+eAJ9UvHRA9+FEL6QnGDDa f7cKLXGAn4hGBBARAgAGBQI/ErtaAAoJEEbMXGPzGKVqBKwAoIWVZi26MWxq91G7 ytgdk+IAo1ljAJ4oxOjd8ktAxzpngemiQba6fcODhIhGBBARAgAGBQI/Eo1CAAoJ ENQ8swWV/so0IGsAoLgQbXksT3ky1H6PZT84riVZIYIhAJ9fhEFvggy+mk1c7Q83 F4siBXPdo4hGBBIRAgAGBQI/EvrmAAoJEL9BWVtzcqKlY/EAn1jS/jDdL6Jt22bf kEumd6bXkybmAJ4k1h9wjnMJbO1e77abv/qEI+SpWYhGBBMRAgAGBQI/ExELAAoJ ELmCy9XA4x8d5moAnipVnLkzFFinxEI5FPryPZIZOSPlAJ9nL00dJBHPmdq+/aNX 2uiG9o2vC4icBBMBAgAGBQI/EyqqAAoJELRrkjttir5xzgQD/Rx6E+XnZYugX81T gusbMr+3Nqvidy7sRITxcpdp4P/KEZ7TqgDYPiM2pcndmJ4H9cGgYjdOQPCXBnT1 bgt8YrPR17UaD5SEHRHkCSrq+kArqhXzRyi1fHDp+y/tuW9LYwQwJtADBlzewVJI lAu4i/YhYnrIbqSslK8RbuPMFGSSiEYEEhECAAYFAj8TLZsACgkQNfZhfFE679nk 3wCeLdsBGmcMlV2/Fq5bvg9n3sZEib8An29knbRciT9i2YiYFHy3biaWWeT2iEYE ExECAAYFAj8S58IACgkQklW9n+aETbmJFgCgsX2fJUE0P1sSyBNv1vGns5SsZyMA oIHA4TSpCkuIBkXuw/zccPUsK8ZEiEYEEBECAAYFAj8TQ0MACgkQrews0RqVN+dj oQCcCt3DtSKMn0jxKoFS2yNKFg/fwOEAn2miXA/DS14nMD2/8Xo+twofkN9xiJwE EAECAAYFAj8TXYAACgkQ722CQfCBGV2UugP/Ry/90QFKOTobYclldwH6/Sz8FbfW cv+7MehDTGDwpdaEDEBpBmcQOTgSAX58B8Pp+pCxzrMBMj0+X4IKOFGxv3qAVqgg pEdYwOOAAFIuL7ZijYd5dzIE4js2D6CT2L3hYFoV0e3+OtJ8cZTSliRsdT/FZNnm zM+3T5Zk2GzSMf2IRgQTEQIABgUCPxGixQAKCRAoxvVrgXw1aC/4AJ96fwHv2e3+ UfXBq8PYyVhfUlyRHQCfZwSwcBi72xgw48PYLUnrtJ4d68GIRgQTEQIABgUCPxQj DgAKCRBRrPatdb6Al0noAJ9YIZEaWBg8wW3eaufla8kBM/FkjQCgqmKGpsT5MADz sQPYnVmKOPczbfmIRgQTEQIABgUCPxRZnwAKCRCELNt6RHeeGLS9AKCGcRi1Ga3I jSTwa8Ixg+NfqReVQgCfShNW3daI34t7bSXgmN/hHZ6mLraIRgQTEQIABgUCPxRS GQAKCRBYKVdQBQCDi8ojAJ4h8c0qO9HoaQ8mqFKA9qVBSIB9ggCgs0O7CNw39RtJ a7iPBSGikcpQat2IRgQQEQIABgUCPxRgmwAKCRB3+BUzuw7ox2t4AJ9QxWGJLAbw NchwY3fZGJ4nSDcqqQCfS/yf2Of/6auZaKWcaM/6oTMMzE2IRgQSEQIABgUCPxUO mgAKCRDVTq5LyZhwscJ7AKCbv7SLVqf2T8EapBaReRaL5NcoNACbBqnuJh8Pc/3t 48Fog112zOqkxyGIRgQQEQIABgUCPxUqvgAKCRCJzUshYHVZ5uKiAKCtW4l39m7T IqF8u8pfqkgpz8Z2DgCdFiBCMi/FyPfVULc//LVKwwcZaciIRgQTEQIABgUCPxUq 9AAKCRDTW7yZvH0CCv8DAJ9hWSxUcOEVML9AaFJ5+3fkXlUSaACfRyvdPSRAHcfo bjdv8BmWsH7WYJKIRgQTEQIABgUCPxVegwAKCRCe0HjvSzoTXFEHAJ9s5QrMG7TV B7mWxE+O/VwCRKNHOACfYuq+wytbP9pFJkZQwX1rW0lWgvuIRgQTEQIABgUCPxVe hQAKCRDwI/gLJoQdW+9AAJ9VvvZW5R7ppcZfYrJ1SZChveCnvQCfR2sWHPSbzGrp sii0DbkB3x4GE6GIRgQTEQIABgUCPxWL9AAKCRBTtrgdwTzuB+GUAJ4yxAtvBEqG tDKsySqR2Ywv7xcRzwCfRQBmGdzar/OeLVHUziwduAoeShWIRgQTEQIABgUCPxPz IQAKCRBL7yYkIt9Ah2GWAJ4kpQG83TGrnIR0p6Web4T1QZjBsACgiBqEfjSGxngU cTRrQxx/bs8TX6iIRgQTEQIABgUCPxPzKAAKCRCVZB9rJT5Y45ftAJ9fNjIStddg GjgMs3jcGo6oak8QjQCgq4Q7ivzJ2HJUawLk0hOM1p8BT3eIRgQTEQIABgUCPxXW bwAKCRBBufToW3E98CEaAKCAodx0EjodNg5VE5AF3oPAVPlZSgCgrIh3fheMXgTy 32bqzny8BV5yjhSJAdcEEwECAMEFAj8V9CqGFIAAAAAAGgBjc2lnbmF0dXJlLW5v dGVzQHBlbmd1aW4uZGUiaHR0cDovL3d3dy5wZW5ndWluLmRlL35iYi9jb250YWN0 L3BncC9zaWduaW5ncy9ub3Rlcy5BNUM4MjA5OTE5RkZBQUNBRjQxQkIyOUI2Qzc2 MTc4Q0EwRUQ5ODJELmFzYyIzGmh0dHA6Ly93d3cucGVuZ3Vpbi5kZS9+YmIvY29u dGFjdC9wZ3AvcG9saWN5L3YxLjEvAAoJEBmiaAmIOP2URR0IANjcbSgJNDnmGxUg lEcaoUk6QEeo9iNa11OJP4+Uv1XXEEbHiyWpvALvzQ6v7Vwhofo2KGLVCTEhZHz7 MVIl+0c/zbCd7v99iOPySRRN3DhJvqPnD22Kc2KTM7WknZSW2WOKd1fU29vENFr7 7Z59UPqiB55zbXIobObbJOwu3x/vRNC/5bE4t2H7zLNRxmeNKt3S/ch6odJdCM/B lYy0Df2REc2s2EVLcOYsL+RXwWQp33BFt4/YqmGJQUus2nxz6GraY4J925p2S4Y7 3RcTDcWZTAeexwpxHSw4VmJ5Vupa9Jll/vAdurLUVCDd4Dd1pGJAnsHsLqD5/zdX YIxNST2JAQEEExECAMEFAj8V9DuGFIAAAAAAGgBjc2lnbmF0dXJlLW5vdGVzQHBl bmd1aW4uZGUiaHR0cDovL3d3dy5wZW5ndWluLmRlL35iYi9jb250YWN0L3BncC9z aWduaW5ncy9ub3Rlcy5BNUM4MjA5OTE5RkZBQUNBRjQxQkIyOUI2Qzc2MTc4Q0Ew RUQ5ODJELmFzYyIzGmh0dHA6Ly93d3cucGVuZ3Vpbi5kZS9+YmIvY29udGFjdC9w Z3AvcG9saWN5L3YxLjEvAAoJEKseS2BGdWse/3oAn297V8QlgeWSsvqfNYPKpqWp OGRhAKCIuuT96Pn38WtlGOBa7zZrECTNvohGBBMRAgAGBQI/E7DoAAoJEOfJ26/j Vu/ApXcAn0Czyiw503iLkF53c2qHJ2HUelW7AKDDiDT1zAGHdsdcaH9svMxWOa0l dIhGBBMRAgAGBQI/Ft47AAoJEDu/z3e9iwUNnssAoK6lcUf4GkqjwYYqH08P1J+r HaJHAJ9c9pAx86VmCaV6wQ26cKLBKUNdgohGBBARAgAGBQI/EaO3AAoJENAZ9e+Q J6uIx6UAn11HUO9dUXyAcUXqx8lyaEa20cW7AJ9kMTvSqDHkvci2MhcUkGzjpUv6 xYhGBBIRAgAGBQI/ERsxAAoJEPS0sMx5fr+r/m0AmwT/dtstpPJs7wEOejhbgGqm vc/PAJ9Ynh+eN+noydvRINXMXigzuuoX1YhGBBMRAgAGBQI/F9G0AAoJEJEfSuaG oRjmlD0Anj1mLd5E3VlkwvE2/tjgs6fQ7Zy4AJ0Z7vIFQjFnMIGJwhFqYsLbKsy4 +ohGBBMRAgAGBQI/GE0WAAoJEBp0fkUw4LnYvPgAoIUWj1ZA98QOQqcjUoC2XYom fJl+AJ9O71OiZXEgbccf2oQeY0B9mD00IIhGBBMRAgAGBQI/GX6nAAoJEGZmcXrb g1Z57xIAoNUVFg9YL70dNJk6t9ktEEjzb2QrAJoCbcLt/dEXOcWXWbY6hDrpkKro oohGBBMRAgAGBQI/GX7LAAoJEA2WS2ZXDm3qO3MAniLwLC8Yy9QYRDWNfPNgkOhO L9lVAJ9AL3wmTAeNsmupBo6rUaw+gFw4sohGBBMRAgAGBQI/GX74AAoJEE4CrK4d 1rOArlMAn31ZFiAi9SPYMbK4MUgJjmVvF0znAKCPp7dwDl1Xi4hTigwPlgC+aqvF o4hGBBMRAgAGBQI/GNSkAAoJEM6KedeYAW3H84gAnAu3PMqTcX+JptdB37ZOmijC gihkAJ9ENGWYLfe60LF5xG8/57lUSswxQIhGBBMRAgAGBQI/GvN1AAoJECyYPlrS ilXWFAUAoNEZuH54IwKv3HKqwdTb5DL08dJvAKCVsuNiCCrAadVPkmIPOHcC7Xpm lIhGBBMRAgAGBQI/HE8FAAoJEHFe1qB+e4rJehgAn12rQA8HsCAuMgIlZfE4HtGe atjYAJ9ceEBHVmJxsAF3FcCr38hxW2PwfohGBBARAgAGBQI/FbTNAAoJECole3fG NyjSnukAn3LkrAAgqj9XTzCauqMRDJwY0EN+AJ4pUAViilJ4+l0xkiB8G6w9zBVj mohGBBIRAgAGBQI/HGcmAAoJEMgPdFmtwp7NMGIAnRZpcoAfoNrvzFIoGcY2d1fu 9GTSAJ92cH6IuV1sargAc0JD/vUrzQpfp4hGBBARAgAGBQI/HanrAAoJEIsCZlm2 jV9/Sf8AoMAQDmyuP/iKKZERTcP02ZCXv3JHAKDcHVMd7wFzEZ9qNnJuUEAQ6ovZ uohGBBMRAgAGBQI/HasEAAoJEN56r26UwJx/7UEAoMz4FRCmX3fCjNNDk0gmwLYQ c40RAKDjnf8D9EUTbvCCJvxQ+O7kEYnnM4hGBBARAgAGBQI/HaguAAoJECjdsP0Z yba6H7MAnAvGz3+gipApA92/b+SK1uVpFGwsAJ9yH+kNzOTDXwo175VGLAmURBWO LYiOBBMRAgBOBQI/FzFmRxpodHRwOi8vd3d3Lm1hdGhlbWF0aWsudW5pLWJpZWxl ZmVsZC5kZS9+bW11dHovc2lnbi1wb2xpY3ktMjAwMy0wNy5odG1sAAoJEN6Fg/i9 v+g45T0AoMBLmZPru2CgFojMenlKza7YIMThAKC4Wiu1jnPKUwLOp5/MB2MvmHx/ RohGBBMRAgAGBQI/HsRyAAoJEPhZkLAkiutz3TAAniyoHpHInn/2jUtEPN3jGkCN 6pD5AJwKClQwZX+WmC4aX+jzP1zamQa4G4hGBBARAgAGBQI/HoSMAAoJEG8ji8JP 2loMBSwAnAvu0OawaAa/YM3/4qajHNr+X2JnAKCGtUpISQdh/E/IrZ7edx/qUnE6 +ohGBBMRAgAGBQI/Hvd7AAoJEDPN5fiITHpBKh8AoLE1re+oa04pjBTtTf3/36Nl gcaSAJ0QbazVwe0lBE8ETg50Kg49prwSdIhGBBMRAgAGBQI/HuFUAAoJEJSbJewH RHJSjP0Anje106ckc1DIxXY1P5fBawny3A6qAKChKf9GrwfT4n8KhfofgMVIO43M gohGBBIRAgAGBQI/Hw1YAAoJEOdNKbgr4W0BL6oAnRnMjBLoSTryzhH9RbgEvzqP b5TNAKCNwTLxRmyFK0ggzoWc54Dj7vecOIhGBBIRAgAGBQI/I5jRAAoJEBigzI1X BqS0aykAoM97S+RAuCp1fMZwVTKxpeRmaB7wAKCoq/P79PiPTdc1Dx+jXWsZJuE4 IohGBBMRAgAGBQI/JXRrAAoJEPK1Kl0KX7aHiREAoJCYlW13RsXkN2h9+wnnxfxH NCm4AJ48N1o5SqnLkoH1RbaGNSCLzemZaYhGBBMRAgAGBQI/JuGpAAoJEIkhtdzN FaiDH+cAnRQdXLaRinzhypYKixILJ/kqbM1FAKCD71d5zuec12xpIdpTIGSHS//X p4hGBBMRAgAGBQI/JuG0AAoJEAcXdOAA2M0W5HAAn2nCP4ChajePMo13UgUhBAdj WEDcAJ9OxZ8RWnV4/woi4cJzI8ecYdZKW4iNBBMRAgBNBQI/J8icRhpodHRwOi8v d3d3LnRyYXNoLm5ldC9+dGhvbWFzYi9jcnlwdG8va2V5c2lnbmluZy9rZXlzaWdu aW5nLnZlcjEuMC50eHQACgkQpHnNxFq0YGqQqwCgmC3Bor+yZOdWCVMPcU4UJwme 4nwAn1ogianeyFlIdSmXdVyAKZCI8yDoiQFjBBMBAgBNBQI/J8inRhpodHRwOi8v d3d3LnRyYXNoLm5ldC9+dGhvbWFzYi9jcnlwdG8va2V5c2lnbmluZy9rZXlzaWdu aW5nLnZlcjEuMC50eHQACgkQ+Xz54zpLf10zZgf/USp4QHtIfkjZzwcTZ9A8ZshL o2F/+u2E+rs83afTmFHPZWVQeQOakPceaQXkHq99yVERNTr2btJs17LroQDg/DRT spuMOnWpU1HqiaFDsHXJi0/An2aDg51nEDzzdiH/aIL2B9rQAk8ZkdaOEns1VwdI 7pr5gBW3DGwIwMxkIU5bagzuTYe/DYqwQr1WJgdh30IaX3N/u/7rLnGCkkuoTnPJ pSLHBdnWCnXvS3zj7Ky22Xi2YdQSGxqvMHvaPp2vvwUFLC/plnyZFi8SpEptncFY gohdU+awfkZMLWs2lJ1uQmb6Ce3Miw3k3DYVrGsKSF+S0cEfCyprlPjPG8e3oIiN BBMRAgBNBQI/J8iyRhpodHRwOi8vd3d3LnRyYXNoLm5ldC9+dGhvbWFzYi9jcnlw dG8va2V5c2lnbmluZy9rZXlzaWduaW5nLnZlcjEuMC50eHQACgkQeQV2j3WE9dg3 qgCgkNm7eLMfVxKfRmxc4KAYg2Z09W4AnRSC551xVi3FQAiT1MK4AtAzsP/FiEYE ExECAAYFAj8nyMIACgkQ+dAU8DjJhY390ACePZsJNaxFOT73pg8KEoDXD4UxGMEA oNvNIjre4i2MZZbM0Wmhft72hbxXiEYEExECAAYFAj8nyMsACgkQXQ9/SeDknzRW xQCg3oqo0keERowG1CDWB61hzWVzZbYAnjz59v8q0it2nMI6bdoW+k5cexb/iJwE EwECAAYFAj8nyNUACgkQG7CLvyqSMiUw+gQAmw3DUvljjS//6vm+fqSQoOiNoD1e UwCM88Ug3tacEEuI6/mHTghuuvnuJ7Q/PbIxmJEFtNDMCAZV3zto8+FjuoI0DiaB u3xdn8qWQOn662XZ6bNvS7eog93fk+Hxk0LWocw0aEu2pVM7FNegRsjzx9qtzkVq 5ow533SVeHBkqJOIRgQTEQIABgUCPyfKvgAKCRApvl0iaP1Un4bEAKCWhOwKmCW4 jvrqNdkAE7IQZhe/BwCgiLRIrNBxcRXUj1bSFg78IbgSGjuIRgQSEQIABgUCPyfh MgAKCRCfzyzNPz5kJvp5AJ9SNJGpZkQ/6j1+Fmde6tmo3j3APACdFSsB5Ydr1lVo JlIx/hzh5cRlzhyIRgQSEQIABgUCPyheRQAKCRCWJIPhVmLHNLs+AJ9E2uMLZOqL 9YVFPi+b5fw7hijHVwCgnXLQuv8mfVjc+j2Kb5FWmnlptuKIRgQTEQIABgUCPykS RAAKCRAC1u0h4yxPS45aAJ91+p06ngZRvjfEXEBLD3P3L+NRyQCgpHNju63uXD4k tz+IDW1mB5tKQvSIRgQTEQIABgUCPy5JvwAKCRA5Ig1uDBr/u8XoAJsH1kfPDKp9 K5QF8+CQMdbRfWsOlwCcCwJvCLfXTlONYE57Ymm14pKrEaWIRgQTEQIABgUCPy6P mgAKCRDKDhacKPo4im0HAJ4wFWktr3ddxLyObSvsgTWkvWpIEQCgq+2w2ZcTMaZI +9DORKLz3i7XaFKJARwEEAECAAYFAj8wMdwACgkQC3gy83PWLUG+qQgAjlu0+Nuc UMGjGsjAzDj91vdQQSY3tnr5xN3Q8ThElsieaTlsktZdu9FBe6yS0acUnQ1TvXlD ub+KTpc3AJmG4dlm0EhHtK7Cg8l416jZ+zNFlIitSdY7mZADS8LLVOkjPetpPVol R/o1zGrLO3XZhZ8kCWUXI7DyVgz2Y+VleAiD5YkZ0jqEC6JQlbQf2fpyQdqJnCgk 86oHMAG5u3Ue62mn2OSWBGYGS4FP7Kauap+E8HnRFz0yMPhBXGkxy6juoMz1y9WZ CaDlsMZ+4QjRLuj+371oZwNeL5IsadEfiFmgE0pmrF55dzELaUQx+9cmN9d3YCmj nijFrYNUWHZKQIkBHAQQAQIABgUCPzAx6gAKCRAZq6/sHbI0q3zSB/4gASNN4W7l BSyZ9hbzoRlVoE0UqQr6U6OlOov0fkyGC2v8pYmcz1M1Cbjjq5G68cd+qurDzqzG 4Qj4ZHI1rSwQFT8T68owL/Z/h2loUn9rpDZEBts2Vx1lUCa05t+b+znFtGjDgZYT fhMsd+3GQg3nx5E2rMfnyj+bSlNLzyvtBbZ4KPQshEBvn8YoUtZtnQFGXKiVRULF tv/laXPkxA06e8pwFshv9ZcVztM2JrY28bm4AeIxV+lXltXzuRuhaNIQk5HMrQpw zOyNqLMmk+AsHV1aO2LcTF6uILyS73/T0cXpnnUXfMooZ7d0au9HCqawssGqL1e0 EoDj5fTiXx0AiEYEEBECAAYFAj8wMfgACgkQeF8wZf69S9yHpQCfe5VHuI3+Jd3y QrO2Y1GdG4JX+38AoPfazoV9u8oHnlT8xFr83Zif6IQFiQIcBBABAgAGBQI/MDIG AAoJEHw5el/KZtCx7DMP/2aRTGoRvfamj8ruS+USMF/jDl6/S6AWvsxIziqYOmh+ fv7CsqJL8h4yvoDcAjQcm9fEOguVhQi7juWU5RsrFHzAjzB8Pts527S7UZlnSKUs SZLq6rINSu/LvXjXFDErXyPTQWFPq3k+SPbq9zbYjd9FzHO657rGFGM2zLkLSme1 zevAtOZZM4nXXb+lZACnMlayETDG62KBGbpEkyCDx20ciBKnc1O0gt80pb6BZvyt Feuveqrzjv8llbz0yS8c6WwZCIRSGL+SSk8GMoVAlUnc+n40YzWDqFE2nyhI3OpT QuukUPkim6YpyHw7U0kKHv90NNKA8v7/AiI6enBfN0omIiAccr2obWhlhbOt9nS9 npXvmCDnC2oOjE145GfC+7FdbuTE6dL7tPbuDhZ5vT8tpqV+9Gj9EJK2H6ztMY5r ecjgHddf3rbjQXE6PG+/uIoVmjh3Rsmx63clIulEAU8lLwrQbb2CqIcsY/Zl9TBv sDOV5iuusLrV27LJHvzxNiMnDI917GBQWlsvj0w2LoTdJDCKgcHCJq3v6SOQsqoP n9ijvj2xZGWoRjUTizy3F932aHPMQhyTUVTA87/IxF61jCvcDCy3YUJ6EuHkuF1G 151efg9w46e8u1+KF38KunEYrwo0sOuU6GU+v79ZFOhgJY12awEulbFn5TGZZ86d iEYEEBECAAYFAj8wMhYACgkQlYRRoq3PfpSW5ACfdMKPaOquZzmWviuXWfoMFzAo IE8AniVwalnJp5JljCxr1OWr0PaDaKoOiJwEEAECAAYFAj8wMicACgkQ/Uo43Ch2 DT20JQP+NFxgVD2xrfjN/PCN7ZatwGT4eEe+j7FE4lDYGpYJ830Q57xpxzDfrsGv fIDVqQezmdVZoGuOECA09sD/DJ8fVb7HtlUcE3zCMk9nMVfhJAe+JLIZVOkVedWd rwbYtx54TqmCYduaP5X/IlMqSa5HL9lsAgTwCZLr7sOt24LAf0qIRgQTEQIABgUC Pzal8AAKCRC7xxTRnGfNlrxGAJ4hwZ4KAbBORIrkTlQprQXaTfgf0ACeI47PZfdu Mn1iZ7Xg4ejlKigPz2WIRgQTEQIABgUCPzflcgAKCRCAdScAZahB7eQoAJ0SZt2o HMBiSE0gbG+hMu2lJ4nrngCgpEtvcDkdvk3/Qy4JEm3fLR7Cpo6IRgQTEQIABgUC Pzf4IwAKCRBFwCFHaavdVMhDAJ4rhdl/bKvFlu/ahFADLZTtwR6/3ACeNtWb6fVA llBaFCOxSBtaICz5W9mIRgQTEQIABgUCP0konwAKCRCPubcPpM/JbgEmAJ9PIP8H bg278jI1avE1N+C9VjFV2ACgmGrFTHsIWGgFfrw7Sqj/vMmrywC0M0NocmlzdGlh biBCcnVlZmZlciA8YnJ1ZWZmZXJAaGl0bmV0LnJ3dGgtYWFjaGVuLmRlPohPBBAR AgAPBQI9q0EkCAsJCAcDAgEKAAoJEGx2F4yg7Zgt74oAnjGE1c1jdTHTGEYhWgUj YeHee0U5AJ9cmeMgr5XSuF6B6H4saaaL8C0yGYhGBBIRAgAGBQI9tHFYAAoJED4s 35lZGelGshoAoKjcIBjSAQvs7qs1YPobVnCtXk5DAJ4+aucRPTSAjG53Oi3UufOD 5EMoXYhGBBMRAgAGBQI9tIq7AAoJENSNEHJ4+KjUn5cAn3QIeyeEcztJAG/g0TDn O9G4Fti+AJ4oKRxI9s+mC0ZKTLxVGNA/VvSfs4hGBBARAgAGBQI99RB+AAoJEKZa JJONqkR/xGEAn2hhwbXcGFeyaAfu8NAIgewXfofyAJ96u5jnfMiUnI5M0IZ85j0p CE+enIhGBBMRAgAGBQI99PpZAAoJEN+hCDdk3bohHrcAoJg1hl0wWn36eWkeR3Sz 7Wl+t2eZAKCmfeJTPxD15DuoRzwTHjgI2LRixIhGBBARAgAGBQI99mhTAAoJEIMf ett9H+vdkRIAniOZxKBze0MfDYjUFqpU8Mkmi/2uAKDXtq7qNVR+8BHyZHzO3Rce QQzL1ohGBBARAgAGBQI+QCnWAAoJEJWnRNJ6HmtffAMAnRtBAMYtiRm34zmTfkBG MhPHNXkYAKDsI4vO3pPN4yHL3zg7Im2Vtt8LOYhGBBMRAgAGBQI+QCWnAAoJEGxG 8ZwW/bKYHmcAnRaexQEkpH/weZuhhWFd3k4NfcgqAJ9sIjBlBgYfZ4/K0MizocDV UYqHb4kBHAQSAQEABgUCPkA0XQAKCRC1rDlKuf8qEQxuB/40ondanrBbsEFNEdnG HzOZzxUB1hG0jAomkbO3gv79qiTxizq9t8weQB4fVh0AhZ0KJVxeJr86Z4iPSz46 1S2IXRyi4VCdhZ0zWtw6s7+cVGF47egcyMOPe4cESgeJn6Macp/vVwbyf44EJ+KX 9o9Qn0iV2aW/J4bL0fKpV3p8a90LIJtmK2agLk4V3fZMfOPOV+15oytmO4Pmrxum fcvgpIA5vfqM0dTL+ZpBIWITMU0e85vl+WPx2zok8xt7Ly84hS+gLnRDwrNKYm7G 12viTJOUDg9mcfxCOyV7z5EmVjfMzQbinsatgZ9BBK1HjGak7RfCLn5zmF/WXam7 xF+MiEYEExECAAYFAj5ASuEACgkQlI/WoOEPUC4B9wCfQdt6bD3cg67q6NapMzl8 tVkvwfkAniHumuOtEoPxjxOiz838H+VvlH34iEYEEBECAAYFAj5ARsgACgkQHI0n ZIQ34x8BWQCgnZQ0SvlZny3U7nM6yPIcEiiBUH4AoMWc4PpBTJDQicAXi1sho54z wZA/iEYEEBECAAYFAj5AVSkACgkQgGcShyMVr6PzqACg6CVGOLFGtw5Q8sAJ+Ujq qOFgJ5cAoLqBYBwb8zBaaqZRYB8OK18U18TZiJwEEwECAAYFAj5AWbgACgkQhqAI GyKylR1OggP/bTrJNeOtMd+C0YdFEjOUvaxLRtXP8ga2rVi5b8UwdQSDTHmtq7iE +b10Jkgj6eaUhmDyKgknezBIQLRPzu/7aDjM0+3BSPmkW4CTI7UWxECQJwqiCu2R AnrduAllRG3z2Zgur87l9zoH+IOguERmIfawU3c+VIt6Fj9euNFOgE2IRgQTEQIA BgUCPkCsngAKCRBiSEuPG0iN6omYAKDnbWbx4mPpI69Wor6B6OOaAQTjtACfc/WA J38X3O0OENnb/K5IgGL2f6uIRgQTEQIABgUCPkCqFAAKCRCuUcxBI0Z68dlvAKCP XIuDufIzJSMMljNAq4nAErw0IgCfRt6GmlkPjnhtid3uaJC4A+iOqyWIRgQTEQIA BgUCPkDJGwAKCRDVVqZgiOPvV8CdAJ48OwRI/e2sAAlBxKC9zRFKg6wbVwCfWSCp GA2L39tMexAn55CpdKR2K5aIRgQTEQIABgUCPkDglwAKCRA5o8lM/cSo/f/UAJ0Q dEZSxgWIIwUE4dneT/oDNtIZrwCfb76Kr9o4RaKQjAaHDlViEeqHt6aIRgQTEQIA BgUCPkFU0wAKCRC0deIHurWCKQ5AAKCRN4ozZTbwVoDDKUE8/5gWpPQeQgCgquc4 oMK47BicU2CzTOwJWCMcq2WITAQQEQIADAUCPkFeMwUDAeEzgAAKCRBPg4y3JqCo FlhuAKCO0wWTLknRQLNlwlUa8qk8ES7lmwCg+MdIinFHkKQG4T4NveGx3M2sKBaI RgQTEQIABgUCPkGUwgAKCRDwJO+CNVGeqFRuAJ4vbA3s4Bc1BCMAYE+oxtCEvBqQ bgCeMDgyFQPET6ZFKZ0cHIeKcJJiHOGIRgQTEQIABgUCPkEW2AAKCRDcNnQ35arL NJHYAJ9KKBN4skVd0f9eap/dTZLkEz19jQCgrmFeW1esQbrvvrJfndRDt6DlEN2I RgQTEQIABgUCPkFcTwAKCRAHJZTVR7A165/kAJoCAXm2/WMWCnkeSDGueKYBEu6l DgCgnJSZhVZvaKwnomv1W1KtlRjl+BWIRgQTEQIABgUCPkFcYwAKCRA/V8xvnmt2 3/l5AJ41iWNVTfcuWAS8nIzzhYTDVWnPTwCg19SZ3hZXkFlHVks4VLGAAiwPBsiI RgQTEQIABgUCPkF10AAKCRBBGPb8lSbpxbM0AJ9zUihZu04IpPRZPSz9LiG2dgHO MgCgnrll692/wGopjsYCE8aRzlJuFDiIRgQTEQIABgUCPkFzRQAKCRDQ5Ee9ESjy X+dBAJ9OroeixjCx/bDMDoBSCYqB321S1ACeJ2H9NHd3KGXZ8JvMELMvmS/RxgWI RgQTEQIABgUCPkFzXQAKCRBrphakwVE7DK/9AJ4kYBvBO0OKLPbjsWBcZ+F7e7sN ZACfencb2FyQneCzhX78tjjrWraRIBqIRgQTEQIABgUCPkEMZgAKCRDHON/LNYa6 cUkHAJoD517olE6O5piUrvw+yoZzF8++4ACfWOCLwyh2DEVl+Y8PZYnCIsB1TvOI RgQQEQIABgUCPkF7XwAKCRBueUUCoBl5wB6ZAJ40y6v+9Wr/Me0lEsg4VwhoVW8y NgCgj+5cl3eEEX+Ou8vR16ATBdlgnH+IRgQQEQIABgUCPkF7bAAKCRCjGM7Esm5q ucvYAJ4ulBIZxcnftwKEhfBzSbGNCJyrpwCfXxX7ISVFgqeqkSESFZW+JHwfipWI TAQQEQIADAUCPkDKfgUDAeEzgAAKCRB1E6I2ExAs9SkMAJ9W5y4x0CHyg8GSL0s/ CUVmJJ6MIQCg0Jw7lN4t3LtFCjScjeDU+IabpmSIRgQTEQIABgUCPkKmEAAKCRBA DB62okjOYyvHAJ4zV/6Z+/o2g1z45eEWeGaqqwP/5gCfc7Dfa6RiCQDsGOnWNA5m bwAGnMeIRgQTEQIABgUCPkQyqwAKCRCwxLn3mg2CqcvwAJ42iDFNJbmM+g2Ah7hT IuBjsey8BACgkCMQxNDIRObSJZD7t1fqO3NdCvOInAQTAQIABgUCPkRPKgAKCRAS 6T6JP9G2tSTaA/44qliNYgOZfKeTRzhDzwX3IRZlVmDX6PhGAHPb1ju/ClUJN+Qs i1Meq8qOxJ7EmxWdhVaicvPQuSUP/9zKWBF7xT5DOmBFwruK5TB4azgixsEnqTbn E2Ueqqba74xTFO2+jfj/9r+rNwYxsprNhh1yKV+oClgoMOg18UiQiYWzxYhGBBAR AgAGBQI+RYMeAAoJEFv8diRAZaHa8p4An2BVlKsaa7mOkTfotelp+kStgveQAJ4y nhx0QrwelwDFlnMLAb/hJhNwEohGBBMRAgAGBQI+QY9hAAoJEC9KXfQQ64+oVo0A n0BHI9vdu8OYdVeI8Nqy4O7w+MJ0AJ9cLRVTXawC0XC45h6LxJ+KqiNrdIhGBBAR AgAGBQI+RsZ1AAoJEJ71dopqzj+sNkoAnAgmXXhMgwAtbLhbAhgVOMFlRRUmAJ0X Y7tvPh8CFXT6fOb6xf8qozpem4hGBBMRAgAGBQI+RsY3AAoJEOpKzVz2XGjNJgQA oKfu2aKW7fSiH5z4ZBrPjqA1moWbAKC4GRKnvliFWw7nqg69xNmffHVu/oicBBMB AgAGBQI+Rs/1AAoJEEC/HpEdDdC5rUEEANq8aUuaMlZ1aw6oCTlFDhxSOu+Gpkcx grlziYDwKXUjR2OFUZaq/wohbjrJGTGR3DBdOe2NYaTudbFNehl9nfAEAdw1bxTE rDuDydm96FSYVh4XpKBCdndNjF5TIyT3miwkCyE/AIvWpa7tJVZzwTfyiPpX+BWW jTpu3Hl2rDNFiEYEEBECAAYFAj5Hr40ACgkQagIyDYKgMl6dvgCg47NneegMxMG7 biK/VPBZDwP1YfEAoLxxEAkHSDkeNBg+lkmB+HlbJaiAiEYEEBECAAYFAj5H0HgA CgkQEMun3/wGpS2VhACgypTumsugt1rogDj6n9vS403AesoAn3f5F9gcRmo5x5iJ WRQGkyqDn9e6iEYEExECAAYFAj5IZ7wACgkQmpTNb38U76Q0gACeMWM0+Zlma8mL sVBYvy+sFl24pegAoICrdVi0Vp0d1S8PlhnLfVBmJkMOiEYEExECAAYFAj5IaTEA CgkQv7s1Bo4lI/3jBwCfWhLWZlO1s087n/FfB4pC1v4/n5UAn1zTvthQ8iEaXlGb 97ycKkGRTq80iEYEExECAAYFAj5JZJ4ACgkQ3uEZ6Jp2yaN5hwCfVmppO2o1alnw VuglKbdXjOE1rpgAoJwOiXq5tuE4pSjdbQi/b+8/YMLgiEYEExECAAYFAj5PlXUA CgkQcieKIj7SkS4XSACfWqEMG5JG2di4ScIs4bBuTC/i7ZUAoI5f3vVGq2ZgjoCg ZT0GNuCT8yFbiEkEExECAAkFAj7wz8YCBwAACgkQDbEkl9DbWrZlIACfQst10m5i 3W/Zw1IhTGymFHr5lz0An3+3+EQGY4rktVDTvAkI+GOp/qJ8iEYEEhECAAYFAj8I RKsACgkQnIUccvEtoGVYnwCdHtQFnSIRNHApNkvDCTXjaBvlvgkAnjwDaZGVW2cv i7HMcnCem6zK0qfIiEYEEBECAAYFAj8QVQkACgkQ1vr63ZUvP/+6cwCg8MI1AMI7 aWXiVHhsevxtmKb8K8UAoIfduASaeW1jfkIQJjKvnSAJCUOfiQEcBBMBAQAGBQI/ EH+ZAAoJEEAGFQ5ACertyh4H/jpXvk+I6jjf6yoHT76hbi7X22fBJoacEJDQr+W3 qESSANtS0QS2ha8e6sIMXvoZb9lCDdGMOOf8v7+h58kpwVzCrwP6bvk5HboORULF bP+AQnzuWIY5I7URtFviqbZDUtcTnUine5Bnr9EgE+IsT04G4Bdra2tTF8NywrWn zB7L8KW5fgGEjx8FuCMl3xhHKLVGTAFbGEUG0p7bIcszKmL9skXZfOR2BBwOei2r PcUkFhVrAFnbYZDOzH0dOU9XNyYC/sciS1uRunhJgbvhlEy/3/z8B+REOTO6SoOW ShQmVpHF1L+RM2vbgaA7n4Lm1M0fD1cuFFeecOCxr5WbyB+IRgQTEQIABgUCPw2/ zwAKCRB8IsOfgHrFOjHXAKCQMiaglcYaiOJzpMlWsI2g9OUSLgCeMxJubKw4zbte Ay0EwHn1XOzDkt+IRgQTEQIABgUCPw6kqgAKCRBN/6N0Q4ZdAd8kAJwPB1+MBBya +I6+FZBA0F6+hwH8nQCgu8br/qRVO/37nWKXcBrdovqMrymIRgQTEQIABgUCPxAe SAAKCRDhhSLXfHEry8HKAJ4j5xQM6HBjgGS2m6QGiUmNR5dOqQCePZXu5A6YWe8x eXbi8r6vPwhaFtyIRgQTEQIABgUCPxAotQAKCRCzNNMIli/S3necAKD6pZHPYzJR QCvCthKRLehSscHijwCgynfSZuATXmj4Dw9ujUs0LwCCoJWIRgQTEQIABgUCPxD7 LAAKCRDFwMXHIY0Y12OOAKDx2DUpUt1R3qsn3sVmLb213OiBbQCdFT21Q5ZVNjyi 0Du0TF4s9HcqnKuIRgQTEQIABgUCPxFJLAAKCRDqIZlBJHfK+O94AJ9Jhf6DOhk6 SNTMc3vcxW6oja7gVgCdESo1tGfX5eNioP1a78vlE9Td+92IRgQTEQIABgUCPxFc uAAKCRAZ/tg84r6jQV0gAJ4nGDM3FYzIfwc7/OWNGgt/Jnky9ACgr+5vwUI2+s3m H0mM7oAGKxXzg5iJARwEEAECAAYFAj8RQWYACgkQCen5CopyTkUtQgf6AzTMbzqi 7dNRiblJ+3p4r993zSDGeiPMeS6iM62Ab6yGHbCJWDXS3N/AV3AY31H9zg1kfnYb hUmIpKnoML1V5vXND2+a0feC8eg6YaFUzATZbA1LJxQgsukEoGPjUutuzHrdTUme aWEvcEjrqjit32/r2/Ii72IJLp46EUHT3arMe86yyH/ui/SO/kNUe78rgM6QmKOf KVImKee+0lsU8y+H/v+81YUgxXqFjjpIW1MxFLtuinug53dOYworXhOLKUFg7JOn Y1OWxdNNLmjP5+hCDvEJeFobKUJeneFJHBzq/x+YJdqrcwRpdP76W4Oy1uZJMTNy T7kr7VzxhgIie4hGBBARAgAGBQI/EScQAAoJEPVrJqOmOZ5zDWAAn18TasWrwIRv 55y1GIsgYByCbytNAJ97Mi2X1jbcQ9Glyl3GQPd0a6teKohGBBMRAgAGBQI/El8f AAoJEKCQ+9OXGZ/DEBgAn3J/H+TnOg/+twcFz6qlzvTMx3sfAJ4g2GwIEU4QslyL S6OLz3JUgyphFIhGBBMRAgAGBQI/Eo7MAAoJEFZtNizuCXfoIZcAoJmG/mmltkyw EK8fHmc0EV6gyRd9AJ42LmhI63aCOjf1th67+LqsHaZg44hGBBMRAgAGBQI/EpRG AAoJEI+5mXFO6zHxsV8AniK2jiSurdSQWdixPZoV2eUXulpGAKCYrtNkuLP4s5Ej cx+54hmyhyRKqYhGBBARAgAGBQI/ErtgAAoJEEbMXGPzGKVqeVQAoIc5qKO5Q6GE vLUe8dFWWjoPZn2YAJ9LBBPFsQxIGavFNMCtEfaVGICOUohGBBARAgAGBQI/Eo1F AAoJENQ8swWV/so0wwYAoL0ynA9cDZlRVk1WKRCx0U3MWsmVAKDDkTQxbcVhx4Y4 wNPp/9+bLQbcRYhGBBIRAgAGBQI/EvroAAoJEL9BWVtzcqKlDjcAn07iDymtatbZ 1A4lzxgP9J+LUNKBAKCBmNvdGEgB3NStaioG1ykK38WJ64hGBBMRAgAGBQI/ExEL AAoJELmCy9XA4x8d2ekAniL9GJ18995gauA8HIZfGs1+AHBEAJ9x4by7OYz6s1p4 X58cYM5EJqRVJ4icBBMBAgAGBQI/EyqtAAoJELRrkjttir5xQ1UD/3qEX2rdoUfy BnnicW1Wlj9xCzi8tjpeawzjf2lSKW4UlwfSoZvPBTTnyp9gVrtWKI+Ore9pdCQq qOzbAAjEJIjiWRkRNRSyj401W7nEB0v0cUsxdyh3ajScAdZsG86OpqmLHIPZg2TQ hdFiBJAI0jRQ6haTY7Vc+3C4kgF4jfKriEYEEhECAAYFAj8TLaEACgkQNfZhfFE6 79kzhwCcCcGP7VtaWt+vXh8i2p9QdJLXFwwAmgMz496wZkvq6AtXvPc3rv4dKRJe iEYEExECAAYFAj8S58QACgkQklW9n+aETbkOtwCgiV7F6uPAkVhyniYK47lrplJp WUMAnRrc7filMie3WQ6KoIYMc58AFUneiEYEEBECAAYFAj8TQ5YACgkQrews0RqV N+eIFQCfZv0mqPt9yfoTIf0iEHFL7+nRIHUAoJHd2euw2J6ivJXwDnYTJQvg17FW iJwEEAECAAYFAj8TXYUACgkQ722CQfCBGV0MxgQAo/5lTYhqACyuXP6o1yZBTBOL yOB5jQ4hXSJEefy0P0iIwZGFOxXE1BVfgA272XqgU2wByxFe8BPMrkNdlgoxmgpo /H1nvcUMINwFbixM3loOgy4NpDSxfg3/i4wrSn6flqJ0X/aNDlUcwaxRyo0XVX8J WxDPob7rLd/tMjgshZeIRgQTEQIABgUCPxGixQAKCRAoxvVrgXw1aF/WAKCuLcvb sIDc/yIOJ4L/PwetJqz65wCgv14ZUzkr2byfbxWqB0x9Pe8Z4ZyIRgQTEQIABgUC PxQjDwAKCRBRrPatdb6Al1zHAJ9HRP0Qei3JEyXz4WwigmOCxGzCLgCdEz0mS8ca K0YGTruexNKnVz4c3S+IRgQTEQIABgUCPxRZoQAKCRCELNt6RHeeGJgJAJ0eBH2p BiN/er2jDaR65lwk7GHsMACfXCSInkBPdcRrmDx4qjBVMPh7c0SIRgQTEQIABgUC PxRSGQAKCRBYKVdQBQCDi0/PAKCUqyyZnTffFI0Cc6XXIxLcSc+l5QCgyKOzD0UP F3LyejZLMXoE6HNHsJaIRgQQEQIABgUCPxRgnAAKCRB3+BUzuw7oxx3MAKCRkneT Fl4GmlPR9PimSByE28Z/WwCghDzNUCmnkgwl67jbtpZAJNuSPcmIRgQSEQIABgUC PxUOmwAKCRDVTq5LyZhwsf6bAJ9P7azN7qGk4buXQ7CIhQ3a2pHb7ACeJSF9Qdn2 8nkdMM7G6u8jb96wBaKIRgQQEQIABgUCPxUqvwAKCRCJzUshYHVZ5tNZAKCwYW7A KNF1Jl5WF8YrLZdQXqfmIQCglwELvUiyJWOMzPqFR0YPx0n1u5qIRgQTEQIABgUC PxUq+QAKCRDTW7yZvH0CCpsoAJsHOkTbpuzsvGTvNrrYNPSwXAhvkQCeNinhCKOS jjiIUbUIHDsOz8sIAYCIRgQTEQIABgUCPxVegwAKCRCe0HjvSzoTXCvGAJ9w31Zv azal4I/N1CX9sOu/2R/ABgCeMyo5M0vG06uLFkVKidTP0t838QOIRgQTEQIABgUC PxVehQAKCRDwI/gLJoQdWzvhAJ90ieEwIPKGXlPEmCnLlaCfGAhpCgCg9H/SGzS4 V+jAaEqmSIvltHTf/c+IRgQTEQIABgUCPxWL+QAKCRBTtrgdwTzuByH/AJ9S0n5U egb5DNIUMt05ImWfQ+uWEQCfTRu3SC9Yn/YGW18W65mSeoGEkqmIRgQTEQIABgUC PxPzIgAKCRBL7yYkIt9Ah08pAJwMs9tctTxNv/QGhPmlonaQ6ugxcACfcTmKFWST 9tpWQGJYMdPIymVW3+SIRgQTEQIABgUCPxPzKQAKCRCVZB9rJT5Y4xYwAJsEa4Zi Ib+DJ3f1K3KX7ofvADBQ7ACgkAR1nIokfD6rFzMhfWGCIfmgXU2IRgQTEQIABgUC PxXWdAAKCRBBufToW3E98CnFAKCH+yj3Fo+mwbSpXoHJmDk9pd+BfQCfXgANpSPQ qib0Wtteoo2PPtgiMi2JAdcEEwECAMEFAj8V9DCGFIAAAAAAGgBjc2lnbmF0dXJl LW5vdGVzQHBlbmd1aW4uZGUiaHR0cDovL3d3dy5wZW5ndWluLmRlL35iYi9jb250 YWN0L3BncC9zaWduaW5ncy9ub3Rlcy5BNUM4MjA5OTE5RkZBQUNBRjQxQkIyOUI2 Qzc2MTc4Q0EwRUQ5ODJELmFzYyIzGmh0dHA6Ly93d3cucGVuZ3Vpbi5kZS9+YmIv Y29udGFjdC9wZ3AvcG9saWN5L3YxLjEvAAoJEBmiaAmIOP2UEw0H/RVZqajm10VQ cFpumvPC/qvWRIxZdQASPdMGKAASqPnrNQmfqHo/3rnU3BoquWWlZikwn22BGkuR aytvAI+AAyrrkA3R5HgwlIgtCQpTzljJPVEOA261BDlXLvttZipW6DvjZ8+s7QWW fKZYwbRCm5mcri1JQAmxtjZkK3E1K7yfDL7onLrHDx6H1d0njgN1j5K/82m3e6eF YOoi0Qpq17yH1HggGXx04rGgn9yaBOTmP0fJPsfnzWo4+GIfmQjfG0rrJhdakRgW a1JO4aI+goaxu6KSTFhpOnd2Rw34bkQICL6jZC6G4MtVSao0IsVtNiP1YcBbv2Bs 0ueQduyvaJiJAQEEExECAMEFAj8V9D2GFIAAAAAAGgBjc2lnbmF0dXJlLW5vdGVz QHBlbmd1aW4uZGUiaHR0cDovL3d3dy5wZW5ndWluLmRlL35iYi9jb250YWN0L3Bn cC9zaWduaW5ncy9ub3Rlcy5BNUM4MjA5OTE5RkZBQUNBRjQxQkIyOUI2Qzc2MTc4 Q0EwRUQ5ODJELmFzYyIzGmh0dHA6Ly93d3cucGVuZ3Vpbi5kZS9+YmIvY29udGFj dC9wZ3AvcG9saWN5L3YxLjEvAAoJEKseS2BGdWseZeQAoIz9KlFMtajFGHN2dxGK sG6mO3oCAJ0X8Z4DETXm/K8ILQ1Z/pP4RodIP4hGBBMRAgAGBQI/E7DrAAoJEOfJ 26/jVu/Aw+4AoO4wBXNHbVE/rPsMbKPufe7Ec31YAJ4/1ioDRk5fR5TEb+vvXSW8 nofiqohGBBMRAgAGBQI/Ft48AAoJEDu/z3e9iwUNDfQAn2WxsohG5n9Aq43Ct95k koqBFturAJ9+96R3ERPGKh9swWnJ9rBlkUFGZ4hGBBARAgAGBQI/EaO6AAoJENAZ 9e+QJ6uI8fYAn2tnCEZv5HogN3Abkr0XrmYL+7KPAJ9H4zrNiI2xha68apWA5qlV LqyHPohGBBIRAgAGBQI/ERszAAoJEPS0sMx5fr+r7kYAnRw1oK6hqhlDWUHxmPRW VbnYP5NxAJ9GDLHgyWasYFj4rFsBHleIAmu+yYhGBBMRAgAGBQI/GE0WAAoJEBp0 fkUw4LnYihIAoMSxOoAUqwrOSZZfAT1PN5tnh7X6AJ4pe0/QNg+zIB9/mvZAJbvg bSHfsIhGBBMRAgAGBQI/GX6qAAoJEGZmcXrbg1Z5GsoAoNPTcGZB/zlLarfBlJdN cyTkaTN+AKDAj9c7kZqVwQRvfgO19viKFqOuEIhGBBMRAgAGBQI/GX7NAAoJEA2W S2ZXDm3qNhcAn16xPNxTE4U9eqCCT26dCf7VqAyzAJ9RT4KTUEUGKseS8f13FzTo T1ueoIhGBBMRAgAGBQI/GX76AAoJEE4CrK4d1rOA1O0An1WBdZaCJRIthN1/ymMm Q6HnRPotAJ955kGEkWDp8s5SL6NDI0zBBkGvVohGBBMRAgAGBQI/GNSpAAoJEM6K edeYAW3H1z4AnjSEKHleKRyOb/kG37ko+eIB9FD2AJ9GQ/q0P754ZtxqaFUiqHAJ NHkKI4hGBBMRAgAGBQI/GvN9AAoJECyYPlrSilXWwDYAoKUwfgKjZAsl0coktJZv 14OHy3tRAJ9VAy9BEUSWIFSaKPsC8WCrs4eXjohGBBMRAgAGBQI/HE8FAAoJEHFe 1qB+e4rJ2f8AnjihYtaFRbsEwGtuE9C+5wjKZYkEAKCGJ8lgK5447GtFvs9sc0Kk OcJyxIhGBBARAgAGBQI/FbTZAAoJECole3fGNyjSTqQAnjzG6RQUZB2fHuOOv97X PEUxf6VyAKCAu1JdTxOl7uvOSgzX/l5hhZ9SHYhGBBIRAgAGBQI/HGcoAAoJEMgP dFmtwp7NENYAn1wYpBppW2AV2J+LS+4UqyzwUgx+AJ4rmKBgfE8OkM1QHOiYqpy0 MTkL0YhGBBARAgAGBQI/HanwAAoJEIsCZlm2jV9/1N4AoI19E9A4I1vz5at3XRlR EbRDIA+dAKC8ih/vVhLc8dZ49H56mvqPO4ZIjYhGBBMRAgAGBQI/HasHAAoJEN56 r26UwJx/dQsAnAisenAR0GJXx2M1KEZqOEVN81+IAKDi4FQbYnuBNYkp3mmut5CX SSpeKYhGBBARAgAGBQI/HagwAAoJECjdsP0Zyba6/0AAn0j5wJOnIcQfDKStVSoi QcKv3qxEAJ47GNt06E1oPDpBFSyHaX0EicKupIiOBBMRAgBOBQI/FzFmRxpodHRw Oi8vd3d3Lm1hdGhlbWF0aWsudW5pLWJpZWxlZmVsZC5kZS9+bW11dHovc2lnbi1w b2xpY3ktMjAwMy0wNy5odG1sAAoJEN6Fg/i9v+g48LIAoJ9sjzxj49V+IkmTST5q N1rn2aueAKDSswvpJjjC4WCe0fCZk8NvnCOLP4hGBBMRAgAGBQI/HsRyAAoJEPhZ kLAkiutzRcgAni/Tdya62QESUwbPY192zUnpZCUZAJ4p0eMJaTtAFgfUz6k1s9nx B9hHEohGBBARAgAGBQI/HoSRAAoJEG8ji8JP2loMP8UAnRgUejZZNVhjDeuOy3cH M8UQ2fNgAKCbpsSxJs6JFR+yS/N9jx8xcWKvyIhGBBMRAgAGBQI/HuFWAAoJEJSb JewHRHJS5fIAoIvtsVi2+q1/HNomoog68sSbV3/8AJ9lafbGsCje3wLB59bdpLx6 bfvcCYhGBBIRAgAGBQI/Hw1dAAoJEOdNKbgr4W0B8hkAoILgUU+r59s3zs7CL83+ W27m+AxgAJ9gnOZb4OFx0xRKGXWI26XyL6cQFIhGBBIRAgAGBQI/I5jUAAoJEBig zI1XBqS0N0wAnA1VvaIzKG9Sx1YRKvtT6Y7kGhjTAKDbqwjDwn0D3Fzf7NYSs2LV icJVAIhGBBMRAgAGBQI/JXRuAAoJEPK1Kl0KX7aHFCgAn09gsKJwPCNoEwVSnGy5 UDc/sVfSAJ9cc/IJ1M0xWIddrgpzP2O5+V+4W4hGBBMRAgAGBQI/JuGsAAoJEIkh tdzNFaiDmcQAnRQnqsobCou74MLykzwtmFlZUZbhAJ0dmMVtHYC74K2zt+lJvz49 /G1YfIhGBBMRAgAGBQI/JuG3AAoJEAcXdOAA2M0WDRAAoILMsRMzn0aCdR/d7TVe 39qvyzLMAKCpgKEyrjeLLn85zYQt/mEHlJBF+oiNBBMRAgBNBQI/J8ifRhpodHRw Oi8vd3d3LnRyYXNoLm5ldC9+dGhvbWFzYi9jcnlwdG8va2V5c2lnbmluZy9rZXlz aWduaW5nLnZlcjEuMC50eHQACgkQpHnNxFq0YGrGIQCgpqtvf2JAIBFJj2ZEAjar xQHUk8sAnR1PKOzaTtbULulLAfboR5j38Jg+iQFjBBMBAgBNBQI/J8iqRhpodHRw Oi8vd3d3LnRyYXNoLm5ldC9+dGhvbWFzYi9jcnlwdG8va2V5c2lnbmluZy9rZXlz aWduaW5nLnZlcjEuMC50eHQACgkQ+Xz54zpLf11CkQf+L6ndlBkMOsXAHSRpruI8 FEip58dRE3PEWCR5Cs3Zj/TrV9mF0pCnbU+5wlfCBz2Ieuj2ddNwI+9kWicCF4Xs 9avqRAasSO5sUSgpq405nKmNu7KdJEQG33expmPz/AX+agHOwTKpniohjlEa67Qd TG2ewcKvmLEQW0LjY0Rq2gRJ4cGFYkSmynOBp6agg6bITiwXPNQZKQ5VafjOQVUR tXtQTjInZ8gJGVdkrGD46D5a8yznX/KQU4ZEgRmDb6vl9POybhOihDvszahBfwzs c5QBZPHEXCdeCNA3rdCYbaqkxohS+y5PjcYchfO12YOaOB0Gg8SWOnow/M0FFmFc FYiNBBMRAgBNBQI/J8i1RhpodHRwOi8vd3d3LnRyYXNoLm5ldC9+dGhvbWFzYi9j cnlwdG8va2V5c2lnbmluZy9rZXlzaWduaW5nLnZlcjEuMC50eHQACgkQeQV2j3WE 9dg9VACfcYe3EhS4Nh/EaOlsxtBPfa8k5jUAniNbDyUG3T3TZv9p6fCzIMIoG569 iEYEExECAAYFAj8nyMUACgkQ+dAU8DjJhY3c5gCfTaZQqM+jRp21JyZUdMM+9lii SVIAnA58fijG8f9ytFnVu2v+60w/0cEqiEYEExECAAYFAj8nyM4ACgkQXQ9/SeDk nzTt+wCfdlDeiOXOMP5OlGd9mobCgiIbzfcAoOSkTiIY5k/iyi0W1ajOo89HcoaE iJwEEwECAAYFAj8nyNgACgkQG7CLvyqSMiV/bAP/TXflvf1U6ypKOg90Kd4++x0s 0jm0gC+pMsFOedx2G4V7mFdCU5O86MVc+M4J5ztBFR+phYaHTtIfREkgggFCFovP lykzZxTDc4FD/qQmLmMvHVjwb0pVYI9zPEcL2U7ZcvZEQog94lRxwcoIhEWFOdvK nyjM9KEAsk3yqmAa2fmIRgQTEQIABgUCPyfKwAAKCRApvl0iaP1Un0XaAJ0eKoSA oyzjyNbxkxPLqhyptAq0WwCfXd4vilC3Rv2Jy6bITLFqiWLNUAyIRgQSEQIABgUC PyfhNQAKCRCfzyzNPz5kJs5vAKCBDTvRUTDkXEedWjYkkRLcyRGY9QCfViuaISw/ 9ypRk755ZGohUNkzqamIRgQSEQIABgUCPyheSQAKCRCWJIPhVmLHNEPbAJ0ea8Dp Xtr3VBTWI57Ph1y9S9sXaACeJKs/hNYnEIkOrh4Vv+dSMBhFom2IRgQTEQIABgUC PykSSAAKCRAC1u0h4yxPS93SAJkBXNMPqDHBuSJCdvunTRZ6dfHrqwCgnJuM/d4I Kque1PwGKAgVr7K/VMSIRgQTEQIABgUCPy5KqwAKCRA5Ig1uDBr/u0+wAKCuQ2qK LXzGsqgrONq1Nc/Q4eRJcQCgkrxWXt0TsjDNRZCXZ7phpuQ7mSeIRgQTEQIABgUC Py6PmgAKCRDKDhacKPo4iuhHAJ9pftPW+2A+h0pIORtiS1hm6wzYCwCg6gUZjYQz N+aMeImP3AJl20vOPnWJARwEEAECAAYFAj8wMXwACgkQC3gy83PWLUEMIgf/avZz 1HowES/LgWuGufamC94UJckVdAw0DN2O5rxGmgqA5TfqwL0g02rfllJRjIYBPT4M uwr50BdVALJ9XLmyGq5Rm6grB4F2HYI04EiU+e38Kr8B5W/rbV2rpEzWYS1bmMbC iEDDydGTfaDIgG4Qgghk9JyTIhoCXIwZ+glPaa1HSAhTIcNhJq2LfulcqPVvt+C+ Zj6A7DgB0OWqccz2+vxMCVYLq7aEVpwcgdPvegYLA1CJ+RiDWKTNkJCWalN9GIzB 21H8XP1fnIqRlnwhpu9qou374BVO+b5l2aRDRz7WNXDFWK/MsZSpiPicIkmykZBY mOC3dMNwgmJrl8Ijg4kBHAQQAQIABgUCPzAxiQAKCRAZq6/sHbI0q+O2B/9k95vb VU+jRLlZOW19HGWGOaIFlZ0lS49SPc3GJN5HutFyj0QLQOyR5ttDWgJ9oCdbQZun /AoTcaVn1KPV65cmXi0AmUfawDNMsHRA+onlVSUttF6Z9FVRJEr37/r2U1uThIQD h6Xv3U+3OFZeCspo0mVWS+lQ+i0c+n3yc6+X+5SIMUOwqe332qTeP/smiGsoN1Gp V6TVJlWHDtTPrAPu89C4/b3rokhVATNVoBm5zk/5aotT5hqf2v7t1nKUlWu06iUO 7VUeeWxyV0+wDnzo9uwDlDCU1PtOu4bSNwCTB2WrUqQLzbD3EIz+9km4ysNWNARb Ub8CcRIm8OUq2oCfiEYEEBECAAYFAj8wMZcACgkQeF8wZf69S9wgFwCgh6pV0QC6 nGUvV5gh6kpq2m86WosAoK9BWccENWzlZPN5FrKAZhsy0phJiQIcBBABAgAGBQI/ MDGlAAoJEHw5el/KZtCx0PUP/jrWCrxFkGmigxc/+hLB9XwwM/Mx01OopeE+vpx/ +GUyrGpSsuhYP2Pvhq7VTFsGqOzIWs6pBpm51/zEZ+43RExafIICRTQ5a4J2dRMC rgLH2Smlkz766klepK1pNFamixWsWopmtsWZ2YX/91G6U6IPASvLLcV+lFuQEZxC kL0GlLk89iOm/Fzyu7r7xG0DOzI4sFdo7W6LQAGhwxTWEqfIpRqTIPH/IYqLeXxE gROe6gCGkpSsk7+S2kG8oKmFPd+AWI8LFhHpBL/NksLTW/Vad2lCHejWe4us1nKD O0lrIdNgjs0W4+p2y/TFH/pUFiOUbBdEqRvzPPMQaUp5kDAbZbG7Eydg+CKImPMd 90xMGWRHs7e60m6aMDwmx43eIdTjFsnBuCuGfic3+ydJ9QeL7IGjhT7wWUGQjpas hbumPKEjhhphIUJtaJFDC6NOLp7o1DgdlQ806OgU3KzmDM5i6QO3noeRA4en6XHc ds/D93quTOXsw9Ex6S6m9AdT1XmPkYN1SUNQr3S0BxYzXiZuuZkdQ4sFigwmYljq u19A7d97XfIe9cRcuOuV3eSJInljG8XP5zx5rAgQNqAU5RoKLl9kik0qmLVkk8Re 8UCAvFVkklZicYR2kLe/YmXTsckT9od6Je5LOpVe++y4+la48vtCKXuP3JL+Rqqa ZxZZiEYEEBECAAYFAj8wMbUACgkQlYRRoq3PfpQZUgCeJbkFjCtAGLhiePn1uRM9 SuRi7sQAn3QdlR7RiyDXyO8GoAT0/ODhdcAliJwEEAECAAYFAj8wMcUACgkQ/Uo4 3Ch2DT3PxAP+L98q7LvobV7AtOIZY13z/wKHCLzrHUeiOOd+I3l8hit6fIzsqmTH sCcSu/wVt7oFaTwt4+TN2epunVFV74J0nB82Bew7J2CXD19ZsQy9qTqeNvLvmJD8 FmWC6LYIqkN3IwVVB330sZQYVcNSNl4hCy4wntNLGWPY37XmG7nOi9uIRgQTEQIA BgUCPzal+QAKCRC7xxTRnGfNlhX6AJ9zfXvNPU17VpgdCyF9L4tw7Gvz5wCdG0dT 1Wfl599fDBZ07pZYdU3fGj2IRgQTEQIABgUCPzflcgAKCRCAdScAZahB7bOWAKCB UB7pH58orpwn4kam34h0S4U1fQCgvh/QHkfYznXxW4PLZjHFzg47eiGIRgQTEQIA BgUCPzf4KQAKCRBFwCFHaavdVI8lAJ90ZPmZVgVr13U6xu8J/QJF0Ah5QgCdGXhO FWEyuY+1IMswfRS9DXffJd6IRgQTEQIABgUCP0konwAKCRCPubcPpM/JbmcVAJ4v xU32w0zWpHtxvY1M9bKwjay5dwCg2PFIpqfUrd3Tt5sfIizXsfwhIyW0KUNocmlz dGlhbiBCcnVlZmZlciA8YnJ1ZWZmZXJARnJlZUJTRC5vcmc+iFwEExECABwFAj4i rWgCGwMECwcDAgMVAgMDFgIBAh4BAheAAAoJEGx2F4yg7ZgtTl8AoIozE3IKJSq8 armihwVbsb423M18AJ9u80NA9CxL7GkSrCvatNOzJjNf7YhGBBMRAgAGBQI+JLCg AAoJENSNEHJ4+KjUHPsAnjsf26YTRwAQLsj9ep/LkNuiyoJGAKC8XX4asaznd7je U0qeJQ3Xohcj04hGBBMRAgAGBQI+LG6/AAoJED4s35lZGelG8uoAoKOXTvFfJ3Rk ByeKGVvKu+o7XPdaAJ4/2bXepNLqNEDgUsl7hkak7FRZ0ohGBBARAgAGBQI+QCnW AAoJEJWnRNJ6Hmtf0MUAnA37LFsdr2rCAcQM1bxrTb41Ap++AKCTtJ/NK3bVL3hb xM7q9r8JNfntEYhGBBMRAgAGBQI+QCWnAAoJEGxG8ZwW/bKYPGwAn1CbytJ94xED 5anIuEUuV807YSD/AJ0VjiIKBDWZN/+xrEd4WaHVDKuDJIkBHAQSAQEABgUCPkA0 XQAKCRC1rDlKuf8qEaljCACsCiPSrFAxyz1saPmjan+RBm2i2HxUJe9XP+wODZ+E tMbqedUkCg0NMTXByyh6bcuBUgKn1pG4PTOZvJMxEHLfsCDvzwp/NxHXIDN+yiGB r0e9WeqiV9zDLFQWPmiSc9AOyoiUavNKmYzgzmLvCKZnSLmP/GA+BfLIoUJuZwt8 BsLXgqyaSs3LNT9GooZi8aVByq8CgyttRZVGOB5EQDlmBYHoy+ifTCWkRfhSIx7O a0uP9ybPR0/RwjVxp6nk1DUMySFb25A5gVfhiQ+IvgOBwXWQ8O5ykoWdBccJYkGR I/4rLYY2nQQ+Z+MoxiStKzNvrJtshxj+ESVTaS8TcZh0iEYEExECAAYFAj5ASuEA CgkQlI/WoOEPUC47WwCePdtefQKkwfQof0vmDb8Qc2Kxq4gAoMwKA9A0fXTG8Pp2 4ikc1c3+5UB7iEYEEBECAAYFAj5ARsgACgkQHI0nZIQ34x81cwCdEYnjuBXMswEj +iBabubPYYuRrKUAoOntf4ZBIMkaPyw2jE5wQ3IVnLtUiEYEEBECAAYFAj5AVSkA CgkQgGcShyMVr6NFQQCeIM3GKLD+VPMKT/BTEvHJU4pSuAIAnA5XMGZaiudfhDLm rlqVpqTpb/tEiJwEEwECAAYFAj5AWbgACgkQhqAIGyKylR3pZgQAkGSMVHpz3PiA rTQNZ+rMF6CsSBpsp+Rs0CyLlG5Nsqrlhe0qW0QZkC/7OvgfGn+WHzO2O44vbPjp gsE/Ex0VOZeuBYpTJZQQz8MbiNjixwypiHBWXBp3e0CbHSq26z6/fAqhVQeDqCQZ ETAfrROeyNIp3vzzfvqdUkmof8c/34SIRgQTEQIABgUCPkCsngAKCRBiSEuPG0iN 6s71AJ4g22uWyjB8uU9gSzu8VfdgolyiPQCeP7+bfvgRhTVagTOc7sjGOEp5bB6I RgQTEQIABgUCPkCqFAAKCRCuUcxBI0Z68fToAKCa/NyunXgzy2O3hJbgASRFYkkF 2QCdHAK1a99O4O3+zQjJWh/q9fXC2kmIRgQTEQIABgUCPkDJGwAKCRDVVqZgiOPv VyT3AJ9idyqUM1cUQoTx9vy7G4ITEnVn5ACbBqQ0Ndq/Cp6PDPESlT6gXbEl0BOI RgQTEQIABgUCPkDglwAKCRA5o8lM/cSo/Y97AJ4hsp9zg6qM3M3Yu97Q4oBTDdZ7 HACcDtBISlliQarPWwt4mHRctma26+2IRgQTEQIABgUCPkFU0wAKCRC0deIHurWC KSPRAKC51dPMqkgVeoeC2hMvgmQlLHHtNgCeKy8boiFAHHezYS7maFRCMsrlNLKI TAQQEQIADAUCPkFeMwUDAeEzgAAKCRBPg4y3JqCoFvJSAKDBbykzsluQJ0mV9s0j QFMBtPsfqACgvr4s+/MxbUJjSpDqEQ1ZNxI8Yt6IRgQTEQIABgUCPkGUwgAKCRDw JO+CNVGeqNE1AJsEfE/svURDc6ClzGTBb2XKekuxuwCfVwuku5/SDcB0IvRijwXT xA4t51WIRgQTEQIABgUCPkEW2AAKCRDcNnQ35arLNNiKAKCyu+jjTP2kF2zsFRZJ 4OLiptzuGwCg2E8G0lPX9hMzRFN0nYYevRlUfWaIRgQTEQIABgUCPkFcTwAKCRAH JZTVR7A163zjAKCeyLsZqYxPLe/XomuCgCQOd8u2bwCfYt4iCLPcx0yMt7Nb48QO VGOdxn+IRgQTEQIABgUCPkFcYwAKCRA/V8xvnmt23y0HAKC90+rYGPDvyXXmAx+K j3QEV2fl/gCeLQH2EXuHRfJyJKzxt4jyvp9CwXOIRgQTEQIABgUCPkF10AAKCRBB GPb8lSbpxfNUAKCHY5RVSETfgloHO2bAiahBDgFPSgCdGfQaKBrD92CKSYdeMNNO jNxhKnqIRgQTEQIABgUCPkFzRQAKCRDQ5Ee9ESjyX1ObAKCWaptXNj4ISu67NT4h EEDGIfUSXQCfVznMDC/hyeOL2BwfRTGrsY35frWIRgQTEQIABgUCPkFzXQAKCRBr phakwVE7DNXiAJwLv7OBvfZYVGh1aCRwqXrGB7X8gQCeI6szoysJKsw8oQUxuZS7 ME9kPLiIRgQTEQIABgUCPkEMZgAKCRDHON/LNYa6cYhBAKCaX9Ofy/81DQWMQfRI iGPoSf/PHACdHErqKXUCB5SBl7ylZhserKncHa+IRgQQEQIABgUCPkF7fwAKCRBu eUUCoBl5wKwUAJ4sz30UjqeOnDRBjd6m3VDHk173EQCeLoMTVar27qYR1TdMt8LB ZqU0LbSIRgQQEQIABgUCPkF7igAKCRCjGM7Esm5quXMTAKCjxNkNzck8JF9O8jsR lT8vgh98dgCgjN+sxGrCkMktXiHZOa9TVbdMfSWITAQQEQIADAUCPkDKfgUDAeEz gAAKCRB1E6I2ExAs9UbFAJ9Ed8MZ6F7nJ+wQ8eUAKbVarTKDwwCfSF4ed0z7231c WJ9ODYuIIfiFwcmIRgQTEQIABgUCPkKmEAAKCRBADB62okjOY4nVAJ4kHn7Lcj76 2BaXyMH4zYFNLeh8WgCfU5ZdUpFTjB6ozFGXDPz6grIlrqGIRgQTEQIABgUCPkQy qwAKCRCwxLn3mg2CqabxAJ9DetdwesQdSCga1zBvSZ95ZpfxTwCggFwmSkqD8Kvh 7ap7P2yTYetXAyaInAQTAQIABgUCPkRPKgAKCRAS6T6JP9G2tUOGBACm8D9SO0e9 TBUQfXrq1XfW1EV+GqdPCN17J/YAVp1NQCqlLHYF3+/VIsaT42ioM5QQcy263L+a FVx2Yi4R3zEeolbGfFBTgvn28odrreZpuAFgjO76PX0eSFv7vvWntHLPgZ0M9rHp lKuGs6kb5GlJxr/VHiHWFKvQnYZsvT/tg4hGBBARAgAGBQI+RYMeAAoJEFv8diRA ZaHa+a0An2tACMMhZoxiOeQxm2v/587Z68EVAJ0SIMqmBEUP8pu4idR4Wq/2zGWW yYhGBBMRAgAGBQI+QY9hAAoJEC9KXfQQ64+oUaMAnR4qJpGEXFPEIkj16B0DmNOa Peh6AJ9NSY/3VohzNVc6CSQKZtvAtKh2H4hGBBARAgAGBQI+RsZ1AAoJEJ71dopq zj+sFVEAn1ZE05x0HC+y1mk4U8Z9cxzsaZxaAKCCVWIs8JTIrKIkMfJLZlAMZHLp fYhGBBMRAgAGBQI+RsY3AAoJEOpKzVz2XGjNpz0AnRNN1YcShhvf77WeO041Gmb6 eyu9AKC/eibZjNysFFd/aJFigvZ3trLNlIicBBMBAgAGBQI+Rs/1AAoJEEC/HpEd DdC5rSoEANMcRBg9Y2PKFTtgS72hP1j1Wse6+MOIRw8W8rt5sFMH21hwIhcDa0nB FDXuNJgNfXYp44AexcRB5BK9EYQWt2pUg+R335AEVTa39sXl6BSU3K3xnBqBMyNF z6acjZ++cjKAXYfIp3jAS+CoIZ4RN7rkd/gmKSivEYp4rTiTbrK2iEYEEBECAAYF Aj5Hr40ACgkQagIyDYKgMl4cFQCeNw45uJggp0nNoq9STTZv4sEQurkAnAjxHHZt m1X7SeUL0Xj/cSOk/DC0iEYEEBECAAYFAj5H0HgACgkQEMun3/wGpS0wXACdHsxb YdzNvBZiKZjmshdpfSCK/2AAoM+6H8QQuFoB/L26N+Xw5SiZ1Z30iEYEExECAAYF Aj5IZ7wACgkQmpTNb38U76Q0fgCgiwEHFgMDHri4LJPoy7nHRlrDGDUAniBp2UFc QwZa2Llw9YsFLMCk6DeLiEYEExECAAYFAj5IaTEACgkQv7s1Bo4lI/0/aACgifSF yPzrEtJlX4orbUUwUVXdebsAnRty6E9OkRzBB2Ka+xl2gXLMVySUiEYEExECAAYF Aj5JZJ4ACgkQ3uEZ6Jp2yaNZUQCdFpZGJ83wRl9/ndVyDYvefxq7q5QAmwfd6brt JlAuDkesUDkJBZN5NbgwiEYEExECAAYFAj5PlXUACgkQcieKIj7SkS5bUgCeMYJa dtePbjOFfoKeERLaFgm9COwAn2w8t4UzywpeSNF6BFaCU0NNlWSAiEkEExECAAkF Aj7wz8YCBwAACgkQDbEkl9DbWra3VQCfZB5blsydcC31ITmvk+Nvb1lO8fsAnRbk IRgOWfPYQ4jZ1gEivjYV7PJEiEYEEhECAAYFAj8L5ygACgkQnIUccvEtoGW3lwCf WZsK3sNJ7YvcszKxAMMKuzwAuIAAoLm5wgjvmtLqcq6bFMljnWchBQ5KiEYEEBEC AAYFAj8QVQkACgkQ1vr63ZUvP/8vcgCfTI3DqqaXacjWQNGUE4Gnu3VL2fEAn2s4 632/qa6krXU5wCWrV47P41uXiQEcBBMBAQAGBQI/EH+ZAAoJEEAGFQ5ACert3KgI AKnjwK5NIpuqBE9K6PlNG5hi+B8O4q6mZw1pm305lmdUWJwGXzr9JHzaOyJPYXMq 92LfUA6v3kwkKZq192hONxdKc0OJo6gJI4tc5dpcLHW+iA/YwBADPvKZArwoQYCY H5aiYthCT4+MCqkm6ZBMTmdFrUuvw0t2/5zlGR6JHaPhs1wDE4j0WFe/F704Egqr Oa1EWu68ailpDmBWeoPiEVjeBTw117RVgKI1GhBjoGN2pde+qtO3+lAz48eC5CtH 5omwTVhjpk4VPdoln8eKWv2ap3FIy7EiK22TWwLeNWmE+5oxEUQt0gCnIfQJbbd9 5ljxNtSthJ61ZkZg7jWHxPmIRgQTEQIABgUCPw2/zwAKCRB8IsOfgHrFOhxwAJ9U 6Yb7IGqCjCI77N+zq8411u06jACgj3LsQf9OhNKc33AGUfc0sHtN5QaIRgQTEQIA BgUCPw6kqgAKCRBN/6N0Q4ZdAQ77AKDDAXNgH7xMSn91PWMiV6ym7Rye4gCg2PRV P3qsB7lJF40Xcg7y6juwijOIRQQTEQIABgUCPxAeSAAKCRDhhSLXfHEry5ZlAJ9A DR0K82x34rlDUegL6GGOyLti4QCRATLox+QxRJzusucNkQLUeVszn4hGBBMRAgAG BQI/ECi1AAoJELM00wiWL9LekvEAoO/zMbtjaJqlcSNXD91aCn6Lk93pAKDAeVhy rUz1hbjbavCbrdy4DLL+yohGBBMRAgAGBQI/EPssAAoJEMXAxcchjRjXqEoAoIN9 qyLfnNPIdmPEp+5K8i9wdYMxAJ0fjRmQoDjRpXggm+lxM0iBHHozHohGBBMRAgAG BQI/EUksAAoJEOohmUEkd8r4n+4AoJ7a9dbf+AY38ytohtsRezz5YJjGAKChRm9o i4NEvkRrKzpNVleolqeMb4hGBBMRAgAGBQI/EVy4AAoJEBn+2DzivqNBHeYAoNh3 Qz3P0MDqDZq/2enn4PI+nHbQAKDSGflEK2t2/ytDfTnYQnD/lw0mO4kBHAQQAQIA BgUCPxFBZQAKCRAJ6fkKinJORQvPB/9tlEMYInNoVIK6zLBr9N6NrzoykHSaknZW MwzJOuWm2Cg7pT8smDpyURnA0i0mTGC5+dLf59SGxCwpvRReAhiZViNKnX9x/GWC qICV5CMbbELzS2RO7XR3PWR+3F0QWBHe0p/HbbhE6CIUTwOUlLS+ZlthI4YEx54E GLZRWWqs0RE8N4V7hoPm9NWoB9mW+ORsYmOqsrWU0LEfexyRgeYWQYQwNIoOQGjE wFGm2SxG3I4mExCY6szHkHeK5dGaVsuVbPji+ayO5u9xoSc5qhwchM7VzadpL9kc p2Vgo4Vv36nL1pS4i0SzZOTkt7+oPKG7h72yvsWwPW7o1CHxexEKiEYEEBECAAYF Aj8RJxAACgkQ9Wsmo6Y5nnMjRQCgreH+6SoH9RQ0c/X1lZGa9p1mbVEAoLZ7x9Pb a7Su84vTeBNvQMhWxalSiEYEExECAAYFAj8SXx8ACgkQoJD705cZn8NJyACghdLL iRgMdfUt8tHzGaW5TECGr2IAnionmDmOS3Aoc4Tbu5iogQ93WxskiEYEExECAAYF Aj8SjswACgkQVm02LO4Jd+hzaQCeLky+oyXD5dSQJIOLkn4/agg87EkAniv1iwRL JxXOCRNAREm9tEnKVxK/iEYEExECAAYFAj8SlEYACgkQj7mZcU7rMfGTkACghx4W qwAb0nJnqVDLK1/hyCAltpUAn2oqc67Q8beMOiWqSEGMfCKHfamAiEYEEBECAAYF Aj8Su2AACgkQRsxcY/MYpWoiVACgq1NLo1I7oTsD7cRFAAi9G7EkaU8AnjEAGb6B vnLdiOKiGY+80sTGU2ykiEYEEBECAAYFAj8SjUUACgkQ1DyzBZX+yjTLEQCeLajU memRkgmpsquVkEUkn4tCHRYAoKzJ5/8wf+5hS6fUhz9rHQBnTTJ3iEYEEhECAAYF Aj8S+ugACgkQv0FZW3NyoqXKkgCdGtpv7qnPjtW9VewBQ+Me3zQY1ycAoJLK2WQb PL57M06GEuqsxCIolst4iEYEExECAAYFAj8TEQsACgkQuYLL1cDjHx2StACdGDHj GgoQMPakN+pxWCe6CjJhDb8AniZ2P3p261uAGe2SvR/O7JiY4VhBiJwEEwECAAYF Aj8TKqwACgkQtGuSO22KvnEGKAQAicKNrwvinh0b4AmDFx6rfxdBRcF6oETbnW0C zhz9Ub9m3FEKzRmER/4JidpMJENJs0s7OdGQjkZRTxHoYp8jGNO8pnj0UVQGghGz p94ugdahOQUWZm7YVg3+ykXQ2MBnuOeufmuMK9k0IIgXIucz8Qe2ReGuPMctcD3V QbUiXaWIRgQSEQIABgUCPxMtoQAKCRA19mF8UTrv2SK9AJwNYzbE5aP0s426BCj9 PclRi43vEwCdF3X0LWoFc3WWrtU2BQDumyowwGiIRgQTEQIABgUCPxLnxAAKCRCS Vb2f5oRNuQRJAJ9vcjKc8FJkgrjizELrPPzYtL7xWgCdG4PioIfrU26tG95qO3Z3 RbldRjeIRgQQEQIABgUCPxNDbAAKCRCt7CzRGpU358JLAKCdFud7Fadntmb8gbSu gCAlayKu+ACeOdXIHn9KTKRsFf+lay/MFJkuv5SInAQQAQIABgUCPxNdhQAKCRDv bYJB8IEZXdpHBACzum/QB8hUm73zvfbtg8kryWZupfhnr8eyg5iW4NKteLWTcYYG c1uoQIWxdBAvtRn3hxE1IRM/0HsuByhanO6dqWditfHyFzYCWB9BdvVCj3244qAb fPr8ZrM0Qen4PXMgUwSKhEvhjDe5y1CdOumn292TTVrKGmYYPMqm/xhpUohGBBMR AgAGBQI/EaLFAAoJECjG9WuBfDVoSFEAoOyMY2PmIBHy1xsS+19UwvGALJXaAJ4w MEwOUoAvULyJRHe2lHKAxP70HIhGBBMRAgAGBQI/FCMPAAoJEFGs9q11voCXV5kA oJRknzUcLVG05Yr/+uPie1eCzd2hAJ9xKrzXTXH0UYBDRtDxtrePXR3xGIhGBBMR AgAGBQI/FFmhAAoJEIQs23pEd54Y6DIAn3bIXtmTPR77OSN7xWiCRHi/C24xAJ4+ +/3c+oMrFS15+vXcUdtVvCFks4hGBBMRAgAGBQI/FFIZAAoJEFgpV1AFAIOL5uEA mgNuz24Nklg8Z0YZZuJJ4KZ6MAtsAJ4xnx+0TqHlKV6QpVY5LK/EUuIF34hGBBAR AgAGBQI/FGCcAAoJEHf4FTO7DujHYg4AnRqJi+N5xvmJLFBtc/Fwg/4tZrk1AJ4z 1G2F+8xdFOW4HAEMvpM4DIhp9YhGBBIRAgAGBQI/FQ6bAAoJENVOrkvJmHCxEJEA niyqkEscT5Pb1U4/YsBjlOKT3BFnAKDegRTwyuQZ5Fv4nVjQ4PqZX3GoGIhGBBAR AgAGBQI/FSq/AAoJEInNSyFgdVnmFvIAn1ZPAm4K+PVEiQO61qCfMn+ChxtOAKCS /X79h4HhU1u4nrdXZHIhAbmzNYhGBBMRAgAGBQI/FSr5AAoJENNbvJm8fQIKhgsA njccO2D3BzBrHQC0PkG2IonxKDVCAKCZtyTDYdhtFUwDmt+Uc4uxRnfAJIhGBBMR AgAGBQI/FV6DAAoJEJ7QeO9LOhNcdRsAniNNCWCT3t/EosNju1EPYDaK9t/eAJ4k dChYqxvVu2svHHxQnP42VC1zf4hGBBMRAgAGBQI/FV6FAAoJEPAj+AsmhB1b6/UA mwU7MIhoLC7bmh7l36761YwzQksxAKDOWIJW/wXBbulL8Gw6XXMJvtRrCohGBBMR AgAGBQI/FYv5AAoJEFO2uB3BPO4Hw5kAoMGOp6M8HsCoWqOer0DSsNwxViHRAJ9s 55WWSjqlWBoz2l23y6643Bz3AohGBBMRAgAGBQI/E/MiAAoJEEvvJiQi30CHnt8A n3HUfqUqQriyiTZN2WMHIk9hRDe5AJ9adB5xQdh4wBZnNSSSo9nlL62/T4hGBBMR AgAGBQI/E/MpAAoJEJVkH2slPljj6BIAniMNct9yBdxXiOMCVJl0HjACq6lPAKDG NnzpHdoqODj83NcmyXJVWETt6IhGBBMRAgAGBQI/FdZ0AAoJEEG59OhbcT3wPJAA oLuaK8k/Ql+BzeTWzCrvnV/WsuM1AJ9BE8/KPWvRl/CZanwDgSAZ+3Ha3okB1wQT AQIAwQUCPxX0L4YUgAAAAAAaAGNzaWduYXR1cmUtbm90ZXNAcGVuZ3Vpbi5kZSJo dHRwOi8vd3d3LnBlbmd1aW4uZGUvfmJiL2NvbnRhY3QvcGdwL3NpZ25pbmdzL25v dGVzLkE1QzgyMDk5MTlGRkFBQ0FGNDFCQjI5QjZDNzYxNzhDQTBFRDk4MkQuYXNj IjMaaHR0cDovL3d3dy5wZW5ndWluLmRlL35iYi9jb250YWN0L3BncC9wb2xpY3kv djEuMS8ACgkQGaJoCYg4/ZT6JAgAvfifYdKHBnC3Ezv483f2fsdF/jbUNa+1iz77 iFI1dRa+SRWKRVbglKeznpT8GYbw6+82gxWZ7Xotbn3s5yGLXNYP0vBhek1YG0zY ig498ROlIc8OPwNgCEVUHj962FFfQSwF2CQ+2e7h5PRll2PRpZNQCzm+c5Xj9p/t slSBWQ23/1p1U7eI3bvfMLVRx9tC/nyPsQo/V/yhIYPi4Ys1anBCl0Gin9g+eg4g hhWl7ksOZqG/Oc6c6viQsgVME4eKVHpljdOj9WCpWIYar2Jsf16ITOMlYnGB4a3S J1kxfXVR4lhZCaZ7PhVAaEH/GZC1ElPzjbKLNdvCTfe3GMNTBokBAQQTEQIAwQUC PxX0PYYUgAAAAAAaAGNzaWduYXR1cmUtbm90ZXNAcGVuZ3Vpbi5kZSJodHRwOi8v d3d3LnBlbmd1aW4uZGUvfmJiL2NvbnRhY3QvcGdwL3NpZ25pbmdzL25vdGVzLkE1 QzgyMDk5MTlGRkFBQ0FGNDFCQjI5QjZDNzYxNzhDQTBFRDk4MkQuYXNjIjMaaHR0 cDovL3d3dy5wZW5ndWluLmRlL35iYi9jb250YWN0L3BncC9wb2xpY3kvdjEuMS8A CgkQqx5LYEZ1ax7SjwCgmoUN3NUQ0fQwbmHqkVnBCc/jL8YAmweyJNMQNKsDC0fr sHFyejRnNGumiEYEExECAAYFAj8TsOsACgkQ58nbr+NW78AkMACfWs9ycteAylXk 2RTrD5RHIYXgrVQAn0VpM3W6vemovNt5zQWuHwUHKMELiEYEExECAAYFAj8W3jwA CgkQO7/Pd72LBQ2EJgCgqRYVlay6OEUReBS4I1Rj2wKtZrcAnidL9ET5crzLbhC9 Gx6/tHWhhPPriEYEEBECAAYFAj8Ro7oACgkQ0Bn175Anq4jOzACeLP5omUoyFcsN XRdWv/IYPBW3jLIAn1Vg4cqudANdKnKBSoTDTh0YxC60iEYEEhECAAYFAj8RGzMA CgkQ9LSwzHl+v6vvzACfaVizS3TQYJEAP8o1Qaz/KbQaVmwAnj5l/c+7wA/YOzu5 sJpArDrXZ+CRiEYEExECAAYFAj8X0bUACgkQkR9K5oahGOZPrACfaQI+NCA28YYg nl2gjmoI1mLl2/QAn38tDQ910otKemZf9Eie7p/zTbGZiEYEExECAAYFAj8ZfqoA CgkQZmZxetuDVnl0pACgiUtNtNoOd0Wbsiifl8jXtNOzkGMAn0WikIoLoN6BlIzY MWjJNhnttKt+iEYEExECAAYFAj8Zfs0ACgkQDZZLZlcOberQGQCfV4ZlNvw3wH/9 ta7BKKgKBzVHj4MAnj++kNQTiMn7F28Nrqv7oavDW8DyiEYEExECAAYFAj8ZfvoA CgkQTgKsrh3Ws4DaHACdG3J2dN/Ht7InqFmFAp+bsPIGxKMAn349vGOvuO3WGqcf gmM+8BDNoVzJiEYEExECAAYFAj8Y1KkACgkQzop515gBbcepuwCfUEZxQi8amnQK l1RS/2Z4MasB/YgAnjxMNuDjHxEIjhwyY8Mk+JtdWmVpiEYEExECAAYFAj8a830A CgkQLJg+WtKKVdZ+rACfXkoiYy82nK/iYRGzPYcBV0hjwLkAoMGxpR1weQQwjgLY ea8VDeSU66ZfiEYEExECAAYFAj8cTwUACgkQcV7WoH57isn++QCfbhjBUzU5EfBM OxwXHd80vwRWTFsAoJMp0cfimpqtBYReuwaCgUmuHV+EiEYEEBECAAYFAj8VtNkA CgkQKiV7d8Y3KNLBkwCgoA0kZroWq8B+ag+qFhwgFfTUGGgAmwcQ/qJN0IO0d1Zu 7m7ex9OCUxfIiEYEEhECAAYFAj8cZygACgkQyA90Wa3Cns0OegCfUFBDn9FBailX pLIoksAsZ27NSkgAnRI70vpPjFvb880qbgF3TkMQuVJ2iEYEEBECAAYFAj8dqfAA CgkQiwJmWbaNX3/9/gCbBaaHT1TQNSp6Y/EoRyYqBAel8IcAoKWvO/u8TwpNruMH +WH11TB67cDXiEYEExECAAYFAj8dqwcACgkQ3nqvbpTAnH+negCfcddCOdcCmF8A xieobFEgaFM5SzAAoJLWt4QuQQMb+5LGi6HOfseqhvH3iEYEEBECAAYFAj8dqDAA CgkQKN2w/RnJtroclgCfTWrG2BkWpeG0peOeyfnmeBWI64AAoNYCOG5EA+52XuU6 9JjeIqszZf0eiEYEEBECAAYFAj8ehJEACgkQbyOLwk/aWgz09gCfZWcalQyB0a4G 0QHSD7VxkWFTXyUAniqUNQKvts2I18wQzH7F306DZe4ciEYEExECAAYFAj8e4VYA CgkQlJsl7AdEclLTGgCggsUlLw5yEf2M1Cnaaw6N0Ad/l1AAnjB8UZ5fTPJSKPUg FpP/hfflfCvNiEYEEhECAAYFAj8fDVoACgkQ500puCvhbQHOOQCeJlrssgsQVNCb 42WxqaBp6e7Omq4AniuERsB6p23quHNGl3tkpA77MRtAiEYEEhECAAYFAj8jmNQA CgkQGKDMjVcGpLQElwCePTqpW7AWzc+fjU4u1sObSP9kOkcAoOX/pYt05VCXzkKa IDiQsitAW1zgiEYEExECAAYFAj8kSI8ACgkQ+FmQsCSK63OKnQCfYoWfh8UGrL+Y c9UkH5fLdVLSpGsAnA87zg5HQWV9VKgkwjA7Q1gk/o+TiEYEExECAAYFAj8ldG0A CgkQ8rUqXQpftod80ACcCIEO/NksTr12Ka3M+xwdwR8APPwAnik0OuGabOoH1cdM 9ucb1c2TuVyTiEYEExECAAYFAj8m4awACgkQiSG13M0VqIOS9wCfYTFqZOjyXShs zGT/5n1P2BnHAXMAn1laYpV9MlJZZ433TunwfmXAaW8KiEYEExECAAYFAj8m4bcA CgkQBxd04ADYzRb/QQCeIYeWMEtqYONpEFShsdv9jT3NQp0AniNQSdgk02WKnIrg U7BdKwqV3/6piI0EExECAE0FAj8nyJ9GGmh0dHA6Ly93d3cudHJhc2gubmV0L350 aG9tYXNiL2NyeXB0by9rZXlzaWduaW5nL2tleXNpZ25pbmcudmVyMS4wLnR4dAAK CRCkec3EWrRgaumsAJ49yYODSjXTHdF4uogHi2icoLyOkACfaqc1xnyfvxNnr8hY Gn1HHh5nXyWJAWMEEwECAE0FAj8nyKpGGmh0dHA6Ly93d3cudHJhc2gubmV0L350 aG9tYXNiL2NyeXB0by9rZXlzaWduaW5nL2tleXNpZ25pbmcudmVyMS4wLnR4dAAK CRD5fPnjOkt/Xa3sCACEx/OEdlEQQArfalLWO4GlbfrBTrhzUMc5gmOFxPbTTu0H Bg7xFNtPV9tcTfs2sUikM9OnzZo6DBPsteKvF793G//Dt10s74WvJB1E6+K6PM2f YUancvcqGt61wSx1DiP1gTlh5ifNNJxoazU6tMseWp34UtWT6Jzh6cciUAnKQEIi 1Updi3CuoUnPL8s+tv30CdXnQOY5eCSkymCEOicjXgHgIyAsAYdmybd4fsl0wJbX eiinGf8Fpp3AKsbqQXNaiGUV6ghXTNNDNRDd7bkdIjrSpjWdqQy8eA+3VVU6YvM3 GWpeLBHGo/6egjk2oymEpjOno4M7KVG8xyCWcG9CiI0EExECAE0FAj8nyLVGGmh0 dHA6Ly93d3cudHJhc2gubmV0L350aG9tYXNiL2NyeXB0by9rZXlzaWduaW5nL2tl eXNpZ25pbmcudmVyMS4wLnR4dAAKCRB5BXaPdYT12AqQAJ9olcgtXD9q6blGQ9oM BzTO8qaLtQCfeTuMjvpcK9qgry2qOxz4c6j7nlCIRgQTEQIABgUCPyfIxQAKCRD5 0BTwOMmFjVDVAJ9+NLIHcNgIlrfSYvT1wSSkr5lKgwCgjktXHVXa4ED+qK4zwnE/ iGEaRZ+IRgQTEQIABgUCPyfIzgAKCRBdD39J4OSfNJhWAKD9qwn9gmx4l6sm6S2U HvKv+9OA3gCglkqjc52se5S7rxkZUG3MOl5PhDaInAQTAQIABgUCPyfI2AAKCRAb sIu/KpIyJTG7BADYnvRfP3BEmDAn3gzO5xxWc+Sud2OcAX5VTq9p43X9YY/I4+zi JfDt4rw+nsqncykJS//9q5g1aYIp+6CaJYbwMUE59aRuUwA7hCFKPXYThA/ZKs7Z 7SziE88OrED4DepXNUSQOHWF7a7OtLz9fMLhsKmFQ41IEn9V3kv5b0Ffv4hGBBMR AgAGBQI/J8rAAAoJECm+XSJo/VSfjPAAn2Lalf12Ql+HKytgVbyZqe9zgXQgAJ9E MknNdmFIlW+m6xCHsdCJVVbGaYhGBBIRAgAGBQI/J+E1AAoJEJ/PLM0/PmQm+nIA n1+OSW2iFCAHLltzx1HhCjjb9qUfAJ0VwVDDriT7AyFpxZK0KjxwBk4X24hGBBIR AgAGBQI/KF5JAAoJEJYkg+FWYsc0JaoAn0xQCU5ZKSxpn6S/jQ3ibIuy6FpkAJ48 7HCwK6/iIQADjZ6PA1wZv9VkmYhGBBMRAgAGBQI/KRJIAAoJEALW7SHjLE9LVswA njYbOD95v8Af1QDnZJRQ8z5Dgh+gAJ9UrmQoearNZM43GDJNYuGFaCZNcIhGBBMR AgAGBQI/LkpUAAoJEDkiDW4MGv+7/FkAnRLppa2/GDsYIcx8t+XWFVKw7LkxAJ90 TrDbg/Ku9/cNYe/pjwwV/hMp0YkBHAQQAQIABgUCPzAw6gAKCRALeDLzc9YtQWc1 B/wNPdo9LSVmAU/Wap4lf/BgSVVhHfiHpE1HCJF9J8Xx1+9ZamYwFHNMoeuSdAjl uz6sDWHQY7igY4gjfpKzLv4YoQcS4I6QEzQTbZfDgXBjkJUtY0ZyJpGMehDLrmPJ OF2gpYnwehadzF+kI+YW0or1cwia+2G/Aym8VyofL4MXm2Hws6Ym4NjoYMqhWPPI 26OUSXBjD4aw3frX0LAhAhhvc/C9QfWxBzxQSyZcmonPvwGvi37tNBhNUJE5sRcE ioGJSVhFDjZ85AFDRgwSRAypHXWUT6HoQbQgPjPDVcbxEqNsqShpqfgh65ptFEyI j1vkbxmyFA0eHVyH0tZR1lSDiQEcBBABAgAGBQI/MDEXAAoJEBmrr+wdsjSrrfQI AMSp3UhvfocyuTylAJr6v7PiT1PbdhckGmFYOsk5O+zUho9Z70ETbWqIuba5ssjl dIUmnCvc45TRneCAKMLRnNnNTDWKn0Bu+kvHeQdZq7aEkg7q6pufJe9lc/bf3aCz OLbTfuyMNLovL4a18QdiJkACiArhcW45qpjtFmOpDDYADY1qBcJ9bIf9dFpFvccP qkStHEbYYC5pNc1GtY8ky7tE+Og1en10AXmIxoB0fjvXpFEukrasz4rhsdqsMkQI +XoHAWpDWMi/x/+lCr3tpu2Gry/Jah5BzZhj8ui8ETIz+zk4+D3AmeBVqgtqZdCU EzaN9VUa8tjCFKHEVa02+LGIRgQQEQIABgUCPzAxKwAKCRB4XzBl/r1L3ECIAJ0e Ciux15E4V+VJhAI9VYWmZODttwCdGaqG/Y/sybsl4PHNZ9NpUBh/FkKJAhwEEAEC AAYFAj8wMUEACgkQfDl6X8pm0LFl2w/9HQERgH/7URJy9Kkjdni9uJN2goE8XsbJ IKCt6WyTB2F7p7bwPjf+SnZF3vQCQ4wG/SeR5hc+24vS6g7OpstJ55S+rACIzUge FynkUSZV83cE7c1fuhoS+V2wh/FOjL0JP6idaNgQzf5joOhE0zpMUIywqyqH+T7J DpWYgwU6s0M981WBIa4Smdvb99KIjBOUJCm0usouGvUUuNW16lwzzkfJ/qEKUiY5 vpQNv0Lv8fKlCL/wM15UX1wqEPkvc4IbBtBLTVbT5k9tqU5e0SduyGzNVwSybT4f xbWI94GejQd3RPuPP6IoYhvoncY4ho2YEixbKFBX348sRgPc2wls4Kqj7dCo73bB 0ibbOI7DN8J824BuXbuKu5C+ZdCQM7zA+E2K+ZfJSktgHuXq6W/Taeqs10UiGLkG 394vzwVJID27FqgafRKSoCYyIU9/j480brojzcXRfdOUVXfnqMY8Ss/xO+NfmiWw Vk2pEiMNNyFQU+5oQ3r3+INXfY36gz8e/bYovv5qmwdgQ94bOU+V/j+xC63UgFAX A/N9UweWeW1XhLHGPP7rdgFzTyIWomPA/DrsGkI2B9PK48uGbkcTKYl7bGrqh+AN PN4gLVohp/56Dmsk/oNvLHstVDNuRk2k/YV/WTT5q7+X7JiRpcfytFCrZOP8WU+4 AEi7gdpIcE+IRgQQEQIABgUCPzAxVAAKCRCVhFGirc9+lBXbAKDBJmrdE3DxoHK0 bJwsN5EckOTu9gCdFMulMvpPbmDlySI+hL9Gx7L/g+WInAQQAQIABgUCPzAxZwAK CRD9SjjcKHYNPYJhA/4nqee92MZijuG25X1KAF9DA8soZ+dP1rzb1bLyc2DRQBPx UDFnvCi8t86eP129nuBEjRio0fJVBva82wHvylQGOd5XBxyBtMgX9ZtaIj2JZiDb 4RrYuUwpmsuB7uKOhKt6NmZ9lhveDT469CXrFMMSQqcDkQTiLe0eQIbMi9hcFYhG BBMRAgAGBQI/NqX5AAoJELvHFNGcZ82WD/UAnRExqoFW3L3j+Aoxsw5CHx224HfR AJwJerLot2mcAIfNB7npjxdZk2yK24hGBBMRAgAGBQI/N+VyAAoJEIB1JwBlqEHt M+0An1k+PgllLDTk88Z1kzNfwHSxOnvfAKCHWseWvQWd6Uk3//whXYKV4ot9aohG BBMRAgAGBQI/N/gpAAoJEEXAIUdpq91U71IAnRo1KMe0RMD6M4JjuIri7Zy2mstB AJ0Vpg2C+YGXvd5YZ+mnPTKN9WXPM4hGBBMRAgAGBQI/SSifAAoJEI+5tw+kz8lu QUwAoOOKJaJO6SjfsxiOm5NZfF2pw6sjAJ9SlkPdSyqD58xJwxlb2xAs58WT+7kE DQQ9q0DtEBAA+RigfloGYXpDkJXcBWyHhuxh7M1FHw7Y4KN5xsncegus5D/jRpS2 MEpT13wCFkiAtRXlKZmpnwd00//jocWWIE6YZbjYDe4QXau2FxxR2FDKIldDKb6V 6FYrOHhcC9v4TE3V46pGzPvOF+gqnRRh44SpT9GDhKh5tu+Pp0NGCMbMHXdXJDhK 4sTw6I4TZ5dOkhNh9tvrJQ4X/faY98h8ebByHTh1+/bBc8SDESYrQ2DD4+jWCv2h KCYLrqmus2UPogBTAaB81qujEh76DyrOH3SET8rzF/OkQOnX0ne2Qi0CNsEmy2he nXyYCQqNfi3t5F159dSST5sYjvwqp0t8MvZCV7cIfwgXcqK61qlC8wXo+VMROU+2 8W65Szgg2gGnVqMU6Y9AVfPQB8bLQ6mUrfdMZIZJ+AyDvWXpF9Sh01D49Vlf3HZS Tz09jdvOmeFXklnN/biudE/F/Ha8g8VHMGHOfMlm/xX5u/2RXscBqtNbno2gpXI6 1Brwv0YAWCvl9Ij9WE5J280gtJ3kkQc2azNsOA1FHQ98iLMcfFstjvbzySPAQ/Cl WxiNjrtVjLhdONM0/XwXV0OjHRhs3jMhLLUq/zzhsSlAGBGNfISnCnLWhsQDGcgH KXrKlQzZlp+r0ApQmwJG0wg9ZqRdQZ+cfL2JSyIZJrqrol7DVes91hcAAgIP/jnZ KpGqASvqV4BTsuzZYnkKowiU8tGUybSO9fM8COJA3QfADzgrBwAn6pMDsHlVOkbf sBbKvca8SOrOXmvNTEXcrr404/QJoTGffg3z1emjK2+K6aCcS98iE//W3mNGuFuh LZkH4coFgdggXVUnXJC3UWmKsvAJEe2XxPdkKPYgYPe7epQntg6GpAZnnLGIqLjJ QIuhxzS1a709fxcfsQ0h4kAG+OkZmdLMM1lV10XgnCyD80zHjx1vNjaijEmgviL4 H+xg4cxX5hYAd2UPhamhGKcLHmTv5djxDt8fScH3suBaf82i6NyHnd5EgrEoyg+z 5UZVsqZ3I3upvkQHy+aIjH6CIhKM71ue+vg7Wd6AVnjtbCq3xIQ7zfkJIohWfKCS mn8vBBiJEi/F9qyNX2D992V+v30c+/oGwL/VvL9Ox9COouVvfW6nJf6VKMNwDy7v TYgMSp7GTz0CNW02LaTBzjBsLdjMmsCAKXTOA9ldcWVSsXH+h6LSsLD/nJ9OCD6K MulIsXcKWJQrvKLqNH1TdKgERyUn/p/Dm1W+akC6yhLGN6OK9SyRLrH/y6A6nPt/ mHaOu0h8bE67/7PkOjQU3kLIt5O2QHxSaVhajdndHdfxG72mh2g0pr0+2WlRCed/ r/seCS5jGqq3gdoTzecJucCwhgsT4AjdqHg71zZciEwEGBECAAwFAj2rQO0FGwwA AAAACgkQbHYXjKDtmC1vigCfSJqw4IQrMBb4tPw6vYmPkAmrwh4An2rlgpX+S5kT wbWi2ooYrpfqJx4K =CgQQ -----END PGP PUBLIC KEY BLOCK-----
D.3.11 Wilko Bulte <[email protected]>
pub 1024R/EADEE409 1997-06-16 Wilko Bulte <[email protected]> Key fingerprint = CF F5 30 59 20 AE 17 69 98 F6 58 F0 4F F0 EB 3E uid Wilko Bulte <[email protected]> uid "Wilko Bulte <[email protected]>"
-----BEGIN PGP PUBLIC KEY BLOCK----- Version: GnuPG v1.0.6 (FreeBSD) Comment: For info see http://www.gnupg.org mQCNAzOldcsAAAEEALOm0m0njPXcJXJerVjwiLMA0jho2mJFtWqup3Dj4Z/ra8JT k+tf9deja26fG2PjEaDCLogjdKIhF/ZKFAxxZnaoIevhc/M2Tt1m4GuOe8gTR1t0 BdqsjR8zY834LTFlYxF40w7UkdAvqynAkX8kDD1ydfAkCEJB+6fGT4fq3uQJAAUR tB9XaWxrbyBCdWx0ZSA8d2lsa29AZnJlZWJzZC5vcmc+iQCVAwUQM6V1y6fGT4fq 3uQJAQEasgP8Dy986Wy0UhnwhQiYcyWbSnUtzwYH8Tgxh2hNixr3jEr7GTVQn/Ik rt7QDk7+0b++RQuZs2c23Iie7TLS+g0yihx+l/LSvl5EWMBpLrKebB4MinvwtRBM iTJtpoK9CqDT0hYO3N34oRlf1FBaaFAyyfi1HYWrBEMo0ja5oHfwCl60JyJXaWxr byBCdWx0ZSA8d2lsa29AZnJlZWJpZS54czRhbGwubmw+IokAlQMFEDw7STynxk+H 6t7kCQEBJY8EAJXiHeP8NoMvIL6e6QnKmg+FiP7Lel+L67KNa07FaAykDQZpn6Tx TxYxuJvkmjdRLfZ6Mbm3kehqXl8VpL2ygmt2ovXT3RRaQ2RpydujFxnHb8SJDZVp TfHILcnILe0YDUmEzhMNhjSE1DcorpGNQAsz6udYwjb96HcOkG43enhAtBtXaWxr byBCdWx0ZSA8d2lsa29AdGNqYS5ubD6JAJUDBRA8O0mNp8ZPh+re5AkBAWBZA/4n kQGBkrS2neeUbdIzF9u3Udy0bf8dUkojjupbjCHBH8IxlNzkq1K/TvCDPkeKxriG Qq4Zi6GasGcgJpUJV0rK9bZaeVI8xNeqFm9VkLlvCXrgOKborLR8V+T52WB+C3+X YsQre7WGrvmof6B+p1LbcFuYSq7XnYP/sU4htprVTw== =AxGr -----END PGP PUBLIC KEY BLOCK-----
D.3.12 Jonathan Chen <[email protected]>
pub 1024D/2539468B 1999-10-11 Jonathan Chen <[email protected]> Key fingerprint = EE31 CDA1 A105 C8C9 5365 3DB5 C2FC 86AA 2539 468B uid Jonathan Chen <[email protected]> uid Jonathan Chen <[email protected]> uid Jonathan Chen <[email protected]> uid Jonathan Chen <[email protected]> sub 3072g/B81EF1DB 1999-10-11
-----BEGIN PGP PUBLIC KEY BLOCK----- Version: GnuPG v1.0.6 (FreeBSD) Comment: For info see http://www.gnupg.org mQGiBDgBZiARBADgByjeXtfBseo67ZhVuyAMTk4vWu+bh966TDx29E+cS2Ud+mYe X8eQYKfiCQXlAzspXFVy4nmqsBY6KJKGFek5lPoCKhh2xpftYq+M+2N/oznrMzK9 GZvMdd/zhVp/HvrdpLrIxjMVA4dai5p9pYB1kgr3EjV5ed3onKrWP/soLQCg/3LP TAJ8ngyQvH+YieZpZRJn/IUD/2ZQGOSSPhJTiYmPR6+dI4Mj+ep+NlrC0bel8RBh ANV5eaIbh+rKFPPj1Pdei+Fbkixft7Ne/jH4s3d1li4L255T4Zapw+JMCOQf0+Ps 7za7uE88ofBK6nxdmJSR8vLoVKJLSD3cxyJs+BmldqZTzOuh945I7ajwyaqnPEiI GG6vA/9bRbnqnvUgMUml0kNq9ItjvdyUM4fgdS+sICjnFtwuPC29+0/FP2qmiEm0 W7GyQNBqDHlyiEe+R/G+3hA0/ey2dMVeOI7ti5+oQXYD2dccrQT2ixHAyko+N4Nn XVy8nIzUWNFprXLpC4WPfK2VjSJpp0nrm2DN07LDN0NcJMrQiLQdSm9uYXRoYW4g Q2hlbiA8am9uQHNwb2NrLm9yZz6ITgQQEQIADgUCOAFmIAQLAwECAhkBAAoJEML8 hqolOUaLYDgAoO6YPC4qnUXmHkRA7p4e8t4ZTe1GAJ9Yv3qqNB6M+/60uN0MCshb a35lsohGBBARAgAGBQI57on6AAoJENN4FMlqzsGqwIkAnR513+/0KzDMUI2GLsG7 R5q3cpqjAKD+IOPgbJHgIK0akA9GNA1z/P0/v4hGBBARAgAGBQI57opmAAoJECAV MdWEXf7dDMgAn1djbz2wTeCG09TEdvSATrPmj3eWAJ4/syRYBR/qLqBdiyLW238F BQ7uuohGBBARAgAGBQI57o74AAoJELYkBuZbwVKh+g0AoIxeOw1l0FGdy/hKdluz 9mrb6EexAJ9VOHWxZKgTTln8+ZyfxBd5ruFB8IhGBBARAgAGBQI57o/JAAoJELjx LUz3PH1EZS4AnihF2U43bwiEGWkT/JLLy7TSfRjFAJ94xSfSt39smgMQmVeYMBHu HSLMrYkAlQMFEDnul3dNVigheQUMEQEBKw4D/iWjX6ZnnmDStbXxWmEH+e2M7G16 R3nY2TuOCpjXsZqqRe8XHS15DKspNJwUZNHh+Zjr9U2sRqalmkIFt2nB2X8CdMyR pHFf0SrTwnapIYRHEZ74fkAsu6qb7YatSNhzwcmALx4mzgLX7ARsrau9NzUgrY/G RqH8GOyB5lHPFpAdiEYEEBECAAYFAjnvJEQACgkQGPUDgCTCeALPGwCfeoJCW9cs 4K6OtnvLJIiB1oqV6FEAoN8JjdYrOwgykMjyq9f/PFRm6WiOiEYEEBECAAYFAjnv JFcACgkQiOF7HfzlZWFTxACfTQ6LjXC6kmyqBEjgSQvc17Ypaz8An1Ab704SKRwR r3eLdUOBTFdDXbU9tB9Kb25hdGhhbiBDaGVuIDxqb25AZnJlZWJzZC5vcmc+iEsE EBECAAsFAjgBZmIECwMBAgAKCRDC/IaqJTlGi3A3AKD3HgdSlRjb2PNY9fmpEeYH 4lFhpgCgocDA03BR5C9wuSKhaBVFULlm8OuIRgQQEQIABgUCOe6J/QAKCRDTeBTJ as7BqsDJAJ47uf3WrmN057AwozmuZtb9vMm5EgCgsykRluwbCgC6ZewHezoaiOow jzeIRgQQEQIABgUCOe6KaQAKCRAgFTHVhF3+3bZUAKCApjy6fQvR7tLP1reuVofJ oeTofwCfetmE1PO1XcTZxUer5PN01sqA0TmIRgQQEQIABgUCOe6PzAAKCRC48S1M 9zx9ROChAJ4zQm6DLDcRdU6Tuk9/OCdKnHMnhACgtDI6x3Jw8FPXci2P2tdRtKN3 B1KJAJUDBRA57pefTVYoIXkFDBEBAUr7A/4vnr99JzFe44a674uECQbpoEQkYYnH f/LLbUMhQkmp9nRwI/pS4lpEMxPhKBPtOjL3tkpXfhFRGClMKbRLB58Qj9QNVzHq nnN9MV83+fhH4fYU5isO5sVl817AN8NJdE6OsyL7LZWT3n9Ri5+qgeMa5rjMLw60 hUAISXJKZ1r16ohGBBARAgAGBQI57yRHAAoJEBj1A4AkwngCApcAoKmg+EZV4ev5 RW/Y8LqjShfezs/QAJoDCln4Q/DTjxMw0JqaGB4ueI6CwYhGBBARAgAGBQI57yRa AAoJEIjhex385WVh+ygAnimdjrEtTQA77QEZ2PF0BEf9//V8AJ0S73bH8sBgmy12 ke3p9QDxZDYHi7QdSm9uYXRoYW4gQ2hlbiA8Y2hlbmpAcnBpLmVkdT6ISwQQEQIA CwUCOAFmeQQLAwECAAoJEML8hqolOUaLDKAAn0Qd6pBHUKZwZ4PNnVZFBagD3mQ5 AJ41koGIb6g7Q1Xtu4HEBQZAvsgpKIhGBBARAgAGBQI57on9AAoJENN4FMlqzsGq u2kAn2POi/O3+sJ3G7mN4rBkHf6S7eF1AKDjdY7lbIjkJ8+fUyIrvuVigzAQRYhG BBARAgAGBQI57o/MAAoJELjxLUz3PH1E1Q4Anix3+MKXfnwrgUmhkReBQS4sp6Qe AKDN04ovFaX+oElfkglOxltBumSqfYkAlQMFEDnul4pNVigheQUMEQEBX2QEAIQO PgnwB5rBnqA0kNW0jNy4fq7UgikOYKjps/NVvuGhR4cfn6uZQUNPeO7S3BKL3JPu BlGm1cSwLZES3xTDpnq7dEQWYyc8c+/U/mUrSDQH1hVVo0rZwYFqr+5ZL20M1Fw+ ve+XgfV8RvrMBXtphnVl4Qo6yghuWmf5pBEpElp9iEYEEBECAAYFAjnvJEcACgkQ GPUDgCTCeAJSiwCfT8ClDVDP37K+RE0wI+0o+YTrCCAAnR1pTuctZsNefOKbSWXk 8BiHHfW4iEYEEBECAAYFAjnvJFoACgkQiOF7HfzlZWHbuQCdFwi9MWCX+1ppGDcu YFwdNYfNn7wAoJSIogi5+KgCWhyoQWogYlgCs4WZtCFKb25hdGhhbiBDaGVuIDxz cG9ja0BhY20ucnBpLmVkdT6IVwQTEQIAFwUCOe6N+gULBwoDBAMVAwIDFgIBAheA AAoJEML8hqolOUaLEEYAoPHfT4twSf2tKV8moPhqgQFgN2hxAJ9K7Lhc8HWSpvgh 4jIaHaM8eiJnookAlQMFEDnul7dNVigheQUMEQEBYvAD/j4EQzuAKhSdaJ54F1hH 8PMmOwxM9HJ4U8BvWY/wQJa0Hgkxg8UdQE9O7ZFWj/KypTEheSEreV6JWtkCdtpg KADWPRwKEnH2oz4y0/GjwoHfpyIZFlAC9WYYo0+glKLnH/FQSt7W33eJxLkepE23 2hMOa6nEO3OFbik5PxaxpkzciEYEEBECAAYFAjnvJEcACgkQGPUDgCTCeAKdJgCg qtwHztlKh2pWO5FlSpMZ3ilXLEgAmQH9OUO+28K2b6DYqGPSn+UDWfi/iEYEEBEC AAYFAjnvJFoACgkQiOF7HfzlZWEi6wCg3uFRxhC+wR5304Lq/pJzX2HuqqUAnicZ 7taSto90zR/xwcYEdcSaRHRAtB5Kb25hdGhhbiBDaGVuIDxqb25AY3MucnBpLmVk dT6IVwQTEQIAFwUCPRgU4gULBwoDBAMVAwIDFgIBAheAAAoJEML8hqolOUaLXVYA niQtgvTgGqxqsxRkd/aFegjCw9zIAJ95e7tBtTbBFgWZ/TeMIpLVAgZJUbkDDQQ4 AWYiEAwAzB13VyQ4SuLE8OiOE2eXTpITYfbb6yUOF/32mPfIfHmwch04dfv2wXPE gxEmK0Ngw+Po1gr9oSgmC66prrNlD6IAUwGgfNaroxIe+g8qzh90hE/K8xfzpEDp 19J3tkItAjbBJstoXp18mAkKjX4t7eRdefXUkk+bGI78KqdLfDL2Qle3CH8IF3Ki utapQvMF6PlTETlPtvFuuUs4INoBp1ajFOmPQFXz0AfGy0OplK33TGSGSfgMg71l 6RfUodNQ+PVZX9x2Uk89PY3bzpnhV5JZzf24rnRPxfx2vIPFRzBhznzJZv8V+bv9 kV7HAarTW56NoKVyOtQa8L9GAFgr5fSI/VhOSdvNILSd5JEHNmszbDgNRR0PfIiz HHxbLY7288kjwEPwpVsYjY67VYy4XTjTNP18F1dDox0YbN4zISy1Kv884bEpQBgR jXyEpwpy1obEAxnIByl6ypUM2Zafq9AKUJsCRtMIPWakXUGfnHy9iUsiGSa6q6Je w1XpTDJvAAICC/sF510YKnZ/qLcx8LfgpeHXSwVzk6/wZnnplNMAr5CvgYWa8fWJ L3DcbYUsZ4+eG86RULQ7WwaTXvuRXxiDsc7Rf3pKlZJGgOdIPS+VmCasO26/ohlE tWZ/5VoOJD1fRdoI6gttwhBXURY2ydl0cy+rCv7hLBTEOLunCWiA0fiPC8mw06vK ckaEdbhsB5WfH2XVEpF1db2zliNLeCAFEjxoo429/2JcaKaq91hqxa/ylAz8W4ku jCxTifWF9Ef8qz7wE9tyAplw7/j8E4lo/xSAOQLL7sh99B32bPo5sXCVS9IdZQCx GRsZM1JIlSbhdMKWrWaKpJIxWwNxlWHyVIHCY8PiZr1GB+qBICQL8egBtkurQoB1 mBPBjjVtYS9VUXx2GtG92mLR4QV5obkqz9O3ZM7fVBjpCVHKdf5s3g8IOWPmP6oX 0IgOQXC8PDOcpSYhgccap0PcEwh5wWaTCTFlxRG7cUesFODM1RnP9X4sFygNCVOy TYxI06oLAc40TH2IRgQYEQIABgUCOAFmIgAKCRDC/IaqJTlGixddAKC6OtCIquKb qnfGSEooSVFz5kPTaACgtZYK1PfljVCb4e0xoy8XkArq/8s= =cJgh -----END PGP PUBLIC KEY BLOCK-----
D.3.13 Luoqi Chen <[email protected]>
pub 1024D/2926F3BE 2002-02-22 Luoqi Chen <[email protected]> Key fingerprint = B470 A815 5917 D9F4 37F3 CE2A 4D75 3BD1 2926 F3BE uid Luoqi Chen <[email protected]> uid Luoqi Chen <[email protected]> sub 1024g/5446EB72 2002-02-22
-----BEGIN PGP PUBLIC KEY BLOCK----- Version: GnuPG v1.0.6 (FreeBSD) Comment: For info see http://www.gnupg.org mQGiBDx2qBMRBADYSjvWKVcUxUb1aR1VjHTlFo6zc6PHMK8W3CRin7lY3NgsYsmZ n0IvGQIDEHhTpOEWLS0S6A/bseaGUir52X6spZ8i5hfd7Ps9RmeS0oHx0XDS9JTJ HXFE5RjExHbLnw4DbsaqR4Fl1V7NJU2U/nkiJILJd/PGPZsdstKYv5QvnwCgmwr7 QZlkTV/m61MmbMAEpEFWaecD/Rp5Qb9S5NGVplNeNqub4fC+Ydarkorr8qBJN9Va xu1Qgj3sOAoxmuOnZ99YAgXhs9Bqe4QsrQfs1cMUVzZsl3FIffh92HkrLmdJlsjX 8lrRT694cIP7+ELNGKJ/zaXI3j2cnQPVqUO1icVfijqatqDg8bgQS8C8CGQX6e6h ADKGA/9cIY450gMvrtbR3/bqH+IgvBCUog5RXv0y8c80sJnzeqawx2BuziFvv6mZ Kv0PJ2vnWok0NHcyuBHkkEt+ujYlMQXHZ6wRykYxIUzM8tl+9129tSNEK+GdcCOZ rfbwm8scs+VmzrHXP+saOPcHPBr0e/KPPixNN1I5HB3yI0ILSLQeTHVvcWkgQ2hl biA8bHVvcWlAYnJpY29yZS5jb20+iFcEExECABcFAjx2qnEFCwcKAwQDFQMCAxYC AQIXgAAKCRBNdTvRKSbzvmmrAJ9FVK0lT4Qym+qzj0EA6TP3V42cwACfQl+ClPzJ zngykscMJW07MBXkQ9i0HUx1b3FpIENoZW4gPGxjaGVuQG9uZXR0YS5jb20+iFcE ExECABcFAjx2qpkFCwcKAwQDFQMCAxYCAQIXgAAKCRBNdTvRKSbzvkEwAKCRteUw 2X3XbPsVDCBZarrkf113YgCeIHmhkDHbauw4UlUO1tYNVObn5dO0Hkx1b3FpIENo ZW4gPGx1b3FpQEZyZWVCU0Qub3JnPohXBBMRAgAXBQI8dq6XBQsHCgMEAxUDAgMW AgECF4AACgkQTXU70Skm876CUQCggJuwNIJy6f05Ka17RYn+j8hEQhwAnicDXnsy 5SEYN6amlHdqN/HwXCsbuQENBDx2qBUQBACifA9hUBBYNqCcXTs8Jk1MCcToMFob vRt/SK2EcwjZ9aF9sIX3tJFrOHEe/bIcDMX19e480T4+BBs9MyHdnKgPR6vP8ZEe FvT8+44Wd6psLB1LwsE8UpJ3CbLjkgafTpJIlh4NP5iM2p+2ugUIRM2ZaAG7MOMK Ec47KOEb6yI9ywADBgP9F+p+zQ1Z/qVekBooIKU4xKBryGb/XIPJi/Pgapgr3oE9 kKH4iObbvMBSV3kd4a0+FSEXSZyRnMD1AG+dWhAHgb9rbjtICp3hZOKCMfdZxFVg QStZO8vP5EhQYYtIXiNmOvkkBPqb+to5RgFFez8oIdPlMUq2Hf9MBIY6XDoNJl+I RgQYEQIABgUCPHaoFQAKCRBNdTvRKSbzvh9GAJ9K3KifYIBOHlsmRLF75mgKQk/c 0wCeIOeVykZkImOxs0pEQMR/4g47Wjs= =RNuY -----END PGP PUBLIC KEY BLOCK-----
D.3.14 Andrey A. Chernov <[email protected]>
pub 1024R/D99D08EB 1992-08-20 Andrey A. Chernov <[email protected]> Key fingerprint = 33 03 9F 48 33 7B 4A 15 63 48 88 0A C4 97 FD 49 uid Andrey A. Chernov <[email protected]>
-----BEGIN PGP PUBLIC KEY BLOCK----- Version: GnuPG v1.0.6 (FreeBSD) Comment: For info see http://www.gnupg.org mQCNAiqUMGQAAAEEAPGhcD6A2Buey5LYz0sphDLpVgOZc/bb9UHAbaGKUAGXmafs Dcb2HnsuYGgX/zrQXuCi/wIGtXcZWB97APtKOhFsZnPinDR5n/dde/mw9FnuhwqD m+rKSL1HlN0z/Msa5y7g16760wHhSR6NoBSEG5wQAHIMMq7Q0uJgpPLZnQjrAAUT tDJBbmRyZXcgQS4gQ2hlcm5vdiwgQmxhY2sgTWFnZSA8YWNoZUBhc3RyYWwubXNr LnN1PokAVQIFECw/DtoPMnk/5rEpbQEB0v4B/1p22B08NEiLeZ32Yi7OzGSUx/VB sKb0M3cd4vHOq1NpJ9Npmumh63MwSXIMinSJg5f0kOU8kPvNDN4RAQ822gOJAFUC BRAqlTF3vtlI/HoTNvUBAbKgAf90Gc7wQD+nnPfa5cRbygIwhBsKRHPTcuA+Q4cw 9pxDyx5rP3nX2/9WLCt2mjCWU+8azL2EPycj2yj8E9AcINDEiQBVAgUQKtZsJsBZ rJRXtjnNAQH5/AH/ftSIdQsT0TfROoD3oNXKlB0BRNLk9n/loxgdgo8E6JdTSjwv 6y6DbWWOIx3jOeHedbdj/jF+pwq7//tfPjvxbokAVQIFECwcyHfNP8+ZgPs5LwEB 4iACAJXf+a1C6lWT3Wek+J6t56m3ZKb9JyTm0WlhLr9I4U7T3xOo+gLN9LG27A1m dy3VNpV4Lkf3nCxvChO/uSKEvueJAJUCBRAt/1zc1T70qQVgy2EBAdT9BACe2n4l HwDK0uOSe5sHeq2uJNm7n6NM2DTdCnvPHI4SEhv679aILIvQzNCqo15tW2leZNAZ K+HX6TfQ5SGYvD+IzGjnmNiBKbicfcueMi+3BmPIbqi+0ldXNPkAQ9PGheDyiMkL WdBpfRYWjGydJtael5zERUYz6ypOCUH+oujIaYkAlQIFEC3v+C7iYKTy2Z0I6wEB uTsEAId91Ic+wAbOVzfqXiQGOS3LJpjVqo4IJoj2NMsbbZH/0gW45WBBkdeazL7F WgQkP8/fTjT4KWRUcSbhd1wZ42I8ME984CcUj9/mAofAn4sNxiIqwe8BzqrQVojY BAITLZ3jRHqAY2CxHCEN8jR94vCyBRiQ0y5vTMmj2VBZcFlpiQBVAgUQLD+8YeSB EPHD4o8vAQEAiAH/VGq6E1+ZANCb5NZvWzcL9PwbhwZs9OL4q1/2WqBR6NUDCnXR j6prP0Uuth0aMJe24JL6B2VXGXaFt+Bqv8UixYkAlQMFEC9fWDHtMMnXZzjK4QEB cwQD/A/nCx/DRga/VySwHk8NA/WjhqwNu/P4mQo1TU5q1wfdRAJKukbEJJzVRByT FwzsjlVA/w3pQzWSAwPiH2aQCtCjHTT44wex/8biiovSwVmjXRHrWm7hXANzJePj ejrgVnKDHLa9CBJnp2ev8ktTkN8L9bwKadrpoWQg35yTcfUwiQCVAgUQKvCFp/TK AIGN5yLZAQHHGAQAmYedyBv06feLsd8qKRkLN5QI3eTVcAtH9Yk+hUFH6JHLaRrl Sy9r5Rwyf99Ma8ptcljiHiTo5/Jr2Tg+8i3PKCqDP4nVSrXcZrQHhMdXg1V1o4ez 0h5ekv7qa3nRG/GmdObzZlKeDaUkRx1ZAKsqoTrYsdCJRXJu8vn8hjaaGSy0IkFu ZHJleSBBLiBDaGVybm92IDxhY2hlQG5hZ3VhbC5ydT6JAJUDBRAxybkd4mCk8tmd COsBAfC9A/0Z2YB/WB1y5rIcSA2RzXWZpw8fXVzBaNiPMDZih5wUwZXuKoorxBiu vUyNsZd/wMAbxRt+bRBsjwuPyIbc2Coiu7RzvZS4cZKf8A98YYbQC09flQr+TsGA jQJramjo0DmetKny0Ox0TP/iDJ5rzhFeXamu1N/kmPTuF+VtGy0ZcohGBBARAgAG BQI4sf/8AAoJEEJIzn3YQhsXPGQAoJOXb6ds66pcxI27WlG+1TMgxxP0AJ9NENwa nBYSXfuTQOUJqaFI5yqun7QkQW5kcmV5IEEuIENoZXJub3YgPGFjaGVARnJlZUJT RC5vcmc+iD8DBRA0n+w1jmGml5JeBcIRAoC5AKCGhH+RRIi/77orCnVtqqAYXNRw 3wCePM3rpaGKxA8wXbFknw9QlEVFhf2JAJUDBRA0eblW4mCk8tmdCOsBAS4BA/9p p/ocOP96Xi8dEm/Szcf/zXwgpFXn0n9hvUMIcenb8G1+4ZhXGve4ewUDeBrm1NWe RX7Ok3mpkga6LQWBpjgsLyekvVooBfWB0CENweCxI7JALaXI1OfN8uNszNdZJLxL kFNhnXutXWiMpScjsbIKY0lqZMaudH4GNpCzH4Jf37QlQW5kcmV5IEEuIENoZXJu b3YgPGFjaGVAbmFndWFsLnBwLnJ1Pog/AwUQM8v6uDwCuTUmeywGEQK34gCZASzK aK8WdFR3mqO4NFASSAv/GDUAoLrTunnXDz+VF6KKxzrlQdgjjRJGiQCVAwUQM2Ez u+JgpPLZnQjrAQEyugP8DPnS8ixJ5OeuYgPFQf5sy6l+LrB6hyaS+lgsUPahWjNY cnaDmfda/q/BV5d4+y5rlQe/pjnYG7/yQuAR3jhlXz8XDrqlBOnW9AtYjDt5rMfJ aGFTGXAPGZ6k6zQZE0/YurT8ia3qjvuZm3Fw4NJrHRx7ETHRvVJDvxA6Ggsvmr20 JkFuZHJleSBBLiBDaGVybm92IDxhY2hlQG5pZXR6c2NoZS5uZXQ+iQCVAwUQNHmy 8OJgpPLZnQjrAQE5NAP/Q5MIBciO5qTfreaMRG/NKRWw20gf2EDWXTDpn3n6IfR8 etbFcpPS8FkTTLQSb5Ldyi0svRsyZUTcXcPcbLGEFWaDOPLHQ1g2iJCNh2L7qD89 XfQKfi847qEEGlLIjq9jqoY2pyxrC5G0c28r/ncyk58rBKUgIQFhCKZxmGRyL4S0 MkFuZHJleSBBLiBDaGVybm92LCBCbGFjayBNYWdlIDxhY2hlQGFzdHJhbC5tc2su c3U+iQCVAwUQMBHMmyJRltlmbQBRAQFQkwP/YC3ahs3ZMMoriOlt3ZxGNUUPTF7r IER3j+c7mqGG46dEnDB5sUrkzacpoLX5sj1tGR3bvz9a4vmk1Av3KFNNvrZZ3/BZ FGpq3mCTiAC9zsyNYQ8L0AfGIUO5goCIjqwOTNQIAOpNsJ5S+nMAkQB4YmmNlI6G Tb3D18zfhPZ6uciJAJUDBRAwKvwoa1pnjYGyp3kBARihBACoXr3qfG65hFCyKJIS mjOvaoGranxUIkeDS0yQdTHzhQ+dwB1OhhK15E0Nwr0MKajLMm90n6+Zdb5y/FIj pPriu8dIrlHrWZlewa88eEDM+Q/NxT1iYg+HaKDAE171jmLpSpCL0MiJtO0i36L3 ekVD7Hv8vffOZHPSHirIzJOZTYkAlQMFEDAM6oB3HZKuiXLHwQEBk8cEALYHixYt q4UjnZZaQ11MM/kkumxIxU1oEbFhTMvUJznKq8sOy8rhZlnop+I2rI2NN9ybDg31 kD4j1TQN1BJ11YPfp/ALzTDzvCZEbwp9XjYNFWicvSd+vLgK4qPd2oHdmH/0ea/k BLj4yLLFZPIXXMv5bhIUol1n+myzFRxANCfjiQCVAwUQMCsAo5/rGryoL8h3AQHq 1QQAidyNFqA9hvrmMcjpY7csJVFlGvj574Wj4GPao3pZeuQaMBmsWqaXLYnWU/Al db6kTz6+nRcQX50zFH0THSPfApwEW7yybSTI5apJmWT3qhKN2vmLNg2yNzhqLTzH LD1lH3i1pfQq8WevrNfjLUco5S/VuekTma/osnzCCw7fQzCJAJUDBRAwDs+qsfyM h3t65eEBASL2A/4yK/F6qP9iOYJ3IIUnhUdNZ9LxCxSL2heHB6Hxs8swaWLHwPuq YBSNSDPi1Bd5G1JAGP9rkn/VORAnGjAk1gsFYCVTvqBtO+UhxDOG7oa87rWYjNXU 8k2nqWj6U8kTFFMfWTDGCbO7G6iyHdXg8KycVD4awTb3/8NltrGB0mPHHYkAlQMF EDAau6zFLUdtDb+QbQEBQX8D/AxwkYeFaYxZYMFODHIvSk23hAsjCmUA2Uil1FeW Ausb+o8xRfPDc7TnosrIifJqbF5+fcHCG5VSTGlhBhd18YWUeabf/h9O2BsQX55y WRuB2x3diJ1xI/VVdG+rxlMCmE4ZR1Tl9x+Mtun9KqKVpB39VlkCBYQ3hlgNt/TJ UY4riQCVAwUQMA1IvuJgpPLZnQjrAQGrQQQAhwfqrVvPNLHkQg2S45f209W9eOaa OtFO7umtzxAZGNDQO9rVg0LkTxfwp/9PlXRTcUFLIJK28GiVjqItCkLL5Tpt0a7M Sm5/brxCi8RMcih96cae+pL8/5RFsBHirwSvvOD29Zc6Rt1u7tlw34t1UD04t+Um TAB3OgtArf5ozZWJAJUCBRAwD0sl4uW74fteFRkBAWsAA/9NYqBRBKbmltQDpyK4 +jBAYjkXBJmARFXKJYTlnTgOHMpZqoVyW96xnaa5MzxEiu7ZWm5oL10QDIp1krkB P2KcmvfSMMHb5aGCCQc2/P8NlfXAuHtNGzYiI0UAIwi8ih/S1liVfvnqF9uV3d3k oE7VsQ9OA4Qo0ZL2ggW+/gEaYIkAlQMFEDAMrPD7wj+NsTMUOQEBJckD/ik4WsZz m2qOx9FwerGq7Zwchc+Jq1YeN5PxpzqSf4AG7+7dFIn+oe6X2FcIzgbYY+IfmgJI HEVjDHH5+uAXyb6l4iKc89eQawO3t88pfHLJWbTzmnvgz2cMrxt94HRvgkHfvcpG Egbyldq6EB33OunazFcfZFRIcXk1sfyLDvYE =WCki -----END PGP PUBLIC KEY BLOCK-----
D.3.15 Sean Chittenden <[email protected]>
pub 1024D/BC84B341 2003-02-15 Sean Chittenden (http://sean.chittenden.org/) <[email protected]> Key fingerprint = 3849 3760 1AFE 7B17 11A0 83A6 DD99 E31F BC84 B341 uid Sean Chittenden (http://www.nexadesic.com/) <[email protected]> uid Sean Chittenden (http://www.ruby-lang.org/) <[email protected]> uid Sean Chittenden (http://www.FreeBSD.org/) <[email protected]> uid Sean Chittenden (http://www.rubynet.org/) <[email protected]> uid [jpeg image of size 5617] sub 4096g/B6991464 2003-02-15 [expires: 2005-02-14]
-----BEGIN PGP PUBLIC KEY BLOCK----- mQGiBD5N0sIRBADQfd6bSwUn1B8cK4Xb/D7Cm3kU+gt3tGpCBH5ioMSleO6wbjjB HsUxU+I9y4UjpckOyIJxbixxbqSoCfvbJKxBWUL5mWHOFQxuWNSwGM8VP7mP3fmH UStJG4Wpg+Ic6QjUI+O6k1ED4hrQmHeBVqPe3uUoxNxiGWPyRhnC1y1V4wCg6ixC CgHaloSzZVkOPjQvQktRAw8D/R1i8j86t9wAufmu+Lv6uHxLWe3ZcXszuPEDUt7G SodzqigfOBEBC3AiBuB/oFpgSdypaN8vbsQvVBxxEjPi68+7H4Jz5EWjAmbfbERL bMnnxWe/wfxSwwJkWlV9S1Kg4sJY5SFMi6qiinPQKSGjDNQ6G4+5UNKBQU8mWRPU Q1GcA/wPv4G/hJnHPfS8720YA22fjpbdgFsTbFR6jXR5GwA6+phiT9h2JlG9g4c5 ZOH5K52LUC3IZeua9jNLYlO37xYxLX8F79oHegeo6atuRG4juuJ45gyIO4Roets/ nYL0kI9xzjvU+cgcoFUwp6mgUnQhdKHKITRD697JjcDtuBAIhbRDU2VhbiBDaGl0 dGVuZGVuIChodHRwOi8vc2Vhbi5jaGl0dGVuZGVuLm9yZy8pIDxzZWFuQGNoaXR0 ZW5kZW4ub3JnPohlBBMRAgAlAhsDBQkDwmcABAsHAwIDFQIDAxYCAQIeAQIXgAIZ AQUCPk3ivgAKCRDdmeMfvISzQQprAKCeWF8bj8FnuE5BAYoWXfQMQomsMQCfT01r SvgimVwQTZHPFboXS6SMPn60QFNlYW4gQ2hpdHRlbmRlbiAoaHR0cDovL3d3dy5u ZXhhZGVzaWMuY29tLykgPHNlYW5AbmV4YWRlc2ljLmNvbT6IYgQTEQIAIgUCPk3i 9QIbAwUJA8JnAAQLBwMCAxUCAwMWAgECHgECF4AACgkQ3ZnjH7yEs0GlsgCdEOP1 dQRHEDQCjnwtSCZxcwskIycAn37IzM/raOcZ9Wx4C6EtUTU9AMFFtEBTZWFuIENo aXR0ZW5kZW4gKGh0dHA6Ly93d3cucnVieS1sYW5nLm9yZy8pIDxzZWFuQHJ1Ynkt bGFuZy5vcmc+iGIEExECACIFAj5N42kCGwMFCQPCZwAECwcDAgMVAgMDFgIBAh4B AheAAAoJEN2Z4x+8hLNBhHoAnRxZvAwhzYvcPqwvLMkAoS40GR74AKCbk8dQ+rmw afLmuuGF0fLWbJKxibQ9U2VhbiBDaGl0dGVuZGVuIChodHRwOi8vd3d3LkZyZWVC U0Qub3JnLykgPHNlYW5jQEZyZWVCU0Qub3JnPohiBBMRAgAiBQI+TeOaAhsDBQkD wmcABAsHAwIDFQIDAxYCAQIeAQIXgAAKCRDdmeMfvISzQeVaAKDXySjoHnugvq/d 7fSdNiRzNpULWwCfffJQeGEd0DzdUfUpQnlgEDmnGA20PFNlYW4gQ2hpdHRlbmRl biAoaHR0cDovL3d3dy5ydWJ5bmV0Lm9yZy8pIDxzZWFuQHJ1YnluZXQub3JnPohi BBMRAgAiBQI+TeOxAhsDBQkDwmcABAsHAwIDFQIDAxYCAQIeAQIXgAAKCRDdmeMf vISzQcFUAKDgfF2CxILe+mIjLM0zJ/tUBw9VqACeI3VvpklyTvg0qDJWorII+qED iRrR1UTVQgEQAAEBAAAAAAAAAAAAAAAA/9j/4AAQSkZJRgABAQIAHAAcAAD//gAY U2VhbiBDaGl0dGVuZGVuICgyMDAyKf/bAEMACgcHCAcGCggICAsKCgsOGBAODQ0O HRUWERgjHyUkIh8iISYrNy8mKTQpISIwQTE0OTs+Pj4lLkRJQzxINz0+O//bAEMB CgsLDg0OHBAQHDsoIig7Ozs7Ozs7Ozs7Ozs7Ozs7Ozs7Ozs7Ozs7Ozs7Ozs7Ozs7 Ozs7Ozs7Ozs7Ozs7Ozs7O//CABEIAMgAhAMBIgACEQEDEQH/xAAbAAABBQEBAAAA AAAAAAAAAAADAAECBAYFB//EABgBAAMBAQAAAAAAAAAAAAAAAAABAgME/9oADAMB AAIQAxAAAAHLuNZoit7AMPH0eqqxYt4NVgG2tNrKt2eXUwmNyZNKKGToIqfSdaWf PlN2Oxnxo0NWp2IfO5fT4ro8KlW10M7orDjLIwHCSQF63NuqjCnF3amCoToK3ArS XKTqlFOwrPZzqHpc90uWKKdCuEDaVjg4BsSFwDg60zXOQ1AkcSPbRWaXaYjlh63K ecEyeZOvxewXVE7hO9X7i0T2K61aIytgVwY68LYwrZvR5p8ySVZPrcl6BG2UBr+Y rqdvidptq9sE1XFOg107/HuJy58WZZzGizbwZJXktfkOlOuhm4o6qnSgVxVBeEVV GaNIZ5DGBppp89psysRJ08GdkzUdnF7rPfnmHMsg5xVgHbqlDNVuAgOIU8jq8pXO 6ZViydMl6B57vp0EcU51TOi4BPUTiEgnbWQnS5+e6HPvjSScM6QL0TE7xXRU4zrG QojJCAVRqJBujIHWJwi0ebvlSdNWdHs2GOrd5kXWDbFGtaFuLKQrgQeDyKBYimtR UKfTlwy3iGzjI0qF5pfLaIc9bMXeGIRxOhwetTTWOprg1ijd1xuJLLRJIGEk5UUi agElcHSQc6VQMKWqF0kh2kllf//EACgQAAICAQMDBAIDAQAAAAAAAAECAAMRBBAS EyEiBRQgMSMyMDNCQf/aAAgBAQABBQL4FCIKnaLotQ0bT2rOJh7fw5mm0tupbTem 1UGyyigdS2xArR0zLcLGrptDaAyyp6mmfiBk6RBQmp1TcNLoHV7beE5vg9Z2tKMG ac7JzBOp0aWJ8dKiiWXhUr4Uz3tlso8bWpvvsVemupZWDaumknX2Ee5sdh4z2Fep rtqel9lBYt+OVDKP+WVOlQ4dN114WP6hylt5ZtxdhfTtVwb1DF1WATKf7eTFv1Ff 07Ks5i1rF2xtj4LdnR7acef+WaBisY8iq8j7bs2mYRqmE4tFoYx6iuwXJVfJvuUH zj/cAlcX6hExtiNp0MWoLHTzf9pWcWPiP+0AlaxV7Y2I+GIR2J7xP3t+87VIWNdP ERjOUUzjmdOcOx7RsfBNIbaLKGrnGUfezIxnRaMrrK+ezOBGZGI068W7vtywGw0v 03Eab7nKPfifmePQ2aiVjPkP5TpdWL4LvRb1q7bO6NyVazXeY22Ye8xt/oQfdgxZ toruna1KOaanqt/3OMKwiYgAA+4ZiKI/ezfS6nuUOD+43KzGIF5NxryaBOIBPinw 0584f2Hwfasy9jlJqTx0/wAFOGzkY89zMRjWJ1a8dWowATXtin4r/Vtnd1Dn2yw0 KJ7ZYgxNa/K/44/Dt/zIhMzC4EZmyr5FlnTrPc/DS6WzVWsnTRt+U7Q/fEwpOOJp Kq7a/UPTOiuw09zTR+jkxUWtbe8OxmJ9TkJkQkGN3iMaop5JbodPctno+oV9jOWY ZicZicZxnTE4iYn7OfBeXaHe1MNviMJxxu7BRpK2tsdoPIzvne2mxWW2Z35CM6zm zxNEWPZVmn+tzMzMZVaNpKzPZtPZvBoYNNSs7CFti2Zp/wCvM//EAB8RAAICAgID AQAAAAAAAAAAAAABAhAREgMgEyExUf/aAAgBAwEBPwGkjVGo010Ql0yhq43kbbt1 EYjVM0Rojxk1io0l15PtcUdiUCPRnJXFLVjxgVYrByq4SEIzfK/dw6LAyby7h9vJ kk/XSPVmfdp4E07yTn+Ct1szdjbpfa//xAAdEQADAAMAAwEAAAAAAAAAAAAAAREC ECASITAx/9oACAECAQE/AZqnkeRVyz2QXwi+c0u6UWsnCjLqEgtNdPh8+xbfS2y8 TjIpS6RCaao8XtIxxGou0Iy/Nf/EADAQAAEDAQcCBQMEAwAAAAAAAAEAAhEhAxAS ICIxUTJBEzBhcYEEM6FAUmJygpGx/9oACAEBAAY/AsmxWlhPwvtx7rpW3lw1tOVi Oty1YQsVnY07KbU14Wli1hp9F9uCtLm/Kh4jPA7oYjXuSsFj1nYd14tu6XLklTgj 5VIDPVUHyoadS2lamh3uEbX6cbdTM2MnV2WFlSsZMv7lQxYrZ8u7BAttIbwvZa3l o4WGxZ8rSAFEoFh1I4ThtPwUWPEEXwEGgDSi8nVK0nZeGxhtLRy8S0dB/gFw3lUe R6lGs5IhOD9ueFZ2oFI3VLmpxlYVvRYhpP8A1EvxH5UjbyPCmoM3k8BQihhN/UqV Wy2Wy2zRz5m0Xe94/QhTkr5Jrk8RzoxDSIVbqZKLqAXUCq3anwsQdRG+B2UFshFz dsmkKrqcKXOW98ucnMGxyMf8OWHsoRHby3D1vwnZykyCt9JzzlcfXI2zf36T5GFY ZrdCc7gZW+h8mqptc/2yg8IHnNVdS611KiDeTmZ/UXTkqqKpW6hR+3NZ/wBBcYz1 Rcpy4WfJTWcC6qrneLRocCvGsZLO44vpZOr6LH9TT+KwsaABfut76ql4hA8qHWTf cBEMhzeZzzdXLCA4Qy4x8+TVeIaNH5ua3jNis6jhQ4YTmhjS5YrY/wCKgUUlE56i VSW+ypbH/S+9+FqtCV0z7ql1cn//xAAnEAEAAgIBBAICAgMBAAAAAAABABEhMUEQ UWFxgZEgobHB0eHw8f/aAAgBAQABPyFB1DXQy0EAz9UT+ii9yp6xTLfJE9o4gcGX isS+hkiSsSpddATa5eCDGe46JiTkoI4Jci1cpl6ms5OvNlEqUbqNMuUNag1uDrIl gq/mEsS7IsuMYwtVEEUCci/9SkZvoMqFH7QG6+YBArAC4g6abuWam8oqZRgb0IK3 W/GZSJo3VQKx3Fwyosm7NHcjDUcdEh3MVfQ94EFXl7xkF5T+DxG8xnmoqcGzNH+Y UXlChUMBrDcsIng0sTUe+6sqZ/K5uVdV32wRlw7kdwcFvu//AAiMYHoBK1jAw7zI sKw8AMKslYY5hkNZ4AlSYGdn7ggNia5v7msU/wDOJgRbtHLlCO94lo2Tvg7YNUxv 4GNdOL/FjUNzq+gEkvOpTNAwN1BCtaHHeA5i33H1/Glw5n+aKErokZitShdxpphS 5K8xcqVBrmAbX2UcPR0pdjL2ct1EGvJUNsCN3FVVV295iFogXd9RXCnibN/JBMCg WaQ69InqJQGYnwmCOmRbSo4tomg3OZkgyUTRAzASIOCY7RCUlkass8S2rmUCjEMV nx0tPmEUXWZi74dTb4juZmOY3CNIPEsiI9HJLQlXszLG93oqp7kDfiZinP2wq4AI NijQYnljlxLTMQbi7uHyEALY6AGRIlKOzoYRjDboWuaZBXfmOibcsvUbRqL81Kco myF5YHmpCysIKq0Q76xUXetLuMSaXHQ3KGlAA9VE/mj2h52yUv4lsobmhYxWUbcC pYXGGm1biwaKtKbiALs1DYmlI9R5jV5JilwzGZ5ByQwDnhgiY3LnfoD0SqKiWvMS YgY8ELrkDWPh4ZfzknEQIKskWn7lWXG88U4J4yxmLxhqN6SZI/MKV0Nw1NoUv8MA hMytk3M/UYgwLiIq01cDbKNk4TFIN12nniP6l/g5doUv3OYKf3C8xgZuJiOW3KC/ tFAT4RSxen40RtXK9kDEZPaVRP1Oeiq3ieY+2fiONjLIWigUJ3IIO/4vxMNw592n 6i5sM81N1FFxmbzHWYarYcS8yr3FqH6nPr6hFGDtLYuMPn8TcBi+D1KPjmKj2peC /qDeoOO0rc1kdewmO2h4vBj3Eom1bfwqCCo5dBKybCLgrguVm8O73ipoTDV/MVVz LwtPhlqMRClU/wBQPOly/wCnVgEumcp7BwXL7h/QYCpkh75lNcJlVw+We8SuG/ZA mtr3xBcoYg2kAaOeYo9TiAwYGmNAF7BIdPGwdCZCSzb2NJD02NPiLckVnC+YBxQw PNB8QDR0mA7jp3QIC699FDUZjPDr/csfUrMqIuWcSgxEuIEYMZoKw904JTtK3plr jpxLjzOSF3uy4gXkmI0RHmCNyzaPBiEMDs/uLSAGgmFdXEyftehXS1WR5mTmBYHR jyTY28pXw/ML7iQ36bEyjZ5XCmgB4lWtx3f1lyuDiHL30f/aAAwDAQACAAMAAAAQ +ORkZbfyz0BhCKdAACXU9rRbiAwTCzF7HK0CKJDNNBAfwXtxkI9AjAj0WqIMUDCF DPAqSVCCwE2Q2RkC+nBPzjmsMw1iNzn4pPMhSdLagzDzCCeAdhhfA//EABwRAQEA AwEBAQEAAAAAAAAAAAEAESExEEFhUf/aAAgBAwEBPxDEFl74Z/LoWJ8GXEHcSby7 ZccjRuQIOno63zE/lp8uhYbL9tPOJbhlgnloxO24V5wz2zRohtNgnkeKn8g6R1YZ UcBGeSU1Dnm3+OmWg7d2BmYC2gAT1UxKUTTDjtkB6tsdhjfYYWPyyHmPBIcQIXyc ien7ZtWP5C36sFFghzIswmnwZAZYUxNnw8iwR2f6yus+WW//xAAcEQEBAQADAQEB AAAAAAAAAAABABEQIUExUSD/2gAIAQIBAT8QmTj5D3GNeQkxYw9Q9kR+FgNZ/kC+ QJ9jgs2Lu2MLSezL3+A2c41GyfeE74XI7szjiHCYCB7w0fIFNZS3d3bPvGhABL1C QhDrdO4d6t4OXkWvyVLUa/x8yacb+Tn7KeQw42+dj1JpBAFjYeAm/I5Cko6cgGQj eDZH5ZPf2LTkkyQsIQDn/8QAJhABAAICAgICAgMBAQEAAAAAAQARITFBUWFxgZGh sRDB0eHw8f/aAAgBAQABPxDMRjQl+IU0K6DMKUr84YLtoEVlqBm1/wBYkBhpyB8w 9SByTFxVos6bmKBttLYQKS0LgvmIIp0QozLcR2WjBfmsvq5XmdIh6j+4cakQW/dB cZGXTM8IOT5qYgzwRe3mWauVZR89RLHskWPpJTBBFV5VWo4EtC4PYxEQ5LyDseSN iyjBAWuf4jD+C5BAOVgJ1j1dAHQ0QXICBeDg5XiWslRGvKwPr7lsZYYfuNTlB17s H/YAq8kw8F2/iM3aq/8AZjZEpTHniqxBVY2AJ+ZQDLUA7PHxEK1AshsOQhbyRXT+ C5eYhzfKtcy3Nf8AyKBEvbwLOX3q/cFwLQtu3xduZXmMcifjiCL79m3wlrnjMcMH ncqu1xH5TQZNHRcd4TIyebzUqQ8qPyVy+cZKJ5znEOWssJ7MUy/YMV+mb1WoZUlQ m3dnK8NY8RwRVkQfJ4itzK8S/naC6igAhwjo7BV8xcWUmL3fxg+5XqXZGMtvl8cQ W0SmUM1yGdsTBOwx6p1/JL5hZEK+EBe8fuM+lUAegUkZ6WFir86gXfMNsVULW5IG Nm1sIjA6hcw4LE7VQ7N3gr1LZmgbxV/Y0+IBueCf1KfP1G2mq8EO4ncZcMnYdfHU PhREW1vMGSxdohgZ+9HzMaVBvaZ1ZjWziIySwdfkdRHSIfR9X73MZn+pZsnxBQIv SoLNnsixxEUJRUSwLO+oSApDwcAeKH8S7nWmWyicc5oqr/MbgHCP/PcxQCg89v5h hY0nH1GvraNq9xwsDWMsLhRwMXROB/xOKnkJXoDjJiAMPtKih3HJM+x4hW4njqBF 2cvrMspsZcIRQceXcVLREoc5ogxAWBzti2qyvPFe4FHHeJXde4XJn9E0NhFVglQ+ i71DOsPFRMVIwsnKf1H6BdmswGEAmtYioWTKirrEsjDuQ/uXzqjj+4AF1oTxNvA4 glMHEIwMUl/aXsHxELV0xBYL6mfCEtxuyWuuNihiOwEae5iirHH8Iil1Flm4up4B cBUmW6Nyld1ee4rNcEMZzo1BWWuVlAxZgwVQycyhAGu4HBhgqahfkr3FYwzN0pRG IUlJLj8I3KwMLEFYXof+wS0djQ0waTQUlPHk0sgtSsyoBxtl+PQRvEPTiIjvhifq OgK6dxAqKOIQ8MZhUjdlIksIriUZub0y+kuUQOBcxIQBmgAK+IfS9FNe0z0w0OR7 mIbtBAtwOqr4lLwK8EMLB4XHd3Deizf5Vhn1sKvqcpHxHIbkG7lKIVw/UFrFC9KJ iGlOpcNxxUVAUUVDR2Ux9gbA7Y2pVFkL4jgSfIU5P3KmzXuOszKlw0Rwh8sxKpVh MFeoK85cyoNgE9zIz0xwem4WkCH3K/gr+Ojqf2NemMSAo3bs8QHJ1zvGEgEstQhu LxNlzIxrxHzeB4i3Qr4irwt7iE18FStarzLYjbvEtgwl4jpOYY2Rx6t/hxMQ2mdn Er2Fwz+p4eJrBKMwExptvXiKp8rZ8EqOfuO0xdwxurgAYCi8w6oYOPnUGi6eeIaM 8lfxKcITwigrzuX/ADZcEFc0wS6pz3Ct0CgQispy3E0t3Tw8REJxCyr1GtKV7lQE PEFGK7bmHaaNEZq9LDvd0fKH9ysyn+XJWEDyjPsfOwYhCqDDqiF696RjVWoDBe4B Q0GWaoLnzC9CyrWJQRDhDCsCz7maZDaUQKwzZHcvIp0f9JNS3+VR0bjuqEexMIeG 9lc5+oY2Pm3rTCuRdyhzG6qreCYo/HiWF6w17mbXnQxB4FuKtcwY0bDeVU8A4JnG PT5P+fE2yjv+CDDnPMzCJRemmomgtWvymYBa3GXPBE9lwKjliAsBKuMsr/aAsbc3 cGcF9zEg4oigxhHg2+csB9sfkknawZ8SoRU9WwNbavfiAilqN0VcFrZsPcqgqh/U PULv0AzFDJPhr4mtHelqDEWC4zMCt57iXekojYjB0QB3g5Wxv9Rt2iZLseeHZESB iaa2DN+IhRefsgaPBn1CqJQwIwKy+ot4ekSo0DvmBSSi8htj0qwdtPeI6JKiyy4E BFZBp4joNThp+pqxYt0xI/kMHxLXzC6WQODdQsR7ICnKDM7EliJ29qeTucRXCibT EM3ikcJsjpZq/ua3mrukjcFu6YlUoN3kuHaEm0LmOixs0Wy1LL4pKkKjxEhnvqES CqA7WaJnPNFRKgYh7glaZSV3DQP4JdHGHDx/qKNipUHnmGPV9S0QpOeYZzkFXBYy fuOP3L3T3FayZ3FxWBsIdeCKllbjBLRv56msT+3SsVDOWyaPPcdIZamk9cStsCkW Bxu9MtaT4jJVMeZcWfuXpLLPTF4nt0Q2SGxcPtz6hwY0CgIoVhp2whrXfAGP3Fzq IFCfcuUIrQ13CovTTpgm54VsTL5Qek+G4panAJr8kt/x/wDUCdmCH+5pDct++JTH XAAhhPgjxRy4O2MGmgaiCJlf6I0ar8T/2YhiBBMRAgAiBQI+TeSrAhsDBQkDwmcA BAsHAwIDFQIDAxYCAQIeAQIXgAAKCRDdmeMfvISzQcePAJ9eofsu4Gnkf7gkcTkf 0B4ds8F1tQCcCTV561Ho64n+L4mfKNwmN/xx/fG5BA0EPk3U7BAQAKFcE1XhzyVg witA7JotLPJY892Qx75y7eExFMqbUMGy9Me0LwSpRo556ZZgnt6kGydMWvOPsJaQ 6IZ1iNusTifVtzzRu0XiItqEjnCo4ndU6qtIYsXrlzcug4EsOzqi4XIdVFciYTU7 xQuJBgPjJeRvcrD5Xpck5HWkDFNFSXr79OCJ4RE11+UyB7ZlDELPYszyo1utOGcU 6yStR8MMbf7i0RSg/AcJFnAYIwL5c5hLSBlFY1JtkUtgxysszq5n4OdJsgcDPYk8 tNOTQAnUqO6fxiIcGB7eIl26WLqPXz0ZVB/NpHWFcWMjfj5mmyVA1RRJL3ypSE0y XbvoCO1SfvonWOqIUhHMg8o8UrJ9Rl9fOV7599bLkrHj+MJr5XgqIntWIITvIfQC w0+k+SnDdS7pnWAPkYCj3bCwLvgBNriYU2xY6BfMa7mYa5IlNtaxYiLLGcPAOrWq 4+kYKFcQPoI7Pio3TMowWz0aVH1KZht0O+qJvzUu1eieVe7uDbZa8M2uubW1aR6T mdwlG2YGNWjEOmVcXWOCxpygD5cZa+hVPIKf2hyVdl0IfauxZUwy9nr8WI2k4c09 DRm9oNBEcoAzUBag5YDWXqPX5D8dwOayrh7rgeNXlkmjI8cGT9v26R/ZLuf9Ho1V OCRep6LzOsNiklfgt1K+iUjviMlCG4gfAAMFEACN2XllfBvjLLRdllUPunXlDpQr iVRvmu7Fi288CEgezB1LqF5po+narDLo9Zbm74KgClbdZ8bLblwrtAZpVeOegMDA +1ulRe9zLXLg999zFsaC0fSB2a86NBaEyUK2DXl2B25S2iTDw2ioCTDqb4GLXc0B LaoAXa5ycwcBur7zKfV/rvRSRziwMS86CNT3C03UrsNmVZ4W61bfv3dZDwHcRBIh 8KYs4NS6t39ACjCglIY4lEIgbxySb/Kkmqqpo2+/9bg9A61SMZ0Mol3Uu61nX3ea gkK6pcVo8u1/ecreSbo8xuXMrE15JfNtZ+Mat/3fR9LeFeLbTIzYH+ZzfjvhR0Ka O+Mat9Qgn/d8QzOmgFt2LhmKJ3JJ8voW4rEhJmnkZD7MhQ0RmOaW/h/XviHZe6Pk DZC+sR1/xKKtEGw5St8z1wbCMANy3JzIsYgwtAaPdoTpfQDyb7WoRXSQfUSg+BTn T27MnKYhYUeQmkyEKTAS36Ffi92ZmtSvGcmXiovsefYOIyHsKAhGKe02fWrLy8Xs XEcJMSCmCUmFHLhQHF4OdObb+Rze9DsMt55LOiXgV4BHZmho7vFkhoeoMW+r250f dPEU5QtV5CrDzW5AGzfZeCB4Kg9O9G41ntMRbdRUzszGDV4wuFzTCrskYSTSNoO1 fuz7l0pQHXYlrB/0VYhMBBgRAgAMBQI+TdTsBQkDwmcAAAoJEN2Z4x+8hLNBpesA niEm8um9k6vu92kVVLHCMYKf2kMKAKCfrTb7guqaWRtIfMajQuHatAWhqQ== =LG1v -----END PGP PUBLIC KEY BLOCK-----
D.3.16 Junho CHOI <[email protected]>
pub 1024D/E60260F5 2002-10-14 CHOI Junho (Work) <[email protected]> Key fingerprint = 1369 7374 A45F F41A F3C0 07E3 4A01 C020 E602 60F5 uid CHOI Junho (Personal) <[email protected]> uid CHOI Junho (FreeBSD) <[email protected]> sub 1024g/04A4FDD8 2002-10-14
-----BEGIN PGP PUBLIC KEY BLOCK----- Version: GnuPG v1.2.0 (FreeBSD) mQGiBD2qLwkRBADbZ6Rsv7guMTzGT9lj4eIE29vj0ZZNWFepFEqEmWK0jMLAATX0 koXkP/qWsuGBhVHcSyZtVG+MYTwAzo5nBszx12CNL/GkEokQ/9FXi+cA3W5TJZTE ssMq0PPwqCB7+s/4DBmc3uI22TCOI7J26XkftuwkdihCMG/gk+cgKkzZ7wCggaBp 02a96DwV/78wUZy9C8B6uMMD/j5jAO2HOubn5CRZrOpko3za+qVsk6yTCmq12z+t r9veYORoVohxVTIY+xpeHQVlOe5URTiKO0Uvu34Tl34x0BbSLBWrGU8UTMA4+hpl QTUK1GI1DheFPGGGxbt9w40nslRVw2Or7GA/XHexCDwx5KZpJNtO8c/MqdlzAae5 CuYQA/9bb5T8xhamrsOFTmdLY3wPM2efnp5d3luwA2Fe3SdC5Rkoa2fDye5w7fy1 9YX638Nw0YU6P/xmygdBjqxKs28/6evo79KAWONL0dl20pEYoj3yVz58C3YGLEFe p9ggrBf41MjnnMg+D7NdBOHtISfOrU3TtB/1DiGE3+QpMwuOHrQqQ0hPSSBKdW5o byAoUGVyc29uYWwpIDxjamhAa3IuRnJlZUJTRC5vcmc+iFkEExECABkFAj2qLwkE CwcDAgMVAgMDFgIBAh4BAheAAAoJEEoBwCDmAmD1SyYAn3JBBPs/6lAQ55HLjew2 suN8XP8RAJ9OBFQhUphqmQ/shjrwbNRBsgDbc7QmQ0hPSSBKdW5obyAoRnJlZUJT RCkgPGNqaEBGcmVlQlNELm9yZz6IXAQTEQIAHAUCPa7Z7gIbAwQLBwMCAxUCAwMW AgECHgECF4AACgkQSgHAIOYCYPW9MgCeOYgOUTCIsagnCymketJwQoGBEpsAnik+ bL1lPnomVghlMMUgU8wxB9sQtCFDSE9JIEp1bmhvIChXb3JrKSA8Y2poQHdkYi5j by5rcj6IXAQTEQIAHAUCPa7aJwIbAwQLBwMCAxUCAwMWAgECHgECF4AACgkQSgHA IOYCYPVI0gCbBZEg/a9K4BAY5HQ7wFOp6u/G+nYAnRgb4zUmf2M57dxEx2hm93pI aKP/uQENBD2qLxAQBADMGxA9f5QYLFnR/XZ+Hqa/YCeqFMZ3hC4KnjWBDDXfI0Cv HMLBIW5027NPIDeN95998T5YJPDm1TY5Cort72CTDS3eIfoG0iGwIzzLfXrZB7Zc 1BukNV5NMFeKPO7pX6k4R0aQr0SQUmcdYD7t6V/M4xswVOwcECk/W9BuGA/9NwAD BwQAy8LmYyssQdjImAASQABcpdOua5orv0ojYMu+edGmjd0WqhXToUHcDfQgL6YA kO/4g37ysvGwlpj8U7cZwabMO/zwnryyOEeGEA+5aCsji4VRZHOkdflcuBOXj0nR 9yHmPFfwWTxLtV9ajLCP4vXqKPrKciS8SbuLYzvx+lnUiCqIRgQYEQIABgUCPaov EAAKCRBKAcAg5gJg9eZZAJ90E4gu6VACob81uH3MxWmgjpG2iwCfeNTe1Wz7EO3K z54TjDmC4biJg2M= =g8A3 -----END PGP PUBLIC KEY BLOCK-----
D.3.17 Crist J. Clark <[email protected]>
pub 1024D/FE886AD3 2002-01-25 Crist J. Clark <[email protected]> Key fingerprint = F04E CCD7 3834 72C2 707F 0A8F 259F 8F4B FE88 6AD3 uid Crist J. Clark <[email protected]> uid Crist J. Clark <[email protected]> sub 1024g/9B6BAB99 2002-01-25
-----BEGIN PGP PUBLIC KEY BLOCK----- Version: GnuPG v1.0.6 (FreeBSD) Comment: For info see http://www.gnupg.org mQGiBDxRQfMRBACvHk6znTM5boH4k+2+anGxRuPxPPIJgo6Ny385v60FtJjwLwDh 9LwvZZjpjXi7MM/0FRfUE4bqzrdBtUm6XXGC8v/FTH72TemXR54yr2zuCTcX3jML e7wjrO0SO1cttASSeb8OsVQEqiMT4VRm94AYdQvS8bNxbqlog9PYmhh6lwCgwDYl Br/IhYSKQTugPEb8nSyP3e0D/izp3mt4NXcULIp0PZFpvnGZAMLq8moZ3cYa+8nM kRCWd/1/94lCd1YM8f3lQsaEvRuWaw7rT1ENknSb5TZnEMsTvV03CM4DMzH63Zde wgl8Xne5lF/WyiSsjUeSkmvCExFA83fz/Cv8/fk6K2O2Ajo0b33Rb7WLH/gb4U4s 9ZkEA/48XB6/s0vGFVnELRSXbc6wCHbnhG0/58ewSbJ2XjyIFFFmeqIF2bpLhuRT YTBz3styfrjeAqsi9t4gtcEK3vyvF83ql5b23u5/V/+O/ZLwk3kceYmjM0mbETil FajrLZjaWXpTRQauL/tsqxItBI4BNuTvnh9bizQY8V7xzAgMwLQlQ3Jpc3QgSi4g Q2xhcmsgPGNqY2xhcmtAYWx1bS5taXQuZWR1PohXBBMRAgAXBQI8UUHzBQsHCgME AxUDAgMWAgECF4AACgkQJZ+PS/6IatMaGgCgqdklRK39OoUma5sl44pEl7R3GhAA n1680hBnTGdIR4wxFY39uX9zK708tCBDcmlzdCBKLiBDbGFyayA8Y2pjQGZyZWVi c2Qub3JnPohXBBMRAgAXBQI8UUKgBQsHCgMEAxUDAgMWAgECF4AACgkQJZ+PS/6I atPX0wCghHE+X/oyrMbMrCsdwubBf1WudnAAn2WHoVNZpzgMck2MhFdwa/1rAJI1 tCBDcmlzdCBKLiBDbGFyayA8Y2pjbGFya0BqaHUuZWR1PohXBBMRAgAXBQI8UULc BQsHCgMEAxUDAgMWAgECF4AACgkQJZ+PS/6IatOKKACgsnfy7ZCxEWmdnY+c9KLm x0V1Zy0An34Ky4kzHxDYDTIoO6XRS48+/aljuQENBDxRQfoQBADouiAUldDORJkG K7fN81SWvocuySMOL/dEv6UQnBgR4lmjmaLog3QMbGIsJqiPRLDDS3PMkYf1dgDy 6hPmMkWF/xd13Vpk4S5sIjrqTBGoE9f0SPbcDPIjRj+htXFcI+qvhvdceYi24Zvs xGX90jb+fimZdrJNtobfEqJaYOkrDwADBQQAsCwtAczuP/aM624+UYBrNMCmHpRS ZAOAnp7Hz83GafkWynaNRDYan2KsBrZJmbZ3MJ6kyUj6k37Keh1c7pR5DsY202on 9haB3lTZv+j2QooPyj9Ityd985eqiRwAMBuOrpaCpot7zYlwiG/Lx/0P00RZ+Jdz hyidSKrsudGAp0OIRgQYEQIABgUCPFFB+gAKCRAln49L/ohq06htAKC7SFr0uQmS 9fjEOFsF9oPMMxgFwQCgjvMA6reNmNAm0i6ycFh3QVYEUic= =C4zW -----END PGP PUBLIC KEY BLOCK-----
D.3.18 Joe Marcus Clarke <[email protected]>
pub 1024D/FE14CF87 2002-03-04 Joe Marcus Clarke (FreeBSD committer address) <[email protected]> Key fingerprint = CC89 6407 73CC 0286 28E4 AFB9 6F68 8F8A FE14 CF87 uid Joe Marcus Clarke <[email protected]> sub 1024g/B9ACE4D2 2002-03-04
-----BEGIN PGP PUBLIC KEY BLOCK----- Version: GnuPG v1.0.6 (FreeBSD) Comment: For info see http://www.gnupg.org mQGiBDyDmj4RBADa/Icz5Xl+cJUGNxC/tWgXWqcA9VA8GN+PeqKhXS0BnVHntdsQ xbpFUUKK4ld0Zex/Rec1jgC/ikExJHHIee8ZVcHqP+tsWexi83/ZvEdzI95diBp2 Is5fYp8P8hdIBNQSOoc1jVYrTJUaZgJK2uBzbkh/WbipwsQbueRzXqPORwCgsPNr StLzqOpjrA7FdUz/JVQf5+8D/1SiKAOFiW4TxY+fS09lqiLs3mbXjvw23iQwLxje 4vBd4+b9iAUWOsSretSKv6OE9ZlD4FYea8HmMgEkuKfXGc8GvTq4J1uHZ0gcVbrB GmxAUBPPaAENYEJfJf7dcysKVAl14ZQVIvzAGJAZHGuegD7uekGKnOEA61R3ze4a M2zNA/96I77l0qiMc6J7gXmiD5uxC7FsSCFj5sqTYMgBqzIYEZjU/tTUbth84xcR i4X0WNkaILqq1mOcBfmzQMvzG1n1CydmJU6iF1ewle6cIui9TQYg5CESrJF7xid4 vVXRz+xi6hc1+0bSaoJa3sfpNrSSr0lKGdWHZozWdQjOvTMCXbQoSm9lIE1hcmN1 cyBDbGFya2UgPG1hcmN1c0BtYXJjdXNjb20uY29tPohXBBMRAgAXBQI8g5o+BQsH CgMEAxUDAgMWAgECF4AACgkQb2iPiv4Uz4c6rgCgg7XXmcYqcIlJdDl0aGU8r0Dl kfYAn3W4oHUReFhATFkj2d+7zu+Rsu2MtEJKb2UgTWFyY3VzIENsYXJrZSAoRnJl ZUJTRCBjb21taXR0ZXIgYWRkcmVzcykgPG1hcmN1c0BGcmVlQlNELm9yZz6IVwQT EQIAFwUCPK4tTQULBwoDBAMVAwIDFgIBAheAAAoJEG9oj4r+FM+H7U0AoICIVoBe 9B8bo1lrvHh+UF7GY/WaAJ9C2mCThFrmqxCr2bCtR12UoPCPqrkBDQQ8g5pAEAQA qk1J4LBDLeWs6ZOkPDYYcKCSAu0qlzEf5YP/TcSeZcjJyXILgesFXcayoy1v7ILP QSXj4p5uzRyn0fuGqiTvajjxMZz1aSkvgGyS+gc+PDmi4SJ2N/tX2isrul8MK+NG eUsLuZaM1JKhgKpq9yuu3D3ELG7ESga7xsOs1V/sSd8AAwUD/20XByIlsUUC/65K G/DQ1WfX2gNuy5If9tSPQ6h1Lno5Hv3ow3ktybIoQSxbcBo28nA/Gzg5NFGVkkqf OkH2xtS6V0K/WjzsrloBHCPFiKp2yHpXfKubxl8yefQPTMj8hLwlBKrNiN1fz5/6 29TIkEwDwrUwHxQreE7FAzPMqHORiEYEGBECAAYFAjyDmkAACgkQb2iPiv4Uz4cn uQCfX1zNrahRTWz/HRpF7ms8qZqzdOIAn1uuu6Jst43pDzanBHUOBzUP6ymA =Bu/6 -----END PGP PUBLIC KEY BLOCK-----
D.3.19 Nik Clayton <[email protected]>
pub 1024D/2C37E375 2000-11-09 Nik Clayton <[email protected]> Key fingerprint = 15B8 3FFC DDB4 34B0 AA5F 94B7 93A8 0764 2C37 E375 uid Nik Clayton <[email protected]> uid Nik Clayton <[email protected]> uid Nik Clayton <[email protected]> uid Nik Clayton <[email protected]> sub 1024g/769E298A 2000-11-09
-----BEGIN PGP PUBLIC KEY BLOCK----- Version: GnuPG v1.0.6 (FreeBSD) Comment: For info see http://www.gnupg.org mQGiBDoKphMRBACXqpAlgcW54cNw4RBJvlbX5GZ4+VGpV8AyFnkkrKelwH+qgViL L96W7iXCEQqciAAQ2Jw6AMskSdVbb24Y70foITKGo1VEXBKJci3sdKvuPWkHNlJq zGKIrikVHLrD5Yixt1b6SVntWiRJaddiUaI21Zcuechaap3isOAdYrNR8wCgluEV qGB0ng92wVENiIaooHiib28EAIzfn+czzPm19gtAM03W/otZJqsHsIGWuuoIC+Wn Gr9aGVFGB9NcYXHz+jdwSe3o8oE84ohWBI/JVX4K+xCt1gXBqRax4F1QdDse3np3 o49bV79VFbaec8htk88NTp6Xwd8b1GaUFXFbtqAN7DbZEz8oB+57E+2q+ajFQTx1 X6NgA/99QvNMD+SWc73a5SbicKPw0DDktkhHlE4re255nfvgnqjpmxWYyT80Ra+2 rqABKUrgGgegv1I8/w5zbGBd8h3lO9opMQ1qtt4oAKv/incBh0OouMGyQRINQIMQ YQHcUmOu1ds5ijS9B5QCfn89TO4aCoJiS17FRxpJmoNrx30/LrQeTmlrIENsYXl0 b24gPG5pa0BzbGFzaGRvdC5vcmc+iFcEExECABcFAjq7HT0FCwcKAwQDFQMCAxYC AQIXgAAKCRCTqAdkLDfjdSENAJ0b+qcfohYNvN4EcyltP+bcyW2QLACghCW8T6Mk uTs7EkA83E654PfgJSOIRgQQEQIABgUCOm67jAAKCRBdUhyM5rFQFmTqAKCZAG/9 xzh3ZhbTk/vD1RFDFhEjtACfY5oFGV5jon4sJHsZRQ/+fv5F+JCIRgQQEQIABgUC OzoIGgAKCRAgFTHVhF3+3Q8sAJ9UXDBTCKXbbpGrYIVmh8+AbFlpLQCeLdXz4Rvq ht35oJdscZIBXlEqs/mJAJUDBRA7OgjCTVYoIXkFDBEBAUYHA/4sxrvsZe5bZqPc tFoB1KhhLDhVIWMhOrMLN5MPQAV/OHUebDZaOUYn0Rojybh0kQnFhkySvCy5z6vu IXiNQF9kwdL4l5mCAuY6zoLQ05ychnUQDSjAR1vRW8AuY/9zLqsk5IscIWoUpIvL FscLp5FzPmRIe++UteR5s8lQdrexg4kAlQMFEDs6CTwO7bznZmp0IQEBlysD/RMM m8HEnqlCQ/psnaenXQFcKEkNPFWu6fmA2XDYUsauvFYWriILCu7SmGZVPfGpfUGq m1nvvrkRim3+5kpIEZQnFkW6o7DsDhFQakcIt/+tvam4sRUxzJ/Dxl/lmaMfJ9G9 0KidfQ+Peh6Sn0z8j8A/9rFCk0nf+EaUfOhtk10IiEYEEBECAAYFAjs6ESgACgkQ gb3TxA4fm3lJWQCgih0UnLvUcL/miI7K6A+1tuPG21oAn05R3obifoeLIsYBGe0b rf2GCVQxiEYEEBECAAYFAjs7PmIACgkQtNcQog5FH31wDgCgkMLrbEAc3q3wqVfQ UB+Mw7SvsMgAoL1ffYtAmbQKknRfgv3SNAeMfST5tB1OaWsgQ2xheXRvbiA8bmlr QGZyZWVic2Qub3JnPohXBBMRAgAXBQI6ux1ABQsHCgMEAxUDAgMWAgECF4AACgkQ k6gHZCw343XQqACffoEs3DQRVH/U+3Hcp0P3+p+39rwAn3DZHvQDAoPGTHvcfwJv JiNyzU02iEYEEBECAAYFAjpuu5EACgkQXVIcjOaxUBbbcACgxf69HGBrCBjoCJm0 8uMzStTFdk4AoIwTRhmZKdF16GKxcCavvw9aHRz1iEYEEBECAAYFAjs6CB0ACgkQ IBUx1YRd/t1GwwCdHVLbDTjY3/8ti7uMv2y7gOfVDJwAoI1hS0OT2XHvp5vsK7Vp aAOf2HYziQCVAwUQOzoJFE1WKCF5BQwRAQFqlwQAriB57Dl/IZX1CcrxKXGsZJUi Pqh1Pnzg0hhwDEmzlo8GqS61IFFchDQLXKRA8jHHy9DmKNQUVTjFkiasj6gp0xDE +S4jLt5+CVCSG/3/rCk1m4d8pE4lfB46gUzKxD3TPR+fpzElaUaZJ9bAYuXpCGKt 7q3Cljp/Ri1/dBfhq5WJAJUDBRA7OglBDu2852ZqdCEBAZezA/4yUw6AZEleESFo HGwHKyoqeqRKm5V9FgfJ2QDfiqp27HSQo4sLht/83yl5mkYs3dB+JJNWQkgC/62r xyInPK2zNPnlUoHL27NI/onXpVFgPwLiUGF1S4s8VSliiL/mcaEKYSr+F1IZPeEy /Rwx54eQ4qOvh+JTJkwpuJ8e8+yanohGBBARAgAGBQI7OhEqAAoJEIG908QOH5t5 8FEAmgNqpoJJax89oWyAUBF+iZR2hRIdAJ9kp8cVFj3NNWZ7QNfKfIB/xbHEwohG BBARAgAGBQI7Oz5mAAoJELTXEKIORR99g8sAoL/YU7ZZi/21I5xcsIa5iQ7yEVq2 AKCn7/iYCoo/aCxEuzQRL3VJ50A12rQmTmlrIENsYXl0b24gPG5pa0BjcmYtY29u c3VsdGluZy5jby51az6IVwQTEQIAFwUCOrsdQAULBwoDBAMVAwIDFgIBAheAAAoJ EJOoB2QsN+N11V4AoIFS6k+sbT58GASOpQXyDQleuS7GAJsHiHyt1woHN7mOxpo2 KiqoT3d/CohGBBARAgAGBQI6bruRAAoJEF1SHIzmsVAWDrEAn0AIgsTVcu0FFhv1 0syvJpwVqqm7AKDBJ2MZAt1EeT7WR8JKfB47g60StohGBBARAgAGBQI7OggdAAoJ ECAVMdWEXf7dV5AAoIIbg5nm3XE1Qk9Nv66nVZZbqm+eAKCCBQ3YptghBWkPwLUb /7BO94GvX4kAlQMFEDs6CSNNVigheQUMEQEB/h4D/3gjPGl2VBCgKeq7wxccGXqD G/1tkgkSaujnC5ORad5AkNg6ZrgmH/h3b4CUymVm4ddoLwzgaq83Uo7nvA8v4vRU 9oKhczr8+jfqhSUF2wWUuNBDZreeFWuVJr7CJyEEPfv+wYTbNLNrPRTT9NLweq94 V3FGu3c0T7z2VCiDnS9piQCVAwUQOzoJQQ7tvOdmanQhAQGm/AP+L1f1FWsBHaaf gVLxN8D8jNR0htpU/xrW9vTp/YvLrNkx8ihGH3y16lyAZlXON/ZiLIVIdKXBkuE+ zxfzY87s+ZJBEQJgj87khRsetL4qoUZIObgE4AIv0szu1bwXiK+RcPo7jPnpg2Q4 cYc/jFpMM+lkelmHp7lV/Kz6MhN+dd2IRgQQEQIABgUCOzoRKgAKCRCBvdPEDh+b eRZqAJ9Fp7+mNG54DqPDV1J7qP4HctZkXQCghjz28SPd+DBkzT0nLNsbJKQ8db2I RgQQEQIABgUCOzs+ZgAKCRC01xCiDkUffQVFAKCanD9OqYtytjpgJPwS4QoRc2j8 lgCghRujIjNIsb1jAC8mchBbENHfDM60HE5payBDbGF5dG9uIDxuaWtAbmdvLm9y Zy51az6IVwQTEQIAFwUCOrsdQAULBwoDBAMVAwIDFgIBAheAAAoJEJOoB2QsN+N1 uCgAoIwsEXnbbmB+PLB3TPW6gU/BhKp0AJsEJIq5VF3qH+mjqiKxgtq+vNQ5jIhG BBARAgAGBQI6bruRAAoJEF1SHIzmsVAWpPkAnRq+OwehLht3RdZ0eEMaBovxgre6 AKDU2u+ORxySutpVAXqt1nbxg2wJoYhGBBARAgAGBQI7OggdAAoJECAVMdWEXf7d jmAAn2tmOwfDfggEKVuIOl6BnqdPZYLKAJwK/sBvu+n1hoFldXi52uR0FVgQc4kA lQMFEDs6CNRNVigheQUMEQEBzqQD/1ZjUFZkyCJIjHhITiaFskyFodgk3fngLihn vt52cTHZGk8F4aoLTAIhWmmvBkk9rNWVm4yAJZZRAHbz+vtyKGYAzBF8oWgski8X QxLp/rU05BcwOQvVGh5OY/VyJY9un+DJ2cT+7TvL4VjbCqURSuA7fBBu9SYE1H2N 2Ef3jnrEiQCVAwUQOzoJQQ7tvOdmanQhAQFXNAP/YbFNaL7oKn3TecpmCHnAooT6 VnTecdTfEgbrPUnaucDMgmC+uGxLOtxVhx/X7KxMIX2WEit+bnJHH3mOCzEOnqWe 7XvW02jAYnPuie5BL6a0CP9Hi2/TXtz33obFVQH7KyGlN8CHfuGhMBuILZ5qN1pz KTlU2V/7D8cM/YO5dK6IRgQQEQIABgUCOzoRKgAKCRCBvdPEDh+beZI0AJ0SJ6bM 9HKt05Hs7VSf4jzRVpt9+ACeJLZbuklMTIYc60RYx3MQeIJ/AOmIRgQQEQIABgUC Ozs+ZgAKCRC01xCiDkUffW5GAJ98fM3fg05lK3Qkt+/qrfJ1vR3WNQCdGD441Gm1 Y9y6PYGN6ix+3raAV6O0Gk5payBDbGF5dG9uIDxuaWtAYnNkaS5jb20+iEYEEBEC AAYFAjpuu5EACgkQXVIcjOaxUBaMkACg6uMcI7/L4Dhdm687gDIuGAhcBHsAn387 0y82CP64+tNmsYIJyK4xbXoBiFcEExECABcFAjq7HUAFCwcKAwQDFQMCAxYCAQIX gAAKCRCTqAdkLDfjda79AJ9reEvg1IeU+fK7dvwNG17p8izWSwCfQitEiQEgZejn 712syoykKXBg0pOJAJUDBRA7OglBDu2852ZqdCEBAeH0A/9anrxTdxUye7niuosZ sHtaklLA8sVgcZjGrW7Kw+islIT0qHhIajL/KPfIlKrzdoJT8MJGchvZdBLh53Qi DVMJ8U8sJN9Fnmre5QkNXtwR1fyG3okU0gmw5pQELRtBfdKs1Vn3XbgYwEAlXmOQ VS947nLloaHtOVlDL4xqtj2fGYhGBBARAgAGBQI7OhEqAAoJEIG908QOH5t58WQA n3kDIa6CF99xuovvh/p9cmSWVwdjAJ9fabaZj3FFr2ZBgLhKdvnlBl35dohGBBAR AgAGBQI7Oz5mAAoJELTXEKIORR9944oAn2lz4goNkImYgfUFquPOgclQ1kxFAJ4s ER2eLyl2lWQoRsOds+SX2ikb+LkBDQQ6CqYXEAQAkEkfRicoO8I42BfA1Tgaut/H eUdWWLO/nGx6hL2FNkQ/vBhjinsvi3vd6+4eUE/O/3deTSGi9GtgXplCGxaDuF/n r9JjAobOQ0f5TFLiILdy8OL2SZE6VHO6VfCoGy1N7Eg3jvzJ8pFNxTdVww8HIlAr nNn8Kqww57uustQYISsAAwYEAIFghSt+tj3C5koFh7IXPLNHrux5XsDMaCUcDTsX jpEQ7WywzHUVgL2QHxeTbZ6ZMp6BkPklsgPdNpFEOCCaUFzJ/z/1/dTGXPMuWgGI nuy0bFA5mHdiisjLYP+tvRY170mVSjB+qVRErM/fzrO9eQtKkaYLozWXPTZCN5XK k4sGiEYEGBECAAYFAjq7HZsACgkQk6gHZCw343UoNwCfXnf91HKKcZe7yb7h9rJA PbUkrewAn0exWATudMNC4IQf18YvII1t4Cn8 =9wNg -----END PGP PUBLIC KEY BLOCK-----
D.3.20 Ceri Davies <[email protected]>
pub 1024D/34B7245F 2002-03-08 Ceri Davies <[email protected]> Key fingerprint = 9C88 EB05 A908 1058 A4AE 9959 A1C7 DCC1 34B7 245F uid Ceri Davies <[email protected]> uid Ceri Davies <[email protected]> sub 1024g/0C482CBC 2002-03-08
-----BEGIN PGP PUBLIC KEY BLOCK----- Version: GnuPG v1.0.7 (FreeBSD) mQGiBDyI9msRBAD3ChWTrd6eyVBO/p8CKWvVwR2nHBlwNzjUwLhXK12wNXpzIOkD ZoRm+eh23B06dTISQhfCJEdC6nhb2Tu/q7ZdTVZ8xsuEQh0AYgxDfaKbDkOQ5UXb CbymX6LEarS7yt/WNTZYZ42wKfaaznW7k9/pf6BiqkSOeXyYAhqgHty7KwCgyqN8 2In5R/b/DDAN51vGrFWcD5UEAJwcZ6zCpwZKKRNbWziKGC+avf2AAkc94uwU+qzn 3oea4Fp/NCSwoLghisKtMM9PDWk8Kkt0HUcv5n88sD3HfXzYQDFbx8VxLXqdaIyA NYtY9JJ6ErX9FlUaUM0qwbxI5fahKzmENFPn/1322Tq7UpuVcLOdqsHZG3xMAv4s ynzmBADBf1z7t9xBlbbLOZ90KxH9+TAbfap62fryCmr+a0cQVsynfPMfM2vdgUi1 UP26yE5IqpIliNTdxtXCei5sWsWkA/N4sEMREXzsNjiN/IAerU9aw7MIW/On9oC7 vNGBiVZ0sX0mMnG+m39wPP/WFsWogHehM2ZDDLQCgkcxqJHpqLQkQ2VyaSBEYXZp ZXMgPHNldGFudGFlQHN1Ym1vbmtleS5uZXQ+iFcEExECABcFAjyI9msFCwcKAwQD FQMCAxYCAQIXgAAKCRChx9zBNLckX0oMAKCpxcvH6Wy26NQgnnt9h9fsOlpOVgCg mvkKmB419Urr02VlIvDS2zPF3re0HkNlcmkgRGF2aWVzIDxjZXJpQEZyZWVCU0Qu b3JnPohXBBMRAgAXBQI8lfbDBQsHCgMEAxUDAgMWAgECF4AACgkQocfcwTS3JF8l QACcDIWbwFoiyzwstCX9yLofxXoX8OgAn0+C1dAVU+SLHk8a3eXSiqqfZaLJtCBD ZXJpIERhdmllcyA8Y2VyaUBzdWJtb25rZXkubmV0PohXBBMRAgAXBQI8lfbaBQsH CgMEAxUDAgMWAgECF4AACgkQocfcwTS3JF8B+QCglZ+/NH9oWiL7+EyJ04KUFF6N btEAoLWBDEfP8E0EX/KdcO/0elAnMbRauQENBDyI9nMQBACCsXTESbCbETBauHz5 lsLGPcIu3Wxxm6q03eu4ssivMNN7eYhkxoHK4bE0iIMl8iFUjeIzvGXBrdPIbhhr mFJ6gIfQ0lwVexTZkpFDQyn84CY+TbzWXNOdkAZsq+hQugw1yVKn4FO6cGxKdB4q NSaee/7TTBWXluiOblwU3B3fSwADBgP/RwKczbedj+27cYLvuk2jpDs7hmhL2BLh a9HmnTyPFYDhW97s7gHjHn3nYjikWssTYuVGllsn2DXRUVOeYJMzC9KaFHwRM+iL gPOKTNopEmvvDCVi8ZeUvyquowH0l3sigHyF+vPaQph3ZxHvO5bI6eaqtffLMagt l0rlSKD4kheIRgQYEQIABgUCPIj2cwAKCRChx9zBNLckXx4mAJ9kE53878kMY2jH iJ8ElEzEWbJOsQCfStKMIHgOPO05CJbsJXq7OYX9wSM= =aCeK -----END PGP PUBLIC KEY BLOCK-----
D.3.21 Brooks Davis <[email protected]>
pub 1024D/F2381AD4 2001-02-10 Brooks Davis <[email protected]> Key fingerprint = 655D 519C 26A7 82E7 2529 9BF0 5D8E 8BE9 F238 1AD4 uid Brooks Davis <[email protected]> uid Brooks Davis <[email protected]> sub 1024g/42921194 2001-02-10 [expires: 2003-01-22]
-----BEGIN PGP PUBLIC KEY BLOCK----- Version: GnuPG v1.0.6 (FreeBSD) Comment: For info see http://www.gnupg.org mQGiBDqEiCoRBADwWLn5/i7UKtPtYhqlnae4bL5gq5hNreZ0/iAlCf0AS9Q0z11H Kyl3jI80pHNoNXrjBYtbeLv3u8Wz4kqSOM24ucJyEL1ZM5zh9TOM3FEnk4462gZj e1MSZROiYg5m4RPkFPsVlDsVEVt1aniEY5kFokbpTamUW7eBMsYDNaHEYwCg6Iwl Hq7RDo+mVvxaFWbimI+64vkD/iptrVjjQmdXeGD5PTv5D5xOlvDJDQt4Kw7SD3Wl dpaKF1wZQ13n1a8s1GBnNwBQl4eSgbaPan/Bam1wnOhBwfp807I/aXgS1HCBlCLs VJNvNuftEKNTVhIDw01APzkndiRwPfHjkEnZ6Ff8UBxFyCe/U48vXUcijj+i05ZI yXuGBADppRc6BpUq28RLl0HVBnJq6+njKhLUS2++AD/Gy5PlRfKS0RscPOeJLfSU aw/HykDjp7tM9Be4pMbfUQ9mFvh/ZBxWHZPR12xElVCGxj2D5tvjTCNmUAbkB/5L lkKd4GsbzUvSceYRyV/t8BxF2dgm8lhvWcxDvAteMyNyoV+0BrQoQnJvb2tzIERh dmlzIDxicm9va3NAb25lLWV5ZWQtYWxpZW4ubmV0PohGBBARAgAGBQI8TfKvAAoJ EF2Oi+nyOBrUEj0An04klgcanatMV4YxA2i7cIvtyp8FAKC/Qp6+vFInWLVkptCJ hCrjjIDZ3bQhQnJvb2tzIERhdmlzIDxicm9va3NARnJlZUJTRC5vcmc+iF0EExEC AB0FAjxN8gEFCQOqnVMFCwcKAwQDFQMCAxYCAQIXgAAKCRBdjovp8jga1EuTAKCM wVzJgrzJZFNAu11EBoJpa5Fg4wCgimc2y1CJWrGuu76LObZpDqBjZUq0HkJyb29r cyBEYXZpcyA8YnJvb2tzQGFlcm8ub3JnPohdBBMRAgAdBQI8TfIBBQkDqp1TBQsH CgMEAxUDAgMWAgECF4AACgkQXY6L6fI4GtRaRACgsrMkyOfBsiQeQBxwu0xJZsuf tGgAoLAhfnA9bHvU4b64W9vrnUiSU95puQENBDqEiC0QBAC1dmLTUeMnKdvIlYE4 ehnTXtuR5qywsyNq9VRr1ZJ5Bmf2ZR6AoAZqrc+Cxs148h+xT6HZbx3hDVWn7SSL l5V+lBiq+t4PkOUIdmTBMQNi1q5M5kBAGVd+s7jhtSx+/sMJ1E3Ce8TBqQcfGCM1 xh4YOJn1CBFjULXGigwCpB9/OwADBQP+OrG2bRYS4U+m58WdJQd6SbUdO7lCK0PF 4zJ0EmCVAxYCLiAYj3Ncvgb4qboUU6yTqEAMTSW1nhSKtTejaQm253B+buAdKJZ1 I4LqVS/wBuGCQaL7IJ8Ug31Dc3GF6y8+mAGORcwXFmzEq4vMxftRPO/osrZ3zjKt XZoJbSECZRSITAQYEQIADAUCPE3yFwUJA6qdagAKCRBdjovp8jga1B3PAJ9J9qb1 WfZ5thp5cNXwI9ct1ntM8gCglc59uFkGmzHvIrllvB5oV5kPfRU= =C/F2 -----END PGP PUBLIC KEY BLOCK-----
D.3.22 Brian S. Dean <[email protected]>
pub 1024D/723BDEE9 2002-01-23 Brian S. Dean <[email protected]> Key fingerprint = EF49 7ABE 47ED 91B3 FC3D 7EA5 4D90 2FF7 723B DEE9 sub 1024g/4B02F876 2002-01-23
-----BEGIN PGP PUBLIC KEY BLOCK----- Version: GnuPG v1.0.6 (FreeBSD) Comment: For info see http://www.gnupg.org mQGiBDxOCiIRBACyyyoMk5OyGdOkR0a4fj8zPJ2AOielQ1BYv7JlIWdNeMHdQ0gj liTgXwDimeBnElw7sNrmdfocfwKbmX33exFPa3AkJgLflBcuH9+xE3ozgzMl6t76 QL90PPIc24Er670NnhF7Smvubus4IdckvM24kuUTINmiuFzVwuwWdXdwvwCght6R HPpuFeiMZHRJAiHmu9AkKrkEAJRLmRGgdqTQ6RRIQobqGS+1grl6AsXHzKfvjx8I //12yrFiUcXE+167I529OW2i4ilmVjBmnwwe3750ZKBIp8OUBkMkfMuTSyCCFD22 CX4N7D68d8eCJiCqv0jMZGnoWoMulmWzdyplcg/FhdLzUfpXLWX7/9gzy9k8hKBT Ou2UBACRLG7zwgKcYx4yjHhsCxuqGOeKtcfF49ghCp1s+wPsnXy8b6ZAY3wFeHC5 LFyUsQFarizV0aeqJoOXEB296xZYPpgW6C+rajd1WVi7zhPxsfYedldX8HtGDMKm FRN88P75OGjMdFOYrpXTqUAJnoTUN4UynLV6WbfM7Cne0syg9rQfQnJpYW4gUy4g RGVhbiA8YnNkQEZyZWVCU0Qub3JnPohXBBMRAgAXBQI8TgoiBQsHCgMEAxUDAgMW AgECF4AACgkQTZAv93I73un4TwCfWqT0UeeEn9qstLTycDZF6oiKUusAn2dZRiNX 06KUv2qJk2g88nUsBXgDuQENBDxOCiQQBADXY+I+CYMmiant5TBMzh5JfqhW2FXa aZDgi5XTVAStL6AaygeLIaVSSUUuOxiD4JB7vxHYB7pyVg71/lg5moud8NP2HNKW YR2mZjCQ9bHRQRqqPBTMrSHJpq10cZ6grxvVmte/oC4cI35wL8HEe2WwChZgk0tS YrA5PRt/UGWLLwAECwP/SxokqxcRa3lZqkpdwLgLWpyx1KNBg7wIJYLmALI0UxpS ezweD7OukikqZ1BYlaaWZ7N++r4sNDR9WTIv0ySNovxJnnlyo6FzD9RD7ijQbAvp nhpikigC+GvdnvmreMXYztc9WvFeJT/S8LGDkDHcm0ECmBDo3EA8W0+sOQsZxk2I RgQYEQIABgUCPE4KJAAKCRBNkC/3cjve6eroAKCCMN4s5AqvTy38BWmspFvSu90I IwCfTGutfs+PGUY9JJoabnnfJhfIgNA= =MFJO -----END PGP PUBLIC KEY BLOCK-----
D.3.23 Dima Dorfman <[email protected]>
pub 1024D/69FAE582 2001-09-04 Dima Dorfman <[email protected]> Key fingerprint = B340 8338 7DA3 4D61 7632 098E 0730 055B 69FA E582 uid Dima Dorfman <[email protected]> sub 1024g/A51DD1C0 2001-09-04 [expires: 2003-09-04]
-----BEGIN PGP PUBLIC KEY BLOCK----- Version: GnuPG v1.0.6 (FreeBSD) Comment: For info see http://www.gnupg.org mQGiBDuVKxQRBACAKP3+q7GJT2OMujrs3EgY2hdrTtLatgzpYGHsyewpckAhMPv0 RGyVpcmXdArWQFMfBdO76TO3r6/CKRTEAAW7UieQwCqflr/qRWfaiMkqIDxll6wU ZdayDmuLPlp76xN7Cvy4p34lq91VNdrZ3FesMXH1xTPrnaJX4zhFEd1/QwCgnmvP UrU63yhExZOs0Cpo9ruLa8ED/0t2nNIoOM2cUghN6Lnh45cY1O+jnjJ4QMOi7bEs XwS4sIZLzZ6F07RCTTbcyRkrrh+WqX89z35ppi6PM2GZS3Zgz+W+gtzvrhhBcIHm 0INVgsJJE8Afa2EzA2HIXsKl462Rojo8hmFXO34lCnQTe5khzLZVlUSxVpdoucvE ew/OA/0Sdos8xBWc5cFz7iycKpDCNjEuvMroPaFH0I9wPAX3ZBQeyHVLsUYDZKFb xDYlfLPfRikkxolxF+kuzqejgPMJe8aBZfPK8fIhn3IJw/5mOETGnaAPSQDCuN81 jIQ20Dancod59Axoj53VB5bvUW49Z5lapV6rGLb78YuYxxQcUbQhRGltYSBEb3Jm bWFuIDxkaW1hQHVuaXhmcmVhay5vcmc+iFcEExECABcFAjuVKxQFCwcKAwQDFQMC AxYCAQIXgAAKCRAHMAVbafrlglNVAJ43xNHxghUNhyrjQQ/rNThSTBHVhgCdGwDV 4Mx4tZO05bUNjVqN6hZjk3a0HURpbWEgRG9yZm1hbiA8ZGRAZnJlZWJzZC5vcmc+ iFcEExECABcFAjucoLMFCwcKAwQDFQMCAxYCAQIXgAAKCRAHMAVbafrlgs7GAJ9B v4NyZ+COALrl5xH8kZUeiiI6WgCfbi+7Bd6bmjnkaGK7wg5ea5w7iMy5AQ0EO5Ur GBAEAPKGZONAP104j8zhf2wX42+3rutC8C7ePcbSy2rs+7yO0R1tFrPfmLMXF/Cd j79Ecrs9cJWgAfN7nJ9m7qrEzEpl3+ZzL7ULjdhZDwLQz+leD9hfdCbTzFOpSbsb wLHoBLz/Wz3kxpK5zvUTtt8xXkjqNrr4CNwzIPaEmK7yB7A7AAMGBACXlgar2mqk OoZikYMW5zQvDK7++YQxLjoR6xtgLYIkbLI+mOx5HH/KK0l7SXNRED3oqBvqrDPs 5PNk7PIT9Bv580vCHcw7CBJu6yp4fJEgLTDoSUmuKTInCmacZ089TcLB6unShMem oZEQ2Ntxg5pocTaJaTTCvDTzr2Kkec5BF4hMBBgRAgAMBQI7lSvYBQkDwmfAAAoJ EAcwBVtp+uWCsJ4AnicMU1RuWFUL2s0HM4xookDCozSUAJ0ZlLrDbYAKt3ScdByX y7fioZzL7g== =OOmA -----END PGP PUBLIC KEY BLOCK-----
D.3.24 Udo Erdelhoff <[email protected]>
pub 1024R/E74FA871 1994-07-19 Udo Erdelhoff <[email protected]> Key fingerprint = 8C B1 80 CA 2C 52 73 81 FB A7 B4 03 C5 32 C8 67 uid Udo Erdelhoff <[email protected]> uid Udo Erdelhoff <[email protected]> uid Udo Erdelhoff <[email protected]> uid Udo Erdelhoff <[email protected]>
-----BEGIN PGP PUBLIC KEY BLOCK----- Version: GnuPG v1.0.6 (FreeBSD) Comment: For info see http://www.gnupg.org mQCNAi4rWsAAAAEEAM1u8Y60omElX7Wtrh75P8K0L2Gp6omV6iDuwl9kXYhN94jF DE1F4xpkRDWvQxsWbYeIk2F3VYGuN12BhbRNcNqoyniQt2XMmbdEmp6ltumH5WbG jR5Xg0LkJ5AJmxvjJXXA9q+/eTfmyTfPjnCL70cTMWHdUl+EBUPoh1XnT6hxAAUR tCFVZG8gRXJkZWxob2ZmIDx1ZUBuYXRoYW4ucnVoci5kZT6JAJUDBRA0K3Q0Q+iH VedPqHEBAe9vBAC+el5mJpqPkC/+om/SSE7mxyuUqHAx1tNUymL8gTuV3mFB0goM xkxhUOMMYe9z2zyi+RXrECfLT2OqqUA60EZpl6Mgymj8SVZSv4ZwXdU8cgynYNfX T1pC57mN9mxL10vTTJEix7QsrVz0W479/IkBrhW9nTidQtORW1Si5T5IA7QeVWRv IEVyZGVsaG9mZiA8dWVAZnJlZWJzZC5vcmc+iQCVAwUTOwzFWUPoh1XnT6hxAQGl eQP/bLMp1qSdkt2/BKchpx+lhOemCmT3LHQ1sNzelb7dBwnsvE3Z9lOycH2pm1ro j6x3vmcDAqZ1yh2eFEVNK5abfhuI3QH+9QdgvMcSIQgF3VIMer7JXxNtFFX8JRKm +YfLfDifcK+B2HRkpMt9ETY8b3/cYz+gbdKNe4nVde5KPT20IlVkbyBFcmRlbGhv ZmYgPHVlcmRlbGhvQGV1LnV1Lm5ldD6JAJUDBRM7DMX9Q+iHVedPqHEBAYHUA/4l j98KC7y8cjapO4Hi0r/eO7gUwDujvrBMYbWuhmNCO6xlPfwRNm76tnNiTFdqVLat XSrQwEUys9Mq9xe2F2RuqSfYWjmHKX3/gNW3gRJbnBqO1QN6CDqo39a7LgllqFf4 yFj9V6i1c0WSBiOeWy75DHpsfXHupMxZWPPRWh0TnbQfVWRvIEVyZGVsaG9mZiA8 dWVyZGVsaG9AdXUubmV0PokAlQMFEzsMxhFD6IdV50+ocQEBzqsD/0nX9rV5cAcd jFTayQvoAjb/nIN+TJVHumuC/Glp9fKHlfTjMnsUawma+iQESjUB8XgyeJ0WvR8M vQGEMowYr1YTtFiYfFOvrzXZmhB6NfhFV3s34ZLDeBnncUqkas79Pi9G9AP2Y/Mc c//i2owj58xTfocYNT5IxVVYjB72Py+3tB1VZG8gRXJkZWxob2ZmIDx1ZXJAZGUu dXUubmV0PokAlQMFEzsMxiND6IdV50+ocQEBBJsD/1SVP70fNa3ShAn18+yEXOIL TlFYCUmGaBIeAsd7r8tXFYbf5STAOEOiqBB9Y7V1tV4IriACru+9wo5wBQoCLBT1 RNj4NhwVvkGReTDsA+Zz/vUULrbklVKO724DktO0+WRbn/w99trttuUTGvTHRER3 BjuOfJ/QoLlnLAsDBMov =TCJD -----END PGP PUBLIC KEY BLOCK-----
D.3.25 Ruslan Ermilov <[email protected]>
pub 1024D/A8EE370A 2002-03-31 Ruslan Ermilov (Sunbay Software Ltd) <[email protected]> Key fingerprint = A3C4 291D 95A0 AF1F A85C B029 524B F83F A8EE 370A uid Ruslan Ermilov (FreeBSD) <[email protected]> uid Ruslan Ermilov (FreeBSD Ukraine) <[email protected]> sub 1024g/2E858CD8 2002-03-31 [expires: 2004-03-30]
-----BEGIN PGP PUBLIC KEY BLOCK----- Version: GnuPG v1.0.6 (FreeBSD) Comment: For info see http://www.gnupg.org mQGiBDynFvkRBACvJhyWUOYn4yRZE2PANbsbkWpGETeXoFD7UVEI6IgXGXe4ctWb Ct0BuARjmtPu1jM/6rzRkhMwtwxw703Es6TpsTWDB1Lvh41MsyXXtMH67al3leg4 fbxNbI/0BEwRv7CVx0VN8JPZpx+uM7hZXxwaeIZAW6ikEyeGTatsgUqpswCgjWNB mcFjN84zzE0oiuWG8vIOBUcD/jYkX/ov5B6Mi0jIpeQbG7mHtG4tC8c3GFUNrr/7 Atq4ZxEdXzEPszkSKK/iDR6x1tA4Y3NZr83b5x9OEZ5a/X0v4ozc4SMVA8phqh82 +03qaufLm8OfnQ0Iv5gY54a/PgbwnVLFJ5za6edl8akmk4bTArU5Xi7PBQEMSvcF POW0A/sGSAMojoAtbz8UFKEZVrIW3w44eoqsmU0JTu4PrV1ROZeejeScDrnv5bf6 qGFGBdHpBF2BVOgHary+1VopTnOCZ3RaMXUkPRlFUmEpFnHePz8VhvxcKe0VnKYS WZTAihKtTJbJh3lUi0RMEzce2sTNymJ7zau64NNiUV3rHzQJsLQpUnVzbGFuIEVy bWlsb3YgKEZyZWVCU0QpIDxydUBGcmVlQlNELm9yZz6IXAQTEQIAHQUCPKcW+QUJ A8JnAAULBwoDBAMVAwIDFgIBAheAAAoJEFJL+D+o7jcKPjkAljy9YgxUtTogXDgn Nzi6b/KPO0wAn39JM6TtZG4oktuqcyUlCeYG29FMtDRSdXNsYW4gRXJtaWxvdiAo RnJlZUJTRCBVa3JhaW5lKSA8cnVARnJlZUJTRC5vcmcudWE+iF0EExECAB0FAjyn GBEFCQPCZwAFCwcKAwQDFQMCAxYCAQIXgAAKCRBSS/g/qO43ChnRAJ9rr0sGbkQR arBCZ0Z6QGqB67VU5ACdGAJ/xzWc3DS5KRRciCkJPAjrFoy0NFJ1c2xhbiBFcm1p bG92IChTdW5iYXkgU29mdHdhcmUgTHRkKSA8cnVAc3VuYmF5LmNvbT6IXQQTEQIA HQUCPKcYJAUJA8JnAAULBwoDBAMVAwIDFgIBAheAAAoJEFJL+D+o7jcK+PcAn09P V3D9BGrvqzqx4To7L6LBJ7z2AJwNGJrhJoTogtE+4xf31Pg6PGuirrkBDQQ8pxb8 EAQAql4D1eAsTEuEI6URE0wSzen9FrtTKDCGyPICg1usCACvbFBxcavf9F/ZMV1U Zi3Jo2Ggv2WAHE2ymLRNYGKx2RQaEQi6ivbp04b3eMHfm9ZB1aJ5y+uPgjXv6EQn crZr6KJnzTG52WogbX/zDBT/0F8ijlrlsdzgKoHgYx2nMAsAAwUD/3ld+9MP+UIv 1YV4XT28ihskbtmJJsx4rdjxaKTvHwdhCjB/urPGG48XKlbw3LrIkWVjtTM25LJS dx015Rb/PDR0HbV7DoBdX/1XqnT1MGgdUwQwwlsgeN4COCxIMr3Pk/meC1SLUbdM uWwdRXSOLe8+AlK5Vqql4rCDPWFyWiUsiEwEGBECAAwFAjynFvwFCQPCZwAACgkQ Ukv4P6juNwqx2wCeOAbMTBXdEG0534h3VCqTtgEIpiwAnRNGTbLTMOVpDxsmnbBd fj73qDX4 =GuP8 -----END PGP PUBLIC KEY BLOCK-----
D.3.26 Chris D. Faulhaber <[email protected]>
pub 1024D/FE817A50 2000-12-20 Chris D. Faulhaber <[email protected]> Key fingerprint = A47D A838 9216 F921 A456 54FF 39B6 86E0 FE81 7A50 uid Chris D. Faulhaber <[email protected]> sub 2048g/93452698 2000-12-20
-----BEGIN PGP PUBLIC KEY BLOCK----- Version: GnuPG v1.0.6 (FreeBSD) Comment: For info see http://www.gnupg.org mQGiBDpBP9wRBACTXnvtFjxGYNH2xj0oZ09ggebJAzNOz6FiQKBkYo76EtyhFU2U s8F6HJmhAVJVEodJiA2V+mbVVI9wG1r+yFxgpC4JCdtozSt2cgKHlfFcrAUn/bVX p3ZiVio4/tWVS4kcOZcN/gfXxykG3Z6IgeMct4P/v+Yby5FKrjFcHUXrYwCgpTuq u89HjAet3e4MOkJ43QDOqf0D/jQTRdivb0N302svCzG1ccc1y7YhiLN7GEY6VttK Dkb9psNQFlgd+GNOpQqXXvh0EhzC0sA+lNo6F6rWZsrtQD/i2vAubzmtvgsF+UIp 268IbgRs1RHW5ZOqzkvDjMN+8/Kk/v4qQ+62WAuP2/iZn6bAjAfBPd5SGa97SZ3E d0sjA/9o+3jTgxhNz56fxQb/e2B4lqPxuIsorxB28hmXliOVRQBHwx4e8XNvN2Xz WklapX3AWKP/D1ZyzxNEaBezu4NBFpl9HqudFDyFeRzyrhGSD/f3XtlDTHD5hv31 +LSprexLW8nxbsKKjX94LnyYItRGcf7gU5z1V73amT0vedaXj7QjQ2hyaXMgRC4g RmF1bGhhYmVyIDxqZWRnYXJAZnhwLm9yZz6IVwQTEQIAFwUCOkE/3AULBwoDBAMV AwIDFgIBAheAAAoJEDm2huD+gXpQaPQAnR/EryK6lqRdUFT3CQkf9a7mds4SAJ9b Uh/4pgPEMHVqh/mYuabRi+D0vYhGBBARAgAGBQI6Zft3AAoJENwfuC7pkT1X3MwA oPeTrHw/8GFopppT/LtI41zM4NZ8AKCEPsKoGwmtolGYwCTGc4sZje1lTIhGBBAR AgAGBQI6Z05CAAoJENh2/K3Z1dz40l4AoLHYYCgZoCWLtS4ybw7MZK5ZbIkXAJoC C5q0lY5Kg+UReRewOH1vzz/wyYhGBBARAgAGBQI6gqxpAAoJEJ0r034T/C2b5uYA oK8oK8CubWexgX1rJoKRINWBjEtoAJoCOat7l1Q6xjBN1E8fqn7f09Vfo7QnQ2hy aXMgRC4gRmF1bGhhYmVyIDxqZWRnYXJARnJlZUJTRC5vcmc+iFcEExECABcFAjpB aRwFCwcKAwQDFQMCAxYCAQIXgAAKCRA5tobg/oF6UJDOAJwKrq6xPbruIKSiL3O0 0Npnq1h4yACfXIkxgKsR5KxKk6kr58ZxZd2Dsn6IRgQQEQIABgUCOmdOSQAKCRDY dvyt2dXc+AxbAKCzZ1Rvjn6P2kLaCo7/2A6LOetihQCfdL8Wo82cTXSpsGTJg4LU FjlE9XGIRgQQEQIABgUCOoKsdgAKCRCdK9N+E/wtm+CiAKCCd05PPCM3ffd85LKm +cRR3PTybgCgu5y+kYYTJB3hBchxggLCrJ166wm5Ag0EOkFAfBAIANHkcMb9WQWx 1A390MV8UFdR8eqiYZfuFHaNwgT3Ou+0QcawP6uC9gbeqEpNnlHrE3giJvP7BrNM zut7Y2Ca5FJ1oy0m48OwmZY5AP2lN1CsIoU1bOCQ48R3KCB6Wb2dE442MEdMen73 +HzNnLiFGwifqn5yAHVIzfKilhpRUFr5lbZJkBk5NIc+Ny+ZK1JHXuJZ3jdKFBu/ Gusip9Dpd+UANyF8Tq+S3YfP8lFu7zA1JAHu5LnDOo/K1gZ6EZJxc5hYUu98Y6Xv 6EJLEwjKHNZLI8skX2uXR/0zQsZNz5FbSVGdQfYJlq9q3eDZBBoibc4Pf8LPOXLM HhKyj39FE4sAAwUIALTlJVYI4353pzebM8D9mtqXrXY1qusNqm63pWHosPuG75XT 2hOmjuFFyoC7TEsMe57BUag3HiWyNR/CrVw9AppqZ1s4O/zAo4HlkJbZ9rhv9IO9 FiTR5FWtNCArAQJWpflRMYuVthZVVTGEM+zx2BTNhBdU4LEtRMz28E/r+tn72sMc ypZv6/FSs5Rn0/rO4zYiIisk3ZLYCbJMHQIxjAIdwH2XJBYbbuyN9GbCLVOcIlkt sbdwCNIQXY7rBX7g4Br16NCo0g35p/92s9QFFN6GJIzdOpbq7JVHnkZhMLfJgGhm JIS85paJGy0bbb4qPnE+Tmi3apYe3tZ8FjkKRfKIRgQYEQIABgUCOkFAfAAKCRA5 tobg/oF6UKe8AJ9QmSqCD+d8ex1kMxJ0SZZqIcSO+gCfUUTrdZCUu9yC3KJIjvzH 6r7mPk8= =R6MH -----END PGP PUBLIC KEY BLOCK-----
D.3.27 Brian F. Feldman <[email protected]>
pub 1024D/41C13DE3 2000-01-11 Brian Fundakowski Feldman <[email protected]> Key fingerprint = 6A32 733A 1BF6 E07B 5B8D AE14 CC9D DCA2 41C1 3DE3 sub 1024g/A98B9FCC 2000-01-11 [expires: 2001-01-10] pub 1024D/773905D6 2000-09-02 Brian Fundakowski Feldman <[email protected]> Key fingerprint = FE23 7481 91EA 5E58 45EA 6A01 B552 B043 7739 05D6 sub 2048g/D2009B98 2000-09-02
-----BEGIN PGP PUBLIC KEY BLOCK----- Version: GnuPG v1.0.6 (FreeBSD) Comment: For info see http://www.gnupg.org mQGiBDh63HoRBADnIWpOjAts71A8JG07tKjUYV72Ky0nWN9HAtS8FJTGeT1eXwGI Wxgl0mTrmb+fUWuEt1xyB+0h9uzwbWgrojBiVEyPbfdORFvOlWQ5VXub41vxz0Es AvQt/HptyH5UKPHCtK/5WbgAHPZldlp5rBPA/E9OnsfgVeSf23eyqkup8wCgi7g5 nKKJ1LaE0Y1eVhGLaOSYP+MD/0j69SjwjUpIAe47u1SJLsx/K+vP6Mx7oqw2gD1v Ap6sJnpNVx9vpr+DozYGrGFb+LnnML2/JqU2OQswCBRWmqkATJDrrdg+VyXIdyXV slk/6paQ/qPjcnyLFXWgQuyoL1me+4e36LFCxFTRVcfvO6kidOXGmDQ2ue/Khjef XLRWBADK40RjC89IrGX4PuapS9fOSj++GfWHZsdxuxSYT205sZhMOiTECR+DPZ5p 06si2rPf6GbS/3zPEYd8J5wzHTS5kk3venhpxjze1ltloDQm6hD7/yJdK9poBa8P kRuEYqM8RNWpwNKu1x8SsqyyYy/JzceAAXs1zAs3g7CoLHGag7QtQnJpYW4gRnVu ZGFrb3dza2kgRmVsZG1hbiA8Z3JlZW5ARnJlZUJTRC5vcmc+iFwEExECABwFAjh6 3HoFCQHhM4AECwoEAwMVAwIDFgIBAheAAAoJEMyd3KJBwT3j9EAAn0c1DQKEVawy t2zfgVxyIYsw+ca+AJ9CrtFiZ3yQIp0Y2alhcRBhM+13I7kBDQQ4etyeEAQAhBiJ oc5q7eotOiSkna9BDGxlxg8fM2+wb/MBTrOUZ+BkbsVYRNBQnzzYtczS7uwXt4Fc Oy0iBD+uOEhVDZgXNQLFg6HxyN+xikgWiPx0vKjQVIfKB1R1Uqh2VIslGc90TS8f WTo+7gkcwR5Kjq6m8rs8qeFa0GqrtTP+bRBoj9sAAwUD/AvVkkCNJK7pRWDWVSJk NPmvEJ/8i+YahBLcUkg+4H8nSh+fNdhI2ED6CN5ZU7yYiTN5iAc9HJLDLFzHRIDX KyGS3JqzwrT6+HKTaS2fVKFVeGVgzlTvczWizabEZAOMQOrV3F46ei4STqBjM09/ nNhGlL2ce641KZ6zgdtCG6PaiEwEGBECAAwFAjh63J4FCQHhM4AACgkQzJ3cokHB PeNuVgCfdFUKo5EQLwqnGxcw5zAzqDnFVkcAn0o58BEAPRr2RoAHHWWJn5JoyJD1 mQGiBDmwog8RBAC+zE0IpGNV1naZh9os6S//ct1MfEMBoHH2TQhajIfLVraWA1I9 AbOTuYYsPgxqK44ZnPUnNLmgIRBeVJXklXsdvjtMrh7QMj7evAGneT4vVdVj/9aY 7mEBuQephgvE4bUM7RPvOc/paiY08+HANljrvxcmMhygDTP5SEp/QJn7zwCghB66 YVHI5u4xBAcHiHbyJWShmekEAIUWEIL4I33C9/yuenYogKLLS2/wmMYMCM5uMTkF jls9KtfW/TQz8M8ZU6xdVBQjvDpw9G96l78amjiMN9Gm32C8m3HJaN0V+4SGJjiQ fL07gu60LG0phnk1CtWLVQnH0LuIyB8jJeoaeYmS2Xv0rLLeMQ/hgUcQB8xu61Z4 n1shBACf1w7B9ivEhBGWBsjuX2gTfW2eS4Mprs7FD1/8f/wbdvhitMdjZOFjOIO8 yi/2W6B6T3suTcUgdC2qFmXkiWUun5kpGp/KRvrYm2eKpfveOL0HgD7juEZtBJcT zV4oMel8TlZidIjIgLUeTbGfxbYPm0gONEGZHsymlZg9/7sDS7QtQnJpYW4gRnVu ZGFrb3dza2kgRmVsZG1hbiA8Z3JlZW5ARnJlZUJTRC5vcmc+iFYEExECABYFAjmw og8ECwoEAwMVAwIDFgIBAheAAAoJELVSsEN3OQXWVdUAnR13DerFrFdS3xufFox/ m9T+VKs6AJ0Y7mgJalqPTTalJB3fbWUeIsZBsLkCDQQ5sKJfEAgA5LI3C4rGWWbG cGZMLDhuBhjcoSFeWnrVVVZAPEm92+LcrfoT1Slp/2+KcKTJN/uQA0EpNmgUFBYr 3vSoVoVm10xBxBIX0zP7uPQNYKoJX3gLBiRZ3xOo4A6VqEpRbo5yjj3rshN4IO9B T9zqx0ZoHSSsCds0Ax/m+0eSTghl+Shle1tbJstgcoxf6peKa6XcOAJWtQ+r6hZB Z1tpjmIrfaeG/26da858C4TcogNhi1cpbyfQTZA7070JBnpRjhcQpELT4hRsJV2G BX0dZn2hJOb5J5zl2M0N0Yx2BHM6mVT+oUc4EvfRn6fuhVRwIuckxwXaA31vWNPh v+S9VD5BqwADBQgAjOXR9HNAh/teG0p4ynOlWx5G+tBWSfqWAKOSpi9SKb2Zipjg bVNjmO4zNYhdAK6YbyQgrDrwUVPWoc8OieUACujklkY11eg8QFGr+tJow7iCMOPL ES5vW1sBUl7dN+4tf5QTg5q9EGHL2rTndEVeutFbcKPR8YQXdu/U5hdO9zha5fd0 RWjG7zLTaukO4mT2bTuojgCrnsvZ4D0XRW+SUcfXZrbKcsoFiU3q+EvlOuWg0W5b FcFfAXSAzC2CpZlQV3hhSDkgeM3cbnb0hv7feSIizFpqFbNyOgarqymZIU07HcX5 c44etbO++GQ/tMI7oCPUb9a5jIt/YqPvIvmPDohGBBgRAgAGBQI5sKJfAAoJELVS sEN3OQXWr4MAnjpZdSq11IEN34VjwhD+eBMcxjqaAJ4yDvFd8u5ehurCY+KjWSXo uPPUsA== =oR1w -----END PGP PUBLIC KEY BLOCK-----
D.3.28 Mário Sérgio Fujikawa Ferreira <[email protected]>
pub 1024D/A6381352 2003-06-01 Mario Sergio Fujikawa Ferreira (Key For Official Matters) <[email protected]> Key fingerprint = 9CB8 0712 2E58 8B14 7C00 B2FB F26B 6E64 A638 1352 uid Mario Sergio Fujikawa Ferreira <[email protected]> uid Mario Sergio Fujikawa Ferreira <[email protected]> sub 4096g/F28E9D8C 2003-06-01 [expires: 2006-05-31] sub 1024g/40575E32 2003-06-01 [expires: 2004-05-31] sub 1024D/4764FFBA 2003-06-01 [expires: 2004-05-31]
-----BEGIN PGP PUBLIC KEY BLOCK----- mQGiBD7Zk5ERBADLiRmPF4tPlm5utOHmVMxJYghTRVdEzyj9SZimPXqukUwFiihi H6K9Kw/RghjA8SWACE3Td3DwPjIfCAhiMzlQM6+Wm+AZXS4zeTo0TAyLK++V92uF vIutNaxPKIIYeXlvVvAvE+EgMa06lxEdwLKddOHhvG6uFJwH8moYuZeLDwCgwDSr JrjEEuyLHUv+fd4Zp6QoyV8EAJdbd/4bgIeD0vxDnJRHo7S7Sh6Z2Q3lDb8NYuIs zPOxHD0PSHYjE3oUOH9Npge3Y95KaWPtb/ZUbtD70MBOaKps89WlOurBzGUG7Fbk Btoysow40PRhA9CidWkrMnnwMeUU2o6yr+qdDPFAAi2ovIJap2DOI+GBRw1qPk3Z lSXABAC44SkHjAMvHf8WPRAvWYSdzDQ3jTJDyXa/L6gwLKZFCQtS6z4U0FkP4+Dl I/AFsJGXuYw3YhGXBNozy7gx6FWG1ZHG2q4Un3En3WO2P1pnD4L7OtbpuwUu3xVy xSyyiJxvTj7Se2Fu3euaF/BuRVlctg7CUuWs3Yedqc9BHMJaH7RNTWFyaW8gU2Vy Z2lvIEZ1amlrYXdhIEZlcnJlaXJhIChLZXkgRm9yIE9mZmljaWFsIE1hdHRlcnMp IDxsaW91eEBGcmVlQlNELm9yZz6IZAQTEQIAJAUJBaOagAYLCQgHAwIDFQIDAxYC AQIeAQIXgAUCPtmU6AIZAQAKCRDya25kpjgTUvjVAKCkAt1NqI8+rYfMjngnutx0 4pHQeQCgirhiV9YLbShnKGtxCJikAbyPXe+0Mk1hcmlvIFNlcmdpbyBGdWppa2F3 YSBGZXJyZWlyYSA8bGlvdXhAYnJ0dXJiby5jb20+iGQEExECACQFAj7ZlK4CGwMF CQWjmoAGCwkIBwMCAxUCAwMWAgECHgECF4AACgkQ8mtuZKY4E1LH1ACgjbH8FcZY gWjQjryIeEMl117sSmgAoIWF9DN1hd9W+A15XzJT024x2PovtDFNYXJpbyBTZXJn aW8gRnVqaWthd2EgRmVycmVpcmEgPGxpb3V4QHVvbC5jb20uYnI+iGQEExECACQF Aj7ZlKACGwMFCQWjmoAGCwkIBwMCAxUCAwMWAgECHgECF4AACgkQ8mtuZKY4E1IT SgCeLH7a72ryTHmrX24FrmpruiPOU+AAnRp7UcdkDrC/jrVse4FAADV+kVGauQQN BD7Zk9sQEACRFADJN7yE4iy4jctLs3GCw/HpTPX5X188V7CBV48rmPYedaR6ofVy D6Tfc1uLTy3H3f7vgJQopczogPMvUPLd1vqOQV1Xi5G56dK1FulRXXdPUf3giytJ H0BItBr/G9aaQ+pMtPFo74dyPiK1XWgszM/2iieHvAOnJ/sk5ZSZqGRH+xMI+iAE m8UPPYMhRwEuCKPFw5rZ7oVqHjRTBApau2GAFRNdzSMUN/WxJES/lP0VgFfq3oAN Iq16OSmfUY4gfIsH3JSxcf0+PSDZ3gTlhBtRtX+LzelSf5wRtsbFFue5wbcE7RFE 0bFql7YdsgRUEdTATYp0mMklm9/ORA3fCb9Pn51ZzTQuet4MKzJnDRdz57Vj5n+P 34yNpFCF6AtSVsT4N5bViKy3aXhJ5dExfBD5RfaxThEz2oMQbTFCsmvpHT81DDvQ br2oPB7/1ObpcaCExhawhkFofFf6VwySmlPTlyMGmyayvVSAsSclxxqzY9jnJkLl XjmrOkV/pkj44NnQaELLHdlL4PyF0J03+CzXJIEMHSAcj3qRZb8KSFk7qL5f+gAJ 1MnlCCgm5eIxW1Csk2LNYyYHH6zkEPnymotEevmTCHpQCaJ6gpSa/HPGJNulE6ru m+hBxmC+DAc3cdZi+a0Q2ouGe76Ier6B6FCAZO/jutYZDT/scLlqMwADBQ/8D50h T0ZbbXiR6xRkvYH+O0FmyRMel20Mb8De1E5zZMVrUcodTq1w4wK7KkVWZYG9Deg6 MzJllgYmS79RVk9AgjxYGJ28f5rWYz16UAf1ns6BodcLqgJ0yPUe4qY++4B+v8oM KwqCyofU2Sc9Ei1WrbkpwKMhAXs7cOdvqWTqKghOHkzehOUSPGvIODji5HJoaoCb Ptkeafb/vrZGJksxOclzjOuYUxEgWVrPD/6srQqyZOAA73vIWcK+5p2lYaNSLDE6 LodV/xjtBlE3nkedha+jTF5HJoWWxV8XfAx3zopESPHmcx08QftqPQ4SYUPhcHsD 8PWfqreUlysiVl/8SD1/TrCgi9EP6zlSnibUlHGfuWLO/ircyTaKMDiFk+oeHqIN yikNJGtklNCEqZt6x6m6oY2QlU/xlLebtXQAZ45bXwRMNNSXgKRKc0RCA1g3ytbY Cg3O1odaVuDNf/d2s7X7T1OV25jXjz1WaMRmkGmbFViqN+4WOHao5KKLcEv/yES7 SC/LQylvGwGDHeNwe02VD+8gXF5NBxLasFZYhJ7XHVFW+l+iMAAEyq9CADmr7U1R W0WuGq6MYWwnf8oWzQgUImPWnBTxJLcCu2zzwLrDPSBDMNhXSwD3PLl1VCt/0e7i UDFwMGji95XUssRWlYVMutvhZhMVF0gSX8u6sXGITAQYEQIADAUCPtmT2wUJBaOa gAAKCRDya25kpjgTUsu6AJoCSUSdL3EH5HAit0716GJkq4mRzgCghX06QM8iycvr qhDNbl3m930Qk+q5AQ0EPtmW6xAEAPOtzgiieGzlUbppT2vR716Z3pY00bk5QMTT Lb6Twb6nHXEJjk0OPG0kztaglZYJkoLVrZsM0ilA80mHLypzzkcORKcYFagAv2Lj UxOSii5H0I2X3z5RGEf7ZJkJzFfUR2qHeY2vBE7HHbp0hhT29SxQ3tbFVtyzzC8h jdHwWu8vAAURA/934YMk3c10hhB0G7ww4nWLLDoYZWxqMnb90EQskMwfTFq9TPhp BQF8YUvictf7S3ZGj8438/7m/2wecGlPBhOtETmeISCfQupGN05jdBkXrExZqbs+ ba+A74+foRtG+SkZU13/igTjNl0AX3ue+88ZtHv9nWg702kiaUVowRB6KIhMBBgR AgAMBQI+2ZbrBQkB4TOAAAoJEPJrbmSmOBNSf/QAn19UFpnfEBl6+8zI99LROctB 6H97AKC3AEqpVGw3C7kIDxnBMsJ8q3N4hrkBogQ+2ZdDEQQAqiU1hf22HTxIGDx8 zu6OUH0/7xPn1rENrYP++xd5ytaTdGl05bmGrQUQyJ5cBTmqVUfW06zWGiMhGbeL L0ZwwONEMhgKSW78p4ZEwZYDuQ6MSg+zDCJebF3Dair8DnVIp2yG2SwiILdHa8I9 B8bPjaQivgrUkrHlmAN6VV6YbmMAoMswZcyw+i8T+LQrPzwi+OpSOsE9A/9i4ULN l9KpylZXTj1LIh+9nezn6z6gmELdyjf72SUhMPJDl8De71P5Qfe/TZgqZmxlVf0/ U/cghVzrNw9oOMdIplUxm7ZMpNsAd/WDesaW+XhTCBbuot1BP8kMo+eSWvgViJ3g khjngEtzQ0qcrrDN8xaSjAoirwTplJAPrND86gP/cPr41d0UTqVCFhh3ikUipwQo pDz3clJwUk1NEGSe15eaJ9XV1XgvGgf3JI/zrruWHz9ps5QVlmf6fQ4WDZnNGjGR GVFc2+2iAJLneHX6dlloWdr3LAlmwvv127FMc4Me8QkFBp7DZzyu81Nm50v+B+ip lawbyJLAMnmXNn1ynTOITAQYEQIADAUCPtmXQwUJAeEzgAAKCRDya25kpjgTUn+a AJwOAvJJUowEO1wf/yKBSw7SM8Om0gCghD6Y5pqnXojyhaFnYz1gYIAGYoo= =DBjc -----END PGP PUBLIC KEY BLOCK-----
D.3.29 Tony Finch <[email protected]>
pub 1024D/84C71B6E 2002-05-03 Tony Finch <[email protected]> Key fingerprint = 199C F25B 2679 6D04 63C5 2159 FFC0 F14C 84C7 1B6E uid Tony Finch <[email protected]> uid Tony Finch <[email protected]> uid Tony Finch <[email protected]> sub 2048g/FD101E8B 2002-05-03
-----BEGIN PGP PUBLIC KEY BLOCK----- Version: GnuPG v1.0.7 (FreeBSD) mQGiBDzS0/URBACREmlUnPeSzfnC0m2oQV4eSzgYjskiLfwZ++Ql3zErPw0AphH7 m95dZwAscTm3CQRHDDd/RYxkJMAYA+jmw8cVX1rXtQ2URRmzy2/I+qBU1NCPrqBj KRqrav9uhLCLGvEwdqWg2dqn8TMwNdlETbH+R0QQ/1lK8XtW0NiHC8I+NwCgj/8A v8ifdpVSnFp1QesTAVwdTbMD/icRYOZ5I94DSRk5GGnmD+lyhfj+ejYbuVEgg2ig V9HuXJMnBKTnuwriuskTreeNQBvBCTltHrRe1LujAtlsbixooTgUU5jkzY+J/PeN fLd1J9uoqTGQ7GjT4SMfKuetSRBhcRZYvm9FM+54vsumKcXGK+qBfPVBHo1bk8go JxgBA/9tnrAoLIUPvs4d4ce9h5BGA2yG9Synz3w1l8Zr+4coomUjbJFV86ZWKPM6 nyb2RhDb20ESkZnCoDxZY+p5t9c3aiQJKQQV8Gj0tj3c7/OKoyMePgabH9752Q6u piZ5Ml3mfse/Kja4THRoPEjkQzAn77jxfvesKiEh+fu6gsJ3cLQdVG9ueSBGaW5j aCA8ZmFuZkBGcmVlQlNELm9yZz6IVwQTEQIAFwUCPNLYkwULBwoDBAMVAwIDFgIB AheAAAoJEP/A8UyExxtu8J8Anixqe2bmDbJpcPb0IoT84nnhJ3kvAJ9sOLAQjWYv K7SdJyMF10YX0CIfHohGBBARAgAGBQI9c+arAAoJECm+XSJo/VSfOQ0An0ygDe/V bqSTjYJwlIE8YYpty4jLAJ47UkBPjTiVre6ew5VF19jMKvdsE4hGBBMRAgAGBQI9 c+V+AAoJEPbdMwIQ+kzRlegAoISM0MmY8lkBCBTsow3Joc7tLgn9AJ0QrUzWpq7N YPnlJ0lcd41pGeMTqIhGBBMRAgAGBQI9suQtAAoJEAtcZfDlrYLgTkQAoJNPNMs7 ScBAN/nLDgzNue3K8KvGAJ9ss/muSiHvLiFfiITYIrMb3iDD4YhGBBARAgAGBQI9 szNDAAoJED5DhLnTnUHhMXIAoNb0MSJWURRoRUBuzS3IqGjeBckJAJ451qIIzvpv 0BPv7IwsHLalwHN0p4hGBBARAgAGBQI9szLjAAoJEHw7eXCIx8H3AfoAn2d2BuYF xAiBrtgQINxUFv0f6uO+AJsG4UaBDFeDfYWuy5ewplYVeKEiCohGBBMRAgAGBQI9 suRJAAoJEIhoz/fZwesRGRsAnihqruuppwzOavzHgImgw880g30bAJ0QG8O547sJ CaSeppCiY9Yy/wQBh4hGBBARAgAGBQI9sre0AAoJENUEeBB7Yyy4xn0AnA7Ro8by KFrC60C4/dHOqU/+AkeEAKD2PCSVlEx8ycBVnWMk0XyXSItDsYhGBBMRAgAGBQI9 sgLLAAoJEOdNKbgr4W0BhsYAoJVB/mXnINoaGdxDp2NoHNLOyCkvAJ9iN6Zhoo2C 4E2eLDhoU93f4F9AArQcVG9ueSBGaW5jaCA8ZmFuZkBhcGFjaGUub3JnPohXBBMR AgAXBQI80ti2BQsHCgMEAxUDAgMWAgECF4AACgkQ/8DxTITHG27ATwCfQaJHzDZc MzhOrYjhobphXayiTboAnifEwKJ1DDVZxPxxWvxNoTvaPwm2iEYEEBECAAYFAj1z 5rEACgkQKb5dImj9VJ8CPQCdEcZ3a7bXQyNZLg3KQ1ZvBfaGIEIAoJKdHTkC63GL fT+osKfdjM4UZ01piEYEExECAAYFAj1z5YQACgkQ9t0zAhD6TNHaUACdHH9+sG2/ msrvhZ0FbGmp1tKsotgAn0y/a+fx5rh2/FTVcpYywQj13jDZiEYEExECAAYFAj2z Dt4ACgkQC1xl8OWtguDpOgCgwPUtE7jFzwXRzAs1svxg5YXU3BcAmgJLcKt0G+FE YL0O0stYX2ea03SHiEYEEBECAAYFAj2zM0sACgkQPkOEudOdQeEXPwCgnJ+9OF4H 22joPbsKqJjFN9hfIaoAoNJDV86nE1d6/CU/LuKH2uvAhv1biEYEEBECAAYFAj2z MucACgkQfDt5cIjHwfcLsQCgi6NITOb5mKFKbsjjxj0LFZ/rauAAoIiJoS55pdqH RVp5WgUikc0YJiWMiEYEExECAAYFAj2zDu8ACgkQiGjP99nB6xHghACdGSHyJofq RXByL+rSxSlV3OosmyIAoJn/bRX4LGGdXqj8OUpvZt4ViIWJiEYEEBECAAYFAj2y t7cACgkQ1QR4EHtjLLi5nACeOt3CWse7n/I4D4z8IH9+foodbEcAoNKDnRE1uR0o SsnDqCVBpVwpGX5ciEYEExECAAYFAj2yAs8ACgkQ500puCvhbQGtKACeJ2FG606O sLLjrzGmeIjZ5xzvK10Anjv8e5eBab8M2cxd5IdieOi6PfNitBlUb255IEZpbmNo IDxkb3RAZG90YXQuYXQ+iFoEExECABoFCwcKAwQDFQMCAxYCAQIXgAIZAQUCPNLf LAAKCRD/wPFMhMcbbieAAJ99oc3W8UA0Peqdc5cX4Lbis7hI5QCgg7U7yZqSbW1b RDP8kufk/86S5g+IRgQQEQIABgUCPXPmsQAKCRApvl0iaP1Un6hiAKCRNZdsA0tc 0oTdJ/pkPkhyRWQx1ACeKRe/CfJF/xWBi8jquecKf6gPMkyIRgQTEQIABgUCPXPl hAAKCRD23TMCEPpM0ZNrAJ9pF8Jkhu9JhU9naYgwAmYX5iS9NwCeOCi1gW7nJx/J dN55WbPIyfzKw8qIRgQTEQIABgUCPbLkMgAKCRALXGXw5a2C4EwAAJ9goNYWpdCh RnPzdARqPkIl9BBcVQCeLVknYrZ7yL0wT/DGabOtE0y+qXiIRgQQEQIABgUCPbMz SwAKCRA+Q4S5051B4UqkAJ9jWdqexFEJSzT+idX58XITvse0jwCg0lOck6/COkYd 8aAwqfIdyH4QJWKIRgQQEQIABgUCPbMy5wAKCRB8O3lwiMfB96UCAKCIyFg+QCTB 0f0VQPOnHFVi3CT0qACcDqnzRgYu3Tz/kzUSr3hWzhnBx+2IRgQTEQIABgUCPbLk TQAKCRCIaM/32cHrEahEAJ92I8GNwWTl02bcQ1vMPHtnbbCf/ACfTilFKvw5z64/ XubRaVr54idRUHKIRgQQEQIABgUCPbK3twAKCRDVBHgQe2MsuMfUAJ9HnuPn+dd3 TgMwr+VCfvox4Dw3ygCeNWvusO4oy5RYuRej36qzPe9nLGKIRgQTEQIABgUCPbIC zwAKCRDnTSm4K+FtAfExAKCjbHa1kgHxAC9FoBJGk0DYBziZMgCdGO25X841oHkq kfXEH/bhoKy597K0HFRvbnkgRmluY2ggPGZhbmYyQGNhbS5hYy51az6IXAQTEQIA HAUCPRc64wIbAwQLBwMCAxUCAwMWAgECHgECF4AACgkQ/8DxTITHG265qgCePGYX +2/SUFlhIlTtJt+cq1BuP+4An3OThP4AU4PT/9Qv+VBQusMz17XciEYEEBECAAYF Aj1z5rEACgkQKb5dImj9VJ8fIACfbBiH1K+OnrBefDuwiQRnk+l0Q90An2eZDyVX 69irU3BQGTnfSSC0oFOFiEUEExECAAYFAj1z5YQACgkQ9t0zAhD6TNFNCQCfRE+X 4BB27oPuIrcghqF8cwAH07kAlAxSx4k8w3cRL8zg3+pj7pYgYNmIRgQTEQIABgUC PbLkMgAKCRALXGXw5a2C4O42AJ9K2vWLCYfeNf3486r/I2Le+gslJwCgyuQ0LQeX T1gzsZN0js913k5tb5mIRgQQEQIABgUCPbMzSwAKCRA+Q4S5051B4deJAJ9QJuZs +TE6tIX72XF6gUhwumxL8wCeKL3F4GkGbKD7oZdAmxyKmXO1mEqIRgQQEQIABgUC PbMy5wAKCRB8O3lwiMfB99OLAKCxSmibXonC4pzcM/wXjWGFdXcITQCgqVk0Wghb V020dqzH92iBgXDleRmIRgQTEQIABgUCPbLkTQAKCRCIaM/32cHrEf54AJ9EOwW3 SLucyv4vGDTv06BeywcYpgCffv5ykOmLpd/OJpeB9YQK1nsiX3KIRgQQEQIABgUC PbK3twAKCRDVBHgQe2MsuJG/AKDjdNIMYpdwcn1/4/U2EBJNAsYWHwCgnfzGdKSc jX9iz+Kxlk6+5ol8X7CIRgQTEQIABgUCPbICzwAKCRDnTSm4K+FtATW4AJ90Xspu Rd+QhrXweG3haragq2CQEQCfe+/ll3/HjfrA+9883jDP14owSAa5Ag0EPNLUFRAI AJtkhGBrUaEVP2fO4wQpmujYfPc7+GT+Q0naKCXrMQ1vDK5ppsghiSr9TdVB3kdk ev2oGxgsCfy2uPC/JuewQByYBmtKJuU6GDaRVXgMhpVwhcRraaDeYZm0GIDQEX3f WSlL07xxbzSZnewlSqUEAznHjLGN1pq9mvPBczq2hrAsd9TPHo/IB9JsVmHV9GYa sHUSbVWx1S6ntU2kV2TyKpBS4luF1Z7y6yIWS9pwiZjTlWdUGSfUkkTu6sM59dBA xv9S5Q8TY44TUQfhHQhcLTz84UurU96i6cb99ZmN5uq6IP6NPIumhOJAqPvHSqly +Ez/oSzSyUoyZ0Saj35E1C8AAwUH/0tkQh1bn/BhIyBO4S9z5wQfI+ZpR7npeKZ1 aYQUjFzbULb27Y20HRujvXljFPoWB1oJO+oXULkCaNWI+72TYXzKRDqYWMaubwrY e5dHJ4hEDpmpqeG7W425rItDfhz2wKORc9vk+eHMHGZZhKamurmeH7hrVpe33BRf ts5yvYWofYonWGF+KydBcrMp3AMbKGQMSOwcBiSpIJVn0HYJFIOWmthtKIMqfVmL WS2sqFKITbBKHBemP+97FVAc82dXxj6irB7/jBjdPX5/5B8HHOXWeEvuHSjZ+6ef XFrTVbeh2u1alB0aX5kz4cb8Fl9Oziqc2Lx5HLgfkKiWgDAu4YOIRgQYEQIABgUC PNLUFQAKCRD/wPFMhMcbbofuAJ4k3jgHTXOHznfpXNRDIjZqPPjJEACfXAql73R3 KnkOqXNQ7FzYXOIPK74= =7TEa -----END PGP PUBLIC KEY BLOCK-----
D.3.30 Marc Fonvieille <[email protected]>
pub 1024D/6C6481CA 2002-04-20 Marc Fonvieille <[email protected]> Empreinte de la cl� = BA56 0F99 83D0 2601 F9F0 2ADA F354 F531 6C64 81CA uid Marc Fonvieille <[email protected]> uid Marc Fonvieille <[email protected]> sub 1024g/D187C27A 2002-04-20
-----BEGIN PGP PUBLIC KEY BLOCK----- Version: GnuPG v1.0.7 (FreeBSD) mQGiBDzBDvARBACiMOP91teeYI9VAEvaJoKCp5LFDF6F7kj9Gfs8ZEheZjT6i6Jl YomPjcwn/yNvZ7BcSH8VyJyZ39dVDnRigUcZIeCPpahUQV9WxVSOtIplyzMlAeGV +9W8zcEmxEJwF1/jrmVvEhmvpXA0VXaXdDf/E/SgK/YeJnqMZ34Fnc8QxwCgo8Zz N4DjetlH3yaO1paom8+ELSsEAIwGlBNP5qHQcH05YGxmLu3dnKt8WidNCHgqessC b831u1SC5oWjhKd8T96eVkaLDuwfVl5ZZ0BsXQCOW6zseuivNd/7xJHSBnNhPr5X 8hJwV+CIhFwLwjfyoI6C+2RhkA3PursrYmC4HRIHAPY1bfsgL4jj0HvUYXWooDt0 gMRAA/9EfMXc4wDiJ0o7TJuWwE8N1sx2bRx3HBjoOs3/8jueCa3t5lOmSchFHDzt SziR0c2viPRV3J15xVHCUKgCrE/RkL0oEfKX8JJb6KCKpCihBxHrmtwkaSvSUklv OyzXXBcHT9uZwfItsySggHYMQNP125nw1L8zNGl9oZJZbXcLsLQjTWFyYyBGb252 aWVpbGxlIDxtYXJjQGJsYWNrZW5kLm9yZz6IVwQTEQIAFwUCPMEO8AULBwoDBAMV AwIDFgIBAheAAAoJEPNU9TFsZIHKCL0An1Oo2ZQF83lpzfzp7dE1ftFIpIDLAJ9f gfCQAc30IHtPRLdXzjKRMBX+Z7QmTWFyYyBGb252aWVpbGxlIDxibGFja2VuZEBG cmVlQlNELm9yZz6IXwQTEQIAHwIbAwQLBwMCAxUCAwMWAgECHgECF4ACGQEFAj1v iVsACgkQ81T1MWxkgcqQeQCdEOqPQySZY+MnocrOc8Ps+Kk/REYAn2jmonVRNsnW liUql1w3S8jdbpwHtCVNYXJjIEZvbnZpZWlsbGUgPG1hcmNAZnJlZWJzZC1mci5v cmc+iFwEExECABwFAj1vibgCGwMECwcDAgMVAgMDFgIBAh4BAheAAAoJEPNU9TFs ZIHKYXUAoJrUKDlTagyb7HZCsQGu3wcVSAn4AJ94gTc5Bg6ZJf4iv2rLKc9KUQ6w UbkBDQQ8wQ7xEAQAwMksHEeImYc6o/txlOB/5D30WAvsn6thnbQIwnrQU8DhFz+/ WcllWpo1O+KuZi4wQrZoZBSmIs5CfY6GyWMbtIwMDwMTKtcWuZcBxNZglNpnPMOL BTDrSbSaHsyGAX3Jui6c/yzXy3zkpMmGSYf1d8qYP1tlORMDyVT8EfmGYj8AAwUE AIH3Vbfn0ZG++EtECWyQQPvokPRVMhWriGOPm/zWgyFG0zNENe5uVT6Unlgl8ven LnabGGdX8VDGmk+0yq2E17JCsBmqec1LgQwjycuiCvZ7V4Nv17e9K6JyQvVaXxap GMCIyzU/4zJ4VgWBV/iorUb6POQm+KEn+4fWePJ5TiLdiEYEGBECAAYFAjzBDvEA CgkQ81T1MWxkgcrl/QCeJe7zmy6hf/KFcMVEAQICIIUZ6iEAniUGdiXy3yD3CGTv b2DowNpBxRiX =wxjm -----END PGP PUBLIC KEY BLOCK-----
D.3.31 Pete Fritchman <[email protected]>
pub 1024D/74B91CFD 2001-01-30 Pete Fritchman <[email protected]> Key fingerprint = 9A9F 8A13 DB0D 7777 8D8E 1CB2 C5C9 A08F 74B9 1CFD uid Pete Fritchman <[email protected]> uid Pete Fritchman <[email protected]> sub 1024g/0C02AF0C 2001-01-30
-----BEGIN PGP PUBLIC KEY BLOCK----- Version: GnuPG v1.0.6 (FreeBSD) Comment: For info see http://www.gnupg.org mQGiBDp2C0ERBADDEONsb7B2tbhvATFEmuw64H7A+W9Kk6NMunEF9kp1VguwRP2w pjtAon2QbvM7HABE7t3IHnDhhS61kLpN3Zxdxwt994s+jRMZ1s/p/XIP5/eIx5ds BgKZk45sm2qdg0vRKAPF+On5voQttbBvBdOVMWOmr60Fc3I+BTNuAgaEHwCg++GC 1P4Upv9OHJCQ7JI7gKa3qQcD/3HWzaGMwyuvcuzWFDLpfv2kuYxNutg75+l0K83p hCFxorUVw16+j4r1/464GnTAhvfp16Z7ReODy53NOlG9/fQXAE1nHZp93kFnkgLF uIQZQKTiYsHP5eqt42gOGmX4lBRpJlpTNsdlSr8CC9VUvzqZ+H6wG4epDE2jUnFD +kmRA/oCBoq5k3Hm4gyi3Y1F8cLUGU9YFDzhzTkDQiZc1Wqd/QlnvMW6vci7MRKv eeeZHQOpzOSxzuPo+b/Prn1ssluAi2IIPObxrq5Gcz9lQ7/xqrvQH5EosbpH5zQM 35ku8psPGcRqcRKG7OecAoYpioLLWc5UJ/SoKAoxqzecICf3qLQjUGV0ZSBGcml0 Y2htYW4gPHBldGVmQGRhdGFiaXRzLm5ldD6IVwQTEQIAFwUCPCEaTAULBwoDBAMV AwIDFgIBAheAAAoJEMXJoI90uRz9hSgAn0Yp/3lUexQCv3MEjwm7l7XhZi5IAKC8 Qnw/RCmcFjahkHQTXXZmW+rSwokCFQMFEDrzKkoSaX0gm5SkDQEBszoQAKvEeQYp zt242YB6MVU88HavNYkonemSqA5s1fbg3dwA4TT6TTJ/757W47vbFnzjb/AmGIJb r8moK8rC+6mnSC2IewsaFqkDRFSRp42XLxyVdwdkJKY/L0Of8rOpWlUsW/Zk6dIE XFUs+5bjSEO9DiMQjmd4upPTF6r4o0jddW+wn0thrqNk+3ghd35q4HjtFnYMruMv BKzLUYfyLkYA16w45nOF9Lr1Tz6oNzdVEJXrubpdHsHMs2sFQlrnD9A6EMog/ouD g2N1ASr6UycE9s2nyVXM5W0WVahAhdMosrUCuzDlhGWv6mQqjTNZfl27/+LJd5sM QEv0MQoTf/fzOI7kJdPsNGTibnnTuE99atLXpbNhsKj82BjYgAAeycutTw3Qy6CX B6fpdWa1PE+BNSdOUbiAtxyV4XPcw84C6rvk7mZepYVBYPKUrupPM9OY1d/mCEE4 zDFv6o9UjiZabQmzKq7T8wKZgV+Pl14dpHcR+xd7tZP79duLdyIkxOe6Z2xbnqY5 NlOar2AfMNtes7GIkknx1p+2koRfqh+W1mPH02Vjgi09ru+kY27jzxHmswRlu67q 3r69rGouXBgIJQ1OnyOPXLKY/iglgkRIXGmAoU2R3Ii/X0lsQRYA5XdtiBodezQd gCuJ1XfK6W4xWjZsONGmEhNN9RezUJKoMSeziEYEEBECAAYFAjwhG2AACgkQF47i dPgWcsVClwCcDW2kRANOyFNhbBhDE4OHOPTAau4AnA/8TasNnyJLhAxeYFiQhpuI fiRDiEYEEBECAAYFAjv9fJwACgkQXvSymrg2XlXuQgCeNou9DlCKpHZF7os0/9K3 xV/hva8AnjNqFXvpIZPylro1vJkzgHh3I4SkiEYEEBECAAYFAjxOdVEACgkQ2z94 QKW3O1wm8QCgx5i66wSVMIhs+Yvb0He27mJFW64Amwdkruw5+oN0NUm8HHHCAqFV S4HitCJQZXRlIEZyaXRjaG1hbiA8cGV0ZWZARnJlZUJTRC5vcmc+iFcEExECABcF AjwhGlEFCwcKAwQDFQMCAxYCAQIXgAAKCRDFyaCPdLkc/VorAKD3J94O/gJeEgYW R+adK3SewjnB6QCfQK+70Io6Jlz3GmoS8+/c3o2hSUyIRgQQEQIABgUCPCEbYgAK CRAXjuJ0+BZyxSERAJ4z//S1Bzb2OUl7ozm899AYR8W1LQCbBkDibniWmMf6Gwy7 fL9Flyks7yKIRgQQEQIABgUCO/18pgAKCRBe9LKauDZeVd66AJ44EAAjhGopDGym iCGXJV0EvKo01QCgiGW4Tr5DZG2mY1aqCtBgl9UIz/qIRgQQEQIABgUCPE51VwAK CRDbP3hApbc7XBD4AJ0Q7a37xCQKlc/m1uxQ62JxgvgHWgCfQFAKfveCwE3W/Fpy +glLmP0/ZTe0IlBldGUgRnJpdGNobWFuIDxwZXRlZkBjc2gucml0LmVkdT6IVwQT EQIAFwUCPCEaUQULBwoDBAMVAwIDFgIBAheAAAoJEMXJoI90uRz9gnoAoPosyzKa niM7FvhR4xLDLaazqe/gAJ9eE0hFz6NDr5h9nRZ1qfU8BK6NM4hGBBARAgAGBQI8 IRtjAAoJEBeO4nT4FnLF08EAmwXdi9L+Yq3liDz2FYledwRRqO8ZAJ9hax4xk4ue E2B8IogV9WHnnRSci4hGBBARAgAGBQI7/XymAAoJEF70spq4Nl5V7ucAn2K6WfjX 4vncJacQLGLVuh3tMCAWAJ430sgOCEmwY2bAdNfu/+WYe6YxwIhGBBARAgAGBQI8 TnVXAAoJENs/eECltztcBPoAn3zovCq0kHyFqm1x0QPDtlAkRG4gAJ4gCD4Le8Rq 43M+s91wrrTyNOutobkBDQQ6dgtUEAQA3sN519zCh7owShpNYRObr//qeAZnPcx1 69ZscNuVDy4EoKeyiLletkmnwNes1IDpq1RslCkHa8UOjFy0jby9cjePCJNo0b8Q 5qG/4iJf1020PT8AMxvL/H/SZH27ueF6PxkpSgDSsz/e92c7CeYpTu+n+xBYsLO9 GtNi5asTvKcAAwcEAL+HRDhWp0dDD4AxTa5evEl7GFy22y5sFVDHA9eukt70/d0d nAi5d14uA/LbAIWyLCE6KC23MAJOgrQSc2PbOa2O45rx3dDw5RoqXDqyn9xPM304 hFzXgllOFOTYKMy6G4DBOv5KWKgVOx03XyIPqAVAObw3rHzewU0wXhD5Qk/QiEYE GBECAAYFAjwhGssACgkQxcmgj3S5HP24HgCfdErc/JU9fVJIH/iLTbWo28vu5yMA oIDNzwMAwpXoLZkEkk/dMUDTsFCy =ZbG1 -----END PGP PUBLIC KEY BLOCK-----
D.3.32 Bill Fumerola <[email protected]>
pub 1024D/7F868268 2000-12-07 Bill Fumerola (FreeBSD Developer) <[email protected]> Key fingerprint = 5B2D 908E 4C2B F253 DAEB FC01 8436 B70B 7F86 8268 uid Bill Fumerola (Security Yahoo) <[email protected]> sub 1024g/43980DA9 2000-12-07
-----BEGIN PGP PUBLIC KEY BLOCK----- Version: GnuPG v1.0.6 (FreeBSD) Comment: For info see http://www.gnupg.org mQGhBDov9skRBADzrOg1JwL+kHv1dTePFR2lNrErbMe+WVeP1sdGuKcYTP15VQyJ WV/6ZoUGsihAmFGcGyJuhcUJbvlvqRf4ZlwD80a1y33SNxxsqe8n5dm4Wy9FElL5 bjs4L0kGJlSL8KnYYUTQKEDBcTch3+GTjgS4NQBZWy4h0W6EWqgxr7CZYwCgpeB3 tnDcY3ELA5EP6Bx8wZN97zUEAJo972g6HplZyuyjqqTjdztXNgD+DlsyNpNkEfqs AnZcr4aqEeyMNtGl8gPIc9JwPPSlX5OfmjCm3zWtEjwrHway6YPggXqX8efuY3lo LxVfjRt6NLI0TuV0FhojgHuJYB9RsXQFZxbYH8A/j6jQHbiN3wTyYHtaAJJ/iELg 82oWA/dTeR0kjvjgrfB1MiFCH4AL77bZWuxSv1CvV09DlYtSxfLpyBm4OHvDZmOv V6zT9COM2+f2/EMI15cNllYXB3WnwfYit9tZtEFBl1+OshqYBbcNkser1pBd5jP7 fDAkpDYGx5OgpqAS8hz4XLPZdS/HXSegodYKinU0p0Rzza6KtDdCaWxsIEZ1bWVy b2xhIChTZWN1cml0eSBZYWhvbykgPGZ1bWVyb2xhQHlhaG9vLWluYy5jb20+iFcE ExECABcFAjov9skFCwcKAwQDFQMCAxYCAQIXgAAKCRCENrcLf4aCaPIbAJ41RzBA OuxYwZFUSbMbU5PHENe6ngCfcnVzDC5+lkssh628m3GTG0EjINS0NUJpbGwgRnVt ZXJvbGEgKEZyZWVCU0QgRGV2ZWxvcGVyKSA8YmlsbGZARnJlZUJTRC5vcmc+iFcE ExECABcFAjvw0YEFCwcKAwQDFQMCAxYCAQIXgAAKCRCENrcLf4aCaMcVAJ9brBw2 LPC2RcZpsm5S//dETM/qFwCgiuPpVVwBP7ibzn5xQVNAdB12xOa5AQ0EOi/2yxAE AL/FYZQw0b7NrD04j6dxrp7wBjgd19ux4zQocXgXPlzpBZxQ4A4/icGOLnIU+vDu ltbpf7aMTd/mJokJwx9pE82pOgxk6i42c5qKkwkmjhO2/4FFk8HXco2DJ9roRi0n eBJztXskUY4cVavKdXNeJY2JUeBYvmrnREWG1W2/0ZMzAAMFA/4ytkv46phPokQe s7yy67bEeHiydjvf3uM+v1z3xWoLw5ZU+8hLdFkESpZ7u+qA1mj3i7LNBZhfA5Bt Cgl10v9DWX9cda2HlMjyyI9p3dfPlOcAh69PMwexJ1VYPtizK4ZkC8dNk0rTVPOf SYftSsFGdDbUAq3ZokhjLkVRFY1LxYhGBBgRAgAGBQI6L/bLAAoJEIQ2twt/hoJo ewUAnRRikiShfD9wCuyMazVJ9+FZLWiiAJ0YFgos24sNEFq5rA4I8UZU0LZ5Iw== =y5FR -----END PGP PUBLIC KEY BLOCK-----
D.3.33 Patrick S. Gardella <[email protected]>
pub 1024R/527BC62B 1997-06-23 Patrick Gardella <[email protected]> Key fingerprint = 54 7C D6 81 B1 63 D2 5E BD DD 58 4D A4 0E E4 E1 uid Patrick Gardella <[email protected]> uid [email protected] uid Patrick Gardella <[email protected]> pub 1024D/C6AF4835 2000-01-19 Patrick Gardella <[email protected]> Key fingerprint = 4B2D 3CFA 963B E310 847E 7D6C C072 B447 C6AF 4835 uid Patrick Gardella <[email protected]> uid Patrick Gardella <[email protected]> sub 2048g/DB3B83E7 2000-01-19 pub 1024R/EE2D47A9 1996-08-17 Patrick Gardella <[email protected]> Key fingerprint = A6 DE 3C C0 33 CF 36 E6 D1 F5 BB E8 3C C4 67 50
-----BEGIN PGP PUBLIC KEY BLOCK----- Version: GnuPG v1.0.6 (FreeBSD) Comment: For info see http://www.gnupg.org mQCNAzOvCgAAAAEEALmnjnJGze7P+HuANRmM5QDJVbpbolFSXO8rqDMH+nhc0maj D0jTTZbGhmZQCUSaEnmCQ3TNqPpoA5CX3sMujoA+vhFI0hu0GcGuIRN+tMwuWRxc j4eJv4tA+KSBkJqqOqRmqKAAaywhVKfd9Jt6qz99kEJz0fh7jFTN5LxSe8YrAAUR tCZQYXRyaWNrIEdhcmRlbGxhIDxwYXRyaWNrQGZyZWVic2Qub3JnPokAlQMFEDm2 p0FUzeS8UnvGKwEBkzID/1WOgEAbxc/2Sbav0msDNKYyJXKjTbixp30mcueGX0vC NnabkYQWhKhIiDb/S8EsIvupXa/yUZvekD33o3QL+Aw37FQjcow6pUS2MCvWLhv8 v39MYn5kIIFbKAkGTQ8TVDAtlJQ6pj3JZTY18oj7B2g8+phGjSjYgkckemFse0Sz tBNwYXRyaWNrQGZyZWVic2Qub3JniQCVAwUQOWcarVTN5LxSe8YrAQFEggP+NJmD g4wOqr7K3hboNCCL+LiBiWOA3wUteRSLQ/F0DSxJizs9IK5+na91AJDMWLMrxk9w hkFJiZRgLtDbT1tqMxGorxIQRNJ04ZELRIVp8lRmpWj3CSK5ZCklDpATGA9LgfVN RsrxY1qWPfsZogT+QOODxRzlrTyDPXXGY0GRUgG0KVBhdHJpY2sgR2FyZGVsbGEg PHBhdHJpY2tAaW50b3RoZXdpbmQuY3g+iQCVAwUQObhBZFTN5LxSe8YrAQHl3wP+ MCzuiUTym5gT0lDI89Z/Hem0DzOqj6g1YhYEHHnNjuiBtLbXDgsu4PqzVaPSlAm5 a8tK/adfI6vaSXx/CpGg6r77Z3sFEKfYGzk/x9t2PZPGYoKayannbegddVpttHZE bBPN9qsd8WI7HIPcHyS/CqBgPb0ZzYYgLGQLUhMoBeu0LVBhdHJpY2sgR2FyZGVs bGEgPHBhdHJpY2tAd2luZG1pbmlzdHJpZXMub3JnPokAlQMFEDxMJi5UzeS8UnvG KwEBMwID/2PR1WsI01XzdKLXzkNTsmJtbc3SlH6aUE05G6iF2t6ZFwT2puxsAQyk sO76GQ587xdhjLCWuiugVrjZrRma6azPSv5d8PoGNvnIxtns6fD569OUPIP/os+Y OUtu5A+260HyvSckMwjlfMATUyCkmF3YLePrOKm296jFAVfZID3HmQGiBDiGRd4R BADcWE55lzYk8yrwzSGDYy+Rv9n/aGQS+e0g5BZXkrJNAURvRdo3hy04fS6RdKO2 tkH45uMV8/iA27+jG2o8Lc7sreWzXCGyw9MCFMaoI/ycI3ZHxyFb07p33f15i19o mHsbPsHUnDNC3Vep8LPbc3rmafDvxPhTFxffBJVjBmBXHwCg/8O01JfOvhsuwuLX fC7S3DNqHAUD/0Zkv5yyaZB/aVav1umwT2gAfrsDbx8bQoy3VZoRI71QHMmym6hJ lQ5pcjplTa6M2dgXwa91qx4J+Ch/xC/FUxPqJkxyZvpgSFzPcUwv5Azaz+4Qdo8F QRztsFaTPOsKywd4kTC3gBcdpPQsqAwOzy3qANE0F+zQv5X0CSeuhOM3A/0SrV3J 1k2ygc3b63kc1EoS0WZ1u+Fn4qZqs2fdxw+ivsmPpQJ7DIimsG+F0xntkwvVkbpT F0VbSj1B8AmzpI3pNr36LgvVOuQtBnq9H5laLNM3xLy/2BDLPYvvRIQf9ThgtwOR pEnpUg4UnbXB9uR3K72PQRRdUf5j0ZKL91HYQLQtUGF0cmljayBHYXJkZWxsYSA8 cGF0cmlja0B3aW5kbWluaXN0cmllcy5vcmc+iEsEEBECAAsFAjxMJ+gECwMBAgAK CRDAcrRHxq9INZPBAKDXnC9asMfRbLnZbJyrHQyR3BVaYgCeJEP+GKKvE5zO8+Zm uAR8Vm6QYV20KVBhdHJpY2sgR2FyZGVsbGEgPHBhdHJpY2tAaW50b3RoZXdpbmQu Y3g+iEsEEBECAAsFAjxMKAEECwMBAgAKCRDAcrRHxq9INcxBAJ47DfVn/t/XSBSM j6hm7fu7O8o6JwCgwSFwymVOx7xpWw5wuLVIEbFPNTy0JlBhdHJpY2sgR2FyZGVs bGEgPHBhdHJpY2tAZnJlZWJzZC5vcmc+iEsEEBECAAsFAjxMKDAECwMBAgAKCRDA crRHxq9INdP7AKDUnCCOxmgE3tatxSZr/pMLIAcCGACfYEAUpWPkZ0jwEkr0Wxvi qrLHQe25Ag0EOIZF4BAIAPZCV7cIfwgXcqK61qlC8wXo+VMROU+28W65Szgg2gGn VqMU6Y9AVfPQB8bLQ6mUrfdMZIZJ+AyDvWXpF9Sh01D49Vlf3HZSTz09jdvOmeFX klnN/biudE/F/Ha8g8VHMGHOfMlm/xX5u/2RXscBqtNbno2gpXI61Brwv0YAWCvl 9Ij9WE5J280gtJ3kkQc2azNsOA1FHQ98iLMcfFstjvbzySPAQ/ClWxiNjrtVjLhd ONM0/XwXV0OjHRhs3jMhLLUq/zzhsSlAGBGNfISnCnLWhsQDGcgHKXrKlQzZlp+r 0ApQmwJG0wg9ZqRdQZ+cfL2JSyIZJrqrol7DVekyCzsAAgIIAPTv+4Zxbvg6JK8f 22cyzL3m3XkM9WbvAzqs9p0TnYxb87ui5f6Wnwfeirp7Th5g7dmVi/gCnOp8c6E1 0N2fUmTeLB05IE2BZMwai8keg0aZ5Nf+wjjC1TpY4vnOfc1BZnhhVtR4jLDfEzoo ta+33XtukK5utfw+/5HjjbBpbjA+mw9zNws9BKtzkV5IW3D2Bnkb8qhsT34CCFeQ VHMz+/g631c3LQOMvLNTLuG0o96Ayd9NH0923etlbnfQmsF0TYNtHXGV9aZHs41Y msa1u+xDWiZFJYZvn2C8xSsNKWEmkEk7z386/EQEnwb38KWHEryWVVZoBlMhdQc+ +iN8692IPwMFGDiGReDAcrRHxq9INRECx6QAnj2cpJsp4EjC+x9u0fPTDs68EQOb AKCLFk5r1mppPFoEof/i0H0s9Hxwl5kAjwMyFlasAAABBADzOGZprD5Eoq+99Rfm CL2kSjANkuu/rhb7bQnZ03DrXhiRqnK4GNbBFlURktS55zwziqouronuT4Y2daLG V3hdzzJRzm1aneO8f5xb78teVwkmi5jzX5d4t7jEW9SAwAXddDV9+xJNyVx4gScL 2kC6M13kci1u9AO+75K/7i1HqQARAQABtCZQYXRyaWNrIEdhcmRlbGxhIDxwYXRy aWNrQGZyZWVic2Qub3JnPokAlQMFEDm4Pn++75K/7i1HqQEBrqsD/0XynfYexM3D GBwh6EJNuzyUAFScs3ZpEAb2ByJQuw4uYufHO14W8fO4fyi3p672XbdIcdkxj9hs gd6uTMqAuT3P88Mavy0K4Zbky764YiqvuBaL3qCZ3w72qXQ4Hv+nElQyR0zI3Ezx Kt2KhXZ5jxlBX4l9Ea1ZxbUMxuJ3p9Tj =iJ7F -----END PGP PUBLIC KEY BLOCK-----
D.3.34 Sebastien Gioria <[email protected]>
pub 1024D/7C8DA4F4 2002-02-09 Sebastien Gioria <[email protected]> Key fingerprint = 41F4 4885 7C23 6ED3 CC24 97AA 6DDD B426 7C8D A4F4 uid Sebastien Gioria <[email protected]> uid Sebastien Gioria <[email protected]> uid Sebastien Gioria <[email protected]> sub 4096g/F147E4D3 2002-02-09
-----BEGIN PGP PUBLIC KEY BLOCK----- Version: GnuPG v1.0.6 (FreeBSD) Comment: For info see http://www.gnupg.org mQGiBDxlUM0RBACvTeKRqOnxJ6rIhOdf9vCoPA46hxkjTRgWCd14oxC/P5SxlC6D kGDg+Cd/FeY347+C0fwmoaEJrzQcUMGIBdjOa6UywIcbuYFUY42T2+hsMVr2SSK+ qz8hmpnmgX2PRmN6veuXI5L1S+3wEUDv/wpJLaPhnIs8Zt3OuwVD+oxmxwCggdzr SyxiA+f0tOqFlREV80qh9mkD/jCaBzww4rfSQrXsiyEOzDVP3v/EA3vYmkwyzm7X //+3ouHrUTPt4w7s7EbGF9xyTj0zi6J+6PADjt4yGgO85BfUyIiOp7oqLyu1lc+v lfgfOUSTr95/jfMfI5QXVoswUqLzAe/kZK8yH+mmd9PNDEXqXhSzWQd0O3kBrvlX KEEaBACB3SslcYkfdh7/kAoC8fyT4eDdJUPXLMgfjks+W4wngu2sHv0fCMhJuW8i 5fhcFUnMNNuxw7LJ/+3NIYx0yacfx3DPeWEtYAlj1AggQJPiXNUIH2hKEh1Md28J JyvfGg5yjFk0QkZXEr/UIjCi2ooUtXSgI99HYn2soOxiKI6cBLQlU2ViYXN0aWVu IEdpb3JpYSA8Z2lvcmlhQEZyZWVCU0QuT1JHPohXBBMRAgAXBQI8ZVDNBQsHCgME AxUDAgMWAgECF4AACgkQbd20JnyNpPTrhgCZAU1wpIXOP+v2CsyPYGcIC03GsDIA n0qxuR2OP+YyFrsnA+yogEETkzbktCZTZWJhc3RpZW4gR2lvcmlhIDxnaW9yaWFA RnJhbmNlbmV0LmZyPohXBBMRAgAXBQI8ZVH0BQsHCgMEAxUDAgMWAgECF4AACgkQ bd20JnyNpPQGWgCfWL/2Q6PBPbDB7xMz+uV18ovl96oAn03b9L6/soWmPDnNN9rX GO0esJ5xtCRTZWJhc3RpZW4gR2lvcmlhIDxnaW9yaWFAZmx1eHVzLm5ldD6IVwQT EQIAFwUCPGVSDQULBwoDBAMVAwIDFgIBAheAAAoJEG3dtCZ8jaT0A4oAmQEQvmqK s9Y6EaJSnNLD6Qy2MKtHAJ4yoimf+lPR85jP4jKoQaMLeYpvCbQnU2ViYXN0aWVu IEdpb3JpYSA8ZWFnbGVAZnJlZWJzZC1mci5vcmc+iFcEExECABcFAjxlUiEFCwcK AwQDFQMCAxYCAQIXgAAKCRBt3bQmfI2k9AMpAJoC9f5tZH0s1LBDksqJF+yDY55Z rACdG+9SsE2SJUOUE8Zfh1h0L13EOWm5BA0EPGVRxxAQAN/O6Tfq3h6bKUDyVtPJ m4qmkAq2dMF/IwTjeiLCgGEEGK9lDxLWtXCZi85NdDqQjM6Az6bqNnj7ZDkxkhXo PBjLbfKH1ZGGYKaZqzDTTX90aNXS5ZkyJ2vTZ5UDv2G3BPzuBkfLoCfieo/ygqs8 2njdJWS7zVYx57ZnYqpSwc0BTl6jeoFXFS0VWnGzHjF8glaDlJbcsveM3oe/kOB4 Cdi6Qw/2XFqxZyTGiDaESbLUw1bMgNXe+sowbx9o4r0IoM/QO8mhe4vVhh3+KuQR wOfuh8FHu3uJ1uEdK3sXZJiyRnFhDokPimiHHI2XOZ+U2EigwvEO34NDgHMz/ax1 vvV1GkpEm2RGjhIaGl3sbytpp/LIzQh+cVEqcrGvRMJ/web+P8W4NM/ygxtpEpJx lpBsMrmMB2jYF3Ry9oCSDBwQSIbMoS+akSR+dySoBlAP7bvseHdPjEG9k7DljcKF y6Bg3X1lcg/Ire6uxLaHfXjRKz5YAvaNJZl7n5uYpvnBh9izYzWxp+EucGqRrz0y +5MB5mMa5czKQ5Bn/qxJEduLNgaM7DgBDaJ+0m6DuJvb2Vd1ifXWeqDhxi9T/ugt drZjvk+FCfsw6JdV8Te8hB2W3NXjsYke7TapAM5sLh7tJ3S2fHHKjgdXIyl3wVr5 CAzHkssJkVT7oP0feryaG7TnAAMFD/928Up+8kdlvOCD48eIwhNeOD8dV+2oLMap S6vsMKUnS7/hIff/gntk5Fiaf3pjio7qJK7GRKvOTvkGd5AnRgvqbYzIqB63OrGI dnUJ3NqZJaNPcHxfMCu3RwgBiKjLAaNhK9PUo1N7FaU+4Gb7MGPdduWFncgX/n5u CxIfY8lkOr74MXwe+gJ7Ybuk5DU+s2tgj5IcI4Qe1VEmD7npv8eekf7VURi6Ga91 Qp5uNDyEAkqrHGJVPEWUZJ891kqOhhheMb3y/AIaeCw1hznOQaEdxlR9zzLP9LeP Wio6XnTLLbRhrk/uDCfjQ/mlZl96WV6SiZzF92jTJhJNRidtr1yENwNMi8cDVG8D D3d1jvBBZNIrB6CLHVAhRxPB11ThPwQuGkVNNrP8VquCXuoOIqJGGX0ivpCmemWi nQ+e+2ASx55rqweUz7urwyLRH5l0JlcOWuTCblwM6ZIqebQeiVm+pZ789fY8FOdI B5TawBkoAHgvSiWLv5iz5d53B1BSV2LigrJ6I+30DXAsbkldvtaeiYKAPRLnk/yn TZZ9nbNPhKTuRXSsUiPrRqgndtVdhWPS5RFJUKV0duSC5qwls3AxUDKf9p2Ci1vZ XmK9iohF5JhGiMe083CuIQITp/PY7xwPgleV0xROGWjiO1MC14wRK+uSRf585yRJ lyGwkugKgYhGBBgRAgAGBQI8ZVHHAAoJEG3dtCZ8jaT0onoAnRqetkw0IQGEHDis P2T/ZtaLVqp2AJwOwHDdKXMLcfeuVe0egqgkY48Vog== =U7Mx -----END PGP PUBLIC KEY BLOCK-----
D.3.35 John-Mark Gurney <[email protected]>
pub 1024R/3F9951F5 1997-02-11 John-Mark Gurney <[email protected]> Key fingerprint = B7 EC EF F8 AE ED A7 31 96 7A 22 B3 D8 56 36 F4 uid John-Mark Gurney <[email protected]> uid John-Mark Gurney <[email protected]> uid John-Mark Gurney <[email protected]>
-----BEGIN PGP PUBLIC KEY BLOCK----- Version: GnuPG v1.0.6 (FreeBSD) Comment: For info see http://www.gnupg.org mQCNAzL/8IwAAAEEANuX7fcIa0S5fVATYQCGwgBJo9DxRr0m/QjrP4dJh/JEIjmv h37FMs9qsMPtyAZWlRSnbVFyQiz5ptFuL1irClW2UHzlLvd5s+pKMfIkJWDTnrvp 0jFebYQt0chZeLcKT9s5sSo9ua+fUumOfaWyubUZPIqmDYqy98Em7wI/mVH1AAUR tCNKb2huLU1hcmsgR3VybmV5IDxndXJuZXlfakBlZm4ub3JnPokAlQMFEDMBDfTB Ju8CP5lR9QEBmnsEALAS5dZyQXxsDAROz+yHizsbgV1Ok9vFwE5en7QnOGcSkQX9 pE7MzzlbpP63toF9zWLF75dbXE5X0yYLoB0pvNi1NXhXqA0YbDeAi1Ed6uBXbomW MDdm0s+O0Y1NfuS0uKiFiJUDOjdBrgEbnmPZM/77dhr5UbmAtQUHFftaQfY6tDFK b2huLU1hcmsgR3VybmV5IDxqb2hubWFya0BnbGFkc3RvbmUudW9yZWdvbi5lZHU+ iQCVAwUQMwF753W7bjh2o/exAQGjjwP+MKiFH9EfOGS7yr5NQ4+vWXuHe1N6fi9N jJsFfzT/RCM/wo/dNG/xhTgdCoCWRt0gKkv3SLEPYGDPDtC3Nf7HV/66wOiYYnxD 3cmjgpLn5u/Ju0oS5xxNb5Ly8EZnfz967lIHjp/qhbZ9o7kO7Nkb7bUgozNqBaRy 9Yo81fVAtrOJAJUDBRAzARCXwSbvAj+ZUfUBAeUyBACKoIXfYBpsKqmmnTg944Tw 5t8lAFZ8qJz42Fjw+hswC6c+7b87imwaH3AjPnFmsA6f1ES7xDHG8RQleDtKsyik gHc9Yos/neVqwfrr4zSV1PdNPPpG5uNT/jI1k1M3pH8kwYdKiwaIHQb5+sGUQsO1 ZoxCdzT7HJq4jJtBGVIRULQlSm9obi1NYXJrIEd1cm5leSA8am1nQGNzLnVvcmVn b24uZWR1PokAlQMFEDMBEHfBJu8CP5lR9QEBak8D/2V+1pP6zA1dvhRLcO2pGldn Q/dcVAAtZIZ7AUUap1pKXZF/Tt4gWKMtAHj01xUbwU1fmI6DF1p4AVjDqOxJDnoZ RD9gv0RiZXdUesXL2UBNHc/7f+amAJgmXNrP/m70ejgzPluniR5hQm76fKYjkxV1 opRhhchTjhrFndoQ9nvQtC5Kb2huLU1hcmsgR3VybmV5IDxndXJuZXlfakByZXNu ZXQudW9yZWdvbi5lZHU+iQCVAwUQMwEQWsEm7wI/mVH1AQHxMgP8D7VM+qUo0qGM uFUKqxoQcDPVKt2W1X6wWTHdj9cxo3oW1tlLEZ24Y2v5v1pzonvseaTjsse134dP a9qjcwXjs/zxXzHoQs3B9BZB2qXaR4T3YeuCjq2qIXGwsrrY5fkoch4OLg0/FOui dmNbFjVQkIma2rIRPa8GhXZJtGl+UEk= =bUtb -----END PGP PUBLIC KEY BLOCK-----
D.3.36 Daniel Harris <[email protected]>
pub 1024D/84D0D7E7 2001-01-15 Daniel Harris <[email protected]> Key fingerprint = 3C61 B8A1 3F09 D194 3259 7173 6C63 DA04 84D0 D7E7 uid Daniel Harris <[email protected]> uid Daniel Harris <[email protected]> uid Daniel Harris <[email protected]> sub 1024g/9DF0231A 2001-01-15
-----BEGIN PGP PUBLIC KEY BLOCK----- Version: GnuPG v1.0.7 (FreeBSD) mQGiBDpjbB4RBADW+4fkXvVjAZ0A1X4wgXJQ4Eyes1LH7sTexP/Zm7sg1D/R9zV5 w2kBwOhICRX/hxVL76YZv2MTNL/d3pV3ZW2yV3Z6H7Pq7s4oVn2q35owUwLQZfSI SBTnBiVN7NqMZ/kzCCdWBwg/4G2FVNFwc7RyuOFQL3ly1PBtgbANbpCyfwCg3QXB K6AtFaEP2MA+SWWHQD2dNxcEAI11cbOHbYU8asIxbqYYyPOMgPsaLlPiTh6JQOO0 2OiGxoQlmZvkhlWf8B9ahCeYoKgA1zPqdHA2C9YMvOV2LvN+/Qi0n3hpqkfM7lLC QMJgm1KxIzccWY9Iz09GRlIFm2JPaCVLsKh1QPW50c3yO9TMSa6lXwiRgvxPz76C JHniBACa25NHH3x8zx5KA0FgMM15Wc481777CFVsKazNay00G0HogSICZ5lHffdi 1O5u+qQHchVKL0Lbe1zhdbVHdSAbEqnKTqseVMQ6I1TVu4gO89B72aY1RxAnAYjh PAb5W/RhZBSR5NDVZyANnqaGE7U7KMqn4/E0lC7w1TzoIZvDMrQkRGFuaWVsIEhh cnJpcyA8ZGFubnlib3lAZnJlZWJzZC5vcmc+iFcEExECABcFAjpjbB4FCwcKAwQD FQMCAxYCAQIXgAAKCRBsY9oEhNDX55peAJ9NKai2qEcFLxzC14qDz80zBGwP0ACf YhsW5qhTw/Rck1Id2W1alUEXMre0KURhbmllbCBIYXJyaXMgPGRhbm55Ym95QHdv cmtzZm9yZm9vZC5jb20+iFoEExECABoFCwcKAwQDFQMCAxYCAQIXgAIZAQUCOmOL hgAKCRBsY9oEhNDX5wXyAKC6VLe3svRc+FgmmjPS/EWvi83sDACeOpmPRbViajOw 4MUhKA7hxnRlBeG0HERhbmllbCBIYXJyaXMgPGRoQGFza2RoLmNvbT6IXAQTEQIA HAUCPSJfQAIbAwQLBwMCAxUCAwMWAgECHgECF4AACgkQbGPaBITQ1+dSxQCgsBwM uDviakYEKswiv6zMHfYBBCEAnjMyu+oxjKOWOo+of2qmtQH2LNg9tCJEYW5pZWwg SGFycmlzIDxkaEB3b3JkYXNzYXVsdC5jb20+iFwEExECABwFAj0iX2ACGwMECwcD AgMVAgMDFgIBAh4BAheAAAoJEGxj2gSE0Nfn6bIAoJlPaQlqk4wbNGoscjigAp0R B9ooAJ41JxSh9w2S16mFTGNKvVpjXw15BbQyRGFuaWVsIEhhcnJpcyA8ZGFubnli b3lAZGFubnlib3kud29ya3Nmb3Jmb29kLmNvbT6ISQQwEQIACQUCPSJiFAIdIAAK CRBsY9oEhNDX558OAJ9iOqCDUX4cdNMSZ1KBQg1gfTn1yACfZNL6BY+mYC+XV83L 7DXacstXHlSIVwQTEQIAFwUCOmOLtgULBwoDBAMVAwIDFgIBAheAAAoJEGxj2gSE 0NfnaM4An1YVu3iDtrG314UIuZoTw3zd9ucxAJ4yg3vWB6ceg06KuyaGTJSdZ1Oa p7kBDQQ6Y2wkEAQA0RSR8vkmX33oyYl+LwlOmemSKbSQFZNImw5TDcRYX83fa1Z1 4oIgJSk1h5l2jx/+29chVR1nTNqPYlRQEDMxVby9rMq2RAnjorM6oDdtIQIBNJ63 vmUcUiORGnKhC0waajpmZibcxoUFk1KcLyfxOT0JTOLgsJfqdqUENIc6NqsAAwUE ALaLYnBOoIr5Wm/KC7wRtS4gHeeOeskZyyoa3+AeBorDl0VvpgYwlNdAaP4xJrx+ CH6UYnxrMgCXG1l4dupkGXOCRPlAcM2ouEyDIGHRTVqHy40khZnWzN7xfZhKNcVd FxeHqOG61ZrhcMboxZrdJC7hK+sYrbngeKRiDs4VRoOuiEYEGBECAAYFAjpjbCQA CgkQbGPaBITQ1+foeACgme+2LKdFkytbn/JUhBqPYVAD8KQAnjP+IDVQ3PDEKRkv AFGJ6i5SrWJ6 =j+GD -----END PGP PUBLIC KEY BLOCK-----
D.3.37 John Hay <[email protected]>
pub 2048R/A9275B93 2000-05-10 John Hay <[email protected]> Key fingerprint = E7 95 F4 B9 D4 A7 49 6A 83 B9 77 49 28 9E 37 70 uid John Hay <[email protected]> uid Thawte Freemail Member <[email protected]> uid John Hay <[email protected]> uid John Hay <[email protected]>
-----BEGIN PGP PUBLIC KEY BLOCK----- Version: GnuPG v1.0.6 (FreeBSD) Comment: For info see http://www.gnupg.org mQENAzkZeP4AAAEIAMKg3LRpUCJdg9V9Pr0KIdvaQeItf5Fcrbh0GE4skfNPKeTg TQifwdG/GrMPYJBPHU8JnFqumLUnd2VSoFEJ/6W5SOZP2l5ZCq496pGCSekpe+kR dN3Ra+GoR+cWVLKuXj+IxA0Ziv2WEl027TnMhWGf/DHLdoWvSwJdVrGnk0KjBJGr HwWE6VGlhBSoOWMa9T0tb3sRVTEIJXDCn8f12eixx8XCzwIQJSgWC+ThrY+ZO/hz FRR5yl+izJfffQiLjc4yY0rXqDu9K3i+/0lWywcbnqMtRj8Pnr3j3Lzft+xex2ml qX68fE6dxof6Tc3GQCEqelj0IOAb8Zqy2qknW5MABRG0IkpvaG4gSGF5IDxqaGF5 QGljb210ZWsuY3Npci5jby56YT6JARUDBRA8TDj/8Zqy2qknW5MBAeMwB/9R+Nvd bPPkvll4Qaw9I1FwM3iaMDM4IkqR6r+Gsi+RYIClYmRBU1HXZzKyNR/Ysy0thnIe YO2yg7U2nYJ00ysSZl1Hd7R9EQBuYZk647PMKbQ+pQ4k9KiO1ObT9JivWz6u6R3l gJMnCUEi6s+xW88eeTDBO/AKE9eUUBDZ765M3WcVmGfDYNpW/D3tX7taGcFT80DG VXKnFHAP2Um8IZeHXKGqh/jTTNCqwz7oj3GfVzzGEnmwI+goZScQWUl5J708MnOf uxiuOMBs7SLsvg1d7iEkO1oCDClv72i2Sr4rPuybIPMMPIpx/DpAZAIiMYHJ6PdK nMXSYgk0GOjx72pttCBKb2huIEhheSA8amhheUBtaWtvbS5jc2lyLmNvLnphPokB FQMFEDkZeP7xmrLaqSdbkwEBzGMIAJLwFCCICbR+kqejjFh2BznIOT69PIfE422e C2yD23fC/lqZ6LixxGrsZK5TxRycWw7fq06h77kd/RX8UMFErphMTkIapt+wLLoX qGLcY1dVyNhW34SutdHzXkMFo6T8COAautpnAMhrSh4dBw6XQUreVqc1BsyXL4vT LyI1/E8E3wELJZHldWQ7ldvXPUOaoJp5PJ0FIV3Nvme9g8U0BrZT/NjH06mYgsKW +40ZjeRycvA9Yjh+ONAOdX5ijn7QbixjSehFsmdpx+KdNyZbp6iAIurf7ysEp2Qm N6K/3EukEnVvy7Nn1L8+7K4IDkK+TocpG/m/P67w1AlrW0tNAMe0LlRoYXd0ZSBG cmVlbWFpbCBNZW1iZXIgPGpoYXlAbWlrb20uY3Npci5jby56YT6JAJUDBRA5HN4y wnPlMN5G9U8BAQVeA/0V4alPthF5+FVL7GJ14R7IQee3NkepbsCQrWfDl11DJkyn DxyISqzQd/ur1v5gziOMppQ35rekRYxqqmcKSg8oZtcQ8WFfrMPOYDDn8uTXmwX4 OgLuW2EnJc0y1JiKuew1tHRQuoObZtO9yePRKkq+cPgLn+yrjPjGAJ1AuUL56bQa Sm9obiBIYXkgPGpoYXlAY3Npci5jby56YT6JARUDBRA5HOfE8Zqy2qknW5MBAXAc B/9QuIZEQJDfYJyv5Ztu9mtEUZoFfavYmLnLvbUz0rwZOzv8/krEQtkdVvkWYWQc JSal11h7L1EyY1YzrTnANkq4KUboeiR3X6RZ+z0p1pg5C0imWFdMpqnY3croHkQy 0zU/d/kDd9mU3xismVbDa9xSJHbFh5KDpvnbeRxh5VIXcdiJ+RbM9VNqsMmZwCBS DgY/pyRuyiMM91L9IfWlOUwllAEHwedQg+ja4/M1gyiGKr7rmiE5LH9xbInvRR2F rQKDtmU49MS7ybHoLfZ9GXKo8iTNOuXE7OGOx8kIuapiNwKm2wayng8utIxGacoO hp8D0uj3dgTFUZ3pcMSxtjWEtBtKb2huIEhheSA8amhheUBGcmVlQlNELk9SRz6J ARUDBRA5HOgL8Zqy2qknW5MBATYEB/90qkiF+JTQZMN2wwlLkXiadUd1uHK8Um7q f19t1pI2Is0BNxtBwVY1OlrkpFkSkpSUHEmVKUVhHjsHVV+r+EdJ4dTcsT6c5cCJ i7avfz8duVbym09yDLytnBGr3te7tkmalwk3JkjXJhiMuUW9w9woCuVWRexlABDm Md8JjvyLqIe6bNkIcE9GvHhQQUYegYqVhDqzKH+cme1olSYDDjt458yMYo6UXu+x g7gESluIgGpK5hKI/MAw3r/XgOliBa9igg816jrTFiX1oZT6dgDKlzxNS7J/O/EM GOmNi8N03Qx819oKlUaMHAFPNeUfdT74bqVYbDo/GJptzaQtUiMv =l5Xu -----END PGP PUBLIC KEY BLOCK-----
D.3.38 Sheldon Hearn <[email protected]>
pub 1024D/74A06ACD 2002-06-20 Sheldon Hearn <[email protected]> Key fingerprint = 01A3 EF91 9C5A 3633 4E01 8085 A462 57F1 74A0 6ACD sub 1536g/C42F8AC8 2002-06-20
-----BEGIN PGP PUBLIC KEY BLOCK----- Version: GnuPG v1.0.6 (FreeBSD) Comment: For info see http://www.gnupg.org mQGiBD0R0hQRBACPEDZc2XKdvIq9F4ofeq/EUB8ISFQ6kaVPcb5ingy5ND+0MUbz K9U+q6Ik8d67KfHHvqGn7XTOXxGu2WS6rIa4ElFHtG/9lpgYtOFRZJxM8nv5+zCn elu18skUNup1y3uIwvhNUY3OPSzVkHC+tUPWfW/8DqdJzud/l8sDFDRtBwCgtixB FHJ2jRXInApVzwLcjpgVJq8D/ixzt0O/Zg2p62/qyAHac7M1sEc2QarCAGwRbuNw jHRtglxQw/GT2NACWqy7lVHKd37ciCrXg9QrTjotJtMcoJbCitYvbQo2RHfEeIyN yw7rffTQ4CpB51KxNhUWHcUfe6Jhx2hgHzehJg7hYnbtSv5hJcn2DXMSHHyHwBri hpldBACI7iJxl2MtFUHBo3XW27WYDzTNTh2LUaMcIaowMW/+vIDds6EI71dCAjuU Ai8DcNacMtE0xRdtNzDMS8vgYWBVLkHv2ENVdLfpxhM72iu4tmPKGF5AXK191dvJ qPge41Z2/57191Xt+keYtuSQDtXwZfSu1uLOHBa0BBvmppBOtrQmU2hlbGRvbiBI ZWFybiA8c2hlbGRvbmhAc3Rhcmp1aWNlLm5ldD6IVwQTEQIAFwUCPRHSFAULBwoD BAMVAwIDFgIBAheAAAoJEKRiV/F0oGrNMRsAnAlWdC5LkmEF3hZjNAIA8gMxkfnZ AJ4k6LXdmHMSSPbd48MbDYq67yzOG7kBjQQ9EdIrEAYAib54xuFqjHpvLxXmqFRl qAgAD5XpavuJisxGjfm7aTVWIpR/OOVFYkW59YInHM7dDHL0Y7tQETeEKf9pj6kF TMyWFoBjtdazqSmq2YXOvI00N27IKT9eqxJ/qR8QgIqBMNkraP9QKi60ASDIRUtl OZSfokSbAKkZMTyS086CgWw0bCPXRCvQLHDjga3KCbht0AjrZFkGmi6r4+rXFnT6 D3JrNSQ0Hj2qFEixHtZvXTsqgsEkOEtoe5taMFSygM0jAAMFBf97Ip2a/kPkXNt0 p+2xmWIFEDim7J9Cwl5viTb1t8fOKx69hFDQ2BwPNDZd1HvlrYTpuJ23uTrDOZsw IT/wVc/IQ9nn4+mkxOmq9iTHCBS99OXz4IsODT3W1sgzUfl+mdqJP8xfEnsyqy6G ivOoR3QdZg7rxvOU98HhDQ1iJX3rCtLNFGisrovDF33oHMEE4oHvSMXeg65JXWiU EpEpioINjrA3P+TL+fMv1tb4+wSUPqTWX34Gx4UfDKnMedxl6j2IRgQYEQIABgUC PRHSKwAKCRCkYlfxdKBqzVtaAJ42mqzwmJCpk8fdsfkHUt5uGTN8sgCfdmDni1OD NWQi1mhQOXZX9oGgyso= =PTeT -----END PGP PUBLIC KEY BLOCK-----
D.3.39 Mike Heffner <[email protected]>
pub 1024D/CDECBF99 2001-02-02 Michael Heffner <[email protected]> Key fingerprint = AFAB CCEB 68C7 573F 5110 9285 1689 1942 CDEC BF99 uid Michael Heffner <[email protected]> uid Michael Heffner <[email protected]> uid Michael Heffner <[email protected]> uid Michael Heffner (ACM sysadmin) <[email protected]> sub 1024g/3FE83FB5 2001-02-02
-----BEGIN PGP PUBLIC KEY BLOCK----- Version: GnuPG v1.0.6 (FreeBSD) Comment: For info see http://www.gnupg.org mQGiBDp6LpYRBACHINF1K2lJiWCFAgY36X+NFDvgbRe9U7BKy2Q8ZPouMOi/GIwW iocDyVwRnK8tC3D1BM3THs3cFW0aPsSOTGngZE8rTs8lm53UWi1UApTUztjH3odp OynMb/Dj3k8SOWkq5mYYzl+38jsz067tRDlij4s4I3EjwcBQJOhnUUWV0wCgpDBc wAx9TBVCSY9H5YLtCrJbnOED/iwQH58xpFLxQO1FDYlUCZgZaASm0luft13HuCrM Zj2oDgJZOcuP2AshoJXnKavDjwBIvgf/p6cPZ9CS0sF8WI+v/LHN/EUQQoXXNzD5 ZujgMh1w35nMvl7fSJRDaie9HggnUx+ODtWimmROpiicDXb849asCrUUEcpU0V3G wYaxA/96OWzf/TCr6CZABFBCLq2VwX3Run3ttBiXOVI69gEDj95mfeDUxPQH4JNt /hI1B61Ab3/yDWmjzrW7Kb2i9URK4OKw/95YjoC2g0t/CFrmFi82UwMsmUp4mIqJ eUrQ202IY2zCqCEtHcTbUdXrP1eFkGmi77s+KzzzknO63+efXbQhTWljaGFlbCBI ZWZmbmVyIDxtaGVmZm5lckB2dC5lZHU+iFcEExECABcFAjp6LpYFCwcKAwQDFQMC AxYCAQIXgAAKCRAWiRlCzey/mTswAJ9uujS3rA/mJcR8TH33q6SRhZSeFgCePzaT lOAkDv2LVm0F+V5CBex2gkqIRgQQEQIABgUCOs49wgAKCRDCpSwr0i8VsUrfAKDi Cffo5C6Ei5xHtWRA0DpHChOoOgCgqwDeqC4zLU/lB/jKYdGX37VPMQO0I01pY2hh ZWwgSGVmZm5lciA8bWlrZWhARnJlZUJTRC5vcmc+iFcEExECABcFAjp/gWcFCwcK AwQDFQMCAxYCAQIXgAAKCRAWiRlCzey/mRbDAJ9BS5FWb+Dj4IHlRYsr6IHCXxet LQCgmpN9GwBWNxzBlbAQEw1O8anp5xiIRgQQEQIABgUCOs491gAKCRDCpSwr0i8V sfQXAKDW4IsDEKGr1rYpO4IIZPMl2hVLJQCcCRUr0Mfce6AXKUYBfjAlZmddN0u0 JE1pY2hhZWwgSGVmZm5lciA8c3BvY2tAdGVjaGZvdXIubmV0PohXBBMRAgAXBQI6 f4GRBQsHCgMEAxUDAgMWAgECF4AACgkQFokZQs3sv5mRMwCffitElKCHTC+tF8hQ R9Tdb87+PH4An3jlIX+TAD/u6CjyAZ9fR8nEXeVUtDRNaWNoYWVsIEhlZmZuZXIg KEFDTSBzeXNhZG1pbikgPG1oZWZmbmVyQGFjbS52dC5lZHU+iFcEExECABcFAjrF NgQFCwcKAwQDFQMCAxYCAQIXgAAKCRAWiRlCzey/mTbAAJsEIOjmXPBxqyrpS0QF lrJtDENffQCgmWgC/5AezMfJwtu+s001BNw7oRmIRgQQEQIABgUCOs493QAKCRDC pSwr0i8VsWB7AKCZe9euDml2vgJAaaPt34ptUl4UHACg4SZK21iSMmLW+cI6L8iw gGvDcPe0Kk1pY2hhZWwgSGVmZm5lciA8bWhlZmZuZXJAbm92YWNveG1haWwuY29t PohXBBMRAgAXBQI7RpsRBQsHCgMEAxUDAgMWAgECF4AACgkQFokZQs3sv5m0ogCf RV9e/JXy1ixgKCVoqzaIQ3j2MBQAoJwtV25V4gpucQxysqRrWTB65Ja+uQENBDp6 LqIQBACFcO+vvM6/ItdzUhX3vIihiKENou4FchXwc/u7uchsLs589+PwaYWXqtPH E9YSjXYo9y87Sl6ciOagBL6rJZ8oNKc/ylRmx42iSTdAdEKCgK355kmXiWgaAm/W CT5YIETaY+D9TrBDD+c+ofB8vhekxAlr30FAnX6VmUJFi5xfrwADBwP+LiUdpsML kdJj0Y8PmbB3Gxle3X9w+6hBkoP8Z0q5dzG3Y3mGYpgLd4Ytf1KEKUm68BDJgcvf 41B2Y6Ptp7mSRAufbymIRihNKH78fleaziWsux2CYJGZvsJzuYrlzgwuTzcLQKL6 MfRXZHPyt+1SwQeV6pIE0DBZLHg9a0Ak5sqIRgQYEQIABgUCOnouogAKCRAWiRlC zey/mfYtAKCVze8DK+0HP1fTQyDajO7o9RTIVACeIwhXBEbRN8cH0BsG/8Qn5sZo 2Q8= =/joR -----END PGP PUBLIC KEY BLOCK-----
D.3.40 Guy Helmer <[email protected]>
pub 1024R/35F4ED2D 1997-01-26 Guy G. Helmer <[email protected]> Key fingerprint = A2 59 4B 92 02 5B 9E B1 B9 4E 2E 03 29 D5 DC 3A uid Guy G. Helmer <[email protected]> uid Guy G. Helmer <[email protected]>
-----BEGIN PGP PUBLIC KEY BLOCK----- Version: GnuPG v1.0.6 (FreeBSD) Comment: For info see http://www.gnupg.org mQCNAzLrzf0AAAEEALuGJUgTVleE9HeqPAi+AqBDMMfa76kC63xx98Hqv1N9TlT3 jlWVShX7Da/9h9WgK98wkb7613Ur7dPl2qVcSns5w7MCustbtt4YEaQwXZ2jOEZf snKt82+DYxZRyfUlY4h/8WA79R8BwTGd/l6g3kDoQuD/446BT8c0Yd819O0tAAUR tCZHdXkgRy4gSGVsbWVyIDxnaGVsbWVyQGNzLmlhc3RhdGUuZWR1PokAlQMFEDLr znbHNGHfNfTtLQEBxIUD/2Lk7Ds8Rt5ZPVNB2Xv2kzEByndv+r1FUDSDcWUn7MaG HdgIqfkNespNzv8K7ORW+qrgIAtCRGXhc0Z1q1/Mb3kzC0g4UW5BuleZEur8Ys7t lc13ZV94Wb/rVEnY5wh2s3mCmMeXVA9CAiNBzzI9O1RKVZrLLYJk62ysSoq1os+A tCdHdXkgRy4gSGVsbWVyIDxnaGVsbWVyQHBhbGlzYWRlc3lzLmNvbT6JAJUDBRA7 8tH9xzRh3zX07S0BAdUDA/4poipXJFYG6r7+Hk32P5unYZt6dJZ4qSwsnc4+DVuk krv5L1jC8Wg/Ojerk2hYTyArM7xQkw0tELOADL2KBUlHp+Ipz7UuO55n/9aOHnWr YJLjT3+9eliYkPqJ4t7sHqlCeuyKc7HkoaaN1ErJTmLLy/Jfcx8BsyVsgihI9V1s VLQjR3V5IEcuIEhlbG1lciA8Z2hlbG1lckBmcmVlYnNkLm9yZz6JAJUDBRA78tIj xzRh3zX07S0BAXQ6A/4zKB/ROfSAUmVQGm0tH1IC4lZX1qV/PZ4z2KUWQPmXP3jr jzYFdlAPaUNIwVqW8Mwj+p9njnL/Ltd3NzAjTP2I7bSzBtg4NcEBRNclOOnbCamX B4mSGt07WgfT1QGCY8HyKXNhUBbqvPShfeH1OM7iyooLWU79V/1v8utB/mHxYw== =nrvZ -----END PGP PUBLIC KEY BLOCK-----
D.3.41 Maxime Henrion <[email protected]>
pub 1024D/881D4806 2003-01-09 Maxime Henrion <[email protected]> Key fingerprint = 81F1 BE2D 12F1 184A 77E4 ACD0 5563 7614 881D 4806 sub 2048g/D0B510C0 2003-01-09
-----BEGIN PGP PUBLIC KEY BLOCK----- Version: GnuPG v1.2.1 (FreeBSD) mQGiBD4dlrYRBADhXves+DDbhv8dD1LyC7e+RIASp8rEN0mJDVarhEy45KxRZcD2 hE9dLXZU/5hcdK7yfatneg5xGFiedFJ+u/HcsMkxeb60+RUcF6Ec5L8PJmCwIQl3 3xP7UmC203YufvyidQSayOk4LDyg5WVGEXiN5KuShJC+feAwvtAao5eHnwCg5CmE y6rO8Bh/K2MQxP8CXCoLG80EAINd8twMsRIIqAxtVWeG0yudtgYdvhpbGrNKoq2b cxmfunLAQmHim1jL5run1St3ZACyuP4brckPiBAOxVoRcIMOGPk04Lw3blKQ7u02 6aOKKlGvW2pF5/Wh6v/q7gzAucn1HJYcGK7Xc8IvfdIZJl/tTeCo0/smxND4EWhU C94zA/0bvNhgntEwLF8x6UJnZXfQ8/LGl/NkSTyTMA1QqRrrik1oN4mYOAHE05Y4 Oija6MSgD8YDRcrxxr8Dwh4pqS/+FlEsV5y4A4OoYbPW5L6FAbEpKO86jbE3FK20 lX9Li5+woBWaTuLRcU2Tk69WLeOTdOrs+f50S1xWB4DJKBjmu7QgTWF4aW1lIEhl bnJpb24gPG11eEBGcmVlQlNELm9yZz6IWQQTEQIAGQUCPh2WtgQLBwMCAxUCAwMW AgECHgECF4AACgkQVWN2FIgdSAaZtQCcDxSj1KNFQXWXPl+U27Sl2/IbKEgAoNDq Yn86zUh4NPJZJb3P174CFRK0uQINBD4dlxYQCADaMWMhYNWemjrdioJoZU3vYkup IcQg422OZoxWYcUz6zKVHZuPdXSAFO+Edrt8QwvYrjhSiOSF9NNnFgNGMBGmqOg9 Kfk5rIKnENNQP8H8CZtzlDjJXVoMAeTfaeV9+ztHwWKk6XagjLApl9Fx42Quu4Po JdvJNHhq5Bf299jecRsWmSo7DtpNnzGC2HFWRkGdkkNmpK7hFe9m3YsFuP3nCFps RXCFMx9t2Bneh1eM+NqogjON+vyZzOUB32WY+x9Kz6Xf29auU1PSNYz+1LC7JAYk f4CrFA6wexQHKe/nXwlik3/JeFSPAsp/VsmvaHOenZTOfmtBT4ruOwqn8DGzAAMF B/4tHAo7/sAMgvkz0qHAxV1DjOjB5AQSs4phksYWYN1uaJq2//oD/jjifmmkhAq0 JLEeKDquvuNot9dtJ/75DF/XNa0Upt4Hq509Wm4o5NBN/CxRzMn6oU+K86S6RF1x JidNNI+CsTfdkNnCn0x6OjRsG0j+CUbwRrs4CJ/7ZWkuMCclLBKoI+rAwd5YM4eI noSrSZ4/2Uct7CyVm2aGIh5ofR75L7k92qZ/D5hN0wwKrL42bO8gJqPGPgsCtr9m OcT2DtOxkS9ir2QRyD7SelKM4pmSbxvk8S/IzrNS7dvKiO0xQXsvf+sG9rZOJ2vF i3in0uB9SeXAzsqNCqtEkSbeiEYEGBECAAYFAj4dlxYACgkQVWN2FIgdSAadQACg z3dGbsy32PBhRn/t1lXp1120VrAAn04hxsFX0HEKt6sqAcpIuzdTVrEM =8gWX -----END PGP PUBLIC KEY BLOCK-----
D.3.42 Michael L. Hostbaek <[email protected]>
pub 1024D/0F55F6BE 2001-08-07 Michael L. Hostbaek <[email protected]> Key fingerprint = 4D62 9396 B19F 38D3 5C99 1663 7B0A 5212 0F55 F6BE uid Michael L. Hostbaek <[email protected]> uid Michael L. Hostbaek <[email protected]> uid Micahel L. Hostbaek <[email protected]> uid Michael L. Hostbaek <[email protected]> uid Michael L. Hostbaek <[email protected]> sub 1024g/8BE4E30F 2001-08-07
-----BEGIN PGP PUBLIC KEY BLOCK----- mQGiBDtvujkRBACVspBVp8gaHUZeh35hSQiKdKYiA5zd0Qez3eiRrWFIilZLB5HH reTe+wFwBOMEsgwA7e4v5GWnsWySWVRe3okPQ+Nc3CTmF7JGlnHklhExFtQ4EGCq Z2BCj+QfusUap4vArd+hOW4MS8bCnV8GvDJLdIMdbOBUI7RAl6+JRxQqYwCgz47A a3bnV0/c9E9nuRek+XRQfDUD/1fsX2sK0w1fjLvBDcrhlPFUDj4P/G9QrjnWJbBl RaDpYaSEklbb+g8TOVtPEqprtFPQvqB9kWS9IJfmd+WRSJYXBtTFPJaYAy7hlQi5 jw7pqIK934cMbJEIMKDfkScpKrC3qplRIUN8oRtpYONF9TnzfrA3RkLvG1Dk20kc RIU8A/9uOfhXSgKgTqSZbW3QbWdE7VyVOBLANeWgHY3MOhh4qKsbM2v7SK2lSVu+ cY650DmZNJEpD7mE5wje7eFTvmrTbB1bygBrpxlithpNkqlFp/ePmU+sal3VTzJ2 SOpDkw6NaGTMercnJe+jWObfPMphEKL18zM/BFwOWg3ubGYlWLQsTWljaGFlbCBM LiBIb3N0YmFlayA8bWljaEBmcmVlYnNkY2x1c3Rlci5kaz6IWQQTEQIAGQIXgAIe AQQLBwMCAxUCAwMWAgEFAjtvujwACgkQewpSEg9V9r7TyQCgjH3eMZ0+irDBZ+eS N4S9vV2eC5IAniLYcMk66do4xiru6g3Qt54B0beAiQCVAwUQO3JisgDy2QnruxtB AQFYBwP9FMPDSv4DdSWaGkCXSeSLfyMsTflkVRa0gRljcqEQQ8iEfYKaum8eI8vE Et2h+bMVe8q9PnCB9Fn++pukaH5wrggg3O5o+2gSh2Hoy0/Ter1E6gHiH8aWoV5V 4yB2J9hEffTrzzG0X4G77XVVWCiAqyp52gRMl6ftbOOXU8XDat+IRgQQEQIABgUC O3MMugAKCRCjLHqb4LuvBA+BAJ9Zrf3OInzwdjeMthjZ6kYtSYysZACeK9vXzmNn PcrKw/W/6M7egoZIeouIRgQTEQIABgUCPmxk0gAKCRDdEQhXRChuGuaeAKC9pThr yviZ4bdM8X16xVvd8RDrZwCdHOPEdLM5xJrMyi52SnqVFukInMqIRgQTEQIABgUC Pow66QAKCRAATVS4OT0kackyAJ9v60ShjVJHiu0CdRf/ylAid9w2yACeNrFJ5axk lXLO1sqje+YW9goFCkK0LU1pY2hhZWwgTC4gSG9zdGJhZWsgPG1pY2hAZnJlZWJz ZGNsdXN0ZXIub3JnPohfBBMRAgAfAhsDAh4BAheAAhkBBAsHAwIDFQIDAxYCAQUC PW34AwAKCRB7ClISD1X2vi5YAJ4ueZ6kNzV3M8yZADEIk1dIxGgGuACeIbYVHm20 m5d9weh9XCs3mpOTzV6IRgQTEQIABgUCPmxk1QAKCRDdEQhXRChuGkMaAJ4ggn3x rOrY4GLFl3X1u2HB0FjSWgCgmpQOyeTHDMYVZiEx5KnulXKwLQ2IRgQTEQIABgUC Pow67QAKCRAATVS4OT0kacDpAJwPRftj6HdKuYeuMbRrREzlts/oJwCcCRx4r0Gj sUIhk5/ImJOBGKYrf9u0L01pY2hhZWwgTC4gSG9zdGJhZWsgPG1pY2hAaWNvbW1l cmNlLWZyYW5jZS5jb20+iFwEExECABwCGwMCHgECF4AECwcDAgMVAgMDFgIBBQI9 bfibAAoJEHsKUhIPVfa+cIIAn2NHuE79An0zOAe5Eb6U/wmZXAvSAKCv8K0wgLvl NPjksWEx8t2G3e78uohGBBMRAgAGBQI+bGTVAAoJEN0RCFdEKG4aswcAoMBnOBII HYdUEJ4WMT2sDzq7GHioAKDd912ew00eGfdnEwSlkRuhGYl6CohGBBMRAgAGBQI+ jDrtAAoJEABNVLg5PSRpNzIAn0T3AF1A70ENm7gxLzjgQpdfEyyMAJ4/H3SBcNQS oQQnxAdrSmzCEBtllrQlTWljYWhlbCBMLiBIb3N0YmFlayA8bWljaEBmcmVlYnNk LmRrPohcBBMRAgAcAhsDAh4BAheABAsHAwIDFQIDAxYCAQUCPW34sgAKCRB7ClIS D1X2vm4FAKCyQJB4hpYGOeZ39eeHRkpfnXFPFQCgtyV3qtUcD7h7ZXPcVDdPvd3a vjKIRgQTEQIABgUCPmxk1gAKCRDdEQhXRChuGurhAKCqdGFrZzRWHmH/3jnH1yXt NJjNlgCeNtY28lujuwijpNDERkqZ2e+awduIRgQTEQIABgUCPow67AAKCRAATVS4 OT0kaX15AJ9NxqQYM/8ESbK4QDoYMzlpFvu9LQCfZMmINbzh4fFzEdAc/PKvPYUH T8+0Jk1pY2hhZWwgTC4gSG9zdGJhZWsgPG1pY2hAdGhlLWxhYi5vcmc+iFwEExEC ABwCGwMCHgECF4AECwcDAgMVAgMDFgIBBQI9b0hiAAoJEHsKUhIPVfa+sZkAoIlI oBDtL4BAInfH1oiTVbWNHQhDAJwPeBUXsa2F3cU3+Fksg7n6sDIYYYhGBBMRAgAG BQI+bGTWAAoJEN0RCFdEKG4aTxcAmwa2jsIaacyRb31elEKZdSWMfZbSAKCy+LiA AemcmXzGUnvSM7/M4w1J04hGBBMRAgAGBQI+jDrtAAoJEABNVLg5PSRpfLEAn05R 33B7SPNsIHEPt+cEINb+JexQAJ97c3MUuDW8FHq8GnY+AM26YzHa+rQmTWljaGFl bCBMLiBIb3N0YmFlayA8bWljaEBmcmVlYnNkLm9yZz6IXAQTEQIAHAIbAwIeAQIX gAQLBwMCAxUCAwMWAgEFAj63lLQACgkQewpSEg9V9r4BqQCfdJrsDo9ero5u9yeO WPMyO6lNCL8Anj+GTaudrlrYhV87cWvWp3TF3JJKuQENBDtvujsQBACFt7tjPWjH lYZMEml5R+o7eZTrUUw0tAtcMcwV86r5xmvllPhsjar/LMAY+VqLPD7Z/KwTwrRf df236sPshB/v5BoRu4RCDW0yy6Q5xOLCj0LlOarUfTYUMhYVfv2FNKNm5FSk9/3N EkwNi/PxGAV5KNIxQXDND4YskIjGiJUZMwADBQP+LVrKJYCmOM3iq3qfcuONwpBv hJb8Z7AWywUyl3H+Gy5/PF0nWzN9nQNHcb5aqiszY4tvdqAUW/ttIRtKR09BXDaA kct55YywRf+mM5EgKxWQtjPW7THXzsPrSCJ9V+lYMH3wHw9+qs34fA1I2m0P2QGw 6b1ZcESbH58wM4x7ZQOIRgQYEQIABgUCO2+6OwAKCRB7ClISD1X2vgovAJ4xjmcd ulAo4ML4T8TJ+alYnQO5zgCfXsb8wtA8I0ngWwOQxrnRRE7+Smw= =Tcpo -----END PGP PUBLIC KEY BLOCK-----
D.3.43 Howard F. Hu <[email protected]>
pub 1024D/4E9BCA59 2003-09-01 Foxfair Hu <[email protected]> Key fingerprint = 280C A846 CA1B CAC9 DDCF F4CB D553 4BD5 4E9B CA59 sub 1024g/3356D8C1 2003-09-01 [expires: 2004-02-28]
-----BEGIN PGP PUBLIC KEY BLOCK----- mQGiBD9TDBwRBACs0PcLGuginQVidy1QScHuKS9G7gd8smYI2FcSsk/AkBhqIkWv hieu+iXlpxyZYCDDPKPhieDLkTHc9hYOGG7oTJhBMXUrUqBIk+sqeeUAl/eh0grX wUU2khj8EkYC1f6p9AKu25zoyXHxjnKulMhrZRIItg7jVJLaFQn2A9KCkwCgyVeF jCegTvZWikBuoXmDI/K3OuUD/19Za3DHV+H0dmfAG7JdVwTW7mJ3nCWJFvlpTSSU 9Di4VCVj8kUGmo/kRgpZ6gwlCaPmwh/wWiT/vHVQqdd+EH/k/ITs+zWrPOnWCxLY zV0BEKtW4kdaP5H9ttNh3Wj1GRpyxh/FrMP7zJfdgze2WoRY57j+H9Kuw2s/42RU zYDAA/9wIriNXAj6pFB+J2sCqYXIMNDNDQh6lYFNFgTS/WPYJoA8PWY62oFc0V6n ES8GOXjyEya428vedVy/G9kj7cB/IiTTy8Hj7JjhUk/rSIPXMMtNyvM6vQ++f1IV 1qSzR9sijpmpk/M2RusUQwBP131PnCzSCmAZB8gvcNSlbA9gnrQgRm94ZmFpciBI dSA8Zm94ZmFpckBGcmVlQlNELm9yZz6IZAQTEQIAJAUCP1MMHAIbAwUJAO1OAAYL CQgHAwIDFQIDAxYCAQIeAQIXgAAKCRDVU0vVTpvKWeZ+AJ0WEAehp+jufcbpKUxs P+DnMXVmDQCfVWsK9Vv67evXLYZW6AOcNFv/Z3W5AQ0EP1MMHxAEAP6wR7DLVEQM 9BbJyp1lVbPGaJLVf5PNICB9xzv9Aq8BkSwYAO+Edy9oAJMG5hFWvwPLNTEVTF40 HJZKQt7s3keZqpq7DrzXOwj7aix9dtYmSnclTJt4VIg3mlpws0/n4MQA7POmEIXw Au/0f8wHwn11GFnAORjtIq39xI2HgLPHAAMFA/9oPh7GHOgXWJdHjzv3EQACxHLc IJqiI814TgCP2ZaaOoQzNZg6MN5nbMVbwmufaL605UYWmDYUrC26pTwlGz+Wpt51 hSUzdRCXamoZJXa0DOK4soqTM+cpajrv2EiGuNAIQ+TUyqKmgvqXyplvy9sGmgJ5 7k0XvvaNHzlqLRl0aYhPBBgRAgAPBQI/UwwfAhsMBQkA7U4AAAoJENVTS9VOm8pZ ldgAoKwfWpC/Tb9nRecHz3IHsBoPsAZnAJ4i99qxrYRvYkUWE7m6dHMTuywsRQ== =Zz7u -----END PGP PUBLIC KEY BLOCK-----
D.3.44 Jordan K. Hubbard <[email protected]>
pub 1024R/8E542D5D 1996-04-04 Jordan K. Hubbard <[email protected]> Key fingerprint = 3C F2 27 7E 4A 6C 09 0A 4B C9 47 CD 4F 4D 0B 20
-----BEGIN PGP PUBLIC KEY BLOCK----- Version: GnuPG v1.0.6 (FreeBSD) Comment: For info see http://www.gnupg.org mQCNAzFjX0IAAAEEAML+nm9/kDNPp43ZUZGjYkm2QLtoC1Wxr8JulZXqk7qmhYcQ jvX+fyoriJ6/7ZlnLe2oG5j9tZOnRLPvMaz0g9CpW6Dz3nkXrNPkmOFV9B8D94Mk tyFeRJFqnkCuqBj6D+H8FtBwEeeTecSh2tJ0bZZTXnAMhxeOdvUVW/uOVC1dAAUR tCNKb3JkYW4gSy4gSHViYmFyZCA8amtoQEZyZWVCU0Qub3JnPog/AwUQND7kZgis sbaj1yqUEQIhvACeJ58983s/0jjThuj6WeTP6hLZNHgAn0o2KINvhw+Oc8uQk5m2 aTiVgVQxiQEVAwUQNcJNdAyPjrKngh89AQHA7wgAg3QnT0BcF/zp0VRMUZwAysRC o4Xkgv4oaisCPO5jERGEp8NlXuMD6wJCrGRZ9xVwTbSRXJVirNkiSKj1rnNc/pPA DbjsmQ+3nhLU+YwNgc2VEhiVpeU2iOL7ircc/YN8epdFPbzn2timb98b+/qlaSiz m+g8pxnY4USn1b4CnzyirD7mvHhV61k0mrUSmaKzgg2Ppeo2qPzn4w44hgT5/jjm iEMzoH8zFrN3pwcUYYhH5rNWNnqUIMwuPOEHn4Wp+sMti4yOqQxNHnP0Mv6mxS8+ UKRhtDXU0Ra0SaIhaNRw0k0YLEbO/lteTRc+7cAPBs+QUTa6xbVxIzsBAWLC7IkA lQMFEDF8ldoff6kIA1j8vQEBDH4D/0Zm0oNlpXrAE1EOFrmp43HURHbij8n0Gra1 w9sbfo4PV+/HU8ojTdWLy6r0+prH7NODCkgtIQNpqLuqM8PF2pPtUJj9HwTmSqfa T/LMztfPA6PQcsyT7xxdXl0+4xTDl1avGSJfYsI8XCAy85cTs+PQwuyzugE/iykJ O1Bnj/paiD8DBRA0FhC0XatM0mFMec0RAgaSAJ4kHkYXQO/74W5m/7ZvQa3CPR8E /QCgpHafK/S6PWQsSOChmVjwrZDVP8qJAJUDBRAxe+Q9a1pnjYGyp3kBAV7XA/oC SL/Cc2USpQ2ckwkGpyvIkYBPszIcabSNJAzm2hsU9Qa6WOPxD8olDddBuJNiW/gz nPC4NsQ0N8Zr4IqRX/TTDVf04WhLmd8AN9SOrVv2q0BKgU6fLuk979tJutrewH6P R2qBOjAaR0FJNk4pcYAHeT+e7KaKy96YFvWKIyDvc4hGBBARAgAGBQI1f/BdAAoJ ELwCvAMsr1lwqUEAnjOz1VWwJeI2QZMNEHO8RLURWHSYAKDqG+S3NzCeiKM3RRzc FubwdsfYLIhGBBARAgAGBQI5ZAxAAAoJEMN1Z4b84RmYUt4AoOtidEj2yIZubvvT kB+moQ1+ZscyAJ9dhz4GLNev7zNNfdAKi8JqoqfMlokAlQMFEDF75Qb1FVv7jlQt XQEBdn0D/0X2Auka6RU2R46NqrFB0kZNL5rGH8BuTRz+cqEATLGkCXknJDeJ9iTo EeE++VOL0utmhcYDyyT95Th5FNlXO8YQLgb7Gxq+UT/HOS7zznlBMs+mQK6dSlB6 7XDNoitRQTpmOHTmKYVsljJA4GBMWm6pawKuxSmX7aavwgYjEbmsiEYEEBECAAYF AjmtSQAACgkQLKRaTx+AVKjiTQCg9FfHlNeMts2GcXWplPQya7GEQtMAn0nrzupn fRNx6+Gi0Km+WSlUQkMF =ZyVN -----END PGP PUBLIC KEY BLOCK-----
D.3.45 Trevor Johnson <[email protected]>
pub 1024D/3A3EA137 2000-04-20 Trevor Johnson <[email protected]> Key fingerprint = 7ED1 5A92 76C1 FFCB E5E3 A998 F037 5A0B 3A3E A137 sub 1024g/46C24F1E 2000-04-20
-----BEGIN PGP PUBLIC KEY BLOCK----- Version: GnuPG v1.0.6 (FreeBSD) Comment: For info see http://www.gnupg.org mQGiBDj+agARBAC1AfvgGQEVdLwS0dirwaN+pDDWWiaSWBNRNo4T4KKG2vyhhnUi f2PcjPx8rYLvbokJFltoTWos3lS8hD8PZGBDlImOPzffdm/GYEmr1mE8fQvzjdKD iOTqQi5IYYhLZIMmUpBTK7XN2zrM8VrkgCpb5TYtBrQUPheWs/SZ31EvLwCglUPA T54Joolfvk0Y8I6dSGYctpUD/3teZiYwem99CE3b1tsqavQ1MUfjwSPZQq8wjVe8 GZUtwaeExugAxNjXIJeXiaCij7S6JSTS0ytyxZ5/O1QFmBhuD/7zjNFD8yB8nu8x slma7mVhMuhqkwU06hTkp6MNNJ7kRItoVETtLqR5mW+0UUSZyePQFIH9U7TKPG3W vYMIA/9btsMQD/7QA9p/m5OP4sfdVdNCZ32tJ534bMjDYyf/P8k7QzvDWU8f7lbk 3vX5pSmHplws0PwSZITmRarMdEH9ucP+24m06MQ7YmDYyLlUCestT2gAxnB5/X1h fJnmdCLi/Vt19WrVM79ebddbCqCaoz0xv+1qOQmPue/vKXIH87QfVHJldm9yIEpv aG5zb24gPHRyZXZvckBqcGoubmV0PohWBBMRAgAWBQI4/moABAsKBAMDFQMCAxYC AQIXgAAKCRDwN1oLOj6hN4YuAJwOTOURcLpgAx4HT43jNxDYCsT7DACdFdGCwsi4 w5ZiCeoizmoBMFvYTa65AQ0EOP5qIhAEAMAerdyvcs7DOxpsli24gkKJxCwHSq9U 23k283XpZHOp/0eS6WEJMHMyQ7BRrx3X6mkSgBEnHdO6MetBQjOHdjSb8ycotrJa H9eMkZ/Iky6dbiWpPLI4ytS4Q8Z4oEGjUTm7pJiE/pgmaCX/kv0WMs/35En+42sY VoVU9bDI+X+3AAMFA/435RbM6ywO/kL8D3lhwINGEIqmxWpJDlXPPJf2pLiWZZVK MLGkHOTe2kUdd+E6WcoRZdGblOKxLACrlKpJa91aw1ftQT6rt0k8GDCGLT/33FWx 2IRSf5sHmz8IOm6L8TcZU31hdWqpDLmiIj+IjUCx8+eAUjZcVRoj6BYnWc1Z64hG BBgRAgAGBQI4/moiAAoJEPA3Wgs6PqE3PKYAnikfYo//UA7/jrDuTXzqPmi/Un5f AKCFsfcXDbLGfWaAqe2YzeDR2Z55/A== =N4HT -----END PGP PUBLIC KEY BLOCK-----
D.3.46 Poul-Henning Kamp <[email protected]>
pub 1024R/0358FCBD 1995-08-01 Poul-Henning Kamp <[email protected]> Key fingerprint = A3 F3 88 28 2F 9B 99 A2 49 F4 E2 FA 5A 78 8B 3E
-----BEGIN PGP PUBLIC KEY BLOCK----- Version: GnuPG v1.0.6 (FreeBSD) Comment: For info see http://www.gnupg.org mQCNAzAdpMIAAAEEALHDgrFUwhZtb7PbXg3upELoDVEUPFRwnmpJH1rRqyROUGcI ooVe7u+FQlIs5OsXK8ECs/5Wpe2UrZSzHvjwBYOND5H42YtI5UULZLRCo5bFfTVA K9Rpo5icfTsYihrzU2nmnycwFMk+jYXyT/ZDYWDP/BM9iLjj0x9/qQgDWPy9AAUR tCNQb3VsLUhlbm5pbmcgS2FtcCA8cGhrQEZyZWVCU0Qub3JnPokAlQMFEDDmryQA 8tkJ67sbQQEBPdsEALCj6v1OBuJLLJTlxmmrkqAZPVzt5QdeO3Eqa2tcPWcU0nqP vHYMzZcZ7oFg58NZsWrhSQQDIB5e+K65Q/h6dC7W/aDskZd64jxtEznX2kt0/MOr 8OdsDis1K2f9KQftrAx81KmVwW4Tqtzl7NWTDXt44fMOtibCwVq8v2DFkTJyiD8D BRA0Pu7GCKyxtqPXKpQRAhhSAJ9Z/WCnDtISX4FU9bF/5QKEvmvtGgCgsKyY1mk7 0ow22bUmdvPOz9zJxQOJAHUDBRAwIIYjCn10cvEMm80BAVrEAv9+1GycVrDVEVEX cNTQ3CX+HiZKNXsNWruNcrU2+/djtR4l069ZysWvx14NPtnefRxspzlUH6CrRMNg R2pGJTUDZNZs58RsYv+BdHE4V/oZifP1fMI7ZuW0NIRjHhUIweGJAJUDBRAxSx5c H3+pCANY/L0BAY+TA/9YQPISXYaS+5r0I60wCJ+i3a9PC69Zak2ikgTHQi97LhpV tEsP3SAYInDw4YMS2oU9w1XxoiLLd9hUpcZlmO8Ip3vNF+E2ZCfR4sNzKarY5fdo +sxzatGWRPgnHjbm6RHWCw6qJACDD3VpaFjx2XD8QrOTyiObnbHhWBdoEAIyNohG BBARAgAGBQI5rUlcAAoJECykWk8fgFSoTiIAoJa59BqzeoS1ytJdiFLzK6GjEl+c AJ9AErDKZKYLaAYa7LSLzt78zlN4+YkAlQMFEDF+jX1rWmeNgbKneQEBCrID/i/r i8/eXUXRJp2fqJqzvrWGTP9Ix1O4vMguah9IILijgpYyOJYkezZKijjVCVmLX7Ew fNXfYkqLAWUa08eov4QfJfJDgfe+Z/3/UoX7RcJoy2AjTBZQzOI9JMkrzFdtFGYw Mr/QXhOdVVpSGeZ/6Hkrs7pd2Z6MNNrRf81ZyJyYiQCVAwUQNBDRpnW7bjh2o/ex AQG7ggP+NcUV4mCzYx1MM05kz8Vt8OEjirEBthSypLf5FrXrJ3xZ38CNX4gckTY2 iYVaXxStSMIaKdeLDM+ArU58UmtL06DXBAu8CXRfzgEDwxM/0FCvjDvoj9FuSyBR KtUIg7wwnCXJ2NI+hxYYF5eVWNtnFfPK4mTsf5Mb7O4jkG4Fw0iJAJUDBRAzBiva s1pi61mfMj0BAeIhA/9fG0FYVdoFGBUsSFE2lLTth1T4uxkaUs5l6E30vhSckUdB A806kx7LaAXtj3loE7Dn/XFLm+VCnCZEUKe1ayb+Cp3Mrqu6V+vWvkDL3gs7lMAL q5w27f3pji+jVPIPVJOdELjroqW+a1C0C0UaBeU5FYsv1REvNxEV3WEPTJd31okA lQMFEDjGXEvKbyuD/AwC1QEBMcwD+wWwOmzXE7wpIEZ1p5KsRiVBQ4F1VEo4LviQ kE0jUx8/i0/Y+kRpb3sZc+yh84qYA9vrRe8IDqc1a66ZvGUPZOsfiICpJoH4ftPz 8xMLgyfHZrSR+wICStXNAKok8Oq6a56+Vxjh7wpNDoObN5XfYyAr23yNoPh07pP7 dXNRfGKiiQCVAwUQMTlDoO9huekR1Y7VAQGy+AP/Rzp+UGtJavbSiPx5EnXOXxkA /+ulXQgQG9vdkWwewkvxDNOzHW3KkUWCGtPtIMENznbFj3QlYB+USIaf1ogvlD5E dXGPDfTINpE8CX2WXzajfgYFpYETDzduwjoWDZfEN9zZfQqQS62VgAReOIz3k9BL 708z/+WUO0++RLGCmImJAJUDBRAxfJXn9RVb+45ULV0BAXJ8A/9K6NT6VLZZC5q3 g7bBk5DWuzBS3oK2Ebww6xzsD2R9edltoz1J3GPngK0CWpHh4kw5iTaRWoC2YJYR NG6icnGvlMAl1/urqQHJVhxATINm8oljDKsj1RBJ6VKBzNbCJIHTVpX0AJoqUQX2 Idi8goFr0fAm7cD2CBb1JhoAdzEfO4g/AwUQNX+5mPxGGtR+MqsrEQI2aQCgmSzO SfQxEtKMshB0VJCgAi9exqgAoNosC8C/0kFMiGI8djBrxiQ1O2vpiQCVAwUQOa+C q6WQ7KI7msylAQFqcQP/e5kOmx+qu99qwEkrwpTWzpfpgGl1BuEsKDIRk6VOmo7o egtd8kzRjL+S2OUgUWA9l6i4uUXsTJWIDzqPOc8i2vI/OfelnKIGu/uTZ/A2Az8V 7+6hhPhIZ+JHZ3ep5rTd++4+SyCFLXWiCl8NmQwdhmJpsWUtHavEsC3NBgW+5rOI RgQQEQIABgUCOe5/HwAKCRAj54bpvu2UbkMWAKCLrzhdCCmJoA1/ljX7HbXDuf3u cACgrwhPV6ZGrKEn1Hkl7Z88ICwAGXSJAJUDBRA57n6ATVYoIXkFDBEBAficA/4s HQMoCC4q6OHVor7iZt33ypvjvaKRiS58A/SgAc0Y8P60GqpuAEcLUl07V5/hAcwW WKGGX1LwBmRxvhbNn2tHUVAj3oB7UM0KSUa7KvltcaqXFYIyjYkAROkgm7oTWMaY vN5H6JucyOJdlkqzvAACtagXntUEwxJ4ptHxwpylJohGBBARAgAGBQI57nf5AAoJ EF1SHIzmsVAWoJgAnR/1FVW1EE7BnHJDt/GpIR5mq11kAJ9RmTUUaedL+I/xCn8g OViHwwcea4hGBBARAgAGBQI57oQcAAoJECAVMdWEXf7dOzsAnApDRHpSZZwB7DbE 03ZPUqZUaCV4AJ9pGurLhFjYo0jVR+CH1MrqkjxVWw== =GwRf -----END PGP PUBLIC KEY BLOCK-----
D.3.47 Josef Karthauser <[email protected]>
pub 1024D/E6B15016 2000-10-19 Josef Karthauser <[email protected]> Key fingerprint = 7266 8EAF 82C2 D439 5642 AC26 5D52 1C8C E6B1 5016 uid Josef Karthauser <[email protected]> uid Josef Karthauser <[email protected]> uid [revoked] Josef Karthauser <[email protected]> uid [revoked] Josef Karthauser <[email protected]> sub 2048g/1178B692 2000-10-19
-----BEGIN PGP PUBLIC KEY BLOCK----- Version: GnuPG v1.0.6 (FreeBSD) Comment: For info see http://www.gnupg.org mQGiBDnuWJERBAChyOg7jb+Cj5UDqGfChHZDAN5GqF28W0GwrvV0RVWqlGx3pn+S XzDur7ijNQfj3jAAGgFErCptXWcDz7CLzS2GxddaMAaQcPWP9hDjJtUJ633xwjU6 H0U0VPdLcWtJJCva1LvKp67ICkM4Wx8OdVHhCQN4akvNkYzdt4AG+s9vFwCg8Ddq naF901g4VlK1IUqWTxPUtocEAJROiv4o3aIWrXvD9YBxkwIrrvtR8V+QaB6drOer AU9NC3T2Vkm90lgmUpP+HCmpZt/T2v1t5a4HHjyf2ljD5ANeznAZORA6SowuWRhv ObmYoN9B+vzHCitVTXLNksJCK9kpEvbS5shzbU6UsecCUTohjCU4po2RrsSSILqE oXYjA/4/j3Qg/w0RabnS6RJyGDls3FBqS4gyVByaJpH81snvZUbw/y9aT9xdo1YW gUaLcEW09whi00M50vaMzXJ0KYcWHZzk7LrhOqcIiCAUm5Dfve3dwk0DbgVD6iCb LRI7NuB1Tm8YyvZRRqG2ZcfYVPZgVm3zj748sRaRSPWfb4wGgbQhSm9zZWYgS2Fy dGhhdXNlciA8am9lQHRhby5vcmcudWs+iF0EExECAB0FAjpsFVcFCQvE8cYFCwcK AwQDFQMCAxYCAQIXgAAKCRBdUhyM5rFQFnG1AJ95ZZo5g7AhYtfJOrmrP5fboYCV XQCeKruSz2WhPM0ss7qsTA/e94XlAeyIpwQQAQEAEQUCOe5hEwoGYWRwcHJ0bXMA AAoJEDGmPZbsFAuB22UD/Am9JP6EHolhUPH4vccPMoaZ7u8ng06npVXXYjnLGbC8 UsKlQsoLxMsC7c1A3iumQ4geIF2/R8Ihj4jpOXYbcx6okDjhZIyqB1gv+RighsW9 uwhsVF7fhk1uRc3asswNZgi9sBGqNnfCqMF351UMTvfBXHnqzDJ8vPMOStsWDzCY iEYEEBECAAYFAjnuhiUACgkQc4fikq0QxsR0aQCfZF8RKRaKqR4emQjub87fAVYo Pk4Anj0WaSOwC1CX34RUN4bxzNi57xReiEYEEBECAAYFAjnuhmIACgkQtiQG5lvB UqHYbgCg8AFs2jQ6xhKIziO/xhupEXT9ZZUAn3IpjCum/oIZOGUELJoajAG3Gckj iEYEEBECAAYFAjnuhusACgkQIBUx1YRd/t11SgCggKU5NOYpsG/04L1LkCcV2lT5 V7UAn3d0EdAIb8tMvCgL1npDSYphoSzdiQCVAwUQOe6J0E1WKCF5BQwRAQG6MAP/ YMLUSid+HBJtNH5AjuZlX52Z0Oh1AInqX6igHrQYutSG7j2Sd8cpk3j6vT9V03rm be2IAK3CRdnkIRQt5nH0acijgjnAyUqJ+q5WYTUksFh5b7i3qbhNj7fw/6Dw3A5O dGlhgTzMSpPSSXuxeeognqkNKUmWw9yjrr2q0Gi3UK+IRgQQEQIABgUCOe6X9QAK CRCI4Xsd/OVlYTzDAJ0RX5Vn8KhP+zdFBxdlNQcO1/vNywCeOlwHD7oY36yog46R iVjyTV+s2EmIRgQQEQIABgUCOe8i7AAKCRAY9QOAJMJ4Ai9JAJ94rFed7/tJJgbm 9qOOMAXdC9MW+ACeJLRW04xTW430Y9G05+4mczcfUbmIRgQQEQIABgUCOmwoagAK CRCTqAdkLDfjdctAAJ9ikjH2Q56jO48RqUcK81V+QZWu6wCfTXXII7m9DX77OJZ9 MK/kXB45OfyIRgQQEQIABgUCOoShAQAKCRAuIEybiwa+dYnRAJ0T1R/7noje9yl3 G1X6XJk2q93QFwCbBXaSGauZ7sYH7kc/iR2yQBP5iTOIRgQQEQIABgUCOe9xLAAK CRDNC4o1+1fXk/gLAJ9jzY1qmkpPqzb9lIzb0Tlt7pCRQwCfe+R8BoGODBcVckr3 jdP6/rTPECW0Ikpvc2VmIEthcnRoYXVzZXIgPGpvZUBGcmVlQlNELm9yZz6IXQQT EQIAHQUCOmwVXAUJC8TxxgULBwoDBAMVAwIDFgIBAheAAAoJEF1SHIzmsVAWgm4A mQGnViGPYiGgaULvlYM35mN2N/TrAKCDsiQ4Gwlj+NgPHwQKa1bQUbyqiIhGBBAR AgAGBQI57oYnAAoJEHOH4pKtEMbEWs0AmgMYEMEB2C0+7x6X7BSfb49c8NbjAKDc bL+B37ri/JXth2rMWGUAHjAb/oicBBABAQAGBQI57ofcAAoJEB9/qQgDWPy9HyED /2rdYa4tS4wXcfx3M1+okMZZERrWaO8rtYORLfvrZY72EJ90giB6bzw5kuUJeeWZ oZsJVnd7ITBtXolBWrOt+s1B4SdV4gt02G4L/lJ42ok1sOlQLVh0UDZgGxc7WUag z9l8F0OsVFLxjlEFI+NDogbv+kz0a2bTMjiWLLAu14ixiEYEEBECAAYFAjnuhu4A CgkQIBUx1YRd/t29dACeJTWyfb0Df5fPm1XPsswweYLjGDQAnjpMDUHOFc5fnNMV qJop9jq/AF5JiQCVAwUQOe6J3E1WKCF5BQwRAQFhugP+KQYQsQKeYB+gPoSI2egK EynZMAJG0YiI5cA5Co4hyNY5YIbIMeo4GixHvwQcnTH/3PzZFcmDzXm22oc654po +hryLx8X7dZnCN8RmvoyMaJfx0664PXWq5zLnfaJnr3gV/IvVHj0uVbDaizWUyK7 dLLe9nLE3nP608/AKuc06dGJAJUDBRA57oYKAdtd0pfmON0BAU7bBACXXkeG3A8b DMLtG2QlmF279GbeQ0ZBG3HojyTzUbk0I6nlM5yeS9/SBkWWeWxkWZgIDhN6FWuR OF9Vh1jIrnZ0wihWitIVsytHdwET4MlfYh0sH+7GW1zUi8syiyGPCd89zBL3EVs2 8pJs+btK/kD2DGQkRWHZN7BuNLb0yM3/R4hGBBARAgAGBQI57pf5AAoJEIjhex38 5WVhw64AoNaWiodMqbzSGBs1Xp/6mDr7rsiPAJ46bAmdjezkyTDC2z6fa6Bzh9o4 dohGBBARAgAGBQI57yLvAAoJEBj1A4AkwngCtqMAoMdXR32u0WIfAE7me3+CucX0 GNAQAJ9daEBWjNbT+VlRQ/Jc1iIdxSBxHohGBBARAgAGBQI6bChtAAoJEJOoB2Qs N+N1zm4AoJXqvlK1b/8LgNxyqh961iRMxsIsAJ9T8aXUpFGCaL/r+109xHrXWkig F4hGBBARAgAGBQI6hKEDAAoJEC4gTJuLBr51GuEAoJSeVEPTlr8zVC0A0fL9zSQ+ ZWNGAKCMlkL3XhHZ/tKaAbJtlf+jymTW7ohGBBARAgAGBQI573EyAAoJEM0LijX7 V9eT8bUAoIOLIiocVylJa8udF+9Q/+AorbkvAJ9sI+JVeywpgFZchlHyb189aocw FrQlSm9zZWYgS2FydGhhdXNlciA8am9lQHVrLkZyZWVCU0Qub3JnPohdBBMRAgAd BQI6bBVcBQkLxPHGBQsHCgMEAxUDAgMWAgECF4AACgkQXVIcjOaxUBY5YACeNT4b YadZLhfd+UVab4JLmH6ss9wAnjTBYX5zCu30yWfszSeWGd2p5TbwiEYEEBECAAYF AjnuhicACgkQc4fikq0QxsSzVACgnCcE565FTv9LhGJmmxjNZi4jNzUAnAkJn9QV DkwFp54Vtl921duYZQX5iQCVAwUQOe6KFU1WKCF5BQwRAQEUagQAiJqlq1zf+Irj iffxGzKP1vcCkeaXRiPyBHkS0yCSy6OBxPhdUsvOzT93qgRUqPGBB4Q7jM7abSuM 99gZW9uQN59nwbBFzWRKK/Cz8xHMlEWIdMZHUXupWUTDBHdHERaj4NaZvE6RXgAd k4saIRT1IFLeWejpaBvLMN8XQXHL3XGIRgQQEQIABgUCOe6X+QAKCRCI4Xsd/OVl YY8eAJ40vquX/AaE+KslwUBVTBmNpQo/UwCgvAbcnU4rzYZ+TCBB4ZRUW+MpdhOI RgQQEQIABgUCOe8i7wAKCRAY9QOAJMJ4ApoRAKC5Wcxx1y8Dr9u4ePt0SA9IhZ22 sgCfTOrGFzNJcy5nI2qDz1VoZPVJQOuIRgQQEQIABgUCOmwobQAKCRCTqAdkLDfj dfNDAKCNnoZlc3cI19gPeP78V+mV83sVFQCbBjBaWkwYqPh4EY2E86U20STnb3KI RgQQEQIABgUCOoShAwAKCRAuIEybiwa+dQ+QAKCoRMM/CeUdTbKrF+Z5W72JlXbq WACfQtCaQuUBN1ibVKQr6HimK1z4cRuIRgQQEQIABgUCOe9xMgAKCRDNC4o1+1fX kx/UAKCf6sSugsIEgu/PD36fUKjmTCa2EQCgzkMVRzIuMcIA0G0493IeecKply20 IUpvc2VmIEthcnRoYXVzZXIgPGpvc2VmQGJzZGkuY29tPohjBDARAgAjBQI7i8YN HB0gSSBubyBsb25nZXIgd29yayBmb3IgQlNEaS4ACgkQXVIcjOaxUBZdHACeP4xT 8uykptHJHuS94P6bwuNeek8AoOlLQUlfadwu/7sdbWtjdWI/0iysiF0EExECAB0F AjpsFVwFCQvE8cYFCwcKAwQDFQMCAxYCAQIXgAAKCRBdUhyM5rFQFsGhAKDCrR9J n4qKt8Hqljofy9M9xT4lMACcCcSKt0PKE1oL/UaNgUVn7tAu/ymIRgQQEQIABgUC OmwobAAKCRCTqAdkLDfjdVxZAKCMp+S6JstAa8HtrAfh41j6LHNf/wCcDq8dJ9nq wEHqP2sFK6Z/NtPu7p2IRgQQEQIABgUCOoShAwAKCRAuIEybiwa+dSOPAJ0cMSzB Jy0H2UGSiVGNK3m19biG2gCgum7/cxqt54aEM3V+SbTYmrkipgi0I0pvc2VmIEth cnRoYXVzZXIgPGpvZUBwYXZpbGlvbi5uZXQ+iGcEMBECACcFAjpxdZUgHSBJIG5v IGxvbmdlciB3b3JrIGZvciBQYXZpbGlvbi4ACgkQXVIcjOaxUBar+gCgxUakd2xJ oUH6+D1mRfndDAqzjkQAoKLSTYReJMHwhXZc2OmOTTH3xsy+iEYEEBECAAYFAjnv Iu8ACgkQGPUDgCTCeAJiSgCg50cRCYSeXmnBCPR/r9uhcT9imtUAn32umZNXmL/y XcfXg7bXzku/DKSJiF0EExECAB0FAjpsFVwFCQvE8cYFCwcKAwQDFQMCAxYCAQIX gAAKCRBdUhyM5rFQFk3LAJ0Wpi09EOAOMXinfOseIOD7Uv1vcgCgoYHE/liKe6p8 2akulQniyJvXnHCIRgQQEQIABgUCOe6GJwAKCRBzh+KSrRDGxHASAKDDqv+grb04 Y6qIx70hBmr1BN7ICgCg1JgK1HW2sJ8xfEO+FSmfwpqwpnyIRgQQEQIABgUCOe6X +QAKCRCI4Xsd/OVlYVDyAKCC6wlp1qGx5/Tu285+eALovxhumgCfVu30XvpgDrFB Jin09OMykkJkCvOIRgQQEQIABgUCOmwobQAKCRCTqAdkLDfjdeDJAJ4mMYP2ItaQ FEOrtC7a+3L1A115FwCeMYSBxtUHjngsaU6Hsdkj7dIQEu+5Ag0EOe5YuhAIAMun iz0umurHI9PJ71ETF+cZLsykYDBMTnUirUoBk/eRJL2nfj4NBbClTLDT2xCUOHya bDEtMYdubzjfs92N6yCRK4v+318bT7d6XMHG6B5vBHCcMhS7O0luNX099S605NWR F+G25B3v0opmJ6p5hsnCfsEOqXe5g8Yoqql4yjbOFVM3L3gfxg9L0tGS610Vqx/Z nHF1rd5BBlmEO+t0U3FMWHidnEMBEE42eKA43U1DqmOUPHeIo46UipGVARO7sW8U N0dRKSfxLwZQEiYvmMTABER1HUi+H/0M1N0IYFMqQ8hpfjocsZUNYfcCoblboCau XkybB/gLAURTapYZ0kcAAwUIAIwxcA7GU1mxYIY1uA4WRjpGfT4w0qRSbonO5W+p JZ/TmM+1cuqe4QetAe+2p599TLckisDvz17ZxBnMZs3adxr18C8oPDlTgReqeVY0 UA/r72AL+i0PXSriFusD3AH3YwsSmNfF48qZ4RapdZUWPGO8L9TNy7eTz07rD2Wr p0kDng9vGBeMMNGGbyTnpYHdSNW5mf3+2VT70HAzR105v8cBAn4wx46yQPEINeTW XnsNbYy6EfJ2iVAyNAnrQW77NJhFBsI8kg86L9S8/o2UFCSXEHAsd7uEXBPLJ3m+ IwA8they6czCm5i8pufRRCveTJUBPsJ5IsWXLrWtScFau8yIRgQYEQIABgUCOe5Y ugAKCRBdUhyM5rFQFhseAKDdFw3usXZLVrKHo30sPv2jNdPM+QCfRqjP/hfxMa+T p5J1gj4xWykgTuA= =U6zf -----END PGP PUBLIC KEY BLOCK-----
D.3.48 Kris Kennaway <[email protected]>
pub 1024D/68E840A5 2000-01-14 Kris Kennaway <[email protected]> Key fingerprint = E65D 0E7D 7E16 B212 1BD6 39EE 5ABC B405 68E8 40A5 uid Kris Kennaway <[email protected]> uid Kris Kennaway <[email protected]> sub 2048g/03A41C45 2000-01-14 [expires: 2006-01-14]
-----BEGIN PGP PUBLIC KEY BLOCK----- Version: GnuPG v1.0.6 (FreeBSD) Comment: For info see http://www.gnupg.org mQGiBDh+mV0RBADir7YUHYRLlc0EN9H9OwMtvatKsJGA/BSvvbcVGdXxcDZODZb8 5UNUDltKTmfgOxMxz5Agadl9M9TJwAUyhRjkc5Ua9LWskx1HnYlsPx6/saFYU6IZ SLrBcfpX62hvpS5x+GJ8VENoRcIc//YFG/zEA5XRQEWG5mNg3KSL/DZRiwCg/6tF 0f8E7vABNKqDRFx2JEkeERED/32z9UUXbg7y26ziUz6oXaXDknCD9HeUdA1lmyjj Vovy7Hmk67OrbuuD6t3p3SI5vUvxfOnzpqMk0lAPtkZmSCmOhvmyGYqbrpIGLV34 wNlLwcNRTUDtfUGu4JL0PMOtpOQXdxhfXGI09VwV0eavq6Kzg1Ce/CFD7k5xdWzy F0J4A/4/eUoXG6KGd4gCTp9werF9ZnUdrtIMkXCgx3D3mrhEIYEBiQ1jeotLK7wv TCk/u9ki7owWdKgvLkMNI3nLp19+NgivoGWklVvhs7URn8Wxv1gMyvJM8k+ZRl/P RQP7V84s2qDQuOKLR/U0gOJeLmHA9leLLeAjxtN0zr4mjV7u/rQgS3JpcyBLZW5u YXdheSA8a3Jpc0BGcmVlQlNELm9yZz6IRgQQEQIABgUCOfDM9gAKCRAgFTHVhF3+ 3YO7AJ0ZJwzhG6FohqEaSFrg45j/GjS9CgCfanJh6tPlubkjpOSFNnJqJcSef2qJ AJUDBRA58LyFTVYoIXkFDBEBAVrXBACxSj5Ou8meYSixH+tPBUPgdbqTWQ6JgdvG zQSQK7q0OvRt/QbM4ewXEr7DRZlJe4pXlQqMn+CUieETjk0vaOsGYrMOj1NWp5jY Kft2xFg+5HehlkM3h7/tXKrz3Bc5v2romFfR/6RebtbWHyf1mg6CJ8AbIRHjCj91 ca6wEOIBAIhRBBARAgARBQI4fpldBQkB4TOABAsDAQIACgkQWry0BWjoQKUFDACg vnqlh6u1d0xcsPF2B4fbo0sF0MoAoNF7E6y4G47o7oFWoL0HCzaXsRkuiD8DBRA5 IjpBhqlMgi1qJksRAqL+AKDIm4mvwS568j9ZkKqI86XOySm6oACfd6RDWR+crZ1u lKLEkSiQCLlFPDCIPwMFEDn8wmF3zinFj6EuIBEC7GgAnj40RzKQEJK1+Lw40ojV /Eav3C0ZAKC7b4D63pTGOWitAWOtpEGV28Yma4kBHgQQFAMABgUCOjKA2QAKCRC7 7G7kaPPBBCLjA/9RQV0lMtKqHQLag6spTWV6DUADkNPfgs56WX6JsATO9B95oxcl ehhMzeP+mbwZgJjR5GraAdoWXYbnWzpfPaKcztYrt90jtDPDcAuAJis6CHGAmych FKeXoCr2m2OGcaQ9V41NNORNm79dX6v+AMyIL0oxHZC1f51bXHamlbyaCAP7BlZ8 K8TPbpYLzQCiBZrszhTlnuhQ7+gSyY77WH9pJRklFqCeFNxDb5988nxwHL7QioRY OAkbgEFzCIdzjtEWjnlv0ZkhXc0qds07ESnGHaqK2r6P/IrRbtXWwsiiY451R113 Bglm7OF+KP9itMJi9Vg8cLj+T8wieTwPd1Y4wpyIVwQTEQIAFwUCOmFZqQULBwoD BAMVAwIDFgIBAheAAAoJEFq8tAVo6EClvYoAnRmzFfvkql3W2b6TQH+nvi7T6cXW AKC5eJxh21XWyRYiD9ZxIVgONzuZzYhGBBARAgAGBQI6hHsWAAoJEC4gTJuLBr51 YY8Anj5qnIMIoyHAesDA7f/sAIjzQIPBAJ97gyIC8sm+vZssS9yusnyWb/oLgohF BBARAgAGBQI7r66LAAoJEIwyjP8WBtuVA88Al34X1C28UykPaRha+9fqLfmuiyQA nR3vk6YF7kIeq2b96dxIF24/reNqiQEVAwUQO6+u12fCgI8zwWJ7AQHIFQf+NW6I Od9DJWW8jIXYrnwp3B61C1emDRrRbEMdW68s1fng6j013f4NF68SK6RLcl0GzTl1 IjxM4tn6akBjqkvIk5FiPJgs7i8WW0Xq0jGqaSaJnbTONRpemCk9lwJOhKa1LVRi c/wHnXP6IXeEwBjJ57H3YUjFc9AW1smWMpUZ18sRBzCp2BHcfTCACz7fFseDtYdA +UNJ4NWSqIJOct5cOGOsumP781JWLSsDiuRFoghYQqUR/xbk1aKHXuRlUYrTY2gk +Z4yzNB3MMCdK1G9jQOMtsN7LZL7E7T8MFU9d6WFIh4h7/xE63AMNlv5t/m5ps07 /ZDuPaxwCKhCA05L+LQjS3JpcyBLZW5uYXdheSA8a3Jpc0BjaXR1c2MudXNjLmVk dT6IVwQTEQIAFwUCOnIVfwULBwoDBAMVAwIDFgIBAheAAAoJEFq8tAVo6EClTaAA mgLzJd8N1dIgO7yB3oL1+y9egIjqAKD5ZipcQcBa1sOTs1EV7czWAkHvbIhGBBAR AgAGBQI6hHsZAAoJEC4gTJuLBr51aD0AoKVQAAjIJ/ZUeqDXcStPYVEjXbQqAJ9w dU4rJbpmPzrDNxVjA/XsxpCAQLQjS3JpcyBLZW5uYXdheSA8a3Jpc0BvYnNlY3Vy aXR5Lm9yZz6IVwQTEQIAFwUCOnIVKwULBwoDBAMVAwIDFgIBAheAAAoJEFq8tAVo 6ECluiEAn1rxQ3Zytp5ewztR0Nx3WZ0PZ8j0AKCvalnlLFWNZvDg9+WHRU8rSy2r +YhGBBARAgAGBQI6hHsZAAoJEC4gTJuLBr51hQAAn35wVfmGgyJGaK7SymU8I9tI GuDNAKCLXoshUwSFXMKcgnGh2WU54FVLWIhGBBARAgAGBQI7r66jAAoJEIwyjP8W BtuVa94AoIcrbj8nl78EMmq4npDs7k7hdJR5AKCYkC2kiIaCwaNyWFOJYeVfTBfO mIkBFQMFEDuvruhnwoCPM8FiewEBQB0H/AnWue1FzgheVvRhdIIWszOvgamNjkum OxbaWFdTOzYkunMDq7zHEP3Z05ZbP8QnfHaXyH0/Dr0Vz2/6W+EMLlW1PXWKJhrz F6GwxvzZpvPmuZkxmngvS/evDVaibXcLSw35mIgRSu18DPb/LxxfBQ6pjMkEBTco +55cgCISAHjGrtlJUZZA8M33Mpbm1Mn62x6tM9jHG9n2Yhyxx4ME9C0PzjywG5DY XaYT1c1WdcO1HrNMbgFch2E7bo/V8IvSsAu198aRXMgmqgi4ZYQI8Wq4XBVIVmMk TZ7bIRvvj6MHqiSk8eIQQL5fNEioUSuPtx1XhaG8M04Er0OFyn/5psa5Ag0EOH6Z XRAIAPZCV7cIfwgXcqK61qlC8wXo+VMROU+28W65Szgg2gGnVqMU6Y9AVfPQB8bL Q6mUrfdMZIZJ+AyDvWXpF9Sh01D49Vlf3HZSTz09jdvOmeFXklnN/biudE/F/Ha8 g8VHMGHOfMlm/xX5u/2RXscBqtNbno2gpXI61Brwv0YAWCvl9Ij9WE5J280gtJ3k kQc2azNsOA1FHQ98iLMcfFstjvbzySPAQ/ClWxiNjrtVjLhdONM0/XwXV0OjHRhs 3jMhLLUq/zzhsSlAGBGNfISnCnLWhsQDGcgHKXrKlQzZlp+r0ApQmwJG0wg9ZqRd QZ+cfL2JSyIZJrqrol7DVekyCzsAAgIIAJ0sC3USd4/7JuScntlGrqL71IFH0Vj1 r6jMSitZyLrL++eDASLf1rFOPDGJMvOGhrV9CvhUvsyLFI1fwoPmwp6pmZv5BU43 MgSbGKYIgkCZ2pGBYg5sTl4iiy8A8Vp4EqrUQhhk1lk1Hy6+Xy+wB4uFIRKuvRiB wGd4MXjfBtzg9vL4tj31kAG0KZ0R92U9qiWkbmAgBHB2wbw+WV45hYNA2Xuurn+S WjSCHrQr08SP966Cl7j96BiOFFg+gJpfjmQTrvB+WuPe7wT4xEQ4Tv2/vTVgO4q9 c84Bi2/Rc+N75MC0MOp+0BVa00cD8DsQBHMFlwea1GikqzDUIcfQb66ITAQYEQIA DAUCOH6ZXQUJAeEzgAAKCRBavLQFaOhApc4CAJ9ZFjZXo1Lex1rHoXZH+LgxlekQ xQCfdkWHAEkV6UyZ98vsnu/ZlHcDwo6ITAQYEQIADAUCOmFZxAUJBaUnZwAKCRBa vLQFaOhApcsjAKCcLm6aVjFIGQxluSHDt/OT41pPEACg0shCNM43tvfaRfzrgDb5 8fGalkiITAQYEQIADAUCOmM/7AUJC0qoDwAKCRBavLQFaOhApZDuAKDZcYc9bnZl iPF6/kmr9BBQtr2aUQCfb2ycB69cTi+09jXD31k8PffbIis= =nTL1 -----END PGP PUBLIC KEY BLOCK-----
D.3.49 Giorgos Keramidas <[email protected]>
pub 1024D/318603B6 2001-09-21 Giorgos Keramidas <[email protected]> Key fingerprint = C1EB 0653 DB8B A557 3829 00F9 D60F 941A 3186 03B6 uid Giorgos Keramidas <[email protected]> uid Giorgos Keramidas <[email protected]> uid Giorgos Keramidas <[email protected]> uid Giorgos Keramidas <[email protected]> sub 1024g/50FDBAD1 2001-09-21
-----BEGIN PGP PUBLIC KEY BLOCK----- Version: GnuPG v1.2.1 (FreeBSD) mQGiBDuqmfwRBACakPfvtnWVymPgHktoM/fjtoJT49oIkRG6DWXLzr6M6E6ReOAJ LCTCo42xgy6vndGb/GUTYIS8JMZSZB0qkTEvPorP70Y0RpD32z+51UYrDtMykohW lnTGjSS/+IwT8cTePzu2C+RTAcvlMktOZ4xHRRZHzi6iEZrrok24cRXLSwCgx1/D GsEQB415mu3t9REREVaPehkD+gMQ2EYZQSj7ZChSghDR3p8hHvzNmN0MgrxNWSbq KID+pO3kBT58SMhOdf206jRAPchoq8aF6Y1h7sZpZCarA1g5M5vomWKdWRde7j4i kRsAa5ntUbW1wIQV+cTO2SVcynlP8sZ/1RHapzy4GD3mH1qspJTAKdfSzjNMUMZJ zB80A/93O5RBrYqnZUW6TfUbCdSNudb+FYYyEF7/0YFf2BfgCn+HWpp6a9hHgbjM zvy4DkkjLu0UjoNeIRGbkLUgZwY0JpMZ1qQZSdQHy13Vt3LkG9I3qnBXqzKRdxQv Hl6+vHUIagar1tGZNK6sTvbGt7TRhy8RDLV+wSvU4YTvAGtqWLQiR2lvcmdvcyBL ZXJhbWlkYXMgPGNoYXJvbkBsYWJzLmdyPohXBBMRAgAXBQI7qpn8BQsHCgMEAxUD AgMWAgECF4AACgkQ1g+UGjGGA7aW1ACffsr6v6U0UARLy/BYPR0A2OJiSKUAoINo r2qJaPXDL5xw6THiWnwOTacGiEYEEBECAAYFAjuso7QACgkQYeMhWg57U9FhnACc DI2Gtphz7RCZwT+vquYm2SqLa/kAnRnBVfz1L1PsehhbudamMo3liLnBtCxHaW9y Z29zIEtlcmFtaWRhcyA8a2VyYW1pZGFAY2VpZC51cGF0cmFzLmdyPohXBBMRAgAX BQI7qpqFBQsHCgMEAxUDAgMWAgECF4AACgkQ1g+UGjGGA7b6HwCgje/V86jKpHj+ 7vbIXFAMTNtQAJAAoLrqJBvXyq5ZLdBE1wXNuJMjyJ8yiEYEEBECAAYFAjuso7wA CgkQYeMhWg57U9Ea9wCgq4ohpGJQedJbO3tIYvti1DMoeowAmwaPmkE5xePzbEXF /LeGkruNK7cHtChHaW9yZ29zIEtlcmFtaWRhcyA8a2VyYW1pZGFARnJlZUJTRC5v cmc+iFoEExECABoFCwcKAwQDFQMCAxYCAQIXgAIZAQUCO75DoQAKCRDWD5QaMYYD tn/gAJ0UcfvNt0XLoA4TlfYpDdslz2LJewCcDxASNUAzOJcGn6FPUfhol5nzT5u0 Jkdpb3Jnb3MgS2VyYW1pZGFzIDxrZXJhbWlkYUBoZWxsdWcuZ3I+iFwEExECABwF Aj3UC+kCGwMECwcDAgMVAgMDFgIBAh4BAheAAAoJENYPlBoxhgO2Sk8An1vv/3Af EADN596xbYRt/VWXjBKdAJ9gFdzjkGimsl+DDMfTK+a8xppM47QlR2lvcmdvcyBL ZXJhbWlkYXMgPGtlcmFtaWRhQGxpbnV4LmdyPohcBBMRAgAcBQI91AwOAhsDBAsH AwIDFQIDAxYCAQIeAQIXgAAKCRDWD5QaMYYDtjBLAKDDnoXWTulatOjGIc8S1cBk lEi/zQCguGI0SNzNOwYQzRIgQk0y3eldpDe5AQ0EO6qaKBAEAKDDqwxSOsONRaRq NUmmnshfOyLZDmSTTmaNObDRitcZG9APvzdOO/kJ6DatcCqdTDCSeoVeTewX6Fo8 qsHUdALtvhBm8jAt1Qt07atXyecb0Oy/3ecgXj2K9inIu3/Lzx+8q7KptdgfTMiW vK00cyIh0+ejGaLI2lyRJ/626jijAAMGA/94gh2j5dLYoUIQyqSyxjKTbxa4ayFJ 3/wEIDdxM9lXIUibm7k5rOMmzbEt469XL3eIsqGCKpZ+4kRTEPwUHYFIZCiDhVtB PsDUUVA6G9vHnf68+HEeBxDJjn97ogsO3oK7HaLt55FfIJiONsPR+afv6qcQUSV9 dMRHizrPy1QikohGBBgRAgAGBQI7qpooAAoJENYPlBoxhgO2SdAAoJTXPDIJf2sq yJhE5E+MrkbWaRVzAJ4oA62xKNbHfUJWJOrlny+YSCPRpg== =AAq1 -----END PGP PUBLIC KEY BLOCK-----
D.3.50 Max Khon <[email protected]>
pub 1024D/414420F4 2003-04-29 Max Khon <[email protected]> Key fingerprint = CE1F 29CA A6BF 2F26 13E8 1B61 62AE 6B8F 4144 20F4 uid Max Khon <[email protected]> sub 1024g/6585039B 2003-04-29
-----BEGIN PGP PUBLIC KEY BLOCK----- mQGiBD6urdgRBADQpkTC4vQZ0QvJaenfB5vMGNzpxq3shsQD5C/ExNtZ2PTrPe8A GAcsNUmZD2O2d0r7VSDmPWQ2zDB8bE+gak1pEmooOZ+lb9t+1UwtkzDWK5MEgbRj 8dlNEagiWZ70jwbm+q8P09LMmjB2ez3OFpDzROjvA0/rU7FMWlo893aqxwCg+0P1 d6tf6xfiE0Dgz0h7aoOBNhUEAIds+i+l14zzp5Dg8nVcrp8GhsDhGUERkpmnu4Ks iXRAbgnhv7XD1qD4EKagITMXmHQ1A6IXVqGjKuEPW3otOEhOMkfOrvI9TCcp4s7s 6d4eHt0wgjptmWF4pV8KCjj6hAkakFuli/ZjVMNiGAb3cXVocw/Q847Df6jNI5vp OfPtA/9kGOoNIssPPa1Ni0k5MPAXB6jm658pmQShlHv1GCG+tbbzqawvimwcal31 m20DwVc/ocRQFf0/2Rqx0h9GfU/QtB+uq2qk6HTEvDfzGv7SRpPwx43fscF3Sn8N K9VXs4Xtbrs5OYGJAMFOWg5SHd9jddTnViNtJQPGD6Bd12BB1bQcTWF4IEtob24g PGZqb2VAaWNsdWIubnN1LnJ1PohXBBMRAgAXBQI+rq3YBQsHCgMEAxUDAgMWAgEC F4AACgkQYq5rj0FEIPTqigCg2Qe8X9Qw88N7mk9llaZqs+3A+FkAn0Hy5JfEudVm /3rXsNKkDf95Z9cmtBtNYXggS2hvbiA8ZmpvZUBmcmVlYnNkLm9yZz6IVwQTEQIA FwUCPq6uzAULBwoDBAMVAwIDFgIBAheAAAoJEGKua49BRCD02zMAmgLFdtcfQwJ3 ctRFpJf8dHyClNQZAKDzqyItbtqEsWQGgN3QsG9+dpsbmrkBDQQ+rq4AEAQAyLyK nyVL7VVb7oJh3n8H6CMXcBy/5OV4bATxxCJLQIP/eJkOWv8H+feYnv8Z1LpMI6CT qhtVpobIpejR1CA/jo0NStQ5phhejvg08K+wgLMPFEOCCI/RUdHjNGHW4CXmhy6G Pm1PPwBiIJGG2AvZie+7NdYjnyd7Q77lE/bFQV8ABRcD/2B36PEMQJu2HpivP/hU 15sVnYim3phBpGeYTV4e8PLhx1TFDgxnplBkCrEB24hqIFge5zjDVvJyE6t4Zlkz IilsEanYbzBUkO/3qYCnwrUefxLxmzMx3tkNVK9W7Z22j3H6Dtvcxb17kMuJNHoV KIufCJXylZFXAp7t03T3uo2miEYEGBECAAYFAj6urgAACgkQYq5rj0FEIPSc0QCg 3Jjbq8a/pI2C+MXDMrW1sC/PhkQAn3vNQqLa/nntV0b3V4lWRI3wk3k+ =AcmI -----END PGP PUBLIC KEY BLOCK-----
D.3.51 Andreas Klemm <[email protected]>
pub 1024D/6C6F6CBA 2001-01-06 Andreas Klemm <[email protected]> Key fingerprint = F028 D51A 0D42 DD67 4109 19A3 777A 3E94 6C6F 6CBA uid Andreas Klemm <[email protected]> uid Andreas Klemm <[email protected]> uid Andreas Klemm <[email protected]> sub 2048g/FE23F866 2001-01-06
-----BEGIN PGP PUBLIC KEY BLOCK----- Version: GnuPG v1.0.6 (FreeBSD) Comment: For info see http://www.gnupg.org mQGiBDpXnNsRBACosqQnFwHgBcl+H2TXLWG/uAAdcZ3d4vlC9tKIPif/WovfOTuA CM5KMb1Of2uAQm5S6KpSCDSudZIZw2az3ka5ESQt82kgd/1Ue8FJDdPkGY1RZrEp Zq7VDPfENAM8NuYCXIdVYpd860tIfongUbpgHq9dA/bgoDDHXlaBQzUMNwCgurYO XH1FSx7vApyBFqaE9ZKglRED/jbd0UeQ8E2Y8jvoHgn9kDGjqgTxNerLK2g7gRgx o0U2do7kjKKWoUfij/x3RRpGUDzkB9xhibyoPQKuVim4NVNdoUoqjuSDnoDT+XtL B8bYGXAAROPXu1AT1r/P5k3kSHDExu1qfLEk9Sch7CKrVdNaZHsrknbmFPPmhdsf zz17A/oCfA5tXthQ4YOlmyjJXiMmiD/aX1fQovjayQDD/diNYQ/z3JUuaA01Nhw4 02LDFCk0xO2T8wWIC8Ox9J7twKKBT9Ep1MpZw/mY7XlpTFP82ls15pNIshogjlX8 23aBC+xrRda6SqTAnqsneyxGujSkS4sNubUWaQf0UUfcxZpA77QlQW5kcmVhcyBL bGVtbSA8YW5kcmVhc0BrbGVtbS5ndG4uY29tPohXBBMRAgAXBQI6V5zbBQsHCgME AxUDAgMWAgECF4AACgkQd3o+lGxvbLqQrwCbBNMKCTamyfzbL+69hya4MTApyOgA oIBKu//LaM9gC+rfYUSFRaVY5PJetCNBbmRyZWFzIEtsZW1tIDxhbmRyZWFzQEZy ZWVCU0Qub3JnPohXBBMRAgAXBQI6V51BBQsHCgMEAxUDAgMWAgECF4AACgkQd3o+ lGxvbLpvuACeJLJc2HBP42h8lVDWTZwV3qstGXUAn3yIgz/FK7+//Ax2ceO115u9 T76ptCVBbmRyZWFzIEtsZW1tIDxhbmRyZWFzQGFwc2ZpbHRlci5vcmc+iFcEExEC ABcFAjpXnVgFCwcKAwQDFQMCAxYCAQIXgAAKCRB3ej6UbG9suq2VAJ9TDD3a6fsP E79VBmop25fpGRsmAACgobOH43x4KJJxNSFM+sOY2QCv+rS0K0FuZHJlYXMgS2xl bW0gPGFuZHJlYXMua2xlbW1AZXUuZGlkYXRhLmNvbT6IVwQTEQIAFwUCOledhAUL BwoDBAMVAwIDFgIBAheAAAoJEHd6PpRsb2y6vC8AoIPWrHd+jYEXzo838pxFoJ+x v0N5AJ9kyfJz4y0UjGdwMrfLCRL1+h/OwLkCDQQ6V50XEAgA7nyqQb43D5Nl+4bd pwt+JqTn9/MnmG1Cw0h3++JAMijW/WTGGrpgpuFhtvfjs0nJ3FZMlDjdRfJ2LKa4 xR4J/2gIkYzvuI+JaiojvyaKnO/VZC10zH+kQmEfAZTSONucKPOPPrOX87fJ/SLC RRPJdjR/kcub/yR7lZ9jI+5fKmv06Vgdx5agvL92eY14FdEhg4BiN99CKyOIdTPF xgj2bCultqldQ0FhB5Iw+IYwqV6BJsRewrNJNoXcYLeHkOyf3ULxYwYmu/wh24jW ibfotTy/hvRO6CBG1+r+Svqxj161T8vtFWEDdlMW9Efog3O7zjI8lXWF2pOgGWt3 7g99GwADBQf7BlcqJ8R4BrI/Z8cJbvWWBftMC/dx8F63ISjq65PKc5izq4fSlJWb AEDyTv59Gv7qDSQ+ECnjivw+FBu//BY993kXLIE2KB0AY6jgMz7F4JsBhYofGMSE uCFgvh9c3EO326RtkgsQKM4pOC6LFZRAedjo6LZzm9k2JZK2Xv8fsLZIW9dSEtqG ch32Uu9AfThrFnZ6cApeRnxWZe3btBXbgxK2w3jT16j+CtIbeJGWdF8NN7IZ4+4v PzdDAVBwAR2iUz9vn/d0fGhVYLHBFekfB0jyl9gfgPLkXyMorDOhJ1nhdAI9Jm6g 7FThPfNDzfgEPEgSyVuMqEoti01u0dw7AIhGBBgRAgAGBQI6V50XAAoJEHd6PpRs b2y6l8wAmQHMTVyf5sddE7j9+RCEC9L3VluJAJsFafICjeu6dBMwi4QQaB0zqja4 7A== =E/l3 -----END PGP PUBLIC KEY BLOCK-----
D.3.52 Maxim Konovalov <[email protected]>
pub 1024D/2C172083 2002-05-21 Maxim Konovalov <[email protected]> Key fingerprint = 6550 6C02 EFC2 50F1 B7A3 D694 ECF0 E90B 2C17 2083 uid Maxim Konovalov <[email protected]> sub 1024g/F305DDCA 2002-05-21
-----BEGIN PGP PUBLIC KEY BLOCK----- mQGiBDzqHSERBACUPYN18/fnXdsI3CsH/UgX7CL1yLSgTCTbEA7p/jPA78svM0Kt aHdZG+mhZH9u//SaPuKPoF6OST7pb5ee48bppzL8v1+zYIAUWib/ImR/ZEGi5SzM mYtNCrK3YTblaHoeKKSrVwYvFi4HYQZWG3hcXaozhZRVQTnGnDdQYriSVwCg24Pl UzXu1n8lw+4zDlW3eGIkxEMD/RpnH5n8maXO5MYRvuBpGGTF7x3iV0somnLhQ1Th 1WD/7OhRRzfRpXarG8ObyxyPx52et6tGV9IjSdO+uuVgtTUFRKsr6QYk/y49blnt pGtd4kTHMy99Zt/GP/CBBWn7dQtMGABDobA0ZU5ILkSlZ+DHtZLEkIXljhxIyhbw sIQzBACKTwIrcF0trhi2dibKMOWqy8RYP5iKe1vXy5SCdcU7HxicHGzI0oRdlCHT jh0pik8YWI24d18UdHDhvWHxbF/QCBbW+RAyiNASzzdsiIswo9Zvras/NZbnagHB tP80kBhLVC4udmO7GKYxKjpgsuqihaFJdcpoxx8J6mv2sTxK1rQjTWF4aW0gS29u b3ZhbG92IDxtYXhpbUBtYWNvbW5ldC5ydT6IWQQTEQIAGQUCPOodIQQLBwMCAxUC AwMWAgECHgECF4AACgkQ7PDpCywXIIOv9ACfdAHOpcAmtGrNB7f73DIYjZSRt+8A njYiaKCJ2lZpj9b4JEa7C2uIoFVJiJwEEwEBAAYFAjzqOncACgkQIkYMagPC+y3J ngP+OjIKj3GrGZD8LXE7mK++WiAqlVyC79x5g28q12EUkZYzLGIkGuz4/NA3wcel d5G6dvV+7JEzEf3sAT7/iUcIgYhIepEWFEUhngvNhi+qf/FqVuT9bYz4UkHEL2Z2 Soxgk/W+N914SgLWiSKE+hClD4NjsN/h1rT/kA3kEMKRkw6IRgQTEQIABgUCPOo6 HwAKCRD31D6TzwF+V9VbAJ0alq+w7D5p6jk69ApdFv6qWHZ8pQCglKhTRm9d/78N gZZxXPyTY3qYAs2IRgQSEQIABgUCPXS68QAKCRDc/7Ca5SeztQNbAJ9XzTZBQ6wY X0UKVtj8E5X8CVTMmQCaA/iZu8kibLfaFPPSeTjocghSdzeIRgQREQIABgUCPPI3 LQAKCRDkwbNJgRZkuSIXAJ0REQ1xY6OFvWLLY7vtPhSkEbsXJgCeJXaVc7+6A/l/ P7RGJoVA2aqqSryIRgQSEQIABgUCPjwGgAAKCRAL8GQSYLofR8p1AJ9NLtBZCdpd p8oG67sSD9EGk3+hWQCg/KkUjHGmVSGmQU2A+CX8MN80lSKIRgQTEQIABgUCPmtE jAAKCRBOOAZa8Q9p19UWAJ42kJIpDGF+/PoSnZ2kKXev6Pwd0wCffoPGbdkFDn4U 1QkH1LfBS1fzZ9u0I01heGltIEtvbm92YWxvdiA8bWF4aW1ARnJlZUJTRC5vcmc+ iFwEExECABwFAjzqNHkCGwMECwcDAgMVAgMDFgIBAh4BAheAAAoJEOzw6QssFyCD NvgAniuAmAatY9m/JXsO8Pf4Gaqn8sdDAJ9w9iEjbVIrHicNoGig+JZ2MzoXaIic BBMBAQAGBQI86jp6AAoJECJGDGoDwvstnBYEAIbMNUUVHnlBJyylGD9ILRi+6hM4 3OVjUMtSi3+wWxSX8iLnC8wfSUClEcbhEsgLo88IH9KARIMRP5GVZd4IdfQ944AC O64TgKe+Gywk5LW5BwVJOMpXLlrZ13nEM48hoiLipn5c4sx7fKBTJKQkz1KOrNfh IvL1t+wZ4XMUCDiWiEYEExECAAYFAjzqOiIACgkQ99Q+k88BflctgACgnBG5BoSe NBw4L8ZU1sgm+ioMzboAoIprTOjAbKoE7JP1Lp4sw7yQ3s6hiEYEEhECAAYFAj10 uvgACgkQ3P+wmuUns7XTmACgghrnoPXCydTbuzTMvihKf+YFMv0AoIwLXMMrcZfV E7VisZO7LHKPNAsZiEYEERECAAYFAjzyNzAACgkQ5MGzSYEWZLn4mACgtfoD3CAL hinoyXOMFMbGrZhBXVAAn0iSmTDzGG/ez7IhxVfxDgronhLQiEYEEhECAAYFAj48 BogACgkQC/BkEmC6H0f6WACgj0hsYBO/cd8yReuHn7G2Uy8ITXEAn1gPWD0th/V5 Z+3evG91zU45tYOoiEYEExECAAYFAj5rRI8ACgkQTjgGWvEPadefrACfa6HcGH4h P7H1OYrFtAspVdWKYmIAnjKIN8ukxtmZUxBo6XH+Aomk7bDOuQENBDzqHSQQBACC eenGIATI8xuuYEWX4Q+6RD68CY8exYlHgBKug4rkjNFu+S7FjhCzklyCJ4txdLfE HI8rqTvH56nQT/SRAs4oeTyGJoRxH+OvOK0SMJGuSduegNEPR6wShdgJcsEmeeqb GuZjWxa9p79biD9reWXCEhFrGjwAZDLMDJvoWAu+awADBgP+OsRhHT1r+PeD2tWA /x2wAMgfePG2fEI2QQg0BZtyEK+NBA5uWFZZTQUqO2MPGOxqfAKPlmBBE+tJBAbQ E16+IzXJZ+DUv1JhlV+/b2vJDD3OcwEJaIk+/IQpDkGRwteevdRxDTfqaRI11XbD YwM4u2aJPTjxyXHxXiV9P69wrmSIRgQYEQIABgUCPOodJAAKCRDs8OkLLBcgg0I2 AKDEBTYIFJjK1nTwXRYfHEx4ietiLQCfbMUkZi0uCFW71DQ/w6Sq7ZuUwgI= =WWB9 -----END PGP PUBLIC KEY BLOCK-----
D.3.53 Joseph Koshy <[email protected]>
pub 1024D/D93798B6 2001-12-21 Joseph Koshy (FreeBSD) <[email protected]> Key fingerprint = 0DE3 62F3 EF24 939F 62AA 2E3D ABB8 6ED3 D937 98B6 sub 1024g/43FD68E9 2001-12-21
-----BEGIN PGP PUBLIC KEY BLOCK----- Version: GnuPG v1.0.6 (FreeBSD) Comment: For info see http://www.gnupg.org mQGiBDwi3FcRBADkiWSSJSOX38CIPgbUnnDQ8S79eZ0zQYnYn5aeRMi7w0B4SnQP 1DcFZ/EHNtQWJTCaQBWQZZWvL1ZjdK284YrpSKs7gfoV5BufcFqKatewWZUfsUad FEKTXLXlZa55151UtFy9erkA22VWHmqkauDFYl4DiOtaUWCX1Gg8xCvB3wCg0sbC /VtANEu2XbxUp5pGmReNn50EAM4vLWfZk3T2woHN0VBOwEk0BM216zfJQGLFUFqT nLKezO/QqoCCcVpH7rwV0V6NI1w6YOSx14CU+s83iyyO0KlRypoptWKBoA+cjs/y 3Iy05K147YfWUhgkKcyw/Qwx8wCDaetG+qZCX4nY0EByezFe504uDkcxk5BrqBX8 E6kzA/9vSG+J4aejKRw9z7Ku5cLV9ygXCksu325uY2t+J6b+48cT8eFMOpgUHyNV m5ypOL31KYRPkOzK+iiDoTPODh4Zg8YZLsgWdTrC0ZQW2nWPNd3Zv+tLAmiwVjIV x4XqtFXh4nhI2eM/PXhdN37R48OKB0DmrvdH819/2+9upNvO/bQrSm9zZXBoIEtv c2h5IChGcmVlQlNEKSA8amtvc2h5QGZyZWVic2Qub3JnPohXBBMRAgAXBQI8IuKv BQsHCgMEAxUDAgMWAgECF4AACgkQq7hu09k3mLaWwQCbBEeFWt8z4HlnAys0FYB8 /U63eqkAnjKz2Lxj14N8QYtbtFThZRB5fq5cuQENBDwi3GIQBAC79Y5tcPi18bZd REXZmDOnLc0gHD9y6PHgR92BUCWQuafcxfQqqY2ESF/JQ0dFfBEkCAmYU2YkPZA5 A7skmv9zHun/bXAP02hrvMU1Gt0ZHIzDV0EaO+uxY8eSKg4JuxZzpgzWCIxI/6uh ZhOuEF/uql7IDKMQcOfsvVrF8cZfNwAECwP/UvxNG/RUOlOHdRo3hY3H5l7zmaCi AwUU6Z+LxDn+fwERX7wL5rasafi1r7/9VvGADfelpxKR0kZM1eKYPtri1zS6Zm5a CC+QVyyoTcb+x0mWForq6FxLDf7+l/O0TuEG7VOH4RgLaT2N33yoScEvxdB/Qo4w KnT39F7lYjbzBvGIRgQYEQIABgUCPCLcYgAKCRCruG7T2TeYth30AKCzp2KXBqsa N6wOyM+tHQ4DKNMasgCglJCipoxpnnvCsGiZJv9AgNQFDGM= =a9D2 -----END PGP PUBLIC KEY BLOCK-----
D.3.54 Hideyuki KURASHINA <[email protected]>
pub 1024D/439ADC57 2002-03-22 Hideyuki KURASHINA <[email protected]> Key fingerprint = A052 6F98 6146 6FE3 91E2 DA6B F2FA 2088 439A DC57 uid Hideyuki KURASHINA <[email protected]> uid Hideyuki KURASHINA <[email protected]> sub 1024g/64764D16 2002-03-22
-----BEGIN PGP PUBLIC KEY BLOCK----- Version: GnuPG v1.2.1 (FreeBSD) mQGiBDybt48RBAC/KCE5CLVZsYvpmgrbum7JHgIgnX39EPMQmL9Y3LmYy6Iwh+OF iIjIqW6cDeCcxHoJBwbSUerC5ueriwZCh46gSnLVjnmBLlGFXyxYbSfFGetMVVSR 6OpiQuITp4ZhVw/UoCGloNsIFKg6l4JMwqZmsrZPdl+zUU79RV9Zb4XhFwCgsRIo 1mf9I3rNZ8f1Jv69nUR/lJkEAJB6fY1rtUNUwq+JXOnFGD0KnC8isQNyOeQ7Y1il HQ9mGVKuUC3Zh0FzvdsU7Ks2ss9ynxfbFXnyyAOqXwTzU9pMuW5oLOUmjqwEfAhV 4S0xcnPcfGGJ671NNeqa8X4LQv6ECWai6O4CbA4aluRqhHNxT9dgEai8RN434LQE tGxcA/4mIlvVoM2c2DRjD4+/Oj+i80ZMpOgE1RkuQmXoZ/DwLD3EHbIBX4cNffOd FzxYrKCrXD50MehIw/IhFfHN/GdEN7NT87M3j/ydSYFluoiLv8FXO00mr8cDi3wF q+LGbniEhVcW6wpUz9zVFmdLAp3HQi1uRAHqYmdSs6gqjl/+pLQqSGlkZXl1a2kg S1VSQVNISU5BIDxydXNoYW5pQGJsLm1tdHIub3IuanA+iF8EExECAB8CGwMECwcD AgMVAgMDFgIBAh4BAheAAhkBBQI+L/K/AAoJEPL6IIhDmtxXgj8An1YuXcp0iurB ZYHiaYMzAb+lYhALAJsEAKTyeqO0plIvHBV49L5CErZo87QoSGlkZXl1a2kgS1VS QVNISU5BIDxydXNoYW5pQEZyZWVCU0Qub3JnPohcBBMRAgAcBQI+OM7uAhsDBAsH AwIDFQIDAxYCAQIeAQIXgAAKCRDy+iCIQ5rcVwyNAJ9Y5N6lIMXVy4sYCdgQvqDR xkUN0gCgrsbQwfTOBcy8Mw/UmGOE4/fwrNa0K0hpZGV5dWtpIEtVUkFTSElOQSA8 cnVzaGFuaUBqcC5GcmVlQlNELm9yZz6IXAQTEQIAHAUCPjjO/wIbAwQLBwMCAxUC AwMWAgECHgECF4AACgkQ8vogiEOa3FerLwCfRPWW7lC/pAVdD2Jo+8rcWTKQ1xEA oIQ/on62k7YBO+buO+K472a/cW2MuQENBDybt6UQBAD/ZGmvwhzt9YWhF9q7mLOT iEMzL2AzBryLzzUphejgDlJN/TIoDtaJfMyNkO16FbUq/WLQbKYFKfDunqx+eVSi PsneeYw9nAdlcXVgHRjoL3vj5O7PIg4qqps2mnLKEOXLAH2PNTYY6+8T0NQicdht YIraowzLoKRdINuDQrCpEwADBgP9H4CwbNJtQAHwS9ATmfL6F2Bg9LWe1godSWkM N+nBxKvMqrajJWfxV09f9gzn0qmMZT9u2DwcADzRQLC3jkzgOD1f8UiAuCuDEE1a vg1iCuyiI6m+MMWCkOCj/69wIu1ilmWqkn8SeoEwN+hwqHa20ue7vBhXreQanJim sq38ZdCIRgQYEQIABgUCPJu3pQAKCRDy+iCIQ5rcVzT/AKCgYOyEMpIxXYVI5gYM CwQ3hkJ28gCePnTu3Ke6lPoQsMAo3TzKkUO9Wj0= =cXJQ -----END PGP PUBLIC KEY BLOCK-----
D.3.55 Alexander Langer <[email protected]>
pub 1024D/8E2523FD 2003-01-28 Alexander Langer <[email protected]> Key fingerprint = B757 5ABF 691F 4011 F565 3765 BFBB 3506 8E25 23FD sub 1024g/16C3B12D 2003-01-28
-----BEGIN PGP PUBLIC KEY BLOCK----- Version: GnuPG v1.2.1 (FreeBSD) mQGiBD426UgRBACFqy2/VWsyZvkXo+SUhfepgnimCDWXvg/h7wZyml703ChJgfm1 T93CmHSLSzGXJDPMYd0CFjps3AhWWIh5vBegFB91vcJesXEYyZ60sx8TgP3nTB9T /5h8ICKqM3gCntIVG4tfMoN2KTdYpfJ9Q7gczyZ/vT7xc6rBPq/c4xVN/wCgihVA l4A4ejcm8inx7E/Owh/ioOkD/jTW+kiB6+91qzO5LOEIYbcapUZwanffAp/294Wk Yn1AFJsMp2nwqV4I0i53NFWMz8LffYzfZCJP8ugLP5x1uR6T0SrPN+lBqMgyQTOX MR7EZUS+pK10GJVzhvuYmpld/m/0XZgQ/JudCDa/UQWd1I5+ZtARXyEkIXcL1gPG r8gHA/0Z04MmM7Uh9FJHjF6PApLgRz0vxQwGEgGleuN6KFS6NZmrCBZ0Zypeyagr 6DkNYW5w4C2CuGTrbWOsX1P/CKhUyYa7KKRoo1Wxf0NirwInhFkSDvJP2wsG3FWD HsU0PC1JYjMBXtrYRcVRaamDIT3vovgry4SWcCoVpi0/gqQHpbQjQWxleGFuZGVy IExhbmdlciA8YWxleEBGcmVlQlNELm9yZz6IWgQTEQIAGgUCPjbpSAULBwMCAQMV AgMDFgIBAh4BAheAAAoJEL+7NQaOJSP9NAEAn0b/dR2wwZQSi8tJgOn3X7dgi6cc AJ9JSK9kEM0itnHtB5mLi4CWwnw604hGBBARAgAGBQI+QCoDAAoJEJWnRNJ6Hmtf v9oAn0+uAimUZj+a6k1DWriMmoov4xXiAKC+Z9W5Ela8OsN/HrpDntE4y5eGmohG BBMRAgAGBQI+QCR4AAoJEGxG8ZwW/bKYi+IAnA0SuX93QxtfTc9KS8xARtmsac5J AJ9cvumvWhrcn3zyKpZguY1Za9vYD4kBHAQSAQEABgUCPkAyKwAKCRC1rDlKuf8q EWl8B/9YlA/bCbsn12ae5S9MCJLVvVJr041awz+hldB5uITZmXGsY0WspJlittLc /3xSpm2yV9kBzC5Px73jNmbn4YdPgQ9IQzScXR1r0aSnFTFMRY1TsE4LUdRCuN5s uIwHRZL+/xkD9N1knWq3u2yQxyebYuEJDYUUGnCPjpafzZ6D5G0eBLYxvTlNeoKr AzXChgTnX4rebXSLJ5psIGg8aLMOCxg9gaAIUtaJz2dE73qaOLSX6XNjAxUSnIPz 5mcu7oPufaoWbRzkKhXu27IS6yKbHAnczm3VFZWkHr3iF8TCGVfR5wpySl7lxGAj OTyX3SR0RkwSkPON186T1+psgpFuiEYEExECAAYFAj5ASlsACgkQlI/WoOEPUC7S UgCgkK34QyNmuAvstAluO1oWLHst+Q4AoOwdgaJ2Zg1G36jXsQnCM2Yy4w5NiEYE EBECAAYFAj5ARhwACgkQHI0nZIQ34x/f4wCeNJ4fYteAkVIkUQR+VehwlRSk2l4A oNgAIOT3Oj8eGBz3AEiCV24Ea1caiEYEEBECAAYFAj5AVHEACgkQgGcShyMVr6Ns 2ACghFIICewbGCYTpsfIf1YuQ09iyugAn2RKW/+k6/mB+UA7osWlDYa3XTgYiJwE EwECAAYFAj5AWWAACgkQhqAIGyKylR2PTAQAjBCnsgjy6xXFJgbZ8Dfy+yOorhaP Vvz07amOt4VDR16AnsNSOLaeaEbhmnfz0OzJorwefIhDsm8EQGsUSozv0PemmXLa JsfjNsZJ+fwjFPwJYJPEH9T3zxfyXddLmMWFgiVU0+ANCxHWQrCVwt5EZ0uc67c8 gFEKhAgzhFkd24iIRgQTEQIABgUCPkCsUwAKCRBiSEuPG0iN6oVMAJ4jXgYqqLSw nx/OGDjYwVCjU4FcawCgxfwxTXwtJ22jfMd4E3UyK5GmP5iIRgQTEQIABgUCPkCo 4gAKCRCuUcxBI0Z68UwzAKCfpMbKRsFwyZ108T8bNXRxWQl61ACghP+3kCWXBDXV rTXu0V7sxHMju1eIRgQTEQIABgUCPkDIpQAKCRDVVqZgiOPvVwh1AKCDGKnsNC1I GlCkbO6Mzo8YlvdsEACfZCL63k35gFU8VOMjiEOujLLM11qIRgQTEQIABgUCPkDf yAAKCRA5o8lM/cSo/YdzAJ9R3CzIQDfB9Fm8+PuXCpOdWeC6WACfWBQJTpm+IUfn u0yE379vMf7wVwuIRgQTEQIABgUCPkFUFAAKCRC0deIHurWCKQXRAJ9bw1S0i06o rcKagutpYAXzC0LVewCeLKffKNobngSbGloXRvnT9fOnHCWITAQQEQIADAUCPkFe MwUDAeEzgAAKCRBPg4y3JqCoFobGAJ9Mz207gdQxxzhKWhKipRGt9gNhSACfYx45 38ILOw3Xpf0BZrPi93ZUARWIRgQQEQIABgUCPkGT2QAKCRDwJO+CNVGeqIQFAKDp AR/yU7vazd52T3mbMeVTaJTw3gCfaTQiwrLP8P5QgFd6ZK5c9nzm5quIRgQTEQIA BgUCPkEVoAAKCRDcNnQ35arLNMlSAKC1o5DLm1yhoHHlBtBhDiIPzTidRACg18Gy fiXF0NrIKoX0L/eTPuxOh2SIRgQQEQIABgUCPkFbrwAKCRAHJZTVR7A16zV4AJwM dVvjtp8/kmhyqwSiKkvGpOAw9wCfbgJG50u6H+QpGdwRP8gbfCbB5i6IRgQQEQIA BgUCPkFbwAAKCRA/V8xvnmt238YzAJ0SyRBAPbOga8ZZ6WacAQe1QI54iQCdH4vc cIs0mKBwS1FS9ncjfp6bD2OIRgQTEQIABgUCPkF0ggAKCRBBGPb8lSbpxX89AJ9S ULytwJeaU9s/WOZDNYrCSYZ/9wCfY0v9xp9+XZYpBp0LpTf09yundh+IRgQTEQIA BgUCPkFxfwAKCRDQ5Ee9ESjyX1t6AKCRrIL5FRMEOcVt/O7Kil5f2uR91QCfb/zW NjhVY7ZPZu008Ag1JHUmC8eIRgQTEQIABgUCPkFxnAAKCRBrphakwVE7DGMjAJ4u E+TjhKF+z9Gd2V1xtjf1IuNM7ACeJxNg55UDzGfqhZHwFmTUaYT+6WOIRgQTEQIA BgUCPkEL7wAKCRDHON/LNYa6caOzAJ0Ri13g9FifpVlfJBkoYhUb3Tg2jwCffb2+ sNSXdXCmhpy1TO5a4uJlQE+IRgQQEQIABgUCPkF6lgAKCRBueUUCoBl5wN0LAJ9r 8yKODOffy700Tx4irrZhuZbSCACfZP82CTCP9nW8g0zwWR4A1MTGNiWIRgQQEQIA BgUCPkF6pQAKCRCjGM7Esm5quWimAJ4sqvyHvg39SeME8gYrDKM+86qTngCg9Jr/ ua1kfPq2wnMOYn8sIU0FhumIRgQTEQIABgUCPkGcQgAKCRBsdheMoO2YLdzoAJ4t 83kmlxVnVgr6kA57D45pnJBzcACg+qLDcPIQ0jJwC/3OHT2grjYWzGyITAQQEQIA DAUCPkDKfgUDAeEzgAAKCRB1E6I2ExAs9TEYAJ9clpBGSlIWrEJ4CXweafE84eXN QACgjNVKxwWIKzO6XFpo5z/4kcZjJmmIRgQTEQIABgUCPkKlcwAKCRBADB62okjO Y2sAAJ0a5t43MkQjxHEqMKDQvsbudzKAUACfQHbFEJRqREOQiB0R00yb3xyShjuI RgQTEQIABgUCPkQyRgAKCRCwxLn3mg2CqXYpAJ9wbHr5+IqujUYYjbMkQNmlPFhO ewCfTmFosrJmWPs5/B54CUgiI3xxPxyInAQTAQIABgUCPkROzAAKCRAS6T6JP9G2 tdo8BACxQqwIk5NL/GmkD68W+ohslqOGMHxi6oRAZ4SDbZG5+srMt6HPRj8+0XAF KyXNCFTjepz4ENXpNc4a5DyifNr8VWoRRbMNWJbWMfNVQeoI8HOwwIHne+EAQJyG KHU2oERXl2qac0itKdAGnpEy81VCmTGrG88weT1CpdgBMCA23YhGBBARAgAGBQI+ RXPaAAoJEFv8diRAZaHaFmwAn3pYi2E49o5gStyi34ElEUv97d2dAJ0fSnl8h5pu XU8sjFTatTqstF7jG4hGBBMRAgAGBQI+QY27AAoJEC9KXfQQ64+oU5kAnimPrymT Nn1dRfY6qqPQ/FzjNRHwAJ9kh8DWExTtRum57uwHYh8mZCycmIhGBBARAgAGBQI+ RsZkAAoJEJ71dopqzj+s+JsAn35S8PivZRqCn/FH2R14UV7oxwpgAKCPHwYs8uth ax/Msp4EhzkzBLkmO4hGBBARAgAGBQI+QFwRAAoJEGoCMg2CoDJeiRQAoIBj8H5F 5bbT+rFCJPQgpccOgEM5AJ49fwIB4H5hL1CZRBR6mgEH8RWXk4hGBBMRAgAGBQI+ RsYnAAoJEOpKzVz2XGjN/QYAniTd+b8kUXY6AtgcWxDSkAqJYGfoAJ9+99DECFxh uZ4fGVlSEQtlhjPTsIicBBMBAgAGBQI+Rs/tAAoJEEC/HpEdDdC5nFkEAKA53EAx YAx1X9R/HcKwoxN2nRJI/hloXfbH3wHNaz9a7ig2uWiFdRls7HIU4jAHVeYALuhM YSMrf+qg9C4oHACAehWeo3vsYDr5+BfeEcfYaC2ENEnqdPMh6KcbOtaqfdL0AT5g weZ3AB1S5HnuqavFEU2kegYolMjC2z/W/1qHiEYEEBECAAYFAj5H0EAACgkQEMun 3/wGpS0rtgCfVcOQxb+AaGpI+a43UusTvOlGD/0AoKAqrz6sGdxftY1Jj/mzyaKw DeDViEYEExECAAYFAj5IZ6kACgkQmpTNb38U76TgbgCeN7yH/RLVPfTTg/tcZPIb 7dj7vLEAoJTELa22zBE9c9umKyuCHwBsauqwuQENBD426U4QBADVSlQ8CFKgwS1G Isvg2iyjs7mC6wBJUVxjEFElX9Ze1I6GXqMPV9EhWTbYAorvTG5lvnKDAUCkNvzc 7NXgnlDkfyjU5LGJoq4QLRF3RLxmjKp1tqJEvCWAKzK7HFjgpyQp002MJgcIQx5s CuymdBS2gisAX/pWFwF+mVo8GhzYkwADBQP+JRtsLXyAYqBpfMbd0J7t3oqjWbIt X2euC5fbvzfFVyNcpgMPwcWxOy+S2CS52+5q3zoqWlr8DEacWvtyq2Rf5hGroQrE pvBGxskxVVJYudS0P8+fi0je71Mn3dkFDTZee5AZoacAvcevFHULiWtI+0Crh+xG eU1MvasMWJJElb+IRgQYEQIABgUCPjbpTgAKCRC/uzUGjiUj/XvsAJ0VkyEVanGd LdFixJcekhk5afCDlQCeIwDkhUZTrNokI83c/7cxCj8BQSw= =4rxH -----END PGP PUBLIC KEY BLOCK-----
D.3.56 Erwin Lansing <[email protected]>
pub 1024D/15256990 1998-07-03 Erwin Lansing <[email protected]> Key fingerprint = FB58 9797 299A F18E 2D3E 73D6 AB2F 5A5B 1525 6990 uid Erwin Lansing <[email protected]> uid Erwin Lansing <[email protected]> uid Erwin Lansing <[email protected]> uid Erwin Lansing <[email protected]> sub 2048g/7C64013D 1998-07-03
-----BEGIN PGP PUBLIC KEY BLOCK----- mQGiBDWcyFoRBADed0r7ei/q5DX2f1sKLuIaf71LNIUjHPV0npYNsZxodS800pTY gqTJuqe1DfJKU+nw7FAKQN1myJPNj2aIsvm2sg80xV1uoJmWTloQulRGQ6C7C+Q1 xB20JUL7GIczUM5hDRajr44vCJcFSs7EVVHBXRWi2UVm1cja/R3knkevDQCg/2yz IUJmOHN2ccJVuHttouGEukUD/Au69uLjcdPgMrv5vLwAg1Vg2uf/Qj3RbHiDgi0O RWgG5urvRM/m1T7QjB6UKpF+oYACkmfwEZbMzlRJe1jtr7qRwOpAMW99n8fc1Jx6 YfdVtl0TxhnZBhI7/Wx+1DW7zi1CwbzBXFh1O8zdwPUn7g2G09NWDGEkDGb5Gz5e pXrBBACipRm91E9z7AQD52ygXzcTsqN/S5vDFtLJ4zJQCRRQ+LLt01vVmbkg8yhe sQVqUMjp/HGFI+CmPZpp4Oc1Y5ixlat5CsnIWxzjy2YU9mqBAx3jocf1+HuYQq/9 XoENs+ySHBkdNQFU6thEqJAOYD5lmIt84OByaOHrbc7d1yOcBrQgRXJ3aW4gTGFu c2luZyA8ZXJ3aW5AbGFuc2luZy5kaz6ISwQQEQIACwUCOqZFdgQLAwECAAoJEKsv WlsVJWmQYYkAoIGgdSHKz/VmJvfUoG7rL1TQcQf1AKDoHFN+vPK6418A2DytxTWG VgkXH4hGBBARAgAGBQI8UYMvAAoJEA8SlUXOHPkKaiIAnAgslxPgz1agFB0iOXuI CG7J56+CAJ9jyAUte/fimzHkBK8VnH7AC4BeBohGBBARAgAGBQI8xpO8AAoJEDx7 h1Mest5m3vkAnjsKf/RN/Ef+Tf/ki+GRf693IhqhAJ4isfzDR83AgfkRNzxVgUyU NcLNZ4hGBBMRAgAGBQI+baDeAAoJEFPCDI4dQfvVbGoAoMm2lJYVPhweKl9sOJNJ byUfYv7yAKDwUDg1yCvW8Vsd2AHHTf0MvkDgn7QcRXJ3aW4gTGFuc2luZyA8ZXJ3 aW5AcGlsLmRrPohLBBARAgALBQI4tn49BAsDAQIACgkQqy9aWxUlaZA6yQCgtVpX j4W3g+m0TYejJyXJjRPrAZwAn3DQItM5PRmp6baTuu+sZRmesUA+iEYEEBECAAYF AjxQPkQACgkQIqvw7PlWHDFPGQCeLj2Fh/uwdJzUeCS/AIX2DaynwH8An2BsSrOV m/90qtotUD0AHqRUtDuQiEYEEBECAAYFAjxRgzYACgkQDxKVRc4c+QqvmwCgnBG4 Nbfl8Zn8E1ke3NlqrhZIizwAoNpHT+ik/Jq1tw3s9gBwULesiDtfiEYEEBECAAYF AjzGk8AACgkQPHuHUx6y3ma24gCgzklLGnzmcg1yC8MPS7UvHITceiUAoI6dS41+ aTpBLTl4Js5ei18kM5pziEYEExECAAYFAj5toOAACgkQU8IMjh1B+9W9zgCgnerR Psk07mXe38KY7ROVTBzd+RwAoIUDC6Glo+Sk3oqBN4Gk7B9dVUHqtB5FcndpbiBM YW5zaW5nIDxlcndpbkBkcm9zby5kaz6ISwQQEQIACwUCORRUmAQLAwECAAoJEKsv WlsVJWmQSdAAn1R4xzjkbTXR4CUJF4mramSs9R//AKCLvACJMj009dkQ9xOo08k/ a+NZDIhGBBARAgAGBQI8UYM2AAoJEA8SlUXOHPkKk50AoMjV8lYE28vScGYXIj1W ebhzOB17AKCiR1/uxnZnZU9AxAwl+qG5CEQ9/ohGBBARAgAGBQI8xpPAAAoJEDx7 h1Mest5myPwAn02QMT5rCXuGAotZd8P803lwzaD2AKCqfzU5tK/L6FRPoozAnUaY V0oVXIhGBBMRAgAGBQI+baDgAAoJEFPCDI4dQfvVpXoAoJeatp2KOxsyFxhiRFuf +w77RgWkAKChudBj76hLzDhtZ2L6zpJVWolqirQfRXJ3aW4gTGFuc2luZyA8ZXJ3 aW5AZHJvc28ub3JnPohXBBMRAgAXBQI8UFhnBQsHCgMEAxUDAgMWAgECF4AACgkQ qy9aWxUlaZB4sgCgslCAr352Y+jFQVjtcyOUtllHdtAAmwST7eF/kqaD6BGWyTUS a9eKCFrLiEYEEBECAAYFAjxRgzYACgkQDxKVRc4c+Qop5ACeLZ0y9IvPzDtFDntO 7dzX7kSd/AAAoMD9WYDr0ZdOIEnOZJr1S7USZ5dRiEYEEBECAAYFAjzGk8AACgkQ PHuHUx6y3mYIBQCggT3iQploUCt1imOX4GN4/uG5FNkAnjJmSsJRvdWfpT+lrQWp eXwQ/9yMiEYEExECAAYFAj5toOAACgkQU8IMjh1B+9VG6wCeLK8MHCxSVC1dsuqb 2uvWnF7eg9MAoN1kBzOgoViaC3mzru1dih4wzHuBtCFFcndpbiBMYW5zaW5nIDxl cndpbkBGcmVlQlNELm9yZz6IXAQTEQIAHAUCPt2IKAIbAwQLBwMCAxUCAwMWAgEC HgECF4AACgkQqy9aWxUlaZBvwQCghevtwtKniV+ih3eVpCwq4+0lJk4AoIVAoqiL 1W3yMGhb6l9ACw4ENMK2uQINBDWcyFoQCAD2Qle3CH8IF3KiutapQvMF6PlTETlP tvFuuUs4INoBp1ajFOmPQFXz0AfGy0OplK33TGSGSfgMg71l6RfUodNQ+PVZX9x2 Uk89PY3bzpnhV5JZzf24rnRPxfx2vIPFRzBhznzJZv8V+bv9kV7HAarTW56NoKVy OtQa8L9GAFgr5fSI/VhOSdvNILSd5JEHNmszbDgNRR0PfIizHHxbLY7288kjwEPw pVsYjY67VYy4XTjTNP18F1dDox0YbN4zISy1Kv884bEpQBgRjXyEpwpy1obEAxnI Byl6ypUM2Zafq9AKUJsCRtMIPWakXUGfnHy9iUsiGSa6q6Jew1XpMgs7AAICCACl 11XSSrItBWZ6D1UnqNdlk4bexhvuGgnfhXwnOr7a1+cAlw79PTE2VlFeeYx3pmUe XMlwM9d7tS9VIwtERldHkcDQ5yBWQqIINKFj8sH4OXbV9p0D+bFBgTHZI1I+Io5Q gENGUPALMUgGrgyHCkiENATuU0wyBCK9Rlfi4VbmwVRLDo5WWITd8U8+hQrDgBTQ 6lRsX5Xf8OUKI/UDt5Zcl7qloTRyjOLrlU7ga+gjiKRByzbS0OBtwYE6ls6cEaPD HoqNX/2u/7Fc+V89u25A4BOikaC1lIzBy3Mgwf043er/44ZemfOwycLJRnWgxLkL 0lwPF1BmDv0T1eR9n9E+iD8DBRg1nMhaqy9aWxUlaZARAgjwAJ0bAdh//MdW+nXm ZZJ1n5CP9hUz3wCfTHoJ4SI+xFT8Za3OschyAe/NaLI= =prJB -----END PGP PUBLIC KEY BLOCK-----
D.3.57 Yen-Ming Lee <[email protected]>
pub 1024R/5EB52E51 1999-03-03 Yen-Ming Lee <[email protected]> Key fingerprint = FE 7E 04 56 FC D7 24 21 B9 3B 53 06 E8 93 B5 81 uid Yen-Ming Lee <[email protected]> uid Yen-Ming Lee <[email protected]> uid Yen-Ming Lee <[email protected]>
-----BEGIN PGP PUBLIC KEY BLOCK----- Version: GnuPG v1.2.1 (FreeBSD) mQCNAzbdCccAAAEEANydbxi0PCKpAl+7A5I07015Sm4R8YzqQF2LXvneC4FplHvy Qq3ZmibDQEDHEOArFDnox3iY04Svl3KejPkmOAyZWzqZYINLGOaIW/hwkjB+U2ZA cLMUaHDdXgG9U3P5nanksJ2dBpVgehZ7p7PKnqsyMW17Kq+M8snMx0NetS5RAAUR tCZZZW4tTWluZyBMZWUgPGxlZXltQGNpdmlsLm5ja3UuZWR1LnR3PokAlQMFEDbd CcfJzMdDXrUuUQEBG64D/iZgQNzZaNM1AigEwVYIzqvyWcOJsk19VGrQI9fJK92s fwJxJXKVGvU+8R8px2HsNqiu/jYovud52NjqVheFGrRdQNS08/HslbEUZ5UH+ID4 Jg3WqMrHJScaau25N4o8FXIdqBz89KfpCFOwdMx699Qa6P8D7GLsxY5Mc7ikZjec tCZZZW4tTWluZyBMZWUgPGxlZXltQGNhZS5jZS5udHUuZWR1LnR3PokAlQMFEDpT X7LJzMdDXrUuUQEBx98EANyLMVVMIQxDOE6xUNeXwUw+ZAETEUcAVKztz/jxLI07 BoNbCquSoZzja2R54IUXwSDcQ71aV5KG/KVI4HT3XBroKYRvJzzf+ePNZtOSokeq 5ybdtvrMAO7oEIkJqOpN/H6lIXhApLtXRi8yhIaoIVQ4k8WG2yQiIFu69qWFM6DD tB5ZZW4tTWluZyBMZWUgPGxlZXltQGxlZXltLmNvbT6JAJUDBRA6euJ8yczHQ161 LlEBAa2FBAClvm2syJMdCfVlUJpdr2f9SH8qwi9uxf88lVfJb3+46IArDBCLHHdp kDvy+H3NPVCUPeYndcfl/P9fLLunqosTuVksdNKFFhx6+hmyI3+tmGXavgc2wq/z oJ6vnHYW2sOMiQYD46cUsepf9aroH8BvNgoe2VfldDqwW43nVXNwVLQgWWVuLU1p bmcgTGVlIDxsZWV5bUBGcmVlQlNELm9yZz6JAJUDBRA9Wn+pyczHQ161LlEBAW5+ A/9NaKX20d+ixhO5C1/ShUXUVt9IIIX46Arj1HGeWR5xs5Ibt1QXGH+F92v56Sm4 yakclijxU0nSmFxeQQNiTndACMrpkCUz+G3SzTzYzu9N+2eJ4FP/KYb2os2QJ2u8 IztGZ+3GmEdfQM6brT6MhAH5DK3RurYg+wQcSFR5A6msng== =B37X -----END PGP PUBLIC KEY BLOCK-----
D.3.58 Alexander Leidinger <[email protected]>
pub 1024D/72077137 2002-01-31 Alexander Leidinger <[email protected]> Key fingerprint = AA3A 8F69 B214 6BBD 5E73 C9A0 C604 3C56 7207 7137 sub 2048g/8C9828D3 2002-01-31
-----BEGIN PGP PUBLIC KEY BLOCK----- Version: GnuPG v1.0.6 (FreeBSD) Comment: Weitere Infos: siehe http://www.gnupg.org mQGiBDxZg2YRBADEFCcKKsa/VS6z7aq+04C4rJ925MPEdQnGo4EVKtRv38AnqUaW M6w2CJuDQ4iS+FL+nWaSwRnfGufftkEx0mSum1FMXQQ6+buC11LkgUYcF2f0wlak HGr6Vo48RGz76Vi7u5tcoEaLb6uYjJfOOAzYX1aOv/T+qeGVc+JJG4LhNwCggBHB 1DpYSy35o1I7EyVufjruQJkEAKp11sHwuPcc6Q4q5hSKG3VM5TJKHwRkdoRxgfjT UJGecH9GA4Td7vh11dMyS22RnFNS5hcCdCdoe9PkDEvwp+w30pi8uNOFmpCF9TlA FRgwFC9pq6VveHd1PHWSRgiTFxeTXgJ0Y/zCZSitURCtlqMXMg9qnUe1tTAF99yp zmQZA/sFaFGTLzCbPrUY+2q13b5PSQsv2D5FHFGuH3FL/rIyPexKmm9Fcs+LAQM7 rx94ipa0OpwapUwCFPg6zNqQ+67JM4KCzRsoSQPsVtCNNcEODQRMXqx6DK1tYUvf ymCAmXUqqqVXARyDh954uBqTfRSASsqPsVAxtwmVA7rceEcIfrQqQWxleGFuZGVy IExlaWRpbmdlciA8bmV0Y2hpbGRARnJlZUJTRC5vcmc+iFcEExECABcFAjxZg2YF CwcKAwQDFQMCAxYCAQIXgAAKCRDGBDxWcgdxN0LiAJ0Z9skwJiQAqTwfTXNVo3kK YqXgwACfdNFVwmHkW8IX5XaRjG4hpZI+C8uIRgQQEQIABgUCPFmDpgAKCRB54pxg sAY/55CDAKC3dAAgVvg+OwABgBy7256FTlHMrACePFhoOz6hVb8aueuvrPsbSLGD itWIRgQQEQIABgUCPFrGVwAKCRD0jKgbaahYc4k7AJ9YwQMauG4iOmTDvbTw413Y BlgrvQCg1typrAUwhGaJrYrWbWykz4rp+jO5Ag0EPFmDcxAIAL+7gbcAV1sNfmfW d/5/zctXmJD9nxpAAxN9dh7S8Ff+Opw8X6q2bWoJNGLLiUuzBL7JyQWnv83EtEo8 9d/QWqQOX9iuZFR6YsVqPIrZpffDceyVGlXZBNGSMUTb/z6iWpItD8r6j5/G/sVm +4Bm8UoSWGku534VVeYCcGiFxsEQVT7W3HHnE0Jn5IaMAynbNsNC44cHHe2S2x90 jCS7Xm2KhX4JFDltA+HAEFs09wqF15YCo4JYGVd5WiNJxDE1X29iI50gkRiZnxR3 fDOYCsOK5/pu8h1j8/SgUMWRt6A5+r3jjfnPiH9EwlAwdu9xm5Xnul04/d33pI1N rUoUeesAAwUIAIryPOPHCzWuhFnvw+N8/3AYPwlLOQg8DPBU2akAX9gjGO6KN5TK hbVfntMpNER/j0QA0sDUus5PaTbPcLgdJJyPC8fhe7ExUMmBUV+5VhWcEKmCVEo2 i+eKr1xuFs1IhzgNmDB1V45nzhcAJvQNEkiF03BknUIB3ck5wqXQKGue0uNBx0TJ OaKEeBlrd51ma75XfVXmgtvXlodoItiCMI/Jw5umAHeSQp/ocB0/10U3KwRO3JZX dXv+xzaOgp1R2DT7S4X+Ts5vX7sRhMMRZ9RcONhvLcVN5uoUYjxgLg+kMxJfRZrh /KZS5glnx+Kg4xcSVuT7orrO6VfmVzAQjIKIRgQYEQIABgUCPFmDcwAKCRDGBDxW cgdxN0T0AJsEmYPLtRk6a9wJnzd8GwwCusLwyQCffMrJLHm89j+hw4yMRwHT30Ps H8g= =ZuST -----END PGP PUBLIC KEY BLOCK-----
D.3.59 Ying-Chieh Liao <[email protected]>
pub 1024D/11C02382 2001-01-09 Ying-Chieh Liao <[email protected]> Key fingerprint = 4E98 55CC 2866 7A90 EFD7 9DA5 ACC6 0165 11C0 2382 uid Ying-Chieh Liao <[email protected]> uid Ying-Chieh Liao <[email protected]> uid Ying-Chieh Liao <[email protected]> uid Ying-Chieh Liao <[email protected]> sub 4096g/C1E16E89 2001-01-09
-----BEGIN PGP PUBLIC KEY BLOCK----- Version: GnuPG v1.0.6 (FreeBSD) Comment: For info see http://www.gnupg.org mQGiBDpaoxQRBADcF3xUpV2Vs8pV5QnfwFvTzBY1fnczFB149fe1+plAQEARu5xk Dn6dpnPw9CM49eC0ouEYwPByhICcSwlUGBgxKsOqGjlkIlge9vtQdwI9i4xxHv+h OxTyhdHYI8hQjyFJaQNmzim7SdfX8bvx5bcuNV9n/sVIsKoy5rbXo2rWmwCg/+rX A79Ki8IORrhyEGd3+JS/rGMEAKpXT8Z6MNOJa8xL2mrVd9ZlKDMSZXPMxYowddI3 hZQqjtbssHvB6qpmbrQ0geNF7aaBCIAnVR8tAMxacdSBpbz0ittXA9i86gyjMri5 6xSgd6CrdcbibDD5TIOSBeYcFBb+4UkZ85kQYil/gcksp81NZg53H5eI5Wrw6sBM /nYCBACEGldPZ2DdUPPvsfNQme7N4Yd6jS3BvXbXhqCYfHiCNiRS09fcLGEnO4br 6mQ9/K8kLx7R7GXSNOevoMNLLJ5kc1DIFYXQeS1weB86HY596nNqn914C8UWhcoR wZBv4bkgZpAirBGPvrO+Z9YM3B1N0a+xu1rZzYSsBya97wsverQkWWluZy1DaGll aCBMaWFvIDxpamxpYW9ARnJlZUJTRC5vcmc+iEsEEBECAAsFAjpaoxQECwMBAgAK CRCsxgFlEcAjgrpCAKCHxIaNLyp4tT6j2UrFEyINUY1apACgnv8EuncpGD+Zm+Em o8HOKUG5Mv6IRgQQEQIABgUCOyeEvgAKCRBr2cjSd5gysdAvAJ92xR6Wv4jg8DBn VMypazvpAM7fNwCfbsK/olkpB8NQGt5YaixPvu8IWF+JARUDBRA7Mhy1w33D30O5 lTUBAUx9CADDyga+ulzenkEpaykTu8FPJ8RS6Dj/2K1zROfdoKNPzTWZeHrGM9FM bPsZ6Vg4tJJKacr9WblfRNiUf0KIStU4ogFMYcouEWJ7Fvc6ovH91zB0WOzACVGX rjJc4TUNe6E33XotLW2fhpEWZoUNJxMa9uux5i6YRFXSpyXLcu+tmSDBGkjdyRZ/ VsNglwfQDFtI+MqIpHQP8NpJSqeTxDdrLLK3+bDcxNDqzqVmOZ4Y2Mlzej9pxPBY RYbOs6aORQkDCOC8fhYixI/gu4+hZQTkr/Dp2Zev9THwo8wjg52Pd3KU9Y4OoMtO fOdB6z0dLzGbWUXaealBJujEufBPPVCwtClZaW5nLUNoaWVoIExpYW8gPGlqbGlh b0Bjc2llLm5jdHUuZWR1LnR3PohLBBARAgALBQI65Sx4BAsDAQIACgkQrMYBZRHA I4JFIACfWI/enwLh44kL6z8mQtwE0Q+iSlIAniahZULNeHsoE3sNcfcsCFNafw8Q iEYEEBECAAYFAjsnhMIACgkQa9nI0neYMrFpcACaA7k/1m9DqK0AvSBZsSLL0fwo zmQAn03jRr8opZGMVdivbmi9hkHiRwAgiQEVAwUQOzIbycN9w99DuZU1AQE6nAgA lbrIYTH+p+v/bflh9gp6o/KUQDVwx9TBZBVewogyWAYf2uDavJ+m90oXVgMu4H1W DU5spmtn//R62TGoiS8vPOOltsfNMCgTCIrxKHEUQEXMa4rVkiI9NGRL6tdDnRgq P3lpg4eP6/bF0zxcc3s1l2a2WeK7+WYtOOYU9TCcebsyiHxvWuev000rQtRUgeHE jCdaAVuCUlBD6f9MUX+Ww6HbWwFJYXkMW2Ga931MS6qf5xcuhyh4JHI/YLwdiOoo mdbUbXTkU+r+od0iB4w930sxwjnyGO2LfTxcIA7fgeALkmNhWwVCZjkQ0iGR4LEj 1RHvahMrU6qqX40xgz8/dLQkWWluZy1DaGllaCBMaWFvIDxpamxpYW9AZHJhZ29u Mi5uZXQ+iEsEEBECAAsFAjrlLLsECwMBAgAKCRCsxgFlEcAjgq7JAKDwmq2mVJwr pFHaVsrfJZXmRSqYvACfTC1DhXwEm8m1aFeRhe9N6LUPtyeIRgQQEQIABgUCOyeE wgAKCRBr2cjSd5gysV4tAJ9Gt7y4bVGlm34MRdurQdTsEmQ64wCfRgI2kGaanklo IySQ2tNH0B0s5UaJARUDBRA7Mhy6w33D30O5lTUBAVNYCACPSdTc+y8xnOTAO69I GxWnVw7n4ZP1yAOFW0kWXDlSrzxvuBzkaYYe2q5tBiTjc38j8L0m/GvIAToFZKGG XxNbY7IGhTP/sZBXei7960cUZEJqaTHIrJxALXeyYj7bQ8OBtLsuJpG2+7k4c3+1 M8t/k4DpVx2L9IgtvHTwIOH1MeJpH526IUXDipNFaRTPKUHE1exKOd7z1zyGgE7e x0+X2cTckTFzy8NQgZFzAkA06HOYjQf8i/IOvp84Svozfg8NH2KriC4MA5a3rD4G n6fqtecPgMrcG+KIHJYZvg3yToceFJkwxZFcSGtl43pprgSf/pqkZ1fodcJ7Llf9 gJ4OtCdZaW5nLUNoaWVoIExpYW8gPGlqbGlhb0B0dy5GcmVlQlNELm9yZz6ISwQQ EQIACwUCOuXFUQQLAwECAAoJEKzGAWURwCOCLMgAoJGhtnPbzYhZWHm5S9Dkgmvj QsgvAKDq9LzJ14Sojrtpxka5F5iViLoqEYhGBBARAgAGBQI7J4TCAAoJEGvZyNJ3 mDKxzzAAoJFFuWMLf6HHO0TiPdafPjuruVpuAKCC0eE7oh9t4xMlTb2SYWMpZS9p hokBFQMFEDsyHL7DfcPfQ7mVNQEB9KQH/iLaexNwzgB9efMXg6RH+TtaWzxBdeEc 7CD9oxjG/1tsfd8S10UScnr+JHTDNn3eh5KdQDjPmKkedPngAIjKHvb/Jux7jcxO OLmRnVeFD1kMyNlv5ggtJcHJ4QXe4rBko68qyU5ON9pvA/h7Xe/ulGw71dOCx0T6 jBlpmLF8AZlHW7z8OS+DYa7fJFI65cDbtd6c9hM+O4WNj8PK7p6MPgilIaWsnJq1 lS5fkaQK+dqaIaVEE4WqTt8v8xC805X58HZXRFma5D39yGFNd3LRCpu48mM5LDLT Q7tfs9jn1Ru7iUHyjI1Jel0hvRGblL8iW/zvwmS/XTXPsh3H0U/WfWG0KVlpbmct Q2hpZWggTGlhbyA8aWpsaWFvQENDQ0EuTkNUVS5lZHUudHc+iFcEExECABcFAjrt DlEFCwcKAwQDFQMCAxYCAQIXgAAKCRCsxgFlEcAjgknjAJ47s3GGw/KsEHKDjjRi D/kcOgiNZACgxKgabQRGmvwKMl8fTtNxiTbAyDOIRgQQEQIABgUCOyeEwgAKCRBr 2cjSd5gysSzKAJwOKSwO0ZIm9II4sjcxWPeNUHAl5ACfXShCxB2mVs6kRDsD1o7f aWeuChCJARUDBRA7MhzCw33D30O5lTUBAaMTB/0S70cAqqqAqrJBZosRZhmXWixk Ah1gMH8SkNVygA3BE3k4A9LC3LNyvlnbCGPFH8PYvN8ymcn3sSPu9nyHVZ31VDU0 mp7JvKeW49tWxBeoFWpNJeNxTv2aNpFCLahpiwcDt/HW8/1NC5dJirDrIrVTrhWG 85UUYeGmMX/5qC7bFh+Y5FC6HxnFTCWlxpZQDtWw4Dbf8r4dMrw/2I9Uubj6brEx LeOG2gB5UAuSS5Brp/9eiAlJs6jRgLU883IzpIhYanz37nJcLV5MVHhbGiR1Yyhr IQlO4pQ2f3VhaEpkUu63x6lxfyVVJsZZ+vZU6EvtJSFACWR1nK2SbszGt/FRuQQN BDpaoxcQEAD5GKB+WgZhekOQldwFbIeG7GHszUUfDtjgo3nGydx6C6zkP+NGlLYw SlPXfAIWSIC1FeUpmamfB3TT/+OhxZYgTphluNgN7hBdq7YXHFHYUMoiV0MpvpXo Vis4eFwL2/hMTdXjqkbM+84X6CqdFGHjhKlP0YOEqHm274+nQ0YIxswdd1ckOEri xPDojhNnl06SE2H22+slDhf99pj3yHx5sHIdOHX79sFzxIMRJitDYMPj6NYK/aEo Jguuqa6zZQ+iAFMBoHzWq6MSHvoPKs4fdIRPyvMX86RA6dfSd7ZCLQI2wSbLaF6d fJgJCo1+Le3kXXn11JJPmxiO/CqnS3wy9kJXtwh/CBdyorrWqULzBej5UxE5T7bx brlLOCDaAadWoxTpj0BV89AHxstDqZSt90xkhkn4DIO9ZekX1KHTUPj1WV/cdlJP PT2N286Z4VeSWc39uK50T8X8dryDxUcwYc58yWb/Ffm7/ZFexwGq01uejaClcjrU GvC/RgBYK+X0iP1YTknbzSC0neSRBzZrM2w4DUUdD3yIsxx8Wy2O9vPJI8BD8KVb GI2Ou1WMuF040zT9fBdXQ6MdGGzeMyEstSr/POGxKUAYEY18hKcKctaGxAMZyAcp esqVDNmWn6vQClCbAkbTCD1mpF1Bn5x8vYlLIhkmuquiXsNV6z3WFwACAhAA4vXK JfvHChbHRCc0z99UHVCluHwRUDopIFNfuBmiAOA7Ozz19dmYBKDgudZpDNZtbE4w 0S2eW3xVTkPUWdrhr0jDcibkhpdFI+Cp3x2zOhL16Yug1xFSqWDSOo3QX4eBVxMH 0sCHiZMlcx/QGl1bwZ9PpO10PttjloI2SqWGUNK9FGDjVfJoX8YMy5DG4rLcaS8+ m2IOb9BiYoRs2Dot9KZjWtL7+CDrFmLH4q8P6OHiE0RJy+7YoTvsHr0JU6suasHK NPfzrXlWZ8C5sKX0XuZTJNkfKojMVucM6olzpaE04NAtKjDffHr7Rr0md/6Zy7ru gJIOwClDyfMmVud0J9Sx/pLKlldakJl25Xfctcz/DXZJNGpvfeMm5+pzR/zulQc1 zDopdrSq261hJKE/5N6tPflXz9UreUdRm1mZV7SEgCKODMxSxexRfw51O0fk3vZ3 rfSjSgeIz9Fs3ypJHCd2q5C4LDa5XgX8vNSYxLKIevu62BnQXJVTKCyuvzUGOrvs nhKzR4GjrMm2575e+pxojQPVXcytFqzn4CS3QTWHvm+J1EzFwhdpR2kXAmaarpye JbUjuCDHDhJPegXY0oRa51lLhvcij1U6smqutADIQSck5JmyQKuC+x7Y8iLk/HSO 3uni8G44oFCf9KJG69f5Va0RHgjBUOZgKMAlKA2IPwMFGDpaoxesxgFlEcAjghEC 3KEAoK+jSxWG0hQa1aK0vkQ+IvD+Ag7EAKDahnKlbMifGmPSpYjK0zcUeojzyw== =NLH6 -----END PGP PUBLIC KEY BLOCK-----
D.3.60 Clive Lin <[email protected]>
pub 1024D/A008C03E 2001-07-30 Clive Lin <[email protected]> Key fingerprint = FA3F 20B6 A77A 6CEC 1856 09B0 7455 2805 A008 C03E uid Clive Lin <[email protected]> uid Clive Lin <[email protected]> sub 1024g/03C2DC87 2001-07-30 [expires: 2004-09-08]
-----BEGIN PGP PUBLIC KEY BLOCK----- Version: 5.0 Comment: PGP Key Server 0.9.4+patch2 mQGiBDtlTjsRBACWK06+7mvIGANAHlZcVtH8KK7jv4Bx5Q+eJ/SmHeyczNpVteQw GljaasBweg7xd3b4Q5//YKFZ+U50wzFWHFcLcMvwCwNN1XedC6L0rq0Ra1YpIA2G eWkr6MCbf8qtYOdayoC/B+oa1IKtwPmHpA1racXLPuAuSzyZrIA8JFIY9wCgyN3M +2U5F8gjbDATfzEJ/BpvIeUD/R6R7711Q7zydbw1EkOEu+eqJdX8hNUtokzQDyJT InrT0K8xKdOfbNsqe3wRt/YNxmqBZG0AQX9FPIYID3YouzTW170nxSB1cfvUDeh0 UzKLz4OGvy3eGJr6nab293zmCaqmf4MXwkxxAEdKfwCw22Z70CI4Ul7bgvDlgob/ LcuaBACUTJ9WEtchhGFsSTAArFNs6dfW8AuxTKDPZiV02PbrJPAvVTjDZiTCq2DM YshoOoYpE3it+wIzlCCr0CeNZevwvsmM++3OqsWjlIv12cFVVbrAAvdAaiPe+gCj E+zneGcQ1g37F+xOIdMoWuIiGuLfN17f1xJpPtVGXoUR2m/++LQbQ2xpdmUgTGlu IDxjbGl2ZUB0b25naS5vcmc+iGUEExECACUCGwMFCQXZ+cEECwcDAgMVAgMDFgIB Ah4BAheAAhkBBQI9ej39AAoJEHRVKAWgCMA+2akAoJZ5XS0YMLSkPjOyAqF/8OPW WdF+AJ4p/dklZ1yRLzIroXBmgrZxvDQ2MIhGBBARAgAGBQI8kbY2AAoJEKzGAWUR wCOCxz8AoIm2muRDYUr/9YNwqyz2kmgjP+6MAJ9xxaeHMLHt+TFaDBNVTSyHGIKg aYhGBBARAgAGBQI8kbYlAAoJELzi4iOpqMRi1wAAn3XC9ISmMoSVsZgATYamxJJ0 UIU+AKDiPkhF6LO463HupowfIjapCW/BjLQaQ2xpdmUgTGluIDxjbGl2ZUBDaXJY Lk9SRz6IYgQTEQIAIgUCPXo9/QIbAwUJBdn5wQQLBwMCAxUCAwMWAgECHgECF4AA CgkQdFUoBaAIwD72OQCggVanjxvht+rQUaGumWmQ4aKI4uMAoLVfx0pkvCMapHuF qCVq8O3TlIt0iEYEEBECAAYFAjyRtjgACgkQrMYBZRHAI4KIDwCeKWsXb4GLH8g8 /gtiv+hsgOni9l4An10L0LtQPIryuN0mr3oCmPi4erCNiEYEEBECAAYFAjyRtiUA CgkQvOLiI6moxGJvYwCfdYm0zYfOvSe1ARzrMSGcGhchCLgAn0rzSA5L2OKvArnM X+qdun1Vxmd+tB1DbGl2ZSBMaW4gPGNsaXZlQEZyZWVCU0Qub3JnPohiBBMRAgAi BQI9ej39AhsDBQkF2fnBBAsHAwIDFQIDAxYCAQIeAQIXgAAKCRB0VSgFoAjAPtog AKCz7a9KK0GT3ebtxA8POzdUVOovTwCgyKHuKty/1sfoxEu6udRpvvz8bmGIRgQQ EQIABgUCPJG2OAAKCRCsxgFlEcAjgm9RAKDDIPppGlgd5sMHhoeuF8mjZz6FNQCg gwawSjUEUi8ODTEp5VFwluEbMjSIRgQQEQIABgUCPJG2IAAKCRC84uIjqajEYgGO AJ9iuo+14eJ7YVjEjXjVsSLTW4ANxwCgwNZaDRIHSOI4HDoHNwYDjtMmA0a5AQ0E O2VOQBAEALf8ssusqYLEbmL+VMjyhiftLcD3vyInzDik5DBcYmUA3cKs/5tNrdzn ITPVGPS9Smpq1PfcgMqsX7PIDGyqoN0yQtUKYurDG9zb0VyUA+YDCep7U7E8UWJ/ zCdBUe39tq7LZLbLnZ8jyoKzZfdy+p940aCjwIieUUaE6B2EgK7LAAMFA/9w3y9S iixtxIYXoEA6znq0omGj8hwL4OU4wfPO9q88mYKa3Lvby02C+EEtktj52uFjanG/ Y/xIqRxhvkeI88ygd5ZAeT9LLgF7js4a2J1JhpzDifPXRFQmI6V6xcsnuykSKiUg b2ZQsBeI+pETOGu5k8ErEWQ6/50cxbNbIh1Nk4hMBBgRAgAMBQI9ej3cBQkF2fmc AAoJEHRVKAWgCMA+pwYAoKHqWu567wybWva+mq4bxgqmObMvAJ93bRDufbr4g7OA h595qTbzrEVfRA== =vmJY -----END PGP PUBLIC KEY BLOCK-----
D.3.61 Tilman Linneweh <[email protected]>
pub 1024D/807AC53A 2002-06-03 Tilman Linneweh <[email protected]> Key fingerprint = A92F 344F 31A8 B8DE DDFA 7FB4 7C22 C39F 807A C53A uid Tilman Linneweh <[email protected]> uid Tilman Linneweh <[email protected]> uid Tilman Linneweh <[email protected]> uid Tilman Linneweh <[email protected]> sub 1024g/FA351986 2002-06-03 [expires: 2004-06-02]
-----BEGIN PGP PUBLIC KEY BLOCK----- Version: GnuPG v1.2.0 (FreeBSD) mQGiBDz715ERBACtUda6yExghzQAimIJ+aH4fKEXDYUXk07t8KURPZD+LOCuQkwG DF71fklUC5tC/aYOXtHkBD0trw1rxtCuJxtdwSioeCi/gslrd0X4iTmsd6cPsJ0v ZFmMcJpwy1TappXGeaZ1q67MS59itR/TTRv++z57mJBVtqPLYGLUH/H6mwCgkibF 7hxfeFLg5UEQP1EKw/JWZ0EEAISeVnxqgJDaf5VsRRfdr81bxTVh5G5DksisElrr +ipHE0a68UicR+ci8Hg9mPxsJB9Qpr5fQ5NTd1UtEJx2C40LaJvebtFB2UJu7SEY jwQ1KzoJtbU0IfnHUGIqog+l2iLFDJdwho319kJzsatHlt1HT6Kt2ZCV6w0G/PbH +gDlA/9ocHK/4MuyM1bbHP2dYv+bbY9PgprgdNQYCowqRsjGFuuV12Oc1CJm5Ksl tLunUsa2DupQUe19Fw5A7nyU1Em5sRESCNs0RE6YgxKb22OuoejPS+u5C9agDKa1 /6yHHm0Yk3FdsQh8uiCvGo04y32riGQZxwX8UHGQdd7KSSCDkLQhVGlsbWFuIExp bm5ld2VoIDx0aWxtYW5AYXJ2ZWQuZGU+iF8EExECAB8FAjz715EFCQPCZwAECwcD AgMVAgMDFgIBAh4BAheAAAoJEHwiw5+AesU6eD4AniXg8BZgz+FOOJBnYlOD2e57 f/ngAJ9dnQSgf4FRljyNDjN6VzBpowkGRYhGBBMRAgAGBQI8+9hgAAoJEBB93aNJ DMQ657sAn0vXEbMPtNNa+G8HZWNwGxvwYm6UAJ9Kn91z8tAyPzljEIQ92IKfZYru k4kBFQMFED0D5lMBVbrioJTaJQEB6VEH/0cN+4hAZd8FbBhUKrM95+raq3zvWRih vxB0Tvpe4gjx47dFB8FFizydHbxOsB23zRhYwc1nCLpCUp7+3qyz4E4CL9pgpTfr sjC17bWAS/DlwMRtrgrBPfFRvBOX4qPPE+VfWuvzapEEGJSEI/fCTvEiDML7PxDA RQ9j8xFFY/6RBTjZfFoenBRPRrp7b8d/u51DzQt5cPXW5nU42Ck6vyRyf66gFtKq EW8wzUgfLU1orUM5y3vLK0Ct4Keaqvkqhr8uS+lNl/GLrEEhpu99EFhMKhtHpOu0 8CIav07o2KKcOVYV1CWbpAhkp/gEgAQla3oMF4GZ4cq74HgMTYhOlNqJASIEEAEB AAwFAj0Ew6wFgwO5euUACgkQCen5CopyTkVHggf/XyO3p5CQ+sqbLVr8IyBGBReq gXgNV98UbhngBm+BL9VFNJwJyb+QqaJGQZxBvn8Ng13cRBDgGIlzPzUWccs66zOu ZoHkR9IeLnKYQud2VWG1bGFfUrq4p49xZsV/bD3kzORUUNF0zzTzc4EK2/xHgooq rbcsjCXsCS1598uaDOo8nzMnQBO9tRiiyYNE0gIAYsG766ZhdUHkIWJquCK+A1U0 PljBTF4HORVruJfViaCvYguZCP22vyYbpXmOZzGIWQ//m0yXJ40mhWae2AjtJJyQ Em4zRLsWv6TRwa8+DSW2OMKM/uXbz/nLV4OSj64IEF+VKdznwRpcVVHkAKPRjohG BBARAgAGBQI9BMA6AAoJEFGs9q11voCXV8EAoOLDeoKg5vxig4Asj++zLbNyLHKL AKCZyRZjnQHOh229J9qUCsEC0opM3ohGBBARAgAGBQI9ASZWAAoJEGfDAwhyWzfG 7SsAn0lNlCrct/T4mpuiaV4Vm2OjCCTpAJwLIQbHo6/96jUBSvNmW8utNMtrs4hG BBARAgAGBQI9A/CZAAoJEHjLuZUaVye5rq0An2Mi7OAiIrDgnUODQ6TYrqa42zUb AJ47eMsYUUNtx1Jbb19zR0LxYXCUXIkBEgMFED0D5liVYGGm3ZNBOQEBBj0H4wV3 LwQpg/WaBsheFkLyxJyzaxJSwuEXRmlKrolwAwYiqNllFI9+8OC30Cp7wacboC1n s1d19gBEGrfTVVp/W3+Q3BUrTNwvdOzCkZn+P0Cj4eEkUDWK88dvfOtrOuYSW4Ud ts8dn7fcu/HUA8vDYBc/aKx7leY79FrnYjlOB40/0cmzVH5CTw+34+KvkR+B6Cgm eBGB3JJ+9wUWj07YqKfHWxXdr8pPOY/iTObKCyTbNWNM324u/9FXtT8yF5OyEXEh 9BTEIVSh9PPXpnn+c8S3Z485ZdAY9mtxbyCvHqNADdOc1CnLjmSkGezudaG8kAjt RbMEF0xoHAlSMtSIRgQQEQIABgUCPQH8LwAKCRCVZB9rJT5Y48oRAJ437TebpR5q H0UHfd2BigyWaGwLzgCdE0+oofRIkvnxNcc32E4VdqBWkYyIRgQSEQIABgUCPQTf CAAKCRBxXtagfnuKyaTAAJ9DrEeMA/leLmS87AqDA/NLwis0+wCggUVtAjyQJGUm w17U9mdddN507mOIRgQQEQIABgUCPQSwbAAKCRDOPNFAdhcTZ/dVAJ9p/xqvxrQi RxRun1BChjrp2gLxzgCfSpgGYCWl0Ft+BsDNoh40hvaemJCIRgQSEQIABgUCPQTn QwAKCRCP8RrF3+gPsm0dAJ4vPnWGCV6GIciG/cgpMeVKhlssvgCdEpvkHMCZccw/ sCwHIxtQ8UEK+tmIRgQQEQIABgUCPQTZgwAKCRDjd7Y7dn78JGHdAJ9co+txuo+4 bCpDy8560dIx9YenPgCfeDK3ytrX4InMm4qJ5HcAvyCpSS6ITAQQEQIADAUCPQX1 fgWDA7hJEwAKCRAUETjdo+RdZojGAKC2ZWUvMRagUn3K6wMuW/QFav2+zQCg3I7O vwjBeKoFiBISXNuef/M8u+6ITAQSEQIADAUCPQWkmAWDA7iZ+QAKCRA19mF8UTrv 2QbUAJ0RYBKzMEcuGDRrpRgw45Tyoi4WSACffVbIrg7MLNtZOrUc89qB/akLjKCI TAQTEQIADAUCPQYL8gWDA7gynwAKCRCNmjwfONntm/o1AJ9FSqHTkIyW2VVxrKcG iAl0Bxb/rgCffXQ02gFA5F4AgwSFh05HKSyrFO+ITAQTEQIADAUCPQXkxQWDA7hZ zAAKCRDKDhacKPo4iityAJ9aZij7lqY2Qsfe5o2Nyqb1kxotzQCfb1x2rlwmjeds LRsPr5I9iE0TMJiIRgQQEQIABgUCPQYM2wAKCRDu+906H+KB6xZ6AJ9+bKkfquLO JoiOCYHoo78EG+pAPwCfZOMGKKJ1ikkGjRViaA1Ygpvih4qITAQTEQIADAUCPQZw RQWDA7fOTAAKCRAYWQx96ws33CnFAJ91rADHNjNPPuLXzT4wBhSDybWXuACfaWWX iupFFxbx1MvpwveBTKAkZVmITAQTEQIADAUCPQZ0FgWDA7fKewAKCRApvl0iaP1U n9zwAJ9427nh1GyST65n26eW5xlDtpVggACgn4Dq9eM3dCnK6C2auLLe5dyOHviI jAQTEQIATAUCPQUZEAWDA7klgT8aaHR0cDovL3d3dy5tYXRoZW1hdGlrLnVuaS1i aWVsZWZlbGQuZGUvfm1tdXR6L3NpZ24tcG9saWN5Lmh0bWwACgkQ3oWD+L2/6Dji lgCdEkk7NvpsXr46p2p9eADs8ORpkmcAnjZcBlDIj2c0O1pPEXOKs5BJSfQpiEYE EBECAAYFAj0Hqg8ACgkQOtPmyoSF4NciCACdHZV+M/55urDisMjCiwaks0CCzpAA n3vOFAuO5CtJaGRdzfMCGXSKutX0iEwEExECAAwFAj0IdlcFgwO1yDoACgkQrjA8 sxkq93my6ACdFFEg58wLd537CZdiJ9B7Gh3M12EAn3ZJvOPelE56phbu5V7Ah14Z OcxSiEYEEBECAAYFAj0XO0MACgkQDWEQ1nOP4IE4ngCfYraj+NUQhproQeBCo2fb uLTApO4An3ngBIziwZN1rIceMdNIMx2Q4gEaiEYEExECAAYFAj0MrmAACgkQGnR+ RTDgudiUXwCfWoc3XqAMPMhOa7kpjsJxJJCR2hUAoNoTTUxlc0OgP1L6MunUgYb4 6IMAiEYEEBECAAYFAj0aI6kACgkQSYHgZIg/QUIlCgCgpyZ6iOlSe0/5qnrro+A5 OG6BAOAAoJ6vG/ClrmC+nHatZDA+yCnCk6NPiEYEEBECAAYFAj0KdqgACgkQaO3j KFvkT5EBGgCgivHRlkEfPNujOmvZKo5zUor07ekAoKBT47Y+Xrbn0spYdHzJ5hZ4 rf2PiEwEExECAAwFAj0LuucFgwOyg6oACgkQ1LQ0suZ2cUxjrQCg2mRDPXEJ4j2k tvkdFCax1GEKB3YAoIuxuWlxvWpujPf6af82sHsgyrrRiEYEEBECAAYFAj0bGekA CgkQ/Z/D9pDh40aOdgCfSOMQ+nXBNbenRHxbWBE2eDXBubcAmgON8zew01UA1H1g 6Sk45WPJAK22iQCVAwUQPSLOeb1ApukPzoVJAQE8lQQAiCSul7FIad4Pder4RTB8 ow2nE52U4W0G0mjD78CBaETZOHGJuO8llrqnx/rYDS7rsAL8Rj/v5YrsYOBbPY/6 s94W6Jy6iWijwccQJRw91CtGueCTab9EsQE6WQnp1kxDyJC3FMytBchVE+gLmcn/ 7MhPnWj05xA4wLS5N0maYEaJAJUCBRA9IeIrxEaR6Lw5pc0BARbXA/9alLowjmIi UFTd0s8l80en75x6nKXOvieebje/i10FQXVu7Y3O7znApQcyiN1dWOmtlelUEjV9 csRgWgfn7aAqINDsqmp2IHDUft4iLzCeGduldvDKbcnPVG/HHetKQAxynFjNK+H+ f+VDboJ8AjYPxL43ZB4NjC6iqQNiY8OGKohGBBARAgAGBQI9IeJLAAoJEOZMMhXa FT+ruQEAoNAg2ihQoAo/Wz0bauF52ccpsyZlAKCDwfh8+jjU8BUz1Kz1SR+/9Grp BYiiBBMBAQAMBQI9I3u8BYMDmsLVAAoJEMRGkei8OaXNoTcD/32pnW2lKuSTcyn8 eRvB2f9xsqli2Qx+bjJDKNp5EvnYKs61VUrrwOhsxNpHP4phM6Ej1AyGTBKfezEW kDtiYnk1xBvD2WnhRT7jb4o2PmzN8Qz8L60M7IweMHDiyAFe+zJjnDTlItcw30pT jw4KGDxNYrIsJoZnJuyXQUbcPnMLiEwEExECAAwFAj0je/cFgwOawpoACgkQ5kwy FdoVP6sA2gCdEILbXQoBznXBVmXjJgPEF5DpiTAAoIRUPbzU3u6i7k7+MOvzUJbK YYveiEYEEBECAAYFAj0kXUAACgkQKKG1LRrafiwYXACZAdAast3PEsIECoJfzMxK BGKa4rUAoIuvOACVKNJpzopyBNv5d5BdnjXpiEwEExECAAwFAj0muQ4FgwOXhYMA CgkQYdhR2aaCIVPLdgCfQ9tGNzelZhZWFeY//djW+UnJ7M8AoMBvVEQzSSMkGi3W wWy8TUwNI4ZniEwEEBECAAwFAj0nEgAFgwOXLJEACgkQnC/GTAhVf98Q5QCfdq0v ZA5pTFiHRCmOskOFQU6DTmAAnA1HY+bJQMRuADyg6LQDPtEbzOqmiQEcBBABAgAG BQI9J5ZCAAoJEIz2bIET3TlQ7hUIAJ2b2qeLLwtYfm46S2VKocpvOgj+pOh9SYsU e7O6HmJ0mX8lciYz/nXq7mve5kGZGmc9giY6LxN60AO7AuMtMgenGR+FUDc1G2ur UfC0e2Jx7YrxwdRid7lELwGKBG/8z4A/oSaB+2hDy/iZtOBPyN/gjCCAnPwZf2bv TOkZIxeAKRyW0t8lhg9e4NO7hvDSDs455CLaGMOXGbxv+y0HnEn1DDf5PKF1PjPa aya3aHRQEOvcSOzYhqPdWvcqY3eGGcKVwTt1dA0ruvLVXYnQkEFI47Yhl4F6S8sc PXmLAzE8vlIfPUv/3kHYl+EztX5Axp2xBpoRicdSH8ZdcJzqdLOJARwEEAECAAYF Aj0nlnkACgkQ/LriDKIR9e2e1AgAlgDD4CNRsCi3sdZSF+phdzDlDoXfpNjtWM2T VoP4GHpaMrHA1RU9kf3V+PCyQJn2EOqvAmz8pyJTbN5bPuT0qEWP/U8a1925zHWT nPAlQH8eaC02Tt2xQnT0aNX5LL1r5J3As6COLMiX6MNj9hQCzdXZ/R44SYA11Se1 cO+HKK7Tu6jdo3RV2EHfVPqlqQY5srcT6gCH+OQ/DUj91YF0qgpIcR8V5TVGAL3E FomagpV8LF52jfAWFlruSWAe6tU46zVZYvBRqCoZGr+RDj6fwHyZFA1OVe1OOQve kQxiZ6w/RTCY2UEUvh+Xhi6e7nAWkHgt1es0tYukz/RZl8DsYIhGBBARAgAGBQI9 J2s7AAoJEH2fkZBvKrstTJAAn0I4Agn/8mQZwuuIyKDFuT6xxjnLAJwLDB11sgUd Ah5pn5GAA7yXpycD/IhMBBMRAgAMBQI9W3rgBYMDYsOxAAoJEBC7gPwWvXfGxaMA oI/HDBNqRp/HVY2EBpsyNKs3e0plAKCz1jyRfJg8ua5s3O768U+TsmTBrYhMBBMR AgAMBQI9YLMIBYMDXYuJAAoJEDFPepXsFSlCXU8Anjb1QVtw56tmUkVpiCNk65gF SYokAJ0SuUqirypdyYq1Xy3RXCr189hyxohMBBMRAgAMBQI9alVUBYMDU+k9AAoJ EPfw5w8wfVbtEL8AmQEe/IS2DirWST0mvUjsJK3JbWIsAJ4oSAlC8Cx38fBKieVB TvyYAC7nILQvVGlsbWFuIExpbm5ld2VoIDxlMDAyNTk3NEBzdHVkZW50LnR1d2ll bi5hYy5hdD6IYgQTEQIAIgUCPPvY6AIbAwUJA8JnAAQLBwMCAxUCAwMWAgECHgEC F4AACgkQfCLDn4B6xTqQkQCdGkuqsAuKJc/Dnuah8CrXGY4hOZ0AnjT8Mq2Rc4XR jhpPC5r9s+FFdTEZiQEVAwUQPQPxCAFVuuKglNolAQF8fAf9FRYD4NPCgtRI3ZHU 5q7iOUUYZ7q6qxAzbofc4RqHPgyMeTjAaSnb/xbgTC7x8vbOK6YNqveDW+HwqFNr 8/CiTMhbwyD5S8Isa4qgQXiEz6knSZhkM4d2zTie7QaEgc0YPkwwgj8iN81p6GaZ 7+QErt5wzg4iJnAWjBDPF5b0eHIor+OJINegunfE2dSpWFMmMxpgQNQIsCLj52Xc JJhy9TjoL4gWXaKS1DXcTJrkqaGQu35FDwIL8h1CF3WiHhwbDt3XUAA1phLmgPnb e+AmSfZKKGcBSIlS7AOLBY2tcr5izumDtA/8UxmA4+KbaCjufxIgSwiYF1w9tNa2 SNCxvIhGBBARAgAGBQI9ASZbAAoJEGfDAwhyWzfGCn0An26p3nkrkZEVqPD7eQCS YbuvHx/rAJ9oVYcKMDUxU5yflVi6GCDZsDaKVYhGBBARAgAGBQI9A/CdAAoJEHjL uZUaVye5W7YAoJttvh1QcIUk6a3WRy3gSwxBt/TWAJ43DR7fP789MJJ8ScIDwx1d j8t/S4kBEQMFED0D7SSVYGGm3ZNBOQEBeU4H3j0Xg8Obo0f6SvgJGTVkF71c++kP CL3Z21bxdudK5B4SJPK66GyHqHHOdzQTqHGnRORLLJBC8KQzuN16lhTPRhNyu//s HeXw9xKbcum2W5Cay5qgTUM2H2OueAvCNCUXfX/gMgABvxHkUMDYTZh6zpLQTA8c feOO9p5hPXr6SvDcu3ZyNrq+eayV6V6AJzwe/Go9G85ABkkqDZw7BDI3PfTJgFoU RwQoIUOawAo933n+k4fNoACRiUMevOU0FD/2J64Ck4adZ7nOtMnhTvOacmTXBI6l VC3OWI6PSdF1W08ZLMDLvVd6IOTBfVmm4mz7pacCwnKxlEXvFJ77z4hGBBARAgAG BQI9BLByAAoJEM480UB2FxNnSv4AoIV8Q7QRX7wfOO+XiThVZYNu4wqXAJ9EqR/1 EUQQZpA6zeYVlaIOqhmns4kBIgQQAQEADAUCPQTDrAWDA7l65QAKCRAJ6fkKinJO RUrHB/0fX5mNz9MO8jAEnEOCWJdcDLP4aYyfema9l3RAWZd1wDt3yumhl+v9KXbG b5SO7UMeBuQq7DOALBsaag3FHjmpxmWvKSOk7rGHvVMxhB+krlZZ6owSSmSv87cj r2oZunGFk3fZ16/nVPWFKCC9ddKThNBjCZ8EsEk39PEE8w4KayDmFT7n+rsdiIAH 6YK1ZgXRJb5hYQrF1MqhZA1IF0adWUJqjru0CTfG4blw9MdTZSjFbZzi25RtO5ka CnXwwwu4eJKnMl70vEpyw2sLZlRVXQUZiyCYhbKhgyl38WjibUd20p9gv4ywYXZq GpMlTQXPlHfDciXV95bLD9yyGtijiEYEEBECAAYFAj0EwDwACgkQUaz2rXW+gJdR WgCfbh8pq+MMhNhDjILn9xKHDFDtuf4AmwSufZRxbspp/d6dL/nv8nAd9q5KiEYE EBECAAYFAj0B/C8ACgkQlWQfayU+WONzFACfQBGpIsi42s3iqv4aAzpXzlIJNjUA oIfca9XSUulrYQecXPL4XT/yhK+biEYEEhECAAYFAj0E3w8ACgkQcV7WoH57islj ZACeJ/9V6UMcN1EfQq/PnhfrDWw25RIAn2gDH8AS9N1bFQXPy1LymrgBLJMoiEYE EhECAAYFAj0E50kACgkQj/Eaxd/oD7JjVQCfWHRYcwZ5hsrQp3b5eZaUJ0nh3wMA mwd9/DReuYIn4kDjdlFtFiCz6u4XiEYEEBECAAYFAj0E2YYACgkQ43e2O3Z+/CRh DQCffdw06kcOoGkHmvs8FSY1qQf9rTMAnit6fMF4c77nQv+vbe2G2MIm7Yy6iEsE EBECAAwFAj0F9X4FgwO4SRMACgkQFBE43aPkXWYihQCfYo0cYtGmPQWeN8EwWD+e j/8xy0gAl1Mu0DSPleoxWNuxjx3cdUjO6zaITAQSEQIADAUCPQWkmAWDA7iZ+QAK CRA19mF8UTrv2Y3+AJ4w6Z9kTvk6Dj1R5dKdICifFfO1eACfR0YPBn0OyFMh5Ule A5qAj0KA0JCITAQTEQIADAUCPQYL8gWDA7gynwAKCRCNmjwfONntm+LBAJsF6XSE GS5y/3s5E2k36LR7+4vh/QCg1QRAZ9qRD630zqK9x8OYoZHD2QGITAQTEQIADAUC PQXkxQWDA7hZzAAKCRDKDhacKPo4iqgnAJ9FEQ0wvy/gouoH6U749fHISfeSNQCg nOFFzWtBkj7jVQmgkiMgmu4O8HeIRgQQEQIABgUCPQYM3QAKCRDu+906H+KB6y7x AKCRCRezXbCQ4Xys3jUH+fdvCeZwcQCcCF2sGF2mUkEZGQJohRhyfgbLu1uITAQT EQIADAUCPQZwRQWDA7fOTAAKCRAYWQx96ws33DLLAJ40HfHpwH4CsJv7WhwwRDTA E0V8SwCfU0dg/1Djrdqce2wdxIz03uS6vEWITAQTEQIADAUCPQZ0FgWDA7fKewAK CRApvl0iaP1Un04CAKCoa8LGBAkVsBGYicxkD97nncgW+gCdFcFwKlJvwTAsvCcB ZylrnX1k/RqIiwQTEQIATAUCPQUZEAWDA7klgT8aaHR0cDovL3d3dy5tYXRoZW1h dGlrLnVuaS1iaWVsZWZlbGQuZGUvfm1tdXR6L3NpZ24tcG9saWN5Lmh0bWwACgkQ 3oWD+L2/6DhniQCfRY91QlECGZNKnfVBlBCSFwR+JtkAmMS2LqXMI6uSKTt0w539 aXD6J0iIRgQQEQIABgUCPQeqGAAKCRA60+bKhIXg1z2QAJ9bVeFM/lGBraT3dvuM rqNUTcnkCwCeOztwin6ok2RF5roDJFv/CQABB7CITAQTEQIADAUCPQh2VwWDA7XI OgAKCRCuMDyzGSr3eaGiAKCZy9RsqauGkx8fezUbMnnags6QIwCgo8CyAP8EaXIk u8Fo54vKi3VSt/GIRgQQEQIABgUCPRc7RwAKCRANYRDWc4/ggY6gAJ9eFOQziCs9 9YnLOwuyX/3sv7/CDgCfcgnPf3ru3s5BnxpRXQ9NMYkrFMSIRgQQEQIABgUCPRoj rAAKCRBJgeBkiD9BQk+vAJ9nPQsRffj4Zi1LKdYaw5c6+GhSLACg2uuNuA2lRf4R dgPMWMkbOUAtbsWIRgQQEQIABgUCPQp2zgAKCRBo7eMoW+RPkRHRAJwPqoDoEI8B lPgkqKzNdIAa7aJD7gCdHOEOvOSSPPOgSNOqcw5Ug6uoA6+IRgQQEQIABgUCPRsZ 7QAKCRD9n8P2kOHjRgwQAKDBXj9phhAOl3YwgDc9JvSHH0ST0ACgiR5stLkG9WNX tySGPfDiO49RIxSJAJUDBRA9Is6DvUCm6Q/OhUkBAT8MBACch7zkD8aZ14D0ZHB/ lgQE3g32AAovMEbWKqQR61FqNIvMftOVfUFhGniUmrmihIRKBec4xtAkPhWe+4Fn BfltgFN7AV17d8iu4btslQ7tHWeFdcnDdneC71fbNl/hooPpZxd5vZ/oRO15Ed5I 3L5U6Iuw9awLUIOBucSRRVcZj4kAlQIFED0h4jDERpHovDmlzQEBTvED/jQ/Pb5T UOouqFz2r6CMZhopu8H1ynVcPtN21pkZB+UVq2rONRYwXHqagME2kfZ7AnARHFos U8i+XzRHCFwFU5qc9hdL9OTQAbCGxdic2ZJdDPl6zF71QgWTQ2Bk0XyN728w6APv 6w1W77c09BzjldqMqyhGrqL686LLjyCss+u8iEYEEBECAAYFAj0h4k8ACgkQ5kwy FdoVP6uGlgCgpxDw0SSapnFskycdn1K8aB2CqJYAoMQAfxPe8ZNM1w+AiVjysaXZ ZjW6iKIEEwEBAAwFAj0je7wFgwOawtUACgkQxEaR6Lw5pc2lFAQAg6KOdiu04FGz 1jz+Tggkl7t4KtDJrGZBmva4vxUBhK0AdlMsSZZXbIodSR7PVA7Mb3L4tDx0tneF IAC+32KewWOuCXwtVwOJZK3axg9w5GFg45Ghh8Hc5F1M5Uyq6NvWyb7qi7XUmhH5 qM6eqDcrhvCOTRCLGPBXM8p4+aK/T0SITAQTEQIADAUCPSN79wWDA5rCmgAKCRDm TDIV2hU/qxlPAJ9WyClD0K4SB6gXUa459zlhAfKYEACgjK2qLAFGTuphWmakm9D5 iAqmQzuIRgQQEQIABgUCPSRdQAAKCRAoobUtGtp+LDQsAJ4xhLonZgdcPxmtE0wW SOIMxjBZFwCdH0M4kmd6AveulTaSQwajCfHX+4GITAQTEQIADAUCPSa5DgWDA5eF gwAKCRBh2FHZpoIhUxdeAKC+qu8EM7ItPi5M8dpfAv3KBPxTQgCfRxhhsJA5rclt Al2/EcgOPD8UYlyITAQQEQIADAUCPScSAAWDA5cskQAKCRCcL8ZMCFV/37qBAJ9X 2kW9GAdwHjuVPl2jxcS10MPUbACfdaOWvDyDuECpmZZ7bKK99KD2L8+JARwEEAEC AAYFAj0nlkYACgkQjPZsgRPdOVCDNAgAuQzIvrD9jL3rxqHkqzChKiSS4KwmPtV+ ocFdxLdZ3znJcbSAilsOyndaGgyzkXfvlSTN29C9lbuq4ie+frC2Epd5ftbGqEzR Pyq5RhwfVIMcNhHCxK/P2X49pR2vTKfCEIxXLPbnqTvq8dCymdiS2UV8fWsYuyBN GicUx5ZkynsFZG5DqX2HCwoQL6uCB2SGZrPoiqrsyi1V0L+eqqbUjxvMwhlfJlZx Gt7V4YIZ+0C14fAHrWTK35bAZIUTpvJ5pL5jaGOxaLlcKD7A4oB0/TxlTXDsFEZj 2C5pGtEatF539EYbj4vPCX3cS18JVSFqu15Ugol0lWRBz/fYAKvO5okBHAQQAQIA BgUCPSeWfAAKCRD8uuIMohH17XFBCADLe04FFxOJqg71YUApsdTmsxXBrF94DGBq jNpaI5QOVuL1d9mA/OwxjEi1YyG/b2Nsh9VFBeFvD2X77aHpohR1/hpghVMG6hm+ 9145vLrcNRPGis8KD2chEEoZBFY89n9ZxtJ8kPj6Ix53rKeO3fViNvRQNWZcyHMV Pr1VBMe4boe4g06BuBH5nc5Wqn4tmX6ZYbSXt5BO58S3+Wk3j0u7OEVvH1OCaE9t 1cbyjjOBHWwdKLAIwq6davDvlhTwVOgFjbkoYliIFRqoSFKZwPvibJVZD28wwNls BBJIjnVnVhgH7g8+ZQwRn54BnGh/6yHcDvWTuCHZ7Fq1WCXGP0cTiEYEEBECAAYF Aj0nbSoACgkQfZ+RkG8quy1MzQCbBMwBpJ9Vr6ZcRDR/6eweor/Ne7oAnjyljwUI 6q3tADpARXloSgrdD/0tiEwEExECAAwFAj1bfMMFgwNiwc4ACgkQELuA/Ba9d8YS swCg94croA2J/I7JzNw2tyN+V2HGTO8AoO/1WSSq/sEMKPXM8lMxhNInTqN6iEwE ExECAAwFAj1ben8FgwNixBIACgkQMU96lewVKUJNagCglepWBAXkIuCftlIZmDGK MY9yZSsAn2QTu7boe7SsDskR7sfeRqZP4jNtiEwEExECAAwFAj1qVVQFgwNT6T0A CgkQ9/DnDzB9Vu3tyACcCj7pmsfzGlJVD6CCVplipvJcagQAn34Z8vfjZqYVRVgj 72CwMsKpgDHJtCtUaWxtYW4gTGlubmV3ZWggPGxpbm5ld2VoQHppZC50dXdpZW4u YWMuYXQ+iGIEExECACIFAjz72QsCGwMFCQPCZwAECwcDAgMVAgMDFgIBAh4BAheA AAoJEHwiw5+AesU6LrAAn1b1v095d8SjY2t6825yYT5KsP+9AJ9OhFAQb0IjZSkn 8JFqhKE1SX0FP4kBFQMFED0D7RgBVbrioJTaJQEBn/QH/0NIkPktR4yatrjNn3ng GN2RjxTFeQxts1ToRrUVeNTSoQFAoLMfdE5ol6qfX6erZeVVbQynXGejdKCpdd27 BaRgZaOFmhu+VTkphUMFuriWGzDa1Tjvpfz5eh9ttIoLTS/63KOlJLt+6jxKXxTV XBAkY4sPrvioI/7Ck24JLEk+ucREflDtwIECxc1q62ILOqCpLK4gw5kaHaq2k8Dt 3HzvxzYlVR/2NqXrmQRIVYXM/h97pTtT71F5NCzpqXNVcSXdJvu0KQmj0VtFDVO8 Sorwg5Vd9+6X9BdUOH0zLEgnhCbsCJSAufWv7P0fyam5r7TnmPxnavuWiH0t9FOw VLaIRgQQEQIABgUCPQEmWwAKCRBnwwMIcls3xgS8AKClp7GvhNuC9vWPVcnl32at 6YPZNwCfYRBIfFjuX4+GdO95b4B1TxuqsgeIRgQQEQIABgUCPQPwnQAKCRB4y7mV GlcnuVeOAKCwfdaZQxDPoqPvwc5mH838MqcmyQCghaW26yx89DXtH3+J7QY6CoM0 ozyJARIDBRA9A+0clWBhpt2TQTkBAavoB+EBc+TDTOr3kn5eLs3937TA8pWJDIyZ J5YPw11Zb9LSkoayX9zEpUEI39MfkaQMTEjhY9znlIU7/Zfhfq50JY4O7KmnsuQ2 ydE5peiVTkJKmjDFSm6qOVyTHBar675OFN4EkFbDMumiBQm1CIhwx2mYHnGzpyFc pzx56HT8XoTtcsx1w11xcYBXbVUAH2wWfe8fW/qOB7iZHO8MHu3LmNuMkjz+ADxL 8G4KG59PSwU3FenX+EWQSTVQYa3YtrwMqDNHDWkU246B/DaU5C6fdULiFpOG2xw9 q9BLcUpWMd0XyXhqQUNdFyW2u6BEwV8uSuMlOEf/cxQLHF3I51D5iEYEEBECAAYF Aj0EsHIACgkQzjzRQHYXE2dDLwCfRm2wRAhTYteeCROJNzLgNT6f9wMAnA9kSRaB Iu+qvIkNLPY+ycURiT9hiQEiBBABAQAMBQI9BMOsBYMDuXrlAAoJEAnp+QqKck5F PvAH/RAuuJKv17ypiD0srNn11G+EmCg2lWcKAdeJYPC7PdjLwh8LCgLzdpqKX4j+ ARzne91imjP8Uv4gpbXkdFj9ZBX8kO6NM4SvVsZGK9h0zm36NhnkJz7xrM8Jjxoo UFOmk9GyxAm3uJsEgUmD4B8yriATP8oV+P0CzMOEQGys5NO/WeTahX+S1cT5UzHl 0fXWKXIkl/7K5FBV8m9TJBoh6PmXz3n/4N5gjvZZHqYpONH7UnGSX+qfa7Y9AlJZ DfZvMi7+9o5cFUnY+i4i8x/Smqa/rXu0yvI0S+Eka7ZpgEYwI3mG/UySUyTAXZrP CKsu+c4C6Wm6aiaWt28DD9nrJlSIRgQQEQIABgUCPQTAPAAKCRBRrPatdb6Al7Fk AKDBjrFL5UKmNw1qcQlEiLIZbufG1gCgn+R6W9zER+aHAAEIp6nvovPpLSuIRgQQ EQIABgUCPQH8LwAKCRCVZB9rJT5Y44KzAJ9k4CGPmQfa/akdxzOSPk9Xy2Jr3gCf UDlg7aqKFzQfVXGhRB5mY1oGFL2IRgQSEQIABgUCPQTfDwAKCRBxXtagfnuKyYWW AJ47ebFmU1T88sjv0g6PxG8jhsjfNACeLJPoJQ79/zjl9VdRRpwfPbPV76qIRgQS EQIABgUCPQTnSQAKCRCP8RrF3+gPsjLQAJoD8FZVaURfW8/gTF+++1g3Yo72eQCf W71pRaG2yJMxzx8e5sdCsi/e432IRgQQEQIABgUCPQTZhgAKCRDjd7Y7dn78JK0s AKCUjY1jWOij+r82em4WwMK0NKNwXwCfVikXY9VZEiADv3mIQCsfRpz8qtSITAQQ EQIADAUCPQX1fgWDA7hJEwAKCRAUETjdo+RdZuyAAJ9AI8UC1vo4F2oPewmEJGAb sFY1SQCgs9w/ezD7IP1GTKAtHpG5tr1qEbCITAQSEQIADAUCPQWkmAWDA7iZ+QAK CRA19mF8UTrv2c3BAJwIN5KQgGRpDXrTzowaR1824qJkrACfa2nCGhe0RuCwekIX fMCz8JzRqzqITAQTEQIADAUCPQYL8gWDA7gynwAKCRCNmjwfONntm+k8AKCadTBh sI+vHi8raftGpQg1ghnetACgsAAJVG/8TgXMiS4s4q+JrFY96V2ITAQTEQIADAUC PQXkxQWDA7hZzAAKCRDKDhacKPo4isgBAKDGpKncJ303ve4gP4RdwPH7jyHSEQCd EQTGG4f2B2gDNRH/64uviDKzBeeIRgQQEQIABgUCPQYM3QAKCRDu+906H+KB6+vj AJ40jjq5pAokP5jeCGzDLH733kuGEQCgiZMLQGB0QHX2vGuA5P5RH9Oc1NWITAQT EQIADAUCPQZwRQWDA7fOTAAKCRAYWQx96ws33FL5AJ4pHF+rJbA+sFVT0RM+uwUD LaOahQCfTG4fzJvwJEB0tagVLv0fgBvX+ImITAQTEQIADAUCPQZ0FgWDA7fKewAK CRApvl0iaP1Un+PLAKCm20iICHrd+WIxQHvyvmlW/0PMdgCgmK8x7QLErIH4M3xD D566t4ejBOyIRgQQEQIABgUCPQeqGAAKCRA60+bKhIXg1w7kAKCs+PV4Czymng8e Q35qcblPJwz9hQCgzd+63MrkZnnQ13cch39xEsK+Wo+ITAQTEQIADAUCPQh2VwWD A7XIOgAKCRCuMDyzGSr3eab1AKCfS8vArAChELO8aprSbM3FcFvrCACfYqSDCMur 6cGmIIPdpakEZwhqc9uIRgQQEQIABgUCPRc7RwAKCRANYRDWc4/ggYCRAJ4x0GO3 BtWb4VovimIaJyNqn6itfwCeLCC3k2/aSPjyYj+RCr/LXVfLoM6IRgQQEQIABgUC PRojrAAKCRBJgeBkiD9BQnaDAKCZfVjYY0/0fpLof+XY2CiKyVGH+QCgwRnyKrHi fQd1mU3MTAlcjtJrjASIRgQQEQIABgUCPQp2zgAKCRBo7eMoW+RPkR7CAKCPbTWQ KpzLeyoIjkCUMWKB4TQi6ACghDb9hhmkMQ64ZFF0DYUSWsKoyk2IRgQQEQIABgUC PRsZ7QAKCRD9n8P2kOHjRp8IAKCFkZZvJnO/lPibFKNa09KUf3Q4PQCfXn6NA3ey 9peyLrkuyQKEDF9CA5iJAJUDBRA9Is6DvUCm6Q/OhUkBAUbCA/45odKyNdrcQ1n6 i1aDW+LCw8lTxsOikdW5GJQRhHr8CX38zQG9I80Mc7OqspyVCiJ7RrbJB3q8i/QS auaWBGw7Hfxi2+KL0kkYnLVzyGwinRfH9jH2N7AV4c5pK2T6qPIqAlqvbahpiBgW 3N7F23yeSkQmnZf77bwCoZ1EGBksoYkAlQIFED0i+ZvERpHovDmlzQEBSBMEAI1N J2GVmXnSUpj9afeU11jx1Ox+RCut8/6TZW1cx8sYgsEdjOjmnDe7BCC/z53TDNkd MFW345rRKIKLaSnoIaAMZx82YhST0/1Uo5P6SdFbJKIue1ZbF87X4mkoUm1jdpl3 tm3K+cqX2OhDDSsgWZ6Np0lGUXWfKXdLWVn9yc26iEYEEBECAAYFAj0i+asACgkQ 5kwyFdoVP6vDRwCgrsF/lXGtOtTsfTfBdhUYqdcqluUAnjhvQuk7J06favTV7RT9 MFrVnlyUiKIEEwEBAAwFAj0je7wFgwOawtUACgkQxEaR6Lw5pc1InAP8DiZIr+zb c88sTKSIAta6rJgXOen9D3IfF1uf31chOcwtXqXAZgF3PFoQMUUvsnF2nR0FdxKY x81u+DhUJf8LEzSu7KDscr1fQfnEHY8XQZkH28Nf5A4Pvif4SokGIFXPJenvivZv RXm3w3vDxWsXNDeavEwruCLwTKIQFKW/7kaITAQTEQIADAUCPSN79wWDA5rCmgAK CRDmTDIV2hU/q+wIAKCgdfE9yXXmaSoLhQfc3TAX2FIoHQCfaiCO2SSD6WuKkGiX qxJDPDzAcaWIRgQQEQIABgUCPSRdQAAKCRAoobUtGtp+LKeWAJ4g8wHICx9icwlE LuySSekh117AKACffGS977DXeYUWPmuMznQohopGwgmITAQTEQIADAUCPSa5DgWD A5eFgwAKCRBh2FHZpoIhUysNAJsEqSngY18nH5YcL9fldx7/xw1vnQCg1SGsH3j/ ur6JDQZpQZOwrDogB8+ITAQQEQIADAUCPScSAAWDA5cskQAKCRCcL8ZMCFV/366l AJsETX+UOmk1Dnnf4qv6V381lDv3CACdFmrgKoi6JYNCRMkumXYJVhC5uk2JARwE EAECAAYFAj0nlkYACgkQjPZsgRPdOVDZqgf+LwLZ0vTEMFSqheRIh98mCqlk1S3c vbPiAOf8y82TWaX0+PEPPZIFY4dyfCED4+aHI7i6aU0EYc2SS0oe3T1w/AvCKP3b vI5DPZhPiLOiJbGR2RYy05MDXJf0DougJdRhEWimOp4uYnqXi/2yAxPg/S5jzquc X2RWH4y3Qn6ejgrAY1brjGBEmnoJ0nviJZaqUHxVgGMrfNDcxLsZywMFDe8UB9nR DFQ/qLlsV0qIs+LVvGBwM6ddXTT1Z36jqfCrzR9WmU4CmzmXnlBSFEojhq6LRnin /TeR5p0G9wDLQiWAbS8ErWT6bPMj1MgidL9xOYPo9T/cwIubOclErJqKvYkBHAQQ AQIABgUCPSeWfAAKCRD8uuIMohH17dqpCAChvKGyZVUSos0rJJXB1uTzBiYjkmKD lcGlH0s2D3hFsMVFTnAUQk0A+jUFg/AThjFkKf5YnnuVcRY0D2Q2dacX9B6nJC9U h3u0fsc6GpnRil9Eha92svxOtlSs1oePvssGj3Gu31124yWUOmAHHsNafHvZ8krn 0yC8BzAR7DqqpJK8ZAguJIS518fL/qxg8GMuDJfJAiHr9OSfWSN/SsKoCXeoytwi 4An8mi1LGSPD22vokVW55uxp/9brMpfOyJfFN8DyAPMLs5svS8NE/v2kxPuN8EVW bfLuT88tLAyBWx7HZQU7aSjbPSWQI9xEoKLjzZVYzhHvmv+t0EhIblz6iEYEEBEC AAYFAj0nbJ8ACgkQfZ+RkG8quy2/8wCdG5rhmWS51A1iMOnJt6r80dSL4wsAn24H 2Z67TNNFBtHUb/qWaDB32MrxiEwEExECAAwFAj1qVVQFgwNT6T0ACgkQ9/DnDzB9 Vu1xDQCgkdM4WfTBxAZsiRe5PLYP8jDR2/AAniCW+Gu2EQJwLWRjPqOvcJIb8LRF iEwEExECAAwFAj1bfGIFgwNiwi8ACgkQELuA/Ba9d8bY0QCg69LH3fDaDaof3M6p eyRHv9PCM0EAn32I0xguBCMVsbv6gxTrXo4w4YW6iEwEExECAAwFAj1beicFgwNi xGoACgkQMU96lewVKUILeQCgoLmUFS1YgDn47WTIHB3S8eO5a3MAn1L+l+O161pC /zvUYH4aoa+9Xuy1tCBUaWxtYW4gTGlubmV3ZWggPGFydmVkQGFydmVkLmRlPohi BBMRAgAiBQI8+9neAhsDBQkDwmcABAsHAwIDFQIDAxYCAQIeAQIXgAAKCRB8IsOf gHrFOi2+AJwJOkvM9ojo9xpjptCzSxT6/H/LYQCeJfTX//MssJ/fb9IWCjP6woIJ V1WJARUDBRA9A+0PAVW64qCU2iUBAdccB/0cjLKVxCo0Vq3HhMLgsHxW+4xqPLcL i3GxTkiCSkJCWTG/s4EtRrFO3OLRRpO7MvWiA06u4PkPP+xTlbW8UEM3T+dv8WCK 8I+VBlTzBff3YvBkn4GzJV5g1I4NN4osDFh6Jtc9gatcFf6D3v+C2xWKHZ0AV+CU Hm524JAb3/+fiRkePaeoKr/oxibIm/mNonPQup7KBOfpBsoHSeEaY/7KogKiniV2 dCzh5uLn3zQnw/MHKkJrFjcHjZFzzjmDaC9tikXUcY2GsQg+Sp4Xv1fpjujT9BKI KK+aotsG/VZ6HLvmUaFY3W4dQ9Pq5jFnEN4VzifhtKKUou8BT4jaJMZhiQEiBBAB AQAMBQI9BMOsBYMDuXrlAAoJEAnp+QqKck5FrksH/j37K8wcFO78HG/GO2SjKlOG 8mgq2zEQNctEodT0DegJuXW6OtKaEcLrgrNYWogBFJ3DLBc1A6esFjYqYanqv9ck YVR2dFZqPS1SbpJpdd8kx6MX0CX3gfSsH7/DwxCm3+6C7OXoOTlfLYaw3mR/wAzi ExU0WeEa8b6zNCe8nJlyqLOm8UwOarwaYt5LAeFVrxuMw2lmkQr8VWGByXg2JTq7 Ey8nKiWPR3kUny2E732Bh7SkEuvQJpS3eBGzQ24enFHvTZ4ti+Ty6Tom8WQeZP9u 60+pJY5vmUZjbNBl06yW1Cl0D+60zDv+w4YBh7+MEbRzdrqObF99lKaByk4WlViI RgQQEQIABgUCPQTAPAAKCRBRrPatdb6Al8WrAJ0UGWD3ifEeDXhBYDkF2/EIlfuM OwCfaHvJ5BzWEak/uQAEYUzWb1+GrF6IRgQQEQIABgUCPQEmWwAKCRBnwwMIcls3 xlbnAJ4mqyE9U2svn5pm7AyG/j5GOyhOqQCfahDzCmIa4k5hMs5vZpPUlShqQAmI RgQQEQIABgUCPQPwnQAKCRB4y7mVGlcnuRJOAJ9LS7+vS3boxnAKsrPYd0qO6+2R HgCgsYwJn6OfnTm/cKC/4j+kLLRRa/yJARIDBRA9A+0UlWBhpt2TQTkBAS1UB+IC tY+/MOSiz1j5xqhC7STAxOPPQD18HmO3AHZywXr3G8iOh7iyJU3EphQID6B43Tvu 8VjaX2mvJur0rppMlHqGDJSvk1J8diwkuhb5jwmKBBTOoPdh6QEhi8GanAizKd/r nppwAfzeP0CmiKjzQQJUiAK/P4KLhf////////////////////////////////// //////////////////////////////////////////////////////////////// //////////////////////////////////////////////////////////////// ////////////////iEYEEBECAAYFAj0EsHIACgkQzjzRQHYXE2eG7QCfcEiEGHSI kInfEejdpD/8f6Y9m58An22TX5Bih78xgT3UO9KS8f9S/ylBiEYEEBECAAYFAj0B /C8ACgkQlWQfayU+WONmegCfT1kY6b07HTIq4VCPBT3In2XbZh8AnRDjvSvwjSKU MjjnpUhiMtXa07SFiEYEEhECAAYFAj0E3w8ACgkQcV7WoH57islESQCdGD2QXknl os8pcpVMqVGiGm2bDXAAoIUuDg3KWXFjFgKPld+ZS2mavWFXiEYEEhECAAYFAj0E 50kACgkQj/Eaxd/oD7J4tgCfVWUu7UihVszFVvd/81eBbED8xbMAn209Hm3s1eOz Yo/58hUcCXdN5B2viEYEEBECAAYFAj0E2YYACgkQ43e2O3Z+/CTsZACgigG3GK7M oFnwncUbzJyi2VppBqYAn37m1LIu17G9TcN5o8RwsO88+UeOiEwEEBECAAwFAj0F 9X4FgwO4SRMACgkQFBE43aPkXWa0pQCg3HBHDpZqmVSpwSErMCJLKiY4N04An3Vp c6u5ili9/wYZ8i6VuEAyv90giEwEEhECAAwFAj0FpJgFgwO4mfkACgkQNfZhfFE6 79nK4wCfRd6W2DnPsmPr6m2OFvyUfEs/3oMAmwWQXu94+Do8kzcDUAqlZnNIQgz8 iEwEExECAAwFAj0GC/IFgwO4Mp8ACgkQjZo8HzjZ7ZtnGQCfdU7o1RurcEvPvIbf fpFEZyImPdAAoMe4TK9gay+yiZEtEwjG2DEjLchXiEwEExECAAwFAj0F5MUFgwO4 WcwACgkQyg4WnCj6OIopCQCeJ38j2R3sNNd+G+fSWQmXpItFU2sAnibRr54Ho/FY LG2pAsG2I5ZPtuU5iEYEEBECAAYFAj0GDN0ACgkQ7vvdOh/igeu6cACfa3ftn3xw rMKDU+cxSBmzHNqorskAoIpQOIl27WCw6HzZ5IbrAJ2dTca+iEwEExECAAwFAj0G cEUFgwO3zkwACgkQGFkMfesLN9xXyACaAvq6pbEmj/Lfp9kHUbIbVUFrLzIAn23e BQnnvI3GzuNb3E8VWzXdVWyTiEwEExECAAwFAj0GdBYFgwO3ynsACgkQKb5dImj9 VJ+WkwCgkESIgfCXSH+eRR5PNXXQWb1MlyQAoID4yIz1N1OFVIHrvYQm88IaJDdL iIwEExECAEwFAj0FGRAFgwO5JYE/Gmh0dHA6Ly93d3cubWF0aGVtYXRpay51bmkt YmllbGVmZWxkLmRlL35tbXV0ei9zaWduLXBvbGljeS5odG1sAAoJEN6Fg/i9v+g4 CnoAn2xsBlhU4Ar0ometcbozgfIUifvNAKDHthneVq4UVMN5C0Lp/w79iovplIhG BBARAgAGBQI9B6oYAAoJEDrT5sqEheDXBmEAn2oQ1mPMZriGVYExTl84OJ9gAnUY AKCp/YEIl/uXbbfOcRXtt+J6/j0FXIhMBBMRAgAMBQI9CHZXBYMDtcg6AAoJEK4w PLMZKvd5UZQAoJvsUA8rcNAe2dGu0+ysKrCQR54hAKCm19dKdKtlyMNdk7JwegDx X/oV/4hGBBARAgAGBQI9FztHAAoJEA1hENZzj+CBfhYAn154RoF7b6WX/0JJqByL JZA2CRrGAJ9gkpij+UcwniVl/ru3SYNZBYMV54hGBBARAgAGBQI9GiOsAAoJEEmB 4GSIP0FCeJ8An1WZ9Q5mxMXqISV8wJzfnuHMO1hzAKDP02s+oOMGOQZ8DusomH1M BXLaE4hGBBARAgAGBQI9CnbOAAoJEGjt4yhb5E+RNRgAmgJXUIpErNj8zkWWpc3e ur3F1FqOAKCBih8+KJxKKxtL+i17LmNZ3h4ALYhMBBMRAgAMBQI9C7rnBYMDsoOq AAoJENS0NLLmdnFMwIYAoNrAyDonRQehoQfAdlJv9uJt2XAXAKDVNE+78xgimxa1 7Q5JyrfD9iO3/4hGBBARAgAGBQI9GxntAAoJEP2fw/aQ4eNGG/UAn3y3Z0gLNgEH PkeUawLHZkPPurEyAKDEROVxqsXKhvao8P2dBAJ/elix5okAlQMFED0izoO9QKbp D86FSQEBtukEAJ1wluaZ5TPaTFGO0HZ0GveXSZUakgx1UwL81oqoeqTmDFGb3xw6 erbB709IEjsfnEGYlKpf5kkdFVRIPOgZonvcD/I8WLy3tD0xExv9d6nD9sTHuOy9 XsuD61dF53Eb+AxDkTwpLoJdG1AimstQZAn+s4D/DHKVc8hQwY1qIRuaiQCVAgUQ PSHiMMRGkei8OaXNAQEPrwP9E5Zt9bK6y9VYcIsbBFDvAYLhjhvT9IKOfQrHIzsn NgIfec6R0B8LRXGaOlUf6jMTP1p06OvuyRNGHHusWDui1nVPcN+t/uXB7QT16Uef Xv11czXqmzCKtDaEDQHCqAJMWAFGjL96IESNMTFGGSx87nMUgDmL5HJVaw+WLG5k cVqIRgQQEQIABgUCPSHiTwAKCRDmTDIV2hU/q959AJwLuccd2AAC9BJ+Q4XRfqsY K8rcvQCg2B/Ek/s9V7hs6cH0ZelLnfDOCaaIogQTAQEADAUCPSN7vAWDA5rC1QAK CRDERpHovDmlzZLNA/kB9K6vKiTZWUCCq4x0T1/AX4DduNNazpNXEWRd0id8wvhS v7jjPTSn2SORPkgmsR5sxmpgeyfI2LHajCSADJ1042j6V0YDLNNRjARZjohjSSbW f3tOfPZ/pJI5g2odUnnSHePGxyUPmwcGIf7U50MIIfLLNX+AvrrLYlNstmFs4ohM BBMRAgAMBQI9I3v3BYMDmsKaAAoJEOZMMhXaFT+r3m4AnjDIQmnvm6MfBrAV2hFr y65muCPKAJ9o9+eFF3lS3hEoOoiF8mDUpyBTa4hGBBARAgAGBQI9JF1AAAoJECih tS0a2n4sdSYAoJIFqlNPp8z5Rkf//9RUWnG8LhKXAJ9vmdP5tQTtkmkV7KHYUS5b QtupQohMBBMRAgAMBQI9JrkOBYMDl4WDAAoJEGHYUdmmgiFTtTIAniRboW1Zg0ec UEPQVU7ulTxnlLYnAJ96iR1ZfdsoseUqehBhdaqm9L5Q54hMBBARAgAMBQI9JxIA BYMDlyyRAAoJEJwvxkwIVX/fl18An12BQYjFZRc0flDXRh0/L1QXUggyAJ4ueFZ0 M3YYsjzYOl1xRkbnuzLzVYkBHAQQAQIABgUCPSeWRgAKCRCM9myBE905UEgeCACm 02d+IBhcQGXS3f74HImb+UF7xbC+sS0JgIha9bXbjcbuk5hrVA3dFrPlh403JHCU zj+Ucetjj0GFTp8mwoowZdgjbQoAphixJ0hCyePLVlxQmIey5kSmHO601SeHiLjH k4l8rE1u+2q6TQgY1basJMw0u1pzqIyXIOIZHDJwomjd63g6+NO+JbPDMa+D3ur7 hJkWcKaNrRVRPTJemWD7PAJLPmMyyq3AXZFC0nJKab8S2AUuyxdCLSwkLxCQHXIq vImocpniny6eq/2h2Wt9LZ0G2BhvBEXA9YRJQnEwhDqf1GFJojtbdGxKmbQ6Vl51 ZLgT9qiPFbwhLDGzj9S8iQEcBBABAgAGBQI9J5Z8AAoJEPy64gyiEfXtZh4IAInC 8G4WUR7fF3puLovnymgaonudsm91vLE8H26fKAUMj+i4Lns3FCrKUKgsIqE6ykJ7 cimFq50qO7EVAOEHA20L7muCT3uyuUViJey4pDiWJxn9gRklYwb7AP1Z70sg/vCZ pWpHibfmzh3NV+iqtA/iC3+mv0M4+g96xlqcz/4h1wR4NGuZwViO5iFbglrt2XcC u0Mivi9HhIPwNV0MDxAUQXyoGa0MLSreABhzlH2gCeoplFVgauSN5FiK/U1vJmkW NvuBQWlrb9mUxE1YLjCbJnVa+qrucZgBmAbWxhxZpEM4uo9W/CVyYs+Ar3rnh9x3 lasLOfIzaizglb/xenKIRgQQEQIABgUCPSdsHgAKCRB9n5GQbyq7LbgQAJoDxrU5 j5yyPtUZJ9HRpkfs5M02xgCgwlE4kNBns6e2o0e1kWHY7D6bKu+ITAQTEQIADAUC PVt76wWDA2LCpgAKCRAQu4D8Fr13xorcAJ0d12vev9ozWYskLLTxY7BkRwUlQwCg 3BJpc4TFehhWuPONffqe4bZpGw+ITAQTEQIADAUCPVt57gWDA2LEowAKCRAxT3qV 7BUpQjwUAJ0eJRIuyt86xdZQyKVeuPswBjdXbQCaAiVYgoClomccI+7txd2d3Osc xg6ITAQTEQIADAUCPWpVVAWDA1PpPQAKCRD38OcPMH1W7fmFAKCKAIKtV5yjPmhV P4CkRbNv8SNhHgCggJUw5vvaRaYjRLY5oJ1WLpZzoy20I1RpbG1hbiBMaW5uZXdl aCA8YXJ2ZWRARnJlZUJTRC5vcmc+iGIEExECACIFAj2tupoCGwMFCQPCZwAECwcD AgMVAgMDFgIBAh4BAheAAAoJEHwiw5+AesU6JfgAn0YeR4c8htL/o0Y6NgkKzMi7 H3NEAJ0Rbxu+ghYG2k+qTgRr6HMPA8C0tLkBDQQ8+9eSEAQAlH4len4HnBlYW7YT MLAQfusc2JdxD+meidHs1XaBs5Rn0seyQefmOro01k8R8jAEmqzhHCghvVEU0aTL HTWqPHfIxS05HLZIYQ0IEFMf5z2SSsvUGrgydtHq1a0Bw4qN5+xkOMETZKBdM9bg nL7KtF+GHFrrftvLblabHw8eXAsAAwYD/11GvCT+Nc9wa+pzLPgj92xMz0iELHIq 88mCEHEY1MCaodifdZZHwfj1wd+Lddbwcw1eX62TghQunsYDxqSYrDjx3rmip30o PjryT5SRqB07zc/5Sh6G2/xE4JtgQIXkCQ+C2TynHw3kSAcTY8A2tdMvQQH9MWJ0 0t2Im74JSwMYiEwEGBECAAwFAjz715IFCQPCZwAACgkQfCLDn4B6xTot3ACdGHGZ oFk9kC8+dUofV/TNC2y1XS0An38uZp7TSItq6FjLGnwwxyEHKSi9 =sbOD -----END PGP PUBLIC KEY BLOCK-----
D.3.62 Scott Long <[email protected]>
pub 1024D/017C5EBF 2003-01-18 Scott A. Long (This is my official FreeBSD key) <[email protected]> Key fingerprint = 34EA BD06 44F7 F8C3 22BC B52C 1D3A F6D1 017C 5EBF sub 1024g/F61C8F91 2003-01-18
-----BEGIN PGP PUBLIC KEY BLOCK----- Version: GnuPG v1.2.1 (FreeBSD) mQGiBD4p5ccRBAC+tbiJm4bc9dO8oaRhVGqWmNhYfi2GnX4AM2h+L7bcIU/7jWVn uWGe/PFHDcuOpEov/XRw1gmgoNh2DopTxf363DVMevmGW3R1842YMmLvCYZ7C0Rd 0GdbHW1xXeRSygs6peLcPGQ/7ISK0BHMudFim5FrpD0tq3qrqRmuGgls2wCgyF37 u+ZoP3xiP0wANhoWJtyBWQEEAIeYSHvIPKFIo9FG/+wckx9Fc+hLXPKwoETBPof7 Wft9zXiYyowuGj6/ydb6v229nI3lJwVPR8X6Ptjf6rO1vjf7uUED9dNBLr10vdW6 jYClBT8lqJAq3DzEpDk2kOlhYwtrykyld9Ys/7vgliuBB0XRUxGVNieqDck7PZWL ewz5A/947m/ZrlZbn6+jsshGk30/pEXZUhcDnUBwW26GuFk0TGlXBha3N0NFwqz3 a7qnJcvSTKfeZJY5NCwqzCo/rLpmaNd9JCUrgwSd1MI9Txrbj3lDRy5dj4FZBQ2N BVgni7SRKaiPw1KeEprSOR8yiM9ZjbV1g5zPeZ2bZhSMCP7mdbREU2NvdHQgQS4g TG9uZyAoVGhpcyBpcyBteSBvZmZpY2lhbCBGcmVlQlNEIGtleSkgPHNjb3R0bEBm cmVlYnNkLm9yZz6IWQQTEQIAGQUCPinlxwQLBwMCAxUCAwMWAgECHgECF4AACgkQ HTr20QF8Xr9fvgCfUMy+qlN9qQtwMFAKWViSllk0xYgAnApLMv95d6Ecrj7+U9Et liAwNQXWiEYEEhECAAYFAj4p8nkACgkQtNcQog5FH332EQCghR98TNpvYGdrsg6Q S3BngO5n3VgAn1zo89iPy8VMP/kXq2jlzs/74+i2iEYEExECAAYFAj4p9igACgkQ 2MoxcVugUsOwsQCfY34hwJIc8MapwIy8fWmCeLs4T0IAn0aVpewWF99H6SapelNP hvDzTYLIiQCVAwUQPioA7mVgqaw0+fnVAQEUHgP9EJXxzQlkaN8VsfRJo/UFmC4z wGkwu2yatUjMSZR58VpS9rF6CH1rzmNFtZZmIh6ItQ/mPaUDW2yObWBRL2r9vkVx e+DPcpcZAebM3ibjsOg05cftcphv41rLak0C2Nec3MXnxT15O7fcO6aO+d4oJ2Yi oL7YJX6RHrqNCTQn6/65AQ0EPinlyxAEAIGtuZXdf7K51Gb9jijgdV1NMPKwujoq K9f1PZocpDve0vwXN6AvzJ1L/LTrZPvBZ0UCAJR/zVtz4H2bnSqalbd8j8bmxfYx 0SA3QNAKJhgBGNlnK4HvAGJCs8oXYp+6Ph9WWlTcPzkfscPFc42VcUEdfL/5kyLr OvGAUW6D7iCnAAMFA/9CWXarz2QMrkduiasc8bhSmv2lVOfUVcIdz9imc72Z5GUk FBiQJ2kuqJrxMUqAgoccnJ9R0QVZwCaQyRNakEQEcENBKq9Haa5LLo7nD3CAiqIi URqloJORSzXoQCrw8OelbBp9RaEqVdCecbNqAbA8Ru4NIwcyZCgvnX/bUTKq54hG BBgRAgAGBQI+KeXLAAoJEB069tEBfF6/XBkAoJtQ4ECj3ntS2xlODgB8N+cKIsdb AJ9Lwk2EEIZhvzhwvhpwIKAhWhHcmQ== =C3Jv -----END PGP PUBLIC KEY BLOCK-----
D.3.63 Bruce A. Mah <[email protected]>
pub 1024D/5BA052C3 1997-12-08 Bruce A. Mah <[email protected]> Key fingerprint = F829 B805 207D 14C7 7197 7832 D8CA 3171 5BA0 52C3 uid Bruce A. Mah <[email protected]> uid Bruce A. Mah <[email protected]> uid Bruce A. Mah <[email protected]> uid Bruce A. Mah <[email protected]> uid Bruce A. Mah <[email protected]> uid Bruce A. Mah <[email protected]> sub 2048g/B4E60EA1 1997-12-08
-----BEGIN PGP PUBLIC KEY BLOCK----- mQGiBDSMdS0RBADQE42S0MDRcjiuM4mPH4NL2m60OMHgq3mYuIzrNkRE4jSzZJiG 8jBMl5VysnTkdvL61gH4aihIqioULOUq3L9XEtlrLbx1HDXEEdAdhARzqPapD4x2 FbHpjb0wjxQ7RmXXvLHDlPa8x8K48BJjZ+9WhPs6TKu78+I+9cqZ0u1KKQCg/2ls GAGht29FiOtHrHFVMKl3WXMD/R6wl33Xsb7mwFROBWoYxExqSAZ9xeI5KUtQ5f2U eYSbUfxCTkcBIImjf6UhtjLTs6Rc0ouYLHOHu7wxVVzA0x3UpcEWUkNXWsy4PO+S j7PdzKi52BzR2LY62DoBTUARAaIsvp3fV126NPBHR2Isflo2OlEvwKGJ40IJMLGN d3xBA/43QdXUcxa/FFAeCroYr/BkWPYz7Oh1HFBTa9xxrKL5sLDJChp/yLFoVhsG 0t4w595cbD8L1n1PckcaKVK2Y8vjafJKL5k5Ea/CnF0kO7+Q3RaydqzOcS2yP0n2 ZLQ+sorNz1huY6hrJemH9SjWnYKg4xbxfQzRBcfRxGQv3usvC7QhQnJ1Y2UgQS4g TWFoIDxibWFoQGNhLnNhbmRpYS5nb3Y+iQCVAwUQNI10l6jOOi0j7CY9AQHawAP9 Hv0fwpPbQC90t8sreFT+ObRlzYSQnOHV+XYcqi0DJ+nbZYB+60CzPxHkchhfqLi0 zsNYbqlfyTCJabMS8d3n4aVRke+eMpD8UwsBGcfOg+3H9aFfsNDF9qC46eaN2ZEb MpsMaPzEMvdvzIWY5pF1uziJs+hqPNpndOv9bg9mr+qISwQQEQIACwUCNIx1LQQL AwECAAoJENjKMXFboFLDw38AnROHlV7ICnlxqYdlI0SdPG3JtOyqAJ98I81ydzgL oFd8Xfz9ei+hLyxOkIhGBBARAgAGBQI3g7dNAAoJECE8XjTxggtVMVIAoNZVmb5O 3IvfbRizfGMJZJjR1nxkAKDr5s7RZAW+CaMuCnDDjN/0D3ncNIg/AwUQN4USPK+i AUnWOX+nEQK/RQCg/Q34D+y74SwbsDKq1PFzRKRIbUwAniLwxuIjOT4+Jx/6GbUf 6BfFafUqiD8DBRA32f85aUz3f+Zf+XsRAsNlAJ9pXnWSnE+Cd/o+GrnvjyyCZqtm ugCfc2yQMwC1xIepPJh8W7tI07GBYh2IRgQQEQIABgUCOe6H5gAKCRAgFTHVhF3+ 3aFbAJ0ep88lZvbBXHhWgy2h3lFG1D20XQCfZ5zVhLMW56ngMHp0jbcs/Ti+hDiI PwMFEDnzsYN3zinFj6EuIBECrjMAnRIxFEDvi0bBwYtYbADEFulWY8znAKCwfvI7 YsVOkMDtk4nEuWwK6bKCzIhGBBARAgAGBQI57o1VAAoJEIjhex385WVh/NwAn3TG PXOwLH/vtdJNGGM62Hti5PnkAJ9Alkx82B7cZzJdVJEAqw/hND3NiohGBBARAgAG BQI57o1aAAoJEBj1A4AkwngC9RkAnR/O/64hobb4MdEKhJgjpqE5++OjAKCGDgk1 KTN2xyl4wtvmrXoMzXAj34hGBBARAgAGBQI6znAjAAoJEAn+vxCCmc2z2AQAoKTB Xco0PfZVVT/xdlqEmiJqeGHEAKDm/m7X/ZHZ6eqQtZlRYUvbyq7+j4hGBBIRAgAG BQI9B61HAAoJECH5xbz3apv1ixsAnjRebx42qfys0PPDQ49g2WWDd+ndAJ9mMtBx FjjVfWkEPD8A3NoH9UwqoIhGBBIRAgAGBQI82X58AAoJECo2sboILs/F1jUAnRIL tof1eX0l3d33tgDgOSKTXTbIAJ4n+MHK2xgLYjlcziszbcpdTJZw8ohGBBMRAgAG BQI9B6uNAAoJEEbtrfQ1fWX7qdcAoKa+XpYx3wsaIMiOgIV+0I0KNa0rAKCqRzrL j7FPb7GWLAkmlsti5q5mZ4hGBBARAgAGBQI76agcAAoJEFWW3Qzpv2U9wokAn1Br L9Zpzu7ReGG/aARyOg8OGM3xAJ9ukPAfaRVLMNXLBZB5iY2XS1ZE9IhGBBMRAgAG BQI9B6v5AAoJEF2Oi+nyOBrU2dIAn1/zZZa2YHDKQKB3ezFDtL5RcMTwAJ4r84Lm hbCRDd3bmIvkqMB68UEK2YicBBIBAQAGBQI9B60rAAoJEHxLZ22gDhVjo/gD/0ZB rsCe/N+qD+3yXPZlZLgNY5dyl6k303DKynA4JzYicnoI6I2qwUBaW1sFdPciTvOX tS8Ws2sxBxYrkJg1u2Z/ELbrQFKxLiMQI+3hQouco0YuzJpBMjy7m6/Ng/kvvOfp +cthtE0sioS7bV0DA+CtGdkoIyXJ+zW/EEjflQsuiEYEEBECAAYFAj0HnwgACgkQ tNcQog5FH30E4ACfcwEjK1y9a6fexy/VezQJOm25Fb4AoJn6lRn/n0dSjiWqFKZz Kf7TXRQZiJwEEwEBAAYFAj0Ht8QACgkQtoTxfMEKh01LaAP9GzaaBCIKZBDOqWV2 q57uynK585vJjJcBwGBxGzhOn4OTgKlBnJQHX/CfjEQ7jm+gbaSne3ALJg0EoOvC lliIuDdBYlGcaJ9gCLBb5b+V1ovJ0e+YInPFGeBVhJ+s6LviBypQOUUWsWcRSm6x q3kM5hJSqT6meEcpea1VZDGs0YqInAQSAQEABgUCPQetOAAKCRDW4KH+T74q3TPw A/402RLdED/a6E+x2k6jQ6jtqttM/XOTbtNFbikaPbd2BrZdpW0zudJR/lRN/S1M nl0OFtOhuub4ZZDZOEEH4htj+iKB4j0UsTVHHu+fYgRqSOIPYTiRp8v3lPyigGsK RuoM/GKCz6ZgCKD0T0jqnrYObecGU4QCer7q33yuyL/KNYhGBBARAgAGBQI7qNnf AAoJEJ4dB2Q3giKoNbEAoMCT21JPZBoWzNk8faBWC6yFw6j8AJ9XB/GsGPTgcQHB r7DdYvTRFTt0w4hGBBARAgAGBQI9B6nLAAoJELVSsEN3OQXW1WUAnRAZ79PRhihJ vf5Vr+dOOoPVoDarAJ9yKQBJa+LUOlfunIYPTzHKWWfns4hGBBARAgAGBQI+g3Wa AAoJED980pFG+s3HXxcAoK4CeZoen9p8f8PuozJjvxzw7o4VAJ9gjYOjfjq+9zDo S6lTVfENesrk2okCHAQTAQIABgUCPy8b3QAKCRAdYunJN23Ox4RtD/0WQeos1rFE 1cIUrLIFqQq45/F2IID9bI1Ob5gpbS27xjOpvqAvy7d0qMXf5bpQbM/HJFRh5DSS HLhR4f8+jzsdej4S7yZNZlQHF3ooqR1Ufm/warXHSbupkcn7jpf4ewuUTPbuiZcQ r+emBeXqxrXBfw6Nsbzlznbn1J7Ov3C9SCZsF3ZT7EhNGabEbC/PM/qISghtvM1i NkXCqU5d4Lod6GLD8AHx5n6oyvQW1Mg41X8IrVpoYcrBXpzorfOOaGcs+LfWS+px xLm6hjYPZfd55Lv7QgldOJ59Gbdgk6KUsywSPfVfTn7Vpk7hfotNu9MaoKEGge6K nKWvC4Jl4k/gsjYneIiqkGxcIr/MKSFI9s9JrqdqnDTkEtP3bRxISRkHVwRLMh0c Vqji7kb3zvDMozbFxJ+7ABYzF3Q5UfM2Uft8BuUfvmi33pxHRXNbFeiwH3yJTkEU HEFeDE/E3DmoI5m6qvR44t+ahpNU/ea554//DiiRXDYl1DzGEWJJ1bSED5tBi1uM 6mYHNO9DlPGXpiaGqazGRXerfwkz7/cM1KJQu8rQvDS0h1st6OZ27GVaYG6nkMqL h/haeJcNEblxLK3ujMwaZtK1TpZqwrkW+hmbni74ihUxycG74fdr8nEYI0ed2Ku1 uB17PrFl3i9oZFOjHLL99FSe8DbF1j2+6YkCHAQTAQIABgUCPzFIwgAKCRAPJ00h lI+PBvAdEAC2s6BtzDi0CXZhGB/No7l5M6vm8z6c6x06TCaTte4wrCdCSgB3InjC na/qNl71v2aRlftcDMuWzcQX6l8BebsyJ7uaM5hHwMfqntsB7D5gEgirptQWMzap gELcVihFAs/MHwKPnxALvAtUBid1Ln7PmeHj8kogHy4zYpDEd7A9E1E3tFkdeUlN 2YCpxv+fiz8cN7mZOH6+67Oiqs4koWUGadWGiMMORGpIAwyKMxg09X2uRDZFn+2L fEpHVshTP2OVF6pVef5P6gjD6RHy4/IApA12i/q69KECp7rRXz8kB6it80CbK23n iZwHetM+yPvpEWes8LiT4bTxha5b6+aZ7NHHYVE2UbrVZ5YY5EulDRP3J9Sc+gfk rJieh33Wf3RVcRzIRDJhMs6cMwnxTuM6WctXMZMyIxfz6AqagaZNjNvFRqfRg4aJ XkpHgdoBDOX3nfKFgnUnjfWJF2M4tVdPVDgi6IWDIgzFNx56Je1R4UyltyjwaLGc IJYoEkvjSBTbEDLaHI80Laz2SuBD9cZvMoaOipjYVtFT3h22LCkgTHuFFtZxJ2PU 3LWs0L8oWSft1RjTBvBi0k+RVp2apN7l0N7YVPVIGrMBebTfXaAx16fxuXJehhe5 oRTjAbeEOwNR5IajK9y64JVlGU7+cde55JDJ44Cs6/y00KoAttxILbQbQnJ1Y2Ug QS4gTWFoIDxibWFoQGFjbS5vcmc+iE4EEBECAA4ECwMBAgIZAQUCN3ugQwAKCRDY yjFxW6BSw8EIAKD2/YFjWVPD70pxxgncZAdoNTl57gCgmHAQBbEU0glFEy2vbaiw KNB7QHSIRgQQEQIABgUCOe6NVgAKCRCI4Xsd/OVlYVW/AKDVOmtjLziEZDRxiyei mOQy2cQ0pACffZ1KopGDjOi1Hwi3diH5dSmOOwOIRgQQEQIABgUCOe6NXQAKCRAY 9QOAJMJ4AkinAKDIpaIXZCpCK7ysX9PW+3/tL7nNawCgngynY5TWPwEdZ1aedPev 6M/3+HmIRgQQEQIABgUCOs5wJwAKCRAJ/r8QgpnNs4gPAKDjAHY+qf+Li5WmAXDz QhsZ0Om0dQCeNJ706+74vz2NLze1Ttc4EHmDXEWIRgQTEQIABgUCPQenhQAKCRAg FTHVhF3+3UHaAJ9bd79S/Sq93vH/bQbmGuoUFR4BXwCfa9bJYAT5gz3SN6pxqRxZ yqb6EqSIRgQSEQIABgUCPQetSgAKCRAh+cW892qb9Z6dAKCQqaiB1Wh467OWGusG vrYQzXlq4gCg4FNg/xngvZeJW97Ntn1BJza6s3SIRgQSEQIABgUCPNl+gQAKCRAq NrG6CC7PxbswAJ4gLnUa0Jx78YupuQjIPRB5r3puggCdGjYiK4n0b9LbI7jZhgJs Eb89JoGIRgQTEQIABgUCPQernAAKCRBG7a30NX1l+4flAJ9Dz+M2C2doo92UtEmZ K+DYzJ16AwCfYga0raO8/sIAEd1Wrp+3IlgmrcCIRgQQEQIABgUCO+moHgAKCRBV lt0M6b9lPaakAKCAhO9xMc+3ldxsPUnGNhTZ6HivgACdEAzCr/VbLp0dG2/hPV5O m1d4aA6IRgQTEQIABgUCPQer/AAKCRBdjovp8jga1BpjAKDDCZG5Y5HLe729yr1P P/Q0vf/FRQCgiXZX0DhJj5Pa/SlEKHn0FqJ/ti2InAQSAQEABgUCPQetLwAKCRB8 S2dtoA4VY1BIA/9l02ueCOR++lCobMBgOBcFOO5NiE+Mx2osDI6r1cZFMYJXOfxR 1nbvzT/yGZv2waF0XECMvbjUSdcRPHalVGDivaLR98z86p7mFzr2g7LHpI/brauP IVYq61EHtZK1LWzKFAK6HEpx+C4JXURsA0d8i66Yu8bxjVJVn9pP4WEiI4hGBBAR AgAGBQI9B58MAAoJELTXEKIORR99m68An2c0YEMO40sqUAJNrmCrox4RlAXUAJ9P vIK2AFsFRj0CYqjc1F7sdX3VCoicBBMBAQAGBQI9B7fIAAoJELaE8XzBCodN+R0D /2fWf0Jp2gJy7Pq5v3GZBxiE4Jlgill6C7iFU+wv+V6Yfp5KFBfTNH+myn8DP9I2 PDhSfH/epN5UqkuTzqyz4DLpmD0Q/eK2U3SmWrfQFojhBUDGLDSsSMcsUQOc/kYY AZ1Iqpe+2F6+UBNq66/DWbS/9hm9uqIL0ehRb+x4Nl5WiJwEEgEBAAYFAj0HrTsA CgkQ1uCh/k++Kt1d5QP/RZ8QoiVv3yqpFDOogmHGFqoO3PWJKMzsP0zvySlSM0Q9 RD3bSTRGYg02UxHm+EPS6hy42td452YUYMMK4lirRQtywcKjuM2P2owoB7H0AuVj DsmEdLihxVq79/Mh2WWytabS0OVxvR51JW6HT8imv3/8vSU1JXA3BZnTrl173dSI RgQQEQIABgUCO6jZ4gAKCRCeHQdkN4IiqFUkAJ4zDQG8i+y4+nmrEDHtewizXX8a /ACgkOdRDTFhrElHzO81thsR6BnDh2+IRgQQEQIABgUCPQep0QAKCRC1UrBDdzkF 1ic1AJwIQLg4bt4zXyc79PsDRm3esGh15wCffnTIMDtR9b2kRuFVRLnDBxA0IOqI RgQQEQIABgUCPoN1pAAKCRA/fNKRRvrNxw2cAKCJnEPhKU+w4MRdVyOsI3m1puIm 2ACfX1+ehJ0wkRuSKN1sE9XpR74PqTKIPwMFED6LNcJiQObrltOfCxECiSMAoMAw czTW4s2rMJzvEsSxVUMgH9ycAJ9ztFJbYsjP50gMjWbx8IFnHLQKPohGBBARAgAG BQI+Yp0KAAoJEOGpmw+ppg/j5NcAoM+A5luHR+h/uGFyCnMScUMV2mH8AJ9oBLhu lGjW4otlfO8Sm6WXTJxEvIkCHAQTAQIABgUCPy8b0gAKCRAdYunJN23Ox1ytEACn pieD6dwAgESgHR+Iw04YYbmLB1rynuI65AqfBRdEQnqG5xXjwZmwJ+aaSFEraKLz 6RQLpv4HvKoXyvZAhzSFOPmHvV7GgmCTDZ1kVJNg22F/8AdpBdfrW4RPbK7MeOS1 MXV7xzr5mC5NWimIJVrsn2TLECbciIu8Kpy4c7wv3EF7wmZzaTOkalQLL9XODpWh m2X1ASJ+nl4P9J4IElR+lwy/KqRXLljA6/v9+wBs6kmVidbzeXTrKttX++EJ0Pxy MMX2j0CAVZeXTWH5ieafn6X9uU3f9QA1ZF6w23Z8JTp0ggoOvqYJ5+GqmDdn/YrY 3hUizlCy8OnAOs0cpN6VgaRrVgmIWKdK/o+VE2iLlbSbcXaLSN43BIWpnFrypxRZ LN8YZQb3P1/A0ukOM/GHf8qE+0SXJlL6CUP1N5GsgRejJOc8YEuSkanPA478Kvwa Y0m5vXnc+weUHSrlkwxKrRXzENz9jGimhbK+J8OSPqTVup3Mjnc04zglDYtWbttl c20zZtB+I29uTqarLLRPG+LpKFxSGvEJivXMiksWzR8ePy2VRGCo7bSbjT54nTJe BuhMYylNc3tDege6vDiyAJnFOWCF19b5coyStLsSc6xuKXRe8cUcuxeHoiapXlYd wso2i6jhKOuTUspA5gK4kBe90RDN4kbholz5wUiiAokCHAQTAQIABgUCPzFIvQAK CRAPJ00hlI+PBvVuD/wOSFsStty8WdpxlG0gXk9RWWaCYsNjBcYCpHTFoPRQ+fZn /wQWWH0EVZ4pmPJB9f7COADs6gnoRWUFl+eApNi5bgsC8XUvcSnWJpPrZwmt/2c0 mTd5rM5LvmaGezMjBKYepTvMWG8atd3Vt0O2WObt3/1mXVfzEr/EbbcTZ1umFyjU mh+6Z0LsCt910Br8D77PZdxjB4BmiVxWQKsHtuSNRTYFRPgGZcsKzu1cyFyI5DE6 kwh1b1UjQSV7vCPRsCiNXflbejjZZCtSQ1OBrM7R/4rPsa0Tkf9MEBq7Wsj313KM Z0oPhEcM5so4P04VYhMHqABTijeF7kZ+GaWdiKZxVhDzaFryG1IunTLr5HO+yFa1 NgsFtBbsmuploZYcJMeWKuo/z4DWvClgES2sTBKfRfVOq/65juxImaDxc1Qy1yyR BYl1Wiib1aZSToK/X/OsZwPVo7QAPAqbDQcMkrc5JJ80c0N3TJtu+ymidWUnZ+gv Fe6c3DTV+trItxrwPjhHfPD4+oHH1tFb+ofcAa69qt6jLIziLMjS+Tyv5/8QP8xs hscaiCDQUpjWwsjkkDfQBBd2lpry5iUL1dLVfSDprRttdTpIe7ZXBsss+7XGBx/A 4ApW2JAxoPo+A7obZMzt29jge6RCIwSXx1r6ltrqnYcVO2RFRKEXP/IJ/Iexq7Qc QnJ1Y2UgQS4gTWFoIDxibWFoQGllZWUub3JnPohLBBARAgALBQI3e6BXBAsDAQIA CgkQ2MoxcVugUsPZiwCfY5ctr5WUcudZWtpFWMHi92NQw+gAnR6ZXAoKGj60ngO5 65JNLHfmSvpFiEYEEBECAAYFAjnujVYACgkQiOF7HfzlZWGMRQCgn+s8SBmz9hSd 8OeYwYsjF0WHPaYAn0QpxDzbfeu3Sl23jG9FfOIu8sbpiEYEEBECAAYFAjnujV0A CgkQGPUDgCTCeALFVgCeOGHzQYS8qwb2R1Rv92gkTynYEhsAoPVrNmjEyL6kgfaG zimUvujKp/j3iEYEEBECAAYFAjrOcCcACgkQCf6/EIKZzbMTdgCfWnKUsO/UFuzJ v6GNPoJKvuijYtoAoJq+R3DuVv02lH2U5z+poRbKNxHKiEYEExECAAYFAj0Hp4UA CgkQIBUx1YRd/t0fUQCeNRNg/YrqNFxIxSXjQ/hLrsoyXr8AnRh8pMej9GETsC/I TjMRFoRPKUBYiEYEEhECAAYFAj0HrUoACgkQIfnFvPdqm/XsRACg2zS21QFiYOAw dE2+IuMXTgUeP20AoIAKBSmrJp4kkZ3uCUGnfcqCnrQqiEYEEhECAAYFAjzZfoEA CgkQKjaxugguz8V96ACdEw8B8x+HB/j8eafXaEmXDticsssAn0aJHWNQ60oy6Ww6 MJlhVbviHQX3iEYEExECAAYFAj0Hq5wACgkQRu2t9DV9ZfsVHACeOh24yPiGheCL 9fSn5DqewlbXBgYAoK3ohnTnemr7d+WOFyUBEC40lMiviEYEEBECAAYFAjvpqB4A CgkQVZbdDOm/ZT3wKQCfeJi74jVdAoCMReOLZuhysyOvWQwAnR4DhVl0mT4lNac+ e2Tg+DUhMZLaiEYEExECAAYFAj0Hq/wACgkQXY6L6fI4GtT6uwCcCNRXowlp0Cdd 7xUmw691tMc3nJoAnju97kDwcs7GSfzphpQSbbSxzUM+iJwEEgEBAAYFAj0HrS8A CgkQfEtnbaAOFWPMMwP9FwT3a3yTnHHSlSJAUA6UKMl9W6Hd/dyh/bqmXD6GdzL6 GWV72sY9JVhiG1MaDLcidVLwqnzHhHIn9ibLX0jvKuxFArtzXTTMLF3vfSlTCTVj G/KK/oOOzus5ywcXmy5TWsNQGZM6bkfOV4Kb9/NWQdxey3/9E8IIiG6Y6GhE41eI RgQQEQIABgUCPQefDAAKCRC01xCiDkUffXv1AJ0d4KZbOXacSojnOqvGjzsw+s9W zwCghKXawa5KHxj2BbCPkAD94egu5ROInAQTAQEABgUCPQe3yAAKCRC2hPF8wQqH TY+mA/wMn7JeQuxidQfsGGcQPQ9gViw6isJ7+0+Duhwxz5cYpStqCz0glCT6dml+ YU5H+nJxAFT+lmwNhhIYApUU0jYSU+hN9QWRroQcUVqD1ez1g96IKRyvixtOYLH7 q5WJ28KduhoTlzhRzPCze5yTpBUHtYofOMF28784GeYHzM4/UoicBBIBAQAGBQI9 B607AAoJENbgof5PvirdG8YD/0kmn3i48bYB6EqWJOeRPevtT2AEDUvM77tMkj1r 6Lv37jzgQz8RnDCOeSz5L69L6btK1QN45hgVJ793jGyDjtwA3pwSV4wnO6c2Hi8o ftx25xZluJptStitkfpwglTlXLzmH7KHH62N17FE+0vG/bgllUOrFrwha0ggqIqZ RU9viEYEEBECAAYFAjuo2eIACgkQnh0HZDeCIqj7HwCgymx1on3e7qggNgfOI8Zt DL1VwwkAniFFcbctF286yb7RlXfqzqpAdYC+iEYEEBECAAYFAj0HqdEACgkQtVKw Q3c5BdZM6gCfThj2TY4fIMaJ5gAcnXWfauc+F0YAniLbIhcaANoF5c/+ing4HYId tuZ+iEYEEBECAAYFAj6DdaQACgkQP3zSkUb6zcfNHgCeLhyr6LyKo3ikSxHjMMb6 EqBSLwEAoK7lo0LcSU6WDJdj4nLDzOGCal5LiD8DBRA+izXkYkDm65bTnwsRAt+5 AKDgeCXVoDw9QsvAoiiWxqUv0D5FiwCgy3ehcCdUxDCYO/Ji6Wb6jEomWUeJAhwE EwECAAYFAj8vG90ACgkQHWLpyTdtzscxaRAAqj5ICPLkPjsP9463qKSpxRvEXvik CitJu2G2PitToMwOjGpfwCnk1mvL/fDylRkvnNGDLNh5P2hehSTyzKN6fGhlvXiV AQZ3VlLLX8MjbIeCerM0uWTTzcS++rW10kGgnXU4HVGg5NmPk9AegjpZa2L9L3Dz vTvUKG6Nr3zin9TREFZCBvvw5pae/90IdhTKeKQcr7Hr5qtmjVyLmkMWS1pIfNBt SAj69beQhkrizfhxsaYGMJ0u0jXCrGRGdZhiZhiPs2JF0lPY6dCi3lDJQD2VkUpS JyQXJ9a40WQTGjqWJwRwjbUlYAtMGrbdX4DJoQigg3Y91jcFsJyKccyMtsnq+eLk QlWGM0gX/AugCaKnbFZwNAmoTlwI0b4uV7I2gYK5D7mrX/iZ2uX8Um/OFYskoS8l x3zEqq3mZjxxWKgl0jAkcNmtadLRO6bxh77QdtX9SpfXcptX3txMYYgZ6UH8WH/+ /TzMCmGjcoh83PntOuoeKeal1UOAxNkLiNkK2LieMdg4hM2E1S7wfk5nKxXOfvVh B2Dx7t0V4n3yxNVBL9hAyD1dkR8ie73ZQ//+3uGFrrKnsKez4feTVVoaxsK6DaKJ qCOS9mB+qYx7zO6CDhPtEtPLveM8vo8OA0GuXwS77XKyYIp04AwLqcMrA9a2j98x DWu3/SBxei3jt5aJAhwEEwECAAYFAj8xSMAACgkQDydNIZSPjwYi9Q/9Hkau9rFp 7XhydbSaonO/0XYmbb4VsgthlRNEWBwcb/+A5x1bd6GFFfb7zk7ed2vrrc7vJg9y PnC05tEJxOn1t2sRNKLSg2aRlt/oOAMNCXtjCmfDarDOfBIdXLR01nh7DwDkf8mE P6CdGPKLD5qLxfKfzpBxHDow3oUeEOvxOYphsuduUv7r6f7l9cMKoQ9xcM60iTNb IWJamrnD0nQlu8S6RuGmOJ4nN3zN50RQ4ZkZDnhiEhKX0H0hL48IFzEyES8+N3rM LBsm0kaxW3pKwsgGXKCN9AWo82fhRfX+sOqxDfYbDhwwiKXZFhG3F83VAcIfieJ3 Rl0xMW2h2q+GpXUxmlMXm63yQ+2PhG2u0loY0BNmv43n7C6SJJ2jgxO6mFvrywEl sP91Xd5OJACQVvb7Q5/z/AThF8+APZEExrfU26STgkouhXmqVkT0XdkZFPgXMJA3 G3+aYwIle1Y7fehATO7Jw9JTD96oqyQFteTHjXAxfD85r8KsAM9Y5VGmqQ6rjNVb 0k80i2TBJnWsKmn59eRI7e/3+vxQxa7Ph81pypAJ+bz7VKGzb0My6idjO7FxFHcx EZX3VSVDzn6OI/3pMI91w50StDQQ4eQ8XevuxRRfNGF2hrdSm8Wgxsvk658/npHQ jJY212geo168OYnyNwQmPrtFfMYovl4AZ8e0HUJydWNlIEEuIE1haCA8Ym1haEBj aXNjby5jb20+iFYEExECABYFAjlFaDcECwoEAwMVAwIDFgIBAheAAAoJENjKMXFb oFLDEnIAoNDmgaKLYjlMJvDLRldpXz426vlgAKD1XA7gzZ6PU+ZZASI/yqO3KyMI 1YhGBBARAgAGBQI57o1WAAoJEIjhex385WVhuYEAn0KTZ+sr6nbvOM8wQbLfpeoY WWjkAJ9kiU8uESWXramTTKYKEHyRfjEVG4hGBBARAgAGBQI57o1dAAoJEBj1A4Ak wngCOVcAoJkuzy4ExNIbcOenDulktU8PzKF2AJ4gWgdPoetGKrdvvXltzkZmGEWW EIhFBBARAgAGBQI6znAnAAoJEAn+vxCCmc2zOWcAn2l5cdCim4hosA3JgTFxWY88 Nn1SAJdUmY5oZz78C55anctTLe7PRU/biEYEExECAAYFAj0Hp4MACgkQIBUx1YRd /t07EACgjbVehslGPvD4mzNTL1x7/ktfzVsAnR+zRgLboVbm0F9iXeDyBS0GCwP9 iEYEEhECAAYFAj0HrUoACgkQIfnFvPdqm/Ul4ACfZ9quYLJH6dgKUevVrUa0Pw8x b68AniKuCQeV613WZ7FVg3fa1hGieFbjiEYEEhECAAYFAjzZfoEACgkQKjaxuggu z8XEyQCgkdFSHUFj0df99F9g23btIZ9S1PcAnA3onVGJDFwbWOvWHcI1NcOih4yA iEYEExECAAYFAj0Hq5wACgkQRu2t9DV9ZfttkgCgmNUSBn6fUOCCzOoicMkKOGTJ F1UAoL8EOdcsQn7ave5zLTi6sdLOKWXDiEYEEBECAAYFAjvpqB4ACgkQVZbdDOm/ ZT22bgCfWI3LN3yV0E4cA5IXE06OKV9AWSIAniDeTJ+oUGqkfGeYen4l6nQPc8a9 iEYEExECAAYFAj0Hq/wACgkQXY6L6fI4GtSW4ACfXylpriRootREFdGvt4v1bIUS OO0AoN8+ZpewzHfccJFVzuQmWo5fKovJiJwEEgEBAAYFAj0HrS8ACgkQfEtnbaAO FWOjaAQAhaKsuyJSR6r7umfKv7sNqkXBqhNe5K2174kpYMW/+1LJeLtypTAQFpwr I9lZ7/HOw60Bg21zXxFGb1d88+UH1Rd8/E9J/xqbR6PjkS8C0KVe9rnKBVjdc2ID q8vCukPDm7KsGA0Q7XzBrTQZ844Oe67CPwO71mqlyKHbWJ+4r7iIRgQQEQIABgUC PQefDAAKCRC01xCiDkUffQgjAJ9IyvoAOr5LQvcLQruu0ohxFw6MhACgyxz55/sX KGC72X7Lq+Drxtbk6NyInAQTAQEABgUCPQe3yAAKCRC2hPF8wQqHTTzNA/90Xuah 3BM1E5jTtZYGXj/qv8lrCKHE95HInS3rt+wewrB+6NWX9j/CgohJ8dUl2CtzzfhL VMoP/WfYal4jKBrb5G/qhYEHOUxmZgLVp94coh81XWiPWkqN9DOKR91UWkkk1nC2 JAubebtdvklK5TratGUIyzzl6Qi+d3fIu0TnuoicBBIBAQAGBQI9B607AAoJENbg of5PvirdRsMD/i5z0JsScbkuFdwKpsG0OhW3/kMiTgyOsQKbKD3Hat3EU2xRPOss YCQ3kHlzffil6z6dEFPknhHpFTvGeIpScoZo1RKo8kSRegcH0VzlKtVE1aPKvluj pJKWunzIOzzC9YSinGlNrkW8RvDlREPidHpHgSB8i5Gh5jxvGSq6lZsPiEYEEBEC AAYFAjuo2eIACgkQnh0HZDeCIqjR+QCfS4xYBA+OWINR1yrXCGv9Qyoov+kAoMpO E577gVIjKL/14kYMpE2zIjtniEYEEBECAAYFAj0HqdEACgkQtVKwQ3c5BdZhRQCd HrcVSvpudCCW6EUqxrQMeqML0aUAmwZG59HWV9qBPt2W6X1VoorF2dIYiEYEEBEC AAYFAj6DdaQACgkQP3zSkUb6zcdcOACguhsSDmPx2h9zicj+oy8WgdknCl0An1/Y 7Oby+nfKg+R7aWbm7+n39tfuiQIcBBMBAgAGBQI/LxvdAAoJEB1i6ck3bc7HR5wP /3yrrOLC6Oyx/+TtKHwjNyEIiMrPSwXB+YeTUjW/XKnr46DHlcxHyg/L8rdfXw83 eCC4Kk3lip4JI/RC7IZ62GrlmvNdF6PR9kbfb1QGhsx8D7RhdBrx6tUytoOBPixj ZRu44ZBW1rvDqQ9orI5QwaurZ3CO8/HSWGsOsCSuU65DQizKa1kKL8qGujkt9jxi zTjfhRHgGthDThLAV3FRH7rXNQR6IL6+houF8GqgeeIJNpQ71aJeC8JZEmYTCcNS Na0hHk07GFokwJ5DYVZ3uEb2zmAibgq0W9yoGu+KyohsBu36YlBmrOwZIs+RXqz7 AiOmwiIgiwCnLlKpKFAxAw/g9WbJgpx0FTEuLnEv+QAN7bhf+iNankDiFx9kjmWF sUCxICGovIJf4zn4SAnjF0tdbIEJhvTim8F4VsSTxy1pK1RgIrVB2MP34+ekvgkH aPSRs4y7CY/AycV0p6/2oeekOlFe9rk31sPucmHMiPkJb04Tme8y9ZLUEG4oEAGX Jk6YEtZXYR/aXO1rq5clfW1ekTmHoqiHuo/fKzG5RXmolOAoBWNJSKjygNTiSiu3 fA3rEgGDSz/A91tsUWzIGn6eMsScJuXKFWp/n5kJ5z3udK/ablkmjroIvz5GuAj9 1zsvPKHVGdOcAtvCLO/0HDEMxwI+VHZVGfyTcE4hZQWGiQIcBBMBAgAGBQI/MUjB AAoJEA8nTSGUj48G1ZUQANFCmRNGwbTLHku4Fbc+AAHiA1R4v1S/S19gE/0YIvZs bQdrpftrmxK/ZfqSHitm7f0Tenjii/zeIjTmXEK9KW0ZXnI99IhfEsKAnfyJFFx+ UOaP+7ijaBgTVzl96+vmqnYRjHIwHtEdtLtUVRZfdldxGMRmcpvhcC9skaRAEb1A T5nspYtA0kw8wlHndyrVmTtyzeZXyf7XqGRmk7NxE2LyE9XoHKPQxu47gPIb2iav 2HJROvBPbPBk1/Vf016t4NBZE9yHTl5VjWwswG5wL0Y6nLrFx9dn+AyglIc/1nGh ff8FPORMVhfqw358QxFbXCQfNyXW8QuLgozGOUuhhLbrw20yVu97cJK3cAc0zMIu GlAvUmFglZb8S66HeMus5tlBlGFdXoGk58HVVYF488tlM1h3FFm8OAMFTFF7N1Ke sJ3GlXvoDCnjITJPXqBIAE1N7MG4oFUMs+sdTt+dKmYMdo9Q/tyzB3BKWe42zjxY b9M0+YLbkFQYZwaMReRfZBkHdHBQ4FAk0XpmWJ6w47cm/dIG8DiFM9hgdaG4B/Ux +bhj3HMsV/aK+apr12diHdv6TpsZR4/wjfyBnGiFOrZuv7qIoAD2KBvlvoI5pR+Z rH9TLjJgZ3HF/PoalrDrFewXd0G9048KpfKR3uaQP8Wc7l3oxh/vzrr+Mi5oF5c0 tCFCcnVjZSBBLiBNYWggPGJtYWhAZW1wbG95ZWVzLm9yZz6IVgQTEQIAFgUCOUVo WgQLCgQDAxUDAgMWAgECF4AACgkQ2MoxcVugUsMR9ACffGTZ5+6qgLC0RFqatxkJ 5YwqwgIAoKgsCGMJsAIpxhNbXG5pelXhrQA9iEYEEBECAAYFAjnujVYACgkQiOF7 HfzlZWE0dQCfVIdGmpefW6qr8TOrENXM39HolocAmgL5DdG/nYUfUUP6LrS5u0/A 2BvEiEYEEBECAAYFAjnujV0ACgkQGPUDgCTCeAKmmgCePVbkQ9AsnCO+sqkZ7NYc dK5LT9UAoNU3T9jgMvnW5gDKTaJEy8477q6FiEYEEBECAAYFAjrOcCcACgkQCf6/ EIKZzbM9tACdE3IgDQ/y/f1ZhuyIsud2baKg6K8An2r8w7cEAwfWye7u3I6sr3fJ R8/eiEYEExECAAYFAj0Hp4UACgkQIBUx1YRd/t3U6ACfVd5fnfsai/K+duMDi0WK a2k38VEAn2p0uGy85e0MQ1S0u3FdGSLfkN8XiEYEEhECAAYFAj0HrUoACgkQIfnF vPdqm/U3ogCfau3JPECPX6A/RI4UWkUKQ+oowGwAoIpLlY529WaVqbbVbVYacVLV bdFBiEYEEhECAAYFAjzZfoEACgkQKjaxugguz8Vf4QCfRDfaMqBSxK43gurEuy8O CFKwqGAAn3oqVlkd8t59MZBw18KZbaPbly1diEYEExECAAYFAj0Hq5wACgkQRu2t 9DV9ZfvzrgCgiTbsoz9DrF9xDC2Z78Z6gLbAv74An1Ym7gkuCUcjHTxwXXNzfZ1C iY8KiEYEEBECAAYFAjvpqB4ACgkQVZbdDOm/ZT3/xACdEGJfn+fp/0WSaMjNEb1E YkUXYdIAmwS7bOv/UjLxJ3HcY4ooG/BexGd/iEYEExECAAYFAj0Hq/wACgkQXY6L 6fI4GtSrDgCeJVw1t8/ud5C7P+7VDoyIXv47M50AoLg3I3TP32lGXqF4hFe6VfeM ppj8iJwEEgEBAAYFAj0HrS8ACgkQfEtnbaAOFWOYXQP+IJH2o8bGTLrZp7Nc2Bs2 p7aln3COggZKfk2F88VRA7Utsdjj9KysLp8EiNi7tR7mj4LHuRp4wBNv2RDSWqk9 OZSq6IW5ZpmlECCJ/H42wmn+jt3gS4bBQyQlUtr74hDqfqgY1Wd21bJuZpCTL9dr VICxN+Dof8MJH51anQAsI3OIRgQQEQIABgUCPQefDAAKCRC01xCiDkUffYP6AKCm 90SLG+7bnqIVykONaB/sFtu+8QCgn01PJqvV4duJEAkTmHs385UYJ9WInAQTAQEA BgUCPQe3yAAKCRC2hPF8wQqHTbR3A/97W+V7e/4rowEAh5l7EOKXxTLvwfrZDvsB 0nFBLv/RCb7jtQmwtGijb2NCuOTtNW3/HOGeeYNMwPfYf4jRsLRtlOIkwaULx5Rg mK4NITJXHiJ0D81wduBfPoZO+kP11AZpQF2n5okOMqoXLceg1ue3g9llLPMJZveS jQnSi0kcV4icBBIBAQAGBQI9B607AAoJENbgof5PvirdMVMD+wTxQSvmqx18J2uY Zj6ujUX3lbYPwK1ggM4w2MmVKUD+X9RBjaW1aSp9YnQLL4j0lFOkYsscIlGSFRGe E8cF8DBis2ape/lg6DWSON9qHgS/44YRC8xXZPXNB1wwQM4cUa4L3MxzAfYWJwAj MO0y5owDebKEnZjYeGaRD6hwhkbriEYEEBECAAYFAjuo2eIACgkQnh0HZDeCIqjg cwCfYuVM7kgfbmALOd/umBDLHGxx6HwAn00+6UqhasWTl+G2oCydp7sMkguSiEYE EBECAAYFAj0HqdEACgkQtVKwQ3c5BdYilQCeM1Mft6Kwxqo1nbOLzQ5vOWlRbSAA n1IyIuMAmJylg/cMqesV4McXYXQaiEYEEBECAAYFAj6DdaQACgkQP3zSkUb6zceU JwCgmyXUHKLSZ+3DwHQQIBnSkouNJUoAoKP/GwrD+mo2LDKObb10I5xwQYVwiD8D BRA+izX7YkDm65bTnwsRAjB5AKDQcLYt/6PjoATMIPe3izHDsImhVgCg79BeGlQC 3H5R6kecepRKFeK5g9aJAhwEEwECAAYFAj8vG94ACgkQHWLpyTdtzscyaw/8Dz5m VfCrrTCx4J2/h9/HgXCMCwyMdG87e7CgQCaqsXo457G9thSA+fSxZ5rjDDqs+go5 K0QGE2U7UgRJ+YMlemCxrywRCIfoO5qW+fWc3juHwEVehrfSfsa9Xk7BizoyETeK +1ggx50hNN+DRKG7jBokwzOsMYH4CJgPRBz96DL8Dgaxiys6cPKx8bmVChu9goZE tWSNbTXdeCZRDe043IFy0Yhg7CAYKOIm9+L6iqQ3nYxCXOdHRBvGVpZM6ZlBCsJD 5DDSTqSb5EEuiybO8YYzaDXnt9/Fam/j+arS7eJqfYXsI9CBA5SCZkaQERMkFm0u k1uiQZa00VBU2tJHaAPqmc/Nuv88Db9056x8pvS1LPdtZ9cL7xqZRXzZDl4mRljY L1Yn8xU+OmeVdPVVfUjSe0lxog1d9ya5DNNXySVT22xqIIYK8I9d1VHRhGtsPiZ3 Hlj+FXnvc9KWFuRAwprkRclOXZvU2i8F2joxPvLyE06tjTOj3VNDJPd3Q0LzTtfM Hszoom4wt8RtxNvQqkDuoJ5VHyshdWRcZg3mFIeuEq8QHgP26YQqOG19N1343ao8 k5rLhN59ZeGo5zzM/zklOjrdhyenfRH/8BQZe1TFeDHuD4jURekDFFOVKM/j4Bf7 Y7qxAkzWLdqWsFnOMUy+Sy2IyEotVM9Opsd3IVuJAhwEEwECAAYFAj8xSMMACgkQ DydNIZSPjwZD6xAAtsGfhze/SOnRJtGrz9zPrt0ZT7e+sWCk4k8hDt3JqGjuLUsH 7Cu4IcVLrmNLlKNxrN2T8oxMcibDoQj7er60iocsSifIgwpwnJXhJ40Tk6OK1aSi VIwQ4ff9lywSqaEY4wnYymxg9ADpPJfDVIZkhjARdLVfdLhkFwBiLVj7T8KfY++q G6XZDCk0WdQ+Uh7qk8fLwdihuKK9+ySCVOwLIuARAmBtGOS8VOzgm1kVoVs/RjVn 7o5Wu+ckbYBkvWkzC5uwTR/U8MRs15V4MmxGL2omjO532ZogiyGNhbI3nkA9byWO KQayLPK7/Vf9jYEzEUrCfX0oU/Y/tK2tUKCI4GX0Y9s+8D+xmo/uKMmV0Rh79rMN ZAhnb7Y66qn7/VYJjyBxZoR/1dsLn0147ouuF0NISHBtSocPH/5/b4Ad+7jUn9WZ e4H6jVGdjjrUIGk3C0IB2fUW7Dp3Eda8J1rtMMeo6ult7y67Q4A4g9wcsY5cJBwk ckroU8wQraLaFGutClWeyoHneb4nBL9TJwjw2DlknIp39TFONIE6T0lJvapOU16z TB8IZ3rixVuMl+IcJi7uNuCCmDsh6auMG2QMIIe9B5wGQ4cPS1CmoG/O5G1/D5e0 Rncvsy/KdnwnA2xCGVH7YgCM98SfJGLCI9bpCqq63llKPd+rCzlLU1Scali0H0Jy dWNlIEEuIE1haCA8Ym1haEBmcmVlYnNkLm9yZz6ISgQQEQIACwUCObAzNQQLCgQD AAoJENjKMXFboFLDmsEAmLW+mrxFTSmfjcdPhUlbJukG5N0AoNe/Y714aKVs9VGO YSA5yUTcHT0miEYEEBECAAYFAjnuh+gACgkQIBUx1YRd/t03nwCeKoLQcsQ+kHoR J5/JAqlFWWlNwL4AoIjLZYWrWUCSxgHX91gxTn7DPGKRiEYEEBECAAYFAjnujVYA CgkQiOF7HfzlZWH2gQCgqZAhZ/6HGYl/siyRgDNdQRSLXBEAnjMVjCjTh4pXuxsM dc8dHXel9lbRiEYEEBECAAYFAjnujV0ACgkQGPUDgCTCeAK1vgCgpjlLmwJAJufX 1KtppJM9UGYibJ8An18b8VJgcIw23X3i326LF7CgEIusiEYEEBECAAYFAjrOcCcA CgkQCf6/EIKZzbMX5QCeIYOXykfBI64nEOuKXSnwqj87uBQAoNpGfqwbPl6sPGBG voD+ENo0TJPGiEYEEhECAAYFAj0HrUoACgkQIfnFvPdqm/W56QCfTkykxpGC0Kij UTqkjpuioGnF5SYAoKCAQA/Bco2ZL2ba6dqmERmtdtykiEYEEhECAAYFAjzZfoEA CgkQKjaxugguz8Wo4ACfUOA80FaRAnGxYINgBYbVMiLouQoAn3fTZSNapOWtFTPM USk1vf/u1229iEYEExECAAYFAj0Hq5wACgkQRu2t9DV9ZftbUACgySSCz8OeuZ2/ eNLkPltlYOIX/TEAnRmVB0TVrrH0W4ETfWwY9tkkWNobiEYEEBECAAYFAjvpqB4A CgkQVZbdDOm/ZT16vQCfQbkZFxtg+HEZd6VRkDuLTb46p6oAnjz3ER34z3/xcKWi 3tthxoAgo+LBiEYEExECAAYFAj0Hq/wACgkQXY6L6fI4GtQU8QCcDHsLp+7aB67X H4S3C2chB6GEuEEAoKtOOLSpkV5VeeCqJb7xI+kCh0WmiJwEEgEBAAYFAj0HrS8A CgkQfEtnbaAOFWMYpAP/VXUz6c6YRe6Wp+g3KeqcUo3uhp/M8s/PIS8lAVzVfrQC DHe17kT06AmFguqV5ULi098aiKoJPrx/ud6aHpAAy7XSJChhQ8vTu7HqMgyYQ96j XisRvnwAftFLrmol2kr2/7XyQo/5rz6G4sRG1hE/MZ98wJF5nt6u01+J0rUQMeaI RgQQEQIABgUCPQefDAAKCRC01xCiDkUffVadAKCSZtSum2leNys+aQ/etE4YezRP JwCeJjHNF2ohbHjshqPt0u7Fy9MdHuiInAQTAQEABgUCPQe3yAAKCRC2hPF8wQqH Tc5KA/9M+mdDJlXAKBIihf9jPjzlWBc18QjKiiNqLpMzCcEsKSn76c2gh/kNxtrE fH3uDWiMKoVnyG84CzvQkEVCJWGBESfcYBwdHxVctql2bkJOc7AXUY98Hd0dzGkW tEgfA1JszyDLHv8wFg4I6nECt0NksdIuezcIoR6rcnOBqFtx+IicBBIBAQAGBQI9 B607AAoJENbgof5PvirdnWwD/iLCDiVKakUEbcYiOt6i2HZIy1Fge+crZCmSVaXT 9ZrPvqbNQJk5bzHP5CoW+Ew/LulUjvDhBaeVkjsEx8tRYNf6OVMiD1WrV/SNdrDi PkRJh6PpfTYPBuXL6Q4y4I1/2XcEVMGoY5bOI+xlwAexmuqGA5PWSis0Bbzo1hwP eUWdiEYEEBECAAYFAjuo2eIACgkQnh0HZDeCIqgWNACdFv/yViz2IyAAZyrdLEid xPvqNwIAnjtIVerblxkde/zD/jQ5WTtkxkYIiEYEEBECAAYFAj0HqdEACgkQtVKw Q3c5BdbcrACeI6FjTI8w9xurz8FqpwTH9y+7KKgAnRu8PdQhAod3MmW6yazmyOee PMbuiEYEEBECAAYFAj6DdaQACgkQP3zSkUb6zcfIqACdGOQNobR4OeOljCiYpgAZ ewiMRPQAnijlqTW9k0MCojiSDW/YLaR6tjJuiD8DBRA+ihZ0YkDm65bTnwsRAgtL AJ9+u9KItWzjN4lAoMJnn+3GKOfJ6gCgji8lrRYFIw/VNvajQA1h77gYcBSJAhwE EwECAAYFAj8vG90ACgkQHWLpyTdtzscBEhAAiQB6BvdSadOZBdYTUSoU2iRG/MeQ nctGzM5kG/VlOrVs+LJ5IBoSBElZgt/uryeRERySrMFDchJefymP6XZLrPx3cUuc ui1MVFBk96bBqzDpdG9oh0vwwSeywDIcZOdCxAQU8VSgcmtvUvnkjbg0WgwsOVtL ZqvoabW9Y1G4jDbP66HrMC2iwxRYyncHcs6FKO4Qsh66WiMjM9joUvnouh2zSltJ z7ZTNopRyqppzOKNoLq7N2hHdm37FmTsZaxrrN+6AGHlRxTyRWvWXli98yXMYA+z tApG8J+Ak35gg1zD8JrMYT3mLF1jQUtAYh+yR5BS2R2Il4PjnBU1Sxg4EBtlfaUo cTfC4Y7wtLYllljQGPtPQ/DQl0dV/QC9qWUw+/TGIVl/9N+CEGID9Ebx67B0io3R DeFAocVLGO8fyNAT+xU+LAvyHXidR3lfB+AmAiA/ZuU+fvnIakBetUeeMMQfVVMM Z9xsoQZJ6p1iYrx4k44VuznP5eCfKU4Am/AOffwqfUrSEjcHlfJWUfg/NFE29GPa SmkkFs1ODB2VYeMd3JQYBIxICWvaMhO470vA7fmYWFJ2qT14M0G6Re/8oXv6nPlq AnHsu7U8sHyJr2uAPme0BSvUwluLVHT6v33f7ueC+7VE6OJSuzrOiVcEdwHwbZ8l UeNY+EALtMkVtCaJAhwEEwECAAYFAj8xSMIACgkQDydNIZSPjwab2Q//dIlTPXFm SeBixUzTmFwgJbNRfZsjhC1fQVGMMQLuArq1r+mAzVkzOisn325PuBmTRotycuhF vGfzmIRmaD9s9wCnahiSMX/21sUF5NwcdCyJXB/q/KyRUBCGfJGAdqaFxftHE0ul BNQoQb0osSZTit/8XAHxEIxtJZlQWBQyCvUYZxH5Jr1Fv3Y4fTqKGuwg0mtXyEst CGhKP0mE6iVO9/SBn8P9iqikVl+ZwHhBl59pBY1VGe/2UJxPR3zz2JFAsZa+Rkn3 6dtaGOWKV6j2yhMaDx6NvhD+MtFCFgPqhhionj2kp/vwlffRMTMijp1Ai/6tMrie BwwQ5RornT5gYMSitVLyVlBsZhir9Ix+mvGp+HkxPlh9e6z66v1+EtxxArm5Akl5 sNZkoRcN05sQQI4tZJLlDYxCLJdDupZ7buRb51laawNmHQBS2+egDkX3YQakNpNJ cJ1NYyqk9DKGydHDGVmnXdJcYZ3zWCF49i+M5BMkLt5IYdKYxE4sVBmTyHh1HVnU c6wEJSS0C/GerpzHNVZ/eE7NDPhbme4EWIiHNpz7m6UOlXRLT3Rrm0qQuttd3t3m sWDkPIKdPznVOnXjS/E6YRAbwdtLlzRnWGBZnRMqe+t53rFlDQMJeYKKjKkCFlh6 zvSU4jGP9wZPWuAEW0tvGFzavZvZgNydky20JEJydWNlIEEuIE1haCA8Ym1haEBw YWNrZXRkZXNpZ24uY29tPohGBBMRAgAGBQI9B6eFAAoJECAVMdWEXf7d2RAAn0dX XuAxO0XTwaA+HOBHCej+tUMbAJ9xCW3fF2vB/t9IW61MtPuAFWO9CIhGBBMRAgAG BQI9B6ucAAoJEEbtrfQ1fWX7CfMAn2ExluVLGlJV8mlX7nfBPi4JeCMJAJ98hGwH A3tleg/ubMv4uGscjNrciohGBBARAgAGBQI76ageAAoJEFWW3Qzpv2U98aEAn391 QWVFgn3UTwXMuRef9KBkpAgLAJ4iNadVgqJQH5joVJH2wIq7C5XvGohGBBMRAgAG BQI9B6v8AAoJEF2Oi+nyOBrUbXQAoIcTT9Q1yCrAI+xkks2QIama6/w7AJ9tih87 vkK4xOnMvAp3NkJgNMP4AohGBBARAgAGBQI9B58MAAoJELTXEKIORR99Zu4An0dS r/CnHDjvIUsNFn/Ye08FFVbIAKDMWeDWd/RTiOb7L/n4blC1x/fHn4icBBMBAQAG BQI9B7fIAAoJELaE8XzBCodNe3gD/3FZKMU+sD2spgqPQqfvSCfKkr758cxaeiFO JMDXoPQE8ghM2cnZkOCnDh7fUaNtOBw1w0AkBkPh/3dgssScRc32KFcgVuuGKxF7 yuerrNaNm89Qx/3hI0IK4ZVGP9XYzoc3HjqYDyvkSOTRtVJxuMPfZ7rrSbWE5hzv J7t20DTHiFcEExECABcFAjunuXgFCwcKAwQDFQMCAxYCAQIXgAAKCRDYyjFxW6BS w0ASAJ0RmAxQSELWpVeptQQEjYUan+W1IwCg7NXWM7FTZXxYW9BqsgbbrCKfY3+I RgQQEQIABgUCPQep0QAKCRC1UrBDdzkF1kQyAJ9UY/7PGBVcLb/yJ+FVfpBPl/HM gACff3tX1XewSrldWAeSxXTSZ4J2UcSIRgQQEQIABgUCPoN1pAAKCRA/fNKRRvrN x4tWAKCH0cfUA+YxjImkxB5GFg0Qs5UA2wCgsCXeqbOV5pr7erEWWyuLFhLLuDWI PwMFED6KFiBiQObrltOfCxECPfMAmQG8h0vaR5GpK4zub4xE3NJNJ9t/AKCpF1UZ N/B0Rq30FQ2CIBQf4bJKTIkCHAQTAQIABgUCPy8b3gAKCRAdYunJN23Ox/iAD/92 KLkjpcJDeSGmYtDI0lOQZ+S5NEe0A8wPJ/qYkee//XlZcD0gPg5EWLyoACC9hqxz Wx9Nr5B3ygvxHomadQNXwy12WwWp+BieW0ERF3HY1LGcNXRDJUhECmLCoKAxixMH yYBFdFN+jeHSipIQ69IXPH1YKlT8pvbzeoc+28qH9l+N201UepVL2g1+Dl1vfotH HVrJZnEM1bh2r1DumiGVxHWQM99yB1ZaII9ZlKoFEdcCr1CcU+op0CDhy0hQ+7rU IJvuIeowQFzqpP5dwzJcBYEvdP7qqYRxn0CBCZEiQW3Ab8ihLri5Zli4uHUSaycw 4q4SC3IjlSO3ZvzrPPbrCBqEaxRIftMKiNVtAbwCCevsWyM2gY+qzrUqZE3UvwID 8Ku3n+6dQyKZaUNUws/0IPgKGBIMsrnMyKwXnkZXnWP/8iR4a4nP+55cFXHSvRuA W/ELJHsbo0ADgf8ChDeuvEV/hBg24B1caMCa4dzxW1MByFaVOEAKJ4unV+fkZyc7 3PyXqPd/NbpHheDNZ+b6+R8L3eIDLplEtMy3bVlIlX4FRkvj+UoIjPlLEtic3j21 mDOqsfrbYqS3x5PqnEO5TGQwazif1u7YWF4o5lEBeUJtDIDoHfRM3ScdWkkVENlG x9PnUtsoPTrbdbMzBeAPKEtFE7s5j++0tZaVdSXd3okCHAQTAQIABgUCPzFIxAAK CRAPJ00hlI+PBobgD/9bbfUm4H9IUhPiF+jiTtwC3xci1Fud5yG/7sk3GRvwP82J +VfOo6OwkwUU+J9oad9LV35LWx2kVDmuIdlHUZnJc+A7/OVw26z7i7cbVTL8Cc76 +rijrfuTnd1dhd52btU7V+Ij1LjhWdMXVRlxy+tTGs0iV7Ck4M2pJSdDUH0wK+IN AczYH0Ye8u8Z8BjGvOcWH1isZZ/P688cW9O0F/nSuMyeUHArX+huqTsOa0rPXAWe nTFad1IaRxyu9jMAvjI4jgbkL3ssL1g0ucyem0m9/vRyoYz3SF1HLyXS0i9wSnHP a41kTbrjDuPOwXFgGwZS7tqg4uoOXlrTNecoaMFCIDY3LihPQKVANRBfKDWmCrJX qCN5BStT2RhEO6A++iEi1tuzgoHHjxcXYgk60zwYnny5ZzlE3Y1xsPNT3prpoRar WVmkhDd150stDrZpTKO4GDBphg6Y9dwIsd3Uon5DyczlVYhJ1u8t4+DbXDXMwyMK fjHev01ZG+BTtGYTR2QgAmDd9ie2QwSEol3dQ4j+0qQ9e6ahJ6Hdl4pj2RfTnuSb 1Ixt3pNr7ZoCaH6PRewQKDpqRmIh1M24Q0dsqjO+xif9pUhXRdrUSOgpmY2ZSTA4 c7bU3xyE602kX+rt5VOM3fQ/gHK+/6ouC8NG/+20glBHonAv8veX/35ELdPeY7kC DQQ0jHUuEAgA9kJXtwh/CBdyorrWqULzBej5UxE5T7bxbrlLOCDaAadWoxTpj0BV 89AHxstDqZSt90xkhkn4DIO9ZekX1KHTUPj1WV/cdlJPPT2N286Z4VeSWc39uK50 T8X8dryDxUcwYc58yWb/Ffm7/ZFexwGq01uejaClcjrUGvC/RgBYK+X0iP1YTknb zSC0neSRBzZrM2w4DUUdD3yIsxx8Wy2O9vPJI8BD8KVbGI2Ou1WMuF040zT9fBdX Q6MdGGzeMyEstSr/POGxKUAYEY18hKcKctaGxAMZyAcpesqVDNmWn6vQClCbAkbT CD1mpF1Bn5x8vYlLIhkmuquiXsNV6TILOwACAgf6A0oIHx7GA/Wg+7Xy+rZVKyrO Q+bxzDQbpNNwDBP5mZ4NoG6tgX9LLpLkihRlmL76JsNHhQxaSHOU9mjmuAZgNVlY RE+O/fTIlLkRrBkgn0colEMy0EFx8/UsTPu8j/RBURcrAD+ony+vXyl9cb2HEfpe UWhGQC/WdIhPwRKCK2fIZ75Szjkd4tgD9+yYUEfGCbpw7bRwqHRDEdVy7qx7nHcT H5Xq+vdqJ7ZlsaNMNhDukS3RunILkTW5q9WeW9eabSSyY4uCY81YP2bRF/U/FPM/ mYbWNUELgSmN/YkSwWLGgfjcCObTwgd0FOW7XZuJ71R7ytBEn5kDt3bcvULsB4g/ AwUYNIx1LtjKMXFboFLDEQJ3lgCgpRxakeNIvUps4fdR3nZq/MRKTsIAoI5BR4Lr baOwqe1M5HlH1W/jDLIp =ilxe -----END PGP PUBLIC KEY BLOCK-----
D.3.64 Mike Makonnen <[email protected]>
pub 1024D/DBCC68B9 2002-11-23 Mike Makonnen <[email protected]> Key fingerprint = D228 1A6F C64E 120A A1C9 A3AA DAE1 E2AF DBCC 68B9 uid Mike Makonnen <[email protected]> sub 2048g/9AEE33B8 2002-11-23
-----BEGIN PGP PUBLIC KEY BLOCK----- Version: GnuPG v1.2.1 (FreeBSD) mQGiBD3fRBQRBACTeC/ac7IDcv4v+oB1EB0K0+soiCMsRx4uNL5+VI0IffKPwIQQ dZOam8/GuYtzQMCZOCPTWc/teVvi4Go0gat4mYITqt1n5+OSMv7w4yK8o1yNOona wo2i4TzJg+fRDbU8hUb2i1q38WYcwok/Gulfp0Ioxq6pPzl28CdgdlQGlwCg8Ebf y8oAInL7nGa0AxzgNSJoZgED/A3iaUHdICb647+43W8L6OtAD0xOsTmE7Qpvs9gz aaW7fTPZfRL1XERgEv2AWzLHjGAbnkg619REuiOreUFBc5TAvd50//ylh2DgNvlx 4WOpT9X/LkrbfPRteWhczZOkC9qe3Ib6gU5rFbqGb5KaP5k3QEwTOyu6PolOzYj6 0mhUBACGRbVBD8t9tkBmSKYdW4HIFKRa+rxbIo17RvOFtMxrZUqeEIts5g3AdDkk TRHS3TXYGPCcf6VNscGgtJ+PUDWUIJTwSUL67E+i3VApXvgUeQ4ghCVJZ8bkcxjG x0n3JgKs7sSZ7s3HOEPRnCxPQ8F5Pf122ANMkm1EU7sK2zKgkbQeTWlrZSBNYWtv bm5lbiA8bXRtQGlkZW50ZC5uZXQ+iFkEExECABkFAj3fRBQECwcDAgMVAgMDFgIB Ah4BAheAAAoJENrh4q/bzGi569UAoObhwwmRyFvv2bilTfywRYrSr8ADAKDuHMdv rwAL4H+OiwuKHeq6/TgGeohGBBMRAgAGBQI+E7wEAAoJEIf5oyUW2nJ6xBQAnRXv 3F5F4Lv45odLjCRTBOyEP8KsAKCFar/HOOxTbGjdnLhrotNbywVsXbQfTWlrZSBN YWtvbm5lbiA8bXRtQEZyZWVCU0Qub3JnPohcBBMRAgAcBQI+GIM0AhsDBAsHAwID FQIDAxYCAQIeAQIXgAAKCRDa4eKv28xouQeyAJkBJHNiVu9/0xPJ7rcmqX7tjPSf jwCg6kwp7it5O9K+/AlDbFUDpAZzzQa5Ag0EPd9EKRAIAJEEwVSqL41B5+19CtU+ Tp4EbdVoVhc9l1Fb2jWLoT8g3/GggJFD08VxSZnqmAzJQTnQ8WjcoKO9IUYDAV31 17vNxr8RfXM5uqdDX0owsHju562koNTv1/bce+IUchbx9IYGGMr4dKph7Y2uEQE+ K0SSbX1rJOZ4ZdIu+FBW0jUvX4RjW/HuJ42lyUL7m1E0HQ8psDyGfS+NccPvT+HY QWPuoq9FlwmcHEJPUlYT4/f1qV3SOD6JEeVx+7xSPe5GXDYQRdDaA+dl+Vk6xEaU GR3aROu1Ce5vqkOT5u+0nL+cQtHYxSfK15H71EE7zf08ZZvJ/lAQ3xQ811r+pbRp Dj8AAwUH/it0Q7pS4TCGcM180jXGxBURYhXIj5J5bCk7v4mMVT07Wbwm9EohtPR1 0kNleHa3GCKmkVSIwiz9uXGaoin0uArzYa4oAMGlIvzGfdEl9CtZkLMEmn7qlDSL RyRrvGzQedrbrW/1JuaN00I1hxCLKHzkTqGl4L+Cq/V3YLkfMT5tDaac44fLGUAF CxkgdTsoYTvjrw3fsUSwvSIFvdEv8zfmV51vKLgFsU5tGyDfVGtbLk5Eo4noHidK KpdW696sLjTZczzLLpJ8yybK+IroJTifY4wgi4bN0ZooObEYDPeYf86KBJQBZLeC ea9ZV3SM4TO/1OKHpWbOcxDadVkTpkSIRgQYEQIABgUCPd9EKQAKCRDa4eKv28xo uTqtAJ0RBqUFaqqFrp6K7Gzkfvyv6yAr5QCeNhdFijTm7IVP06J97BvfSt3YYwE= =Mwcu -----END PGP PUBLIC KEY BLOCK-----
D.3.65 David Malone <[email protected]>
pub 512/40378991 1994/04/21 David Malone <[email protected]> Key fingerprint = 86 A7 F4 86 39 2C 47 2C C1 C2 35 78 8E 2F B8 F5
-----BEGIN PGP PUBLIC KEY BLOCK----- Version: 2.6.3ia mQBNAi22tqgAAAECAPARUB5VpJvYQyHAzL0WITkJmKG1lpwFMPz4jenjJRplPr33 OvKxQcXh1bAWNVFiJVDJsWwnfif94wQdVUA3iZEABRG0JERhdmlkIE1hbG9uZSA8 ZHdtYWxvbmVAbWF0aHMudGNkLmllPokAlQIFEDCwQ4yqxsuiiP+uKQEBricEAKAE f18kbKpFKU/DPRVhVYlLHCkzXLzZCiTxBUGjMaXZswKwrjVLF2l8mrNQhqC9L953 AGyUYNfPLtqw7b088v3ATCIrZ+izWyE27IrjZWSS57GZiDtnkm6moarG79yANBql LBc0sK077cHEC+/gDwXNBLg0NNpHkaVXPxixt/ETiQBVAgUQMK+p+pFKk8pIl/up AQF0QQH+ME6vPoS2+FgSN1q9R1hwmwEPAaYdyfhv2lj1/6KYDEaO9Lhw2u57nW7z CDpir9gNN0X9U3XrIxlJ7wWxa1k2PokAVQIFEC7vu/zjBB1VQDeJkQEBWFsCANX+ qJO8J6qeJW8gcrmxMBA0l2MjEHcu8XNky6YT3yS6So72yL1lZbG78Sew03fXnWNS GyhRrPz7sURNLtJDNDo= =wpn4 -----END PGP PUBLIC KEY BLOCK-----
D.3.66 Makoto Matsushita <[email protected]>
pub 1024D/20544576 1999-04-18 Makoto Matsushita <[email protected]> Key fingerprint = 71B6 13BF B262 2DD8 2B7C 6CD0 EB2D 4147 2054 4576 uid Makoto Matsushita <[email protected]> uid Makoto Matsushita <[email protected]> uid Makoto Matsushita <[email protected]> sub 1024g/F1F3C94D 1999-04-18
-----BEGIN PGP PUBLIC KEY BLOCK----- Version: GnuPG v1.0.6 (FreeBSD) Comment: For info see http://www.gnupg.org mQGiBDcZe6YRBACDOZSZ5cWE6IvNkx2Ht6S/VdIY1OXFU8n+cOVxNIHFWXPUOrFG F526VZoPfjURnslubdxXC8TKGspX96uc1jdROHvEwsxUUELyzZ7G5oJ5wd4jHwjq K5zwV5FZoNm1SHdeN0FqZB9rlJdOt0kxVZS+b1PUc0j1i4oDNZz7+8rc0wCgltLi c2i5RQzjuvJvF9P8OYGujHcD/3Tq02ov/aNX+jIoO58uuOBZpYFL7ZfbCeiMs+4A dmvjTI9MpfLBP711iu1asuikx6HLQts9UTVk36qP9ubNmFi54kDHsej7Ce8m+dOu Cjcjle6Be71MGLq4YUxd9xZmGGDPhEFnHWbB/QPP4n/m3DN3hblWBgP2PsgmqDyK 518dA/0bhL5pvw5LSaRtGxxWvFBInfWGzC5EuLw4ERZW+bEFB0To08ZnocLRN/E6 tZ2JTr2O5aMLqUEM3jgsIvs9EOGUBwPRzyOQXpc2uQemn7J0pL6PQfuBIaUI/NOu ULM0gQfLIV3wOP6Y5gH0FBcLt/ofrqdYys0C6zTq3LqDW5FdQbQrTWFrb3RvIE1h dHN1c2hpdGEgPG1hdHVzaXRhQG1hdGF0YWJpLm9yLmpwPohVBBMRAgAVBQI3GXum AwsKAwMVAwIDFgIBAheAAAoJEOstQUcgVEV28OwAn3Vej8AnsKK8uTWbJ21VDY7T OjUEAJ4yLYfPw5a8C8vGiAKid9sGeZiGwbQrTWFrb3RvIE1hdHN1c2hpdGEgPG1h dHVzaXRhQGpwLkZyZWVCU0QuT1JHPohVBBMRAgAVBQI3GX1RAwsKAwMVAwIDFgIB AheAAAoJEOstQUcgVEV2OhMAnRDxuze75oYGBKpmajy5uqKoxzqSAJwK9RX1Qz16 XxNkpl1GXpxu/uTMJ7QxTWFrb3RvIE1hdHN1c2hpdGEgPG1hdHVzaXRhQGljcy5l cy5vc2FrYS11LmFjLmpwPohVBBMRAgAVBQI3GX1lAwsKAwMVAwIDFgIBAheAAAoJ EOstQUcgVEV2cwIAnjzKpQYVzgQKH+m2p0INfg9WLNv2AJ4pKR2Euf6bc5a2/gmX dIjpyg44brQoTWFrb3RvIE1hdHN1c2hpdGEgPG1hdHVzaXRhQEZyZWVCU0Qub3Jn PohXBBMRAgAXBQI71CCFBQsHCgMEAxUDAgMWAgECF4AACgkQ6y1BRyBURXbNzwCd FbR5SgpkfCI3USicWNAuX3ZmgxsAn3nMt3/3WBkLJYx4b9Fq9j8XIrHEuQENBDcZ fB4QBACE5eLj/ouWmFq+5jwSwGln6EOH8k96VE4bUrYspqrKxAxSoVagPyg9z1Fd QnjgXPaKuvcdfqVJZFWM97w675NIT/ncup3q1BG5HRrTCi7xs2pHaJ3eeY4Ek2eg jx8asi72tOkKWPLY/Qjg7pxVBPjD1VeC3/VOMDHhA2RRGL3GowADBQP/ZCqA2Nbq 9ZgDyUVgHBDjcZ8Ilqnu5fvn4P9veMK2vCJAGxe+tIjJ6qut6mr7Bk+sUrTIvRMG QuvO6fOrBXseihfrrz9OAkwMrfhQKYe6GuOAHViaOLSeEj/MSM5zomUvHJVsMU2q r/TXMui2cG2X/z+Nu3oBdc7r+QPzEztyg+2IRgQYEQIABgUCNxl8HgAKCRDrLUFH IFRFdivuAJ0clNOzjVcGl+mtAISube0ZfBGsbQCfXNRIS0bUADiMVc2AiW53Q47h oyY= =GDLX -----END PGP PUBLIC KEY BLOCK-----
D.3.67 Kenneth D. Merry <[email protected]>
pub 1024D/54C745B5 2000-05-15 Kenneth D. Merry <[email protected]> Key fingerprint = D25E EBC5 F17A 9E52 84B4 BF14 9248 F0DA 54C7 45B5 uid Kenneth D. Merry <[email protected]> sub 2048g/89D0F797 2000-05-15 pub 1024R/2FA0A505 1995-10-30 Kenneth D. Merry <[email protected]> Key fingerprint = FD FA 85 85 95 C4 8E E8 98 1A CA 18 56 F0 00 1F
-----BEGIN PGP PUBLIC KEY BLOCK----- Version: GnuPG v1.0.6 (FreeBSD) Comment: For info see http://www.gnupg.org mQCNAzCUT6IAAAEEAL6dJExgqBvPOEKuRtkeb1b+bcUkMV+TtiT5GPXcYlYeYuDH Veh5BK+ib0sULahN2lGdgIWEwcnyGokELvc9ZwWyjgcopWRCoY+VkCzz4YIqtiHy T8VUw6bIidslytDjG6wAp2zDtAR75uOM0bLDMsoXQ1s6sP0HMRv1TA4voKUFAAUR tCRLZW5uZXRoIEQuIE1lcnJ5IDxrZW5AcGx1dG90ZWNoLmNvbT6JAJUDBRA5NLf9 G/VMDi+gpQUBAf4sBAC21xtMkZsdR/FoHzg8fppFN623p/ALXJVBEA52W/FPfqVd 4tAJeViU6UgtFBxvu1J7ctXM9O4r+xd040ZTtWVDZSRhssZN3hBGx31El66niUIU IfJBco0nkfUreuKw3MX6vrZkuNc/WGFaQo96JCsYTt7OSzZQu/vpa3gLH5kThJkB ogQ5H426EQQAxAaz+YSEAmOES6KLRJW0otN/whsuTPIbksydLGrRUpvGivG9Ohe6 khLnXE0ApknWxb2aqvP5oRHfB2nx0ZPpm1hdrjMgD/574GT4gskyTdRKd9hdCUrc lcS0WohvsI8si7kKJawa5F0zy08pNOIFstL1YRdQBzfFYHl30aGAXFcAoOnEpqZ6 ffE4E19IexMDmb1KA+s/A/0ctHXLB/5vlUjOpGB7bI3yHHgTT6r1C56WkXQ49SV9 Ad2sN4nrvNKdNBJcN1oAvPh49WBWcSAwTTpub87rl5B8vQEoUHOBWQMUrGCU3/yD KopmHBvtROsP/3KGiCfrteWCdy6aonQLv4TXOeqYMstbU0MjNBVgmAItoxqz1237 CgQAlO/5jMCLdxricI+1f7Gd0zwbxHe1JUV7kjLqMx1JZ75LlxuIiQbJgMpWVNXu j0O8df5mbhh1+G4K9O/p+Cg19+r5ghc8Ms0YOEkYRlKp0be8uzrCu7qItGfLKMsP t1eU2RJ5YPkD0bOjcVxlFQmXkQ791jncpOdrz2O1qgMLpr+0Hktlbm5ldGggRC4g TWVycnkgPGtlbkBrZG0ub3JnPohWBBMRAgAWBQI5H426BAsKBAMDFQMCAxYCAQIX gAAKCRCSSPDaVMdFtRS5AJ49YIU1IAJl2cs1g5gDgXPoY/RdsACffJZMBGaXpcfm ZpRRIAtzq+Vv5Yi0Iktlbm5ldGggRC4gTWVycnkgPGtlbkBGcmVlQlNELm9yZz6I VwQTEQIAFwUCPE+i4AULBwoDBAMVAwIDFgIBAheAAAoJEJJI8NpUx0W1RBgAn01T zuWhCWOShHSfKM+sXcD1YrwPAJ4jr1tE0c1rZ1Lnz5YYZefpSnt2mLkCDQQ5H451 EAgA0k1+aZvnxXw7WBcuEcT8VRBUfdYSrXVEi8R7xjKrw06U92cDSkqdA16rImto u0SSTFTnUXXHLdAuf2nsHplrzjEAgrMUWTtRTtaPKrtCwWE9Tk6lSxOO3+HA3mGn I3Hl1KgTErIbqIAIhftJXpW63Xt1CZtJ5fOKCyNAL4obe+gkmsyNTPwYw1iEVG1N exIdkm4Rr8TWohJ/b0ql3rEv9y/nKRj23OYGDGKKGY03svz5Q/TB1CdQdlfXhtEN Uz674NimuiP0NyBp0Un+hPnr9IuoEILuQhAYOnji3G1OVEQCBFONGT6CLugoPrgQ 0/KeCgIxB59TVkLm41yukcukzwAEDQf9EpA2dTA4k5rr451jRPbR1a19knOAz7Z9 J0tWWbySXGw1ZMLMf7BA7bnnIqDeuKLkxIwc4UGQqiXmmKbbdy0pYPQSC6dxIsFE 8vnL7RLZKhTLi6bFPj6Wspik0H1GnmvRwlaJ+Fn8g7pG6Pi1B497dTmZU3TX8s11 XT09jftPjHLeziCBXu4OE/a0Gqc59r0A0bG94RbaW1rVmnX9KuvMpv9Wfx1AN2eB jrfpDPoMd8JU5Fn8KATvLlXPkSqQ+iQxOvYs6iXhoDrugPuo5bEF6sJBc/iC7ZmR kuy9zUh6K1uAYJoZferxiaglJH+pyrkBBDLjj3Akw5pSmJesekGwsohGBBgRAgAG BQI5H451AAoJEJJI8NpUx0W1UJMAoIrd17bhiZx3eYtAgi+1IwaTx8QeAJ4plmqJ sGDiYyJDVnPYxZcEN0h06w== =CRmh -----END PGP PUBLIC KEY BLOCK-----
D.3.68 Dirk Meyer <[email protected]>
pub 1024R/331CDA5D 1995-06-04 Dirk Meyer <[email protected]> Key fingerprint = 44 16 EC 0A D3 3A 4F 28 8A 8A 47 93 F1 CF 2F 12 uid Dirk Meyer <[email protected]> uid Dirk Meyer <[email protected]>
-----BEGIN PGP PUBLIC KEY BLOCK----- Version: GnuPG v1.0.6 (FreeBSD) Comment: For info see http://www.gnupg.org mQCNAy/SKTUAAAEEALT9vGQnDIzghnYdH5u7zeRqZPXH+2Wbq0q1FD334xciOQMh S6DtELkvVzA4x1PoTvDminXVoPQHtNKs4iMSM6uT5c9JxmdTlfrTfN0JeNi8Jz0E f0NxJk05cjhBKACGrD/AMvnQetUhmbSH3ss/XXfq4kVb+an+0eUVKCUzHNpdAAUT tCZEaXJrIE1leWVyIDxkaXJrLm1leWVyQGRpbm9leC5zdWIub3JnPokBFQMFEzTv E1PcieqTvCHCLQEBDvwH+wWxG5ANk42zjlbZGJ7QqgbfB8t5O5VzlJ4TVL1HWZXv AbLNOYeCxRJqQoJcrEjuWM5T6G+NFZuvjV3+aByNuASc0a97rdu3qfMcQFnyhPbw ljmQjXg8I7szw0KtWahx32WaSZxZRWs7EBZkOkZmR4u53zLWUUz3+bmADsYHjtiS j1zssOyujYaViTrR0xZ3jY3KXEg5LRGI87mzZvzB1HQw9T5/OEGjearU7O/nCsbC 4CbexSHGEKnk8WVOfIq7J0wS74/vjxvAJnIXiEd9hAVCFIFQOjWFduKku1FDTBWk XfayxciiQeOZEOk02r09LoEGO9rX9u30P3r5j/+C2DyJAJUDBRM0t7aVH8NrVijL 5/UBAbxiBADKfom5wJ/8VphpWalKc3iPVLo3cmehaD0kvdtmhn88bQ9EG4TwL5FH ceN+yyoEUp8jCDp/eiBbMy4MgZPF9yqUxSSn+9dE1a9Q4GnWDSW7S1eiIWUpPwaA kGMF0XrWkl5SADudf154fGdKZ6R2wFd/pjPmZ9WcjuGeb4D0Q+/I/YkAlQIFEDSz rDMZnmx2bOkyOQEBx9kEALJ4xJRPH3F5DmrmTTUdkuRGcaf/jZh20Uzh4c89rVFi fafcDn7iZG6uw53Ybla8rgb5w7VIx6T7rvOTAip8F2v0FbghoA+lRARyWiLokLtC XpiuSJaEx0NehfvGuNxNmSLd/h3Ky0ekoyo6QJlNvKh79Zv/GmZYc3hwGZb3tFJj iQEVAwUSNLNeSgnccDk5839dAQEUrAf9GWjBbmdXaFjbQkvn6EAUv3FzrYXfB8in LQhWTydTdEc/yDt6b9aU/mihtvGc+M0+r6aQypbFaUTmj09d871quFU3McwfUxh6 TsrH0nJbToru5YBlnWBlK7A20etMJl+AfQuFiFPGeKKh9FS4oAMVfMFwOiLgobZr zv2buYv7w+MSHXwEYDcVN+8ohe25WinOZVoZHx7T0UeRftEfvkKPhf8PR6bWQivn 24P/ZXKGP/7C5zJPt6lligTAHZAVms9Tj3+iDWKbcbHYQ/Ct4+qws5aGszHHtRVL t4QPr8kSvvW/LKrz4P2Z8eAXgAeOdHf9r1y6TnLmmRWWSE9sf13/FYkAogMFEjSz XjqRXk4s2wiTCQEB3w4EZjgibaU+pTKDNeiwQyTZZ/VcMUaNbNEFvDlbbaTx+Cgo fxKO3cueJHKLGs2pyq0MioXFJbzoKI2gloQ+ay/f8OWU8gvSW9dhPcf03eBVEZQ+ asapi81zI+IigVa/Us0H3rNOScC5nd+iyjQAjXA+wwbbTblxvZiBLe+2aUSruhqX no+F1OLaSYBCpCQMUIkBFQMFEDSqOAC+po5/hTEyfwEBNQgH/jF7wbWP781ByIsX n0xNdMuXZ2E81Nvt4vfnHAWELXhCyG3CL3iYwFwlk0ZC2evO+niZxIwVHJVtS8Dy OFfKCr38ElCrIvv0B5kLvpeY9DLicM+Hrhk3viUJj0p074qxC4owUiMdGT+Q5/qr 8IM3MACq2KDFfcVnEI2FqDZnygkAQF/7iA3OQanb6BXKWAalgtmDbB0GZ+6rs+Wg RplysITEhUOUo5RMyNEzD43dVNoE8SEk1UBwr4K8W/RcscfoZNukAq+KjHXQ+933 W0O8SrAbqaYhCNGS/oUvui8YZjG4N2MCaJjVYCatY2kIVcuGqzZzu1HiE+GyJ5L9 hgFLyhyJARUDBRA0sPB+nnPrCk1Y7lEBAZprB/98cyhTMyelbeDgpp3b5/W1Y72t c5aP5rCslih7iu+P69SLgxPoJ0hw2Ur9PpCkDWK0N6UQluVwAMtNEImaAEa8CbLN bJnXqV0n763xC+VnGEqVkub/vHQpcahliJxx5PoWSmOOwvH0kbZZkgnnJRnB+BCz aKvj1A4dDxijX5drHLRWl2kV3pbpotfXXiN/IRZd8hIb0axrEjh7P7M49DVdRLKG lfe/U+HgsHDcOD86X3yOxtOcf04Fij6+Z4FQ09gei7vhVet/8KFLMaYNUU/Iker1 7Ngmf0un+Hk1NrHfDpalmVz9P+32wozcctaLFQckpTBhszbMRA1+0JUSNnFiiQEV AwUQNK6LFg/TsrJXDH4ZAQEROAf+IvqgnpqrITf7gyTPsLnQxYiV4Be1FWboLmRw izTyIqyUOMPPsbZEsrIsKnAqkgk9Zk45FpI8XoiE+ZqqR+Vki94UdSQQRVDabe33 NxkjT7WuZFwgYi5h3YFKGMSuS4HNU4dMUyqG7lxDRWwrvV7QFA88MtB9/YzqSfJF fKCLCi7K+9dsv3ThJ0EE862sAW7cU0/853UAnKPlI5NJY40TxUyKE1VREHszrU5O LKap9M2gHjeMIyzs7sj9ioOZcfLt8PZkw75kE5ttPzokD+LiiSo8YM3U22sOGD7I 7JjkU8bibtSZTmuOcEtedd1p0KzDrqGCr7hC65JNSt8qkezzOIkAlQMFEzSr343Q 7XFfk08SzQEB73QD/iZP1T4KRyr3VbOdbvuvEb+qCuj1Ty6D/oD7v3K5/gu1zrjw uEfxHNnh8LeBkVR0lc5hVKrGrpXKPJnq1GYLrWOtXFgs1tI7epoWKmXd9lxc2fSf x8EUoxikpvp4NTjWnViRC6xHQ9VMvbOi6ZyzKc+CeStQUWiS3znIsOWZcA8siQEV AwUTNK1HDhhutKVJvbM9AQFIkQf/ZI4NwJwoK3xB+7sp6Fb03pwzcEDGc/swvi/z rvYgQd3asQTPkurrCjef2QKQbeKtylW2lZ45GrWLSB23oSrZkziyIsnt9/0xzMsm 1cGeT9MIrdpEMmriQzD2MqDJFBZaB0l7KVf/aLaGXuIlzt+P6Ubh+QFbGEwdlJtc oKbLXNqAOEv/bQtqAqDzeBKOHzHGhym7u5BfKXhwBFnj9BDigGCdrn7hRvQOcFnQ AMqA/ySQxXGzAWqJJV0YXhrnyPDRHWTMp8JFnB+IbfxuDtHpwpkECTPh3J75bmRR Wkyrhwwxg4ATplJpRhGOqgqdZQWd/PGz4Bb9GkeP4D42jPQlTIkAlQMFEDSqirHk Ybn2j84RhQEBEpAD/AyaYow1MOxmaH5bCtVAHG6J2fsvBD7y2s1C1+GHaL/h981G NP/JjMjOZZJEIUgQQsaXKihHlk3c9UN4mSMU3jEA5YJhfeouQqWirxlf3jp6fzOI McY6qiF3lnqtMMJD7xAYkHHFLcDSrXMr37+X8l5NMaX7ecDxZhX3ci9LIoIZiQEV AwUQNKmVm37wWOhDIxQlAQGJigf/S0Az1YtdUQAitCx6VJ/9/9LRZ9bA1NQLe6OM waztjSOvTa98upy3Rra5WPYsv6QVM8YnvVZGyOmXy6UmvaMUErg4bw77wM6sPjru rAWJwQNR+ZQzdYwA6vk0OhNxvBDSVAMWBDkhMMRZQ/ttiuG3MmjMetXozl7jnHTa X+1hKxcJd3mr9wPByICxd7CGe7MDcrjM6wb9M0uaequ/VewHLUMpF/Y7VoLcDCj8 twBvdEPlS0LkFbAf8athcNhtepOheUw3KkZQ4KoWOexfszhFJP8iE3OVxMgp9GaN vEQQbk3iVUrvqt7ofF45OaSnIpzek02aVdpfqcurZQjeOLrYvYkBFQMFEDSpFJA2 fBamCi+H5QEBAfYH/Ry4jHhlY97Doma3KwMzSO61jkw+6uaLZmA885ltZJoEkS7n Ojz6zYUmJOvgA0Se2OcvJmUCnK88Qu/mQ6MduK7r4qQLIG6JjHGLzrpHMmJRTPJf jiCHGrgIT/wWukaeNwv+NGkOlrzcIp2SJzF2zb4QzHiqqwUs4gqCZxGkaC1QCq38 DsbyQ/GIeIl7g8WxzCKVJVvGTFR2/VRb5fVPnkCZJa47nev9YpxTnRDv9A+RKSG0 33OwKbZCK10sUHtEndK6HCozFpwtf72Q7CK+vuY9bl5d/WoWkEQ7s5QCNih8K8TQ 4Swi2Cba1+/QqFgyt0SFLYTctiZzk1eTnr9hPRyJAJUDBRA0U8SOeRaPkdpiClUB ATabBACJCOFjgP2Gv4hGVykF6OzytbmjkTQ9FoPNucsQe/KTKUyUiAyBxTIqU+b4 T24BPWXK91ecP+Kv4qWT+1MHiVrIsLJe8T4RYONNdpystIaoqLvYYSNlUA0H7daW 9hS7hvUMCfvWQlUZF19L/5TS9516+t8r2IVh3H4ba6eljcxLlokAlQMFEDPzSFOo bpJgSifwFQEBzH8EAKK4F5vNleLRLwE3Y1fha74WAUEQJrzhe5FMWUl4ViFwO4hv l/zEuFzDXJAF0CAkrgrs5APK2cLV9evKUokk4K7/WcxtVTEFkzj+AlLUKeIEh2V+ TJe1eNUBQz94aW2xtp7HXX2Hce+Lgj9BUjEmS5N4/vMxcaQXfn+3rK3BssS1iQCV AwUQMZEKf7UNAz+kLonRAQEhhQP/W0IcgfWlol6R7hxADisr6RKo+Y4YvA/lkVJj Ka9D466vMOA0pBiyOkzSjj3VBbtRILrv6AWrbt5vp1/ovn06+PeHNb6Ta8yj1DPD Gb0xMe93xbqSXgCAv6SPTYIZH4FN8S7wfy27vEs4n6AKLqDg2OOBOT939C+iK2rM DDM015KJAJUCBRAxANRNOaQJrWw8XmUBAc1cBAClLLFbYVVLyewtsdKzPquf2zbZ btPG7Vv1jeWCoKusWQHMlu4wFZXaTGZOQ0mUzxUlZcu6bAl+VwbvAtIxHunvNvN2 QtGuWp+Uk4HFSBvhX8fLfIRjKj+Zv/bffi0kxepQXSxh7RJXokYRhe2b4/YmjIeO Rm34eShgFbdY6+MJXokAlQMFEDD920zlFSglMxzaXQEB+aoD/ijK1ER845SQhw7J SKZnwOGiTRMnoefn46d5NorVbFU+Btp9I4Twz7Skvua9smd9CCeIgmPCAkEZBi7j JOH4XZGNCEKkJ41Zz9Q8fjnl3W/4i4lCgtnQnCq2ErO0UngCaqZr3k4ATytZD+02 YO3ZJ0KWJRuqRQQ45prwt/Gq8BBctB9EaXJrIE1leWVyIDxkaXJrLm1leWVyQGd1 dWcuZGU+iQEVAwUTNO8TntyJ6pO8IcItAQFQ2QgAirJqlbSJdRm9uA6kuqrd1jDA UjYjCagLh2yBVdG+SIDyZejLFROrpQRCPbdh1N/V+jJY5HQHqLz+Jpi5QHOn3+VJ evGfa63/btCd5LwhZi0nwRCmw3xhHulm1Nb2pQVJ7+172zd3AE38lmdnnzMt/1F4 3vG0r68jWkr9WDIXvsrtC7E1gyfvotPnmAk/PG0cxf+cgMprBJpH8xnbWGpdtQbj sNo6tijd2KYR0r3qWoeMEdk4JNIdPWd2JW9zGIlYVsHeTBZfjwO+IbsZ5voS40fk cZJXRQqMfxnp89YUYBHJ1lMFHNflwHHxzuAvEa5NN73jQFfumLxJNdnKlHDEvIkA lQMFEDS2lkvlFSglMxzaXQEBSlgD/3PJnW9pwAyQewA4q+wmQ8WTucGL4pQXC0lU mbGoXh573Kz7NzKPoW6HhFcgWa0jcBJ1UKyLBppuS2jhHe3V9a+fPLX7fYzzQqOT D9hLbp0fCGwZzE/QSvKA3AHhUBTppSVIN+vRMa8Pw4kFOu38mgJFh6LWQRGK30dT hz/smT9GtB9EaXJrIE1leWVyIDxkaW5vZXhARnJlZUJTRC5vcmc+iQCVAwUQPEvy rOUVKCUzHNpdAQHDMgP/f6VLtoGILhjPafrfeE4009BC3JCjdi+B1voxbXRVyb6X 2oXNGw1tpm6S13vrhS3T4ob4MW9+uyj2idyHQlQXkZmTs5P3mEoGXq4HzYC7WHZD pQ1GrF+sshid1XDjej7bCKiVUjJeMyrdI3uD+cgu/kWDc5GC0HFy8+qqutUKFyQ= =b0g6 -----END PGP PUBLIC KEY BLOCK-----
D.3.69 Yoshiro Sanpei MIHIRA <[email protected]>
pub 1024R/391C5D69 1996-11-21 [email protected] Key fingerprint = EC 04 30 24 B0 6C 1E 63 5F 5D 25 59 3E 83 64 51 uid MIHIRA Yoshiro <[email protected]> uid Yoshiro MIHIRA <[email protected]> uid MIHIRA Yoshiro <[email protected]> uid MIHIRA Yoshiro <[email protected]> uid MIHIRA Yoshiro <[email protected]> uid MIHIRA Yoshiro <[email protected]>
-----BEGIN PGP PUBLIC KEY BLOCK----- Version: GnuPG v1.0.6 (FreeBSD) Comment: For info see http://www.gnupg.org mQCNAzKTzO0AAAEEAMVsAcUX89qHkwlI03RlAYBqQa00TFmgPwZs8sWvNUqTGtlK kOXcN9WNBvwzMYtEk/u5C1HukqISnFkDW7ZKYm+Um1sQPioFHTwDC6R2HRDZBCV7 0fROlQpb479iBlr8wNAYDhOs0rl25FpE/uAXYThW9Ik/apgXN4rTGxk5HF1pAAUR tCJNSUhJUkEgWW9zaGlybyA8c2FucGVpQHNhbnBlaS5vcmc+iQCVAwUQNu4ch4rT Gxk5HF1pAQHYiQP+IoxOpfpSPg8Gr7MUtoU3WZPY/5IuKoOwnFNFcSyuhrgn/OOB pbxkYjTO3MLh7Xa+9sPigevHy/sNA4vVZdjk05sjRfAZxIWPrinRy/kzva0KOY69 u1QfX+Vx2mfq/EfMJMHP/Am0H71nOfAZsscKlb/jmuo1TxIpCUx+wWmNn5+0I1lv c2hpcm8gTUlISVJBIDxzYW5wZWlARnJlZUJTRC5vcmc+iQCVAwUQOY7IlorTGxk5 HF1pAQGQBgP+MXSjPfcnNhNfUmeLu8sM63DnrFIfRP9E+n/yhZT0wO51r2LmF4ZX YI04IJCywJiPjEpCFXNAhqDfypkTXWcbLTxX6gE5GNqii5iq+z+UuO4panpJO5OY 4H0/90cH6I/zl93EZN9wfZJghn66vgL4tDTgILdRPekIOB23JQIXsf60KE1JSElS QSBZb3NoaXJvIDxzYW5wZWlAeXkuY3Mua2Vpby5hYy5qcD6JAJUDBRAyk8ztitMb GTkcXWkBAf3zA/9sDB0n/UlsH9hzaw4r2k0FT9F7Ixtk2i/vqmHDUUcrlEqGaeko /3Q+et2KzepX981mI7N2jdClqJgjlHapGoIQWZL3Jy7ocgCXDTYwGU2cFRF7kzkz h3FyYotm6bMi5F53GamkVbYZfogLo1MW7jmqIydJNdT1oseDbrwkjvXwdLQlTUlI SVJBIFlvc2hpcm8gPHNhbnBlaUBjYy5rZWlvLmFjLmpwPokAlQMFEDKUUFiK0xsZ ORxdaQEBjuIEALtVC6fjyDiRnZ3ReckdTO7k83VUTZiQH+2cMFNd8gi+O2sZ3YnW 6veQI45VB3oHD9kzMjol3B1ld7iKcQzHC6qUEviW+mTRRN2Y26DB704FNeUrqm1A LO8NPL6iNKFvUNsu3T0ZRY7oX9a9nMmcD7M2bm6jxrhckS8hY7x1D0xftCpNSUhJ UkEgWW9zaGlybyA8c2FucGVpQGVkdWMuY2Mua2Vpby5hYy5qcD6JAJUDBRAylFA5 itMbGTkcXWkBARgCA/0RBudh/8z/HWdX0GC0m3I0zIAOiGfmnJMPkzLryXuOQsbE dg28b193QnwTz6/ASF6PLJkivcd1vREXCz3C+jHz6OGs5jUKcSf5c0ZaIE4T21Hq LPKHSj0cYxgiC0auwY46m/yfO8I0bdiM6Ki3fSBTlTmDlNhWxOQ4Ic2RamKNNrQl TUlISVJBIFlvc2hpcm8gPHNhbnBlaUBzdC5rZWlvLmFjLmpwPokAlQMFEDKUTtSK 0xsZORxdaQEBjWYD/i3EOU8lEoje9jTBHfQaps9BQgviFSaHk0G41emKszLSLnGQ BeMGZTyWda6sTSqeLKg56HEmmVGzC/nHlhwspC6bdYaBmOpnSmmzxVstcYq8oiXI mlfFEcL5DJEau1VTBP56Fk4GCffaibCTRGYrQcJz4yLfATjYsni5Y8zXqhWItBdz YW5wZWlAU0VBUExFLklDQy5ORS5KUIkAlQMFEDrvMx2K0xsZORxdaQEBTgAD/jO7 tb78V3muNw+rfD8tA+yWXw8IdC4QHCa+Ga6Uwf9nw0WD+fuuz0I2La4iaC3FPtTs 1hz1QlmrztffL3tfsePDeN59nz89m+WPW/Cu+mLY2Eim2Hm6AWKVvtxtndunOSls xQLr0uhvNN5BOzEqv2V+l0MrwadPxUrHG0izqmGJ =cmvD -----END PGP PUBLIC KEY BLOCK-----
D.3.70 Jim Mock <[email protected]>
pub 1024D/3AA4FEE0 2002-01-10 Jim Mock <[email protected]> Key fingerprint = AEEC 998D 7828 D306 AFF7 06CA D8FE 7285 3AA4 FEE0 uid Jim Mock <[email protected]> sub 1024g/3780652B 2002-01-10
-----BEGIN PGP PUBLIC KEY BLOCK----- Version: GnuPG v1.0.6 (FreeBSD) Comment: For info see http://www.gnupg.org mQGiBDw88s8RBACUCev7G9g7Bl2dxPQQpmO8jrud/oRe7Q9OyXfSl4f9hZBFYoB9 jS5+H+Cz0nnALPpCAQVpjEjUQ3llDE7XcfNTeEJrqlhTcLzPW5k/icKbPgHnbZgp qC1Brxy1sjy1qGOJSoYCkludXkI1iyt3Fw7ingUFpvTpT9gFYqgLExNZbwCg/scY 9iub1moAJTdBsva/jGatazUD/2GymldDx+M1gW3P8YqOkmn/lv8RDTjlCvfhe+xA X6hxIbasYDJAX0cNs6tJd1KJpznwT0MtRuaFq6+xmVcGTCEyTXsf5yqQDV9mGyMn B5cr7kyxArfyNcoq9DYyEhtrqfewLIA6eiPCIdyPRD9/5GpLk+9c/I5MQB1All0H LjJuA/9OTyJkKvPO5rsLSjVfhNg4FPx3W/23f9767tcOKbFSYsb5rHYSC8sP/Mim fgyqZJd2jm/ch4xU9zxPRmKIgz8mUxpofwh2v8iDtfUZwqVJCrN6RYskJCwG0WkT bhG7Hp3q4xGa48npkCXGw4NnKkKYZTU3RK7FbcwZmJYb7krzX7QbSmltIE1vY2sg PG1pakBzb3VwbmF6aS5vcmc+iFcEExECABcFAjw88s8FCwcKAwQDFQMCAxYCAQIX gAAKCRDY/nKFOqT+4FuNAKCRO4EJs5q5YNgbe12hCiPPKL9eaACg+z6prde98KAn qD/gCRvAORa04bG0GkppbSBNb2NrIDxqaW1ARnJlZUJTRC5vcmc+iFcEExECABcF Ajw88wgFCwcKAwQDFQMCAxYCAQIXgAAKCRDY/nKFOqT+4O7RAJ9pKTJDRjdP/cPo pkzTIgjhk1cPugCgp/hX2a7w26gqnvrRXCa9T0Rxvgq5AQ0EPDzy1BAEAKJwt13v YhG4P6mgwevIECIshvuM9vRqlR5MULHavyZqNOLp5M3mCr3k4v3ok8G7UeSc1Jg/ 5ND1EKw63gNh2SsetlruSMWZLEJ3aerbBBS71HIog4oGuLst3dbc1TJ3ZQkamMnk BB8kWARSzSdpjCc7ANGi/5Omnu0koknduPabAAMFA/wNcC6i3fr7SGo0kFqCq752 lkl85IdVFApLVnhz7PrrI8WMw5QaltnW8aiKDwE7+EDu8C6vQj9YQNldjVzjAnav RpvZue3K+mdrZ2BzCxOnF9PNxo4pcFwYefyPqSWnht9bvlU7DHeeykgStBGcCE8F YS6CogoPwRGC7WGYF2amL4hGBBgRAgAGBQI8PPLUAAoJENj+coU6pP7ghJcAn2LW giZk+flVW0OUFmBACgqffLtmAKDxU4uLZrS4nA3Utgiu5x+/8n8yUQ== =uAGs -----END PGP PUBLIC KEY BLOCK-----
D.3.71 Marcel Moolenaar <[email protected]>
pub 1024D/61EE89F6 2002-02-09 Marcel Moolenaar <[email protected]> Key fingerprint = 68BB E2B7 49AA FF69 CA3A DF71 A605 A52D 61EE 89F6 sub 1024g/6EAAB456 2002-02-09
-----BEGIN PGP PUBLIC KEY BLOCK----- Version: GnuPG v1.0.6 (FreeBSD) Comment: For info see http://www.gnupg.org mQGiBDxk42sRBACyzSSCLYA90zaZoMlg4zhMXhciG/YuiBZ005q0s9W9cuFFxwOM 0mLFbBHQKj5TG5TNswnf9VreRg8lRPCzgQ63atc10RU2tfa88hIjWZ4G4WEFDeXS hlj4dIA6KO93UEoJmIyR7hswisb086mK4dM9hq9FxJT7YQ63PkUYmd+pfwCgjX/y xM6+aPj0sXuOvAcVVmrnp8UD/2pEd8kxAKIaWmxOm9aGB0/E6vjZWxCk1+CO7tgG 4gInFYUnqniPB4JOXOWriwBGPx5IqWYwYpgeuoi/KeE/Wn7bRUEeCbBGEmJkHO9l 3xJuPX8JKDkGuTNDvR3SINKSzx7gb77eGorwxV7e4FXBeXOyXLxgDqDhh7Sjv5/4 ikr2A/99b5t1akHlNe1ITpuEETDNRcfu38/KW/nF3p1IKQ4Q+exSlEJzPFupYNoZ O7uD3A0YCNf3jIY52ufkZXqhqfsp6aRLetbqDcKVrZWSudAzGAEk3Q85a6Ei4mUB tfv4dmXQOLzfAFHezhCQIt5LIPJ5Dmz/a26+u0DmlfisgP5ltbQkTWFyY2VsIE1v b2xlbmFhciA8bWFyY2VsQHhjbGxudC5uZXQ+iFcEExECABcFAjxk42sFCwcKAwQD FQMCAxYCAQIXgAAKCRCmBaUtYe6J9pN3AJ982m/rtLgyiuHl1IM+/xfsZ460SACb BM7V955SU4T2b+1FW1ieOuuZEKC5AQ0EPGTjbBAEAKbxUKuiOJsAQnGKTXtbyRdR Y6BZQK9tPNXEIjIUZ94Crs9lVq/P3kyvpR/ziL+Yt3agUAELiX+cggUZ5KRzKBmo PJ6ZdWOuKLRN2+PfK1QVOQayeZV11XZAsPwyHI2v/hvjJnFvQNTEXWLZsBNnfTdx 0zi5RBNhf5Gt1hyuT4cvAAMFA/9xKQ7aKkvi+C7KafwH6B5X6lIQxRbTQuaZaqKL M8pDmVLqo3er7S1ullwMWfarQLHtlwirX9IOQN833TCDev9QeeYZZ5g2MpWO5nx4 kxEOAK6Lg+QBg4RcoLK9CpHUpLoChGQzNaDudztUixwVaaigj21O4PXFr9pmLLZk vj7AN4hGBBgRAgAGBQI8ZONsAAoJEKYFpS1h7on2XgAAnj0B9B7g4XPMXjizKVNP YLC2BYjgAJ4tZI/tGYxHex5RCeFv/fG4wN593g== =R/4a -----END PGP PUBLIC KEY BLOCK-----
D.3.72 Thomas Möstl <[email protected]>
pub 1024D/419C776C 2000-11-28 Thomas Moestl <[email protected]> Key fingerprint = 1C97 A604 2BD0 E492 51D0 9C0F 1FE6 4F1D 419C 776C uid Thomas Moestl <[email protected]> uid Thomas Moestl <[email protected]> sub 2048g/ECE63CE6 2000-11-28
-----BEGIN PGP PUBLIC KEY BLOCK----- Version: GnuPG v1.0.6 (FreeBSD) Comment: For info see http://www.gnupg.org mQGiBDoj/ekRBACnO84k2i5lLHZKscyV8tjQSkkr26hasdbc/uyV7HTiPhMUjEAz Pamk+bDmy/Ls8k0SJ1l0vILBBd31G5VYtKonIrgp4vZ9gV0fBdCyFDXb8bh11Pk3 pEZiG9vJevq40OPvsThLKHCLNhZ5zLPp6gd0IHwRJ0LU94pouFXd33MzrwCg4gTJ K00Dw0w1hFtUsq6WjNC+1B8D/2WiEuzBMnO6gz0p/eJ1eZ7mvrBXLQZ0u5vJ3eg2 CCPrtS1ZITq3ICPDN6biEiMgtRmlYn/VYvDQqxwNE0X2yMfB/9sdah45zma9EeVn Iy8meaCFDLhm4aIYc1foUuz3WbCNlJFY5xYPXCMXLkC65xdybHKng5TXh6NOOWf3 PfCWBACPMotTRKttAuw5YcZE5VDrSXPYHu/jm2CpIVmrac7+kDj9pGH9sB7BdUxw vczqtAT0jk7MrT+u3FH9wBtEFTXl7ksGTmDOFWJgYn3ZOEaVaX/OqD89UNhrOA2v ZOaaoKMYxK/pszPdr1Ghd6BQCmYKtLBlFYiTDRM5UMVHTqN7VrQfVGhvbWFzIE1v ZXN0bCA8dG1vZXN0bEBnbXgubmV0PohXBBMRAgAXBQI6I/3pBQsHCgMEAxUDAgMW AgECF4AACgkQH+ZPHUGcd2xMLwCfdEkPZVBgEmYnlyOKfyTSslMhud0AoKDKZNXA huNslb4KF8yKWBNRwfPStCFUaG9tYXMgTW9lc3RsIDx0Lm1vZXN0bEB0dS1icy5k ZT6IVwQTEQIAFwUCOo01FgULBwoDBAMVAwIDFgIBAheAAAoJEB/mTx1BnHdsOfMA n1xd4f7iAe6id42DLg4W3fibsCwsAJ0cT2lf08RhHkT+zLVoubyIDoY6ILQfVGhv bWFzIE1vZXN0bCA8dG1tQEZyZWVCU0Qub3JnPohXBBMRAgAXBQI6pO9pBQsHCgME AxUDAgMWAgECF4AACgkQH+ZPHUGcd2z+7gCdF5fq/lebn3/gp40O8xP/J0XFbiIA oKJP186L04qpSNamc/qG3gs7h3DGuQINBDoj/wkQCACl8M8ObSTJaOY4SgoQkKgB CkJJP5ScUpfYV9w3dxKL/77cyfghfYsnAWuA9yXJcjA0F+u+jRf8gS7OaHD9H9Mm pMGq54Aa0KUQaDbL/Jzf5zrKS/RASHzl1vYXuZB1OIzPfeAIx9u3UaziVEGXJha3 1KgTur+TU+F94ZFTi8uApq2VoNT6sFi/V2x79bxlLFr9M9yD/0+kMZKovWRODy6T gWJzzcdd//dkvKp22tNf6C2wq8Bu60cWR81+awgG2otgZjCPUs2Bwhqa5opeUqGn J+f+PXo6+m2UF21m1vLARENuumu6SXf3XqGIUiQbT6jCdJORzwaxeCiMfu0qNnUX AAQLB/9u9gZN0N0r21ZjM6ZRmDC/REouCdYHEj49+f9g/xLXCfacpWVcrK9lIrcg hxRE2mQ/nlQLeHroC3Dp1AfThKSPFX3PRD/9CcRu480imT84ljf+6vonAZ20Edm5 vVO+UoJMZQ2G+rWRRf4bDfwFoyDw3DsNmUL4yH8m2RpTxXn0pQtD2riJD8CBCXEP K95TYT4MomJ7Szg7O5/QLngfw0q6QdKRm1vEIP7r6t+UbVNp9+5g9qvz4aqm3beY pw1QCDHcqpDITnlTxTdV2SgNpF8JPg7joaOa36AxWwRzfLFyzyw/JGQE8RwJa8BN iTu0IrKuiF1biRxqiYO887GBA/8QiEYEGBECAAYFAjoj/wkACgkQH+ZPHUGcd2xN TACgkS0AGqqd2nLtWhpbE72tD660tv8AoI24cRkUa2op32mti5zfLLMsM4AZ =76WN -----END PGP PUBLIC KEY BLOCK-----
D.3.73 Rich Murphey <[email protected]>
pub 1024R/583443A9 1995-03-31 Rich Murphey <[email protected]> Key fingerprint = AF A0 60 C4 84 D6 0C 73 D1 EF C0 E9 9D 21 DB E4
-----BEGIN PGP PUBLIC KEY BLOCK----- Version: GnuPG v1.0.6 (FreeBSD) Comment: For info see http://www.gnupg.org mQCNAy97V+MAAAEEALiNM3FCwm3qrCe81E20UOSlNclOWfZHNAyOyj1ahHeINvo1 FBF2Gd5Lbj0y8SLMno5yJ6P4F4r+x3jwHZrzAIwMs/lxDXRtB0VeVWnlj6a3Rezs wbfaTeSVyh5JohEcKdoYiMG5wjATOwK/NAwIPthB1RzRjnEeer3HI3ZYNEOpAAUR tCRSaWNoIE11cnBoZXkgPHJpY2hAbGFtcHJleS51dG1iLmVkdT6JAJUDBRAve15W vccjdlg0Q6kBAZTZBACcNd/LiVnMFURPrO4pVRn1sVQeokVX7izeWQ7siE31Iy7g Sb97WRLEYDi686osaGfsuKNA87Rm+q5F+jxeUV4w4szoqp60gGvCbD0KCB2hWraP /2s2qdVAxhfcoTin/Qp1ZWvXxFF7imGA/IjYIfB42VkaRYu6BwLEm3YAGfGcSw== =QoiM -----END PGP PUBLIC KEY BLOCK-----
D.3.74 Akinori MUSHA <[email protected]>
pub 1024D/9FD9E1EE 2000-03-21 Akinori MUSHA <[email protected]> Key fingerprint = 081D 099C 1705 861D 4B70 B04A 920B EFC7 9FD9 E1EE uid Akinori MUSHA <[email protected]> uid Akinori MUSHA <[email protected]> uid Akinori MUSHA <[email protected]> sub 1024g/71BA9D45 2000-03-21
-----BEGIN PGP PUBLIC KEY BLOCK----- Version: GnuPG v1.0.6 (FreeBSD) Comment: For info see http://www.gnupg.org mQGiBDjXWqERBACDCxgN9+yMfpm3yvkYp+P4Uw6xxPdcZ9RvnTRkBX9zXaRgSPmM zeZ63LpB99uVphVZrv/EdlyTf+cRdz6VXXRcTBloA/FsyY86IluBnWCH054WyXzr 7az5WB9yDbPnlwcSL919bq0UqTuQUlQswdQAoDQG5LNNZNa0T01ydYtNlwCg3weS I/nEJrGCXGy2wrjg8LiwQ28D/Re2JHQPTYqDEZl6wj5U83wT55ChnTrjPRbGmr/C UdJP6CZQg6+DXYGYulcp3oL4btcdFDRFglJzmQNkUYmqiVC20SMVKUctrOCAI60P 7VE40UtXz9EounPSRQQ1lSdMNeRwrZ9o7IcrSj0EBw8lw3d2WxyM2Rs2crZWfOI2 mu8dA/9LbmAw5sLk5Lo5i41nAWP76pyuGxSia6zMRdML6ynoC5kmyrI9TwW5LNU/ Lsq1Ru2XSA+CwSBpTt0vdwS88dDwPGxRuUHhWVpa1M5t7K7uYODB1cD5AyNoNnR/ lHpxfPZOJNdA3OPgfssN9K+PIuhbBU5xONCoAcdC9TEqSezfUrQfQWtpbm9yaSBN VVNIQSA8a251QEZyZWVCU0Qub3JnPohWBBMRAgAWBQI411qhBAsKBAMDFQMCAxYC AQIXgAAKCRCSC+/Hn9nh7n1bAJ4vkEQX0JkcYgltt0Vv5qkS3bGqNgCguxfhuEzZ vBzpAW9/XdstjA/DSPS0HUFraW5vcmkgTVVTSEEgPGtudUBhbmQub3IuanA+iFYE ExECABYFAjnly3oECwoEAwMVAwIDFgIBAheAAAoJEJIL78ef2eHu7RoAoKn5Lw0y C+/lju5+pV0WI5dmxTzxAKDJRtsRSTBcJ7ohvzztxZqyjfSK+bQgQWtpbm9yaSBN VVNIQSA8a251QGlkYWVtb25zLm9yZz6IVgQTEQIAFgUCOZGiowQLCgQDAxUDAgMW AgECF4AACgkQkgvvx5/Z4e4t+ACgnr8RmYw81/oC7MKS2CSoFb9cg6sAnjKay6ho 14iMG+YcFNbjxwGvSE9EtCFBa2lub3JpIE1VU0hBIDxrbnVAcnVieS1sYW5nLm9y Zz6IVgQTEQIAFgUCOeXLZwQLCgQDAxUDAgMWAgECF4AACgkQkgvvx5/Z4e5+zQCf Z/09J5FOgAqw3UrTTAzR6QWicG0AoJdlBcdUltEO4WV+q3FRlw4RVnA8uQENBDjX WqwQBAC09OxAmKbGn9FETdMA/5abvOY7JgNcFhQutEVnJ90mF/npBucWkCRbOr83 t+NB0h5Te+lV/c+mjPyOemfWdAK4R9zQsat+ZqATv4Vgiy0UbJ/5TPfSraNK+QkX nxcDrhpcJXZhX6VYzbWdRSn8xSZzPT19qq0BFafz9UhZKXnLDwAEDQP/dpZe0jWw rED/Kbyr8CDoEKuun/5gPi5xmNz9iJlyvcsdOgok7yen0HHWgdaZAGX3GzjpB5gA aISX/kK66s+NeM1XQ7YXpcI8naf0jPa6N3SNWjLf3xPxLbMk0SyaGnrnSQNikk/H Bk2Nqyn0kcEaaBbdfrgkuuQWPnBDrq2EdOOIRgQYEQIABgUCONdarAAKCRCSC+/H n9nh7oxxAKC+gMyhZmSZdTvT3a2Y0RDOx5kRLACeP3JEvGZAZuo1sJeEw504+jr8 1Xo= =M+Al -----END PGP PUBLIC KEY BLOCK-----
D.3.75 Masafumi NAKANE <[email protected]>
pub 1024D/CE356B59 2000-02-19 Masafumi NAKANE <[email protected]> Key fingerprint = EB40 BCAB 4CE5 0764 9942 378C 9596 159E CE35 6B59 uid Masafumi NAKANE <[email protected]> uid Masafumi NAKANE <[email protected]> uid Masafumi NAKANE <[email protected]> sub 1024g/FA9BD48B 2000-02-19
-----BEGIN PGP PUBLIC KEY BLOCK----- Version: GnuPG v1.2.2 (FreeBSD) mQGiBDiuMYURBACEgL3d4mL0pojugj8TZFEQef+MKkXB3lazrqV2ahgWqt6K24qr 5fZrGkI8vxmYR4VkI1eLfe0Q4LoBZifL5nJYEvMvWPmdLuYjp4iwjgBdzLnwr59+ k8+T/fohGDOqx45voCdq68Jmxg283zFGQ4FChMP3ZMlOPmFRIp01C84xxwCguNFG BVPeuM0y7JH0ucRygUqc4acD/jfe/UEjGBWxOCfZYOnXEp4NXWis3xRyUDO3cuoG 8M8MEmg0dX0onFuNU5yrEBFtzPw2GO6DMM8h5hJXdSWkiyusn05PGk/jVSP9/MD5 TYyqKL1tG/fKUgtevZSi7o1x/N0bgIBqmzd30Cqx29p7juVV+SBcKCRT1qloz6fc a5B6A/wJD5n3HOAStsWpZ6To/Apdb4A3PD4+ePfQxSICsHCFg/M04FkrG48So2qc 7dSq6UH3xLsoiRIUonwCQsT+PaQQMrZNKjfal9xlEFfw1TV/squ+oNE8E24Lkzxt 8Kkn86Ec5uiUlRulSMG9HJuWM+9Qu7TF76FWP8llVp6ELkYCGrQhTWFzYWZ1bWkg TkFLQU5FIDxtYXhARnJlZUJTRC5vcmc+iFcEExECABcFAjv4RDQFCwcKAwQDFQMC AxYCAQIXgAAKCRCVlhWezjVrWUEIAKCgwVSawCg1Lzrbf8uZdMAfeOWFXQCcD7EF tsdhbEV62AOUeQQWPr9de1O0J01hc2FmdW1pIE5BS0FORSA8bWF4QGFjY2Vzc2li aWxpdHkub3JnPohXBBMRAgAXBQI7+ERfBQsHCgMEAxUDAgMWAgECF4AACgkQlZYV ns41a1lUuwCgsIhWJdtPBebkV6w+NQ/8jlkJgrwAnj9lZkiTAgl1E/vcF7yPbY7f HlHetCBNYXNhZnVtaSBOQUtBTkUgPGtkNXBkaUBxc2wubmV0PohXBBMRAgAXBQI7 +ESBBQsHCgMEAxUDAgMWAgECF4AACgkQlZYVns41a1nv1ACggYgtKhaprmMs30oz yoC0NatFJ44AoI0XSPh2G9zHEjF8AyYAe6sVCLqvtCBNYXNhZnVtaSBOQUtBTkUg PG1heEB3aWRlLmFkLmpwPohXBBMRAgAXBQI7+EljBQsHCgMEAxUDAgMWAgECF4AA CgkQlZYVns41a1lYRwCcC8l4PdrwHKNrZlTW6vod6kYgR3YAni8iLUZW5Se6nTH9 WuN0XYPpZRG5uQENBDiuMdYQBADVzBBn5+1UQVCLS51y6eCD3TidT/uJAr+eeiWZ IbTmXrltNm5rGs7OT9QYNLhCFFPYKJxa9hFbrGpgserEFnqBfxcbMLa/wyIm9m/l MI+NNCAU4IpgDWtgjf1kjzwnJPwH69YzcqS2jlEKIjkCrEa/Bpr1Nvo4aLvqlTR8 tJh+1wAECwP/YBMEMx/zgTvS3Jtji6nPceRe8icGRHb4SD7MVF/WxYu5VK7wlmuw 9I9WXnHyYaL4c6Q49FAvwhkppByqJFL0txyJ8+nNa6H5mit8m6dcsCMG3NzyvxBP 082h/MWbJn3Xdg89lp4UG3UP8sV1oWyIchd8rqxFk/EVB7fVQWNz/gKIRgQYEQIA BgUCOK4x1gAKCRCVlhWezjVrWUlcAJ467I5lFNlkwcENe5vND+DPaWyreQCfddOu 6Va2/bf7Ln4TKyl17uRro7Y= =VmY5 -----END PGP PUBLIC KEY BLOCK-----
D.3.76 Yoichi NAKAYAMA <[email protected]>
pub 1024D/E0788E46 2000-12-28 Yoichi NAKAYAMA <[email protected]> Key fingerprint = 1550 2662 46B3 096C 0460 BC03 800D 0C8A E078 8E46 uid Yoichi NAKAYAMA <[email protected]> uid Yoichi NAKAYAMA <[email protected]> sub 1024g/B987A394 2000-12-28
-----BEGIN PGP PUBLIC KEY BLOCK----- Version: GnuPG v1.0.6 (GNU/Linux) Comment: KUHASIKU WA http://www.gnupg.org/ WO GORANKUDASAI mQGiBDpK8uIRBACY5SwFQXiqzDlO1k/syoFoiFIFl/Dp+QmwK2oovIvlBVo/1gbx EhXrKRrfC67KSxxdUsgN290v/VVTmq8Opy1/RF+RAdxM3JrUfkcm5+IBWbSUfXFP i8OXBVgh7wNENVtwwD52F+0CFIWZXkClaif4DGkf38V6LJ6hBIycxuNDQwCggXTT Kj5SP2hFC0ueyQtPDoJEgbED/0bPL9R08io82IQqksOR9IUy0OdFJkLVWLnollEY LGjXa/AHgE8L8oWU/2eF1WM4JrtVRdcKe0Ja2e9LuH6IonGAdwqUeeAOwA/RdGj3 63EglH5ugv4rZZKWZ3/piuNXvtq0bhAfl6zBHi5iUB4bgPVoVJGn3VyykPWxdqfX sT5+A/wIml11cFMogN3RXy/2Y3JRWeBtUCfdoRjeQPgK8++krm2Pr/AtHgcqNSjI W0slX4cLou2TEhV3BHb/4npsdaY0BzYgL7V1YggCv0Pu1s2D53Nzi30V66SRP0BZ OlNTA88WdMfoF3ttb04swSenG9X8dbpyYEdlvxNbbKKbUiBORbQxWW9pY2hpIE5B S0FZQU1BIDx5b2ljaGlAZWtlbi5waHlzLm5hZ295YS11LmFjLmpwPohXBBMRAgAX BQI6SvLiBQsHCgMEAxUDAgMWAgECF4AACgkQgA0MiuB4jkZz3wCeIi857V2zyRA7 gRVsx+DcoCLeC3YAn2G3gFd+v14iZHXrPaqpd1gSjjayiEYEEhECAAYFAj2pty0A CgkQFwU5DuZsm7CchQCfdD/itI8d/uhmH9A0upJYYoYS46YAoOAfpFKvAGe/vBpw dy40SxBG/qELtCRZb2ljaGkgTkFLQVlBTUEgPHlvaWNoaUBGcmVlQlNELm9yZz6I VwQTEQIAFwUCPai4HwULBwoDBAMVAwIDFgIBAheAAAoJEIANDIrgeI5GKx0An1kh KzDAfR7Fzba/V7DHq2BRLcRQAJ9nZFgBncerxFMYAanwJruIYtPnJYhGBBIRAgAG BQI9qbcxAAoJEBcFOQ7mbJuwe4kAn1E2VVFpLajGFYgipCmMgpxRXPmxAKCUa/ee BEW5LPNf8xhaeIGlAtPZm7Q0WW9pY2hpIE5BS0FZQU1BIDx5b2ljaGlAYXNzaXN0 Lm1lZGlhLm5hZ295YS11LmFjLmpwPohXBBMRAgAXBQI9qLhMBQsHCgMEAxUDAgMW AgECF4AACgkQgA0MiuB4jkYrnQCfUgkHO/ioUTHeBtYJHGeL9qthlnMAnikYzk6K gDV8cHI/ETcNoh542Q6piEYEEhECAAYFAj2ptzEACgkQFwU5DuZsm7A/JgCgvX8u hjU7WPofTfM2d11+j+ywHm4AnRS8iRNMqbP9+crcNzCRSQ7OZFqluQENBDpK8vEQ BAClmz0m/wuG01nst/7X+riyNgZ3j3oRurb9Fg2pb7wkci6nlhzCHTcFNCZiY1nS Vp+/3tRkC7HQPz3zhYo3ieCf12NUweJ8jhbZubp1fYY9ubKoj12I+LXTfZf3kA5G UD/n1nkAqxH2yP3eVz1BpKUc+Lz+5USiDo+XfrvfxQcZHwADBQP9GejakrIdVKcA /4UTWnMh8HK2b7tDLwLKyJg/8lagBkIAH5tPpCXi1qXuvHe+T9SjbdwW/lyxSARV FAz1ejp4QEWsAGQ/pchjb+S+iYvNq0VfzkZPqFFllLMaQc9mo6blgGgSEqLNpba6 gDmVTJZ5jAhVxFBhRPwchSdPP3ewVRWIRgQYEQIABgUCOkry8QAKCRCADQyK4HiO RpwtAJ0alZHYWdBCXaPF9G9HCl/T40wzJQCdF5K4aEEsIG1P0WmNjbY4PEAVndc= =NZ/b -----END PGP PUBLIC KEY BLOCK-----
D.3.77 Alexander Nedotsukov <[email protected]>
pub 1024D/D004116C 2003-08-14 Alexander Nedotsukov <[email protected]> Key fingerprint = 35E2 5020 55FC 2071 4ADD 1A4A 86B6 8A5D D004 116C sub 1024g/1CCA8D46 2003-08-14
-----BEGIN PGP PUBLIC KEY BLOCK----- mQGiBD87tOARBACkfv0/19ar/kUNsj2vL+APjo/cx0A0bubEmaPhwNuLOjtafdNm /pUULYi28lDVDxQJ8UM1voqrCcue+finCyy+k2L0nR37tlUA4t/+GH4gq4y2xL7S o/D5DqHDA0cTDAIQCbdD/rj3Z7nJw2Vkn3tAwZ6NUXV7OdLS+csbpJIjmwCg0HB1 tzahpgegUe5XauCly+NXNMMD/3UcnNA7kBKSZMcuOVq7TkqYYvQZPoroK3yYcAZL Yo4WoPEyjtlD/ZpZVysQiSMxLXRHjsEbMAMZL7Tx/Sav01XUiBHBGDHXaWWVdqmg efxtBeoG7MZxAAXBLfcSeV0bjkd9oGWW/inHrl0NgEljZQqo1kbIEb5asooyT18v vZgjA/9l8xZdOlSJv7Ct+VGrfMStMmpBCn7IRSjeJRq2pNe0pbJtzXAnAwyrB62X gF6n7ONKdLk/WPihRdfrc4BZnNIWZU0q5P11rOENQEnToprAOYebhmS6cY0lx0SR M00HVTTgzsNVWDy9h+uOobicBSHPh2La7KGnFRtMb6pZFg5Y2LQoQWxleGFuZGVy IE5lZG90c3Vrb3YgPGJsYW5kQEZyZWVCU0Qub3JnPohbBBMRAgAbBQI/O7TgBgsJ CAcDAgMVAgMDFgIBAh4BAheAAAoJEIa2il3QBBFsAUoAoIGf7gn1DPL+Miw3/2W1 YdJPT3TjAJ9LOVjgV1mZks+FjRdl1IETcJ4fPLkBDQQ/O7TjEAQA9yIaEvU/Vbj0 L1xFjIOGEyM5vFvn5xP2LibOI7hUH+cMDaWkBgrSLqsI7k6P3HSTVWpkKUTl+vJe OJnIx1gFE/WJDPK5trnjzHQI9kWf6j8EREXCFuuvDy3QhuJiHTjB+I8IVYh+oiXl 6SNo0ekvQd6KZlkPUXy8rczb8Y+A7GsAAwUD/iPYrIWC4xSX8kL6HFjaE2fS42EW iyfyb7slFSE2xtRf+xZyBa2Mu5XQsg+vJcSBsjrxpYdd+OuyTLuYRsYvuLZnB65H tTli1/ous2J56useJyeik9wJfFyZBlOtmw1QFLxELly+XgKiyGRNkTrws+smyFjC GWwhlhc40r824oWPiEYEGBECAAYFAj87tOMACgkQhraKXdAEEWySXACgwFVr9ZgH TYnmgWGXAmQWvJV+xAQAn2HlGDmOpuTDzfO5PvXOOWnFjvIt =bcPN -----END PGP PUBLIC KEY BLOCK-----
D.3.78 Simon L. Nielsen <[email protected]>
pub 1024D/27359A51 2003-07-22 Simon L. Nielsen <[email protected]> Key fingerprint = 912B F341 7E90 2049 05B4 3800 87DA 5C0D 2735 9A51 uid Simon L. Nielsen <[email protected]> sub 2048g/C11D9097 2003-07-22 [expires: 2006-07-21]
-----BEGIN PGP PUBLIC KEY BLOCK----- mQGiBD8dLTcRBADMsl+DCPR8Q1jwimfBJcaQv+oSW/gM6H3hTbIdge6atmkmqPCd KsD4DO56upi76h6SQSIiJbzKK+FVJGXaIhpBQ09obulObrmd/EnpxJRDwkOh7Yfc WoVrkzZu2nJTRVgRzcVN5S91mG8jC080+izpBdSXFEn22gRqNmq5nOTlJwCgzG1i iVXRCkOO2AKgS4jvHn8skFMD/0vRit2WUPhcrvhL15JfUOuRpG9A8h4uqBxeK1pu rDX93XFeiBmGdi4cLy6D5wyJwkp3biojiHhTeBOQqNrwsa1O1Jg5OVXR6vT4KFcV goItGZezSJk+e9BmjhiOgaFiWuTXcvyBGv/hgGNAeW5UY/gA8FH7Mu/FbqGDAsGi DJFOBACJIe8UhdiK4QOUrlAk3OoX9UrgCmBQwwxBZKkQyjKgeKTgIQ+jnjiZ3Azj eR9Z1H4Y80BGeCoZCe0l0wdRjm4lQVD8gk7wp0Ru5qBhxxV8cQIhyRHzfgt58UDl jAnAk4bvfUtHApx+G3bVh5jhvEuGLnZsB2d5XNqZLMEMvcCBdrQhU2ltb24gTC4g TmllbHNlbiA8c2ltb25Abml0cm8uZGs+iGQEExECACQFCQWjmoAGCwkIBwMCAxUC AwMWAgECHgECF4AFAj8dMhkCGQEACgkQh9pcDSc1mlH6LACfRWO9Uv2sLEfRk0lf DbBuo6BZl2MAoJtKCZRBW5GOdLUvUWLE3p+YYxn+iEwEExECAAwFAj8dMioFgwWj lY0ACgkQ8kocFXgPTRwyMwCgxHTbtWznRLOuvDtUGKD//6IVGt8AoIV/yqC4/eMc To/U23AXnVMyUlRHtCRTaW1vbiBMLiBOaWVsc2VuIDxzaW1vbkBGcmVlQlNELm9y Zz6IZAQTEQIAJAUCPx0tagIbAwUJBaOagAYLCQgHAwIDFQIDAxYCAQIeAQIXgAAK CRCH2lwNJzWaUZARAJ0d0KQu1jQh7j4tOs/4jnJXPe4D+gCfQVlNR6jR9cLwVB2x WDVzWqPG1WmITAQTEQIADAUCPx0yKgWDBaOVjQAKCRDyShwVeA9NHB1sAKCodM0f LdSyHN6pe+nAZaX1upC8TgCeKTtcl7BvRXeznP+JGUMUT0Qb6CW5Ag0EPx0tQBAI ALZ59V+SBIYMA6pk5gzPAxfvs9RZnLCAktE+BlssdYfsed+mu3VbcXmrtKMbb1xB ADW/Jr9JsUQIC2McVCB0ZGtiZDPxIvcLaGQAVUsN6Q/FPrT7fHuN4r+DKPB4BXJ0 2CK/qYZLrid3XsrYVc/7W/InaTz6skrIwfykggO4e5JNNd2hraahihQWurHJEQq0 4leB+gMg4KBGKD5dc+M/Orw5Z9jhsT/+GkAQlwPsBVvNXks9RnLldkL5N7CDw7jL 00RBJnASNPJp44zKPP4mMtFNOoYmFQVQGC7Qt+yHalGhdFR2qnsshz2Tm3BuNvI0 vbSRMxJjl3W88pCwpgZvOEMAAwYH/RcMNwpjDEhXoyPBwXIGRPerP1j7ZLMeGW4N cakUorZ5Qt/m2H5n0WAjVQaoKs+l+WYTpyGcg8ilFcBQjVJM9g9oWaGi0X9VL2XE JXtWu8F+epXRzfZSoj3UFk0iT0ut0ckrjaJKvkMdvrWfTlu2l1TPbG/UjlXoY6uJ Xgo85CwkaSgoV7HEUyr7CI2LLbnwGNw0Ugx6wU+lZoPqUylRCf1wwEMokyo/qHx4 dlsELvQlfG2sOrX5ogwQcU05FwyWK8zZC5XynrMEXYt1aLlgOrgO8RTac47KYw2z SSRvRPANpgRZ+BGJtPvWl5gQRV+vohxgW2flWRNiqKLJ89Kmm0SITAQYEQIADAUC Px0tQAUJBaOagAAKCRCH2lwNJzWaUazaAJ9koP8M9azeT7FzlMv3QTihNQfn3QCf RIjHFx0IpWJIGdTWrCB3m02y35Q= =TWiy -----END PGP PUBLIC KEY BLOCK-----
D.3.79 Anders Nordby <[email protected]>
pub 1024D/00835956 2000-08-13 Anders Nordby <[email protected]> Key fingerprint = 1E0F C53C D8DF 6A8F EAAD 19C5 D12A BC9F 0083 5956 uid Anders Nordby <[email protected]> sub 2048g/4B160901 2000-08-13
-----BEGIN PGP PUBLIC KEY BLOCK----- Version: GnuPG v1.0.6 (FreeBSD) Comment: For info see http://www.gnupg.org mQGiBDmXNAsRBAD0WcmPy11DRvDsEpadBPCATmPrvAImfj5XjcxBAJlBJoc9fiq4 8OcnipVdId6STdVKvB3K3h9aNsb75+rD/W3nMi8MumjyXJoHAf8d68cnjppizcPd uQPOy76lkbiyV9OYBtaNQqmU8hE8MTr5Kew9NBCoC4SB4NX8kVh8iglrZwCg8J4F ltBYDz+Z5ZGoh54fnYN6IAED/jO7ISCvWbFtnzCw1FOghcgueqrWoy0OYKq8ZfuO m046fuIlHcswJOKLLexTajsYAC0WWe9H3SvKvv1etexMh5SsrgWTsSuIvlPfG4oj D5vIYqvH5NiqJdh9qiFEzGsv44jgESDVy9qaErbXRVe9htuRZqbtEPnB5cRRwTr1 WhfuBADW1VLXj3UGw4OeBBd5KPIYXCx7RKS4nfrlBCqMcIaiD+K42U+7PXEJB8uM 2sJ6uRYs0j4tTLBbDC2TC1QfT5NIVLG5wWkIh+jL7PODH+i4LF8n0pQyuLwJOFAx s6RIHNPB2fdI5sqB9lMIBszlb896wVJf9PPWFAt/5Aekw7eTLbQiQW5kZXJzIE5v cmRieSA8YW5kZXJzQEZyZWVCU0Qub3JnPohXBBMRAgAXBQI76xZsBQsHCgMEAxUD AgMWAgECF4AACgkQ0Sq8nwCDWVZnYgCg4fzk40pYLg3iNayO9dDNp4yHS/MAoLi/ WCYhNOS0TMpap9SQXC/2e0MZtB1BbmRlcnMgTm9yZGJ5IDxhbmRlcnNAZml4Lm5v PohXBBMRAgAXBQI76xekBQsHCgMEAxUDAgMWAgECF4AACgkQ0Sq8nwCDWVaoNACd HR57Uuyyti+OqVr4zaVEIgg+bYwAoMcFR3xdqArQmp561541p+k1IBUWuQINBDmX NGsQCADRkDqg2uW9mn5YCXlzx9KlhAfPRny6kF4+B+ga0ZaIzJng2pY8EsAxKn88 yH6ERs/PYdsy/AyksG8vzuc9CalW8JFEc+kvtJIL0HhBonlInaeUWHPixGEcOPcW ab8dPhW3zfEgOqquky21d8Zg+G3Z29tmKGcYKSQgt6W59z7vITK7+gv7tOGp2IpZ 1kGqPZn+JqvB3n/uWo3rTxOGA/tduMwfESA5gHmEzKmU/17yIkE0SflKOp0VIGdl Fp1A1ULJDDVXjtDkxFvZ1I+WpqF7p9FCgy/OHUfUa0py3uHIEKMahqpAZ9e8D+GI nGizPR33ZY5PfM72ABXeGhFnweP/AAQNB/9HPBzxoJJFJNLyosSlI+Wkmh51K/nC EawQG6a+tgL6cPHgJQkgthPUywkI+2g7SUSurgPz0hRCPg2PjHP3PwVhjKzUgfAj y9eVnu+JSpst/a0Y5LEQdNnwG+Y+Cs0q9xj4T1VXw8B9fA3y1wS1a13zCQjfLrZP ziIGjHIBvpOFrSU3ML1rRaVfQpm2wQXsGHzjkaZq7HQy2EOVLzik34XkPBY1DrnY nSEwSurfjTrKTLNYsN53xCGwJ2w2347qXr04j87XhRmGCJQ/Nrrin4z4LQ/zNm5Z bErlts8PAfR13kqP7rx/H1n5obhpOoXUqb4Rm94c0r/s9JRah9ppgADRiEYEGBEC AAYFAjmXNGsACgkQ0Sq8nwCDWVbTvwCcCG0X50Tq7V4NeGgREttltmR7UlYAoOgK 1OFsIdCCq6JjrwvfN7ry3pwc =clge -----END PGP PUBLIC KEY BLOCK-----
D.3.80 David O'Brien <[email protected]>
pub 1024R/34F9F9D5 1995-04-23 David E. O'Brien <defunct - [email protected]> Key fingerprint = B7 4D 3E E9 11 39 5F A3 90 76 5D 69 58 D9 98 7A uid David E. O'Brien <[email protected]> uid [email protected] uid David E. O'Brien <whois Do38> uid David E. O'Brien <[email protected]> uid David E. O'Brien <[email protected]> uid David E. O'Brien <[email protected]> uid David E. O'Brien <defunct - [email protected]> uid David E. O'Brien <[email protected]> uid David E. O'Brien <[email protected]> pub 1024D/7F9A9BA2 1998-06-10 "David E. O'Brien" <[email protected]> Key fingerprint = 02FD 495F D03C 9AF2 5DB7 F496 6FC8 DABD 7F9A 9BA2 uid "David E. O'Brien" <[email protected]> uid "David E. O'Brien" <[email protected]> sub 3072g/BA32C20D 1998-06-10
-----BEGIN PGP PUBLIC KEY BLOCK----- Version: GnuPG v1.0.6 (FreeBSD) Comment: For info see http://www.gnupg.org mQCNAy+ZtI0AAAEEAMPph+5fYQ4pUXUCgsXGqWi1LuxtqSP3WC/20zlqOUq35T2e /3dEqFXB1Rbzz7rhI8hraDyGybexiO9OcQMbxSKBha+BnMyqhoTM7bmzSZCRSWtI Q3ugC5Q0O6RUkrHL3k88h/Q/9IrqCXIesMaeeWOIit7tJ9dYgWVgqaw0+fnVAAUR tCJEYXZpZCBFLiBPJ0JyaWVuIDxvYnJpZW5ATlVYSS5jb20+iQCVAwUQNmQ3lT/Z OshBzgmJAQH1XQQAjUh3qkI0ZHl9qT9cKB0luAA++27jB5muW56NhcgobAje2T3Q JRosYrHJ8HeNfp8bsYitsfxMiLs7PvRGFbYopFnkApEfGoxh9MVzih/lvDLp9UbT fUvB7SVsV+T38/Cxzs4k+mPh8CZp3ACCG2NzfmIW73fVwJdpejkPHLkq6wSJAJUD BRAzFpK2Q+yGnRNLITEBAT2wA/9Oq5mKzG/0P2q25cc2fQzqcLpLL/QqJRf74Xns Qiz8wXKrasUNpYun9NglgER9+D9t4AuZtsFI+yOfuS7zDoNUhYpkq5Zr4PGYYHyi LxY8Gzxv4Oa1atP5XMjRkP5UzyQLERAcHJwYZK/aE/wXkUu7qFspDeDTNNXZ8ddr qV719IkAlQMFEDKRATFlYKmsNPn51QEB3msD/jOwXQRYrOMzXux+dfgQNIt+ckaM tXn4+20u0Aaj3rPqMU6QIoTvsMcG147q3TYwq7pXYvdujQpbPjC3ErBnM1gh4Xvq Phqf8aaYzfUF+0rxwVbUh55VLnMC6YHY+KzjHD41SMC5B/eScGog1tojvO+qxri2 3J+6Bk/t1sNabBAxiQCVAwUQOXHPRKRQkCwJ0+ZNAQG2EwP/R3igrGUwGF2Fzadv U6trHulGwvEnLy6JF8tBstifVOubJWxzliHpB77Vf34onzG1a1yezRqRUsrzSeyX 2StbJtG9M/3hYVVSuexHzsItnqcAcfggzQs275XV+EJ2JtK/zYp0QiusmPQJsA/R C+A/dSG+7xEtyNq9p0h9VHi32f+JAJUDBRA0didEq/8HtEbzIS0BAf5oA/43tqeI pgkuyKvCg28bX0YtQBSJo64ohFsSgQN2FANfpghH8dhfQt3/AXH3jOisHA7ESTNx ZT8yxPl3T4ZhZ3VILlldeuAM4g1U/ZDS+IPJMu7Rzwt4XYy725X+fLVeWoPIuIgp vX8+8hc7v6NkV2nwBMgbRGoblAzas2K79skXvIkAlQMFEDa+UHHKbyuD/AwC1QEB ULYD/RgnK84Wf37e+5WGQbHgzUkrXXxzfFpRTEV0owBSK5KA7+qlGVQVFZJ/Qz4d EwU0EAHj72uaxVuYAa+fCaOzD/G6VOv+4r9zout8dxPYfK1RLPMg/5hn0Jqf2Ce7 33ibK8NUYtjMY5z0F5wjEdiieSsLIsT9J4dB2ZODT2Hfe7briQCVAwUQOXHPFPLl ZUzmDiptAQHgMwP9EdDJkh33cF7UQu/76hKFMc4FkTOQgvQYx2qnl4ZeYgjs4saQ roj92c0WlGbdsUP9U6lE1o0CkuMKyxsfagc/5SQlqgMiVYyr4QKRBiHVQYQJpSdD 6ldX9mmtHdaawPw2BuEke97MzHA30S1pgfsHb2x1CQ1SCEgqSU1yAm5IIzyIRgQQ EQIABgUCOA0WMAAKCRD168A8ggVe99e0AJ963AhynrQYwfkqgywJpxN27blObwCg m2LOJHiX/iBG1JYeuE8bYpdhlKy0FGRlb2JyaWVuQHVjZGF2aXMuZWR1iQCVAwUQ MsRyh2Vgqaw0+fnVAQEnxwP/adrTqBG3BsYkDcG2Um3r0LgjcrC44HSNgYrA/rDs OmeoK8pmCaefqhvEshmI/TukqmfCKMZM7DAoGCV+20kNqvsqSP5AG6ctBoM6bQxj 7oMkjLIl/F4Ryob2zsJW9ozR1lyTbo7mWiMjdZqC3JQzKOPUmJECN1UdnYNzbpAO vgu0HURhdmlkIEUuIE8nQnJpZW4gPHdob2lzIERvMzg+iQCVAwUQNmQ33T/ZOshB zgmJAQGrCwP+NNVRnjjcNo41qkTsRW8bhqhbHrHBOlAfq+3kT/gM1xUAcYsQOKur gBGNMAr3wew8ApsUz7QgatFLTgxBNX/vS6/7hUuqNJhBAwpCG6i4lUFmJKONY9YN D9tP6VhNMdBLF76yUhxORPu4vcxPOqchN/Jgkevjf9ONnIYDeV/hySmJAJUDBRAx 0fuQZWCprDT5+dUBAczAA/0fq4ncYY1FqCSqQH3nLO60kz6vmo8IlTI7cpL/e521 TqRTOK6HLXYrnVBI49D+oN99TLGTlUk+jOrHc7Y/js0IRLZkKcNUsl3JVIGith7A PaKSFkMVNF7BrIjqHIWzyPuHs1w7z3h4BmFUTQ7hc29QYlW2rgE12qvxwesQ7B2o HbQlRGF2aWQgRS4gTydCcmllbiA8b2JyaWVuQEZyZWVCU0Qub3JnPokAlQMFEDZk OCo/2TrIQc4JiQEB22UD/0LP2Xn8Pasaq1IoZ3GUSEG25y7KK+GtJ9pR/XDU7Eil NB+GvKw5amL2vjxQNbphb1TqJ/dHaqKvAunMpLbOMUUSqzzZ34orPqLcB4LCq8wy Djch1sZzPSHPxI2zrAB3AQgbS8MXMxXoFjYFmxMtBSFZc3JqrkcTvu8KMXluTBB4 iQCVAwUQM2kkQ1dBBKOknqTZAQHwjgP/Xtg4VaOoHkqVo3SF4r9MkAtgG79k7pz7 dlIlMaYGJB87flG5PpPHI9o+9txWQH4vkexaGzUsez+Jgna39lhM2h3Vi7ekRK+t a76lHOYq/6B4FD9TpLYAFIcukyVDJJcsxDZD0WRtoYkG3z0GFRIeZtV5nKdxnpdH oop1rotiL/6JAJUDBRAyxHKdZWCprDT5+dUBAenWA/93EfJZx5fuarjQ7AnQiPAj Ai95v3Rlh13+N9vC34+C7RMi9pIj6B6PnWTNbVhg8RY8S6hB91J6GrN0KVLD8yDp Y6+U08Yc47fOfSWhPopNDfqgviGw7ONmc2QCWEKpcH4c1VD2jJIr7iewfVgJAiKd EB8kQhrutuQNDNNX1dCSCYkAlQMFEDR2J1er/we0RvMhLQEBJB4D+wUr53bKlokg 6LAa57g9EfeCLZSSlLArf77vwLoaLKzsdoWLQ908VNmQZQbUt5kt3O0Htdx/zRTP kqzV2tKW0aA7D5XDWJyv1lfBuv1g8C162s5voiMKz6WyCynP8n51nRlXaSHtxWql LBBQ3IIzJXGd4AekQGBncx8o2XSYdQyLiQCVAwUQNZF2YbNaYutZnzI9AQHCzAQA hFX2gAvH07D1kO0b9Mt9p7b1MFJgSKc+P/qfx36FAOJfjWtDicsYItx2AG0g0p95 DpZRwFa1YH0qrF1pXXTlBSFwRSmozArlToNkEOKmO7LiLrDsyXQEta2X98A1zfcg +WcUB0Og/qzege2hEs1bSvIOTiDlt8WczMX9f2Fl1MuJAJUDBRA2vlB5ym8rg/wM AtUBAfAgA/9oGE45DxXJLVSpE1+8NjtEN6O8i826PWP1EkbJvoFTDGY2e0IojtSx peiCIikbSSF4uOT3B7WIEmZVyn5ajx4RCKzoRcKVfgu7i+Y57wExoZSx8VrjS05T wFQ+RbHSXThyO1HZCYdfSaaYVfrrLv5ooTBRHzP5DlSXk13nddBOE4g/AwUQOT3B NOMeMj1ArjBSEQKxUQCfY3XjdW3Yun2hWKmKaPpXDBKonz0An1Wr4nbjBvlsovrs eysWYs1ovDgKtCdEYXZpZCBFLiBPJ0JyaWVuIDxkb2JyaWVuQHNlYXMuZ3d1LmVk dT6JAJUDBRAw9rraP9k6yEHOCYkBAZjmA/9lczxVp0UjLAXM3jfErQv2dzpLDAiT QVp10pi+a8mAzPVCnmCfcNy4fQJbInAfe5FC8gxBe9DnsjLfHh5vlZzDHANpbq5P MLW5C2igBoAg0Im4RpevDhD664ZgYgB6HXHhPBSB3Gaarnpx+R6JpfDBolSg6Boi IN3q+kzftlTaDIkAlQMFEC+a5SFlYKmsNPn51QEB/tEEALKURfb7Y7metDHx5oV5 LybWyV8cTJKINUllX8HDnz6zZQ7bMYlQ0qsqRqEIDMpMk1tojT+/HI4te21uW0T/ FCemdm7leZM6g38Ne358L8jY/34iz0bIFeZjDzLoOKW5C8wtG/N88voiE0grVR3e iFEmtwWT5lRaV+DmKYQ4kXxAiQCVAwUQL6UVDceLqoSSZB6ZAQFokgP9G9xfWcKj CxbEr9TAEDsKIsNkKQKEFlfqGuAjSVWOBqEIyG0Wb1pZEQKHI379aEK9nVNSsQ5m Qk/E6JRvYENt9q5uJ9mp6+wPUVYt83YL7uv1YJJSy788tdr1esutgiAeLNmNMmOg Rw3vz8iKYJozmSyDSK/HwHS7zZ2Q9K5hpDCJAJUDBRAvoGvwym8rg/wMAtUBATFj A/9h8jSR5py9wPy6WkjsYQbml8B2fVjsLzoQbMI+b5IFYeDkRYLTnSLJKzuK8zHn 1aFeXIhD0CRY5PC9jMAu84I59iE90x95uLPAH00rSJam2gEqPovRYcinADluivOT XGAn5qN9bKlmdsFNLMIFs/rohnIFab7wG3+t+i+8YYY2YIkAdQMFEC/kX5DT8j9C J2rqEQEBOFcDAKcdXpMcMjw+uSDwNc0pjOEYkfnpaW6MKnOo0qbwALmuSn/l21+J eypp1kr9VeWKn9tcUHucBHyTzswxeu21jI/KUUIRzuQsupgnop5LyNNrpDjxbQvN uiBIX+jAVQvxsbQoRGF2aWQgRS4gTydCcmllbiA8b2JyaWVuQGNzLnVjZGF2aXMu ZWR1PokAlQMFEDH/SvU/2TrIQc4JiQEBl88D/1d/WSV3W6RwZQUnbSp1GELg5knB 87imzxf3t328/vzRRFUgAeB9qcW9fYRwdhZDs4ffUASm2fXSbXocnRdGDJMKaFZo oJpYK95vZFc0irLhI92w2RjLH1tF/W0TCopWMLN4KuqYX3PLMzQEcj08w3BcwWXw D0UuVD91d4WeljRZiQCVAwUQMfQd+VdBBKOknqTZAQE+mAQAsE8nykNNff0IINOC NIBLSQoldsWtZrO8aTlUI9Exf683zWeOQc2zijraJbEhj+9nXY6qYI7Gf+4N2eFR vN3PkAyVcBAaVHtQ/Q1/HBCjEwY2TiU05hktBSEa7M3XZyy3+YKjQlj2JSJqvA0f DI7Mv7xrKLZEi3yrO7HZ8xO6NJOJAJUDBRAxlKZbZWCprDT5+dUBASQDA/wOt72i yCcgku9VCU8tu5ITF2sbz6b2Zp7y9plW4UkWCjXHfvahpmiTRXFkc6S6WykLoyjQ Hxw8IjsGR/J+2EcdnCHzcWv4w1/COIb8lAShu9pOiT5pTdzBCPNqdCQFBlf9/S1j FPHv+1NbEx5HfkJbuwhiACy60GEpI8YLhUB7zYkAlQMFEDR2Jy+r/we0RvMhLQEB NkMD/25QwNJRTtAB9fw4b5XNcpTxBpkMNBQ5Xc+NDeJ4uXt4ET3U8tNwFqwg0DF+ 8SyeWXfRzgPiIj5A5I/DkJAPVlKz4R4QFDMtsodj0p7dpiCfHb+DOXh+B+iCT4zL us9PFL5CnV5aXfSrtmkYMrIVfXRxVYpDAjC03ZP4t0SAKWNIiQCVAwUQMpHsW8pv K4P8DALVAQEEkQP/cxwPYVHiztp1Znd+6Z3T+NCWIpJS8sPZmqc+MR0PG7BFXREV 0OjHVTT2uOo9UTNVXWTCO3wZSvWl/nOxlurMMxBQtXlrVZ83jDIeOjBEC5AKGFTh UVpFx/YcxnRFXGiZ/bErqEPiohbu9i1TYOyiSOr+PArlinqdB+O54bij8G60MURh dmlkIEUuIE8nQnJpZW4gPGRlZnVuY3QgLSBvYnJpZW5AbWVkaWEuc3JhLmNvbT6J AJUDBRAzZsMLZWCprDT5+dUBAaYZBACu9COxVsyXxjJrXo+4DdazJYgcbH8cZstQ 2VUlT9E+8ZJ4iL4H5qIqvtkp9eIiZdi2/ovv9wA0uV0MZdPS3IkqumKrz4UGbwLk Y+VMTDtJwuMztfia+qcVx/HLuZMfuTAB/fyuJLW5i9kb7X3yUSbr/9J8p+4da0R1 YMj/mKuserQxRGF2aWQgRS4gTydCcmllbiA8b2JyaWVuQGVsc2V3aGVyZS5yb2Fu b2tlLnZhLnVzPokAlQMFEDJmySJlYKmsNPn51QEBDVED/iaXSckzmJmSli4El3+R QwsKy/eT4CmwzEH9kFlYJ+qYYE3tIG7oVMiBkKMLj95Qk9wt0xMXo1NsD4PsFDOJ XfyUcJ+jl3jwGraGroVvu2Lb/0UiC9qXPmNKeYopQCrswdx5EUkAmLXA4lgfPS1g EeEPQQVKbMc2DBXhUDubqbdztDJEYXZpZCBFLiBPJ0JyaWVuIDxkZWZ1bmN0IC0g b2JyaWVuQFNlYS5MZWdlbnQuY29tPokAlQMFEDNmwyRlYKmsNPn51QEBwT8EAIVR LR03d2nr6xjGFNq/1B+o6lZv9rKHBxQqjG6j/hzUhQNnywKQA0hEucVSMLyKsXSg 0Prso1Ta9lZFqrAnqCFAiSt9Ed/BQdFYBygTUAXKkeA6cT8pe7CaqSocWYTjGmfQ 7Ol1zBz4o5JQWNOgGCkAjBxl8gbd7yjV7R2Pg8kPtCJEYXZpZCBFLiBPJ0JyaWVu IDxvYnJpZW5ATnV4aS5jb20+iQCVAwUQMf9Kxz/ZOshBzgmJAQF9QgP6A06oVvhv XESbd/Y8FogfjOKw+sr+6ok+VC5cdC5a/memKPejSj+UCVe3J+trgmmvDEorQHat P7ceDXwDFbfXxM5wLHSUXpDef+FH2g4kA6ffiTVkgNiXeLIxhSBtDSJjV69VHIki lg7M4iN5EZkoeysSLGqbV2JFZr+N5E0fn6aJAJUDBRAxkFNfZWCprDT5+dUBAV7O BACntPk0/VswGltxwnstBRS6lJwFEye/aHme58nR5teMIhntDyxY42cFxv06hGNC ndoUqPfAFALp5TIs7c56vB/m3ii1VACXEJUc7yW5APwjYSoM/Mjoz1XKo7Y5C4+6 xENKH2jpRKH+q2hjblcC2VZ+pJ/Mv/Wej+fBGkMF9n+0dJkBogQ1fjNOEQQA1ynh Qpl7E31casIlR7+zFqD/bs1LiC7be0CAxi8hFnYQ5KlF6lMfcqx+gdcuKt/FyO2d jhYeihFww2cjkfZ7bANERffofnvdkXzegqOhd0jsk7gbgEPo1fh5dJm4e0qo5eUo 0zI09wLx5yjNtWWnNM5o4YVxaa0kiC3DKdRwXIcAoP+4T5LqLm0FMXR+Uo1Sq7Mr LVn9A/sFkOT8Ss8+JSwxtk2QIAg+QvmvyGl5xmL14zn3NpLSwocFSMX+2fXBAEQz lhBz38JI59DhIbV+7XlIjsd+Id/8CFTzeSH6oR1QnBFEE0fmcGAGAAqn4oX8mHc7 bVQxrxzJlMFILts69fTdqJURKjwNuYZbO8OxelJTeHfjxc5Y1gP8DBwxtuZPVJw4 mymwl0DoQwEbrC+mKBTdyZ3gOMv0zN64KFEKQZJPfdtfLy5Wks9k1x+53vp8ZXV/ CIoDf0hvbuiunlifyyklLi8nqNa+KMRmnws7XkEmgQTrkIV26V9sRCt8EOuDXZ15 QWXwcuSRGvt0lqUztokAuyTbSNJy45u0JCJEYXZpZCBFLiBPJ0JyaWVuIiA8b2Jy aWVuQE5VWEkuY29tPokAlQMFEDm0v3AA8tkJ67sbQQEBlVAD/igpVJFYq5HGrOpV ZgL7WgAzvf5cU0hmLi+C+Tm8kF2xL3rHNlUnzzdl6BxhLXfJ0xTEADsLUifBJPxQ AwJyG+Abbf/gciaYwZn3GFwPKbRQJ6dmzBX4buq2cMzs9oKANTAIQACgkhFOSs1H FcIDaa/VNeP9ox+xcnp8WSGM49CGiQCVAwUQNX4zzWVgqaw0+fnVAQF21wP+PK9M lfIcaOAuQVMgQhsDWqlj/DdxtsxT1GOnlHp3JGxdThyxdBDrxmiU22a6216s01fN 5Ac25USeKRCcSVyG0+G/Xd3VfWDCEQCLNBwblAGKW9BEZfJhS1xOuTEYxgbmuvrl LTdvWm+MwPetv8kayhD1LM4rVovMxenaPYUub2SISwQQEQIACwUCNX4zTgQLAwEC AAoJEG/I2r1/mpuiz/IAn12Jm9/9Dv/b4gIauJlzjETOxhMoAKCQkYkZoX8/OMgg uxkmPy4tgYut04icBBABAQAGBQI5cc+lAAoJEKRQkCwJ0+ZNB5sD/3NrN8ZYP7Wi q8Zb389Qwc0JFHB9+EyFimhPHrLGgFBrZXM98YWd4wnkzqzeRKHuQMnHVdBG6z3u SJEU8Rsl4KepiujxjTeT6SLjUwAR0iG03O81GU5/otBtsqTIiJJdJD5tSPqHkuXx i7ruAF3eKlobaNFNzQYOjtdF2Oz+UfW0iEYEEBECAAYFAjlxz8MACgkQ5r/NLxCB o3xeGACgnDA4cV3ts1eueZlof0vhnhtOtVsAoMxzJZorbcesWEuFDr7/MONCn5Ca tCciRGF2aWQgRS4gTydCcmllbiIgPG9icmllbkBGcmVlQlNELm9yZz6JAJUDBRA5 tL95APLZCeu7G0EBAZECBACL36sVALZfqAh6Ku3b2g9EKMBOCzHv8hJmFHCw1uUH 4SU6dM2DeIJo2nVBaxtK4/G/0f2Ed7bQJ78C3GM1oF6LZiRQzEX/QlwZQSS8cyPT C2H1j6J8ZnOMnbytE/NFbjLZDSTktKd8+4GNe0oDTB3/juqva1OBmSsnj1NhpMsR k4kAlQMFEDZjny5lYKmsNPn51QEBkUcEALYsZckj5fs7uUzjSgyzF/2RrHJ5gGrp NBwikiy1+wdZ6bz8CQ6kcYC3Dap3iHSc9KWTn6sK5ZvYXcYD9k7is8V8zuitUrrS GWpY96qmNsCTvPSwfwIcyhYSIJYjdqmv4EnKo2mwkY3zqOV9DT1ABFLSI9Eyy8IL euhrm9jWEXs0iEsEEBECAAsFAjZjnl0ECwMBAgAKCRBvyNq9f5qbor96AKDgZmSA 0aJZLBG9IjT+Ol/eqUbFPACfZ0z5wo8X4/aD9MEAbJRJQEvGsHyIPwMFEDk9wNvj HjI9QK4wUhEC9wsAnAgPzultU4+iO6c0mhJMBgFyAwriAKCZBIHKp2TaXPl+JYk/ k58afcSTh7QqIkRhdmlkIEUuIE8nQnJpZW4iIDxvYnJpZW5AY3MudWNkYXZpcy5l ZHU+iQCVAwUQObS/ggDy2QnruxtBAQGIGwP/a2m02NL+cJ/BoIFINK9HN+mOubYU To27NN/uNyvIqUnvN3JiOv8j5/cJOUDUjEPbZve1y5izyDyw/4HxBk6OKAKWJ4tG SZOCEndBe01m1e2rczkjw0wPM4VcPVUXyt/432e44fo+pMczvtUFWQdz1inx1auG REqu6xad7P5nj4uISwQQEQIACwUCNmOeugQLAwECAAoJEG/I2r1/mpuilcMAn1Vu g9cpssNgJLaNhmD5ftmivVk5AJ9X673ovjPGPXRnlseGkldpeyrUCrkDDQQ1fjNQ EAwAzB13VyQ4SuLE8OiOE2eXTpITYfbb6yUOF/32mPfIfHmwch04dfv2wXPEgxEm K0Ngw+Po1gr9oSgmC66prrNlD6IAUwGgfNaroxIe+g8qzh90hE/K8xfzpEDp19J3 tkItAjbBJstoXp18mAkKjX4t7eRdefXUkk+bGI78KqdLfDL2Qle3CH8IF3Kiutap QvMF6PlTETlPtvFuuUs4INoBp1ajFOmPQFXz0AfGy0OplK33TGSGSfgMg71l6RfU odNQ+PVZX9x2Uk89PY3bzpnhV5JZzf24rnRPxfx2vIPFRzBhznzJZv8V+bv9kV7H AarTW56NoKVyOtQa8L9GAFgr5fSI/VhOSdvNILSd5JEHNmszbDgNRR0PfIizHHxb LY7288kjwEPwpVsYjY67VYy4XTjTNP18F1dDox0YbN4zISy1Kv884bEpQBgRjXyE pwpy1obEAxnIByl6ypUM2Zafq9AKUJsCRtMIPWakXUGfnHy9iUsiGSa6q6Jew1Xp TDJvAAICDACbUnOQOcw3s+pOH+FYx/GmyXVbPBDQt5wH/XlQQq+pRl5EVxMI+H/q VW8kvrgrY7iZXBNSdfj0RgONxwr8NBASkQndd863+8wYVBdc7x+uPi6XF5JABqh2 asmx8F7F4shq0WJ2QfLmk37l2mdBmFyhGuOlsr6Z272BbigiZQoicVXuYilUUrax hCWQ/nZZm4/Be2RaOhqX7jegPu8Zmkh1PqKoIj+HAXrhs/o21tVFojeZtc6f5Lap 0t/lhFE4Fq9VrvK8GtnuU6nvVoZv1OOk6nE9aghK8qP27OEW27OH6TwAG/SE83IX eIpoFZp40RWliVHeE66iNwsb7r5f8ZNsVtwXF7JttqORySwizWg1KlFo2odWmAGx s3n3DtOa9rrZsvPZHlReFuZG6q9C6MDBPb7o9wPVFr9AbVA3Kgz+V4uEuM6NAZn5 K+XEOEOyBf5bdjVBdfd7ZRqXhzUrqK2C9HTaEo5H4g6X4gUHp2x3jtyPKHTG6Eqm OwSwTfpoWTWIPwMFGDV+M1BvyNq9f5qbohECA8kAnjryv1dFUQTWTQGJJ29hn1Uy lSVmAKDF3kyQAZDAyz+21MQJnmJ2O5dFJg== =cMCa -----END PGP PUBLIC KEY BLOCK-----
D.3.81 Mark Peek <[email protected]>
pub 1024D/330D4D01 2002-01-27 Mark Peek <[email protected]> Key fingerprint = 510C 96EE B4FB 1B0A 2CF8 A0AF 74B0 0B0E 330D 4D01 sub 1024g/9C6CAC09 2002-01-27
-----BEGIN PGP PUBLIC KEY BLOCK----- Version: GnuPG v1.0.6 (FreeBSD) Comment: For info see http://www.gnupg.org mQGiBDxThkERBACPf5/QHmyM944qrl3hWlWvK9fZZR2c37rhxAeqDJ8WsEMPBTZK WPn9BsMk+2d8e62FkzYo6L5juekd8invwd1nnszFFJdTDWx+vpMMgYuHBmme0QuP OnlU2FwJUCknw5Ed5pYV8F6azGgUNjYKIIJi/L3D9S2qDZ7l+3DgD0knKwCg4o8Z ZE2vd9uQw0AZ7lIa+li3hB8D/jHrVZqHxhOuUbxIXoJG3g54mH4i9GF8uN8ZdhA0 9AxLVLzjLr4CQd97++LdSLagSvgD9N6OrtMPeqge4Frr1anJ+LRPDeOQhd0meJZB iCiekil4DSOsowqgmIG7DlAJx+PNV66qO1ExX1fv1ugyoWHJqYmdBSF9x1fHU788 GxCtBACC9DLBMmMVu1Fsw3rnkZaR7xX1a1Bu95ZUu6TKJP6qUS5GnQOxF7dDjuwX /uRinkQ7W9vR4UuVvcV+Ct5R/yq7e+SfLb+YFQ2BmWeGNs5AVLxIZsZ0ar16fwB9 XdxxHU/IkA3kYo4JfTvi3QXjLn4mbYUuBIVGAL63UO1kx1c8crQaTWFyayBQZWVr IDxtcEBGcmVlQlNELm9yZz6IVwQTEQIAFwUCPFOGQQULBwoDBAMVAwIDFgIBAheA AAoJEHSwCw4zDU0BXeQAoMlSoeOO5WtFMyC8viNAafpPcT6hAKCcjmQyI/cI0id2 PMX9ZOfrKd/ma7kBDQQ8U4ZDEAQAw9gcDj02cAlUh8G9bLIQazPLJnX0fah7KB3O kxh8wFn0LliP7W7HLB+nQNyO4TfNgI0bhVyKDQQbKI2xJ4hylo9Z1K2R7GilgCnB FUqIp0MdqAswX2Dq7KXoyYAZRBOnQounUMaQ+6cfRI37mWc6dC2uY5qHne4zmLML /lVOjVMAAwYD/1ZArkN4IDk/VALPnzW4VYcCcT+101DMZfIMvHK2MiwWFmO+Er/K gIo9DrybHNQ6+bVQh/F6PSlxDrgWey7dQbHQSssC364v3RPOCmuBJCMTEszaais3 VekHF9i9NMsUzbGpowaQv+YKMFQu4Rtlwaq7NUp/cD4a+jaxto9ij4EliEYEGBEC AAYFAjxThkMACgkQdLALDjMNTQHvuQCg1PrMlcafQ3BUaXAQRlGoyvF2WcQAn17c HA1RAO/MXM99nT62+AKLlpeb =mfY+ -----END PGP PUBLIC KEY BLOCK-----
D.3.82 Peter Pentchev <[email protected]>
pub 1024D/16194553 2002-02-01 Peter Pentchev <[email protected]> Key fingerprint = FDBA FD79 C26F 3C51 C95E DF9E ED18 B68D 1619 4553 uid Peter Pentchev <[email protected]> uid Peter Pentchev <[email protected]> uid Peter Pentchev <[email protected]> uid Peter Pentchev <[email protected]> uid Peter Pentchev <[email protected]> sub 1024g/7074473C 2002-02-01
-----BEGIN PGP PUBLIC KEY BLOCK----- mQGiBDxaTyQRBACmEhDX7pW9oQY5krlJO+cKp1/dTOsyonmmSftVKayUY5rdWckq NzNW0z0q0Er2AuyojL+Hu1b8FsKATQrPpAZReiW+2t6w8RZpj3xuxgpapQUZnC85 VTclNIkGrHMVrMz8U6TR3eY5rvqDAeBTDd0uk7Ze15t40A/H2qR1PeNpcwCgx4ds qeZc66EfIRQAzI1JB5D8jTsD/A/qzG3t6qnJ4wUVn3nJBZ3evClzk2EWcB8Krg3i NG3MRfRDprAZdnnj4HAkBgrpJrKexqEEIMYlkL/UFR7pqwoWJQWJDcHlfsQtxIDA wM3bcQrZ7dokBdZdVJXuUnuT8YWYW7cAlWtPfJohjiIK7EzW2GntojLTryOHbNiK J3ihBACT90mof6uXHmntNAodatIRJRxQOBK6iZH2x894i41jEOcTFbwqpV50wsnj Eyav1RWeGVZwB3XdSBj7DfvfxaoRKVsoaRUiJza8fCksAF4TCsRNIks1fDamM/Q+ HKP7pl1UjxVAxM0iuLlQQo7dm5Nv1eWJ++HGgq/05xjoogmm6rQeUGV0ZXIgUGVu dGNoZXYgPHJvYW1Ac2JuZC5uZXQ+iFwEExECABwFAj3h7j0CGwMECwcDAgMVAgMD FgIBAh4BAheAAAoJEO0Yto0WGUVTrK8AnR1klLDRBMbTZdKBEGq7LzTPygbOAKCj ST0W1jBJlzlDOgccGaTdC7jvB4hGBBARAgAGBQI+L7kFAAoJEIWAWf86Zh+dcOsA oKJBD933Uz0BaJc7c1TkJq7t8iQoAJ9aIw4ORey/3+z6JfFqS0G301J8HYhGBBER AgAGBQI+V7j/AAoJEE0F4QDGxFyVzv8AoJ0KTXMofgVN4ujfUN+O9AEkFO6BAJ4s 62iGOWy4pDJDzX0iMm1qIP+EBIhGBBERAgAGBQI+nX+8AAoJECopZefBlHJhq9YA nj165KPT6I5H9dTeDJ3f+5oOzCS1AKCLo1K3Lj1JtI3tsYHNel27AD0PTrQhUGV0 ZXIgUGVudGNoZXYgPHJvYW1AcmluZ2xldC5uZXQ+iFoEExECABoFCwcKAwQDFQMC AxYCAQIXgAUCP0xIWAIZAQAKCRDtGLaNFhlFU82wAJ44Q0GVbMbP3Y2QaWeHWg1x jYziAQCfUVbc2CdwUjkHOYaZKr66YkvM3PGIRgQQEQIABgUCPGJWjwAKCRDg76IP e8BRpZ5HAKCZDkO4MkjOahWe0ymrt4oCRUBO3QCgkjTTIc04Hc88olmKk4EWLykt rtKIRgQQEQIABgUCPi+5BQAKCRCFgFn/OmYfnZqzAKCS9d91g253NHZdFQjQYxHI NRu/XQCg5IJl7Yd0YQ28fIuj3h0ec/2Ii9qIRgQREQIABgUCPle4+QAKCRBNBeEA xsRclZYpAJ9vSVtQoddzuZ89LHc72VdrS0o12wCguk7H6H4MIbzhpAdbGcn3gMU5 5t2IRgQREQIABgUCPp1/tAAKCRAqKWXnwZRyYVstAJ0QcwhInWCS9Ybxd2/KjDHW eiFy/QCeKj/eQRXFDNJmeteOpzEwUCOQGnmIRgQTEQIABgUCPQgsOAAKCRBorCrx zxc3EwUvAJoD0f9XU3w3EPdhTnGKHKC+O1t/SwCfSODrUVLtMjhlU/jspyOb9N7C 7AS0IVBldGVyIFBlbnRjaGV2IDxyb2FtQEZyZWVCU0Qub3JnPohXBBMRAgAXBQI8 Wk+aBQsHCgMEAxUDAgMWAgECF4AACgkQ7Ri2jRYZRVNsRACfWp1/y6lO2GeL8lGs sbtzPJjPlOIAnjygrmQgBHnLuN63j3Jez6eU0YDziEYEEBECAAYFAjxiVpMACgkQ 4O+iD3vAUaWq0wCg03egogtrmDoHMIkAUAU8JOIhf78AoK0XZqpsY+bKT1FU61Xf dMwppyekiEYEEBECAAYFAj4vuQUACgkQhYBZ/zpmH51PaQCdFMFElVRsRZnKlNpS 5sO0LjKoOMYAnAxSk8VMPfO5vLLD10f2iVnpCaVyiEYEERECAAYFAj5XuP4ACgkQ TQXhAMbEXJXsNQCePkFm2ZS0kdjH1Ceyv03L0tNFi7UAn05JyYua8QJJ0+gZGp3e ysEVqx4tiEYEERECAAYFAj6df7wACgkQKill58GUcmH0mwCfZjHAm88VCC6uEO2b c7WsUTYcjaMAn3cOAvJoZiZWMKtHCO2yOEhzZ9pUiEYEExECAAYFAj0ILDsACgkQ aKwq8c8XNxOxZACguOrASSxMsUnvogEEPTV1hrhAMPMAnRbOZ1fohg9hoLdK9iG7 IZ2bsEOEtB9QZXRlciBQZW50Y2hldiA8cm9hbUBvbmxpbmUuYmc+iFcEExECABcF AjxaT60FCwcKAwQDFQMCAxYCAQIXgAAKCRDtGLaNFhlFU0vBAKCy6zCtronBWyLQ RPiOFdtS3Y0G2QCdEUxCZwGJzIkYUTjiWqVaAfAQVnaIRgQQEQIABgUCPGJWkwAK CRDg76IPe8BRpfS1AJ4u+2bwf2AvGR4a6HPrtynL8CyiDQCg0ZyiRyUsxaE+ZfAj zVIuhcvP2jqIRgQQEQIABgUCPi+5BQAKCRCFgFn/OmYfnZnaAKDYD7rmatMyEZu2 rtXEyEV7wYlScQCfRQ3EF06yXslCBFWHl25HZBERNDGIRgQREQIABgUCPle4/gAK CRBNBeEAxsRclR3OAJ9xl67Uv8TD7lU04KJSBrZbsu3iCQCfcuco5RgSJUZ+H6sA xxql8sCrvHeIRgQREQIABgUCPp1/vAAKCRAqKWXnwZRyYQ2TAJ9tGzH86GBwxtUq kg8Fazib6yoWFgCfWG3qzYdIkfOBlQt6TpK+LVzP0COIRgQTEQIABgUCPQgsOwAK CRBorCrxzxc3E4J0AJ45O3G57NPoO5liA/GKZbriVaOM/QCeIhT+l7NUyLqIlTlV MKbBJ6hULi60IFBldGVyIFBlbnRjaGV2IDxyb2FtQG9yYml0ZWwuYmc+iFcEExEC ABcFAjxaUXMFCwcKAwQDFQMCAxYCAQIXgAAKCRDtGLaNFhlFUzwzAKCP2qhxrFot 7GIF3tIo1O+dc1P3RwCfS+HsYldQMhcMtTLwK7uTBCcDsaqIRgQQEQIABgUCPGJW kwAKCRDg76IPe8BRpcAiAJ0T/n+UbSZzH51HRSlpXlKwnTdeoQCg46wupQiXMNCb VMyEcyOd2w8zsSaIRgQQEQIABgUCPi+5BQAKCRCFgFn/OmYfnf5FAKCIAu/ibl8F RFfyDfQnU4XlmKKUTwCg4MquGS1xJyDyKlYc5diBak7pPf6IRgQREQIABgUCPle4 /gAKCRBNBeEAxsRclbvrAJ9CcI/uzxLP3n5KS+O4U72AnZ73xwCfZp9bR3NiqDG2 FMrTkIKv9W8a0ceIRgQREQIABgUCPp1/vAAKCRAqKWXnwZRyYVB5AJ0RGRxnG709 wUvBMIXL/PsFxYgKQwCePXnopdhyfPAO4XkViwLg5t1WXM6IRgQTEQIABgUCPQgs OwAKCRBorCrxzxc3EzgqAKDfbqPMzsYHu56o7hsoot6qKH85UQCfR2UCDprRfc/J Mn7wk99JzgXGK4G0KFBldGVyIFBlbnRjaGV2IDxyb2FtQHRlY2hsYWIub2ZmaWNl MS5iZz6IVwQTEQIAFwUCPGFgxgULBwoDBAMVAwIDFgIBAheAAAoJEO0Yto0WGUVT Jc0AnRlGc3mhcl/V0tgRtALHDAIxwbReAKCqI7yIS0+BAbTv79i4w1Q5JDrunIhG BBARAgAGBQI8YlaTAAoJEODvog97wFGlHVkAnjSzA06USmdTpUdsWJ78BvrS+rMc AKC/g4FN53hIZHkpUeeBiBQdqHNO2IhGBBARAgAGBQI+L7kFAAoJEIWAWf86Zh+d +8wAnjKVxQmImb7HKKGkij6Z9KWuvCayAJ9n49YyrSM1xBa2WGhPiTuHmRRan4hG BBERAgAGBQI+V7j/AAoJEE0F4QDGxFyV14MAn2lzFnlXmdjgfSyUiYr/1hDY1mHP AJ9aNWzD5VbsXr+4Ziu1wvSswQLAxYhGBBERAgAGBQI+nX+8AAoJECopZefBlHJh F/8An05sKrlgdYOlCxfxqL/B3K9xlGR+AJ9yx9GjYyquDD14dZwL/MKT2zXeRIhG BBMRAgAGBQI9CCw7AAoJEGisKvHPFzcTuHsAoKStAPYmiYgX4OqxVWv0XrDdLrhe AKDeFfbgM7Vs14LQ/+z8zw+rdaAv0LkBDQQ8Wk8oEAQAq0sam1E0HG+Cet9tjCfr mZWdXipWqdSJhRF8IGvtEVeQiDb3SWAspmKIf4NCQqe7GE4jCjPhatEh3Za08Y9F dGgSmuSX2FvzIjeI1X7NTU6DxBQcJEcFHdXpRk7C4z/WXRLSjsDscEYFVCjFhBA+ NOL1i4ORIV3AMZBN1stY0ccAAwcD/0AZrhhFfh4bEqcVrELRJopascwYn0W2k0Qr i+thNkVxXPR6srSAbSNegHwr33nHsRDt2N8s/mJltaLVM/+dGSMg5VqblqaEwH8s Fmvmjqk1m32xOmq8hGmcHwNpHJst9P7HwC2zaw9uJUc7cqu8MWnEL14ZXQ5Ms++2 qDyzHF8SiEYEGBECAAYFAjxaTygACgkQ7Ri2jRYZRVNOIQCfS6RP6xi3cPFTukqG 7Rtia+1GhTIAn2ioFhy7G63OaNiy+TQ4c4LoZlvK =7eJY -----END PGP PUBLIC KEY BLOCK-----
D.3.83 Denis Peplin <[email protected]>
pub 1024D/485DDDF5 2003-09-11 Denis Peplin <[email protected]> Key fingerprint = 495D 158C 8EC9 C2C1 80F5 EA96 6F72 7C1C 485D DDF5 sub 1024g/E70BA158 2003-09-11
-----BEGIN PGP PUBLIC KEY BLOCK----- mQGiBD9gSfARBAC0ZC5VEuEzqk8KQ3tFam5rugDTaigVzYDmT6XBrQuVwYrFY5zj gz3o87e/KGmvh0FgpulhoJpkOW9l7oPQpp0wvEm45WRq17+7quW9VppgVCzs79FL Cc77A4g5LAuO27i1yygfMfPrr6J/M5bM2FyuUS35QvKBTlkZiB/Zt1d1QwCgzJML PdRvozXQdg6/bPc+M3Wh9AsD/0NxL7cwGExg57hnxA3oNB4M7IM1MwbDDaEQvJbW Ls8c+x2UMzdE4XHMhr940GiwUzEa1lyy0M7FmB+cdFgqhJ1VFjYE6VyGkyYtticL my6Im5S4Pfvx7pO2qLmYW+OnbnC6FFgFPbsAZVl/1fy4hN7U2zQIMw3kIodFBnyN RMsvA/9uzITCim3ov/9x4OYX0BfUNNmczIZMvXbmcuDH+NfwkGu9pmRitx/AWHGJ chOv4vMuMnBHU12TV1dstlWrb+Q5DVrnbVUq90mUbxg2emvlv+xK2oZ9EBKjAv/z NFqySi52vd+OmgopbVI6bI2+VdKrKeNcDByt/2zRGo9Y9hDULbQeRGVuaXMgUGVw bGluIDxkZW5ARnJlZUJTRC5vcmc+iFsEExECABsFAj9gSfAGCwkIBwMCAxUCAwMW AgECHgECF4AACgkQb3J8HEhd3fUzKwCgj1hA+IDNLHGdD+ua2bs3nPcL+vMAnjR8 6CwsvOZIL5cr0EyveMsGNWqnuQENBD9gSfIQBAD+YKY2v46TD994B3h0KtAI8/Zd aJ+K1yUNIDxjueo7v+c3jKaWPgX1h+Cr/O936IVnG1zg81zEF0Ly6NcwWrj70UDO deA4tvx8HQoYfjwRA2kYAv73yvt+UG6WS3cGkX28dcLb8/JEV5M64AYKhgqRX12m VJWIKdqMYzho8n0mCwADBQQA9WcaZB8RVj22I88DA6okYxiU2vqAN+QUvZfX0X1/ 7Rh3mB8iAXBuASEw6NbQnGtky8RlkTDgYu1UJt0aSV2U2CXKOyPCJut0Ka+YYtOM prdHmnNSksNvwThju8F6js51nrf3D/7L9SFhc+W8JTfa8iz9Zfgq1HQkZ3foSO5J W0CIRgQYEQIABgUCP2BJ8gAKCRBvcnwcSF3d9Ut3AJ9WFh2gFxmqE8O3B85dO4yx z/OvxQCgsQynjVGZI9JJn1W0KOAYSbihdu4= =kQUf -----END PGP PUBLIC KEY BLOCK-----
D.3.84 Jim Pirzyk <[email protected]>
pub 1024D/4E23DACA 2001-03-02 Jim Pirzyk <[email protected]> Key fingerprint = 07EE A1BD 32E5 C402 59B6 22D5 D846 31D1 4E23 DACA uid Jim Pirzyk <[email protected]> sub 1024g/F38895F7 2001-03-02
-----BEGIN PGP PUBLIC KEY BLOCK----- Version: GnuPG v1.0.6 (FreeBSD) Comment: For info see http://www.gnupg.org mQGiBDqfK40RBADDZo6Nm31TcstpbbDGjJXxTAace2fZhTtu98UaC3/78vD+YTqH Mp4sR6OSSWuf1vS9MSeaHJitLvuProQvOC+yEKzW31KuAPnldqrTerEdcy41GASb NbqNz0fTBOUyRebJQ52XZjFC3nagAf+btqIEd8rRegwK0JDWdkIhuNztBwCgzWyj Z3y2+rYSoTc0gK170uL/zAUD/jIOCSPtLFgZf8AgPaxx1fkWmDZdf4RKpckVMgnK vZrQkhXymksXoH7CeT2MpB5R05tpOQF4jV8OwCHSYqJ3P1XlEod7plw98BUiyS3y gu+ML1fiIERHnZumDFxRwKN2ybkzMbZzuHiZl3pAdWe+3lYa65aRIs3CrUoQSzN1 /JfJBACtOCm6Xq8kfk4fVvlN3lqDcpU7Gw3kJiudOg3gAv45egeG18HKJI3H6gvq N7rj0xl4m0vEL5AYBRJ/THVy/3574s0DwCCPI18VQPL8vmSXc8UgAkJlgkdtumH3 OHqPNi4NPEd82wECXmnflbCS5A5CXGtrzXsPMrhiXz3lpFFR+LQiSmltIFBpcnp5 ayA8SmltLlBpcnp5a0BkaXNuZXkuY29tPohXBBMRAgAXBQI6nyuNBQsHCgMEAxUD AgMWAgECF4AACgkQ2EYx0U4j2sqnWQCgvXWdITNFCbKedEmEXTbwzzKq0qcAnjrg XUiN3MvMvXk9tnGDCJwnWhoYtB9KaW0gUGlyenlrIDxwaXJ6eWtAZnJlZWJzZC5v cmc+iFcEExECABcFAjsEMxcFCwcKAwQDFQMCAxYCAQIXgAAKCRDYRjHRTiPaym2w AJ4oUKyvm2uf0Hkqig4s66TzKYVu2ACfVLrGSFHD0oharwIs8CcwN5wPg5O5AQ0E Op8rmBAEAOKSRsTI+Ty5w27RVzf62B29RZOfdySTmEPQu3YdlWFuA7Rks5fD565U PMUtPRzTEy7ofoPHxWv0bgbEBDuAoXmkjz/KYhcTGCwVyzg9PN/QEa8F/ETn/1Y9 bbTejC3mM6ThPDqKvdh70IZW7jMfeDxKUTCHs3rFdGQrJfbdP6dnAAMFA/94szUi Hx02WgHQjVdYjFNp4YdWNTn/HEDZZdhKyI+ATw1IqtnnAlhSfLW0AhRIr2qSwT2t PW6eocCmrDHPd1VZ891QfcF/tWkSIgB8ROaFkjJra57wZO+/Dg46kdpZYh5xjrbR tffQr2c0/2tnvTrl4/ErMmhskeppBtwZfpuzE4hGBBgRAgAGBQI6nyuYAAoJENhG MdFOI9rKNWcAn2WQbmvRcYF9B0YjzGNFKXjGjzuVAJ4v+kxM46P9tcQ3ZTKMKOaz 9bVtpA== =ggLc -----END PGP PUBLIC KEY BLOCK-----
D.3.85 John Polstra <[email protected]>
pub 1024R/BFBCF449 1997-02-14 John D. Polstra <[email protected]> Key fingerprint = 54 3A 90 59 6B A4 9D 61 BF 1D 03 09 35 8D F6 0D
-----BEGIN PGP PUBLIC KEY BLOCK----- Version: GnuPG v1.0.6 (FreeBSD) Comment: For info see http://www.gnupg.org mQCNAzMElMEAAAEEALizp6ZW9QifQgWoFmG3cXhzQ1+Gt+a4S1adC/TdHdBvw1M/ I6Ok7TC0dKF8blW3VRgeHo4F3XhGn+n9MqIdboh4HJC5Iiy63m98sVLJSwyGO4oM dkEGyyCLxqP6h/DU/tzNBdqFzetGtYvU4ftt3RO0a506cr2CHcdm8Q+/vPRJAAUR tCFKb2huIEQuIFBvbHN0cmEgPGpkcEBwb2xzdHJhLmNvbT6JAJUDBRAzBNBE9RVb +45ULV0BAWgiA/0WWO3+c3qlptPCHJ3DFm6gG/qNKsY94agL/mHOr0fxMP5l2qKX O6a1bWkvGoYq0EwoKGFfn0QeHiCl6jVi3CdBX+W7bObMcoi+foqZ6zluOWBC1Jdk WQ5/DeqQGYXqbYjqO8voCScTAPge3XlMwVpMZTv24u+nYxtLkE0ZcwtY9IkAlQMF EDMEt/DHZvEPv7z0SQEBXh8D/2egM5ckIRpGz9kcFTDClgdWWtlgwC1iI2p9gEhq aufy+FUJlZS4GSQLWB0BlrTmDC9HuyQ+KZqKFRbVZLyzkH7WFs4zDmwQryLV5wkN C4BRRBXZfWy8s4+zT2WQD1aPO+ZsgRauYLkJgTvXTPU2JCN62Nsd8R7bJS5tuHEm 7HGmiQCVAwUQMwSvHB9/qQgDWPy9AQFAhAQAgJ1AlbKITrEoJ0+pLIsov3eQ348m SVHEBGIkU3Xznjr8NzT9aYtq4TIzt8jplqP3QoV1ka1yYpZf0NjvfZ+ffYp/sIaU wPbEpgtmHnVWJAebMbNs/Ad1w8GDvxEt9IaCbMJGZnHmfnEqOBIxF7VBDPHHoJxM V31K/PIoYsHAy5w= =cHFa -----END PGP PUBLIC KEY BLOCK-----
D.3.86 Kirill Ponomarew <[email protected]>
pub 1024D/AEB426E5 2002-04-07 Kirill Ponomarew <[email protected]> Key fingerprint = 58E7 B953 57A2 D9DD 4960 2A2D 402D 46E9 AEB4 26E5 uid Kirill Ponomarew <[email protected]> uid Kirill Ponomarew <[email protected]> uid Kirill Ponomarew <[email protected]> sub 1024g/0CEE1A9B 2002-04-07
-----BEGIN PGP PUBLIC KEY BLOCK----- mQGiBDywg58RBACh3rn8lR6mEBpFzQUN6oRmHo2mlkzY2+Pz2d5luRyE51WVVOlO 0juFuR2PIz1LXPy0Mucz+lGjZ3FPejU4PaiVe0WOeV57UaSeGvB4D+wc289fO7EA ZUiI6vgSGnK55FbA5YN9eDlDqr50zh9/XS++bOovtu0VvBQ9CbXGz/O8UwCg/dHO aHTyTA0pE2rQq/7c82+xl6sD/3etZa4LnesLIEHfZbueuAJ9x3CGwNn/vdecjv3Z i5rb9Q2i3jTZDWoyRSwusP8ayTh7lslkAAVlARJ9pF8wbJ/V7l1DdglVovvHuH2C 1Zf4GvzBCQcVvDhuTqTerxmwe2QE6r5bwPOP8hSguvfzaR4+6uGlsJZdoN+vvmhB wNnhA/wKulV96Cx8KDX4g5QY0+xD3v+9fnA2pPIdVOXmEfYEyN1oG3LTaF7VSxc7 XQimrpCwtRB+1bYa/edezf+PitI5994zqrd2HP0x45zwhiKoWZ/terUrGCkXbHB0 Z9cxxO/yG72uq1De7EuNkHPQ1MdW+G4LV/myN3ukSQ4MDmvrRLQnS2lyaWxsIFBv bm9tYXJldyA8cG9ub21hcmV3QG9iZXJvbi5uZXQ+iJwEEgECAAYFAj4xFKMACgkQ IkYMagPC+y3CYAQAnt5p0WARbMW0GcTxBTI1FHMyht6+iIdyiZS+nJiFkZrA7/Ly Obejxp/EUJJGkrLtVGlO2Pz+GkeHacYdqBSXFooRr8v8mnxrral/w3CFP/RdMi6A gVPuHwE0o+0ASIt088Fj0c3bOXwwrjNQfy0L1/yzQTkwolKRDduRy1MHMk6IXwQT EQIAHwIbAwQLBwMCAxUCAwMWAgECHgECF4ACGQEFAj4476IACgkQQC1G6a60JuX1 cQCgmXQygEurSCm92i/zfzMiCFz1jFIAnig2u+V1fZ0FSttJRT1jtoeen/8uiEYE EhECAAYFAj4xFI0ACgkQ99Q+k88BflcOVgCgjbba8fXqqFo+gPoPRHooBb2kEIoA n23oCHLUszXHgtF5NxWn3oHBAmcqiEkEExECAAkFAj46N2sCBwAACgkQKavcJrtH pjd81wCeJMiDsndp27OZD93XnvLgShh404kAnj5zLj3Lh9vFIaX0NmiXJCr30ucR tCFLaXJpbGwgUG9ub21hcmV3IDxrcmlvbkBuZXRpYy5kZT6IXAQTEQIAHAUCPle8 qwIbAwQLBwMCAxUCAwMWAgECHgECF4AACgkQQC1G6a60JuVCWQCgorM+0KdXDg45 pjCoUb+Wi6KAyAAAoLsoEOWK6eGqHdhGfCoSdd6eZi8HtCBLaXJpbGwgUG9ub21h cmV3IDxrcmlvbkBndXVnLmRlPohcBBMRAgAcBQI+mBEoAhsDBAsHAwIDFQIDAxYC AQIeAQIXgAAKCRBALUbprrQm5Us2AJ9fSe77QzPMJlR6dXsBLH0yEcYq9wCg9tbT 6fwFChFssWL994yX8RkB3mm0JEtpcmlsbCBQb25vbWFyZXcgPGtyaW9uQEZyZWVC U0Qub3JnPoheBBMRAgAeBQI/Gv4WAhsDBgsJCAcDAgMVAgMDFgIBAh4BAheAAAoJ EEAtRumutCblwVQAniHrD71+DsawshFYOBHVrWh1UllNAJ0VU8faM6NiOSWNuAGa Ww0eQR2JgbQuS2lyaWxsIFBvbm9tYXJldyA8cG9ub21hcmVAdW5pLWR1ZXNzZWxk b3JmLmRlPohWBDARAgAWBQI/HOqpDx0gbm8gdmFsaWQgbWFpbAAKCRBALUbprrQm 5d6zAJ9kvdC4C2GiPDKvHmGsxQbiovgDGQCg7exR5ExcZ1tpK3T7Gzcqft9X22WI SQQTEQIACQUCPjo3bQIHAAAKCRApq9wmu0emN62xAJ9r7GNqHo86l3h1kK7Z0VoD OqBwUQCfaSXRXnh4LKVEM7PylL98NLVPDsyIXAQTEQIAHAUCPe8gXQIbAwQLBwMC AxUCAwMWAgECHgECF4AACgkQQC1G6a60JuUQHACg5xzalIV/AmLjmXMH/Fft8tRy t8cAoIjN03XYBi1zLGLqlc8PND+FBAOriJ8EMAECAAkFAj45NY8CHSAACgkQIkYM agPC+y25tQP/Y1atgNB8Su5clHpYkQj55p3p29mFFh34lCMeL67wfugzn8SscywA pw5DuJYCB0mEtFcqMT/wzsAELqzpxsQCK9KocN5ZmJ33S8F2pqkdkPGu9LwXr5wO XitmFM/jnmbdSAGmKrRWR9j9TbhQpakNO1xuqLct8ByQbBpQPagyRJqISQQwEQIA CQUCPjk1kgIdIAAKCRD31D6TzwF+V81QAJ9lpm5N9BPfzHsFGSoBTum5vPWy9QCf fT7e/00ZEpgJosR6Gh+UzJw7Mj+5AQ0EPLCDohAEALwdffpYikHSKcFxexWIH1wS XKDTsBEw1CdA1seHL/DuczJTbjLxEYkqHePpQztBOdUwM0yWObHI0g4F4A1K4RPQ a4sCBgrUkejXs7HXrBrFDrbryQFhulitD+SKtzwenOm4VXGK7E0ws2fRtXbBt92k zkAUS9G2OjWHW62pZ9FvAAMFA/0SbUjW7XUj/AhCvaye6paSb0CDoJgTfheUCQz0 CnxX01NGAu1R0boJS5TBQ8P7idwo081ACuF4vxuIqkWAkgD2S7sKsJzLDaNUCnIj V6wNkd0qD+Jz71OsgbhXX5Ey7s6hGzwgaTxYab5FVmflGUNlMs99HYGpX55NePt/ KpLNHIhGBBgRAgAGBQI8sIOiAAoJEEAtRumutCblAJMAoMMlLNDqtgzn3Q3Qkyg8 /V9mzIKIAJ4t9TIuZLbKZjDxDY8Acz+a2+W7SA== =K6me -----END PGP PUBLIC KEY BLOCK-----
D.3.87 Mark Pulford <[email protected]>
pub 1024D/182C368F 2000-05-10 Mark Pulford <[email protected]> Key fingerprint = 58C9 C9BF C758 D8D4 7022 8EF5 559F 7F7B 182C 368F uid Mark Pulford <[email protected]> sub 2048g/380573E8 2000-05-10
-----BEGIN PGP PUBLIC KEY BLOCK----- Version: GnuPG v1.0.6 (FreeBSD) Comment: For info see http://www.gnupg.org mQGiBDkY4OYRBADvB+3Uh68SGrlbrq1MTAN/gnVaj4ztmA15X13bunGYdLKLEJdq rd9xFv5OgxGZXJ+sDhbKomJ7yrBGtUwC5kIrKXN+MPbO60yy30+kIVLKjXIv1d+c MlWhjFzHra7WGFmvhzYnbOI/zjlOR68iKHnwxhtKFOK9m2O3voURWLEuqwCgzK/S j4UGrPUmZf9XOZcKdnN07nMEAJrNh6aoVgK1xwpyO9uTURuCppqAUym/fr4xNQqh mngblwIACnV9FpBi1ogtX1iDo4YeQa7t7ALgdwTBbU8upVFYzoVByid9ibNu3OKv j9JvL55jUVg0wv6a8bEWjxnNK/zVa/HCzTbAzHob0CSgH9WmEJJEUIqI2/PG2dj+ ZX3QA/4y6Gon6iya2wk0Zs7mrTj80kxLRMnuPN6geTGVNTfrxat+sA1PVpT2WWSo qOrPoyxcpUBbJ3VlFmuYDDgld4lJiGD/2SG5BkD6OoGlRnD5AMgUxQtQFnkloao0 3md8UDucIJnJRF94pttQtv4lVKaocm4z0Fx6cWC4Ysupj1AG0rQfTWFyayBQdWxm b3JkIDxtYXJrQGt5bmUuY29tLmF1PohWBBMRAgAWBQI5GODmBAsKBAMDFQMCAxYC AQIXgAAKCRBVn397GCw2jxyVAKCbPwK2rDZx/oahfd4M7XJ4GoF0xQCcDExtL+DK wOugUQwfVIExB+HBM3y0IE1hcmsgUHVsZm9yZCA8bWFya3BARnJlZUJTRC5vcmc+ iFcEExECABcFAjse9k4FCwcKAwQDFQMCAxYCAQIXgAAKCRBVn397GCw2j/OXAJsF bdYQGgCs3sXMOdb7pNUi2DL2kgCdFOFSojmWV9mulpzH6ceb/fKgoJC5Ag0EORjh UxAIAMrmc2VXtnp/WWhGne6yTirnnWjR/c+rSK8ixbAqTkdYnocY6gtBJliR7LSh Cv2RD8TaUc0ZZseHC5vR7VZKXobXUF7QqB1Rgzz/CpsFeEmxxQxZrVKNjwcMloSt wmH17yW5tBDg8+6KhFwHj40oV88/49L8utVMEW80gh9O9TlYw5qCAp5QKqkFS52A hO54xjTNdEpv/9yXpwQfgUqkAHM8MQhsaxmKCIQXUGt6Lp13aHDAYtMizED0LBjV 3P3qCoc03P9k2nWwGGU7dukncYNNuLDW9xwkAfV9VQuPYCHEBiPTcRnn99imyvNz FNhOElHDttCyKtt1FdZZVAQzXusAAwYH/18mnEMMv4rMZglYb0PRCxaxwQYkxESt KyXEclTc0kgyaZnf4Vbdz1rroxxZLIf+16p/MVNFierz/7d5FbJYggCDSsBAaj4r Qe2/Os3oCnHyyQY+zF9Ac30CsxzgDxMYxYGJHr6x+s9cloZ3WwBFAO0bMoS/9T/9 /S7L0d0litecox5et2yEw4AqHdCslGx5mX0os66uh99eeEwW2EQHSLklwUPReb7U 6m+fNyWxq5w+qTPG+zcXdiW/117T1aONVmg29tSNW8S/syha2PCJ+IoordBus4mU kfa49yCuXyZAYDNLbkiqMVTDCqrH2+n1mbUuhRBaSZEvgqVfVLZzRziIRgQYEQIA BgUCORjhUwAKCRBVn397GCw2j7T3AJ0ZDGzVqNQBE07ntRKuzQQmou8YhwCgibYR ZJyP31xlO+Lt5FgzzeqcQwU= =DKp2 -----END PGP PUBLIC KEY BLOCK-----
D.3.88 Thomas Quinot <[email protected]>
pub 1024D/393D2469 1999-09-23 Thomas Quinot <[email protected]> Empreinte de la cl� = 4737 A0AD E596 6D30 4356 29B8 004D 54B8 393D 2469 uid Thomas Quinot <[email protected]> uid Thomas Quinot <[email protected]> sub 1024g/8DE13BB2 1999-09-23
-----BEGIN PGP PUBLIC KEY BLOCK----- Version: GnuPG v1.0.7 (FreeBSD) mQGiBDfqEAgRBACWuQA8w3jSz2SOXCzzuggBpkXadlyswhNi5Jce1auOqiRVw8gD cTlIWLpboHFyJeF/d5A1UPjgmiexRuyyukyQn30Z3bx5MaWwojJb/K/4ppguCwg0 6hXIJoT77FpOex8WySQ4nGK22+EHp74utDJSp6uj4QxWYhXJ+/LraUyhUwCghdgF ByPm2qwPYbiNJaeLyJNN8oEEAJEOxTHuXlB5HUzFSOPOYFIxzpsFkbUvpqEt2Ug9 mgorHqgcmeP98YWLwMFznLXehyAjtvoqRYWWHepHQwaeqx6ZpwHdStPXTi5mb3ih Rzz90yL+2ctf7nnd7rc8bveN8gzlRAnHKjyjSkC9DXpBWd/N0P53XPoqdm+WlMu5 XC2IA/0fVbpYQfcbiFf9O/FMym1gWqF6xemtP3ClEG82yhAU2kyYnmdBQj+OYaJO eTW7RSptEfx2429HgOU51JHn4JGEf1U14Qe67X0I1jzIPKHxLACWwVxezbbW2ljm snPDX9S7QhZgZFiQRD4hvV9h+cK5EYb0ee6JW6rX1fK1FAyt9LQnVGhvbWFzIFF1 aW5vdCA8dGhvbWFzQGN1aXZyZS5mci5ldS5vcmc+iFgEExECABgDCwoDAxUDAgMW AgECF4ACGQEFAjfqEAkACgkQAE1UuDk9JGm9TwCfQu87Wzf0dxpjtI8FsCGpeZsC aL0AniDJcaMKrNDhV2RYGhVWnS2QMgU5iQCVAwUQN+oTTN4fokUTQBLdAQFCKwQA qYJH3xn5saRMS3vCd/OSgho1sYT/VpqSRKqqK+++TwnAiddP4nIjJ801qi3xmj/x asZXY/t6t9c6F/V+zyi+605FiWd1zob7jCCk+NGmSCcBdfu2QDJfbSnQEkkDDyIM gDFp0a8yTChd3khAqrEyKV/nurTi0CFuHHUlLNZvJGOIRgQQEQIABgUCOH8t0gAK CRDNwlt1HkPUTkfVAJwKlx7U/PIDLugWOC7y4ezhd+8L+gCfVQN19+VQjW99tlCJ UTrCe389PpmIRgQQEQIABgUCOIBuWAAKCRCBvdPEDh+beVnhAJ96FGBEcsxgYqjg HOaGeRKtOygYaQCcCreBXTmJ4kjI6hwEXLIZEOriL3OIRgQQEQIABgUCOIAAWgAK CRCCvws+sGjBN14fAJ4s8KTGnb5CEOih8rlPXPirmH5CUgCfSEOhLs0Moo6v0JzD 9aNYpQ/85iaIRgQQEQIABgUCOgqtWwAKCRAOp1a1FEhD9ZcFAKCAtkdn9HmB1AO4 htYQ4WhU7wbpfgCffOzyPPNIEQEorZg9q6fSAhMqirqJAJUDBRA6GWTqQGOdg4uP VMEBAQJtA/9K/+oQfcjiLtasv2CWsRj+ueQJBCqnsScTgQpKSZX9xZhqLok6o3XP xeM0iJtyz4rjAwI/hZioc6+o6K/K1OKn/1Lyfzj4KtdW9tevtAtwYFcetQNxEtlB 33GgIBo+GgJ9JhNzXnqPZdV13WQRdBntpJGkezIra+T4nES+rptdwIhGBBARAgAG BQI7HkUGAAoJEDoapjWQmlQGPGMAnA655jvZwLDUWTAH/5Xhl6LyMGGtAKCffcLQ 2mHerpCwXzWKNPs8me2bs4hGBBARAgAGBQI7HpFlAAoJECwYoCq0xfN/GZkAnR9x NWIvk5tqG2gwREX9yRuj0b4RAJ9xtyb4+Md0hYbC6Ygb5ezH8ZAM8IhGBBARAgAG BQI7HmMFAAoJENyRPZhd8DFn5BIAniJWbZXPO5OoMAdBeS72QriYbAlxAJ4m7HmD APcikpX9MV/o9HqxR0Nd64hGBBARAgAGBQI7sdvrAAoJEEClvu1y0Dyxl0AAn2jY qYDskpmBvkuPYC59Tl9fzQmmAKDGF7+cP2FUvtxmZ+l8iTm/g50hBohGBBARAgAG BQI7uInSAAoJEIYHkD298KrQUCMAoJs159fBsjZh7E0sGWE0IAEdwH0gAJwIcsJp U65HrsSIbVbvmD+lbwa2tIhGBBARAgAGBQI7xx4sAAoJEDBZv5LNN1b0SbwAnRdL ZcYR9OuhqTW8rEs0OpcGTVCVAKDswo+6NOzugNZLqZIfF52RjkHfK4hGBBARAgAG BQI7zVoPAAoJEFPlmVtRVTMKRYIAnjgLGrRo3Zh/Fl/+ODaABypF2Re9AJ9U1h4T FINLAY9569j0rqFNr5gD/IhGBBMRAgAGBQI897wiAAoJEPEzIkEbgK3mUvIAn10j BuF/A0y+gVesLfsIDguzfyCcAJ99K0azFbXYSUZ5/XJSJlBRhZexhIkAlQMFED1i DHoA8tkJ67sbQQEBzUwD/jLSmpWIglpBi+F7G6OSXXE57BHldGBoLWTjK4oO8rvO 4zBoC7QoqOQSLuC9NjrjRFlSWNWR5O/xOH7I6hSE/GSt2mmIdUnEAfgplJ04r9qJ kBTE5ix/XPc02uBSkgQv3TGdqr8SNu8trSa0AT7vw78kKOj0TVw9Ap7DCcKzYsTG iEYEExECAAYFAj1h5oYACgkQiONoszDJNIpI4QCfeqYp+usipwxyPtDNKsb/JjlU FekAn2GxcLbSsS2kW6m5fqa3V/Tw7k1PtCFUaG9tYXMgUXVpbm90IDx0aG9tYXNA ZGViaWFuLm9yZz6IVQQTEQIAFQUCN+oTswMLCgMDFQMCAxYCAQIXgAAKCRAATVS4 OT0kaQ/MAJwM8fztZzPR2wWY6uNbBeZhe3J2NACfUWj1hvToUB6cFPY/Eer4mhJp wziJAJUDBRA36hPT3h+iRRNAEt0BAQK5A/9er+qYqfrZRJCkXRwT8YNpt4Zi087Z jyYMZR2kYAZJUA8Q/YBoJuPqkXlsx3kWmyDe6K6jP1eMJiWNbrcH4m96IeUEbhlD 7e+LGpwqYjTbp+7pwfAHkpAQXkB/vvo4Gitcb5Pknvj+YYPsEDuSMQxbBL1rWAhc 1JhROiaWE0vdR4hGBBARAgAGBQI4fy3YAAoJEM3CW3UeQ9ROYR4AoLUZJtftjz4n +wEo+H2hCN+UN9duAJ9Yb8lWmH/ZIJqLMM9PiXU0OIz01IhGBBARAgAGBQI4gG5b AAoJEIG908QOH5t5dbwAn2A/LWelybp46IxdWKYjBvd3m3PaAJwPOGcJengwi4St b0SjNXaxUq4prIhGBBARAgAGBQI4gABeAAoJEIK/Cz6waME3UFcAnj4lGBYFE0n2 8R9GA5iRf+gcT3j7AJ9ob/SnIaS/TNI+YM3QhiAV0PWdqohGBBARAgAGBQI6Cq14 AAoJEA6nVrUUSEP1KkYAn20CoeTxfh+w+DuohpfN4G7b1NHVAJ99wSZyYcMBZ/fb O7cMKc7q/c29HIkAlQMFEDoZZPxAY52Di49UwQEBK7oD/1kkDsmY2V0/eVpdsB25 Ua6YmOe81hm1/jDSe0869wDWDwwdyzgpVciifPDqVIAl+2uzawrazkJUJaYTHaTh WPJe49pEkrfoBlymefaPfzxkZc8VTsiyecvjB8yqgiWkVKIOoaTnfsaL28YX5VR+ oMQwR8iZmTdyTqvBOyaK0DRyiEYEEBECAAYFAjseRQkACgkQOhqmNZCaVAZyIACf c4DWUuct4pEosdStBnb1nTrgBNAAniFY/KV7LQUOK6Cd5fCg28T3ZFetiEYEEBEC AAYFAjsekWwACgkQLBigKrTF83+UQwCfYxx+gCEwSQVS1Wf99OI71i5Qr/kAoM1Y pc0h8oQW9eP2qB7i5OmM4RY5iEYEEBECAAYFAjseYxkACgkQ3JE9mF3wMWfwNgCf aOsZeRQ55p5AxfH6dNnUFztuLQEAn2OVaJq9x9nlNaVHHhtVvBSy3e0JiEYEEBEC AAYFAjux2+4ACgkQQKW+7XLQPLGvjACgzjpcmwMr8D70XsAcKzRlGBs+LBEAn2E1 s8k//sWpelo/XZtdIN4FJUe2iEYEEBECAAYFAju4idYACgkQhgeQPb3wqtDMgwCf d2qtQCT/RP9kaJntGJvdXWMZYLMAnRDRPUjUbHVc9gMaH9lLKX9rHJ1CiEYEEBEC AAYFAjvHHi0ACgkQMFm/ks03VvS3yACfaVpSjmAOPFwvtf6760mrf0I2Sf0Ani9/ WYGG3ARZiike52mMEEkhAdQQiEYEEBECAAYFAjvNWhIACgkQU+WZW1FVMwowNgCd FMw/T9fCkIzXC9GM/VYn+FMVb5QAn05iilPJu0CpcLfsXbJRS+E9JK1eiEYEExEC AAYFAjz3vCUACgkQ8TMiQRuAreYX5QCeIqv9hIM4ta/kt2abewVyqdMDt/QAnj2X YppdAV7y783u+hBscbmr2hHPiEYEExECAAYFAj1h5osACgkQiONoszDJNIodbQCf Y9l9H+W0hQyFTER1LcCppFTTTBMAnjtsPJDc9eq1jKwXhTIUkWdBCwjptCJUaG9t YXMgUXVpbm90IDx0aG9tYXNARnJlZUJTRC5vcmc+iF0EExECAB0FAj1hgngCGwMF CwcDAgEDFQIDAxYCAQIeAQIXgAAKCRAATVS4OT0kabNwAJ9hD8FZ7SFnQio/uHYs sc+k6gU98wCcC34bEYJ+XVKB75WUMleshVtmP0GJAJUDBRA9YgwHAPLZCeu7G0EB AZhgA/9hC5jSb/DCB5dMWYRenA/aJkDsSsCMgAqmbFGLWzUZRgn2Bqc2uFKdT+ea TeeKapnSl2ppxac+odSUPTY5PWF9Q5+OsNQLOJkcLy5d2XSGoYiicVXe7smUHl1l tlT3+twbiwCe/3qdlsMOPEhJfUKyYRVzlsNLVlLaLjFRGY2h/IhGBBMRAgAGBQI9 YeaLAAoJEIjjaLMwyTSK5xsAn15xwc2IBpNg6/TLBL5QzwD/KLmlAJ99rGujgTt1 rjWreFrHtzJivbuJaIhGBBMRAgAGBQI9YgSRAAoJEPEzIkEbgK3mscIAn3PWrHtn Smt+NrxPPf4fJRdmzx5GAKConDEqaPYmi/DfAw1mB2vLF1lhQbkBDQQ36hANEAQA ija4VG1y1xjhazkHAyK/ux2AVYC1b4wEkUa3kos7YaoQ24tfO9Y7l7EA0abBM5Ca 9v2rWb5k3ouXBuyI4C02muT/dUUfbZb9atkvZeJHWzFoBjHu5RHkCTT5Vfb6tJZr e/njzwQEXDXCCbEXS9JLQ2vQo4+o1sKnmb8XztsrSfcAAwUD/jxXIq3DoUgrPc/A c16hgLkgI5Reu7QkRIpOO/ZuBZ5ymwdFXHb/4l/0ti9H/ONUag1PAHC2+YMuuZoO NhVkFw5Uxm8QEoiS88I1Tu+PSrFIG9J2uzOcaVR5cWlvszoitxicR2IQIkouy9Zv oS9ihhkhW7P/VXoxfLFwBD0qsPdsiEYEGBECAAYFAjfqEA0ACgkQAE1UuDk9JGne lwCggGkRGKsB/L4LeCilJ1DO96kNj8UAn1ofH9VS6wXK83zRzJ0NJpwVsCs5 =mFN1 -----END PGP PUBLIC KEY BLOCK-----
D.3.89 Doug Rabson <[email protected]>
pub 1024R/95C11771 2000-02-27 Doug Rabson <[email protected]> Key fingerprint = 20 BB E4 38 5D 89 D2 D4 68 A6 2F DC 0A DE 10 3C
-----BEGIN PGP PUBLIC KEY BLOCK----- Version: GnuPG v1.0.6 (FreeBSD) Comment: For info see http://www.gnupg.org mQCNAzi5GEEAAAEEAK2MWoFtSEoa6/eVi1dRiebsF+F4DnoxIaQATYfhynrLDLDL Zvl0pfgzMWG6VvtsC5c2u549BdYsbs7F95dUUAe2JG9V3m8YeLuzC5uTpac5PeX4 2pHpniY5DDRRlgv0BpCRDOF7JmnMSp1yv5I+EFzTdGYv1CdcyFfJuUqVwRdxAAUR tB1Eb3VnIFJhYnNvbiA8ZGZyQGZyZWVic2Qub3JnPokAlQMFEDi5GuIB213Sl+Y4 3QEBIPMD/Aqz0G5OfPjsHo+QgqXgwYfsdl5D2qEoQGj/GvJNW/+I5MeV4YuydZGJ PbJa6dX0C9jdhlPd6BUtDKBsY6/lQns+VIufraYhalinWpExFdDYi8ONu9tPzgab 7HCvgz+Ecp5UFdbIdfBvgelfwJBgJ1486VUsC8H4TfAjp0ZXlxRXiQCVAwUQOLkY QVfJuUqVwRdxAQEFqwQAkREhyh+Eu3QYxDkhhGwxHWl8G3WLEth/6MRUwLY0L3dt qPfZ5MByKqhj8EqKoso4KnBzDajeKwjIeM2mzlmOdRH6ElR4WtoQpn7Ru3O9u7/O l0ojq8PDUw0KTNKcLYuvG2qBKHeLYzpTEPRbKiRprZtB6bRSYE2mM3rY7q9LU8k= =pQjj -----END PGP PUBLIC KEY BLOCK-----
D.3.90 Tom Rhodes <[email protected]>
pub 1024D/1B9EBD43 2002-01-15 Tom Rhodes <[email protected]> Key fingerprint = 2D4D 1D31 A5C6 08AA 1075 C963 C0F9 A089 1B9E BD43 uid Tom Rhodes <[email protected]> sub 3072g/F7A606E4 2002-01-15
-----BEGIN PGP PUBLIC KEY BLOCK----- Version: GnuPG v1.2.1 (FreeBSD) mQGiBDxEXywRBADtQr4venVgd80wgpOBWwSLvYrw7YmFRMcTP5aw7fRHhxmhEyRE /1jyqt6I/uyS9irePzRyGcX/2RY1+APWjXN3dFtrcYzF1zNLld5flVzid//0bBt6 WkxH5DzCd18B0iZMVKYkVhlFibS2vp6opqoOAd5SU+oDx4OY82r1jDKavwCg/7FU VwL7iSh6PmnzBWuXIaeFjeUD/2E5JlvQXbcCK3AbEZJg/1lk9vfD+JVl8ZcOA+Tb JyH9MXJ+swS3wvFesjwIwIQLIx2LsecuHItmzybBMmYNLSd8RTsI1gYPLl2zqUaN FTpgHeh1bKF3oi9nn1KywxxpZxI8s9ClmdIeBW2hNWOGJf87vwAYf4uglox89xWf tztCBACPVVdNrAb2UOcFlwjvtcC11XkR7elLSrImJ61uZkCFQ3SNJ/nyppjzg8KS KDwehl4X4poqDBBShyh27PF8DtaZ0slatZuMz3CcmR5+aR6b9+5gHoekNwtR/Rra gYyTAMwdlnrh8zOd0fcpdmUW3NN531zy4Atu77rMb9JvWEz3sbQgVG9tIFJob2Rl cyA8dHJob2Rlc0BGcmVlQlNELm9yZz6ITgQQEQIADgUCPSAgAwQLAwECAhkBAAoJ EMD5oIkbnr1D2YYAnRcFECq5cm4t4mBmbsRnk3CCqZ3RAJ0eIsczi5W0fVRaut93 lnnnPH14frQjVG9tIFJob2RlcyA8ZGFya2xvZ2lrQHBpdHRnb3RoLmNvbT6ITgQQ EQIADgUCPSAgAwQLAwECAhkAAAoJEMD5oIkbnr1DsyEAnR/iu0Ijqv+yqCBsiGQh hZ7JnhQLAKDBlIB1Xka1xJBCS11HitB8QiQbn7kDDQQ8RF8vEAwAzB13VyQ4SuLE 8OiOE2eXTpITYfbb6yUOF/32mPfIfHmwch04dfv2wXPEgxEmK0Ngw+Po1gr9oSgm C66prrNlD6IAUwGgfNaroxIe+g8qzh90hE/K8xfzpEDp19J3tkItAjbBJstoXp18 mAkKjX4t7eRdefXUkk+bGI78KqdLfDL2Qle3CH8IF3KiutapQvMF6PlTETlPtvFu uUs4INoBp1ajFOmPQFXz0AfGy0OplK33TGSGSfgMg71l6RfUodNQ+PVZX9x2Uk89 PY3bzpnhV5JZzf24rnRPxfx2vIPFRzBhznzJZv8V+bv9kV7HAarTW56NoKVyOtQa 8L9GAFgr5fSI/VhOSdvNILSd5JEHNmszbDgNRR0PfIizHHxbLY7288kjwEPwpVsY jY67VYy4XTjTNP18F1dDox0YbN4zISy1Kv884bEpQBgRjXyEpwpy1obEAxnIByl6 ypUM2Zafq9AKUJsCRtMIPWakXUGfnHy9iUsiGSa6q6Jew1XpTDJvAAICDADBjQ3p OyWSFGSmZagEbqS2T+KMs94IxwdEXqLIfsS1XvPl7D45kKTN4ThEzuz2sz7gWvv8 pWTiV+XlKSgzjX+c6mu64DJTLiYn2Vdgk8VqxmDMWlS4r7nQtCuUg9+cqrfDE+vl Cqpfy2hDI4rNwC9vIY6RomEEeq68ixmUWJsUSoitXtbVxTrq7iPJYzFmkBqWT1iK WUekmfDN6wY94Lpbai1I04kR+/vxKdkmMAMOwv05W6+llXUz3twwuqny5ipQcPj5 i/+Pe433UEFmuNtkUNk8lX5QhuBnyhFK+nzlOScld08AL5zcqKm/yew7zSREXnHu IzMjzAsO216ufFWqI9UDE0tg6US045P5GeY/uXRfDNb65DuGxFeisDyH/WtoST20 hn5OcS+RAv0fjKGhwTeInc9Qdl57cd8n2Kif9oBlQ9wnfWL3lxxZfMOpHJNy6+D8 dCem3EdjUI9ScJyRiwfo6fXJyZ630n+3I1UtGQhqG2TYDiPo4yqw8rMJm1CIRgQY EQIABgUCPERfLwAKCRDA+aCJG569Q5/eAKCTPO44fSJpxA3pKV2T3D9tmLpWMACg m9rVxuLvsLUuy0UenEK6/bBsDsk= =C9cS -----END PGP PUBLIC KEY BLOCK-----
D.3.91 Benno Rice <[email protected]>
pub 1024D/87C59909 2002-01-16 Benno Rice <[email protected]> Key fingerprint = CE27 DADA 08E3 FAA3 88F1 5B31 5E34 705A 87C5 9909 uid Benno Rice <[email protected]> sub 1024g/4F7C2BAD 2002-01-16 [expires: 2007-01-15]
-----BEGIN PGP PUBLIC KEY BLOCK----- Version: GnuPG v1.0.7 (FreeBSD) mQGiBDxFDgwRBADSAPXXRSDeS8jX0younPZ8dPSW9UBSCn9GKgyV37q6rrwaHlSm CspUTL/92h92nhosLkNa8Xq4P7oZJ1NUijPGIXAxuwOjkE2lxBP+0Kxzkjrc0FF/ ZQK6cqpVjtrTCGBo3+im6v/dw2UnmILM1GrV+TpcmTvyGMJjXT4VB+xtiwCgiv56 PVM6qCrd5p3NXlveaiYoXwMD/Rza1QobPGHlpX0hkj7bPS0YApNEY8F82yZ0vArY NHiQ7lUW+wLWL3+/+h/O8T6tjE7FeKdoI9+U/EQ+3tIbUVpDWbURJtJVyCE/rD/M 9kDjXxp/74aICSIlRxPMA8AGAP2Zv7a4GZIlhBVmDu3tKlDvatUiRU9HPACOZqQU FpR/A/wJRDr64ICA5/N0qB3e9Rgxg66LcjFl40jwM1Hd/8c6JlLE/vcdowcqxHPd yEgKZoJoKYN5Y7WXnQUvrkD5O3b68MGfJRjlvxCML+yedD0lDntzJE2O8NQdATnB cj1CraaXHvtN5sddw8Gtih6/8p835fcsQyr/V1BKhoTGCTtkpLQfQmVubm8gUmlj ZSA8YmVubm9AamVhbWxhbmQubmV0PohdBBMRAgAdBQI8RQ4MBQkJZgGABQsHCgME AxUDAgMWAgECF4AACgkQXjRwWofFmQmD1QCggnxa96nN9TOz2aLsVQ2qszwzBBQA oIHKFC8JXYP8FH0fA91zLnceWeLDiEYEEBECAAYFAjxaJggACgkQo8kg3R/NoURX hgCfY64+KES+rcptZLiA5hoAvX13gsAAoMOiUC/0Non6V/srofbjO8HFM/IziEYE EBECAAYFAjxYkvYACgkQDCFCcmAm26bQlgCgjapRIU7hMjz5HBnZgNr418+JVRkA oI2DYOP10H4gBZPwT574rkvlrXiKiQEVAwUQPGs/CGfCgI8zwWJ7AQFkGQf+LQO4 gNf0j9z/LIyKA2mCT5C8Zjh0h7DmRxiiU+4N+bIUuZy7hSVlyWnJMG1JTKMiK1Ss nUReCTkNM70rBnxOQV3BlcHksb9ZsrECy8icfslRJGpQmQlrUxppHSyb7UJh5d69 C5xpDEFUBpTgSZw5JKDOui8gZL14TcthoP5vuj9geo+DWWogyYq0umiaZSDzGeSa ST6+ebL1ne+F8hVdxSHcTChFVfrHDWdgAhkGBantTsfbETTwnBHH/k+INu6LxBkC JAZMw50vKs739Z+Zxx/gSRd2CDnSlUsoMgJGKLX5MGWmCqEPw8uyBT/T9t8GOAg+ sx5XjhBhe3PmVPTKNIkAlQMFEDxrQDpVLh4uc9KIpQEBgk4D/RaNrMtwjUoITVdY UwNLGdh2JC2d3pM2b0DUoL1rcXwctmc5z3I5co2c/r9k00PGzWv6D3LYboTd/bxk lPvn+6uIYmisl7CknFnCLO7lbILkEBGpQHE/8Z7EAI2zUZ/bi3VKcKAFooNPv+2p HteKkkVc6z82BWCI0bzH+v/Z0Yu+iEYEEBECAAYFAjxrRMMACgkQUgAclY4JAiON BQCgiIf8HrEU/qOoM9BMRwW/1RYeVhIAnjWu/jgHWJVvdPpfG4UIJKpk8DaliEYE EBECAAYFAjxrRR4ACgkQjDKM/xYG25XSygCffF0SdJ+WNXkxspiC2BzQAldql78A n27raDOotEaHxv5/qatznaWJja5UiEYEEBECAAYFAjxrS7EACgkQGPUDgCTCeAJj kwCfa3fOqwWcLbVO9we8um2rkZl4qZoAoKLH4FUXz3qldvVyRvhbSlDWGwP0iEYE EBECAAYFAjxrS58ACgkQIfnFvPdqm/WWRgCfaGeUlRGzWSQQZzg2pMz+eC/yFuAA n1+qQO7UVEzxTnoD3hAg1T/mLsaDiEYEEBECAAYFAjzPTrEACgkQzerIIuwxO7XE yACg5rmr96yl/M/qQ3DIFrx/Md6eJYAAoOStOGPS/9Fly4Dv7T9Cx7Dsz4QDtB5C ZW5ubyBSaWNlIDxiZW5ub0BGcmVlQlNELm9yZz6IXQQTEQIAHQUCPEUPdgUJCWYB gAULBwoDBAMVAwIDFgIBAheAAAoJEF40cFqHxZkJlowAnA4n58ngka4X6ycZCpXo YNRu1R8iAJ46BzE35MLJtgJQztGSnWngoLhCVohGBBARAgAGBQI8WiYKAAoJEKPJ IN0fzaFEho0AniKI34jtQurc2v0PlnTAze7AKRmmAJ0Qfp0DhFEbuWqv2dJbJCnh 9wYOs4hGBBARAgAGBQI8WJL6AAoJEAwhQnJgJtumuDgAn2NODtyfzrThSVz9xls5 A4CrpDvHAKCywVtdpH4aYFNtHZPt48wxar+mgYkBFQMFEDxrPxRnwoCPM8FiewEB nH8IAJ6w9TU1kRNm4ifVR9yp3/FMBZXNnor4FykOjOZISowfFGY3wwNWGnbCSa7B 5spkDiqnBFwMwbcTQXo56OEWNAir0hAkUEQD7GUMcZmEWy8ZaQIedN3SHhydfR6X aNar7uHyi0yi19sgq1/Jnu8DLsPio75gSv1h95anIvoGE1YpkTNGemQ6SyGs7rQ5 7QuYXqN6P60cJLC0kwEZ4YbcN1OuZ6iSj31TDVp8EzDCkFm6eMQ0wI6UPpdlymxE gfFAV3oDlj4ZG6pzNw/ZcvQFeqMNgM+c0j+omZsFlPvW4wfZAV+cevVV5ATosYSd PMas2WxPXG7pAwhyRIgyq33/09yJAJUDBRA8a0A+VS4eLnPSiKUBAWl9A/9kN+3x nxr8iU8sZMef8PpFMUNj4gp5ARDw/Q3Sx7jlGJEyuLGbeH0Zu/mTvpV6vQzcm3NQ EB51WQx8EmizIbtX1PfpyRgKLOXGll0M8D0c5JOdZAAAXYVa6AtFm36rZ9dbM2UM XGNClNt9zXUXK/sufCVC1z6vm87I+RJOUhF91YhGBBARAgAGBQI8a0SzAAoJEFIA HJWOCQIj7r8An2XwJ4WHnootgfqCUcIfbr4y70QgAJ9ngcIvPy1q8UKMdLk/Y5Ti V8TlE4hGBBARAgAGBQI8a0UkAAoJEIwyjP8WBtuV9uMAn0BBM8hO1iCUp9UD8bQ3 Ptp3xrC1AJ9Bn+yVzTVl1x55X71sglUWxtQixIhGBBARAgAGBQI8a0u0AAoJEBj1 A4AkwngCupEAoMzM2E10s/451EDjYkdr1fKo9tV/AKDfSYJ2vOJx7JzciRfj5hQJ v+81GIhGBBARAgAGBQI8a0uiAAoJECH5xbz3apv1pQQAoNKsi+LOvlXM2GGkzQoY Pz9xDxs/AKDgm87TPdaMYhI2P0AzCTHJenYalYhGBBARAgAGBQI8z063AAoJEM3q yCLsMTu16gsAn2OJb5oK/QYgO0EpREcYF6EVOLegAKCipUzr16GCumxYGj5cEngb 7ZkFfLkBDQQ8RQ4OEAQAu5zqbppTM975ccYXxCUx2OECAdzxoSgsJe3kunbvZOSy i28t4V+H1+54ks8AOlihN5XBgZAR0ohJ7RTe/5l/EV9rZcY+Tnf75UskLbjifzZP Qxd9zYZ2sUbv9oJnX8ORiphIRKlfVjbe8tqdaexQ382FQwUVcC+yc1u2Ye5vffcA AwUEALlq/J7TvHXtjeY4BgKsApAxGzyf4roPuXADurCLoaXrUclUsU3KWOFOToW+ rxQQYAjz1T/lXSOGVzDCaQf6IVIWBYEVu3ZWTI8/amp37hoLdiiU/x0VWVkgjyfX VTdIdsmnDaoTAVq+r+JyIubzRcr79SpOEIo5bPl+km/6R/S3iEwEGBECAAwFAjxF Dg4FCQlmAYAACgkQXjRwWofFmQkGSwCdEHZJnes6qzSKL6bXiBr0veCSQNoAn0PD YbCuiDguaEN052KDrSoDvk4S =L0S4 -----END PGP PUBLIC KEY BLOCK-----
D.3.92 Paul Richards <[email protected]>
pub 2048R/BD42E037 2000-02-21 Paul Richards <[email protected]> Key fingerprint = 38 4F 33 80 53 92 01 46 ED 4B A4 91 3E 1E 6B FE uid Dr David Paul Richards <[email protected]> uid Paul Richards <[email protected]> uid Paul Richards <[email protected]> uid Paul Richards <[email protected]>
-----BEGIN PGP PUBLIC KEY BLOCK----- mQENAzixYT8AAAEIAOEcrRb8i0VN7NENPtQ9PiIbD0uaW/2gQSC2InsACYmAUTMe k/DuQqvQNQR2cbZBHOiJMbpWV86EnZjs7sthuU3NYGaGbhnkh13ttRiA/Y1vRF+f CcM/PCT92jCiWQ61Gfn2k9ZYXUg8XfBI9TENzOsvumijKUrsyh2CkJxcRVS1xNMu NWI05fWMM8wRVeHxc08ZUwg+E6k7A6ojNpNiIWkWFFrBPGoN099bAH0pj3Anq5sJ yuUhuzluZuo8wX0dk0lp5HEwh3R2abLggV5CdOLsWRY8w8/NPauZcO5/Y5k1j2LK y2yrn30Tq4i7dhVkJqbLH8elHWE0f/k8Qr1C4DcABRG0LURyIERhdmlkIFBhdWwg UmljaGFyZHMgPHBhdWxAb3JpZ2luYXRpdmUuY29tPokBFQMFEDixYT9/+TxCvULg NwEBcXAIAKnjx9CfcFtN7gFDzClkiNk5icjvx7kvPJuYOjFcylVyoPKX3xxjNKOB zBN8s7uS35ogVr/kvVTjhCTmhk/ne8s5dInIsihX1Ois/Hp72siuWQiziol6tR5l tf1cRiWvY6HlEzWF5Ly9KZBpA82us5LFOZvuORvSSWUdg5C33LmCr8lEKrv2FJkv JSlf6Do+37ZEDoh3HJQwdXlCJFE660PZ0Qynya4sQvP85BeFbSbIQXr0LijwCDgi Dl0qURX7P99LRW8iOGSzUEQVkwiONM3GgSbwiiYWwmtuYvLs7aSyCB6jR6WJYp9h 1K4n3084Siy0LPtwon7iJKk1XZeMpdy0JFBhdWwgUmljaGFyZHMgPHBhdWxAb3Jp Z2luYXRpdmUuY29tPokBFQMFEDixnaB/+TxCvULgNwEBSy8IAM7Pir5/xVolXpW9 fS+5kAi9sXkNK7uN+ufzkl5E1RhwTCp8n2+5yESiasz6VaCgbOvFETicpxx4py7p 56wPSOaq1+WwPDU4FQM5in7ZrFiT3WzRRZbl4xBQybgoPALsJDsB7n/A0VNFRHwb i4OLceboPss//VoIIQyhEWTfyQY8/1THC4LSucgwpwHRkh/mZnWG3zZzzs3HBNdf ZMLRrlA6Y1kYVM9fIacv1zEPxtDJZV20+x3CS4D+KBEBDICM9TyMYk6PONjszent xTCSXtF6MAxmXG4vV7HJgRweEcSyCp8x6O3Gz0FTyyZXtMNUBdmDjLB/Au+oZZK3 hsObZBe0IFBhdWwgUmljaGFyZHMgPHBhdWxARnJlZUJTRC5vcmc+iQEVAwUQOLGd xH/5PEK9QuA3AQFr3Qf/cyLH1+X+lGgmQD9GXR692Jx+s+DehhC+LMWzvUyTH4tu r+rAj0EsPZu9fVfEMyE17/c8EwZmN6CPejr8Fr/jm2UVAKgzkUmoYT2FxkZkEhNC tpgwLUk/2+gNgTlHg3s9PtgMeYOXYR9VtOyg0AWi7UOKDPCtBRMlcHjJXCMFg5P2 nCHYT8nMQ2hHlEqVIB4Wt6XfR2Vr/bd5/F1g/jRa2gMVMvUmUJJdgq61Lb97CnOn VjBev/TY71jpM0WJG33Qk7EVVrtmPOutYQ/rB/oAq8B7mjtTLXfyuwy8teTnz98K eURFXYILCl7oQDKYvs24MAzkpEp80ih3XcTkN65W+rQfUGF1bCBSaWNoYXJkcyA8 cGF1bEBhcGFjaGUub3JnPokBFQMFEDixneR/+TxCvULgNwEB/MsH/AyGGcZOlB6k RYEz+V7m5P3nwMH9qkEqr0TXkFfGtpc/G88eyRHwC8auDAW5BBm61bdyZRxkrtwI aB1+QuFefkhRO95+s2ZUhKZARUW/GTeLdLpp7lFxrLBi5+ASCzZRZdVgbEl3S2gZ IDIaQPcy99ZkeDvAEqc9dxqPi7T4R12FGrmDyMHOlowvkitxo1rIgqrjuClSB1+j 0Fw753twzyga1c//sk5Wxkv3AJ4gOWjI7ZvmY2aCPi9/S/VQ7xDkrhxkU1sH13/N jOIpGVSycwXZQABF1myhWWb4gNSGrlKZRkxIAdY5UeFozOQkvJ0REEZa3qx7Nbgt j29HvBa02ju0JlBhdWwgUmljaGFyZHMgPHBhdWxAb3JpZ2luYXRpdmUuY28udWs+ iQEVAwUQOLGeA3/5PEK9QuA3AQHW9Af/XQJyuk4or9q5ut4QGBrwP6mn8l4Sz93i r4571nuyKeRu7dDSkxmiYoIZ3LYbLQPM3uG2fO2TpG6vvsMp2bN/YWu/B3AHGVJZ 9N/yTO2H93isul/cLFl4hwvYHSj+4hiM4rUExsQaun1Kzq7NTfUkIvbwep0TfvNe cyxNd9M3oDPydC06GId6Kk1/HXpV8nM6ftsLu1RpOTPVnMmn3U8NfU4V7WzrWcVo 3PEqNKFJeZ0DSZRJW3iB4uu9fF++p/BbGXCZINBF1c6IW3fmbFWNH2TfJLJ0i+pE QGldx9UT2RqSZPxxWfJ7h9XPbZ9iOJzOuGrUWRWBV7gZZeCLMEYFpQ== =bMYo -----END PGP PUBLIC KEY BLOCK-----
D.3.93 Ollivier Robert <[email protected]>
pub 1024D/7DCAE9D3 1997-08-21 Ollivier Robert <[email protected]> Key fingerprint = 2945 61E7 D4E5 1D32 C100 DBEC A04F FB1B 7DCA E9D3 uid Ollivier Robert <[email protected]> uid Ollivier Robert <[email protected]> uid Ollivier Robert <[email protected]> sub 2048g/C267084D 1997-08-21
-----BEGIN PGP PUBLIC KEY BLOCK----- Version: GnuPG v1.2.1 (FreeBSD) mQGiBDP8ElkRBADQrtDGMaOawsdVCxQTrtCoa+VFeSebgBgIdfrgduTTOteV+bqz RYa94GBx3Df/LCxEtb8bgcL6DlD/B5nCjzMfwzW+JkqXDz7g96oVWW48jUIeNrYL qBZruvcopUEmH3iBZU8ig3lpJ5/XbN+IYGP474E2rnTNfaY26E0iWkWqtQCg/wIY KQKifk4Ibn3nbOlGoSQw3lEEAMPKAcgV6SgMYUE/SQXbSrrsKLQXDFKD8nAJ9+cF QCtxLwP/qwt5aMQwl0KAZ4xR1XEWAq6KGOGjPpm0SSjfmAYXgADTLAnx6zI1O3yq 2SLl5ydH4RBumWXAMssVCLUJJzXxL/NY7e2x5Zh5RHbYA9m1ntGhiWENk2G6zOlD HhzmBADL5zYL4jbgd2D+bzkiyCq5ncJhq39ycs7h2DijQGa6jR1bvcw/P2cBLleH AKy1g4padSlD6CZNDDpe2C3J+QihewU4dF7fHL6Glh5+pBQMQJEPMsxZJcJKapY6 lND8AdwqZiO8NNqPBvcMHo0Hzdvq+KsfjyaDNS5NXnvGwM0IY7QrT2xsaXZpZXIg Um9iZXJ0IDxyb2JlcnRvQGtlbHRpYS5mcmVlbml4LmZyPohcBBMRAgAcBQI9ySLP AhsDBAsHAwIDFQIDAxYCAQIeAQIXgAAKCRCgT/sbfcrp0xUQAJsE6dINq5+mc5gw ieGp3xSOMMp4NACg+LVyJ5/4v0BbeX30o1WTzXg98wCIRgQTEQIABgUCPckoMAAK CRDxMyJBG4Ct5uA1AJ9APWbgNCEePCQIcvvyHERzwaIhEgCeOwpBcx3nHA/2Zctr 9ucM9k/GOOiIRgQTEQIABgUCPckuXgAKCRCb4nAu9HrCyzMwAJkBpQYBe0OY33K6 afRhhwNftxu9VQCghMTqnQAdEaoHfKkcYYPAugV1xKOIRgQQEQIABgUCPck/iwAK CRCBvdPEDh+beTBLAJ4omqo0UIgkNPWSiRrX5rC0uHTpwQCeM2yChFqgvp4NzfEu 1IliZA3c0WeIRgQSEQIABgUCPclAJAAKCRCNSU00xw69UPyBAKCBogvUjrV75yhu ZkseAqtneTaQ9QCg54LR8gntcq+vk3TFR8m8cQipP6iIRgQTEQIABgUCPclU8AAK CRCiu/skDPlW9yk/AKDdMRhDyxjGuHSRJ7dBUkAXG9z6mQCgpTuFvRDT3IkJ9rz7 FiGAm+QbhsOIRgQTEQIABgUCPcoXyQAKCRCI42izMMk0irpGAJ4gIAsZgqj+/DZa HTQFTYz+EWT7sQCfSOG9j3mpI4/a6FDKeHhbmTkSzyyIRgQTEQIABgUCPcrARwAK CRAATVS4OT0kaXp7AJ0XGNyqzJFLnSOwSh8eLSaKjglMTgCfaO71nFRNoTj4ELJU 1XoKYMZlmVOIRgQQEQIABgUCPd5pdwAKCRBFPEVJAjDWAukBAKDdRrz8jnhQ+vCL QaIld141srNGIACeLvEAUo/HJvzKVHIJgu6f5W1wBzOIRgQTEQIABgUCPd5l6gAK CRBdUhyM5rFQFj4sAKDKCsTFsYm7upksTb54TF0h+u2KgwCgluvqiiiNY+HbX2lv hnu2vrYsqdC0JE9sbGl2aWVyIFJvYmVydCA8cm9iZXJ0b0BrZWx0aWEubmV0Pohc BBMRAgAcBQI9ySLzAhsDBAsHAwIDFQIDAxYCAQIeAQIXgAAKCRCgT/sbfcrp03zr AKDj+P/SJD+q22RIg+BWBp1j01ReGgCgp8wtMs31kCIaG74shWhkgBSYyuyIRgQT EQIABgUCPckoMAAKCRDxMyJBG4Ct5oftAJ49FgQ7xEwscOat3nsVimEhri9riQCf RQ+X3Xi55gZjDfgotzHMsPhDQzCIRgQTEQIABgUCPckuXgAKCRCb4nAu9HrCy7gq AKCAkBLPJZ+RZ6w0xz2RQ2AgCRuwFgCdHHjbecJgIcmI2s5pZXUF2Z6sqjiIRgQQ EQIABgUCPck/iwAKCRCBvdPEDh+beVjLAJoDBsVA4jZpenu1+/6mp/nbrNkskwCd EpOZBApWWhVdc3/LtYMs6WrqrKeIRgQSEQIABgUCPclAJAAKCRCNSU00xw69UDeQ AJ9PaXLlxRiTaqMQQvGXf6HN/5epkwCfWR6eQWeS5UCltbd/aVSg/g9vf1iIRgQT EQIABgUCPclU8AAKCRCiu/skDPlW99vFAKC5joJPDADSIG1YSman7WOkIM+IaACg iofiFy0zs2gtmVla+QQ/M6JFytWIRgQTEQIABgUCPcoXyQAKCRCI42izMMk0io+y AJ9z4MiKWKBTHQ0NIMKWfT8NxR4bzwCfYJYN/a9WDBbUcmmU7ewSJI5YA+iIRgQT EQIABgUCPcrARwAKCRAATVS4OT0kae5eAJ90ALtCnufEuAjdf1+Xw5ztjl0U8wCf WlmFg/LtK7UUyHnOZdeUt24FTmqIRgQQEQIABgUCPd5pdwAKCRBFPEVJAjDWAuve AKCMCSMdhbCVNx3UD7R/IHwkj/2O1QCg4MWBRXPxoS97IoEMjVH8e8vEYqSIRgQT EQIABgUCPd5l6gAKCRBdUhyM5rFQFn47AJ0Y7PloVqQLbnDL2qVXIFytEMvEXwCf Q46AHN/Yt81sitX+RXObDLWQ9h60KE9sbGl2aWVyIFJvYmVydCA8cm9iZXJ0b0Bl dXJvY29udHJvbC5mcj6ISwQQEQIACwUCM/wSWQQLAwECAAoJEKBP+xt9yunT+QgA oKU46+Zjp6wn/NMlVE/M2cmDOup3AKCAiVSP1aJyEXOLptWozuGNJ2fDIIhGBBMR AgAGBQI9ySgrAAoJEPEzIkEbgK3m94MAn1nbCsgPM/kKYtk0XG5XtLjK4vRxAJsH vzOZtOn8ckuz7AlM2d/wUGR5QohGBBARAgAGBQI9yT+IAAoJEIG908QOH5t5bi4A n3OjFEBI8mRSQTsj0Iz56PMbXdbAAJwJOBi6u+nLgEfhegQ5emDd7eK8CYhGBBIR AgAGBQI9yUAWAAoJEI1JTTTHDr1Q8wgAoNro206RIz4pDvzRphQrDpILy9IGAKDS YEgSUgv9ohMps/xE/O5tBi2UJYhGBBMRAgAGBQI9yS5WAAoJEJvicC70esLLjnIA n0YIZMq98VFuKst/c0q+zfH7e9Y5AJ4uc5lUWaqliZfEY5mhIzaG+fg6RIhGBBMR AgAGBQI9yVTqAAoJEKK7+yQM+Vb3YiQAnjlTSW/hnjpWIfqwurmvWOz/yPcRAJ0V s5m9CP2OEm/8cpUMh+CQjUaD4IhGBBMRAgAGBQI9yhfCAAoJEIjjaLMwyTSK5FUA nisMJFdPE6zo3GcTXDn7GdUTOjdbAJ99syT6ijQevXcZcCB3t9EwEHfcKYhGBBMR AgAGBQI9ysA/AAoJEABNVLg5PSRpmIwAnjHR6d01Dxaq2WhsbuGUfc8ULvRtAJ43 vLlCP4B8NVG7WHhKCGV8PaayzIhGBBARAgAGBQI93ml1AAoJEEU8RUkCMNYCLFYA nAlLX/rgFBSZY22HIevPsThLOjMuAKC7dOLmD28hTAi/2G7vHzRoXHQs74hGBBMR AgAGBQI93mXhAAoJEF1SHIzmsVAWkxUAn3fUf5wZirpDV95I+Wm0xp4o32TWAJ9f E3cHi8r2IOSzOSj1+dQMPjNZpLQlT2xsaXZpZXIgUm9iZXJ0IDxyb2JlcnRvQEZy ZWVCU0Qub3JnPohdBBMRAgAdBQI94hg+AhsDBQsHAwIBAxUCAwMWAgECHgECF4AA CgkQoE/7G33K6dOaSACgvZiV4D5cpSrRG1CCEL/1InOO6n0AoPZm2Tu21jUldjk7 JbhCYywRUgg1uQINBDP8EloQCAD2Qle3CH8IF3KiutapQvMF6PlTETlPtvFuuUs4 INoBp1ajFOmPQFXz0AfGy0OplK33TGSGSfgMg71l6RfUodNQ+PVZX9x2Uk89PY3b zpnhV5JZzf24rnRPxfx2vIPFRzBhznzJZv8V+bv9kV7HAarTW56NoKVyOtQa8L9G AFgr5fSI/VhOSdvNILSd5JEHNmszbDgNRR0PfIizHHxbLY7288kjwEPwpVsYjY67 VYy4XTjTNP18F1dDox0YbN4zISy1Kv884bEpQBgRjXyEpwpy1obEAxnIByl6ypUM 2Zafq9AKUJsCRtMIPWakXUGfnHy9iUsiGSa6q6Jew1XpMgs7AAICB/93gJFiuchJ MmENS5jIlSVFM8N1x/33SQpHw9Yuc3SKelU3Nm+u63HFMLEzMnr+5msl14hlA63W gC2cCuyZw90a9sSs5Cz6HZNdPgjfUaCRyhZVvGOqlSQBNgx01qH2VYekNmsn6Fuu m6cyZ/cwd2fpBlf0DWL0FOq1NzkPTKh6Y2y95DcpyRNl8abW2E0rhofxkWB8taKo mv6n5N8pLMK7SHLSv3cQXzU689czejNyHm5FbtcXxPrTMTwpgDmwbSubVj7Rbkkm ImnDGemOFGjv9uQjcuJNATJJgfK6IjNWyx9kgPmoN8qMNeo5bmzkN3SZduIrZITy QGImglPEIvfIiD8DBRgz/BJaoE/7G33K6dMRAnbxAJ9H2TXdTLPZQ1OUZCnoSA0t Sz4M7QCfdTT4428ML0KH1ozDZ3Ipizq3ic4= =6Dn6 -----END PGP PUBLIC KEY BLOCK-----
D.3.94 Guido van Rooij <[email protected]>
pub 1024R/599F323D 1996-05-18 Guido van Rooij <[email protected]> Key fingerprint = 16 79 09 F3 C0 E4 28 A7 32 62 FA F6 60 31 C0 ED uid Guido van Rooij <[email protected]> pub 1024D/A95102C1 2000-10-25 Guido van Rooij <[email protected]> Key fingerprint = 5B3E 51B7 0E7A D170 0574 1E51 2471 117F A951 02C1 uid Guido van Rooij <[email protected]> sub 1024g/A5F20553 2000-10-25
-----BEGIN PGP PUBLIC KEY BLOCK----- Version: GnuPG v1.0.6 (FreeBSD) Comment: For info see http://www.gnupg.org mQCNAzGeO84AAAEEAKKAY91Na//DXwlUusr9GVESSlVwVP6DyH1wcZXhfN1fyZHq SwhMCEdHYoojQds+VqD1iiZQvv1RLByBgj622PDAPN4+Z49HjGs7YbZsUNuQqPPU wRPpP6ty69x1hPKq1sQIB5MS4radpCM+4wbZbhxv7l4rP3RWUbNaYutZnzI9AAUR tCZHdWlkbyB2YW4gUm9vaWogPGd1aWRvQGd2ci53aW4udHVlLm5sPokAlQMFEDIE 1nMEJn15jgpJ0QEBW6kEAKqN8XSgzTqfCrxFXT07MlHhfdbKUTNUoboxCGCLNW05 vf1A8F5fdE5i14LiwkldWIzPxWD+Sa3LfNPCfCZTaCiyGcLyTzVfBHA18MBAOOX6 JiTpdcm22jLGUWBf/aJK3yz/nfbWntd/LRHysIdVp29lP5BF+J9/Lzbb/9LxP1ta iQB1AwUQMgYGsgS4QK9eGvw1AQFKxwMAgFh/hThe6nT9YUONHIdxWNaL8zUx5SEq 7WDCOTYqUCJoXJzwRcIlyHaZOO1OubsnOMyNWpR5PxDEfoXyV58UY1RH4cXiP55e yAgEtWQF6RtAvl7ikZmRxFr3QAVQ3QxmiQCVAwUQMwYdyB9/qQgDWPy9AQFtiAP+ Ob3Ee5S5j6JcOQ7OkJcFgAJgRkNX3XcyO3IECZpWpihGHkcWKaQZd76sKjvwBq7S Fznt8UxOwmqe5YSpW3cZGrbyFIrUU5nueL39eJsdyY2u3bK6CXeFikKWKOjiesMv U3GJttqaQZb+8UZyWNLSOpfPo0NVsbHk6jscEHLEHLOJAJUDBRAyCihxOgN22FUM Xy0BAf1aA/4jgZSy5F/J3R3EziV+yA3bFa2MVlY+SvTrwm+8JTTYgqmTaVpWJ34n tBobYtxKOb2o+Ie8QGdN1sbU5Nan32oOa44Qo/AUvr0SynANb3CoA6n+DsCPNx4z QXxO6+5mDdnWh2dx66MDAZpOAxX0lndZjhT752ZJbjTOXoXGgV2oSIkAlQMFEDIZ rVY7f8e8znZrHwEBblUEAKbFVE4oE+WFo0APTXeWdPmv6FbWacsOWTpYyyT976iX TGuk4nYX3GrYx2xU73ucdXZoxYDF/zEE3fM3//l3HMvz1+PpZyjaT3kn9WOGivhP Ch5gRnehs1+giG6MhmC0vXt5BpzdOhdgELWi8iRYEO9cEWhrsipkBhcE5+44im9W iQCVAwUQMfgT3jz++eS7QkvFAQEk/wP9H0du7o2mP4e+vuIJ7ZvLeEw/05+S60XC 67B33YahMq8BTr69R69FYHDcODG3Qmi3fCXfbsorhVWzdB+X87p0mI38E3lUOGiW 6pcSxdBOL7IKoHInCdQqF4WgWZOknN/mORpaxqyHvm2oWvNfe5RmtQsnBEPBGBnQ GtvzA4ZIDLaJAJUDBRAyEOLXPt3iN6QQUSEBATwQA/9jqu0Nbk154+Pn+9mJX/YT fYR2UqK/5FKCqgL5Nt/Deg2re0zMD1f8F9Dj6vuAAxq8hnOkIHKlWolMjkRKkzJi mSPEWl3AuHJ31k948J8it4f8kq/o44usIA2KKVMlI63Q/rmNdfWCyiYQEVGcRbTm GTdZIHYCOgV5dOo4ebFqgYkAlQMFEDIIucpYl6t82lyyQQEB5KMD/0dAWjf8yKCW +sjcX2hUUWAwbfWVYJuabBqMdrdaqSkDvQRzm0KXGVQ3BN0u2WRmr6q6JSzuWdFL 438rJwS9Dk9g+BVvveiMdXCQ/v4S1ZlPO6B7j8b+CnRg+GjdWcqbeGAH6V3HRlvB oC1B45yAyhxK7pbdFetgfVDyKoMQs7XSiQCVAwUQNYZ89VsBgeyXi/ZpAQHohAQA oM2qlrfjXD30cc6wf7rSermdHLGjDBIHI/kl/jYjXfoxVlPzuQ2gWLBMJJqmIMhA M6go7Ub40tHtmrLWQJKTurcTT4qYhBkFSr1gV4JfyjqEKWWa4LtA0tCwng4XiIx4 QJ1/yj4F6vHMtQQ0p91UQcteLNGqLQ/cYkeXZVTAWqeJAJUDBRA1kcBzZWCprDT5 +dUBAXDdA/9OoqwWqtgdykcOm1j7TuBqEiilg4PE7wEq8gADjkpvjkU8hCJWbmT/ XMcTckfehyOJYlkcN5U/JHJYMMpu7y4qZwDxq9lvZUghL4cl1B73KbgNcV2drTIh DX5i7fGR4u2CK0dztyuQ3KYBpJT179ERRDw9ZjmCgd3sri/uMz90oIkAlQMFEDGf WDRrWmeNgbKneQEB9DwEAIaVZQHN2TPyjk8sAUofM1ilZUpN6v8xp5O4SZhU4Z5Y R9e9t/lplxPGgDyYvlVzliVBUIMBCyekfI0lNqr5NptVVsmEqkSr3FUUDKk9sI7L NBhNTYIO7TK5ER09IpexNscSG/LzKyMJnZG032KgVIYRp7Fjx2R6uzKANf2/qyuw iQCVAwUQMkRC8Hy3DmMtBSL5AQGP5AP/WMRtE+DdMZMHLiYNXquzOd1MvfeylZbE bM9xIqTiRWqHkIMknSxZOGQWtmI1p3HspMnvwS8LcbzGZGxRdkIh7BdTX+9We+Cr qTevGPjY+3yO5eN+EAVwwyXloLbYrPTnwWES1lXSjoHN6EOn1YouJNbmdbAfKJNC j+7TZALdNAuJAJUDBRAx9vzphNbc3Le3wi0BAXBCA/45ftozyOJdxKYLpVQLpwSc 9bUyyPctpJCwzc2u7nFpaT7zdPzDiM5fgR6Y+EYGgjOIsSArHTvP52S9cwh/Auv+ g8WRIPbNxvwqq3DTqbC+fObhXeQnZZvpCYXQ0EDmosCv/Z8BH+Ley8m5o7misCWS fp7GXisg4MR3k3fg2/KNk4kAlQMFEDIEV2eOAs27CVkM/QEBX+4D/0GthUuUukWC ht62Gp1gA1Xv4pBVdpcbjNWs5Vm7JpY17ylVhnunFevd50uZRhgI8ZW3dgA8F45Z DYb+ORy1hZvTxL3jvSY6+rTLl1bfDdqcYl/tTy1DfQraYUyFO2H457Oq8mWX8Bh0 nyMTRoubmtkqF4YNLL2mJ8R8V5jrR9uIiQCVAwUQMgYuMpwp8Mbst+fhAQH/DAP/ c/TYArdPFIp2AFpHbYcMix0MlpWvH/Pm/5GBsWvH++u8FYVR1VxQ6w0cnj5bUeAF M90iISE7Q1+Y+sTQQqiMeuMsFy0dcR92ofRG3p1D3PgbfRE74fI0DzGGNJY9f8rL wqVD2QbcV1M1Jw8M9Fd1XLUQHNND0gl0kNVqm2vHW4CJAJUDBRAx+RRbpFCQLAnT 5k0BAXu+BADAbMQ52w/XLiOTHxf0HkzRBuASFVGbQJA5nuBIO877D3dw3iSghnjY 4glmK0UwhsGglszEJPv/jDpnZCOjppfgCLqyS6B3Hh0vYz9Ys3T+3zdo5HXiUgbI sbp20FrVBJUoDkEOIheZKsAYcbTnxD/y/ULKMnUTEdcgeljw++R+1YkAlQMFEDIZ +N6v719yl27X+QEBRkQEAJcjgLLAOai5PlqZOeAp8ffOhERJ7YKyfTxdwGDZoLrT 8B36+4JwdhwgaWWmlfsHko0wwWp9BKYju6Q+LGfu1JmiDyarUD2q9WWw62hk1Tns yK0TjCmr+ADvi8tNaRwUGQRJVyuoltKusm+SCqs48RSLQxOmYk7KVcD8F4WOgG6y iQCVAwUQMZ47zrNaYutZnzI9AQEQQgP/Z88RStJfdiSPlMk8Vn0w1fSUSjsAdiOc mARs0jiliboLc+cyWxh8JJAMe5eZFAcA5ZJ3A4u8KQ0Xx4NoXczq7S6uB5Un4pVS dPPb4tmhmzXZdJkoK17QfGNu8+lYxNOtjKKYZ7Mfv0KaANWOwdpg7HcRcXSecOa1 e6saKgSZbUmJAJUDBRAyGYL01ocrpT8NmN0BAd7iBACc/G/qpW6OwxgKmXqPV5qk eQKCl1NgiTIatm5avRd4h+whgLcPJ1K7zHCpOA+GOAQC8MLGnJnxJVAdsiZjgkqy ZTHez5sHUiVjJpuk/yaaODT2g0OpYCkSIo7/0uagg1SnknvWWIgMr/TNd+HE3SIJ /wipVc5wLNWE6r3orQTmz4kAlQMFEDGe9eHcgPKm1TJ8uQEBhMMD/iYQqUg/8RRf ZmbGCt38lAGGpxCWROsEBoM6c6p7/ih7AwpHvJoynO1iEmz3uLTdW7d+CguEOykT nmigR4ePSvhw52JZ9gOyNIVRhI81WFbg5Ku4wDdzb3Kcyo0cPuGmvetwI9SLsnZG dyhw5wKOMrYFBv/0gBQ14rgL2A/EwRkuiQCVAwUQMgJKVfKmgBGt1kwZAQEX0AQA vkt5G7pRADd0iO/wPgP3bZfQ32Xs0/QuEkQRrJdnJUBTBiF5jEP+7+5S16ykO1Ns 1W4DX1PLJsOYdrwSC+n9T8nsUpnN5s/SWOHq/CnmaXH+h9K0pB5fone0xdBr7k3T TxTvIXPRJ/hhukBzqm5AeDUWenMLX8FDIZNhR1wZ4xe0H0d1aWRvIHZhbiBSb29p aiA8Z3VpZG9AZ3ZyLm9yZz6JAJUDBRA0FbDyH3+pCANY/L0BAcaEBACWu8AG7JrW rw1fl68fcGmSS40OXhOsEDICXDG+sjNxFXQojPq+TSZYuJ4u1e8MNOTxsfd3y10r vztszJvFy8mA+1zaFrELqzGR/mNeOLSqycSxzJ8mBV8jLqb3ikirOz4uB9EsZBu6 GrtvgKmusULDg6ZvQruIJ8q8ODSYE/04uYkAlQMFEDQWoDw7f8e8znZrHwEB4+cD /05quZRK3E/eCkeHl3oCU+J0TAar995WS3gxloPM6vj/taeuAeRggVLm1Dq9MqmS hFhg+VwdluiH9uz2loK8Tlv0Sgx8fEMPCHFjBqVlb8pIJDRQ6WufUDZ1OPNI308J 0k95K/LeYs8gvH1/zSIMmeyr5lVCtZSNU8Y05iji1brAiQCVAwUQNBWssLNaYutZ nzI9AQGp3QP+OKSZpVgmBY7Z6IkQq52t1U4gTEYBgOm+T+A3ZdlrOo2ACURL+ago 4W8BMA0rPyhGRpAWH4OH5wTX31nBnYuUeXz/CKQckiVdQA4PN61Seh2Y7msi6V47 2kuc+Nt30ofsWrrSBlh5yU+iQXMx7kIU6Ampvwp7IILjSBOlJfcE7tGJAJUDBRA0 Muok3IDyptUyfLkBAT5fA/4rMfz2D2WYm7ujXquY7Mh+eTVQ0cjxxZoQXge0209d fwwqZDnxqKWnrfl1FIwCrL4NLvwOkyMXxX+hQKf5CY7HeiAt/O+9L+7FidGYnDHD Y7py9q5226n8HdxgCYAZGF/k4/rbYvdI49FAJNnwTAi7psi1EpQo1raruE4yVmqn EZkBogQ59zBkEQQA4jWzhgsNeyX9UkgZerRQdJZ3OOuCsOHIdR5Vf2fIMCgJ25zN 51jCuxbg49TVAowcvi2ajVKRqtYFmBw8SLT/a5untxWsXH5EmPq3SADeZaHMRRrt TD3TA5zFoFqr2H2ZJBxym7DehVhKqee5ScGwxdplWakSQ9m5yndYHLNaPj8AoNCT CXyS6KIVHjSpcxpT8Zjjwtt1A/97HBr224IZ2+So2tFbPNVMRVwKt/U7JlVCsOjo 3xF9GUSreDT4LGrm8Y67k+pAAcoR+KvE0NKGG1xWchmm+NGF7U7+9XUfHWAmFz1t 6OGmZkUIZSaHCWda9VUT9h61iU39PMhXV8ee/M2tK4wF/L/cl1LfaSHWsLKFgx38 HvHH2AQA2YsTtaYpNF0jSxKxmATiMH9sjgNlz/JFijibQoj/jtyU+dfHf+oPx/DA NCXpi1CCKmbeT14Q9n1mc2msa0tT1qJqj0S2Mm2gH4SxO3rXj4Zb/cnPrAxZZyxY FjkqBoeSEEdLxJwb0HUZ7gOs+aPqqz0+l+JyMuW7t3IoGsjwEzO0Kkd1aWRvIHZh biBSb29paiA8Z3VpZG9AbWFkaXNvbi1ndXJraGEuY29tPohXBBMRAgAXBQI59zBk BQsHCgMEAxUDAgMWAgECF4AACgkQJHERf6lRAsFl7gCfWqmRNrZDTMunpsdSLD1i rohDJjIAoICakbb+lQ3jlSkPgiTZOe3L7yv1tClHdWlkbyB2YW4gUm9vaWogPGd1 aWRvQG1hZGlzb24tZ3Vya2hhLm5sPohXBBMRAgAXBQI59zC2BQsHCgMEAxUDAgMW AgECF4AACgkQJHERf6lRAsEhwQCeI/mR3pH7oMN59R6hTiIGjNt7X0kAnjVUZFiM iYWkf5LeymkDrxWy5t/3uQENBDn3MGwQBAC46iYEw3jtA6oWtCD+VfNcR74eDT9W JCJ2vxJD6bN35fDXYjzXk6uyvX5Z0ag0yjKqbqsa/bPOuTTIeoxK/3zr/jh+x2L3 dFY88uK/Dit7FY7NM2+jDoETXZoJbZuNf3eiTWmI0JrSUBMHXJdTuBO0LfAY65tR OqzFwCgztqF2NwADBQP/TDM+25v5c0njS8NMofBsun5dtywOHjmbMedDgaZRGsa4 P+4/owb9jUBjk7GOtlL2edUSKBNuWYbKjDkW2134W6rbKDZYlnkXQ8Z64XIm5STB zfUEiu0sEFB8Cfe4oX8kHXa6kv11NOzK9qSv4zxmJTI3CMABi9fOu3R4F2XsuNGI RgQYEQIABgUCOfcwbAAKCRAkcRF/qVECwUUEAKCElDCyXmWq1T82/oT3eFk4WeFs jwCgnb++jBLoAgqu7BiWMBVe9sCLfMY= =qL8T -----END PGP PUBLIC KEY BLOCK-----
D.3.95 Hiroki Sato <[email protected]>
pub 1024D/2793CF2D 2001-06-12 Hiroki Sato <[email protected]> Key fingerprint = BDB3 443F A5DD B3D0 A530 FFD7 4F2C D3D8 2793 CF2D uid Hiroki Sato <[email protected]> uid Hiroki Sato <[email protected]> uid Hiroki Sato <[email protected]> uid Hiroki Sato <[email protected]> uid Hiroki Sato <[email protected]> uid Hiroki Sato <[email protected]> uid Hiroki Sato <[email protected]> sub 1024g/8CD251FF 2001-06-12
-----BEGIN PGP PUBLIC KEY BLOCK----- mQGiBDsmLLMRBACzChIgYTqLMuheXTZHCAY+wFm4wOcjUhx5PkzCsb1H2qGO5/3p LNv7Z1zaGRXQMUSGphxM+Sipe5EQV+/1OGAGcN5Lz2sOd7otDbCdwR92QIzYnyfn 35pkS/rabz+UFKEwh+ccBQDKZg6oDRD8DtsLDzAvBag+fauln2uqlDlKSwCg4AGc ke9KiRL+VZJgD7laVQMT600D/0WAnR8FgnA5oEDqLRDP1tZErGiU7TPUVkq7ZkpR ViQsJTYQIzxWXF8wkD9j0QqC6KgkChYifW9r5+GJuEh857G7NMDh5CnGcFsr/9uh wn1LH1iJkG5FPb6Zx1HaMPqEbvSwp50DF/8kHaQlAqjQfzABW+BKcsHAZiTV00Bu S7yEA/wLmej2UdFb+CvoZC4qDTwj/Fy6xO3ME3D6hCBLCR4KeYT5IT/J70G56g1/ Ic/Itdj3cOf/RaqsYXizK9GMvsEFRJiMJTNKREpH5sztAyyCVkhDAGAA73lOf9y4 sGq5vZ6h6veFEQzFTMToaV5acMRMEJK/ugaJkTEGq3Gn2tQjabQfSGlyb2tpIFNh dG8gPGhyc0Blb3Mub2NuLm5lLmpwPohcBBMRAgAcAhsDBAsHAwIDFQIDAxYCAQIe AQIXgAUCPzY1pwAKCRBPLNPYJ5PPLQxsAKCipc7Tk4QPfaTnZAc3J1H+Vmc7OwCg y1xlg6kRmKFhWobRRX03sG5heIW0HEhpcm9raSBTYXRvIDxocnNAcmluZy5nci5q cD6IXgQTEQIAHgUCPzYz/AIbAwYLCQgHAwIDFQIDAxYCAQIeAQIXgAAKCRBPLNPY J5PPLbsDAJ0euaxaoZDwaaIFUtoZAQhb1V9S8wCgsLYKWmC6hiawq1GcHx89kUDo FS+0HUhpcm9raSBTYXRvIDxocnNARnJlZUJTRC5vcmc+iFcEExECABcFAjsmLLMF CwcKAwQDFQMCAxYCAQIXgAAKCRBPLNPYJ5PPLWYPAJ9dKxYSQigmtLX3LwEQcfCa /GvtgwCg2sCQAQsuE0HibUhUUMx+9uxg+m+0IEhpcm9raSBTYXRvIDxocnNAanAu RnJlZUJTRC5vcmc+iFwEExECABwFAj362qoCGwMECwcDAgMVAgMDFgIBAh4BAheA AAoJEE8s09gnk88tIj0An1tD6abQ1aLuGYXR8m0rt9qkfjOgAJ4jp2WzHiHLAsVe PbFE6bBuM8sXcLQcSGlyb2tpIFNhdG8gPGhyc0BhbGxic2Qub3JnPohfBBMRAgAf AhsDBAsHAwIDFQIDAxYCAQIeAQIXgAUCPzY1qgIZAQAKCRBPLNPYJ5PPLZ9oAKCm q49oDZQjcOyvFU8/KDmfbn4BDQCgvoc51W3coHVSnCJ2hdZ14bywoaC0KEhpcm9r aSBTYXRvIDxocnNAdmxzaS5lZS5ub2RhLnR1cy5hYy5qcD6IXAQTEQIAHAUCPfra 1gIbAwQLBwMCAxUCAwMWAgECHgECF4AACgkQTyzT2CeTzy2vSACaA9NzC8lloD/h JicT4dUgvF61CpAAoLGalbhtBKr0NMoDud6MOZw6p2i+tB9IaXJva2kgU2F0byA8 aHJzQGpwLk5ldEJTRC5vcmc+iF4EExECAB4FAj82M6ACGwMGCwkIBwMCAxUCAwMW AgECHgECF4AACgkQTyzT2CeTzy1mmgCdFq1WT+cD8YVNSyrF52B14Q2fe2kAnisi jFJgnfC0JG9oUsR+cbCgwVy0tBxIaXJva2kgU2F0byA8aHJzQE5ldEJTRC5vcmc+ iF4EExECAB4FAj82M7UCGwMGCwkIBwMCAxUCAwMWAgECHgECF4AACgkQTyzT2CeT zy0lAQCgmrcr/smdHBkIjoo7FWQfu7SUVaQAniMv9wpgxs2aJuvq+AaPZqfy2+LX uQENBDsmLM0QBADx1OyHXOriU8+yIZEAq5uVFfOSf+WpjMwsr/m+ZPCKxvMVgQTf gGy/591XuO6upJ3N6Jc+XEq/fJQtaNI2fP7uViSHPjCXJycDS5kYiGK0USf7Z8wk 7txq/FnIaHRtD9o24XrHFkFi4TutLSbQjvh/Du72jHQBdAeMcCgMnKyXHwAEDQP+ OusHspKiVZbXgA/S0UNdHGPu9xkUbzjEPHP096X7cdFugYYP8TrArSNvQlIWMy96 QbgC2WW4yCBc09MVR5jLGpBX11d9rNGjorbJtdWEoYbDhE+jd2tvUvi1OLdpsrOb 3LJA7dC+966Lb7Wp+Vh6iPqRfs4+7IveWc+9SKY5rk2IRgQYEQIABgUCOyYszQAK CRBPLNPYJ5PPLTHoAJ41BFtRWr51zPq1YC59HnY1tPhAVACfa9wBW5B8JtRPOGg0 F7Gi41lcFhA= =uLMC -----END PGP PUBLIC KEY BLOCK-----
D.3.96 Wolfram Schneider <[email protected]>
Type Bits/KeyID Date User ID pub 1024/2B7181AD 1997/08/09 Wolfram Schneider <[email protected]> Key fingerprint = CA 16 91 D9 75 33 F1 07 1B F0 B4 9F 3E 95 B6 09
-----BEGIN PGP PUBLIC KEY BLOCK----- Version: 2.6.3ia mQCNAzPs+aEAAAEEAJqqMm2I9CxWMuHDvuVO/uh0QT0az5ByOktwYLxGXQmqPG1G Q3hVuHWYs5Vfm/ARU9CRcVHFyqGQ3LepoRhDHk+JcASHan7ptdFsz7xk1iNNEoe0 vE2rns38HIbiyQ/2OZd4XsyhFOFtExNoBuyDyNoe3HbHVBQT7TmN/mkrcYGtAAUR tCVXb2xmcmFtIFNjaG5laWRlciA8d29zY2hARnJlZUJTRC5vcmc+iQCVAwUQNxnH AzmN/mkrcYGtAQF5vgP/SLOiI4AwuPHGwUFkwWPRtRzYSySXqwaPCop5mVak27wk pCxGdzoJO2UgcE812Jt92Qas91yTT0gsSvOVNATaf0TM3KnKg5ZXT1QIzYevWtuv 2ovAG4au3lwiFPDJstnNAPcgLF3OPni5RCUqBjpZFhb/8YDfWYsMcyn4IEaJKre0 JFdvbGZyYW0gU2NobmVpZGVyIDxzY2huZWlkZXJAemliLmRlPokAlQMFEDcZxu85 jf5pK3GBrQEBCRgD/jPj1Ogx4O769soiguL1XEHcxhqtrpKZkKwxmDLRa0kJFwLp bBJ3Qz3vwaB7n5gQU0JiL1B2M7IxVeHbiIV5pKp7FD248sm+HZvBg6aSnCg2JPUh sHd1tK5X4SB5cjFt3Cj0LIN9/c9EUxm3SoML9bovmze60DckErrRNOuTk1IntCJX b2xmcmFtIFNjaG5laWRlciA8d29zY2hAYXBmZWwuZGU+iQEVAwUQNmfWXAjJLLJO sC7dAQEASAgAnE4g2fwMmFkQy17ATivljEaDZN/m0GdXHctdZ8CaPrWk/9/PTNK+ U6xCewqIKVwtqxVBMU1VpXUhWXfANWCB7a07D+2GrlB9JwO5NMFJ6g0WI/GCUXjC xb3NTkNsvppL8Rdgc8wc4f23GG4CXVggdTD2oUjUH5Bl7afgOT4xLPAqePhS7hFB UnMsbA94OfxPtHe5oqyaXt6cXH/SgphRhzPPZq0yjg0Ef+zfHVamvZ6Xl2aLZmSv Cc/rb0ShYDYi39ly9OPPiBPGbSVw2Gg804qx3XAKiTFkLsbYQnRt7WuCPsOVjFkf CbQS31TaclOyzenZdCAezubGIcrJAKZjMIkAlQMFEDPs+aE5jf5pK3GBrQEBlIAD /3CRq6P0m1fi9fbPxnptuipnoFB/m3yF6IdhM8kSe4XlXcm7tS60gxQKZgBO3bDA 5QANcHdl41Vg95yBAZepPie6iQeAAoylRrONeIy6XShjx3S0WKmA4+C8kBTL+vwa UqF9YJ1qesZQtsXlkWp/Z7N12RkueVAVQ7wRPwfnz6E3tC5Xb2xmcmFtIFNjaG5l aWRlciA8d29zY2hAcGFua2UuZGUuZnJlZWJzZC5vcmc+iQCVAwUQNxnEqTmN/mkr cYGtAQFnpQP9EpRZdG6oYN7d5abvIMN82Z9x71a4QBER+R62mU47wqdRG2b6jMMh 3k07b2oiprVuPhRw/GEPPQevb6RRT6SD9CPYAGfK3MDE8ZkMj4d+7cZDRJQ35sxv gAzQwuA9l7kS0mt5jFRPcEg5/KpuyehRLckjx8jpEM7cEJDHXhBIuVg= =3V1R -----END PGP PUBLIC KEY BLOCK-----
D.3.97 David Schultz <[email protected]>
pub 1024D/BE848B57 2001-07-19 David Schultz <[email protected]> Key fingerprint = 0C12 797B A9CB 19D9 FDAF 2A39 2D76 A2DB BE84 8B57 uid David Schultz <[email protected]> uid David Schultz <[email protected]> sub 2048g/69206E8E 2001-07-19
-----BEGIN PGP PUBLIC KEY BLOCK----- mQGiBDtXc9MRBADg4tN94el8rq0ZMUqB2jEVACg/UfYjtsaboDL4HBBUH+P+Wxic 9JqotcTbT8pJGeRpeXbfO0YHaAFnUfilhoFkeLyAgDvnUP9Z77DjFpliLAKlvuCz Lxi4UxgQXRdedNCg3omrxQWx7Yx067GT/yw4RgvogOuYBX0l3AJ25/WBxQCg/6Dj TMTu6iYR2Y6dEL4NGs9PnBMEAKBlhelAhzYoMpcWpk2VITUgONMW+Oi2JDTmwDd+ 1FAUDc1mHSoNBKPUrCWyXiwfzL09/ROlK/KMR6YoYtV6d66zZ/dQNuzrMhsis+Ou PCtvcaR5NGln49THgcw7/K5gTjwrG1xA/wcwnvUp6sxjh4p88meI/LNBAstixb3z FiLDA/9pAqn42B9ZBL1le98DTiLDemHvQFgXu8Oj20IIF0umyJRBfKwDY6iIx0gd 1rUKua6XnqMSEg+LmHmSfDBaAOsFTdnL7wVU0tLF0V9goxU4qDZjw5EeMEqnk7tg /6REIvtdOA/GLOmr/Q0WA4JEukcih3AQ9iFnwg7WAp0S4GF6gLQsRGF2aWQgU2No dWx0eiA8ZHNjaHVsdHpAdWNsaW5rLkJlcmtlbGV5LkVEVT6JAEsEEBECAAsFAjtX c9MECwMBAgAKCRAtdqLbvoSLV78JAKD4iJ2kNeTsYQnWZ2DeytAeqVaKFwCfTIQE lFPZyaQr7yjthREE+8SPZCG0H0RhdmlkIFNjaHVsdHogPGRhc0BGcmVlQlNELk9S Rz6JAEsEEBECAAsFAj5S1iEECwMBAgAKCRAtdqLbvoSLV4b5AKCljokqRgi/pbDa ZebYLluQCIkbgQCg+jSKAIi1r+CZiaCJdqk193IZVnm5Ag0EO1dz0xAIAPZCV7cI fwgXcqK61qlC8wXo+VMROU+28W65Szgg2gGnVqMU6Y9AVfPQB8bLQ6mUrfdMZIZJ +AyDvWXpF9Sh01D49Vlf3HZSTz09jdvOmeFXklnN/biudE/F/Ha8g8VHMGHOfMlm /xX5u/2RXscBqtNbno2gpXI61Brwv0YAWCvl9Ij9WE5J280gtJ3kkQc2azNsOA1F HQ98iLMcfFstjvbzySPAQ/ClWxiNjrtVjLhdONM0/XwXV0OjHRhs3jMhLLUq/zzh sSlAGBGNfISnCnLWhsQDGcgHKXrKlQzZlp+r0ApQmwJG0wg9ZqRdQZ+cfL2JSyIZ Jrqrol7DVekyCzsAAgIH/1AtvAGCJchvLFoaR5KNocKcoUMe2NrpRrFS3DsYOsXU 0U95pmAHJaMt+wv4UDs/wNzOzC6stRML+3lg6sYnSgddH+N/DA0b5jQSAyNWlL87 j08h3ATaPeDD6qhqFRe3uzpQMAJJWbeTdyiT2vwgglgcaJWuVjYSfkkxX7AVDFHw C4IOuZ0aQhHyHQsGQURTg+sotMx+kX68o7oGZqBBOcr8VdFyrlq0Tq1b/i0fJnn2 Nz5hY+OOXbyeoJbaY0KiGnnMwHmeZ2eJWk1cCHUZnrY5WOxYQHail2KHXxhYuPoI xsL0y+XdErX+lc2BiEbvXROs+VxEo/3/BVJXAIar3nCJAD8DBRg7V3PTLXai276E i1cRAsj2AKC26JMJWsvd93UUWRXDKmU46MgLggCfTOIjPheQwY9VCN3jO9YROzij QVE= =qhh7 -----END PGP PUBLIC KEY BLOCK-----
D.3.98 Jens Schweikhardt <[email protected]>
pub 1024D/0FF231FD 2002-01-27 Jens Schweikhardt <[email protected]> Key fingerprint = 3F35 E705 F02F 35A1 A23E 330E 16FE EA33 0FF2 31FD uid Jens Schweikhardt <[email protected]> sub 1024g/6E93CACC 2002-01-27 [expires: 2005-01-26]
-----BEGIN PGP PUBLIC KEY BLOCK----- Version: GnuPG v1.0.6 (FreeBSD) Comment: For info see http://www.gnupg.org mQGiBDxUIHoRBACGAbIspofa2HTwV0Y81ZgrizVgvsHduKRMYmu9scX6eFSQWC2a JLXXnMJMK97LG2m6qX/hzjxZKU/n2eNpHa3h9zLYQ/8VdN+AFHGZtgmZ7xe7UpBI V2YohykdmgKqg8WuVQGrNTwbkaAFeLnG3yXhR83qukRvv+qFfXbEF+1S2wCg6lLg YJ6U4J1pfTO95Rd4hw5v6DsD/0hUfa6C6C6xjME6P7r/ORd91+nJsfO0pcV1rK0s yCMdAy/zdUlKpsNF9vS0qhCFonuOHWxMEe7D8L80oUAwlk4RrFBm+Ch7RoBGYGru aEom/7JGNoRqUD2CKbFnkAYi9HP6XlXcpgm3GO4c4VtIcEbgywjw7rNhmNoYLrZV YUb0A/9mNCqpPTd8ngm7kPyTTMJitYEVaBPXEdiPueYJND+eI9AQkcqYhs6LWq4c jgmTNeImQ+kR1UeDj3dOwUDqhGmLPN60nD+Q2oHHBif8NJOu47mx1dgdriM9FsTN 3UbeSve+mY8Z8zcPIYKl2UJLPZckWgq4pZRrE147cnKHSHHM9LQtSmVucyBTY2h3 ZWlraGFyZHQgPHNjaHdlaWtoQHNjaHdlaWtoYXJkdC5uZXQ+iF0EExECAB0FAjxU IHoFCQWjmoAFCwcKAwQDFQMCAxYCAQIXgAAKCRAW/uozD/Ix/ZB8AJ989jyDH1G2 T1KMoNd7gPk9tAw1VACfXJgkrI42ShC4cHz37xrVLXeJp9i0KEplbnMgU2Nod2Vp a2hhcmR0IDxzY2h3ZWlraEBGcmVlQlNELm9yZz6IXQQTEQIAHQUCPFQ+0AUJBaOa gAULBwoDBAMVAwIDFgIBAheAAAoJEBb+6jMP8jH9P+YAoM72fnNwxxcDjb+3Mv3A CfbHonYCAJ9lfK9fIbkgfAHo+2kwnOEN4yWxzLkBDQQ8VCB/EAQAzzIqOgms7u+e UKampP/5U9G78HA3GIkVLcAeq5FfpFtls4NmSKz240zNxXmABWTSlBmOQvMdhB08 vRbzEsxPoVdNaF+QvRZYEr5+2bOM1pnHqYYMyUKwN83LXgTDnXxas4mtrkgngZTe tGdFQ3PIVqW4jV0MmnEmaqde0nMJ6XsAAwUD/2z82PDDwFBu1Ogogh63qE69HSQt 8weHX+Skmi75jE3r2niUlx6B0IfLXzFqP33vyrsov7QHgAuOjNficisbC73o3gjp voJ2RYB2IfUCgeFvipLpqY1TWJ3bF52TYnJg4rrEWd5OWs4FB0iaJ78LVWgq3WsN zfgcgfQ38d+scJu4iEwEGBECAAwFAjxUIH8FCQWjmoAACgkQFv7qMw/yMf1PIwCg nSP0i+q9jhEf9T5xA0+qg2yYB/IAnjvd/tA+2/5bP4pObE/oRNjIVZBZ =YPu9 -----END PGP PUBLIC KEY BLOCK-----
D.3.99 Gregory Neil Shapiro <[email protected]>
pub 1024R/4FBE2ADD 2000-10-13 Gregory Neil Shapiro <[email protected]> Key fingerprint = 56 D5 FF A7 A6 54 A6 B5 59 10 00 B9 5F 5F 20 09 uid Gregory Neil Shapiro <[email protected]> pub 1024D/F76A9BF5 2001-11-14 Gregory Neil Shapiro <[email protected]> Key fingerprint = 3B5E DAF1 4B04 97BA EE20 F841 21F9 C5BC F76A 9BF5 uid Gregory Neil Shapiro <[email protected]> sub 2048g/935657DC 2001-11-14 pub 1024D/FCE56561 2000-10-14 Gregory Neil Shapiro <[email protected]> Key fingerprint = 42C4 A87A FD85 C34F E77F 5EA1 88E1 7B1D FCE5 6561 uid Gregory Neil Shapiro <[email protected]> sub 1024g/285DC8A0 2000-10-14 [expires: 2001-10-14]
-----BEGIN PGP PUBLIC KEY BLOCK----- Version: GnuPG v1.0.6 (FreeBSD) Comment: For info see http://www.gnupg.org mQCNAznnjPsAAAEEAL5gfaY7RP5vm89lqmjGAJRBFLM/qzHJKrYkRVDASeLZ0/JI Bfypd8N1vQz80tnqzOh7aLgAskgluyx0O9EuZXTJUwm+ew6wA8vh8JA0kpI5g3N5 wjXQNWPxSCeNIz1hbgAPtRunVLXXoaxxCQziU38bd2RvzlvgQdbgof5PvirdAAUR tCxHcmVnb3J5IE5laWwgU2hhcGlybyA8Z3NoYXBpcm9AZ3NoYXBpcm8ubmV0PokA lQMFEDnnjRPW4KH+T74q3QEBKlED/1F8UjkufYD0G9eV7X5ujAVffIBl6nvHVw4+ /m+lXxnUmOInk8AUmHIxK62BJ9CPWHegf91BsGNMVA7cQiF+atdz8Yy4h1Snt7FB OsL2Ak0g2WUrIDfB+N5SB/EjdK0BdURsccYbORGVIveveUNmxuW4jUZWcInCkDx4 FTGRxzAFiQCVAwUQOeevO3xLZ22gDhVjAQHAVAP+NWdTbxipCQANnRf4BNl492mG VN51MBZnlsy/lyMu2yckR3eacaXmp3zKardwex7Ajle5XC6sJ1H3twYv8g63eqJ4 XuxC9Uxmer2mj7wibcO2srtwv2hgLMNVjJrClALolQ6WT7/6L1YENP0Ef26eJXnw pwXdfaXurbwnv4tyOOGJAJUDBRA556+fvdqP1j/qff0BAVUtA/94+oMC9pJgXi+0 tbwUsAu/pJqHByjCjO+LscH+gtqb4VhfxdEllHTVj5Cju7o+HcYZdtTRdggx2FqV zaCp2kq1kbEGuQCJzwNHkG10I8C5YlyXUaYGwX1gEPImzTpOI0C3Any0UvK4KQsl Crj0UmRARVwzulGYE7hxknivvkdbw4kAlQMFEDnnuKvPHrUDIjJ6AQEBL3gD/0CL e4R+dknr+zAUfldFg+cYzjzjGNENjWNuz1hqw3SMC0RPPdXtysSNQJGzBTtt1PEW whlPDKA1Wg1y0BLt6wDOe1LIIZUe+nv3OELd9M7D/2k9ctHilyqSdON+pPiCmUVK MtA8sfP5GdVsS8G6qFVFFvXzBnNvlcsuVjTA72ZriEUEEBECAAYFAjnug20ACgkQ IBUx1YRd/t1J+QCXQKpkZ5rqZ51SbcgRaFI0yyab9ACfXujgbkNmaxHGnOCxGzIp VJDnXOqJAJUDBRA57oZATVYoIXkFDBEBAWL6A/4/LJE/dP2EcrCAFn+GKhLJjdtq ks6UpyZ35UlEYdgBldTX79TdJIFUte87SZ7b3RVDpOMHpGj2jpOgRfZj7+nGCeLZ DstPcAJJSHc7qvdrv7egu97p8dw6nxrMw3oR2VRptivQzIbNkvU+lIQ2exkVHkgR WFGrNBkWJqVHYN3Sq4hGBBARAgAGBQI57potAAoJEML8hqolOUaLCDIAoJ6u7b1b vPN0yh++SWLsBRL71woLAKD7MhDamaYfKyJwjbZbSHevr17tjIkAlQMFEDnugJUf f6kIA1j8vQEB59wD/jBIsmEMqCTKTefHfng5B978SCIkrVq7gTOhafidFKD9KEme LVYJYmi+L2Rpa+vwfUqt/gWyoh6svM6PH63HVb+7Fjv1nmEQM+mSabNq/kDgmpjg 9QPHbMjcCU/vLSMu3tdmCAzZBLAmTBIZy1pnV8GkF/gCxwR+Fjr00F+g+/siiQCV AwUQOee+9y1ZDtHS0qyNAQFJFQP/TYnSKTs6X0Re/1CD91w2pGRzEeumO+hNs1aX sWHQ2VL1JGI3lRvGf8CkduPVScGsPENN7IYKieCToKfL5bBAyojqN5ZqFV0J92ZK Tk28HQplz9B0KsgXLRwK9q26zyFedMJhG5A4Jp4B53cGOpHXljTaSVyvBq4Kk0Sz Qe+wbi+JAJUDBRA557s4mAfmW9hLWSEBAdb9A/9u6umDds1HMyvwsoW1MLwlexhv /74gv/K/Z64YGdYGJcIwgQihJg0AEXjVg3UtpCLpJase91DYfNpj8u877MeAxuZv W4l6BF5Pess3NbphHMpUjsBXhOJwb1pHTwOFk/qjOVvRZgD8tbykzcxF/u8IUhBd RJG6fUrjtIzLQBLiM4kAlQMFEDtV12F8S2dtoA4VYwEBHacEAKKsLSNwV7aoyqf3 yrbdOu8H4/WzYjBLyPqlGFHa3kSH6VPO6Hv/+2/fEgL9YiuxwONAPjeMUqhyoQts eLCR5G3TwA5WW0VEvkOjFJjRGNqlQ1L/1OAJGaHexKLdAEamzK2tcr2S69zHik2x 4p5KIMx7KPNdJlUrQwQnYSjGtEXyiQCVAwUQOe8PYqjOOi0j7CY9AQGLkgP/ZaS6 jBnmL5Rniqp6acM3q3C+63YP+e37R+vcbGHrAMuyOMmGoKwq/955Rg8VRDPNrDpL M1PlWBcmitrxXr1+NaEuN9+5NKeKnpPEf8MXXwgjUe8vl4MZMbSOSoYGOy3x9f2R LwkrHQ84Ma9+DYHD9dpt2fGXOpsSMM2xP6qVsOSIRgQQEQIABgUCOrotcQAKCRAD EujDXYzae7/qAKCPAntk7ReoP991XUYDqVnDlWnyOgCfRUHDScDh+nOlsyBBZ9IM BLKRcjqIRgQQEQIABgUCOrmLHgAKCRDSD9QFytUJxsZhAJ9iaHp7M9Sz/fVbrdxV AYj8IgTpzACgkLisMWdl06CWRp8/WlQ4wIUInzqIRgQQEQIABgUCOrozZAAKCRDa 1acZvMEx3qFNAJ0RMwoNTlUc65TnsCtrIRP07aiipgCfRYAeTFJFAde2FHE/cfXL XAbUYZuIRgQQEQIABgUCOrqeuQAKCRBL2KFeEWrdp1JyAJ9XiSLygWe4U9dYZL+U 6XqXqbVMgACfa1NwVeHLBjb31nLlus8eCZpQOdOIRgQQEQIABgUCOrqeOQAKCRBq g0XINN4vLwikAJ0dfdqA6A/KbdETee5vtrYRfgxcvQCeNVp+Bz2iD8ZmDmIRCLq3 sZuCOWaJAJUDBRA6ulth9u84uPhDcHEBASgyA/46x3K3rPzitwnwFLSwg12tdjVp t/rl04rScdA2WPAjr9TooFJCMBN+DBmcIt+y9puE4kSHYuOqsDgSBxPJlDa8U3B0 FwJKBxnr+FEVqpfsvUf0Y1WT/3nD1z9aWUwoKpoJyvHiWJwagk34Dzv0FFA/3s2t Cm3PjQ12xwztcrrdSohGBBARAgAGBQI7VLq+AAoJEKK7+yQM+Vb32AUAnjXWXcQ2 iJ/wQWfEY9JA5PDXNreFAJ0cLQESRA1uii0bHFIfdUr07PhOq4kAlQMFEDtXQW3h 1PwU5tB0cQEBEMUD/3g7h8wCNzbbtLh0/l7/1WlFL4eeRPkEVLdGIQfB25Q3qZ7B eSZNef2LMtTUqoQtpJTiHWg6BDsr0Sn4zIu2m66POh3wEbc8zbBci4zLr8VFQ2b9 U6+ABGeMtNrBpJyftZVZwtCD3f7i6N+wAEi3hcOq46THmaxNuHEW32l9rDJBiQCV AwUQO1kQagZ+Xti/tWVpAQEblAP/TECpzEAdlLRZUSP3yvE3jeqbVi88UbNrD5Xa /AvBCctlXpFzA9AIO4dILyztXykFHXrVVTY8G+2EZWrsiCBPrMrYgORPX1n9x4WV RoTvCGvb5rs+wStsHAJXNEX8co2C34qc4jpLIs/NAtIzgI6MoFcf8Qld9oMbwQSo lNlc3YOJAJUDBRA7adA9I+Ri1L97pCEBAeecBACdFGVUzCM7q2uiDPInIhPsJKDb 51Rqt9UBTvXJ3o2Ztt+9bcWwIZ829VWcAE+VQ616jF7an1tzZlRrLx1dh5pcIZOl h2Mx2aMaFxwKGnDlixwGio536dUKuMfAvZnTqW6RdapySOUjD2lDYuyfw65ns5jp 7DTTaEazd8Q2ZVBlOYhGBBARAgAGBQI6uZEJAAoJEJ213TFSWb7JAEEAn0gFmar8 1oCz2p5mRLtio0ItmNYlAKD3dmsqUAgdd+Mz4G7ax8JNelfpN7QrR3JlZ29yeSBO ZWlsIFNoYXBpcm8gPGdzaGFwaXJvQEZyZWVCU0Qub3JnPokAlQMFEDnnjPvW4KH+ T74q3QEBMeYD/03sPgJ0QKQXzSRGyiVZBkZ4frsFj6nH2IP9+zCTRUlX0uyo6f1Z 2RC3a++MbaKFR/LUmdZ8DkOfOTcvsoIQJ6BOQO1/XpOkppvhrYRUU7a6C9wM7ptW EJvx5IcmWk5oWxmx373ecPb5MkhiXK85/NRxhlS5PG5kcz2ajJ7imYnuiQCVAwUQ OeevZnxLZ22gDhVjAQGn2AQAta7mxgLMyGKhq9msyQ2rITAhEvhoYM47OeOgyq5F Kx0b0rEmIjC+sDx3YOsbauw/Z5bAYzZnUmhe65KKA76eITqlnMt1ykaDu0jQLGKc zXjuLCMCDT/JCZStoyt6XhG9R+R8PnXk80PtZlTJjHuJyghBq5fzrIKs0k2G7eVc hnKJAJUDBRA556+nvdqP1j/qff0BAWVdA/9m5bMpkhnxDcfApaDp6mF2hEdacuHX rMXOzsrTuFiFoJhByXfMbMDM1T8Hq3FU8TJ3BQ/ydgoeiuvWJ5j0clBegCbxS7tH /FvlnZBikNeARFTD0m5HhmG+vzIwhe2sjh7/0dqaj1RMwLPxrQVyukHGnzyFodjc DJy1jWEl1Onyt4kAlQMFEDnnuLHPHrUDIjJ6AQEBNF4EAJbWN0TBkhndWI0ZwzYB ecji+VzV04rCZzgg+XCX4p6YfZn/T9GmP+11kLg2M6RZMxXHhDoGyySaJnRow3wS 0JHvpKH5nWqeroWhGjWdXbtrlh4e6NbH/72e+xcBCFumuYRntZUlq5tjrGYa4TUI F87ibvNipGJ+12Ia2xg3biwIiEYEEBECAAYFAjnug3AACgkQIBUx1YRd/t3ncACe LGaEhnVagJXTiufqtHb0ukCwBdsAnikTuFqH49JGFZ1X62vtOPWzrg1diQCVAwUQ Oe6GS01WKCF5BQwRAQH2CgQAlplYPCet71rkFQpsgzzcZR5YtQS+PIeNLXTStuOc DPtTK6069s/1MmAYaNoa4B0nYXw8iUjuBra8W7mL5bWKj1/nAYMsdIvt+QJeBjCM 5b4KfCdFxpm0LPmGHP9SIHgJxptJJvGOsZ/doYYJh8EWFMuaDnDKxyF6Xf8TeJo5 uPqIRgQQEQIABgUCOe6aLwAKCRDC/IaqJTlGi8jjAJ9SwrJ1diaDEhfhxfXz8dLz pmmolwCgqf7h4Y78pGRPi3V9m+tfcGk8MaWJAJUDBRA57oC0H3+pCANY/L0BAUOa A/90Zs74A/fud2gsqPPW1XXxLd6XHD3s8UK7xgVxshq/0+Ufa1uOn1JioAOgYf5m qRe8qyN7j8V1q9tvOeUIZKDYg+nYgMqHJ1zVHx2F34ihbUuRwsdgHZOh4srwqVXQ O52FB0kDKxRYtUwm2FdZGR01QJoG/E87BGNb1/XCppz3dYkAlQMFEDnnvwQtWQ7R 0tKsjQEBnI0EAI8u3KxjyA+GwnIY7rxw48CuefYn+XjM31D3glu06mW8rRpmmfMR Haw16uXuc5JB96HiXt9/yWqi9guxK8UOBzEUjwr7UmzlNWS2K3/MeEJeawUXrRFl 7nKTutX+8pL19xjWjngZYpiUFJ2KN0p+/28wQZAcumWfXDE28okPR0jUiQCVAwUQ Oee7RZgH5lvYS1khAQF7TQP9GqMeOk+PEzYdrf02tIRgZqOK8vPA0ulVwVZ9kI8w mChF0Y/N2+BjqJRv93BeNc8WzzI3rQHdQi+Nksd+RPNNUyVoicyGrl+UBVO7GHPm RQuQz4XC378WTtGUyFASmxgvo28T9QJaar40Zkq0I+ZIaggGAr9qtKc3GC9sDsgE rs6JAJUDBRA7VdiIfEtnbaAOFWMBAfEpA/4klnBk5rcdlbIM0OfJx53vsLCxGBXz /zxpOboHGQ7pQvmqDbdOxsl19i8IPlSZr7QXMCsYsBfGpaAbWE/FccjloNhGqmsz 7v6P4vuzoOsKF1Z0IFx975KX2txUjH2sZvbC4w4XTWHlMSaKvEMaqeHyTR8SmKJQ Tway6eZ/+7Ca7IkAlQMFEDn4b9qozjotI+wmPQEBF8gD/jnr7OlRpSBUz5uHIT2s sOhNJ8APU2fpAsZDko2xnsHLm+5Uo6UDph4C8cPeCCJB9MqTicb63NKeXYdBbH/6 i4auD101bIf6fvdawBYQtZUS5wLNhFpOWfRcYOnazzUwPntERmB8b1jCnClsIOvd 8s821d8PS9Rqb/c6sMxcfgnqiEYEEBECAAYFAjq5iyMACgkQ0g/UBcrVCcbRDgCg lD7I7eyTlt+ANPqhqlCyGI+fynEAnAgwUVTnA9PvxQdqbPwAi8TeINY/iEYEEBEC AAYFAjq6nsAACgkQS9ihXhFq3afcqACfU3TXiU1hgK0dZ0iNcBbo1wtfUlUAoMhA 9AUjaBuGCSkuQwyrwvGkv2lxiEYEEBECAAYFAjq6njsACgkQaoNFyDTeLy8SkQCf bwG86aNwQS186QsKeJLdx8Fj6YgAoIsiYdN/O0bfiizUZYLRSOEgLt5LiQCVAwUQ OrpbY/bvOLj4Q3BxAQETBAP6A3C3azOdu+A6UyX9f8yGHn012ibI8mxUvR8MRpbM iVaIQ4hVUjyK/3pcw1qF6a2Cfzw2+l2kizKbI8U0PUnZ3ki5dq1MAmWmxI7O2T/d 6ZHsRPrj671X9ya5yblLEhfhd0uGejLBV76tJCxdpeQdWgU5HwvvUZobHig/54/5 Q8aIRgQQEQIABgUCO1S6wwAKCRCiu/skDPlW94J4AKDkHDn9SR9yOyVCSDiFppmF ptOkvwCg0xYLoZI/b4O9ZiSMRFb0ktY0CFaJAJUDBRA7adBOI+Ri1L97pCEBAZ8b A/9rlgIM6+dyJI8q1HsziqZWUYIQ9w2ol5l3ZCVXqEYP/ToalP9Fe+LYclZgbifB Lydz71ZED0EtS+q1s7/bcUzadRPEZqoy/RGFop2SO5Cxam3VOBt2MiHOxG9bRlbp D7l6ZLmLIDGOH4xv9Q1iS+7BXwCxoSjjeQF4piOY8i3uuJkBogQ78sGtEQQA0PGj ByXgQDy4N9gbzxhtwOXrcnSN6dSBhM/2bYrnSh3lYKevjrt4EaOQHdnPkyigNYTI QndGsh8SQqaeNKo7tl/mXPe7LCBhZ7Ds+ltMveEq/B1HmksCaPXqJJdS52XfJUAS hXIv30pRstGvISPvm5bfBJWKKFAp8TSDC1xlhj0AoP/dcbvUb123NcRexBqIBAIL UrQdBACbeYy0dBiOMA0nhx94R5BOGJJ6k+14Z0a6Qz+WeBJTia6f7inokr8yYHVd zelpTTD7QYCNCqq9LmomjeqtkZBPFfj29tbLeZ8NwyuE2XFz12JPTfs2QUHw6WD0 uI/jwcNECxeDQ8VxmY8h75Uvoex5JkYCJynyHExkmdxo+hjqTwP9HxTm026/BA/M bc4sJUHU7zcXoG367vikJkOC2kS8uum/fp62bDey846DVyF/EryddRVg7pqXZj9k VFJ0i1CEXr3IsjtWi3OZb7/dVD5DOKqFDhr7OJQZbulPHgiackLPRXQSngt02UB6 qMvru435E/m4yGI5DvtjWIdcjyLioYe0LEdyZWdvcnkgTmVpbCBTaGFwaXJvIDxn c2hhcGlyb0Bnc2hhcGlyby5uZXQ+iEsEEBECAAsFAjvywa0ECwMBAgAKCRAh+cW8 92qb9cxuAKCcmeGEGidQC5RNwE2sDaiiD2RlUgCffZOb5sf3hsfBgLRNJBX8LAU2 D3WJAJQDBRA78sLJfEtnbaAOFWMBAQkKA/UVxp9iAa+RBlQVK/SxJkYhvXwdAWmL tI5f4ggVxO85rt3tMXzqynxf0NKT+8QmyevkQgFELptW+d2fnC2OLqlYHDGYOIZC EBx0x/OIcWBtdEn2zjS7peFwwOmS7qE2O9bYYxL0k63u0+mAuN2zZtq5h/LUuLvt tC3fIFXC5ZnQtCtHcmVnb3J5IE5laWwgU2hhcGlybyA8Z3NoYXBpcm9ARnJlZUJT RC5vcmc+iEsEEBECAAsFAjvywgMECwMBAgAKCRAh+cW892qb9eHMAKCnO9VJJuCH tr2OX1tzPCPN9vx+sgCeJ7I6BLfajCcqdKnDLV2pvp/tRSyJAJUDBRA78sLUfEtn baAOFWMBARQ8BACuOOFfK7qLFipRdyXL/UEMulH7Jf6pr2rnxGcXShEob8H0HT14 CMfeShmGezrgLmPU7hqwY6fz48XjASLMo2LVtcdNxsn/f8+CSIhYjCue5AwW+CRK WFEgN5MUsjkaK0ikBi0+OELw23qsR3RtEzEsURvyVf61bbdJJWYZ3Cva3rkCDQQ7 8sGtEAgA9kJXtwh/CBdyorrWqULzBej5UxE5T7bxbrlLOCDaAadWoxTpj0BV89AH xstDqZSt90xkhkn4DIO9ZekX1KHTUPj1WV/cdlJPPT2N286Z4VeSWc39uK50T8X8 dryDxUcwYc58yWb/Ffm7/ZFexwGq01uejaClcjrUGvC/RgBYK+X0iP1YTknbzSC0 neSRBzZrM2w4DUUdD3yIsxx8Wy2O9vPJI8BD8KVbGI2Ou1WMuF040zT9fBdXQ6Md GGzeMyEstSr/POGxKUAYEY18hKcKctaGxAMZyAcpesqVDNmWn6vQClCbAkbTCD1m pF1Bn5x8vYlLIhkmuquiXsNV6TILOwACAgf/ZjIISPnsQx4SLh66JTExKgs/PMzP 7OOZNu7OdqwzELAGG6UIs5v4SgrWZ/VGg0lFxwhPF/FgOL4ZVVhIfHrBSta3j3t6 Qtp4AZGoxGyKi5aoO4+uj+DiFK+/1PHLW4sHwFyghy+TdAglOEKkr7++z5+sZKBU k0ik8h+LJwMl44UqIjAqGlqdLmE2xU9q0lgjJ/UERpNJV+FBR6Lxu0TGyUc3cVu0 ovbJ3Hey7Dcr4lvPaj6GXZCfck8QqPCZvEc9CfwPXOrrdSZ9Cax6qyYwSuSy85iA ymFwQE3lEbKhf1LXcgDDBXF5eM4dtF5bwAW7ijnvYG+4GU1Kg3b+zQkZMYg/AwUY O/LBrSH5xbz3apv1EQKExgCffMvcS5FKHNfSwc2GOBLFdRYDjTUAoI3Fpxi7re/C hdiB/lsBOHxjhvJOmQGiBDnnrJwRBACXxbriCa+0S4JY8rFJe9U160xXZ0hqJsvf IZtokLGDjC21G83K4pTJRhdWlWa04HrehUtMIdT/EXKfUJCFl7vk/WGWT3/1H3xx EUQzxKu3xAJWQXJs8t2r+Dkj0csrpLJvRyuZ5+mzzFbzFSIaWohlY8Q1Ou+39jOR fyVPkGjizwCg5CzrVDcXH2oTF3vMHsw/Bhfz3bMD/AhY8q/jmUiV09hCKb7XG6f0 C+qpmBeByk5G/JFmTRv5T34MkWQJodaUOhJtzoOsOjKQSect3c+XncIMADAGCnGP GP/6sxfuyLOgsuV6TXSxUvxi+E99zKTmKPFRTBuJCVATrTmHHAiLEqTZzE8DeJ6w K9kT1fRVnCKs4yczI7diA/44Ay2OW4PAuri2lJm7yXsiP54lNCP0eMXOQ8RSWBZh HKQl66o/pm+FsT9GK5XloJrFa7+2XuiVoyNiva18dZkCFJzychda9pwfkkHjtidM RI97ACdUCPPQFVMB7Dqr4wXp+qQ+tXScnZT3LMeotFwuiSfDl4VeNOswEw+F9ObC UbQsR3JlZ29yeSBOZWlsIFNoYXBpcm8gPGdzaGFwaXJvQGdzaGFwaXJvLm5ldD6I XAQTEQIAHAUCOeesnAUJAeEzgAQLCgMEAxUDAgMWAgECF4AACgkQiOF7HfzlZWEO hwCePNxxTa/16SShRlkehXsG6CzWeksAoMCaDOmhTexTrNfARBURWr7A+lkPiEYE EBECAAYFAjnnrQ4ACgkQGPUDgCTCeAJDSgCfdyHzyykKAQpt0xJKEEHiVmDXEcMA nRM6JG3b8P2ScMYr8jHnzyd26/9viQCVAwUQOe6GZE1WKCF5BQwRAQH1ZQQAiASZ 8t3aMWxJBGqzfmfJwhn+toAO6MlNx0vTagiO1+X5DG+0Yv2R28WYsetAOvJLQ5+c oGm9YYlC1IyOfbwgdJ/UZ7v0wndZ/gNSOKVK7Av8oItXAbVWni2Faym3jWg1M4uf rTBGkCouN6VMN6xUfue+3BEyWVQ9+xgwLS4nCZOIRgQQEQIABgUCOe54gwAKCRBd UhyM5rFQFkLDAKCagGDgxsIy5/CaXH7EQ9DZwAi+tQCgrTwg1ubGAvy8xYWDdbHa 1aUaRdaIRgQQEQIABgUCOe6aFQAKCRDC/IaqJTlGi+BQAJ9TZw3/MkTZvwyeJx4r EIOYfU8CMQCfc/Vdt1wI4gPwpy/ebNLV49JWmYGIRgQQEQIABgUCOefNIwAKCRBA /7Kvxn29cAXfAKC0z9J9EY547dJzkBWYyjcm4eGAfQCg8gGsyHJSN/HsWdIXcaEr PdshIWW0K0dyZWdvcnkgTmVpbCBTaGFwaXJvIDxnc2hhcGlyb0BGcmVlQlNELm9y Zz6IXAQTEQIAHAUCOees/AUJAeEzgAQLCgMEAxUDAgMWAgECF4AACgkQiOF7Hfzl ZWGS0gCgy8P4iM6tbH50nfGZX51Wb4Ge7RoAnRtI8BzHhw+lH+l4dAUk2tmCzARH iEYEEBECAAYFAjnnrRIACgkQGPUDgCTCeAKMWgCfTmWBF0c0pp2w6FbpH/o+Swf3 wNoAoKTkPKf3MNeQ5ndu4AyefA5E6ckYiQCVAwUQOe6GbU1WKCF5BQwRAQFRAAP/ RVnv8rhjaUiXmZpUvvCyJ2FLj8wlI5lS6vcjqsrdoWUkEnbBssNVBtac8LAzXGV0 TGcqgNckV/8avwhfKqFvUD+RBVgYP/3TBcAKjNK7TSgOmArFGJ2+N2Yzz7ihpyzF vCf0tCupXQALEhyDprg+p5dnvC/0jskjaYdHeAuVChuIRgQQEQIABgUCOe54iQAK CRBdUhyM5rFQFi+NAJ9kmSkjeLlthNOFMbi2dNgJVsMxwACgyyu1Xk6FCjEI4hJF OwcEBR8SlAKIRgQQEQIABgUCOe6aFgAKCRDC/IaqJTlGi0hLAJ4uplCrccwi4PK/ vUaXpnFgrlqZaQCeNlSO2SfReOaMZDMedbMEUDIrlzGIRgQQEQIABgUCOefNJQAK CRBA/7Kvxn29cExzAKCG5NPGwqrBI0fDTjLrlwyC/QoH6ACeNjQPM3dHVPE7ogif gsYnPWRPBXK5AQ0EOeesnhAEAO9L5G1lA3oDYFq62bifXtKS/zM2aiKND8yONxRa EuhcSqroNY5FrRy1wd4t14SA4/LzZ34DsiuNZ2+h2HD/3KTMDQ/qE/FBblNwE5ZH 9cQ44a9WwGsWFDRgtuHV/7dHlZClPpwD+tFVI7UGufhv+PPKAG3tTfRvWY2lReqV wsc3AAMFBADlrsLDoQFnE2ieS5pn3pB/aiMF2Z09U6fVTY+mdAdAU43xifQFGMi9 vuzHNzwFGtJosK35BhfSshHTER3cT0yN79HifRAAwKP+KIoxFhfgudZafG6BaaIO UlhPW8s9k+FtN04x6/jgRq9pz/E6MwVxW0Rf6V5XAIFWWN3xd2JH5ohMBBgRAgAM BQI556yeBQkB4TOAAAoJEIjhex385WVh4UgAoL/9Yqhurdv28afXOQFO6iYYw9rd AKCbvUNf7ygAueM3OPl/j7AfQK1X+IhMBBgRAgAMBQI556yeBQkB4TOAAAoJEIjh ex385WVh4UgAoNUFbjJY+EdQx+mry6ajI0O1OzjHAJ9rspd2xHuO+r1fEZyn/N6k LsOLmQ== =GprF -----END PGP PUBLIC KEY BLOCK-----
D.3.100 Arun Sharma <[email protected]>
pub 1024D/7D112181 2003-03-06 Arun Sharma <[email protected]> Key fingerprint = A074 41D6 8537 C7D5 070E 0F78 0247 1AE2 7D11 2181 uid Arun Sharma <[email protected]> uid Arun Sharma <[email protected]> sub 1024g/ACAD98DA 2003-03-06 [expires: 2005-03-05]
-----BEGIN PGP PUBLIC KEY BLOCK----- mQGiBD5my2cRBADKOgeJz+IX/4UT65iwvAMoR5SMctMAEGNHvTk96H0DSYmDmqPE 6D4PWxjiAmbFdMmxGvmPlZDGRk7IpZhrvmsAuAvwImA/UyGb3Qnb0zOoOlAIQiGz NXRvum8vzoTeW5r9ghLOKkBuze1qi8PZdT+ztreaYcPPZBI9zPNfnZd29wCg4Sqo eWA46NgWICUsOpC3dkhAmdMEAKBUmh8p4kOZQq5LPv3y1fo+5MBI1gnawiJoO955 nzVuisH5h1yaNjz0nkB5VtEG2Ub2mhBjckze4EP4FzPgIpOhSMdGfNh67rrByvv5 DD/SBwjULSEGbBlywn462QDb1X0PxFX5C6IYK2Q6i/vbWkOFMI2dVuQX0PUq9zjN D5QJA/sFeXR7NcutCUaLknFCaV1cBTITJNurKn5Vm3QQq5s6R2cFTxdouHcSNkto EbhcAvMapxlWl146h7mAtLsXXa5s3wuMWq+igOXUk0wkcm8CqvSQtnVYl4Xy/Ll3 zXKxtzKHZ1YxAdYQXGkesBuaSafCN6VYDFFSEwChHrwe1sV9obQiQXJ1biBTaGFy bWEgPGFydW5Ac2hhcm1hLWhvbWUubmV0PohiBBMRAgAiBQkDwmcABAsHAwIDFQID AxYCAQIeAQIXgAIZAQUCPmbLaAAKCRACRxrifREhgYRWAJwLdcAEvjkJf5bHy975 R7q7Rp4KUACgq214dvKu35ysWriNNxu2jtIj1he0HkFydW4gU2hhcm1hIDxhcnVu QGZyZWVic2Qub3JnPohiBBMRAgAiBQI+ZsydAhsDBQkDwmcABAsHAwIDFQIDAxYC AQIeAQIXgAAKCRACRxrifREhgVrxAKCXiBsYhu++BPQX9prGf2BeKNYaswCfaS2Z eNyZsxSNedBb26k8ARWrZzq0I0FydW4gU2hhcm1hIDxhcnVuLnNoYXJtYUBpbnRl bC5jb20+iGIEExECACIFAj5q4pcCGwMFCQPCZwAECwcDAgMVAgMDFgIBAh4BAheA AAoJEAJHGuJ9ESGBbWIAnRAlo9PVZzdar5pmWDGspeyGk63ZAJ9X3x6ZQSD7uYeB ajKe61NpPAamJbkBDQQ+ZstqEAQAkgu4UWlgyF1IeMM+vwHQ43zik3Rn6nhpJXRb Arpg4QyVHQNQshVT4XsmSvcgw0TSUub0x5m23dqnhcoB/mk0kAIymVQiEaa4SLjI tTXd93yRvSgPd8JEUNFwcSE43ZJrrmSAqIc6MUJ0hI/pAeCFvRWYQ80+82xx30Vn fJLOJR8AAwUD/R2xFX5geJ7W8OyLtB5XQirkL1YPGLNNx4lyAPXFJc1s1KwfZ90q LYNw2qLRIacYKmY2X9BrWADXPrEZIDKljn+Awz34lSwerLHWwYDDoeyjfMt4Mmra MsV8UIjaBGO1ptbqEDSVeb1tiWQGa622pT5YaZp/r/OFdlmg+JvkAzHkiEwEGBEC AAwFAj5my2oFCQPCZwAACgkQAkca4n0RIYGWkgCgxhDAezhK5kiSC4N74g9ifsF2 jl8AnjujFRJcMfV2R28jiZ2BS9mnvqjU =klyl -----END PGP PUBLIC KEY BLOCK-----
D.3.101 Vanilla I. Shu <[email protected]>
pub 1024D/ACE75853 2001-11-20 Vanilla I. Shu <[email protected]> Key fingerprint = 290F 9DB8 42A3 6257 5D9A 5585 B25A 909E ACE7 5853 sub 1024g/CE695D0E 2001-11-20
-----BEGIN PGP PUBLIC KEY BLOCK----- Version: GnuPG v1.0.6 (FreeBSD) Comment: For info see http://www.gnupg.org mQGiBDv5ys0RBACm/dkRFFWNFb6pafzsHX3YHfyYBQAhyoT5ZPvvh7e6RdHYdxYc tYjgtOid4jL20Uz7kXYwT5OVYo/l9j/AqknacYoboO5AHcJrfO3QjfztJaorUSqv w9dv6DSOQWwTmexeshp6v5aEsOpDbfPtUnFBwcJe5lOBsokk2CqkzI/XqwCgv49G uNLbdtIN87CrUwyiLG5nsSED/35/A/9b/KNwjBoBbheCJDByHNPd9svQIpVWTuk5 i5RKVQQET4ZD5tPQWPnSZ95ztkkwcjjOak+esHK85yTYXXjrfcP7JiE3HIZhyj3S dxWaOFEbSE3Xc0BT+8BOAPFfb2WMSdCQFowkRqbMiFudLnz4tZnBmTQcuxqp4G7S AFh8A/4jBhhkKaw0KeWtkFKugVgUWZNWZ54aJhUaLg5wGbSTNME74YLO0Xc+wkjY id3gG5ayJyecZXCMUf175/ZaSPeNRCBOfMjDnl3G05b/huBFUnXzxTkWCcmopOwW 5tz4C69UVP1UHg4XMu+f6D48srIaFu+DOMTwniL95vqcGkCUJrQkVmFuaWxsYSBJ LiBTaHUgPHZhbmlsbGFARnJlZUJTRC5vcmc+iFcEExECABcFAjv5ys0FCwcKAwQD FQMCAxYCAQIXgAAKCRCyWpCerOdYU/oHAJ4kKjpX6iMF1Y0FjPMyFiyUlgjT7ACf a3czQMrflxJC/VNuzMAmzA19j3y5AQ0EO/nKzRAEALHq1lBY0OBQBeV7sGOvTaBN itMZeVDrGDYUQ9xunaDsEHfz2fD3jXCZLaUayv4LZeWzRr4DbnK4F0AmZLR1v5h3 LxBuvqHPRma5RyyFRftwTNHM+DWu6TSqnE43QS7Ci+z8ua96CmcDa+PnEfubyNLE dco8gfE4oHDqni1R2qVfAAMFA/4uVSYj/DvIzckbZ05FjG+pg4HKsyxyFeFsrm9D 8JD9tC26k4YxLG5FPBdKRsDrN/lZbnLWHTtZqhE3WlX6DRlea93T9Vi2skbujKcN mbao5pyVXWl1dboFquP8ku91CRTZvmdLF6IBnPo0LfOu4jD6DsD5O0UZ7lD/Y+6p 8WcDfohGBBgRAgAGBQI7+crNAAoJELJakJ6s51hTsJUAoIB80SN0z90ocSdxYGwl xkOSm2cvAJ93DigXb3moOsw3BRLlLPQRS6TZxg== =aR5H -----END PGP PUBLIC KEY BLOCK-----
D.3.102 Christopher Shumway <[email protected]>
pub 1024D/3219F982 2001-05-17 Christopher Shumway <[email protected]> Key fingerprint = 45F5 931B 0646 BF84 E78E E274 6C29 340E 3219 F982 uid Christopher Shumway <[email protected]> sub 1024g/D215EFED 2001-05-17
-----BEGIN PGP PUBLIC KEY BLOCK----- Version: GnuPG v1.0.6 (FreeBSD) Comment: For info see http://www.gnupg.org mQGiBDsDZMARBACAhNya3wnw46CweXc2PKvIQythRjNsyDl17SNCwfzXc7Pvazz/ MvM7W9YdrC/PbuALNkj6KZL65yZI+H/gVkQtR7GzeSmsz1sAWGQsXXgXsFQ4mSEQ U1+lVgLa4yn88kv9L1oIdrMZ+2ymUtnCqCd/7U7tPk13abQk7OmxRHppMwCg8119 tIQEJg5orrjOxGO2L2008CUD/1j7qKo+OFDQp3dIwJXwnxdA4Bal2ujh5mPkWZQU fpvxbWtyc8V56KqDWJgo/T6DuJt4B7aR/tCr8VtsvI0SZ2LmG3xzvLD3Hn2qQvdi U7qxgqKdrgfzCeh1DItNhcWSQCAVjYRbS/Tof/6Mr10Qn+HAwB+ng3tx0Fw1JnKA 69uNA/9PZm1H4crVrA1pWyTgujAcZpb25mnmZjTsRmc+wtVOho9RTTs2nu+2QyH4 IkVG5q1G+PqkUBqzQIB5r468Y1md92C8cBiC27cASy+HFbpR0iXvoTnQXMKqZpiS bZGG7ZJmAJBLus737FRc6ZvkdZR/Xax2Bk5r6sOqprkiY7oox7QwQ2hyaXN0b3Bo ZXIgU2h1bXdheSA8Y3NodW13YXlAdGl0YW4tcHJvamVjdC5vcmc+iQCVAwUQO4as s2Vgqaw0+fnVAQE5mQP9F0oI5EMKV3vqRfrRDJdUtg3rZCxBMeGkOcO0ndniVfMb DUOEqhkU7BDKV0jfu8VKHcJNdUnUWAO43kxW3a+FbOuK3b4NuVM9d+Lptp3KoOWD dN9SkSDHBbul6aRk8JxaMvTyM5X0iLmxIPJvRfrr52W1omxBSjiNKLxrnF0qLZaI VwQTEQIAFwUCOwNkwAULBwoDBAMVAwIDFgIBAheAAAoJEGwpNA4yGfmCht4AoMUH U/JOWNyuucJBOp7x5MtJ8igmAJ9fwiHZMwPAFjUsw6goX5VycMtVtIhGBBARAgAG BQI7hnYDAAoJEMiT/MUn0FXbIsIAnRpbR+bcYKngcj/O+5bW01leCzKcAJ9SUNdu mMHocPtPTVgFnvcIgFlzW7QqQ2hyaXN0b3BoZXIgU2h1bXdheSA8Y3NodW13YXlA ZnJlZWJzZC5vcmc+iQCVAwUQO4asvGVgqaw0+fnVAQH67AP9FsnB5eujdETjbO+6 vCgmRDqoyKDdDHp9Vd0VQBNA3sAzqyWEyJONnKKhkHvloUoqZn3fCCBXG8V5bNUb PIRvwZLHAWMYJ0xQpPYWdaBK//mA4ajy2kKutZxjj+syyvlYhJFR3nbS9fcEdXuT zPGJ9Cz/KeBy1dp17JpRosKcrVyIVwQTEQIAFwUCOwNqlgULBwoDBAMVAwIDFgIB AheAAAoJEGwpNA4yGfmCmg8AoMqpkDtVgFF8NfsjeSRPWdLjsFHbAKDRdvt4XNOh l8Rzwf1FZIFzNw8Wn4hGBBARAgAGBQI7hnYFAAoJEMiT/MUn0FXbuPsAn3FXTbjM Enl80lkp0pDR/vFTIIcfAJ9P83pLohiqVjGtqplcuaG2p0pH3rkBDQQ7A2TFEAQA 96F7sthP9d1DPEejGQu2taZv5OPzESvrpcUIFWDm8jecpxEUx75GLx39IWfm1Mjp nY0Dx/i/bDSVbOmDRycYZqVl3+C2GidJmidhUgnBSZsRBvO3VBWUJlkhRSWmeHXe PE4wAcfwrirHSbViHCVRpsObfwcv8Nf44Kda8O0gW78AAwUEALtvTQzTQQbtMaUo cpxcCwoWk1QqIN4POR6l5nz7RnP2RYcWjSsrL+okc8dInMk7qrq4SVjFUp5qjN42 LGRTXBLFIKj5u8p3SUXpSRdZu2u4po1LlPsZ8wxS2EWJza8sealwMAS8mPppqAfe mnAjoMco7bR/zW0ALHcIbOGl7N89iEYEGBECAAYFAjsDZMUACgkQbCk0DjIZ+YKp FQCfeCdSynq2+Pn6zanYqJnOU5L1b3MAoJbvh2e9jR/i4oXPgGsv0UQu/r3h =NDqN -----END PGP PUBLIC KEY BLOCK-----
D.3.103 Dmitry Sivachenko <[email protected]>
pub 1024D/13D5DF80 2002-03-18 Dmitry Sivachenko <[email protected]> Key fingerprint = 72A9 12C9 BB02 46D4 4B13 E5FE 1194 9963 13D5 DF80 uid Dmitry S. Sivachenko <[email protected]> sub 1024g/060F6DBD 2002-03-18
-----BEGIN PGP PUBLIC KEY BLOCK----- Version: GnuPG v1.0.6 (FreeBSD) Comment: For info see http://www.gnupg.org mQGiBDyVYkARBAC2Z/8odq3zwRIQZ9XOF4ZoQ8ITJRrTUwwYjwOf4Kz6gTH+zIGt Q57m5w1Scse3J/fDdIZzw0gJgH0XRpKOonWi23di4B3Oyvrdr1Zm6OlqUjoty8CC 7jo5WlLF/05Vai2HCUmFeqiukCN0mfm3Fd8S+hf1IpE1gaIxCKNvYaf14wCgpoVG Tqi+lIMCktV/vxUf3h7KgOsD/3nBeANz3U+Izr9g/AsF/FnHXeawl2m7USaIB7b1 4CFrQp8FDl6TCAtPHQyQ6pdnh0HZ3h+7cfPB1poRaXUvDimQZR9KHZO9uIilpC2n MdBjbkXmvVQ5FhOJz49cXw51Lck11n/+OuP4N4TcIHdt0DQJoUrGIB6X6Op9aOrP Ob70A/sFsFfebYdfH8loLsJkHU8VbB2Y0KZBXSnhysQ9muvj1HqT+n66o/3SliCE R3cNVMgg51pqxzUC0o6qTVKJbfOrI5b2tbYjvx87ejugQwafhKu8t1liDuUYQK0Q S549pzLKUr/NUvJaYU//6QlFIPNSzwB6x4wjrWAKBv6Vn+x0c7QoRG1pdHJ5IFMu IFNpdmFjaGVua28gPGRlbW9uQEZyZWVCU0Qub3JnPohXBBMRAgAXBQI8lWJABQsH CgMEAxUDAgMWAgECF4AACgkQEZSZYxPV34DFVgCfREoIUfpKaEeGyzl0zKThVC7J XccAnjiB85SwuNAxMraQuGDJXojukUfwtCVEbWl0cnkgU2l2YWNoZW5rbyA8bWl0 eWFAY2F2aWEucHAucnU+iFcEExECABcFAjyVY4cFCwcKAwQDFQMCAxYCAQIXgAAK CRARlJljE9XfgA6GAJ9RFwXlNqYap2SI14IPRjX9ZAzvjACeOC/Elh0HkwQ2HZMT edpgzOuknUK5AQ0EPJViRRAEAO4VdFfYGd/amgG2MDGqD269Kb5vTFbS5mDczgjM 6gXZgOjhbvj3x2auo+Pfos6M/bOtHuIk7QFOeOEJ1wcg8wgE3L3kFQPeEPeOgKBk /eA1ExIW3hiPeuwNxT3iWEv0GF/rvCSeSK3nuuDBNmkSpJ4LHIyO8Kf5YJNp8+6D yJ8rAAMFA/4jaulRHxSsWlFIm3gpBR9aiXGGX1pZTuJpXqjAQcRzDa9cuVatiSJS H9wzfE8R4353s5HpaY3AkVRjY6s9AB8bygGdUCQjuIuifTS4+tG/wmaXNgyqBqaB 6V9gTgfW/7XqcJUGeLLMUpccSRZhlQvHd18aTfPWPB49xu2+arw6P4hGBBgRAgAG BQI8lWJFAAoJEBGUmWMT1d+AYlgAoKZWZs7rDLdQbn2d0CVwmWb6hQLhAJ9E/r8N n3jf2PI8Psl2wtgvWazpaA== =mkxU -----END PGP PUBLIC KEY BLOCK-----
D.3.104 Jesper Skriver <[email protected]>
pub 1024D/F9561C31 2001-03-09 Jesper Skriver <[email protected]> Key fingerprint = 6B88 9CE8 66E9 E631 C9C5 5EB4 22AB F0EC F956 1C31 uid Jesper Skriver <[email protected]> uid Jesper Skriver <[email protected]> sub 1024g/777C378C 2001-03-09
-----BEGIN PGP PUBLIC KEY BLOCK----- Version: GnuPG v1.0.6 (FreeBSD) Comment: For info see http://www.gnupg.org mQGiBDqpHqIRBACDazER4MfiNd6QrTZ925IKM0HuYP1YN6uodGYhCuBGb1a4cFnt 0Xuw1fuaGqahBnNmBg7Rsetaf7b7/w90Of286mRBgIJIr33VxaKd+lW8l6ORQK9K bDR8/IpgHxjt8LXNdBr0/Eddj6mOPojooIDOmoGyj0XOlRb5bq+xWlDtAwCgnjQa KG01en2qMUwrvPPZzyWg/qkD/3q+NyOVyi0MAgXdYNxI0tMrDPsRzmbvG8wxZQ1S fGHGJEvlKhksePCteX3cLicrxRZazfIteiBXL+0iEvSauF7JZzhG5OfbLTQS2MKr d0rFCSmez4VAJfx8nqJoA4C+yTphxAlyP53JKF2BmRbfSuz4vIbi0e+zsc+kZehS 7Tw+A/9tanL63z5D8qmPZAE1JqRJfyDnTthzUPPY9h1CEZN4jtcdL/FLME2TmKva 5kcgp0WTAGK0tHsyHvij7KZDAp8Z2R8/456DpS0Rk5vTBy+WKMWV+j+RlRlSAr1U bkg6cEtMKCImXsprST8UImfJH0DFUXt15gQ4ogog2xPnuvk3/LQiSmVzcGVyIFNr cml2ZXIgPGplc3BlckBza3JpdmVyLmRrPohXBBMRAgAXBQI6qR6iBQsHCgMEAxUD AgMWAgECF4AACgkQIqvw7PlWHDE3ugCfa3zgBbxwCmIGGlSrwWPP0q+IGsAAnjuy GZPJgHaWjAn+SrRftnZu9M0biJwEEAEBAAYFAjqpRasACgkQH3+pCANY/L0+bwP/ YrW19JdTDG7fDCYbwgn1ngA1y+nRT25G+ozBUJt5q0H8VL6nrWwcbfk9Yg6jWkIx Qs2SF1A9yv0YXFqN1ihGYk0iTU/peZ17wP/TIvd+zkcrzXpdHrfrOy+xgalbi7+c v52W/49xYvqBsmk0CDRSkdkYt3VgvK4Bo7xoBF4IEl6IRgQQEQIABgUCOqoEkQAK CRBHg9f1XdH7jORAAKCxXIkp49PFrGbiM+JBIsMS+Ig2bwCfXeekX2maFMz4I8pf AorI1IepXYaIRgQQEQIABgUCOqqpywAKCRA5SqH23klAVvt2AJ9kzNRR0EjI09CQ TQ/m/Rr1/LCjCQCguXoX2XJHP/+HEFs2THnDfoLU/taIRgQQEQIABgUCOqzL6QAK CRAKdbF0qMx7Ulw4AJ4oKf0ufrvJ5tus51E5w8dRFTx4PQCeOfwDs+ergM+7Rp2N Borm6mrF18qIRgQQEQIABgUCOrIYawAKCRBMkXPzcEhgNMzHAJ4oa4hCoZOp4bG9 +9pCThBAKY2NYwCg7tQ9eNJdqMCEXGK/4m267Ln9QfGIRgQQEQIABgUCOrIYegAK CRAwsbGPZ4yL3Zh/AKClN3cei8gFogDQH61mdjagTzuGBwCcDCt4N+tz+Vwb6zlF vrUUqSdTMe6IRgQQEQIABgUCOrWzFAAKCRCykdjYZOuTLtrtAKCXRt59ypkFvQQc f1HY29CrzPvh9QCgmpBh23D7Tb11yoM3i0/g37vIQ4CIRgQQEQIABgUCO3lDNgAK CRDXYxq7nko3rv1CAKCLUGNAVyZsp5TXrCuse0/yF96vSwCbBl4Tm2/MZj/phNKC UwjGw2eTN4OIRgQQEQIABgUCPBdmcQAKCRBJ9Xw5GLJJGyr3AKCZx1BGvYveU2GT TaZ8X32klZsx9QCgzO/N422XbR5PIpnxt0FXKqSMFxiIRgQQEQIABgUCPEnw/wAK CRBUdQxFFW0hZNZjAJ4tMdQoxwZQj3il91ndSrGUD5cWUgCePQueyaYG8JCruXDX KTB5f1YZN3G0IEplc3BlciBTa3JpdmVyIDxqZXNwZXJAd2hlZWwuZGs+iFcEExEC ABcFAjqpKJgFCwcKAwQDFQMCAxYCAQIXgAAKCRAiq/Ds+VYcMazBAKCMqcWbk7gC hYm53EL6HVDoxaeDOQCfa6bEjXrcxW/EST0FlCMcs2LKoXSInAQQAQEABgUCOqlF vwAKCRAff6kIA1j8vQA+A/4+e1LpjSu8NFfeky2GG2Mjk1xqzb1nzVDQlKmaPXY3 dLtqw5tVHA1FLNaSFXDg05NowqQj6OIfavs26orerWyRrD3OJZQBBde5gf/IZBVO bk4WzE0hZmHQvchrWR/gDiHJRYnSw+4Sx5MnKBlgccZbIPxabHudUnx12iuNtTl6 O4hGBBARAgAGBQI6qgSmAAoJEEeD1/Vd0fuMdi0AoJdRZoDG9YwxVyp3wb+e/e0r UPwdAJ9fFipa2TGSkCjO61unpDtawmJCLYhGBBARAgAGBQI6qq0MAAoJEDlKofbe SUBW+xcAoKmJ3XWnXwJyFMD8CZfNABbBeYNvAJ47O8mk5vhbl7rl9LneJMNEMama v4hGBBARAgAGBQI6rMvsAAoJEAp1sXSozHtSFmUAnAqhsMdq6Ihz1LQwrNuKXS0n eaO0AJ0dIWyChTlqADHbW7Kfq4OZw7yyfIhGBBARAgAGBQI6tbRMAAoJELKR2Nhk 65Mu8CEAoOhXx5OkCJtIOBUbobpphx3QxZQFAJ9BZ7bxk3VdhpQUrEdlZp9vP3S/ xIhGBBARAgAGBQI7eUM4AAoJENdjGrueSjeuDXEAni1RAvL4LqDhx2GT4QLH36Zg VoGZAJ4qq2IR+g4plSyfFC+DxfXgi/ASQohGBBARAgAGBQI8SfECAAoJEFR1DEUV bSFkYvgAoLXHkVuyK7iXyhYrSTMeSZeYp8tNAKCloJ4rZB/E51xD49UAH1P5PV7v orQjSmVzcGVyIFNrcml2ZXIgPGplc3BlckBGcmVlQlNELm9yZz6IVwQTEQIAFwUC OqkorQULBwoDBAMVAwIDFgIBAheAAAoJECKr8Oz5VhwxEjUAn1QJFvqeDJ8gU8rt gz3CmnjlsAAmAJ9BqfYvV5zxGvgkOKRyMu6i2Qa5m4icBBABAQAGBQI6qUWXAAoJ EB9/qQgDWPy9FkYEAKwpmiuxudlg5EK/ZJ4ClDDdL+Nr9TXY0sKLSwJdDWpgqBAj jovInON6rEeqa7CSvSlDozqzf97IdKRjBQFkogPbVSfvgamz0zJZtWkfE7Hvw52X 8U7PyWthoTwECIvzYKH35+NiecJQqXf+AfGRLF0pCSBLSXR2zi3Bqee3nZ3BiEYE EBECAAYFAjqqBKYACgkQR4PX9V3R+4wBdgCfdPlMBWMvvNAcseruEfvAoRpkVGwA oOGKx9zFdxeJMh1g+y7S5/9fRbf3iEYEEBECAAYFAjqqrRAACgkQOUqh9t5JQFbO owCfXo3a9iJoed3J1BlGTxmGmUJj9coAnif3VT+yBgedsiHlhQSgtGzA3JnAiEYE EBECAAYFAjqsy+wACgkQCnWxdKjMe1JWqQCeOyD7vywbVSEtL50PIpKC/OLOpWsA njBP5yLKAJESHopfPxDbn2FKBN/2iEYEEBECAAYFAjq1tF4ACgkQspHY2GTrky4n kACgpwg68nagqKErqB9OZD8yqrUqn/YAoI3YNI2VWY518f8pW2G06+a5nmtfiEYE EBECAAYFAjt5QzgACgkQ12Mau55KN64LuwCfU7FdiOvvFKloFqFNKnypvZrh5H4A n2giMNGYRQ5DYUPPcmmi5I9vx/JhiEYEEBECAAYFAjxJ8QIACgkQVHUMRRVtIWTJ ZwCg8nPl82ZIFs4+2Opuoeg1AobzO9cAn2EbkcY5WfaCFO/cpflXpEgX6V5quQEN BDqpHqoQBAD69+DjZ00uDr48npfWtrVxuDmZb2jzS3Tdt0p6V2gVuengjobHNb1T 6o4BIjPu/yQ8qDlDOb+OF63wfowMCIU+qNBBtmoSDKmQu0M9hREHA9PeHjIsN2dk wpIAnM7kXHAE0T00QlBCLzjvef/xooKGdcaA4Zse+wLMixgwJbto0wADBQP9Hlh+ SI7YcYZV+nOhNnPdBG98UHNhDiheklrZ5BQMLzPEn+qHkaZTeX0SrEbPmm4D7nRk UGTh1H2CIL/YaffqVYVKw/8HTIJeXZMgJwdq+j3S5P/Vnc/g83uZpuzdW8PNp6A2 u1JHPq9M1haoszxtTirQXxo4Ht4/DWaY1DtDkZWIRgQYEQIABgUCOqkeqgAKCRAi q/Ds+VYcMQbsAJ9J+QGEzdNcvYY0lAXZAnLBnW7lDwCeNJmcu4gVYPvBDLe2Xu7Q Crfzumk= =Ru0+ -----END PGP PUBLIC KEY BLOCK-----
D.3.105 Ville Skyttä <[email protected]>
pub 1024D/BCD241CB 2002-04-07 Ville Skytt� <[email protected]> Key fingerprint = 4E0D EBAB 3106 F1FA 3FA9 B875 D98C D635 BCD2 41CB uid Ville Skytt� <[email protected]> uid Ville Skytt� <[email protected]> sub 2048g/9426F4D1 2002-04-07
-----BEGIN PGP PUBLIC KEY BLOCK----- Version: GnuPG v1.0.7 (GNU/Linux) mQGiBDywu5YRBACKxY/5WzdUtpL2aK2Yy/Yde2spYiEP2vKj3bs+ovV7a9129lki ldCu8PhoJO+x+96+AwbrR/T5FlXyQrInMa9U5os/8/HQjTXtY/oeq+UNDNFZrnMR Gu0zYICbzgd1rW/tnZJBkB3X2Ao6k0hSATGmP5/sowT7EBSdaM7ZhhqOywCg5A5n J7+062MfzdS/3KoSn+Utex8D/2BN/BMLvrItQBUjy0tn8Vsomx+FHbFKOm1cuOeq smhsOmsANwIafiZnK4+SnQlVbXJLM6exNTqSimH93y7Q9BX7hmWYl0XVpUui0mBR UrVG00PEa0jTLasOkvlyYBS1En4gZ5J2ArE2cYFPkv7jndqJ/pAAZkG+tQnXJ8l5 g0SLA/4tJHLJ6kPad98V3cVbTfhY2Dn/i+QbHvzBbBj+bETLEUdqOKzADGrWoJeE fADfxYi24wHkpH3U781p4SldZpOUvkyYj7YmjqZP0AH6SsKI3i52z1BDQF49gRcD uc0sSmv57yvjKCk1Cehen4/qaVcqXWTZ5NfyGb+hbHLtA2FxSrQjVmlsbGUgU2t5 dHTDpCA8dmlsbGUuc2t5dHRhQGlraS5maT6IWgQTEQIAGgULBwoDBAMVAwIDFgIB AheAAhkBBQI8sLuXAAoJENmM1jW80kHL8KkAn1yTiwsMLq9GsqA44hkh1Sk0etM/ AJ9BiDSqgX0S/wzyXAqfYcsmxS96qbQnVmlsbGUgU2t5dHTDpCA8dmlsbGUuc2t5 dHRhQHhlbWFjcy5vcmc+iFcEExECABcFAj0dWzwFCwcKAwQDFQMCAxYCAQIXgAAK CRDZjNY1vNJBywFtAJ9NCVHRa6GxtfTxae+6ZkTh08xQZQCfcGNMwhcSGJUyjKI2 eYucgrkwp2C0IFZpbGxlIFNreXR0w6QgPHNjb3BARnJlZUJTRC5vcmc+iFwEExEC ABwFAj0di4oCGwMECwcDAgMVAgMDFgIBAh4BAheAAAoJENmM1jW80kHLzoYAoLqR 3unds+O73Z3EppJna4gECkQ0AJ0Uye7ZXLMTJo7pNmZSBSz6bA/qFLkCDQQ8sLvS EAgAinenfe1g5Cdp8bf72+idBePq0zHyPUOpCuFGkiKXecXpgQUHCVYM8IiafB1M Or9V97vy1H56sr+HaBsC75mpuPC7lnltoY+zq0zIkNbi20+p/546W7A5MV66xtTx D6uUSyZ3jksAaVch+6yQNNxr3CDWiNSjomkK1ExPsjaPAA82L4yExAJJGwUYAPOS B1Gw6N3dUtoNuQwJdcw8fjsaRektXsHm6Nnm++3gB0YJ4/x3gcvxlNlONHNp5vdW msQAJtWj4isSMfqi6Y4SQsw2MWOKrYr8Lt++m4cQC6/VZXafTR/TrDZCqYhwovyX vgLMdKfxTZLqsyZwgWDxFKOEewADBQf8CCEh65lRfWQG3MopboOs2fFp3BsfVMvA stV5AYktLHvwGXTW0rx7sCdb3kBtKjiuNFob3gis2Nd05NUxFrzrZsyaktyDiZmT gjmEL1LvodDg/mXLRQgl3QDzUL1nlfFQRkcKqlDfCYezbgYFxCy4EGsC86cf8s8F ZI0hyXXY+zir+xJ/w4KBtL+cY5LJExh0FyPfNnL+tXUthRuN9wxZwVyQ9I4RTlkv ybb8VTWEgzkIf5BiDZalvcOJNAujptlgz2cLnV4Kzu55Xy7jOi5YfYjMbSDa6W5c vO/wbcAG3gwZOoeHBRjwTNkn4iBkDPq71o1LDDxHvWUVAO+jU3TrZYhGBBgRAgAG BQI8sLvSAAoJENmM1jW80kHL1RMAoNsmDIuxlUf3YwjAr/fSqBOKWgN0AKDc0CBV uZAqlAL0tDv8Fiz3HvICMQ== =mEvy -----END PGP PUBLIC KEY BLOCK-----
D.3.106 Ben Smithurst <[email protected]>
pub 1024D/2CEF442C 2001-07-11 Ben Smithurst <[email protected]> Key fingerprint = 355D 0FFF B83A 90A9 D648 E409 6CFC C9FB 2CEF 442C uid Ben Smithurst <[email protected]> uid Ben Smithurst <[email protected]> uid Ben Smithurst <[email protected]> uid Ben Smithurst <[email protected]> uid Ben Smithurst <[email protected]> sub 1024g/347071FF 2001-07-11
-----BEGIN PGP PUBLIC KEY BLOCK----- Version: GnuPG v1.0.6 (FreeBSD) Comment: For info see http://www.gnupg.org mQGiBDtMtwMRBADrWbrHZdss5Nlj/VpLW92lUpmYdmw5l2wYRtTTeHXrfvUk++pX dJ0l1bSC829hokrlQiJZJdiPqu0fGnhxXoeA5QMvrtjMAG8E+MRSLIUaay08SLeJ NhQR/ymiLFmh5ZyzXyG+qhZj7/xw3ynHLQ/KHPhRJpAs9ef0x0rgMZxJQwCg00Y2 8eIQKg3mikkLllnK7OHgMYED/jEhj6G2BLjKc/QliKn7KZZ2Ev4MMKUj36LPgzqH VTEhliqbRylW/nCFWhMyxbqzRjR0t6ng3PJYlSltcwwJheySHRogxV/gUvYMwQau WKkyFZfiO8/OBZkbuQotLI+4tU2cQFzBTuFIogh3Eg6PRDKUFx6g1AlbloFgmimX mdHABADTVFYFKHY9YuUTfpD0S0uLFQrtj3xyZGfA4tjXtc1xCgSmkxIVUoTzg09u EtcEvo8FzmmH5JQQV7cM8TTZutSFcHuCftwbhoMH562YkbuY160TCDHB9xc7hzk3 uzij7HKskm0b6QmMCI6LAYHhAuTk1IKY03DwLBIgEX8g68wyBbQjQmVuIFNtaXRo dXJzdCA8YmVuQHZpbm9zeXN0ZW1zLmNvbT6IVwQTEQIAFwUCO0y3AwULBwoDBAMV AwIDFgIBAheAAAoJEGz8yfss70Qsc6oAn2Kxzsk/d1GDM4VssT3U3jaHDX5FAJ9l jFv088oFIgnhUiBOmoPEcwnozrQhQmVuIFNtaXRodXJzdCA8YmVuQHNtaXRodXJz dC5vcmc+iFcEExECABcFAjtMvDsFCwcKAwQDFQMCAxYCAQIXgAAKCRBs/Mn7LO9E LEV6AKClm5AuE0PobuyUVri0ZPT4Qzn/SwCfUO4Q/dz2kXJfcoi+svIdboVWsz60 H0JlbiBTbWl0aHVyc3QgPGJlbkBGcmVlQlNELm9yZz6IVwQTEQIAFwUCO0y8XgUL BwoDBAMVAwIDFgIBAheAAAoJEGz8yfss70QsqkIAn3CdGD3kdBP8cNCWB/mmdlJJ 2Ba5AJsGjmI0R+adewxQuNIGxPuwfuhqSrQnQmVuIFNtaXRodXJzdCA8Y3N4YmNz QGNvbXAubGVlZHMuYWMudWs+iFcEExECABcFAjtMv/4FCwcKAwQDFQMCAxYCAQIX gAAKCRBs/Mn7LO9ELCM3AJsF3zHJhMdP7zGhP1Sbwh0vOA8WYQCgxONfpOQhAWu/ WwnZZnwNjUcnbh+0KEJlbiBTbWl0aHVyc3QgPGJlbkBzY2llbnRpYS5kZW1vbi5j by51az6IVwQTEQIAFwUCO0zAYQULBwoDBAMVAwIDFgIBAheAAAoJEGz8yfss70Qs txUAoKltbmA6D+5e4f43LWOOqfv6P/jOAJ0eUczvTczRuBzg+7fs0MsrtYtteLQd QmVuIFNtaXRodXJzdCA8YmVuQExTUmZtLmNvbT6IVwQTEQIAFwUCO0zAkgULBwoD BAMVAwIDFgIBAheAAAoJEGz8yfss70Qs57MAoK3vUyOUBVsEoHitX5eXJDos2JnX AKC4pG7X9x0EziSKSi/SFmRRNhx267kBDQQ7TLcHEAQAoByKPA5d5RrBOmmVb6cA 5T0sQvYBsgHpn5INcPr4/B3pAXROzu+SveIh1yg6f5poE4LhxQ0Yva0sCPVI3WPU YDpOSu4l0BikO26sQ1WdGYpRiTxuFaqzKLapIiDOz1lpY4o5yChEKtJw6t94Hckr Ss6dPH9uE4hoaWxdbvquTrMAAwUD/RrkuvBBqAjN7flRrnNuQA04j8Oc5/znRiHQ Ojq8i0w7t1qrT5zCNbd1S4Avo8hc5+G6ap9nv5KA3G9TKsgBQjcCB038k/k0pzRg JZhIOVBXpbPb8ZahMk7Tdm7nGgILJzfW0cg2AwToKpEcxEVrhdtTjc11/J4q+wBO 07lDXfYgiEYEGBECAAYFAjtMtwcACgkQbPzJ+yzvRCzdZwCZAXcRSox3VdhHpoJV FlnCmFbg4FAAmgPfaRZc9BE1SF825LsiKDAvUzs+ =D508 -----END PGP PUBLIC KEY BLOCK-----
D.3.107 Dag-Erling C. Smørgrav <[email protected]>
pub 1024D/8B71D3A4 2003-07-01 Dag-Erling Sm�rgrav <[email protected]> Key fingerprint = FDD3 5997 92A0 007F 9905 511C EB80 DE1D 8B71 D3A4 uid Dag-Erling Sm�rgrav <[email protected]> uid Dag-Erling Sm�rgrav <[email protected]> uid Dag-Erling Sm�rgrav <[email protected]> sub 1024g/CC6B8628 2003-07-01 [expires: 2004-06-30]
-----BEGIN PGP PUBLIC KEY BLOCK----- mQGiBD8CGuYRBADzqbKtcdXlXg1xGpKUyEwioFcROYOSi/FJIxlqlHtJCbu1bc2n tWwcEBfvIaxHGomxCGJD0Np0eRVw3FCX066x8tU0JYIU1WwBduykxieRC/smFEXS qYV5judew8+7dzLxvBMrh1XmoLi46n5fE4s5XP77Ee4G+c6GKKa1ylRmDwCg3Zf9 ln46QEtizQiS3+abMLToaRMD/3trHS7CU7AhHs/t4YtH5esSjBEGVRdarulx1WhS eA3JmTMO0s0rUsZx5PZ2mne3UBygicHLikRvhvk9W+mqcZfBBJywY6Ir+6XEV8Jo OXWUmid14AShoZmY8Lb3OxOjkOGzcTHLKZWqHeJ3+jG/WTsBDLf1aCcjdBvzp+V7 TIY5BADD/hSpwC+G2HVuYBkTtvwk0YyiVSgSHz9w12dAkobZBlNM3uKP1o9nWjud kqcetGpZ3xkU+t0NZx/0su4cSJpAFBWIlsleLpORkrE8kJiIenDz9BME2Gi5aFFK 3gbL+ZNV6Ccbc7Cjg6CpuSkxBMDgtuLiGHetzEn37L2pQnyhabQmRGFnLUVybGlu ZyBTbcO4cmdyYXYgPGRlc0BmcmVlYnNkLm9yZz6IZAQTEQIAJAUCPwIbQgIbAwUJ AeEzgAYLCQgHAwIDFQIDAxYCAQIeAQIXgAAKCRDrgN4di3HTpAteAJkBbRDBtADa YwKIzSGoB+LN61Hk2wCg1ZDTxf5TaLnXpoincz74mhGnwxSIRgQTEQIABgUCPwIb pAAKCRBnJojhBRLkmleEAKDG/JBT3ARmcjbHgCBfie+A/1AbswCfZ97QvkStC9eN ujJ8fUkVb5l9UdKITAQSEQIADAUCPxh6KAWDAcrUPgAKCRCxqd2C3IFLCXZgAJ48 otvZ1DO6kMS0Lt7eKknTtZ9mwACgh5AjU9gt9dt/BEOqphXaIOmNILCIRgQTEQIA BgUCPxhehwAKCRB88/WvKUmfYRkfAJ4jtwsoGUL3UFEX3XRjpO88covnqwCeMDYS emhisum2Swmju5CJZQJNjkWITAQSEQIADAUCPxks3QWDAcohiQAKCRBl3zTAK1+F 47gtAKCQTh+i5g+KbkIvmYafNkPw3aP1uACeJ4sinjggT9zSgZZg0fAC7RzzIGmI RgQTEQIABgUCPxkr/wAKCRApvl0iaP1Un1fqAKCr3eNpDoM8f/fLVVpjBEP2jary wQCfW1aKflErlEsfFUys73/6jr+YlVuITAQTEQIADAUCPxkfzQWDAcoumQAKCRCZ yJB1G8TjK+fkAJ9Dtu1DthanegAKz/RWBM2dbxGMOwCgnDesDhlNMGznGec9mavM 4fU3nFOIRgQSEQIABgUCPxlIkwAKCRAGBpzylpRX8PiOAKCOoCQIjjusTfYg5Lqs K0zb9idvzwCcCp6I5Iho+n08gUI02wsjJ8TK596ITAQQEQIADAUCPxl5ewWDAcnU 6wAKCRCEibFNiAdSmy+tAJ42r/XopzqPRecjUM3cUExTa2MGkgCeKYcU9xudPnQn ju3xKLpmvuEzKOuITAQQEQIADAUCPxh04gWDAcrZhAAKCRD2KOuTR0MgbDXBAJ9S 9aMuCCZb8uzryttdwyft58qCjQCgtOMOD6yDGDXghVA4wkYhUKiaOM+ITAQSEQIA DAUCPxuF/QWDAcfIaQAKCRDsDq9xNneAJWlGAJ0UAj78jh61YD777qiOVM2aJWoM XgCfUP4FjfsT5x/HqdwNosks3Yzb7TCIRgQSEQIABgUCPxwcowAKCRB014DXvzux 3VOpAJ49Qm71xO+bcyLgJMh+kNQCUoIbqwCgk1IW5d7nqyuvnx5Lo7QKSP2HJRSI RgQSEQIABgUCPxxhUgAKCRAnZWjXXGFTrbKbAKCK6kQh03nbZNDTWpkB4rxnPDmG EgCgp1O5BGDIGaQ4eiid8ymCT7Mry0uITAQSEQIADAUCPxxtbAWDAcbg+gAKCRAL 21Oxos+KODWqAJ929MhCDh+bPiXdByVVC6r3ClYoWACgmXu254JSOpq3f1EOlp2o 7AGlnzuITAQSEQIADAUCPx0oOQWDAcYmLQAKCRCkU1GZ6fLHR8aBAKD0vnVXS4WI BQRLpynwLN+yEkdyAQCg/G/WO9lV+q6Da5m6lHuYZnpXfrCITAQSEQIADAUCPx2Z oAWDAcW0xgAKCRAakE+JnAT0VlKNAJ0Yg2Jg1MnCl04AHzXT86riHwobCwCfbsnT sGD/erRIF3lbqy4uQeruwM2ITAQTEQIADAUCPx1nQgWDAcXnJAAKCRDnTSm4K+Ft ATbbAJ9CxwqDUVzxAlMRC2ZoNlVlICNcwQCfY8J5VeOUTupywIxu5t76JPjpXlaI TAQSEQIADAUCPx4vwQWDAcUepQAKCRDMAZrE/xbW6DRDAJ47fcUc4q5qniHr0XEZ kJugQvGfBgCfefzT5kQCZWApdz6pOLH/OaXovdOIRgQQEQIABgUCPx5y/gAKCRCR N06BglvveWDoAJ9h9TvrGeEswOA0xTQUl1x4OZk4fgCgxn23O5GbD0yVtBzvI67s eAA52QqIRgQSEQIABgUCPx50jgAKCRA0UO1RP8wqkL5rAKCJ/n/2ry+X3llQ4khO LnRykVecXACgh4PDAmZlsBNqB6+IWroS0IZBM/+ITAQTEQIADAUCPx7QQQWDAcR+ JQAKCRAo7rNaPo3MwBBaAJ9RsGrXWpNb5CKvoycyzH3iFiiUcgCfUmnxZt2mJuVE tFRn3A58aGMARIaITAQSEQIADAUCPx7UYwWDAcR6AwAKCRCSvJR2Y5QmXoFtAJ9G xec9vmWXykCffgOZ06Rq+avJFQCeP2foMaxgVSbs3y/7W5HEn8p985CIRgQSEQIA BgUCPyAMgAAKCRAD4Yxrg+URD2ejAJsEMtRdfceRZd6aJBTbd3Lha5YoLwCg2q0P YiOk88cRS73S8ahqw/M7XjeIRgQSEQIABgUCPx74OQAKCRD0tLDMeX6/q4inAJ9Z IVHiFjge0MEcYc+7QmdHf623EQCdFOjaotIeiAcgNVZ6vwLRIskbKhGITAQSEQIA DAUCPyBUPgWDAcL6KAAKCRCJIbXczRWog//LAJ9+R5+CD+OQQk50N6jQ2qdVwb5p NACdGBU1ETCsL0KWnjy32juiNU88RuaITAQTEQIADAUCPyGQFQWDAcG+UQAKCRCU myXsB0RyUsL5AKCv5vSTkKGMO7wreIGmmFvda0ggRQCgrRG0w0LgMNTV5GuUYYpX KyrxVf2ITAQSEQIADAUCPx779wWDAcRSbwAKCRAOp1a1FEhD9RSAAJ9hbunLjJzo p4zW8ps6UA7Pt7bl0ACePT6NS1g/MNm4v+zrmfVMg4aL6O+IRgQQEQIABgUCPyGw HQAKCRAo3bD9Gcm2ut1ZAJ48bF6UYI1lASjAIiPfEWElzlVL3QCfQqTluGlAMQcs dDshxSMkdf3EtNuIRgQSEQIABgUCPyJCJQAKCRD6jjeQkFE49LJMAKDCRfWkc3S6 dE51wT6fqMzeXhhX1ACg/DJGErRVc5Na5DYx0Nlje5o25ROITAQSEQIADAUCPyOf 5wWDAb+ufwAKCRAYoMyNVwaktPnFAJ4oevrGP5NQ4z9Q/+RyyRxa6sBo5wCghGdy bxebkxFr944+m4X2pAoQPeeITAQSEQIADAUCPyPSxwWDAb97nwAKCRCWJIPhVmLH NBdbAJsHBKKyAHxJsrmnEsvbCarsez5L/ACeKfDtK7v74VhPGu1Ozxf9WM8rv/uI TAQSEQIADAUCPxvhvAWDAcdsqgAKCRDYDvNai7UnrxIYAJ9flzoj3WwuCarJrRV9 uMTpuPIUQQCePQMaDq+S5B7roGV9NYbwDyr6cuCITAQSEQIADAUCPyO2RgWDAb+Y IAAKCRCUT8anamoLvKZtAJ9yf0DD//5z+wnEoiy5ng/wUrVMJACfRruv+iqu+N9C PWvr5UinfpG/ciKITAQTEQIADAUCPybdBwWDAbxxXwAKCRAEMjbrEHMZdwZdAJwI vGOSSGFZpLP7I0txC46JjfHXUQCghptZRT6VbLrRolaSvlcSGXOBlraITAQSEQIA DAUCPyfZugWDAbt0rAAKCRBXo3+9Uc+EF1/sAKCJ1QhZyKXb2cOmU3vupHpbgyM0 9wCfbd637LEgrthTBxx3uabI8ieaD06ITAQSEQIADAUCPyf+zwWDAbtPlwAKCRCf zyzNPz5kJlZRAJ98/7k3RxeHAi847aSqySPMXGAQfgCfU6/28s6iysmG4V1N3I9D 2BEjTBWITAQTEQIADAUCPyi+wQWDAbqPpQAKCRCELNt6RHeeGFG/AJwLccmukoGz Rshsl9ObuY3sJ4xxowCeJCzBdiQYjW0EBj98kwcbVyakhdmITAQTEQIADAUCPy1C AgWDAbYMZAAKCRBO9KmE8sq5yKbOAJ49xGQfX1U3SpJ0t6Bfv1wXSN7ObwCfR9FA 4/RGHC6Ta21uwWSSRcqJo+qITAQSEQIADAUCPy4+EAWDAbUQVgAKCRASCWOdEUqo XHnQAKDcvAqul+ywVc+EHY1akvB4bbypBACgjHQl2Vm+MBrRoMJLHP3sfrNpYm2I TAQSEQIADAUCPzESngWDAbI7yAAKCRBgMFsxwJ/TWpyjAJ4n8f74gthGecILKm5W 3PYFRhDnBQCglm7e0b5bQGaDhKMh2uD5lvHfUoaIRgQQEQIABgUCPzYZcQAKCRBp 0qYd4mP81MtzAJ9btvXaK4nL4iFxctKDjnCYP3LmjwCdFzZI/R+ROl6xUZvNKGcG VknK+paITAQSEQIADAUCP4RVFwWDAV75TwAKCRDFFK+OS6QBw6FcAKD0uqMhweVR SRLWy60tT8C6g6ucMACfa4LvBUggM7ccon1tY3MinRczm/CIRgQTEQIABgUCP14p WwAKCRDeeq9ulMCcf2LaAJ4yS2svWpQgfJPjteMYtpCmjOGhOwCglezYyo9N8lnf fxN7SO2O4Wh6K0qITAQTEQIADAUCP2y9+wWDAXaQawAKCRDRToUm3EfKFuZyAKDi 51ByUieYzfbAYOsXLc8C1dMTTgCgyLGukCXEOaJMKZv9jpnR8c3ug7+0IURhZy1F cmxpbmcgU23DuHJncmF2IDxkZXNAZGVzLm5vPohhBBMRAgAhBQI/AhrmBQkB4TOA BgsJCAcDAgMVAgMDFgIBAh4BAheAAAoJEOuA3h2LcdOk5KsAoNNWuZkGBYffdYyD 10HX8KOY3u9rAJ9YIUt6kyww3yHSvGEj8QbKGTzATIhGBBMRAgAGBQI/AhuoAAoJ EGcmiOEFEuSatxQAoMjoDyiOBOnSKwOJD6ZUX6F7gxkvAJ0aS5oR7a7PGv8rg43f 3Rphb6n5g4hMBBIRAgAMBQI/GHooBYMBytQ+AAoJELGp3YLcgUsJsboAnjICTvnU pAelKjVJZNH2zWQUVl+yAJ9Q/zp/xOsXHmKSVjwyn3bAIgUOoohGBBMRAgAGBQI/ GF6HAAoJEHzz9a8pSZ9h4fIAn1mwi9Dga8pjlpPEbyPQLs5+KU34AJ9zeOKt6ZnZ CwwPWMXTJo8Gm1WiEIhMBBIRAgAMBQI/GSzdBYMByiGJAAoJEGXfNMArX4Xjpu8A n3aB65/yrgUdSl+KkxSDFR09Pol4AJ9rcKngs8252Kc5tInznPzMu1FSDYhGBBMR AgAGBQI/GSwCAAoJECm+XSJo/VSfD1sAniXGEWecI/zJ2B8S6RIY0m79YgE1AKCE Bmef3SPC+cnUqADPhHOzhRFhR4hMBBMRAgAMBQI/GR/NBYMByi6ZAAoJEJnIkHUb xOMr0vUAmgJie4tSyFw6QvWMqcpgqaeCaVPgAJ40XfSALv/p/7AYJrK9S6l9/2EX 9ohMBBARAgAMBQI/GXl7BYMBydTrAAoJEISJsU2IB1KbaEAAnitC+rBDUikYtW5z hXAgODKG9oXBAJ9jXkQYcG3XpTCQFkZRUVKcBcKHH4hMBBARAgAMBQI/GHTiBYMB ytmEAAoJEPYo65NHQyBsOz4AoL+p8Qek5z0deSf11ResAJMA9SatAKCeeaYhRy7v 8vn2aYXn1O9FKtLKtohMBBIRAgAMBQI/G4X9BYMBx8hpAAoJEOwOr3E2d4AlONMA n2zOGmZimfF18lUezVonksekAR/3AJ43zQpSqTUpfcEJVZORkkaj00dQd4hGBBIR AgAGBQI/HBynAAoJEHTXgNe/O7HdFrEAnRT5i5HCCnH0wArYosJgGlVa4UObAJ4s AAlikY3sGnTypQnZt8RFGiTx+IhGBBIRAgAGBQI/HGFaAAoJECdlaNdcYVOtvl4A njfyK61YobMTE8UfMP8QKb6ndKbkAKCGHS1ksNa9z0gJqF4eiuSvw9g4vIhMBBIR AgAMBQI/HG1sBYMBxuD6AAoJEAvbU7Giz4o4eesAoIpMkbOZDabH0er3aWjhOCVt A+eeAKDWnDZRyGLLE+RUtvjtXKF2ptrkxYhMBBIRAgAMBQI/HSg5BYMBxiYtAAoJ EKRTUZnp8sdH+SsAoPqkFdrjhanX1BDvoZ8+uuhgvxVkAKDSpDl2i+Vme9IVC1a9 kRspBC/664hMBBIRAgAMBQI/HZmgBYMBxbTGAAoJEBqQT4mcBPRWOVMAnRHQqSso Cy+ttNY5JC6wcdqvXzzTAJ9UZ4/Kwhz9RsD9tuiK8tmzhgd3S4hMBBMRAgAMBQI/ HWdFBYMBxechAAoJEOdNKbgr4W0B8n0AoLDOM8Fbt5StIo8V70BSmHCstw99AJ9I YMgvN/tG3Pi+Fg6+timzc+sC1IhMBBMRAgAMBQI/HZIJBYMBxbxdAAoJECvIQBYg aHiVNCkAoJtrq3WFl/10DX4EJzPLxo+JId3NAKDOGnf8lugM32f3YhJfZMP4DNlB TIhMBBIRAgAMBQI/Hi/BBYMBxR6lAAoJEMwBmsT/Ftbo9MMAoPDItb6h0btpfcKG ++iZAXCi8JkCAJ4qXml8hgtbQDK5VMf0na6dpC54mYhGBBARAgAGBQI/HnMNAAoJ EJE3ToGCW+95UtsAoJa5D0L/hkKp/ymOctCtX3v71LO8AJ9KJnLeyx7QmTOFB2YS uTZsTjj594hGBBIRAgAGBQI/HnSOAAoJEDRQ7VE/zCqQpM0AoKtM3T83UtJ8CxjX 49LDDcEXtr/TAKCHOmlkUgtvyQMd33gv43DA3G/VqIhMBBMRAgAMBQI/HtBBBYMB xH4lAAoJECjus1o+jczAIgAAniggxP1tv+cROAUnqVpES5SVrOOJAJ93z6YAz8Cd hiMTRI6ldX2kOZ5SQYhMBBIRAgAMBQI/HtRjBYMBxHoDAAoJEJK8lHZjlCZevGoA njPHbHDyG1KjrdkO9aO//icCm0c0AKCRK55Cc8B2R986bTNdsbJ1HbRym4hGBBIR AgAGBQI/IAyBAAoJEAPhjGuD5REPlngAniy3o/53WuriEqpPrJI1tSL+0WpvAKCM iM/FsS/Aj7WQ3VgwXOH1O3NOP4hGBBIRAgAGBQI/Hvg/AAoJEPS0sMx5fr+ruUYA nRX3M6iNtrb+70BgPLaNk60v9O0+AJ4maY9wxLkuSofC0qOrEGyeopRduYhMBBIR AgAMBQI/IFQ+BYMBwvooAAoJEIkhtdzNFaiD5xsAn23YnSt7/wMymkj5WZ5fDxZM ADxsAJ9W53EYbc/aqmm/TSaOZupcUbo+P4hMBBMRAgAMBQI/IZAVBYMBwb5RAAoJ EJSbJewHRHJSoocAnAjp/7zq2XaEkY4DncAQXydDYSYlAJ9TPPr6hHrmX1UT3Xjm GA13goTPAohMBBIRAgAMBQI/Hvv3BYMBxFJvAAoJEA6nVrUUSEP149YAoJLVDRco hDVi0vCSkqgAHllkvpqJAJ9BUYNu+8BPy+CzeaWcIxs6chSddohGBBARAgAGBQI/ IbAdAAoJECjdsP0Zyba6SlEAoK79wSGqr+YBOuo8Eo1uGO4Bv0D/AKDPJI/PBqaG +zSjRZ0RYZSKOEEGrYhGBBIRAgAGBQI/IkIoAAoJEPqON5CQUTj0MaIAoPu12xZJ zwRJVkELnpKyMUJk8yHbAKC77Buj8kLGyGywDYaj4QjeXVWyuohMBBIRAgAMBQI/ I5/nBYMBv65/AAoJEBigzI1XBqS0pqQAoLrIgHkSiFw10rt0gL5XzDqAWQmPAKCP qo79MpHPRUrahrvphcGo/IoDNIhMBBIRAgAMBQI/I9LHBYMBv3ufAAoJEJYkg+FW Ysc0P0oAoJy9J/R6rQfRfAvzwniBtY24Uo2VAJkBdhqPOZy3pUoSFLFf/RL2MC+s 8IhMBBIRAgAMBQI/G+G8BYMBx2yqAAoJENgO81qLtSevrCoAoLo5mW2WubgiAPNZ Nhn650TdLbb9AKCPDxLF9r1FUz0tocGjceTRrDMLb4hMBBIRAgAMBQI/I7ZGBYMB v5ggAAoJEJRPxqdqagu81doAn1TH5BpcZpY8OO82TVkVr1CHb7HDAKCZvci7e4gD zTW1QxqybIXaJdamG4hMBBMRAgAMBQI/Jt0HBYMBvHFfAAoJEAQyNusQcxl3dYkA nA08lLLRBAXB4nMnkQ5czuKJui5dAJ4zZ33EVqYiMwbnLwHf/x7/0Nvqe4hMBBIR AgAMBQI/J5BCBYMBu74kAAoJEOYoTyeGYkq7N38AnAno1QIF7S+fa/brdlS1v6Y9 WcDQAJ9ZcSnHxDHWEsFJY1OVr9TtfWKdjYhMBBIRAgAMBQI/J9m6BYMBu3SsAAoJ EFejf71Rz4QXYTkAnjrzN8edIRt53Bn30+T42OVs8tBIAJ9TeVYb+itMlxwW/ANT /ZHzPbNl3ohMBBIRAgAMBQI/J/7PBYMBu0+XAAoJEJ/PLM0/PmQmmBAAn2uMnKOj lvigwUXJxuaXFRt8Emc3AJ93s0YgrKq3x3mkB2VD62GH/MIcXYhMBBMRAgAMBQI/ KL7RBYMBuo+VAAoJEIQs23pEd54Yg3AAn0pAXqinYw7KbPF5cjxtpeiEPtHTAJ49 aruLEBbYZ2gykTzJjOKaAqixl4hMBBMRAgAMBQI/LUICBYMBtgxkAAoJEE70qYTy yrnI/bsAmQEqZCV8O7V0A8o/fUFQoU2timBKAJ0WDWUTOp3z01zulOE0rK24LCTt O4hMBBIRAgAMBQI/Lj4QBYMBtRBWAAoJEBIJY50RSqhcPFoAn31O6vClkPqIDQYE Mq3pcNSQEX/HAKCvxPI1VO6SzComlXou6pGS2F1zi4hMBBIRAgAMBQI/MRKeBYMB sjvIAAoJEGAwWzHAn9NafT4AnRXzNKBo2zxqgoEkIMjyzS/Dw+GXAKCid2+tbk0k Y3QbUueb5UXLIV+JrIhGBBARAgAGBQI/NhlxAAoJEGnSph3iY/zUex8AmwWGVkv3 iylbbUVlkQxfhKXg5ZTKAJ0XeZSLvwtUilBIPlaQnPJV0AK75ohMBBIRAgAMBQI/ hFUXBYMBXvlPAAoJEMUUr45LpAHDCMEAnj3swDnYMk4jKlWSm4sIjdcTmQGTAKCd KHLPAq/wOKopXJAE2uLCpPnd4YhGBBMRAgAGBQI/XhCtAAoJEN56r26UwJx/FUUA oImLIb+F8xaRcRmuyo7SYDIr8RDVAJ44HRS27Gz36NjHWs2vJAx0rFpV/IhMBBMR AgAMBQI/bL37BYMBdpBrAAoJENFOhSbcR8oWQagAniLPDhLvo2E6OyzrnfJ3O7Zp 0POiAKCGGMii1JooUWZoTflICYjYduTN+7QjRGFnLUVybGluZyBTbcO4cmdyYXYg PGRlc0BvZnVnLm9yZz6IZAQTEQIAJAUCPwIbHAIbAwUJAeEzgAYLCQgHAwIDFQID AxYCAQIeAQIXgAAKCRDrgN4di3HTpOwWAJ9IwZmz6izqDGDMmXXSHfDQ3PpztgCg hnehrAYLNYLbGNbNGQ4UMTdpPoeIRgQTEQIABgUCPwIbqAAKCRBnJojhBRLkmjoc AJkBXBaMJEHqR1NzdUx4UtwHkZOvVACgj6C/xTLk8juWlvdGuVtA1GW4Jl2ITAQS EQIADAUCPxh6KAWDAcrUPgAKCRCxqd2C3IFLCeloAJ9T1q/2w8j37HuLo8omGiqv SXGVEQCdEQLMInjv23LXoEGDKdKjsPs2lrqIRgQTEQIABgUCPxhehwAKCRB88/Wv KUmfYSMkAJ0dm/NXvyUezxlxWWyCO4lUvQRz/QCfct3NqEpWxmo4VVFtgtEH9xle QGmITAQSEQIADAUCPxks3QWDAcohiQAKCRBl3zTAK1+F45ovAKCJ27LfYTQc/aOB xovcoxRgDzLr/wCaAv0gN9DvLVzulm93WVS/dEjkzY2IRgQTEQIABgUCPxksAgAK CRApvl0iaP1Un9VzAJ0d9vsy06TKjf9Zv+OKIZRNSXnUNQCeO0G399gDfK+wdKGm xgriqtiDYIyITAQTEQIADAUCPxkfzQWDAcoumQAKCRCZyJB1G8TjK7U+AJ9cvWL/ 1bcCFDVvMwAJUkKyhfMYeQCfaPuu8+ck9wOq1TZw93dDJQeTLl2ITAQQEQIADAUC Pxl5ewWDAcnU6wAKCRCEibFNiAdSm9D3AJ9aF+WBBjDYFY1lXKOQYIeiVJlnvgCf X57C2qQp7syfSJHrBe0e4oW2qayITAQQEQIADAUCPxh04gWDAcrZhAAKCRD2KOuT R0MgbDivAJ9pVmTh5SNEHrdiU8LSm1EmOBQ3AwCfc2mTLdblVBfz+w7yWOVN8UUb mpSITAQSEQIADAUCPxuF/QWDAcfIaQAKCRDsDq9xNneAJfUcAJ0dQIrgfcYtq0R1 QPVMnh+PtarDXQCdG8cMGwiPUIUnND3SbicagF2/6oyIRgQSEQIABgUCPxwcpwAK CRB014DXvzux3ZXkAJwPZSW2+Vnke+gTUKfQcTXXRA65TACeOl4+AhiOOjqJ8km2 mGE8pP+L/DaIRgQSEQIABgUCPxxhWgAKCRAnZWjXXGFTrddhAKDxUb5NcxFc9nO4 cR2ga5d4B/lKIgCgxPZT4n5Z9l6nh5lYyVLUE+r8EciITAQSEQIADAUCPxxtbAWD Acbg+gAKCRAL21Oxos+KOMmcAJ0bq0pcFTeIam/lzWwJVZAq5XtQgACeIYbjGYKe JtPhdK70G949bcpQoCeITAQSEQIADAUCPx0oOQWDAcYmLQAKCRCkU1GZ6fLHR9NN AKDq0f5BEnzU7rSTdeKbMYqa+XxheACgsLum8mepphBHfuXZb0itBBCHFFmITAQS EQIADAUCPx2ZoAWDAcW0xgAKCRAakE+JnAT0Vm57AJ0WGqpAPtHe5vlPuDL/G6gw V9EB1wCeKpHChgLFEDm8mTZneAND34rhU5yITAQTEQIADAUCPx2SCgWDAcW8XAAK CRAryEAWIGh4laQEAKDBrDe4AKk4Jmyvy30WYSen7dK6SwCdF+CyoMqkwIyxA6ow X2QIXhl5Dz+ITAQTEQIADAUCPx1nSAWDAcXnHgAKCRDnTSm4K+FtAcCtAJ48wa79 lrU7+IknP21sOT4V5OS1UwCcCvvjMI1UijU7owyoJgDMz5a2P8GITAQSEQIADAUC Px4vwQWDAcUepQAKCRDMAZrE/xbW6MTZAJ976sQyJiQDt4/Cjn0dJHXSP65csACg uhb9mtnax++8w40vwyz9DVCRlNWIRgQSEQIABgUCPx50jgAKCRA0UO1RP8wqkIym AJ0cGfZWOf91+xeLHPpVApTsjoUgKACgi/Kteyt80giYYCnWBOYj+ZAyyjOIRgQQ EQIABgUCPx5zHAAKCRCRN06BglvvecoTAKCrI/Gp6WRkux1xQQ15S2BV6YYqVQCd EuupKcxW30SxpSvGa6MmPWzlwpiITAQTEQIADAUCPx7QQQWDAcR+JQAKCRAo7rNa Po3MwIQAAJ9mNzbqS/sFzv7C0SsMunPhOjsU/gCdEt/kO4oNM9YfNgLWTV+ZmKUV LZmITAQSEQIADAUCPx7UYwWDAcR6AwAKCRCSvJR2Y5QmXiY6AJ9SRxD3zYuGuj8E kYhvSLDKx2ThHwCeIIMxjb2hb8QUocE7H7pdt6o2FmaIRgQSEQIABgUCPyAMgQAK CRAD4Yxrg+URD+RPAJwMoYa+JThfpAWU2yrI9JWsK0J6uQCeOErn1m8Bz/w9xmK5 3ezg5xgr/F6IRgQSEQIABgUCPx74RwAKCRD0tLDMeX6/q3jVAKCMJEcJlqGSOctx 4QFp0vTe8yaGygCfTyTk88mTa+0MAtLHCJYudVs+w7uITAQSEQIADAUCPyBUPgWD AcL6KAAKCRCJIbXczRWogycKAJ0Uyv6/nR1V3asjbh9uAbAcB35SgQCeJU5sIHj3 Fax7pp5zW3y7HnvGUEKITAQTEQIADAUCPyGQFQWDAcG+UQAKCRCUmyXsB0RyUh4h AKCxC9UN0J6z8hPuVcIbOVUru2OONQCgoPUkqtCQJGxgnQi+LwtS45YT/2mITAQS EQIADAUCPx779wWDAcRSbwAKCRAOp1a1FEhD9WpUAJ47y836RKJj7uvd0HG5GKGD XXL4pQCgiE1921hK8/4OZLq1uloxirm2LpGIRgQQEQIABgUCPyGwHQAKCRAo3bD9 Gcm2uiVoAJ9Kai9hiOf6wx1E6p4JOuTkEiZMOgCggenCkL1Pq1LVVB5YLz4pu0tw 0BuIRgQSEQIABgUCPyJCKAAKCRD6jjeQkFE49No7AKDaO+qq0b9iBVcczPU2MAjA B1NFbwCg3Zzi1R603ZFwe78zlAPWuFgVkoqITAQSEQIADAUCPyOf5wWDAb+ufwAK CRAYoMyNVwaktJG5AJ9Ttt5a5A1jWCUDWWpq8hqsJYkGjQCeJHYhXbzaZNZ3Hrzw BJ7PxeE2epKITAQSEQIADAUCPyPSxwWDAb97nwAKCRCWJIPhVmLHNB/IAJ4gHOZi 90AES4hvJB6rr6aLVCSo1gCgojUPPaiMT2UPprjrQknYd0lykTuITAQSEQIADAUC PxvhvAWDAcdsqgAKCRDYDvNai7Unr5gUAKC/VFgsTTX1pQlF+xjUUb/6a8G4awCc CszzQcEb6O8FrSzqKDu8a48LYSGITAQSEQIADAUCPyO2RgWDAb+YIAAKCRCUT8an amoLvG+pAJ0WdQFOuIh9NzTUWdYgimY7KLcNwQCfTBTg8FqQ1ECwtUBvE3aOv/6L ckGITAQTEQIADAUCPybdBwWDAbxxXwAKCRAEMjbrEHMZd8U+AJ9S5E0/f+3LEkO4 TLEX+V2ykxL4nQCePjFHyS3EfK0DfQqf6vWsmwKnQr+ITAQSEQIADAUCPyfZugWD Abt0rAAKCRBXo3+9Uc+EFwe5AJ4/xt3RSBcpAVqZkRpxx77hpnt0PACgkXNJic18 ynrgKnLswWjVkL6fgk6ITAQSEQIADAUCPyf+zwWDAbtPlwAKCRCfzyzNPz5kJuCl AJ0Yj9k5tBwYBFjAkfbRR382qIhlwACeK+BcalSB1NlEAxjnRn49QVAcBayITAQS EQIADAUCPyeQVgWDAbu+EAAKCRDmKE8nhmJKuxqPAJ9PqYkZx4pTwUvh1b72BBGG ZHyB8ACeMIyXll/ro3/0rE6XV+JXRYBJ2CCITAQTEQIADAUCPyi+4QWDAbqPhQAK CRCELNt6RHeeGIWnAKCjGV3ez9cEqHbij/V1jo9NMTg74ACgjaIxLcGr5n6INaXU nhFXnSkm9aaITAQTEQIADAUCPy1CAgWDAbYMZAAKCRBO9KmE8sq5yG8HAJ9vc297 kJui7ezOPgZt6Q+Q/Nyl/ACcDvMS5Fz+3BvMKgYYGxjH2G6CGL+ITAQSEQIADAUC Py4+EAWDAbUQVgAKCRASCWOdEUqoXKqKAJ46/A5uRBDXtfvAESU3kwoeU4rLKwCe LM+sIpjE+7MOvT+/J/rHHk3H7deITAQSEQIADAUCPzESngWDAbI7yAAKCRBgMFsx wJ/TWto/AJ9n5MMXv12k+rfae8TPknglZnO0kwCcDbud/mCyLAHtRhE28mKq6S56 sCuIRgQQEQIABgUCPzYZcQAKCRBp0qYd4mP81MAeAJ9nRdc8HhSg4+w3yZBS2IDe VLNAywCffp9m60HqhpkZLFsFy7sNIQP5+1+ITAQSEQIADAUCP4RVFwWDAV75TwAK CRDFFK+OS6QBw6cFAJ0aqMS5QKsy3i6Ogsnkj3PebLgg8QCeMkXXnEpKFiqJUvr9 dRk7aaNVmX+IRgQTEQIABgUCP14pYwAKCRDeeq9ulMCcf97RAJ9QI1Jb9lWSfwvH Rk7h7/xBAHGTVgCg6CeSRpPmlGaIFpOy8syDcjo+mjqITAQTEQIADAUCP2y9+wWD AXaQawAKCRDRToUm3EfKFnjGAJ9k8qNrYvPhmSM0TNvTj6yUhIb0IgCgscPtrCc8 nIEXmqaOAlWcENLIcYm0JURhZy1FcmxpbmcgU23DuHJncmF2IDxkZXNAaWZpLnVp by5ubz6IZAQTEQIAJAUCPwIbMAIbAwUJAeEzgAYLCQgHAwIDFQIDAxYCAQIeAQIX gAAKCRDrgN4di3HTpCvGAJ9+WwbFqYmfF4VUYacFilE6oZgsYwCbB/1pqiucaUEY 01J12MZ67hL3AAmIRgQTEQIABgUCPwIbqAAKCRBnJojhBRLkmmxzAJoDbjUjLH0g 2GVEemD0aXu/47BVQwCfSmQ3F4Qt/n48s/fH93B637hghlmITAQSEQIADAUCPxh6 KAWDAcrUPgAKCRCxqd2C3IFLCazTAJ9olprAaEri10PY6GT6B1H7Zt7Z7ACfaydz U43GCqzQTkhHOKnbwuRWmjWIRgQTEQIABgUCPxhehwAKCRB88/WvKUmfYXeCAKCL o2j1MwQWt74HMn7cRsWUXD0rdQCgiHeth4zSEtrJxMn1XH/1Px+KRHWITAQSEQIA DAUCPxks3QWDAcohiQAKCRBl3zTAK1+F4w4RAJ9DYI3euaJmMWlhXdVYLiymzT2D sgCfew833xdBgategrQ8j9yPxI+15EOIRgQTEQIABgUCPxksAgAKCRApvl0iaP1U ny5UAJ45n2HCHEy8paBFxj+sU5jC0frUUQCeL3qrRbJrNG7r7zeTTFB4Mmp2vSuI TAQTEQIADAUCPxkfzQWDAcoumQAKCRCZyJB1G8TjKxKRAJ4z4tbU2PKsRN6NopBg JVZ/q2WeogCghQqO6nhSt4mrxxoiNV1EAy/TyvKITAQQEQIADAUCPxl5ewWDAcnU 6wAKCRCEibFNiAdSmyKFAJ4nGAyKpzeaOCZSwSursIsovndAIACeOBb0yVc98wUn x0AbWNckrW1Xbf+ITAQQEQIADAUCPxh04gWDAcrZhAAKCRD2KOuTR0MgbFcGAKCs 3GyBIY4HxZiw9pktf+ofiXkZ0wCfb8XirCaTwaZZkQy8lVRT3oo90eKITAQSEQIA DAUCPxuF/QWDAcfIaQAKCRDsDq9xNneAJcpDAJ40rTqC69ZreNUofhmYZLFe6CP6 IwCcDQrACXNRdPtCPwiTYToNZrzkTw6IRgQSEQIABgUCPxwcpwAKCRB014DXvzux 3SqTAKCs5ES7RWf6wY70MsLixHx51DAiXACeOv29RV035TTtLSV7C87lqLmDRwyI RgQSEQIABgUCPxxhWgAKCRAnZWjXXGFTrYuIAJwIot45cSbxJN/YZVWfMwGr9z/j 1gCeLDBIbNM+K49kgOpCshRdojpBpgGITAQSEQIADAUCPxxtbAWDAcbg+gAKCRAL 21Oxos+KOJ2OAKCzSHA6eEisbs2bCqRz1uLiHpVnMgCgjn/sr4kENlXkn3uqckBE w4eyoJqITAQSEQIADAUCPx0oOQWDAcYmLQAKCRCkU1GZ6fLHR9puAJ99IvnrF4tK Cs+Vab2wWCChhNZa1ACcCKZEhm9yggZtThb0+Kphrn3QYyaITAQSEQIADAUCPx2Z oAWDAcW0xgAKCRAakE+JnAT0VheDAJ9dy1uCEymVo4+XOcPZ42DePmqJMgCgjO/D gOYIUIpBEFvoEu8oa6+Ls4eITAQTEQIADAUCPx1nSwWDAcXnGwAKCRDnTSm4K+Ft AQS8AJ9aG7X581/mZFsknt/yOKXGk18lXwCfTtO6y+sdNNk41U2veRc6zf0oRkGI TAQTEQIADAUCPx2SCwWDAcW8WwAKCRAryEAWIGh4lUhVAJ4hDaIa6L1BylU7l9rr 8XC+OGdSgwCfR4o4G7/7MkAPw/64fih1/VyJa2uITAQSEQIADAUCPx4vwQWDAcUe pQAKCRDMAZrE/xbW6FTVAJ9wryMTchgpIYi7/JFPx8MSggyYYACeMBTu2MxP6fir JXpDBL19uuWaklaIRgQSEQIABgUCPx50jgAKCRA0UO1RP8wqkPhPAJ0fnEXe+1AQ uYFBuNKezk6FnXTLYQCfUtKtuvp7wBDwJcU6MwLrb7ty176IRgQQEQIABgUCPx5z LAAKCRCRN06BglvveUGxAJ4qqmIeA/hytOJnr8E0bsDkFeJdYgCghrt7VDNEUsmU vWzWSTmaBTJV4V+ITAQTEQIADAUCPx7QQQWDAcR+JQAKCRAo7rNaPo3MwI2+AJ95 3dnLyCCpUyej8cdwXjW2JqmZjgCfZpUYD1/NVbRbIWyU3LxFTbX39aqITAQSEQIA DAUCPx7UYwWDAcR6AwAKCRCSvJR2Y5QmXkt6AJ49ntlWDrnRne4+oP6DO9fYkkz4 owCcDm7e+8B8sgpjk+Xhg8n4lELDUeeIRgQSEQIABgUCPyAMgQAKCRAD4Yxrg+UR D6xfAJ4kxcYZlGoQ2Fr0cSkmrcKYmZ9K0QCg1YvdeXzB+qmzR7bCr5Rdt4gRPU6I RgQSEQIABgUCPx74TgAKCRD0tLDMeX6/q56JAJ9y59oQWYq7+GTdedA3aSGHAtv1 IACfaPc/qgz+jTDzXb3HN5Q+r+BNjVqITAQSEQIADAUCPyBUPgWDAcL6KAAKCRCJ IbXczRWog7QCAJ9m8tCLR/isMAFhb5ZHu3YtI6EPJACeNa1UKmHEAb3eJMNgvFJL zuOuDhyITAQTEQIADAUCPyGQFQWDAcG+UQAKCRCUmyXsB0RyUsAAAKCwP9jtvVMy 9FITvQk5ilLcPlYY+wCgrmq24Rfn5uVptt0P4p+qACuczvWISwQSEQIADAUCPx77 9wWDAcRSbwAKCRAOp1a1FEhD9fSGAJ9naGlGXXCgWzx0Dhre1xhuJrprcgCWKZoq exGekG/GWfqSy/RnY7O3P4hGBBARAgAGBQI/IbAdAAoJECjdsP0Zyba6idQAoJco 9XscsPiu5M0zYtsE60QRI7tpAKC262ViwySCXJ6VPRm2pYhlCITw44hGBBIRAgAG BQI/IkIoAAoJEPqON5CQUTj09UUAoOQBCVRxYnf9YNTAfr3/3MlrnC1eAJ0SQ9kp pt8hhcWWI6fGd8e6U7dE2YhMBBIRAgAMBQI/I5/nBYMBv65/AAoJEBigzI1XBqS0 xXEAoPAnLWfgCcBYcH6wziwaaAkxII2ZAKCdL7cnfw1LmyTzTPE9pi2iuVyoAIhM BBIRAgAMBQI/I9LHBYMBv3ufAAoJEJYkg+FWYsc0HkcAnAvyjtS/UfNEsA3matps +zK2cDoQAJ9jYSioLSB/joK3ioWcPJpFFLZ+FIhMBBIRAgAMBQI/G+G8BYMBx2yq AAoJENgO81qLtSevk1EAoJqpaO2VsifTyc3lE58433d29C0kAJ4mBnIWuXK6+b7K QtqWsjrm6RDeWohMBBIRAgAMBQI/I7ZGBYMBv5ggAAoJEJRPxqdqagu8izcAn31q 0EOcVno6FR/NTr+tHralt1xXAJwJ8QUAakI1xCJOY1E6J0WbCTq4zYhMBBMRAgAM BQI/Jt0HBYMBvHFfAAoJEAQyNusQcxl3NYUAn34lLoGEa+TlgJk4QqqFIZQ5yW9O AJ4jDqe+d/uFu5oSMEElqC7UM0JqpYhMBBIRAgAMBQI/J9m6BYMBu3SsAAoJEFej f71Rz4QXsvUAn1WgmSt1hixGcduqwq7y10yAm5CAAJ4wYmCNDCrwbm2GGaNs6mks eiTmk4hMBBIRAgAMBQI/J/7PBYMBu0+XAAoJEJ/PLM0/PmQmV1cAnjMYQGwmZlo7 3jLfUVVUpEwJdZETAJ9aARWjhKb5y5kwX7k4UKifmftpy4hMBBMRAgAMBQI/KL7u BYMBuo94AAoJEIQs23pEd54YumcAn2tZFaO1EBLzTH5x9JjF9/uKLIZxAJ42QAzD TuuPfHSe4mtXLFqx2TVeqIhMBBMRAgAMBQI/LUICBYMBtgxkAAoJEE70qYTyyrnI D9EAn10P5mNeZ0KLXq79Se/G427FDXcMAJ4hflLQHW9cRY6/6nhJ1lcqjV8ftohM BBIRAgAMBQI/Lj4QBYMBtRBWAAoJEBIJY50RSqhcScsAoKQ0mBTHr+aq7zrNNL8E 4i0onq/NAJ9yyaoCj4koz8yop5w9C0XPoEfSEohMBBIRAgAMBQI/MRKeBYMBsjvI AAoJEGAwWzHAn9NayRYAn2i86aEMVnYhG8k4xqb4WsmI+Z7yAKC/Cc2B262AnACm UdgRiF04pdGIaYhGBBARAgAGBQI/NhlxAAoJEGnSph3iY/zUUooAnAhlhKlWCN7J cLG6IDlPDpc4h7bAAJ0QU1SspMJaXHbhJyHh3ZlPzmeVIYhMBBIRAgAMBQI/hFUX BYMBXvlPAAoJEMUUr45LpAHDE3QAoPmouoGYY11c/yBIQ6PNLkNgYNo6AKCbtvZV vDaPgUxMN217aYbbRkHLRIhGBBMRAgAGBQI/XiljAAoJEN56r26UwJx/whgAoOgh RzYyizMIJwusD36WI+eNWz5XAJ9AYmvzj7CEjn0zWkLZ/iSxnRfOwohMBBMRAgAM BQI/bL37BYMBdpBrAAoJENFOhSbcR8oWm8IAni3VGn2Bo2sBCP2rKq8lQM2d3BmV AKChblnVFPw9DelLuwEcTIxoIp6F4LkBDQQ/AhroEAQAxx/m3s5TmXgCqphGDItk peQ4JFRmMvwyT+mXm4K+E30D9M/TvAtUGnObMBc+Ifmk4gQdlHgyQIZDNdF5IR+I 6oappfz9WTYtQzJTfC/Ejs3624S29w/zjY4hAl1W7F9aCxkdyC5wnp3fYuHDjxRR 2Gdfgxvc24XSde9tXeDnHlsAAwUD/ig3kgvONFWpftakaIuEBoVPm+KXrjrR3ETM 5sbKNQKH7k2hdcRI+38yRURVnjP+R7UVSAU9xyTZAVusxiI3dTXX4b0xrw196bT+ HFuM/golbFiBWpYaewXC/cP5DhxT2zSo0KLj03zEfCew2lwRvIXrjD4ok2sp1GGc JFgi6JPhiEwEGBECAAwFAj8CGugFCQHhM4AACgkQ64DeHYtx06QtIACeJf3XVR6o fCEFD/61ocewNQDnONcAnjAr9T9WRgoE+1MqKOCX+YadH9CW =Il3u -----END PGP PUBLIC KEY BLOCK-----
D.3.108 Maxim Sobolev <[email protected]>
pub 1024D/888205AF 2001-11-21 Maxim Sobolev <[email protected]> Key fingerprint = 85C9 DCB0 6828 087C C977 3034 A0DB B9B7 8882 05AF uid Maxim Sobolev <[email protected]> uid Maxim Sobolev <[email protected]> uid Maxim Sobolev <[email protected]> pub 1024D/468EE6D8 2003-03-21 Maxim Sobolev <[email protected]> Key fingerprint = 711B D315 3360 A58F 9A0E 89DB 6D40 2558 468E E6D8 uid Maxim Sobolev <[email protected]> uid Maxim Sobolev <[email protected]> uid Maxim Sobolev <[email protected]>
-----BEGIN PGP PUBLIC KEY BLOCK----- mQGiBDv7rWERBADAnp/1Nc02OyU3eiXisqYDw2CaFNG7CpTNalQbJCX9KDuCzNbh RKS7slRG0Cp/IsCIoJ0WLugslAZHBtLigl5XxdVeTYKJfXV1gKXLBnzW942oswUu zMeZzpcrCYHK7AVaTtZJEQTDf/SIx/ZYu8DJPv/7m9I7aY3EYXQsHIqj7wCghRzg vhbpzqR9KiIsH82z5ctlGHUD/AixgJJ6dCf/bxIq3siaijMs1fM1JNLTIL5W7i+I LWUjM9PJztfasAZMj4kXjimZl9345CW+0+jV2oe7y+AFWGZUsQHKb3azruH9frZc a6JSUOwvy4mQjMwtQC2ngJsUQGqrfGl3DLaa4hJzlgQ6i0PHTN1ljKvrMNgtgnZg dypDBAClZuCCjn1RffnM4FzWuDZLYL/wLhqbtzMNvQXe5gwnDeg1QM1xgfUtaaa0 7f071Ayv+K54wVk+7XIRZLP0Kbgo07kJlXw5AzznzY4167RkcrifLPtG4nbDQCaS QreYjUG902h8T7ckkmTV6VAPGUEh/ms9aAeFxAg2XOXiwCaYerQfTWF4aW0gU29i b2xldiA8c29ib21heEBtYWlsLnJ1PohdBBMRAgAdBQI8INsQBQkB4TOABQsHCgME AxUDAgMWAgECF4AACgkQoNu5t4iCBa+UagCeMqThxqmQO5n/pvkdZJFAksbYq2QA niFy0ueKyy02rhB0Lbh3zShEKJQgtCVNYXhpbSBTb2JvbGV2IDxzb2JvbWF4QGFs dGF2aXN0YS5uZXQ+iF0EExECAB0FAjw3HbAFCQHhM4AFCwcKAwQDFQMCAxYCAQIX gAAKCRCg27m3iIIFrx0xAKCDruWA4bQ2VLLpGU3F6pOZES+q3QCeOhFfgzDJ9awe YPrdegHIzleN2R60IE1heGltIFNvYm9sZXYgPHZlZ2FjYXBAaS5jb20udWE+iF0E ExECAB0FAjw3HfQFCQHhM4AFCwcKAwQDFQMCAxYCAQIXgAAKCRCg27m3iIIFr4Jv AJsGythE5SUctWSmAYIxYHagnEUU/gCdFQv6AywESIEMOLK5iaONMFb5NGO0I01h eGltIFNvYm9sZXYgPHNvYm9tYXhARnJlZUJTRC5vcmc+iF0EExECAB0FAjw3HwsF CQHhM4AFCwcKAwQDFQMCAxYCAQIXgAAKCRCg27m3iIIFr2yUAJ9bXGm+Rg9O1yot 9wHXMj+dtZBoRwCfXqO8GzzC5OHu8umYkBHjHeAxdf+ZAaIEPnt4lhEEALMYoq1X 1JORul+WMoR096V9k7ep9BeYY9+gS8VPwm5+74lDD9seqmnyKJVgucFtyRJJbKpd 8F6L1JelLmmoekue1w/uOWDQM7YydqzqeMFvSg+ouyFpG7YM9HkS0ATcxL3L3THx qh/9V7oxp9N90N7aYE/LB1n20+vA17mlEyQjAKCYWr/rcJJqC4U9KOSko0oHJrYz rwP+KCWfQ+R+K0kSloUDRuQORWZTV9auyvf1mHEilrBOkfo5zhYoGTrf8BFwOLVI iNW+0mlZ0jzYENuojDwyGbmrhJr40JlQ0nTtGbEueOVUPcSbZLCXR2V501SlskzY kVhh1k97nEdlxSeNFPrKPwMSnIdDeQqrWMvQNu2juii6gTsD/RiVLyBNcweaZVj+ 9HfSoouhn/XPOFcCvLGHHcOOTOA6Mz1CajFHHz+MnLyuQGPNDEbza/lD9FYH6bih JYdiQlKYI/V0xOPL7gHcnd6upVRAuEqY2btvaBTcs3F9HSCzx8uPaU2jTlCuxEIH UtUuzlpLD+lwlkPhZnfBO77XE/gTtCRNYXhpbSBTb2JvbGV2IDxzb2JvbWF4QHBv cnRhb25lLmNvbT6IYgQTEQIAIgUJAeEzgAQLBwMCAxUCAwMWAgECHgECF4ACGQEF Aj57eJcACgkQbUAlWEaO5thT+wCfUAvjKS3zoH6wWetspVyW4Ffa0n0AmwfnY3pQ HljcLDwkiNc7XS1u9YCFtCNNYXhpbSBTb2JvbGV2IDxzb2JvbWF4QEZyZWVCU0Qu b3JnPohiBBMRAgAiBQI+e3lvAhsDBQkB4TOABAsHAwIDFQIDAxYCAQIeAQIXgAAK CRBtQCVYRo7m2KRvAJ9Ww/uVYgcqLP8MkaEN3y+XkZz22ACfaK0WVlj4Xlzu7DuJ EQeKdLVBmUO0H01heGltIFNvYm9sZXYgPHNvYm9tYXhAbWFpbC5ydT6IYgQTEQIA IgUCPnt5lgIbAwUJAeEzgAQLBwMCAxUCAwMWAgECHgECF4AACgkQbUAlWEaO5thD BQCdEiloTvJm20RzYyWYa2eoEb7TO0QAn18AW+3W8RtWRHCR372icaP1cRdhtCBN YXhpbSBTb2JvbGV2IDx2ZWdhY2FwQGkuY29tLnVhPohiBBMRAgAiBQI+e3mpAhsD BQkB4TOABAsHAwIDFQIDAxYCAQIeAQIXgAAKCRBtQCVYRo7m2HohAJ9zYvuoOqiC QAXkxL3jvr412tZU0QCfdZP5ee+W1y6rO69SCA3CrNqvVsU= =WseN -----END PGP PUBLIC KEY BLOCK-----
D.3.109 Daniel C. Sobral <[email protected]>
pub 1024R/488A2DD5 2000-06-07 Daniel C. Sobral <[email protected]> Key fingerprint = AF 90 A6 A2 B5 8D 6C 28 37 F3 F4 47 8B 31 47 DF uid Daniel C. Sobral <[email protected]>
-----BEGIN PGP PUBLIC KEY BLOCK----- Version: GnuPG v1.0.6 (FreeBSD) Comment: For info see http://www.gnupg.org mQCNAzk+tBAAAAEEAK5EJZPGnimL5cl9lFRpl3mYboOuN6K/ne/2oHt5CNlhBTuU 64VDPcBsM6ha+KJwSCdiO191AHnbpJSmIzNmL1VLHZunbZhJms2rf388pXO6nyu3 GW7x2nmqg5qTTkVZAILcuqb8DF4ODF8FEwwCzDJ4ikhSxgXbsTN8YkBIii3VAAUR tCJEYW5pZWwgQy4gU29icmFsIDxkY3NAZnJlZWJzZC5vcmc+iQCVAwUQOT60EDN8 YkBIii3VAQH1AQP+L27NSLH7LAG4M6GMaMVaI4GkLroqWVumwggYI0UsrBazSYhI t2fULDSnbhXGYUnmMYc8GcS2+m7KIp6getBSXWXPYr44aOwC2r3mB4WmUp4gWsqd 80C5Zc35m62xpkg/yb59UMI/OWTGdU9tVVS1YTdaarLGl+yJ6EWM7qECiVSJAJUD BRA5RV1dVS4eLnPSiKUBAaXaBACBbO0J8IhMnsAXZ7fYKrQVCQFK6HSMQjISlm4Y 8kD1ZtKEMUuBlbbHEt7NoIcvH60jDJPkjSgwMRjUYbluTQe/dfthRkFa92WYcy0G BbgEz+Iib1s0deFF5wL0wSLC9RIIReOk/pEOg/cY7efeutoEOX8LVfz18MkxgH2A 3Cv6gLQiRGFuaWVsIEMuIFNvYnJhbCA8ZGNzQG5ld3NndXkuY29tPokAlQMFEDk+ vYUzfGJASIot1QEBPjAEAJMooQYQUef1jKBsYC9xh9WcvtQ45Hku+BKwU6tBlhLT JMIn9n0guzXey4gsVcpgJcjmZEXAq+dbgL/ps63CXQAahomlszpdea9aumbak1aU 51eIEftheyZaqmM4stDvoC+pdQxWP5K3n2d/7itwFde19xQNuK9UD9iPjJnz2L47 =Axyy -----END PGP PUBLIC KEY BLOCK-----
D.3.110 Brian Somers <[email protected]>
pub 1024R/666A7421 1997-04-30 Brian Somers <[email protected]> Key fingerprint = 2D 91 BD C2 94 2C 46 8F 8F 09 C4 FC AD 12 3B 21 uid Brian Somers <[email protected]> uid Brian Somers <[email protected]> uid Brian Somers <[email protected]> uid Brian Somers <[email protected]> uid Brian Somers <[email protected]>
-----BEGIN PGP PUBLIC KEY BLOCK----- Version: GnuPG v1.0.6 (FreeBSD) Comment: For info see http://www.gnupg.org mQCNAzNmogUAAAEEALdsjVsV2dzO8UU4EEo7z3nYuvB2Q6YJ8sBUYjB8/vfR5oZ9 7aEQjgY5//pXvS30rHUB9ghk4kIFSljzeMudE0K2zH5n2sxpLbBKWZRDLS7xnrDC I3j9CNKwQBzMPs0fUT46gp96nf1X8wPiJXkDUEia/c0bRbXlLw7tvOdmanQhAAUR tCFCcmlhbiBTb21lcnMgPGJyaWFuQGF3ZnVsaGFrLm9yZz6JAHUDBRA3DAEvDuwD H3697LEBAWRHAv9XXkub6mir/DCxzKI2AE3tek40lRfU6Iukjl/uzT9GXcL3uEjI ewiPTwN+k4IL+qcCEdv8WZgv/tO45r59IZQsicNaSAsKX/6Cxha6Hosg1jw4rjdy z13rgYRi/nreq5mJAJUDBRAzZqIFDu2852ZqdCEBATsuBACI3ofP7N3xuHSc7pWL NsnFYVEc9utBaclcagxjLLzwPKzMBcLjNGyGXIZQNB0d4//UMUJcMS7vwZ8MIton VubbnJVHuQvENloRRARtarF+LC7OLMCORrGtbt0FtYgvBaqtgXlNcKXD6hRT+ghR bi3q34akA7Xw8tiFIxdVgSusAIkAlQMFEDgdNQU/ZTB66ZtiFQEBBL0D/3PZ1au2 7HPVMN/69P3mstJLzO/a95w6koavXQph3aRbtR7G/Gw5qRQMjwGrQ4derIcWPuON oOPXWFu2Hy7/7fYgEAsQ004MskEUImJ7gjCZbmASV/8CoJHtBtNTHC+63MRfD++Y U0XXsN832u5+90pq1n/5c7d7jdKn/zRKniQQiD8DBRA1On7BSE2D1AeUXi4RAkb7 AJ42Ss6CTanh4hGyCU4b7/1/C3YN4gCeMr/leUdkWUOMtfZw4/oPXw3wAhCJAJUD BRA3DJamZ0o98VSxcbkBAQisBACa6S/a72KFyc7ZlpqTbrkj6BijO75uICeB1c1+ FMYx4TEXN3NDxB7sQm6AykgMSQmraChjfmwaK0P6iBJVYQKNxVscgA8za71rEUaU rt8M6aaQfZlYMy3DHYjl1mmzeraD2ZjY70DPliiSnsZbu+JKlZcdNEfE6y5jprN7 vVTtFYkAlQMFEDNzvb1sq+iWcxFJBQEBfZwD/R3KNFf9ype9Dea8j1YIeNZ1E3e0 3en1I8fMj6EmS1/L1WfFzMnfFCxZs7JgPtkBuB3CqP8f+LOdDt6PHPqNakmI9E6f iuGfJZ3jFZYATXa0XKuIoxIJNKhqkpbF8ixJZFTxFwAAwVYM3+sqr4qQ8FzVc5en txjyxPFNkwJwRWV+iQCVAwUQOKl2j31Nxs/Jk7xZAQEidQP+IADd17yiXIV3h/pr f2nDYgO/o8bQI5jH0oyYmiJXWHWgPREmIlw2pj28EM7mjDrJQN7oR/ltLTTfAG3G kO8KlnijdVmexxT8y1LmkEyYaIjU3VpmimZIcYgzRgOcnCQVyORcFG9tkGgfEo+7 u7xFwaTKPvsxHDfrOoWkmwAfMOiJAJUDBRA3FKmdnWdBAAxuEhUBARJtBAC9mwTX OL6cT64NwE3Wfz3pKS+pWI97PaQX/H+3mC16uN/AP8sIlpKy++IF8XGdhMvQB2Vv q2yT81G63zAID97lqG3krw8ikaNcLSp02B8vjhCGwSBw5iFLity+yrqQX+1gCOOk O358s9Lcb7Ua7g4736Mpff00kXyCnGsNmiDYe4kAlQMFEDNt51zvs7EFZlNtbQEB W0UD/jZB6UDdEFdhS0hxgahv5CxaQDWQbIEpAY9JL1ygd1RWMKUFGXdRkWZmHEA4 NvtwFFeam/HZm4yuGf8yldMyo84loTcVib7lKh4CumGxFT5Pxeh/F8u9EeQzclRF SMhVl0BA2/HEGyjw0kbkprI/RD3pXD7ewTAUrj2O3XhEInLgiEYEEBECAAYFAjVq LOEACgkQ9Xj0ZDU8AgY18gCfZBmPr90sGIXz3HZoHMfyY3QfLSUAn2acppnW/NjI ZBnCYCs7EI/l1dtgiQCVAwUQNq9AjPafnz58Zbu1AQGDmwP+NLOUsBKV063jzu/A KFBRGuWeG4MsZKU+wVW6upv6ELSudPV3tjNstF0y5HfOqF6Y8isxs1qvE+mUyjXR ffuS4UtspScrXT6tQIw5NgaHH31l+PqV50T4gul3DXWBokC/Dkx72REmEA4h3jH8 APFnTMxStUfNJyTMADWF4ySay82JAJUDBRA3Fjs4H3+pCANY/L0BAZOxBACTZ1zP daJzEdT4AfrebQbaU4ytEeodnVXZIkc8Il+LDlDOUAIek5PgnHTRM4yiwcZuYQrC DRFgdOofcFfRo0PD7mGFzd22qPGmbvHiDBCYCyhlkPXWIDeoA1cX77JlU1NFdy0d ZwuX7csaMlpjCkOPc7+856mr6pQi48zj7yZtrYhGBBARAgAGBQI57mEkAAoJEF1S HIzmsVAWneQAn3ZJ/mSszOjEwTjTPX6HSO/nLIJ0AJ9/YB2Q2XX1gbTx9JlIIUwG 6QeZOohGBBARAgAGBQI6t00oAAoJEJOoB2QsN+N1KscAnR2mEU5khcQitC4h85l+ iC/WfnW4AJ0V1yY4fFz7OPzPmVcS2Qa784xgHIhGBBARAgAGBQI7Og/KAAoJEIG9 08QOH5t5UukAn1fovkBjEEzaoj4ese1j6+N/+ePCAJ9tXJA3ZiV+xpwEX99wKD/9 UKdbOIhGBBARAgAGBQI7PHfSAAoJELTXEKIORR99J4sAoJvjOirmZSB3ugyyCq9B K6ZdWTwHAJ0dhktheUV5yo8/8t5GytZe4ZnsULQgQnJpYW4gU29tZXJzIDxicmlh bkBGcmVlQlNELm9yZz6JAJUDBRA3FKWuDu2852ZqdCEBAWVJA/4x3MjeQKV+KQoO 6mOyoIcD4GK1DjWDvNHGujJbFGBmARjr/PCm2cq42cPzBxnfRhCfyEvNaesNB0Nj LjRU/m7ziyVn92flAzHqqmU36aEdqooXUY2T3vOYzo+bM7VtInarG1iUqw1G19Gg XUwUkPvy9+dNIM/aYoI/e0Iv3P9uuokAlQMFEDcUtWOdZ0EADG4SFQEBzwUD/iDF JROA7RL0mRbRuGCvbrHx0pErSGn4fxfyc0rKnXHi2YMHLon23psO/UYb6oadAsqe 5LiNpBzt2tfZGd2V5Q5d1Q4ONUlf2eS8zcPb2mSrhf77RmpLTo2nOROWs51hiAOX M8LEYMnRDnHfDlTzFDK3TVkSOl0TrZ22WkUsJg/GiEYEEBECAAYFAjnzuKEACgkQ I+eG6b7tlG7fygCfWp+4d0XMF2h5Z3dF2NHRQZ5cKt4An2Lihl29VXso2OY+bV5s 9JRiTOeTiEYEEBECAAYFAjnuYScACgkQXVIcjOaxUBYtiwCg6uHe9RAfPJDy7fC2 gqEmeO9hR8gAnAw8oGTuRxpX+0kdbTpxZl+5UxuWiEYEEBECAAYFAjq3TSgACgkQ k6gHZCw343UihACfUdslW43QrvELZUfojQpfJbhKgZkAni3t62v1mYDyre3zlctw vB2gpVefiEYEEBECAAYFAjs6D/QACgkQgb3TxA4fm3mcmgCePiFNuSQzZJSwQenj pZUaP8zALLsAnRT9r4JmFy4DbLdT3ora8aNspu7OiEYEEBECAAYFAjs8d9cACgkQ tNcQog5FH32f5wCgsrKZ6IV01c0R6IvUH8pDuQ64Tz0An06PzWqgmCDoeoOjjzS2 ngbS4k7gtCBCcmlhbiBTb21lcnMgPGJyaWFuQE9wZW5CU0Qub3JnPokAlQMFEDcU pcgO7bznZmp0IQEBczAD/3b7bI98gQvrHosunwf50vjZygaH39xJL+exbGa2hreM /Z+LFutXssGokc7ipYR6qwxNe0kymnwTmldTbZe47O6IOSBT1jZVYdXCvrKQ5neu eQ/KcrIc4gxen0gLKhn059+cZdt14zttDDCuOI+COVeqxMlAwQ65l+PSeejhZH8G iQCVAwUQNxS1bp1nQQAMbhIVAQFDCwP+P0H+WSW0h2dB2M6pH9t04GAkK1R/3TnL qQP6TiRvF5PVgBoDrkonaj9mP6L7r0Xb4FQn/eRgHumsrC63aHR6TVm2dwbGgCxB 0UnklJ4yTBRnmq0Z4KZU9vn34o+redTqndEjwGfvsXMr/9DL4hb9YVUlt//o0I0J vJGJGM9saX+IRgQQEQIABgUCOe5hJwAKCRBdUhyM5rFQFuJEAJ9L+13u+bX1qzjz 7DGfEpv6qh8tKgCeKMA6VwcAi1NPmyNySaLRhqz9oFSIRgQQEQIABgUCOrdNKAAK CRCTqAdkLDfjdZmPAJ9IMUAaCOyeEW8IZBQ3KUhCWW1Q4wCfYdWfp2mrQZmkejFg c6NKZulIBeKIRgQQEQIABgUCOzoP9AAKCRCBvdPEDh+beRQtAJkBD5tug9hw8McZ 4FmCQdoww8lgGQCdHxrNgFDuqQNBjj+2tgAxR1aYyhWIRgQQEQIABgUCOzx31wAK CRC01xCiDkUffd0sAJ9DoGfZSslJWJ+jmFV8wch4olfuzwCfdSm+Fzi+1rg/k1sm W6HWhlmV8RO0I0JyaWFuIFNvbWVycyA8YnJpYW5AdWsuRnJlZUJTRC5vcmc+iQCV AwUQNxSl5A7tvOdmanQhAQHgcQP9G7c2PBY7WCXESItPNGlTfVGHUjPDWWFUxUmQ sAYHD2J5KSO90iS6GpXWL5bjAoEKVPRQ4TbwqOlZsEo8UgBJFjM3jJLCmmuwbkfj kQVCiyi9gb8c9wzNdTYYyPSLBVPGcyrsjygfnzwTEep8Q3YBEPeeCYHbj32u7IaX bqlb8F+JAJUDBRA3FLWcnWdBAAxuEhUBAcYYBACos9nKETuaH+z2h0Ws+IIYmN9F Em8wpPUcQmX5GFhfBUQ+rJbflzv0jJ/f2ac9qJHgIIAlJ3pMkfMpU8UYHEuoVCe4 ZTU5sr4ZdBaF9kpm2OriFgZwIv4QAi7dCMu9ZwGRtZ3+z3DQsVSagucjZTIeyTUR 6K+7E3YXANQjOdqFZYhGBBARAgAGBQI5/MjzAAoJEFq8tAVo6EClLkEAn1UHGexD Mj/uZ9oHoyu4GJW0PkKrAJ9YRLH5YPux7txOymktvIYWdACg7YhGBBARAgAGBQI5 7mEnAAoJEF1SHIzmsVAWn/wAoNcd1PwEz1sXKNJ64sJHqBowtcg9AKC8SzrUiHdR kABWV0rVfmxMnKpt74hGBBARAgAGBQI6t00oAAoJEJOoB2QsN+N14rMAn0tkxYzI ZR3q/TTVD5pl+4x5wUmSAJ0fayzjxJlBNhI/g+OYTaOJGAyhXIhGBBARAgAGBQI7 Og/0AAoJEIG908QOH5t5Z34AnRiddtVRnUC8vAKi3JfPD0SjlSRoAJ0dhcomVwh6 GEfod/xwEsezfTvv0IhGBBARAgAGBQI7PHfXAAoJELTXEKIORR99aQMAoIhrnIaq fSY+OTkytI92T8Jk+WhYAKCIwO6MR6JUn2QIzHKWUiIQ2J4Px7QjQnJpYW4gU29t ZXJzIDxicmlhbkB1ay5PcGVuQlNELm9yZz6JAJUDBRA4t89HDu2852ZqdCEBAXM7 A/9YBm+45S+GxfCMjVkYxWBAlNIGS6n6TBlRTNQ0B+f3RhUvCAksSRZnGnTm6PcU P8Lc1bzvrDj9s8auGjT1OvQ6ypC1jR7D71nsjRIaKvgLAbsPGjFSMKTwZFx+LbHC zBEvRcSb7tYnJg+gtjXbVcztlSzCbWtv4qRnVhrotirh9IhGBBARAgAGBQI5/Mj1 AAoJEFq8tAVo6EClHQYAn0WVMv1mf/ybg8Q570StT1Bveu6BAKDWIeCnyERzTB2s AToRo4F4EXkxp4hGBBARAgAGBQI57mEnAAoJEF1SHIzmsVAWfwEAoJTnt1WNtilj wWBW+j5LzhHPLmH1AKCsm8orE0M6kLK64DsFzFiuCkqhkYhGBBARAgAGBQI6t00o AAoJEJOoB2QsN+N1B98AmQGyos7+2Z38cL5i75N7ppn55gBkAJ42Qc9LQxdR7pOL E0R8IqiaUXrS2IhGBBARAgAGBQI7Og/0AAoJEIG908QOH5t5V64Anj9wAS0UicwC 8pwP4upADVFjddTjAJ4iGkDwrvXoig2Ct+xzmJyP78CmPYhGBBARAgAGBQI7PHfX AAoJELTXEKIORR99JYIAoMvPy9WeDrsRADN8ePg0UWjQ30yBAJ956M19BCWSuXAR jVwP3kTqaFKMlLQpQnJpYW4gU29tZXJzIDxicmlhbkBmcmVlYnNkLXNlcnZpY2Vz LmNvbT6JAJUDBRM7OhMLDu2852ZqdCEBAQTZA/sGHilPXF7QfYTFwk3mTh02dI4l iBwQ2Bs8OuNAXiQyD5wH91JhEgwNUYa5lV01zWvgZznMJUGmijAXVUs2uRwCV/nQ DDZs96JVRLOk8t6UUjPG47CeECsw4RXTXtPOsS4AubNdnplXFD2tI5lBKgn5xewO +0prjIKHRpZw/YXlsYhGBBARAgAGBQI7OhTiAAoJEJOoB2QsN+N1EkcAnAsDn+4J uBSsw3EVvTRUWL2ulZK8AJ4mQQhfapaafRvdWbN/kR07k1Z2nohGBBARAgAGBQI7 PHhgAAoJELTXEKIORR99lWgAoIWH4tk6xJzxwtN+bUQHj8u/DwNjAJ9TTH1Uw0tt 3mPjEgv3yQyXxmScDQ== =g4uu -----END PGP PUBLIC KEY BLOCK-----
D.3.111 Nicolas Souchu <[email protected]>
pub 1024D/C744F18B 2002-02-13 Nicholas Souchu <[email protected]> Key fingerprint = 992A 144F AC0F 40BA 55AE DE6D 752D 0A6C C744 F18B sub 1024g/90BD3231 2002-02-13
-----BEGIN PGP PUBLIC KEY BLOCK----- Version: GnuPG v1.0.6 (FreeBSD) Comment: Pour information voir http://www.gnupg.org mQGiBDxq4ZARBACJSN3t0e7d8A7LNfvsKsNNfMWbANu/f3vEhDEj4D4X2QLKyk8t Ti5/wO2Z7HJiT5QfI3zeRWetvHMWXhAYc24GrTUMdCt2zhUjufi5BdysmcbLiZFt 9wjJpJITW4A6W7YP55ORkZs6ye/j4Luf7YN4xISWvM9/kzpUtU8R6txC3wCgq28H 0tdFPUDvyAwr+97vHs97z/UEAIFPSIAsrH00DuudiLpqZB0LE+BcDsSKgxBQsZJT 06EQQaE9XMN4f46nAtxzFhSbGZL4qIBUO3Ny1Pp0rqjCfumuwONLXZSK829LaaJn WfZ5ux9ZjvfYJ86NgUV2tFnwZm2UYQXc4234FfzfebeiSmYI27BMvLJ28xXU+pNw vUvhA/9uPu+i3Dk+ha+0UaBTp/HNTAveoTKH6lNOS12XhCNNPQUL0gonJTeWThRO z4YttxgLa5I/MoNsub0+GtNrlyhLyHKzjBBHEqJHJp7+zkyfCODnJaxUqoKskUSD QF5VX6v6vEQl5UBjGwonHmzsrnuqTb9pyYhfPTch9n22eS6ZqrQkTmljaG9sYXMg U291Y2h1IDxuc291Y2hAZnJlZWJzZC5vcmc+iFcEExECABcFAjxq4ZAFCwcKAwQD FQMCAxYCAQIXgAAKCRB1LQpsx0Txi0J7AJ9q3/ulyXnWjGWlR0L+3QtfPKI5EgCf WTLlr+SXYF+nrW4VvQcJvuyzZyG5AQ0EPGrhlBAEAKQjsjIRO+kHT+9qCYsw6HPi BYzH++xP0i5143trUJ66FoEfqOl4UqHwNJ7GEXq9MWgzBH9wDL69Bb4kSKQ9vKwD EgAnXObS3FOUPLK5AMXc5jy8rRaUru58+cGs1cNIg69zgQ3FQyWF0FHI7kGsAdz9 8iUZhXL22I7+EVBgd9DLAAMGA/9oK+Xjo7xdLZvkW8b4nNIA7Xyml2uMLYjg/OVg qRkVU5f7KM2oHna7+VtvdJrIl9bTVc6mrTl6GY1/0GYb1edgSu2Axg+msj3fVkGd 8hWuNQ/T5v45kgPcoJxWLzaWWkDeLQAf5tq/QVmN8hofl6UsrsNDvYTBbl7129uo 3BJbG4hGBBgRAgAGBQI8auGUAAoJEHUtCmzHRPGLta8An39UVQwz3OgsZQ5e8upC VEBCvTUmAJ9/8mbmXF+Ii/JdY6STmU1MMfmQvQ== =A6my -----END PGP PUBLIC KEY BLOCK-----
D.3.112 Gregory Sutter <[email protected]>
pub 1024D/845DFEDD 2000-10-10 Gregory S. Sutter <[email protected]> Key fingerprint = D161 E4EA 4BFA 2427 F3F9 5B1F 2015 31D5 845D FEDD uid Gregory S. Sutter <[email protected]> uid Gregory S. Sutter <[email protected]> uid Gregory S. Sutter <[email protected]> sub 2048g/0A37BBCE 2000-10-10
-----BEGIN PGP PUBLIC KEY BLOCK----- mQGiBDnjW8sRBACtLAIsIja7+4PNGeKl3CWK1BDt8mJrNTU7yIpIFyU7kbGFzNDc nKuTGXwFlI/1N964p17uvwVBq49dFTGFOzw2AEvgwl5Mb75Wsf5ztYVSir8ng0b7 123nb09ZExWCQTMMbD6RXEVfTrIUEHazYMDIhuIU+/WkYVhNWuiaACvpJwCgjuEx /8BANLXa9UkQt5ztgWwUUdkD/RvGakaQr4gAhVcm2mfDYjxLtm1+BxbzsDV9U2Nv 2nlXSfCyxvbTjwX+Bq4/bwR1a0KDIPvjqYAm2tQY+bsPGkjwBL0DUrHVTRK2PpPc K/9avIFk+PYkpakPQx3saE9b67UbGk5rUCnbHU99mvqET3MtU5yRn9B8hu7owROi EXFPA/92vhsPhcPsvTq9Wi4FlWF8MeDyZsEKA/lLUTl1A4QnbiRtC3bBvxOeoPPu jQP25DskCdtWWcOuvHRZ6kE/WncID38oc00dqaB9xR+pi/ltnXZpOCjvU1Q0yMd5 QcoD9Im6fLN8zo4gr2f2cwWC7TQ6TLxTYpifGK6sbC0ATdnFkbQkR3JlZ29yeSBT LiBTdXR0ZXIgPGdzdXR0ZXJAemVyMC5vcmc+iFkEExECABkECwoDBAMVAwIDFgIB AheAAhkBBQI541vMAAoJECAVMdWEXf7dycsAoIewU3SxZCQWxKFdQ7444Sm4qd/w AJ0W8T5xXDLYlW03TjJuLo5JnENQsIhGBBARAgAGBQI57nu4AAoJEF1SHIzmsVAW xCYAni+wfeykRrWXDjx6LEbwY3/tJ+vFAKDkDFVK859XVpmHin5cwYESpiWEuIhG BBARAgAGBQI57ovLAAoJELYkBuZbwVKhP9cAoJbEJSB3b7Gs4fhkohykCTdN6ofK AKCGSbPBOt9GK7r+XVOPBVJBpZwHYYkAlQMFEDnujg5NVigheQUMEQEBxocEAJOV MLs6IKMMeWX6OiegkmdMaox86gHOOOS/94n78ClwTJ8kf4MVPF/qz9oLvCNYcSP0 IevlMAAMgPQx4amUwwrdqO3lUWx01jrxO3L7r7PKLCT61gIfoVhjJSRvA4wVdGRB OhDFZ18qzTkqUORDbjohknDSt6Ydxh6RwEKQM8EtiJwEEAEBAAYFAjnugY4ACgkQ H3+pCANY/L34TQP/e6VCd8sZhz8pqlaxk2zHmyCKR9gKHn1P34Fjd/wt+mMz16T7 aJbr6V0qpdvZdCkcmoQ9Q9btX9uu+GAQLUHPHLCn8bg7icw20d46LUmm1b3x3N1v OdBk0AykVGei+TuSs7QLFQXWqwQCOfBWVk62Kw0fL1hMBVPKS0uHPotRqBOIRgQQ EQIABgUCOe6NMAAKCRCI4Xsd/OVlYdj1AKCjZ04lHm8Dk56adtZkzdzBCx8C5gCg q3QsF46O590E55SsokQd7YD8kASIRgQQEQIABgUCOe6NOgAKCRAY9QOAJMJ4AlwI AJ98qRCL2U3KnYKrbPc+p8bzZxbTZQCglbkX8ciJVvy5oHzJO/5f+HIg0k6IRgQQ EQIABgUCOe6TegAKCRDC/IaqJTlGi2/FAJ9l+bY/2GWpmUxtZYs0hdnejFC4IwCg ivx3tjij0SfNTP79mbYFX3oJxo6IRgQQEQIABgUCOe6OpAAKCRBzh+KSrRDGxCeI AKDM83nigOH0/v8H6M//+bS1LV/A0wCaAqGb5Nl+D8pnYK/hEER/YUCgVMKIRgQQ EQIABgUCOe9ejAAKCRCTVeV2USQDllNdAJ9gmpeLdhkr5u0pWuO+o9GdUppyywCf QWuTbYI1gUKl1z+19+YUo9+kJzWIPwMFEDnvZ0rjHjI9QK4wUhECp7YAnApxxvTZ VLi4bsBqM+VDVnbPyVHfAJ9vj8pXkv400Zm7Mq8warkniGN45YhGBBARAgAGBQI5 9HwcAAoJEBoX/tg15TvDXCUAnR3ymarKUUkgdFBMzq/H9paGWz6xAKCOLwiMYhte cwGDJX6s65DkkK1V6og/AwUQOfzDgnfOKcWPoS4gEQJPAQCgnvIv2HFf1nX7Kool PVvVNYS7y+IAnA073e5i5N1HQ6+ZdDPMCm4G1wPgiEYEEBECAAYFAjs5NIgACgkQ k6gHZCw343VmYQCfRIJqA7Le/8De5lsxUKJCwofEiE4An3nHw12vlBB+pD3Isp8t IMBO80T2iQCVAwUQOzoLUw7tvOdmanQhAQF2wgP/STr380FN4cqHKPo9YoFPIr3w IkiX1HupMBWvp7yqU/0VzWeYw5/SPhtL1u+4OLQw+JzRTXRWksleBSLft5aoj3Is 6sry4ICNXz3nQepGSIarhtjZ1MBSVhmRPDvRf/aQSC/nNhq5w/GesQBPHYqNU+8Z c6mIbSpSGSxneQuhLEOIRgQQEQIABgUCOzoRrwAKCRCBvdPEDh+bedDkAJ0R9Gc+ sVy6QbjbbsCD+XbI/zXqqQCdHeMN6+yPD3qKKQajYzKYIqRFyhuIRgQQEQIABgUC O0AKwQAKCRAXjuJ0+BZyxUSAAKCPXKa1+HidCv55P66AvH+DAnCaTQCcDPrzPjxd IJ4RUQgasMK2ptv8k26IRgQQEQIABgUCO4hBgQAKCRBSAByVjgkCI84UAKClNjgb 0DPRySH+kL4zOS6xaNT5nQCgqEVDEw3kBWey7LUtyjxPS8TK4L+IRgQQEQIABgUC O+B2KgAKCRBeakKSkH3ZZloOAJ4r6my3qw+c20aweoKXCF4cpBZC3ACgh1CoA1GH hvq/drP65s2woQE/Yk+IRgQQEQIABgUCPBEtuAAKCRCmzd7uuzvZuEMLAJ9m9zor 3WstocNvkKInbcv5TAcYcgCfVfLYd7GKUBA9ZBGrUx2s/Cezl9OIRgQQEQIABgUC PBE9FgAKCRCj8j9oMUUU7sgSAKDXFAbnUvT6CBZ7z71sOKw0LlfTGwCeLRVAnUfS ZLV2CS1/3JKM77W6CYyIRgQQEQIABgUCPBE9NgAKCRB0bcUgGn7VbSQOAKCiIWkt ZvGQsgcHeR4oSrqB/vqUNQCfbDptGRJ0rVlbjJqYbq/CJNTd0E+IRgQQEQIABgUC PBUX4AAKCRCsjdSbXIj/ndegAKCYFii+lsT2fgx8/4pKB98N6bKGlQCgqLOch91n 2HH/2NA4zCjdfKVR/RyJAJUDBRA8FRfn/R/34dzmziEBAZdxA/0fn5+SAO7fMctj LsKfpMY4f0G9sXVeBH6yJr1Qqg2vAJSYod5EXJmpLUIhMC7WR0WEfOIg7xsvgDhO s1ggKiGTmAN+0v11w1TXxsY0LXlWVtVCq4Kou4o+ZHtydXFxfUSLV71oovZrPAbe SnE0OTCqLpUzYoBV14djD1iKGMF534hGBBARAgAGBQI8FZ17AAoJECBlfewSPsYx BPAAn0XJg0Pp8FBkV0S+/Ssd4GSRSJbGAJ9x5FYDB97/mijlRvQaHRflOKeTb4hG BBARAgAGBQI8Hd9kAAoJEHw0tOFM5PZV3yUAn3nikj6Z4cQ13g+zDs+rvNx36fKx AJ98vb0if81tw1WVazH8XsJbGK3ICohGBBARAgAGBQI8ERs5AAoJECILyIMzDEp1 Z7oAoOQilHqP/vFzz8p3j4fvZs7Q8v8pAJ93Pj+WEtRi0H/k/m9sYIQ/yH0hiohG BBMRAgAGBQI9B6kvAAoJEEbtrfQ1fWX7IzkAmwQw4TRYchaTtTkT8QJ06+XmAU86 AJ0d5Gb9MtC0XdvMPeCKWwgdq/3F/IhGBBIRAgAGBQI9B7BlAAoJECH5xbz3apv1 fukAoKPv5i0h/ID1XiEnUhuyR2dJAAzVAKDURVTZzxDY0ehVTQCPxfpNg6hsrYhG BBMRAgAGBQI9B60qAAoJEF2Oi+nyOBrUNzIAn12QHimN1BiKppLknVfVTR86BbuJ AKDcN3RN/660kLLsfKOAOmFoViiGIYicBBIBAQAGBQI9B7BEAAoJEHxLZ22gDhVj gvAD/00EB+DgmbuAm7vJsD2IiqRiFzTWUA+ppnoYPKfO6w1Xy4Blf6XjRwSAiY9z ctFSpQ3oTiHBkyJ7+IZ51NsJdaj4GiDwYuuP+F1E/ThQFunc2yxJKRDLgs2E8mSz Ecz5XQ6+7AJIT2mUHB7SDvhqaLYhKHLBSJ+edThpKISlsODFiEYEEBECAAYFAj0H rSwACgkQtVKwQ3c5BdZOyQCdFdmq32OIrMwVes3EBVzIrAJKyIQAn0jxtW7INcgO oi829JPBFIYyUZFIiJwEEwEBAAYFAj0HuVgACgkQtoTxfMEKh02L1gP+KzfNZO9J Fcp9oFMQ7rQXGkhg0OzGxYMg7EUt42wGm5J3BI/wdbMRg42lX2GSu/HoEm1jSP6Y rSIXxaUnX48xuBSWd6GndVdCIVOavruU6hUjdhg5G0APC1lk80DK3Ib0g+RQnodQ gTva9iWzV2/8OLdaT2NwD0JP5Eh/nw/NewOInAQSAQEABgUCPQewWQAKCRDW4KH+ T74q3Yk9A/9U+KDqW9l0CyDbad+sVExgAml5jXzyRYfWxLMta46yfgHodEXZnokh YZpsIiMOswZw8HsjMo3aKCwU4eV1robkeqpgSqTDCU7RRLJoUDDEqq0FWAf1CEuf 58zIkxXb6P2Q7fsaOyOO0cel/wLhmcJfxQL2/Z+C1Kc+MNwyuW0tJ4hGBBMRAgAG BQI9CCHtAAoJENjKMXFboFLD118AniJmQTVOYlk/ji4uM4zPwF/nZXVhAJ95SqkF vdR7dyQfeMGfzXH0eq2mPIhGBBMRAgAGBQI9yzBOAAoJEG2U2yGkQUVxhUYAn3pf cwHeK8aQDebwyN0mWzIClgzYAJsE3f3zW9VsRfMAuQgwXwNGyVto04hGBBARAgAG BQI99uSvAAoJECnk97b03b+uobsAoKBPMtrUUyOUz3q21mZ/L8Tw+jaSAKChwBjX hcivV/+ayoAMbWOoNnjkkohGBBIRAgAGBQI993/lAAoJEIyjJ9tDO6CH8s0AoIVT 7w1OuVpUoMLi3kCx0fYAeDhHAJ4qnzEC6GezG+m9bwO55341uYMAUIhGBBIRAgAG BQI99386AAoJENfKOrov6HXMU5oAn2kRaA7dqpcD3yHxwly21YL4EQ/GAJ9tThrS wPasv74tg3zE25FqdnrTcohGBBIRAgAGBQI99vi2AAoJEP5PXn8DpeEIfhwAn0HX rxH4jBwNFEWtHyRhnnq2KsfaAKCEtWUIiP9uVPNtBArpJGRLdY9Gm4hGBBMRAgAG BQI994cWAAoJEFawMV8BZ8o4QTYAoJ5zFMMHcqi6lokiZ1rcoc4EkvDcAJ9SHvm9 Cc/yLvym2+d7xLaGfFRpL4hGBBARAgAGBQI9+AZ/AAoJEAkitBQQRHddPKIAn0lH 5rDr2OghxOBKicUCQYAd8bICAKCTZjUE4ECNt7fWPXHXOrxNikAqZohGBBARAgAG BQI9+D7QAAoJEMhTz3PoZU6X3GsAoIxw+xOEleTOtul3KtWeLSnDx7wOAJ4xJCr8 D4PH0+h9xFijiKQdqsQDs4hKBBARAgAKBQI+KO3KAwUBeAAKCRBuiJudMebjmKHt AJ0X20zqwBq5ktgrzyyCt2zmU1AtIACfZWie6QR5eA3QU+U9HZ18FPxD0ViIRgQS EQIABgUCPpJNTgAKCRBh9A0v3SE9uo7vAJ94we2LUiG7sY7eg4l3AOnFRAQ8cgCe JJb38AMvB0VG9JjqTaSVc9TfEfi0J0dyZWdvcnkgUy4gU3V0dGVyIDxnc3V0dGVy QGZyZWVic2Qub3JnPohWBBMRAgAWBQI545CKBAsKAwQDFQMCAxYCAQIXgAAKCRAg FTHVhF3+3a8YAJwLQwRdXo1/0RK3G4EFklG6TXXZlgCeNMTkt3JY62CMDqftWBAC hiTgiP2IRgQQEQIABgUCOe57wQAKCRBdUhyM5rFQFmk3AKDtT2hQ5pX+6RZ50ORX lSxQ1BN/FACffkckE+GkCPt6zOMa4AR0D2ouO4SJAJUDBRA57o4pTVYoIXkFDBEB ASQ0A/4yzORAMwz6ZxNobN5ULmtD0iVnXc4Rai5jq+Gvpbo6GE9hW0TYqMGelvKm JTNy+Ug+uPPCEzT/QznQRBfXXaR81WeGrpqEEstTAc6oBksLDRq08khCttGm+Y01 24Sj/ECLpUtmSG4XVUzt92vALHw2Ye56XBChsUA5FcgT5b4VsYicBBABAQAGBQI5 7oGoAAoJEB9/qQgDWPy9BzgEAI6sCXiG8h8ynlpXyWQblT7gFBWkZ/pim/1flIwv fzb9NDizeKhK/7Q2yKKAi0WmEVu4aPO8KSte5w0RrcL/PN0ntKfwHItyJm4khtRw Lf9xjCLfInRbCogXqWz3l0lS7c6GboVMZg98ckNMHkBIz0WkAc5IY5knzN32+Q2l MYgNiEYEEBECAAYFAjnujTIACgkQiOF7HfzlZWHhwACeJGcU/uPxHSzFcnBv7SyX l6zx7owAnRaUWXQmUAePv6BrnrMoU9H+6126iEYEEBECAAYFAjnujTsACgkQGPUD gCTCeALgTgCfTkrdc2jsG5Gp1Lz015mDUDV5GrcAoI0Cct0/fKB6Is522b4SblU/ wS42iEYEEBECAAYFAjnuk3wACgkQwvyGqiU5RoudFACeLusByZnXwg2b23xUxquL H/wsVacAoLdFNOvwE3jjMZD+6JD5cG3DYGYEiEYEEBECAAYFAjnujqcACgkQc4fi kq0QxsR6ewCeKOFHSlTZH4NPY1HssXShRafcnQYAnR2dDd0EhcKCe9gNdzrSqDcM Vuh6iEYEEBECAAYFAjnvXo4ACgkQk1XldlEkA5ZS7wCdFUYiuNyhDK7FMdhQ85gs 9MeRJR8AnjrqyQgu2dYTMFRiKj/Q++N9JT4MiD8DBRA572d04x4yPUCuMFIRAkDe AJ0VdYlBJWvJcBNMNBoVpZtpBldqsgCggs9FcLWIJrV3najTOUOA+V4XCpiJAJUD BRA57oFKAdtd0pfmON0BAekNA/4/d/2ej6u0l64BtAIuQOm+MGWBSI5KlcCEXy6i V/KMj1Qorre3aei/nBVzX5bY3oI9ofZ/qn//GZky7vqIJfm8htIn24uwrSRomApE m/jo8+zDomH4zia1UJvhvtp3mMUXRDa6fQ9mR20G1NLt+wrnV5bj+zwrn/3g41Hr IUJIfog/AwUQOfXYC9jKMXFboFLDEQJ8dACg1/Sj+bJIeFDHmKmT2Z6WnGlqJisA njTZsQNGEL3x1WoVH98WnL08PT14iD8DBRA587Rpd84pxY+hLiARAv4oAKC99cE0 wgQlaO8GWEztUP+oTs7XrQCgvny5h9Ydsq9UkHqCBmOKnaZIUSGIRgQQEQIABgUC Ozk0iwAKCRCTqAdkLDfjdTlMAJ9Ssn3nGqITEzAxIwIn2DgigpLPXACghRW6Sot6 CS4ZaXLkEKr6Gd3ygFSJAJUDBRA7OgtXDu2852ZqdCEBATmTBACEUgUzk4KM9kPY vQrbhqz+1Q7pafBC6E6EwrQMofbzSxdF+bIsFTgpy72q9gagYOvw+ntY5+pDyCJZ 4dgJcQUtm1E3EfBTPvZuCiObphhDwO5X169bRDGJ6Lvu+tSWPseXh2kLhqtQJaat 4i5N5sndSa5A/Jy3r+63krG5jqL2pohGBBARAgAGBQI7OhGxAAoJEIG908QOH5t5 Ey4An2hvIhN1sIosvxYabATE8nu0emxqAJ9f5E0q1ov13smU++lXTlR3Tz/QYIhG BBARAgAGBQI7QArEAAoJEBeO4nT4FnLFx7UAnAoAynRfpCr4b+OED6g2zJAR7vhW AJwN2u0xZBC/rAjAOA8VvqF6TNXoNYhGBBARAgAGBQI7iEGHAAoJEFIAHJWOCQIj KesAn0TH9Ai4JTTeWmmrbVgBhCdu9FaQAJ4sgcVaajqDH1KSEQ6xq9pLxUW6N4hG BBARAgAGBQI74HY4AAoJEF5qQpKQfdlmCTAAnj/saNHLzGlaNw6XbmMTkdPcwqNq AJ9TwljvnABJBi2MkIdnQZxm6wz7oohGBBARAgAGBQI8ES3AAAoJEKbN3u67O9m4 c4oAnj4HIlHFQq7EyunfxEmZsFeUpgSQAJ0T+kdgk3VYyEDAJvWY54JTXXP6rIhG BBARAgAGBQI8FZ1/AAoJECBlfewSPsYxN0wAninRjUaNmTOh9HlY7D5gEbHDUNcN AJ9dMWK14Qza2qnYKAuwpcxPhFHfAIhGBBARAgAGBQI8Hd9pAAoJEHw0tOFM5PZV VQcAoN190LU7jsPqpvOsGhav/2Vl4znkAJ4yISiCnc4H6vx6leTC63jgk6kc1ohG BBARAgAGBQI8ERs8AAoJECILyIMzDEp1ZbwAnAr0XsXG+Cyo4p2Rbf4rGhp2Y/5G AKDERRea6EGP6jL9Wx+zjXmTqWvDJ4hGBBMRAgAGBQI9B6k+AAoJEEbtrfQ1fWX7 TW4AoJNqI23+6z8F9or177Ue/RADwxyvAJ4xFL0LVOa1e+yqIgo6IKmD4qpuiYhG BBIRAgAGBQI9B7BoAAoJECH5xbz3apv16gAAoPhAHTxwPcVb/cYx1om4KrVVDfR7 AKDXlXnV8pHxcTSlOsmCxbXZo2kGtohGBBMRAgAGBQI9B60sAAoJEF2Oi+nyOBrU FvAAn1cepW/byih3/Lzt0AWotEXdM8KrAJ9HdXHE898p3xWFRv9HRpPZMoIzCoic BBIBAQAGBQI9B7BMAAoJEHxLZ22gDhVjPigD/1FQ/XJrg9wSMYF/WA1/7l2S9lGP 7b6htNOa9CUwd8hJFDJe4bT+e0z/DnBKqxtoQs1XvhXzroIohmBtQNFfwjlu+I+4 eMhzLsDD4h+nuE+nm6yltwLl0ct2TMww+PX/28FRl4ftAfFuLhuYkxgUvs4x10XC d5A7hFoHusMv3aNGiEYEEBECAAYFAj0HrTIACgkQtVKwQ3c5BdYbxACeIc4DpFve lsf1Zn+pKlk2TJq0HjwAn3cU6Xr+vSlD30lmZ9/YynIbjz82iJwEEwEBAAYFAj0H uVsACgkQtoTxfMEKh02w1wP+InvSnrYzUgdeqOeiTMDavDKwo3qyeFgSopBun+fu l7o7QotxUr18BtczPpZzv/q3yh3WVUuT2s3O0Kkiyxjp4h7xSZ1XEMhbhFjOfe3e E1YFD/lwKuS6TcBjrODhnrtwAbssoewQsZMmSQHRiB+VYxgsm1Q42H+ay4uDQ86h p0GInAQSAQEABgUCPQewXQAKCRDW4KH+T74q3RyIA/kBnsF5aCKMEHm9nHZ6j4ER 9Q0cHbUeKq2bvwD9WUcqlsD8u3bK48lxZqsGszsIpGuFFFgiRSMuPhzI1uqbvcHi Hwre2g5s1n0uizLS+a/+ZOR/lPrZls4E6ATxIuaxY4BM9Q0rG5hb/nmWodSjA+3/ isvxz6uFVRHoNyb+BgTx+ohGBBIRAgAGBQI993/vAAoJEIyjJ9tDO6CHT0gAn3G2 WZSWIjaSabw8aofRpZ8tMwguAJ9a0oLpChBQgFyOu/JtiZLYHu6MsohGBBIRAgAG BQI9938+AAoJENfKOrov6HXMvFkAnjortNOFTeizkCIFzmwYzQKtUrs8AJ4nAD6U ylwidkcAcUcWLVkZUg7rXYhGBBIRAgAGBQI99vi8AAoJEP5PXn8DpeEIEVcAn1cX KkITyYWR8UQryNUoIJRKaLI4AJ9dO8SCYTTqkUCHCWs7l7UDz/WpBohGBBMRAgAG BQI994cYAAoJEFawMV8BZ8o4DkIAni+T09CG4T6J1sPw+cVEWjcrvVL9AJ4gZ7yb KQhskoNksw4OlCHNiuyNrohGBBARAgAGBQI9+AaCAAoJEAkitBQQRHddHUkAn2we Ma4NX7LzmUb1jdk7c5ztdttxAJ9tqGAOlhmrQ/VfApGwCQtlFiJicYhGBBARAgAG BQI9+D7SAAoJEMhTz3PoZU6XpBAAniwwfqVSeG5b1vV8zUrk4ayDj3fxAKCR52+R V3464Dqp8e2kkouI+4c4aIhKBBARAgAKBQI+KO3NAwUBeAAKCRBuiJudMebjmPj7 AKDZoWLp1mJ9ByddGJnwuP8i4hwYDQCeJh2n2Emrz0Gv5HQQMkfNxB9XEriIRgQS EQIABgUCPpJNVwAKCRBh9A0v3SE9uq1cAJwKHc2rmuRjF/vGGzL3bM9dhQFYsQCc DO3xXCba1Rc+QPJfwlJhuVTtKau0KkdyZWdvcnkgUy4gU3V0dGVyIDxnc3V0dGVy QGRhZW1vbm5ld3Mub3JnPohWBBMRAgAWBQI545CpBAsKAwQDFQMCAxYCAQIXgAAK CRAgFTHVhF3+3Z9AAJ4sw5jXvvpvaTU8KeSRdps35YE3kgCeOzr50psCrp6FIsqv t8VBhykU6LuIRgQQEQIABgUCOe57wQAKCRBdUhyM5rFQFj2YAKCyih1PKF294baE WHLLmh7CNivUBgCfd1nv2q6lFFlFbeptQ77d1HA6f82JAJUDBRA57o48TVYoIXkF DBEBAVSZA/4jIjk5o+S5DH4TsqvBozosE6bod/lyleqkoFnulUfAVqMiDSDtWDYf in1mSmC+py8jcRfRw3Yzn0YNf3aWpMWW2pdQeSlNHBxHkcH3tiXfiaWpXUv8skYJ X5AjGSlqOcuSOKynaLGLsJt3lSVhx8jaBX6Q+2ND7LIirXDIMWe7HoicBBABAQAG BQI57oG8AAoJEB9/qQgDWPy9DqsD+gNnPN8++meWpLFEwtVlUhf+AmCgSnc0TROM 9rgwtjsEzLBLuPmXgAI6/0FOwfj8kwFuZ5JUSMfdRm1QM+oHkqfjKi3RsCiShX0l HF5FPbhMgoxFuvTCnfUn5AgxRkzzMmH9VMJx/InbN9H3CmoN2eqhyqzlaQlanc4G iKfw+/NfiEYEEBECAAYFAjnujTIACgkQiOF7HfzlZWENIgCgzZ4DHX3MxzoVPPKi BqQ7olfGoZQAoKPZjucBMaicCbpgk9QpnZDe2OG6iEYEEBECAAYFAjnujTsACgkQ GPUDgCTCeAIeqACgoP6bZ2VuQQbXwSNKV4crNLqm3BUAn2l9U5vZ3K5ramSJtT/d lPpI3h0UiEYEEBECAAYFAjnuk3wACgkQwvyGqiU5RovYdACgj0wQ2fZyFF1qPLL4 lDBsOAzSuOIAoOS+IBCrAFn6V+3KvylHuiMtik7ZiEYEEBECAAYFAjnujqcACgkQ c4fikq0QxsS2egCaAy3ys+YSnZvuQjTJYxyqUpPVOikAoJaZ5auYk8LX8qT8VXQ/ i8RusaPHiEYEEBECAAYFAjnvXo4ACgkQk1XldlEkA5YumwCfVpQ0tHjaiJ0SvxBK SSrYPm9Xgy4An0rbFL1h7748ZxP5AgeYhNxG8ZKSiD8DBRA572d+4x4yPUCuMFIR AhrxAJ42B68gBbQg01A4oVdFfOa9RX1GgACfdzg13CvXxaiMs+UbcLl9qqNw47uI PwMFEDn8w7F3zinFj6EuIBECrnAAn3k95VzUbZSSuA+sIAkHGGDVw68RAKCPnEHx foKb60Za3UymkINn/aBdfohGBBARAgAGBQI7OTSLAAoJEJOoB2QsN+N1wH4AoIpy XfE9yypNjA8Cr471UqnHBH7NAJ9KVU2QFmF92Biki5tamSnU5lnP6IkAlQMFEDs6 C1cO7bznZmp0IQEBY20EAKODjHE6v+pezQW1OMC6AAJC0QacePZCnwwrrzOVWzDE zrniXF4kF0t0ctsObP2BwBOrytYFIr/85myAI4zb+3ZNim6L49aEkoVuo/HiOBAe Ip4Tyc5ETHD8dd/IDsMtse/hN8FNN1LKXYGEwh29n903JaLKxup7ZQdHF6ltjDVi iEYEEBECAAYFAjs6EbEACgkQgb3TxA4fm3nPwwCZAZFP8ciAyFFp3XZZlJplsUcG 5EkAoJODgFF1sWesgv4NDmK8sZI0Jy6EiEYEEBECAAYFAjtACsQACgkQF47idPgW csW5JACfbdnrXG9XpRNVsQ0zJT3tIcRTmLoAn2wJWVVLNTPZcKVnWKVR8H97ztB+ iEYEEBECAAYFAjuIQYcACgkQUgAclY4JAiOtOACfeV0ELu6l2OALf6pOgPIdjnus qykAnj5Atp6IXwLawebGavHP9zvQsQ9fiEYEEBECAAYFAjvgdjgACgkQXmpCkpB9 2Waf6ACfUiLMyxhdJdqxMhV5YriU2RZvGq0AoK+C4YcspsDsS+l8vPgvC99peQzY iEYEEBECAAYFAjwRLcEACgkQps3e7rs72bj6SACdGtdNYF20ahnd34SOdkK5AyA2 6NYAn0tSBYUgbsWXEDfoJy3uhjnmbN5PiEYEEBECAAYFAjwVnX8ACgkQIGV97BI+ xjFUywCeMRgKKTs+rkZmmVS7xo65W+LR3i4Ani6c+nHLWyDUXukkZhCp9rAZu+8P iEYEEBECAAYFAjwaYOQACgkQfDS04Uzk9lWHNgCgrH8XRSCnuhkINCYKZ6wb7dZR sKUAoND0H2E/DgTwdisbM5mIfG+pOjzJiEYEEBECAAYFAjwRGzwACgkQIgvIgzMM SnXXEwCgotD1jJLrop9goqQUlTCRKrQT2JAAoMWAfd4h1FvrXWvbi27+i0XgrC6v iEYEExECAAYFAj0HqT4ACgkQRu2t9DV9ZfsjrACdFny/yvBNPZBWM1wsQTWabX5C 9wcAoJBR8QC95Z/AvZVHFhT2V1fiCLlwiEYEEhECAAYFAj0HsGgACgkQIfnFvPdq m/VgwQCdHGT0CGAvx68hQq50i2tUhTgOKakAnj+2W7ERXafEHYtIZtyFYWXXBm97 iEYEExECAAYFAj0HrSwACgkQXY6L6fI4GtRtUQCgtRjmmIXXuAIkyhdgN+ShFIyq EGYAoNYJeaf2J6upt84scuzSA8SsuowLiJwEEgEBAAYFAj0HsEwACgkQfEtnbaAO FWMqjgQApA2X8w9q4mdDEjX4/cZrQ5IHG+rKq+lmVKEtgRSGb6RDUy8lkh97RhVV +0o1gNhs+H0q479hgPJ9TRzTiFhql2QgnuGuiT95K23ZnChXKyULWIJc4077swZA ryDQT6nWPNviMhwS6/BvbEoLtYja+xW3/SfPVZjwW+ZghTLT/s6IRgQQEQIABgUC PQetMgAKCRC1UrBDdzkF1sAtAJ9vmbuvxHxqdCqJpUQf6+57Ga8fCQCeO3Ke9avn rBfR/EQv0E51zrx5ULWInAQTAQEABgUCPQe5WwAKCRC2hPF8wQqHTSzSA/4+uR0o v55XDEdgjsPs+oRZHDI4hIKdSFRMDRFU9Vjuhyi257SCrmEGUpuuw8chgDOtynaa HkQZ80lrq0qZg9g9eBRqGMEwblzBGsRResb1ubB+fX+DpntJw5eHtBqv8SLYe61j jsNZD0yXRenL/dXfkH7Tj25yMof8WYxO7ZkKzYicBBIBAQAGBQI9B7BdAAoJENbg of5Pvird5tgD/j3D/jrB+9ETGlBYd4BVz8rjhHBKpofx9LZPe/X3Z7dHYattyl+G Rnq/lr5w/UPbp3QVO72p1LWYE9qMeB8usmMe6c6RWe1Jhx0q9yUS58VQ9cnnVaMH QAc91OKre1P+FoGuaVCxAZrPjI30Dg1H7lncZaDCQDhscDrg2znkniVJiEUEExEC AAYFAj0IIfAACgkQ2MoxcVugUsPIXwCgtMf+88LGSwUW4Uf0Qmn1l6xKTokAmIM6 VPoIaqXGCXJtsd8N7GMUQl+IRgQSEQIABgUCPfd/7wAKCRCMoyfbQzugh8IfAJ4p qA1enwsfEgyMptD6MNdKfJ+gogCfczxia0yt7Dxx2SecYlcvADKxXhqIRgQSEQIA BgUCPfd/PgAKCRDXyjq6L+h1zAjBAJ9HRwiZTQB7m+/qGzm28VLDFj/c8gCggUzx D+sixRdljlssCmdQrNdyEXSIRgQSEQIABgUCPfb4vAAKCRD+T15/A6XhCGB8AJ4w Me9ipP4OwstNYls+xiJN2UrRPACgkjU8oSj1RX8PbMlL1MrhHn0gIEmIRgQTEQIA BgUCPfeHGAAKCRBWsDFfAWfKOAoPAJ9s/CFR00kFrpWkaODbT7ea31bLuwCgqYDF BoqYVwDVBrwqOGr3DA5rs2uIRgQQEQIABgUCPfgGggAKCRAJIrQUEER3XbCwAJ92 zZZJyC3apJKQQVZA4ieo3iRsEwCeJyOC/0/vr/VKKM8IhiFPzpqyegaIRgQQEQIA BgUCPfg+0gAKCRDIU89z6GVOl88HAKCdVdrf6IyR98cmR1Y6/h/THlJWXwCcCQVq Nl0sM6UXl/dyfpTOw5v1xmCISgQQEQIACgUCPijtzgMFAXgACgkQboibnTHm45ih 2gCg+SBttC1AUmuZgHSiRxze1XR+FMsAoNkynSxkrAO0twkG37t/UzF/0bUYiEYE EhECAAYFAj6STVcACgkQYfQNL90hPbpIFQCeM9foqwKsqgScULlMoev/USnOb3MA niLeVpdpf6MAi9gLOhUI713BM8i8tCVHcmVnb3J5IFMuIFN1dHRlciA8Z3N1dHRl ckBwb2JveC5jb20+iFYEExECABYFAjnjo2kECwoDBAMVAwIDFgIBAheAAAoJECAV MdWEXf7drtAAnjgr0qNs0XbNC/TIpGuDWJWkhxxwAJ4+TknZClBKlKZNjn8AsmwI PpWA64hGBBARAgAGBQI57nvBAAoJEF1SHIzmsVAW8mkAoOx2QR1iXggQIknHd24B NGtXlFp0AJ9by9b0IqB9jY2Nq2yl9G3xKMElCoicBBABAQAGBQI57oHPAAoJEB9/ qQgDWPy9vNgD/RhKbHVRmORUKEGr059QexpgN3YZxcE+k7T+u+c4g6n3u6G+qlYA avdtvxEagBgGilYT3ZQk5Pt/2ss2+hCYJJECh1+Eo320wPBrjxOClOwi7Nw+lIK5 acTtAt60zxHnLfIp8MJlrQPbIJ53ZACtlq+hZjGR/DdzFu1vqoUQ+9XNiEYEEBEC AAYFAjnujTIACgkQiOF7HfzlZWF/sgCgrA52wER511iftFEbpNvltT1dxDcAoInq gtdUDy8FFkqcLDkJ0LsBNZmgiEYEEBECAAYFAjnujTsACgkQGPUDgCTCeAIYFwCg iAls2rG6XYsQirh92R4Ixv5uBiAAniREG9/kPIRjFjuw1m+Aqne/WjbfiEYEEBEC AAYFAjnuk3wACgkQwvyGqiU5Rot6/QCg4bghKw6sGeX3x4UvWEglw1in7aoAniav YOK9NfyRNPl1VYpZGj4Gk7CNiEYEEBECAAYFAjnujqcACgkQc4fikq0QxsSM8wCg 2g0eOvOUy8kX+K3YFFKQb/V0p2kAn0ViZPCMdrdKsP6yxhr23HNX5y6piD8DBRA5 72dW4x4yPUCuMFIRArKNAKCHOuqkD2knDjGWd5JNQo4aQFhcWACgx5nDxSqmXk6R TGMwZYbmoA530yuIPwMFEDn8w4l3zinFj6EuIBECPKsAoJYAg1KKOh3iM2O4IkyY 7n3CK/qeAKCqcfr7CZ/uld5ClFzIxJGZIzT99IhGBBARAgAGBQI7OTSLAAoJEJOo B2QsN+N1bu4AnjQDseKJXvhSL7kPBk6oDuru/J2OAJ9vYrahks6NoBvRWZ8B7H66 DymaeYkAlQMFEDs6C1cO7bznZmp0IQEBXscD/1X1sTB3Ag1w8aMJxLhpxeBrPikd 8mbs06FTD26CTdK4SuQrO4nBlDkoaxItfPuIf3SyTR7NQijH7MFo+75Lpat4FjSr QPhZleWKj0U78KYLaIFaUTkoCZMhJEKFwvS+gKbP8FQR2TI3jHWjGJnRcMMA/PZ2 COkyGZsL1UgPBw2diEYEEBECAAYFAjs6EbEACgkQgb3TxA4fm3m9hQCeMtzB3clG 2FLlU2k2UtY7NHyVKs4AoIzNSzMvtSQZGhB+/jM3E5GzAiYMiEYEEBECAAYFAjuI QYcACgkQUgAclY4JAiMxiwCcDq1QzMkLiyTzuS2qYuSIBibYdVkAoKfAJBuR1EiZ NkqHoKfviFeB4NHxiEYEEBECAAYFAjvgdjgACgkQXmpCkpB92WaNjQCgpxoHhw2C 418T2DWOOTbE19okarIAoIBoWrPD4aid+OVJYIZ1iRLho1hIiEYEEBECAAYFAjwR LcAACgkQps3e7rs72bg6YgCeLAM2vcwu8g1Nz9UdSyO+tDHbMHkAn1RtZ0hCMFRA J4nqL47vYiQ49ISciEYEEBECAAYFAjwVnX8ACgkQIGV97BI+xjHPZACeM9xZiELl COKdFLZC6mGrGj0uh44An3derychCV2kZHEkxXIextWHOWSniEYEEBECAAYFAjwR GzwACgkQIgvIgzMMSnVABwCggRqlrHTDwkzJYpPMU4t3+JHl3uAAn2xGrUGxKATs ZdXDu171n50YJa5CiEYEExECAAYFAj0HqT4ACgkQRu2t9DV9ZfsFBACfSZrFGiWn XxwPAXZfnW69QXtavNcAoKLpt6/U+ms+MJk3RB9XuKe7lo5liEYEEhECAAYFAj0H sGgACgkQIfnFvPdqm/UJJwCgogtFxoob1yTTa2tnqzchLAGLnTEAoInj40lhkcjC +VMl7FM+mKWGPrTdiEYEExECAAYFAj0HrSwACgkQXY6L6fI4GtTFBwCghZ9L7nxV qQtMHtqSY72OXygMO2MAnRebMkouZedp4rFVCxqFOkoTM5NQiJwEEgEBAAYFAj0H sEwACgkQfEtnbaAOFWOCCwQAqiQnXTXABp4VrIjCCTdrdn1O/u4GWW/OUfQXPOIK Ig0eOfCMM60SaR9ZyddmrLLYeDk8vkPbdIAxdaQz3WyqOwLWCqu/9C3YPS7mIzDk HN+eJbjvSPG97mQnu1uuL0qu52sQKGe83WAS6fioz1YTKEnoDKQCcDCU7S+K7Eud wG6IRgQQEQIABgUCPQetMgAKCRC1UrBDdzkF1naHAJ46joUFFCOBBx+bwSP/d0qf 1Kl62wCfRdKyAp88it85PW4gecYx6kRKfyCInAQTAQEABgUCPQe5WwAKCRC2hPF8 wQqHTV0uBACCzT3oYFZVvfaeB2gu2ja7SgG049T2TscWZR+vuI0GTnpW9DQwJu6D wiQWcu5s3rIUCY/8vDKfYr6qYUN1P+cvKIfTNEfNcHqknrujRBlMG1/42Wlw+jqk tWIsKXDdbGIBs6k7hslFa1Ho1k5eF/sAv61E8OBJVlIbk+lm2yzcQ4ibBBIBAQAG BQI9B7BdAAoJENbgof5PvirdiuQD+Ln+qrC39iLPhu1JWR1g8cVrRq2kMX8Rgk/o PMXvryWNeqbUyFr19/5WZYWKLLUpQunaASjh4b2MFuqADmDozRc1MQcG1kNW8K9F wNCCJ5OdmIgoi3LXvBHGwaqta8A9ckV/Y94Y+VYPU0UQ4KQCDW2+Ke17vefTrYNH OGk9chaIRgQTEQIABgUCPQgh8AAKCRDYyjFxW6BSwyOiAKDbGsOoZZ18LRdx8Ljz SuQID3cRhACg4xYcTXAhrvonBObrLEV68+c1mkaIRgQSEQIABgUCPfd/7wAKCRCM oyfbQzugh+lRAJ0VJk3+EjuXmmZi2t1kSX+fJcsLPgCfc76HizlZy99CVwl7JNsT x7S9o9mIRgQSEQIABgUCPfd/PQAKCRDXyjq6L+h1zDLUAJ9CgUMXNkimqDjC8hK+ 4mXTWY+8VQCfcyj6jSqQNGjfUuaYYfFNRn+LiwyIRgQSEQIABgUCPfb4vAAKCRD+ T15/A6XhCCd6AJ9CLo/EEozb1hkumNK+hR2V4Ca5XQCfTurbRsPFqa64XGvViPiF tm5c7V2IRgQTEQIABgUCPfeHGAAKCRBWsDFfAWfKOJboAJ4+u0ACS2bHcCMk4qAl 3LM+vyPDPwCggM/gQhV5vcO8U+9WGHGBJxzMpGSIRgQQEQIABgUCPfgGggAKCRAJ IrQUEER3XcjQAJ9YLe8ARydx5sgE2NF3yt79Ra14xACcCYzFuu67d74lpm+BR7M1 /0/fFH+IRgQQEQIABgUCPfg+0gAKCRDIU89z6GVOl5IaAJ9CMlhQkY92ybMBHQZX glrAyvXO3QCfTdGWgDvnUJyskQyFGZ9LnbtrxWCISgQQEQIACgUCPijtzQMFAXgA CgkQboibnTHm45jAewCfaVTRu4IRnQ/RPSIxMEEbQgRMazQAn3fN8DVoVUlZH7uo TN7vIJT5AwUHiEYEEhECAAYFAj6STVYACgkQYfQNL90hPbqvbQCfUstEQfLQHA0l 0Y6+Nz26QsBuc30An3BfepjYD89bUaXODn41Na+yiPKpuQINBDnjXC4QCAD0UBPS OUsYU8KA9uFCN/RNUtKzx/W16jjpYxqvCdKxbjb3pI7cbmMQtwLHgIcwTC/jSHGx cJB8JcVHQeaf87XvHt06Gb4aOZAX+oAELe3T+nzSdQ1HttSplWPqzkH0AvoMdCf+ ZmM738cTLrUHTIkgc/yGzUyXiV+m0bCsUBYgDSLgUwS2hCl96r8ELxPqAVVHrDJa 6GPVH+zfywkWaQUknn1TiVnM8JjQiC9x7V+tix9xisysGAG+XPH+jYn9c4q781Nc psD/hLG8IKd1AjlfSnxS9TD+WOg3g2VdzfcTy64e1z4o6XC/XJssQQlPQYmsnVvx 3LnfIZjlJSO+aTQ7AAMFCADKSxl7M4TC9nEkt3xzx9Wl4qc73J1RqF3+tCNlj2Et zcbKBxynifjY/m3FJdJcDvbsaJUubBE3Kze+SZih9gU35yZU81++Wq0KhqcpDK9L qnK3/+3YKqiXV64+Vq43dQXu1C2nsgzQ4vPZ15dgeRLbK+4ez/Gt1fm/YJ86EA6t UGiZZo37N7wodPoBLfrL+8xRimC2kFK5vOCdsU50HZv4v55t2oHRi5FRWJN6GGUH eDORcCvzkeulvNxomKaAOyRMMLwzch/kF2eQs36veVwzENiKDub28PCuhrFXP7ke q/Ybz19GIsJFSd7lemnzuTSkMoQhPjXmlshsLXhi3Km6iEYEGBECAAYFAjnjXC4A CgkQIBUx1YRd/t15/wCeK53sTVsgjbjDv984yiaHxGzKz9sAn1jpwcaKsxGC0ayc sTEQABKrEX0m =fxvp -----END PGP PUBLIC KEY BLOCK-----
D.3.113 Yoshihiro Takahashi <[email protected]>
pub 1024D/8394B81F 2001-10-15 Yoshihiro TAKAHASHI <[email protected]> Key fingerprint = D4FA D8CA 2AED FCF4 90A3 3569 8666 0500 8394 B81F uid Yoshihiro TAKAHASHI <[email protected]> uid Yoshihiro TAKAHASHI <[email protected]> sub 1024g/B796F020 2001-10-15
-----BEGIN PGP PUBLIC KEY BLOCK----- Version: GnuPG v1.0.6 (FreeBSD) Comment: For info see http://www.gnupg.org mQGiBDvKlwgRBADKGTPgNos5F4dobTyIhNN1nVHwKtvdTM06orzFj8VccmdZlJF7 DLp1UH1gwiVGLu1NPOrQXKeaZmK3iO11fTV0zbCUlUnfgSQsJJeGUFMx7/tgu/F3 L1qe1p37txNYN09SSEBJe7rlTLhM4VWa3LeEG58Td0d2qP/fJeikz9HIVwCgzIJd aEclfjgNmsx2lM8jn6qxJXED/jyqV1eAgTD8C6MRPGYcqyLUZoIy7SwdhvQLKlT3 rAI4yHy5m8Njj0bk1oJM+2PAhZN3o16tpsjQEJuWoIGWxe9P4AX2Rr6htpidn2Gc UOXaMFZyy0MX4ULfph78FEzRC8WGEV1hWLW9pNnzaASY/RwNNvW/YnGyKSCq9ilC YG9mBACfcmN76QnFFDHd76otrltwwjj1zTRoHEnBgfj/EldDeOaU5cBG0HiV6cbv 94MYUi16AnN6462qG8RHJmSPblsm2Og1e7aaZl0CpVgOq86QBwqDHFXh0q0UtgXU EQChaBe68ydZRwd9TScAknuj5iAXfXtwAeyhWbzmVyJH0Kk8QbQlWW9zaGloaXJv IFRBS0FIQVNISSA8bnlhbkBmdXJpcnUub3JnPohXBBMRAgAXBQI7ypcIBQsHCgME AxUDAgMWAgECF4AACgkQhmYFAIOUuB9UUQCgwTQSPrbTxhJvi1DdGsYhHOsT0PsA nRNBwMyeLPQPhLxw8EPLgyno7+EHtCZZb3NoaWhpcm8gVEFLQUhBU0hJIDxueWFu QEZyZWVCU0Qub3JnPohXBBMRAgAXBQI7ypdXBQsHCgMEAxUDAgMWAgECF4AACgkQ hmYFAIOUuB8q0ACfTgzsn+Q6wc4aDQ7nT3+M4HPWXhUAn3nhtyq4Ucu2A6oHXvVt 1oAhhGyPtClZb3NoaWhpcm8gVEFLQUhBU0hJIDxueWFuQGpwLkZyZWVCU0Qub3Jn PohXBBMRAgAXBQI8VVkOBQsHCgMEAxUDAgMWAgECF4AACgkQhmYFAIOUuB/XmgCa AgHmONlOiOhKdY5LtVJoDi0+cOgAoK4wJFYzstYbpXayj0LqbgmYiY3QuQENBDvK lwwQBACBBH7cM4WCT6D1w1XAQnWgL4eE/fMcR3aPiHBDd8eDWFFOhwSPh3W6jZ5T STUEZCF7lgD3k+QJtDhVKE0U/hha1ZFMgdTTbhEW9Pl9DHW3BYxPXxq/SURwpGFg 0GriV65Hx3Dq6cxkBfzGZzrZA2JfRwb3pXisNSGDILAtNRw3jwADBQP+OSbFQWL2 n+KrBX4dPbp5cuFVL1/NNOWhSOwU+IsR8jDaCYpLy+Zkn7Bn90bIee7zsdWOkGWf /qV0qm6dY7xLs/hoCKgk+0jPPevVcCayfCTzBZ+d76qPjWQtEgKN7/LJZn8rMCBf B4kHxrcclf9z3OdI+BzTNrPZaCeHLd7nMKeIRgQYEQIABgUCO8qXDAAKCRCGZgUA g5S4H1r/AJ973EUo0J+SF83Sj/hL0zDTQBKlKgCcDy1o6LmSduT3NE28KB3Iw10I kqA= =eB3G -----END PGP PUBLIC KEY BLOCK-----
D.3.114 Mikhail Teterin <[email protected]>
pub 1024R/3FC71479 1995-09-08 Mikhail Teterin <[email protected]> Key fingerprint = 5F 15 EA 78 A5 40 6A 0F 14 D7 D9 EA 6E 2B DA A4
-----BEGIN PGP PUBLIC KEY BLOCK----- Version: GnuPG v1.0.6 (FreeBSD) Comment: For info see http://www.gnupg.org mQCNAzBPh/0AAAEEAKiF0rNVbbuQue8Mo+knlGKtZJXWkLOhmdzE+FPxTSRv3TOS OHOfFbEbTlcuplvYv1US6o4liAyyx6vGLGa7ZW0zLFAtTOJTfwW3GPmcMTieOIK3 wwzJtjH+wi7VeXIQCU/mOcLC9A8QaLqhJ86e3m9FODSFMIluSoucrgI/xxR5AAUR tC1NaWtoYWlsIFRldGVyaW4gPG1pQGFsZGFuLnN0YXI4OS5nYWxzdGFyLmNvbT6J AJUDBRAwT4kMH2ldntvsCqUBAVAcA/4x53VCfOx5Bm+BtneQNEvHgV8aqWW0tM4r 31KtsSjMwuHF3kl7PJtCfVk4OpRvog4u9V5G7gtUhUIOi/Qfuia2YHvvxIh3sx7Z Gg22e4FxNzNob3qV+YiPOr+Aa6EoYfHB45eHSLFXryCBS60a0CfZies+CSzcHBy9 /Zu51dCtnQ== =f57V -----END PGP PUBLIC KEY BLOCK-----
D.3.115 Gordon Tetlow <[email protected]>
pub 1024D/357D65FB 2002-05-14 Gordon Tetlow <[email protected]> Key fingerprint = 34EF AD12 10AF 560E C3AE CE55 46ED ADF4 357D 65FB uid Gordon Tetlow <[email protected]> sub 1024g/243694AB 2002-05-14
-----BEGIN PGP PUBLIC KEY BLOCK----- Version: GnuPG v1.0.7 (FreeBSD) mQGiBDzhleARBACRg1KdGeSzgkTXaRoBCqnjTjxoBZR8HzRn2hs1hS3CBJVGfAKQ NOCyKFQWWqYIlKDIEA38767uW3yyKNSnQQI3Ad17ifWp37M1B4wdgGGmEAiyE3Z5 v63120MJgRhejyZph2d2CfAPiLPq2LXy6UIUipuYQl0BICZnL6rDm+QAwwCg164x uMUutYhSdB9/hBLPECwtXeED/iE9eyJVcXvdambHZfcvySg5e5+z7Y8FMWQuhcO0 svBIrhU/gr7S9lkwudOj3LPIffwCUBNerVDGuDUhu7iR0YIRDX6aN+LCkHFXK9x5 ScLHIj0HHpbQLJeCeGAZnPpuIluFjRSaklVERHvio9gR2cOlo+iXRku/SbzPEzA4 BTvYBACCKxLHWNFdyiZLIMsSVn4pJtgUzIfSw/auBALMft03fvXD0cNOm2RfhJj2 Yc5U4k6PBBtoTTAaKVQ+D7CRHBhlg+Ls/aJSk7Dj8XJHdv0w1AkGz/OAJlJIDj9M RRCPyfhTq4nlsbFOrJuTcq5XMxbdd+voohkhgaiz9Lk+KNCQX7QiR29yZG9uIFRl dGxvdyA8Z29yZG9uQEZyZWVCU0Qub3JnPohZBBMRAgAZBQI84ZXgBAsHAwIDFQID AxYCAQIeAQIXgAAKCRBG7a30NX1l+5DrAJ4gSRjBxPBeGI8qjBCAEFlKA8MOawCc Cm2cEju+gP+x2a/op28O02bg7NWIRgQTEQIABgUCPQegzwAKCRAgFTHVhF3+3ahu AJ0S9r2mcQEfQ21ZzacV6sTyJkXtoACfSxld9fOItvrLPh6C52JecXfraCiIRgQT EQIABgUCPQeutAAKCRBdjovp8jga1Je6AJ4hlXGQAixShrEIb5bwTPWNKpQEbQCg 5XcnCDTpR7MIjRHd1Dg1Q9DgpvKIRgQSEQIABgUCPQeyOAAKCRAY9QOAJMJ4Apoj AJ9Dp5QAmcAR6LVlPdE0usEtw2bgwgCg7pXfhaGhtMDvjJOWIardnhtKQ2eIRgQS EQIABgUCPQeyVgAKCRAh+cW892qb9Se9AJ425mHg4dJf88ye13TsQkMAsSgC4QCg jbqcE3gINIe3HJLam4stKTGcknCInAQSAQEABgUCPQeyQgAKCRB8S2dtoA4VY0ow A/9gHpO8ZsTMx17LtBEL0+p2x6Uf7QzWJRilbgVr7/nCiMoj04rdbft27DnQg1pU xu/Lzv32kkDLsWBfwV4bR9efa6Q9N5o+/eJZUuNVypxK1QHCrJ/oG2yeTtvVyixR zXoFGAGiQ8xJplAJ8keY3NKjYHssFogU2GmYc4EIak9HDIicBBIBAQAGBQI9B7JL AAoJENbgof5PvirdwdkEAKM7iNtj5DGZ0yOLFgumLiRr2a9IwAHu+su08Pjb9lj7 oUO/TlMIKf7Y8xG61ydotBL7t4eZFAWyT9ej+UBp9sBh2O5mY6CLeBLnXlka41mP JyiDjK1hhTf2ccrkwrlCSDx19R1RQrjsndaTcb4AA9yZQdoetslI2FNqvXfsvtyO iJwEEwEBAAYFAj0HuzwACgkQtoTxfMEKh015jgQAiZAHy0Ql+xB5zTRTkRziZSt7 uqHwF9KALoUd0UByFJPcqqtv0sWNcYVPu/rAAQFveG9bqi9rDPmxIuuEGl3TAyx+ ZKtXQ5re6E4G0AoJCKOpUAZaRQHak/iJZHgpl1Yyy2dB56kt9xz6Q+rCPS8O3t7e giQzGOF5csFv465gB52IRgQQEQIABgUCPQewBQAKCRC1UrBDdzkF1ujVAKCAJrrj PUzvNvCSuGMNmf9Dyua5AQCfTEJusbNkJKgu7CxHqyzTMvVlQtyIRgQSEQIABgUC PQggAwAKCRDYyjFxW6BSw/5SAJ972HfP7sNl9poX8YGE0T3vN8apBQCg+WiUgSJO ZeYEQMiZKLwAxoMbape0H0dvcmRvbiBUZXRsb3cgPGdvcmRvbnRAZ25mLm9yZz6I XAQTEQIAHAUCPOGhOAIbAwQLBwMCAxUCAwMWAgECHgECF4AACgkQRu2t9DV9ZftV aQCfYIv+czm8hMN3wjxF6sA5D43vrMQAoKRTxRmyjxDnRe4QoAZRRzogt6stiEYE ExECAAYFAj0HoNIACgkQIBUx1YRd/t2B0QCbBG60aRGEgrQzMkpodzJbU5Itys4A oIS56noACXYphdM25tdfKPS+QesfiEYEExECAAYFAj0HrrcACgkQXY6L6fI4GtTj FACgiAuFsZW43/A3A9EATgD8s0tEmoMAoLHpxQUAQkvYlHobnsU2jSEImhDZiEYE EhECAAYFAj0HsjsACgkQGPUDgCTCeALbewCgokMlypquzasL3SExbdbXS27xCwoA ni4XvyoNd3GBePs4fy4yUjKyOTJqiEYEEhECAAYFAj0HslkACgkQIfnFvPdqm/V0 MwCeOBidsDe/z1EzCFK3LJPDkBvQCP4An0UYz4df9J69dxmP2Eqn8JJsdUdIiJwE EgEBAAYFAj0HskUACgkQfEtnbaAOFWNKxgP8CfH/yozXDafD//91tmXwS6x4MSTX stkfOGfOT6dLqla201Z+CDsHayQwfwVzJdcVYU+5Xe8dwb/sK8JjLiwb2ASnnhZx nZLeHZYAi3U0oNscxrPZJ7Qz93KFrNf/No8HrmryU9TUFzhSHKjHyNeBH+TJEOj6 PRLftHPubEkO1q2InAQSAQEABgUCPQeyTgAKCRDW4KH+T74q3YoXA/wIaJzGfsFF d3nlZKK8hfZD89eUSR8swV/Oy6Ctl8qOSk4XWFxtjRRzNS9BM/TYjd7cJBUOQDQK u+wQFMztJdKdmntwoBTrdg7HGMGtKnR5Ppzv2XuGOKuoXy2y3yDgRsZc3iFEweZR Ao42FBFU1wtDCV3+B1X4Gj6CJDMT9R3ItYicBBMBAQAGBQI9B7s/AAoJELaE8XzB CodNgcgD/RYAFt6mLWS+CGSk2MdB4eA1McDDJY3d+On8c672z1BdQjPeYdd/zWHj aqeMoc1j/ctisGogN1HUwujoI+xo4puraFnFiYyJR9lKFK9uMBVw/eRvp+29QYa7 RY/6U/OD7cfUo0BMBS9ZhZHNg6GMPSlJWd87pF8N3mFrwRK1dVOziEYEEBECAAYF Aj0HsAoACgkQtVKwQ3c5BdYl0QCZAQrSvVWxwmwJq4qS4m9FgdWTucoAn2Dea8HQ oOPvLRj9IRh0jdzOWk45iEYEEhECAAYFAj0IIAYACgkQ2MoxcVugUsNSiQCgktJN 6aCAHnusQajUnJ9expOWxYEAn18BPBKs8vdWvTJjNwqI9BAe6WUduQENBDzhleEQ BACPsAZpNNdGXIlKMXJhYOeg/CuPG5dt0Ucaq9YhmmUJw8tmuLL5D839BC79qaSr B9UTcuKdi0Kmaiu0nTas3h6ThDu+nqLpiGAUqkSST8jhJXF7e/X/ggMLatkBIvNs nDf4owUFjzsm9nmb2GPPecWGsyArPkRGCmV+nfEYvhBo+wADBgP/QZ29lUpgOu4b nhgE2LP3641zQHjMqvYrZKnHbmHVYUjZwuV2YUvdFPI21OYWlsAYyid8OUTN9RKS +CcDcHZhS9SS5otQLG9P/aKVh/C9H2mnRU0GbSt8hf0HX+y6nuzPe3iwE9O5rbxe S0c/zhrPuz3ZK0Y3e0Zb+tdd4NpOVxuIRgQYEQIABgUCPOGV4QAKCRBG7a30NX1l +wSEAKCHPJh+3QRUcI1DG53fij95oTDMaQCfU2DJ5U/pKSfJFjFvN7XRpacDZZI= =1nJ4 -----END PGP PUBLIC KEY BLOCK-----
D.3.116 Jacques Vidrine <[email protected]>
pub 2048R/33C1627B 2001-07-05 Jacques A. Vidrine <[email protected]> Key fingerprint = CB CE 7D A0 6E 01 DC 61 E5 91 0A BE 79 17 D3 82 uid Jacques A. Vidrine <[email protected]> uid Jacques A. Vidrine <[email protected]> uid Jacques A. Vidrine <[email protected]> uid Jacques A. Vidrine <[email protected]> uid Jacques A. Vidrine <[email protected]> pub 1024D/1606DB95 2001-07-05 Jacques A. Vidrine <[email protected]> Key fingerprint = 46BC EA5B F70A CC81 5332 0832 8C32 8CFF 1606 DB95 uid Jacques A. Vidrine <[email protected]> uid Jacques A. Vidrine <[email protected]> uid Jacques A. Vidrine <[email protected]> uid Jacques A. Vidrine <[email protected]> uid Jacques A. Vidrine <[email protected]> sub 2048g/57EDEA6F 2001-07-05
-----BEGIN PGP PUBLIC KEY BLOCK----- Version: GnuPG v1.2.1 (FreeBSD) mQENAztEWGUAAAEIAMeniH36Nfiwf/XoVWcZReau9V4Q0taZs9J0WSAmT1kuS1OD X1r8SAvQ5/8yDHy5rL+jrUpNw6p4YH5ll3ZNolLuWbEVyAOpJDalg28VOC8pKrC/ 2Rmdlx2Ri0BMXAZW4hf5UrBSf05PgoMbHEM4IIbeZijv1dgLMlq8tT1TLimg5CON wW0rDHr9syGYMQFLpmyoWha43B8xnJj121mGB3AE6Fhz+G1wYKQF1/KZucckJctu eAOjw5yj6Lr008yvAhP8Wl89BYNwdGmaY2HUPtey2XxahqJI46/u/GXkkEQqk2vW sNz4bIvzEArUWzH71GIj9NCiUAKGZ8KAjzPBYnsABRG0J0phY3F1ZXMgQS4gVmlk cmluZSA8anZpZHJpbmVAdmVyaW8ubmV0PokAlQMFEDtEaoo3kYU/CUckqQEBkawE AI7xJVCu7nHfHK0FhSQGSK6FtcV1sFK1KmIR94uyVQoLbtRWCd6od2U1BuMi+9/c ymc7YFQ6ZeMrx0aUwSmb36+cOpLUrPs/B131OgBX/0O6EseXZ2FPrsD38/oOHHLv ZoPWPiP/utQIkHpdmGaZfbsT3Jk64iMhl4IxKmwhDsoFiQCVAwUQO9CR+VUuHi5z 0oilAQEmAAP9FjGpHibt7uJTgYoXIPA9u4tJ8Ry0cLOZX9a5Yq5NfPMTA8v+8pY2 +IrhqhRHWDND6lIoc9aZkjFAX/XnCyZaA8aTSASXC4k5PbEvHoTrFXtpSKSMtZ8R 4AfqkhvJ8I0r0yRXvZxpx3EAZpy2K6jVhz8bwiQuk2fJK+79AQyRTHCIRgQQEQIA BgUCO0RqxgAKCRBdeSLkcaKMc97QAKCIeXaT+tII2hgCz1JaN+tp6Mn8RACgmxRN +9k+m97qhph1ES8GFeQJVsKIRgQQEQIABgUCO03CgwAKCRBmgG8dAPfQeiznAJ9D klpWg02B8JByK2cnyim5ohqkBACfZZgGEMXVYxctKIB9DearNWhxCySJARUDBRM7 RGdBZ8KAjzPBYnsBAXFKB/90kY7ts9wDI8g3Bv9Q9PjbzSpTrnIIUOCuMpd/wvzg xr3ERnvJeoSJWE0guWQ6+YIeaPBYIyhV3yV3YhHFQo6uYAt3FsgB/z+kiRMhxnic 2Xxqvws8i2Tb7xpYI/yJIm9fZZteHOJ/jOacHX1fdzXVZfXzfUX31biE2LVdkAiT rny1egGLbN+blylNabHha0CLFkfaZ/UuenuS1rbI+oS+cwWGHZZxvp9+m0E7nDGi Y7VDvzMLBq/0zUeTOLaOYqqCym9UGoq3yywkJdvcwykkR/BS8vYP1l+rTqVv06Fn xQYONObU3hILupLZ51GaP+jkkTgIzAVv43lZVbZ6/XjoiQCVAwUQO0TC6/vCP42x MxQ5AQFItgP/YwO035pYdCTUNprIXtnPkhMJU3m+ST3XGl+vTxD5M8PSpxL95Cvx fYmvCaPkP5lXPPG1vi9f6dfYWkmL40t7U6+IlC3EaXD0w8/VTWMmeuC2rigUx9wR uO05RR1Ks7/X5rADQSok/30Q8TiQ9BodmemEPmcMDL5/1dJkq/oFVEOIRgQQEQIA BgUCPAv/6AAKCRCMMoz/FgbblWfXAKCX7bfb/+cEBCbrruEksFqbu4JlvwCfUYih DTpbY9otgZZpt6xCbQ51gDOIRgQQEQIABgUCPMQ7SQAKCRCMUwqAO4GCft74AJ0e H0zWlC1Ikf3TDpjH3+JbFc9ywwCeMsXor788M9Fj0W+4eo4QdM6wRdCIRgQTEQIA BgUCPeId7AAKCRAV1ogEymzfsmjLAJ9nReOMPhBn0Z6/cuOU/C0ny7vCUwCfaHCW bBmS8lIv+hQmh+j4Ku8S3hC0IUphY3F1ZXMgQS4gVmlkcmluZSA8bkBuZWN0YXIu Y29tPokAlQMFEDtEao83kYU/CUckqQEBJ18EAK9VTM8litmppmSW8RpCTkCku72Z PTL91tueutRw+PGgD4rL1BSuAZ/I/H+fYzy0w2Haq6tG88CkzxjzzWiBg7NoVpEE 4kv3U3FfkgXXd49Q/CRufsQWZL1qxV7Qpouk2M3VeZ9lJf1kI1GZHsDw2g0fBbIs SncAn7p9j+H9j8v2iQCVAwUQO9CR/1UuHi5z0oilAQFMxwP/V3yvPwqm3vZj364T /++VfcEkc5ZLFj9oZ6utO5Vz+NdjpjFhDKDMGBTwjXTnXFDTJDDUMlWGVKJxORf2 7oS4BvqyTzhPfnijJm9WeE3TNPgtx0vMzVuFuiydV9z9uT71pqmbKbtY2v5lxSBG lJX8pHY0lrRtNIY3ICH3SV0e4nOIRgQQEQIABgUCO0RqzQAKCRBdeSLkcaKMczUU AJ9b7ImPK5sckKVvnyt7lz4Hk2mIIgCeKoAl6XUU558xIu2AFA8fzma1zneIRgQQ EQIABgUCO03G9AAKCRBmgG8dAPfQeoWtAJ4rN91CFY8FQDuZvLEIGW1QQuHadgCg r+bq33V0rM/wF2VPrqu6th+f1sSJARUDBRM7RGeeZ8KAjzPBYnsBAZjqCACyAxcc G5bI+hKjumPZS1W8WmvOgPHs0Q9poaKLTbC/bZPXnqeIslIfv1xm5FjNhXlpK08E mjEiC4kGOFSkW65qNjWdRKXoUzq86v+dphDLpxd0FYXVViA7ETb3Hl6hv/7Qr5RZ O/yGOI7unf01hEonTDUI5Wfs7dwc1wzSVAC5dc6rOlTGquSzcuignQM/rxJzx1iX NZ2+G6h114/M1CkENBdS+gs+OrQFCp5D861b5gXjPX2z+5MpInFlgTLWMOBGYaPQ AJZ+abF44iG71idEO9J+ywwAbOVKXxJzGhuqd1iDfoy+KaJ/B0+n5aAH2q8dmpOX Uwh4F473DE9O1c5BiQCVAwUQO0TDE/vCP42xMxQ5AQF4rQP/TM7vbt5uxTpSFXcC OWaG4GCgvxC2vftoo20klH3hcacod95GhS5xtvtNFVzCXM5LQEaH+F3g3NxYbPMt qWAU7VY4GSkbHsKu6min5wQGy6///ikyS8oDYBP5QO1uXA9kNYmSsCm1ulrCdx7G fD8yEyxpGj1e3q9PfNx+ouNF+T2IRgQQEQIABgUCPAv/7gAKCRCMMoz/FgbblejF AKCGU0Uxm9gODWu/9iVrAfiGTxSGIwCggThVGpYk3bwgKI5v5UYsRGoKi02IRgQQ EQIABgUCPMQ7TQAKCRCMUwqAO4GCfrDUAJ95BWGWG/6A69LVFnG7QVl95VbQ4wCe OyNkM/aKnhMp3yWkp1DyKuHh6/+IRgQTEQIABgUCPeId7wAKCRAV1ogEymzfspG+ AJ4oTlUWkSpNcEWrlXhI1XxkXc2VqACeIOqoDsfljL+6J9agzgavXQT0LeG0J0ph Y3F1ZXMgQS4gVmlkcmluZSA8amFjcXVlc0B2aWRyaW5lLmNjPokAlQMFEDtEao83 kYU/CUckqQEBjS4D/iuKIplzePrW48YhcgOcdNmVv0f7oLzGYo6plhp64gRyQMok wfO4Qozzc86PZlwiA0O9th3TRNKy5U/CAKzuJIfVjIOiJg6O4LCPwb6A5Bn6G0Pl Vqza01/sPex2EZHlMh2JmqapaN2BtZrtNrfOcp3PNkg1Y2hePwEbC7V9hyZYiQCV AwUQO9CR/1UuHi5z0oilAQG7/gP/WljbKpJyNmAw1scRWFoP3PDd5zjHdpaBakTw QMLLa6YlZr38it59dTWGVGNYDNvD9Y7Jbn039HEhQFDjIu8nGSD0+YYvZIXlTpnV XujFrLE7wCVSt/0OtoOBguWSDLFgu0PpGiZhOZ0dqvgInV5rfwIdIbpnKoLqpbYj xymzo1qIRgQQEQIABgUCO0RqzQAKCRBdeSLkcaKMc9WhAKCKtx+b7msbnZ+3hW6M JxUWn92dVwCgnXTO3EhDI8U6Bn4mrmIf8rYoIWGIRgQQEQIABgUCO03D8AAKCRBm gG8dAPfQeiYgAKD8yXuTqgdxPHWWngut0yhJ1lDTWQCeJF9wrOlYhv3GBeGJxAZh y1q9xs+JARUDBRM7RGdaZ8KAjzPBYnsBAQsrB/4rxhQORVVCRfx9k8uQVVIKqCEW OJM4CDpX0iBrBpuVtYsV1A+FdAMoLmsKUeEreBRU/pedIm+Of07/vLSeRULQwB6w I6dJvel4m3n52LwO37uERyL6FuKSNKpRwqhFg9lBj0G5r0ZVR7RlwEIgwnq2h3RC 5jaPBQo7/uNoCCgGW2QGTTHBzdtq+7R96Yqykwkrrj+j4BoaEvG9vOisVvDX2VKr tcOvyAekL/rgCmcNcqh+Wmn3ojXneDSI8hnVqStSsOyeRnCSdw4AZYcheOAJ9Tyo dqRcHW/zoPDXe80greaL3aVThGyCSy0alAW/xX3HyaDWTgrc/OwJC4OcXnXtiQCV AwUQO0TC9vvCP42xMxQ5AQGPtAP/QIilJ0/zVOiRupmyWdz+pYaih7zjTKA5aUyD vtZZG1ASC/tcEf5A6udd3RNhFekVQzT2TxbExgkD+R7f4Nyd91YMzXjPDO9FWcto jseAkgI8K2FfUNse2BX0g/zYTYEhCegLufgRZgyhLFib9Nl28MhxlOH45USHSuY1 uLCO6eWIRgQQEQIABgUCPAv/7gAKCRCMMoz/FgbblQggAKCRzjeBCLmlDUqAelCh hyOYu7Z4FwCbBxUNPrFAUSZDXtTAdsk6oDbc2zqIRgQQEQIABgUCPMQ7TQAKCRCM UwqAO4GCfnZDAJ0SFZ8j0d55VeDpYZCGqai9toAagACgjPwvNS0iTHEHEYGy1K+l 5QMU/lKIRgQTEQIABgUCPeId7wAKCRAV1ogEymzfskBQAKCE1RFp7IdjP+TqPbpI UyX/5QhrIQCdFKzelL8uRrxm2wFcmk+Xt95KZnq0J0phY3F1ZXMgQS4gVmlkcmlu ZSA8bmVjdGFyQEZyZWVCU0Qub3JnPokAlQMFEDtEao83kYU/CUckqQEBHEgEAKUd LyDA5dUIrqC9cd+noesEh5GE4PhQ/KWOtYlaKtIk34bG4vX3TCsUsEsyfP7xD0I3 UPrKHctWfVQBj+iNNl9ZTK5FMJVt4N//f95ehFmmAnbUzyKXI6m6tgSvraxlSn2j v6tXwgZWyzAewePMwNqhC0A/Y1KdCNI8ZuU7gDChiQCVAwUQO9CR/1UuHi5z0oil AQE6FQQAjwd0zW2wT5XbKOMggHnVR9qHQa2hP++Sezu5/bZj0HILcVj+1matIpzS 2wQpHhkJCAsTJKfVuSPH27vE9EK1JVc4C7tl2b+0KWmKXJ1wjQypH1CCImMO7Zqo h2yTGCd+vmj1+QoFANp8/RfUGYzAcvotfkBmLIqGSCeZiMoDB3eIRgQQEQIABgUC O0RqzQAKCRBdeSLkcaKMc03oAJ9qpsHxaTrBUGl/CZTIE4iK4H9YRwCfUoUWszi2 hkdDkWWPCKpyJZh0xlKIRgQQEQIABgUCO03G8QAKCRBmgG8dAPfQeledAKDvEdli OUOAhcPBY0CjUrXOaZqLzwCguj7bNyAO4opEU41LH0JrVY/AiZCJARUDBRM7RGeM Z8KAjzPBYnsBAcFhB/0ZLLi878axVM0555fQA/toZyaHB0UUDLHK6GnQ8CO2bgsR IWSqujq2/z+1ylEfH1HOO7oYyZih3f//OUCoabtUZ0fGxEaCUec3pHd/UqRR++nM WVQp45lph1yhcYIj8NGEC5W/M4L8IQaac3aGP3sd0ipaQPrIm4wOXgbOG+TXywEE mcR4VL2eF1ozuCBVtZ2MxSqsh24Zlrdns594OrG+gCQKe2Pnv6JA1HG3/66mse+y BkSsv5wBJwjOkulheFOJiOIsJm4/V3/2QHNSsH/fxhHMOZXNiYPfPf/5kQhyMFiY s6SMHS4XSzNSaI3p9PJM7fsXJqILOx+McSymg8D5iQCVAwUQO0TDB/vCP42xMxQ5 AQHsdQP/WabwUvXt5jKw/pqZS4Pqbc8qsDLSuN5xH5JgewwNuZBNpVHzenI4hdtX g4t1U/Cm50264hBTTH2YgALEduxjXFj13oVN48JSPJXWyFQSUi/BBUAw2JpVk8iJ Vdginlezc9EhrSEZxDRBIQVtlBBHGZdYCD5P+5y2NVpkhES/5ciIRgQQEQIABgUC PAv/7gAKCRCMMoz/FgbblXuwAJ9g2+D5ZBtSHCqfI+ngr+O0EaaxjQCcDwgR2mZl 2Orrh5rXYXLcTQmW/VWIRgQQEQIABgUCPMQ7TQAKCRCMUwqAO4GCfsvLAJsFIm39 rRd5Q43XfFHmLWCjTf9OZQCfQSUgEK6eMcEVvhpiHIS4W20Ke26IRgQTEQIABgUC PeId7wAKCRAV1ogEymzfskx+AJ97BkmjdjqNu+JfxpH2e4DcnPk8ggCgkerLDhkS jWet2EWo9Tzc4ole+xC0IEphY3F1ZXMgQS4gVmlkcmluZSA8bkBuZWN0YXIuY2M+ iQEVAwUTPAv/fmfCgI8zwWJ7AQGrPAf+MlOC2G4Z9sb3NV+MA1vFoxQAl6HeQntA ousZDBkyMVC6AGnLWWAOyYQnWOTc2qRY2kWKh9HI1+eKGKTLNeMrodT4DM6OvMeY 38KGqqAIjcwlxphyAtaRqGqNzlXCpdJVo2WSmcTkio5szLgMqDGVuuLRdxLubAcW /r+gSio3avkw0f740DnU8Uv6Q/SiThkUY9uz8C6W70K8TCpV1u6L8Rg8Nit2Py6b bAOMpYwb30IObHbyXTihrWYMLKQ9I2pzSpsdHrnsn2XEFMlVUh1aIwTc4UYB1i73 DvsY/oYkYiQikgh3oKfqUIYUi6FY5VS+VUq0gGcuFGvkP9sDbCbHzIhGBBARAgAG BQI8C//uAAoJEIwyjP8WBtuV/FEAnAmm4E9WUNCs0cx3arrfqQ7ERXQKAJwLQLb/ lj/fF+ZEU94mLuAEAwyEiYhGBBARAgAGBQI8xDtNAAoJEIxTCoA7gYJ+uLAAnRgp qwaG4PT/JcGjNeCRJbPapKGWAJ9K62TrGtp/2yAl7e36z3HKj05lcohGBBMRAgAG BQI94h3vAAoJEBXWiATKbN+y2CwAn0ORDmsnZIBM6n1n3N9/Z/8+0Sq/AJ0VkDUD 0UjvrtHSHSC9LPL5vNhSBbQmSmFjcXVlcyBBLiBWaWRyaW5lIDxuZWN0YXJAY2Vs YWJvLm9yZz6JARUDBRM9a6LPZ8KAjzPBYnsBAYt2B/4h9obwPHLDTt9HCk9wbqPS YPdxY9aWfVDwspaD0ZkX1jdYxDx8DW4On080sXxpdKIpx9gfIa3R+efLVEgu2TRW OyZ6dnDERYbtpRa48et/BcmXhW086TGg3jWjziMDsJ3mv9WTuXe+CQ6cFupi6l2m ukOWMnIy+NJj1cD89hrtVXvFdGquAsMYvOv9zQUgvB/n+zOFfixbo+lIZsqgoQfj BHG8QuZrO4Jitq1a3eUe19OGKzEfNyiXb7DiHxx+wNhuWzCT+Okk/ERHV/DV2l5I dS9yDcluCXbfrRB1ibm0qrQ6MHg9oN6x6Dgy8b6+GtozOrH4CCRQaWBn2hA+Y5XD iEYEExECAAYFAj3iHe8ACgkQFdaIBMps37Lc0gCghDvXaxJjcFJj7MZlgpopCakU lc4An1ae3VlInvowTEFcKQ63796tz2vLmQGiBDtEaLYRBACaGs+hkBuM3WpcsUCp I8RXdp3096q4yDePWTA+L6j7iLvIiTkFVH2JIx/lbN+0JKZYnXop4Oby2gcrbvPN dCBwQERPOGmhFvsippfBcNJ/11duHA1/jbsATZif2LD8tCIg4ksfE2VtysYzRvJR KZ/ZUkRoH9eLszOHNEYb5a1r7wCgoDzgurI7FnQe6OLpaEgdaBx1ZasD+QGy55D+ aWzXS0+Mu3l5rDz836oo2Gen3GIgd9ScQNN2iyEC3wA68jkDICkOYpF54vSvZ3/V d35tEZsJaW0LpR40ktE3wdWL2w+dScGyK3BlTLw03RqnfuJIj+WjA54FDLzsEOLG zE8Y0z2nRPgoKIWKAx0i2mSPLRKikHTyFl9qA/9N2CGdyzm3ofQ4Kff43GedwVBq aFXzDVE62KuOZGRqtQcS5/o1LNO+TdQzXXXe/C2JRedx6Tn7i02gJuYZA1yT6b7+ H3UoYYsBIdTeZYGZwFWonAkzxRwSSQ6kuxfS/o+kBnugEzO/tLHSgY38nVNdILHV yh5YHT9QsDCdXB6L1LQnSmFjcXVlcyBBLiBWaWRyaW5lIDxqdmlkcmluZUB2ZXJp by5uZXQ+iQCVAwUQO0RqpTeRhT8JRySpAQHWawP9EODkTCa/R8kv572zaFOxGuqC NDXRa+WeetPxru6XZcFBv4tNaXFw1Zwcmnxv8tQSbzhbtBLaJpbNpCcF2ps7PSgB biIsm+pPc8Si/s16bmcs9MppFtosPbwo3EgbbEY0moQUSxab6+siYtnmAZDWcony eZs4uLzsHQ2dQYxa9aSIRgQQEQIABgUCO04PVQAKCRBUthZ5gKoR2E5RAJ9gqb2i R9yVCai8N0dt956SxlQJ6ACfa3P+EValFi+wbnVJ3KvYs49O1U6JAJUDBRA70JHh VS4eLnPSiKUBAS+uA/41y0R3sTCK5NdgDdQmZDLxycrLux35wSQ+E5hCOHm562/U +BuBiXJkwJcaqWx3FdybP2+bQdbryhwheZluTB2cNaZlCzTWA88lMRVciDLfWC8e X27qT4sC3M0I9mLLQ7Y+4n/rx7S+UDyhW6rzlWBc3tBJvukV+rokMvLFcBCM8YhG BBARAgAGBQI7r622AAoJEFq8tAVo6ECluB4AnjEoH+0liWGI7Q0svCjZduPToZUl AJ4+rQe+/fyWLPO8W3v3NhNhOYw9B4hGBBARAgAGBQI7RGraAAoJEF15IuRxooxz yQoAn2zE/YlQ/CjNNpfZGrBFtpgIZmslAJ4nD6g0U5ten60MPQlYNiKOkDuFBohG BBARAgAGBQI7TccpAAoJEGaAbx0A99B6qPgAn1HHgEo+PIw8SbmnK0ebxhi5yjIq AKDFaU8qf+hfdvs96SoNJ2k56j7RiYhXBBMRAgAXBQI7RGi2BQsHCgMEAxUDAgMW AgECF4AACgkQjDKM/xYG25XNOwCfbdlFl2we9Gbl6dk1g3ityn8OXMUAn0rkuWS1 6SovViXzqFYwGxxGE24riEYEEBECAAYFAjtEz80ACgkQx5UK+27R3D+e3QCg3RVE AxETxzYKHiXWhSvk0WORaigAoM/hjGI6B29WF6tqNIwK5ntxNqUTiQCVAwUQO0TC tPvCP42xMxQ5AQFzBAP/Uqv+WX5jhfQ11QGoCKNgj37av3+PrV8FFZl7oYk7XWvb xrkV0VEK4Hyyd6zJI1I9TIM2EBmeWBNVay1tGCpBWkfJooFwsb5Uo3edjfFrn/cA PjQj3OZnG/5Gyw+Dl5udA4vr8Iskhj5VHvrJvJJSryrCfOavGs9qzP7IMamuIHGJ ARUDBRA8C//QZ8KAjzPBYnsBAYnZB/97gr9wOk5XUnREHS5JH3/5GyGIkYFznocP nPS/6jK67Vs68ZLVuQ36Vy0TJ58zeqckG3lRGWBMhTfBFHfnTTUFKrqxLY5chN3U 6Jap1aRMHp3QI+lWJP98mzqLW0puV8O8BINSswjBkCp4EOW3va8/vWVUMLzjALM1 txRurZ7Ae6jficJudkmdXdSvc0A4UWYgArzLbMSitwwsU15WtWzRFew0H6MXxtLN 1rHRN3P+aQE0T4aITZIaCUIMOuQKBYwGwT8SF0A/DGAFi8vb8so62mzYFiT0/bQo Y4hif1bf9nw7v6zli9DpFYPWWB6pWmpbUXQlQTvryBjmD4qxB2tziEYEEBECAAYF AjzEO1QACgkQjFMKgDuBgn5dcACeNKmOz08/aVRqXjVuVXdfhiFY8r4An3iRW9zy 0M12RZpIBflZBC2KzhvFiEYEEBECAAYFAjxrRSkACgkQUgAclY4JAiPzZwCfbJ1u zPkXv4APOhCDgDpMTsiNtusAn05p419H/Ql9MZhhh0Z5wERY7u9LiEUEEBECAAYF AjxrPs0ACgkQXjRwWofFmQlyLQCXePnxlsQw1akWQUV5pDIAHHDQpgCeKqRa23t6 PHM7g9PdEGc3Gw+QamKIRgQQEQIABgUCPGtKIwAKCRAY9QOAJMJ4Ak4kAKDO4IVw V2KASZV0DblLDTkfuzow5QCgodm/YPiTin0FNCC4Nqyt6jDxbaKIRgQQEQIABgUC PGtKkAAKCRAh+cW892qb9bXbAKDA7r0x7nVqfgyb3I+hl3aGnZpQ9wCdF7jXSaFn 2zqjjPXXAbifCrhf5byJAJUDBRA8a0nNfEtnbaAOFWMBAfNpA/9ZA8Bth1GxJfI3 pYqzJWbuCDLwrMRw4HzKgrh8VXps1CQWScJsF2zZdCKQAz4tmH9Nug3pnuuiAYE/ dicHq16KpvLRNv4ZrAVR/th3P8EwQpX6XmH4D6ZbmhGeawhf3naOkl0ju1mThIPh Wwlfhoq7DvhCelRBEbGbDtAGFHFMj4hGBBMRAgAGBQI9YRbeAAoJEItfRiWnAR2e K/sAn0112EJ0oLbG+ibQMLrQkr2SJPfKAJ9+TIz8znCNoFcnkN47ebUryn2vk4hG BBARAgAGBQI72DGeAAoJEDXUoEGQThj5qwkAnjum+a2F6IhY7uVagRM7NU6whhsR AJ9voaLZaFoL268/N0zM8DD+rBaWX4hGBBARAgAGBQI7syQhAAoJEONzzsALTc2x zCUAoKMgX5GGoZ+JoZod22wau64jZCiLAJ92Rjq7g5oBb6bMeeYSvTX6OpgaEIhG BBARAgAGBQI93JFzAAoJEOztoYZagVwfuIUAmwe+bcssQDeQmlUTpUUbQ1gqBwX8 AKCjHaDJEmVJQbJGgWJTaCYqpK27GIhGBBARAgAGBQI93JGGAAoJEPNELzbWbIHk kfoAn1oehPwL3vSRjxRPhR0V3GeKt7wVAKCrPb9J81C3+0OrHCGB8hoiGR0II4hG BBMRAgAGBQI93M72AAoJEC1ZIA9jNXaZkN4An2AqN/FL+RZDsDv2a3tOO7HH5Uv+ AJ9Fif9cBUbjcl6NcJ/CoxLI10+qfohGBBMRAgAGBQI93M7rAAoJENrdQe/OcRgo hx4An0P0X7CGinnSIHgtkrSnnHLYJLyxAJ9G+udL3igOviHkJqlCUl9nopTge4ic BBMBAgAGBQI93U4nAAoJEOHJS0bfHdRx4SoD/jxrpZKQGQ6HXP1sg2zGyR33QI4b 0iLjYtxG3QSf55FCdP0zXcaD6uOPlCetR1DZy/u+MPNxpvhjvLfE5DQ0gF4AFcar nsMUtlJH74SRFUAkehySpvOmsvMh4Al4HPmr6XpRjVOsLyrJN+mtcl3vIKxMTau4 aWWxxjE1skahgnUriQEcBBABAQAGBQI94HVTAAoJEBUCTNN0nXiJWbkH/1rsVVLj HL6Vxadz+eO5tiLahdj+R+i0+zjGWvMaRmbo3rg9U/NVURwJdEclLG9TGbQY6L23 LcQHjSVqavnr03RGwGSAfo7ai+tr81YszXh9ka3uLsQ1CaeotpZNq6XIuXhxTjaK AAFXsQmdfAMiIMm0gGTqme/6y3E862Bx8M0nTpH9KjmYxy7OTbptw5/Y9vTX5oAd xRzGRuR4PR+43YlEz9vN4DynJm3sV+miGPRTj+jXJZ/jMmTISlRPK5xJx5hZTqvR v4ZyhmSA/R+vDNbSMccIBisqBB0OoDnWEZXtD2Yvus0vOheU/DE2gtDzDpxDYsqf 4RxHuHv9ignnlwyIRgQQEQIABgUCPeB06AAKCRBI7x9bLi9mjudgAKDFm3AQ9AIr +k3VVXdh/RNR+A2VrQCfRPGGpFniW6qYhD3B0BlMG9Fs4DiInAQQAQEABgUCPeB1 HAAKCRCmw4BP83aBPUexBACnsxJmRRl4rHni7bBERkfKDWzQBm/JHOWOxUyAn7VO Ny3MfXotFl9R/uPPqnD2W5d34CaNLvOYCC0/sqy3t7lcvty5DfX0rEAcvIhq1khz p7wOgg9RuWIgmTr98WLtStA+imNTfpkPKZDKxQGF1k0V4WsNUsPxADQduwY1Sq4Q +IhGBBMRAgAGBQI94h2AAAoJEBXWiATKbN+ya2oAn2oNRt2SrjZzsFn1hSwjsbUy EnqbAJ9q8XC7gVuAQNI1/usdsNLgyx0gB4icBBABAgAGBQI94svGAAoJEI4CzbsJ WQz9oC0EAJczia/ZAWFGZ0/hVyB1G2wKn/v32CQVba8aEObj05dLklt1v8kIzWSr kfquAk+Zdn7rhwusyNwDxsHDCkFKUsFS0jjDnkUcveZuiD2qvp7CoyBeu8VyEVGW OIrcsiTI7I7pnskFQox+j5+Ose1Lnjum5q/6aLM8iwqRUQUzGR7FiQEcBBABAgAG BQI94suvAAoJEJ53fDCLRgihuKAH/AyGz8uzPCgo1PBsF2Y7hxnJfFw+JM/V3tDT iQiPqww2wSMs+pIMaHqz4TUK7ZUYy2vg/qjViyRRhj5+gcBqnBkIe1L82hlpQabY YclIl69vS5VJIfiqp9T99z6RKu4kQCB356vg9bFeiYaSJJ2XFQ+z0OxHiJIMQ+0/ j/yX4t5R+zmfN/va6rZIwAEh3D6R89Vq6Lt4+IuqPvzBhq2pw6d+RqHIKyGGtC8l YYUszLs9e9UD/FXEpDb1wjiZHNtEkJocsON81sE5Gf6iyFutMsEO4yHQF6SY9rV8 218eGsS7goxX8S3knirQonrQw8jRS7ohSc7ZYY9zQzUxlasJHA6IRgQQEQIABgUC PeLLlgAKCRCesuTzaRbIc7EEAKDeNWwCgPaG0C62amNgOCm6dcCvpwCg4ZZ049Fw tjD37t+gN4ZMJp5H5Cy0IUphY3F1ZXMgQS4gVmlkcmluZSA8bkBuZWN0YXIuY29t PokAlQMFEDtEaqs3kYU/CUckqQEBfesD/1k/cdGF5vgVgtq23cGwRGSy+cgeTItK 4TJyfvacZJsMWWXhBgEPvAltOWmFSUxCJQ4FV0il7+wEfrCCba3Xs2AFuPPSfNk1 t+Rb1hK478J26DSmvkVRHnyErKuFqcrHb/OZ48sF3b3YGupp87NRCMsAyty3jrih tBOHcWf8x76ciEYEEBECAAYFAjtOD1cACgkQVLYWeYCqEdg3OQCgtakH61ognpYO T3hQ1ujxkhE1TJsAn1HWyiLNzRW0NamY0Eq8MQzmo3rIiQCVAwUQO9CR41UuHi5z 0oilAQEbUQP8DG6SYPQ/ItCqVPf01deS8ORc4jKBWgDI6Dybo/WDMcdE97sWU0r+ dZtXzv7tv7IE2n3WVUTmB623SvTnvmpdun4+lyk993rz7H3yng9jPqzF7DmzVRUy 9k7i5PC9+gbaAYOrljuYCx+5nlOxQ6anTCRng9RaId8kHtnKPz0dRdqIRgQQEQIA BgUCO6+tuQAKCRBavLQFaOhApeTkAKCB5AslGwamxbrSFnOWUAVWZojEpQCfWpfa cu/L8ErRLS7UfHO7bBx0tLqIRgQQEQIABgUCO0Rq4QAKCRBdeSLkcaKMc1DAAJ90 /x6QGPJhi2zugTmyxAbEeitVlgCdHO1Cb3ypPotsYL1luknVjJRJgCaIRgQQEQIA BgUCO03HLAAKCRBmgG8dAPfQeo43AJ4q0i93iOQS/BVkI1ZC6Wmnc9M3eACfTnIm BUKj189tSh+k5SCzGOeMjLiIVwQTEQIAFwUCO0RpYwULBwoDBAMVAwIDFgIBAheA AAoJEIwyjP8WBtuVbEkAn2YN3IqLxnAuWJLIFI4z/P9XafxeAKCB6B2XSUd1iG/W /ULYIVRgKEexrYhGBBARAgAGBQI7RM/YAAoJEMeVCvtu0dw/Gm0An34P4fky0FGA eXxrq0YAADFql7w9AJ9qLmCm3YGPHyk4U3/rozhkip7qUIkAlQMFEDtEwt37wj+N sTMUOQEBbEkD/R0v2RM5Mw6FUMDyR3n2XEbyvP4MhVVWv7O59b008sNz+ZcHa3oh e8DuvYtiVXVFZXtS6Gqsocn44mEoC2zt2vEcrRPbBnwmIIwYtgp8nhIfT8pENJcP s5UqIN+3Wh95PuscwVUOv5+oKXFpgDBQWTEfG0liY2i6Eg3xAkI4PF0iiQEVAwUQ PAv/1mfCgI8zwWJ7AQEaWggAlFVTQmcCPoareWkF84hco1hc33h4lYO9tZAy81Ya tdnl2LNwwUS0uOC3O/m65K8dwz37AE1MxQJ2I4L1bvH5jrMfEAv774RPWA0dSa3f IXd5mq2iDD+loc6b0yA/+/MZN+HJ/H1XoyJWKvvGTYcuW4bI7aiZxWj+8TvOgCbF 5Vj2cmNFJJoF9abdSQG3TGBkQXZ6DY09WX/9EiQC8beK1c4IBDbpp25j7LE4FLLQ opvVq9q1bRlpzMSx0lB9u7jmA3lrtGw4XqlQ/uoORZ7mnWnTiVMDYHWKmVnuwhq9 SlHyRTKOf3Tknj0qQxmkS+lNucxICaL+SUubZo+glARKOohGBBARAgAGBQI8xDtW AAoJEIxTCoA7gYJ+wxAAnifDVrWySv4oKNI0Wr8RNCD09i50AJ9Y8Jr0ydg8UehD /4ggkGqbmEGn2ohGBBARAgAGBQI8a0UsAAoJEFIAHJWOCQIj6BgAoIyiZ5Eo6rqj 2vqT2rA+3YUNXpamAJ0RGOhRMpoWZ5WV/VcFwIUO+jBVJohGBBARAgAGBQI8az7P AAoJEF40cFqHxZkJ3JQAnRXqtLza55yZNE55IBInaffxY3Z7AJ48C08nltPWYMKf bw3t5bupWaB27ohGBBARAgAGBQI8a0omAAoJEBj1A4AkwngCvsoAoLTJncmFM9Lb ymucsNfBR1vtA2qeAJ9x3YAQsz6rzGDbYbT3KgJNzXIlBIhGBBARAgAGBQI8a0qT AAoJECH5xbz3apv1XogAnR1+vz6EJS6jsvjqqQ1EkcdluvZaAJ9EppEkv5RNb7lf F9Bkxw9nH58Ao4hGBBMRAgAGBQI9YRblAAoJEItfRiWnAR2eyDgAoIxU6Efws6ID 4xuQN3fI6/rZCwYgAJ9CTAOKkaM5MQ8oRKQP9T3KjgUYwYhGBBARAgAGBQI72DGg AAoJEDXUoEGQThj5ENsAnRZbRK3hpYeoYt4MGZMbPW+MSFv+AKCAPer45W9FEkhu jyw2WknyZBPIwohGBBARAgAGBQI93G+aAAoJEGes8cJc4y/MOpkAnjzJVR+TY15h 3fT2ym6tU6PNBaNzAJ4qCB6PzYdpN+cLucFs6NyD5yM4gIhGBBARAgAGBQI7syQj AAoJEONzzsALTc2xs7QAoJYoLXySZzFvWupjz2GCH/J5TtMeAJ47A+OwZlHjeGbw rILVWRjvHq6uYohGBBMRAgAGBQI93M77AAoJEC1ZIA9jNXaZy6kAoL3yOGfKTngk KSHucyf7JG6rorIrAKC4cOQn9rwDnN3zyiuSY+KiZWaexIhGBBMRAgAGBQI93M7u AAoJENrdQe/OcRgovFUAoIrMY85jRh4geZJKVIeBK5HF5aBcAJ41ygZmhaqqs+M8 6gxuKtkUbDY2ZYicBBMBAgAGBQI93U4sAAoJEOHJS0bfHdRx3zEEAKSZqpe+aNNU 8Bw+R9d+5J9kbJzUMQbI6gkYNDfTg/Cenpu516s257b41frAKOLV0Y938OMB58ob EiGt7OWeKmX1Y4jb2bbfu/qyHIbMZxTOB6W1FGkgA9D1K47zvUho+HrScYXH9mbt pCK8sSjAjzMS/rAWgMPX/wlFsu5zcHxliQEcBBABAQAGBQI94HVaAAoJEBUCTNN0 nXiJhxgH/0hJ5FLoORlV0cvRSxC9j6Mvv/y9WZMLEcv2MH94zc8LJ6O+JDRwx7cV 6Q9blzl1cLGc6YOwGkmYWu1xX3+VOia6M6HaEJEdlXE1kCXNK0gRfPC4uXpynXeQ OVZ75YAO8SrIwza9D7vm6i+Z+WQnFQfz1LzHe9LQEy0YWHUjyjyjAaBN7gmig6gY mK7JxaGJZ/epEecxPA0rvLx5BijxxP/exRMDcadKNM76daIDNITTyU+ItToEtqG7 fCaInan9yC9LjCpvlhRKNcgl6vBMxa4NuwdXVvVk1rc+IikKlyQ0rQaeB5VLjzCe 3Ah8DtfJrgwwuRvx2OX3uCHwJadQ1b+IRgQQEQIABgUCPeB07QAKCRBI7x9bLi9m jit0AKDU/qHgKEvUnVZeb5QAIi/+dJv10ACfa0efpT24cyMLmWPwzJxRK9blVyuI nAQQAQEABgUCPeB1IQAKCRCmw4BP83aBPaVxA/0UFpyWupnx75NXJ7t7f53c3h/1 RryODIRGOndNqwd5Bgpcim05TrlGI3jFt3wb4g5dFSwH27NvwXJvqJ5f1KbBqvRw Zy7+XuAVj7ZDzPclN/4m9iAiwpQX9SR7fZ3pxsXcFKVvGSyRUwARJcAxFNqhnFvJ stehSGSY8mLsPoGsyYhGBBMRAgAGBQI94h2DAAoJEBXWiATKbN+yEo8AmwS5cd21 lk4+zhl7XbgFw7NbvJoTAKCNFJXE7z9mroZXgfDiPJ+XdaIdm7QnSmFjcXVlcyBB LiBWaWRyaW5lIDxqYWNxdWVzQHZpZHJpbmUuY2M+iQCVAwUQO0RqqzeRhT8JRySp AQF54AP/etVik3wRU5ubefl/pzZmvMm0ue3lnyOoURbW3kxaZsyfEjdiQy3zypTH m6BnLmyrvxSRTQY73Y1++1apCnn90zMf1wT8ucjm4IAKFyUbJVgvMTmvRnTyJ9iO 5BuOW0nKwkoBW9J5W5Jpk+RYpZKrds14VYTht6QPtT9Ey1Qe47WIRgQQEQIABgUC O04PVwAKCRBUthZ5gKoR2FvnAJwM+7W7fyma26ueEo+NoSFqRYxPcQCgn0dpaMbB 4qQ17wVpuSxC9bTOOleJAJUDBRA70JHjVS4eLnPSiKUBASuSA/96koGDlUBVjy4U aDBHFN/+TZHxsxkO5GXhizMSSKHBfjw4nLrJL0EyGeZfp+4z/KTp4DrOUUzmBgYY lgfe3LBVTj0nfsb/tcab3c+UTYndbIJO1b7Gq/xfkzRNV7p/e1fCIFUTQzB1qROL lVkUBg/mSGzHPndRqMWIPm5B/6c3VIhGBBARAgAGBQI7r625AAoJEFq8tAVo6ECl rqMAn0qAn1JyspmZ0zMTEJqAagxP6QOBAJ9SZX471Y7fNs+3OQbSOOsTXTrjuYhG BBARAgAGBQI7RGrhAAoJEF15IuRxooxzlt4AoPvyWYaAA4WGAekoRO7JNU9vvbKM AJ9Fea3AL5SQGQ72niIozb0C3SKynohGBBARAgAGBQI7TcP6AAoJEGaAbx0A99B6 VY8AoOU7J84qyiixa80nOWZJeOHY8xNPAJ0dMJhYKvLdl+eqJ9pgrbqTQoXQcohX BBMRAgAXBQI7RGklBQsHCgMEAxUDAgMWAgECF4AACgkQjDKM/xYG25VrcwCdEGYw 4MiKXoorrWjnxVa3xyzUFo0An1e4xt3fX8eZVZBdWvsciNYV38RGiEYEEBECAAYF AjtEz+IACgkQx5UK+27R3D+10QCdEFqssbv3ZreVGeUUJAQ5x/EU6FMAoLM+GPdX grOVIOIG9i+S8k879u8uiQCVAwUQO0TCxfvCP42xMxQ5AQG7RgP+Ou53E+ydlbOV FAaW0Eo3AXJ7ynsAL7mVu3qrD4QXSImIiVry6RzaOwqc66hjImuWN0LFMni5pJE5 dphTsJc4MFdSbjxty/XWd000HiUs64Ny2LgnH82QKTAjIw9Ua443krIeEipcL+MH mdrOjBRdCT0no/badbbOQusiwQE6i46JARUDBRA8C//WZ8KAjzPBYnsBARAFB/9e 7C/VMWyO6M04kINBj4TSavohQWUgRwC4rLPR/+8Y3JtrZYRJLH3v3ZkSI4NTymgg qHW7XBuyHJeSEH7NLZ5N2sHdUU+Tkw4rb2S293AYGpkQ+koywNaF2Pod5w7pMnwz 8dkhEizfhndOEIIig5nc8QORAZPJ4zm6fDgwAr8saiXN14wDu1TSZzqAIkwavYAh qEQr4CfzYEO5r/xHWeerKhF60iIIkLELppvXo9Qzpy+eWVG04TP0UD/lOCOiGoGy g6TlRyYAnFpjiOahDYDzO2Bk2t91mQLzcsdKc1RoDT0ncfUfltsy9BFftjybDpY5 jcmCsrYKiGcwRZ1qT2wdiEYEEBECAAYFAjzEO1YACgkQjFMKgDuBgn5BMQCeKkl+ fFY/rnDlS2tQ/ctk7XQB2+cAn1o30JgvZn/7bTDBt51F9D3vtQ0miEYEEBECAAYF AjxrRSwACgkQUgAclY4JAiMZdwCfdA6uA0OnSoSiMN3Ak3S1Iqedf8oAnjEw3XYg /XGXb4mDYMLhZ0r/F0VhiEYEEBECAAYFAjxrPs8ACgkQXjRwWofFmQn9KACePOL6 SJNkNA5qa0PnLn9hZBuA5qgAn23GsJ0VyBeMoO/lKzyMO54udJtiiEYEEBECAAYF AjxrSiYACgkQGPUDgCTCeAL0awCdHW3HhtXWkwmCFH2fJvEH8z0WvsoAn2UNZR0x 0+sAH0f39A1SftEYF/0TiEYEEBECAAYFAjxrSpMACgkQIfnFvPdqm/UADQCfV4/W Yj5/cNOtONx+fuPkLtE9sYIAnRr1nGxBRllnx2i6FiL8KXI8ixVWiEYEExECAAYF Aj1hFuUACgkQi19GJacBHZ602QCeOFIfjWvbBeBx/59rAsMmbzys3N8An37vTNi6 MUtBd3PdDx6n55VSD96QiEYEEBECAAYFAjvYMaAACgkQNdSgQZBOGPl2BQCg3CBk oHj8DwrUp5/6/lhY4fc6eTUAoMo6PCoonSpTPKN4LcakUifl7KEaiEYEEBECAAYF AjuzJCMACgkQ43POwAtNzbG/ogCfTu7fiZ7/NWrgtUe0c2KSyhPflLEAn18stV1A 16ppYvrcF58A3Itu7ldHiEYEEBECAAYFAj3ckcsACgkQ7O2hhlqBXB+e1ACg0oHI T9sNgzbyT9QKV8yP82ovuXwAnAxLq1yUuXJWr/qI793aWLlIhwtDiEYEEBECAAYF Aj3ckaUACgkQ80QvNtZsgeRndACgr9XvLsdhB6O6+binbjYDWHqTmTEAnjtsCw39 ASPG4Po6RAV4Zjc5IuvliEYEExECAAYFAj3czvsACgkQLVkgD2M1dpnyzgCeMMP1 BPTXYZU9bk/ztaPdSE4GBDwAn3Tr8kd4X7euramTXywj8IxRfUMjiEYEExECAAYF Aj3czu4ACgkQ2t1B785xGCjLQACdEHoqBw5Ssh9yVfPA04IEPF3pvToAn3FIUFB2 1PdJA2GPPG5lXy0WsSFViJwEEwECAAYFAj3dTiwACgkQ4clLRt8d1HH7oAP+NeWR zMSJGZoQLKZ506Z3f7/KYVltls8rzRkMz8sXqvEyFzhGO+vutVgylzN3NPhlnREf vEBdJGgT6rcvu6lQ+oYkgAhmNv1Ovu/JAK3MkUp7Bn8OhEFpigFl247Tlci6V7Qm +OifPBcbZxH2JpyL5uuGbzoA/S0nOvUNe5WN/SCJARwEEAEBAAYFAj3gdVwACgkQ FQJM03SdeInQgwf/cNwYy+WbV/i+jODKBpc3IoBC3ZL8dhRgU2q78MYQvA/UM6/I ijg8nYff4iywDYFrENAjEUhf/T2Zb7rBNXxG1LuWRLbQuvB6YcaaiKitWC57PvAG HS92lnRpwTTsTYblYncobTiefuu6ZuzTanrVzQVlqA9yQOey4aMDu57MsWgKQYn6 f16tCQFxrhcrXpUT4i9c0TYKQYGI4vRN/vRFZiWtHNYbVMVKdAoSz8NuqxkF6B+G p790TCRLkfHiBY2ZkV4AdagOywwPQ/QZmz1I3BNKzs6DiHoW+uT09ba+Y3N38QmD OO8ZXqeJqhUrcwAnz4Hdeg4aKibqSkepa34grIhGBBARAgAGBQI94HTtAAoJEEjv H1suL2aOK+cAn0Gp3N+YsU9+juW4g04Iwn9y7eghAKCMmk0hhy4cau+Trxpi77qf bL2uuIicBBABAQAGBQI94HUhAAoJEKbDgE/zdoE9VmsD/3pUOJT2z5Vgmqr0Sksn slj+h6dvO+GkohGmECMN//aj2ou1+VETutAUz5Yx8f4kfNioxbsZnpfRY1v7VPuk QYlFIRNaUzesesobQ+1gbO8dcVuuywNPwP0ZzjrOYfnWKNmkAHzxYRj9eKPGszhX zntwuGi/t90JmjTCHU3DMACviEYEExECAAYFAj3iHYMACgkQFdaIBMps37LWmwCc DCxFVe246xj2ZxB207ScmVc6bNYAnAqoBWi8+xW3MKpu+w3/BPhRhOvdtCdKYWNx dWVzIEEuIFZpZHJpbmUgPG5lY3RhckBGcmVlQlNELm9yZz6JAJUDBRA7RGqrN5GF PwlHJKkBAb87A/4kgyJTnK3CM+W+l27tbLjFefLFEuEngcVLHiInainv9/x3ZnZA gsE+pr4QOMPHg0946CzyfCZ4taCkmtGRtULoGUlPppdjw8psUiB5yq/g8ac5/o97 IRbbQqNTxcoS2svBfXrPrJgtWC/BLZK6w4z5Zr1+wFSDu5SfoFteRFIeGYhGBBAR AgAGBQI7Tg9XAAoJEFS2FnmAqhHYlpsAn3edJn0Wn9CtgQOa0b5Jy+iEH7E8AKCJ 1taCxmTM3jHtP/66HrH62RcpxIkAlQMFEDvQkeNVLh4uc9KIpQEBk3wD/145GM1g +bgW31n+XA7MuE7QZA5BAvHU44fs9QS/nCm1ZKYbMql5nXzL/cS1OQEexLwfhoL1 5DCs5rc0JSMGB2SYfpdcNT6dlOGfrFcXKppDKHXPyjPzTUhoMAAM5o/660E2RQvz xVVAmpYu4XRTMP2XMV2ibJLbUBiA679mu8JgiEYEEBECAAYFAjuvrbkACgkQWry0 BWjoQKUf8wCfaty+zDtvN5Q7HxlBr+CkUnZGd6cAnAkDWPthhGdqmXrVD9KTo0YG 2ZW8iEYEEBECAAYFAjtEauEACgkQXXki5HGijHOweACg3ZtrY0Zci1HThx5/uEPB uf21cL4AmwXhrY3zlqHbigRQytFlM11YjaMciEYEEBECAAYFAjtNxywACgkQZoBv HQD30HoVMwCfXU5l6znuIsF9/eCIwd9ZLsygUH4AoPpW/6P6QTxk5QgTN9iQQSb0 g6EziFcEExECABcFAjtEaUAFCwcKAwQDFQMCAxYCAQIXgAAKCRCMMoz/FgbblbRw AKCf49lsY4UW9FHt5eelnV/NvjTTHwCdE29Cq7qaP3NDP6XFNSKjI/E9dAaIRgQQ EQIABgUCO0TP6gAKCRDHlQr7btHcP0KgAJwN4doSyAC/KQjzCa+RfIT79oORRACg lK/FnLEV67zc7Pu48k9mN3xa5WmJAJUDBRA7RMLT+8I/jbEzFDkBAeDBA/9YmnOs zmK2n9M3Q5qpLXDSN8m2aDJ6grJcq4swaWCSwFqUNufdIsiPAb7MwnqYaZriXpfa qJGp6ilBEd+3GlGC1I2M3uyQhsgmS4HdH1sIq/P0WlSYE0wawQmubszpCc2yeaKG cf4D6EIafZGwOYv1gK1jngHG39bs1oR4LaP4k4kBFQMFEDwL/9ZnwoCPM8FiewEB C3UH/1mAPNA8r4IEtg2m9H0fNBxJsE9DUFcNvAcPg5y8al9RfdUKti/HPqqbZdGj A0tQteA5GEm5JbzYweIB/gCFxTqj88LGbVmF7iFseF5/pIabVtThI2mS8YOBomfV SkV5VgSaeTtqPOzHiv8/TYvOIGku2FRY2BVKADYrNdASIPKoiisLd0PJ8REEOqhe D/Ze2eH5UWV3VNQjrAnikYhkwoBh5ajGaz8PE+vWchsIxjmIMmu29yLZj9Pm4q+Z n5auoU8RTiOIahqM7bdDWpfBmilU3Ew5kVACPx/0ZML9JpNzReL+srr+j3AJUuLS CDBrRdBYEI8B00kwTnb5MfnlzeeIRgQQEQIABgUCPMQ7VgAKCRCMUwqAO4GCfqWN AJ9Q0SoGwPMt+IhwkAWpxw9XsrLFJQCeOzNSi3pYtKXzD3D8/FfZE140nvmIRgQQ EQIABgUCPGtFLAAKCRBSAByVjgkCI7bHAKCJqSm7cDdXH1BRJafFm/DGVG+KFQCe P6BfCJBqdFjACBNV6hPiN8lAudCIRgQQEQIABgUCPGs+zwAKCRBeNHBah8WZCUTC AJoCImRYfAFIl2pSsQVqcm4dkhr3VgCfeIDnHSrgrRKkyA/dbwo+wZPx766IRgQQ EQIABgUCPGtKJgAKCRAY9QOAJMJ4AgX8AJ9IDMQ6un1Xc0VxI0ZLuPqhqMPN1gCg whzHC46/unSABA4Nx7xEoM9YWBSIRgQQEQIABgUCPGtKkwAKCRAh+cW892qb9fKa AKC3KdjW2F6WLCJIbnQ/m1aunGIFqgCdFLmAt2v6JaoL4X1i8N7oi7AGzgqIRgQT EQIABgUCPWEW5QAKCRCLX0YlpwEdnuYXAJ0YNl0ntsypaCrVna9x2PJ+myby+ACf ZxQZnNrs+XX/QjllIakyh4ktHhyIRgQQEQIABgUCO9gxoAAKCRA11KBBkE4Y+R0w AJ9Qc22wrFOkbW4TvPW9mE4JNQC2ngCg3eR8wgVlU3yKIuSMaEK9uLiZAi6IRgQQ EQIABgUCO7MkIwAKCRDjc87AC03Nsfg0AJ0QIEHU88JB20zVqwgvqvqZvJd0dQCf WW2FeCHJl0BTrO7NNnFph5tOyCCIRgQQEQIABgUCPdyRmQAKCRDs7aGGWoFcH1YI AJ9QUFukKkDPFsZDZqAgN+HD2/HA0QCgvS3luA1eAHnCHCzKEdmc/9woa5+IRgQQ EQIABgUCPdyRvwAKCRDzRC821myB5DkzAJ9Xbtaml5jFP3usTYX0e3mcojhh+gCg wDABH6TY/OBywmKgy2DUNyvRAOyIRgQTEQIABgUCPdzO+wAKCRAtWSAPYzV2mU0S AKDvx6fnJu0rcgrq/Q9peWUFmeT2UgCaA3II6kd3R9n6WQPfUS6P2W7Q6L+IRgQT EQIABgUCPdzO7gAKCRDa3UHvznEYKMhkAJ9qL8RJqohyanQ3H8wL+XgE3T2GDQCf VYaEVBwInmSJx7HT4zYEKO2/mL2InAQTAQIABgUCPd1OLAAKCRDhyUtG3x3UcfDq A/0erLJkJube07ZpVktxJ0bak9CaB4X2AG55I72gLGfMueJYTOxzCwiVEz2hUYYq oTS+i0/3IrN8eJ5iJxyCkiB6NBqwGTYF0w0oD1IG0WMmYUhtGVywqRnJT/3IUD3C 7soekvWb0NzJjWvUp03w5M5grlzX5G6FwW7hkytBIDLTtYkBHAQQAQEABgUCPeB1 XQAKCRAVAkzTdJ14iRODCACe4SgdO2mDPLWxpHtaNwpOoL/OoVbj5UfqIFqzsMz4 PJtAc94Zc2VQjq76w6uDwLomzmoHuLhPe9INIbgEG+2KyVGTyrVisIcSjAP/j4sS Exz2DkXYyKwuyShnB0sT7MIRUDkFu+evo7D1Hfdqu6fbc6RuNTlF3R9ewGQNZRdQ Z97ZASMlhbrGsb01RtcZhVGR43gDBbTLXDx4f3b55bBBQkBdnySKSjstk09aj42M LSLMnd3h3U6sn+LBaHKTNQy3CfbYF5rOtVimYAxKcNQiGgBa5scA405WuPdOWTdz LsuhpjXVucGcyqwMTiTAMUNzllk/K3QWPuza08/KsNlOiEYEEBECAAYFAj3gdO0A CgkQSO8fWy4vZo47uQCg6mAfbnN+f2zuzbz7KN9t6UyIBVUAn0+tA1TcWb7WNnja CZlM2cy16k1OiJwEEAEBAAYFAj3gdSEACgkQpsOAT/N2gT1J4AP+N4h0hqm79tPM oLPKBD/GIKNCZT6xkpLIMco3vxd5UEMmO3+5OaKCuR/gdONtdMNCYU5hkAjQs0u2 DHjf2NIQFYvRvPoL//22H6EzZNt375MSzCDB0VAPVcIjZO7Jrs79bezXobb/aISZ IY7Mlr7Z1d7owP2WNyxhBkgTn2oZ8V6IRgQTEQIABgUCPeIdgwAKCRAV1ogEymzf smoVAJ4vu6BeS8Fs4VwsyW1Fyi4MicTP0QCgjuCxrAMaW6ZpUhUQQ+Rb4lrQqk+0 IEphY3F1ZXMgQS4gVmlkcmluZSA8bkBuZWN0YXIuY2M+iFcEExECABcFAjwL/2AF CwcKAwQDFQMCAxYCAQIXgAAKCRCMMoz/FgbblUiGAKCeCQaiDh0dnEPi8vw+qzue I0T9LgCgln2n+ZN2GDQ2HjaAy1wSLTtod1SJARUDBRA8C//WZ8KAjzPBYnsBASBh CACmLJ7K1mBNMn7UJDCsqnrnAsM3syxQl696+eYZ77jF4DZzXRli7MzF7ZCCnHBG GprsxWaQ1VKVGbEiLeRdUY53Ck1mJbzynjsz0m7ov5zkwJgu54zYrWJljb/JhjJD S61bVaNYz7sjUnzpOZIDrdyWPHeuVzd/aYWCUeE4w7RxC1IHeTXERuAQQTQ1fvRI bX9ImpEGgSN1jy6XpRLDbGFJ9QdQNwbxS0WAGhdrDejXgICen2Fi5i3PdQ2fEY/t SzbyDuxm4H04hY98V1iSfzn9renwPRoFsGLnNN0+31uJRXs8b8len1B7AwITCbFy VJZrkTZPU1V1ePu3MJ0PQytWiEYEEBECAAYFAjzEO1YACgkQjFMKgDuBgn6juACf fl0byV9hWncUSMftJ6XWISAyDM4AoIDW3zsrRbBoD0R9qEVVTJBAkrEGiEYEEBEC AAYFAjxrSiYACgkQGPUDgCTCeAJlHgCgvBttlVqACXF09IDDQPqhtCNdxQUAoLrJ oPsjGlmtc81S9dP7uthWVDpbiEYEEBECAAYFAjxrSpMACgkQIfnFvPdqm/V9SwCe OaDuN8ZHTdORvZlTgiVyrKGHEK4AnieZj1nAE8YSBGQKsBw/cyXrDjBTiJwEEwEB AAYFAj1g/p0ACgkQVS4eLnPSiKX6UQQAn2pb1S8nxEt8TPV+k4zL18et/AUX6JeT Foa53Wx4eHYnXtLzcTN7OfC6x6bnOsj1J7tnjrszyJOkfC9+w8env6fu/5yIOJA9 JLfcEyfAIGrOIS5RS3H1V97i1c5+8oxHPXuUO9K82BV0gCTs/JHskitplEbc1Imd YIpOtgHMk0aIRgQTEQIABgUCPWEW5QAKCRCLX0YlpwEdnnoAAJ0TgRrEvx36F6eN vKUrc5xJeok/3QCeIeaBdUReQ32GMFHkZfYee0ZWMF6IRgQTEQIABgUCPdzO+wAK CRAtWSAPYzV2ma0EAJ0Vbd8UEj30UPPt/mtSIfVgGLVFwgCdGrgcQYgXN9HgIEiC gpxce9GJCFiIRgQTEQIABgUCPdzO7gAKCRDa3UHvznEYKGGQAKCEu3lu4DoHcqMc rafVKrai0ZqDeACeL2m2zhRBwQWvnc74ts27Ft1IJVuInAQTAQIABgUCPd1OLAAK CRDhyUtG3x3Ucdw+BAC09AA2r9qp5DQZEfPWG/JaIA/C/UDOQsfxW9ADaAuNWcj4 UoXpU5w7RmcpzixxOXfklQxxTjHnnsrvTWOE2oDhUlVaBNdrKliYfIL0WsFl7/xd tk3T/gGGpoXrpWt/XXZrb66goUz5AEiMhsiH6guozp5nDgDWlPA3kxeYNYjTtIkB HAQQAQEABgUCPeB1XgAKCRAVAkzTdJ14iYD2B/9Vu1KMZZpjJTYia9DhL2u1gb1H seFTehbbHlIJ0Il61VhyD/u/4oVeZ4MKNb5bMEDS0cp2XQN1/ZA+cGcTlL7Ccv4b glODBuMwfHg1vJuMEpwxvPRaCEweXbC9XpQoniOlSvNV9Z/v1SZ8gOMR4IwgO3G0 sL4zq3IOdq9cGCmKUeNVyI/euhzij7G7XzCQzXc+KPKWPmFWrmgLnMtRurSv18m6 P1c68tBkyceJUGPvhDsvwsgLeAPLYDaEIfXU/jacMWsxmr1F9yKSBYDCBS7NmsfK VWbM/G+iF6g4oh7Wl9UWCRC+UM3rxXoBWeTj6XsA5nTtDt4FAflOJspKTEd4iEYE EBECAAYFAj3gdO0ACgkQSO8fWy4vZo48tgCfbTnEwudD/TfU1jfsiebUGnDBd5AA oICicrt+YvnjuIxzu2fB8wmlqoERiJwEEAEBAAYFAj3gdSEACgkQpsOAT/N2gT3x SgQArgw+nKBTh1dkwdx1+qgoQp4n958i1dPJFlZ0why3DncJKafSnsmSdYSDwjU5 wuvnCm3eeT/7AZxdpQ4oOxhquR9l2hg5czoAHQ7fP7mtPGwJvFdmMJUROsT3JX60 +LKA1GGnhjKU6kOzksqL0bmN85fewTDPEKLVeT5tJXkYnN+IRgQTEQIABgUCPeId gwAKCRAV1ogEymzfssQ0AJ4g9DnMnhGTvaQb+8Ksh4f3jwc+WgCfQp3jpFMfRaKd zaTejKJoaOaiu6K0JkphY3F1ZXMgQS4gVmlkcmluZSA8bmVjdGFyQGNlbGFiby5v cmc+iF0EExECAB0FAj1g/icCGwMFCwcDAgEDFQIDAxYCAQIeAQIXgAAKCRCMMoz/ FgbblXs2AKCJI2mkKiMjb3LbN4KlNVasia3sygCfXrmHuvhepOcV6u/jaWs/6B7X dlqInAQTAQEABgUCPWD+ogAKCRBVLh4uc9KIpWkDBACItSCi+GsK3Nfm3agPmhf9 mEDxeaQwQJ3bqt+xDyAfkj6Bi3iyHSfxs8sdtqRK5MHEaAtEsrfMHAZtOz7dcX5u ORQ/xpJVH+A5ZnsPNUdr5tF0LTawv4khteqeZsRF18McwFjWewrkGadDgEAuuT4f UiGW/uOfaNYmFnih04XXK4hGBBMRAgAGBQI9YRblAAoJEItfRiWnAR2eJyYAnA7g HfvG3k3nnSoKtW5SQZCejna8AJ9tVvOJ4tvEjZ25VrSuYB0v8EOrk4hGBBARAgAG BQI93SzxAAoJEAQcxk3XwniUWpIAn1aQweAk+GdKIsZ5nX038wRviCzEAJ4hWfKt tHJh43PvtcKX1oHWvgcp4ohGBBMRAgAGBQI93M77AAoJEC1ZIA9jNXaZ3vMAn1+e 1I3KoLX+cIcCStEPaVBgwuGIAJ0f1Xr7A8KmG0MW/YZjfhPm0C88q4hGBBMRAgAG BQI93M7uAAoJENrdQe/OcRgocs4An0dwHEujgqomQu7FgQXenEtA2+WpAJ0fd9an sXz9HQ+E3ONkYg+KRi9oBoicBBMBAgAGBQI93U4sAAoJEOHJS0bfHdRxuq8D/0Y1 sJ7Hn3LnGIcX9YWZYNPtvsJ663v95A/ZiaaQEluInD0r24EC07+dbIe5j8PYjo3w hWl9SQKx+N+sWeVWfb5X0oJ47YUSZu9q7Xh/we1DUV245GMmamnPpOK2pazlExhn ZtK57eBQd4o1QNByLNouvn7mIb6Yz0dHS1c22mZTiQEcBBABAQAGBQI94HVfAAoJ EBUCTNN0nXiJvDcIAKFcrWdPM9EsLwBSXglTKBfdG9bAxD/c0FEGsob47XmctP4M DHZvNU2KWOziqZsovk2xaWUp6WKEetQHU9n+RAzUEl3kZrRvRVSdZmy6rEs4VGUC uXUT5TdaXBy4Mi6mbVX6FfrkhLXISkYHC6pvuE2vZFCioDsA5B3Yjw3XhHtV/3Nv 43a1f6JZyIqn7YnraJF6gS0vos4BGwaRRA3DZWDj8WK6wsSRsv+XEkONCcSWHCOi w5TiFCn3/VNbuKQ/hzn/w62JvafsQq5oF95CheXTYzo6zY5i1DE8uStFNagXMqsc vBpRiC6BBRAq40YPONKtHM58aveZ/ufNj/xUQROIRgQQEQIABgUCPeB07gAKCRBI 7x9bLi9mjmbiAJ49oWSAmySGwwgPaRrzAk1Ic3tSFgCg2KgCtmIXHXPTScLlTVtD eprPlyaInAQQAQEABgUCPeB1IgAKCRCmw4BP83aBPU76BACki5Ho7/oSVGUaJ+Tj 8IqvlV6GNTOF1C/yA9xOXWUX5d9UDkUOgTyFSR7zx0nLo9YxKRoQhIdkBaeZMDwP pWa4hR9EMEdEkRXbE65PpTNpbfX5yRtqF07KQMR649tlO8gqIZlF6lAOecMtDtaW 73g6QnkX6JDKtT5nXs+Ykl0guYhGBBMRAgAGBQI94h2DAAoJEBXWiATKbN+yX8IA niCrUN1j2Xv8b/ey1g+hWAvEhtpUAJ4gUVlH1PnwbmVkmjfeM1zMTUZCr4icBBAB AgAGBQI94stXAAoJEI4CzbsJWQz9HK0D+QHvaJN37U7GqItRca34fWhnJvDllJJk zF9BGydZnGaOhTH5ou6qZF4xjJ+UmsCYhyGvIjH6gmqw4fe/oWAY8s10zIK8FhLr pmYm7CQe0Ewh/3zWxlX3/OLfRMRJFjeKqjkyg4+LvpQAFIFkz6Nf6hHC+crAZ2Y+ xhINCkId6auCiQEcBBABAgAGBQI94ss+AAoJEJ53fDCLRgihudgH/3Y35hMF9/js sgJq6/4CqSiXTtlrqN5+ELlGNy5uv2d3YNVGHOXGCLVVHTOvTsxRWyFAPu8DDiNJ /3yrQkkWxWbziHMsUyownqSw5REcYx/s10NO+UYRGamDr/5XTGss+Cg+LDN+ewpQ Fs5dmuq0yAXbQ/MOsAAqDVMvvHPZKbDTOTHGAai8bzspexQGBR6Xe0HhPDlJzaxT 0JB1HVXcBJN/UKRiHpEF/XbHFgDYrHdjsAwxSXr7dWq1b4BItwSkkTLxXkcZ4oku hMoYLpEbH57Zm7UnMxcYEIrzBInJRVDzVj1Y3doucMPtnr2KPa6/66mYz0hvwO89 FoApwq+Ghj6IRgQQEQIABgUCPeLLIwAKCRCesuTzaRbIc+5tAKCxfRem+hT8rE9e M6rj1nOEzIr4PACgoio3VpFqx2zfDYsCz46U4NMSDrWIRgQQEQIABgUCPeex0QAK CRABuRx628rLXpcOAKCB1zqxeFY/hRlTtwKITlBucJayGQCgy/DqPzqxNwXRr/GH xQSsp/s/tjW5Ag0EO0Ro7RAIAKzyK4A+9fcEZOCtFx6tdC/SSRw/qvyfEeb+8LJE wkvnJnuVmrpd22JUvnyI8dvP+dFpMDnaSrSj9XjYwodlSa1nrH0tHvDfGIod49KD eUY3IUs6fg2smHmhbczfNUqQ9e8s4wrCQeb9p7Rp/V3jJYj2df8/W3uoDNsVCYPy YFwPbSkEYiKSdc/peS7MbX2dQ9Xr+PtLWeWctg1GG/UJQ04xPUw7RDr+QtRnQcVc yd7d0lObroUTUXRSVLFAW/DFUS/Qfb4rHe4vhyjpeuMmnddrLOQzJRqxFaa0Wm+J RKVemv8JqlFRK8zwP/QIm726wuRaYg27Tr4+zC9PJZIYl2MAAwYH/i6ptMz9BJF5 S5kQGnyl/PuCX3R0G9NvG2Urmev1yULSZwSYmU/KTM1o0s9l5PgOPtG7TQi8oZio a9RcuNmsWcolZlEk8vfUjKonmILYcj508LNWY0WnfWvEnGDuHqpb+L0YQqarHcFn 3kHl5WYW2UhS0Vi4ViQE0gx9jSKqdAiQyTdsM5bQlgtzfvGpp2t2sIURlvOe92Hj yDw094f3etzLapIR95HoUcOwiOTxDqxcjVcZjPw6AwaaAdG8ARRANEGfXUtRoZ3p MNOF5yfJaGHG9sgntz/KRMtumtBrj5wXCgJnWGY4ce7EBZRclzfS1yElq4GqVth5 oRVMAVIka+CIRgQYEQIABgUCO0Ro7QAKCRCMMoz/FgbblSZAAJ9R3lBoVNcgGuYI mYuoZPQc42S78wCggnIdM5gSdDdYXWr4UZZJfTfdDkk= =lY5L -----END PGP PUBLIC KEY BLOCK-----
D.3.117 Adam Weinberger <[email protected]>
pub 1024D/42C743FD 2002-10-12 Adam Weinberger <[email protected]> Key fingerprint = A980 3F2E 80A8 9619 9D1C 82E8 A3C2 8CD9 42C7 43FD sub 1024g/15D67628 2002-10-12
-----BEGIN PGP PUBLIC KEY BLOCK----- Version: GnuPG v1.2.0 (FreeBSD) mQGiBD2neE8RBADgkTfNUPbm3AVnVPn/Ds5lDO89yKowW3ULixWqJ6Mti+7sIQ6y A4v5/dlUODTH0sdL4Cl3q36pCOP13IIq7o14h4YOjMhdMhsv43678VYK0PvR70hK /PxqIRV3lQsP2g8LihKLpRy6sHleIXu1hRLbIBI6/iJTmFcENQfivyHpBwCg31J6 6jew1OrTLlB76aWmmRJIlVkEAII7j0gAqV/zjR16sAsfiCSHSg9A8RGBmC67zUfK PxnrLiw0gqyrt77YnXvANGWDdIMHEZrcDBrb8ciSO8agBO2+/7mOVDVDU5I/SJRi rfJTQvFphcnOe7F3MaxdfA/vZE9woXq4JLXfnmcgUAey4iYB2QbV/+v1HBo6wys6 qyDXBACMsXFWZbDNDwUZBxGVS66bLwpZ/UhWqkrAyvK/7M/HQjkFTUUX2fSTPnWh AkcA82asPxQFTdbd7BOs4JnXUY4m+wfP3pzGaCbgL6WYumRjvmvkmeyZtFD+2wxL nu/F3oO9PC2f4mGa6E928BLy2bRCV75L0OMmbR5Fd0Z+95k3kLQhQWRhbSBXZWlu YmVyZ2VyIDxhZGFtQHZlY3RvcnMuY3g+iFkEExECABkFAj2neE8ECwcDAgMVAgMD FgIBAh4BAheAAAoJEKPCjNlCx0P9I7UAmQGWPEjqlXfxptWgb5WKskfl+rkkAJwI OSvOdiBFM7/EBBgn9pUQ/6PVUrkBDQQ9p3haEAQAzc17FQj9ePY4tW2+nWiQzj8I GVG+8fsVwFhDb4hFcpJxPiR3/J07tU4iyKek/qUiOQdW/dI30vm3rOSIUa3r9iaj OaJilRVDO3ErUCdcrJjGf+fTWZFa8t2TLwOooyV8tJ5IUYLwJ8s7/3OpwWh1pfCQ qxGACCiXeKQo0a9jxJcAAwUD/35x0sm6jV2OZaHxX/JteeLu1hJOE4hc8oRqiE93 4j8frz33jIsRFpKJ+H28LXtRmVXtVTdq3RuHll5JRCMG+IPLT3Tns/d0L90twpOj 4r+2BFIK6SYE6JYngf+J5clwve3vE7Y/b8NbSawEApvVxdrpsevGH0Sn5MSdiukm EkJviEYEGBECAAYFAj2neFoACgkQo8KM2ULHQ/1NRgCeJ6ZJYvc1oOUBdEKd7SoH rFA6N/8An3A9ukQlZm3lPMutMia2vnsb108k =0qTN -----END PGP PUBLIC KEY BLOCK-----
D.3.118 Nate Williams <[email protected]>
pub 1024D/C2AC6BA4 2002-01-28 Nate Williams (FreeBSD) <[email protected]> Key fingerprint = 8EE8 5E72 8A94 51FA EA68 E001 FFF9 8AA9 C2AC 6BA4 sub 1024g/03EE46D2 2002-01-28
-----BEGIN PGP PUBLIC KEY BLOCK----- Version: GnuPG v1.0.6 (FreeBSD) Comment: For info see http://www.gnupg.org mQGiBDxVl7cRBADbXnR4t/xRvvOSiPuGPnOGeamrphPbpPXsWD8Nm/pjfN3fhSfa 0gv3Y2n/IyLTg93gWZhWloMznkdg59Oj0oPSUxjgPauVw4q6l3JJIcurJNlp/Q7l DH0KLFJ8GuL6zxAz7Jcx1BpAIEu+G2SnI8+ZuGvq+YwaDxPFavfCqmVaBwCg/iPu OI+84/W54yZXvxfUN7dkDmED/3CxYLGeWqPqE8B8Eq8BlmgfP/FwaqXXb6xR7jsE XBaqNOIita6Iz49sYTYKYY2rMv6dMXjX1FM13wNW3rS73xkNvuJz0WU6sWl9Hw1e kjNjCN2oIqkqB5/1H14NMSOcUPLqERP7goFIK7OAJejUmm5Nc3KjG1S2G97xxjPe 39mlBAC0QFfa8J0Z6TORFa8Uqyx90pC/Y+I/S+y0vP/59ReP/PnQq/aUdDPLt5OZ edtpz7M4A2GtoVkWtedPRsw0hYK+Q3CtOMemQSnlfVjTZq5edL05Po09N89M/WMz hB9aRcdY7IN/btsQ0H12ZH+rEj+O4Adu+qEjsWePfW60Uj74GbQqTmF0ZSBXaWxs aWFtcyAoRnJlZUJTRCkgPG5hdGVARnJlZUJTRC5vcmc+iFcEExECABcFAjxVl7cF CwcKAwQDFQMCAxYCAQIXgAAKCRD/+YqpwqxrpMSwAKCVuyt4B1Pc1tAwRMEOmmZw 2nGIIQCgyRvB49snyBl86TikYv97ZifyLmK5AQ0EPFWXuRAEAIghycOZtElvBhfw r7TisjtVtzKhbF0Kj9cGg5brCC8/bJLK7PxNe48NSdlqMJ7algumsgYR37b/QBmq sOSEa2wXCnvCSD0ol+bdPn+Psb+hyi+AVNmVgdlJwuxHUHny0lWQnxeQLrt07SAw Ye/Nnc+arH6GXzBwXSpsQ2sOaMajAAMGA/9Hzjkv6HmJkPlKT2TNx33mbLaDk8xv vAJXxogxDcUqDDwqszWPcqShaW0IkMZo+grZfykZJjA0/8QUCaEUwhnYIwHMQRdA uNegCF/D2x4yzkF4d9gKYCCykDUrwvFDztIhGkinyzu6+xwe9qFcL/esIxnnonz7 Wx8/3e7pRvS2QIhGBBgRAgAGBQI8VZe5AAoJEP/5iqnCrGukuikAnAt8uA1EIv/5 WDCIpvNp0lgmwes9AJ4vD1R35+Db6UIw+R5EJaxNBY84zg== =xbGI -----END PGP PUBLIC KEY BLOCK-----
D.3.119 Garrett Wollman <[email protected]>
pub 1024D/0B92FAEA 2000-01-20 Garrett Wollman <[email protected]> Key fingerprint = 4627 19AF 4649 31BF DE2E 3C66 3ECF 741B 0B92 FAEA sub 1024g/90D5EBC2 2000-01-20
-----BEGIN PGP PUBLIC KEY BLOCK----- Version: GnuPG v1.0.6 (FreeBSD) Comment: For info see http://www.gnupg.org mQGiBDiHU3wRBADX+GS3fClPc0K3s2RePf2YeV+w7X3cmnWb0FLhAekfIzjLSHl8 PWxXXQRtFyjR4KpsiwpGusX/nIJmaEoAdyqROKvpqYZPa3CjI2ldq1t1mj8lUOLo +ktQvgR/fZoveOl+HT1yIRZDsLrQWYE96lC8Xx2Iiip/16whzhE4rJfWvwCgyb+G a2jW0JaqmVRmyEqwzudoeqEEAKNUV5lmGRcs/GxwAJ7JRcxMI5QtoUBTfDKYyJZi t6pudVC9STIpMoEw9m4c5KRFixdiHno/dbkECvSzpTA1qAHiC2WxeTXAz91ySTfk iGNVlc670A+eC7Qi3ZGYhWKgKAvm0hOlYxOrU83u9naHKA+l4dOIGCQoZ7ElcfdO 77T8BADQG/nzZcaoS0o9za11YcYMAWDiEHX2JyWF7+O+qJc7UmAGMZ4YHeYOBTkT 6ybzjn5JhQtSr9YQglweYFjFYdeOmQAYow1MJxJvh0e0eoXwzOgdwJ8fzbxpHeAQ W9uuI754sm3U80ag7RvzgeWRX7HdETCtbFF8ZCWHSE7sj29ZB7QlR2FycmV0dCBX b2xsbWFuIDx3b2xsbWFuQEZyZWVCU0Qub3JnPohWBBMRAgAWBQI4h1N9BAsKBAMD FQMCAxYCAQIXgAAKCRA+z3QbC5L66jfWAJ9QRUBS9u2D9s861txzAAGDur0x/gCd ELqxcKVno9Q/l0DFb6c2ZIlkTT2IRgQQEQIABgUCOIdUpAAKCRAj54bpvu2UbtDT AJ9anhNRzF+bPhzGsoVJG1M0+aqsWgCfV6grZerQHY0jrzh7AcGCMNNDNYaInAQQ AQEABgUCOe58UwAKCRAff6kIA1j8vYq/BACbNYb6vCIi7/qEYF6dcBrEKf3sQ9mR U+ign91BqI1XR6KWREzMb7C/j/8ClreLp+UYpzf2dGiMtg6wo05VM9/wNTgQ9XGQ lm8VHRuMG6nKMxzMmugVhoKM16g4ongkLwV2GP7i/UULLl/YtBY0HHeZrvX5dFTI e0I71GmWy38WDIkAlQMFEDnug1NNVigheQUMEQEBX6EEAKTQbXGBs5XC1NuI3UdO DRvpRnzwY1KXlcJNWEUBFnwKqNdu23XyWT9VoMSHQwntTH1LkdYrrZJDQIlCchHS bRoobiveoUEqqHtWx9enhADBbSyl+SeDanOd1rx3jieplg8rseeqS7j2k5EUCaus wsk2W7zn4mpRNR25WuO8JOhjiD8DBRA57ojmGPUDgCTCeAIRAvbfAJ9SwgJaBMEF FYpRIoNsgvnHRaBmvACfVf1DdCW4EiCwtstuphmkZU9uv0aIPwMFEDnuiMGI4Xsd /OVlYRECVBkAnRJA6imAt+d9i2csxiReRI2xCrC/AKDjL3Wlp0ustkS1SkXiEZmX OcGfk4hGBBARAgAGBQI57oOaAAoJECAVMdWEXf7dfowAn3es+GZFfAzNl1BY3IdA kHBkpybbAJ0SghHeM67I6UvsD3OY4aKDu7D/g4hGBBARAgAGBQI57pd1AAoJEML8 hqolOUaLhLEAoOj8APJHlYELhru0tPRZSfZYovDmAKD9rBzlJZzxeN36SfwkYiNW nnl0A4g/AwUQOfXFQNjKMXFboFLDEQK0OQCg2TuAY5h0Q7dgZgDe3dW/1zlLjskA oOFLVMM9s8oA8sTCTGAMqnca/3GduQENBDiHU6IQBACjT3ldbYOk2zYwEcaYhxom HuhAht9WhqRkBstdrJbmHw04zMNdRyodfbZk/DunKPnYPjSXVL2m3aXXdzPLXmMJ WTA7WykvMxBZX9A7GONMwWKOoZcEJheNagfgOa+be4rZ/S19AnUDBXQGDCgbXlYa BCrSRuAmfOVQ4VLW+3OovwAECwP/Z1P1kKWACm9Ual6GAlk+R1pASGOJS2kOyYkt 0VvV9BBfYaxD+4E1xp6T4FEkdQk2Lz+91q/b6z7CA0Ed/2yNtm1HmVGyMc5yFRoj U38i0Lrxf0fo06g+ewwIXXEEuZrdGEFaxQpWTZ/uCFiGe1wtnGT91B4FDENxuIQ/ IbrSxgOIRgQYEQIABgUCOIdTogAKCRA+z3QbC5L66mpDAKC1YD/4KeNybL31f9B9 iq7OH/kskwCfeEvJINcMBk0UEdjpgO85woB6QKI= =stB+ -----END PGP PUBLIC KEY BLOCK-----
D.3.120 Jörg Wunsch <[email protected]>
pub 1024R/76A3F7B1 1996-04-27 Joerg Wunsch <[email protected]> Key fingerprint = DC 47 E6 E4 FF A6 E9 8F 93 21 E0 7D F9 12 D6 4E uid Joerg Wunsch <[email protected]> uid Joerg Wunsch <[email protected]> uid Joerg Wunsch <[email protected]>
-----BEGIN PGP PUBLIC KEY BLOCK----- Version: GnuPG v1.0.6 (FreeBSD) Comment: For info see http://www.gnupg.org mQCNAzGCFeAAAAEEAKmRBU2Nvc7nZy1Ouid61HunA/5hF4O91cXm71/KPaT7dskz q5sFXvPJPpawwvqHPHfEbAK42ZaywyFp59L1GaYj87Pda+PlAYRJyY2DJl5/7JPe ziq+7B8MdvbX6D526sdmcR+jPXPbHznASjkx9DPmK+7TgFujyXW7bjh2o/exAAUR tCZKb2VyZyBXdW5zY2ggPGpAaW50ZXJmYWNlLWJ1c2luZXNzLmRlPokAlQMFEDHi oSdlYKmsNPn51QEByz8D/10uMrwP7MdaXnptd1XNFhpaAPYTVAOcaKlYOGI/LLR9 PiU3FbqXO+7INhaxFjBxa0Tw/p4au5Lq1+Mx81edHniJZNS8tz3I3goijIC3+jn2 gnVAWnK5UZUTUVUn/JLVk/oSaIJNIMMDaw4J9xPVVkb+Fh1A+XqtPsVaYESrNp0+ iQCVAwUQMwXkzcdm8Q+/vPRJAQEA4QQAgNNX1HFgXrMetDb+w6yEGQDkJCDAY9b6 mA2HNeKLQAhsoZl4HwA1+iuQaCgo3lyFC+1Sf097OUTs74z5X1vCedqVoFw9CxI3 xuctt3pJCbbN68flOlnq0WdYouWWGlFwLlh5PEy//VtwX9lqgsizlhzit+fX6BT4 BgKi5baDhrWJAJUDBRAyCKveD9eCJxX4hUkBAebMA/9mRPy6K6i7TX2RjUKSl2p5 oYrXPk12Zsw4ijuktslxzQhOCyMSCGK2UEC4UM9MXp1H1JZQxN/DcfnM7VaUt+Ve 0wZ6DC9gBSHJ1hKVxHe5XTj26mIr4rcXNy2XEDMK9QsnBxIAZnBVTjSOLdhqqSMp 3ULLOpBlRL2RYrqi27IXr4kAlQMFEDGpbnd1u244dqP3sQEBJnQD/RVSAzgf4uor v3fpbosI0LE3LUufAYGBSJNJnskeKyudZkNkI5zGGDwVneH/cSkKT4ORooeqcTBx KeMaMuXPVl30QahgNwWjfuTvl5OZ8orsQGGWIn5FhqYXsKkjEGxIOBOfvvlVQ0Ub cR0N2+5F6Mb5GqrXZpIesn7jFJpkQKPUiQCVAwUQNRkF14HR8QVbfEftAQHb6wQA uXzEE+LHIk1kSINIgXX0+UcFpPc1rctiBkzZZhgzFvGC/kYrsI/GVYE4erL4sVXA NJqZxaMC/AAaGfaduALRFXNidKinMJBrZg3NCtq7cqrc/3aDmZJ2IaHvxoS+XC/i RVoeTk+jb6wcliqMkf41UlHsijyALtVK2Dd78T8GhJq0LUpvZXJnIFd1bnNjaCA8 am9lcmdfd3Vuc2NoQHVyaWFoLmhlZXAuc2F4LmRlPokAlQMFEDQUWQGzWmLrWZ8y PQEB8MID+gJ+SOuG9HBEKlIvySUnVgOhQl2bD6/iclynDc6lhdvAo48sKWwTsrco JCxwd6Xtq5/3Wet6QDBute/0KWnRN6Bh4BA2PDm9n18vpRnmXd8fwTYYYDv6SqA1 azUrECcbkZ1S8n2+LKtabx2pZEaj6WgNaVnXYvY6AAN+nuNVlMjWiQCVAwUQNA+s uh9/qQgDWPy9AQHZdAQAr/5KxA8JP9fhEH88FvFSvbwakYkyfcBp8BoDemVjDedv g41uoTD20m2h8CfhR4atqJbDycdhHYMDOgCNHo7O5fdO1RX7nsEjOtM8dw2RvqHx 8+4dT50XNH4s2g9oYmwV6i/rD5SDqpL3BrkUYMCBpGgsdLIHFxFWgJs4RpLlLkSJ AJUDBRAzkGS1ZWCprDT5+dUBAYo/A/46JaGjdmbYYqmUSOJnnPHfLy6nNv6vVC61 vTyOvYTCNrTiEuDR8Ku3oB3cOhWrF7g86CEimYczg7i1xb3ZMdCKXvQIvN8LG19R zp4POg/eSsPX8bCmbaEauZgD1v97P36va8oFudSE+YKCXHml/UjMdT1HZfJDP1e7 sUjZto5JmokAlQMFEDIIhZl1u244dqP3sQEBUzMD/jVUimHfqX7I71YYqQQH41ht g7PZb+TKLviRcu8t1NdxFgVoJJk5FKxAo8Y0ys9lSgugArETbkCgKCXm2jCqv+wJ y7QDQwy8l11S+VDZP7KVKkaZZyGqhcI3sV0bLGtnnPPHMsi+1yKjqRod3vpfHImm W0IBK6l0PnecS3Ge7yxGiQCVAwUQNRkFNoHR8QVbfEftAQH59wP6Ar3emiJ3gseU ayKAjx2SH9lDVMsvIJW8cZoeEsDfoHlTEbz448KLKuh5rKOBAU++WBFtXQoIbroi 4y+zVpJ7z2xJ6sHU/xo6M72QCvieahT4y3C6f1mPsZyjlMRpFoCpBddU+U8kbkqT TBVjNF5DNyhj1keIR35DJNpevpCCE6q0MUpvZXJnIFd1bnNjaCA8am9lcmdfd3Vu c2NoQGludGVyZmFjZS1idXNpbmVzcy5kZT6JAJUDBRAyCIX0dbtuOHaj97EBAVqC A/0YQZvqrVvobtn6gI/XfAlYBCiboK8WSKV7gihbzvmwoELaILfRF/kyYeLPFFHX BZMhCLvAk9gt0a69YK73JH8b604M0s77WMr9dO9l9xpFWPkpVDATAK3ZdajVtt6E +0OefGo57Gi9OuVyeZux2nIE04pIqH2BvItbO067BHquj4kAlQMFEDWRxZdlYKms NPn51QEBzt4D/RALkWpNJNTtlyKE0NBeSyRoci9OCfcYI42R+39HoJnLPAgT+aFc EqinmEcsBvwECjJVrrwBN3f6/rESGp+JaYNiw5bz17lmouh27FEvWETy8QfcQl1+ Ck7HJqkMs1rpcLwhWvMmWlx49gBPJAJwcVSmhsuSVQKp5iSFDn5pbZCTiQCVAwUQ NRkFU4HR8QVbfEftAQH2vQP+PzI1rHZq4Q6/E9RS3zW/HDuzByASi3A9iM5MARqi ACLug+plFatfHfEaWII8nKytqY+kC3gaDESZ8+PFvGRZvMCRBrD5nv9YUC7LJIAX NFGklsyIEvDAtlO/Q94LjgCct3ta6ypA45ZxaMkRdCkZer1EPjSloLrUBRpDhMeA otu0IkpvZXJnIFd1bnNjaCA8akB1cmlhaC5oZWVwLnNheC5kZT6JAJUDBRAxpL3U PiAdBSUb0JkBAZg7BACE+mKhsrd39/P6NattCCOSg76Pf2CVgZdvbb7qK4SmsVGz +58pi2OWM1M0rcHgNZKTIg9rBy47gui2KOnqOR7ZuyMVJJqyEZZywmWmfCy/sR4U i1PehZNNNBAi09u03ItbozrEH6Msa1oC8mp86XOA70Et8e4DYtj5a9tVbjjtJYkA lQMFEDGpZGx1u244dqP3sQEBcMED/j2vNkHlqSRNJu3+A13fw4mAL4fw3l1rbm9X 10PcqgC9d9Z/Ds7EizG9D8Bv6sma6SutbE92wL7VZTX7WsZrg+8mn9UlEN6zZrAa uf6I7v9xChIhXOILbsmlxu+Mu8tVwEiLLXJP9G8n7ztreM9Ee3dUUZykWHgrKTHF I2LIbKCXiQCVAwUQMYJQHfUVW/uOVC1dAQHkqAP+Igll7mUWQ+vYH8KvsEoxUGi3 X8lK7Tk2weAlne4rXnDiZW009lwWL90puf6pEzosoMV78YXQdkP9kPUUm3zJCPMX bDfjQH4XYYYQ7CcKWpkO0QCqcgHMz8QJBCof7oGLyCmQVmsWCDl443uKSqa6wOc6 VhK0z8IF+ClJtHyQOYWIPwMFEDQ+6fsIrLG2o9cqlBECVYkAoL7YoSnCZf9/ms75 Be/iV0IgpD4mAKCpyMa964e+W/x6GQeu5yfPxWseOokAlQMFEDWRxWVlYKmsNPn5 1QEB5fsD/RpmQEl13QQqGN7auFd2gT31+vmN6D260HSkAKqAxvWEFydVGLdJVnhk FAh+pjbot5k/5YtSoZ9PHoFKwHKzXdaUFP09m6Jy5aQMdS0Zf3NSXioyzEZCQaM1 d2afT94KeF5k/lE69hcPXkDSSN3rbo/HF+1vJApO6EpNYJPaNKexiQCVAwUQMYWa BYHR8QVbfEftAQGGvwP/aRyXOlVRTbC/AxP484Dwz2IMo1xkBQFAjz+P5BVnVUHe VocoqSl28atNSX89Uu+3q1Ich0NCsA64+r0zgMwsipLWNmvXr4GFn7t99knYmk5s VU4rnCbNVKLGKA8HXK0iQqqEn0lCkxk5QonbifYToyvv18skrVrgQxa4dnm5c2Q= =Bpdm -----END PGP PUBLIC KEY BLOCK-----
D.3.121 Alexey Zelkin <[email protected]>
pub 1024D/9196B7D9 2002-01-28 Alexey Zelkin <[email protected]> Key fingerprint = 4465 F2A4 28C1 C2E4 BB95 1EA0 C70D 4964 9196 B7D9 sub 1024g/E590ABA4 2002-01-28
-----BEGIN PGP PUBLIC KEY BLOCK----- Version: GnuPG v1.0.6 (FreeBSD) Comment: For info see http://www.gnupg.org mQGiBDxVhBMRBAD20EH9hS3S3gy73E1s//vYS1yo4GmmvzUzMTJo4HH6OMFT/MVn B51RXK5YlQ1cau4MWt2sifpWsG2hmmmPtOIaC6Mn4X8cEXmzy6qW5m+3RUdXB8rM pFSEVVEGhE9Sq+pTI1wB4VUJ5mhQtvWVJKsmuyf1YRa/zrr2zbZTIXg5EwCggloA GdcoFNm7p+cW56HJI1jZTpcD/jUyc4KLeimo+6Fn3z6NZh64GS+JmmCDe7mlcK2S XNPVq3tXXP3ZUKdv3faoMAgI1hSi82/32GINDkhiLPc0Q2tQZRDYKvyY/swgJSnV 1LV8jlpk2VsmsYOp9hW4SJLAQUaejpZe4CwHpOfJWbPkXE83nVygA0lnN89dfhIH JaB8A/9VottMl88+CLzqF3AzN72R5tFWnSFMWumaODis+UvLW0XAMP4AHhvux/FS Pl+m2YtilHhib6lfMYuGalN84H7VxOBxjc9L4qORV9jP4cWEYXpxx0DTmmtFfLae xGGTyYNM1RiqmScXMF28Am1I+WhnLTql8DVFWr8XoZUbususg7QjQWxleGV5IFpl bGtpbiA8cGhhbnRvbUBGcmVlQlNELm9yZz6IVwQTEQIAFwUCPFWEEwULBwoDBAMV AwIDFgIBAheAAAoJEMcNSWSRlrfZ9yQAn0bnLWBjo47dKrS82X1VvbuokkNXAJsH oANWk5PoOZzySJ7st8/IyaLBErkBDQQ8VYQXEAQA2cEOpYzl8L5y8TErdj1lfpHt gxm1QFETl8HvZGb/hTRWVhIcUhtOLA2uftk1oDHbnp+FPsJuFTxanCaCSQVdtMEE I1zK/Qy384FjS1B6L3yq84yTKn+Gp8SbMX3ZWT+dVmy88yJpmo/yFiiN9d2hYy1q fCUWhbAoWeD7sqSeGL8ABA0D/Au95rpaYunrMhu5nVdvZpTbNEIEDLOTS337GWy7 n1E9RG72ujCLFg8tbEmjEUFYfCZ/cW+6+2/Nj7zoGH9xXH6bRTfSKXojdKgNkUvL SLynpmFpUlFKc4fzSxx5EkCxH/zog9X2CQjMvxHmSD1/x+LeD0v/5WMsLvIdj6Op 0KmziEYEGBECAAYFAjxVhBcACgkQxw1JZJGWt9nbrQCcCvSJho7n1r4+1PGTlcep ABxplbsAn05jPrtZLjln7aKcavCp8FICJ2TY =GYHE -----END PGP PUBLIC KEY BLOCK-----
Colophon
This book is the combined work of hundreds of contributors to ``The FreeBSD Documentation Project''. The text is authored in SGML according to the DocBook DTD and is formatted from SGML into many different presentation formats using Jade, an open source DSSSL engine. Norm Walsh's DSSSL stylesheets were used with an additional customization layer to provide the presentation instructions for Jade. The printed version of this document would not be possible without Donald Knuth's TeX typesetting language, Leslie Lamport's LaTeX, or Sebastian Rahtz's JadeTeX macro package.