") |  |
| |
Version 2.0
Copyright © 2011 FuseSource Corporation, a Progress Software company. All rights reserved.
Updated: 15 Nov 2011
Table of Contents
List of Figures
List of Tables
List of Examples
Fuse IDE requires a Java 6 JDK.
You can download Java 6 from http://www.oracle.com/technetwork/java/javase/downloads/index.html.
Fuse IDE works with the following versions of Eclipse:
Galileo (3.5.x)
Helios (3.6.x)
![[Important]](imagesdb/important.gif) | Forcing Eclipse to use the JDK |
|---|---|
By default Eclipse uses your system's We recommend explicitly configuring your Eclipse installation to use the VM from a
Java 6 JDK. You configure the VM used by Eclipse by adding the following two lines to your
-vm
|
Fuse IDE is supported on the following operating systems:
Windows XP SP3
OS X 10.5 or greater
Linux
![[Warning]](imagesdb/warning.gif) | Warning |
|---|---|
The icons on the context menus do not appear on Ubuntu 9.10. To resolve this issue run: gconftool-2 |
Fuse IDE can deploy routes into the following containers:
Fuse ESB
Apache ServiceMix
Apache Karaf
Apache Tomcat
Jetty
Fuse IDE is installed from the FuseSource Eclipse update site. You will need to add the update site to your list of available software sites before installing.
Before you can install Fuse IDE you need to add the update site to the list of available software sites. To add the update site:
Select |.
The Install wizard opens.
Enter http://repo.fusesource.com/ide/ in the
Work with: field.
Click .
The Add Repository dialog opens.
Enter a name for the new site in the Name: field.
Click .
The Add Repository editor closes.
The name of the new software repository appears before the URL entered in the Work with: field. Fuse IDE will appear in the table at the bottom of the editor.
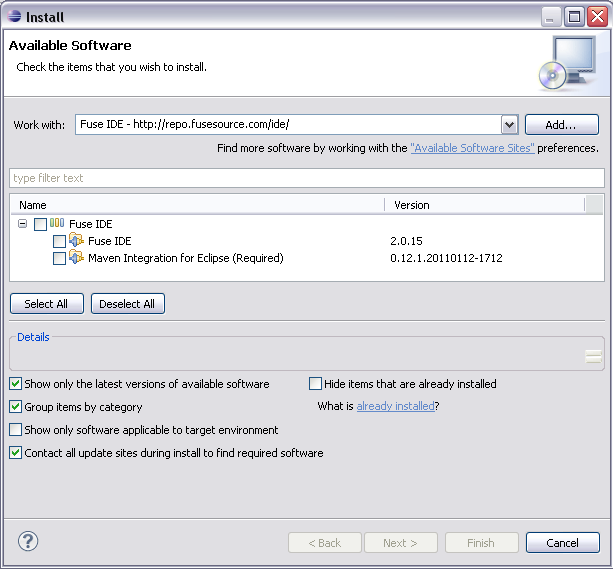
To install Fuse IDE:
Select |.
The Install wizard opens.
Enter the name of the FuseSource software site into the Work with: field.
![[Tip]](imagesdb/tip.gif) | Tip |
|---|---|
You can use the drop down list to select the software site. |
As shown in Figure Figure 3.1, Fuse IDE for Camel will appear in the table at the bottom of the editor.
Place a check in the box next to Fuse IDE.
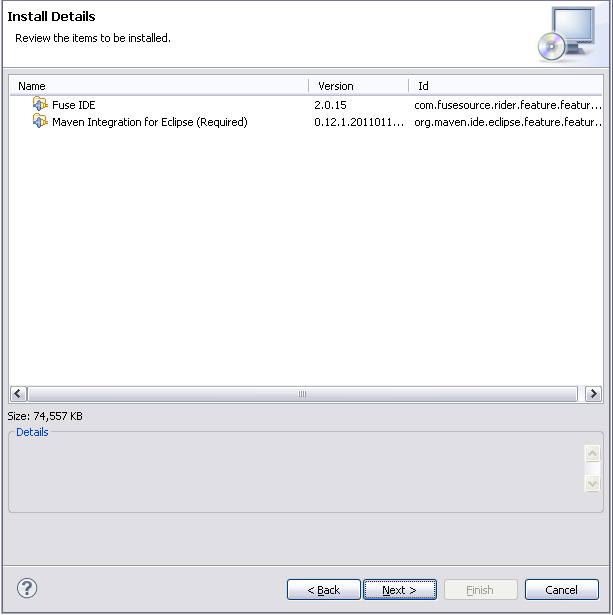
Click .
The Install Details page, shown in Figure 3.2, opens and lists Fuse IDE.
Click .
The Review License page opens.
Read the license agreements.
Select I accept the terms of the license agreement.
Click .
The software installs.
If you are warned about installing unsigned packages, accept the FuseSource certificates and continue the installation.
When asked to restart Eclipse click .
Eclipse will shutdown and then restart. When it restarts, Fuse IDE will be available.
Fuse IDE can be downloaded for free and taken for a test drive. However, some of the advanced features are unavailable without a FuseSource subscription.
Features that require a subscription include:
running a route as a local Apache Camel context
deploying routes into containers that support hot deployment
deploying Apache ServiceMix, Fuse ESB, and Apache Karaf servers into Fuse IDE
visualizing a deployed integration application using JMX
JMS destination browsing
tracing messages as they pass through routes
| Tip |
|---|---|
To obtain a trial license fill out the form at http://fusesource.com/contact. |
In most cases, Fuse IDE can download your licence and install the license in a single step.
However, if your firewall or proxy settings do not allow Eclipse to connect to the FuseSource Web site and download the license, you can download the license from a Web browser and install it manually.
To register your version of Fuse IDE:
Select | from the Eclipse menu.
The Eclipse Preferences editor opens.
Select |.
The Fuse IDE Subscription preference panel appears.
In the Name field, enter the name associated with your FuseSource subscription.
In the Password field, enter the password for your FuseSource subscription.
Click to add the license to Fuse IDE.
If your license is successfully downloaded, the expiration date will appear in the field.
To manually download your license and register Fuse IDE;
In a Web browser, open http://fusesource.com/account.
Enter your username and password.
Click .
You will be taken to your FuseSource account page.
Scroll down to the Subscriber section of the page.
You should see a link entitled Download Subscriber License.
Click the Download Subscriber License link.
A file called license.key is downloaded to you computer.
This file contains the license needed to register Fuse IDE.
Start Eclipse.
Select | from the Eclipse menu.
The Eclipse Preferences editor opens.
Select |.
The Fuse IDE Subscription preference panel appears.
Click .
A file explorer will open.
Locate and select the downloaded license.key file.
Click .
A dialog window telling you the license has been installed appears and the Expiration Date field on the Fuse IDE Subscription preference panel will display your the expiration date of your license.
Once Fuse IDE is installed you can check for updates and install them using the standard Eclipse update mechanism.
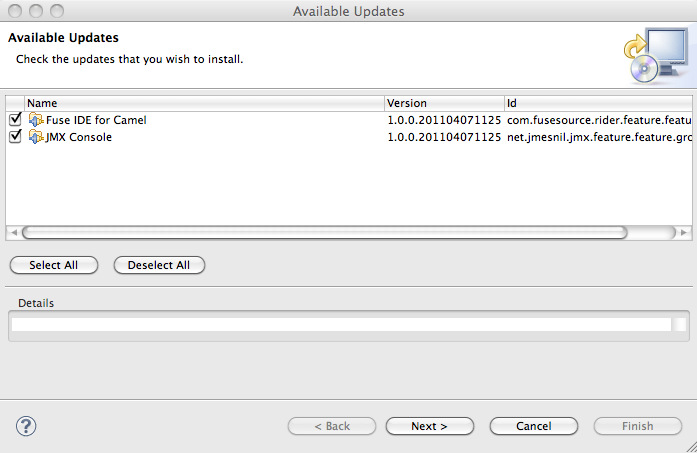
To check for updates to Fuse IDE:
Select |.
If there are updates a dialog similar to Figure 5.1 will open.
Ensure that Fuse IDE is checked.
Click .
The Update Details page opens.
Ensure that Fuse IDE is listed.
Click .
The Review Licenses page opens.
Read the license agreement.
Select I accept the terms of the license agreement.
Click .
The software installs.
If you are warned about installing unsigned packages, accept the FuseSource certificates and continue the installation.
When asked to restart Eclipse click .
Eclipse will shutdown and then restart. When it restarts, the new version Fuse IDE will be available.
| Warning |
|---|---|
On occasion the update will fail. To recover you will need to uninstall Fuse IDE, as described in Removing Fuse IDE, and then reinstall Fuse IDE , as described in Installing Fuse IDE. |
To remove Fuse IDE:
Open the About Eclipse dialog.
Windows
|
OS X
|
Click .
The Eclipse Installation Details dialog opens.
Select the Installed Software tab.
Select Fuse IDE from the list of installed software.
Click .
The Uninstall Details dialog opens with Fuse IDE listed.
Click .
Fuse IDE will be removed.
Click to restart Eclipse.
If you access Maven repositories using proxies, you will need to ensure that Fuse IDE is configured to use the correct proxies. Fuse IDE can use the same Maven configuration as your command-line installation or Fuse IDE can use an alternate Maven configuration.
By default, Fuse IDE's Maven integration looks for its configuration in
userHome/.m2/settings.xmlc:\Documents and Settings\jdoe\.m2\settings.xml.
On OS X the default location would be /Users/jdoe/.m2/settings.xml.
To configure Fuse IDE to use a Maven proxy:
Maven stores user configuration information in an XML file. By default, Maven and the
Fuse IDE Maven tooling look for the file in the user's .m2/settings.xml
file. The Fuse IDE Maven tooling can be configured to use a different Maven configuration
file if needed.
Because this is a user specific configuration file, this file is not created when Maven or the Fuse IDE Maven tooling is installed. If it does not exist, you will need to create it. Example A.1 shows the minimum required entries for a Maven configuration file.
Example A.1. Minimum Maven configuration file
<settings xmlns="http://maven.apache.org/SETTINGS/1.1.0"
  xmlns:xsi="http://www.w3.org/2001/XMLSchema-instance"
  xsi:schemaLocation="http://maven.apache.org/SETTINGS/1.1.0 http://maven.apache.org/xsd/settings-1.1.0.xsd">
  ...
</settings>
To configure Maven to use a proxy you add a proxies element
to the settings file. The proxies element is a container for one
or more proxy elements that configure individual proxy
instances.
The proxy element uses the children described in
Table A.1 to provide the information for a
proxy.
Table A.1. Maven proxy configuration elements
| Element | Description |
|---|---|
active | Specifies if the proxy is active. |
protocol | Specifies the protocol used by the proxy. |
host | Specifies the proxy's host address. |
port | Specifies the port on which the proxy listens. |
username | Specifies the username, if required, to access the proxy. |
password | Specifies the password, if required, to access the proxy. |
nonProxyHosts | Specifies a | separated list of hosts for which the proxy
can be bypassed. The addresses can include wild cards. |
Example A.2 shows a sample proxy configuration.
Example A.2. Maven configuration for a proxy
<settings ... >
  ...
  <proxies>
    <proxy>
      <active>true</active>
      <protocol>http</protocol>
      <host>proxy.sample.fusesource.com</host>
      <port>8080</port>
      <username>proxyuser</username>
      <password>somepassword</password>
      <nonProxyHosts>www.google.com|*.fusesource.com</nonProxyHosts>
    </proxy>
    ...
  </proxies>
  ...
</settings>
Complete documentation for the Maven configuration file can be found at http://maven.apache.org/guides/mini/guide-configuring-maven.html.
To specify the Maven configuration file and reload your user configuration:
Select |.
The Eclipse Preferences editor opens.
Select |.
Enter the full path to your Maven configuration file in the User Settings: field.
| Tip |
|---|---|
The button will open a file browser to help you locate the file. |
Click to load the new configuration from the configuration file.
Click to close the Preferences editor.