Introduction
For this tutorial, you will create an aquarium simulator. The goal is
not to produce robust game play, but to show how to create a simple
iPhone application with animated objects moving around on the screen. We
will keep the scripting and scope to a minimum, using the editors as
much as possible.
The following topics will be covered:
Setup
You will need to download the artwork for the aquarium. Click Here to
download the file, then unzip it into whatever folder you wish. When
adding the assets to your project, the files will automatically be
copied to your game's projectFiles/game/data/images directory.
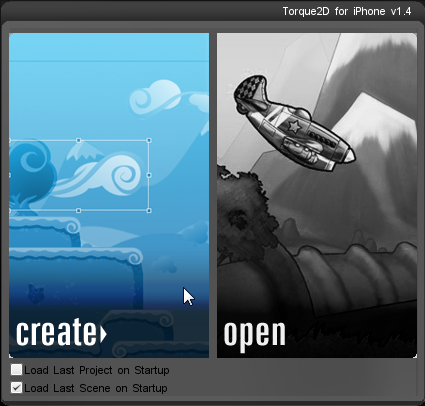
Next, let's create the project. Start by running Torque Game Builder, located in the tgb directory. Once the editor loads, click on the "Create" image to open the new project dialog:
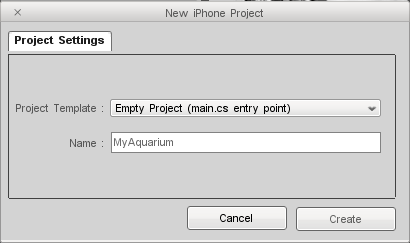
You can set the initial project settings when the New iPhone Project
dialog pops up. Use the Empty Project template and name your game
"MyAquarium", as shown in the following image:
When the editor loads the project, switch to the Project tab on the
right. This game is intended to run on an iPhone/iPod touch, so make
sure your iDevice Settings are appropriate. Use the iPhone / iPod Touch as the Target Platform and set the Screen Orientation to Landscape:

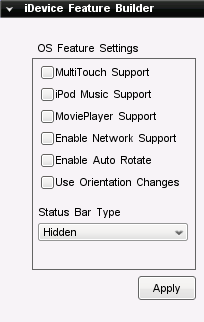
Since this is a simple simulator, the project will not require any extra
OS features. There is no need for a movie player, iPod library access,
and so on. Scroll down to the iDevice Feature Builder and disable all
the checkboxes:
That's it for setup. You are now ready to start building the Aquarium simulator. Next up, creating the level.
Level Creation
The fish are going to need an environment to swim around in. The art
you downloaded includes three background images, each meant to exist on a
separate layer. You can find the image files in the Fish_Art/background directory from the download. There are several ways to add these
images, but for this example we will use the editor to load them.
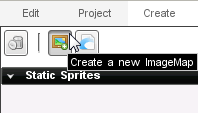
In Torque Game Builder, click on the Create tab on the right. Once the tab is open, click on the "Create a new ImageMap" button:
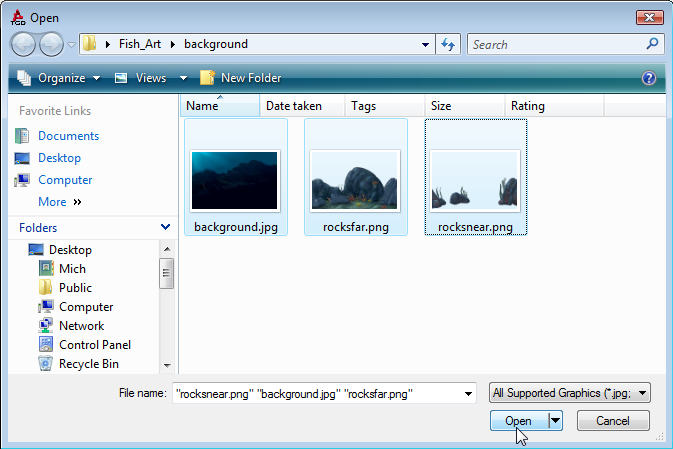
After clicking the button, a file browser dialog will appear. Navigate
to the Fish_Art/background directory and open each of the images. They
are all 480x320, so they will fit perfectly on the iPhone.
(click to enlarge)
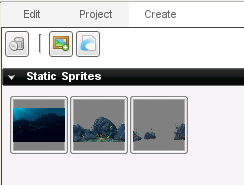
After opening each image, the backgrounds will show up under the Static
Sprites rollout as small preview images. If you did not modify the
ImageMaps, they should be named backgroundImageMap, rocksfarImageMap, and rocksnearImageMap. This is what they will be referred to as for the rest of the tutorial:
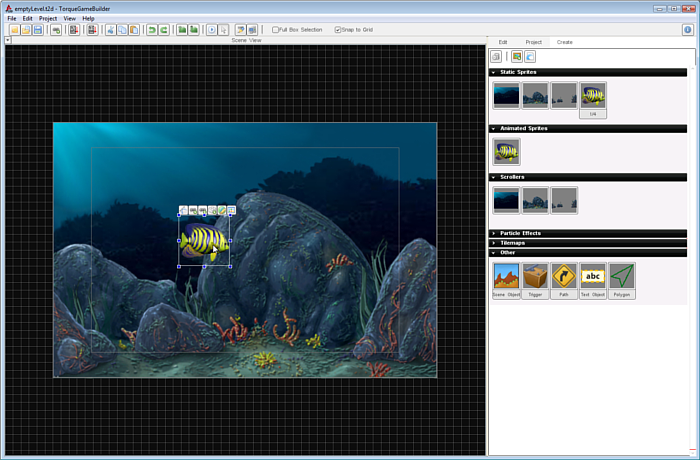
Let's add our first sprite to the level. From the Create tab, click on
the backgroundImageMap and drag it into your scene. The image will drop
wherever the cursor was when you release the mouse button.
(click to enlarge)
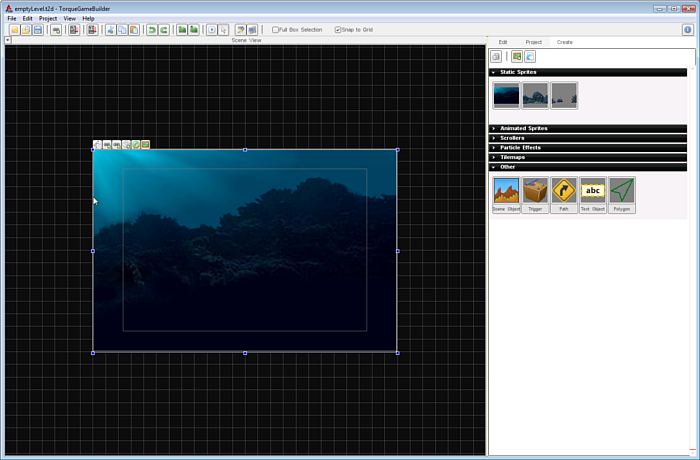
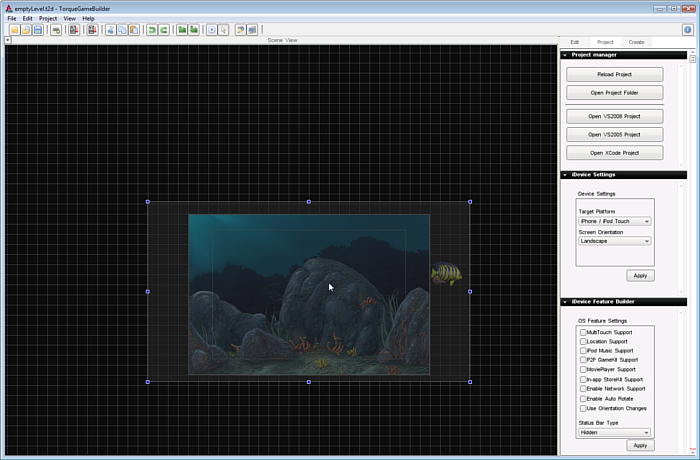
Adjust the image until it is in the center of the camera. If you can't
see the entire image you can zoom out by pulling the mouse wheel back
toward you. You can use the mouse to move the background around the
scene by clicking the image with the left mouse button and dragging the
image while holding the button down. For more precision, you can use the
arrow keys on the keyboard to nudge it slightly in a direction.
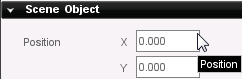
For absolute positioning, an alternative is to directly input the X/Y
coordinates. With the background image selected, click on the Edit tab.
Scroll down to the Scene Object rollout. The first section should be
Position. Set the X and Y fields to 0, which is dead center of the
scene. As with all entry fields in TGB you will not see the image change
position in the scene until you either press the Enter key, press the
Tab key to move to the next field, or click the mouse into another
field:
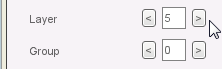
Currently, this background is on the top most layer: 0. From here on,
every asset we add to the scene needs to render on top of this
background. To ensure, go ahead and set the background's layer to 5. You
can find this property under the Scene Object rollout in the edit tab.
You can click the right arrow next to the field to increase the layer or
you can type the number directly in the field and then press Enter:
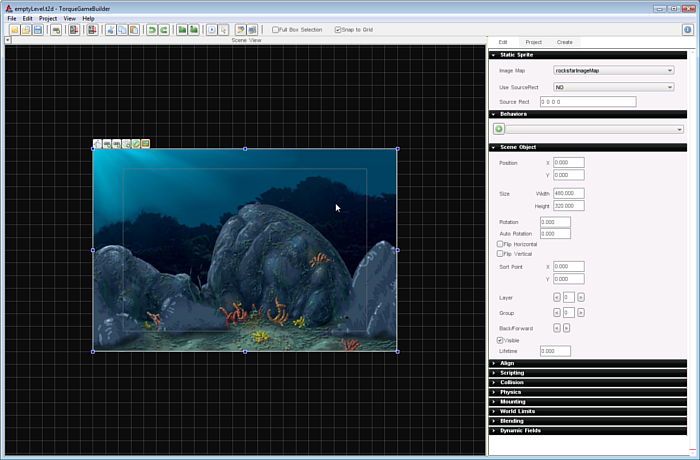
Next, click back onto the Create tab and then drag the rocksfarImageMap
into the scene. Under the Scene Object rollout, set the Position X to 0
and Position Y to 0. This will keep it in the center, just like the
background. Set the layer to 4, which will cause the rocks to always
render on top of the background:
(click to enlarge)
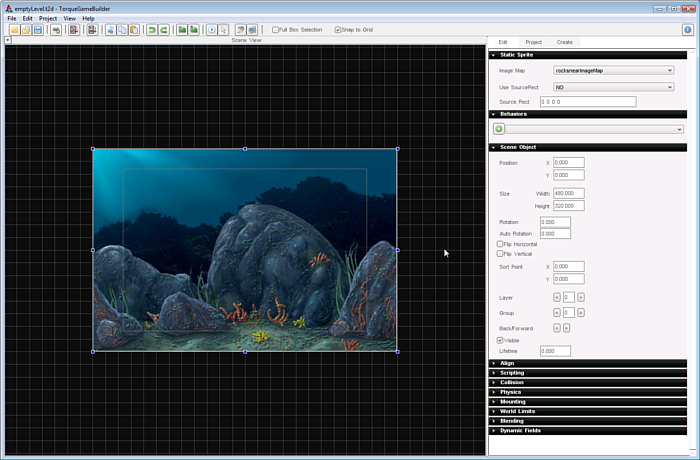
Finally, drag the rocksnearImageMap into the scene. Just like the
previous two, set its Position to 0,0. Set the Layer property to 3 so
that it renders closest to the camera out of all the backgrounds.
(click to enlarge)
NOTE: Make sure you are SAVING your scene each time you add an image
to the library or a sprite to the scene. SAVE and SAVE OFTEN!
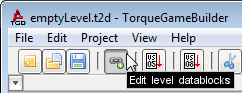
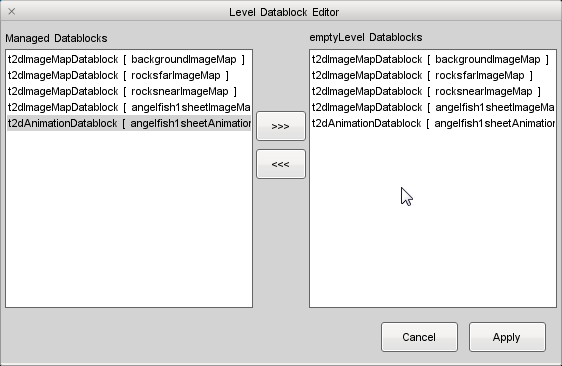
Before testing the game, we need to set the level's datablocks. The
premise of level datablocks is covered in the Static Sprites guide. In
the top left of the editor, click on the "Edit level datablocks" button:
The Level Datablock Editor dialog will appear:
(click to enlarge)
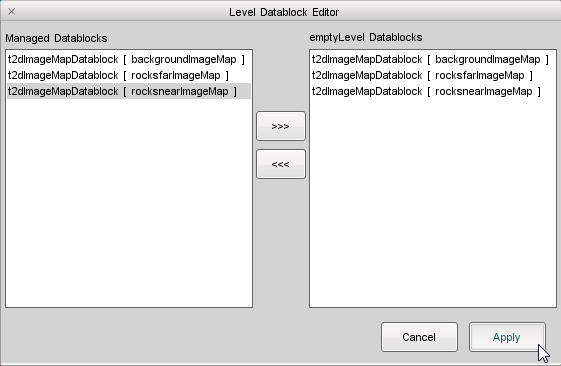
Next, select each of the backgrounds and click on the [>>>]
button to add it to the level's datablocks. Click on Apply to save these
changes. We are ready to test! Save your project, then run your project
(keyboard shortcut F5 on Windows, fn-F5 on Mac). Your scene should be
rendering all three backgrounds in the proper order:
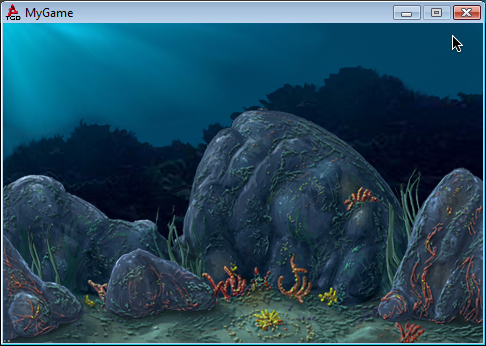
With our aquarium built, its time to populate it with some fish.
Fish Creation
Creating an animated fish sprite and adding it to the scene is a
multi-step process, but a very simple one. The following portion of this
tutorial can be applied to all your asset importing and setup.
Loading Fish Spritesheet
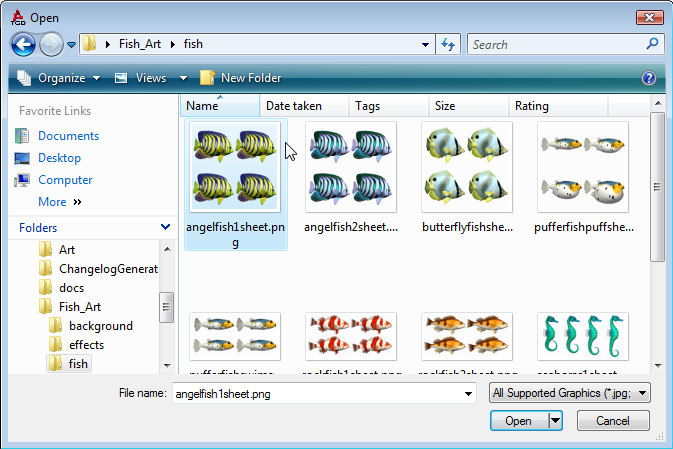
Loading the fish images will be the same process as the backgrounds.
We will start with single fish, then add the rest later. On the Create
tab, click on the "Create a new ImageMap" button. When the file browser
appears, navigate to the the Fish_Art/fish directory where you unpacked
the images earlier and open the angelfish1sheet.png image.
(click to enlarge)
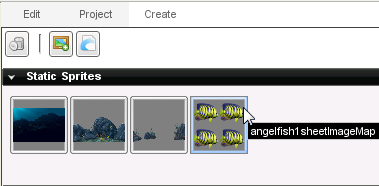
After clicking Open, the new angelfish1sheetImageMap will be added to
the Static Sprites section. The reason the image contains four versions
of the same fish is because it is an animation. It's subtle, but this
spritesheet contains four separate animation frames.
Before we can create the animation, the ImageMap needs to be split into
cells. Double click on the angelfish1sheetImageMap preview to open the
Image Builder. When the Image Builder appears, you will be able to view
the stock values for an ImageMap:
(click to enlarge)
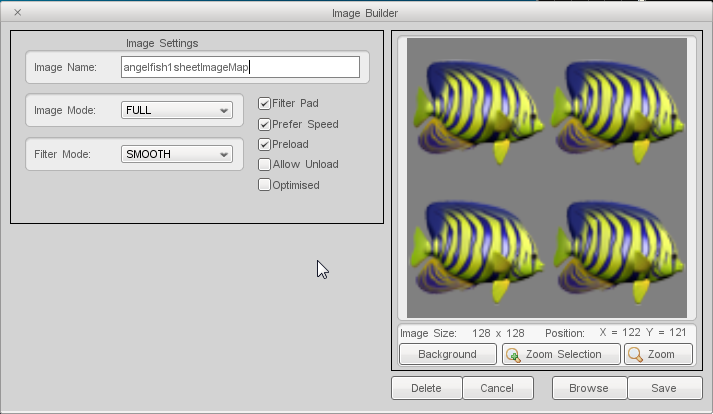
As previously mentioned, this ImageMap needs to be in Cell format. Click
on the Image Mode dropdown to display a list of options. Choose the Cell entry to split the image up into four parts. Because of the resolution
and number of cells, this operation should automatically split the image
evenly. You can set both Cell Count X and Cell Count Y to 2 and see the
same results. Make sure your final version looks just like the
following:
(click to enlarge)
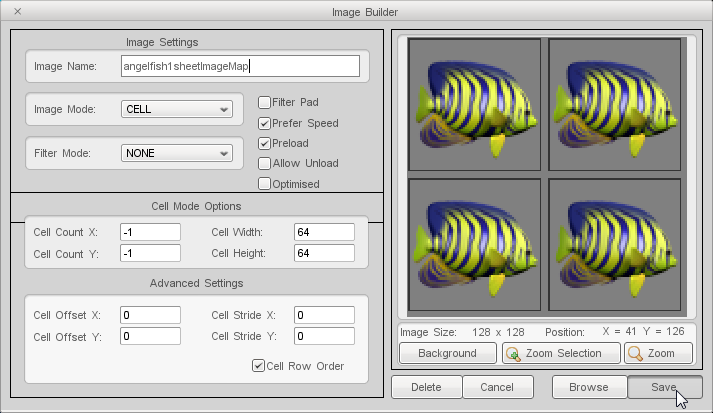
Note: Always disable the Filter Pad checkbox and set Filter
Mode to "NONE". Filter padding is a shortcut used to clean up art with
flaws. Edges get blurred and a fake outline is created around the image.
Since the fish art was created properly, disable these options to get
the original view. Do this for ALL the images you load.
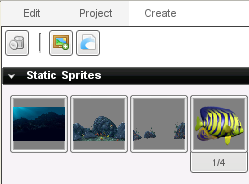
Back in the Create tab, you should now see the final representation of
the angelfish1sheetImageMap. Notice it just shows one frame, which you
can cycle through by clicking the numbers below the preview:
Animating the fish
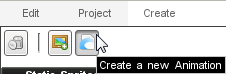
Now that the ImageMap is in cell form, we can create an animation. To
do this, click on the "Create a new Animation" button. This is located
right next to the button you use to create ImageMaps:
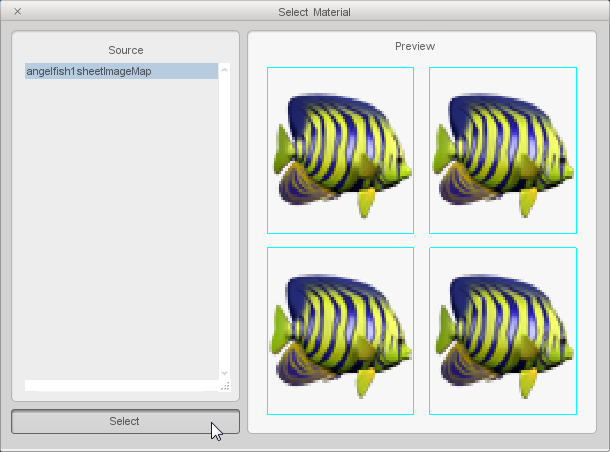
When the Select Material dialog appears, you will be given a list of
ImageMaps to pick from. Only ImageMaps in Cell mode can be chosen,
leaving us a single option. With the angelfish1sheetImageMap
highlighted, click on the Select button:
(click to enlarge)
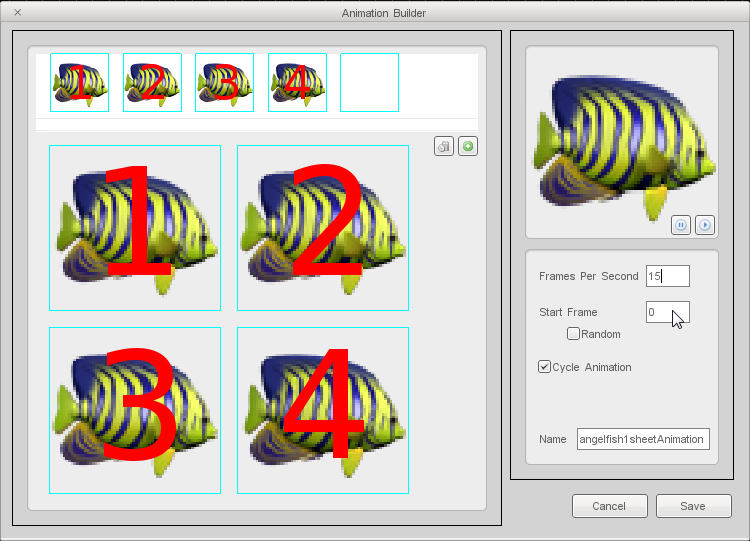
The Animation Builder will open, allowing you to build an animation out
of each cell. When creating your spritesheets, you should try to stick
to a standard for animation order. For the fish image, the animations go
in order of left to right, top to bottom:
(click to enlarge)
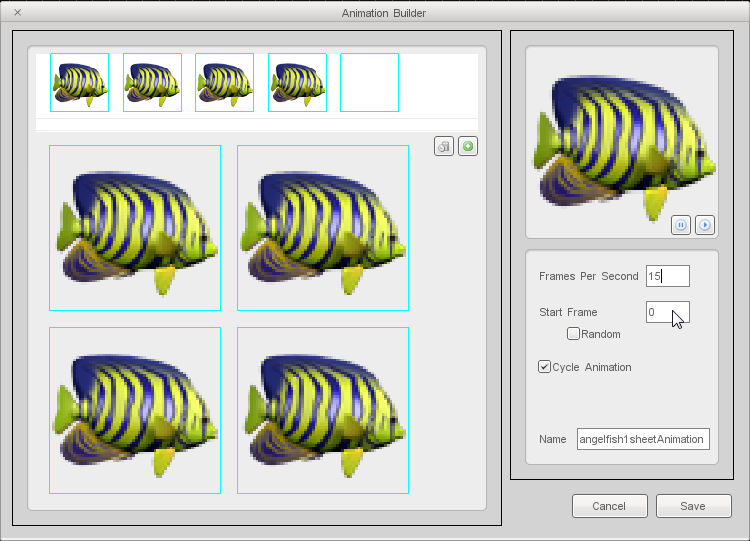
You can click on the green plus button to add all the images in the
correct order, or manually add each one by double clicking the image.
The default Frames Per Second is way too fast for only 4 frames of
animation. Decrease this number to 15 then press Enter. Compare your
final animation to the following image:
(click to enlarge)
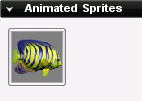
When you are finish tweaking your animation, click the Save button. Once
you do so, a preview of the animation will appear under the Animated
Sprites rollout in the Create tab. This visual will help you when
picking animations to add to your scene:
Adding animated sprite to scene
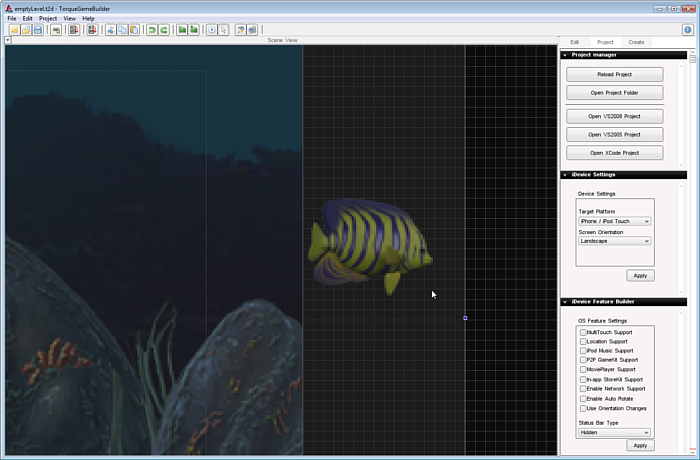
Go ahead and add the animated angel fish to the level by dragging it
from the Create tab into the scene. For now, it does not matter where
you place it. Just add it to the scene so you can see how the animation
looks.
(click to enlarge)
Before running, open the Level Datablock Editor again. Add the new image
datablocks to this level. Notice there are two: the ImageMap datablock
(angelfish1sheetImageMap) and animation datablock
(angelfish1sheetAnimation):
(click to enlarge)
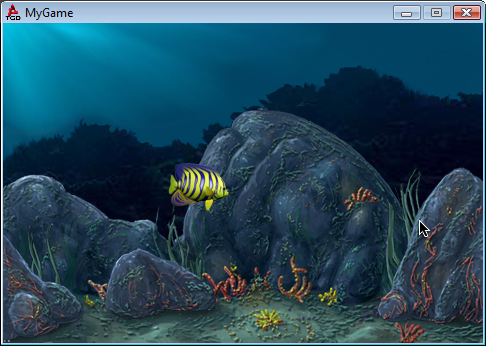
Click Apply, save your project, then run the game. You should see your
new angel fish animation cycling. No matter where you place the animated
sprite, it should always be in front of the background images.
(click to enlarge)
Adding other fish
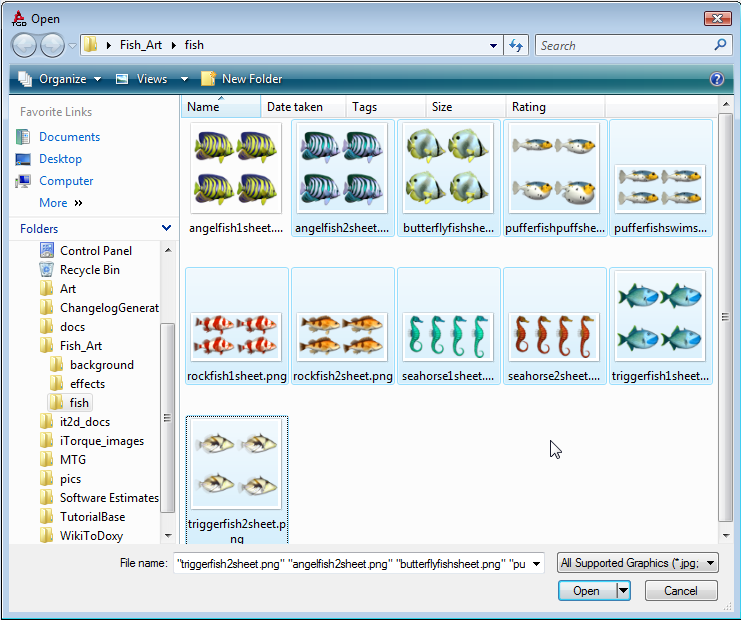
Go ahead and load the rest of the fish spritesheets into the editor.
Again, navigate to the Fish_Art/fish folder and open each image
(excluding the angelfish1sheet.png of course):
(click to enlarge)
Repeat the process of setting each new ImageMap mode to CELL and
disabling the filter padding. There are two variations in the process,
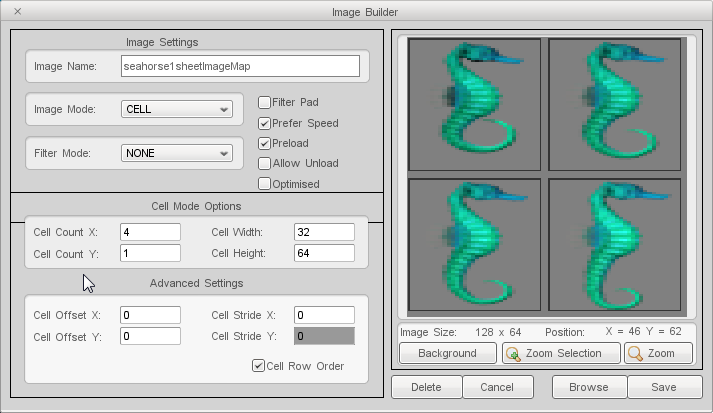
however. If you look at the seahorse ImageMap, notice it does not have
the same layout as the other fish:
(click to enlarge)

While this spritesheet contains four frames of animation, the layout is
different. Instead of a 2x2 format, the seahorse is 1 row and 4 columns.
When setting the Image Mode to CELL, the cells will be chopped up
disproportionately. Set the Cell Count X (rows) to 4, and Cell Count Y
(columns) to 1. Your final ImageMap should look like the following:
(click to enlarge)
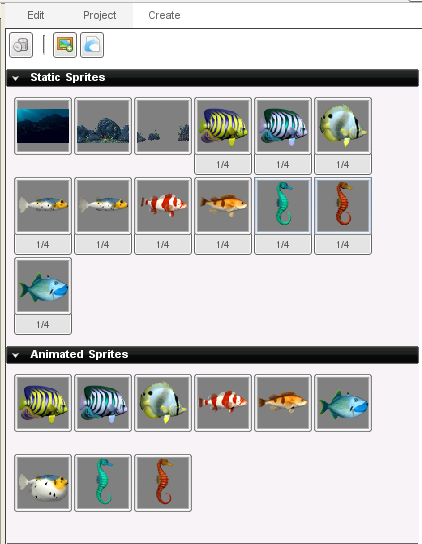
Continue loading in the other fish, setting their modes to CELL, and
creating their animations. You might want to adjust the animation
speeds, since not all fish swim the same. When you are finished, your
library should be full of exotic fish:
(click to enlarge)
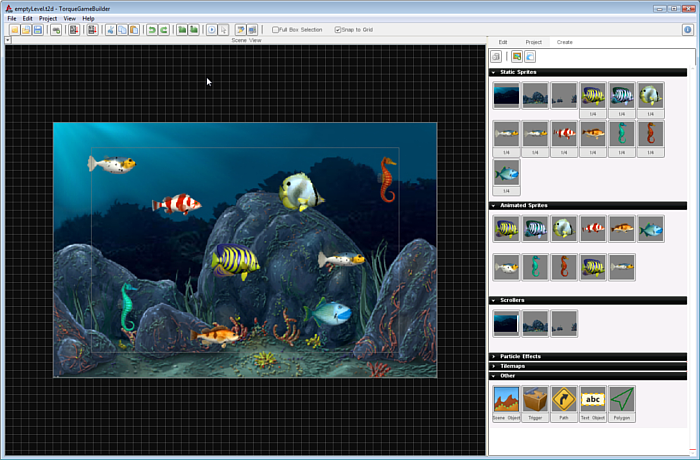
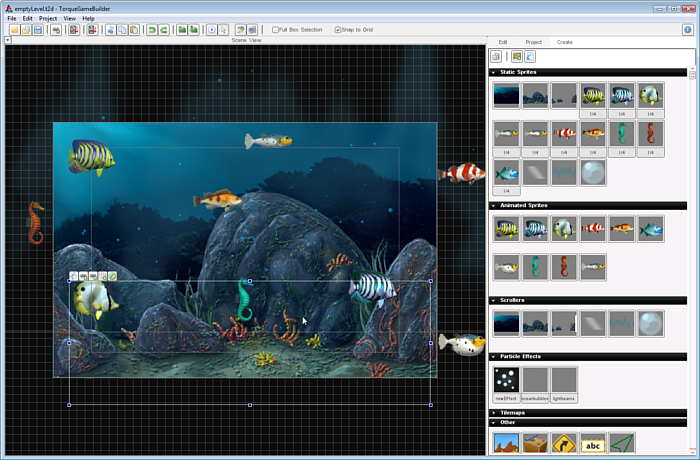
Go ahead and populate your scene with at least one of every fish
animation. Remember you want to drag them into the scene from the Animated Sprites section not the Static Sprites section. You just want to preview how they look in comparison with the
other fish for now. Do not worry about placement or fish movement, as we
will get to that later in the tutorial:
(click to enlarge)
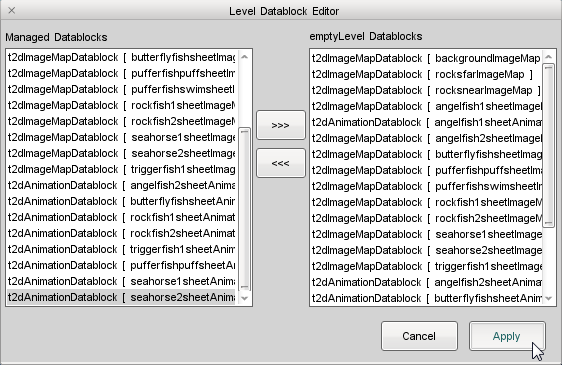
If everything looks good in the editor, open the Level Datablocks Editor and add all the new ImageMap and Animation datablocks:
(click to enlarge)
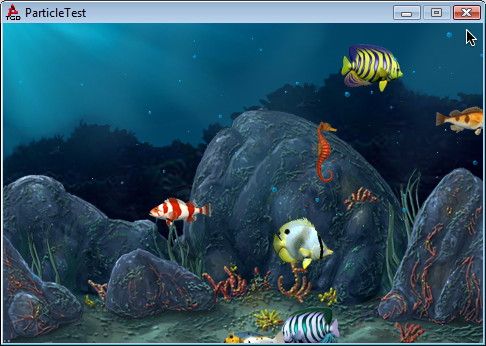
Don't forget to save your project and scene every step of the way. You
don't want to lose anything in case of a power outage. Once everything
is saved, run your game to see what a populated aquarium would look
like:
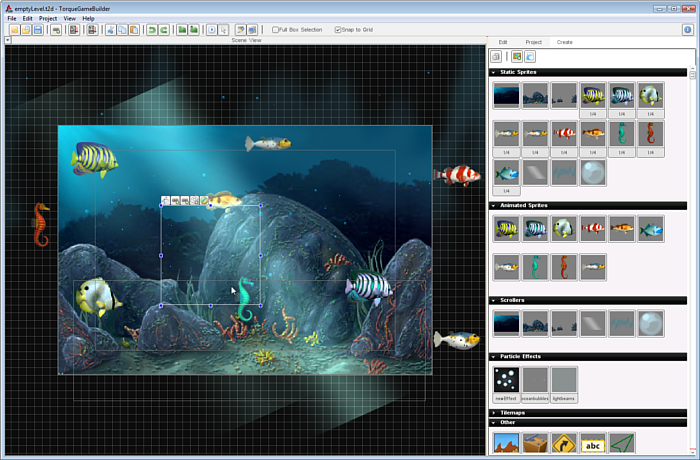
Before we take the time to make all our fish swim we are going to
enhance the swimming functionality. We only need one fish to test this.
So remove all the other fish that you added to the scene. To delete the
fish, or any image added to a TGB scene simply click on the image with
the mouse then press the Delete key (fn-Delete on the Mac).
Remember to save.
Basic Swimming
To make our fish swim we need to add some script. Scripts are stored
in a subfolder of the main project folder created by TGB when you made
the new project. Games are created by default in the <TGB Installation Folder>/MyProjects/ directory. To edit the script, navigate to your MyAquarium/projectFiles/game/scripts directory. In this folder you should see a game.cs file. The ".cs"
extension means it's a TorqueScript file. Open up the file in any text
editor. Windows users can use Notepad, Visual Studio, or Torsion. OSX
users can edit TorqueScript files in Text Edit, TIDE, or Xcode.
Game.cs Script
You should see the following data in your game.cs.
//---------------------------------------------------------------------------------------------
// Torque Game Builder
// Copyright (C) GarageGames.com, Inc.
//---------------------------------------------------------------------------------------------

//---------------------------------------------------------------------------------------------
// startGame
// All game logic should be set up here. This will be called by the level builder when you
// select "Run Game" or by the startup process of your game to load the first level.
//---------------------------------------------------------------------------------------------
function startGame(%level)
{
   Canvas.setContent(mainScreenGui);

   new ActionMap(moveMap);
     //  moveMap.bind(joystick0, xaxis, "joystickMoveX" );
     //  moveMap.bind(joystick0, yaxis, "joystickMoveY" );
     //  moveMap.bind(joystick0, Zaxis, "joystickMoveZ" );
   moveMap.push();


   $enableDirectInput = true;
   activateDirectInput();
   enableJoystick();

   //Time to start game is measured from the very entry point, until now
   %runTime = getRealTime() - $Debug::loadStartTime;
   echo(" % - Game load time : " @ %runTime @ " ms");

   sceneWindow2D.loadLevel(%level);
}

//---------------------------------------------------------------------------------------------
// endGame
// Game cleanup should be done here.
//---------------------------------------------------------------------------------------------
function endGame()
{
   sceneWindow2D.endLevel();
   moveMap.pop();
   moveMap.delete();
}

function oniPhoneChangeOrientation(%newOrientation)
{
	%new = "Unkown";
	if(%newOrientation == $iDevice::constant::OrientationLandscapeLeft)
	{
		%new = "Landscape Left (Home Button on the right)";
	}
	else if(%newOrientation == $iDevice::constant::OrientationLandscapeRight)
	{
		%new = "Landscape Right (Home Button on the left)";
	}
	else if(%newOrientation == $iDevice::constant::OrientationPortrait)
	{
		%new = "Portrait (Home Button on the bottom)";
	}
	else if(%newOrientation == $iDevice::constant::OrientationPortraitUpsideDown)
	{
		%new = "Portrait Upside Down (Home Button on the top)";
	}

	echo("newOrientation: " @ %new);
}

function oniPhoneTouchDown( %touchCount, %touchX, %touchY )
{
}

function oniPhoneTouchUp( %touchCount, %touchX, %touchY )
{
}

function oniPhoneTouchMove( %touchCount, %touchX, %touchY )
{

}

//Luma: Tap support
function oniPhoneTouchTap ( %touchCount, %touchX, %touchY )
{
}
This script file has some of the base functions that are called
when we test our scene from the Scene Editor. When you click the Play
button, the startGame() function is called. What we need is a way to
connect our fish objects from the Scene Editor with our scripts in this
file. We can do this with what we call script classes.
Creating Classy Fish
We create a class for our fish and then assign it to our fish object,
in our level. Once our fish is in that class, it then will
automatically get a specific function called whenever our fish is loaded
into the level (which happens when we play our level).
This function is appropriately called "onLevelLoaded". Add this function
to the end of your game.cs file (right after the end of the endGame
function).
// This function will be called when a level loads
// on any sprite with this class
//
// %this - Represents the object calling the function.
// %scenegraph - Represents the scene this object exists in
function FishClass::onLevelLoaded(%this, %scenegraph)
{

}
Now as you may notice, we start with the keyword function, which tells iTorque that we are beginning a function declaration. Then we follow with our class name FishClass. This means that this function will be attached to the FishClass class, so any object of that class will call this function.
Then we get to the actual function name (onLevelLoaded()), which
you might have guessed gets called when our fish gets loaded into the
scene. After the function name we have two comma-separated values inside
of parentheses. These are values that will be passed to this function,
and which could be useful.
The %this value represents the object calling the function. That
value is useful when we have multiple objects using the same class. It
represents the specific instance of the class calling this function.
The %scenegraph value is useful as well, since it represents the
scene our object exists in. Everything in our scene is inside of the
scenegraph object. Here is a breakdown of what our function script
means.
In this onLevelLoaded() function we're going to get our fish to start
moving. To do this, we can place a call to set its velocity along the X
axis. So make your onLevelLoaded() function look like this.
// This function will be called when a level loads
// on any sprite with this class
//
// %this - Represents the object calling the function.
// %scenegraph - Represents the scene this object exists in
function FishClass::onLevelLoaded(%this, %scenegraph)
{
   // Set the object's velocity. A positive X value
   // sends it to the right
   %this.setLinearVelocityX(20);
}
Be sure to save your game.cs script file. Now, our final step is to set
our fish's class in our scene. That way this script is triggered upon
loading. Additionally, we need to enable physics on any fish that will
be using velocity.
Setting FishClass
First, if you closed TGB before opening the script file reopen it,
otherwise make it your active application. Then select the angel fish in
the scene and open the Edit tab. Scroll down to the Scripting rollout.
In the Class field, type in FishClass exactly how it is written in the script file:
Now this sprite will make use of the FishClass:onLevelLoaded(...)
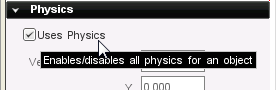
function. Before running, we need to enable physics. As an optimization,
all sprites have physics disabled by default. Locate the Physics
rollout, then activate the Use Physics checkbox. Without doing this, the fish will not make use of velocity:
Voila! You now have a fish that will automatically swim when the level loads.
Test that the Fish Class is working correctly by saving your
level and running the game. You should see your Angelfish moving across
the screen, playing it's swim animation as it goes, giving the illusion
that it is swimming across your aquarium.
Advanced Swimming
A fish that swims in a single direction and never comes back after
leaving view is boring and unrealistic. Creating a more complex swimming
simulation is easier than you think. You only have to add a couple
extra functions and modify our existing ones. Let's proceed with the
advanced swimming lesson:
World Limits
Now that our fish is swimming in one direction, we need it to swim
from one side of the level to the other. We can accomplish this easily
using our fish's world limit. The world limit is a bounding box that we
can define visually in the editor. This is called the world bounds for
our fish object.
We can also make it send a script callback to our fish class when
it reaches the edge of its world limit. A script callback says to the
engine, "call this script whenever this event happens". By attaching a
script callback to the world limit, we tell our fish to swim back and
forth whenever it reaches the side of our tank.
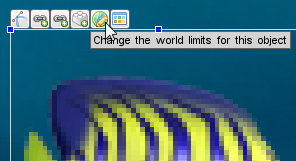
To modify the fish's world limit, select the fish in the scene. When you
begin to move the mouse with the fish selected you will see a small
toolbar appear attached to the fish image. Click on the World Limit
button on that toolbar:
After clicking the button, a dark grey box will appear on screen. This
represents the World Limit of the fish. You can move it around by left
click dragging it, just like a sprite. To adjust the size, grab the
corners and drag them in a direction. Set the box to replicate the
following image:
(click to enlarge)
You want the box to extend past the camera just enough for the fish to
leave view. Our purpose for this is to give enough space between the
camera limit and the world limit for the entire width of the fish to
fit, that way we don't see it turn around. Zoomed in, you can get an
idea of amount of space needed:
(click to enlarge)
Now that the world limit boundary is set, we need to configure the
settings for it. If you haven't already exited out of the World Limit
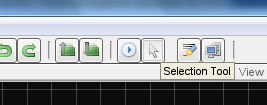
Boundary Tool, click on the Selection Tool in the top toolbar (looks
like an arrow pointer):
Now that we are out, click the Edit tab to look at our fish's
settings again. This time we are going to expand the World Limits
section of the rollout. If you can't see the section or the values in it
then close some of the other sections by clicking on their labels. Once
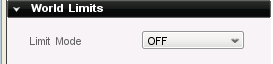
you can see the values you should see that the default world limit is
set to "OFF":
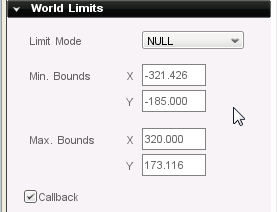
Click the dropdown and change it to "NULL". As you can see, there
are a few other options such as BOUNCE, CLAMP, etc. In our case we
don't want any physics response, and we want to control the response by
script, so NULL works perfectly. We also need to check the Callback box
to ensure our script will be called when the fish reaches the world
limit:
Back and Forth Code
Now that our world limit is properly set up, we can add the script to
set the proper response. Open your game.cs script file again (MyAquarium/projectFiles/game/scripts). Add the following function to the end of the file.
// This function will be called when the object
// hits its world limits boundaries
//
// %this - The object calling the function
// %mode - The mode setting for the world limit
// %limit - Which world limit object reached, "right", "left", "top", "bottom"
function FishClass::onWorldLimit(%this, %mode, %limit)
{
   // Set up a string comparison switch based on the %limit
   switch$ (%limit)
   {
      // Fish hit "left" boundary
      // Make it face right and go in that direction
      case "left":
         %this.setLinearVelocityX(20);
         %this.setFlipX(false);

      // Fish hit "right" boundary
      // Make it face left and go in that direction
      case "right":
         %this.setLinearVelocityX(-20);
         %this.setFlipX(true);
   }
}
Since we checked the Callback option in the editor, this
function will get called when our fish has reached its world limit. Two
values are passed to this function:
%mode - Represents the mode setting for the world limit. In this case, the NULL mode.
%limit - Represents which world limit it has reached, either right, left, top, or bottom.
We start our function out with a "switch$ (%limit)" statement. This
takes the value of %limit and then lets you compare it to different
situations, or cases. It allows you to have different things happen
based on those cases. As you can see, we continue with the statement and
compare it to "left" and "right".
The "$" after "switch" means that we are going to be comparing string
values, such as "left" and "right" instead of numerical values like "1"
and "5". In the case where our fish has reached its "left" world limit,
we do two things.
First, we set its linear velocity along the X axis (horizontal) to 20.
This should send our fish to the right. We also call a function
setFlipX() passing it a "false" value. This ensures our fish is facing
the default direction (which, if you remember, is to the right).
If our fish hits the right world limit, it calls the linear velocity
function along the X axis, this time setting it to negative 20. This
causes our fish to go left. We also call the same setFlipX() function,
though we pass it "true" this time. This should flip our fish animation
to face the left side, so it will appear to be swimming in the proper
direction (we don't want moonwalking fish).
Save your game.cs script file and click the Play Level button. You
should see your fish swim back in the other direction each time it comes
to an edge of the aquarium!
If your fish is swimming, go ahead and skip ahead to the section Random Positions.
If it is not swimming, it means you have either:
- A syntax error (which is a script terms meaning that the commands
are not typed correctly). Go back and recopy and repaste the code
changes for this section into your script, then save, and test again; OR
- A .DSO file using old code. DSO files are an intermediate form
of your scripts created and used by TGB while running the game and are a
topic for a different lesson. But for now, if your fish is still not
swimming correctly look for a file called game.cs.dso in the same folder as your game.cs script, delete it and run again.
One of these two solutions should fix the issue.
Random Positions
Now that we have our fish swimming back and forth properly, we can
add a couple of things to make it a bit more interesting. One of these
things is to place our fish in a random Y position when it flips and
swims back across the screen after hitting a world limit.
This will give the illusion of another fish swimming in, or at least as
though our fish was moving vertically and not just horizontally. If you
don't still have it open, open your game.cs script file again. Locate
your onWorldLimit() function. It should look like this.
// This function will be called when the object
// hits its world limits boundaries
//
// %this - The object calling the function
// %mode - The mode setting for the world limit
// %limit - Which world limit object reached, "right", "left", "top", "bottom"
function FishClass::onWorldLimit(%this, %mode, %limit)
{
   // Set up a string comparison switch based on the %limit
   switch$ (%limit)
   {
      // Fish hit "left" boundary
      // Make it face right and go in that direction
      case "left":
         %this.setLinearVelocityX(20);
         %this.setFlipX(false);

      // Fish hit "right" boundary
      // Make it face left and go in that direction
      case "right":
         %this.setLinearVelocityX(-20);
         %this.setFlipX(true);
   }
}
We need to add a call to both the "left" and "right" responses. This
call will set the fish's Y position in a random number between the top
of the level and just above the ground. We are only adding two lines of
code, so make your function look like the following:
// This function will be called when the object
// hits its world limits boundaries
//
// %this - The object calling the function
// %mode - The mode setting for the world limit
// %limit - Which world limit object reached, "right", "left", "top", "bottom"
function FishClass::onWorldLimit(%this, %mode, %limit)
{
   // Set up a string comparison switch based on the %limit
   switch$ (%limit)
   {
      // Fish hit "left" boundary
      // Make it face right and go in that direction
      // Set a random position in the Y axis
      case "left":
         %this.setLinearVelocityX(20);
         %this.setFlipX(false);
         %this.setPositionY(getRandom(-134, 107));

      // Fish hit "right" boundary
      // Make it face left and go in that direction
      // Set a random position in the Y axis
      case "right":
         %this.setLinearVelocityX(-20);
         %this.setFlipX(true);
         %this.setPositionY(getRandom(-134, 107));
   }
}
We get a random number between -134 and 107 to set our fish's Y position
to. This way the fish's Y position will change when it hits the world
limit. It will now swim in at a different vertical position than where
it left.
Click the Play Level button and you should see your fish swim out of the level and in at a random position:
Random Speeds
Now our fish swims back and forth, and comes in at a random position
when it reaches the world limits. In this part we are going to take it a
step further. We will make it come in at random speeds.
Not only are we going to make it come in at random speeds, we are going
to define the minimum and maximum random speeds in the editor. Now, you
will learn another level of integration between the editors and script.
Utilizing this type of integration can be immensely useful when you
begin to develop your games.
Rather than hard coding global variables, we will go with a more
designer-centric process. The next step is to create Dynamic Fields,
which allow you to make changes to the swimming functionality without
rewriting code constantly.
Select the fish, then scroll down to the Dynamic Fields rollout in the
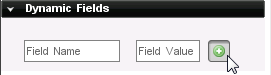
Edit tab. Currently there should be no dynamic fields at all:
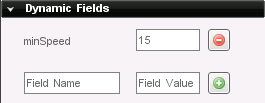
In the Field Name box, type in the variable "minSpeed". Next, enter the
value of "15" in the second field. Then press the Add button next to the
field. This will give our fish a minimum speed value:
Next, add another Dynamic Field called "maxSpeed" with a value of "45".
Now our fish will have the minSpeed value of 15 and the maxSpeed value
of 45 attached to it. So when we access the fish in script we can
reference these min and max values to get a random speed.

Save your level and open up your game.cs again. We will now create a
function that will set the speed of a fish randomly. Add this function
to the end of the script file:
// Set the fish's speed to a random value
// Range of speed values is defined by
// minSpeed and maxSpeed Dynamic Fields
//
// %this - The object calling the function
function FishClass::setSpeed(%this)
{
   // Speed is a dynamic variable created when this function is first called
   // Every other time after the first call will simply modify the variable
   // .minSpeed and .maxSpeed are declared in the Dynamic Fields rollout of the editor
   %this.speed = getRandom(%this.minSpeed, %this.maxSpeed);
}
This function will get a random value between the min and max we just
specified in the editor. It will store this speed value on the fish
object itself, that way we can reference it when we set the fish's
velocity. We need to now restructure our onLevelLoaded() function, as
well as our onWorldLimit() function to use these random speeds. So
switch your functions out with these.
// This function will be called when a level loads
// on any sprite with this class
//
// %this - Represents the object calling the function.
// %scenegraph - Represents the scene this object exists in
function FishClass::onLevelLoaded(%this, %scenegraph)
{
   // Set a random speed for the fish
   %this.setSpeed();

   // Set the object's velocity based on .speed variable
   %this.setLinearVelocityX(%this.speed);
}

// This function will be called when the object
// hits its world limits boundaries
//
// %this - The object calling the function
// %mode - The mode setting for the world limit
// %limit - Which world limit object reached, "right", "left", "top", "bottom"
function FishClass::onWorldLimit(%this, %mode, %limit)
{
   // Fish has turned around, so set a new random speed
   %this.setSpeed();

   // Set up a string comparison switch based on the %limit
   switch$ (%limit)
   {
      // Fish hit "left" boundary
      // Make it face right and go in that direction
      // Set a random position in the Y axis
      case "left":
         %this.setLinearVelocityX(%this.speed);
         %this.setFlipX(false);
         %this.setPositionY(getRandom(-134, 107));

      // Fish hit "right" boundary
      // Make it face left and go in that direction
      // Set a random position in the Y axis
      case "right":
         %this.setLinearVelocityX(-%this.speed);
         %this.setFlipX(true);
         %this.setPositionY(getRandom(-134, 107));
   }
}
There are a couple of things we changed. First, we added a call to
setSpeed() at the beginning of both our functions. This will generate a
new random speed each time we need to set it. We also changed the
setLinearVelocityX() call in our onLevelLoaded() function. It now uses
our speed.
As you can see, we changed the other two setLinearVelocityX() calls in
our onWorldLimit() function to use the speed value as well. Note that in
the second call we still use a negative speed value to ensure our fish
goes left.
What you have ultimately accomplished is exposed a piece of
functionality to the editor. A designer will find this kind of change
very useful. Rather than opening up the code to constantly tweak the
speed, the values are right in the editor. This can be applied to
several other aspects of the swimming, but we will leave it at this for
now.
Save your level and test the game. You should see the speed of the fish change when it changes direction.
Config Datablocks
In the last section we continuously upgraded the swimming pattern of
our FishClass. Toward the end we ended up creating code that hooked up
to the editor and made the process of editing much more designer
oriented, and less programmer-centric. Code once, design the rest of the
game in editor.
This next step is along the same vein. Once you are completely satisfied
with the properties and functionality of the FishClass, you can package
it all up in a single datablock. Once the datablock is written, you can
assign it to each fish in the scene with a few single clicks. This is
called a config datablock.
When you create an object, you can specify a config datablock, and all
valid data will be used. If your object has already set a data value,
which is also set on the config datablock, then your object's data will
take precedence (as it should). As you can imagine this is immensely
useful for assigning similar data to multiple objects
Navigate to your MyAquarium/projectFiles/game/scripts directory. Create a new text file name it datablocks.cs. NOTE: Make sure you specify the .cs extension, as this is the designated TorqueScript file extension.
Additionally, the file must be exactly named datablocks to automatically be loaded. If you want to name it something else, you will need to modify an existing script to exec(...) the script file. Leaving it as datablocks.cs will cause it to be loaded when the game initializes.
Copy the following code into your new datablocks.cs file:
// Fish config datablock
// Default values are used by FishClass
// for swimming functionality
datablock t2dSceneObjectDatablock(FishDatablock) {
   Class = "FishClass";
   Layer = "0";
   WorldLimitMode = "NULL";
   WorldLimitMin = "-321.426 -185.000";
   WorldLimitMax = "320.000 173.116";
   UsesPhysics = "1";
   WorldLimitCallback = "1";
      minSpeed = "15";
      maxSpeed = "45";
};
You might be wondering how this datablock was defined. Some of the
values should look familiar to you: minSpeed, maxSpeed, and FishClass.
If you look in your level file, you will see something very similar:
new t2dAnimatedSprite() {
      animationName = "angelfish1sheetAnimation";
      canSaveDynamicFields = "1";
      class = "FishClass";
      Position = "-88.000 -7.000";
      size = "64.000 64.000";
      WorldLimitMode = "NULL";
      WorldLimitMin = "-321.426 -185.000";
      WorldLimitMax = "320.000 173.116";
      WorldLimitCallback = "1";
      CollisionMaxIterations = "3";
      UsesPhysics = "1";
         maxSpeed = "45";
         minSpeed = "15";
         mountID = "5";
   };
The t2dAnimatedSprite is the angel fish we added earlier in the
tutorial. As we edited its World Limits, Class, and Dynamic fields, this
block of code was updated by the editor. Rather than use a
t2dAnimatedSprite, a config datablock uses the base class t2dSceneObjectDatablock.
All the default values we set up earlier are automatically applied to
the fish when the FishDatablock config datablock is assigned. Now, we
just need to create fish and assign them the datablock.
If the Torque Game Builder editors are running, close them down. Once
they shutdown, run the editor again. We do this so the editor parses our
scripts and loads any config datablocks we created.
Delete any fish you have in the scene, then add a blank one to your level:
(click to enlarge)
Next, select your fresh fish and click on the Edit tab. Scroll down to
the Scripting rollout, where we previously set the FishClass. It should
be blank. However, if you click on the dropdown labeled Config
Datablock, it will contain an entry for our FishDatablock.
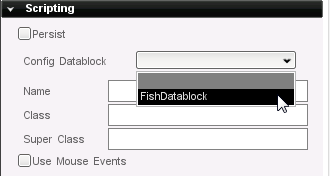
Click on the FishDatablock entry to assign it to the fish. That's it! No
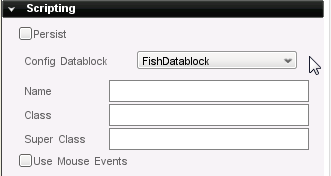
need to make any other changes at all. Your Scripting rollout should be
identical to the following:
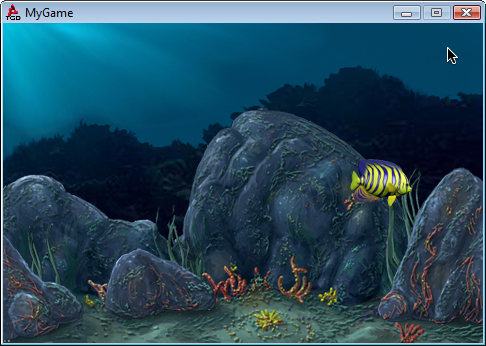
Save your level, then run the game. As if guided by designer magic, your
simple animated fish now makes full use of the FishClass functionality
with a single property having been modified:
Not only that, but your ability to control the speed of the fish from
the editor has been restored. After assigning the config datablock, the
object's Dynamic Fields are automatically populated with the minSpeed
and maxSpeed variables. No need to jump back into the code!
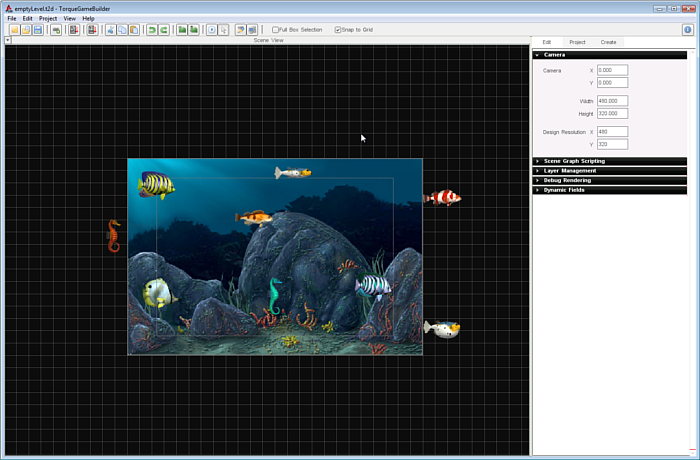
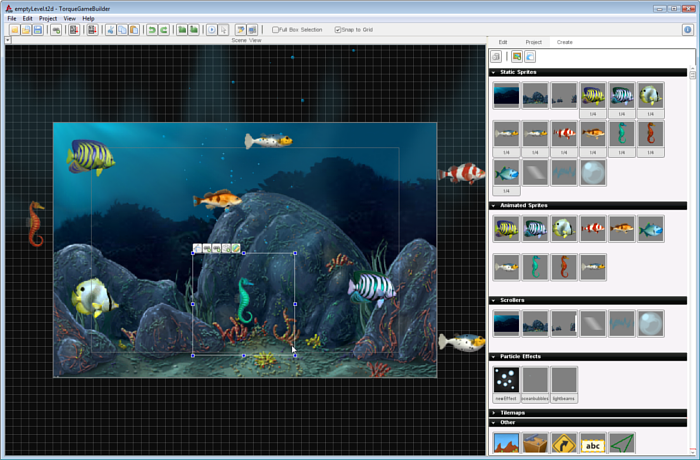
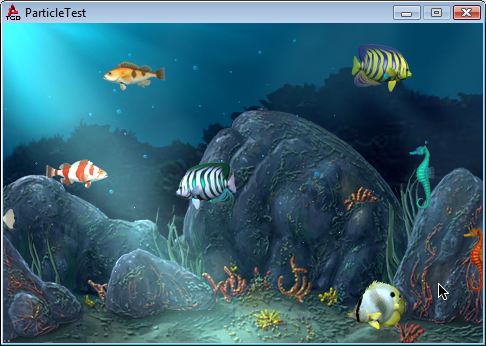
Time to go nuts. Add at least one of every animated fish sprite from
your library into your scene. Put them in varying positions. You can
even create a few off screen so that they hit their World Limits
immediately, reverse direction, and swim to the opposite end of the
level:
(click to enlarge)
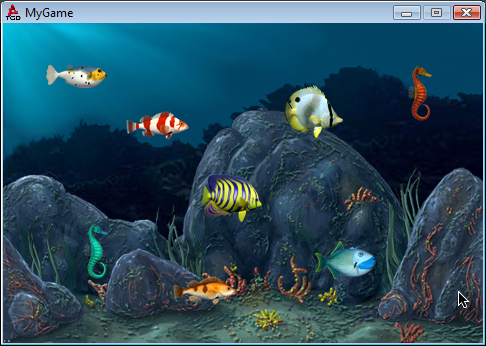
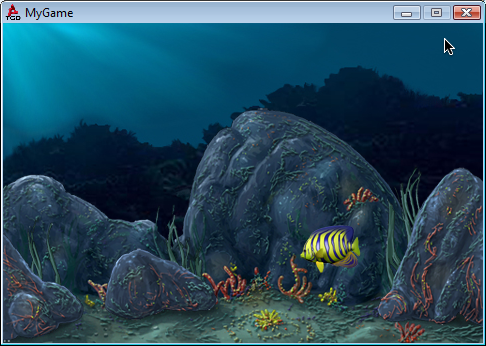
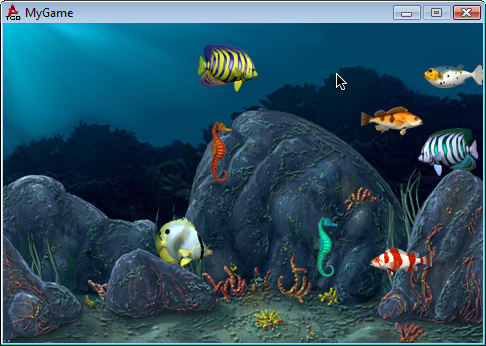
When you run your game, you should now have a much more interesting aquarium simulation:
Special Effects
Our aquarium is turning out nicely, but it is still lacking in
realism. Despite the activity generated by the swimming fish, the
aquarium is very static. No waves, no bubbles, no lights, and perfect
clarity. Adding some special effects can improve realism and up the "eye
candy" factor of this demo.
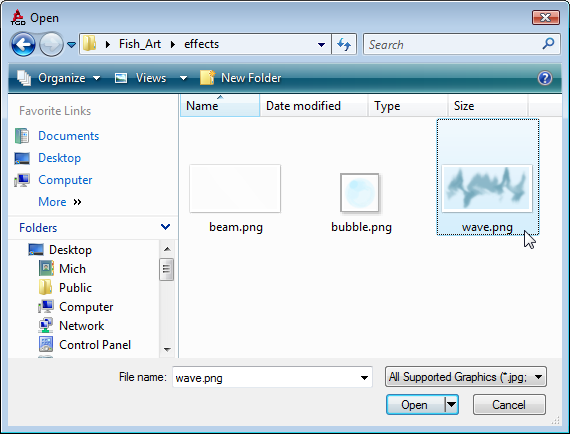
Before creating the special effects, we need to add the last three
images for this project. In the editor, click on the Create a new
ImageMap button. Navigate to "Fish_Art/effects" directory. Open the wave.png, bubble.png, and beam.png files.
(click to enlarge)
As with the other imageMaps, open each in the Image Builder, turn
off Filter Mode and disable the Filter Pad option. Your Static Sprites
section should now contain the new imageMaps.

Finally, open the Edit Level Datablocks dialog and add your new
ImageMaps to the scene. Now that we have the images, we can start adding
special effects.
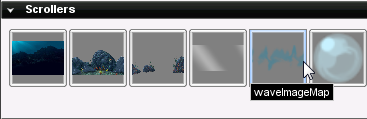
Wave Scroller
The first effect to create is a "scroller." We are going to use the
waveImageMap to create a hazy, subtle motion in the water. Rather than
adding a static or animated sprite to the scene, we will be adding from
the Scrollers section of the Create tab.
You will notice that every static sprite (non-animated) has been added
to the list of available scrollers. If you hover the mouse over each, it
will be very obvious which were created with seamless scrolling in
mind:
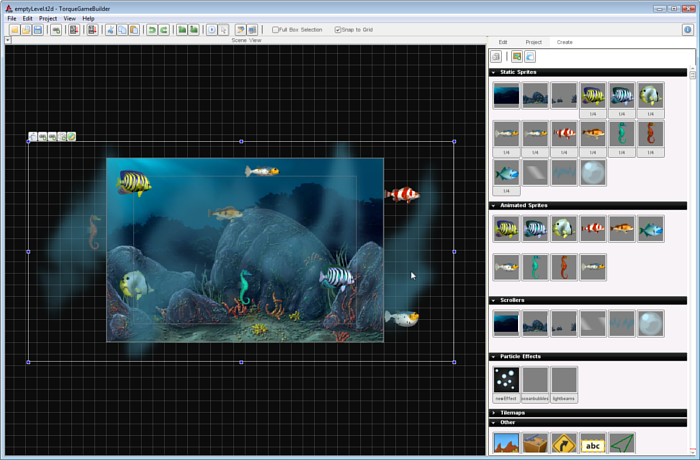
Locate the waveImageMap, then drag it to your scene. With default settings, it does not look like much of a "special effect":
(click to enlarge)
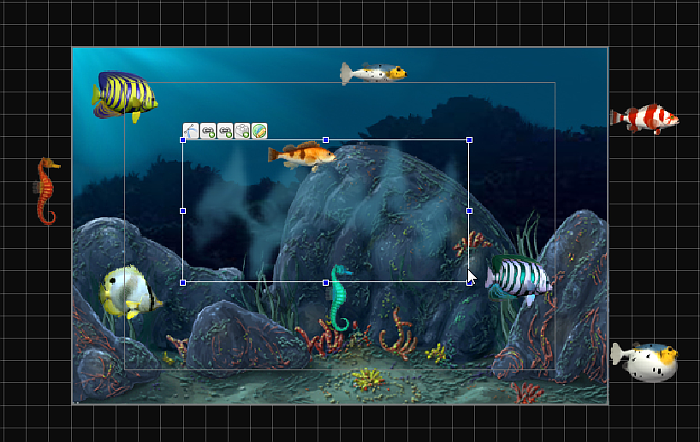
A looping image in the middle of the scene is not the end goal.
Since all of the underwater scene should be hazy, stretch the scroller
box until it covers the camera (plus a little more):
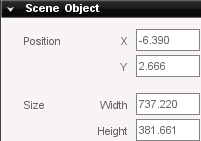
(click to enlarge)
If you want to input the size manually, the following image shows the values after stretching the scroller:
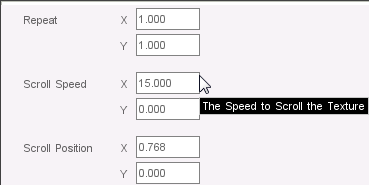
Currently, the image is not actually scrolling. Activating the scroller
is as simple as modifying a single field. You will find the scroller
specific settings at the very top of the Edit tab. Nothing complex is
needed to simulate a hazy flow of water, so just set the Scroll Speed X to 15.
Finally, after you save and run the game again you will see the
highlights in the scrolling image artwork are a little too apparent.
Since the image can be used in various settings, going back to modify
the transparency of the source file might not be necessary.
Hypothetically, you could use this same image in a different underwater
level that does not require subtlety.
Rather than reopening the image in a tool like GiMP or Photoshop, you
can manipulate its transparency right from iTorque 2D's editor. In the
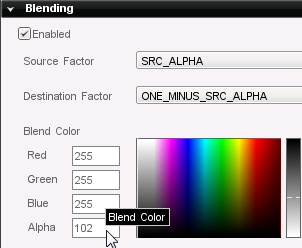
Edit tab, scroll down to the Blending section.
From this tab, you can manipulate the color blending and transparency of
a sprite while it is in the scene. We do not need to change the color,
just simply make it lighter. In the Alpha field, lower it from 255 to 102.
Save your scene and give it a test run. While very subtle, we managed to
create a slight amount of noise and motion in the scene with little
effort. The ambiance is already benefiting from this:
Bubbles
Creating a scroller was pretty simple. Creating, tweaking, and
testing particle effects can be a lot more time consuming. The Particle
Editor itself is a very powerful and robust tool, deserving its own set
of tutorials. For this tutorial, we are going to use pre-made particles
for the sake of time and simplicity.
Note: After adding the following particle effects to your scene, feel
free to tweak them a little if you feel like experimenting. Just
remember that even the smallest changes to an emitter field can have
drastic affects.
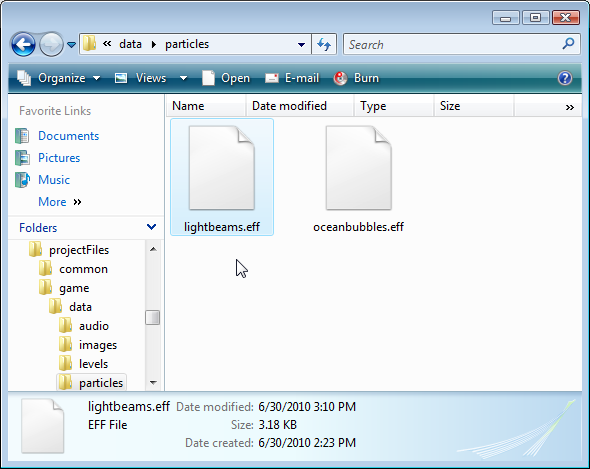
If you currently have the editor open, save your project and close it.
Next, copy the entire "Fish_Art/effects/particles" folder into the
"MyAquarium/projectFiles/game/data" directory. This folder should
contain two files: lightbeams.eff and oceanbubbles.eff. *.eff files are the binary format for iTorque 2D particles:
(click to enlarge)
Launch Torque Game Builder again. The editor automatically parses the game/data/particles directory and loads any .eff files into the Particle Effects section of the Create tab:
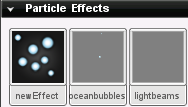
We now have two particle effects to work with. The first one we will add is the oceanbubbles particle emitter. Drag the oceanbubbles object into your scene. Tiny
bubble particles should immediately start drifting up to the top of your
scene:
(click to enlarge)
The emitter, which is what releases the particles, is constrained
by the box you see in the scene. Like any other scene object or sprite,
grab the sides of the particle effect and stretch it to cover the width
of your aquarium. Try to keep the height relatively low so it looks
like the bubbles are coming from the rocks:
(click to enlarge)
When you are satisfied with the positioning, go ahead and save
your level. Click the Play button to see how the new particles look in
your aquarium.
Light Beams
The final modification to this demo will be to add a very shiny
particle effect. iTorque 2D does not support true lighting, but certain
lighting aspects can be faked with clever use of particles and artwork.
This next particle effect will simulate light beams shining down from
the surface of the water, as if there is an actual sun in the world.
In the Create tab, drag the lightbeams particle effect to your
scene. Very large beams will start to randomly appear and fade in your
scene. You do not have to scale this emitter, but you might need to move
it to the left until the beams coincide with the background image:
(click to enlarge)
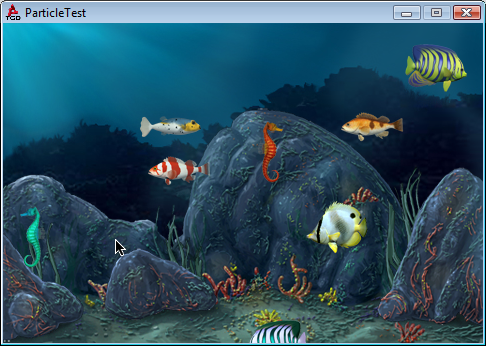
Save the project and run the game. You now have a very active and
attractive aquarium, complete with fish swimming randomly, bubbles,
lighting, and simulated water. Congratulations!
Deploying
From here on, all of your work will be on a Mac. If your project only
exists on Windows, you will need to move it over to a Mac build of
iTorque 2D. Make sure you copy into the same MyProjects directory used
by the Mac version of iTorque 2D.
What good is development if you aren't running on the iOS? This
section assumes you have some working knowledge of iPhone development,
particularly using Xcode, and will only cover the bare minimum steps of
deploying this demo to an iOS. Specifically, this section will get you
running on the Simulator.
NOTE: For official documentation on deploying to iOS devices, please see the iOS Provisioning Portal
Xcode Layout
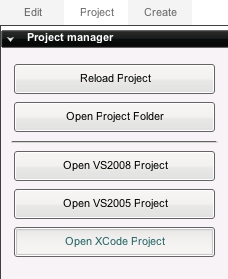
To start the deployment process, you can either open MyAquarium/buildFiles/Xcode_iPhone/iTorque2D.xcodeproj directly or use the iTorque 2D editor. In the editor, switch to the
Project tab. Under the Project manager section, click on the Open Xcode Project button. This button is a shortcut to the buildFiles/Xcode_iPhone/iTorque2D.xcodeproject:
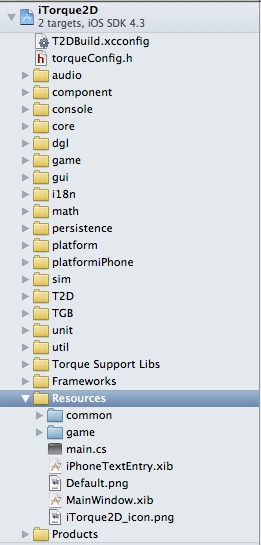
When Xcode finishes loading, you can browse through the iTorque2D
project. Scroll down and expand the Resources group. The MyAquarium
folders, scripts and assets are referenced in this location:
(click to enlarge)
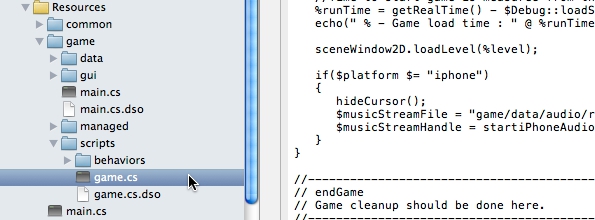
If you drill down further, you will notice the resources include the
script files (.cs) and the compiled scripts (.dso). You should always
make sure the DSO files exist in the project. They are generated every
time you run the game on Windows or OS X.
Building
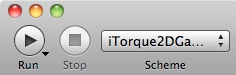
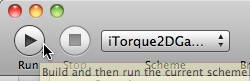
At the top of the Xcode window you should see three very important
buttons next to each other: Run, Stop and Scheme. Run will build the
project and deploy it the platform. Stop will interrupt a build process,
allowing you go back and make changes. The Scheme drop down is where
you will set your deployment platform:
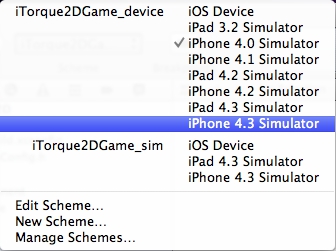
Click on the Scheme drop down to view the deployment options available
for building. Choose the target platform you want for the app. This
example is targeting the iPhone 4.3 Simulator:
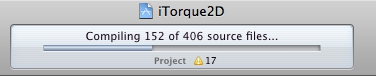
Time to deploy! Click on the Run button to start the process:
Depending on your system's specs, this could take a few minutes. The
good news is that Xcode 4 has dramatically decreased build times for
iTorque 2D projects. After you click the Run button, you can track how
far along the build is by watching the "Compiling" bar:
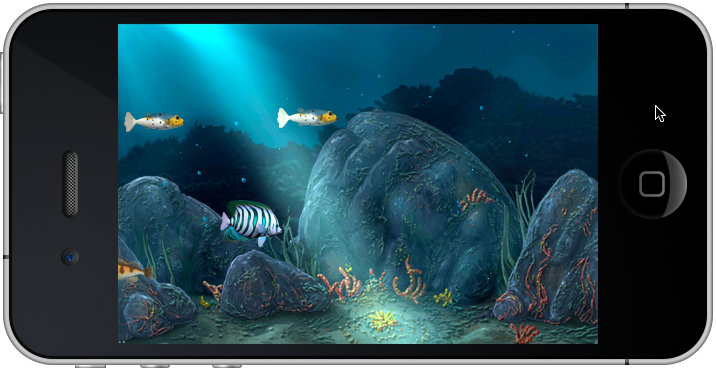
Once the build has completed, your app should immediately install to the
platform and run. Because the build is deploying from Xcode with debug
information and console output, this may take slightly longer than a
real world test. For this example, the game is installed and played on
the iPhone 4 Simulator:
(click to enlarge)
Project Configuration
Hopefully your build was a success. Before adding more features to
the game, there are three important sections of Xcode you should know
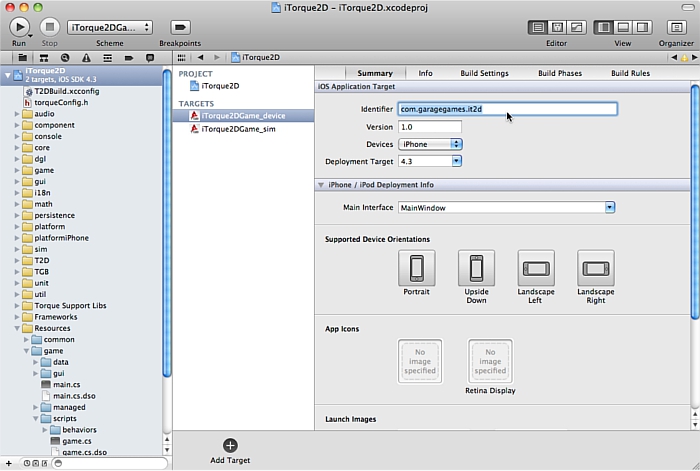
about. At the very top of the Project Navigator you will find the
iTorque2D project (blue icon). When you click on this, the main Xcode
content window will display the Project and Target settings. If you
click on iTorque2DGame_device under target, you can set the provisioning
profile for device deployment, change the deployment target and so on:
(click to enlarge)
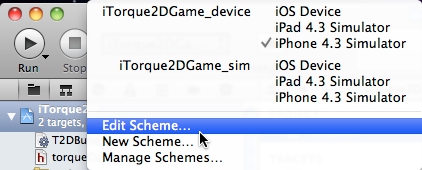
If you want to change the Build Configuration for the project, you need
to edit the Schemes. Click on the same Scheme drop down window from
before, where you chose the platform deployment. Instead of clicking on
an iOS version, click on "Edit Scheme...":
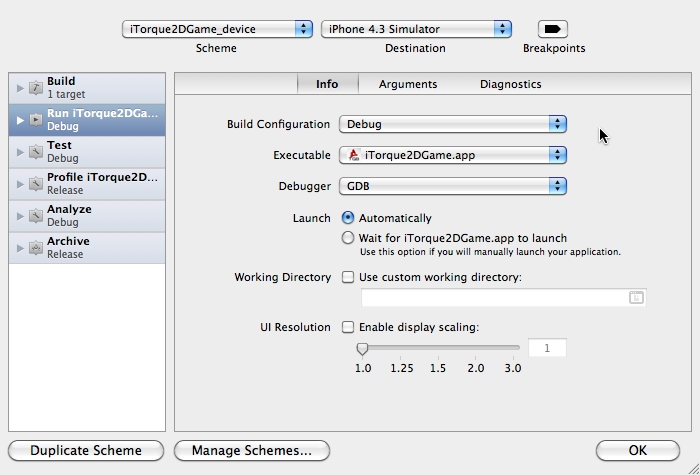
Without any modifications, the default scheme for iTorque2DGame_device
will look like the following. Notice how the Build Configuration is set
to Debug:
(click to enlarge)
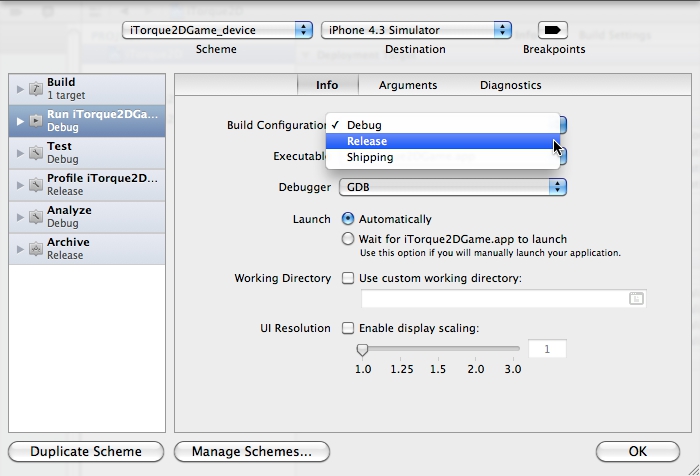
You can change this by clicking on the Build Configuration drop down,
then select the Release entry. This will dramatically speed up your
game's performance, but will remove debugging capabilities:
(click to enlarge)
You can get more information on Xcode from Apple's Xcode Support Page.
Conclusion
Congrats for completing this tutorial. The fun does not have to stop
here, as there are plenty of iPhone OS features and game play which can
be implemented. You may have noticed that this is just a simple
simulation with no true interaction.
For
now, take pride in your first Aquarium simulator and see what you might
be able to change with a few simple modifications.
|