Introduction
This guide will show you how to import your 2D images into an
iTorque 2D project. You will learn how to set up and use static sprites
in the Game Builder. A sprite is a two dimensional graphic which
represents your artwork. The following topics are covered in this
tutorial:
- Importing images (.jpg or .png)
Creating A New ImageMap
When you want to render your artwork in iTorque 2D, it must be
imported into your game and represented as an ImageMap. You can do this
right from the editor, no coding required. On Windows, run
TorqueGameBuilder.exe. For a Mac, run Torque Game Builder.app.
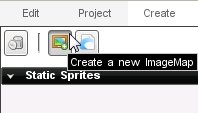
Once you are in Torque Game Builder, click on the Create tab on the
right. Once the tab is open, click on the "Create a new ImageMap"
button:
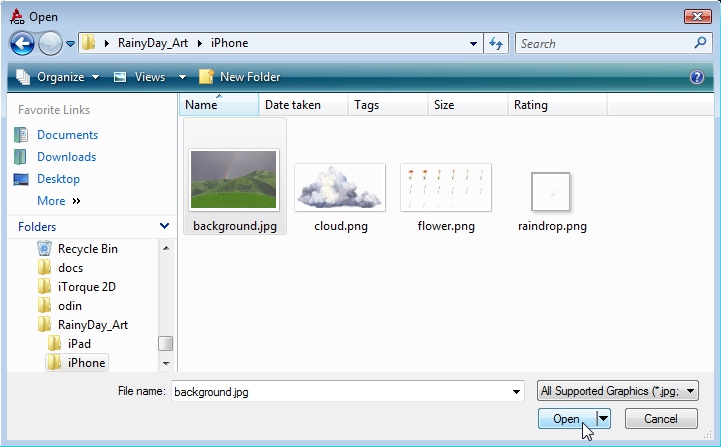
After clicking the button, a file browser dialog will appear. Navigate
to the directory containing your artwork and open the image:
(click to enlarge)
This will create a new ImageMap. After opening the image, the new image
will show up under the Static Sprites rollout as small preview images.
If you did not modify the ImageMap, it should be named your file's name,
minus the extension, plus ImageMap. For example, backgrounnd.jpg will
be backgroundImageMap:
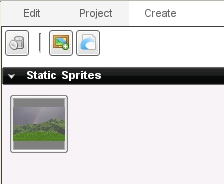
Image Builder Settings
You can change the properties of an ImageMap by double clicking the
preview image in the Static Sprites rollout. The Image Builder should
appear. The following image represents a static sprite with a single
cell, meaning it uses the FULL mode.
(click to enlarge)
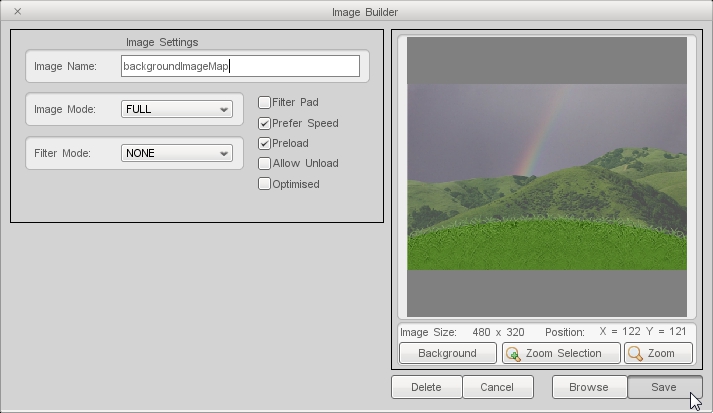
Except in very specific circumstances, you will always want to set Filter Mode to NONE and make sure the Filter Pad box is unchecked. Filter padding is a shortcut used to clean up art
with flaws. Edges get blurred and a fake outline is created around the
image.
When you change the mode to CELL, you can see the full range of options
provided by the Image Builder. This tends to be used for creating
multiple sprites out of a single ImageMap or splitting up a cell
animation:
(click to enlarge)
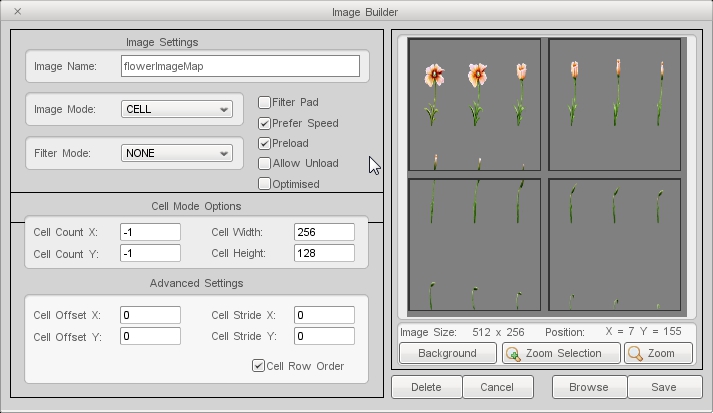
Image Builder Properties
- Image Name: What your ImageMap will be called in script and level datablocks.
- Image Mode: Represents how the ImageMap is rendered.
FULL results in the entire image being rendered, such as a background or
static sprite. CELL is used for splitting up a single image into
multiple parts, which is useful for optimizations and required for
animations.
- Filter Mode: Determines the blurring method for the
image when rendered in the engine. Can cover up flawed art but results
in worse performance. Not recommended for use.
- Filter Pad: Used in conjunction with Filter Mode to blur the edges of an image and creates artificial padding around it.
- Prefer Speed: This flag toggles how the ImageMap data is
packed and loaded. If turned on, the ImageMap will load faster but
consume more memory. If unchecked, the ImageMap is more optimized for
memory loading but takes longer to load.
- Preload: When toggled, this will cause the ImageMap to
load as soon as the engine starts up and parses the datablocks. This
will cause your game to take longer to load, but will run faster and
have to load less during game play. This is a shortcut and using Level
Datablocks is a smarter solution to controlling your load times.
- Allow Unload: Checking this box will give the engine
permission to release all image data and settings from the ImageMap
during level transitions.
- Optimised: This flag toggles an internal optimization
that improves loading of textures greatly. An image must not be in
LINKED mode, must be a power of 2 and must be square (16x16, 256x256,
etc).
- Cell Mode Options: These settings control an image is
split up when in CELL mode. For example, a Cell Count X setting of 6
will split the image into 6 columns. The Cell Counts are directly tied
to the width and height settings. Changing one will change the other
accordingly.
- Advanced Settings: The Offset and Stride settings in
this section manually adjust the location of the art inside the cells.
This is only useful when your source artwork does not contain evenly
spaced cells.
- Cell Row Order: Used in conjunction with the Advanced
Settings. If toggled, the settings will be applied to the ImageMap in
rows. If not, it will be applied to the ImageMap in column format.
- Background: Opens a color picker, which allows you to change the solid color of the background for the ImageMap preview.
- Zoom Selection: Causes you to zoom into a specific cell to more closely inspect it.
- Zoom: Allows you to continuously and manually zoom in on a section of the cells.
Adding Sprite to a Level
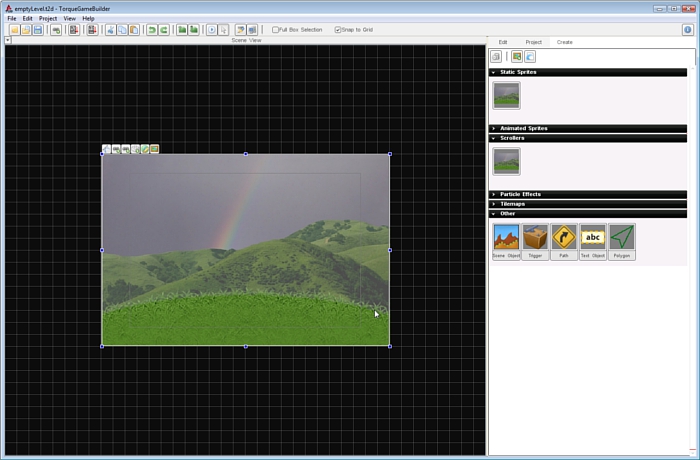
Once you are finished editing the ImageMap, you can add it to the
level. From the Create tab, click on the ImageMap preview and drag it
into your scene. The image will drop wherever the cursor was when you
release the mouse button.
(click to enlarge)
You can use the mouse to move the sprite around the scene until you are
happy with its location. For more precision, you can use the arrow keys
on the keyboard to nudge it slightly in a direction.
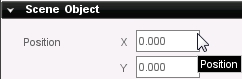
For absolute positioning, an alternative is to directly input the X/Y
coordinates. With the image selected, click on the Edit tab. Scroll down
to the Scene Object rollout. The first section should be Position. For
example, set the X and Y fields to 0, which is dead center of the scene:
When first added, the image is on the top most layer: 0. If you set the
image layer to 5, every new sprite added to the scene and anything with a
layer of 0-4 will be rendered on top of this sprite. You can find this
property under the Scene Object rollout in the edit tab:

NOTE: Make sure you are SAVING your scene each time you add an image
to the library or a sprite to the scene. SAVE and SAVE OFTEN!
Level Datablocks
Before a sprite will render in a running game, the ImageMap needs to
be saved in the level's datablocks. The Level Datablocks system is an optimization feature. When you are editing your project in the iTorque 2D Editor, all of the sprites, animations, scrollers, tilemaps and so on are loaded into memory at all times. However, you may not need all of them for every single level.
For example, you may only need four specific sprites and animations for one level, then a completely separate set in another level. The Level Datablocks editor allows you to manually control what gets loaded on a per-level basis, thus reducing the overall memory consumption of your game.
In the top left of the editor, click on the "Edit level datablocks" button:
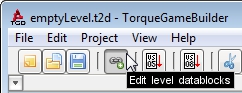
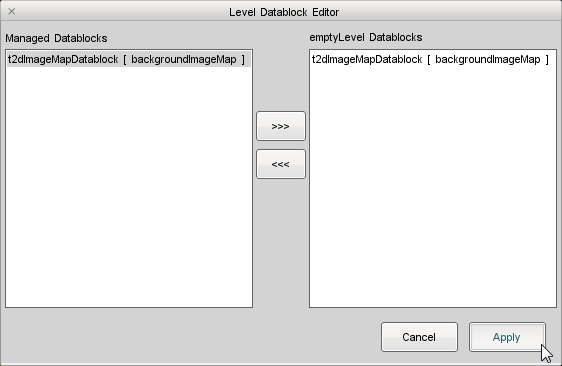
Next, select the ImageMap you want in this level and click on the
[>>>] button to add it to the level's datablocks. Click on
Apply to save these changes:
(click to enlarge)
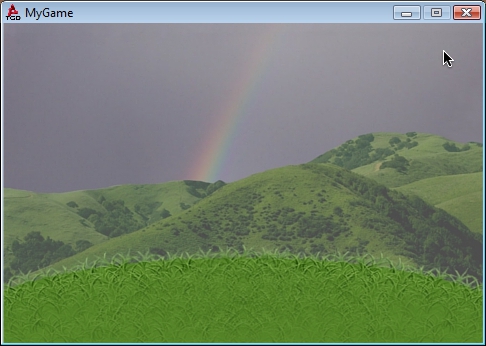
Testing
Once you are ready to test, save your project and then run your the game (shortcut F5 on Windows or the play button in the menu). Your scene should be rendering the images:
(click to enlarge)
Location of Data
Like other objects, ImageMaps must exist in code or the engine will
not know about them. The actual data structure that holds this
information is a t2dImageMapDatablock. The editor saves and reads these
datablocks in the projectFiles/game/managed/datablocks.cs file in your game's directory. A sample ImageMap will look like this:
new t2dImageMapDatablock(backgroundImageMap) {
   imageName = "~/data/images/background.jpg";
   imageMode = "FULL";
   frameCount = "-1";
   filterMode = "NONE";
   filterPad = "0";
   preferPerf = "1";
   cellRowOrder = "1";
   cellOffsetX = "0";
   cellOffsetY = "0";
   cellStrideX = "0";
   cellStrideY = "0";
   cellCountX = "-1";
   cellCountY = "-1";
   cellWidth = "0";
   cellHeight = "0";
   preload = "1";
   allowUnload = "0";
   compressPVR = "0";
   optimised = "0";
   force16bit = "0";
};
The more you add to your editor, the more t2dImageMapDatablocks you will
have in this file. When you add an ImageMap to your level's datablocks
(via the Level Datablocks editor), it is stored in your game's projectFiles/game/data/levels/datablocks directory.
Each level needs to have its own datablocks file. For
example, if you create a new level called myLevel.t2d, you should create
a myLevel_datablocks.cs file in that directory. TorqueScript files are essentially text files, so creating a new one is simple:
On Windows:
1. Right click in the directory you are adding the script file
2. Left click New -> Text Document
3. Name the file, remember to change the extension from .txt to .cs
On OS X:
1. The quickest way to create a new TorqueScript file is to copy an existing one (Cmd+C) and paste it in the location you want (Cmd+V).
2. Remember to open the new script file and delete all content so you can start with fresh code
The ImageMaps in your level datablocks file will be
identical to what the editor sees:
new t2dImageMapDatablock(backgroundImageMap) {
   imageName = "~/data/images/background.jpg";
   imageMode = "FULL";
   frameCount = "-1";
   filterMode = "NONE";
   filterPad = "0";
   preferPerf = "1";
   cellRowOrder = "1";
   cellOffsetX = "0";
   cellOffsetY = "0";
   cellStrideX = "0";
   cellStrideY = "0";
   cellCountX = "-1";
   cellCountY = "-1";
   cellWidth = "0";
   cellHeight = "0";
   preload = "1";
   allowUnload = "0";
   compressPVR = "0";
   optimised = "0";
   force16bit = "0";
};
Conclusion
This concludes the introduction to static sprites. Without ever
touching code, you can import your artwork using iTorque 2D's editors.
This allows you to rapidly prototype levels, tweak the appearance of an
image using visual tools and more. The instructions you learned in this
guide are essential and used all throughout your development. |