Starting The Manipulator
- Start the Mission Editor by pressing F11.
- Start the Manipulator by pressing F2.
The 3D World View Window
The real benefit of the Manipulator tool comes from the fact that you can traverse the world and the 3D World View is not blocked by any dialogs or menus (except for the Mission Editor Menu), giving you an almost-full screen view while you manipulate objects via mouse and hot-keys. Upon examination, it can be seen that this tool is very plain (likely as intended). In the sample view above, we can see the world and its contents. As well, we can apply all standard mouse manipulations as described in Mission Editor Basics.
World Editor Menus
All World Editor Tools have a top menu containing the same elements. However, in some tools, certain menu selections will be disabled. The following tables give a brief description of each menu and the menus choices. Some options descriptions will be deferred till we discuss the specific tool that is affected by said option.
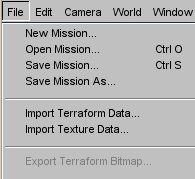
File Menu
Table 1-12.
|
|
New Mission Clicking this option will generate a new mission based on preset values which can be found at example\egt\data\newmission.mis. This generates the same mission every time.
Open Mission (CTRL + O) Brings up a dialog to allow you to load an existing mission. Currently, I suggest that you do not use this method to switch back and forth between missions while editing. Instead, I suggest editing one mission per session (i.e. per run of the SDK). Save Mission (CTRL + S) This saves your current mission. Save Mission As As with Save Mission, this allows you to save your mission, but in this case, you can specify a name and (existing) directory for the mission file. Import Terraform Data This choice allows you to load the terraform data from another mission. Basically, this replaced the current height-map with a selected mission's height-map data. Terrain texturing is unchanged. Import Texture Data This choice should allow you to load the texture data from another mission, but alas, it does not work. Export Terraform Bitmap This choices is enabled by the Terraformer tool. We will discuss it there. |

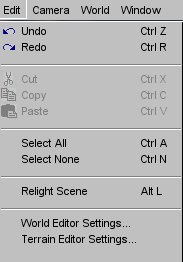
Edit Menu
Table 1-13.
|
|
Undo (CTRL + Z) Undo the last operation.
Redo (CTRL + R) Redoes last operation. As with undo, this does not apply to all operations. Cut (CTRL + X) Copy (CTRL + C) Paste (CTRL + V) Standard cut-copy-paste. Can be applied to single and multiple objects. Select All (CTRL + A) BROKEN Selects all objects (shapes and interiors) in the mission. Select None (CTRL + N) Deselects all objects (shapes and interiors) in the mission. BROKEN B. Deselect previously selected terrain. This does work. Relight Scene (ALT + L) Causes the engine to relight the current terrain and apply shadow maps. This trips a lot of beginners up. I will discuss this further when we learn about adding interiors. World Editor Settings This brings up the World Editor Settings Dialog. (Discussed below.) Terrain Editor Settings This feature relates to the Terrain editor and will be discussed there. |
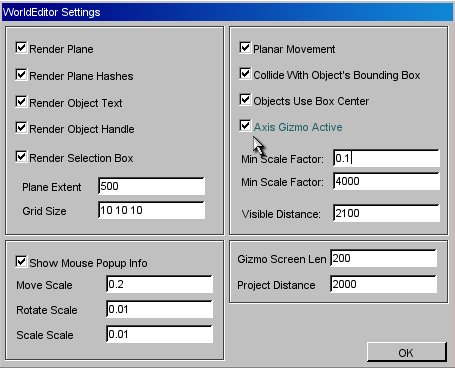
World Editor Settings
Table 1-14.
|
|
Render Plane Show plane when objects are selected Render Plane Hashes Show hashes when objects are selected. Render Object Text Show objects' names and IDs. Render Object Handle Show objects' handles (red dot). Render Selection Box Show selection boxes. Plane Extent Length by width dimensions of plane (floating point OK). Grid Size Hash spacing for grid (floating point OK). Show Mouse Popup Info Show mouse popup scales when moving-rotating-scaling. Move Scale Rotate Scale Scale Scale These values increase or decrease mouse sensitivity for individual mouse actions (move, rotate, scale). Planar Movement Checked - Object will move along plane when dragged. Unchecked - Object will attempt to follow terrain when dragged. Does not apply to vertical gizmo drags. Collide with Object's Bounding Box If checked, object can be selected by placing cursor anywhere on objects bounding box. Objects Use Box Center If checked, handle is in object center, otherwise at lower limit of object bounding box. Axis Gizmo Active Enable gizmo. Min Scale Factor (Max) Scale Factor Determine min and max multiple by which objects can be scaled from original size. Visible Distance Min distance within which object handles are visible/selectable. This has nothing to do with visible distance during game play. Examine the SKY object for that. Gizmo Screen Len Gizmo axis length in screen pixels. Project Distance Ray-length for selection cursor. |
World Editor Settings (Editing Tips)
The parameters on this very compact dialog are meant to assist you when you are editing a mission. Their main purpose is to make your life easier. In that vein, here are some common editing problems and solutions:
Table 1-15.
| Problem | Solution |
|---|---|
|
Having difficulty placing objects within a specific distance of each other. |
Adjust the plane extent to twice the distance you require (distance from centroid/handle). Then, set grid size to 1/10th multiple of distance of interest. Now you can use the grid like a ruler. Example: If you wish to place an object 0.9 meters from another:
|
|
Too many labels visible. |
|
|
Having difficulty scaling exactly. |
Example: If you want to scale an object to 2.75 times its original size:
|
|
You find yourself accidentally selecting objects that are far away. |
|
|
Your bots keep falling through the terrain when you drag them. |
Your bots should now follow the terrain when you drag them. |
World Menu
Table 1-16.
|
|
Lock Selection Disable mouse actions (drag, rotate, scale) on current selection(s). This does not prevent changes via the inspector window although a little (L) will show up in the world editor tree. Unlock Selection Re-enable mouse actions on current selection(s). Hide Selection Hide (i.e. do not render) current selection(s). Show Selection Un-hide previously hidden object(s). Use the Inspector to select these objects. They have a little (L) next to them in the world editor tree. Delete Selection Delete current selection(s). Camera to Selection Move camera to centroid of current selection(s). Reset Transforms
This is not the same as UNDO. Drop Selection Make currently selected object(s) drop according to drop current rule (see below). This may cause selected subterranean objects to rise to the surface. Add Selection to Instant Group We will discuss this feature when we discuss the Inspector. |
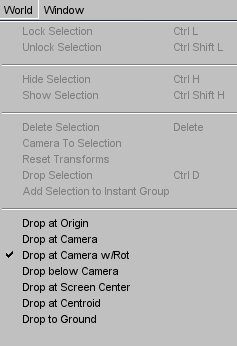
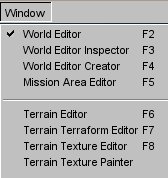
Window Menu
Table 1-18.
|
Drop at Origin |
This causes new or pasted objects to be created at the World Origin. |
|
Drop at Camera |
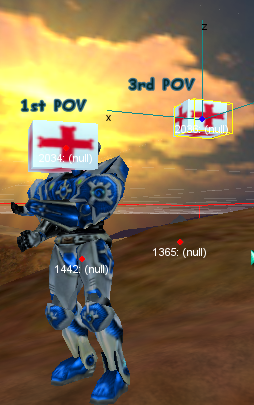
This causes new or pasted objects to be created at the current location of the current camera. You could think of there being three cameras.
I've included an image below showing an object dropped in 1st and 3rd POV to clarify this. This causes new or pasted objects to be created at the World Origin. |
|
Drop at Camera w/Rot |
This is supposed to do the same as Drop at Camera with the addition that the object will have the camera's rotation. |
|
Drop below Camera |
In this mode, new objects are created somewhere below the current camera. |
|
Drop at Screen Center |
This is the default drop at mode. I think this mode's title is a bit of a misnomer. Although I haven't looked at the code (shame on me), it seems that this behaves more in the following fashion:
|
|
Drop at Centroid |
This would be a very useful placement option. It should allow you to select multiple objects and have the newly created object placed in the virtual centroid of the group. |
|
Drop to Ground |
The official docs aren't clear on this, but my assumption on this mode the first time I saw it was that object should be dropped to the ground below the camera. No luck. Objects are dropped to the ground at Mission center. I wouldn't use this if there is any possibility that there could be an overlapping interior at the mission center, because dropping another interior there will crash the editor. |
Drop at Camera (Ouch!!!)