Release Guide
This guide details the process of performing a GeoServer release.
Notify developer lists
It is good practice to notify the GeoServer developer list of the intention to make the release a few days in advance, even though the release date has been agreed upon before hand. GeoServer releases are usually made in conjunction with GeoTools releases, so the GeoTools developer list should also be notified of the associated GeoTools release a few days in advance.
On the day the release is being made is it also good practice to send a warning
to the list asking that developers refrain from committing until the release tag
has been created.
Prerequisites
The following are necessary to perform a GeoServer release:
- Commit access to GeoServer svn
- Edit access to the GeoServer wiki
- Administration rights to the GeoServer bug tracker (JIRA)
- Write access to GeoServer Maven Repository
For steps 2 through 4 above you may also ask someone on the developer list to perform the associated steps.
If a parallel GeoTools release is being preformed, see the GeoTools Release Guide. Alternatively you can (nicely) ask one of the GeoTools developers to perform the release for you.
Update source code
- Update or check out the branch to be released from.
- Ensure that svn status yields no local modifications.
Update the README
Add an entry to release/README.txt using the following template:
GeoServer [VERSION] ( [DATE] )
==============================

[Short paragraph describing release]

[List of notable features / improvements / bug fixes]

The entire changelog can be found at:

[link to JIRA changelog]

This release is based on [GeoTools version].
Example:
 GeoServer 1.7.1 (December 08, 2008)
 -----------------------------------

 The second release of the 1.7.1 series includes some great KML and Google
 Earth improvements, along with other new features and bug fixes. The new
 and note worthy for this release includes:

  * KML Super Overlay and Regionating Support
  * KML Extrude Support
  * KML Reflector Improvements
  * Mac OS X Installer
  * New SQL Server DataStore Extension
  * Improved Oracle DataStore Extension

And much more. The entire changelog can be found at :

  http://jira.codehaus.org/browse/GEOS/fixforversion/14502

This release is based on GeoTools 2.5.2.
Note
The “fixforversion” number for the JIRA changelog can be found by exploring the GeoServer JIRA before or after building the changelog. See the links to the various unreleased versions.
Commit changes to the README:
svn commit -m "Updating README for [VERSION]" release/README.txt
Create a release tag
Create a tag for the release:
svn copy -m "Create tag for release [VERSION]" https://svn.codehaus.org/geoserver/[BRANCH] https://svn.codehaus.org/geoserver/tags/[VERSION]
Checkout the release tag:
svn co https://svn.codehaus.org/geoserver/tags/[VERSION]
Update version numbers in tag
Upgrade the version number in the following files:
src/release/installer/win/GeoServerEXE.nsi
src/release/installer/win/wrapper.conf
src/release/installer/mac/GeoServer.app/Contents/Info.plist
src/release/bin.xml
src/release/doc.xml
src/release/src.xml
src/web/src/main/java/ApplicationResources*
doc/en/user/source/conf.py
doc/en/developer/source/conf.py
Example (using sed):
sed -i 's/1.7.1/1.7.2/g' src/release/installer/win/GeoServerEXE.nsi
Commit changes:
svn commit -m "Updated version numbers for [VERSION]" release web/src/main/java
Upgrade branch pom versions
Update branch (not in the newly-created tag!) pom version numbers to include the next version with a “-SNAPSHOT” suffix:
find . -name pom.xml -exec sed -i 's/[VERSION]-SNAPSHOT/[NEWVERSION]-SNAPSHOT/g' {} \;
Example:
find . -name pom.xml -exec sed -i 's/1.7.1-SNAPSHOT/1.7.2-SNAPSHOT/g' {} \;
Commit changes:
svn commit -m "Upgrading pom version to [NEWVERSION]-SNAPSHOT" .
Set tag pom versions
Set tag pom version numbers to the correct version number (and removing the “-SNAPSHOT” suffix):
find . -name pom.xml -exec sed -i 's/[VERSION]-SNAPSHOT/[VERSION]/g' {} \;
Example:
find . -name pom.xml -exec sed -i 's/1.7.1-SNAPSHOT/1.7.1/g' {} \;
Commit changes:
svn commit -m "Setting pom versions to [VERSION]" .
Build release artifacts
Warning
All operations for the remainder of this guide must be performed from the release tag, not the branch.
Compile from the root of the source tree with the following command:
mvn clean install -P release
Build javadocs:
Build artifacts:
At this point the release artifacts will be located in target/release.
Note
Due to an issue with the
version of the maven assembly plugin currently used, the source artifact
contains target directories containing compiled classes and jars
for each module, which increases its size significantly. The source
artifact should be unpacked, the directories removed, and re-archived:
unzip geoserver-1.7.1-src.zip
rm geoserver-1.7.1-src.zip
cd geoserver-1.7.1
find . -name target -exec rm -rf {} \;
cd ..
zip -r geoserver-1.7.1-src.zip geoserver-1.7.1
Build documentation
Note
Building the GeoServer documentation requires the following be installed:
- Sphinx, version 0.6 or greater
It is also helpful to have make installed, although it is not required. For Windows users a make.bat files exists that performs the same function.
HTML
Change to the root of the documentation directory, or check it out (if you don’t already have it) from
https://svn.codehaus.org/geoserver/tags/[VERSION]/doc
Change directory to doc/user.
Build HTML files for the User Manual.
Go back to the root of the documentation tree, and change directory to doc/developer.
Build HTML files for the Developer Manual.
Create a zip file containig two folders, user and developer, with the respective HTML docs built in the previous steps.
Under a Unix like system you can achieve it by getting into geoserver/src/target and perform the following commands:
ln -s ../../../doc/en/user/build/html user
ln -s ../../../doc/en/developer/build/html developer
zip -r geoserver-[VERSION]-htmldoc.zip user developer
Note
When done, the zip file should contain two folders, one called user containing the HTML output for the User Manual, and one called developer containing the HTML output for the Developer Manual.
PDF
Note
Building PDF files from Sphinx is a two step process. First, it is necessary to create LaTeX files from Sphinx. Next, convert the LaTeX file to PDF using pdflatex.
Note
Building PDF files, in addition to Sphinx, requires the pdflatex utility.
Change to the root of the documentation directory.
Change directory to doc/user.
Build LaTeX files for the User Manual.
Change directory to build/latex.
Convert the .tex file to .pdf:
pdflatex GeoServerUserManual.tex GeoServerUserManual.pdf
Immediately run the same command a second time:
pdflatex GeoServerUserManual.tex GeoServerUserManual.pdf
Note
This seemingly duplicate step is required because the PDF table of contents and associated bookmarks are not generated on the first pass.
Go back to the root of the documentation tree, and change directory to doc/developer.
Build LaTeX files for the Developer Manual.
Change directory to build/latex
Convert the .tex file to .pdf
pdflatex GeoServerDeveloperManual.tex GeoServerDeveloperManual.pdf
Move the PDF created for the User Manual into this directory.
Create a zip containing the two PDF files:
zip -r geoserver-[VERSION]-pdfdoc.zip *.pdf
CITE testing
Change directory to src/target/release and unzip the binary package:
cd target/release
unzip geoserver-*-bin.zip
Execute the GeoServer CITE tests as described in the Cite Test Guide.
Unzip the war package and deploy the war in a servlet container such as
Tomcat:
unzip geoserver-*-war.zip
cp geoserver.war /opt/tomcat5/webapps
Re-run GeoServer CITE tests with the war package.
Hand testing
Start GeoServer with the release data directory and test by hand. A checklist of
things to test can be found in the Release Testing Checklist.
Deploy Artifacts
Deploy artifacts to the maven repository using the following command:
Build Windows installer
Note
This step requires a Windows machine.
Download and install NSIS.
Install the NSIS Access Control plugin. The simplest way to do this is to download the zip, extract the two .DLL files (AccessControl.dll and AccessControlW.dll) and copy them to the NSIS plugins directory (usually C:\Program Files\NSIS\Plugins).
Unzip the binary GeoServer package:
unzip geoserver-[VERSION]-bin.zip
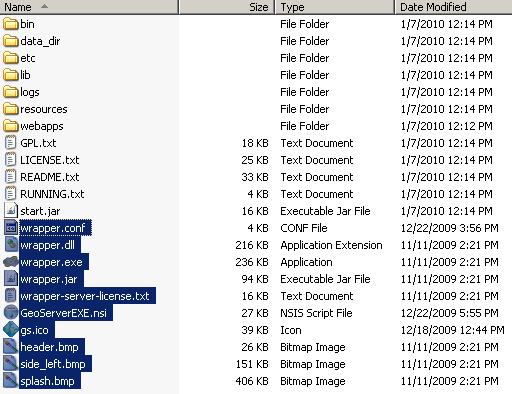
Copy the files from src/release/installer/win to the root of the unpacked archive (the same directory level as the start.jar):
GeoServerEXE.nsi
gs.ico
header.bmp
side_left.bmp
splash.bmp
wrapper.conf
wrapper.dll
wrapper.exe
wrapper.jar
wrapper-server-license.txt
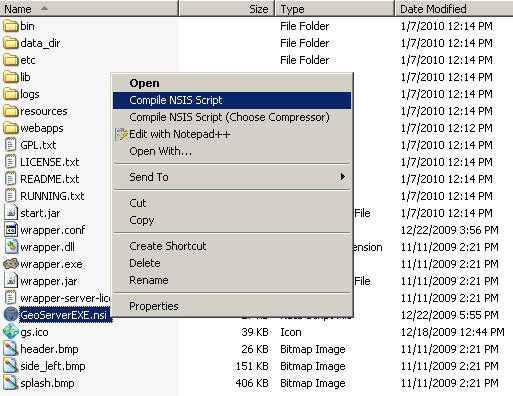
Right-click on the installer script GeoServerEXE.nsi and select Compile Script.
After successfully compiling the script, an installer named geoserver-[VERSION].exe will be located in the root of the unpacked archive.
Build Mac OS X installer
Note
This step requires a Macintosh machine.
Change directory to src/release/installer/mac and follow the instructions in
README.txt.
Release on JIRA
Note
This step requires administrative privileges in JIRA.
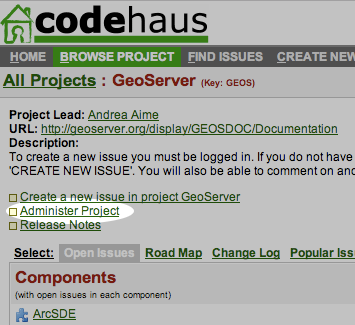
Log into GeoServer JIRA.
Click the “Administer Project” link on the left hand side of the page.
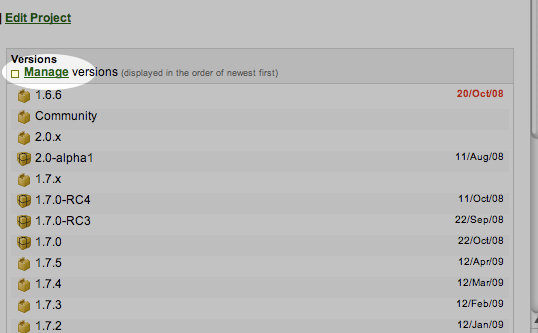
Click the Manage link on the right hand side of the page.
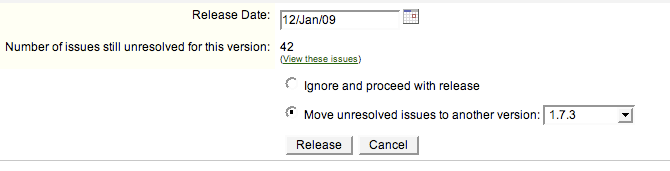
Find the row for the version being released and click the Release link
located on the right.
Move back any open issues to the next version, and click the Release
button.
Upload release artifacts to SourceForge
All of the artifacts generated so far need to be uploaded to the SourceForce File release System. There are various ways to do so, consult the documentation to find out the one better suited for you.
The simplest way for developers working under a Unix like system is to use scp:
The same can be accomplished in Windows using WinSCP.
Release on SourceForge
Note
This step requires administrative privileges in SourceForge.
Primary artifacts
Log in to SourceForge.
Go to the GeoServer SourceForge page.
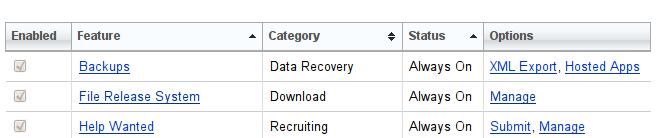
Under the Project admin tab select Feature Settings.
Click Manage in the File Release System row
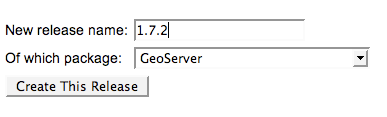
Click Add Release next to the GeoServer package.
Enter the release version and click the Create This Release button.
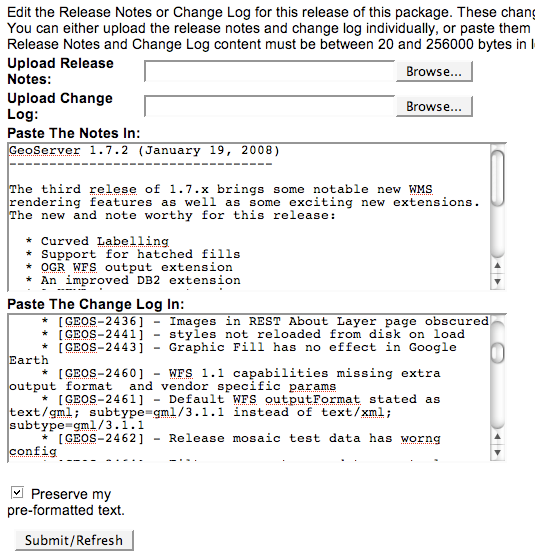
Copy the contents of the README (from previous step) into the Release
Notes text box.
Generate the change log from
JIRA
(text format) and copy the contents into the Change Log text box.
Click the Preserve my pre-formatted text check box.
Click the Submit/Refresh button.
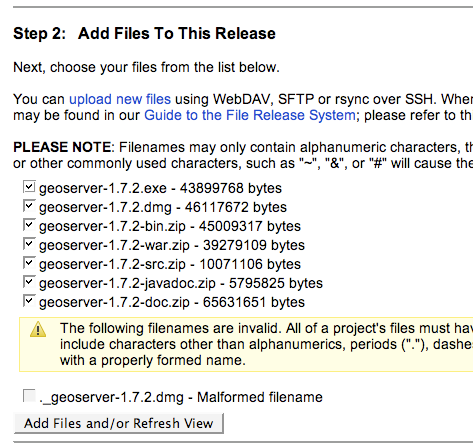
Scroll down to the Add Files To This Release section and check off all the primary artifacts.
Warning
Be sure not to include the extension/plugin artifacts in this step!
Click the Add Files and/or Refresh View button.
Scroll down to the Edit Files In This Release section.
For the .dmg artifact set the Processor to i386 and the File
Type to .dmg.
For the .exe artifacts set the Processor to i386 and the File
Type to .exe.
For the src artifact set the Processor to Platform-Independent and
the File Type to Source .zip.
For all other artifacts set the Processor to Platform-Independent and
the File Type to .zip.
Note
The processor and file type must be set one artifact at a time, clicking the
the Update/Refresh button at each step.
Extension artifacts
Following steps from the previous section create a release of the GeoServer
Extensions package consisting of all the plugin artifacts. A few things to
note:
- The release version is the same as the primary artifact release.
- The Release Notes and Change Log may be omitted.
- Each plugin artifact is Platform-Independent and of File Type .zip.
Create a download page
Go to http://geoserver.org/display/GEOS/Stable and log in.
Click the Add Page link under the Page Operations menu.
Name the page “GeoServer [VERSION]”.
Click the Select a page template link.
Select Download and click the Next button.
Fill out the fields for the following variables:
VERSION
DATE
JIRA_VERSION
SF_RELEASE_ID
Note
The SF_RELEASE_ID is the release number assigned by SourceForge for
the release created in the previous step.
Click the Insert Variables button.
Click the Save button.
Announce the release
Mailing lists
Send an email to both the developers list and users list announcing the
release. The message should be relatively short. The following is an example:
Subject: GeoServer 1.7.1 Released

The GeoServer team is happy to announce the release of GeoServer 1.7.1.
The release is available for download from:

http://geoserver.org/display/GEOS/GeoServer+1.7.1

This release comes with some exciting new features. The new and
noteworthy include:

   * KML Super Overlay and Regionating Support
   * KML Extrude Support
   * KML Reflector Improvements
   * Mac OS X Installer
   * Dutch Translation
   * Improved Style for Web Admin Interface
   * New SQL Server DataStore Extension
   * Improved Oracle DataStore Extension
   * Default Templates per Namespace

Along with many other improvements and bug fixes. The entire change log
for the 1.7.1 series is available in the issue tracker:

http://jira.codehaus.org/browse/GEOS/fixforversion/14502

A very special thanks to all those who contributed bug fixes, new
features, bug reports, and testing to this release.

--
The GeoServer Team
SourceForge
Log in to SourceForge.
Edit the release, and scroll down to the bottom of the page.
Check the I’m sure check box, and click the Send Notice button.
Repeat for the extension release.
GeoServer Blog
- Log into the GeoServer Blog.
- Create a new post. The post should be more “colorful” than the average
announcement. It is meant to market and show off any and all new
features. Examples of previous posts:
- Do not publish the post. Instead present it to the GeoServer outreach
team for review, and they will publish it.
SlashGeo
- Go to http://slashgeo.org, and log in, creating an account if necessary.
- Click the Submit Story link on the left hand side of the page.
Examples of previous stories:
FreeGIS
Send an email to bjoern dot broscheit at uni-osnabrueck dot de.
Example:
Subject: GeoServer update for freegis

GeoServer 1.7.1 has been released with some exciting new features. The big
push for this release has been improved KML support. The new and noteworthy
include:

  * KML Super Overlay and Regionating Support
  * KML Extrude Support
  * KML Reflector Improvements
  * Mac OS X Installer
  * Dutch Translation
  * Improved Style for Web Admin Interface
  * New SQL Server DataStore Extension
  * Improved Oracle DataStore Extension
  * Default Templates per Namespace

Along with many other improvements and bug fixes. The entire change log for
the 1.7.1 series is available in the issue tracker:

http://jira.codehaus.org/browse/GEOS/fixforversion/14502
FreshMeat
Go to http://freshmeat.net/ and log in.
Search for “geoserver” and click the resulting link.
Click the add release link at the top of the page.
Choose the Default branch
Enter the version and choose the appropriate Release focus.
Note
The release focus is usually 4,5,6, or 7. Choose which ever is
appropriate.
Enter a succinct description (less than 600 characters) of the Changes.
Update the links to the following fields:
- Zip
- OS X package
- Changelog
Click the Step 3 button.
Click the Finish button.