Implementing this design pattern in GT4 is actually not too complicated. In fact, it is very similar to the example seen in the previous chapter, with two main differences, highlighted in Figure 5.2, “Relationships between the Factory Service, the Instance Service, the Resource Home, and the Resource” (compare with Figure 4.1, “Relationships between the Service, the Resource Home, and the Resource”)
Figure 5.2. Relationships between the Factory Service, the Instance Service, the Resource Home, and the Resource

Factory service and instance service. To handle multiple resources, we will now need to deploy two services: a factory service and an instance service. The factory service provides a
createResourceoperation that returns an EPR to the new WS-Resource. The instance service provides the operations we have been working with in the previous chapters:add,subtract, andgetValueRP.Non-trivial resource home. The resource home no longer deals with a single resource. In this case, it must keep track of several resources at the same time. However, notice how we have a single resource home, shared by the factory and instance services. The factory service will use the resource home to create new resources, while the instance service will use it to find a resource with a given key.
So, for this example, we will have four Java classes (plus the MathQNames interface)
The factory service:
$EXAMPLES_DIR/org/globus/examples/services/core/factory/impl/MathFactoryService.javaThe instance service:
$EXAMPLES_DIR/org/globus/examples/services/core/factory/impl/MathService.javaThe resource:
$EXAMPLES_DIR/org/globus/examples/services/core/factory/impl/MathResource.javaThe resource home:
$EXAMPLES_DIR/org/globus/examples/services/core/factory/impl/MathResourceHome.java
Before seeing the actual code, a good way of seeing what role each class plays is to see how they interact. For now, don't worry about all the deployment details. Just imagine that we actually have our two services (factory and instance) up and ready to accept invocations from a client class, and that the service class has access to the resource home and that the resource home, in turn, has access to a bunch of resource objects. Let's start with the creation of a new resource, shown in Figure 5.3, “Sequence diagram for resource creation”.
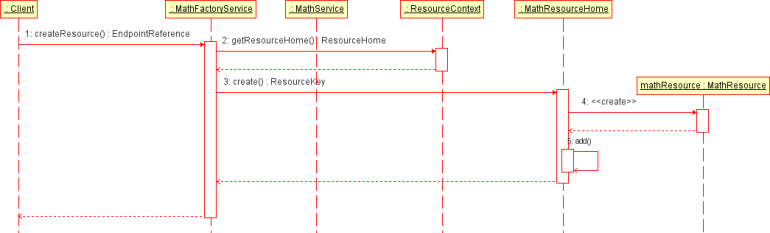
Our client only needs to know the URI of the factory service (
MathFactoryService). With it, it can invoke thecreateResourceoperation. This will return an endpoint reference containing the URI of the instance service, along with the key of the recently created resource.So, the factory service has to create a new resource. This necessarily has to be done through the resource home, which is in charge of managing all the resources. However, we have to locate our resource home first. Fortunately, this is quite easy since we can delegate this task on a Globus-supplied class called
ResourceContext. In the previous chapter, we used this class to retrieve the service's singleton resource. It can also be used to obtain a reference to the service's resource home.Now that we have the resource home, we can ask it to create the new resource. The creation method returns an object of type
ResourceKey. This is the resource identifier which we need to create the endpoint reference we'll be returning to the client.The resource home will take care of actually creating a new
MathResourceinstance.Next, the resource home will add the new
MathResourceinstance to its internal list of resources. This list will allow us to access any resource if we know that resource's identifier.
Once the createResource call has finished, the client will have the WS-Resource's endpoint reference. In all future calls, this endpoint reference will be passed along transparently in all our invocations. In other words, when we call add or subtract, the service class will know what resource we're referring to. So, let's take a close look at what happens when we invoke the add operation, as shown in Figure 5.4, “Sequence diagram for WS-Resource invocation”.

The client invokes the
addoperation in the instance service (MathService).However, the
addoperation is stateless. It needs to retrieve a resource to actually work. The resource identifier is in the endpoint reference that is included in the invocation. Fortunately, theResourceContexthelper class once again shields us from all the potential nastiness. It will be in charge of reading the EPR and finding the resource it refers to.However, it's interesting to note that, internally, ResourceContext uses the ResourceHome to find the resource.
Once we have the resource, the instance service can access all its state information, such as the "Value" and the "LastOp" resource properties. First of all, we will access the "Value" resource property. As in the example seen in the previous chapter, our resource (
MathResource) will allow us to modify the RP's using get/set methods (in this case, with a simplegetValue()method).Once we've modified the value, we have to make sure we commit the change in the resource (in our case, using
setValue()). Otherwise, that bit of state information won't be remembered.Finally, we use the
setLastOp()method in the resource to modify theLastOpresource property to equal"ADDITION".
Don't worry if you're a bit confused. When we actually start coding all this, it'll probably seem clearer (even so, you might want to review these diagrams once we've coded the full example).