Backing Up and Restoring Databases
The topic describes Greenplum backup and restore features.
Taking regular backups ensures that you can restore your data or rebuild your Greenplum Database system if data corruption or system failure occur. You can also use backups to migrate data from one Greenplum Database system to another.
Backup and Restore Operations
Greenplum Database supports parallel and non-parallel backup and restore. Parallel backup and restore operations scale regardless of the number of segments in your system. Greenplum Database also supports non-parallel backup and restore utilities to enable migration from PostgreSQL to Greenplum. See Non-Parallel Backup.
Parallel Backup Overview
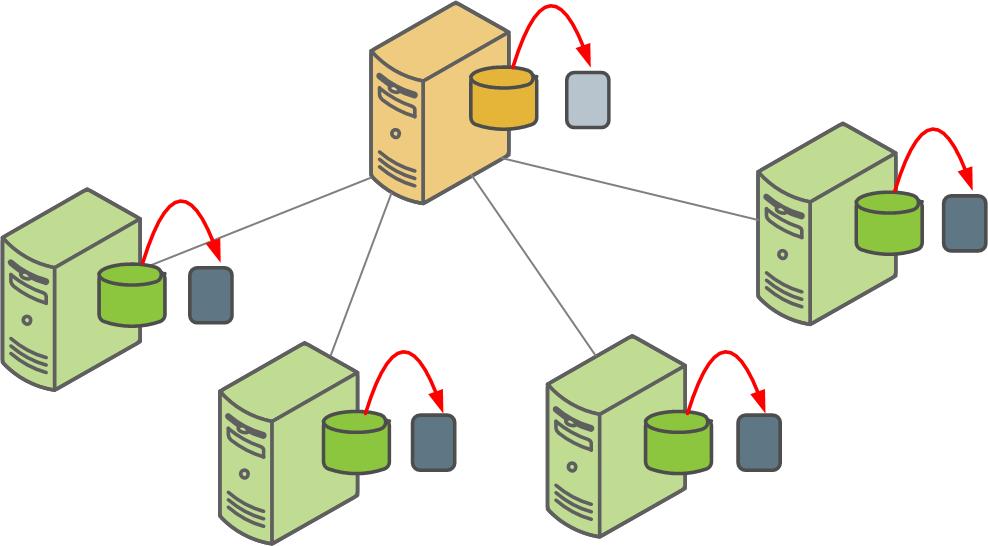
The Greenplum Database parallel dump utility gpcrondump backs up the Greenplum master instance and each active segment instance at the same time.
By default, gpcrondump creates dump files in the gp_dump subdirectory.
Several dump files are created for the master, containing database information such as DDL statements, the Greenplum system catalog tables, and metadata files. gpcrondump creates one dump file for each segment, which contains commands to recreate the data on that segment.
You can perform full or incremental backups. To restore a database to its state when an incremental backup was made, you will need to restore the previous full backup and all subsequent incremental backups.
Each file created for a backup begins with a 14-digit timestamp key that identifies the backup set the file belongs to.
gpchrondump can be run directly in a terminal on the master host, or you can add it to crontab on the master host to schedule regular backups. See Automating Parallel Backups with gpcrondump.
Non-Parallel Backup
You can use the PostgreSQL non-parallel backup utilities pg_dump and pg_dumpall to migrate PostgreSQL databases to Greenplum Database. These utilities create a single dump file on the master host that contains all data from all active segments. In most cases, the master host does not have enough disk space for a single backup file of a distributed database.
Another way to backup Greenplum Database data is to use the COPY TO SQL command to copy all or a portion of a table out of the database to a delimited text file on the master host.
Parallel Restores
The Greenplum Database parallel restore utility gpdbrestore takes the timestamp key generated by gpcrondump, validates the backup set, and restores the database objects and data into a distributed database in parallel. Parallel restore operations require a complete backup set created by gpcrondump, a full backup and any required incremental backups.
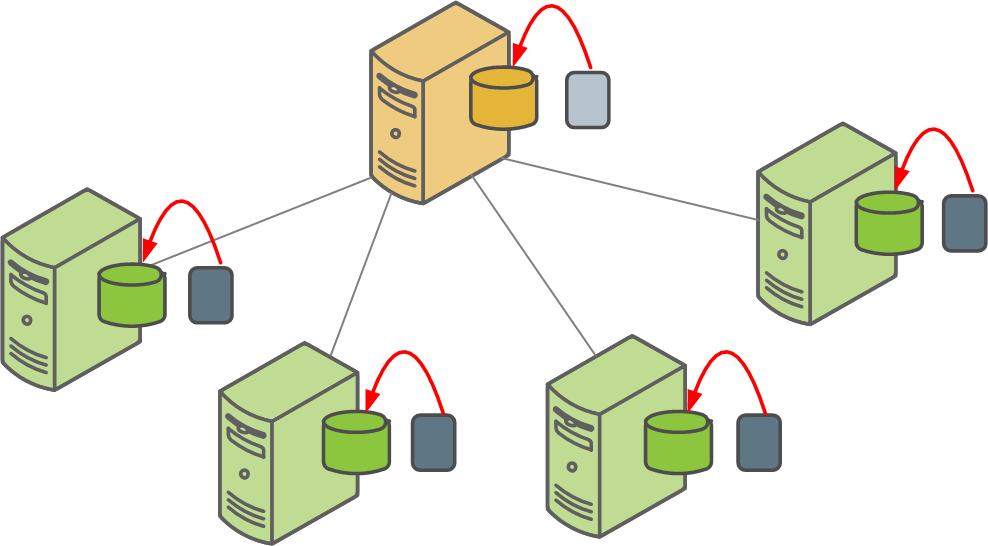
The Greenplum Database gpdbrestore utility provides flexibility and verification options for use with the automated backup files produced by gpcrondump or with backup files moved from the Greenplum array to an alternate location. See Restoring a Database Using gpdbrestore.
Non-Parallel Restores
Greenplum supports the non-parallel PostgreSQL restore utility pg_restore to enable:
- Migration from PostgreSQL to Greenplum Database.
- Migration between Greenplum Database systems with different configurations, such as a source system with four segments to a target system with give segments. gpdbrestore cannot distribute the source system's backup files evenly across an expanded system.
pg_restore requires compressed dump files created by pg_dump or pg_dumpall. Before starting the restore, modify the CREATE TABLE statements in the dump files to include the Greenplum DISTRIBUTED clause.
To perform a non-parallel restore using parallel backup files, collect each backup file from the segment hosts, copy them to the master host, and load them through the master. See Restoring to a Different Greenplum System Configuration.
Backing Up a Database
The options for database backup are as follows.
-
Schedule or run routine dumps with
gpcrondump.
gpcrondump allows you to schedule routine backups, including
incremental backups, using the UNIX scheduling utility, cron. Schedule
cron jobs that call gpcrondump on the Greenplum
master host. gpcrondump backs up databases, data, and objects such as
database roles and server configuration files.
Full backup jobs scheduled or run with gpcrondump can use Data Domain Boost. See Using Data Domain Boost.
- Create a single dump file with pg_dump or pg_dumpall. Use this option to migrate your data to another database vendor's system. If restoring to a PostgreSQL or Greenplum database and the dump file is in archive format, you can use pg_restore. If the dump file is in plain text format, you can use a client such as psql. To restore to another Greenplum Database system, do a parallel dump using gpcrondump then do a non-parallel restore.
When backing up a database, Greenplum Database locks the following tables:
- When a backup starts, an EXCLUSIVE lock is acquired on the catalog
table pg_class that contains database relation information. The
EXCLUSIVE lock permits only concurrent read operations. Relations such
as tables, indexes, and views cannot be created or dropped in the database.
While pg_class is locked, schema information is collected on database tables that will be backed up.
The EXCLUSIVE lock on pg_class is released after an ACCESS SHARE lock is acquired on all the tables that are to be backed up. See the next item.
- When backing up the table data, the backup operation acquires an ACCESS
SHARE lock on the tables to be backed up after the schema information is
collected. The ACCESS SHARE lock is acquired at the segment instance
level as a parallel operation. After the data has been backed up for the tables in a
segment, the lock on the tables in the segment is released. An ACCESS SHARE lock is a lock that is acquired by queries that only read from a table. An ACCESS SHARE lock only conflicts with ACCESS EXCLUSIVE lock. The SQL command which acquire the ACCESS EXCLUSIVE lock:
- ALTER TABLE
- CLUSTER
- DROP TABLE
- REINDEX
- TRUNCATE
- VACUUM FULL
For information about the catalog table pg_class, see the Greenplum Database Reference Guide. For information about Greenplum Database lock modes see About Concurrency Control.
Incremental Backup Support
For Greenplum Database Version 4.2.5 and later, the utilities gpcrondump and gpdbrestore support incremental backups and restores of append-optimized tables, including column-oriented tables. Use the gpcrondump option --incremental to create an incremental backup.
An incremental backup is similar to a full backup. An incremental backup creates backup files for the master and segments. A unique 14-digit timestamp key identifies the files that comprise an incremental backup set. Similar to a full backup, an incremental backup backs up regular, heap-storage tables. The difference between an incremental backup and a full backup is that append-optimized tables are backed up only if one of the following operations was performed on the table after the last backup:
- ALTER TABLE
- DELETE
- INSERT
- TRUNCATE
- UPDATE
- DROP and then re-create the table
For partitioned append-optimized tables, only the changed table partitions are backed up.
To create an incremental backup or restore data from an incremental backup, you need the complete backup set. A complete backup set consists of a full backup and any incremental backups that were created after the last full backup. See Example using full and incremental backups.
Because incremental backups are table-based for append-optimized tables, incremental backups are efficient when the updates are made to data in tables that are separate from tables that contain unchanged data, and the total amount of data in tables that have changed is small compared to the data in the tables that contain unchanged data. Incremental backups are also efficient with append-optimized partition tables if only a few table partitions are being updated. An incremental backup only backs up the partitions that have changed.
When you archive incremental backups, all incremental backups between the last full backup and the target incremental backup must be archived. You must archive all the files that are created to back up the master and all segments.
Changes to the Greenplum Database segment configuration invalidate incremental backups. After you change the segment configuration you must create a full backup before you can create an incremental backup.
Example using full and incremental backups
Each backup set has a key, which is a timestamp taken when the backup is created. For example, if you created a backup that starts on May 14, 2012, the backup set file names would contain 20120514hhmmss. The hhmmss represents the time, hour, minute, and second.
Assume you created both full and incremental backups of the database mytest. You used the following command to create full backups:
gpcrondump –x mytest –u /backupdir
You used this command to create incremental backups.
gpcrondump –x mytest –u /backupdir --incremental
When you specify the -u option, the backups are created in the directory \backupdir on the Greenplum Database hosts with the following timestamp keys. The full backups have the timestamp key 20120514054532 and 20121114064330. The other backups are incremental backups.
- 20120514054532 (full backup)
- 20120714095512
- 20120914081205
- 20121114064330 (full backup)
- 20130114051246
If you create an incremental backup that starts on March 14, 2013, the timestamp for the backup would be 20130314hhmmss. To create the incremental backup, you need both the incremental backup 20130114051246 and the full backup 20121114064330. Also, you must specify the same -u option for any incremental backups that are part of the backup set.
To restore a database with the incremental backup 20120914081205, you need the incremental backups 20120914081205 and 20120714095512, and the full backup 20120514054532.
To restore the mytest database with the incremental backup 20130114051246, you need only the incremental backup and the full backup 20121114064330. The restore command would be similar to this command.
gpdbrestore –t 20130114051246 -u /backupdir
Backing Up a Set of Tables
You can perform an incremental backup on a set of database tables by specifying the gpcrondump option --prefix to identify the backup set when you specify the tables to include or exclude when you create the full backup.
First, create a full backup of a set of tables. When you create the full backup, specify the --prefix option to identify the backup set. To include a set of tables, use the gpcrondump option -t or --table-file. To exclude a set of tables, use the gpcrondump option -T or --exclude-table-file.
First, create a full backup of a set of tables. When you create the full backup, specify the --prefix option to identify the backup set. To include a set of tables, use the gpcrondump option -t or --table-file. To exclude a set of tables, use the gpcrondump option -T or --exclude-table-file. You can also specify the option -s or --schema-file to include all tables that are qualified by a schema or set of schemas. To exclude a set tables that are qualified by a schema or a set of schemas, use the gpcrondump option -S or --exclude-schema-file. Only a set of tables or set of schemas can be specified. For example, the -s option cannot be specified with the -t option.
To create an incremental backup based on the full backup of the set of tables, specify the gpcrondump option --incremental and the --prefix option with the string specified when creating the full backup. The incremental backup is limited to only the tables in the full backup.
The following example uses the --table-file option to create a full backup for the set of tables listed in the file user-tables. The prefix user_backup identifies the backup set.
gpcrondump -x mydatabase --table-file=user-tables --prefix user_backup
To create an incremental backup for the backup identified by the prefix user_backup, specify the --incremental option and the option --prefix user_backup to identify backup set. This example creates an incremental backup.
gpcrondump -x mydatabase --incremental --prefix user_backup
This command lists the tables that were included or exclued for the full backup.
gpcrondump -x mydatabase --incremental --prefix user_backup --list-filter-tables
Restoring From an Incremental Backup
When restoring a backup with gpdbrestore, command line output displays whether the backup is an incremental or a full backup. If the gpdbrestore option -q is specified, the backup type information is written to the log file.
With the gpdbrestore option --noplan, you can restore only the data contained in an incremental backup.
With the --list-backup option you can display the full and incremental backup sets required to perform a restore.
Using Direct I/O
Direct I/O allows you to bypass the buffering of memory within the file system cache. When Direct I/O is used for a file, data is transferred directly from the disk to the application buffer, without the use of the file buffer cache. Direct I/O benefits applications by reducing CPU consumption and eliminating the overhead of copying data twice: first between the disk and the file buffer cache, and then from the file.
Turn on Direct I/O
$ gpconfig -c gp_backup_directIO -v on
Decrease network data chunks sent to dump when the database is busy
$ gpconfig -c gp_backup_directIO_read_chunk_mb -v 10
The above command sets the chunk size to 10MB; the default chunk size is 20MB. The default value has been tested to be the optimal setting. Decreasing it will increase the backup time and increasing it will result in little change to backup time.
Verify the current data chunk size
$ gpconfig –s gp_backup_directIO_read_chunk_mb
Verify whether Direct I/O is turned on
$ gpconfig –s gp_backup_directIO
Using Data Domain Boost
Data Domain Boost is a gpcrondump and gpdbrestore option that provides faster backups after the initial backup operation, and provides deduplication at the source to decrease network traffic. When you restore files from the Data Domain system with Data Domain Boost, some files are copied to the master local disk and are restored from there, and others are restored directly.
With Data Domain Boost managed file replication, you can replicate Greenplum Database backup images that are stored on a Data Domain system for disaster recover purposes. The gpmfr utility manages the Greenplum Database backup sets that are on the primary and a remote Data Domain system. For information about gpmfr, see the Greenplum Database Utility Guide.
Managed file replication requires network configuration when a replication network is being used between two Data Domain systems:
- The Greenplum Database system requires the Data Domain login credentials to be configured with gpcrondump. These credentials are created for the local and remote Data Domain systems.
- When the non-management network interface is used for replication on the Data Domain systems, static routes must be configured on the systems to pass the replication data traffic to the correct interfaces.
Do not use Data Domain Boost with pg_dump, or pg_dumpall.
Refer to Data Domain Boost documentation for detailed information.
Data Domain Boost Requirements
Using Data Domain Boost requires the following.
- Purchase and install a Data Domain Boost license on the Data Domain.
- Obtain sizing recommendations for Data Domain Boost.
Contact your EMC Data Domain account representative for assistance.
One-Time Data Domain Boost Credential Setup
There is a one-time process to set up credentials to use Data Domain Boost. Credential setup connects one Greenplum Database instance to one Data Domain instance. If you are using Data Domain Boost managed file replication capabilities for disaster recovery purposes, you must set up credentials for both the primary and remote Data Domain systems.
To perform the credential setup, run gpcrondump with the following options:
--ddboost-host ddboost_hostname --ddboost-user ddboost_user
--ddboost-backupdir backup_directory
To remove credentials, run gpcrondump with the --ddboost-config-remove option.
To manage credentials for the remote Data Domain system that is used for backup replication, specify the --ddboost-remote option with the other gpcrondump options. For example, these options set up credentials for a Data Domain system that is used for backup replication. The system IP address is 172.28.8.230, the user ID is ddboostmyuser, and the location for the backups on the system is GPDB/gp_production:
--ddboost-host 172.28.8.230 --ddboost-user ddboostmyuser
--ddboost-backupdir gp_production --ddboost-remote
For details, see gpcrondump in the Greenplum Database Utility Guide.
If you use two or more network connections to connect to the Data Domain system, use gpcrondump to set up the login credentials for the Data Domain hostnames associated with the network connections. To perform this setup for two network connections, run gpcrondump with the following options:
--ddboost-host ddboost_hostname1
--ddboost-host ddboost_hostname2 --ddboost-user ddboost_user
--ddboost-backupdir backup_directory
Configuring Data Domain Boost for the Greenplum Database
After you set up credentials for Data Domain Boost on the Greenplum Database, perform the following tasks in Data Domain to allow Data Domain Boost to work with the Greenplum Database:
Configuring Distributed Segment Processing in Data Domain
Configure the distributed segment processing option on the Data Domain system. The configuration applies to all the DCA servers and the Data Domain Boost plug-in installed on them. This option is enabled by default, but verify that it is enabled before using Data Domain Boost backups:
# ddboost option show
To enable distributed segment processing:
# ddboost option set distributed-segment-processing {enabled | disabled}
Configuring Advanced Load Balancing and Link Failover in Data Domain
If you have multiple network connections on a network subnet, you can create an interface group to provide load balancing and higher network throughput on your Data Domain system. When a Data Domain system on an interface group receives data from the media server clients, the data transfer is load balanced and distributed as separate jobs on the private network. You can achieve optimal throughput with multiple 1 GbE connections.
To create an interface group on the Data Domain system, create interfaces with the net command (if interfaces do not already exist), add the interfaces to the group, and register the Data Domain system with the backup application.
- Add the interfaces to the group:
# ddboost ifgroup add interface 192.168.1.1
# ddboost ifgroup add interface 192.168.1.2
# ddboost ifgroup add interface 192.168.1.3
# ddboost ifgroup add interface 192.168.1.4
Note: You can create only one interface group and this group cannot be named. - Select one interface on the Data Domain system to register with the
backup application. Create a failover aggregated interface and register that
interface with the backup application.Note: You do not have to register one of the ifgroup interfaces with the backup application. You can use an interface that is not part of the ifgroup to register with the backup application.
- Enable DD Boost on the Data Domain system:
# ddboost ifgroup enable
- Verify the Data Domain system configuration as follows:
# ddboost ifgroup show config
Results similar to the following appear.
Interface
-------------
192.168.1.1
192.168.1.2
192.168.1.3
192.168.1.4
-------------
You can add or delete interfaces from the group at any time.
Export the Data Domain Path to the DCA Network
The commands and options in this topic apply to DDOS 5.0.x and 5.1.x. See the Data Domain documentation for details.
# nfs add /backup/ost 172.28.8.0/24, 172.28.12.0/24 (insecure)
Create the Data Domain Login Credentials for the DCA
Create a username and password for the DCA to access the DD Boost Storage Unit (SU) at the time of backup and restore:
# user add <user> [password <password>] [priv {admin | security | user}]
Backup Options for Data Domain Boost
Specify the gpcrondump options to match the setup.
Data Domain Boost backs up files to the Data Domain system. Status and report files remain on the local disk.
To configure Data Domain Boost to remove old backup directories before starting a backup operation, specify a gpcrondump backup expiration option.
- The -c option clears all backup directories.
- The -o option clears the oldest backup directory.
To remove the oldest dump directory, specify gpcrondump --ddboost with the -o option. For example, if your retention period is 30 days, use gpcrondump --ddboost with the -o option on day 31.
Use gpcrondump --ddboost with the -c option to clear out all the old dump directories in db_dumps. The -c option deletes all dump directories that are at least one day old.
Using Symantec NetBackup
For Greenplum Database running Red Hat Enterprise Linux, you can configure Greenplum Database to perform backup and restore operations with Symantec NetBackup. To perform a back up or restore with NetBackup, you configure Greenplum Database and NetBackup and then run a Greenplum Database gpcrondump or gpdbrestore command. These are NetBackup topics.
About NetBackup Software
NetBackup includes the following server and the client software:
- The NetBackup master server manages NetBackup backups, archives, and restores. The master server is responsible for media and device selection for NetBackup.
- NetBackup Media servers are the NetBackup device hosts that provide additional storage by allowing NetBackup to use the storage devices that are attached to them.
- NetBackup client software that resides on the Greenplum Database hosts that contain data to back up.
See the Symantec NetBackup Getting Started Guide for information about NetBackup.
Performing a Back Up or Restore with NetBackup
The Greenplum Database gpcrondump and gpdbrestore utilities support options to back up or restore data to a NetBackup storage unit. When performing a back up, Greenplum Database transfers data files directly to the NetBackup storage unit. No backup data files are created on the Greenplum Database hosts. The backup metadata files are both stored on the hosts and the backed up to the NetBackup storage unit.
When performing a restore, the files are retrieved from the NetBackup server, and then restored.
The gpcrondump utility options for NetBackup:
--netbackup-service-host netbackup_master_server
--netbackup-policy policy_name
--netbackup-schedule schedule_name
--netbackup-block-size size (optional)
--netbackup-keyword keword (optional)
The gpdbrestore utility options for NetBackup:
--netbackup-service-host netbackup_master_server
--netbackup-block-size size (optional)
The policy name and schedule name are defined on the NetBackup master server. See Configuring NetBackup for Greenplum Database for information about policy name and schedule name. See the Greenplum Database Utility Guide for information about the Greenplum Database utilities.
During a back up or restore operation, a separate NetBackup job is created for the following types of Greenplum Database data:
- Segment data for each segment instance
- C database data
- Metadata
- Post data for the master
- State files Global objects (gpcrondump -G option)
- Configuration files for master and segments (gpcrondump -g option)
- Report files (gpcrondump -h option)
In the NetBackup Administration Console, the Activity Monitor lists NetBackup jobs. For each job, the job detail displays Greenplum Database backup information.
Example Back Up and Restore Commands
gpcrondump -x customer --netbackup-service-host=nbu_server1
   --netbackup-policy=gpdb_cust --netbackup-schedule=gpdb_backup
   --netbackup-block-size=1024
This gpdbrestore command restores Greenplum Database data from the data managed by NetBackup master server nbu_server1. The option -t 20130530090000 specifies the timestamp generated by gpcrondump when the backup was created. The -e option specifies that the target database is dropped before it is restored.
gpdbrestore -t 20130530090000 -e --netbackup-service-host=nbu_server1
Configuring Greenplum Database Hosts for NetBackup
You install and configure NetBackup client software on the Greenplum Database master host and all segment hosts.
- Install the NetBackup client software on Greenplum Database hosts. See the NetBackup installation documentation for information on installing NetBackup clients on UNIX systems.
- Set parameters in the NetBackup configuration file
/usr/openv/netbackup/bp.conf on the Greenplum Database master and
segment hosts. Set the following parameters on each Greenplum Database host.
Table 1. NetBackup bp.conf parameters for Greenplum Database Parameter Description SERVER Host name of the NetBackup Master Server MEDIA_SERVER Host name of the NetBackup Media Server CLIENT_NAME Host name of the Greenplum Database Host See the Symantec NetBackup Administrator's Guide for information about the bp.conf file.
- Set the LD_LIBRARY_PATH environment variable for Greenplum
Database hosts to use NetBackup client 7.1 or 7.5. Greenplum Database ships with
NetBackup SDK library files compatible with NetBackup 7.1 and 7.5 clients. To use
the NetBackup 7.1 or 7.5 client that ships with Greenplum Database, add the
following line to the file
$GPHOME/greenplum_path.sh:
LD_LIBRARY_PATH=$GPHOME/lib/nbuNN/lib:$LD_LIBRARY_PATH
Replace the NN with 75 or 71 depending on the NetBackup client you need to use.
The LD_LIBRARY_PATH line should be added before this line in $GPHOME/greenplum_path.sh
export LD_LIBRARY_PATH
- Run this command to remove the current LD_LIBRARY_PATH
value:
unset LD_LIBRARY_PATH
- Run this command to update the environment variables for Greenplum
Database:
source $GPHOME/greenplum_path.sh
See the Symantec NetBackup Administrator's Guide for information about configuring NetBackup servers.
- Ensure that the Greenplum Database hosts are listed as NetBackup clients for the
NetBackup server.
In the NetBackup Administration Console, the information for the NetBackup clients, Media Server, and Master Server is in NetBackup Management node within the Host Properties node.
- Configure a NetBackup storage unit. The storage unit must be configured to point
to a writable disk location.
In the NetBackup Administration Console, the information for NetBackup storage units is in NetBackup Management node within the Storage node.
- Configure a NetBackup backup policy and schedule within the policy.
In the NetBackup Administration Console, the Policy node below the Master Server node is where you create a policy and a schedule for the policy.
- In the Policy Attributes tab, these values are required
for Greenplum Database:
The value in the Policy type field must be DataStore
The value in the Policy storage field is the storage unit created in the previous step.
The value in Limit jobs per policy field must be at least 3.
- In the Policy Schedules tab, create a NetBackup schedule for the policy.
- In the Policy Attributes tab, these values are required
for Greenplum Database:
Configuring NetBackup for Greenplum Database
See the Symantec NetBackup Administrator's Guide for information about configuring NetBackup servers.
- Ensure that the Greenplum Database hosts are listed as NetBackup clients for the
NetBackup server.
In the NetBackup Administration Console, the information for the NetBackup clients, Media Server, and Master Server is in NetBackup Management node within the Host Properties node.
- Configure a NetBackup storage unit. The storage unit must be configured to point to
a writable disk location.
In the NetBackup Administration Console, the information for NetBackup storage units is in NetBackup Management node within the Storage node.
- Configure a NetBackup backup policy and schedule within the policy.
In the NetBackup Administration Console, the Policy node below the Master Server node is where you create a policy and a schedule for the policy.
- In the Policy Attributes tab, these values are required
for Greenplum Database:
The value in the Policy type field must be DataStore
The value in the Policy storage field is the storage unit created in the previous step.
The value in Limit jobs per policy field must be at least 3.
- In the Policy Schedules tab, create a NetBackup schedule for the policy.
- In the Policy Attributes tab, these values are required
for Greenplum Database:
System Requirements
- Greenplum Database 4.3.3 or later. Note: Greenplum Database uses the NetBackup API (XBSA) to communicate with the NetBackup. Greenplum Database uses SDK version Symantec XBSA 1.1.0.
- NetBackup client software installed and configured on the Greenplum Database master
host and all segment hosts.
The NetBackup client software must be able to communicate with the NetBackup server software.
- NetBackup Master Server Version 7.5 and NetBackup Media Server Version 7.5
- NetBackup Client version 7.1 or later.
Limitations
- NetBackup is not compatible with DDBoost. Both NetBackup and DDBoost cannot be used in a single back up or restore operation.
- For incremental back up sets, a full backup and associated incremental backups, the backup set must be on a single device. For example, a backup set must all be on a NetBackup system. The backup set cannot have some backups on a NetBackup system and others on the local file system or a Data Domain system.
Using Named Pipes
Greenplum Database supports using named pipes with gpcrondump and gpdbrestore to back up and restore a Greenplum database. When backing up a database with regular files, the files that contain the backup information are placed in directories on the Greenplum Database segments. When you use named pipes, you can configure named pipes on Greenplum Database segments to connect to another process, such as input process to a backup device. With named pipes you can back up data without the need for regular files to temporarily store the backup files.
Backing up with named pipes is not supported if the option --ddboost is specified.
To back up a Greenplum database using named pipes:
- Generate the names of the named pipes with the
gpcrondump options -K timestamp
and --list-backup-files.
The file names use the timestamp specified by the -K timestamp option and have the suffix _pipes and _regular_files. For example:
gp_dump_20130514093000_pipes
gp_dump_20130514093000_regular_files
The file names listed in the _pipes file can be created as named pipes. The file names in the _regular_files file cannot be created as named pipes. gpcrondump and gpdbrestore use the information in these files during backup and restore operations. - Create the named pipes as writeable on all Greenplum Database segments.
- Back up the database using the named pipes.
To back up a complete set of Greenplum Database backup files, the files listed in the _regular_files file must also be backed up.
- Configure the named pipes as readable.
- Restore the database using the named pipes and the backup files.
Example
This gpcrondump command creates two text files that contain the file names that will be used to back up the database testdb. The files are created in the directory /backups.
gpcrondump -x testdb -K 20130530090000 --list-backup-files -u /backups
After you create the writeable named pipes on all the Greenplum Database segments, you run gpcrondump to back up the database.
gpcrondump -x testdb -K 20130530090000 -u /backups
To restore the database with gpdbrestore, you configure the named pipes as readable and run this command:
gpdbrestore -x testdb -t 20130530090000 -u /backups
Automating Parallel Backups with gpcrondump
You can call gpcrondump directly or from a crontab entry. Use gpcrondump to backup databases, data, and objects such as database roles and server configuration files.
As the default, gpcrondump creates the dump files in the master and each segment instance's data directory in <data_directory>/db_dumps/YYYYMMDD. The segment data dump files are compressed using gzip.
To schedule a dump operation using CRON
- On the master, log in as the Greenplum superuser (gpadmin).
- Define a crontab entry that calls gpcrondump. For
example, if your shell is bin/bash and the PATH
includes the location of the Greenplum Database management utilities, schedule a
nightly dump of the sales database at one minute past midnight as
follows:
Linux Example:
SHELL=/bin/bash
GPHOME=/usr/local/greenplum-db-4.3.0.0
MASTER_DATA_DIRECTORY=/data/gpdb_p1/gp-1
01 0 * * * gpadmin source $GPHOME/greenplum_path.sh;

gpcrondump -x sales -c -g -G -a -q >> gp_salesdump.log
- Create a file named mail_contacts in either the
Greenplum superuser's home directory or in $GPHOME/bin. For example:
$ vi /home/gpadmin/mail_contacts
$ vi /export/home/gpadmin/mail_contacts
- In this file, type one email address per line. For example:
- Save and close the mail_contacts file. gpcrondump will send email notifications to the email addresses listed in this file.
- Ensure the One-Time Data Domain Boost Credential Setup is complete.
- Add the option --ddboost to the gpcrondump
option:
gpcrondump -x mydatabase -z -v --ddboost
Some of the options available in gpcrondump have different implications when using Data Domain Boost. For details, see gpcrondump in the Greenplum Database Utility Guide.
Restoring From Parallel Backup Files
How you restore a database from parallel backup files depends on how you answer the following questions.
- Where are your backup files? If your backup files are on the segment hosts where gpcrondump created them, you can restore the database with gpdbrestore. If you moved your backup files off the Greenplum array, for example to an archive server with gpcrondump, use gpdbrestore.
- Are you recreating the Greenplum Database system, or just restoring your data? If Greenplum Database is running and you are restoring your data, use gpdbrestore. If you lost your entire array and need to rebuild the entire system from backup, use gpinitsystem.
- Are you restoring to a system with the same number of segment instances as your backup set? If you are restoring to an array with the same number of segment hosts and segment instances per host, use gpdbrestore. If you are migrating to a different array configuration, you must do a non-parallel restore. See Restoring to a Different Greenplum System Configuration.
Restoring a Database Using gpdbrestore
The gpdbrestore utility provides convenience and flexibility in restoring from a set of backup files created by gpcrondump. To restore using gpdbrestore, ensure that you have:
- A complete set of backup files created by a gpcrondump operation. A full backup and any required incremental backups.
- A running Greenplum Database system.
- A Greenplum Database system with the same number of primary segment instances as the system that was backed up.
- The database you are restoring to is created in the system.
To restore from an archive host using gpdbrestore
This procedure assumes that the backup set was moved off the Greenplum array to another host in the network.
- Ensure that the archive host is reachable from the Greenplum master
host:
$ ping archive_host
- Ensure that the restore's target database exists. For
example:
$ createdb database_name
- From the master, run the gpdbrestore utility.
-R specifies the host name and path to a complete backup set:
$ gpdbrestore -R archive_host:/gpdb/backups/archive/20120714
- Ensure the One-Time Data Domain Boost Credential Setup is complete.
- Add the option --ddboost to the
gpdbrestore
option:
$ gpdbrestore -t backup_timestamp -v -ddboost
Restoring to a Different Greenplum System Configuration
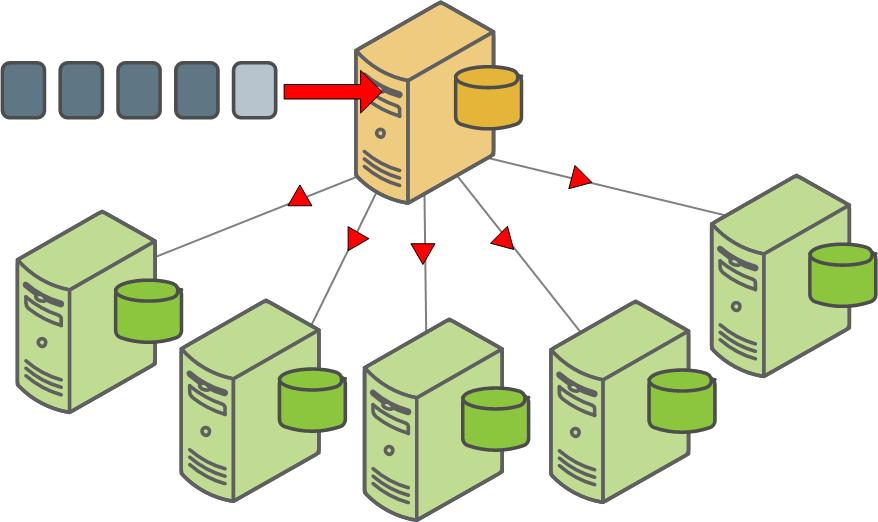
To perform a parallel restore operation using gpdbrestore, the system you are restoring to must have the same configuration as the system that was backed up. To restore your database objects and data into a different system configuration, for example, to expand into a system with more segments, restore your parallel backup files by loading them through the Greenplum master. To perform a non-parallel restore, you must have:
- A full backup set created by a gpcrondump operation. The backup file of the master contains the DDL to recreate your database objects. The backup files of the segments contain the data.
- A running Greenplum Database system.
- The database you are restoring to exists in the system.
Segment dump files contain a COPY command for each table followed by the data in delimited text format. Collect all of the dump files for all of the segment instances and run them through the master to restore your data and redistribute it across the new system configuration.
To restore a database to a different system configuration
- Ensure that you have a complete backup set, including dump files of the master (gp_dump_1_1_timestamp, gp_dump_1_1_timestamp_post_data) and one for each segment instance (gp_dump_0_2_timestamp, gp_dump_0_3_timestamp, gp_dump_0_4_timestamp, and so on). Each dump file must have the same timestamp key. gpcrondump creates the dump files in each segment instance's data directory. You must collect all the dump files and move them to one location on the master host. You can copy each segment dump file to the master, load it, and then delete it after it loads successfully.
- Ensure that the database you are restoring to is created in the
system. For
example:
$ createdb database_name
- Load the master dump file to restore the database objects. For
example:
$ psql database_name -f /gpdb/backups/gp_dump_1_1_20120714
- Load each segment dump file to restore the data. For
example:
$ psql database_name -f /gpdb/backups/gp_dump_0_2_20120714
$ psql database_name -f /gpdb/backups/gp_dump_0_3_20120714
$ psql database_name -f /gpdb/backups/gp_dump_0_4_20120714
$ psql database_name -f /gpdb/backups/gp_dump_0_5_20120714
...
- Load the post data file to restore database objects such as indexes,
triggers, primary key constraints,
etc.
$ psql database_name -f /gpdb/backups/gp_dump_0_5_20120714_post_data
- Update the database sequences based on the values from the original database. You can use the system utilities gunzip and egrep to extract the sequence value information from the original file Greenplum Database master dump file gp_dump_1_1_timestamp.gz into a text file. This command extracts the information into the file schema_path_and_seq_next_val.
gunzip -c path_to_master_dump_directory/gp_dump_1_1_timestamp.gz | egrep "SET search_path|SELECT pg_catalog.setval"
   > schema_path_and_seq_next_val
This example command assumes the original Greenplum Database master dump file is in /data/gpdb/master/gpseg-1/db_dumps/20150112.
gunzip -c /data/gpdb/master/gpseg-1/db_dumps/20150112/gp_dump_1_1_20150112140316.gz
  | egrep "SET search_path|SELECT pg_catalog.setval" > schema_path_and_seq_next_val
After extracting the information, use the Greenplum Database psql utility to update the sequences in the database. This example command updates the sequence information in the database test_restore:
psql test_restore -f schema_path_and_seq_next_val