| Appendix E. gtkmm and Win32 | ||
|---|---|---|
|
|
|
|
| Appendix E. gtkmm and Win32 | ||
|---|---|---|
|
|
|
|
Table of Contents
One of the major advantages of gtkmm is that it is crossplatform. gtkmm programs written on other platforms such as GNU/Linux can generally be transferred to Windows (and vice versa) with few modifications to the source.
gtkmm currently only works with the MingW/GCC3.2 compiler on the Windows platform. This is unlikely to change in the near future, unless Microsoft upgrades its compilers in Visual Studio to fully support the C++ standard. Information about the gtkmm and the latest Microsoft C++ compiler might be on the mailing list.
Installation of MingW is beyond the scope of this document, though not excessively difficult. However, a good GPL'd C++ IDE for windows called Dev-C++ has a convenient Windows installer that installs both the IDE and the MingW/GCC3.2 compiler, and we can recommend it. We will now show step by step how to install gtkmm and properly set up Dev-C++ as your gtkmm development environment. The following instructions should work for Dev-C++ versions 4.9.8.0 or higher. For people who prefer command line compiler tools, a solution based on the cygwin distribution will be described in the last section of this chapter.
We strongly recommend that Dev-C++ is installed and tested before installing any of the GTK+ or gtkmm libraries, as we will be installing all the libraries into the Dev-C++ directory. Ensure that you are able to successfully compile and run a simple C++ program from Dev-C++ before proceeding to the next step. For instance, try a simple Hello World program.
Note: Currently (as of v4.9.8.0) Dev-C++ does not like to be installed in directories with spaces in them. Installing Dev-C++ to the "Program Files" directory may cause problems at a later stage when it looks for the include and lib directories.
The gtkmm Windows installer requires you to first install the following dependencies:
GTK+ 2.x
Before installing gtkmm, you need to install the latest GTK+ 2.x. You can find the latest windows installer at Glade/Gtk+ for Win32. The Windows installer will correctly install any dependencies that GTK+ 2.x may need.
You will need to download and install the Gtk+/Win32 Development Environment. This includes the runtime, devel, docs, and glade. Start with the Development GTK+ installer, and allow the installation to proceed to the default directory.
Now you are ready to install gtkmm. You can find a link to an installer on the gtkmm web site's download page. The gtkmm Windows installer includes both the development and the runtime files.
Since we are going to be using Dev-C++ as our IDE, it is strongly suggested that you install gtkmm into the base Dev-C++ directory (ie. d:\dev-cpp). This will make things easier later on when setting up the include and lib directories in Dev-C++.
You should now be ready to execute Win32 gtkmm compiled binaries. Note: Some older versions of Windows may require a reboot before the installer's change to the PATH variable takes effect.
Now we need to set some project options to create our first gtkmm project in Dev-C++.
First, we need to let Dev-C++ know what files and libraries to include when it invokes MingW/GCC3.2. To find out what arguments need to be passed to GCC, we need to open a command prompt and type the following:
pkg-config --cflags gtkmm-2.4
If the pkg-config command cannot be found, you can cd to the bin/ directory of where you installed Dev-C++ and execute the above line from there. Depending on where you installed gtkmm, you will get output that looks similar to the following:
	    -Id:/dev-c++/include/gtkmm-2.4
	    -Id:/dev-c++/lib/gtkmm-2.4/include
	    -Id:/dev-c++/include/gtk-2.0
	    -Id:/dev-c++/lib/sigc++-2.0/include
	    -Id:/dev-c++/include/sigc++-2.0
	    -Id:/dev-c++/include/glib-2.0
	    -Id:/dev-c++/lib/glib-2.0/include
	    -Id:/dev-c++/lib/gtk-2.0/include
	    -Id:/dev-c++/include/pango-1.0 -Id:/dev-c++/include/atk-1.0
	    -Ld:/dev-c++/lib
The next step is to obtain the list of libraries by issuing the following command:
pkg-config --libs gtkmm-2.4
Your results may look something similar to this:
	    -lgtkmm-2.4 -lgdkmm-2.4 -latkmm-1.0
	    -lgtk-win32-2.0 -lpangomm-1.4 -lglibmm-2.4 -lsigc-2.0
	    -lgdk-win32-2.0 -latk-1.0 -lgdk_pixbuf-2.0 -lpangowin32-1.0
	    -lgdi32 -lpango-1.0 -lgobject-2.0 -lgmodule-2.0 -lglib-2.0
	    -lintl -liconv
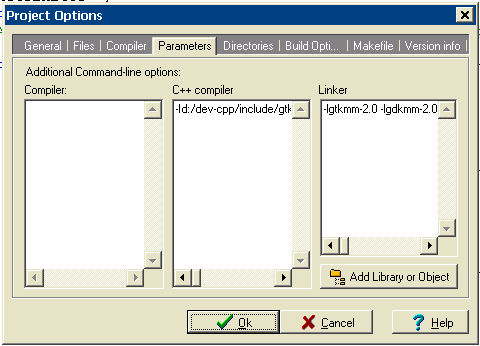
Now create a new Project. We will make this project work with
gtkmm. After creating a new project, select Project Options
from the menu, and under the Parameters tab, we will need to enter the information
we obtained earlier: In the Additional commandline options for
the C++ compiler, paste the include and lib directories you obtained with
the --cflags argument. (The commandline options preceeded by either an -I or a -L).
Now we must tell the linker what libraries to include, by pasting the libraries into the Additional commandline options for the Linker. (These commandline options are preceeded by a -l).
Congratulations. You have successfully created a new project in Dev-C++ that works with gtkmm. Try compiling some of the examples in this tutorial.
|
|
|
|
| Appendix D. Comparison with other signalling systems | Command line tools |