Appendix A: Prediction Service Builder
This appendix describes the standalone Prediction Service Builder. For information on how to access this utility from within Steam, refer to the Making Predictions section.
About the H2O Prediction Service Builder
The H2O Prediction Service Builder is a standalone web service application that allows you to perform the following through either a web UI or from the command line:
- Compile one or more Java files (POJOs), and then build a Jar file from a POJO and a gen-model file
- Compile a POJO or model (MOJO) and build a War file that is a web service from a POJO/MOJO, gen-model. You can then run the war file with Jetty, Tomcat, and more
- Build a War file with a POJO/MOJO predictor and Python pre-preprocessing
- Build a War file with a POJO/MOJO predictor and preprocessing from a Jar file. This enables use of languages such as Java, Scala, Clojure, Jython, JRuby, and Groovy for arbitrary preprocessing
Notes
All code is compiled to Java 1.6 to make it useable with rJava for R.
If you use an older version of Java, you will need to use an older jetty-runner.
- Jetty 9.3 requires Java 1.8.
- Jetty 9.0-9.2 requires Java 1.7.
- Jetty 8 requires Java 1.6.
Testing has been done on Java 1.6-1.8.
- For Java 1.8, you can use all Jetty runners.
- For Java 1.7, you can use all except the 9.3 version.
- For Java 1.6, you need Jetty 8.
Not all Jetty Jar files work. There’s a working Jar for each Jetty version included in this distribution.
Build and Run the Builder Service
Perform the following steps to build the H2O Prediction Service Builder:
Clone the https://github.com/h2oai/steam repository.
In a terminal window, navigate to the steam/prediction-service-builder folder.
Run
./gradlew buildto build the service.You will see a BUILD SUCCESSFUL message upon completion. Run
./gradlew jettyRunWarto run the builder service.Open a browser and navigate to localhost:55000 to begin using the H2O Prediction Service Builder web UI.

Prediction Builder Service
Running an Example War File
Using the Web UI
When the Builder Service is running, you can make a War file using the Web UI.
The following screenshot shows how to make a War file using a POJO file and a Jar file, which are specified in the JAVA PREDICTION FILES SECTION. An example model and an H2O Jar file are included in the steam/prediction-service-builder/examples/pojo-server folder.
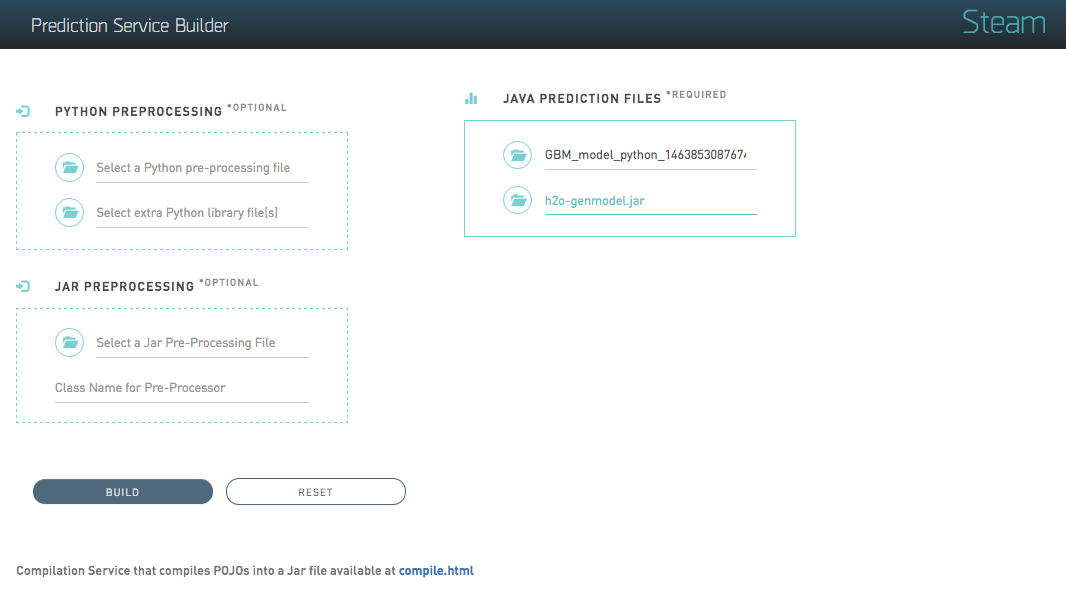
Make War
Click Upload to upload the files to the Prediction Service Builder and create a War file.
Note: You can also build a War file using a model with an additional pre-processing step. There are two options for this: Python or Java/Scala.
- Python. Specify a Python file and additional pre-processing python files and use
makewarpython. When these files are specified, the prediction file will perform additional pre-processing on the specified model before predicting with the model POJO. - Java/Scala/Jar. Specify a Jar file that contains everyting you need, then the name of the Class that performs the preprocessing. Use the regular
makewar. When these files are specified, the prediction file will perform additional pre-processing on the specified model before predicting with the model POJO..
For testing, an example python file is available in the /prediction-service/builder/examples/spam-detection-python folder. The additional python files are available in the /prediction-service/builder/examples/spam-detection-python/lib folder.
Using the CLI
Note that when the Builder Service is running, you can also make a war file using command line arguments. For example:
curl -X POST --form pojo=@examples/pojo-server/gbm_3f258f27_f0ad_4520_b6a5_3d2bb4a9b0ff.java --form jar=@examples/pojo-server/h2o-genmodel.jar localhost:55000/makewar > example.war
where:
gbm_3f258f27_f0ad_4520_b6a5_3d2bb4a9b0ff.javais the POJO file from H2Oh2o-genmodel.jaris the corresponding Jar file from your version of H2O
The POJO and Jar files are included in the steam/prediction-service-builder/examples/pojo-server folder.
Starting the H2O Prediction Service
You can start the H2O Prediction Service using the CLI, or you can run the example scripts included with this package. Running the scripts will automatically start the H2O Prediction Service.
Using the CLI
Open a terminal window and run the following command to run the prediction service using the gbm_3f258f27_f0ad_4520_b6a5_3d2bb4a9b0ff.war file that was just built:
java -jar jetty-runner-9.3.9.M1.jar --port 55001 ~/Downloads/gbm_3f258f27_f0ad_4520_b6a5_3d2bb4a9b0ff.war
This starts the H2O Prediction Service at localhost:55001. You can use this web service at http://localhost:55001.
Example Service
Using example.sh
This distribution includes scripts that can be used to quickly get your prediction service up and running.
Open a terminal window and run the following commands from the steam/steam-prediction-service folder.
# Run an example using the airline dataset
cd examples/pojo-server
sh example.sh
sh run-example.sh
or
# Run an example using the spam-detection dataset
cd examples/spam-detection-python
sh example-python.sh
sh run-example-python.sh
These example scripts generate a War file and then start the prediction service at http://localhost:55001 using a subset of either the airline or spam-detection dataset.
Using example-python.sh
Note: If you run the example-python.sh and run-example-python.sh files, be sure to install textblob (pip install textblob) so that the python example runs properly.
To help ensure that all libraries are installed for Python, there’s an optional file that can be sent
to makewarpython. Set the form field envfile to the contents of this file. This file has to be an Anaconda Python
environment specification YAML file. A Conda environment will be created with the same name as this filename,
except it will not include the .yaml extension. For example, if a file is named spam-python.yaml, the Conda environment will be named spam-python. example-envfile.sh is an example of how to use this feature.
To create the YAML environment file, do
conda env export > sp2.yaml
To test the environment file you can create a new one with
conda env create -f sp2.yaml -n newenv
This creates a new Anaconda environment using the sp2.yaml environment specification.
Making Predictions
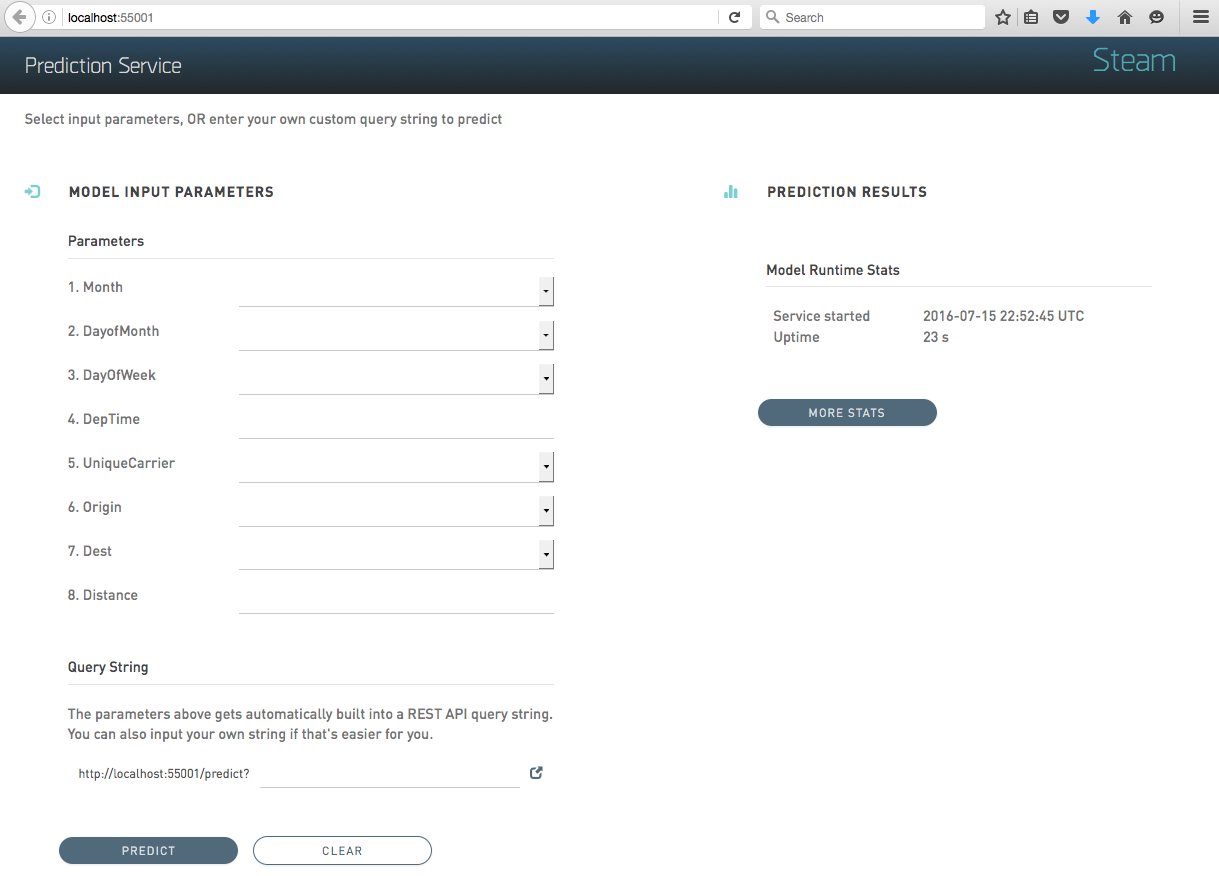
Using the Web UI
The Prediction Service includes a list of the model input parameters that you can specify when making a prediction. The parameters are based on the column headers from the dataset that was used to build the model.
Specify a set of prediction values, or enter an input values query string, then click Predict to view the prediction.
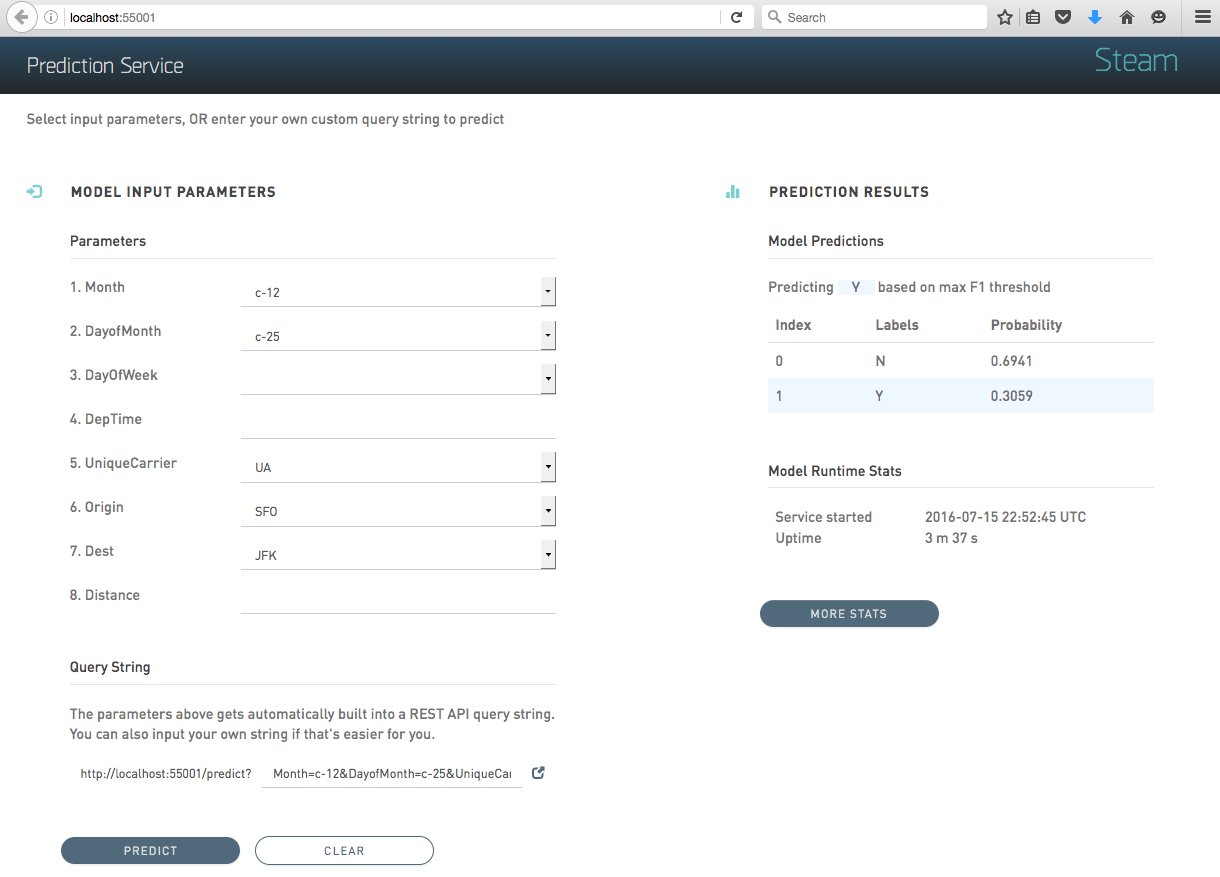
Example Prediction
Using the CLI
GET
You can send a GET request with the input variables as the query string.
curl "localhost:55001/predict?Dest=JFK"
This returns a JSON result:
{"labelIndex":1,"label":"Y","classProbabilities":[0.026513747179178093,0.9734862528208219]}
The predictor has two classes. “Y” was predicted with a probability of 97%.
POST
JSON can be sent using a POST request.
curl -X POST --data '{Dest: JFK}' localhost:55001/predict
This returns a JSON result:
{"labelIndex":1,"label":"Y","classProbabilities":[0.026513747179178093,0.9734862528208219]}
Batch POST
You can also send multiple JSON inputs at the same time as a batch. Each
JSON input has to be on a separate line. If the file jsonlines.txt
contains
{"Dest":"JFK"}
{"Dest":"SFO"}
{"Dest":"JFK"}
The command
curl -X POST --data-binary @jsonlines.txt http://localhost:55001/predict
then returns
{"labelIndex":1,"label":"Y","classProbabilities":[0.026513747179178093,0.9734862528208219]}
{"labelIndex":1,"label":"Y","classProbabilities":[0.008905417583984554,0.9910945824160154]}
{"labelIndex":1,"label":"Y","classProbabilities":[0.026513747179178093,0.9734862528208219]}
H2O Prediction Run-Time Stats
Prediction statistics are provided in the web page for the predictor and as a web service in JSON at
http://localhost:55001/stats
- When the service was started in UTC and its uptime in days
- When the last prediction was run in UTC and how long ago that was in days
- How long time the last prediction took in milliseconds
- Total and average prediction time, with and without skipping the first 5 predictions (warmup)
- There are separate sections for
- pure predictions using the pojo
- GET and POST for POJOs
- GET and POST for POJOs with Python preprocessing
- GET and POST statistics include the time from when the service recieves the input until it returns the result
Click the More Stats button to view more Prediction Service statistics.