
To install Spark manually, see Installing and Configuring Apache Spark in the Non-Ambari Cluster Installation Guide. The remainder of this section describes how to install and configure Spark using Ambari.
The following diagram shows the Spark installation process using Ambari. (For general information about installing HDP components using Ambari, see Adding a Service in the Ambari Documentation Suite.)
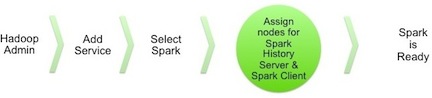
To install Spark using Ambari, complete the following steps:
Choose the Ambari "Services" tab.
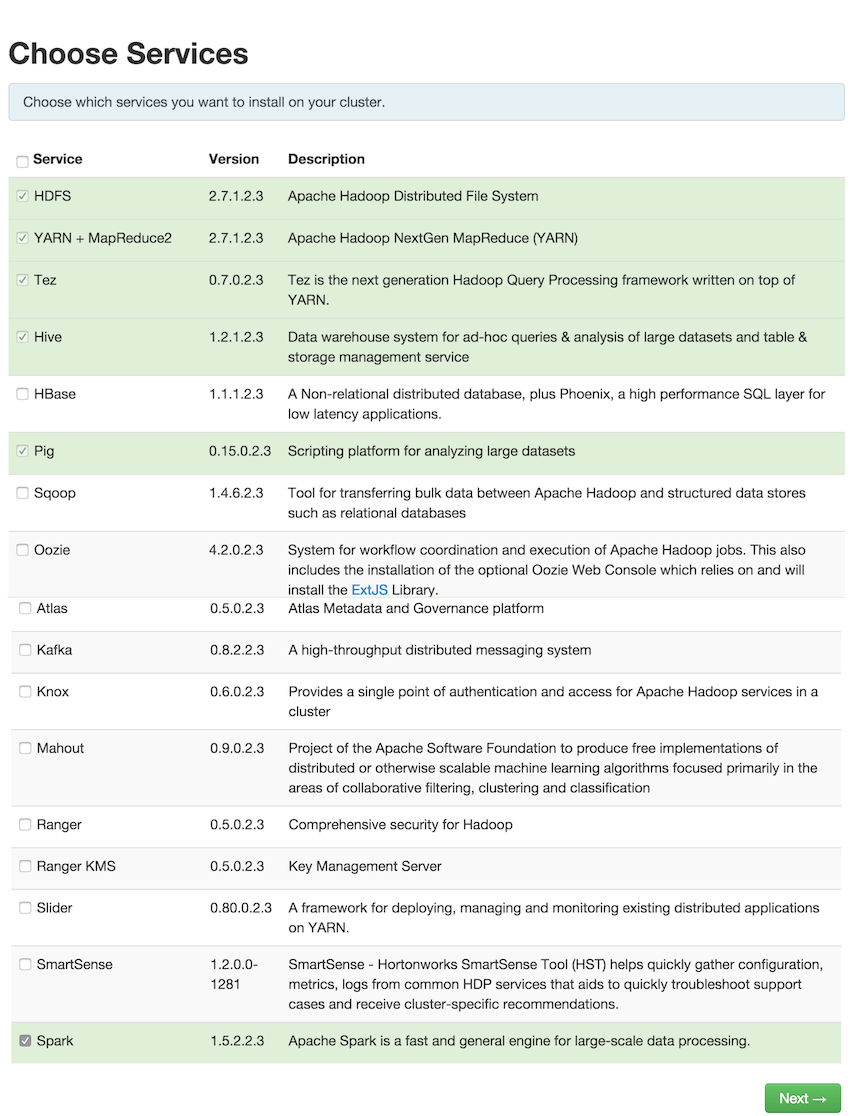
In the Ambari "Actions" pulldown menu, choose "Add Service." This will start the Add Service Wizard. You'll see the Choose Services screen.
Select "Spark", and click "Next" to continue.
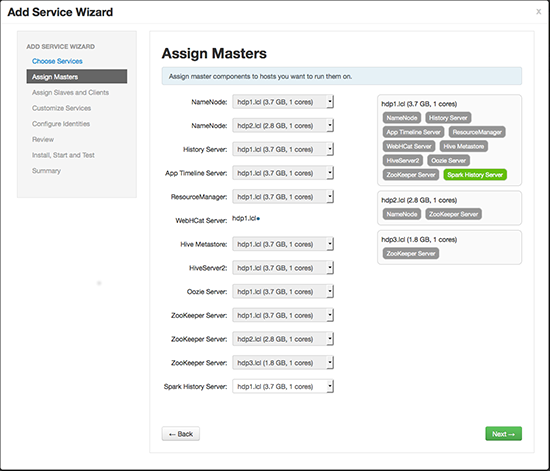
On the Assign Masters screen, choose a node for the Spark History Server.
Click "Next" to continue.
On the Assign Slaves and Clients screen, specify the node(s) that will run Spark clients. These nodes -- where the Spark client is deployed -- will be the nodes from which Spark jobs can be submitted to YARN.
Optionally, install the Spark Thrift Server on specific nodes in the cluster.
![[Note]](../common/images/admon/note.png)
Note There are two ways to add the Spark Thrift Server to your cluster: during component installation (described in this subsection), or at any time after Spark has been installed and deployed. To install the Spark Thrift Server later, add the optional STS service to the specified host. For more information, see "Installing the Spark Thrift Server after Installing Spark" (later in this chapter).
![[Important]](../common/images/admon/important.png)
Important Before installing the Spark Thrift Server, make sure that Hive is deployed on your cluster.
Click "Next" to continue.

If you are installing the Spark Thrift Server at this time, navigate to the "Advanced spark-thrift-sparkconf" area and set the
spark.yarn.queuevalue to the queue that you want to use. Other than that there are no properties that must be set using the Customize Services screen. We recommend that you use default values for your initial configuration.Click "Next" to continue.
Ambari will display the Review screen.
Important On the Review screen, make sure all HDP components are version 2.3.4 or later.
Click "Deploy" to continue.
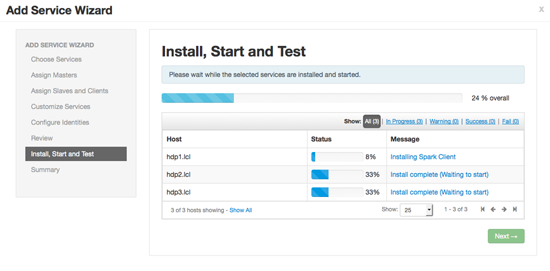
Ambari will display the Install, Start and Test screen. The status bar and messages will indicate progress.
When finished, Ambari will present a summary of results. Click "Complete" to finish installing Spark.
![[Caution]](../common/images/admon/caution.png) | Caution |
|---|---|
Ambari will create and edit several configuration files. Do not edit these files directly if you configure and manage your cluster using Ambari. |
When you install Spark using Ambari, the hive-site.xml file is populated with
the Hive metastore location.
If you move Hive to a different server, edit the
SPARK_HOME/conf/hive-site.xml file so that it contains only the
hive.metastore.uris property. Make sure that the hostname points
to the URI where the Hive Metastore is running.
| Important |
|---|---|
|
<configuration>
  <property>
  <name>hive.metastore.uris</name>
  <!-- hostname must point to the Hive Metastore URI in your cluster -->
    <value>thrift://hostname:9083</value>
    <description>URI for client to contact metastore server</description>
  </property>
</configuration>
To validate the Spark installation, run the following Spark jobs:
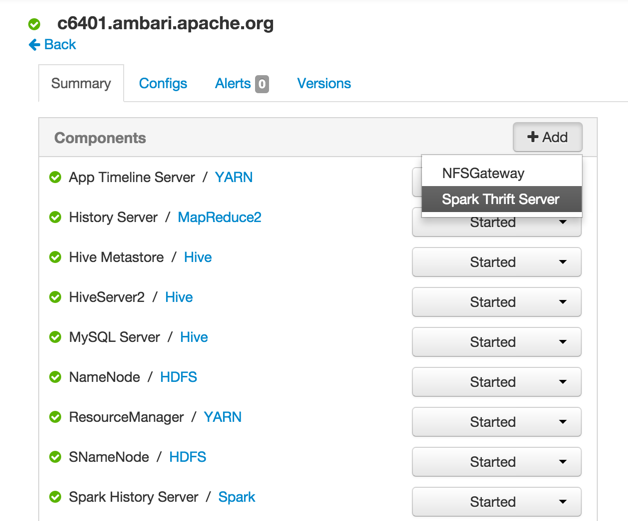
The Spark Thrift Server can be installed during Spark installation or after Spark is deployed.
To install the Spark Thrift Server after deploying Spark, add the service to the specified host:
On the Summary tab, click "+ Add" and choose the Spark Thrift Server:
Ambari will ask you to confirm the selection:
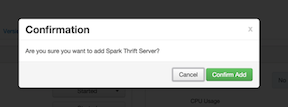
The installation process will run in the background until it completes:

The default Spark Thrift Server port is 10015. To specify a different port, navigate to
the hive.server2.thrift.port setting in the "Advanced spark-hive-site-override"
section of the Spark configuration section (shown below), and update it with your preferred
port number.

Spark jobs are submitted to a Hadoop cluster as YARN jobs. When a job is ready to run in a production environment, there are a few additional steps if the cluster is Kerberized:
The Spark History Server daemon needs a Kerberos account and keytab to run in a Kerberized cluster.
To submit Spark jobs in a Kerberized cluster, the account (or person) submitting jobs needs a Kerberos account & keytab.
When you enable Kerberos for a Hadoop cluster with Ambari, Ambari sets up Kerberos for the Spark History Server and automatically creates a Kerberos account and keytab for it. For more information, see Configuring Ambari and Hadoop for Kerberos.
If you are not using Ambari, or if you plan to enable Kerberos manually for the Spark History Server, refer to "Creating Service Principals and Keytab Files for HDP" in the "Setting up Security for Manual Installs" section of the Non-Ambari Cluster Installation Guide.
Here is an example showing how to create a spark principal and keytab file for
node [email protected]:
Create a Kerberos service principal:
kadmin.local -q "addprinc -randkey spark/[email protected]"Create the keytab:
kadmin.local -q "xst -k /etc/security/keytabs/spark.keytab
              spark/[email protected]"
Create a
sparkuser and add it to thehadoopgroup. (Do this for every node of your cluster.)useradd spark -g hadoopMake
sparkthe owner of the newly-created keytab:chown spark:hadoop /etc/security/keytabs/spark.keytabLimit access - make sure user
sparkis the only user with access to the keytab:chmod 400 /etc/security/keytabs/spark.keytab
The following example shows user spark running the Spark Pi example in a
Kerberos-enabled environment:
su spark

kinit -kt /etc/security/keytabs/spark.keytab spark/[email protected]

cd /usr/hdp/current/spark-client/

./bin/spark-submit --class org.apache.spark.examples.SparkPi --master yarn-cluster --num-executors 1 --driver-memory 512m --executor-memory 512m --executor-cores 1 lib/spark-examples*.jar 10If you are installing the Spark Thrift Server on a Kerberos-secured cluster, the following instructions apply:
The Spark Thrift Server must run in the same host as
HiveServer2, so that it can access thehiveserver2keytab.Edit permissions in
/var/run/sparkand/var/log/sparkto specify read/write permissions to the Hive service account.Use the Hive service account to start the
thriftserverprocess.
| Note |
|---|---|
We recommend that you run the Spark Thrift Server as user |
| Important |
|---|---|
When the Spark Thrift Server runs queries as user |
For Spark jobs that are not submitted through the Thrift Server, the user submitting the job
must have access to the Hive metastore in secure mode (via kinit).
