Table of Contents
- 1. Introduction
- 2. Test Expressions
- 3. Class junit.framework.Assert
- 4. Grouping test expressions into test methods
- 5. Interface junit.framework.Test
- 6. Abstract class junit.framework.TestCase
- 7. Class junit.framework.TestSuite
- 8. Making your TestCases Test-Runner-Friendly
- 9. Using Test Runners
- 10. Using JUnit with Ant
List of Tables
Table of Contents
If you notice any mistakes in this document, please email me at [email protected] so that I can correct them. You can also email me if you have problems with the procedures explained herein, or if you have questions, comments, suggestions or complaints.
This document is available in several formats.
You may be reading this document right now at http://admc.com/blaine/howtos/junit, or in a distribution somewhere else. I hereby call the document distribution from which you are reading this, your current distro.
http://admc.com/blaine/howtos/junit hosts the latest versions of all available formats. If you want a different format of the same version of the document you are reading now, then you should try your current distro. If you want the latest version, you should try http://admc.com/blaine/howtos/junit.
Sometimes, distributions other than http://admc.com/blaine/howtos/junit do not host all available formats. So, if you can't access the format that you want in your current distro, you have no choice but to use the newest version at http://admc.com/blaine/howtos/junit.
Table 1.1. Alternate formats of this document
| format | your distro | at http://admc.com/blaine/howtos/junit |
|---|---|---|
| Chunked HTML | index.html | http://admc.com/blaine/howtos/junit/index.html |
| All-in-one HTML | junit.html | http://admc.com/blaine/howtos/junit/junit.html |
| junit.pdf | http://admc.com/blaine/howtos/junit/junit.pdf |
I am writing this HOWTO because, in my opinion, JUnit is very simple and easy to learn, but there is no tutorial or HOWTO out there which is
concise
explains JUnit architecture accurately enough so that readers can figure out how to use JUnit in new situations
is accurate
The tutorials that I used to learn JUnit spent about 80% of my time learning the program that was to be tested as an example, and the resultant tutorial therefore took five times longer to digest than it should have. There is no need to learn to understand somebody else's data structures just to learn JUnit. If you have an hour to learn to use a terrific product, then proceed.
Buy some used books from my book store, http://librimagni.com .
JUnit is a program used to perform unit testing of virtually any software. JUnit testing is accomplished by writing test cases using Java, compiling these test cases and running the resultant classes with a JUnit Test Runner.
I will explain a teensy bit about software and unit testing in general. What and how much to test depends on how important it is to know that the tested software works right, in relation to how much time you are willing to dedicate to testing. Since you are reading this, then for some reason you have decided to dedicate at least some time to unit testing.
As an example, I'm currently developing an SMTP server. An SMTP server needs to handle email addresses of the format specified in RFC documents. To be confident that my SMTP server complies with the RFC, I need to write a test case for each allowable email address type specified in the RFC. If the RFC says that the character "#" is prohibited, then I should write a test case that sends an address with "#" and verifies that the SMTP server rejects it. You don't need to have a formal specification document to work from. If I wasn't aiming for compliance, I could just decide that it's good enough if my server accepts email addresses consisting only of letters, numbers and "@", and I don't care about whether other addresses succeed or fail.
Another important point to understand is that, everything is better if you make your tests before you implement the features. For my SMTP server, I did some prototyping first to make sure that my design will work, but I did not attempt to satsify my requirements with that prototype. I am now writing up my test cases and running them against existing SMTP server implementations (like Sendmail). When I get to the implementation stage, my work will be extremely well defined. Once my implementation satisfies all of the unit tests, just like Sendmail does, then my implementation will be completed. At that point, I'll start working on new requirements to surpass the abilities of Sendmail and will work up those tests as much as possible before starting the second implementation cycle. (If you don't have an available test target, then there sometimes comes a point where the work involved in making dummy test target isn't worth the trouble... so you just develop the test cases as far as you can until your application is ready).
Everything I've said so far has to do with unit testing, not JUinit specifically. Now on to JUnit...
The most important thing is to write tests like
(expectedResult == obtainedResult)You can do that without JUnit, of course. For the purpose of this document, I will call the smallest unit of testing, like the expression above, a test expression . All that JUnit does is give you flexibility in grouping your test expressions and convenient ways to capture and/or summarize test failures.
The Assert class has a bunch of static convenience methods to help you with individual test expressions. For example, without JUnit I might code
    if (obtainedResult == null || !expectedResult.equals(obtainedResult))
        throw new MyTestException("Bad output for # attempt");
With JUnit, you can code
    Assert.assertEquals("Bad output for # attempt",
                        expectedResults, obtainedResults);
There are lots of assert* methods to take care of the several common Java types. They take care of checking for nulls. assert() failures (and failure()s, which are the same thing) throw Throwables (probably RuntimeExceptions), which is just what you want to happen. If a test expression fails, that test method quits, cleanup is done, and the next test method in the sequence starts (with the error being noted). There are also static failure methods in the Assert class. They do the same thing as a failed assert()-- they throw a Throwable and fail the current test method. Take a look at the API spec for junit.framework.Assert. Enough said about Assert.
The smallest groupings of test expressions are the methods that you put them in. Whether you use JUnit or not, you need to put your test expressions into Java methods, so you might as well group the expressions, according to any criteria you want, into methods. For the purpose of this document, I will call a method that runs test expressions a "test method".
If you have 20 different test expressions to run, and five need to run over a single URLConnection, then it would make sense to put those into one method where you create the URLConnection, run the five test expressions, then clean up the URLConnection. The other methods may be in other methods in the same class, or in some other class. You have to pay attention to whether the different expressions should be run independently. Often test expressions have to be run sequentially with one set of resources-- that's what I'm talking about here. This all applies whether you are using JUnit or not. The point is, if a set of test expressions needs to be run sequentially using the same resource instance(s), they should be grouped in one method.
An object that you can run with the JUnit infrastructure is a Test. But you can't just implement Test and run that object. You can only run specially created instances of TestCase. (Running other implementations of Test will compile, but produce runtime errors.)
If you have test(s), each grouping of which needs independent resource(s) set up the same way (to avoid side-effects or for other reasons), then you can satisfy that need by making a setup method and a cleanup method. For every grouping needing these resources set up, you run
    setup();
    assert(something);
    assert(somethingelse);
    cleanup();
JUnit accomplishes this by having you extend the TestCase class and grouping your tests into methods that share those resource(s); and using the methods setUp() and tearDown() for the obvious purposes. All the tests in one method share the same setUp-ed resources. The setUp and tearDown method implementations need to match the signatures in the API spec for TestCase. This sequence of setUp() + yourTestMethod() + tearDown() is the exact purpose of Test.run().
The tricky thing to understand is, the only elemental Tests that can actually be run are TestCase implementations that were created with TestCase(String). Since TestCase is an abstract class, you can't just call TestCase(String)-- you have to implement TestCase and make a constructor that does super(String). The object "x" below is a runnable test.
    class X extends TestCase {
    ...
        public X(String s) {
            super(s);
        }
Then, in any class...
X x = new X("astring");Not very intuitive, but that's how it is. The string argument to TestCase(String) must be a method in the constructing class. For example, if X extends TestCase, then new X("astring" ) will have a runtime failure unless X has a method named "astring" that takes no arguments. This concept is very weird, but the concept is crucial to be able to figure out the many different ways that one can code JUnit unit tests. Therefore, let's solidify this with an exercise.
I urge you to do this very simple exercise to prove to yourself that TestCase instances created like new X("astring") are really runnable Tests.
Create a public class X that extends junit.framework.TestCase.
Make a public constructor for X that takes a String argument, and which just calls the super constructor of the same form.
Make an object method named "meth" that takes no arguments and throws Exception. Just have it print out something so that you can see when it is invoked.
Add a public static void main(String[]) method that throws Exception so that you can invoke the program.
In your main() method, run (new X("meth")).run();
This proves that new X("meth") really creates a runnable Test, and that when it runs, the following happens.
    anonymous.setUp();
    anonymous.meth();
    anonymous.tearDown();
Note that the setUp() and tearDown() methods executed are from the same exact class that your method ("meth" in our example) resides in. You can instantiate the Test and run it from some other class, but the three methods that get run come from the TestSuite-implementating class. An important implication of this is, if you code any setUp or tearDown method in a TestCase class, you should only put test methods into this class which need your setUp/tearDown methods to run before/after it. If you have a method which doesn't need these prep/cleanup actions, then move them into a TestCase that doesn't implement setUp/tearDown.
TestCase itself extends Assert, so your individual tests can be coded like assertEquals(this, that); , since this is now an Assert.
If you understand everything so far, then you understand JUnit much better than most JUnit users do.
You just run
(new myTestCase("myTestMethodName")).run();for every test you want to run. You can have as many TestCase implementation files with as many test methods as you want in each one, in addition to non-test methods. In these classes or in other classes, you can invoke any of these tests. You could have a test manager class with a main(String[]) method that invokes a variety of test methods in any of your TestCase implementation files.
At this point, you can write and execute all the JUnit tests you could ever want to. You probably want to use a JUnit supplied Test Runner though, to collect and display test results as it runs tests. We'll get to that later.
A TestSuite is just an object that contains an ordered list of runnable Test objects. TestSuites also implement Test() and are runnable. To run a TestSuite is just to run all of the elemental Tests in the specified order, where by elemental tests, I mean Tests for a single method like we used in the Abstract class junit.framework.TestCase chapter. TestSuites can be nested. Remember that for every elementeal Test run, three methods are actually invoked, setUp + test method + tearDown.
This is how TestSuites are used.
TestSuite s = new TestSuite();
s.addTest(new TC("tcm"));
s.addTest(new TD("tdm"));
s.addTestSuite(AnotherTestSuiteImplementation.class);
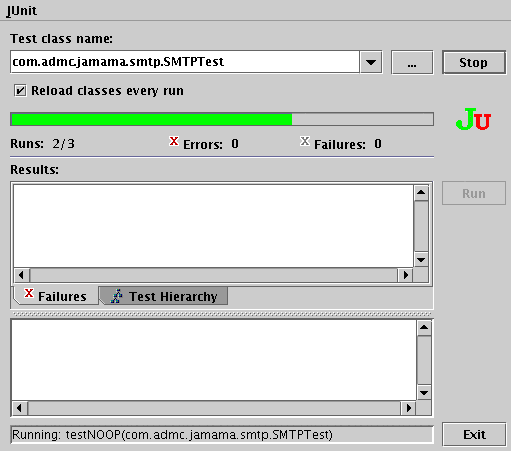
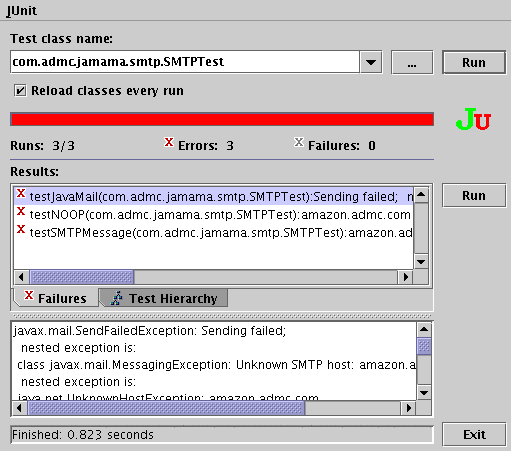
s.run(new TestResult());Test Runners execute Tests-- TestSuites and TestCases. They run Test.run() just like you did in our example, but they also collect, summarize, and format the results nicely. There are also graphical test runners. Test Runner in this sense is not a real class name. By Test Runner, I mean a Java class that can run JUnit tests and collect, summarize, and format the results. The JUnit Test Runners that I know extend junit.runner.BaseTestRunner. This is what your tests will look like if you use the JUnit Swing Test Runner.
Your current objective is to learn the best way to tell the Test Runners which TestSuites to run. There are many different methods-- nearly all of these methods are either ugly or inflexible (the former requiring you to implement inner classes with methods inside every single test method, the latter requiring that your test methods follow a naming convention and be run in a specific order with no omissions).
The one method that is extremly simple and so flexible that you will never need another method, is to just create a static method TestSuite.suite() that returns the TestSuite that you want run. You give the name of this TestCase class to a Test Runner and it will do exactly what you want it to do.
If a TestCase class has a suite() method, then when you run a Test Runner on that TestCase, it will run
    setUp();
    yourMethod();
    tearDown();
for each elemental test method in the TestSuite that your suite() method returns. Your suite() method creates and populates a new TestSuite object exacly as described in the Class junit.framework.TestSuite chapter, and returns it.
This method is very flexible because you can specify any subset of your methods in any sequence you wish. The methods can even come from different files. (Keep in mind that the setUp() and tearDown() methods for each test method come from the file containing the test method). You can name the methods as you wish, but they can't take any input parameters.
Here's exactly what you need to do to make a TestCase class that Test Runners can work with. You just add a (String) constructor to your TestCase subclass (because you need to call new YourTestCase(String) next). Then implement suite() by populating and returning a TestSuite.
    public SMTPTest(String s) { super(s); }

    static public junit.framework.Test suite() {
        junit.framework.TestSuite newSuite = new junit.framework.TestSuite();
        newSuite.addTest(new SMTPTest("testJavaMail"));
        newSuite.addTest(new SMTPTest("testNOOP"));
        newSuite.addTest(new SMTPTest("testSMTPMessage"));
        return newSuite;
};There are other ways to feed TestSuites to Test Runners, but, in my opinion, the strategy of returning a TestSuite via TestCase.suite(), as explained in the Making your TestCases Test-Runner-Friendly chapter is by far the best. Therefore, in this chapter I will explain how to use Test Runners with TestCases/TestSuites implemented in that way.
You can use any of the executable programs that JUnit comes with to select your TestCase class (with an implementation of suite()), and it will do exactly what you want.
You need to have the junit jar file and your own classes available in your classpath.
    # To run your TestCase suite:
    java -cp whatever:/path/to/junit.jar junit.textui.TestRunner MyTestClass

    # To run your TestCase suite in a Gui:
    java -cp whatever:/path/to/junit.jar junit.swingui.TestRunner MyTestClass

    # To run the TestRunner Gui and select your suite or test methods
    # from within the Gui:
    java -cp whatever:/path/to/junit.jar junit.swingui.TestRunner
Note
(Note that you can't supply more than one TestCase on the command-line, though after the Swing TestRunner is running, you can load multiple TestCases into it).
It is also very easy to make your TestCase class execute by just running it.
    # This runs the suite:
    java -cp whatever:/path/to/junit.jar org.blah.your.TestClass

    # This does the same thing with the fancy Gui:
    java -cp whatever:/path/to/junit.jar org.blah.your.TestClass -g
To have this ability, just copy the following code into any TestCase source file that you have.
    static public void main(String[] sa) {
        if (sa.length > 0 && sa[0].startsWith("-g")) {
            junit.swingui.TestRunner.run(SMTPTest.class);
        } else {
            junit.textui.TestRunner runner = new junit.textui.TestRunner();
            System.exit(
                    runner.run(runner.getTest(SMTPTest.class.getName())).
                            wasSuccessful() ? 0 : 1
            );
        }
    }
Just replace SMTPTest with the name of your class. (I use the full package paths to the JUnit classes so as to not pollute your namespace and require you to add import statements).
Enjoy.
The Ant <junit> target is non-graphical. (It's packed in the Optional Ant jar, not with the core tasks, but that usually doesn't matter since the optional jar file will always be in Ant's classpath unless somebody has monkeyed with the Ant distribution). You can, of course, invoke a graphical Test Runner using the <java> task, but be aware that the Test Runner gui never works from my Ant JVM. I set fork='true' and then it works fine. Here are some samples showing how to invoke JUnit tests in various ways. The gui test invokes my TestCase using the main() method that I described above. The non-gui test runs a batch of test suites, but has a commented-out line showing how to invoke a single test suite.
    <!-- This one runs the designated TestCase suite in a Gui -->
    <target name='guitest' depends='-test-shared, compile-tests'
            description='Run Unit Tests in the Junit Swing Gui'>
        <!-- note the fork='true' in the following <java> task -->
        <java classname='com.admc.jamama.smtp.SMTPTest' fork='true'>
            <classpath>
                <pathelement path='${jar.junit}'/>
                <pathelement path='testclasses'/>
                <pathelement path='classes'/>
                <fileset dir='lib'/>
            </classpath>
            <!-- the following stuff required by my specific application -->
            <arg value='-g'/>
            <sysproperty key='test.targetserver' value='${test.targetserver}'/>
            <sysproperty key='test.targetport' value='${test.targetport}'/>
        </java>
    </target>

    <!-- This one runs all of the designated TestCases non-graphically -->
    <target name='test' depends='-test-shared, compile-tests'
            description='Run unit tests in non-graphical mode'>
        <junit printsummary='true' haltonfailure='true'>
            <formatter type='brief' usefile='false'/>
            <classpath>
                <pathelement path='${jar.junit}'/>
                <pathelement path='testclasses'/>
                <pathelement path='classes'/>
                <fileset dir='lib'/>
            </classpath>
            <!-- the following stuff required by my specific application -->
            <sysproperty key='test.targetserver' value='${test.targetserver}'/>
            <sysproperty key='test.targetport' value='${test.targetport}'/>
            <!-- <test name='com.admc.jamama.smtp.SMTPTest'/> Single test -->
            <batchtest>
                <fileset dir='testclasses' includes='**/*Test.class'/>
            </batchtest>
        </junit>
    </target>
My version always tells me the summary whether I specify printsummary or not (contrary to the API spec). Do try different combinations of formatters and showoutout, because the output from the Ant target is very different from the standalone Test Runners.