

|
|
|
The forms-based Net Management Utility, netutil, is used to define the connection and authorization data used by the Communications Server to access remote instances.
System administrators (or any user with the appropriate Ingres privileges) can use netutil to perform the following tasks:
These tasks require the GCA privilege NET_ADMIN.
These tasks require the NET_ADMIN privilege. For more information about the -u flag, which allows a user to perform operations on behalf of other users, see Command Line Flags in Netutil Non-interactive Mode.
This task requires the GCA privilege SERVER_CONTROL. For instructions on stopping the Communications Server using the forms-based netutil, see the chapter "Maintenance Procedures."
End users can use netutil to:
|
|
|
The netutil user interface consists of four tables and a menu of operations that can be performed on entries in these tables.
The four tables on the netutil startup screen are:
|
|
|
The Virtual Node Name table on the netutil startup screen determines what information is displayed in the Connection data and Login/password tables. These tables display information about the vnode highlighted in the Virtual Node Name table.
|
|
|
Valid vnode names cannot include:
Vnode names are not case-sensitive, except on Star Server installations.
|
|
|
The Login and password data table on the netutil startup screen is used for the following tasks:
The information you enter into the fields in the Login/password data table depends on which of the above tasks you are performing. For more information, see Task-Specific Values for the Login/Password Data Fields.
The Login/password data columns are as follows:
Is the type of definition, either Global or Private. For details, see Global and Private Definitions.
Is a read-only message, supplied automatically, that briefly describes the scope of the connection. The message depends on the value that you enter in the Type field.
If you enter Private, netutil displays the following message:
User user_id only
If you enter Global, netutil displays the following message:
Any user on node_name
Specifies the name of the account to be used on the remote instance's host machine.
Note: If you are authorizing access to a remote instance using an Installation Password or defining an Installation Password for the local instance, enter an asterisk (*) into this field.
After you fill in this field, netutil prompts you for a password.
|
|
|
The following table shows the required values for the Type, Login, and Password fields according to the kind of record you are entering:
|
|
Type |
Login |
Password |
|---|---|---|---|---|
Remote User Authorization |
Using login account password |
Global or Private |
Name of remote login account |
Password of remote login account |
|
Using Installation Password |
Global or Private |
* |
Installation Password of remote instance |
Local Installation Password |
|
Global |
* |
Local Installation Password |
Note: When creating a local installation password, the vnode name used must be identical to the name that has been configured as LOCAL_VNODE on the Configure Name Server screen of the Configuration-By-Forms (cbf) utility and is generally the same as the local machine name.
|
|
|
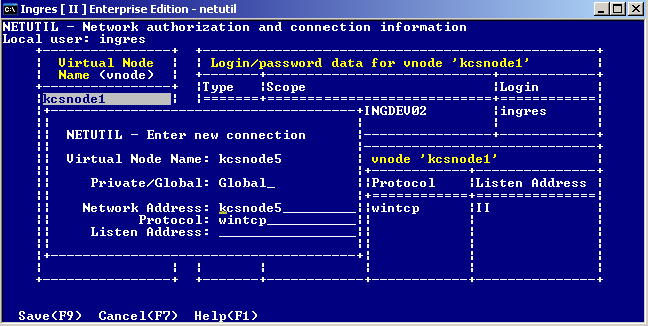
The Connection data table on the netutil startup screen specifies the network address of the remote node, the listen address of the remote instance's Communications Server, and the network protocol that is used to make the connection.
The Connection data table has the following columns:
Specifies type of connection, either global or private.
Identifies the network address or name of the remote node.
Your network administrator specifies this address or name when the network software is installed. Normally, the node name as defined at the remote node is sufficient for the node address.
The format of the net address depends on the type of network software used by the node. For protocol-specific information, see the appendixes in this guide.
Specifies the Ingres keyword for the protocol used by the local node to connect to the remote node.
Protocol availability varies by platform. For a list of protocols and their associated Ingres keywords, see Network Protocol Keywords.
Identifies the unique identifier used by the remote Communications Server for interprocess communication.
Just as the vnode name identifies an instance on the network, the listen address identifies a process (the Communications Server) in the remote instance.
The format of a remote node listen address depends on the type of network software that the node is using. For protocol-specific information, see the appendixes in this guide.
|
|
|
When entering connection data for a remote instance, you are prompted for the name of the network protocol that is used to make the connection. You must respond with one of the following keywords:
TCP/IP Internet protocol for Windows (using WinSock 1.1 API).
Note: This keyword is obsolete. It is provided for backward compatibility and will be removed in the future. Use tcp_ip instead.
Microsoft NetBIOS protocol for Windows (using WinSock 1.1 API)
Novell Netware SPX/IPX protocol for Windows (using WinSock 1.1 API)
DECnet protocol for VMS
TCP/IP Internet protocol for UNIX and Windows (using WinSock 2.2 API)
SNA LU0 protocol for MVS and VMS
SNA LU62 protocol for RS/6000, HP/UX, Solaris, and MVS
TCP/IP Services for OpenVMS and Multinet TCP/IP when running in TCP/IP Services emulation
IBM TCP/IP for MVS
KNET TCP/IP for MVS
TCP/IP protocol for SNS TCP/IP
Wollongong TCI/IP Internet protocol for VMS and Multinet TCP/IP when running in Wollongong emulation
Novell Netware SPX/IPX for UNIX and VMS
For additional information on the protocols supported for your environment, see the Ingres Readme file for your operating system.
|
|
|
The Other attribute data table in netutil specifies additional connection, encryption and authentication attributes for a vnode. For a description of each attribute and its associated values, see Configure Vnode Attributes.
The Other attribute data columns are as follows:
Is the type of connection, either Global or Private.
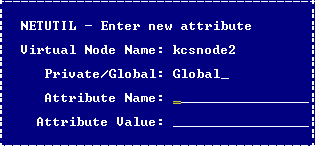
Is the name of the attribute.
Is the value of the attribute.
|
|
|
The following operations are available from the netutil startup screen:
Creates a new record in the highlighted table.
In the vnode table, this operation allows you to create a new vnode name and define its user authorization and connection data.
In the Connection data table or Login/password data table, this operation allows you to create an additional entry for an existing vnode.
Deletes the highlighted record.
Note: Deleting a record in the Virtual Node Name (vnode) table automatically deletes the Login/password and Connection data table records associated with that vnode.
Toggles the display to show attribute or login information for the highlighted node. The initial display shows login information, and the Attributes menu option appears on the menu. Choosing Attributes displays attribute information, and the Attributes menu option is replaced by the Login menu option. Choosing Login brings back the original display.
Modifies the highlighted record.
Stops or quiesces the local Communications Server. This menu item takes you to the Network Server Control screen.
Tests a vnode after all of the user authorization and connection data has been defined.
Netutil tests to see if a connection can be made to the remote instance using any of the connection data entries and remote user authorizations defined for the vnode. Note that individual connection data entries and remote user authorizations cannot be tested.
Displays help screens.
Exits netutil.
|
|
|
To establish and test a remote connection, the following information is required:
(This information is not applicable when using an Installation Password to authorize access.)
|
|
|
You use netutil to establish and maintain access to remote instances. Defining a virtual node name is the first step in the process of establishing a connection.
To define a virtual node (vnode) and use it to test a connection to a remote instance
netutil
The netutil startup screen appears.
A pop-up window appears, displaying the following prompt:
Enter new virtual node name.
A pop-up window appears, displaying the following prompt:
Choose type of login to be created
GlobalAny user on [local node]
PrivateUser [user name] only
The Enter new login/password pop-up window appears. It displays prompts for the login of the account that is used on the remote node, the password of that account, and verification of the password.
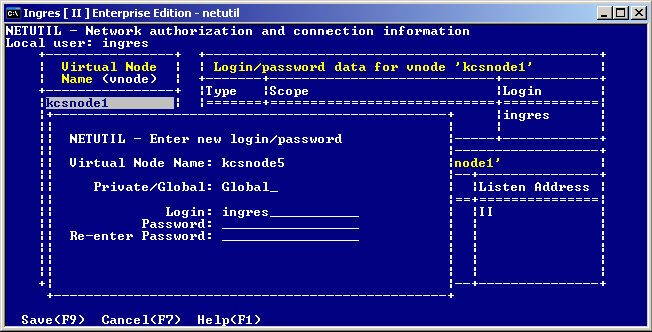
Note: If you are using an Installation Password to authorize access, enter an asterisk (*) in the Login field, and then enter the remote instance's Installation Password in the Password field.
The Enter new connection pop-up window appears. It displays prompts for the connection type (private or global), the network address, the network protocol to be used, and the Listen address of the remote instance. For your convenience, netutil supplies default values for the first three fields. To enter a new value, simply type over the default value.
Netutil returns to the startup screen. The data you entered in this and the previous steps is displayed in the Vnode, Login/password data, and Connection data tables.
Netutil attempts to establish a connection to the remote instance using authorization and connection data you have entered.
A message is displayed in a pop-up window indicating whether the test is successful.
If the connection is not successful, the error message indicates the nature of the error or where to look for further information.
You are returned to the startup screen.
|
|
|
In addition to defining login and connection data, you can use netutil to configure vnode attributes. Attributes define additional connection, encryption, and authentication information for the vnode.
To configure one or more attributes for a vnode
Attribute information for the first vnode in the Virtual Node Name table is displayed.
The Enter new attribute pop-up window appears.
Indicates the connection type. The only valid value is direct, which indicates that a direct connection with the remote instance must be established without using Net. This attribute improves performance because data goes directly from the application process on the client machine to the Ingres DBMS process on the server machine, thus bypassing Name Server processing.
For direct access to occur, the following conditions must be met:
Determines the encryption mode for the connection. If set, this value overrides the Communications Server's ob_encrypt_mode parameter value configured using Configuration Manager or the Configuration-By-Forms utility. The local and remote Communications Servers must be able to negotiate a common mechanism to perform the encryption. Valid values are:
Determines the mechanism to be used to encrypt the remote connection. If set, this value overrides the Communications Server's ob_encrypt_mech parameter value configured using Configuration Manager or the Configuration-By-Forms utility. Valid values are:
Specifies the mechanism to be used for remote authentication in a distributed security environment. This setting replaces the need for a user ID and password. If set, this value overrides the Communications Server's remote_mechanism parameter value configured using Configuration Manager or the Configuration-By-Forms utility. The only valid value is kerberos.
Netutil returns to the startup screen. The attribute you configured is now displayed in the Other attribute data for vnode table.
|
|
|
If a remote instance has more than one Communications Server or can be accessed by more than one network protocol, include that information in your vnode definition by adding extra entries to the Connection Data table. This allows you to distribute the load of communications processing and increase fault tolerance.
Note: When more than one Communications Server listen address is defined for a given vnode, Ingres Net automatically tries each server, in random order, until it finds one that is available. Similarly, when a connection fails over one network protocol, Ingres Net automatically attempts the connection over any other protocol that has been defined.
End users can create private connection data for an existing vnode by adding an entry to the Connection data table. For the user who creates it, a private connection data entry overrides a global connection data entry defined to the same vnode. In other words, Ingres Net uses the private connection data entry whenever the user who created the entry uses the vnode.
Know the following information before beginning this procedure:
To define an additional connection data entry
The connection data for the highlighted vnode appears in the Connection Data table.
The Enter new connection pop-up window appears displaying prompts for the connection type (private or global), the network address, the network protocol to be used, and the Listen address of the remote instance. For your convenience, netutil supplies default values for the first three fields; to enter a new value, simply type over the default value.
Netutil returns to the startup screen. The data you entered is now displayed in the Connection Data table.
|
|
|
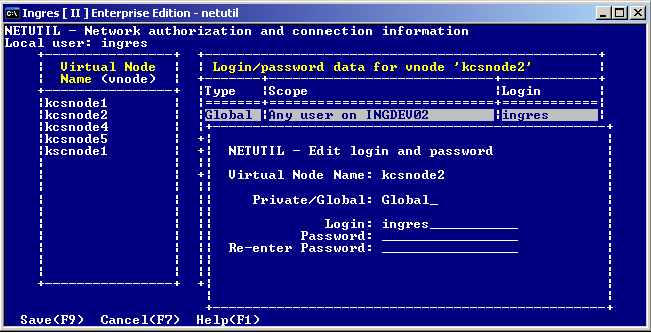
End users can create a private remote user authorization for an existing vnode by adding an entry to the Login/password data table.
For the user who sets it up, a private authorization overrides a global authorization defined to the same vnode. In other words, Ingres Net uses the private authorization whenever the user who created it uses the vnode.
Know the following information before beginning this procedure:
(This information is not applicable when using an Installation Password to authorize access.)
To define and test a new remote user authorization
The remote user authorization for the highlighted vnode appears in the "Login/password data" table.
The Enter New Login/Password pop-up window appears. It displays prompts for the login of the account that is used on the remote node, the password of that account, and verification of the password.
Note: If you are using an Installation Password to authorize access, enter an asterisk (*) in the Login field, and then enter the remote instance's Installation Password in the Password field.
Choose Save from the menu.
Netutil returns to the startup screen. The data you entered is now displayed in the Login/password data table.
|
|
|
To delete a virtual node entry or one of its connection data entries, remote user authorizations or attributes, place the cursor on the desired record and choose Destroy from the menu.
|
|
|
To delete all information for a specific vnode
A pop-up window appears with the following prompt:
Really destroy all data for vnode [vnode name]?
NoDo not destroy all data for vnode
YesDestroy all data for vnode
Netutil removes the vnode from the Virtual Node Name table and all associated information from the Login/password data and Connection data tables.
|
|
|
To delete one of the connection data entries associated with a particular vnode
A pop-up window appears with the following prompt:
Really destroy connection entry?
NoDo not destroy connection entry
YesDestroy connection entry
Netutil removes the entry from the Connection Data table.
|
|
|
To delete one of the remote user authorizations associated with a particular vnode
A pop-up window appears with the following prompt:
Really destroy [private/global] login/password entry '[Login name]'?
NoDo not destroy [private/global] login/password entry
YesDestroy [private/global] login/password entry
Netutil removes the entry from the Login/password data table.
|
|
|
To delete an attribute associated with a particular vnode
The "Other attribute data" table is displayed.
A pop-up window appears with the following prompt:
Really destroy attribute entry?
NoDo not destroy attribute entry
YesDestroy attribute entry
Netutil removes the attribute from the Other attribute data for vnode table.
|
|
|
To modify a virtual node entry or one of its Connection data entries, remote user authorizations, or attributes, place the cursor on the desired record and select Edit from the menu.
|
|
|
To modify a vnode name
A pop-up window appears, displaying the following prompt:
Enter the new name for ['vnode name']
New name:
The Enter Global/Private Password pop-up window appears and prompts you to re-enter the remote account password or Installation Password associated with this vnode. For security reasons, any time a vnode name is modified, you must re-enter the associated passwords.
If there is a second remote user authorization associated with this vnode, a second pop-up window appears. Repeat this step with the password of the second authorization.
After you have saved all password information, netutil returns to the startup screen. The edited vnode name is displayed in the Virtual Node Name (vnode) table.
|
|
|
To edit a remote user authorization
The Edit login and password pop-up window appears and prompts you to enter new login and password data.
Note: If you are using an Installation Password to authorize access, enter an asterisk (*) in the Login field, and then enter the remote instance's Installation Password in the Password field.
Netutil returns to the startup screen. The edited remote user authorization is displayed in the Login/password data table.
|
|
|
To edit a connection data entry
The Edit connection entry pop-up window appears, which displays the connection type, network address, protocol, and listen address for the selected entry.
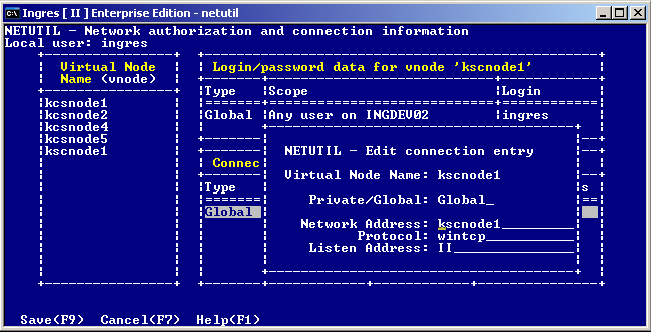
Netutil returns to the startup screen. The edited connection data entry is displayed in the Connection Data table.
|
|
|
To edit attribute data for a particular vnode
The "Network connection and other attribute information screen" appears.
The Edit attribute entry pop-up window appears.
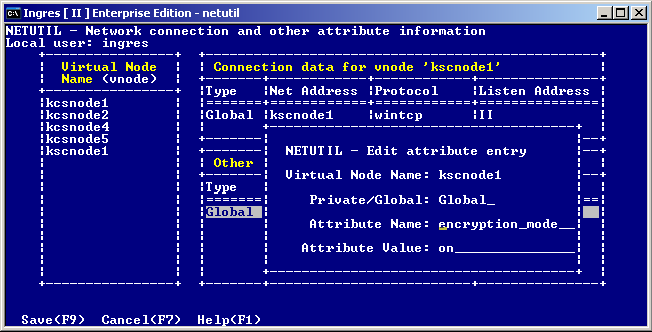
Netutil returns to the startup screen. The attribute you edited is now displayed in the Other attribute data for vnode table.
|
|
|
To define an Installation Password for the local instance
netutil
The netutil startup screen appears.
A pop-up window appears, displaying the following prompt:
Enter new virtual node name:
Note: The virtual node name must be identical to the name that has been configured as LOCAL_VNODE on the Configure Name Server screen of the Configuration-By-Forms (cbf) utility and is typically the same as the local machine name.
A pop-up window appears, displaying the following prompt:
Choose type of login to be created
GlobalAny user on [local node]
PrivateUser [user name] only
The Enter new login/password pop-up window appears. It displays prompts for the global login, the password, and verification of the password.
The Enter new connection pop-up window appears. It displays prompts for the connection type (private or global), the network address, the network protocol to be used, and the Listen address of the instance.
Netutil returns to the startup screen. The data you entered in the previous steps is displayed in the vnode and Login/password data tables.