

|
|
|
Based on whether you select a database or table in the navigational pane of the Journal Analyzer, and whether the Group by Transaction option is selected, you see a slightly different interface in the right pane.
|
|
|
When you select a database, you see the journaled transactions within the database that match the criteria defined in the top of the pane. You can then determine whether you want to group transactions and view the details for only selected transactions.
|
|
|
When the Group by Transaction option is selected, a single line of "summary" information is displayed for each transaction in the uppermost list, sorted by transaction number. When one or more of these lines are selected, the detailed information for all selected lines is shown in the lower list. The detail information corresponds to each row of journaled tables altered in the transaction(s), in addition to statements such as create table or alter table that were executed within the transaction.
For example, in the following window, a transaction is selected and the corresponding detail lines are displayed beneath it:
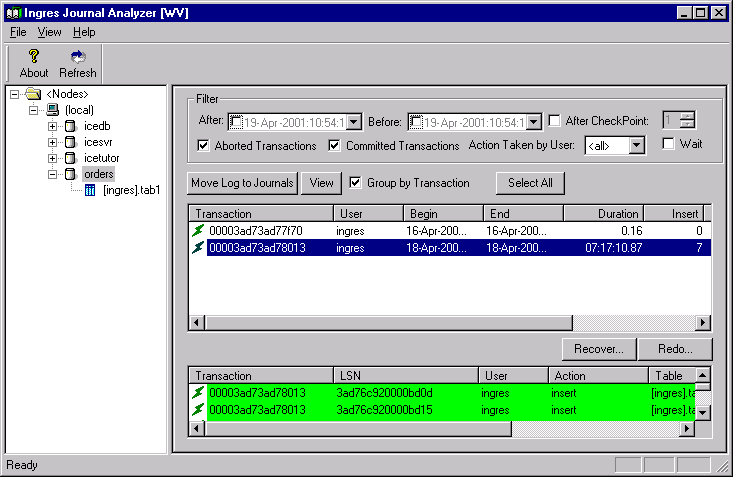
Although the rows are sorted by transaction number initially, look at (and sort by) transaction end (End column), because it is the time when all changes for the transaction become available to other users. A transaction with a higher number (that is, having started later) than another transaction, can be committed first, in which case the underlying changes become available to other users before those of the other transaction (which had a smaller number because it had started first). For this reason, sort on transaction end (by clicking on the corresponding header).
|
|
|
If the Group by Transaction option is not selected, a single list appears, displaying all the individual actions for each transaction, in transaction order:
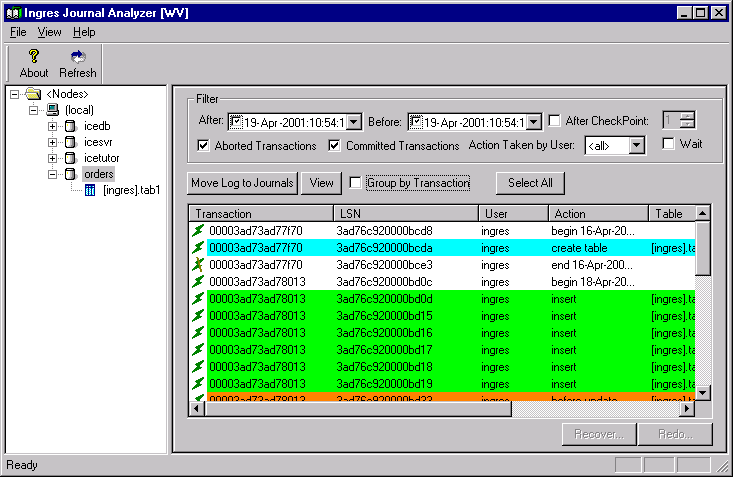
Even these detail lines provide a summary of information on the individual actions. This list cannot display column names because different tables have different column names. To get the full detail of individual rows that have changed, you must choose a table in the navigational pane. See Table Level Journaled Transactions.
For update statements, the "before update" and "after update" images are shown. For inserts and deletes, only one row (the inserted or deleted one) appears. Different colored rows are used to denote the type of statement (in addition to the Action column that displays strings such as begin, end, insert, update, delete, and so on).
An icon preceding each line shows you whether the transaction it belongs to was committed or rolled backed, included a partial rollback, or involved changes in non-journaled tables (an exclamation point next to the icon appears in this case).
You can sort the data by any criteria by simply clicking on the corresponding column header.
|
|
|
On the table level, the right pane looks and functions similar to the one at the database level, but only the row changes corresponding to the selected table appear. There is no Group by Transaction check box for the table level. At the table level, you can view a history of journaled changes in that table.
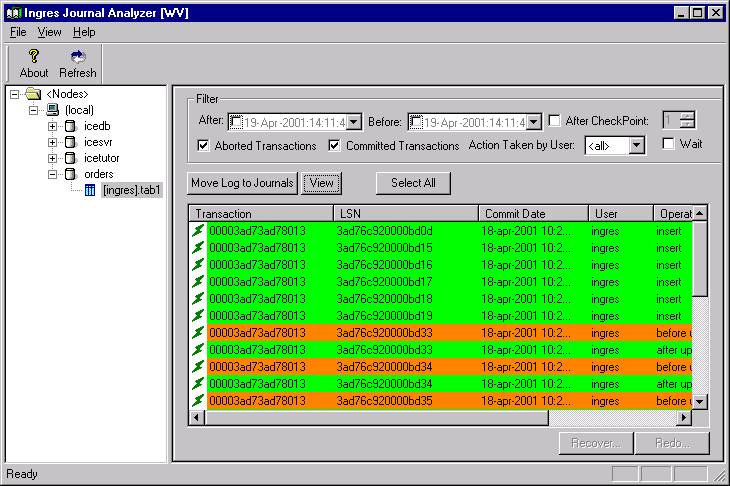
As opposed to the database level panes, where more than one table was involved, it is possible here to have the real column names become headers of the results list, which was not possible at the database level because the columns are normally different in each table that was involved in the transaction.
You can also sort the data on the table level by clicking on a column header. In particular, the following sorts are useful:
For more information on the interface for this utility, see the Journal Analyzer online help topics.
|
|
|
After browsing for the transactions or row changes that you want to recover or redo, you can select one or more transactions or individual row changes. If the Group by Transaction check box is selected, and multiple transaction lines are selected, the detail list shows the row changes corresponding to all selected transactions. If this option is not selected, you are selecting lines at the table level, which correspond to row changes, not full transactions. The Recover and Redo dialogs proposes (but does not pre-select) the other changes in those transactions of the initial row changes that were selected.
Tip: Select whole transactions associated with the changes to be recovered to ensure transaction integrity. This is the preferred and most common way to recover row changes.
After making your selections, the Recover and Redo buttons are available. If you do select lines corresponding to only part of a transaction, there are other factors to consider, as described in Recover Transactions or Individual Row Changes and Redo Transactions and Individual Row Changes Option.
The Select All button allows you to select all transactions currently displayed in the pane for the selected criteria. This can be useful for example for replaying whole portions of journals on another node/database, through the Redo functionality described in the Redo Transactions or Individual Row Changes.