| Inkscape » Tweak Tool |    |
|---|
Table of Contents
New in v0.46.
The Tweak Tool is used to make small changes to paths and colors. While at first paths and colors may seem to have little to do with each other, the use of Tweak Tool to edit them is surprisingly very similar.
To use the Tweak Tool select the tool from the Tool Box
(
![]() ) or use either of the
shortcuts: W
or Shift+F2.
) or use either of the
shortcuts: W
or Shift+F2.
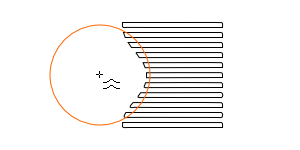
The Tweak Tool works like a brush that covers a circular part of the screen, indicated by an orange circle. The affect of the brush is strongest in the center and falls off smoothly till the edge. Two parameters, located in the Tool Controls affect the “physical” nature of the brush:
Width: Determines the size of the brush. The range is from 1 to 100, where 20 corresponds to a radius of 100 screen pixels. As the brush width is independent of zoom, zoom can be used to quickly change the size of the brush relative to the size of an object. The Left Arrow and Right Arrow keys can be used to decrease and increase the width at anytime. Home sets the Width to 1 while End sets it to 100.
Force:
Determines how strongly a movement of the brush affects the
objects on the screen. The range is from 1 to 100. If
the “Use Pressure” button (
![]() ) is
toggled on, a pressure-sensitive tablet can be used to control
the force; maximum pressure corresponds to
the Force parameter setting. See
the Calligraphy Tool
section for use of a tablet.
The Up Arrow and Down
Arrow keys can be used to decrease and increase the
(maximum) Force.
) is
toggled on, a pressure-sensitive tablet can be used to control
the force; maximum pressure corresponds to
the Force parameter setting. See
the Calligraphy Tool
section for use of a tablet.
The Up Arrow and Down
Arrow keys can be used to decrease and increase the
(maximum) Force.
The Tweak Tool has a number of modes for editing paths and colors. The mode is selected by clicking on the corresponding icon in the Tool Controls or using a keyboard shortcut. Each mode has its own cursor. The various modes are discussed in the next two sections.
Objects must be selected to be tweaked. Using the Space Bar is a quick way to switch back and forth between the Select Tool and the Tweak Tool. Note that there is no onscreen indication of what objects are selected when the Tweak Tool is in use.

© 2005-2008 Tavmjong Bah. | Get the book. |