| Inkscape » Geometric Shapes » 3D Boxes |    |
|---|
New in v0.46.
The Strumento Cubo allows one to draw three-dimensional boxes that remain editable in Inkscape but display normally in other SVG renderers. A box is composed of an SVG Gruppo of six paths. Information about the vanishing points, etc. are stored in the Inkscape Spazio dei Nomi. This extra information is only used by the Strumento Cubo. All other tools treat the box as a normal Gruppo. The sides of the box can be styled independently (or even deleted).
To draw a 3D box select the Strumento Cubo by clicking on the
![]() icon (Shift+F4) in the
Casella degli Strumenti.
Use a Left Mouse Drag to draw the left side of the
box (in the x-y plane). The start of the drag sets one corner
while the end of the drag sets the opposite corner. The other sides
of the box are automatically drawn with the right side of the box
set to a default width. Pressing the Shift while
creating the box changes the function of the cursor to defining the
depth (width of the right side or z dimension) of the box.
icon (Shift+F4) in the
Casella degli Strumenti.
Use a Left Mouse Drag to draw the left side of the
box (in the x-y plane). The start of the drag sets one corner
while the end of the drag sets the opposite corner. The other sides
of the box are automatically drawn with the right side of the box
set to a default width. Pressing the Shift while
creating the box changes the function of the cursor to defining the
depth (width of the right side or z dimension) of the box.

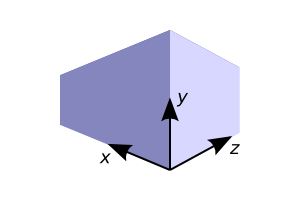
When a box is selected and the Strumento Cubo active, a variety of handles are displayed. The eight handles at the corners of the box are used to adjust the size of the box. The four in front (see figure below) change the size of the left box face in the x-y plane. The other four change the depth (z) of the box. Holding the Shift down swaps the functions of the handles. With the Ctrl down, the handles are restricted in movement to lines along the box edges or to a box diagonal. This allows adjusting one dimension of a box face while keeping the other fixed in the first case or keeping the aspect ratio fixed in the latter case.
Dragging the Cross handle moves the box while keeping the same perspective. Without a modifier key, the box is kept in the x-y plane. Holding the Ctrl down while dragging limits movement to lines along the box edge or along the box diagonal. Holding down the Shift while dragging moves the box in the z direction.

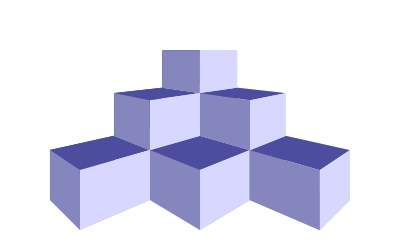
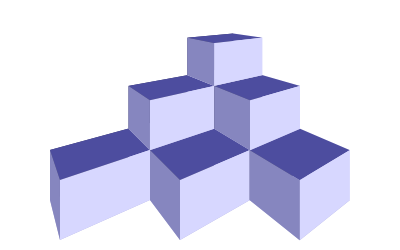
By default, a box is drawn with two vanishing points, one each on the left (x) and right (z) sides. The vanishing points are initially placed at the edge of the page, half way between the top and bottom. These points are determined when the SVG drawing is first created so resizing the page does not move them. The vanishing points can be dragged to new locations. Dragging the points a ways off the page will probably give you a more satisfactory perspective than the default.
All boxes that share the same vanishing points will change together. If you wish to change the vanishing points of just selected boxes, hold down the Shift while dragging. If multiple boxes are selected with different vanishing points, dragging a vanishing point for one box near that of another box will «merge» the points together.


The Strumento Cubo can be used to draw boxes with 1, 2, and 3-point
perspectives as well as a box using an isometric projection. The
above examples use a 2-point perspective with two vanishing
points. The type of perspective is changed via the Strumento Cubo
Controlli Strumento. Each of the three perspective points (x, y,
and z) can be set to infinity or to a specific point. To set or
unset a perspective point to infinity, toggle the «Parallel
Lines» button (
![]() ) in the Controlli Strumento
next to the appropriate angle (or use the keyboard shortcuts:
Shift+X,
Shift+Y, and
Shift+Z that
are available when using the Strumento Cubo).
When set to infinity, the direction of a perspective point is
set by an Angle parameter. The angles
can be changed via the entry boxes in the Controlli Strumento or by
using the keyboard shortcuts:
x: [, ];
y: (, ); and
z: {, }.
The angles will be changed by the Scatto di angolo di rotazione (15° by
default, settable in the Steps section of the
Preferenze di Inkscape dialog). With the Alt,
the angle change will be 0.5°.
) in the Controlli Strumento
next to the appropriate angle (or use the keyboard shortcuts:
Shift+X,
Shift+Y, and
Shift+Z that
are available when using the Strumento Cubo).
When set to infinity, the direction of a perspective point is
set by an Angle parameter. The angles
can be changed via the entry boxes in the Controlli Strumento or by
using the keyboard shortcuts:
x: [, ];
y: (, ); and
z: {, }.
The angles will be changed by the Scatto di angolo di rotazione (15° by
default, settable in the Steps section of the
Preferenze di Inkscape dialog). With the Alt,
the angle change will be 0.5°.

1-point Perspective:
Set the x and y vanishing points to infinity by toggling on
the x and y «Parallel Line» buttons
(
![]() ) in the Controlli Strumento. Set
Angle X to 180° and Angle
Y to 90°. Toggle off the «Parallel
Line» button for z and drag the vanishing point to the
desired point (typically near the center of the drawing).
) in the Controlli Strumento. Set
Angle X to 180° and Angle
Y to 90°. Toggle off the «Parallel
Line» button for z and drag the vanishing point to the
desired point (typically near the center of the drawing).

2-point Perspective:
The default perspective.
Set the y vanishing point to infinity by toggling on
the y «Parallel Line» button
(
![]() ) in the Controlli Strumento. Set
Angle Y to 90°. Enable the x and z
vanishing points by toggling off their «Parallel
Line» buttons. Drag the x and z vanishing point to the
desired points (typically at the same level on opposite sides of
the page).
) in the Controlli Strumento. Set
Angle Y to 90°. Enable the x and z
vanishing points by toggling off their «Parallel
Line» buttons. Drag the x and z vanishing point to the
desired points (typically at the same level on opposite sides of
the page).
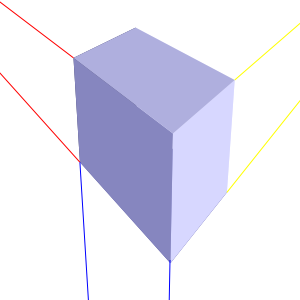
3-point Perspective:
Enable the x, y and z vanishing points by toggling off
their «Parallel Line» buttons
(
![]() ) in the Controlli Strumento.
Drag the x, y and z vanishing point to the desired points.
Typically the x and z vanishing points are at the same level
on opposite sides of the page. They are either above or below the
page depending on if the observer is looking down or up at the scene.
The y vanishing point is then on the opposite side, either below
or above the page.
) in the Controlli Strumento.
Drag the x, y and z vanishing point to the desired points.
Typically the x and z vanishing points are at the same level
on opposite sides of the page. They are either above or below the
page depending on if the observer is looking down or up at the scene.
The y vanishing point is then on the opposite side, either below
or above the page.

Isometric Projection: Boxes can be drawn with an Isometric Projection by toggling on all «Parallel Line» buttons in the Controlli Strumento and setting the x, y, and z angles to be: 150°, 90°, and 30° respectively.
The perspective information is stored in the defs section of the SVG file. Look for the «inkscape:perspective» tag. With the Editor XML one can precisely place vanishing points. There is a triplet of numbers for each point (e.g. "inkscape:vp_x"). The first two are the x and y coordinates of the vanishing point and the third is a flag to indicate if the perspective lines converge or are parallel.
The attributes of the six sides can be changed independently. To select one of the sides, one must use one of the methods of selecting an object in a Gruppo. There is one problem: the common method for entering a Gruppo, namely double clicking on an object with the Strumento Selettore, won't work as this enables the Strumento Cubo instead. The Gruppo can be entered by selecting the box and using Shift+Enter or by selecting the Enter group line from the pop-up menu when you Right Click on the box. Using Ctrl+Left Mouse Click will select a side of the box without entering the Gruppo. Using Ctrl+Alt+Left Mouse Click to select a hidden side.
By default, a box will always be drawn with sides of the same default colors (shades of blue), even after editing the attributes for one side. This behavior can be changed by selecting the Last used style option on the 3D Box page in the Preferenze di Inkscape dialog. If this option is selected, Inkscape will remember the Riempimento and Contorno colors independently for each side. Changing the color of one side will change the Stile corrente for all other shapes but the inverse is not true.
![[Avvertimento]](../images/admons/warning.png) | Avvertimento |
|---|---|
Inkscape does not prevent you from creating a box inside another box Gruppo. This can lead to strange behavior. |
© 2005-2008 Tavmjong Bah. | Get the book. |