Custom Actions
(by Klaus BARTZ)
Go back to the documentation index
- Overview
- How It Works
- Custom Action Types
- Package Path
- Native Libraries for Uninstallation
- What You Have To Do
- Custom Actions at Packaging (CompilerListener)
- Custom Actions at Installation Time (InstallerListener)
- Custom Actions at Uninstallation Time (UninstallerListener)
- Example
- Ant Actions (InstallerListener and UninstallerListener)
- The Basic XML Struture
- Registry access (InstallerListener and UninstallerListener)
- The Basic XML Struture
- Extended Uninstall Key
- Uninstall Behavior
- Examples
- Summary Logger (InstallerListener)
Overview
The implementation of custom actions presume knowledge of java. Custom actions are not a good starting point for learning java. Learners can use existent custom actions but should not implement them as exercise.
In general the installation procedure is separated into several steps. The first step, let's call it the data collection phase, is getting specific data needed for the installation process. Typically this is done by typing all neded data into one or more panels, if a GUI is used, or automatically by reading the data from a config file. In general nothing will be changed on the system until all needed data is obtained. But mostly - depending on to the information, e.g. the destination path - different input panels are involved.
If all needed data is collected the second step will be perfomed, let us call it the action phase. During this step the state of the locale machine will be changed, e.g. files will be copied to the installation destination or some short cuts will be registered. Each of this subsequent steps are denoted as actions. There are actions intended to be reused, so called common actions, and actions for one special purpose only, so called custom actions. In IzPack there are already some common actions, for example "file transfer", "parse" or "execute".
The third step, the reporting phase, is normally represented by a panel that reports the result state of the installation (OK, or not OK) and a simple good bye message.
With IzPack there are two ways to implement custom actions. Firstly it is always possible to define a custom panel that perfoms the desired actions too. Secondly, and that's the new, custom actions are supported.
Panels still may be used for actions that are perfomed, e.g. before files are transferred or after the "execute" action. But if the needed action depends on the selected or already installed packages, this works also, but the implementation effort is much higher.
If the action should be performed for several amount of elements of a pack, using custom actions will be more easy than using panels. Additional custom actions may be defined for installation, but also for packaging and uninstallation purposes. If a custom action is also needed for uninstallation purposes, it'll be always a good idea to implement a corresponding installation action as custom action, but not as panel.
How It Works
Custom actions are implemented as listeners. Each listener implements callback methods that will be called at well-defined points. The method InstallerListener.afterFile for example will be called after a file has been copied. There are different interfaces intended for being used at packaging time, at installation time and at uninstallation time.
Each interface is implemented by a class with the prefix "Simple" (e.g. SimpleCompilerListener) that implements all declared interface methods with an empty body. These classes may be used as base classes for own listener implementations.
To apply custom actions to the installer, an entry in the apropriate install.xml file is needed. The configuration of listeners starts with the facultative ELEMENT "listeners" which can contain one or more ELEMENTs of "listener". For a "listener" there are three attributes which determine the "compiler", "installer" and "uninstaller" custom action pupose. Additionally it is possible to make the listener OS dependent using the "os" ELEMENT.
If file related data will be set, the facultative ELEMENT "additionaldata" is defined for the ELEMENTs "file", "singlefile" and "fileset". This data will be automatically moved to the corresponding PackFile objects in the install.jar. Extraction and usage should be implemented in a install custom action (see example).
Custom Action Types
Custom actions are intended to be used at packaging time, at installation time and at uninstallation time. The interfaces are:
| Custom action type | Interface name |
|---|---|
| Packaging | com.izforge.izpack.event.CompilerListener |
| Installation | com.izforge.izpack.event.InstallerListener |
| Uninstallation | com.izforge.izpack.event.UninstallerListener |
Custom Actions At Packaging
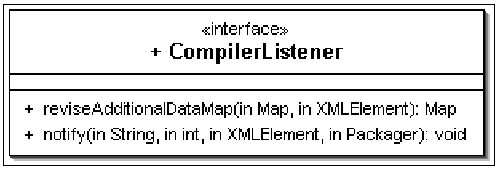
- (constructor): only the default constructor will be used. It is called from Compiler just after creating the packager. Therefore initializing will be better during in the first notify call.
- reviseAdditionalDataMap gives the facility to add data to each PackFile object. This is the place where file related data can be transferred from the install xml file into the install jar file. Although each key and value of the map can be any type, but the class definitions of all used types must therfore be contained in the installer jar file or in the VM's classpath. In general strings are the best choice for being used as keys or values. All keys must be unique over all registered CompilerListeners. Each call of this method adds own key value pairs to the given existenDataMap because more than one listener can be used. If the given map is null, a new one will be created.
- notify is called at the beginning and at the end of each "add" method call which is called in Compiler.executeCompiler.
Custom Actions At Installing Time
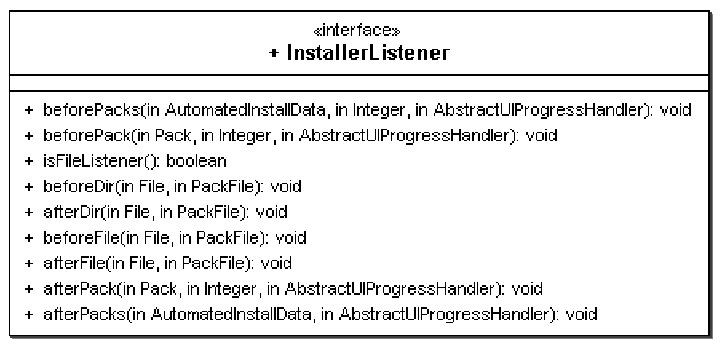
- (constructor): only the default constructor will be used. It is called from Unpacker.run before unpacking.
- beforePacks will be called each time before an unpacking call is performed.
- beforePack is called before a package is installed. Pack object and the number of the pack are passed.
- isFileListener determines whether the next four methods are called or not. This is a little performance optimizing.
- beforeDir is called before a directory is created. In this case, when file listeners exist, directories are created recursively and the method is called at each step. The file and the current PackFile object are passed.
- afterDir is called directly after the directory creation.
- beforeFile is called before a file is created. The file and PackFile object are passed as parameters.
- afterFile is the best place to perform file related actions. The given PackFile objects contains the additional data which was set at packaging.
- afterPack will be just called after the pack is closed.
- afterPacks is the last step before the handler will be stopped.
Custom Actions At Uninstalling Time
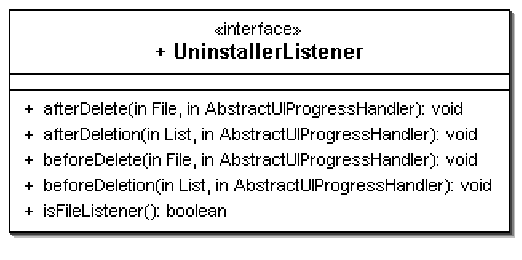
- (constructor) : only the default constructor will be used. It is called from Destroyer.run as first call.
- beforeDeletion will be called after execute files was performed. The given list contains all File objects which are marked for deletion.
- isFileListener determines whether the next two methods are called or not.
- beforeDelete is the method which, is called before a single file is deleted. The File object is given as parameter.
- afterDelete will be invoked after the delete call for a single file.
- afterDeletion is the last call before the cleanup of created data is performed.
Package Path
Custom actions must always implement one of the given listener interfaces. As mentioned above, it is also possible to derive from one of the "Simple" listeners. The package path is facultative, only the class name must be unique over all custom actions. The preparation of a custom action for providing it with an installation is very similar to panels. Custom actions must also be packed into a jar file with the name of the custom action class name. This jar file should be placed in [IzPackRoot]/bin/customActions, may be
[IzPackRoot]/bin/customActions/MyCompilerListener.jar
[IzPackRoot]/bin/customActions/MyInstallerListener.jar
[IzPackRoot]/bin/customActions/MyUninstallerListener.jar
In the default Ant definition file (build.xml) there are some targets for this stuff.
Native Libraries for Uninstallation
If a custom action uses JNI at installation time, often the associated uninstall custom action needs JNI too. For this situation it is possible to declare a native library for unstallation. The only work to do is to add a stage attribute to the native tag in the install xml file like
<!-- The native section. We specify here our os dependant
libs..--> <native type="3rdparty"
name="MyOSHelper.dll"stage="both" >
   <os family="windows" />
</native>
The needed additional classes are packed into lib/uninstaller-ext.jar. If a native library is defined for uninstallation, this file will also be packed into the installer.jar as IzPack.unistaller-ext and used at its right position.
What You Have To Do
Follow the steps that are needed to create and use custom actions with the "normal" source environment (not standalone compiler) using Ant. Of course, it works also with the standalone compiler.
Custom Actions at Packaging (CompilerListener)
Implement com.izforge.izpack.event.CompilerListener or extend com.izforge.izpack.event.SimpleCompilerListener. Place it as `` [IzPackRoot]/src/lib/[MyPackagePath]/MyCompilerListener.java``.
Add a "build-compiler-listener" macro call in to the build.listeners target in [IzPackRoot]/src/build.xml. Note that the name attribute value in the build-instealler-listener must match CompilerListener implementation class name (not including the package). You should include the actual Listener implementation, as well as any other classes required by the listener.
<build-compiler-listener
name="MyCompilerListener">
    <include
    name="[MyPackagePath]/MyCompilerListener.java"/>
    <include
    name="[MyPackagePath]/SomeOtherHelperClass.java"/>
</build-compiler-listener>
Run [IzPackRoot]/src/build.xml. An ant alone will execute the required targets.
Add a "listeners" ELEMENT with a "listener" ELEMENT with a "compiler" attribute in to [MyProjectPath]/install.xml
<listeners>
  <listener compiler="MyCompilerListener" />
<listeners>
Compile with the following command, or an ant task you have set up.
java -jar [IzPackRoot]/lib/compiler.jar -HOME [IzPackRoot]
  [MyProjectPath]/install.xml -b [MyProductPath] -o
  [MyBuildPath]/install.jar
Test it
Custom Actions at Installation Time (InstallerListener)
Perform the same steps as above, replace all occurrences of "CompilerListener" with "InstallerListener" and "compiler" with "installer".
Custom Actions at Uninstallation Time (UninstallerListener)
Perform the same steps as above, replace all occurrences of "CompilerListener" with "UninstallerListener"and "compiler" with "uninstaller".
Example
Let us say, we want to set access rights for files and directories on Unix. The Java sources are placed in the directory [IzPackRoot]/sample/src/com/myCompany/tools/install/listener. There are the files ChmodCompilerListener.java and ChmodInstallerListener.java.
Copy the files to [IzPackRoot]/src/lib/com/myCompany/tools/install/listener
In [IzPackRoot]/src/build.xml there are the lines
<!-- CUSTOM ACTION test START
CUSTOM ACTION test END -->
Uncomment them (activate the lines between them).
Build IzPack new.
Compile a test installation with
java -jar [IzPackRoot]/lib/compiler.jar -HOME [IzPackRoot]
  [IzPackRoot]/sample/listener/install.xml
  -b [IzPackRoot]/sample/listener -o
  [IzPackRoot]/sample/listener/install.jar
Install it
java -jar install.jar
Ant Actions (InstallerListener and UninstallerListener)
In this section the common ant task custom actions are described in detail. It is only for developers who are not acquainted with IzPack or it's custom actions. In addition to the basics there are some recapitulations of the common custom action techniques and some hints for pitfalls. In the package com.izforge.izpack.event there are the ant related custom actions AntActionInstallerListener and AntActionUninstallerListener. As recapitulation, to add any custom action a reference in install.xml will be needed, as example:
<listeners>
    <listener installer="AntActionInstallerListener"
        uninstaller="AntActionUninstallerListener" />
</listeners>
For all referenced listeners a jar file with the same name must exist in [IzPackRoot]/bin/customActions. If compilation (packaging) fails with a "not found" error, first verify, that the jar file exists. If not, create it. With this custom action it is possible to perform ant calls at installation and/or uninstallation time. It is not only a wrapper for a comand-line ant call, but also an intersected description file defining what target of the ant build file should be performed at what time of (un)installation and specifies which properties for what IzPack pack are to be used. The intersected description file is written as XML, the corresponding dtd is placed in src/dtd/event/antaction.dtd. The description file should be declared as a resource in the install.xml with the id `` AntActionsSpec.xml`` e.g.
<resources>
    ...
    <res id="AntActionsSpec.xml"
    src="myInstallSpecs/MyAntActionsSpec.xml" />
    ...
</resources>
The precise spelling of the id is important. The base path of src is the installation project path. If you want to use ant, you have to specify it here. IzPack is designed for running without dependencies on external software or libraries. Therefore it is necessary to include everything needed, in this case ant self. The field <jar> in installation.xml is predestinated for such cases, e.g.
<jar src="jar/ant/ant.jar" stage="both" />
Be aware, that an "extended" ant use needs more than one jar, for example often xercesImpl.jar. If an obscure "class not found" exception is raised during testing, check first for missing jar files. For supporting uninstallation the jar field was extended by the attribute stage. If an ant uninstaller custom action is used, the uninstaller also needs the jar files. If `` stage`` is "both" or "uninstall", the contents of the referenced jar file will be packed into uninstaller.jar. Be aware that not the jar file itself, but the contents of it are required. This implies, that the paths of the contained files are unique and the information in meta-inf/Manifest.mf will be lost.
The Basic XML Struture
An ant action will be defined in the resource with the id "AntActionsSpec.xml". Sometimes it will help to lock into [IzPackRoot]/src/dtd/event/antaction.dtd or validate a written xml file with the dtd.
On this xml file a substitution will be performed using all defined IzPack variables. It is performed just before processing the packs. This is a common way of loading spec files into custom actions. For more information see method com.izforge.izpack.util.SpecHelper.readSpec. If you want to substitute some custom item, simply add a variable via idata.setVariable in a custom panel before InstallPanel. The given variable name (id) should be written into the xml file in the common variable notation.
The top level XML section is called <antactions>. Only one is possible. The <antactions> are segregated in one or more <pack> elements. The single attribute <name> of the <pack> corresponds to the same structure in install.xml (for more information see also installation.dtd). Only the "things" included in the <pack> are performed, if a pack with the same name was chosen to be installed. The "things" to be done to self are defined by the element <antcall> (without ssss).
The <antcall> takes the following attributes:
- order: required. Determine at what point of installation the antcalls defined by element target should be performed. Possible are beforepack, afterpack, beforepacks or afterpacks. Be aware that with beforepack(s) there are no installed files and also no installed build file. With this order only preexistent build files are useable.
- uninstall_order: optional. Determine at what point of uninstallation the antcalls defined by element uninstall_target should be performed. Possible are beforedeletion and afterdeletion. As opposed to the behaviour of order the referenced files are also accessible in the order afterdeletion. The uninstaller action copies the files into tempfiles before deletion which are marked as deleteOnExit.
- quiet: optional. To quit or not. Possible are yes or no. Default is no.
- verbose: optional. To output verbose information or not. Possible are yes or no. Default is no.
- logfile: optional. Path of the file for logging should be performed. The logfile should be not marked for uninstallation otherwise it will be deleted too.
- buildfile: required. Path of the file which contains the antcall. This is the file you normally use as -buildfile during an ant call via the command line. In this file variables are not substituted. For substitution there are properties in ant which can be used. Never write an IzPack variable in an ant buildfile.
- messageid: optional. A string ID which refers to bin/langpacks/installer/<lang>.xml. If it is defined, the message will be displayed in the InstallPanel whilst performing the ant call.
In addition to the possible attributes there are some elements. All elements can be defined more than one time in one <antcall>. All are optional, but with no <target> element the <antcall> makes no sense. Do not confuse the following: "required"s are related to the attributes of the elements, not to the elements themselfs.
<property>: define a property
Property to be used with all target and uninstall_target which are defined for this antcall.
- name: required. The name (id) of the property.
- value: required. The value of the property.
<propertyfile>: define properties in a file
Properties to be used with all targets and uninstall_targets which are defined for this antcall given by the path of a properties file.
- path: required. Path of a file which contains properties in the syntax which is used by ant. Some ant calls need properties files. For these this element is used. One way to fill specific data into it is to create a new file in a custom panel and fill it with values given by input fields. The file path can be set at installation time, if there is a variable in AntActionSpec.xml and an IzPack variable was defined before InstallPanel. That file can be only created with deleteOnExit, if no <uninstall_target> was defined in this `` <antcall>``. This implies, that other <antcall>``s can have a ``<uninstall_target>.
<target>: target to call at installation
Targets to perform with this antcall at installation time. The targets should be defined in the given buildfile or else an ant exception will be raised. This is that what you use, if you don't want to perform the default target. e.g. cleaning the IzPack project with ant clean
- name: required. The name of the target.
<uninstall_target>: target to call on uninstallation
Targets to perform with this antcall at uninstallation time. The targets should be defined in the given buildfile otherwise an ant exception will be raised. With this target it will be possible to undo the things done at installation time.
- name: required. The name of the uninstall target.
Registry access (InstallerListener and UninstallerListener)
The event package of IzPack contains an installer and an uninstaller listener for Windows registry access. The listeners uses the separated pack com.coi.tools which is also available as source under the src subtree of IzPack. The registry will be called by JNI.
There is no support from the IzPack project of this feature for Windows 95, Windows 98 and Windows ME. Please check the patches at http://jira.codehaus.org/browse/IZPACK-58 if you need to support those platforms.
The registry stuff was implemented in all conscience, but certainly WITHOUT WARRANTIES OR CONDITIONS OF ANY KIND
The listeners themselves are only able to write into the Windows registry at installation and delet the writing at uninstall time. But it is also possible to use the registry handler as a registry reader in custom panels or costum actions. The CheckedHelloPanel reads the registry and can be used as example for it.
To add registry support to an installation some changes in the installation definition file (often called``install.xml``) are to be made. First the declaration of the listener themselves:
<listeners>
    <listener installer="RegistryInstallerListener"
        uninstaller="RegistryUninstallerListener" >
        <os family="windows"/>
    </listener>
</listeners>
It is also recomanded to add the uninstaller listener because it is usual to cleanup the registry at uninstallation. The listeners are only used on Windows, therefore we declare it.
As with other listeners a jar file with the same name has to exist in [IzPackRoot]/bin/customActions. If compilation (packaging) fails with an "not found" error, verify, that the jar file exists. If not, create it. The jar files are RegistryInstallerListener.jar and RegistryUninstallerListener.jar.
As second change in install.xml we have to declare the native part JNI needs the dll
<native type="3rdparty" name="COIOSHelper.dll" stage="both">
    <os family="windows"/>
</native>
The dll should be placed in [IzPackRoot]/bin/native/3rdparty. The stage "both" marks this dll not only to be put into the installation jar file but also to be put into the uninstallation jar file. This will automatically be performed by the packager and installation.
With these two changes the registry support will be incorporated into your installation. Without any more actions an uninstall key will be crated in the registry at the installation. If you open the software manager of Windows, there will be an entry with the variables $APP_NAME $APP_VER, e.g.:
IzPack 4.6.8 (build 2007.02.15)
The variables will be defined from the entries <appname> and <appversion> in the <info> element of the installation definition file.
If you would like to have more informations in the uninstaller key or to create other keys or values in the registry, you should create a specification file. The file should be then refered to in install.xml as resource:
<resources>
    ...
    <res src="mySubPath/MyRegistrySpec.xml"
    id="RegistrySpec.xml"/>
</resources>
The id has to be RegistrySpec.xml. The real file name is not of any importance but should be written the same as in your source tree. It will be securer if you do not use special chars like blanks or umlauts. Be aware! If you forget to refer to registrySpec.xml in your install.xml no exception will be made because this is a facultative file
The Basic XML Struture
The specification file for registry entries will be defined in the resource with the id "ReigstrySpec.xml". Sometimes it will help to lock into [IzPackRoot]/src/dtd/event/registry.dtd or validate a written xml file with the dtd.
On this xml file a substitution will be performed using all defined IzPack variables. It is performed just before processing the packs. This is a common way of loading spec files into custom actions. For more information see method com.izforge.izpack.util.SpecHelper.readSpec. If you want to substitute some custom item, simply add a variable via idata.setVariable in a custom panel before InstallPanel. The given variable name (id) should be written into the xml file in the common variable notation.
The top level XML section is called <registry>. Only one is possible. The <registry> is segregated in one or more <pack> elements. The single attribute <name> of the <pack> corresponds to the same structure in install.xml (for more information see also installation.dtd). Only the "things" included in the <pack> are performed, if a pack with the same name was chosen to be installed. Valid "things" are <key> <value>.
The registry stuff self allows to create keys and values directly under a registry root. But Windows self allows this not on "real" roots like HKEY_LOCAL_MACHINE or HKEY_USERS. Only link like roots as HKEY_CLASSES_ROOT are writeable. A try e.g. on HKLM will be cause an exception and the installation fails. The error number in this case normally will be 87 with the meaning "wrong parameter", not "permission denied".
We do NOT recommend to create a key or a value directly on a registry root. IzPack allows it now as a result of some user requests about it. Most it is not needed. E.g. an extension entry under HKEY_CLASSES_ROOT is really an entry on HKEY_LOCAL_MACHINESoftwareClasses. Why not write directly there?Reading is in opposite to writing no problem.
<key>: define a key
Key to be set at installation time into the Windows registry.
- keypath : required. The path of the key in Windows syntax without the root. If the key should be placed directly under a registry root (not recommended; often not possible)) write the key name without any backslash.
- root : required. The root of the key as symbol. Valid is one of HKCR HKCU HKLM HKU HKPD HKCC HKDDS.
<value>: define a value
Value to be set at installation time into the Windows registry.
- name : required. The name of the value to be set or modified without a path. The default value will be written as the empty string "".
- keypath : required. The key path under which the value should be placed in Windows syntax without the root and value name. If the key of the value should be placed directly under a registry root (if not exist, not recommended; often not possible)) write the key name without any backslash. If the value should be placed directly under a registry root (also not recommended and often not possible) write as keypath the empty string "".
- root : required. The root of the key as symbol. Valid is one of HKCR HKCU HKLM HKU HKPD HKCC HKDDS.
- override : optional. Override an existent value or not. Valid is "true" or "false", default is "true".
- Contents part: accurately one of the following content elements
should be defined. It implicit defines the type of the value.
- string : contents for value to be set if it is a string.
- dword : contents for value to be set if it is an integer (Windows DWORD). Only digits are valid. "48" is valid, "0x30" will be raise an NumberFormatException from java.lang.Long.parseLong.
- <bin> : element to handle one "line" of binary data.
- data : contents for value of type BINARY written as comma separated list of hex. Only hex-digits are valid. "48, f4" is valid, "0x48, 0xf4" will be raise an NumberFormatException from java.lang.Integer.parseInt.
- <multi>: element to handle one contents string for
MULTI_STRINGs.
- data : the contents for the element <multi>.
Maybe the descriptions for type BINARY and MULTI_STRING are not fully descriptive. Therefore as example the test entries in the registry specification file of IzPack:
<registry>
  ...
  <pack name="Core">
    <value name="Path"
      keypath="SOFTWARE\IzForge\IzPack\$APP_VER"
      root="HKLM"
      string="$INSTALL_PATH"/>
    <value name="DWORD"
      keypath="SOFTWARE\IzForge\IzPack\$APP_VER"
      root="HKLM"
      dword="42"/>
    <value name="BIN"
      keypath="SOFTWARE\IzForge\IzPack\$APP_VER"
      root="HKLM" >
      <bin data="42, 49, 4e, 20, 54, 45, 53, 54" />
      <bin data="42, 49, 4e, 20, 54, 45, 53, 54" />
    </value>
    <value name="MULTI"
      keypath="SOFTWARE\IzForge\IzPack\$APP_VER"
      root="HKLM" >
      <multi data="A multi string with three elements" />
      <multi data="Element two"/>
      <multi data="Element three"/>
    </value>
  </pack>
</registry>
Extended Uninstall Key
There is a special pack named UninstallStuff. If a pack will be declared like
<name="UninstallStuff">
the incorporated elements will be used for creating the uninstall key and values instead of the build-in behavior. This pack name should be not used at an other point of the installation. It is a virtual and should be used only in RegistrySpec.xml.
The registry handler self cannot ensure the uniqueness of an uninstaller key. There is the special panel CheckedHelloPanel which does it. If no pack UninstallStuff will be used, this will be performed full automatically. If the pack was declared, all keypaths under it should be written as following:
...
<value name="DisplayName"
  keypath="SOFTWARE\Microsoft\Windows\CurrentVersion\Uninstall\$UNI
  NSTALL_NAME"
  root="HKLM"
  string="$UNINSTALL_NAME"/>
...
The IzPack variable $UNINSTALL_NAME will be defined in the CheckedHelloPanel. With the "normal" HelloPanel it is undefined and the uninstall key catches the name "$UNINSTALL_NAME".
Uninstall Behavior
During uninstallation the deletion or modification of written keys or values will be performed depending to the following rules:
A review of the registry will be performed only on supported operating systems (current only on Windows).
A review of the registry will be performed only if the registry stuff was bound for uninstallation.
Keys: Keys can only be deleted, a modification is not possible.
A previous existent key will be NOT deleted.
A newly created key will be deleted, if...
- no new values or subkeys are added after installation.
- no changes are made at the contents of values after installation.
With other words: if under the key something was changed between installation and uninstallation, the key will be persist.
Values:
- A newly created value will be deleted, if the contents at uninstall time is the same as after installation.
- The contents of a previos existent value will be changed to the previous contents (the contents before installation) if the contents at uninstall time is the same as after installation.
In other words: if the contents of a value was changed between installation and uninstallation this contents will be persist. There is no handling of parts of the contents (important for type MULTI_STRING).
This conservative behavior cannot be changed to a user dependant voting because there is no user interface for custom actions at uninstall time. Additional the registry handler to not support voting.
Examples
There are the files
[IzPackRoot]/src/dist-files/IzPack-install-reg.xml
[IzPackRoot]/src/dist-files/RegistrySpec.xml
IzPack-install-reg.xml contains additional to the normal definition the stuff needed to create an IzPack installer which sets on Windows an extended uninstall key and some keys and values under a "private" key. Compare with the "normal" installation definition of IzPack.
RegistrySpec.xml will be referred by IzPack-install-reg.xml as resource. It contains the special pack named UninstallStuff for Izpack and defines some additional keys and values.
Summary Logger (InstallerListener)
The listener SummaryLoggerInstallerListener can be used to log the summary of panels into a file. To use it, add following element to the listener section of your installation config file.
<listeners>
    <listener installer="SummaryLoggerInstallerListener"
        uninstaller="SummaryLoggerInstallerListener" >
        <os family="windows"/>
    </listener>
</listeners>
The default path is
$INSTALL_PATH/Uninstaller/InstallSummary.htm
It can be changed with the subelement summarylogfilepath of the element info of the installation description file. As example:
<info>
    ...
    <summarylogfilepath>
        $INSTALL_PATH/Uninstaller/MySummary.htm
    </summarylogfilepath>
</info>
Go back to the documentation index