Demo
The demo application is a stopwatch widget that measures and displays time intervals accurate to within hundredths of a second. The application interface is a dial that has a second hand, two small dials that display tenths and hundredths of a second, and a digital display that shows time elapsed in minutes, seconds, and tenths and hundredths of a second. On the top of the main dial there are two buttons, green and red. The green button starts or stops the time measure. Once the green button is pressed during time measure, the stopwatch stops indicating the time elapsed, however the actual time measuring continues. This feature allows recording intermediate results. The red button resets the elapsed time.
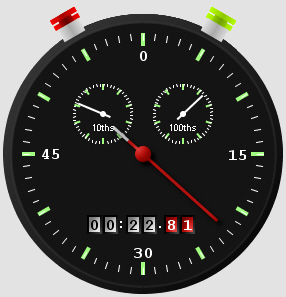
Figure 1: Stopwatch Widget |
Creating the Application GUI
The demo uses a number of JavaFX SDK Runtime classes to build the application UI and implement graphical effects.
The following code draws the inner and the outer circle of the main stopwatch. Note the use of the Circle, LinearGradient, and RadialGradient classes. These classes are used to draw circles with a 140- and 134- pixel radius and fill them with the linear and radial gradient respectively. The radius of the circle is defined by the radius attribute, the start and end colors of the gradient are defined using the Stop and color attributes.
Group { translateX: 40 translateY: 40 content: [
  Circle {
    centerX: 140
    centerY: 140
    radius: 140
    fill:LinearGradient { startX:0 startY:0 endX:1 endY:1
      stops: [
        Stop { offset:0 color: webcolor("#3c3c3c") },
        Stop { offset:1 color: webcolor("#010101") }
      ]
    }
  },
Circle {
  centerX: 140
  centerY: 140
  radius: 134
  fill: RadialGradient { centerX:0.5 centerY:0.5 radius:0.5
    stops: [
      Stop { offset:0 color: rgba(20,20,20,1) },
      Stop { offset:0.9499 color: rgba(20,20,20,1) },
      Stop { offset:0.95 color: rgba(20,20,20,1) },
      Stop { offset:0.975 color: rgba(20,20,20,1) },
      Stop { offset:1 color: rgba(84,84,84,0) }
    ]
  }
},
...
Also note that the Group class groups the two circles to enable them share a coordinate space and to be transformed as a group.
The numbers "0", "15, "30", "45" below the tick marks are implemented using the Text class. Here is the code that draws a white "0".
Text {
  font: Font{name: "Courier" size: 16, style: FontStyle.BOLD}
  x: 141 y: 47
  content: "0"
  horizontalAlignment: HorizontalAlignment.CENTER
  fill: webcolor("#FFFFFF")
},
...
Note that the code uses font to set the font style and its size, x and y attributes to define the position of the tick mark, and content to display "0". It also fills the tick mark with yellow using fill with a defined web code for this color.
The hand of the main dial comprises of two rectangles and a circle created using the Circle and Rectangle classes. Additionally, lighting effect is applied to the dial using Lighting class:
Group {
  content: [
    Group {
      content: [
        Circle {centerX: 140 centerY: 140 radius: 8
          fill: webcolor("#FF0000")},
        Rectangle{x: -1.5 y: -20 width: 3 height: 120
            fill: webcolor("#FF0000")
            rotate: bind handAngle
            translateX: 140
            translateY: 140},
        Rectangle{x: -1.5 y: -40 width: 3 height: 20
            fill: webcolor("#FFFFFF")
            rotate: bind handAngle
            translateX: 140
            translateY: 140}
      ]
      effect: Lighting{
        light: DistantLight {azimuth: 225}
      }
    }
  ]
...
The following code uses the Arc and the GaussianBlur classes to achieve the lighting "reflection" looking effect in the top-left quadrant of the stopwatch.
Group {
  content: [
    Arc { centerX: 15 centerY: 15 radiusX:250 radiusY: 250 type: ArcType.CHORD
      startAngle: 200 length: -130
      fill: rgb(255,255,255)},
    Arc { centerX: 15 centerY: 15 radiusX:250 radiusY: 250 type: ArcType.CHORD
      startAngle: 190 length: -122
      fill: rgb(255,255,255)},
  ]
effect: GaussianBlur{ radius: 2 }
opacity: 0.05
},
...
You can find the entire code for this program in the JavaFXStopwatch.zip file located in the Source Files directory. The zip file contains Main.fx, Widget.fx, StopwatchWidget.fx, and ShapedWindowsHelper.java source files. For a complete step-by-step instructions on how to compile and run the application, refer to JavaFX SDK README.
Note: The running and compiling process of the demo has some peculiarities. To compile and run the application from the command line:
- Make sure you correctly set the PATH variable in your system. For details, see JavaFX SDK README
- Compile ShapedWindowsHelper.java using the JDK compliler: javac ShapedWindowsHelper.java
- Compile Main.fx, Widget.fx, and StopWatch.fx files using JavaFX SDK compiler: javafxc Main.fx Widget.fx StopwatchWidget.fx
- Run the application: javafx Main