Practical Examples
Creating Simple Graphics
To learn how to create the GUI using JavaFX Script, consider a task of creating simple graphics: a rounded rectangle and a text string with a drop shadow.
The following code sample shows how you do it in a traditional way using Java 2D:
import java.applet.Applet;
import java.awt.font.*;
import java.awt.geom.*;
import java.awt.*;
...
public class SimpleButton extends Applet {
...
	public void paint(Graphics g) {
	  Graphics2D g2 = (Graphics2D) g;
	  g.setColor(Color.LIGHT_GRAY);
	  g2.fillRoundRect(10, 10, 200, 50, 15, 15);

	  Font font = new Font("Serif", Font.BOLD, 20);
	  g.setFont(font);
	  String textString = "Java 2D";
	  FontRenderContext frc = ((Graphics2D)g).getFontRenderContext();
	  Rectangle2D bounds = font.getStringBounds(textString, frc);
	  int wText = (int)bounds.getWidth();
	  int TextX = 10 + 200/2 - wText/2;

	  g.setColor(Color.DARK_GRAY);
	  g.drawString(textString, TextX + 1, 39);
	  g.setColor(Color.YELLOW);
	  g.drawString(textString, TextX, 40);
	}
...
}

Figure 1: Java 2D Sample |
To drop a shadow, this code sets a contrast color and uses an additional drawString method with offset coordinates.
The JavaFX Script Language and JavaFX Runtime classes enable developers to render the same graphic context more easily and more clearly:
import javafx.scene.*;
import javafx.scene.paint.*;
import javafx.scene.geometry.*;
import javafx.scene.text.*;
import javafx.scene.effect.*;
import javafx.ext.swing.*;

SwingFrame {
  title: "Simple (JavaFX demo)"
  width: 228
  height: 98
  content: Canvas {
    content: Group {
      content: [
        Rectangle {
          x: 10   y: 10
          width: 200   height: 50
          arcWidth: 15   arcHeight: 15
          fill: Color.web("#C0C0C0")
        },
        Text {
          x: 110   y: 40
          content: "JavaFX"
          font: Font {
            name: "Serif"
            size: 20
            style: FontStyle.BOLD
          }
          fill: Color.YELLOW
          horizontalAlignment: HorizontalAlignment.CENTER
          effect: DropShadow {
            offsetX: 2   offsetY: -2   radius: 6
            color: Color.BLACK
          }
        }
      ]
    }
  }
  visible: true
}
This code sample defines a Group object containing two elements: Rectangle and Text. Shape parameters and coordinates as well as font and colors are set using corresponding attributes - x , y, font, size, style, fill and color. The effect attribute applies a drop shadow to the Text element.
To enhance this code, apply a lighting effect to the Group:
import javafx.scene.*;
import javafx.scene.paint.*;
import javafx.scene.geometry.*;
import javafx.scene.text.*;
import javafx.scene.effect.*;
import javafx.scene.effect.light.*;
import javafx.ext.swing.*;

Group {
  content: [
    Rectangle{...}
    Text {...}
  ] effect: Lighting{light: DistantLight {azimuth: 225}}
}

Figure 2: JavaFX Script Sample |
The azimuth attribute defines a direction angle for the light source on the XY plane, in degrees.
More visual effects are available in the javafx.scene.effect and javafx.scene.effect.light packages. Refer to the API doc or to API Reference for more information. The entire code of this program is available in the JavaFXGraphics.fx file.
Applying Data Binding
Data binding is one of the advantageous features in JavaFX Script Language. It enables all public attributes and functions to be bound. For example, you can bind the window title to the TextField, so whatever you type automatically appears in the window title without handling event listeners. For the graphical sample, you create a slider to vary the angle of the distant light source.
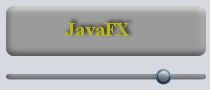
Figure 3: Data Binding Sample |
To add the slider to the Group, use the ComponentView class.
var slider = Slider{minimum: 0 maximum: 360 value: 20};

SwingFrame {
  title: "Data Binding"
  width: 228
  height: 140
  content: Canvas {
    content: Group {
      content: [
        ComponentView {
        component: slider
        translateX: 10
        translateY: 70
        },
        Rectangle {
          ...
	    },
        Text {
        ...
        }
      ]
      effect: Lighting {
        light: DistantLight {
          azimuth: bind slider.value
        }
      }
    }
  }
  visible: true
}
The azimuth attribute of DistantLight is bound to the value attribute of Slider.
azimuth: bind slider.value
So, each time the slider's position changes, the angle updates. The complete code of this example is available in the JavaFXDataBinding.fx file in the Source Files directory. Binding mechanism is employed in the following demos: Nodes, StopWatch, and PlayerControl. For more details about data binding, refer to the JavaFX Script Language Reference, Chapter 8. Data Binding.
Setting GUI Layout
JavaFX Script can easily be used to set the desired layout of the GUI elements. For example, it is possible to define the layout of buttons on the frame in a grid fashion, as shown on the following figure.
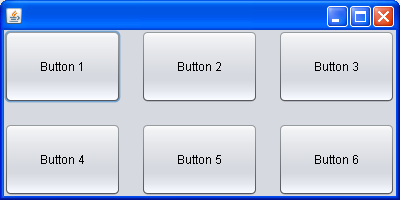
Figure 3: JavaFX Script Sample |
To achieve this effect, use GridPanel and define the number of rows, columns and elements' horizontal and vertical gap distance using rows, columns, hgap and vgap attributes respectively. Then put the buttons on the frame:
import javafx.scene.*;
import javafx.scene.text.*;
import javafx.ext.swing.*;

var f1 = SwingFrame {
  name: "Frame 1"
  content: GridPanel{rows: 2
    columns: 3
    hgap: 20
    vgap: 20
      content: [Button{name: "Button 1" text: "Button 1"},
        Button{name: "Button 2" text: "Button 2"},
        Button{name: "Button 3" text: "Button 3"},
        Button{name: "Button 4" text: "Button 4"},
        Button{name: "Button 5" text: "Button 5"},
        Button{name: "Button 6" text: "Button 6"},
     ]
  }
width: 400
height: 200
visible: true
}
Note that the code sets the height and the width of the frame using width and height attributes.
For details, see the API Reference section in Appendix. You can find the entire code for this program in the JavaFXGridLayout.fx file located in the Source Files directory.
The examples show that using JavaFX Script makes it easier to design GUIs compared to Swing and AWT. The structure of the code closely matches the actual layout of the GUI, making it easier to understand and maintain. The following section offers some complicated examples based on the Stopwatch demo application.