

 |     |
Table of Contents
Author: <[email protected]>
For the purpose of this howto, I installed the JBossTomcat release version 2.2.1 into d:\JBoss-2.2.1_Tomcat-3.2.1. Download it from http://www.jboss.org and select the binary link from the page. Don't worry about downloading a binary package, when all you want is the source code; the binary package also contains the source code used for building.
This is the most difficult aspect of the setup to get correct, however once completed it does not need to be changed so you can setup multiple ejb projects and reuse this library thanks to the folks at Borland.
To do this launch the Project/ProjectProperties/RequiredLibraries/Add... dialog
Add the following library entries to the JBoss-Server classpath (the order is crucual here). Pay specific attention to the log and tmp folders, faulure to put these in the Library class path will cause the classloader to spit out error messages, the most confusing of which is that /log.properties or /tmp.properties files could not be located. This is because the folders containing these files need to be in the classpath and the class loader complains.
/$JBOSS_TOMCAT_HOME/jboss/lib/crimson.jar
/$JBOSS_TOMCAT_HOME/jboss/bin/run.jar
/$JBOSS_TOMCAT_HOME/jboss/bin
/$JBOSS_TOMCAT_HOME/jboss/conf
/$JBOSS_TOMCAT_HOME/jboss/lib/jaas.jar
/$JBOSS_TOMCAT_HOME/jboss/lib/jboss-jaas.jar
/$JBOSS_TOMCAT_HOME/jboss/lib/jdbc2_0-stdext.jar
/$JBOSS_TOMCAT_HOME/jboss/lib/jmxri.jar
/$JBOSS_TOMCAT_HOME/tomcat/lib/parser.jar
/$JBOSS_TOMCAT_HOME/tomcat/lib/servlet.jar
/$JBOSS_TOMCAT_HOME/tomcat/lib/jaxp.jar
/$JBOSS_TOMCAT_HOME/tomcat/lib/webserver.jar
/$JBOSS_TOMCAT_HOME/tomcat/lib/jasper.jar
/$JBOSS_TOMCAT_HOME/jboss/lib/ext/activation.jar
/$JBOSS_TOMCAT_HOME/jboss/lib/ext/awt.jar
/$JBOSS_TOMCAT_HOME/jboss/lib/ext/dynaserver.jar
/$JBOSS_TOMCAT_HOME/jboss/lib/ext/ejb.jar
/$JBOSS_TOMCAT_HOME/jboss/lib/ext/ejxeditor.jar
/$JBOSS_TOMCAT_HOME/jboss/lib/ext/ejxejb.jar
/$JBOSS_TOMCAT_HOME/jboss/lib/ext/ejxjaws.jar
/$JBOSS_TOMCAT_HOME/jboss/lib/ext/ejxjboss.jar
/$JBOSS_TOMCAT_HOME/jboss/lib/ext/hsql.jar
/$JBOSS_TOMCAT_HOME/jboss/lib/ext/idb.jar
/$JBOSS_TOMCAT_HOME/jboss/lib/ext/jboss.jar
/$JBOSS_TOMCAT_HOME/jboss/lib/ext/jetty-service.jar
/$JBOSS_TOMCAT_HOME/jboss/lib/ext/jms.jar
/$JBOSS_TOMCAT_HOME/jboss/lib/ext/jmxtools.jar
/$JBOSS_TOMCAT_HOME/jboss/lib/ext/jndi.jar
/$JBOSS_TOMCAT_HOME/jboss/lib/ext/jnpserver.jar
/$JBOSS_TOMCAT_HOME/jboss/lib/ext/jpl-util-0_5b.jar
/$JBOSS_TOMCAT_HOME/jboss/lib/ext/jta-spec1_0_1.jar
/$JBOSS_TOMCAT_HOME/jboss/lib/ext/mail.jar
/$JBOSS_TOMCAT_HOME/jboss/lib/ext/tomcat-service.jar
/$JBOSS_TOMCAT_HOME/jboss/lib/ext/jbossmq.jar
/$JBOSS_TOMCAT_HOME/jboss/db
/$JBOSS_TOMCAT_HOME/jboss/conf/default
/$JBOSS_TOMCAT_HOME/jboss/lib/ext/log4j.jar
/$JBOSS_TOMCAT_HOME/jboss/log
/$JBOSS_TOMCAT_HOME/jboss/tmp
/$JBOSS_TOMCAT_HOME/jboss/lib/ext/jbosssx.jar
/$JBOSS_TOMCAT_HOME/jboss/lib/ext/jbosscx-0.2.jar
/$JBOSS_TOMCAT_HOME/jboss/lib/ext/connector.jar
/$JBOSS_TOMCAT_HOME/jboss/lib/ext/minerva-1_0b3.jar
In the source tab for the JBoss-Server library point to /$JBOSS_TOMCAT_HOME/jboss/src. This is how JBuilder resolves where to find the source for stepping through the code. Without this step typically you will be able to step through the code but the Main.java will appear as Main.class.
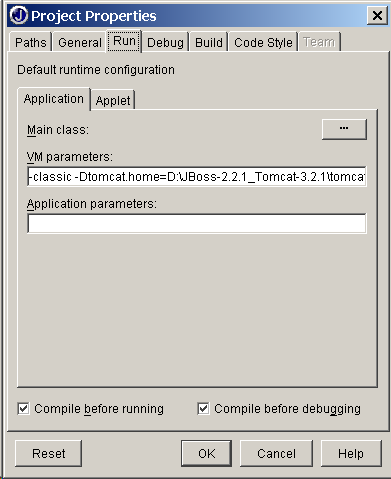
As per the diagram figure below, set the main class entry point to 'org.jboss.Main'. This is where the JBoss server code starts up. Make sure that you set the working directory is set to $JBOSS_TOMCAT_HOME/jboss/bin in the paths tab.

Cut and paste the following line and place it into the 'vm parameters' entry field (Project/Properties/Run)
-classic -Dtomcat.home=D:\$JBOSS_TOMCAT_HOME\tomcat -Duser.dir=D:\$JBOSS_TOMCAT_HOME\jboss\bin
-Djavax.xml.parsers.SAXParserFactory=org.apache.crimson.jaxp.SAXParserFactoryImpl
-Djavax.xml.parsers.DocumentBuilderFactory=org.apache.crimson.jaxp.DocumentBuilderFactoryImpl
The starup argument should be left blank with the above setting. If you want to run with the integrated tomcat you can put tomcat as the argument, however beware that you MAY need to replace the /$JBOSS_TOMCAT_HOME/jboss/conf/default with /$JBOSS_TOMCAT_HOME/jboss/conf/tomcat
If the above steps have been done correctly, open up JBoss-Server.library, this is located in the folder you specified when creating the library. Typically this is C:\Documents and Settings\<nt_username>\.jbuilder4 or home directory on Linux. Do NOT edit this file, I found several problems manually editing this file and I am unsure why but I got several instances of resource not found exceptions afterwards. If in doubt don't touch it!
<?xml version="1.0" encoding="UTF-8"?>
<library>
  <!--JBuilder Library Definition File-->
  <fullname>JBoss-Server</fullname>
  <class>
    <path>[/$JBOSS_TOMCAT_HOME/jboss/lib/crimson.jar]</path>
    <path>[/$JBOSS_TOMCAT_HOME/jboss/bin/run.jar]</path>
    <path>/$JBOSS_TOMCAT_HOME/jboss/bin</path>
    <path>/$JBOSS_TOMCAT_HOME/jboss/conf</path>
    <path>[/$JBOSS_TOMCAT_HOME/jboss/lib/jaas.jar]</path>
    <path>[/$JBOSS_TOMCAT_HOME/jboss/lib/jboss-jaas.jar]</path>
    <path>[/$JBOSS_TOMCAT_HOME/jboss/lib/jdbc2_0-stdext.jar]</path>
    <path>[/$JBOSS_TOMCAT_HOME/jboss/lib/jmxri.jar]</path>
    <path>[/$JBOSS_TOMCAT_HOME/tomcat/lib/parser.jar]</path>
    <path>[/$JBOSS_TOMCAT_HOME/tomcat/lib/servlet.jar]</path>
    <path>[/$JBOSS_TOMCAT_HOME/tomcat/lib/jaxp.jar]</path>
    <path>[/$JBOSS_TOMCAT_HOME/tomcat/lib/webserver.jar]</path>
    <path>[/$JBOSS_TOMCAT_HOME/tomcat/lib/jasper.jar]</path>
    <path>[/$JBOSS_TOMCAT_HOME/jboss/lib/ext/activation.jar]</path>
    <path>[/$JBOSS_TOMCAT_HOME/jboss/lib/ext/awt.jar]</path>
    <path>[/$JBOSS_TOMCAT_HOME/jboss/lib/ext/dynaserver.jar]</path>
    <path>[/$JBOSS_TOMCAT_HOME/jboss/lib/ext/ejb.jar]</path>
    <path>[/$JBOSS_TOMCAT_HOME/jboss/lib/ext/ejxeditor.jar]</path>
    <path>[/$JBOSS_TOMCAT_HOME/jboss/lib/ext/ejxejb.jar]</path>
    <path>[/$JBOSS_TOMCAT_HOME/jboss/lib/ext/ejxjaws.jar]</path>
    <path>[/$JBOSS_TOMCAT_HOME/jboss/lib/ext/ejxjboss.jar]</path>
    <path>[/$JBOSS_TOMCAT_HOME/jboss/lib/ext/hsql.jar]</path>
    <path>[/$JBOSS_TOMCAT_HOME/jboss/lib/ext/idb.jar]</path>
    <path>[/$JBOSS_TOMCAT_HOME/jboss/lib/ext/jboss.jar]</path>
    <path>[/$JBOSS_TOMCAT_HOME/jboss/lib/ext/jetty-service.jar]</path>
    <path>[/$JBOSS_TOMCAT_HOME/jboss/lib/ext/jms.jar]</path>
    <path>[/$JBOSS_TOMCAT_HOME/jboss/lib/ext/jmxtools.jar]</path>
    <path>[/$JBOSS_TOMCAT_HOME/jboss/lib/ext/jndi.jar]</path>
    <path>[/$JBOSS_TOMCAT_HOME/jboss/lib/ext/jnpserver.jar]</path>
    <path>[/$JBOSS_TOMCAT_HOME/jboss/lib/ext/jpl-util-0_5b.jar]</path>
    <path>[/$JBOSS_TOMCAT_HOME/jboss/lib/ext/jta-spec1_0_1.jar]</path>
    <path>[/$JBOSS_TOMCAT_HOME/jboss/lib/ext/mail.jar]</path>
    <path>[/$JBOSS_TOMCAT_HOME/jboss/lib/ext/tomcat-service.jar]</path>
    <path>[/$JBOSS_TOMCAT_HOME/jboss/lib/ext/jbossmq.jar]</path>
    <path>/$JBOSS_TOMCAT_HOME/jboss/db</path>
    <path>/$JBOSS_TOMCAT_HOME/jboss/conf/default</path>
    <path>[/$JBOSS_TOMCAT_HOME/jboss/lib/ext/log4j.jar]</path>
    <path>/$JBOSS_TOMCAT_HOME/jboss/log</path>
    <path>/$JBOSS_TOMCAT_HOME/jboss/tmp</path>
    <path>[/$JBOSS_TOMCAT_HOME/jboss/lib/ext/jbosssx.jar]</path>
    <path>[/$JBOSS_TOMCAT_HOME/jboss/lib/ext/jbosscx-0.2.jar]</path>
    <path>[/$JBOSS_TOMCAT_HOME/jboss/lib/ext/connector.jar]</path>
    <path>[/$JBOSS_TOMCAT_HOME/jboss/lib/ext/minerva-1_0b3.jar]</path>
  </class>
  <source>
    <path>/$JBOSS_TOMCAT_HOME/jboss/src</path>
  </source>
</library>
A note about the initial file directory specifier. I have seen this a couple of ways, if you have multiple hard drives with the home on C and the JBoss on D for example you will see 'D%|/' in place of / or alternatively you may see a relative directory such as ../../JBoss-2.2.1....
I found that loading instant DB within its minnerva pool manager occasionally causes the debugger to hang (on different setups), to work around this, I made the following modifications to config/tomcat and also config/default (it depends on the model you wish to start up JBoss in)
<!-- JDBC @JC org.enhydra.instantdb.jdbc.idbDriver  removed from list of drivers -->
<mbean code="org.jboss.jdbc.JdbcProvider"
name="DefaultDomain:service=JdbcProvider">
   <!-- <attribute name="Drivers">org.hsql.jdbcDriver,
    org.enhydra.instantdb.jdbc.idbDriver</attribute> HANGS DRIVER -->
   <attribute name="Drivers">org.hsql.jdbcDriver</attribute>
</mbean>
and comment out the minnerva pool definitions associated with InstantDB
<!--
  <mbean code="org.jboss.jdbc.XADataSourceLoader"
     name="DefaultDomain:service=XADataSource,name=InstantDB">
    <attribute name="PoolName">InstantDB</attribute>
    <attribute name="DataSourceClass">org.opentools.minerva.jdbc.xa.wrapper.XADataSourceImpl</attribute>
    <attribute name="Properties"></attribute>
    <attribute name="URL">jdbc:idb:../conf/default/instantdb.properties</attribute>
    <attribute name="GCMinIdleTime">1200000</attribute>
    <attribute name="JDBCUser" />
    <attribute name="MaxSize">10</attribute>
    <attribute name="Password" />
    <attribute name="GCEnabled">false</attribute>
    <attribute name="InvalidateOnError">false</attribute>
    <attribute name="TimestampUsed">false</attribute>
    <attribute name="Blocking">true</attribute>
    <attribute name="GCInterval">120000</attribute>
    <attribute name="IdleTimeout">1800000</attribute>
    <attribute name="IdleTimeoutEnabled">false</attribute>
    <attribute name="LoggingEnabled">false</attribute>
    <attribute name="MaxIdleTimeoutPercent">1.0</attribute>
    <attribute name="MinSize">0</attribute>
  </mbean>
-->
Firstly it is necessary to put breakpoints in your ejb's. As outlined previously project settings should point to the source of your beans. Open up a typical bean implementation and place breakpoints whereever desired.
Using the IDE, select run / start debugger (shift + f9). If you want to see your beans being instantiated by the deployer, place breakpoints on the bean constructors (if you specified them) You will not need to have a client running to exercise this functionality.
copy of drag/drop (for windoze fans) the ejb jar file containing the ejb-jar.xml and jboss.xml (optional) to the deploy folder. If you have set breakpoints in stateless session ejb's these should cause the debugger to stop in your code! Hurrah!
If you include a client test code in your project you can debug this also (even though the project's main execution class is specified as 'org.jboss.Main'. To do this, select the test client class from the project class pane and from the popup context meny, select debug. You should be aware though that this debug session will run from the $JBOSS_TOMCAST_HOME/jboss/bin directory since this is where we set the ejb project to execute from (see above). If all goes well, you will have 2 running tabs in the messages window, one of these will be called Main (this is the JBoss server process and this is where you can single step through EJB code while the other is the test client. One thing though, the timeouts are somewhat short so if you spend too much time in a method within the EJB you may find that transactions are rolled back.
If anyone has suggestions of feedback please let me know, I can be contacted via email at [email protected]
 |     |