Create new RichFaces Documentation Jira issue

This will launch the RichFaces Jira page - to complete your feedback please login if needed, and submit the Jira.
JBoss.orgCommunity Documentation
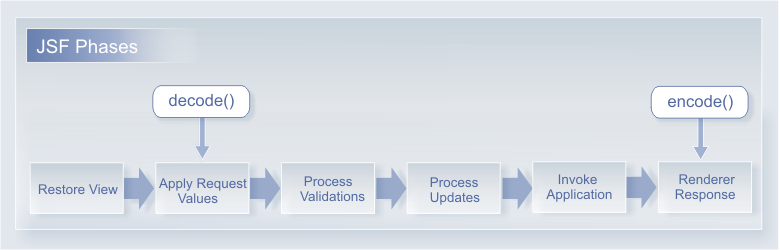
Component functionality typically centers around two actions: decoding and encoding data. Decoding is the process of converting incoming request parameters to the values of the component. Encoding is the process of converting the current values of the component into the corresponding markup. In the following figure you can see decoding and encoding occur in the JSF lifecycle:
Thus, JSF components consist of two parts: the component class and the renderer. The component class is responsible for the state and behavior of a UI component and will be discussed later in the "Configuring component" section.
The Renderer is responsible for the JSF component representation. It generates the
appropriate client-side markup, such as HTML, WML, XUL, etc. Renderer is also
responsible for the converting information coming from the client to the proper type
for the component (for example, a string value from the request is converted to a
strongly type Date object).
It is necessary to create following renderer classes for the <inputDate> component:
InputDateRenderer class where you should override encode() methods for encoding the markup and resources
InputDateRendererBase class where you should override decode() method.
You could also define associated converter in this class.
You could actually implement the renderer-specific component subclass that
exposes client-side attributes such as
"style"
,
"class"
, etc. It is common practice to implement the client-specific component
subclass to make some aspects of application development easier, but in our case we
do not need to do it. The
<inputDate>
is a simple UIInput component, therefore
InputDateRenderer class generates all the markup itself.
It is a time to start creating the InputDateRenderer class.
The smartest way to create the InputDateRenderer class is a Templating mechanism,
one of the most convenient features of the Component Development Kit (CDK).
The Component Development Kit (CDK) allows to use templates for generation Renderer class.
Templates are JSP-like markup pages with special tags that are converted into Renderer by a build script.
It's possible to use evaluated expressions in components templates with the help of scriptlets. It's also possible to create the base class for a template to implement additional functions in it, so as the functions could be called from the template. Hence, in the generated Renderer class there are corresponding function calls on the place of these elements.
Let's create the template for HTML 4.0 markup. At first you should proceed to the inputDate/src/main/templates/org/mycompany directory where htmlInputDate.jspx template file is stored. This file contains a Template Skeleton like this one:
<?xml version="1.0" encoding="UTF-8"?>

<f:root

    xmlns:f="http://ajax4jsf.org/cdk/template"

    xmlns:c=" http://java.sun.com/jsf/core"

    xmlns:ui=" http://ajax4jsf.org/cdk/ui"

    xmlns:u=" http://ajax4jsf.org/cdk/u"

    xmlns:x=" http://ajax4jsf.org/cdk/x"

    class="org.mycompany.renderkit.html.InputDateRenderer"

    baseclass="org.ajax4jsf.renderkit.AjaxComponentRendererBase"

    component="org.mycompany.component.UIInputDate"

    >

    <f:clientid var="clientId"/>

    <div id="#{clientId}"

        x:passThruWithExclusions="value,name,type,id"

        >

    </div>

</f:root>
According to the created UI prototype you need to extend Template Skeleton with proper elements:
<div>-wrapper element with "title", "id" attributes and with the "caption" facet
...

<div id="#{clientId}" title="#{value}" x:passThruWithExclusions="value,name,type,id">

    ...

</div>

...
<input> element with "id", "value", "name", "type", "class", "style" attributes. It is possible to use the "icon" facet in order to redefine a default icon of the component.
...

<input  id="#{clientId}"

        name="#{clientId}"

        type="text"

        value="#{this:getValueAsString(context, component)}"

        class="my-inputDate-input #{component.attributes['inputClass']}"

        style="#{component.attributes['inputStyle']}"/>

...
<img> element with "src", "class", "style" attributes which defines a default icon of the component. In order to add an image to the Template you should register it with the help of <f:resource> template tag and bind to a variable specified by the "var" attribute:
...

<f:resource name="/org/mycompany/renderkit/html/images/inputDate.png" var="icon" />

    ...

<img src="#{icon}" class="my-inputDate-icon #{component.attributes['iconClass']}" style="#{component.attributes['iconStyle']}"/>

...
The <inputDate> component uses styles that should be defined in the template with the help of <h:styles> tag:
...

<h:styles>/org/mycompany/renderkit/html/css/inputDate.xcss</h:styles>

...
How to register all resources is explained in the "Component resources registration" chapter.
Don't forget to add namespace xmlns:h=" http://ajax4jsf.org/cdk/h" to the
<f:root> element:
<?xml version="1.0" encoding="UTF-8"?>

<f:root

    ...

    xmlns:h=" http://ajax4jsf.org/cdk/h"

    ...

    >

    ...

</f:root>
Here is a full example of the template for the <inputDate> component: htmlInputDate.jspx.
As it is seen in the Template Skeleton the Renderer Baseclass is org.ajax4jsf.renderkit.AjaxComponentRendererBase.
You need to define Renderer Base class special for the <inputDate> component.
In the next section "Creating a Renderer Base class"
we will create Renderer Base class org.mycompany.renderkit.InputDateRendererBase.
All the Template tags you could find in the "Template tags overview" chapter.
After the component tree is restored on the Restore View Phase ,
each component in the tree extracts its new value from the request parameters
by using its decode() method. Then the value is stored locally on the component.
In order to create InputDateRendererBase class you should proceed to the
src/main/java/org/mycompany/renderkit
directory and create this class there:
package org.mycompany.renderkit;

import java.io.IOException;

import java.util.Map;

import java.util.TimeZone;

import javax.faces.component.UIComponent;

import javax.faces.context.ExternalContext;

import javax.faces.context.FacesContext;

import javax.faces.convert.Converter;

import javax.faces.convert.ConverterException;

import javax.faces.convert.DateTimeConverter;

import org.ajax4jsf.renderkit.HeaderResourcesRendererBase;

import org.mycompany.component.UIInputDate;


public abstract class InputDateRendererBase extends HeaderResourcesRendererBase {

    ...

}
The InputDateRendererBase class extends a HeaderResourcesRendererBase
class. In the HeaderResourcesRendererBase class all the encode() methods for
the right resources encoding
are already implemented, so in the InputDateRendererBase class you need to override
the decode() method only:
 ...

public void decode(FacesContext context, UIComponent component){

    ExternalContext external = context.getExternalContext();

    Map requestParams = external.getRequestParameterMap();

    UIInputDate inputDate = (UIInputDate)component;

    String clientId = inputDate.getClientId(context);

    String submittedValue = (String)requestParams.get(clientId);

    if (submittedValue != null) {

        inputDate.setSubmittedValue(submittedValue);

    }

}

...
As you see in the example above the decode() method reads values from request parameters,
grabs the clientId from the component to identify the request parameter to be looked up.
The clientId is calculated as the fully qualified name of the component given its container path:
nameOfForm:nameOfComponent (for example myForm:inputDate).
The last step of the decode() method is to store the submitted value locally on the component.
By default, the base Renderer implementation returns the submittedValue directly without any conversion!
If you want to convert submitted value to a strongly typed object you should implement Converter
and the getConvertedValue() method in your Renderer class (in our case in the InputDateRendererBase class).
As it was mentioned before the <inputDate> component at the Apply Request Values phase takes a value and pushes it to the model as a strongly typed Date object. Therefore you need to implement a Converter in the Renderer Base class and also check whether a Converter has been already attached by the application developer. If the conversion of the value fails, an error message associated with the component is generated and queued on FacesContext.
The getConverter() method of the InputDateRendererBase class returns the a converter, as shown in the following example:
...

private Converter getConverter(FacesContext context, UIInputDate inputDate){

    Converter converter = inputDate.getConverter();

    if (converter == null){

        // default the converter

        DateTimeConverter datetime = new DateTimeConverter();

        datetime.setLocale(context.getViewRoot().getLocale());

        datetime.setTimeZone(TimeZone.getDefault());

        datetime.setType("date");

        datetime.setDateStyle("medium");

        datetime.setPattern("d/m/y");

        converter = datetime;

    }

    return converter;

}

...
During the converter creation you should check whether the application developer has attached a Converter to the <inputDate> component already (for example, <f:convertDateTime>) . If not you should follow the next steps:
create a new DateTimeConverter
get the locale for the client from the context with the help of the getLocale() method
and set it on the new Converter by means of the setLocale() method
set the time zone, date type, date style, and date pattern on the new converter with the help of
setTimeZone(), setType(), setDateStyle(), and
setPattern() methods respectively
return the Converter
After the Apply Request Values phase the application enters the
Process Validation phase during which the validate() method
calls the getConvertedValue() method on every submitted value and passes
the newly submitted value from the decode process.
The getConvertedValue() method converts the submitted value to a strongly typed
object (in our case Date) using the getAsObject() method.
Then the new strongly typed object is validated and if there are no errors
Process Validation phase ends. Otherwise the getConvertedValue() method
throws a ConverterException.
Here is the snippet:
...

public Object getConvertedValue(FacesContext context, UIComponent component, Object submittedValue) throws ConverterException{

    UIInputDate inputDate = (UIInputDate)component;

    Converter converter = getConverter(context, inputDate);

    String valueString = (String)submittedValue;

    return converter.getAsObject(context, component, valueString);

}

...
Finally on the Renderer Response phase the value of the component is rendered back to the view.
The converter is responsible for transforming the object data back in to a string representation, so you need to
implement getValueAsString() method:
Here is the example:
...

protected String getValueAsString(FacesContext context, UIComponent component) throws IOException {

    UIInputDate inputDate = (UIInputDate) component;

    String valueString = (String) inputDate.getSubmittedValue();

    if (valueString == null) {

        Object value = inputDate.getValue();

        if (value != null) {

            Converter converter = getConverter(context, inputDate);

            valueString = converter.getAsString(context, component, value);

        }

    }

    return valueString;

}

...
You could find the whole example of the InputDateRendererBase class inInputDateRendererBase.java file.
One of the significant features of the Component Development Kit (CDK) is a skins-based technology which helps you to create a modern rich user interface look-and-feel. RichFaces has a number of predefined skins you could use with the <inputDate> component. But if you want to create your own skin, please, read carefully the "Skinnability" section of the RichFaces Developer Guide. You could find all necessary information about Built-in skinnability in RichFaces, XCSS file format, Plug-n-Skin feature, etc. there.
It's time to create XCSS file. You should go to the src/main/resources/org/mycompany/renderkit/html/css and create inputDate.xcss file there with the following skeleton:
<?xml version="1.0" encoding="UTF-8"?>

<f:template xmlns:f='http:/jsf.exadel.com/template'

   xmlns:u='http:/jsf.exadel.com/template/util'

   xmlns="http://www.w3.org/1999/xhtml">

    ...

</f:template>
According to the <inputDate> markup you need to define following selectors and classes in the inputDate.xcss:
.my-inputDate-input, .my-inputDate-icon selectors
...

<u:selector name=".my-inputDate-input">

    <u:style name="border-color" skin="panelBorderColor"/>

    <u:style name="background-color" skin="controlBackgroundColor"/>

    <u:style name="color" skin="controlTextColor"/>

    <u:style name="font-family" skin="generalFamilyFont"/>

    <u:style name="font-size" skin="generalSizeFont"/>

</u:selector>

<u:selector name=".my-inputDate-icon">

    <u:style name="border-color" skin="panelBorderColor"/>

    <u:style name="background-image">

        <f:resource f:key="/org/mycompany/renderkit/html/images/inputDate.png" />

    </u:style>

</u:selector>

...
.my-inputDate-input, .my-inputDate-icon, and .my-inputDate-caption classes
...

.my-inputDate-input{

background-color: #EBEBE4;

border: 1px solid #7F9DB9;

float:left;

}

.my-inputDate-icon{

margin-left: 3px;

}

.my-inputDate-caption{

color: #000000;

}

...
You could find a complete inputDate.xcss in inputDate.xcss file.