Create new RichFaces Documentation Jira issue

This will launch the RichFaces Jira page - to complete your feedback please login if needed, and submit the Jira.
JBoss.orgCommunity Documentation
This chapter describes all necessary actions and configurations that should be done for plugging the RichFaces components into a JSF appplication. The description relies on a simple JSF with RichFaces application creation process from downloading the libraries to running the application in a browser. The process of application creation described here is common and does not depend on used IDE.
The latest release of RichFaces components is available for download at
JBoss RichFaces Downloads area at JBoss community.
Binary files (uploaded there in *.bin.zip or
*.bin.tar.gz archives) contains compiled,
ready-to-use version of RichFaces with set of basic skins.
To start with RichFaces in computer file system create new folder with name "RichFaces", download and unzip the archive with binaries there.
For those who want to download and compile the RichFaces by themselfs there is an article at JBoss community that describes the RichFaces repository's structure overview and some aspects of working with it.
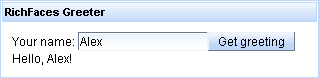
"RichFaces Greeter"—the simple application—is hello-world like application but with one difference: the world of RichFaces will say "Hello!" to user first.
Create standard JSF 1.2 project with all necessary libraries; name the project "Greeter" and follow the decription.
Go to the folder with unzipped earlier RichFaces binary files
and open lib folder. This folder contains three
*.jar files with API, UI and
implementation libraries. Copy that "jars" from
lib folder to WEB-INF/lib folder
of "Greeter" JSF application.
A JSF application with RichFaces assumes that the following JARs are available in the project: commons-beanutils-1.7.0.jar, commons-collections-3.2.jar, commons-digester-1.8.jar, commons-logging-1.0.4.jar, jhighlight-1.0.jar.
After RichFaces libraries where added into the project it is
necessary to register them in project web.xml
file. Add following lines in web.xml:
...

<!-- Plugging the "Blue Sky" skin into the project -->

<context-param>

   <param-name>org.richfaces.SKIN</param-name>

   <param-value>blueSky</param-value>

</context-param>


<!-- Making the RichFaces skin spread to standard HTML controls -->

<context-param>

      <param-name>org.richfaces.CONTROL_SKINNING</param-name>

      <param-value>enable</param-value>

</context-param>


<!-- Defining and mapping the RichFaces filter -->

<filter>

   <display-name>RichFaces Filter</display-name>

   <filter-name>richfaces</filter-name>

   <filter-class>org.ajax4jsf.Filter</filter-class>

</filter>


<filter-mapping>

   <filter-name>richfaces</filter-name>

   <servlet-name>Faces Servlet</servlet-name>

   <dispatcher>REQUEST</dispatcher>

   <dispatcher>FORWARD</dispatcher>

   <dispatcher>INCLUDE</dispatcher>

</filter-mapping>

...
For more information on how to work with RichFaces skins read "Skinnabilty" chapter.
Finally the web.xml should look like this:
<?xml version="1.0"?>

<web-app version="2.5"

                xmlns="http://java.sun.com/xml/ns/javaee"

                xmlns:xsi="http://www.w3.org/2001/XMLSchema-instance"

                xsi:schemaLocation="http://java.sun.com/xml/ns/javaee http://java.sun.com/xml/ns/javaee/web-app_2_5.xsd">

<display-name>Greeter</display-name>


<context-param>

   <param-name>javax.faces.STATE_SAVING_METHOD</param-name>

   <param-value>server</param-value>

</context-param>


<context-param>

   <param-name>org.richfaces.SKIN</param-name>

   <param-value>blueSky</param-value>

</context-param>


<context-param>

      <param-name>org.richfaces.CONTROL_SKINNING</param-name>

      <param-value>enable</param-value>

</context-param>


<filter>

   <display-name>RichFaces Filter</display-name>

   <filter-name>richfaces</filter-name>

   <filter-class>org.ajax4jsf.Filter</filter-class>

</filter>


<filter-mapping>

   <filter-name>richfaces</filter-name>

   <servlet-name>Faces Servlet</servlet-name>

   <dispatcher>REQUEST</dispatcher>

   <dispatcher>FORWARD</dispatcher>

   <dispatcher>INCLUDE</dispatcher>

</filter-mapping>


<listener>

   <listener-class>com.sun.faces.config.ConfigureListener</listener-class>

</listener>


<!-- Faces Servlet -->

<servlet>

   <servlet-name>Faces Servlet</servlet-name>

   <servlet-class>javax.faces.webapp.FacesServlet</servlet-class>

   <load-on-startup>1</load-on-startup>

</servlet>


<!-- Faces Servlet Mapping -->

<servlet-mapping>

   <servlet-name>Faces Servlet</servlet-name>

   <url-pattern>*.jsf</url-pattern>

</servlet-mapping>


<login-config>

   <auth-method>BASIC</auth-method>

   </login-config>

</web-app>
The "RichFaces Greeter" application needs a managed bean. In
project JavaSource folder create a new managed
bean with name user in demo
package and paste there the following simple code:
package demo;


public class user {

   private String name="";

   public String getName() {

      return name;

   }

   public void setName(String name) {

      this.name = name;

   }

}
With the next step the user bean should be
registered in faces-config.xml file:
<?xml version="1.0" encoding="UTF-8"?>

<faces-config version="1.2"

                    xmlns="http://java.sun.com/xml/ns/javaee"

                    xmlns:xi="http://www.w3.org/2001/XInclude"

                    xmlns:xsi="http://www.w3.org/2001/XMLSchema-instance"

                    xsi:schemaLocation="http://java.sun.com/xml/ns/javaee http://java.sun.com/xml/ns/javaee/web-facesconfig_1_2.xsd">

   <managed-bean>

      <description>UsernName Bean</description>

      <managed-bean-name>user</managed-bean-name>

      <managed-bean-class>demo.user</managed-bean-class>

      <managed-bean-scope>request</managed-bean-scope>

      <managed-property>

         <property-name>name</property-name>

         <property-class>java.lang.String</property-class>

         <value/>

      </managed-property>

   </managed-bean>

</faces-config>
The "RichFaces Greeter" application has only one JSP page.
Create index.jsp page in root of WEB
CONTENT folder and add there following
code:
<!doctype html public "-//w3c//dtd html 4.0 transitional//en">

<%@ taglib uri="http://java.sun.com/jsf/core" prefix="f" %>

<%@ taglib uri="http://java.sun.com/jsf/html" prefix="h" %>

<!-- RichFaces tag library declaration -->

<%@ taglib uri="http://richfaces.org/a4j" prefix="a4j"%>

<%@ taglib uri="http://richfaces.org/rich" prefix="rich"%>


<html>

      <head>

            <title>RichFaces Greeter</title>

      </head>

      <body>

            <f:view>

                  <a4j:form>

                        <rich:panel header="RichFaces Greeter" style="width: 315px">

                              <h:outputText value="Your name: " />

                              <h:inputText value="#{user.name}" >

                                    <f:validateLength minimum="1" maximum="30" />

                              </h:inputText>


                              <a4j:commandButton value="Get greeting" reRender="greeting" />


                              <h:panelGroup id="greeting" >

                                    <h:outputText value="Hello, " rendered="#{not empty user.name}" />

                                    <h:outputText value="#{user.name}" />

                                    <h:outputText value="!" rendered="#{not empty user.name}" />

                              </h:panelGroup>

                        </rich:panel>

                  </a4j:form>

            </f:view>

      </body>

</html>
The application uses three RichFaces components: <rich:panel> is used as visual container for information; <a4j:commandButton> with built-in Ajax support allows rendering a greeting dynamically after a response comes back and <a4j:form> helps the button to perform the action.
Note, that the RichFaces tag library should be declared on each JSP page.
For Facelets you should add the following lines for tag library declaration:
<ui:composition xmlns="http://www.w3.org/1999/xhtml"

                xmlns:ui="http://java.sun.com/jsf/facelets"

                xmlns:a4j="http://richfaces.org/a4j"

                xmlns:rich="http://richfaces.org/rich">

   ...

</ui:composition>
That's it. Run the application on server. Point your browser to index.jsp page in browser:
http://localhost:8080/Greeter/index.jsf
In this section we will tell how you can create a simple JSF application with RichFaces using Maven.
In the first place you need to make sure that Maven is installed on you local machine. We will run the JSF application on Tomcat 6.0 server, so please download and install it if you haven't done already so.
Now we can move on to creating the application. To create the project structure and fill it with minimal content we will use the "maven-archetype-jsfwebapp" Maven archetype which is a part of RichFaces CDK.
The "maven-archetype-jsfwebapp" archetype and the project itself require extra repositories to be provided, namely "http://snapshots.jboss.org/maven2/" and "http://repository.jboss.com/maven2/".
The easiest way to make the repositories visible for Maven is to create a profile in "maven_installation_folder/conf/settings.xml" in <profiles> element. This is the content of the profile:
<profile>

    <id>jsf-app-profile</id>

    <repositories>

        <repository>

            <releases>

                <enabled>true</enabled>

            </releases>

            <snapshots>

                <enabled>true</enabled>

                <updatePolicy>always</updatePolicy>

            </snapshots>

            <id>snapshots.jboss.org</id>

            <name>Snapshot Jboss Repository for Maven</name>

            <url>http://snapshots.jboss.org/maven2/</url>

            <layout>default</layout>

        </repository>

        <repository>

            <releases>

                <enabled>true</enabled>

            </releases>

            <snapshots>

                <enabled>true</enabled>

                <updatePolicy>always</updatePolicy>

            </snapshots>

            <id>repository.jboss.com</id>

            <name>Jboss Repository for Maven</name>

            <url>http://repository.jboss.com/maven2/</url>

            <layout>default</layout>

        </repository>

    </repositories>

</profile>
When the profile is added you need to activate it in the <activeProfiles> element. It can be done like this:
...

<activeProfiles>

  <activeProfile>jsf-app-profile</activeProfile>

</activeProfiles>

...
Now you have everything to create the project using the "maven-archetype-jsfwebapp" archetype. Create a folder that will house your project and run the this command in it:
...

mvn archetype:generate -DarchetypeGroupId=org.richfaces.cdk -DarchetypeArtifactId=maven-archetype-jsfwebapp -DarchetypeVersion=3.3.2-SNAPSHOT -DgroupId=org.docs.richfaces -DartifactId=jsf-app

...
You can adjust some parameters of the command.
Table 3.1. Title of the table
| Parameter | Description |
|---|---|
| -DgroupId | Defines the package for the Managed beans |
| -DartifactId | Defines the name of the project |
This command generates a JSF project that has the following structure:
jsf-app

|-- pom.xml

`-- src

    |-- main

    |   |-- java

    |   |   `-- org

    |   |       `-- docs

    |   |           `-- richfaces

    |   |               `-- Bean.java

    |   |-- resources

    |   `-- webapp

    |       |-- WEB-INF

    |       |   |-- faces-config.xml

    |       |   `-- web.xml

    |       |-- index.jsp

    |       `-- pages

    |           |-- index.jsp

    |           `-- index.xhtml

    `-- test

        `-- java

            `-- org

                `-- docs

                    `-- richfaces

                        `-- BeanTest.java
Now go to "jsf-app" folder, it contains a project descriptor(pom.xml). Open the project descriptor to edit and add dependencies to the <dependencies> element. Your <dependencies> element content should be the following:
...

<dependencies>

    <dependency>

        <groupId>junit</groupId>

        <artifactId>junit</artifactId>

        <version>3.8.1</version>

        <scope>test</scope>

    </dependency>

    <dependency>

        <groupId>javax.servlet</groupId>

        <artifactId>servlet-api</artifactId>

        <version>2.4</version>

        <scope>provided</scope>

    </dependency>

    <dependency>

        <groupId>javax.servlet</groupId>

        <artifactId>jsp-api</artifactId>

        <version>2.0</version>

        <scope>provided</scope>

    </dependency>

    <dependency>

        <groupId>jstl</groupId>

        <artifactId>jstl</artifactId>

        <version>1.1.2</version>

    </dependency>

    <dependency>

        <groupId>javax.servlet.jsp</groupId>

        <artifactId>jsp-api</artifactId>

        <version>2.1</version>

        <scope>provided</scope>

    </dependency>

    <dependency>

        <groupId>javax.faces</groupId>

        <artifactId>jsf-api</artifactId>

        <version>1.2_12</version>

    </dependency>

    <dependency>

        <groupId>javax.faces</groupId>

        <artifactId>jsf-impl</artifactId>

        <version>1.2_12</version>

    </dependency>

    <dependency>

        <groupId>javax.el</groupId>

        <artifactId>el-api</artifactId>

        <version>1.0</version>

        <scope>provided</scope>

    </dependency>

    <dependency>

        <groupId>el-impl</groupId>

        <artifactId>el-impl</artifactId>

        <version>1.0</version>

        <scope>provided</scope>

    </dependency>

    <dependency>

        <groupId>javax.annotation</groupId>

        <artifactId>jsr250-api</artifactId>

        <version>1.0</version>

    </dependency>

    <!-- RichFaces libraries -->

    <dependency>

        <groupId>org.richfaces.framework</groupId>

        <artifactId>richfaces-api</artifactId>

        <version>3.3.2-SNAPSHOT</version>

    </dependency>

    <dependency>

        <groupId>org.richfaces.framework</groupId>

        <artifactId>richfaces-impl</artifactId>

        <version>3.3.2-SNAPSHOT</version>

    </dependency>

    <dependency>

        <groupId>org.richfaces.ui</groupId>

        <artifactId>richfaces-ui</artifactId>

        <version>3.3.2-SNAPSHOT</version>

    </dependency>

</dependencies>

...
The last three dependences add RichFaces libraries to the project. You can now build the project with the mvn install command.
When you see the "BUILD SUCCESSFUL" message, the project is assembled and can be imported to a IDE and run on the server.
The project can be built for Eclipse IDE with mvn eclipse:eclipse -Dwtpversion=2.0 command.
Then you can import the project into Eclipse. After importing to Eclipse open the "jsf-app/src/main/webapp/WEB-INF/web.xml" to configure it according to the listing in the Registering RichFaces in web.xml section of the guide.
The project is configured and now you can start using RichFaces. Open "jsf-app/src/main/webapp/pages/index.jsp" file and add the tag library declaration.
...

<%@ taglib uri="http://richfaces.org/rich" prefix="rich"%>

...
Add some RichFaces component to the "index.jsp" page, for instance <rich:calendar>. Your "index.jsp" page will look like this:
...

<%@ taglib uri="http://java.sun.com/jsf/html" prefix="h" %>

<%@ taglib uri="http://java.sun.com/jsf/core" prefix="f"%>

<%@ taglib uri="http://richfaces.org/rich" prefix="rich"%>

<html>

    <head>

        <title>JSF Application with RichFaces built by Maven</title>

    </head>

    <body>

        <f:view>

        <rich:calendar />

        </f:view>

    </body>

</html>

...
Now run the application on Tomcat server and open it in your favourite browser by pointing it to "http://localhost:8080/jsf-app/" .
The Photo Album Application is designed and developed with RichFaces.
Maven Resource Dependency Plugin Reference article discusses plugin configuration and usage.
See also the "How to start RichFaces application with NetBeans IDE" article in the RichFaces Cookbook.
JBoss Developer Studio comes with a tight integration with RichFaces component framework. Following links might be useful for those who already use this IDE and RichFaces for developing applications and those who wish to improve their development process:
"Rich Components" chapter in "Getting Started with JBoss Developer Studio Guide" describes how to add RichFaces components into a CRUD application;
"JBoss Tools Palette" chapter in "Visual Web Tools Reference Guide" describes advantages that gives Tools Pallete (comes together with JBDS) for quick and easy pages creation processs including RichFaces applications;
"RichFaces Toolkit for developing Web application" video tutorial demonstrates some aspects of interaction with JBoss Developer Studio while working with RichFaces.
"How to Configure Maven for RichFaces" article shortly discusses Maven configuration for RichFaces.
" RichFaces Release Procedure " article describes how RichFaces release builds are made.
Read "RichFaces installing and configuration" article to find out how to integrate RichFaces and Trinidad and possible problems that may occur while launching the RichFaces sample on the JBoss server.
Read also the quick overview to "Practical RichFaces " book by Max Katz at his blog.