Now that the entities that compose the security model have been defined, this chapter explains how to administer permissions using these entities. Whenever possible, examples using the Message Board portlet are used to illustrate the steps an administrator would take to set permissions. In addition, the administrator’s view of the portlet is contrasted to an end user’s view of the portlet. The administration steps are presented in a use case format.
This discussion begins with a set of assumptions that set the environment for the rest of the discussion. It then proceeds to explain how to use the Enterprise Admin portlet to create a role, assign company and community permissions to the role, and then assign the role to users, communities, organizations, locations, and user groups. Finally, individual permissions at a portlet and object level are discussed.
Assumptions
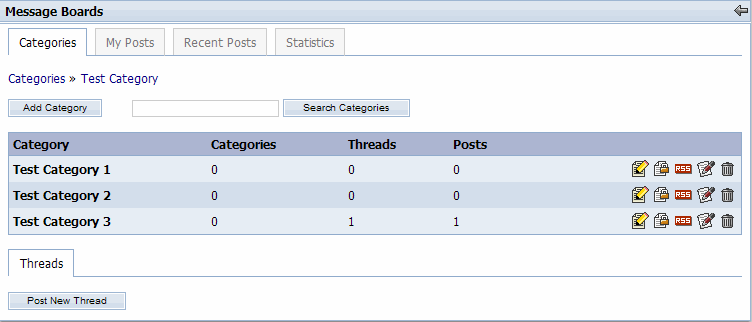
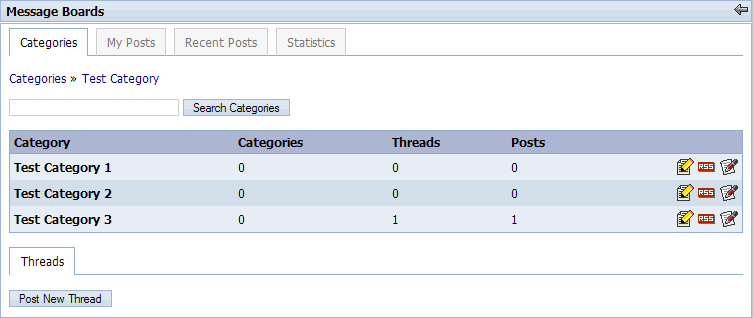
For the purpose of our discussion, assume an Administrator has added a Message Board portlet to the Support community (the support community can be found by clicking on My Places drop-down menu). Also assume that a category called “Test Category" has been created, and the category contains three categories – “Test Category 1," “Test Category 2," and “Test Category 3." By default, all categories are viewable by users in the Support community. For this use case, assume that the permission to view Test Category 3 has been removed for all community users (see section 3.7 Assigning Individual Permissions to change the permissions for individual categories). The diagram below illustrates this scenario as seen from the Administrator’s view.
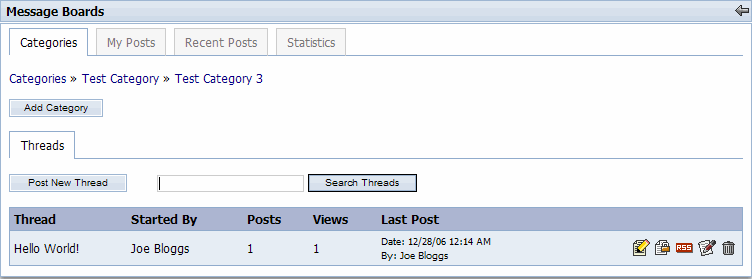
Also assume that “Test Category 3" contains a single thread. The following diagram depicts what an Administrator would see after clicking on the “Test Category 3" link.
For comparison purposes, assume an End User (Test LAX 2) that belongs to the Support community also logs in and views the Message Board portlet (by default, login = [email protected] / password = test). The user will see the following after clicking on the “Test Category" link.
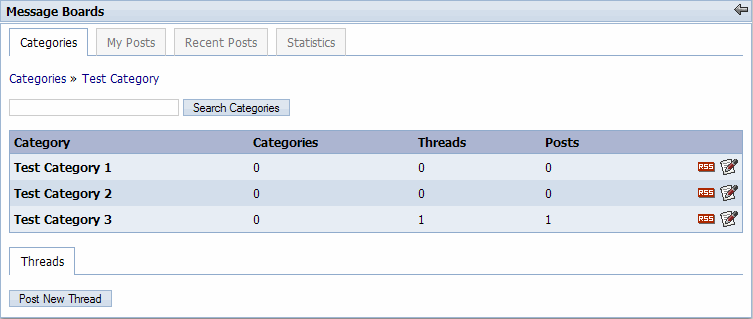
When compared with the Administrator’s view, it is clear that Test LAX 2’s view is much more limited in functionality. Test LAX 2 is missing several buttons and icons that the Administrator has. If Test LAX 2 were to click on the “Test Category 3" link, the following will appear.

Instead of seeing the thread like the Administrator, Test LAX 2 only sees a message saying the required permission to view the contents of this category has not been given. In the following sections, we will discuss the different ways administrators can give the End User additional permissions so the user can have greater control over the message board categories.
Goal: To create a role called “MBTopic Admin" using the Enterprise Admin portlet. This role will be used in subsequent use cases.
Begin by logging into the portal as an Administrator (defaults to the Joe Bloggs user) and adding the Enterprise Admin portlet to the desktop.

Click on the Roles tab. The following screen is displayed.
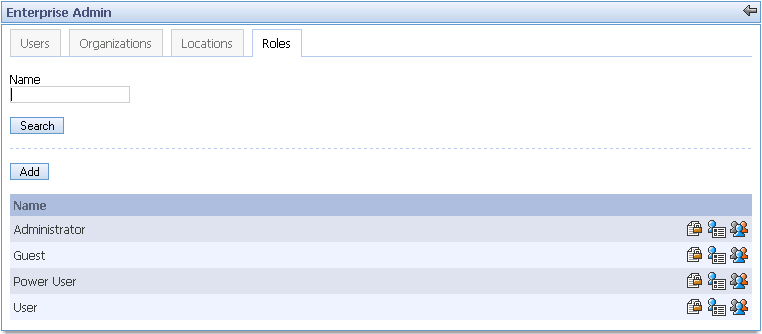
The screen above displays a list of current roles in the system. The administrator is able to search for a role by name if desired. Click on the Add button. The following screen is displayed.

The screen above allows the administrator to create a new role. Enter "MB Category Admin" in the Name input field and click the Save button. The system displays the following screen with a success message.
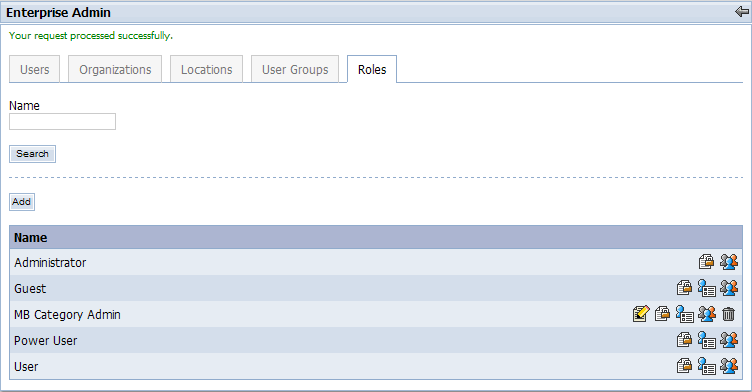
The administrator is returned to the role list screen. Notice that the new role has been created.
Goal: To assign a permission to the “MB Category Admin" role that allows users to view any message board category in the company (i.e., action = View, resource = Message Board Category, scope = Company).
From the Roles tab in the Enterprise Admin portlet, click on the Delegate icon (
 ) next to the “MB Categoryc Admin" role. The
following screen is displayed.
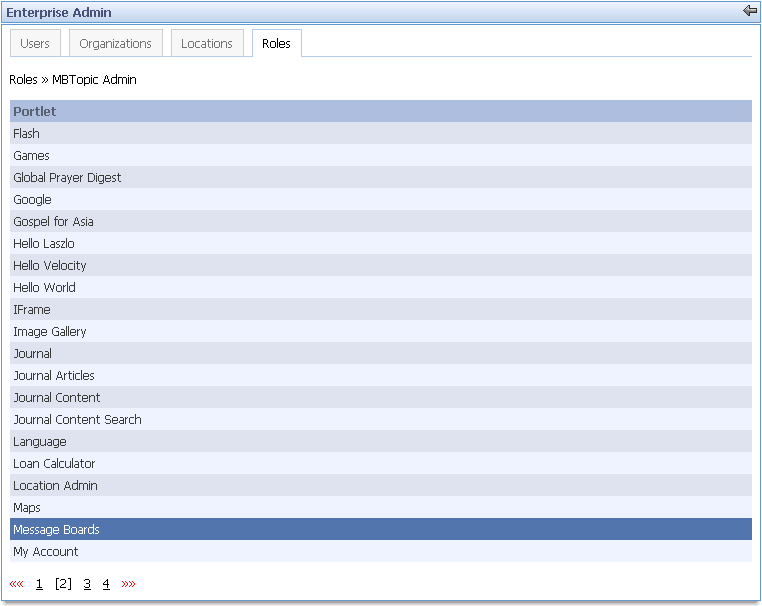
The purpose of the screen above is to find the resource to be acted upon. Every object in the portal is contained within a portlet. Therefore, the administrator must find the parent portlet of the object in question. Because the Message Board Category resource is to be acted upon, the administrator must first find the Message Board portlet. Use the numbers or the right arrow in the lower left corner of the screen to scroll through the portlets and find the Message Boards portlet. Click on the Message Boards link. The following screen is displayed.
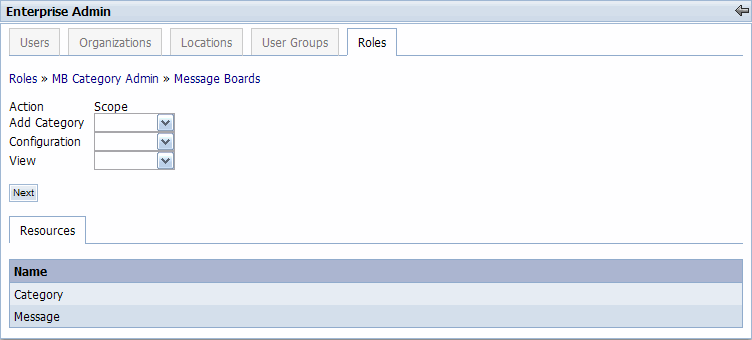
The screen above presents two lists. First, it presents a list of the actions that can be performed on the portlet itself (in this case, a category can be added to the Message Boards portlet, the Message Boards portal can be configured, or it can be viewed). These are known as portlet permissions. Second, it presents a list of the "Resources" (i.e., objects) that are contained within the portlet. For this use case, the Category model is the target. Click on the Category link. The following screen is displayed.
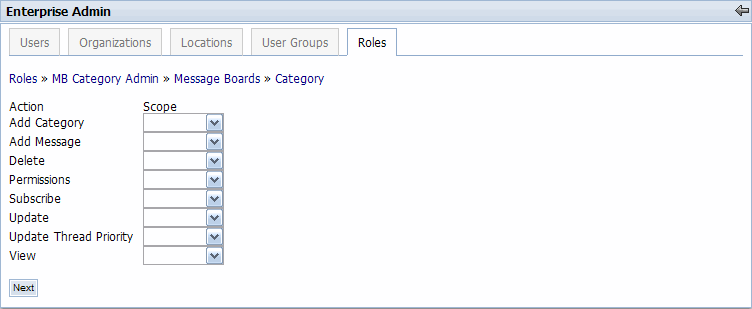
The screen above presents a list of the actions that can be performed on the selected resource – in this case, the Message Board Categroy. The goal of this use case is to create a permission that allows all topics in the Enterprise to be viewable. Therefore, click on the Scope drop-down menu next to the View action and select “Enterprise." Then, click the Next button. The following screen is displayed.

The screen above provides a summary of the permissions that were just created for the “MB Categroy Admin" role. Click on the Finished button to return to the role list under the Roles tab.
Goal: To assign a permission to the “MB Category Admin" role that allows users to update any topic in the Support community’s message boards (i.e., action = Update, resource = Message Board Category, scope = Community, community = Support).
Repeat steps 1 – 3 of section 3.2. The following screen is displayed.
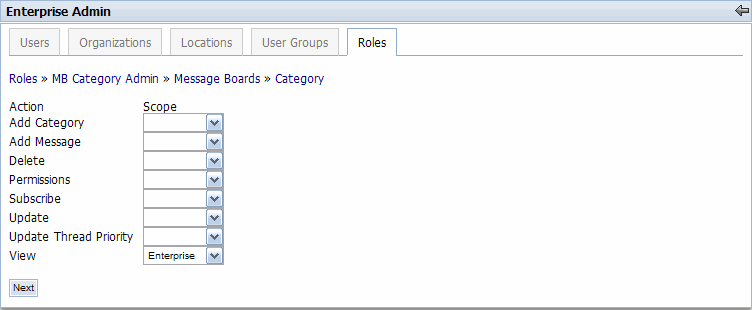
The screen above presents a list of the actions that can be performed on the selected resource – in this case, the Message Board Category. Notice that the View action already has its Scope field set to “Enterprise" because of the previous use case. It should be noted that scopes can be set for any number of actions on this screen before clicking the Next button. However, the goal of this use case is to create a permission that allows users to update any topic of a message board in the Support community. Therefore, click on the Scope drop-down menu next to the Update action and select “Community." Click the Next button. The following screen is displayed.
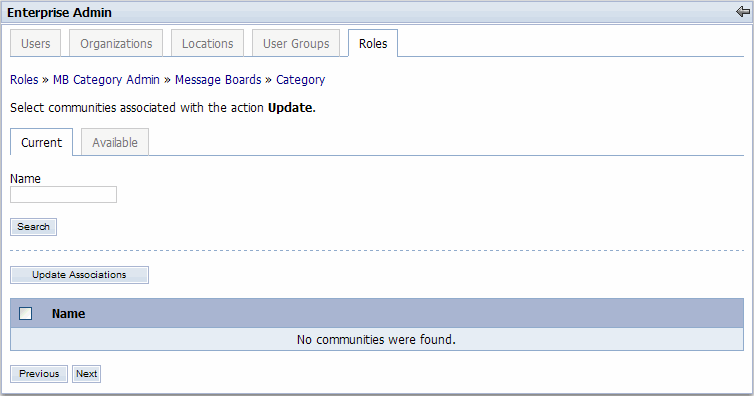
The purpose of the screen above is to allow the administrator to select one or more communities to associate with the selected action – in this case, the Update action. Since the Current tab is selected, it is clear that there are currently no communities associated with the Update action. Click on the Available tab. The following screen is displayed.
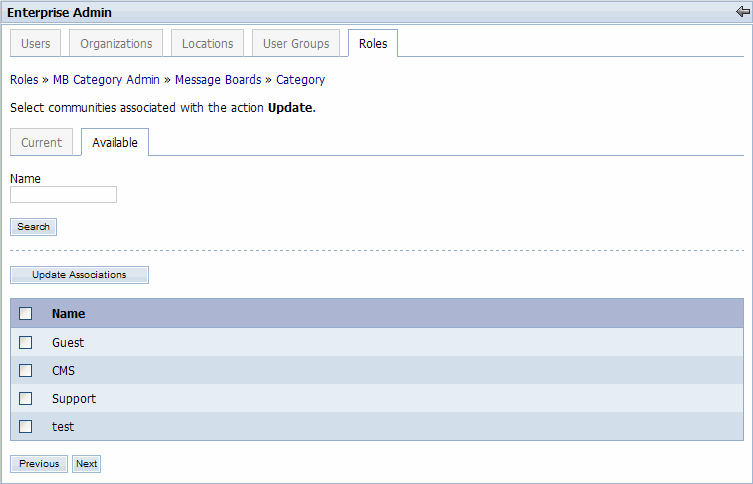
The screen above displays all of the available communities that can be associated with the Update action. If this had been a long list, the administrator could have searched for the desired community by its name. Check the checkbox next to the Support community, and click on the Update Associations button. The administrator is presented with the same screen, but a success message is also displayed. Click on the Current tab to confirm that the association was successful. The following screen is displayed.
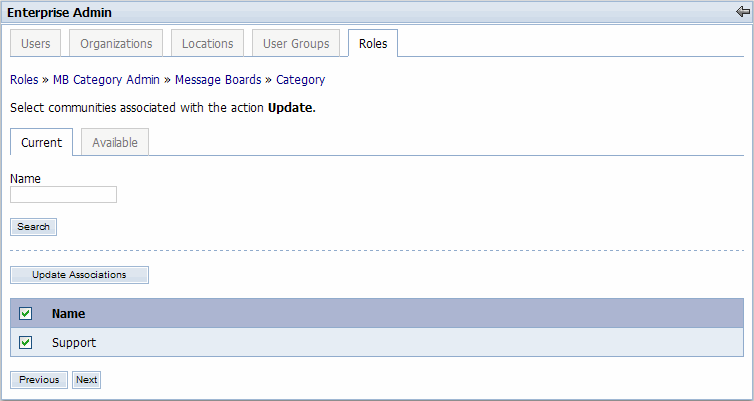
The screen above confirms that the association was successfully made. Alternatively, if the administrator decides that this association should be discarded, uncheck the checkbox next to the community name and then click the Update Associations button. However, for this use case, this association is correct, so click the Next button to continue. The following screen is displayed.

Just as in the previous use case, this final screen displays a summary of the permissions that are now associated with the “MB Category Admin" role. Note that the previously created Enterprise scope permission is also included in the summary. Click on the Finished button to return to the role list under the Roles tab.
Goal: To assign the “MB Category Admin" role to the Test LAX 2 end user.
From the Roles tab in the Enterprise Admin portlet, click on the Assign icon (
 ) next to the “MB Category Admin" role. The
following screen is displayed.
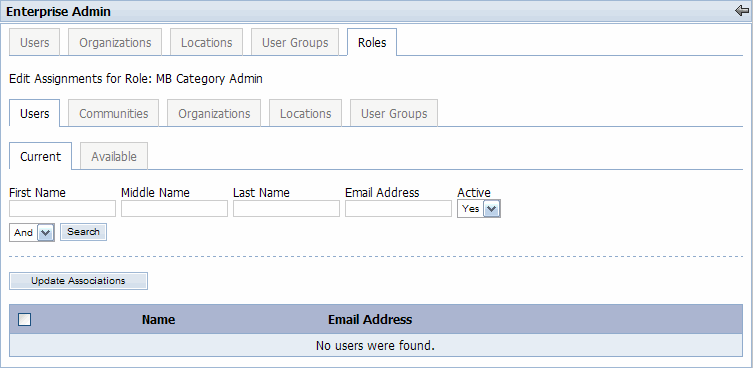
In the screen above, notice that the Users tab and Current sub-tab are selected. This means the current users associated with the “MB Category Admin" role are being displayed. Currently, there are no users associated with this role. If there had been a long list of users, the administrator could have used the search form to search for particular users. However, the goal of this use case is to associate the “MB Category Admin" role with the Test LAX 2 user. Therefore, click on the Available tab in order to search for this user. The following screen is displayed.
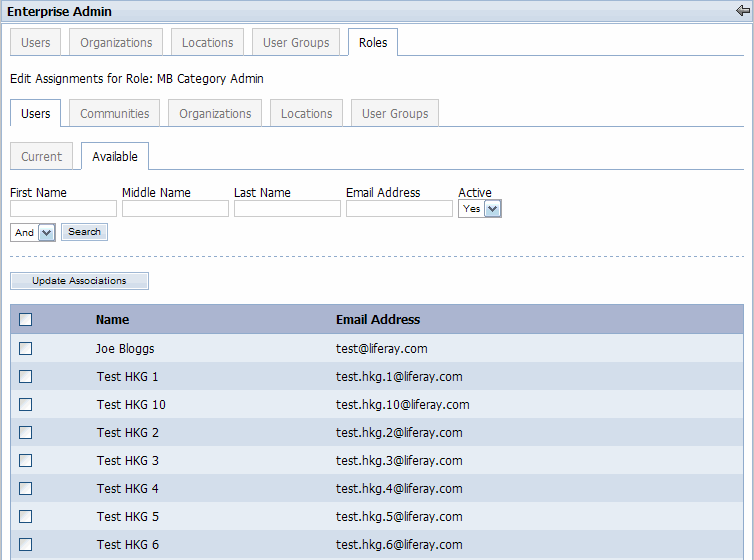
The screen above lists all of the available users that can be associated with the “MB Category Admin" role. The search for the Test LAX 2 user could be performed in two ways. First, the administrator could use the search page numbers and the left/right arrows (below and to the left of the user list) to scroll through all the users and look for Test LAX 2. However, the more efficient approach would be to use the search form. In the Last Name field, type in “lax 2" and click on the Search button. The following screen is displayed.
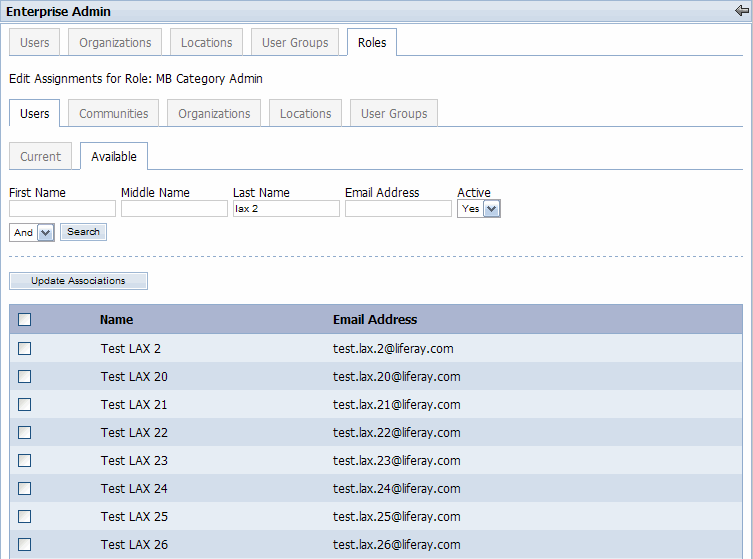
The desired user is the first one in the list of search results. Check the checkbox next to Test LAX 2. If the use case called for multiple users to be associated with this role, any number of checkboxes could have been checked. Click the Update Associations button. The administrator is presented with the same screen, and a success message is also displayed. To confirm that the association was successfully created, click on the Current tab. The following screen is displayed.
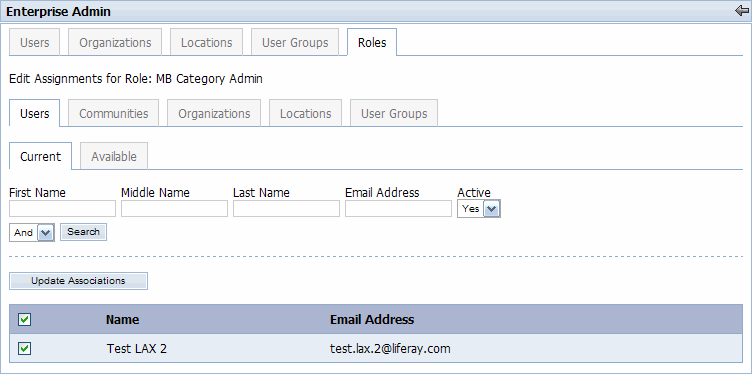
From the screen above, it is clear that the association was successfully created. If the administrator decided that this association should be discarded, uncheck the checkbox next to the user’s name and click the Update Associations button.
Results
What have we accomplished in these four use cases? We created two permissions: Enterprise scope permission and Community scope permission—and we associated them with a role. We then associated the role with an end user. Therefore in theory, this end user should now have permission to perform these 2 actions on the selected resource. To test our theory, log into the portal as Test LAX 2. Go to the Support community using the My Places drop-down menu. Click on the “Test Category" link in the Message Boards portlet. Compare the "Before" and "After" screen shots below.

Before
After
Notice that now Test LAX 2 has the Update icons (
 ) next to each of the topics. This is a
result of the section 3.3 use case. Now click on the “Test Topic
3" link. Compare the "Before" and "After" screen shots
below.
Before

After
Whereas before an error message appeared, now the user can actually view the thread. This is a result of the section 3.2 use case.
Assigning Roles to Other Entities
Alternatively, steps 1 – 5 in this use case could have been repeated for the Communities, Organizations, Locations, or User Groups tab. In fact, the exact same results could have been achieved by associating the “MB Category Admin" role with the appropriate community, organization, location, or user group instead of directly to the Test LAX 2 user.
Goal: To assign the “Add Category" portlet permission to the Test LAX 2 end user.
Assume that the Test LAX 2 user does not have permission to add a root category to the Message Boards portlet in the Support community. Based on this assumption, the portlet would appear like the following to Test LAX 2.

Notice in the screen above that there is no “Add Category" button available. Log in to the portal as an Administrator and go to the Support community located in the My Places menu. Click on the Configuration icon (
 ) in the upper-right corner of the Message
Boards portlet. The following screen is displayed.
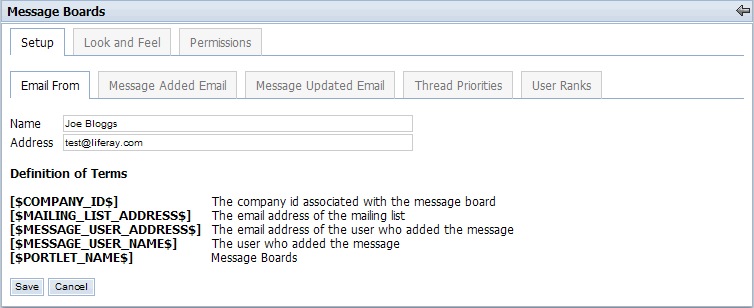
Click on the Permissions tab. The following screen is displayed.
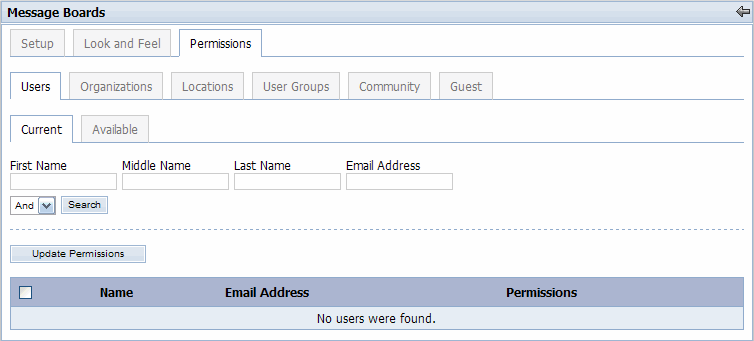
In the screen above, notice that the User tab and Current sub-tab are selected. This means that the current users that have portlet permissions assigned to them are being displayed. Obviously, there are no users that have portlet permissions for this particular portlet. Click on the Available tab. The following screen is displayed.
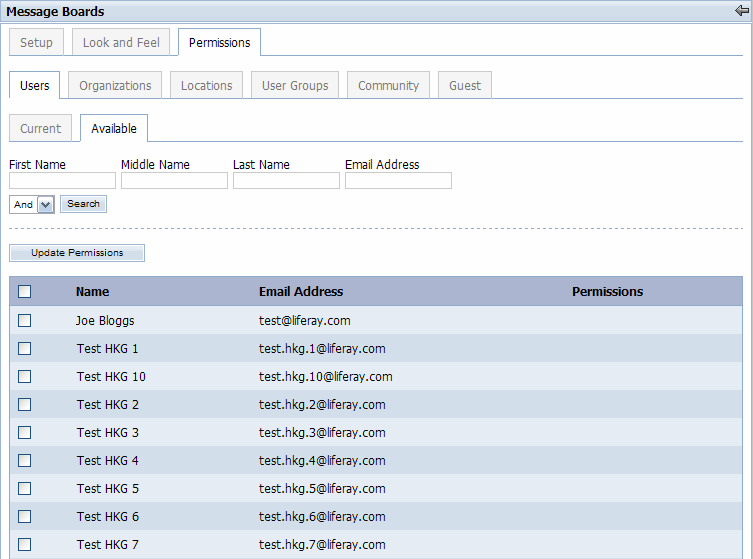
Locate user Test Lax 2. The instructions are the same as steps 3-4 of section 3.4 except that after checking the Test LAX 2 checkbox, the administrator should click on the Update Permissions button. The following screen is displayed.
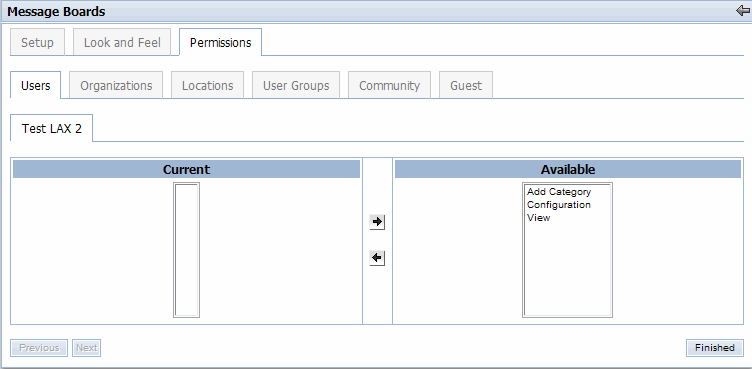
The screen above shows that the Test LAX 2 user currently has no portlet permissions assigned to her. Select Add Category from the Available select box and click on the right arrow to add it to the Current select box. If multiple users were selected in the previous step, the administrator can use the Previous/Next buttons to scroll through all of the selected users and assign portlet permissions to them. In this case, Test LAX 2 was the only user selected, so click on the Finished button. The following screen is displayed.
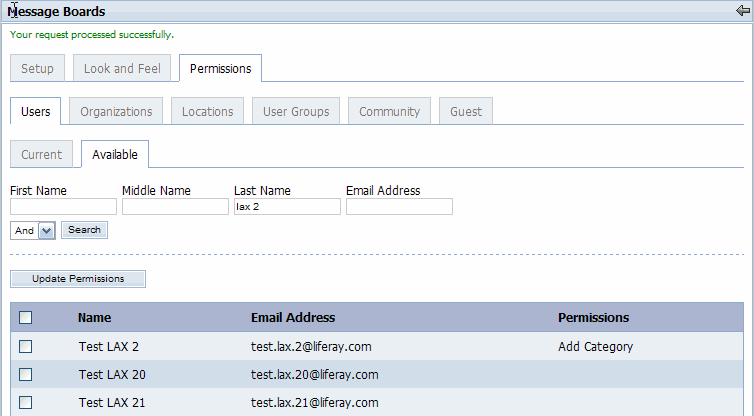
In the screen above, notice that the Test LAX 2 user has been updated with the “Add Category" portlet permission. To see this permission in effect, log in to the portal as Test LAX 2 and go to the Support community. The user should see the following screen.

Note that the Test LAX 2 user now has permission to add a root category to the Message Boards portlet.
Alternatively, steps 4 – 7 can be repeated for the Organizations, Locations, User Groups, Community, or Guest tab for assigning portlet permissions to each of these entities.
It should also be noted that portlet permissions are only applicable to the portlet instance for which they were configured. For example, Test LAX 2 can only add root categories to the message board in the Support community. Test LAX 2 would not be able to add root categories to message boards in other communities unless they were specifically configured as such.
Goal: To create a new Message Board Category in the Support community’s message board and assign default permissions to it.
Log in to the portal as an Administrator and go to the Support community. Click on the “Test Category" link in the Message Boards portlet, and then click on the Add Topic button. The following screen is displayed.
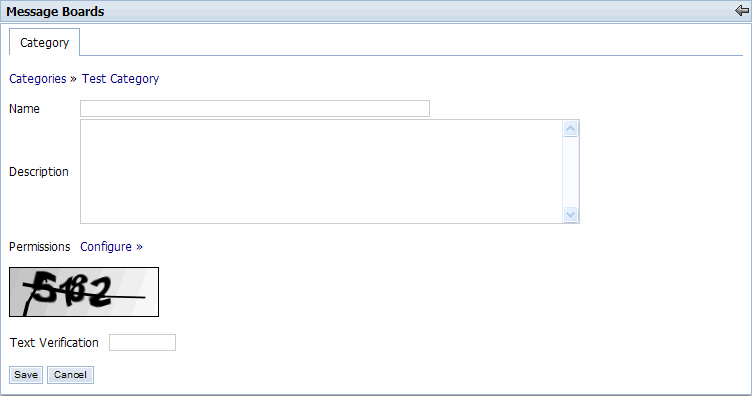
The screen above shows the form for creating a new topic. To set permissions for the category, click Configure.
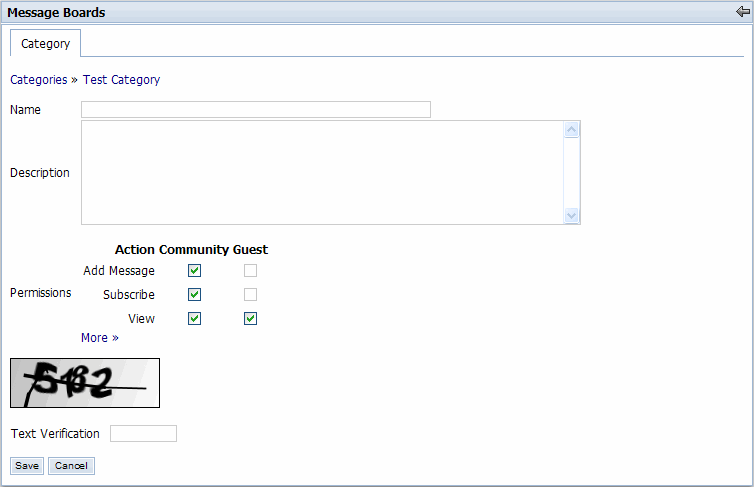
Notice that all actions under Community are checked and the Guest View option is checked. By default, a new Message Board Category allows community members (in this case, Support community members) to view it, subscribe to it, and add messages to it, and it allows guests to view it (NOTE: The process for setting these defaults is beyond the scope of this user guide. Please refer to the programming guide for details).
Keep the default permissions checkboxes checked. Enter “Test Category 4" into the Name field, input the text verification code, and click the Save button. The administrator is returned to the topic list screen.
If the Test LAX 2 user were now to click on the “Test Category" link, the user would see the new “Test Topic 4" topic and would be able to view the contents of the topic and post a new thread/message to the category because of the community default permissions.
Goal: To assign a permission to user Test LAX 2 to delete the “Test Category 4" topic in the Support community’s Message Boards portlet.
Log in to the portal as Test LAX 2 and go to the Support community. Click on the “Test Category" link in the Message Boards portlet. The following screen is displayed.
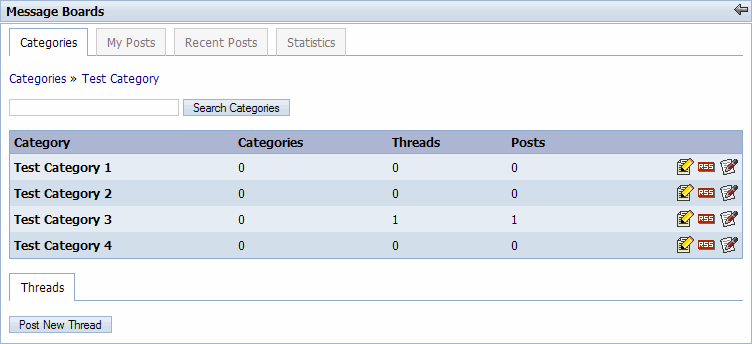
In the screen above, notice that the user has Update permissions on all of the topics due to the use case in section 3.3. Now log in to the portal as an Administrator, go to the Support community, click on the “Test Category" link in the Message Boards portlet, and then click on the Permissions icon for the “Test Category 4" topic. The following screen is displayed.
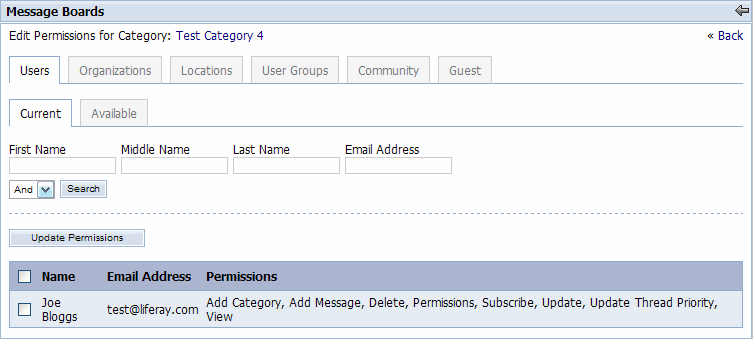
In the screen above, notice that the Users tab and the Current sub-tab are selected. This means that the current users who have permissions for the “Test Category 4" topic are being displayed. Currently, only the Administrator (i.e., Joe Bloggs) has permissions on this category. Go to the Available tab, find the Test LAX 2 user, check the user’s checkbox, and click on the Update Permissions button. The following screen is displayed.
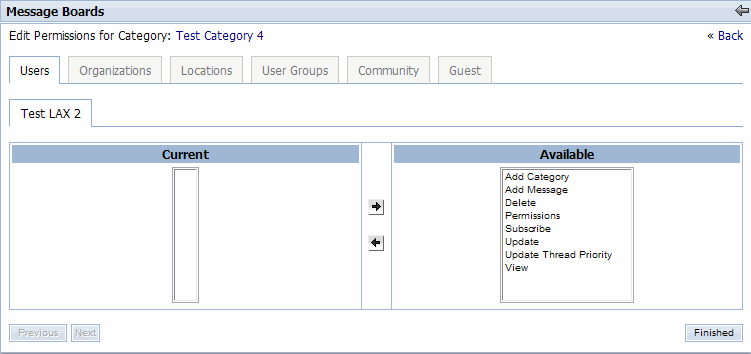
The screen above shows that the Test LAX 2 user currently has no assigned permissions. Select the Delete action from the Available select box and click on the left arrow to add it to the Current select box. If multiple users were selected in the previous step, the administrator can use the Previous/Next buttons to scroll through all of the selected users and assign permissions to them. In this case, Test LAX 2 was the only user selected, so click on the Finished button. The following screen is displayed.
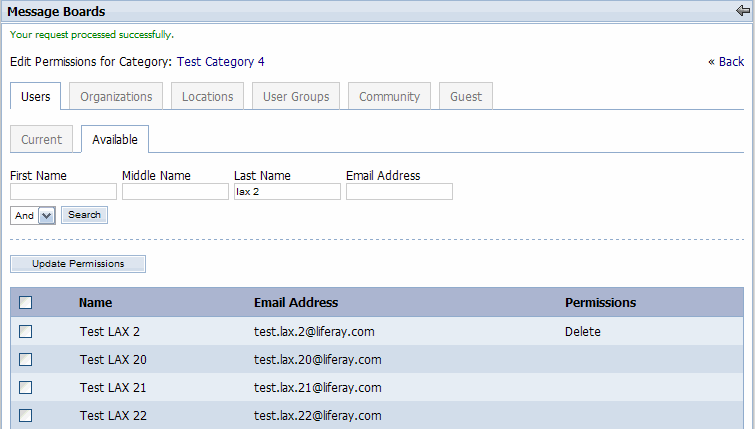
In the screen above, notice that the Test LAX 2 user has been updated with the “Delete" permission. To see this permission in effect, log in to the portal as Test LAX 2, go to the Support community, and click on the “Test Category" link in the Message Boards portlet. The user should see the following screen.
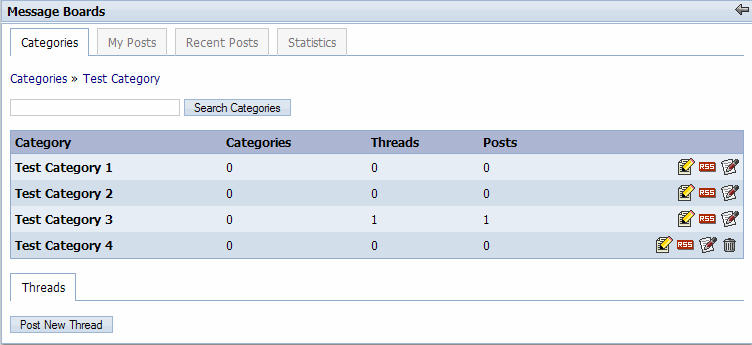
In the screen above, note that the “Test Category 4" topic now has a Delete icon (
 ) next to it. Therefore, the Test LAX 2 user
has permission to delete the “Test Category 4" topic.
) next to it. Therefore, the Test LAX 2 user
has permission to delete the “Test Category 4" topic.Alternatively, steps 3 – 6 can be repeated for the Organizations, Locations, User Groups, Community, or Guest tab for assigning individual permissions to each of these entities. Note that there is a special case for assigning individual permissions to Locations that requires a slightly different use case which is covered in the next section.
It should also be noted that very fine-grained permissioning can be obtained through using individual permissions. As this use case showed, administrators have the power to control objects within a portlet at a very micro level. For example, take the four topics in “Test Category." An administrator could easily decide that all users in the Liferay USA organization can post messages to “Test Category 1," but only members of the Support community can view the messages in “Test Category 2." In addition, only Test LAX 2 can update “Test Category 3," while anyone in the Liferay San Francisco location can update “Test Category 4." The possibilities are endless!
Goal: First, to assign a permission to the Liferay Los Angeles location that allows members of that location (including Test LAX 2) to delete the “Test Category 1 topic in the Support community’s Message Boards portlet. Second, to assign an "exclusive" permission to the Liferay Chicago location that removes the delete permission from all Liferay Los Angeles members.
Log in to the portal as Test LAX 2 and go to the Support community. Click on the “Test Category" link in the Message Boards portlet. The following screen is displayed.
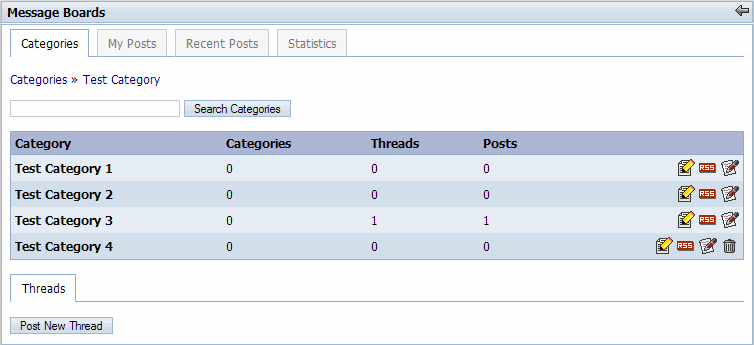
In the screen above, notice that the user has Update permissions on all of the topics due to the use case in section 3.3, and has Delete permission on “Test Category 4" due to the use case in section 3.7. Now log in to the portal as an Administrator, go to the Support community, click on the “Test Category" link in the Message Boards portlet, and then click on the Permissions icon for the “Test Category 1" topic.
Now click on the Locations tab, and then click on the Available sub-tab. Check the Liferay Los Angeles checkbox and click on the Update Permissions button. The following screen is displayed.
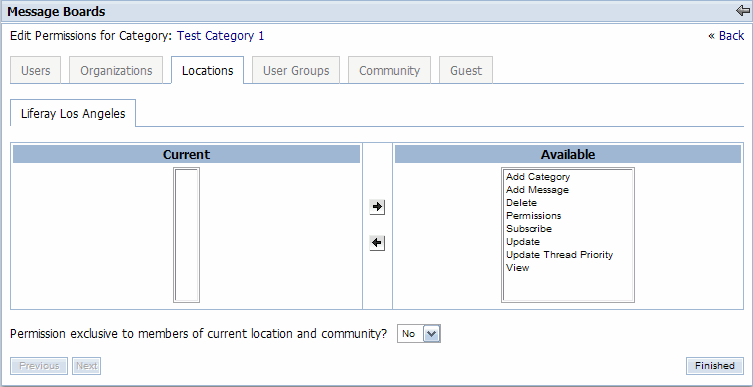
The screen above shows that the Liferay Los Angeles location currently has no permissions assigned to it. Notice the “Permission exclusive to members of current location and community?" drop-down. Leave it defaulted to “No," but think about what this question might mean. It will be fully explained later.
Select the Delete action from the Available select box and click on the left arrow to add it to the Current select box. Click on the Finished button. The following screen is displayed.
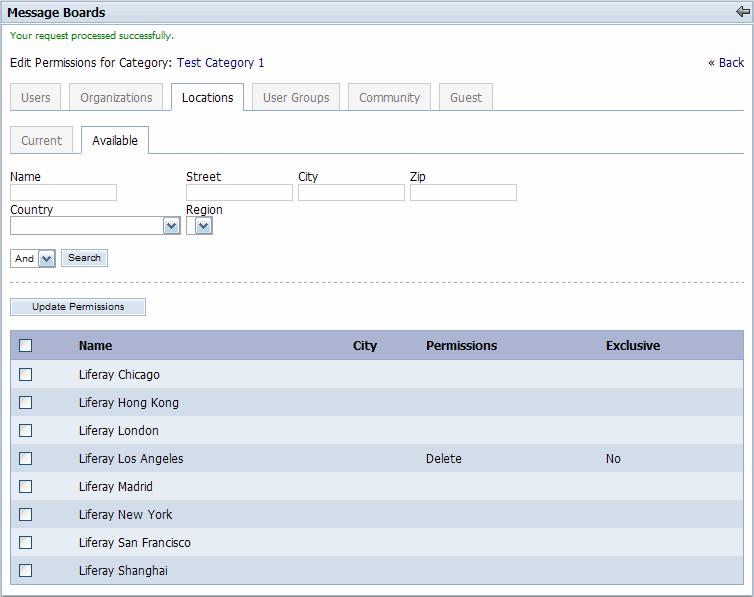
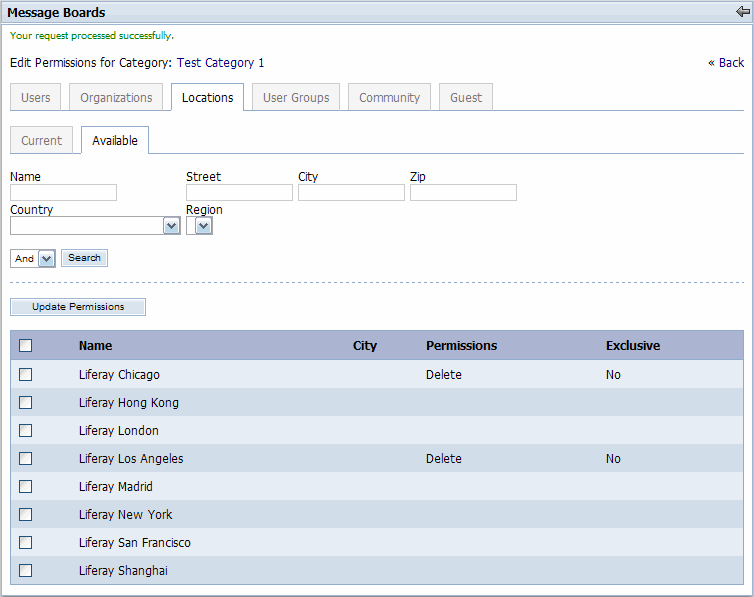
In the screen above, notice that the Liferay Los Angeles location has been updated with the “Delete" permission and an Exclusive value of “No." This value will be explained later. To see this permission in effect, log in to the portal as Test LAX 2, go to the Support community, and click on the “Test Category" link in the Message Boards portlet. The user should see the following screen.
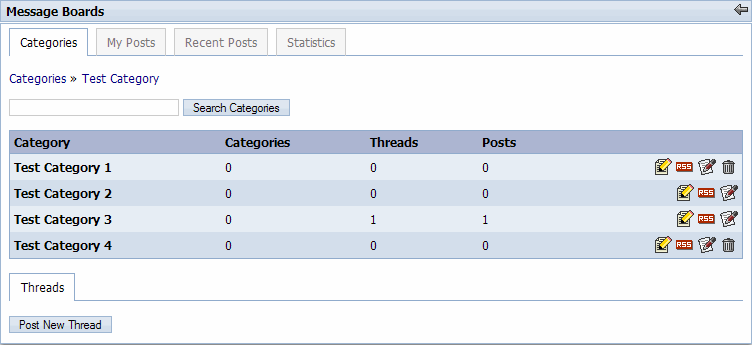
In the screen above, notice that “Test Category 1" now has a Delete icon (
 ) next to it. Therefore, the Test LAX 2 user
has permission to delete “Test Category 1."
) next to it. Therefore, the Test LAX 2 user
has permission to delete “Test Category 1."Now repeat steps 1 – 5 for the Liferay Chicago location. The Administrator’s screen should appear as follows.
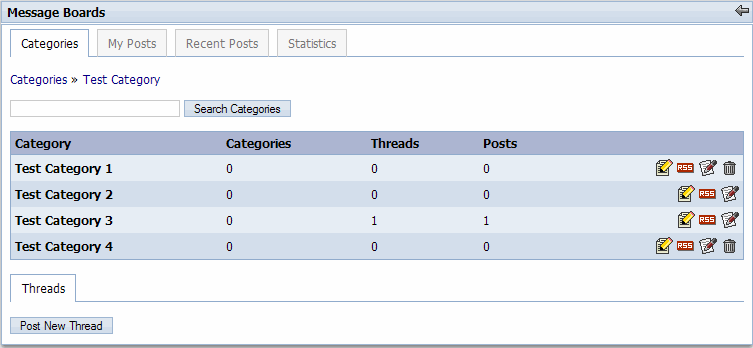
…and Test LAX 2 should still see the same screen as before:
Now go back to the Administrator’s view, check the Liferay Chicago checkbox, and click the Update Permissions button. From the “Permission exclusive to members of current location and community?" drop-down menu, select “Yes" and click the Finished button. Now the Administrator’s screen looks like the following.
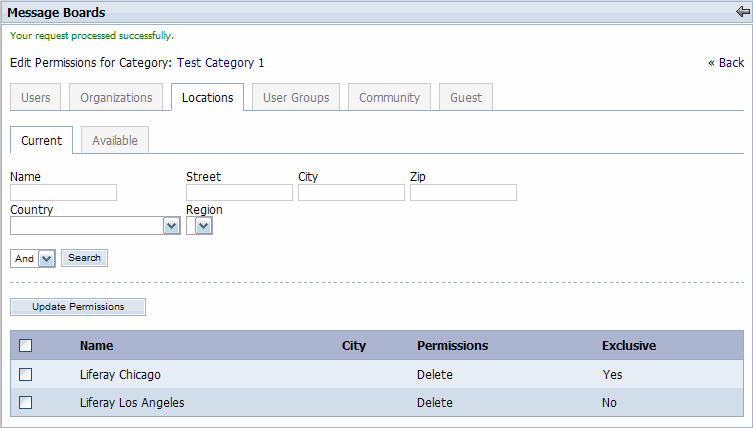
In the screen above, notice the “Exclusive" value for Liferay Chicago has now changed from “No" to “Yes." Go back to Test LAX 2’s view and refresh the screen. It should appear as the following.
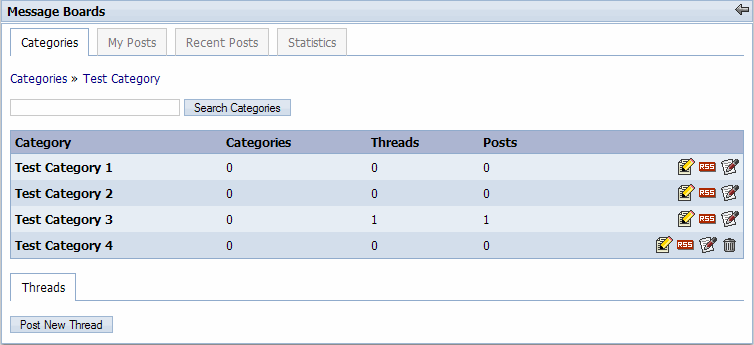
In the screen above, notice the Test LAX 2 user no longer has permission to delete “Test Category 1."
Exclusive Permission Defined
Confused? Hopefully this discussion will clear things up.
Let’s consider what occurred in this use case. Initially, the delete permission for “Test Category 1" was added to the Liferay Los Angeles location. As expected, the Test LAX 2 user received the delete permission. Then, the delete permission for “Test Category 1" was added to the Liferay Chicago location. Though an explicit check was not made, it is assumed that this allowed all members of the Liferay Chicago location to also have delete permission. In other words, any member of either Liferay Chicago or Liferay Los Angeles had delete permission on “Test Category 1."
However, when the value of the “Permission exclusive to members of current location and community?" drop-down menu was changed from “No" to “Yes" for Liferay Chicago, suddenly Test LAX 2 lost the delete permission. Why?
By answering “Yes" to the question, the permission became an exclusive one. In other words, in order to have the delete permission on “Test Category 1," a user had to be a member of both the Liferay Chicago location and the Support community. Since Test LAX 2 was only a member of the Support community and not a member of the Liferay Chicago location, LAX 2 did not meet the criteria and was excluded from receiving the delete permission.
Exclusive permissions take precedence over all other permissions except permissions assigned directly to a user. Therefore, even if the delete permission had been assigned to the Liferay Los Angeles location and the Support community, or if the delete permission had enterprise scope and had been assigned to a role that was assigned to Test LAX 2, it wouldn’t have mattered. The exclusive permission would still have taken precedence, and Test LAX 2 would not have received the delete permission. However, if the delete permission had been assigned directly to the Test LAX 2 user, LAX 2 would have received the permission
Although exclusive permissions are not additive with other permissions, they are additive among themselves. In other words, if the “Permission exclusive to members of current location and community?” drop-down was changed from “No” to “Yes” for Liferay Los Angeles as well, Test LAX 2 would once again receive the delete permission. However, it should be noted that only Liferay Chicago and Liferay Los Angeles users would receive the permission, even if the delete permission was assigned to other users through other entities (e.g., via organization, via location, via community, via role, etc.).
So far in this discussion, it has been assumed that a user with the "Administrator" role has been creating roles and assigning permissions to various entities. However, it is also possible for an Administrator to delegate permissions to users which allow them to have certain administrative rights as well. The following sections will explain each of these scenarios using use cases.
Assumptions
For the purposes of this discussion, assume the Administrator has created a role called "Delegated Admin" and assigned it to the Test LAX 2 user. Also assume that the "Enterprise Admin" portlet and the "Communities" portlet have been added to the Support community.
Goal: To assign the Test LAX 2 user permissions to add communities, organizations, and roles to the system.
Log in to the portal as Test LAX 2 and go to the Support community. Click on the Current tab in the Communities portlet. The following screen is displayed.

In the screen above, notice the Test LAX 2 user has no way of adding a new community to the system. Now log in to the portal as an Administrator. Go to the Support community and click on the Roles tab in the Enterprise Admin portlet. Click on the Delegate icon next to the "Delegated Admin" role. The following screen is displayed.
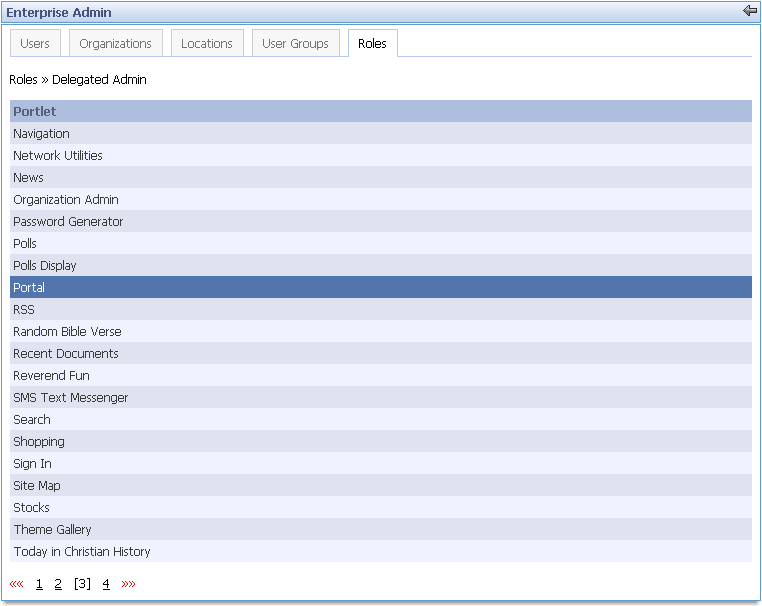
Find the Portal link in the list and click on it. The following screen is displayed.

Choose "Enterprise" from the Scope drop-down next to the "Add Community" action. Click the Next button. The following screen is displayed.

The result of these steps is that any user with the "Delegated Admin" role can now add communities to the system. To confirm this, go back to Test LAX 2 and refresh the Current tab in the Communities portlet. The following screen is displayed.
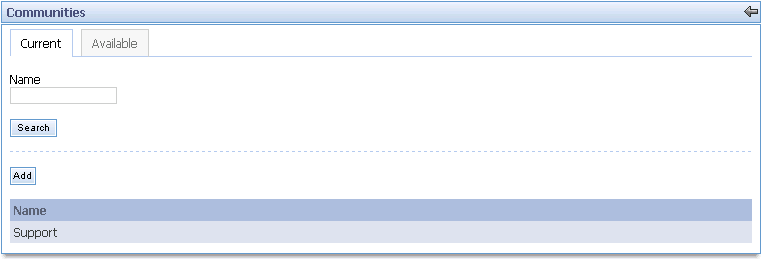
In the screen above, notice there is now an Add button. We will add a new community in a subesquent use case. Now, as Test LAX 2, go to the Enterprise Admin portlet and click on the Organizations tab. The following screen is displayed.
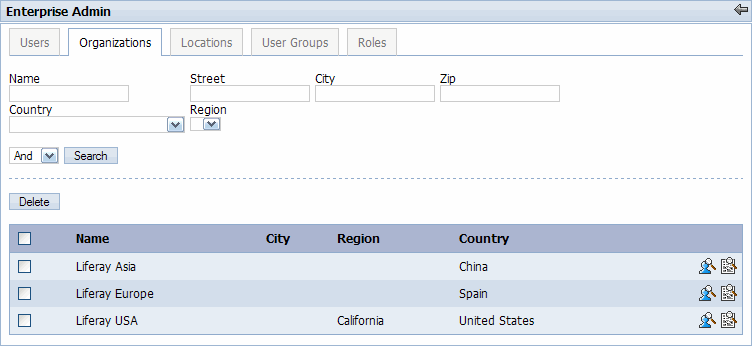
In the screen above, notice there is no way for Test LAX 2 to add a new organization to the system. Go back to the Administrator and perform steps 2-4 again, only this time in step 3, choose "Enterprise" from the Scope drop-down next to the "Add Organization" action. These steps have enabled any user with the "Delegated Admin" role to have permission to add organizations to the system. To confirm this, go back to Test LAX 2 and refresh the Organizations tab in the Enterprise Admin portlet. The following screen is displayed.
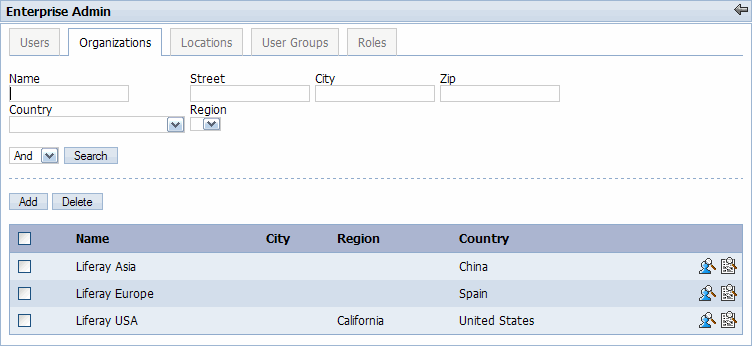
In the screen above, notice there is now an Add button. We will add an organization in a subsequent use case. Now, as Test LAX 2, click on the Roles tab in the Enterprise Admin portlet. The following screen is displayed.
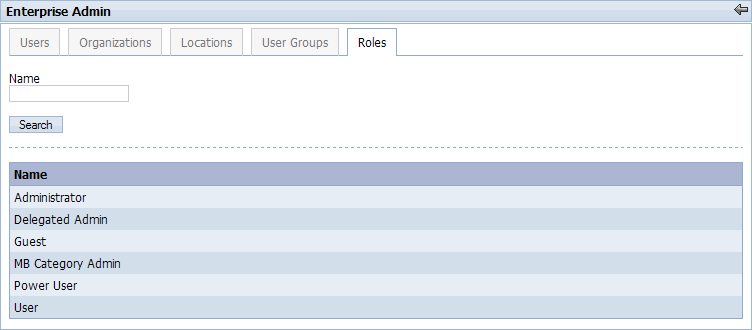
In the screen above, notice there is no way for Test LAX 2 to add a new role to the system. Go back to the Administrator and perform steps 2-4 again, only this time in step 3, choose "Enterprise" from the Scope drop-down next to the "Add Role" action. These steps have enabled any user with the "Delegated Admin" role to have permission to add roles to the system. To confirm this, go back to Test LAX 2 and refresh the Roles tab in the Enterprise Admin portlet. The following screen is displayed.
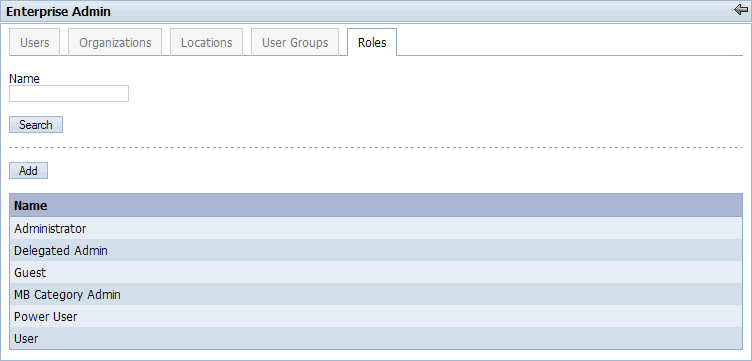
In the screen above, notice there is now an Add button. We will add a role in a subsequent use case. Now, as Test LAX 2, click on the User Groups tab in the Enterprise Admin portlet. The following screen is displayed.
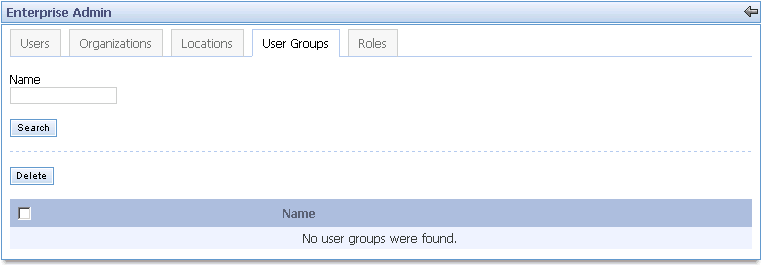
In the screen above, notice there is no way for Test LAX 2 to add a new user group to the system. Go back to the Administrator and perform steps 2-4 again, only this time in step 3, choose "Enterprise" from the Scope drop-down next to the "Add User Group" action. These steps have enabled any user with the "Delegated Admin" role to have permission to add user groups to the system. To confirm this, go back to Test LAX 2 and refresh the User Groups tab in the Enterprise Admin portlet. The following screen is displayed.
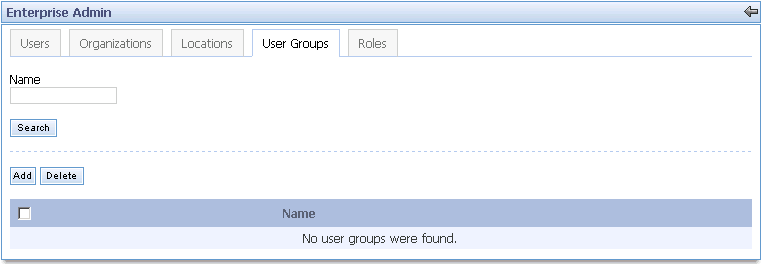
In the screen above, notice there is now an Add button. We will add a user group in a subsequent use case.
Goal: To understand the concept of a "Community Admin" and how a "Community Admin" can further delegate permissions to members of the community.
Log in to the portal as Test LAX 2 and go to the Support community. Click on the Current tab in the Communities portlet. As a result of the previous use case, Test LAX 2 has permission to add a new community. Add a new community called "Test". The Current tab in the Communities portlet should now look like the following screen.
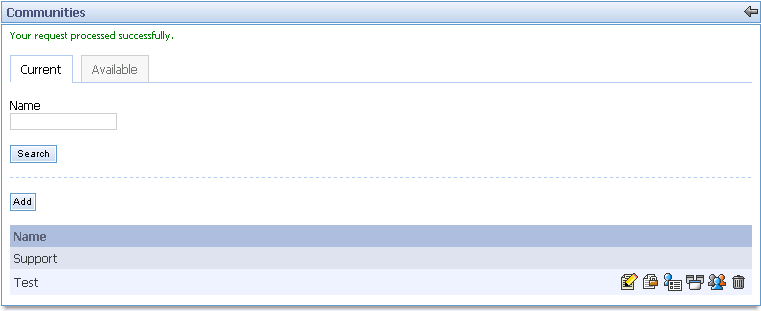
In the screen above, notice that the Test community has several icons next to it. When a user creates a new community, that user automatically becomes the "Community Admin" of that community. Therefore, the user has permission to perform all functions to that new community.
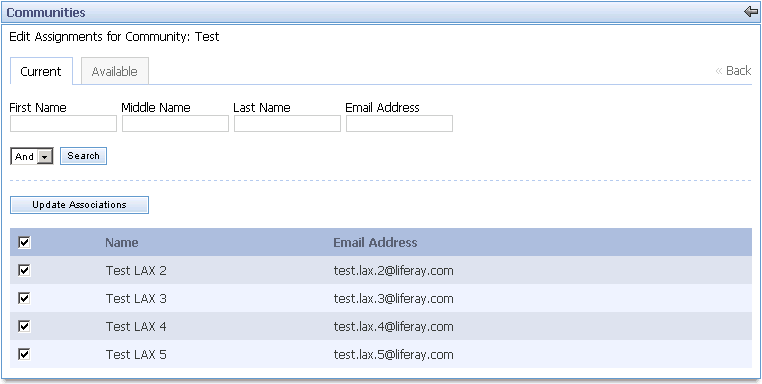
To start, let's add some members to the Test community. Click on the Assign icon and associate users Test LAX 3, Test LAX 4, and Test LAX 5 with the community. Notice that Test LAX 2 is a member of the community by default. The Current tab under Assign should look like the following.
Now let's add some pages to the Test community. Click on the return arrow, click on the Current tab in the Communities portlet, and click on the Pages icon (
 ). Click on the Children tab and add three public pages
called "Test 1," "Test 2," and "Test 3." Go to the Test
community, click on the Test 1
tab, and add a Calendar portlet to the page using the Add Content link. Click on the Test 2 tab and add a Calendar portlet.
Finally, click on the Test 3
tab and add a Navigation portlet.
). Click on the Children tab and add three public pages
called "Test 1," "Test 2," and "Test 3." Go to the Test
community, click on the Test 1
tab, and add a Calendar portlet to the page using the Add Content link. Click on the Test 2 tab and add a Calendar portlet.
Finally, click on the Test 3
tab and add a Navigation portlet.NIn step 2, we added the Test LAX 3 user as a member of the Test community. Log in as that user (by default, [email protected] / password). Navigate to the Test community. The following screen is displayed.
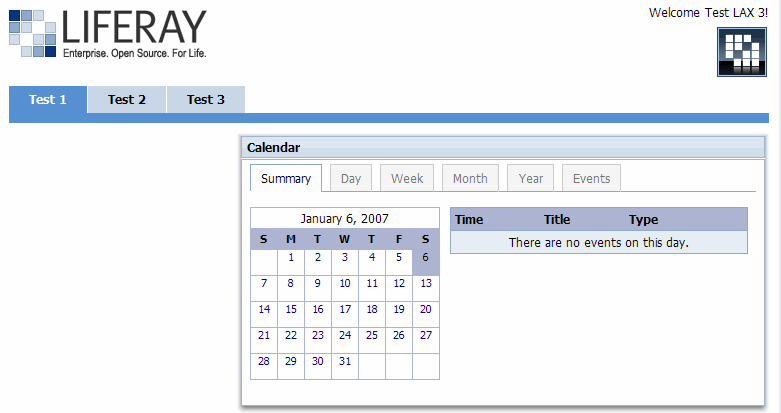
In the screen above, notice that Test LAX 3 has no way of adding a new event to the calendar. Go back to Test LAX 2, and go to the Current tab in the Communities portlet in the Support community. Click on the Delegate icon next to the Test community. The following screen is displayed.
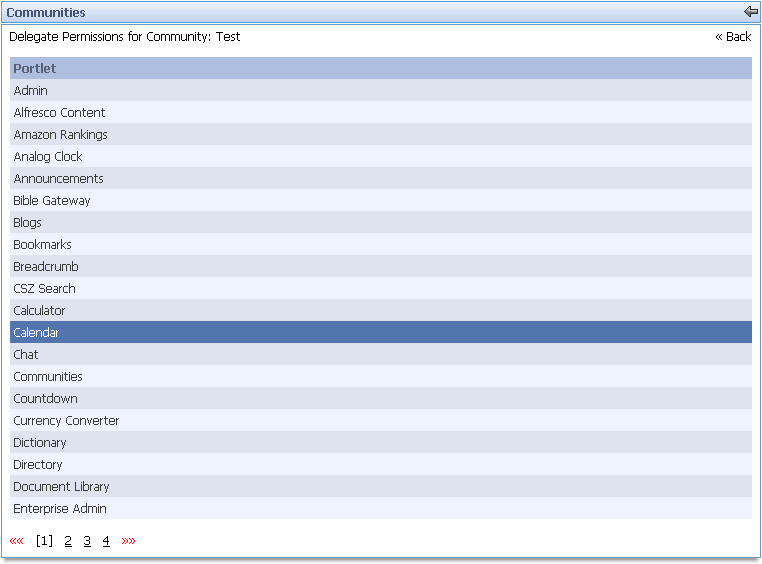
Click on the Calendar link in the list. The following screen is displayed.

In the screen above, we have to decide whether to delegate portlet permissions or to delegate resource permissions. In this case, we want to allow users to be able to add events to the calendar. This is a portlet permission, so click on the Next button. On the new screen, click on the Available tab. The following screen is displayed.
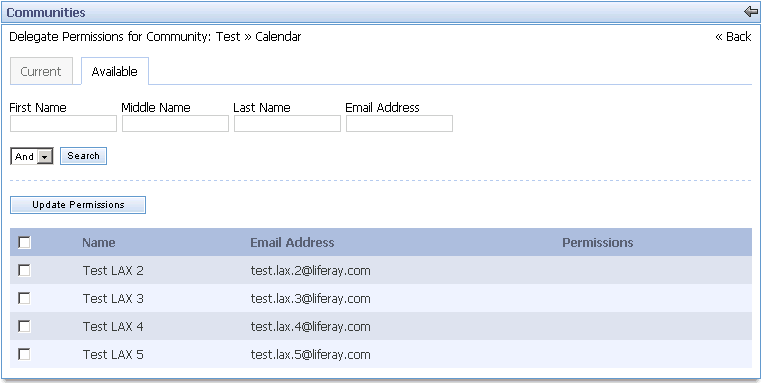
In the screen above, notice that we can only delegate permissions to members of the community. Check the "Test LAX 3" user and click on the Update Permissions button. On the next screen, give Test LAX 3 the "Add Event" permission and click on the Finished button. The following screen is displayed.
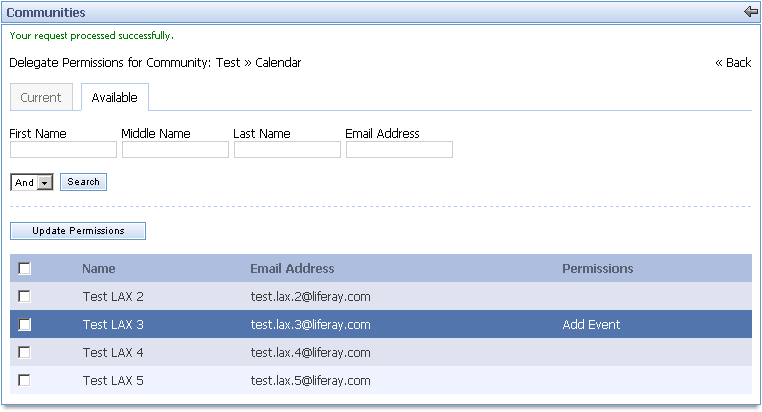
In the screen above, notice that Test LAX 3 now has the "Add Event" permission. This means that Test LAX 3 can now add an event to any Calendar portlet in the Test community. To confirm this, go back to Test LAX 3 and refresh the Test 1 tab in the Test community. The following screen is displayed.
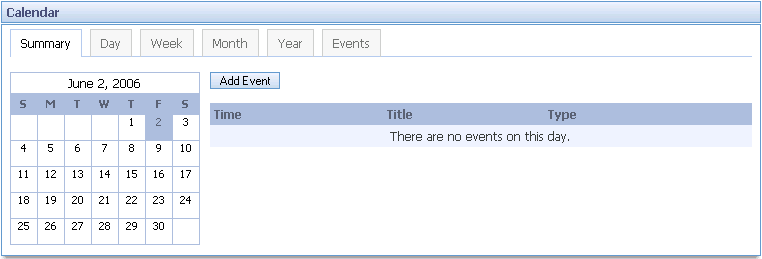
In the screen above, notice that Test LAX 3 now has the Add Event button available. Now click on the Test 2 tab. Test LAX 3 also has permission to add events to this calendar. Alternatively, steps 7-9 could have been repeated using the "Event" resource to control permissions related to calendar events.
It should be noted that the preceding use case allowed the "Community Admin" to delegate permissions such that a user could add an event to any calendar in the Test community. Alternatively, the "Community Admin" could have delegated permissions such that a user could add an event to only an individual calendar in the "Test" community. Refer to section 3.5 for instructions on assigning individual portlet permissions.
Goal: To delegate permissions to users such that they will be able to manage pages within their communities.
Log into the portal as Test LAX 3 and navigate to the Test community. The following screen is displayed.
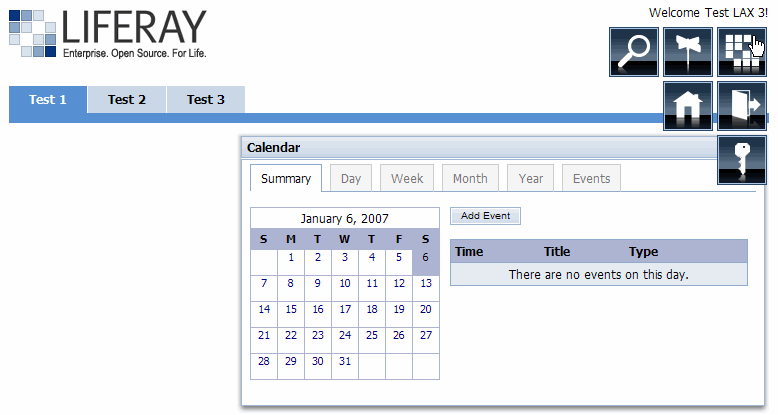
In another browser, log into the portal as Test LAX 2 and also navigate to the Test community. The following screen is displayed.
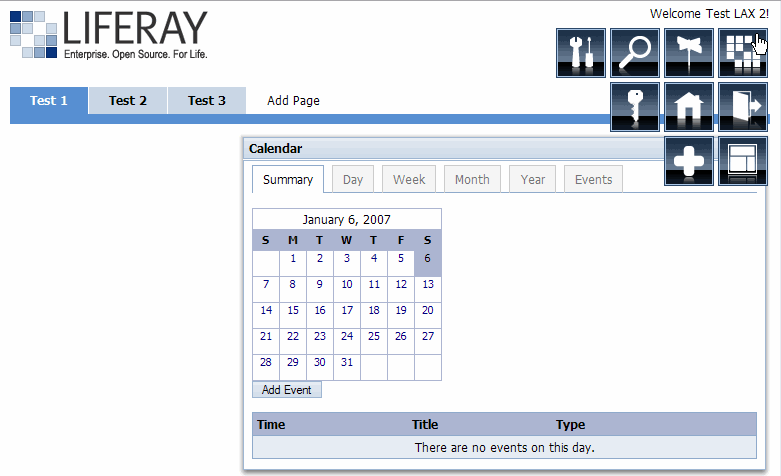
Compare the 2 screens. Notice that Test LAX 3 doesn't have the "Add Content" and "Page Settings" links in the upper right corner like Test LAX 2 does. In addition, Test LAX 3 doesn't have the portlet icons for Configuration, Minimize, Maximize, or Remove like Test LAX 2 does. Also, Test LAX 3 is not able to drag and drop the portlet like Test LAX 2 is able to.
Now, as Test LAX 2, navigate to the "Support" community and click on the Current tab in the Communities portlet. Click on the Permissions icon next to the "Test" community. Under the Users -> Available tab, find the Test LAX 3 user, Update Permissions, and add the "Manage Pages" permission to this user. The resulting page should appear like the following.
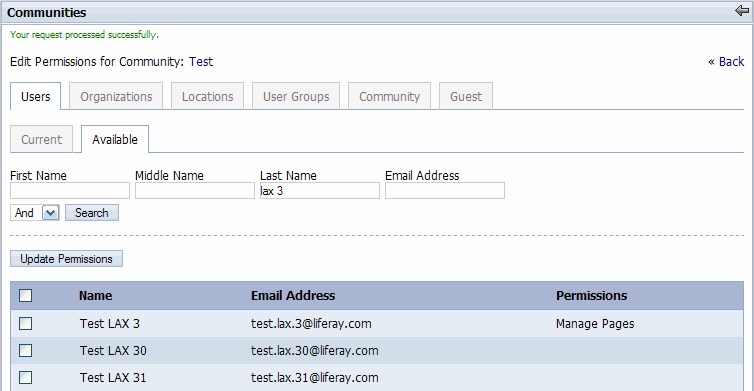
Go back to the Test LAX 3 user and refresh the Test 1 tab in the "Test" community. The following screen is displayed.
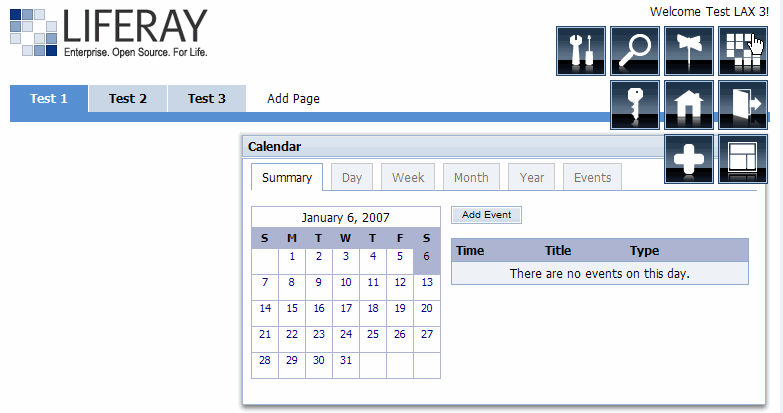
In the screen above, notice that the Test LAX 3 user now has access to the "Add Content" and "Page Settings" links. Test LAX 3 also has all the portlet icons (icons will appear when the cursor is placed on the top right region of the portlet) and is able to drag and drop portlets. This applies to all the pages within the "Test" community.
Alternatively, since Test LAX 2 was previously given the "Add Role" permission, Test LAX 2 could have created a role, assigned the role to Test LAX 3, clicked on the new role's Delegate icon, chosen the Communities portlet, chosen the Community resource, and given the "Manage Pages" permission at either Community or Enterprise scope. This would have achieved the same results as the previous steps in this use case.
Let's now assume that Test LAX 4 should be able to only add and manipulate portlets on the Test 2 page of the Test community. Log in as Test LAX 4, navigate to the Test community, and click on the Test 2 tab. The following screen is displayed.
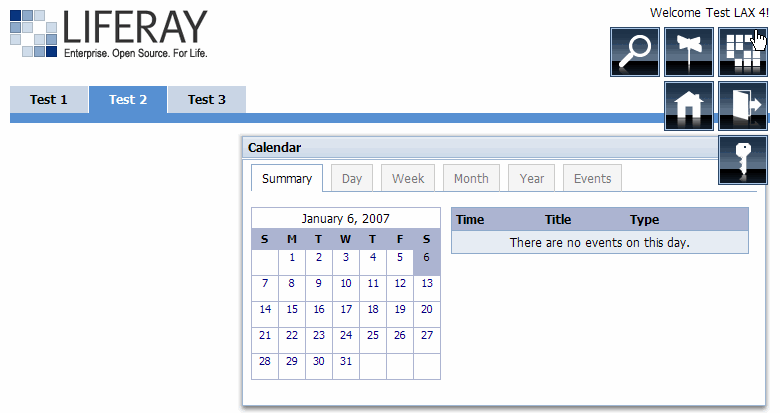
In the screen above, notice that Test LAX 4 does not have the "Add Content" link and does not have the Configuration, Minimize, Maximize, and Remove icons for the portlet. Test LAX 4 also can not drag and drop the portlet. Now, as Test LAX 2, go to the Test community, and click on the "Page Settings" link. The following screen is displayed.
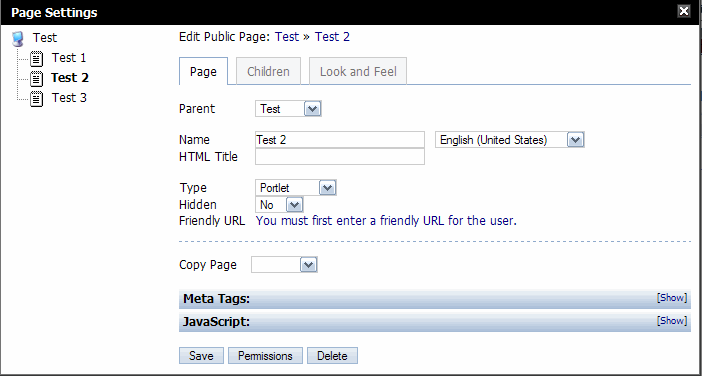
Click on the "Test 2" page in the tree structure on the left, then click on the Permissions button. Under the User -> Available tab, find Test LAX 4 and give that user Update permissions (by default, all users in the community are given "View" permissions -- click on the Community tab to see this). The resulting screen should appear as the following.
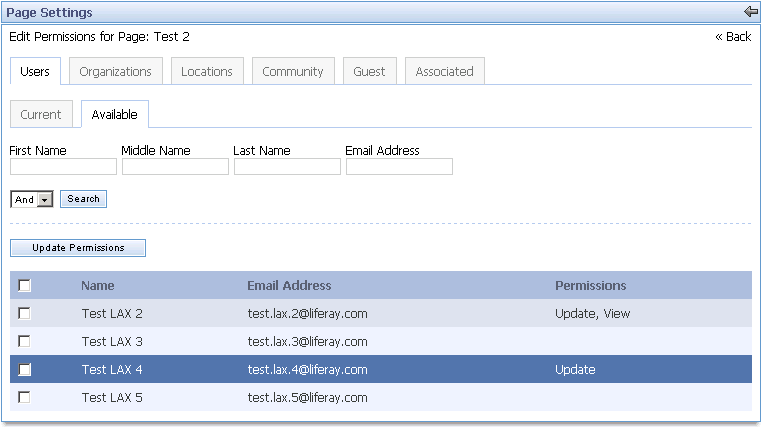
To see this permission in effect, go back to Test LAX 4 and refresh the Test 2 tab in the "Test" community. The following screen is displayed.
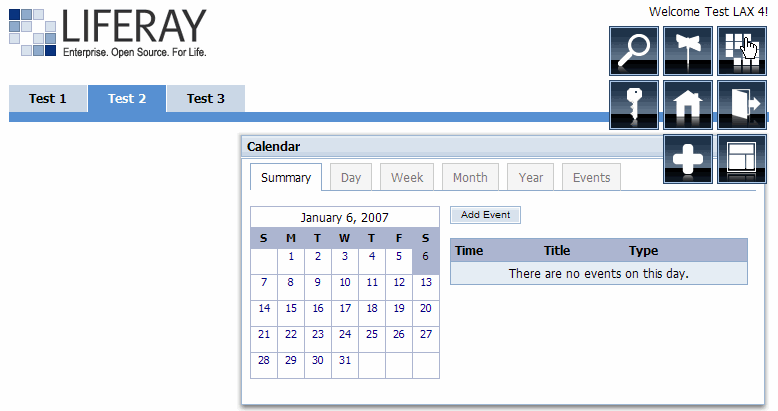
In the screen above, notice that Test LAX 4 now has the "Add Content" icon. The Minimize, Maximize, and Remove portlets icons appears when the cursor is pointed at the top right region of the calendar portlet. Test LAX 4 can now also drag and drop portlets. However, also notice that Test LAX 4 does not have the "Page Settings" link or the Configuration icon. The "Page Settings" link is only available to users who are Administrators, Community Admins, or have the "Manage Pages" permission. The Configuration icon is only available to users who are Administrators, Community Admins, or have the "Configuration" portlet permission. If Test LAX 4 were to go to the Test 1 or Test 3 tab, no "Add Content" link or portlet icons would be available.
Alternatively, since Test LAX 2 was previously given the "Add Role" permission, Test LAX 2 could have created a role, assigned the role to Test LAX 4, clicked on the new role's Delegate icon, chosen the Communities portlet, chosen the Page resource, and given the "Update" permission at either Community or Enterprise scope. This would have achieved the same results as the previous steps in this use case except that it would have applied to every page and not just the Test 2 tab.
Let's now assume that Test LAX 5 should not be able to view the Test 1 tab. Log in as Test LAX 5 and navigate to the "Test" community. The following screen is displayed.
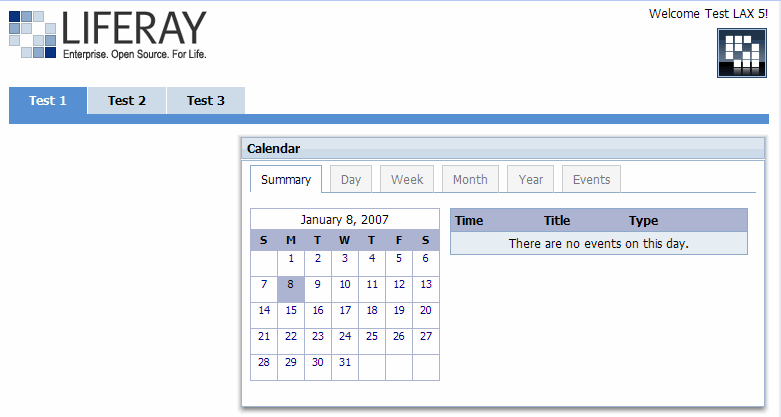
In the screen above, notice that Test LAX 5 has access to all 3 tabs within this community. Now, go back to Test LAX 2, navigate to the "Test" community, click on the "Page Settings" link, and "Test 1" should already be selected in the tree structure on the left. Under the Page tab, click on the Permissions button. Click on the Community tab and remove the "View" permission. Now, no one in the community (except for the admins) can view the Test 1 tab. To confirm this, go back to Test LAX 5 and refresh the "Test" community. The following screen is displayed.
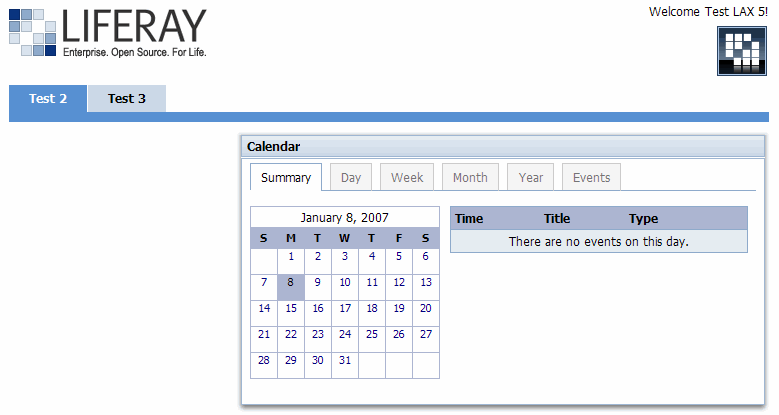
In the screen above, notice that the Test 1 tab no longer appears. If step 14 were repeated for the Test 2 and Test 3 tabs, Test LAX 5 would see the following screen upon trying to access the "Test" community.

Let's now assume that the Test 3 tab has several subpages, and the "Community Admin" (in our case, Test LAX 2) wants to show and hide certain subpages for Test LAX 5. Go back to Test LAX 2, go to the "Test" community, click on the "Page Settings" link, and create subpages for Test 3 according to the screen below.
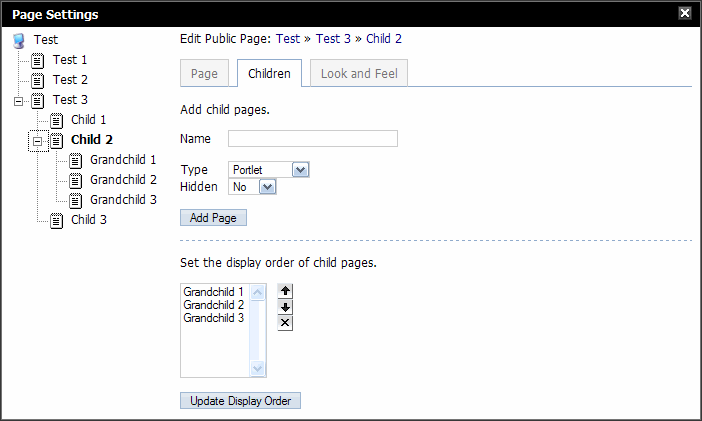
Also as Test LAX 2, go to the Test 3 tab, click on the Child 2 link in the Navigation portlet, then click the "Add Content" link and add the Navigation portlet to this page. The following screen is diplayed.

In the screen above, notice that the subpages created in step 16 all appear here. As mentioned earlier, by default, newly created pages are viewable by all members of the community. To confirm this, go back to Test LAX 5 and refresh the Test 3 tab in the "Test" community. The Navigation portlet displays the "Test 3" link and its 3 children links. Click on "Child 2". Now the Navigation portlet appears exactly like the screen above.
Now we are going to hide the "Grandchild 1" and "Grandchild 2" subpages. Go back to Test LAX 2 and click on the "Page Settings" link. Using the left-hand tree structure, navigate to "Grandchild 1" and click on it. Under the Page tab, click on the Permissions button. On the next screen, click on the Community tab and remove the "View" permission. Repeat this step for the "Grandchild 2" subpage. Now go back to Test LAX 5 and refresh the Child 2 subpage in the "Test" community. The following screen is displayed.

In the screen above, notice that the "Grandchild 1" and "Grandchild 2" links no longer appear.
Goal: To delegate permissions to users so that they will be able to manage portlets within pages.
Section 3.5 explained how to assign individual portlet permissions for a portlet. The two most common portlet permissions are Configuration and View. If a user is given the Configuration permission, the user has permission to update the portlet's Setup, Look and Feel, and Permissions sections. If a user is given the View permission, the user has permission to view the contents of the portlet. Both permissions can be granted at the individual portlet level via the Configuration icon -> Permissions tab, or they can be granted at Enterprise or Community scope via a role.
In addition, if a user is given the Manage Pages permission for a community, that user has permission to update any portlets' Setup, Look and Feel, and Permissions sections within the community. In other words, it's as if the user has the Configuration permission for every portlet within the community.
Goal: To delegate permissions to users such that they will be able to manage organizations, locations, users, and user groups.
Log into the portal as Test LAX 2. Go to the "Support" community, and click on the Users tab in the Enterprise Admin portlet. The following screen is displayed.
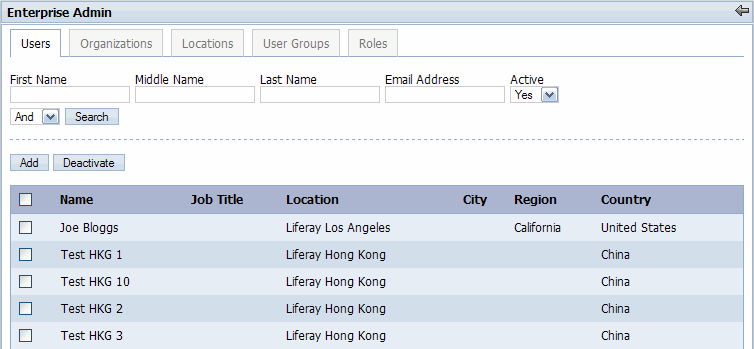
In the screen above, notice that Test LAX 2 has no permissions to do anything to the users. If Test LAX 2 tries to add, update, deactivate, or even view a user, eventually Test LAX 2 will see the following error screen.

Now, log into the portal as an Administrator, navigate to the Enterprise Admin portlet, and click on the Users tab. The following screen is displayed.
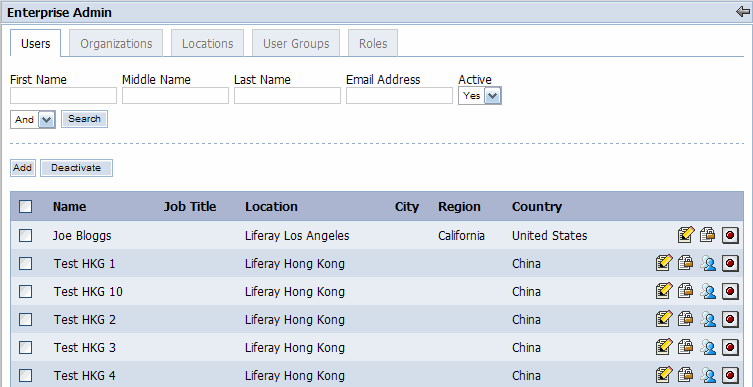
In the screen above, notice that the Administrator has all the available icons to update, permission, and deactivate the users. Go back to Test LAX 2 and click on the Organizations tab in the Enterprise Admin portlet. The following screen is displayed.
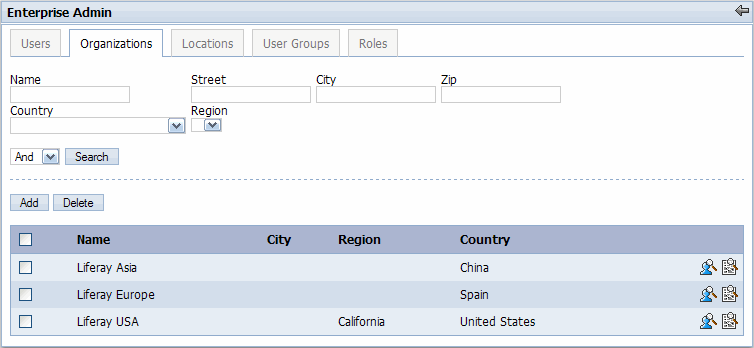
In the screen above, notice that Test LAX 2 has permissions to View Users and View Locations associated with the organizations. Also, because of the use case in section 3.9.1, Test LAX 2 has permission to add an organization. However, Test LAX 2 does not have permission to do anything else. Now click on the Add button and create an organization called "Liferay Test Organization." After you click the Save button, you can optionally add other organization details like email addresses, website, phone numbers, etc. When you're done, click on the Organizations tab again. The following screen is displayed.
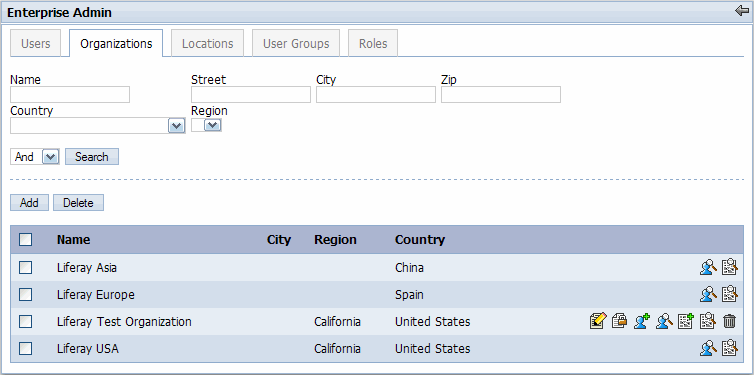
In the screen above, notice that Test LAX 2 has all available permissions on the "Liferay Test Organization" organization. Now, click on the Locations tab. The following screen is displayed.
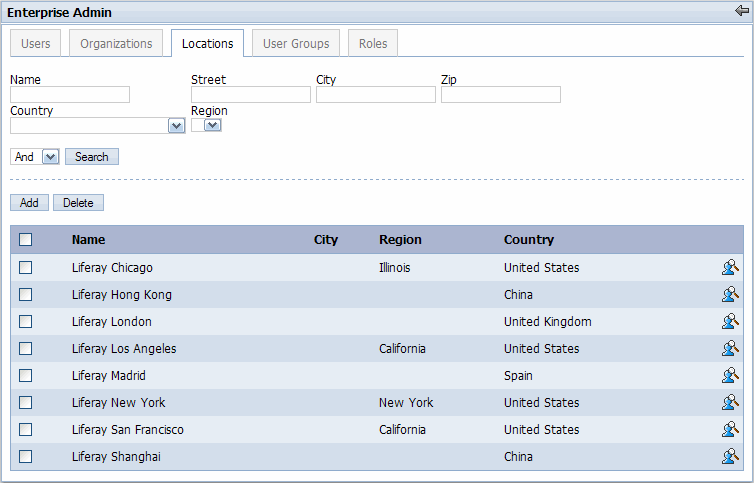
In the screen above, notice that Test LAX 2 only has permission to View Users for the locations. Test LAX 2 does not have permissions to do anything else except add a location to the "Liferay Test Organization" organization. To confirm this, click on the Add button, use "Liferay Test Location 1" for the name field, select "Liferay USA" for the organization, fill out the other fields, and click the Save button. The following screen is displayed.

The error screen is displayed because Test LAX 2 does not have permission to add locations to the "Liferay USA" organization. Repeat step 7, only this time, select the "Liferay Test Organization" organization. After you click the Save button, again you have the option to provide additional location details. When finished, click on the Locations tab. The following screen is displayed.
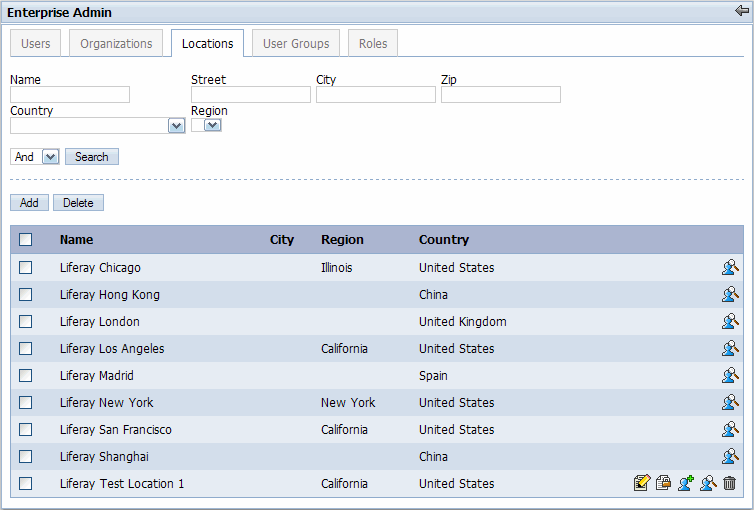
In the screen above, notice that Test LAX 2 has full permission rights over the "Liferay Test Location 1" location. Repeat step 8 to create 2 more locations under the "Liferay Test Organization" called "Liferay Test Location 2" and "Liferay Test Location 3."
Let's now assume that Test LAX 3 should be the "Location User Admin" for the "Liferay Test Location 1" location. This means Test LAX 3 should be able to manage any user in this location. As Test LAX 2, click on the Permissions icon next to the "Liferay Test Location 1" location. Under the Users -> Available tab, find and check Test LAX 3, and click the Update Permissions button. The following screen is displayed.
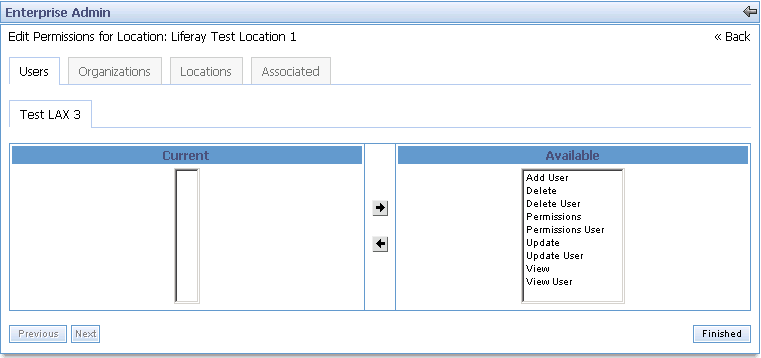
In the screen above, notice the list of available permissions. The following list defines each in the context of a location:
Add User - You can add a user to this location
Delete - You can delete this location
Delete User - You can delete any user in this location
Permissions - You can control the permissions for this location
Permissions User - You can control the permissions for any user in this location
Update - You can update this location
Update User - You can update any user in this location
View - You can view the details of this location
View User - You can view the details for any user in this location
Give Test LAX 3 all of the available user permissions (i.e., Add User, Delete User, Permissions User, Update User, and View User. Do not add Delete, Permissions, Update, and View) and click the Finished button. Now, log into the portal as Test LAX 3, navigate to the "Support" community, and click on the Users tab in the Enterprise Admin portlet. Click on the Add button. Create a user with the following attributes:
First Name = Test
Last Name = User 1
Email Address = [email protected]
Organization = Liferay Test Organization
Location = Liferay Test Location 1
After clicking the Save button, click on the Users tab and search for Test User 1. The following screen is displayed.
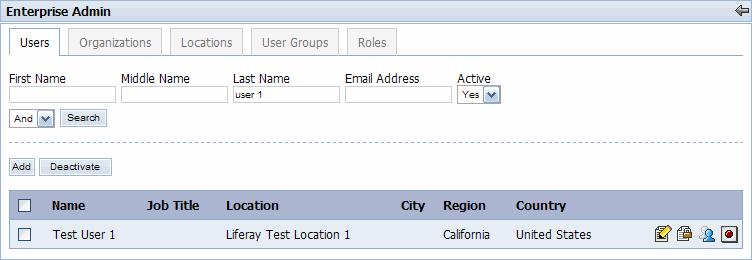
In the screen above, notice that Test LAX 3 has all the permissions for the "Test User 1" user. Now click on the Locations tab. The following screen is displayed.
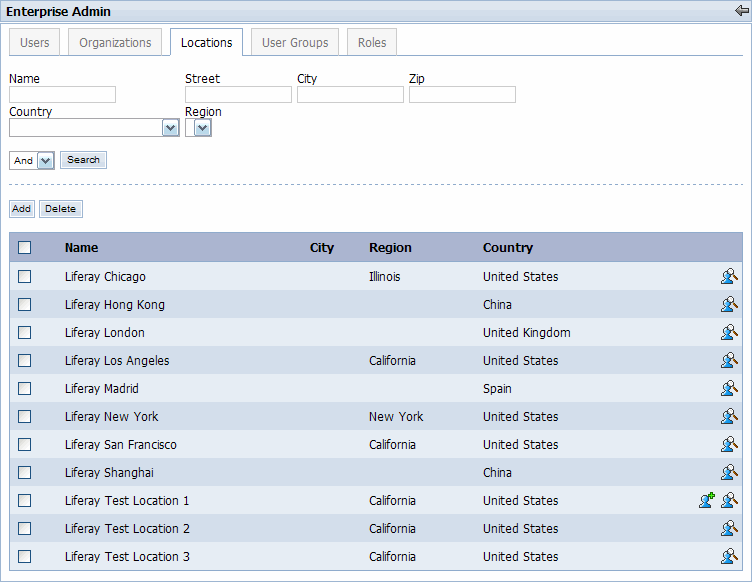
In the screen above, notice that the Test LAX 3 user has permission to add a user to the "Liferay Test Location 1" location.
Now let's assume Test LAX 4 should be the "Organization Admin" for the "Liferay Test Organization" organization. This means Test LAX 4 should be able to manage all users within the organization (which means the ability to manage any user in any location in the organization) and manage the organization itself (which means the ability to update/delete the organization as well as add new locations to the organization). Go back to Test LAX 2 and click on the Organizations tab in the Enterprise Admin portlet. Click on Liferay Test Organization's Permissions icon. Under the Users -> Available tab, find and check the Test LAX 4 user, and click on the Update Permissions button. The following screen is displayed.
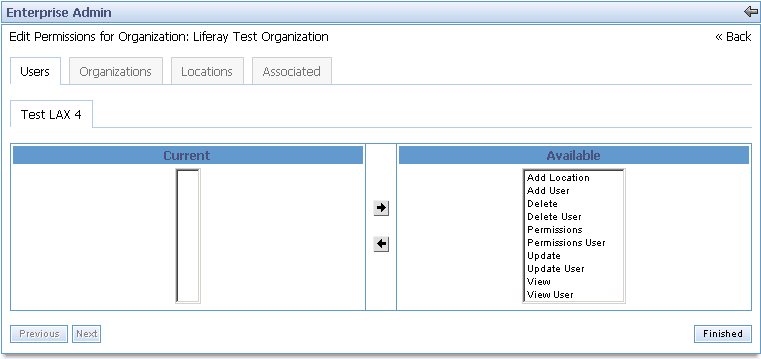
In the screen above, notice the list of available permissions. The following list defines each in the context of an organization:
Add Location - You can add a location to this organization
Add User - You can add a user to any location in this organization
Delete - You can delete this organization
Delete User - You can delete any user in any location in this organization
Permissions - You can control the permissions for this organization
Permissions User - You can control the permissions for any user in any location in this organization
Update - You can update this organization
Update User - You can update any user in any location in this organization
View - You can view the details of this organization
View User - You can view the details for any user in any location in this organization
Give Test LAX 4 all of the available permissions and click the Finished button. Now, log into the portal as Test LAX 4, navigate to the "Support" community, and click on the Users tab in the Enterprise Admin portlet. Click on the Add button. Create a user with the following attributes:
First Name = Test
Last Name = User 2
Email Address = [email protected]
Organization = Liferay Test Organization
Location = Liferay Test Location 2
After clicking the Save button, click on the Users tab and search for Last Name = "User". The following screen is displayed.
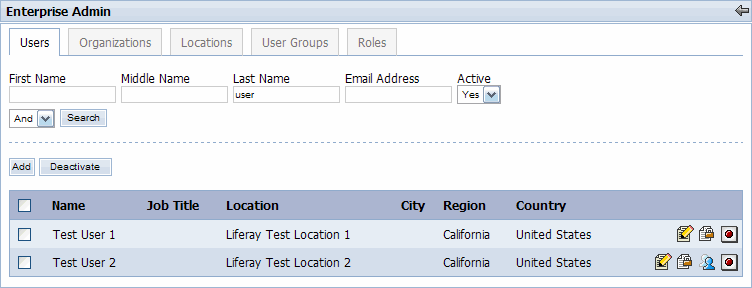
In the screen above, notice the Test LAX 4 user has all permissions (except the impersonate function for "Test User 1") for both the "Test User 1" and "Test User 2" users. This is because Test LAX 4 was given permission to manage any user in any location in the organization. Now click on the Organizations tab. The following screen is displayed.
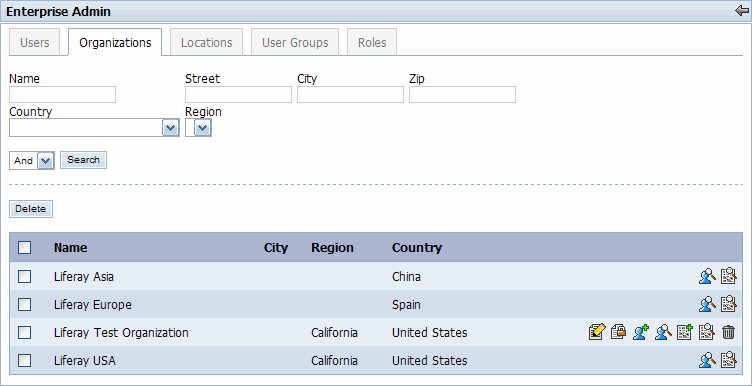
In the screen above, notice the Test LAX 4 user has all permissions for the "Liferay Test Organization" organization (including "Add Location"). Now click on the Locations tab. The following screen is displayed.
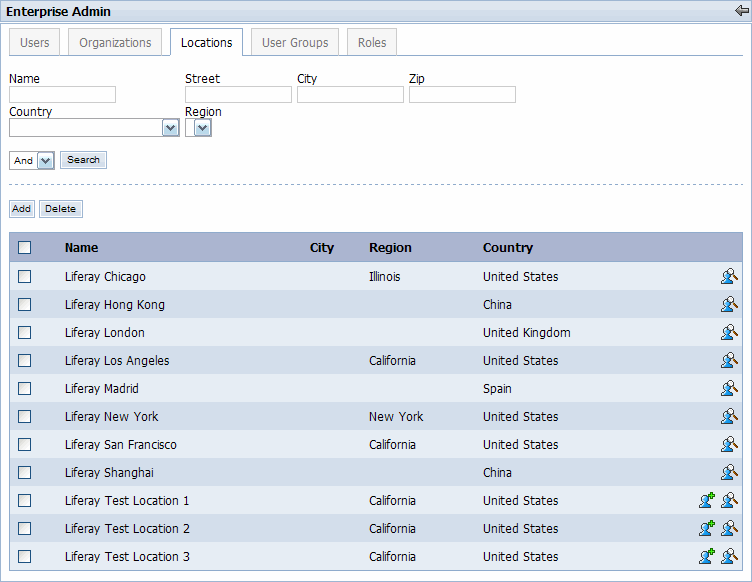
In the screen above, notice that Test LAX 4 has permission to add users to any location in the "Liferay Test Organization" organization.
Alternatively, all of the permissions discussed in this use case could have been controlled at an Enterprise or Community scope via roles. The Enterprise Admin portlet has four resources available for the permission assignments -- Location, Organization, User, and User Group -- as shown in the following screen.
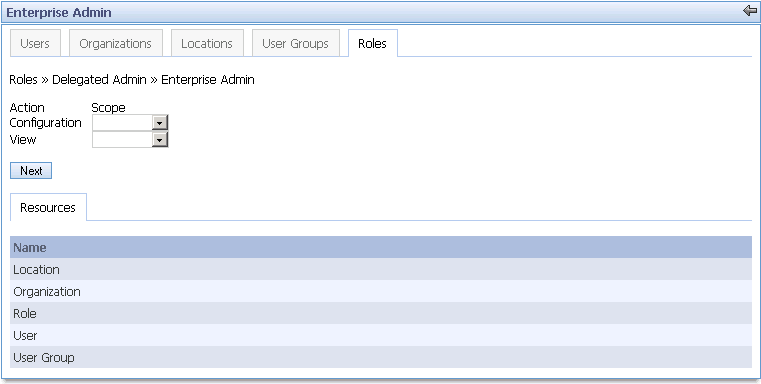
Goal: To delegate permissions to users such that they will be able to manage roles.
Log into the portal as Test LAX 2, navigate to the "Support" community, and click on the Roles tab in the Enterprise Admin portlet. The following screen is displayed.
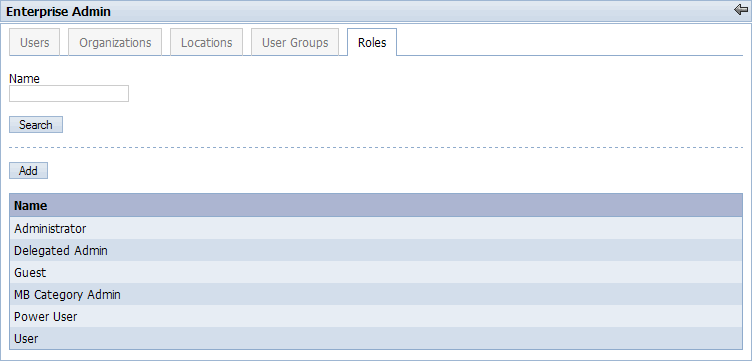
In the screen above, notice that Test LAX 2 has no permission to do anything to the existing roles. Test LAX 2 only has permission to add a new role. Now log into the portal as an Administrator, navigate to the Enterprise Admin portlet, click on the Roles tab, and click on the Permissions icon next to the "Delegated Admin" role. Under the Users -> Available tab, find and check the Test LAX 2 user, and click the Update Permissions button. Give the Test LAX 2 user the "Add Permissions", "Assign Users", and "View" permissions and click the Finished button. Now go back to Test LAX 2 and refresh the Roles tab in the Enterprise Admin portlet. The following screen is displayed.
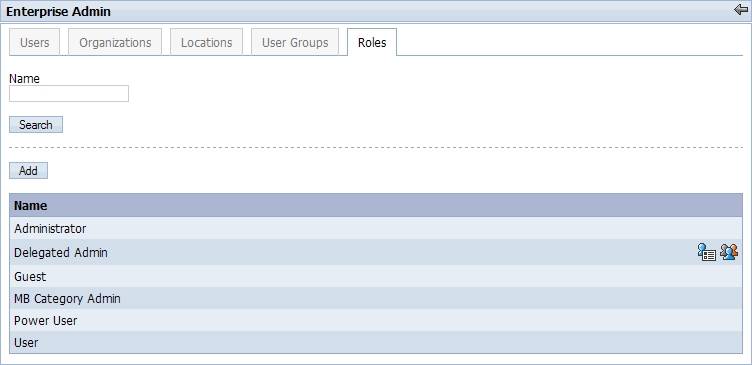
In the screen above, notice the Test LAX 2 user now has permission to delegate permissions and assign this role to users.
NOTE: Be very careful when assigning the "Add Permissions" permission to a role. This essentially gives any user who has this role Administrator access since the user can add any permission in the system to their role.
Alternatively, all of the permissions discussed in this use case could have been controlled at an Enterprise or Community scope via roles. The Enterprise Admin portlet has a Role resource available for the permission assignments.
Portal users who have the "Power User" role are given a personal community or "Desktop". Users are defaulted to this community when they log in. A user's personal community can not be seen or accessed by any other user including Administrators. Within the personal community, the user functions as an Administrator and has all permissions on all pages, portlets, and resources.