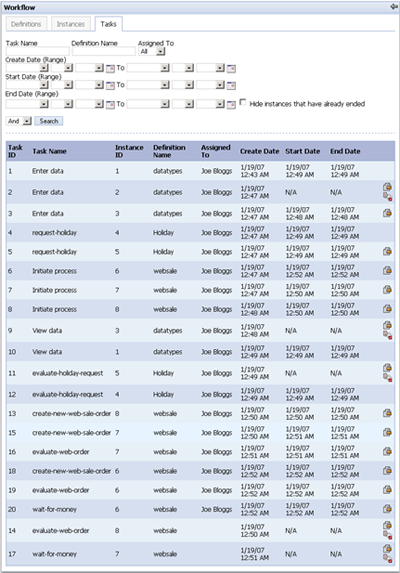
Task management is controlled from the Tasks tab. Below is an example of what the user might see:

The Tasks tab displays every task that has either been assigned directly to the user or to the group/role pool that the user belongs to. They are listed by “Create Date” in ascending order, and the tasks assigned directly to the user are listed before the tasks assigned to the user’s pool (if the “Assigned To” column is blank, that means the task is open to the pool). The search form at the top of the screen allows the user to find specific tasks to manage. In particular, the Hide tasks that have already ended checkbox allows the user to display only active tasks. The date ranges also allow the user to search by task “Create Date,” “Start Date,” and/or “End Date.” The user can also choose to only display tasks assigned directly to her, tasks assigned to her pool, or all tasks assigned to either by using the “Assigned To” drop-down.
The right-most column in the results table displays the actions
the current user can perform on the given task. It will either be blank
or the Manage icon ( ) will appear. The logic to determine which of
these will be displayed is exactly the same logic described in the table
in section 3.2.
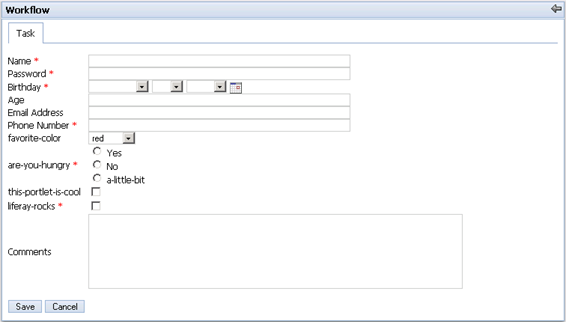
If the user clicks the Manage icon, a form similar to the following will be displayed:

These task forms are generated from the control variables associated with the task and defined in the definition XML. Depending on the data type, the corresponding element is created in the form. Required fields are denoted by a red asterisk. If invalid data is submitted, the user will be returned to the form with error messages next to each of the invalid fields. If all data is valid and the form is submitted, the user will be returned to the Tasks tab with a success message displayed.