3. Hardware Setup
This chapter describes the most common hardware setups to serve as examples. We will go over the setup of timecode records/CDs, MIDI control and keyboard control.
3.1. Audio Output
Headphone cueing, or just cueing, is previewing the next track you would like to mix in your headphones. The audience will not hear what you are cueing in your headphones. Being able to cue is a crucial aspect of DJing.
In order to cue with your computer, you will need at least 2 separate audio outputs. Traditionally, a headphone jack on most laptops is not a second audio output. Rather, plugging headphones into the jack simply redirects the laptop’s main output to your headphones. Having a headphone jack alone will not allow you to cue.
3.2. Common Configurations
Unlike some commercial DJ systems, Mixxx can control multiple audio devices simultaneously. Depending on your budget and application area your sound setup and requirements may vary. This section provides useful information for club, hobby and radio DJs alike.
3.2.1. Laptop Only
There is absolutely no need to buy an additional, expensive sound card if you do not require headphone cueing. The built-in soundcard on most computers and laptops comes with a single line-out and microphone input.
Using Mixxx with your built-in sound card
The figure above depicts how the sound configuration might look. The stereo output of your soundcard (channels 1-2) will be connected to the master out. Depending on your soundcard you can specify a microphone under the “Input” tab.
This minimal configuration may be suitable for radio DJs that do not need headphone cueing.
3.2.2. Laptop and an External USB Soundcard
The most common setup for DJing is a laptop and a soundcard with 2 stereo outputs (4 channels). The first stereo output (channels 1-2) is used as the Master out and supplies the main mix to the room. With the 2nd stereo output (channels 3-4) you can cue and preview the next track in your headphones. If your soundcard does not have 2 stereo outputs, you can use multiple soundcards to achieve the same setup.
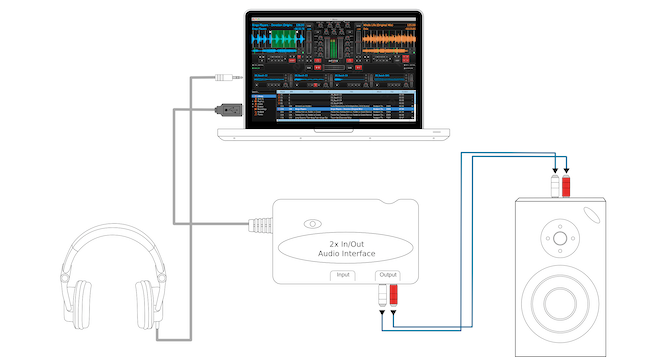
Using Mixxx together with an external soundcard
The depicted configuration above uses two soundcards. This setup is the bare minimum for serious DJing. Without any extra gear, the DJ can control Mixxx via mouse and keyboard. For more information see Controlling Mixxx.
3.2.3. Laptop, MIDI Controller, and External USB Soundcard
Mixxx can work with any MIDI controller that has drivers for your OS, as long as there is a MIDI mapping file to tell Mixxx how to understand it. Mixxx comes bundled with a number of MIDI mapping presets. To see the full list, see Using a MIDI Controller.
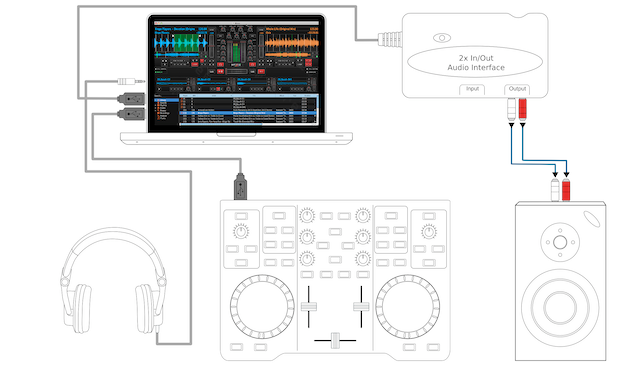
Using Mixxx together with a MIDI controller and external soundcard
Your MIDI controller may have an integrated multi-channel soundcard. If yours does not, your sound setup may look like the figure above. Otherwise, an alternative sound setup may look like the figure below:
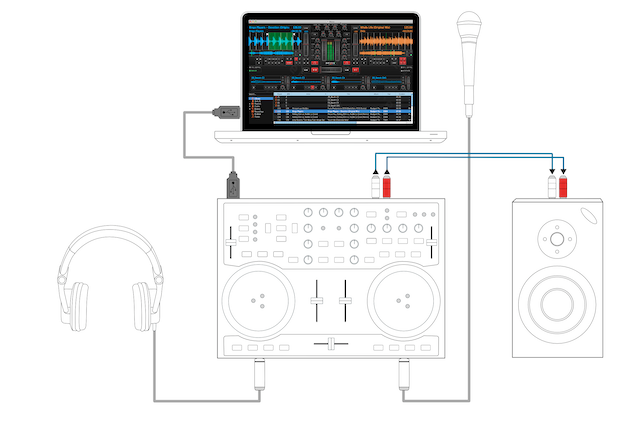
Using Mixxx together with a MIDI controller and integrated soundcard
Note
You can connect as many MIDI controllers as you have ports on your computer. Just follow the steps in Using a MIDI Controller for each controller you want to use.
3.2.4. Laptop, External Hardware Mixer and Vinyl Control
This setup is usually preferred by DJs who work in clubs. Instead of carrying large and heavy CD bags or a MIDI controller, all you need to have is a professional soundcard together with a pair of timecode records and headphones.
For best results, when using this setup you should ensure your system is capable of latencies under 10ms. Otherwise scratching may sound distorted. For more information about latency and how to improve it, see Latency.
Note
It is strongly recommended to use a soundcard that comes with native low latency drivers such as ASIO (Windows) or CoreAudio (Mac). Linux users depend on the quality of the corresponding open source driver.
3.2.4.1. Turntables
For turntables a typical setup is depicted in the figure below. First, connect the RCA cables from the turntables to the inputs on your sound card. Second, connect the outputs of your sound card to the inputs on your mixer.
Note
You must set the input mode of your sound card to phono if you have standard turntables. Many modern turntables have a Line/Phono select switch. If yours does, make sure it matches the input or switch setting on your sound card.
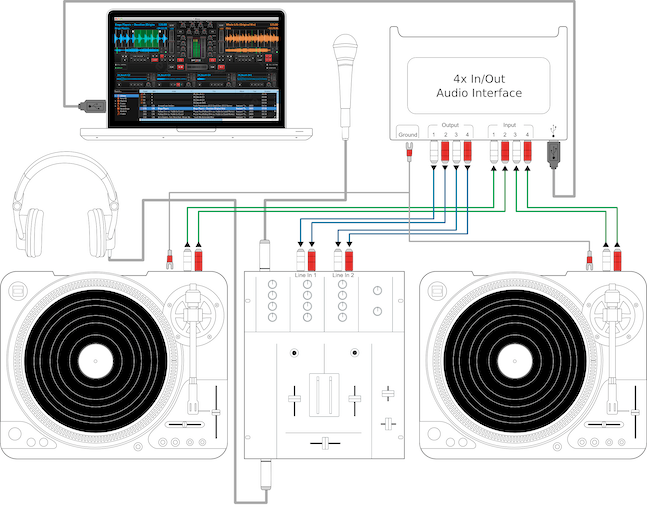
Using Mixxx together with turntables and external mixer
3.2.4.2. CDJs
Setting up CDJs for use with time-code CDs is similar to setting up turntables. The figure below outlines a typical configuration. First, connect the RCA cables of the CDJs to an inputs of your sound card. Second, connect the inputs of your mixer to the outputs of your sound card. Make sure the input mode of your sound card is set to Line.
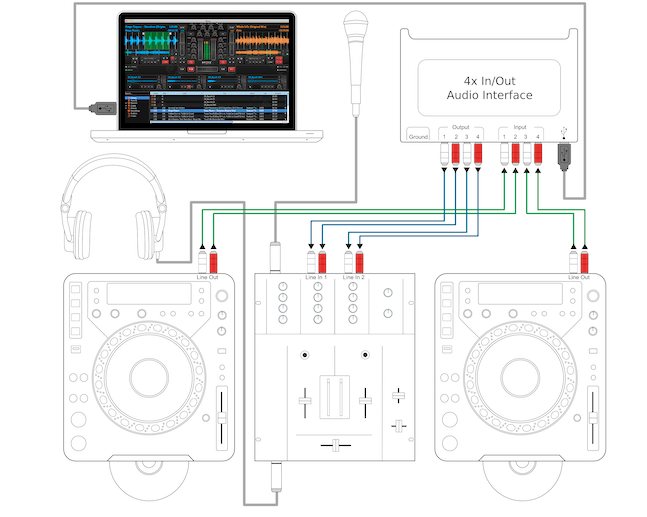
Using Mixxx together with CDJs and external mixer
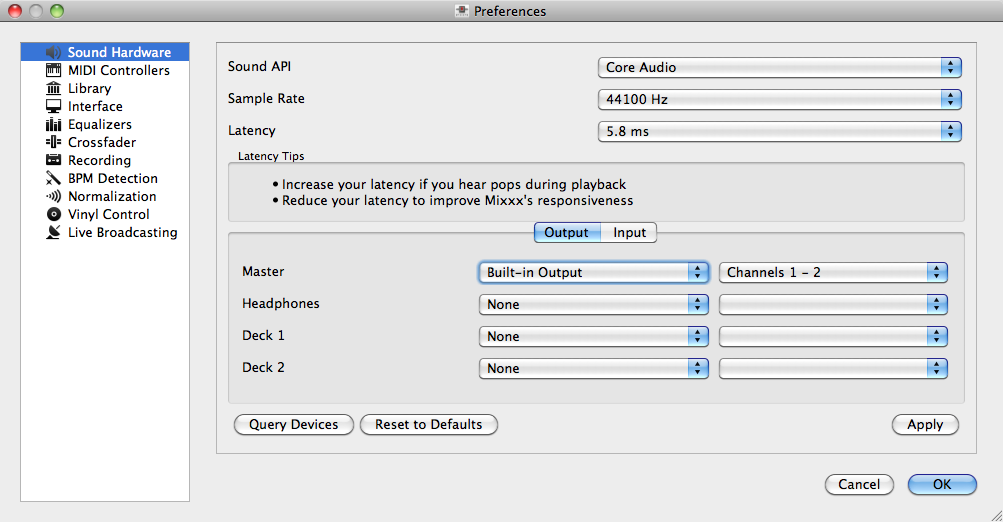
3.3. Configuring Mixxx
To complete your setup you must configure Mixxx properly. Make sure you have:
- specified “Deck 1” and “Deck 2” in the preferences under “Sound Hardware” to route Mixxx’s output directly to the external mixer,
- specified “Vinyl Control 1” and “Vinyl Control 2” under the “Input” tab in the preferences under “Sound Hardware”,
- selected the right vinyl type under “Vinyl Control” in the preferences (see Using Timecode Vinyl Records and CDs for the list of supported control records/CDs,)
- enabled vinyl control via the menu under “Options -> Vinyl Control -> Enable Vinyl Control”.
For more details, see the Configuring Mixxx section.