A vertical is one of the following.
a box or an arrow with a general direction of up and down as opposed to regular arrows or boxes, which go from left to right;
a brace or bracket, to show grouping of things;
a range to mark a time period and to comment on it; or
a pointer which points from one point at an entity’s timeline to another representing some cause/effect or a timer. This also has a version, where the pointer "lost" (e.g., to indicate a timer expiring).
vertical [shape| [from]symbol[to]] [atposition] [attributes...];
The shape keyword can be one of box, brace, bracket,
range or pointer or can be omitted. These variations result in different
shapes, see the examples further down.
The from and to represent markers
and specify the vertical position of the vertical.
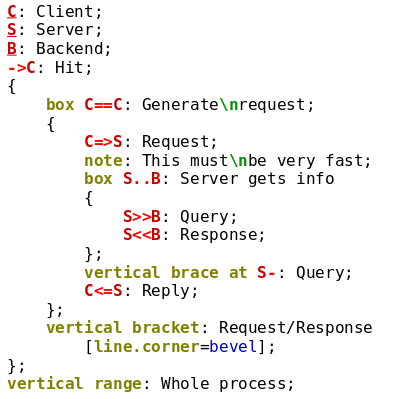
Markers can be placed with the mark command to mark a vertical position.
The third line of the example below places a marker named top just
below the enitiy headings. Then this marker is referenced by the vertical as the
upper edge of it. The other marker is omitted in the example, it is then assumed
to be the current vertical position.
The mark command can have an offset attribute, which takes a number and
shifts the position down by that many pixels (up for negative numbers).
There are two built-in markers, that are available without the mark command:
chart.top and chart.bottom referring top the top and bottom of the
entire chart, respectively.
 |
 |
Between the two positions, one of the
box or arrow symbols can be used: ‘--’, ‘..’, ‘++’,
‘==’, ‘->’, ‘=>’, ‘>’ or ‘>>’. If we omitted the
shape specifier these symbols result in a box or a block arrow.
The arrow symbols can be used in bidirectional or reverse variants, as well.
For ranges and pointers the box symbols result in no arrowheads, for
braces and brackets there is no difference between the box and arrow symbols,
they only control the line style.
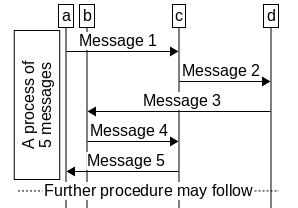
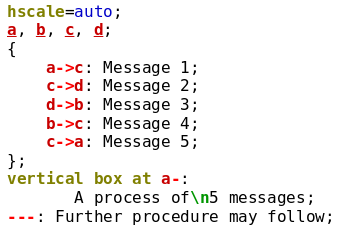
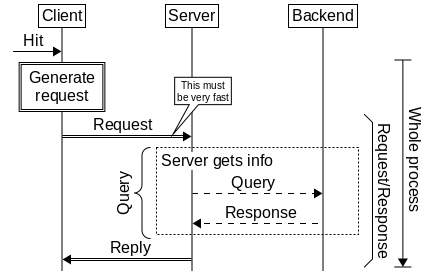
You can omit both markers. In this case the vertical spans besides the chart
element before it. You can group a set of chart elements with curly braces and
specify a vertical immediately after to make it span along the entire group.
(This is a simpler way than to use the mark command.)
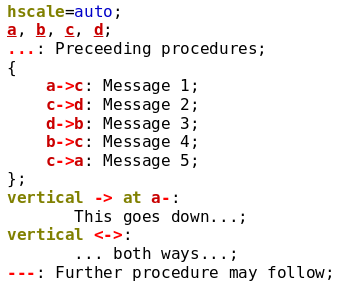
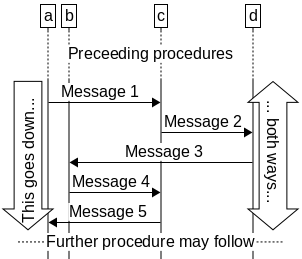
You can even omit the symbol making it default to ->[21]. The above chart
can also be written as below.
 |
 |
Verticals can contain a label, which can be rotated 90 degrees compared to
other elements. This can be set via the side attribute, which specifies
from which direction the text is readable from (left, right or end,
which means the regular horizontal typeset).
If you sent side=end to typeset the label horizontally, you can use
word wrapping by setting text.wrap=yes. If you do so (even if via the
default text attribute), you must specify a text width for each such vertical
to do the wrapping in. Use the text.width attribute for this purpose.
Verticals with vertically typeset text ignore the text.wrap attribute and
do no label word wrapping.
The text after the ‘at’ keyword determines the horizontal location of
the vertical. The horizontal position is defined in relation to entity positions.
It can be placed onto an entity, left or right from it, or between two entities.
These are specified as ‘<entity>’, ‘<entity>-’, <entity>+ or
‘<entity1>-<entity2>’, respectively. You can also specify any distance from
an entity by adding a number after the first form, such as in ‘at <entity> <number>’.
The number will be interpreted in pixels and shifts the vertical left or right
depending on its sign. Use a space before the number.
 |
 |
You can also omit the at clause, which results in the vertical being placed
besides the entities it spans (by default on the right side of them using
‘<entity>+’). If, however, the side attribute is set to right
(to mean that the text is readable from the right direction), the vertical is
placed left of the entities is spans besides.
Verticals specified to be besides an entity (with ‘<entity>-’, ‘<entity>--’,
‘<entity>+’ or ‘<entity>++’ horizontal locations)
are placed further from the entity line
if there are boxes or elements in the way. Only those elements are considered,
which are specified in the input file before vertical.
If the vertical references markers below it, it may overlap
with later elements, thus it is a good idea only to mark the top of the vertical
and specify the vertical itself at the bottom location (as in all the
examples)[22].
The makeroom attribute is a boolean value defaulting to yes.
When it is turned off verticals are not considered when
entity distances are calculated with hscale=auto.
When makeroom is on, Msc-generator attempts to take the vertical into account
when laying out entities.
In a well-designed case you can even nest verticals,
as a vertical specified earlier will be considered
by subsequent verticals (but only if its makeroom attribute is set to yes).
 |
 |
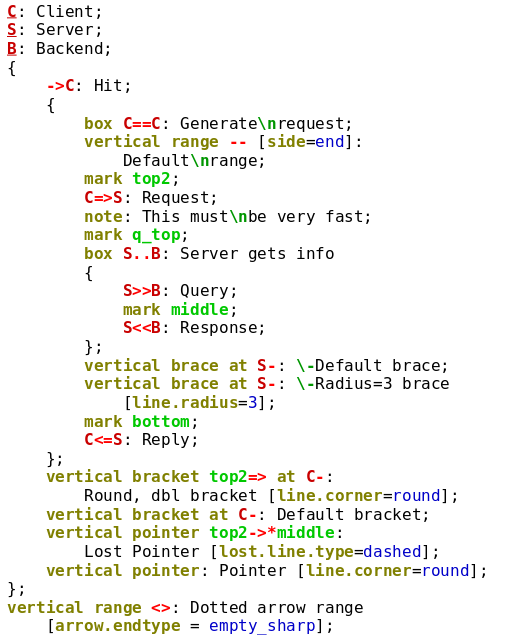
e Below is a picture demonstrating all shapes of verticals. Here are a few tips on them.
The radius of the curves of the brace vertical can be adjusted with the
line.radius attribute and defaults to 8. The width of the bracket vertical
can also be influenced with the same attribuet. In addition you can set the
line.corner attribute to round or bevel to influence the
corners of the bracket. The range vertical can display either an arrow
or just a simple line depending on whether you use the arrow or box symbols.
In case you specify an arrow, you can adjust the arrowhead via the arrow.*
attributes.
 |
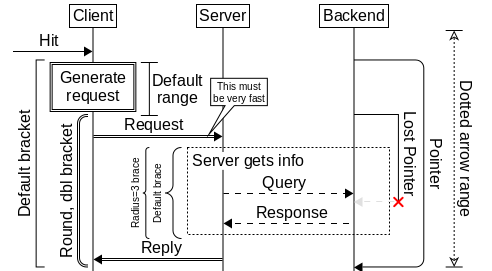 |
The pointer vertical can be marked with an asterisk as being lost.
If so it displays the same loss symbol that is used at lost
messages (see Lost Messages) and you can use the x.size and
x.line.* attributes to control its appearance. Note that you cannot
control the exact location of the loss symbol (via the lost at construct),
it is always at the bottom of the pointer.