Table of Contents
- 9.1 General installation requirements
- 9.2 Migration Overview
- 9.3 Conceptual DBMS equivalents
- 9.4 Microsoft Access Migration
- 9.5 Microsoft SQL Server migration
- 9.6 PostgreSQL migration
- 9.7 MySQL migration
- 9.8 Using the MySQL Workbench Migration Wizard
- 9.8.1 Connecting to the databases
- 9.8.2 Schemata Retrieval and Selection
- 9.8.3 Reverse Engineering
- 9.8.4 Object Selection
- 9.8.5 Migration
- 9.8.6 Manual Editing
- 9.8.7 Target Creation Options
- 9.8.8 Schema Creation
- 9.8.9 Create Target Results
- 9.8.10 Data Migration Setup
- 9.8.11 Bulk Data Transfer
- 9.8.12 Migration Report
- 9.9 MySQL Workbench Migration Wizard FAQ
MySQL Workbench provides the ability to migrate ODBC compliant databases to MySQL.
Convert (migrate) different database types, including MySQL, across servers
Convert tables and copy data, but will not convert stored procedures, views, or triggers
Allows customization and editing during the migration process
Works on Linux, OS X, and Microsoft Windows
This is not an exhaustive list. The following sections discuss these and additional migration capabilities.
Set up may be the most challenging aspect of using the MySQL Workbench Migration Wizard. There is the installation section, which describes setting up ODBC requirements for Linux, OS X, and Microsoft Windows, and the Database Product Specific Notes section that references setup conditions for each RDBMS.
The MySQL Workbench Migration Wizard uses ODBC to connect to a source database, except for MySQL. You will need the ODBC driver installed that corresponds to the database you want to migrate from. For example, PostgreSQL can be migrated with the psqlodbc ODBC driver; Microsoft SQL Server can be migrated using the native Microsoft SQL Server driver on Windows or with FreeTDS on Linux and OS X.
The following diagram shows the general components involved in an ODBC connection:
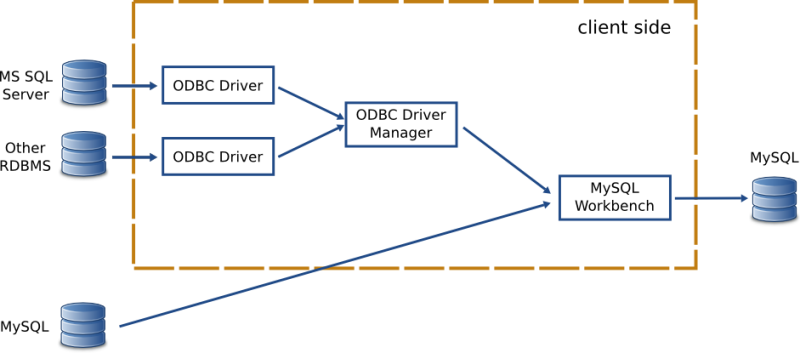
When specifying the source RDBMS, you can either use a data source configured externally, or provide the individual connection parameters to MySQL Workbench. If you already have an ODBC Data Source configured in your system, then you can use that in MySQL Workbench.
The migration process does not support source or target RDBMS connections through SSH.
A workaround is to set up an encrypted tunnel, and then treat the MySQL target as a standard TCP (unencrypted) connection.
This section may be skipped when using a MySQL Workbench binary that is provided by Oracle.
An ODBC Driver Manager library must be present. Both Windows and OS X provides one.
Linux
iODBC: MySQL Workbench binaries provided by
Oracle already include iODBC and no additional action is
required. If you compile it yourself, you must install iODBC or
unixODBC. iODBC is recommended. You can use the iODBC library
provided by your distribution.
pyodbc: is the Python module used by
MySQL Workbench to interface with ODBC, and may be used to migrate
ODBC compliant databases such as PostgreSQL and DB2. In Windows
and OS X, it is included with Workbench. In Linux, binaries
provided by Oracle also include pyodbc.
If you're using a self-compiled binary, make sure you have the latest version, and that it is compiled against the ODBC manager library that you chose, whether it is iODBC or unixODBC. As of version 3.0.6, pyodbc will compile against unixODBC by default. If you are compiling against iODBC then you must perform the following steps:
Install the development files for iODBC. Usually you just need to install the
libiodbc-develorlibiodbc2-devpackage provided by your distribution.In the pyodbc source directory, edit the setup.py file and around line 157, replace the following line:
settings['libraries'].append('odbc')withsettings['libraries'].append('iodbc')Execute the following command as the root user:
CFLAGS=`iodbc-config --cflags`
            LDFLAGS=`iodbc-config --libs` python setup.py
            install
For each RDBMS, you need its corresponding ODBC driver, which must also be installed on the same machine that MySQL Workbench is running on. This driver is usually provided by the RDBMS manufacturer, but in some cases they can also be provided by third party vendors or open source projects.
Operating systems usually provide a graphical interface to help set up ODBC drivers and data sources. Use that to install the driver (i.e., make the ODBC Manager "see" a newly installed ODBC driver). You can also use it to create a data source for a specific database instance, to be connected using a previously configured driver. Typically you need to provide a name for the data source (the DSN), in addition to the database server IP, port, username, and sometimes the database the user has access to.
If MySQL Workbench is able to locate an ODBC manager GUI for your system, a , menu item be present under the Tools menu as a convenience shortcut to start it.
Linux: There are a few GUI utilities, some of which are included with unixODBC. Refer to the documentation for your distribution. iODBC providesiodbcadm-gtk. Official binaries of MySQL Workbench include it and it can be accessed through the , menu item.OS X: You can use the ODBC Administrator tool, which is provided as a separate download from Apple. If the tool is installed in the/Applications/Utilitiesfolder, you can start it through the , menu item.Microsoft Windows: You can use the Data Sources (ODBC) tool under Administrative Tools. And it can be started through the , menu item.
Since the ODBC driver needs to be installed in the client side, you will need an ODBC driver that supports your clients operating system and architecture. For example, if you are running MySQL Workbench from Linux x64, then you need a Linux x64 ODBC driver for your RDBMS. In OS X, MySQL Workbench is built as a 32-bit application, so you need the 32-bit drivers.
The Migration Wizard performs the following steps when migrating a database to MySQL:
Connects to the source RDBMS and retrieves a list of available databases/schemas.
Reverse engineers selected database/schemas into a internal representation specific to the source RDBMS. This step will also perform the renaming of objects/schemas depending on the type of object name mapping method that is chosen.
Automatically migrates the source RDBMS objects into MySQL specific objects.
Target schema objects are created.
Target table objects are created.
Columns for each table are copied.
Data types are mapped to MySQL data types.
Default values are mapped to a MySQL supported default value, if possible.
Indexes are converted.
Primary Keys are converted.
Triggers are copied, and commented out if the source is not MySQL.
Foreign Keys for all tables (of all schemas) are converted.
View objects are copied, and commented out if the source is not MySQL.
Stored Procedure and Function objects are copied, and commented out if the source is not MySQL.
Provides an opportunity to review the changes, for editing and correcting errors in the migrated objects.
Creates the migrated objects in the target MySQL server. If there are errors, you can return to the previous step and correct them, and retry the target creation.
Copy data of the migrated tables from the source RDBMS to MySQL.
MySQL Workbench provides support for migrating from some specific RDBMS products. The Migration Wizard will provide the best results when migrating from such products. However, in some cases, other unsupported database products can also be migrated by using its Generic database support, as long as you have an ODBC driver for it. In this case, the migration will be less automatic, but should still work nonetheless.
This example will migrate a Microsoft SQL Server database to MySQL, and include a screenshot for each step.
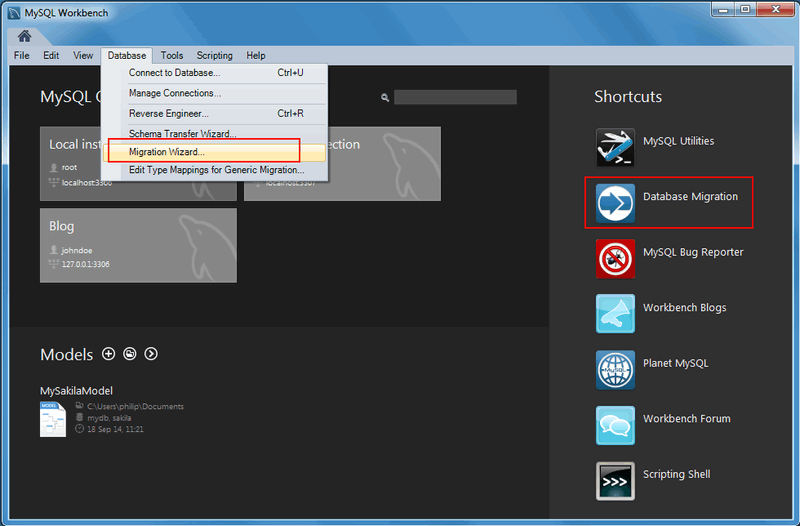
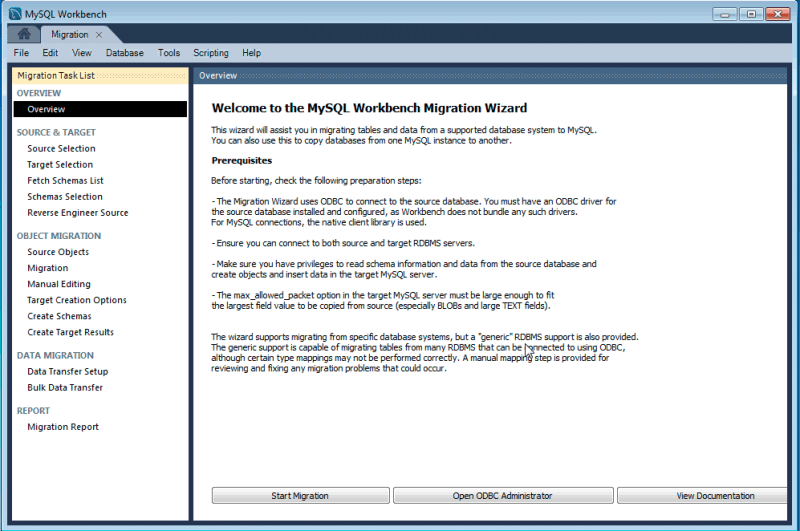
From MySQL Workbench, choose , to open the migration wizard.
Read the migration wizard overview:
Overview
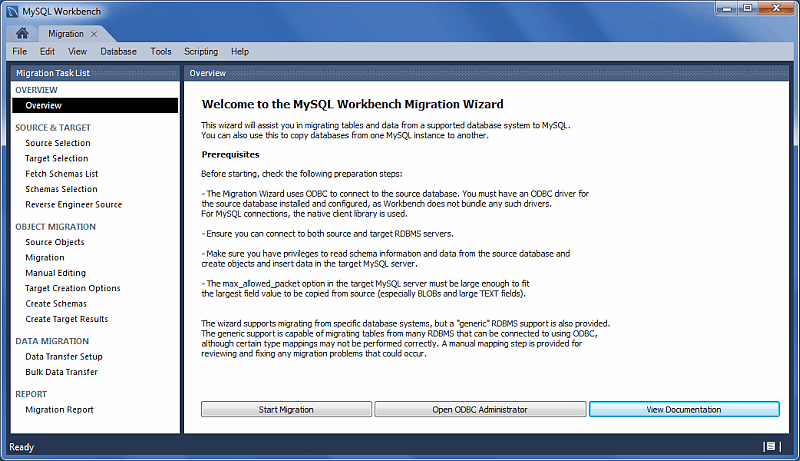
It describes the prerequisites and requirements that should be
understood before proceeding further. The option will load
odbcad32.exe, and is used to confirm that
the ODBC Driver for SQL Server is installed, and to make
configuration changes if needed.
Click to continue.
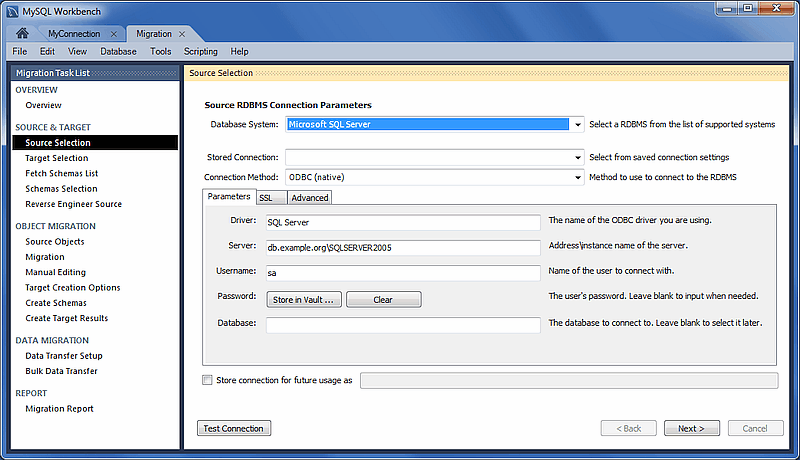
Source Selection
Select the source RDBMS that is migrating to MySQL. Choose the Database System that is being migrated, and the other connection parameters will change accordingly.
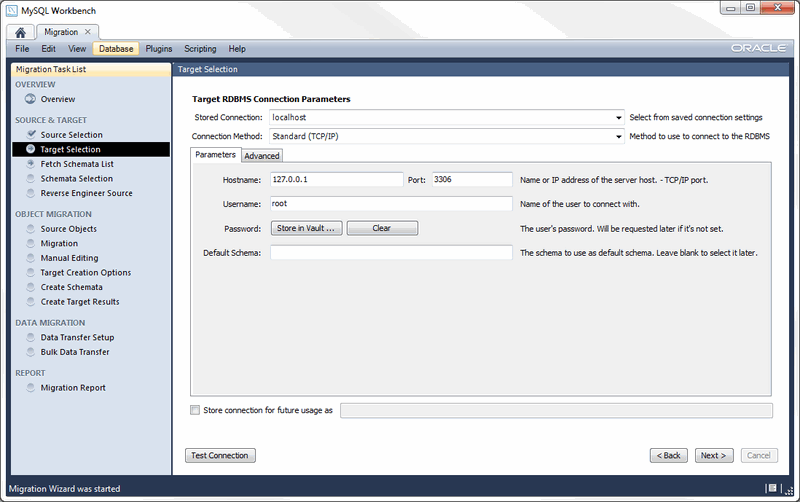
Target Selection
The target is the MySQL database that will contain the newly migrated database. The current Workbench MySQL connections will be available here, or you can choose to create a new connection.

Fetch Schemata List
The Schemata list is retrieved from both the source and target RDBMS. This is an automated and informational step that reports connection related errors and/or general log information. Press to continue.

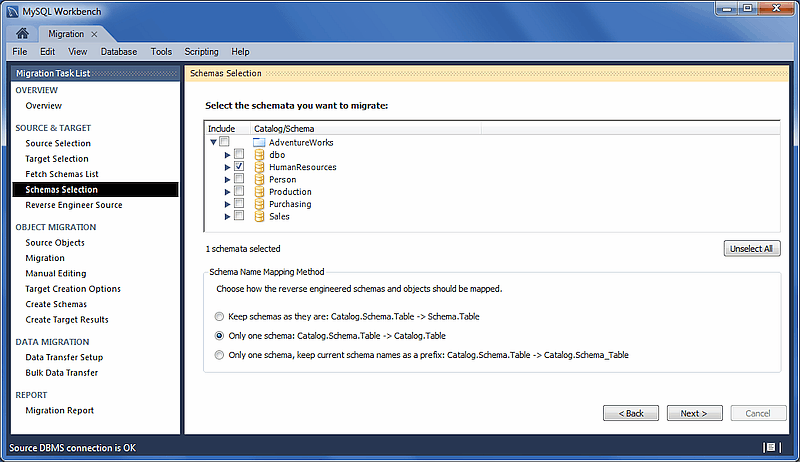
Schemata Selection
Choose the schemata you want to migrate.
"Schema Name Mapping Method" options while migrating Microsoft SQL Server:
Keep schemata as they are: Catalog.Schema.Table -> Schema.Table: This will create multiple databases, one per schema.
Only one schema: Catalog.Schema.Table -> Catalog.Table: Merges each schema into a single database.
Only one schema, keep current schema names as a prefix: Catalog.Schema.Table -> Catalog.Schema_table: Preserves the schema name as a prefix.
Reverse Engineer Source
The source metadata is fetched from the source RDBMS, and reverse engineered. This is an automated and informational step that reports related errors and/or general log information. View the logs and then press to continue.

Source Objects
The discovered objects from the Reverse Engineer Source stage are revealed and made available. This includes Table, View, and Routine objects, with only the Table objects being selected by default.

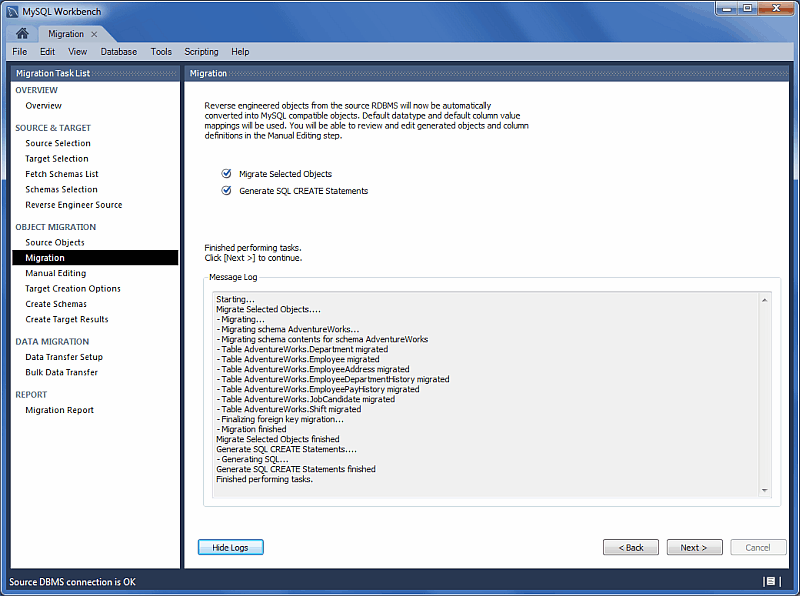
Migration
The migration process now converts the selected objects into MySQL compatible objects. View the logs and then proceed.
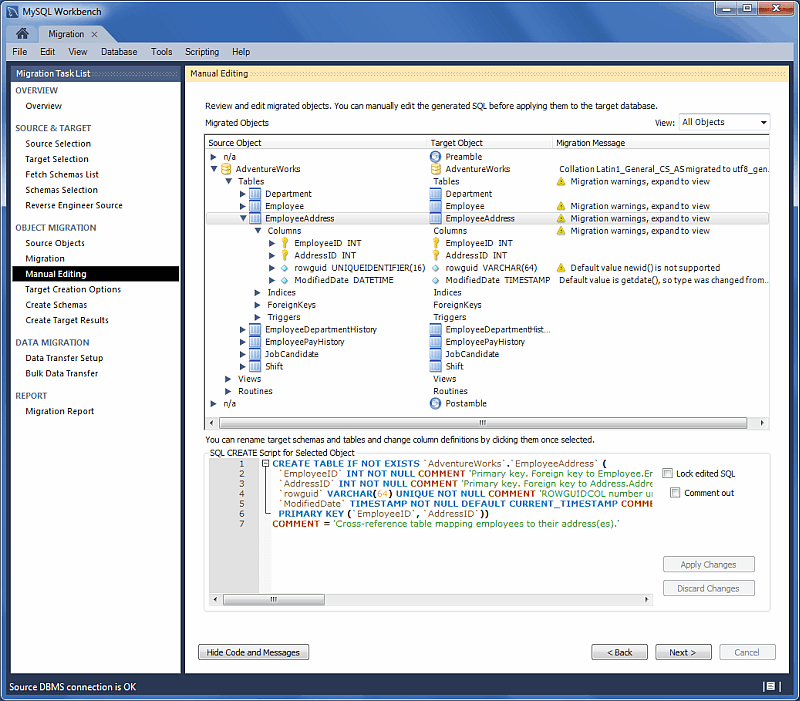
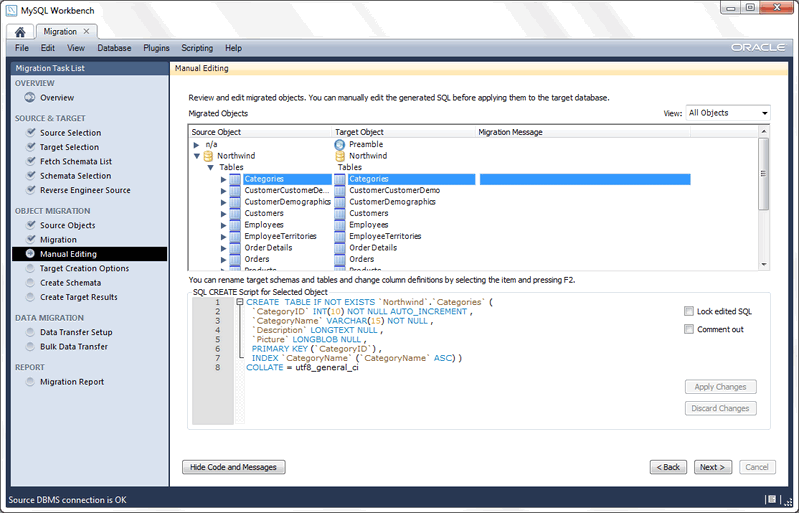
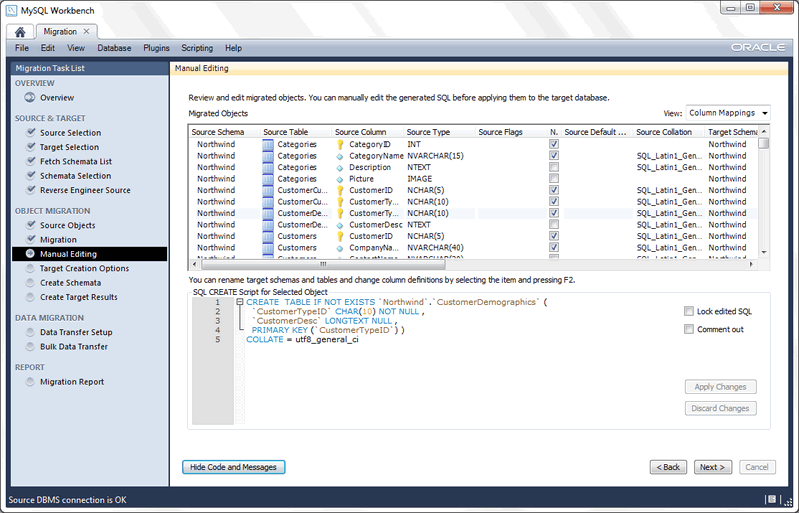
Manual Editing
There are three sections to edit here, which are selected via the View select box on the top right. The button is available with every view, and it will show the generated MySQL code that corresponds to the selected object.
: This will either report problems or display "No mapping problems found." It is an informational screen.
: An object view that allows you to view and edit the object definitions. Double-click on a row to modify a target objects name.
: Shows all of the table column mappings, and allows you to individually review and fix the mapping for all column types, default values, and other attributes.


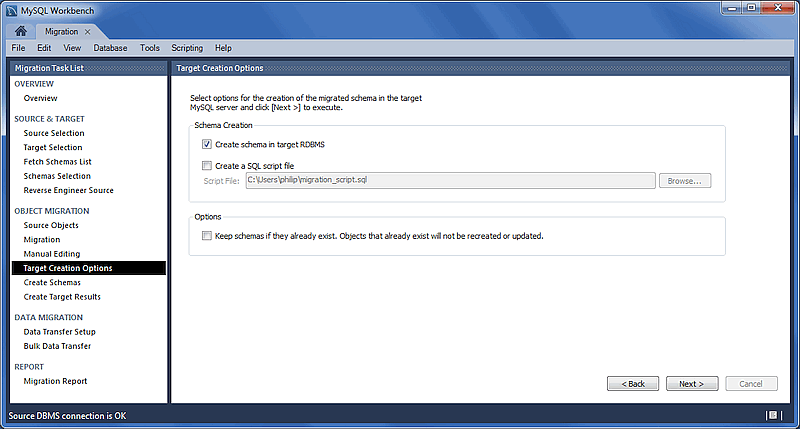
Target Creation Options
The schema may be created by either adding it to the target RDBMS, creating an SQL script file, or both.
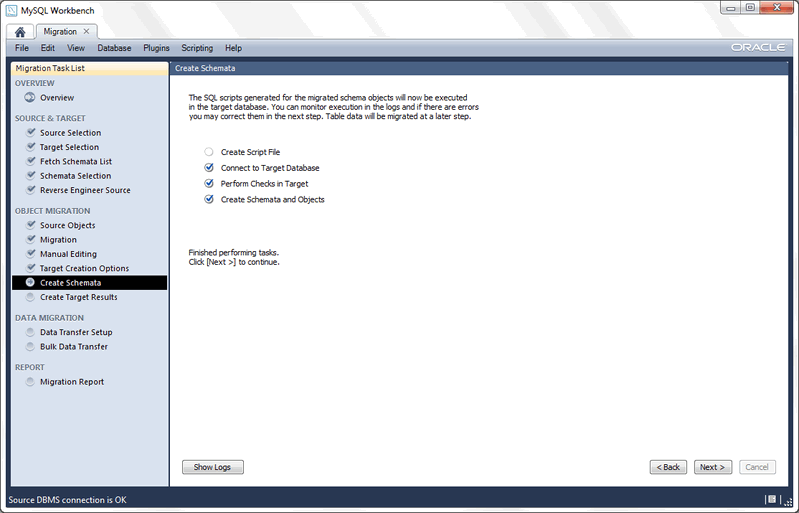
Create Schemata
Now the schemata is created. The complete log is also available here.
Create Target Results
The generated objects are listed here, along with the error messages if any exist.
The migration code may also be viewed and edited here. To make changes, select an object, edit the query code, and press . Repeat this process for each object that will be edited. And then, press to save the results.
The operation is required to save any changes here. It will then execute the previous migration step (Create Schemata) with the modified code, and then continue the migration process. This also means that the previously saved schema will be dropped.
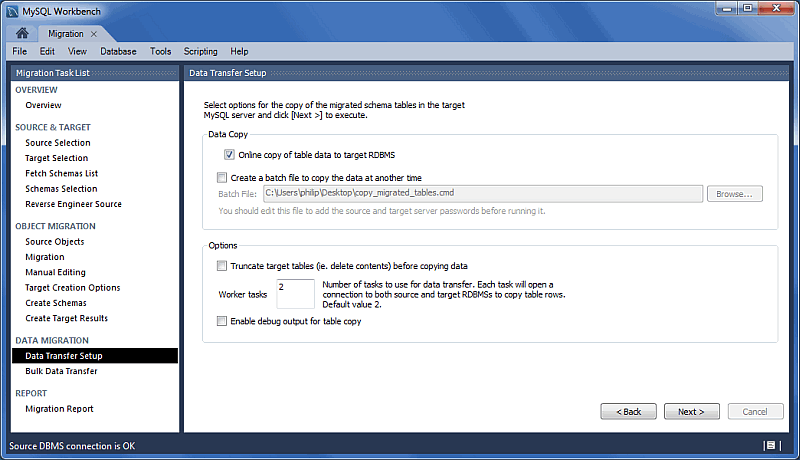
Data Transfer Setup
The next steps involve transferring data from the source RDBMS to the target MySQL database. The setup screen includes the following options:
Data Copy:
Online copy of table data to target RDBMS: This (default) will copy the data to the target RDBMS.
Create a batch file to copy the data at another time: The data may also be dumped to a file that can be executed at a later time, or be used as a backup.
Options:
Truncate target tables before copying data: In case the target database already exists, this will delete said data.
Worker tasks: The default value is
2. This is the number of tasks (database connections) used while copying the data.Enable debug output for table copy: Shows debugging information.
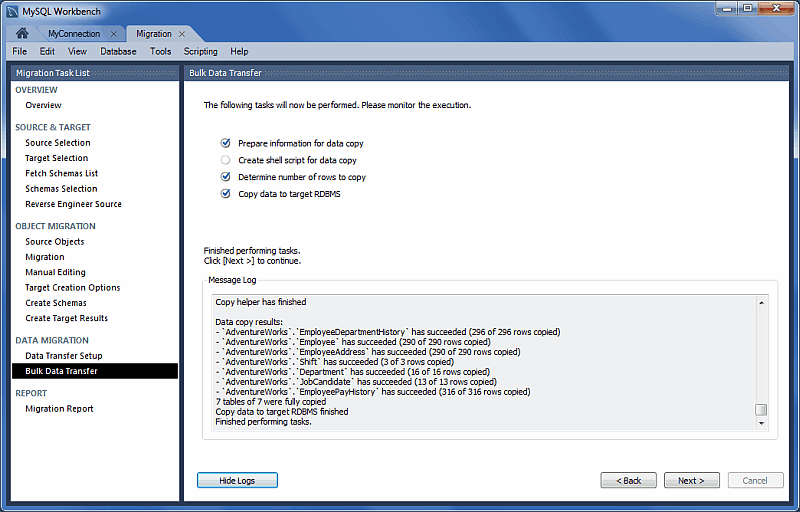
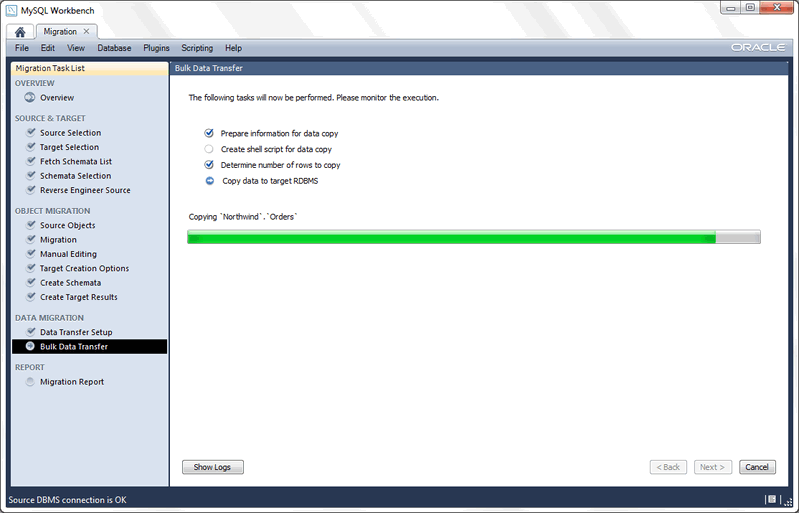
Bulk Data Transfer
And now the data is transferred to the target RDBMS. Optionally, view the logs to confirm.
Migration Report
And finally, the migration report is available and summarizes the entire migration process.

Pressing will close the migration window. The database may now be viewed within the MySQL Workbench SQL editor.
If a MySQL Workbench SQL Editor tab is already opened, then the schema list within the Object Browser must be refreshed in order to view the newly imported schema.
When a supported RDBMS product is being migrated, the MySQL Workbench Migration Wizard will automatically convert as much information as it can, but you may still be required to manually edit the automatically migrated schema for difficult cases, or when the default mapping is not as desired.
Generally speaking, only table information and its data are automatically converted to MySQL. Code objects such as views, stored procedures, and triggers, are not. But supported RDBMS products will be retrieved and displayed in the wizard. You can then manually convert them, or save them for converting at a later time.
The following RDBMS products and versions are currently tested and supported by the MySQL Workbench Migration Wizard, although other RDBMS products can also be migrated with Section 9.2.3, “Migrating from unsupported (generic) databases”
Microsoft SQL Server 2000, 2005, 2008, 2012
Microsoft Access 2007 and greater
MySQL Server 4.1 and greater as the source, and MySQL Server 5.1 and greater as the target
PostgreSQL 8.0 and greater
SQL Anywhere
SQLite
Sybase Adaptive Server Enterprise 15.x and greater
Most ODBC compliant databases may be migrated using the generic database support. In this case, code objects will not be retrieved from the source database; only tables and data.
When using the generic support, column data types are mapped using the following steps:
It searches for the first entry in the for the source type name. If the length/scale ranges of the entry matches the source column, it will pick that type. Otherwise, it continues searching.
If no matches were found in the generic table, then it tries to directly map the source type to a MySQL type of the same name.
If the source type name doesn't match any of the MySQL data types, then it is not converted and an error is logged. From here you can specify the target datatype in the Manual Object Editing step of the wizard.
Table 9.1 Conceptual equivalents between supported DBMS products and MySQL
| Concept | MS SQL Server | Sybase ASE | PostgreSQL | MySQL | Note |
|---|---|---|---|---|---|
| Authentication | Yes | Yes | Yes | Yes | |
| Auto_Increment | Yes | Yes | Yes | Yes | PostgreSQL uses sequences for Auto_Increment. |
| Backup | Yes | Yes | Yes | Yes | See MySQL Enterprise Backup |
| Catalog | Yes | Yes | Yes | N/A | You can map a catalog into a schema and drop the , use the owner as the schema name or merge the owner and object name together. ownerobject |
| Constraints | Yes | Yes | Yes | Yes | |
| Data Dictionary | N/A | ||||
| Database | Yes | Yes | Yes | Yes | |
| Database Instance | |||||
| Dump | Yes | Yes | Yes | Yes | mysqldump |
| Events | Yes | Yes | Yes | Yes | |
| Foreign Keys | Yes | Yes | Yes | Yes | |
| Full Text Search | Yes | Yes | Yes | Yes | In InnoDB as of MySQL Server 5.6, and in all versions of MyISAM |
| Index | Yes | Yes | Yes | Yes | |
| Information Schema | Yes | No | Yes | Yes | |
| Object Names Case Sensitivity | Depends on collation | Depends on collation | Mixed | Mixed | MySQL: sensitivity of database, table, and trigger names OS dependent; other object names are case insensitive. PostgreSQL: as specified in the SQL-99 standard, unquoted object names are treated as case insensitive while quoted object names are case sensitive. Unlike the standard, unquoted object names are converted to lowercase instead of uppercase. |
| Object Naming Conventions | Yes | Yes | Yes | Yes | |
| Packages | N/A | N/A | N/A | N/A | |
| Partitioning | Yes | Yes | Yes | Yes | |
| Performance Schema | N/A | N/A | Yes | Yes | |
| Permissions | Yes | Yes | Yes | Yes | |
| Primary Key | Yes | Yes | Yes | Yes | |
| Referential Integrity | Yes | Yes | Yes | Yes | Sybase ASE: referential integrity only through triggers. |
| Replication | Yes | Yes | Yes | Yes | |
| Role | Yes | Yes | Yes | N/A | Roles are not available in MySQL at the database level. |
| Schema | Yes | Yes* | Yes | Yes | Equivalent to database in MySQL. Sybase ASE: Schemata corresponds to user names. |
| Sequences | Yes* | Yes* | Yes | Yes* | Standalone sequence objects are not supported in MySQL. Similar functionality can be obtained with IDENTITY columns in MSSQL and AUTO_INCREMENT columns in MySQL |
| SQL Modes | Yes | Yes | Yes | SET_ANSI_* in MSSQL | |
| Storage Engines | N/A | N/A | Yes* | Yes | PostgreSQL itself supports and uses only one storage engine (Postgresql). Other companies have added extra storage engines to PostgreSQL. |
| Stored Procedures | Yes | Yes | Yes | Yes | |
| Synonyms | N/A | N/A | N/A | N/A | |
| Table | Yes | Yes | Yes | Yes | |
| Tablespace | Yes | Yes* | Yes | N/A | MSSQL groups tables in schemata (unless referring to CREATE TABLESPACE). Sybase ASE: tables are grouped in schemata which are more like user names. |
| Temporary Tables | Yes | Yes | Yes | Yes | |
| Transactions | Yes | Yes | Yes | Yes | |
| Triggers | Yes | Yes | Yes | Yes | |
| UDFs | Yes | Yes | Yes | Yes | |
| Unicode | Yes | Yes | Yes | Yes | |
| Unique Key | Yes | Yes | Yes | Yes | |
| User | Yes | Yes | Yes | Yes | |
| Views | Yes | Yes | Yes | Yes |
A Microsoft SQL Server database is made up of one catalog and one or more schemata. MySQL only supports one schema for each database (or rather, a MySQL database is a schema) so this difference in design must be planned for. The Migration Wizard must know how to handle the migration of schemata for the source (Microsoft SQL Server) database. It can either keep all of the schemata as they are (the Migration Wizard will create one database per schema), or merge them into a single MySQL database. Additional configure options include: either remove the schema names (the Migration Wizard will handle the possible name collisions that may appear along the way), and an option to add the schema name to the database object names as a prefix.
This feature was added in MySQL Workbench 6.2.0.
Microsoft Windows is required because Microsoft Access ODBC drivers are only available on Windows. As for the destination MySQL server, you can have it in the same local machine or elsewhere in your network.
Microsoft Access stores relationship/foreign key information in an internal table called MSysRelationships. That table is protected against read access even to the Admin user, so if you try to migrate without opening up access to it, then you will get an error like this:
[42000] [Microsoft][ODBC Microsoft Access Driver] Record(s) cannot be read; no read permission on 'msysobjects'. (-1907) (SQLExecDirectW)
The steps to grant read access to the Admin are explained below.
The screenshots in this documentation use Microsoft Access 2007.
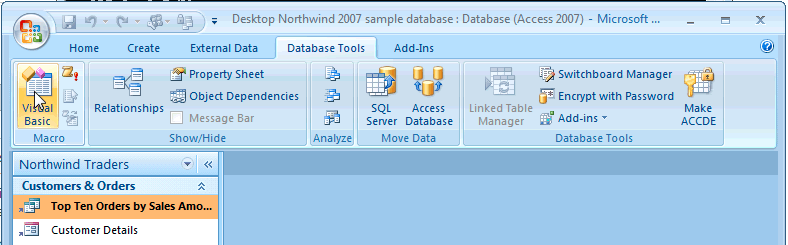
Open up database in Microsoft Access
Under the menu, click the macro button to open the Visual Basic (VB) console.
To confirm that you're logged in as the "Admin" user, locate the Immediate panel and type the "? CurrentUser" and press . This should output "Admin" under "? CurrentUser" in the panel.
Also in the Immediate panel, type the following command to grant access:
CurrentProject.Connection.Execute "GRANT SELECT ON MSysRelationships TO Admin"
Quit the Microsoft Access application

From the main MySQL Workbench screen you can start the Migration Wizard by clicking on the Database Migration launcher in the Workbench Central panel or through , from the main menu.
A new tab showing the Overview page of the Migration Wizard should appear.
To check if you have the ODBC driver installed, click from the MySQL Workbench migration overview page to open the system ODBC tool. Then, select the Drivers tab.
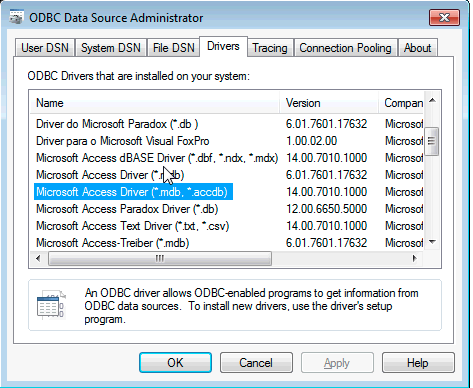
Important: MySQL Workbench has both 32-bit and 64-bit executables. The ODBC drivers you use must be of the same architecture as the MySQL Workbench binaries you are using. Because Office 2007 and older was 32-bit only and even Office 2010 installs as 32-bit by default, you may need to install the 32-bit version of MySQL Workbench to migrate from Access, even if you have a 64-bit machine. If during migration you get an ODBC error about "architecture mismatch between the Driver and Application", you installed the wrong version of MySQL Workbench.
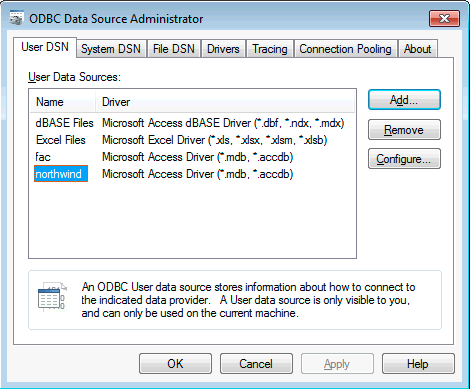
In the User DSN tab, click on to create a DSN for your database file. For this example, we created one for the northwind sample database.
Click on the from the Overview page to advance to the Source Selection page. Here you need to provide the information about the Access database you are migrating from, the ODBC driver to use, and the parameters for the Access connection.
Open the Database System combo box for a list of supported RDBMSes, and select Microsoft Access from the list. There is another combo box below it named Stored Connection. It lists saved connection settings for that RDBMS. You can save connections by marking the checkbox at the bottom of the page, along with a name for the saved connection.
The next combo box selects the Connection Method. This time we are going to select ODBC Data Source from the list. This allows you to select pre-existing DSNs that you have configured in your system.
The DSN dropdown will have all DSNs you have defined in your system. Pick the one you created for the Access database being migrated from the list.
In the Default Character Set field you can select the character set of your database. If your Access version uses western/latin characters, you can leave the default cp1252. However, if you use a localized version of Access, such as Japanese, you must enter the correct character set used by your edition of Microsoft Office, otherwise the data will be copied incorrectly.

Lastly, click to check whether an ODBC connection can be established. If you entered the correct parameters then you should see a message reporting a successful connection attempt.
Next, set up the target (MySQL) database parameters. Once there set the parameters to connect to your MySQL Server instance. When you are done click on the Test Connection button and verify that you can successfully connect to it.
Next, you should see the reverse engineering of the selected database objects progress. At this point, the migration wizard is retrieving relevant information about the involved database objects (such as table names, table columns, primary and foreign keys, indices, triggers, views, and more). You will be presented a page showing the progress as shown below.
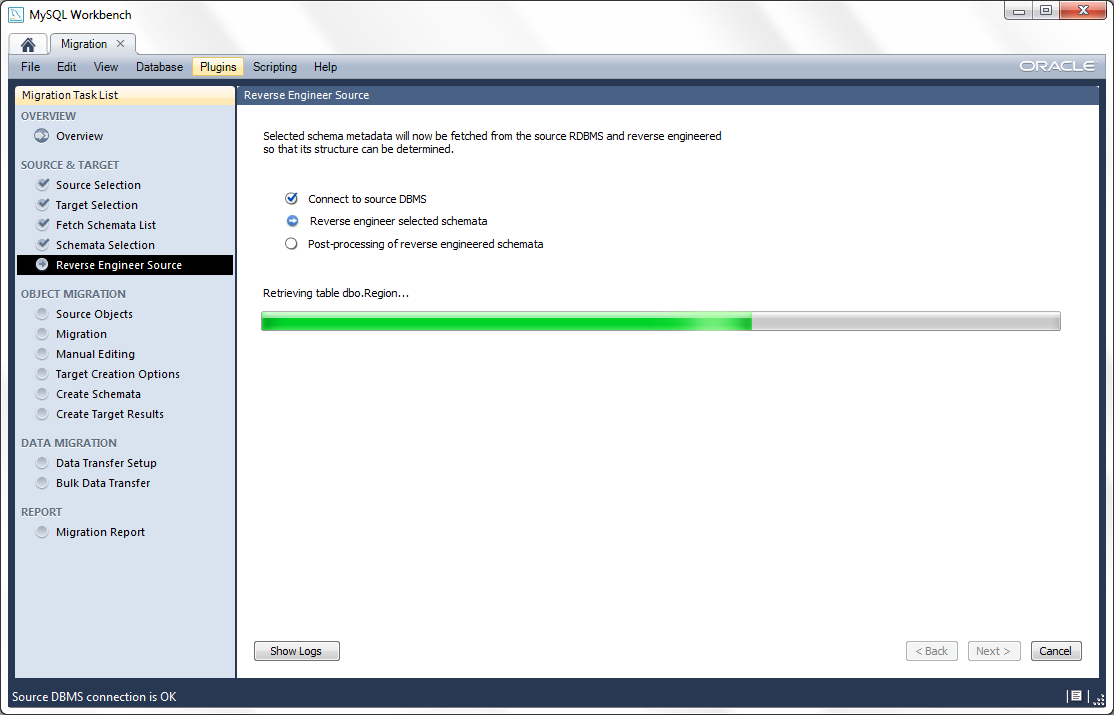
Wait for it to finish and verify that everything went well. Next, the Source Objects displays a list with the objects that were retrieved and are available for migration. It will look similar to:
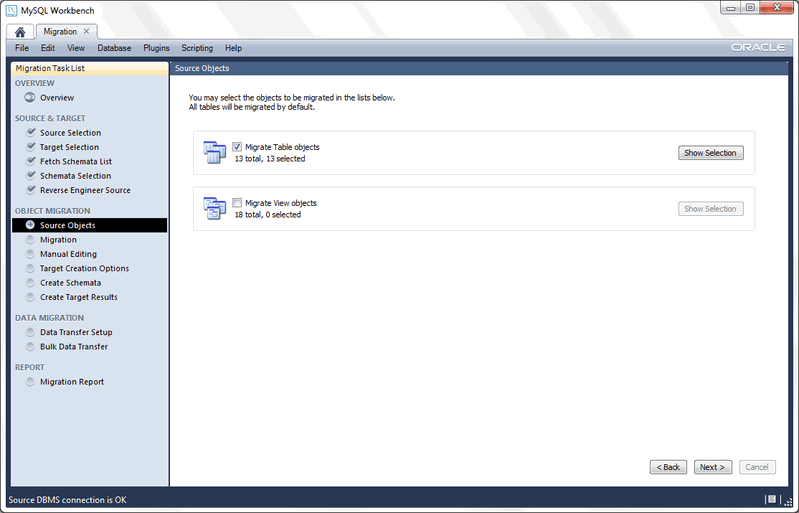
In the above example, the migration wizard discovered table and view objects for our source database. Only the table objects are selected by default for migration.
You can also select the view objects but you must also provide their corresponding MySQL equivalent code later (no automatic migration is available for them) so our example will leave the views unchecked. The same applies for stored procedures, functions and triggers.
Click to configure exactly which objects you want to migrate, as seen below:
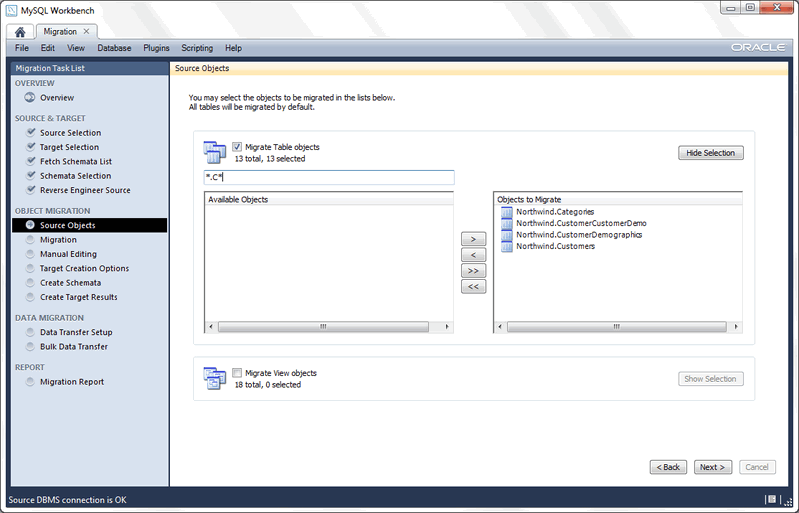
The objects on the right will be migrated. The filter box can filter the list (wildcards are allowed, as demonstrated above). By using the arrow buttons you can filter out the objects that you do not want to migrate. Before continuing, clear the filter text box to check the full list of the selected objects. Our example migrates all of the table objects so all of them are in the Objects to Migrate list, and the Migrate Table Objects checkbox is checked.
At this point, the migration wizard converts the selected objects into their equivalent objects into the target MySQL server, and it also generates the MySQL code needed to create them. You might have to wait before the Manual Editing page is ready, but here is the initial page:
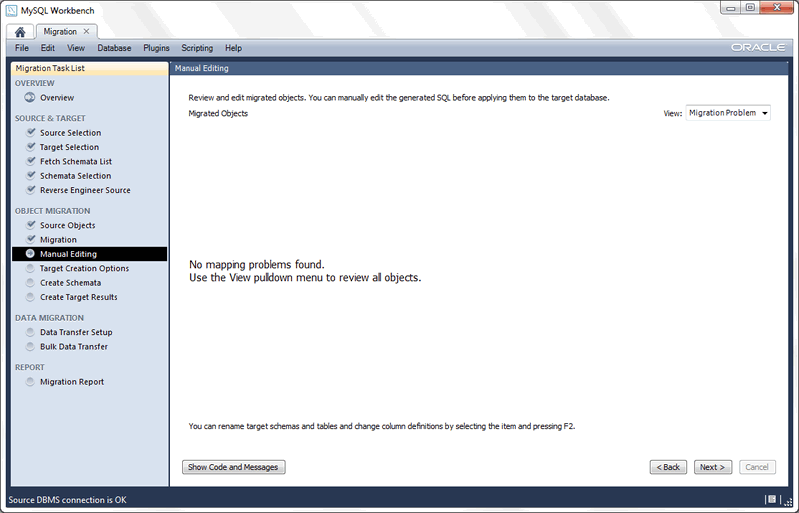
The View combo box changes the way the migrated database objects are shown. Also notice the and buttons. Click to view and edit the generated MySQL code that corresponds to the selected object. Additionally, you can double-click in a row in the object tree to edit the object name, or double-click the database row to change its name.
The View combo box also has a Column Mappings option. It shows the table columns and allows you to review and fix the mapping of column types, default values, and other attributes.
Next is the Target Creation Options page:

Here are options for executing the generated code in the target RDBMS (your MySQL instance from the second step), or you can dump it to an SQL script file. Leave it as shown above and move to the next page. The migrated SQL code will be executed on the target MySQL server. You can view its progress in the Create Schemata page:
Once the creation of the schemata and objects finishes, you can move to the Create Target Results page. It presents a list of created objects and includes any generated errors while they were created. It will look similar to:
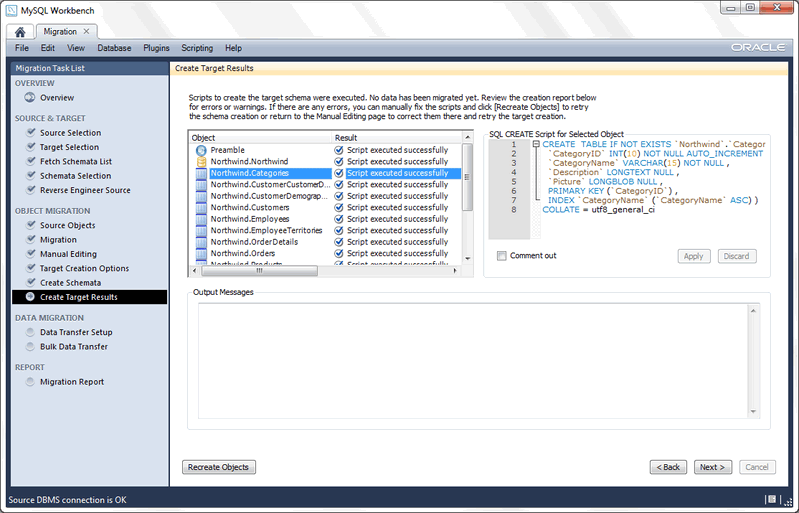
You can still edit the migration code using the code box to the right, and save your changes by clicking . If edits were made, you still need to recreate the objects with the modified code in order to perform the changes. This is done by clicking . In this tutorial we are not changing anything, so leave the code as it is, and continue on to the Data Transfer Setup page.
The next step transfers data from the source Access database into your newly created target MySQL database. The Data Transfer Setup page allows you to configure this process.

There are two sets of options here. The first allows you to perform a live transference and/or to dump the data into a batch file that you can execute later. The other set of options allows you to alter this process.
This tutorial uses the default values for the options in this page as shown in the above screenshot. Next, the data is transferred. At this point the corresponding progress page will look familiar:
Once it finishes, move to the next page. You will be presented a report page summarizing the whole process. Now, review and click Finish to close the wizard.
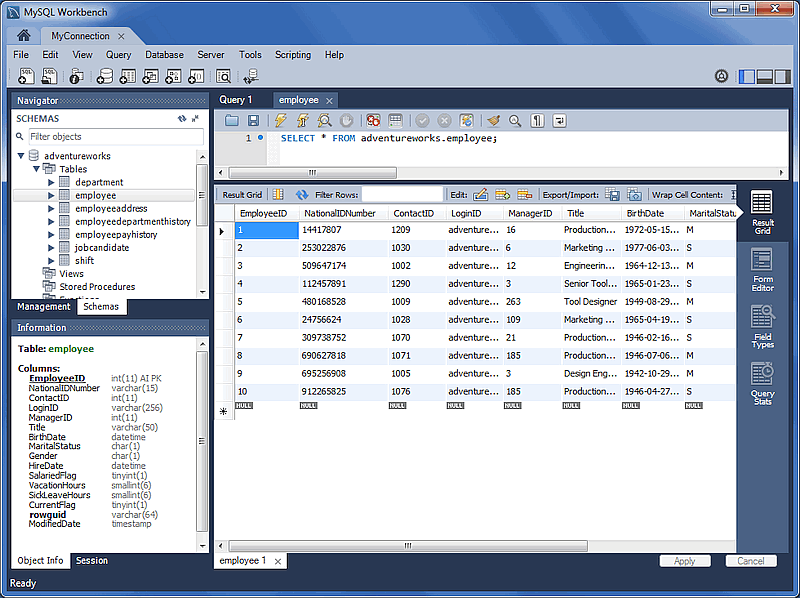
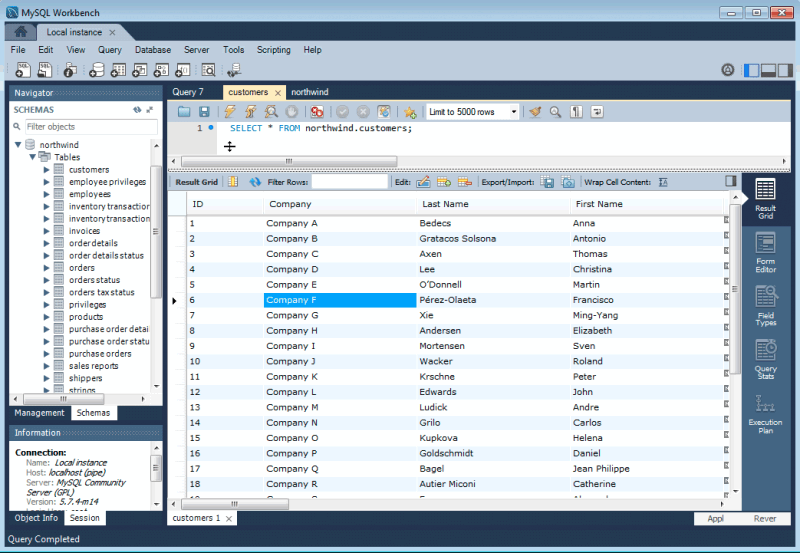
Now that the Northwind database was successfully migrated, next we will view the results. Open an SQL Editor that is associated with your MySQL Server instance, and then query the Northwind database. You can try something like "SELECT * FROM Northwind.customers":
Introduction.
The MySQL Workbench Migration Wizard is tested against the following Microsoft SQL Server versions: 2000, 2005, 2008, and 2012.
To be able to migrate from Microsoft SQL Server, ensure the following:
The source SQL Server instance is running, and accepts TCP connections
You know the IP and port of the source SQL server instance. If you will be migrating using a Microsoft ODBC driver for SQL Server (the default in Windows), you will need to know the host and the name of the SQL Server instance.
Make sure that the SQL Server is reachable from where you will be running MySQL Workbench. More specifically, check the firewall settings.
Make sure that the account you will use has proper privileges to the database that will be migrated.
General thoughts on the topic.
Microsoft Windows XP or newer includes an ODBC driver for Microsoft SQL Server, so there are no additional actions required.
Setting up drivers on Linux.
FreeTDS
FreeTDS version 0.92 or greater is required. Note that many distributions ship older versions of FreeTDS, so it may need to be installed separately. Additionally, the FreeTDS version provided by distributions may also be compiled for the wrong ODBC library (usually to unixODBC instead of iODBC, which MySQL Workbench uses). Because of that you will probably need to build this library yourself.
When compiling FreeTDS for use with iODBC (the default with
the official binaries), you must compile it with the
--enable-odbc-wide command line option
for the configure script. Failing to do
so will result in crashes and other unpredictable errors.
A script is provided to compile FreeTDS using the options
required for MySQL Workbench. You can find it in at
/usr/share/mysql-workbench/extras/build_freetds.sh
on Linux or
MySQLWorkbench.app/Contents/SharedSupport/build_freetds.sh
on OS X. To use it, follow these steps:
Make sure you have the iODBC headers installed. In Linux, install the
libiodbc-develorlibiodbc2-devpackage from your distribution. In OS X, the headers come with the system and no additional action is required for this step.mkdir ~/freetdsto create a directory - within the users home directory.Copy the
build_freetds.shscript to~/freetdsGet the latest FreeTDS sources from ftp://ftp.freetds.org/pub/freetds/ and place it in the
~/freetdsdirectory. Make sure to get version 0.92 or newer.cd ~/freetdsExecute
build_freetds.shAfter compilation is done, install it using
make
              install
from the path given by the script.Install the driver in the ODBC Administrator, to make the ODBC subsystem to recognize it. The name of the driver file is
libtdsodbc.soand is located in/usr/libor/usr/local/lib
Once the driver is installed, you should be able to create data sources for it from the ODBC Administrator GUI.
When using FreeTDS, TDS_VERSION=7.0 is
needed in the connection string. If you pick a FreeTDS
specific connection method option in the connection dialog,
that option is added to the connection string automatically.
Table 9.2 Type mapping
| Source Type | MySQL Type | Comment |
|---|---|---|
| INT | INT | |
| TINYINT | TINYINT | UNSIGNED flag set in MySQL |
| SMALLINT | SMALLINT | |
| BIGINT | BIGINT | |
| BIT | TINYINT(1) | |
| FLOAT | FLOAT | Precision value is used for storage size in both |
| REAL | FLOAT | |
| NUMERIC | DECIMAL | |
| DECIMAL | DECIMAL | |
| MONEY | DECIMAL | |
| SMALLMONEY | DECIMAL | |
| CHAR | CHAR/LONGTEXT | Depending on its length. MySQL Server 5.5 and above can have CHAR columns with a length up to 255 characters. Anything larger is migrated as LONGTEXT |
| NCHAR | CHAR/LONGTEXT | Depending on its length. MySQL Server 5.5 and above can have VARCHAR columns with a length up to 65535 characters. Anything larger is migrated to one of the TEXT blob types. In MySQL, character set of strings depend on the column character set instead of the datatype. |
| VARCHAR | VARCHAR/MEDIUMTEXT/LONGTEXT | Depending on its length. MySQL Server 5.5 and above can have VARCHAR columns with a length up to 65535 characters. Anything larger is migrated to one of the TEXT blob types. |
| NVARCHAR | VARCHAR/MEDIUMTEXT/LONGTEXT | Depending on its length. MySQL Server 5.5 and above can have VARCHAR columns with a length up to 65535 characters. Anything larger is migrated to one of the TEXT blob types. In MySQL, character set of strings depend on the column character set instead of the datatype. |
| DATE | DATE | |
| DATETIME | DATETIME | |
| DATETIME2 | DATETIME | Date range in MySQL is '1000-01-01 00:00:00' to '9999-12-31 23:59:59'. Note: fractional second values are only stored as of MySQL Server 5.6.4 |
| SMALLDATETIME | DATETIME | |
| DATETIMEOFFSET | DATETIME | |
| TIME | TIME | |
| TIMESTAMP | TIMESTAMP | |
| ROWVERSION | TIMESTAMP | |
| BINARY | BINARY/MEDIUMBLOB/LONGBLOB | Depending on its length |
| VARBINARY | VARBINARY/MEDIUMBLOB/LONGBLOB | Depending on its length |
| TEXT | VARCHAR/MEDIUMTEXT/LONGTEXT | Depending on its length |
| NTEXT | VARCHAR/MEDIUMTEXT/LONGTEXT | Depending on its length |
| IMAGE | TINYBLOB/MEDIUMBLOB/LONGBLOB | Depending on its length |
| SQL_VARIANT | not migrated | There is not specific support for this datatype. |
| TABLE | not migrated | There is not specific support for this datatype. |
| HIERARCHYID | not migrated | There is not specific support for this datatype. |
| UNIQUEIDENTIFIER | VARCHAR(64) | A unique flag set in MySQL. There is not specific support for inserting unique identifier values. |
| SYSNAME | VARCHAR(160) | |
| XML | TEXT |
Before proceeding, you will need the following:
Follow the installation guide for installing iODBC on your system. For more information, see Section 9.1, “General installation requirements”.
Access to a running PostgreSQL instance with privileges to the database you want to migrate, otherwise known as the "source database." The Migration Wizard officially supports PostgreSQL 8.0 and above, although older versions may work.
Access to a running MySQL Server instance with privileges to the database you want to migrate. The Migration Wizard officially supports MySQL 5.0 and above.
Download and install the MSI package for psqlODBC. Choose the newest file from http://www.postgresql.org/ftp/odbc/versions/msi/, which will be at the bottom of the downloads page. This will install psqlODBC on your system and allow you to migrate from Postgresql to MySQL using MySQL Workbench.
After installing iODBC, proceed to install the PostgreSQL ODBC drivers.
Download the psqlODBC source tarball file from
http://www.postgresql.org/ftp/odbc/versions/src/.
Use the latest version available for download, which will be
at the bottom of the downloads page. The file will look
similar to psqlodbc-09.01.0200.tar.gz.
Extract this tarball to a temporary location, open a terminal,
and cd into that directory. The installation process is:
shell> cd the/src/directory
shell> ./configure --with-iodbc --enable-pthreads
shell> make
shell> sudo make install
Verify the installation by confirming that the file
psqlodbcw.so is in the
/usr/local/lib directory.
Next, you must register your new ODBC Driver.
Open the iODBC Data Source Administrator application by either
executing iodbcadm-gtk in the
command-line, or by launching it from the
Overview page of the MySQL Workbench
Migration Wizard by clicking the button.
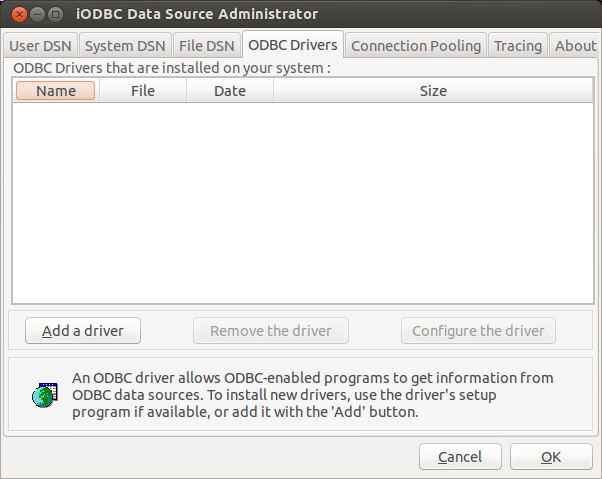
Go to the ODBC Drivers tab in the iODBC Data Source Administrator. It should look similar to:
Click then fill out the form with the following values:
Description of the driver: psqlODBC
Driver file name:
/usr/local/lib/psqlodbcw.soSetup file name: No value is needed here
And lastly, clicking will complete
the psqlODBC driver registration.
To compile psqlODBC on OS X, you will
need to have Xcode and its "Command Line Tools" component
installed on your system, as this includes the required
gcc compiler. Xcode is free, and available
from the AppStore. And after installing Xcode, open it and go
to ,
Downloads,
Components, and then install the "Command
Line Tools" component.
Download the psqlODBC source tarball file from
http://www.postgresql.org/ftp/odbc/versions/src/.
Use the latest version available for download, which will be
at the bottom of the downloads page. The file will look
similar to psqlodbc-09.01.0200.tar.gz.
Extract this tarball to a temporary location, open a terminal,
and cd into that directory. The installation process is:
shell> cd the/src/directory
shell> ./configure --with-iodbc --enable-pthreads
shell> CFLAGS="-arch i386 -arch x86_64" make
shell> sudo make install
After loading the Migration Wizard, click on the button in the Overview page to begin the migration process. You will first connect to the source PostgreSQL database. Here you will provide the information about the PostgreSQL RDBMS that you are migrating from, the ODBC driver that will be used for the migration, and all of the parameters required for the connection. The name of the ODBC driver is the one you set up when you registered your psqlODBC driver with the driver manager.
Opening the Database System dropdown will reveal each RDBMS that is supported on your system. Select PostgreSQL from the list. Below that is the Stored Connection dropdown, which is optional. Stored connections will be listed here, which are connections saved after defining a connection with the Store connection for future use as checkbox enabled.
The three Connection Method options are:
ODBC (manually entered parameters): Each parameter, like a username, is defined separatelyODBC Data Source: For pre-configured data sources (DSN)ODBC (direct connection string): A full ODBC connection string
The psqlODBC driver does not allow a connection without specifying a database name.
The migration process is similar to other databases. See Section 9.6.4, “PostgreSQL Type Mapping” for information on how the migration wizard migrates types from PostgreSQL to MySQL, and Section 9.2.1, “A visual guide to performing a database migration” for a general migration guide.
Table 9.3 Type mapping
| Source Type | MySQL Type | Comment |
|---|---|---|
| INT | INT | |
| SMALLINT | SMALLINT | |
| BIGINT | BIGINT | |
| SERIAL | INT | Sets AUTO_INCREMENT in its table definition. |
| SMALLSERIAL | SMALLINT | Sets AUTO_INCREMENT in its table definition. |
| BIGSERIAL | BIGINT | Sets AUTO_INCREMENT in its table definition. |
| BIT | BIT | |
| BOOLEAN | TINYINT(1) | |
| REAL | FLOAT | |
| DOUBLE PRECISION | DOUBLE | |
| NUMERIC | DECIMAL | |
| DECIMAL | DECIMAL | |
| MONEY | DECIMAL(19,2) | |
| CHAR | CHAR/LONGTEXT | Depending on its length. MySQL Server 5.5 and above can have CHAR columns with a length up to 255 characters. Anything larger is migrated as LONGTEXT |
| NATIONAL CHARACTER | CHAR/LONGTEXT | Depending on its length. MySQL Server 5.5 and above can have VARCHAR columns with a length up to 65535 characters. Anything larger is migrated to one of the TEXT blob types. In MySQL, character set of strings depend on the column character set instead of the datatype. |
| VARCHAR | VARCHAR/MEDIUMTEXT/LONGTEXT | Depending on its length. MySQL Server 5.5 and above can have VARCHAR columns with a length up to 65535 characters. Anything larger is migrated to one of the TEXT blob types. |
| NATIONAL CHARACTER VARYING | VARCHAR/MEDIUMTEXT/LONGTEXT | Depending on its length. MySQL Server 5.5 and above can have VARCHAR columns with a length up to 65535 characters. Anything larger is migrated to one of the TEXT blob types. In MySQL, character set of strings depend on the column character set instead of the datatype. |
| DATE | DATE | |
| TIME | TIME | |
| TIMESTAMP | DATETIME | |
| INTERVAL | TIME | |
| BYTEA | LONGBLOB | |
| TEXT | LONGTEXT | |
| CIDR | VARCHAR(43) | |
| INET | VARCHAR(43) | |
| MACADDR | VARCHAR(17) | |
| UUID | VARCHAR(36) | |
| XML | LONGTEXT | |
| JSON | LONGTEXT | |
| TSVECTOR | LONGTEXT | |
| TSQUERY | LONGTEXT | |
| ARRAY | LONGTEXT | |
| POINT | VARCHAR | |
| LINE | VARCHAR | |
| LSEG | VARCHAR | |
| BOX | VARCHAR | |
| PATH | VARCHAR | |
| POLYGON | VARCHAR | |
| CIRCLE | VARCHAR | |
| TXID_SNAPSHOT | VARCHAR |
Perform MySQL server version upgrades to move off older MySQL versions to the latest version. The standard migration wizard can migrate MySQL to MySQL, and a simpler Schema Transfer Wizard can also be used.
MySQL Schema Transfer Wizard
The MySQL Schema Transfer wizard helps you move your data from an older MySQL server version to a different (typically later) MySQL version. This migration tool is meant for developer hosts as it is simpler than the standard migration wizard, because it only migrates MySQL to MySQL. The data is transferred and not based on a consistent snapshot, so it works best on local MySQL instances.
You should not use this wizard on production MySQL instances.
To open the wizard, select , from the main menu.
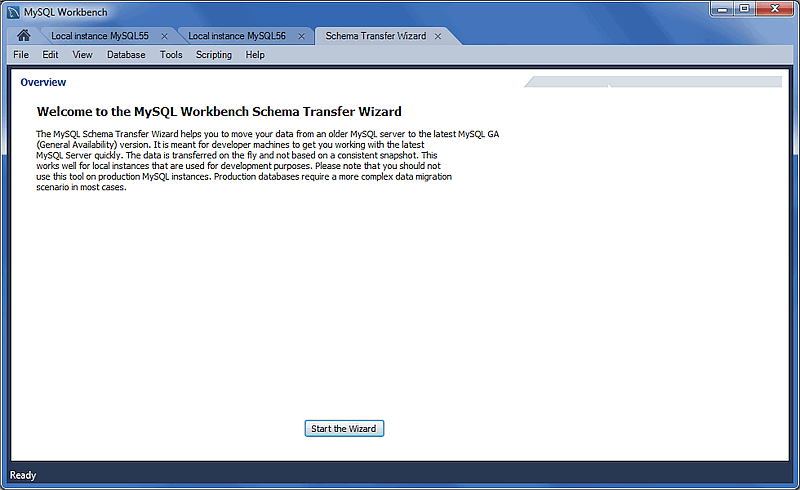
Read the overview text and click to begin.
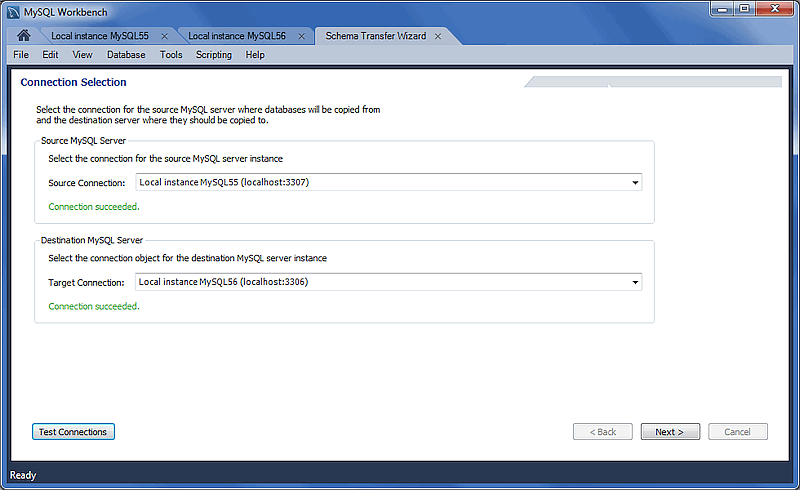
Choose your target and source MySQL connections. After choosing and testing your MySQL connections, click to continue.
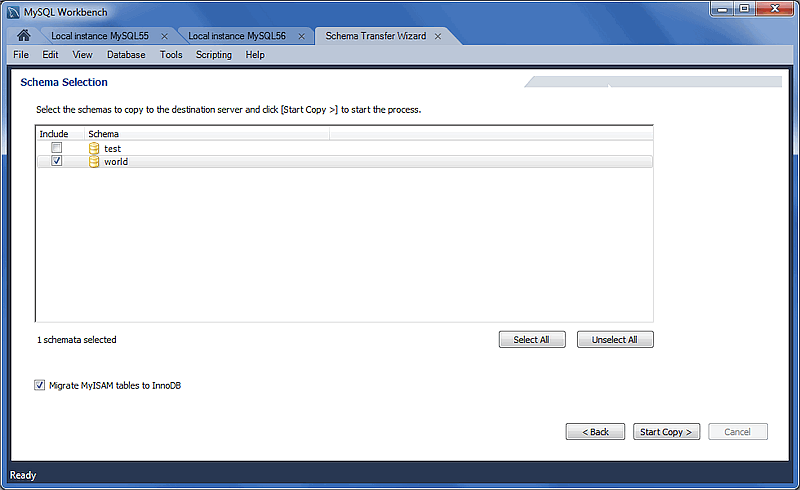
Choose the schemas to migrate, and click to begin copying the selected schemas from the source to target MySQL server.
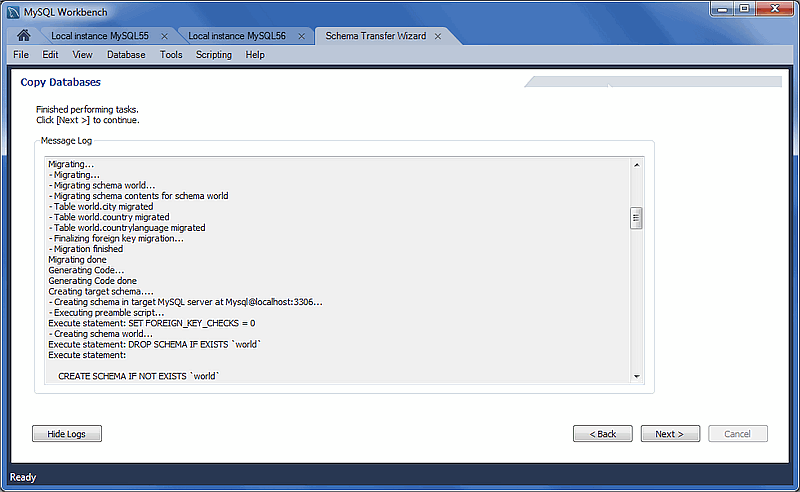
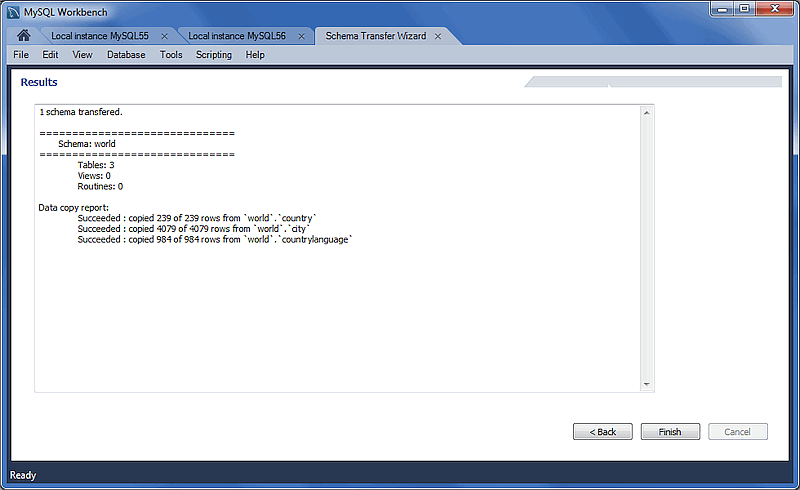
Review the Message Log to confirm that the migration completed with success. Click to view a summary of the results.
Click to close the wizard.
- 9.8.1 Connecting to the databases
- 9.8.2 Schemata Retrieval and Selection
- 9.8.3 Reverse Engineering
- 9.8.4 Object Selection
- 9.8.5 Migration
- 9.8.6 Manual Editing
- 9.8.7 Target Creation Options
- 9.8.8 Schema Creation
- 9.8.9 Create Target Results
- 9.8.10 Data Migration Setup
- 9.8.11 Bulk Data Transfer
- 9.8.12 Migration Report
For a visual walk-through of the migration wizard, see Section 9.2.1, “A visual guide to performing a database migration”.
A connection is made to the source and target database servers.
Source Connection Setup
The Source Connection offers the , , and database system options. This selection determines the available and configuration options.
This connection definition may be saved using the Store
connection for future use as option, and there is also
the option.
Target Connection Setup
The MySQL Server that will be home to the newly migrated database.
Fetch Schemata List
The names of available schemas will be retrieved from the source RDBMS. The account used for the connection will need to have appropriate privileges for listing and reading the schemas you want to migrate. Target RDBMS connection settings will also be validated.
The steps that are performed include: connects to the source DBMS, checks the connection, and retrieves the schema list from the source.
Schemata Selection
Select the schemata that you want to migrate. The Schema Name Mapping Method options are:
Keep schemata as they are: Catalog.Schema.Table -> Schema.Table: This will create multiple databases, one per schema.
Only one schema: Catalog.Schema.Table -> Catalog.Table. Merges each schema into a single database.
Only one schema, keep current schema names as a prefix: Catalog.Schema.Table -> Catalog.Schema_table. Preserves the schema name as a prefix.
This is an automated step, where the actions include: Connect to the source DBMS, Reverse engineer the selected schemata, and perform post-processing if needed.
By default, all table objects will be migrated. Use the button in order to disable individual table objects from being migrated.
Reverse engineered objects from the source RDBMS are automatically converted to MySQL compatible objects. Default data type and default column value mappings are used, and the generated objects and column definitions may be reviewed and edited in the next step.
The steps performed include Migrating the selected objects, and generating the SQL CREATE statements.
The migrated objects may be reviewed and edited here. You can manually edit the generated SQL before applying them to the target database. Target schemas and tables may be renamed, and column definitions may be changed, by double-clicking on them.
By default, the View is loaded. Other View options include and .
All Objects: Shows all objects, which can also be edited by double-clicking.Migration Problem: Will list all of the migration problems, or report that no mapping problems were found.Column Mappings: Displays all of the schema columns, which may also be edited. There is an advanced option that displays the SQL CREATE script for the selected object.
Defines addition settings for the target schema.
Configuration options include:
Create schema in target RDBMS:Create a SQL script file:An option to keep the schemata if they already exist. Objects that already exist will not be recreated or update.
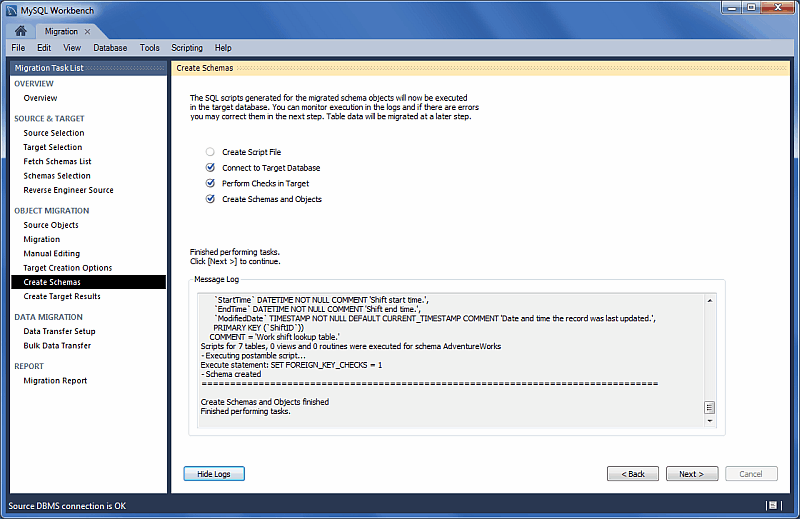
The SQL scripts generated for the migrated schema objects will now be executed in the target database. You can monitor execution in the logs, if errors exist then they will be fixed in the next step. Table data will be migrated in a later step as well.
This is an automated step, where the actions include: Create Script File, Connect to Target Database, and Create Schemata and Objects.
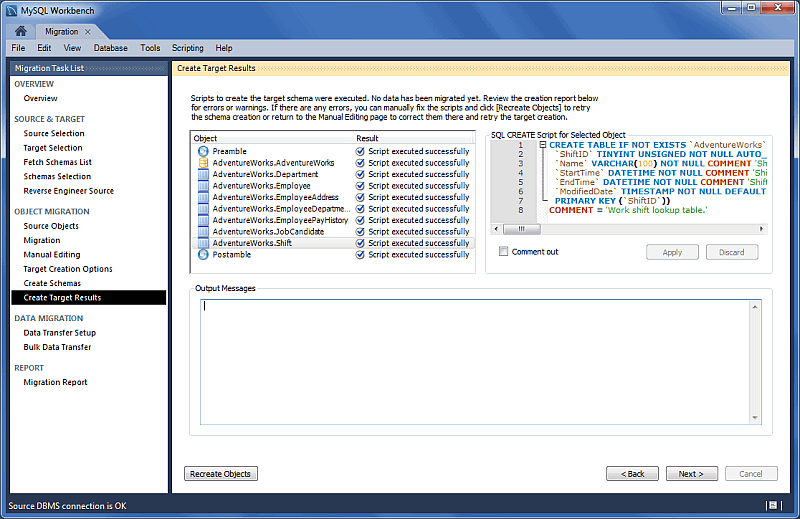
Scripts to create the target schemas were executed, but the data has not yet been migrated. This step allows reviewing a creation report. If there are any errors, then you can manually fix the scripts and click to retry the schema creation or return to the Manual Editing page to correct them there, and then retry the target creation.
To edit, first select the object, and then the SQL CREATE Script will be shown for the selected object. Edit it there, then press to save.
Provides additional options for data transfer, including the ability to set up a script to automate this transfer in the future.
Frequently Asked Questions with answers.
Questions
9.9.1: While using the Postgresql psqlodbc driver, I see the following error:
('08001', '[08001] Already
            connected. (202) (SQLDriverConnect)')
Questions and Answers
9.9.1:
While using the Postgresql psqlodbc driver, I see the
following error: ('08001', '[08001] Already
connected. (202) (SQLDriverConnect)')
This means that PostgreSQL is not configured to accept connections from the source IP.