C/C++ Support Quick Start Tutorial

Contributed and maintained by Ann Rice
October 2007
[Revision number: V6.0-2]

The following short tutorial takes you through some of the basic steps of developing a C or C++ application using NetBeans IDE 6.0 with C/C++ support.

Contents

Requirements
Creating C and C++ Projects
Running a Project
Creating a C/C++ Project From Existing Code
Editing Source Files
Creating Breakpoints
Debugging a Project
  Content on this page applies to NetBeans IDE 6.0

Requirements

You must have the following software installed before you can start C or C++ development:

See the NetBeans IDE 6.0 Installation Instructions and the Installing and Configuring C/C++ Support for information on downloading and installing the required software.

Just want to play with some projects? In the IDE, choose File > New Project, then open the Samples category, the C/C++ subcategory, and the C/C++ subcategory. The IDE provides several sample C and C++ projects to help you familiarize yourself with the IDE.

Creating C and C++ Projects

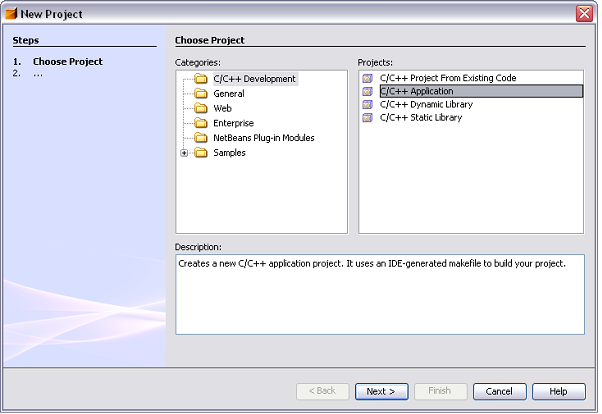
NetBeans C/C++ support lets you create C and C++ Application and Library projects with generated makefiles, as well as C and C++ projects from existing code.

With a C/C++ Application, Dynamic Library, or Static Library project, the IDE controls all aspects of how your application is built, run, and debugged. You specify project settings when creating the project and in the Project Properties dialog box. The IDE generates a makefile in which all of your settings are stored.

Creating a C/C++ Application Project

  1. Open the New Project wizard by choosing File > New Project.

  2. In the wizard, select the C/C++ category.

  3. The wizard gives you a choice of four types of new projects: C/C++ Project From Existing Code, C/C++ Application, C/C++ Dynamic Library, and C/C++ Static Library. Select C/C++ Application and click Next.

  4. Screenshot of the New Project
    Wizard

  5. Create a new C/C++ Application project from the wizard using the defaults. You can choose the name of the project and the location of the project.

  6. Click Finish to exit the wizard.

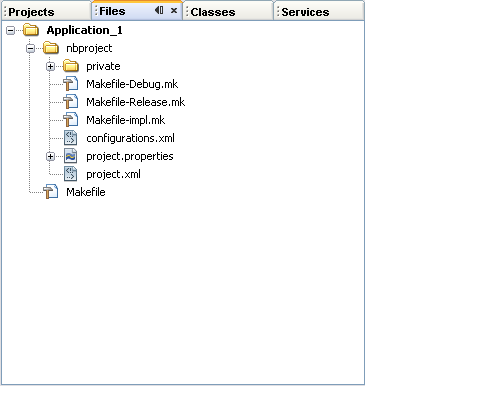
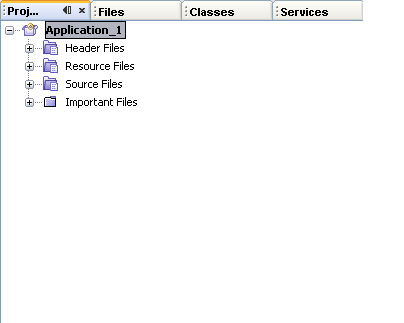
A project is created with four logical folders. A logical folder is not a directory. It is a way for you to organize your files and does not reflect where the files are physically stored on disk. Files added to logical folders are automatically part of the project and are compiled when you build the project.

Files added to the Important Files folder are not part of the project and are not compiled when you build the project. These files are just for reference and are convenient when you have a project with an existing makefile.

Switching Between the Logical View and the Physical View of the Project

A project has both a logical and a physical view. You can switch between the logical view and the physical view of your project.

  1. Select the Files tab. This window shows the physical view of your project. It displays files and folders as they are stored on disk.

  2. Screenshot of the Files tab

  3. Select the Projects tab. This window shows the logical view of your project.

  4. Screenshot of the Projects tab

Adding Files and Folders to Your Project

You can add logical folders to your project.

  1. Right-click the project node of your Application project and choose New Logical Folder. A new logical folder is added to the project.

  2. Right-click the new logical folder and select Rename. Type the name you would like to give the new folder.

You can add both files and folders to an existing folder. Logical folders can be nested.

Adding New Files to Your Project

You can add new files to your project.

  1. Right-click the Source Files folder and choose New.

  2. Choose Main C File from the submenu.
  3. On the Name and Location page of the New File dialog box, type main in the File Name field. Screenshot of the New File dialog
        box
  4. Click Finish.

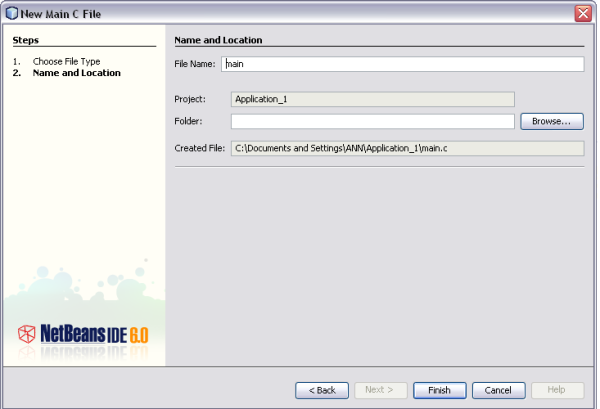
The main.c file is created on disk in the directory specified in the wizard and added to the Source Files folder. You can add any kind of file to this folder, not only source files.

Adding More New Files to Your Project
  1. Right-click the Header Files folder and choose New.

  2. Choose C Header File from the submenu.

  3. On the Name and Location page of the New File dialog box, type file in the File Name field.

  4. Click Finish.

The file is created on disk in the directory specified in the wizard and added to the Header Files folder.

Adding Existing Files to Your Project

You can add existing files to your project in two ways:

  • Right-click the Source Files folder and choose Add Existing Item. You can point to an existing file on disk using the Select Item dialog box and add the file to the project.
  • Right-click the Source Files folder and choose Add Existing Items from Folders. Use the Add Files dialog box to add folders that contain existing files.

Do not use New menu item to add existing items. The Name and Location panel will tell you the file already exists.

Setting Project Properties

When the project is created, it has two configurations, Debug and Release. A configuration is the project's way of storing the current settings. The Debug configuration builds a version of your application that includes debug information. The Release configuration builds an optimized version.

The Project Properties dialog box contains build and configuration information for your project. To open the Project Properties dialog box:

  • Right-click the project node of the Application_1 project and choose Properties.

  • Screenshot of the Project
    Properties dialog box

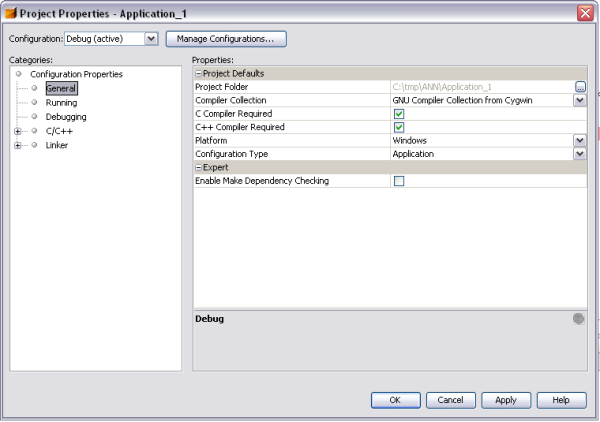
You can modify the compiler settings and other configuration settings in the Project Properties dialog box by selecting a node in the left panel and modifying the properties in the right panel. Select some of the nodes and property values and notice the properties you can set. You are setting properties in the currently selected configuration.

Managing Configurations

Properties changed in the Project Properties window are stored in the makefile for the current configuration. You can edit the default configurations or create new ones. To create a new configuration:

  1. Click the Manage Configurations button in the Project Properties dialog box.

  2. In the Configurations dialog box, select the configuration which most closely matches your desired configuration. In this case, select the Release configuration and click the Copy button. Then click Rename.

  3. In the Rename dialog box, rename the configuration to PerformanceRelease. Click OK.

  4. Click OK in the Configurations dialog box.

  5. In the Project Properties dialog box, note that the PerformanceRelease configuration is selected in the Configuration drop-down list.

  6. In the left panel, expand the C/C++ node, and then the GNU C Compiler node, and select the General node.

  7. In the property sheet in the right panel, change the Development Mode from Release to PerformanceRelease. Click OK.

You have created a new configuration that will compile the application with a different set of options.

Setting Source File Properties

When you set the project properties for your C or C++ project, the relevant properties apply to all files in the project. You can set some properties for a specific file.

  1. Right-click the main.c source file and choose Properties. You can override the project compiler settings and other properties on a per file basis. You can also exclude files from a build in a specific configuration.

  2. Cancel the Project Properties dialog box.

Setting the Main Project

When you right-click a project node in the Projects window, you get a pop-up menu of actions you can perform on the selected project. If you have multiple projects open at the same time, the pop-up menu for a project node implies you are operating on that project. But what about project-related actions on the menubar and toolbar?

Most of the project-related actions on the menubar and toolbar operate on the main project. The main project node is displayed in bold text in the Project window.

To change the main project in the IDE:

  • Right-click the desired project node and choose Set as Main Project. This project is now the main project in the IDE and actions in the menubar and toolbar refer to this project.

Building Your Project

To build your project:

  1. Choose Build > Build Main Project and the project builds. The build output is shown in the Output window.

  2. Switch the configuration from Debug to PerformanceRelease in the configuration drop-down list in the main toolbar. Now the project will be built using the PerformanceRelease configuration.

  3. Choose Build > Build Main Project and the project builds. The build output is shown in the Output window.

You can build, clean, or both clean and build the project by choosing actions from the Build menu. The project also keeps object files and executables from different configurations separate, so you do not have to worry about mixing files from multiple configurations.

Compiling a Single File

To compile a single source file:

  • Right-click on the main.c file and choose Compile File. Only this file is compiled.

Note: Single file compilation is not supported for the project type C/C++ Project From Existing Code.

Running a Project

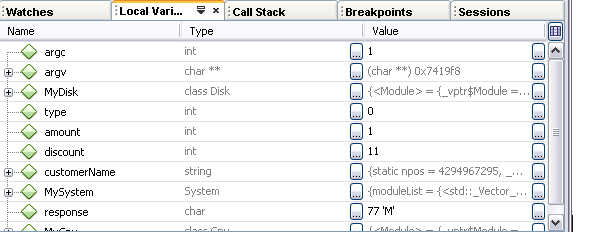
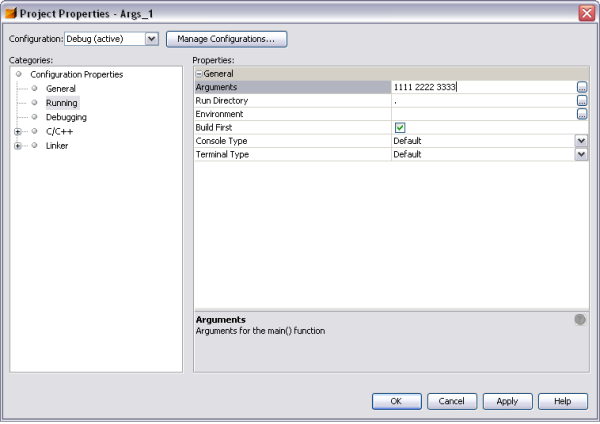
The program prints command-line arguments. Before running the program, we will set some arguments in the current configuration. Then we will run the program.

To create the Args project, set some arguments, and run the project:

  1. Choose File > New Project.

  2. In the project wizard, expand the Samples category and the C/C++ subcategory.

  3. Select the C/C++ subcategory, then select the Args project. Click Next, then click Finish.

  4. Right-click the Args_1 project node and choose Build Project. The project builds.

  5. Right-click the Args_1 project node and choose Properties.

  6. In the Project Properties dialog box, select the Running node.

  7. In the Arguments text field, type 1111 2222 3333. Click OK.

  8. Screenshot of the Project Properties
    dialog box

  9. Choose Run > Run Main Project. The application runs. Your arguments are displayed in the Output window.

Creating a C/C++ Project From Existing Code

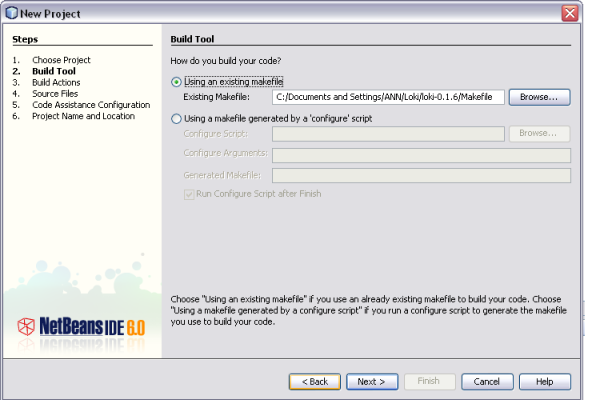
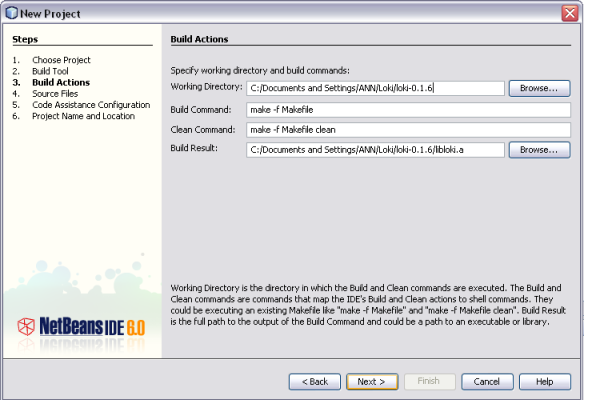
With a C/C++ Project From Existing Code, the IDE relies on your existing makefile for instructions on how to compile and run your application.

Creating a Project From Existing Code

  1. Download the loki-0.1.6 library from http://sourceforge.net/projects/loki-lib.

  2. Uncompress loki-0.1.6 in a directory of your choice.

  3. Open the New Project wizard by choosing File > New Project.

  4. Select the C/C++ category.

  5. Select C/C++ Project From Existing Code and click Next.

  6. On the Build Tool page, click the Browse button for the Makefile field.

    In the Select Makefile dialog box, navigate to the directory where you saved loki-0.1.6. Select the Makefile. Click Select.

    Click Next.


  7. Screen shot of Makefile and
    Build Tool page of Project Wizard

  8. On the Build Actions page, the Working Directory text field, the Build command text field, and the Clean command text field are filled in automatically. In the Build Result field, type the full path to where the makefile will put the library, libloki.a, built from the loki-0.1.6 source code. Click Next.

  9. Screen shot of Makefile and
    Build Actions page of Project Wizard

  10. On the Source File Folders page, the path to the source file folder for the project is automatically listed. You could specify additional folders by clicking Add and using the Source File Folders dialog box.

  11. Screen shot of Source File
    Folders page of Project Wizard

  12. On the Code Assistance Configuration page, click Next.

  13. Screen shot of
    Code Assistance Configuration page of Project Wizard

  14. On the Project Name and Location page, type Loki in the Project Name field. Use the defaults for all of the other fields. Click Finish.

  15. Screen shot of Project Name
    and Location page of Project Wizard

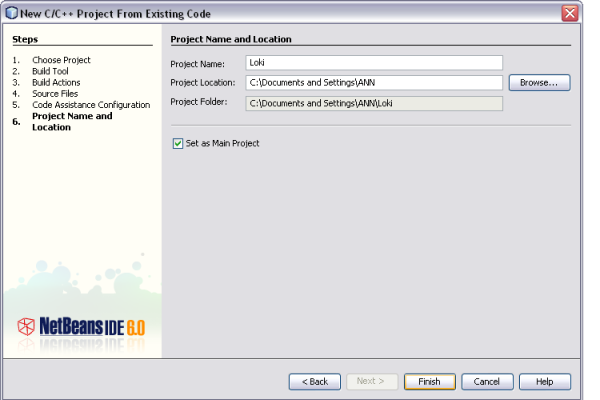
The project is created and opened in the Project window. You have created a project that is a thin wrapper around existing code.

Building and Rebuilding Your Project

To build the project:

To rebuild the project:

Editing Source Files

The C/C++ Development Pack provides advanced editing features to help you in viewing and modifying your source code. To explore these features, we'll use the Quote project:

  1. Choose File > New Project.

  2. In the project wizard, expand the Samples category and the C/C++ subcategory.

  3. Select the Applications subcategory, then select the Quote project. Click Next, then click Finish.

Folding Blocks of Code in C and C++ Files

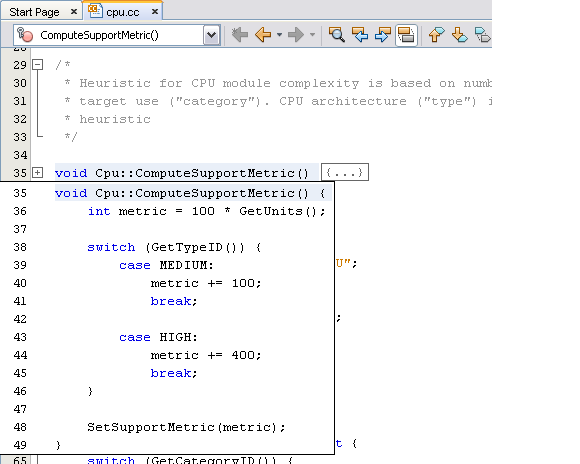
For some types of files, you can use the code folding feature to collapse blocks of code so that only the first line of the block appears in the Source Editor.

  1. In the Quote_1 application project, open the Source Files folder, then double-click the cpu.cc file to open it in the Source Editor.

  2. Click the collapse icon (small box with minus sign) in the left margin to fold the code of one of the methods.

  3. Mouse over the {...} symbol to the right of the folded block to display the code in the block.

  4. Screenshot of folded code in the Source
Editor

Using the Classes Window

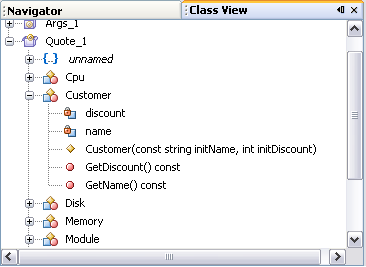
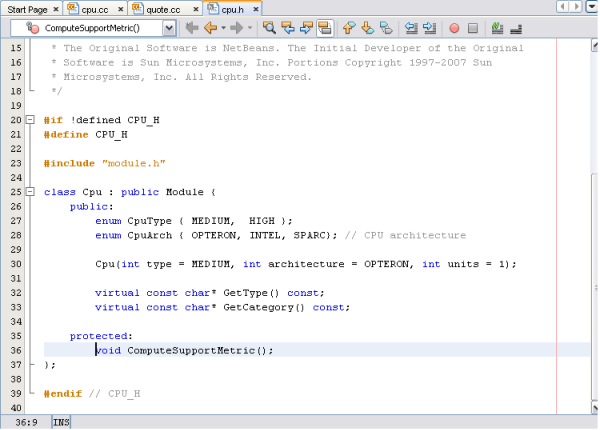
The Classes window lets you see all of the classes in your project, and the members and fields for each class.

  1. Choose Window > Classes to open the Classes window, which displays the Quote_1 project.

  2. Expand the Quote_1 node. All classes in the project are listed.

  3. Expand the Customer class.

  4. Screenshot of the Class View tab

  5. Double-click on the customerName variable to open the customer.h header file.

Using the Navigator Window

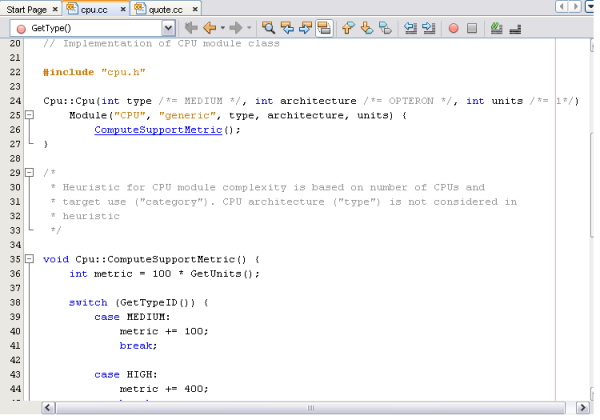
The Navigator window provides a compact view of the file that is currently selected, and simplifies navigation between different parts of the file.

To display source file in the Navigator window:

To navigate to an element of the file displayed in the Navigator window:

Using Hyperlinks

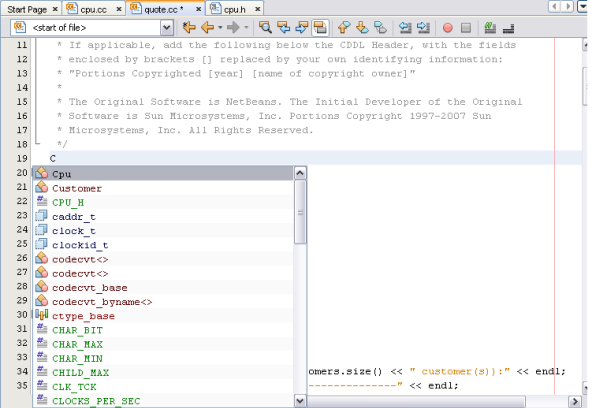
Hyperlink navigation lets you jump from the invocation of a class, method, variable, or constant to its declaration, and from its declaration to its definition.

  1. In the cpu.cc file of the Quote_1 project, right-click in the left margin of the Source Editor and choose Show Line Numbers.

  2. Mouse over line 26 while pressing Ctrl. The ComputeSupportMetricfunction is highlighted.

  3. Screenshot of the invocation of the function

  4. Click the hyperlink and the editor jumps to the definition of the function.

  5. Screenshot of the definition of the function

  6. Mouse over the definition while pressing Ctrl, and click the hyperlink. The editor jumps to the declaration of the function in the cpu.h header file.

  7. Screenshot of the declaration of the function

  8. Click the left arrow in the editor toolbar and the editor jumps back to the definition.

Using the Include Hierarchy

The Include Hierarchy window lets you inspect all header and source files that are directly or indirectly included in a source file, or all source and header files that directly or indirectly include a header file.

  1. In the Quote_1 project, open the module.cc file in the Source Editor.

  2. Right-click on the #include "module.h" line in the file and choose View Includes Hierarchy.

  3. By default, the Hierarchy window displays a plain list of files that directly include the header file. Click the right-most button at the bottom of the window to change the display to a tree view. Expand the nodes in the tree view to see all of the source files that include the header file.

Using the Type Hierarchy

The Type Hierarchy window lets you inspect all subtypes or supertypes of a class.

To open the Type Hierarchy window, right-click on the class declaration or the class reference in a source or header file. To display the class hierarchy in a window in the IDE, choose View Type Hierarchy. To display the class hierarchy in a pop-up window, choose Inspect Type Hierarchy. The default display is a tree view of all of the subtypes of the class.

Using Code Completion

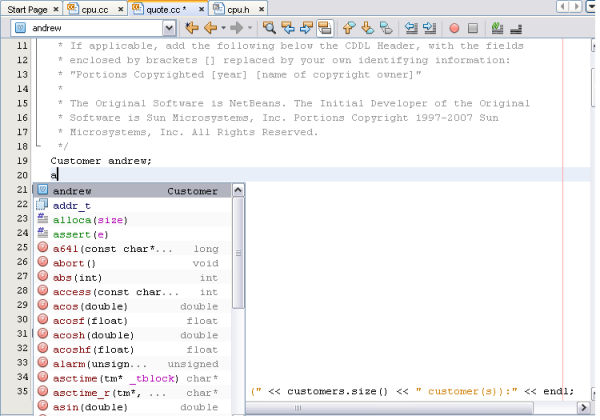
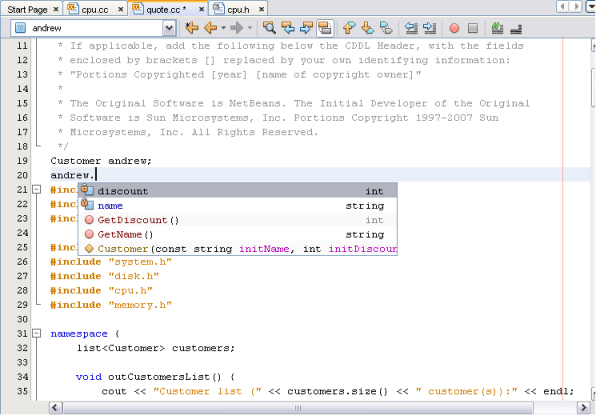
The IDE has a dynamic C and C++ code completion feature that enables you to type one or more characters and then see a list of possible classes, methods, variables, and so on that can be used to complete the expression.

  1. Open the quote.cc file in the Quote_1 project, and right-click in the left margin of the Source Editor and choose Show Line Numbers.

  2. On line 19 of the quote.cc, type a capital C and press Ctrl-Space. The code completion box displays a list that includes the Customer class.

  3. Screenshot of code completion
box

  4. Select the Customer class and press Enter.

  5. Complete the new instance of the Customer class by typing " andrew;". On the next line, type the letter a and press Ctrl-Space. The code completion box displays a list of choices starting with the letter a, such as method arguments, class fields, and global names, that are accessible from the current context.

  6. Screenshot of code completion box

  7. Double-click the andrew option to accept it and type a period after it. You are automatically provided with a list of the public methods and fields of the Customer class.

  8. Screenshot of code completion
box

  9. Delete the code you have added.

Using Code Templates

The Source Editor has a set of customizable code templates for common snippets of C and C++ code. You can generate the full code snippet by typing its abbreviation and pressing the spacebar. For example, in the Singleton.cpp file of the Loki project:

  1. Type uns followed by a space. uns expands to unsigned.

  2. Type iff followed by a space. iff expands to if () {}.

  3. Type ife, followed by a space. ife expands to if () {} else {}.

  4. Type fori followed by a space. fori expands to for (int i = 0; i < ; i++) {}.

Using Pair Completion

When you edit your C and C++ source files, the Source Editor does "smart" matching of pair characters such as brackets, parentheses, and quotation marks. When you type one of these characters, the Source Editor automatically inserts the closing character.

  1. In the Quote_1 project, place the cursor after the { on line 92 of the module.cc file and press Return to go to a new line.

  2. Type enum state { and press Return. The closing curly bracket and semi-colon are added automatically and the cursor is placed on the line between the brackets.

  3. Type invalid=0, success=1 to complete the enumeration.

  4. On the line after the closing }; of the enumeration, type if (. The closing parenthesis is added automatically and the cursor is placed between the parentheses.

  5. Type v==null. Then type { and newline after the right parenthesis. The closing bracket is added automatically.

Creating Breakpoints

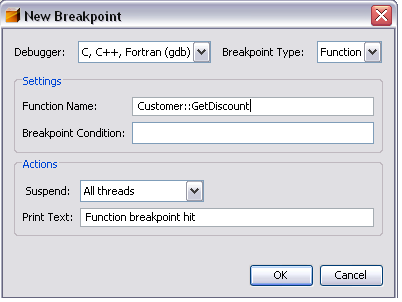
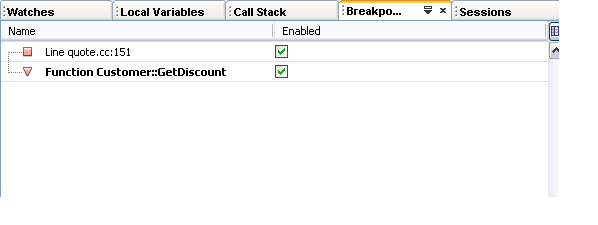
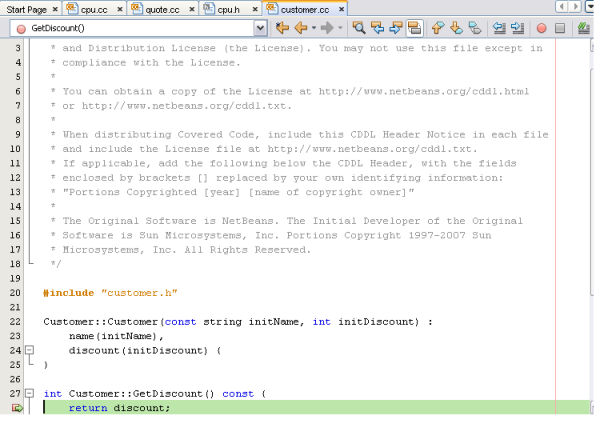
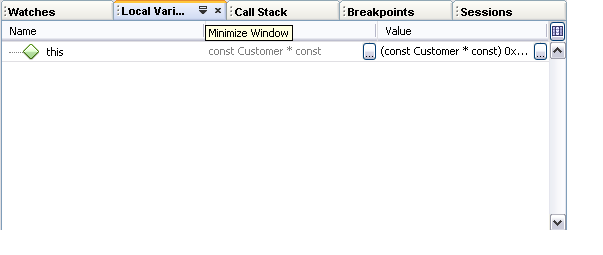
You can create and manipulate breakpoints in your code at any time.

Creating and Removing a Line Breakpoint
  1. In the Quote_1 project, open the quote.cc file.

  2. Set a line breakpoint by clicking in the left margin of the Source Editor window next to line 151 (response = readChar("Enter disk module type: (S for single disks, R for RAID; Q - exit)", 'S');). The line is highlighted in red to indicate that the breakpoint is set.

  3. You could remove the breakpoint by clicking on the icon in the left margin.

  4. Choose Window > Debugging > Breakpoints to open the Breakpoints window. Your line breakpoints are listed in the window.

Creating a Function Breakpoint

  1. Choose Run > New Breakpoint (Ctrl+Shift+f8) to open the New Breakpoint dialog box.

  2. In the dialog box, make sure the Debugger drop-down list is set to C, C++ Fortran (gdb).

  3. In the Breakpoint Type drop-down list, set the type to Function..

  4. Type the function name Customer::GetDiscount in the Function Name text field. Click OK.

  5. Screenshot of Add Breakpoint window

  6. Your function breakpoint is set and is added to the list in the Breakpoints window.

Debugging a Project

When you start a debugging session, the IDE starts the gdb debugger, then runs the application inside the debugger. The IDE automatically opens the debugger windows and prints debugger output to the Output window.

Starting a Debugging Session

  1. Start a debugging session for the Quote_1 project by right-clicking the project node and choosing Debug Project. The debugger starts and the application runs, and the Local Variables, Watches, and Call Stack windows open.

  2. Open the Sessions window by choosing Window > Debugging > Sessions. The debugging session is shown in this window.

Inspecting the State of the Application

  1. The Quote_1 application prompts you for input in the External I/O window.

  2. Enter a customer name after the "Enter customer name:" prompt.

  3. The application stops at the function breakpoint you set earlier. Open the Breakpoints window by choosing Window > Debugging > Breakpoints. The window lists the two breakpoints you set earlier. The function breakpoint is displayed in bold.

  4. Screenshot of Breakpoints tab

  5. In the customer.cc file, the green program counter error appears on top of the breakpoint icon on the first line of the GetDiscount function.

  6. Screenshot of Source Editor

  7. Click the Call Stack tab. The call stack shows three frames.

  8. Screenshot of Call Stack tab

  9. Click the Local Variables tab and note that one variable is displayed. Click the expand icon (small box with plus sign) to expand the structure.

  10. Screenshot of
Local Variables tab

  11. Click the Continue button. The GetDiscount function is executed, printing the customer discount to the External I/O window. Then you are prompted for input.

  12. Enter the input in response to the prompts. The program stops at the next breakpoint, the line breakpoint you set earlier. Click the Local Variables tab and note the long list of local variables.

  13. Screenshot of Local Variables tab

  14. Click the Call Stack tab and note that there are only two frames in the stack.

  15. Click the Continue button and continue entering input in response to the prompts in the External I/O window until the program is completed. When you enter Q to exit the program, the External I/O window closes and your debug session ends. To end the debug session before the execution of the program was complete, you could right-click the session in the Sessions tab, and choose Finish, or choose Run > Finish Debugger Session.