Tutorial Exercises
This tutorial demonstrates how to create a simple secure enterprise application using NetBeans IDE 6.0. In this tutorial you will go through the following steps:
Support for the Java EE 5 specification in NetBeans IDE 6.0 enables you to take full advantage of the many Java EE 5 features simplifying application development. A significant development in the Java EE 5 specification was the incorporation of annotations. Using annotations enables you to eliminate a lot of the boilerplate code used when coding applications and minimizes the amount of configuration needed when deploying your application.
One area that has become greatly simplified through the use of annotations is the development and configuration of enterprise beans. Annotations enable you to specify many configuration properties that were previously specified in deployment descriptor files, making many of the deployment descriptor files unnecessary. Though applications may still require some deployment descriptor files (such as web.xml), the IDE's multi-view deployment descriptor editor makes editing the files much easier.
Using annotations, building secure enterprise beans is now much easier. Instead of configuring enterprise bean security in the ejb-jar.xml deployment descriptor you can use security annotations to configure authorization directly in the source code. Java EE 5 enterprise applications no longer require ejb-jar.xml or application.xml.
For an overview of some of the features of the Java EE 5 specification, see Introduction to Java EE 5 Technology. For more information about annotation specifications, see JSR 250: Common Annotations for the Java Platform.
Expected duration: 30 minutes
This tutorial demonstrates how to create a simple secure enterprise application using NetBeans IDE 6.0. In this tutorial you will go through the following steps:
Before you begin, make sure that you have the following software installed on your computer:
For this tutorial you need to register a local instance of GlassFish/Sun Java System Application Server with the IDE. If you have installed a "Full" or "Web & Java EE" version of the IDE, the application server should already be installed and registered. If the application server is not registered in the IDE, choose Tools > Servers to register the server in the Servers manager. You cannot deploy enterprise applications to the Tomcat web server.
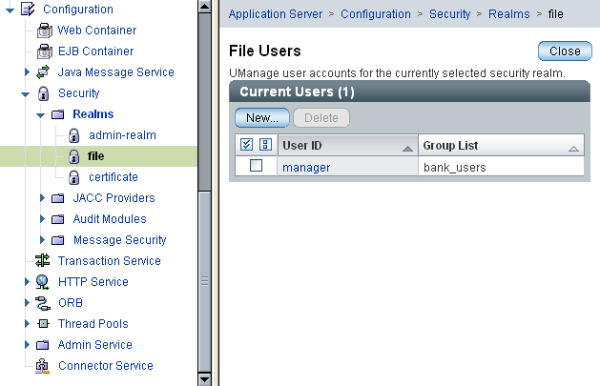
In our example, we only want users from the group bank_users to access our enterprise bean. We will create the user manager in the group bank_users in the file security realm on the application server.
Our enterprise application will consist of a simple session bean and an application client that attempts to access it.
Our session bean doesn't do anything fancy. It just returns a sample balance amount. We will create a getStatus method and secure the method bean by annotating it with the @RolesAllowed annotation and specify the security roles allowed to access the method. This security role is used by the application and is not the same as the users and groups on the server. We will map the security role to the users and groups later when we configure the deployment descriptors.
Security annotations can be applied individually to each method in a class, or to an entire class. In this simple exercise we will use the @RolesAllowed to annotate a method, but the Java EE 5 specification defines other security annotations that can be used in enterprise beans.
When you click Finish, the IDE creates AccountStatusBean and opens the file in the Source editor. The IDE also creates the AccountStatusRemote remote interface for the bean.
public class AccountStatusBean implements AccountStatusRemote {
    private String amount = "250";
public String getStatus() {
    return "The account contains $" + amount;
}
@RolesAllowed({"USERS"})
public String getStatus() {
This annotation means that only users in the security role USERS can access the getStatus method.
Our application only needs to have a simple method that will access the session bean. We will call the enterprise bean by using the @EJB annotation.
The IDE adds the following to the application client to look up the session bean:
@EJB
private static AccountStatusRemote accountStatusBean;
public static void main(String[] args) {
System.out.println(accountStatusBean.getStatus());In Java EE 5, enterprise applications usually do not require deployment descriptor files such as ejb-jar.xml. If you expand the Configuration Files node under Secure-ejb or the Secure enterprise application, you can see that there are no deployment descriptors. We can use annotations to specify many of the properties that were configured in ejb-jar.xml. In this example, we specified the security roles for our EJB methods by using the @RolesAllowed annotation in our session bean.
However, when configuring security for an application we still have to specify some properties in the deployment descriptors. In our example, we need to map the security roles used in the enterprise application (USERS) to the users and groups we configured on the application server. We created the group bank_users on the application server, and we now need to map this group to the security role USERS in our enterprise application. To do this we will edit the sun-application.xml deployment descriptor for our enterprise appplication.
Because the enterprise application does not need deployment descriptors to run, the IDE did not create the deployment descriptors by default. So we first need to create the deployment descriptor and then configure it.
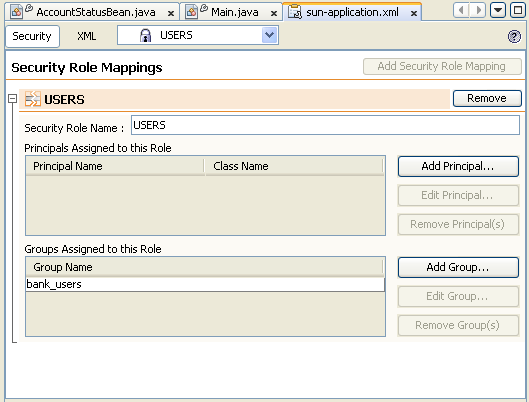
You can click on the XML tab in the multi-view editor to view deployment descriptor file in XML view. You can see that the deployment descriptor file now contains the following:
<sun-application>
  <security-role-mapping>
    <role-name>USERS</role-name>
    <group-name>bank_users</group-name>
  </security-role-mapping>
</sun-application>
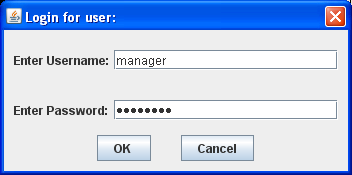
Our application is now ready. When we run the project we will be prompted for a username and password for a user in the bank_users group.
The account contains 250$
This is very basic example demonstrates how to secure a method in an enterprise bean using Java annotations.
For more information about using annotations to secure enterprise beans, see the following resources:
For more information about using NetBeans IDE 6.0 to develop Java EE applications, see the following resources: