Using Java Persistence in a Web Application
This document is a basic introduction to using the Java Persistence API in a web application and demonstrates how
the development process using the JavaTM Platform, Enterprise Edition 5 ("Java EE 5") technology
simplifies the development of Java applications.
In this document you will use NetBeans IDE 6.0 to create
a web application that will access a database.
In the web application, you will use the IDE to generate entity classes corresponding to tables in a database.
You will then create a servlet that displays the information in the database.
The application uses Java Persistence to manage the database transaction.
To see how the same application was created using Java EE 1.4, see the
NetBeans IDE 5.0 Quick Start Guide for J2EE Applications
Expected duration: 15 minutes
Tutorial Exercises

Prerequisites
This document assumes you have some basic knowledge of, or programming experience
with, the following technologies:
- Java Programming
- NetBeans IDE
Software Needed for This Tutorial
For this tutorial you need to have the following software installed on your computer:
- "Web & Java EE" or "All" download of NetBeans IDE 6.0.
- Java Standard Development Kit (JDK) version 5.0 or version 6.0
- GlassFish V2 Application Server (bundled with full IDE download) or
Sun Java System Application Server Platform Edition 9 (download)
Configuring the IDE to Use the Application Server
For this tutorial you must have an instance of Glassfish V2 or
the Sun Java System Application Server Platform Edition 9 registered with the IDE.
In this exercise we will register the application server with the IDE.
- Choose Tools > Server Manager from the main menu.
- Click Add Server. Select your application server (GlassFish or Sun Java System Application Server) and give a name
to the instance. Then click Next.
- Specify the installation directory of the application server (for example, C:\Sun\Appserver).
- Leave the Register Local Default Domain radio button selected and select a domain.
- Optionally, click Next and enter your administrator username and password.
If you do not want to store the username and password in your IDE user directory, you can leave these fields blank.
The IDE will prompt you every time it needs the information.
Note: The default admin password is adminadmin.
- Click Finish. The IDE registers the server and lists it under the Servers node in the Runtime window.
Summary
In this exercise we registered the application server with the IDE.
Setting Up the Web Application Project
In this example developing for the Java EE 5 platform, we do not need a full enterprise application because we do not
need an EJB module or session beans.
Instead, we can create a simple web application and put our entity classes directly in the web application.
When developing for the J2EE 1.4 platform it was necessary to create a full enterprise application
and put our entity and session beans in the EJB module.
We then had to add lookup code to the web module to access the entity beans.
- Choose File > New Project (Ctrl-Shift-N).
Select Web Application from the Web category.
- Name the project CustomerBook, set the server to GlassFish or Sun Java System Application Server,
set the Java EE Version to Java EE 5, and click Finish.
Summary
In this exercise we created a Java EE 5 web application which will contain the entity classes.
Coding the Web Application
Generally some basic setup is necessary before you can start coding the web application.
This would include establishing a connection with the database and creating a connection pool and data source.
Because we are using the jdbc/sample database that comes bundled with the IDE, much of this is already configured.
The connection to the database is already registered with the IDE and the connection pool and data source are already created.
You can view the view the connection and data source properties in the Services window.
Once the setup is complete, development for the Java EE 5 platform is much easier than before because
the container does more of the work.
Because the container is managing persistence,
we do not need to edit any deployment descriptors to configure the CMP mappings or specify the finder methods.
In fact, in this example we do not need any deployment descriptors at all.
In the Java EE 5 platform, persistence is no longer limited to an EJB component.
Java EE 5 introduces the Java Persistence API, which can be used by non-EJB components, such as a web application.
Java EE 5 technology also eliminates the need for a lot of the
boilerplate code needed in J2EE 1.4 development. EJB development has been streamlined so that fewer interfaces are needed,
lookup is simpler, and annotations make component definition and resource injection simple and clear.
Managing Persistence
To manage persistence in our application we only need to create a persistence unit, specify which data source and entity manager to use, and
then let the container do the work of managing entities and persistence. The container discovers the entity beans at runtime.
We create a persistence unit by definining it in persistence.xml.
If there is no persistence.xml in our project or module, we need to create it.
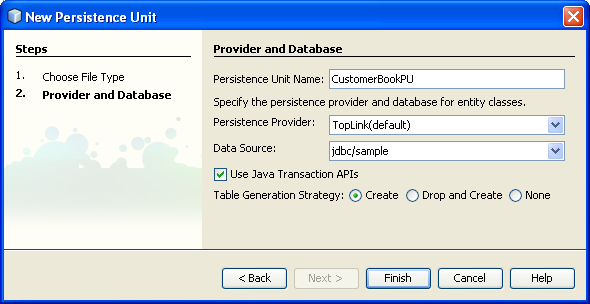
We can add a persistence unit to our project with the New Persistence Unit wizard, which will help us create the
persistence.xml and define the properties of the persistence unit.
Note: We can also create a persistence unit in the New Entity Class wizard.
When creating an entity class, the wizard will prompt us to create a persistence unit if one does not exist.
- Choose New File (Ctrl-N) to open the New File wizard.
- From the Persistence category, select Persistence Unit and click Next.
- Leave the default name for the persistence unit suggested by the wizard.
- Use the TopLink (default) listed in the Persistence Provider drop-down list.
The default provider is the TopLink Essential.jar.
TopLink Essential.jar contains the libraries for Java Persistence.
Our entity manager is located in TopLink Essential.jar.
- Use the default jdbc/sample data source listed in the Data Source drop-down list.
The default data source jdbc/sample is used to connect to the Java DB database that is bundled
with GlassFish/Sun Java System Application Server.
- Click Finish.

When you click Finish, persistence.xml is created for your project and opens in the Source Editor.
You can click XML in the toolbar of the Source Editor to see the XML view of persistence.xml.
This file contains all the information the Java EE 5 container needs to manage the entities
and persistence of our application.
Creating the Entity Classes
When developing for the J2EE 1.4 platform, when you created entity beans you placed them in an EJB module
even when the application was a simple web application.
Each entity bean required several interfaces, and you had to configure
the deployment descriptors in ejb-jar.xml to define the entity beans,
the interfaces, persistence and finder queries for each entity bean.
In Java EE 5, instead of creating entity beans and putting them in the EJB module,
we can use simple entity classes, and the entity classes can be placed anywhere in a Java EE 5 application.
Writing classes for Java EE 5 applications is also easier than it was for the J2EE 1.4 platform because you can use annotations to
define components and inject resources.
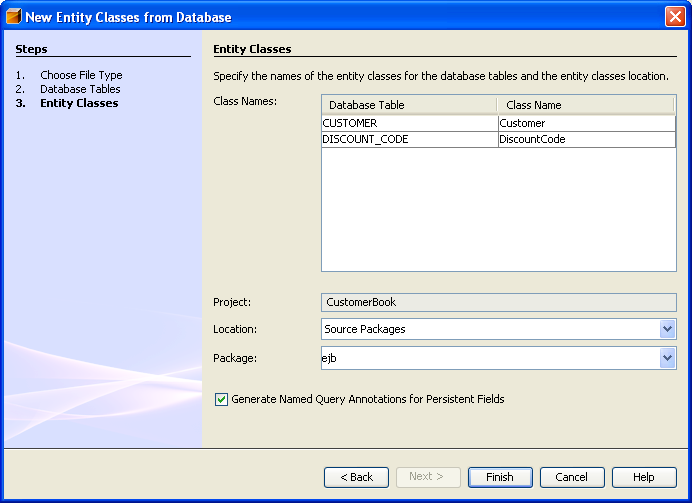
We will now use the Entity Classes from Database wizard to create the entity classes based on our relational database.
- Start the Java DB database by choosing Tools > Java DB Database > Start Server from the main menu.
- Choose New File (Ctrl-N) to open the New File wizard.
Select Entity Classes from Database from the Persistence category and click Next.
- In the Entity Classes from Database wizard, select the jdbc/sample data source for our database from the Data Source drop-down list
and supply the password if necessary. (The password should be "app".)
When you select the data source, a list of available tables appears in the Available Tables pane.
- Select the CUSTOMER table from the Available Tables and click Add.
When you click Add, any tables related to the selected table are also added.
In this example, the DISCOUNT_CODE table is also added. DISCOUNT_CODE table is greyed-out because it is referenced
by CUSTOMER table and an entity class for it must be generated in order to generate the Customer entity class.
To see how the greyed-out table is related to the selected table, you can hover your mouse over the table name in the Selected Tables pane.
- Click Next.
The wizard displays the selected table and any related tables.
The wizard also displays the entity classes that will be created based on the selected tables.
If you want to modify the name of the class that will be generated, you can type the name in the Class Name field.
- Specify ejb as the package for the generated classes and click Finish.

When you click Finish, the IDE generates entity classes for the CUSTOMER table and the tables related
to CUSTOMER table. If you expand the ejb source package in the Projects window
you can see that the IDE created the Java classes Customer.java and DiscountCode.java.
You can see that the IDE created only two classes, one for each of the database tables.
If you look at Customer.java in the Source Editor, you will notice that the @Entity annotation is
used to declare the class an entity class.
Other annotations provide additional information such as the
database table and columns the entity class and its properties are mapped to.
You will also notice that much of the boilerplate code commonly found in entity beans is gone.
Methods such as ejbRemove, setMessage, setSessionContext, ejbActivate, and ejbPassivate
are no longer needed in your entity class in Java EE 5.
Coding the Servlet
We now need to add a servlet to our web application.
Instead of adding resource creation and lookup code to our servlet, with Java EE 5 we can use resource injection to move that work to the container.
We can use annotations to inject resources directly into our servlet, and
the container will manage the creation and lookup of the requested resource.
In this case, we want to use an entity manager as specified in our persistence unit.
- Right-click the project node in the Projects window and choose New > Servlet.
- In the New Servlet wizard, name the servlet CustomerDetails and put the servlet into a package named web. Click Finish.
When you click Finish, CustomerDetails.java opens in the Source Editor.
- In the Source Editor, right-click in CustomerDetails.java and choose Persistence > Use Entity Manager to
inject the PersistenceContext in the class. The IDE adds the following annotation that specifies the persistence unit used by the servlet.
The annotation is added above the class declaration.
@PersistenceContext(name = "persistence/LogicalName", unitName = "CustomerBookPU")
The IDE also adds the following annotation injecting a resource for managing transaction boundaries:
  @Resource
  private javax.transaction.UserTransaction utx;
If you expand the editor fold you can see that the IDE adds the following default code to the servlet:
  public void persist(Object object) {
      try {
          Context ctx = (Context) new InitialContext().lookup("java:comp/env");
          utx.begin();
          EntityManager em =  (EntityManager) ctx.lookup("persistence/LogicalName");
          em.persist(object);
          utx.commit();
      } catch(Exception e) {
          Logger.getLogger(getClass().getName()).log(Level.SEVERE,"exception caught", e);
          throw new RuntimeException(e);
      }
  }
This code looks up the persistence unit defined by @PersistenceContext and an instance of the entity manager.
- In CustomerDetails.java, modify the generated lookup code shown above to refer to our entity object.
When you are finished, the modified code should look like the following
(the code shown in bold indicates the changed lines):
  public Customer findByID(Integer customerNr) {
        Customer customer = null;
        try {
            Context ctx = (Context) new InitialContext().lookup("java:comp/env");
            EntityManager em =  (EntityManager) ctx.lookup("persistence/LogicalName");
            utx.begin();
            customer = em.find(Customer.class, customerNr);
            utx.commit();
        } catch(Exception e) {
            Logger.getLogger(getClass().getName()).log(Level.SEVERE,"exception caught", e);
            throw new RuntimeException(e);
        }
        return customer;
    }
- Uncomment the code in the processRequest method and add the following code in bold:
    protected void processRequest(HttpServletRequest request, HttpServletResponse response)
        throws ServletException, IOException {
        response.setContentType("text/html;charset=UTF-8");
        PrintWriter out = response.getWriter();
        out.println("<html>");
        out.println("<head>");
        out.println("<title>Servlet CustomerDetails</title>");
        out.println("</head>");
        out.println("<body>");
        out.println("<h1>Search Customer Information</h1>");
        String customerNr = request.getParameter("customer_nr");
        if((customerNr != null) && !(customerNr.equals(""))) {

            Customer customer = findByID(new Integer(customerNr));
            if(customer != null){
                out.println("Customer's info for nr. " + customerNr + ": " + customer.getName());
            }else{
                out.println("Customer not found.");
            }
        }
        out.println("<form>");
        out.println("Customer number: <input type='text' name='customer_nr' />");
        out.println("<input type=submit value=Select />");
        out.println("</form>");
        out.println("</body>");
        out.println("</html>");
        out.close();
    }
- Press Alt-Shift-F to generate any missing import statements.
Running the Project
- In the Projects window, right-click the CustomerBook project node and choose Properties.
In the Run panel of the
Project Properties dialog box, type /CustomerDetails in the Relative URL field
and click OK.
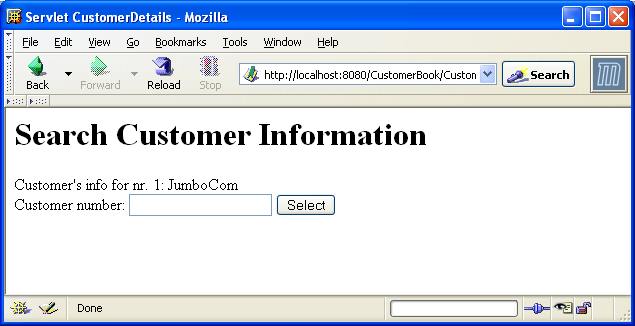
- Right-click the project node and choose Run Project. The IDE starts the
application server, builds the project, and opens the CustomerDetails page in your browser.
- Enter an ID number (for example, "1") in the Customer number field and click Submit. The servlet shows you
the name of the customer with that ID number.

Summary
In this exercise, you built the CustomerBook application using Java EE 5 technology.
You then deployed the project and tested the web application.
Next Steps
For more information about using NetBeans IDE 5.5 to develop Java EE applications, see the following resources:


