NetBeans 6.0 CLDC/MIDP Development Quick Start Guide
This document takes you through the basics of using NetBeans IDE 6.0 to create
a Java™ Platform, Micro Edition (Java™ ME platform), Mobile Information
Device Profile (MIDP) application. This document is designed to get you going
as quickly as possible.
The following tutorial takes you through some of the basic steps of working with the new project system.
We show you two ways to create a Java ME MIDP project named "MyHello" that displays the text "Hello World"
in a device emulator. We also take a quick look at other Mobility features for CLDC/MIDP development.
Contents
You must have the NetBeans IDE 6.0 Mobility or Full edition
installed before you can start Java ME MIDP/CLDC development. The Client/Server
sections require the Full Edition for Web Services support. If you installed
only the Mobility Edition, you need to download the following plugins from the
Update center (Tools > Plugins):
- Web Applications
- Web Services
- Sun Java System Application Server
Creating a MIDP Application Using the Visual Mobile Designer
The NetBeans IDE provides a wizard that enables you to quickly create a MIDP
project. When creating the project, you can choose to develop your application
in the Visual Mobile Designer (VMD) or in the Source Code Editor.
Using the Visual Mobile Designer gives you the ability to graphically plan
out the flow of the application and design the screens the application
uses. The designer automatically creates the code for the application.
Creating a MIDP/CLDC Application
- Choose File > New Project (Ctrl+Shift+N). Under Categories, select
Mobility. Under Projects, select MIDP Application and click Next.
- Enter
MyHello in the Project Name field. Change the Project
Location to any directory on your system. In this tutorial we refer to
this directory as $PROJECTHOME.
- Check the Set as Main Project and Create Hello MIDlet check boxes (both
are checked by default). Click Next.
- Leave the J2ME Wireless Toolkit as the selected Target Platform. Click
Next.
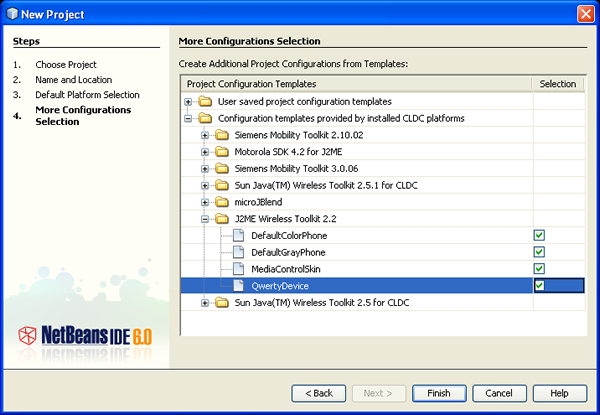
- Expand "Configuration templates provided by
installed CLDC platforms" and "J2ME Wireless Toolkit 2.2"
folders. Check the boxes next to each of the configurations.
The IDE automatically creates a new project configuration for each template
listed.
- Click Finish. The IDE creates the
$PROJECTHOME/MyHello project
folder. The project folder contains all of your sources and project metadata,
such as the project Ant script.
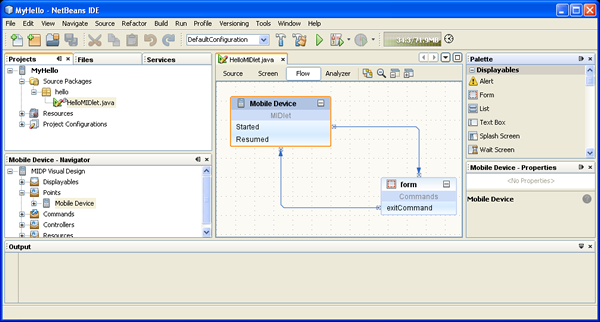
The application itself is displayed in the Flow Design window of the Visual
Mobile Designer.
Editing the Java Source Code
Now let's edit the text displayed by the MIDlet.
- Click on Screen.
This opens the Screen Designer window, and displays the Device
screen, which is the only screen available in the application.
- In the Properties window, click in the Text field and type in some new
text.
Compiling and Running the Project
- Choose Run > Run Main Project (F6) from the Run menu. Follow the progress
of the project compilation in the Output window. Note that the
HelloMIDlet.java
file is built before it is executed. A device emulator opens to display
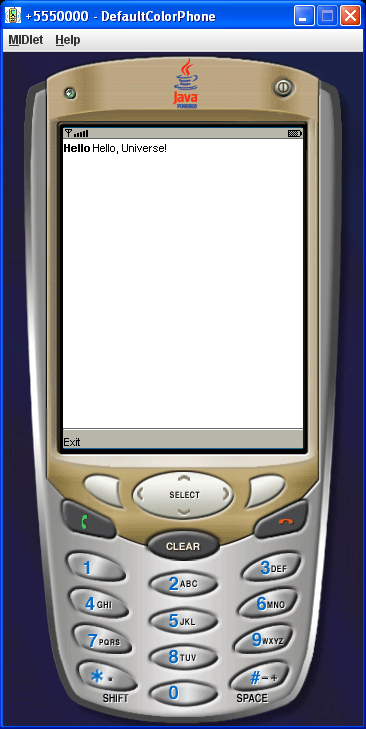
the results of the executed MIDlet. The default device emulator is DefaultColorPhone.
- In the device emulator window, click on the button below the Launch command.
The device emulator launches the MIDlet and displays the text you entered
in the source code.
- Click on the button below Exit to close the MIDlet. Then click on the
button in the upper right corner of the device to close the emulator window.
Creating a MIDP Application Using the Source Editor
Using the Source Code Editor, you manually create the code for your MIDlets.
Creating code in the Source Code Editor gives you more flexibility when editing
the code, and enables you to insert preprocessor code blocks.
Now we'll create the same application using the New Project and New File wizards,
and complete the code using the Source Editor.
Creating a New Java ME MIDP project
- Choose File > New Project (Ctrl-Shift-N). Under Categories, select
Mobility. Under Projects, select MIDP Application and click Next.
- Enter
MyHelloMIDlet in the Project Name field (note that
"MID" is in upper case letters). Change the Project Location to
any directory on your system. We refer to this directory
as $PROJECTHOME in this tutorial.
- Check the Set as Main Project checkbox and remove the check from the Create
Hello MIDlet checkbox. Click Next.
- Leave the J2ME Wireless Toolkit as the selected Target Platform.
- Expand "Configuration templates provided by installed CLDC platforms"
and "J2ME Wireless Toolkit 2.2" folders. Check the boxes next
to each of the configurations.
The IDE automatically creates a new project configuration for each
template listed.
- Click Finish. The IDE creates the
$PROJECTHOME/MyHelloMIDlet
project folder. The project folder contains all of your sources and project
metadata, such as the project Ant script.
- Right-click the
MyHelloMIDlet node in the Explorer window
and choose New > MIDlet
- Enter
HelloMIDlet as the MIDlet name (note that "MID"
is in upper case letters). Click Finish. The HelloMIDlet.java
file is created.
- Double click the
HelloMIDlet.java file to display the source
code in the Editor.
- Click in the Source Editor and change
public class HelloMIDlet extends MIDlet
to
public class HelloMIDlet
              extends MIDlet implements javax.microedition.lcdui.CommandListener
              {
- Add the following text before the
startApp() method:
public HelloMIDlet() {
}private void initialize() {  javax.microedition.lcdui.Display.getDisplay(this).setCurrent(get_helloTextBox());}
public void commandAction(javax.microedition.lcdui.Command command, javax.microedition.lcdui.Displayable
  displayable) {   if (displayable == helloTextBox) {      if (command == exitCommand) {         javax.microedition.lcdui.Display.getDisplay(this).setCurrent(null);         destroyApp(true);         notifyDestroyed();      }   }
}
private javax.microedition.lcdui.TextBox get_helloTextBox() {   if (helloTextBox == null) {       helloTextBox = new javax.microedition.lcdui.TextBox(null, "Test String",120, 0x0);       helloTextBox.addCommand(get_exitCommand());       helloTextBox.setCommandListener(this);   }   return helloTextBox;}
private javax.microedition.lcdui.Command get_exitCommand() {   if (exitCommand == null) {       exitCommand = new javax.microedition.lcdui.Command("Exit", javax.microedition.lcdui.Command.EXIT,
  1);   }   return exitCommand;}
javax.microedition.lcdui.TextBox helloTextBox;javax.microedition.lcdui.Command exitCommand;
- Add a line
initialize(); to the startApp() method,
so it looks like the following:
  public void startApp() {
   initialize();
    }
Editing the Java Source Code
Now let's add some text for our MIDlet to display.
- In the
get_helloTextBox() method, replace the "test string"
code with the text of your choice. For example, "Hello World."
Compiling and Running the Project
- Choose Run > Run Main Project (F6) from the Run menu. Follow the progress
of the project compilation in the Output window. Note that the
HelloMIDlet.java
file is built before it is executed. A device emulator opens to display
the results of the executed MIDlet. The default device emulator is DefaultColorPhone.
- In the device emulator window, click on the button below the Launch command.
The device emulator launches the MIDlet and displays the text you entered
in the source code.
- Click on the button below Exit to close the MIDlet. Then click on the
button in the upper right corner of the device to close the emulator window.
Changing the Emulator Platform
Emulator platforms are provided by mobile phone manufacturers so developers
can simulate the behavior of specific mobile devices while coding, debugging,
and testing applications. The NetBeans Mobility Pack includes the J2ME Wireless
Toolkit, and supports many other software development kits (SDKs) that you can
download from provider sites, such as Nokia, Sony Ericsson, or Motorola.
Changing the Default Emulator Device
- Right-click the MyHello Project node and choose Properties. In the Properties
dialog, choose the Platform node. Here, you can change the device for the
default configuration.
- Click the Device drop-down list and choose QwertyDevice. Click OK.
- Run the application again, and the application runs in the
QwertyDevice
emulator.
Changing the Project Configuration
You created several project configurations using the templates
in the New Project wizard. You can use the drop-down Configuration menu in
the main toolbar to quickly change project configurations.
Adding a New Emulator Platform
- Choose Tools > Java Platforms from the main toolbar.
- In the Java Platform Manager dialog, click the Add Platform button.
- In the Select Platform Type page, choose the Java ME MIDP Edition Platform
Emulator. Click Next.
In the Platforms page, the IDE searches for all available Java ME platforms
and lists them in the window. Platforms that are compliant with the Unified
Emulator Interface (UEI) standard are verified and appear with a check in
the checkbox next to the platform name. Platforms that are not UEI-compliant,
or that you might not be able to install for other reasons, are listed in
red. The wizard also identifies which platforms have already been installed.
NOTE: To install platforms that are not UEI-compliant,
click the Back button and choose Custom Java Micro Edition Platform Emulator.
- In the Platforms page, put a check next to any platform emulator you want
to install. After the platforms are detected, they are installed. Click
Finish. Then click Close.
- Choose File > "MyHello" Properties.
- Choose the Platform node, then choose the name of the new emulator (for
example, J2ME Wireless Toolkit 2.2) from the Emulator Platform drop-down
menu. Click OK.
Using Configurations
You can use configurations to create more than one set of distribution JAR
and Java Application Descriptor (JAD) files for your project. This enables you
to create one set of source code and customize it for each mobile device you're
programming for.
Adding a Configuration
- Right-click the MyHello Project node and choose Properties. In the Properties
dialog, Choose Add Configuration from the Project Configuration drop-down
list. This opens the Add Configuration dialog.
- Enter a name for your configuration in the Configuration Name field. The
name should identify the target platform you deploy the JAR/JAD
created for this configuration. For this example, enter
BlackWhiteDisplay
and click OK. You have just created a new configuration.
- Configurations can also be added by clicking the Manage Configurations
button in the Properties dialog. This brings up the Project Configuration
Manager dialog which contains options for adding, removing, or duplicating
configurations.
Customizing a Configuration
You can add as many configurations as you would like to your project. You
can then modify settings in the Project Properties dialog for each configuration
that you've added.
- Right-click the MyHello Project node and choose Properties. In the Properties
dialog, choose the Platform node.
- Choose the
BlackWhiteDisplay configuration from the configuration
combo box at the top of the Properties dialog.
- The components in the Platform dialog are all disabled. This is because
this configuration is currently taking the values used by the default configuration
for this panel. Uncheck the Use Values from "DefaultConfiguration"
option at the top of the panel. All components on this panel can now be
edited.
- Change the Device option to DefaultGrayPhone.
- Toggle the Project Configuration dialog at the top of the Properties dialog
and observe that the Device option changes based on which configuration
is currently selected. This method of configuration customization works
for each panel (other than the general panel) in the dialog. Click OK to
save your configuration changes and exit the Properties dialog.
Creating an Ability
An Ability is a specific attribute of a project configuration. It
can be a physical attribute such as screen size, or an API or JSR supported
by the configuration. You can create a new ability and associate it with one
or more project configurations. You can then use preprocessior code blocks
to associate certain code with that ability. If you later need to add or remove
configurations, you do not have to go through all your code and associate the
configuration with each code block. Instead, you need only to add that ability
to the configuration. The configuration is then automatically associated with
any code block associated with that ability.
- Right-click on the MyHello project node and choose Properties.
- Choose the Abilities page from the Category menu tree.
- Choose a configuration from the Project Configuration dropdown menu. This
associates the ability with that configuration.
- If necessary, uncheck the Use Values from "DefaultConfiguration" checkbox.
- Click the Add button.
This opens the Add Ability dialog.
- In the New Ability dialog, enter a name for the ability, or choose an
ability from the drop-down menu. Optionally, enter a value for the ability.
Click Ok to close the New Ability dialog. The ability is now associated
with the selected project configuration.
You can associate the ability with other configurations by choosing a different
configuration from the Project Configuration menu and clicking the Add button.
Adding Configuration-Specific, Preprocessor
code
Preprocessor blocks enable you to create, manage and track code that is specific
to one or more project configurations or abilities. The code is enabled (or
disabled) only for the configurations or abilities you identify.
- In the HelloMIDlet.java Editor window, right-click on the source code
line where TextBox is instantiated (
helloTextBox = new javax.microedition.lcdui.TextBox(null,
      "Hello, World",120, 0x0);
).
- Right-click on the line and choose Preprocessor Blocks > Create If/Else
Block. In the first, pink section, append the word "Color" to the "Hello
World" string. In the second, gray section, add "Gray" to the "Hello World"
string.
- The code marked by the
//#if preprocessor directive is in effect whenever the active configuration matches the directive value
(in this case, DefaultConfiguration.) The code encased by the //#else
preprocessor directive is used whenever the active configuration does
not match the value of the preprocessor.
In other words, the emulator displays "Hello World Color" whenever
the active platform is "DefaultConfiguration," and displays "Hello
World Gray" if the active platform is any other emulator platform.
The //#endif preprocessor directive completes the preprocessor block.
You can test the preprocessor code by running the MIDlet using different
emulator devices, as described in Changing the
Emulator Platform.
Running Configurations
Configurations can be built and run individually or simultaneously.
- Right-click the MyHelloMIDlet Project node and choose Run.
- Use the configuration combo box in the Toolbar to change the configuration
to BlackWhiteDisplay. Choose Run again.
- Two emulators appear, one color and one gray. The gray emulator displays
"Hello World Gray" and the color emulator displays "Hello World Color."
-
To build multiple configurations simultaneously, right-click
on a project and choose Batch Build. In the dialog that opens, check the
box next to each configuration you want to build.
-
To test a device on the fly, right-click on the project and choose Run
With. In the dialog that opens, choose the emulator platform and device you
want to run.
Connencting Mobile Applications to Web Services
The IDE enables you to create client MIDlets that can connect to Web services
either through a direct "two-tier" architecture, or a "three-tier"
architecture that connects to Web services through a middleware Web application.
The IDE provides two wizards for creating the connecting classes:
- Use the The Java ME Web Service Client wizard if you want to use the JSR-172
Web Services specification to create a "two-tier" connection to
Web services. This wizard creates stub (client-side proxy) files and, optionally,
a sample client MIDlet that calls a web service. You must have a device or
emulator platform that supports the JSR-172 specification to use this wizard.
- Use the The Mobile Client to Web Application Generator to create a "three-tier"
connection to Web services if your devices do not support the JSR-172 Web
Services specification. The wizard generates a servlet that connects to a
web application that includes a web service client. Before you use the Mobile
Client to Web Application Generator, you must have a Web project that includes
a Web service client.
Creating a Java ME Web Services
(JSR-172) Client
- Right-click on a project node and choose New > File.
- In the New File wizard, choose MIDP under Categories. Under File Types,
choose Java ME Web Service Client. Click Next.
- Identify the WSDL file location for the Web service to be added to the
project.
If the WSDL service is on the Web:
- Choose Running Web Service and enter a URL for the WSDL file and
enter a local filename for the retrieved WSDL.
- If you are behind a firewall, click Proxy Settings to designate
the appropriate HTTP host and port.
- Click Retrieve WSDL to get a local copy of the WDSL file. The IDE
downloads the WSDL file.
If you have a WSDL file in your environment:
- Select the WSDL file from your system and enter a filename.
- The IDE retrieves the WSDL file and the rest of the fields on the page are filled
with default names taken from the WSDL file name.
- Press Finish.
The IDE creates an opened settings file and generates client stubs. In the
Main Window, you can see a list of the Exported Services, Client Information,
and Client Options you can choose.
- In some rare situations, you might need to convert CLDC 1.1 types to CLDC
1.0 types, which means Float and Double types are converted to String variables.
To make the conversion, select the checkbox “Convert floating point
to String” on the settings file and click the Generate Stubs button.
- If you are behind a firewall, there is no public setting available for the
HTTPS proxy within NetBeans. You can change the NetBeans proxy settings by
choosing Tools>Options from the main menu. These settings do not, however,
propagate to emulators. You can set the proxy for the Wireless Toolkit by
choosing Tools > Java Platforms. Under Platforms, choose the Wireelss Toolkit,
and then select the Tools & Extensions tab. Click the Open Preferences
button and then select the Network Configuration tab. Changing the proxy for
other emulators is similar, but may differ from vendor to vendor.
- The generated files should not be edited. Any changes made to the files
are lost when you regenerate them.
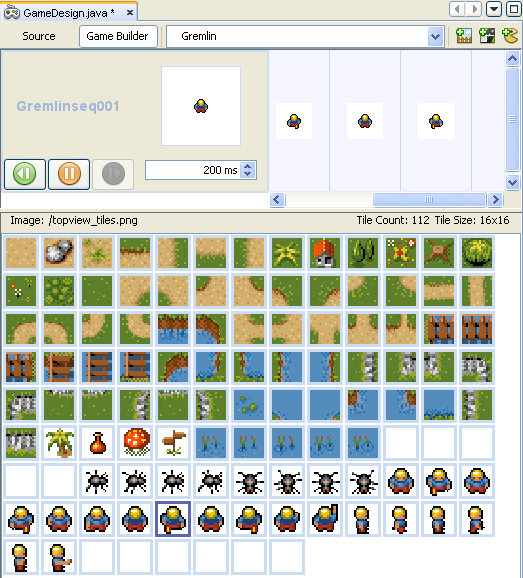
Creating a Game Using the Game Designer
The Visual Mobile Designer now supports the MIDP 2.0 Gaming
API. In the VMD, you can arrange tiled layers into scenes and populate the
game with animated sprites.
Before you begin, save all the images you want to use for
scenery and sprites into the src directory of your project. Then continue
as follows:
-
Create a new MIDP project with the "Create Hello
MIDlet" option unchecked. Then right-click the project and choose New
> File. Under categories, choose MIDP. Under File Types, choose Visual
Game Design. Click Next.
-
Give the new class a name and click Finish.
-
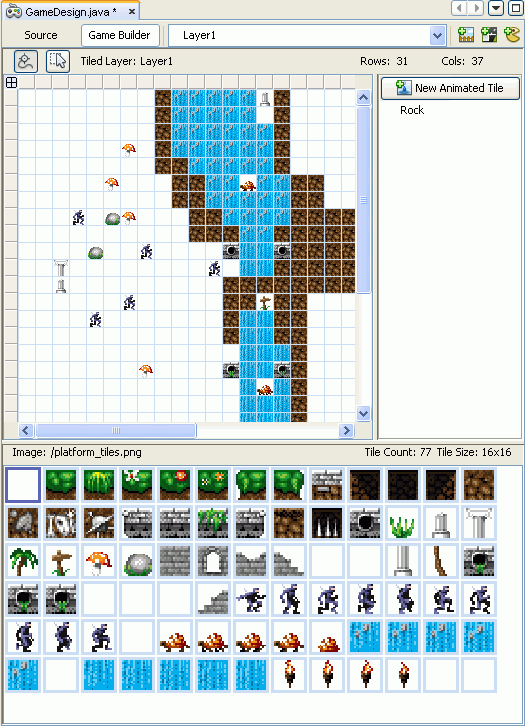
The Game Builder Design Component screen opens.
- Click on Create Scene.
A "Scene" is a level of a game. In the Game Designer Window, an
empty scene opens.
- To create a tiled layer (scenario environment), click the Create Tiled Layer
button in the upper right corner of the window.
Note that you can use sample images packaged with the IDE. To get the sample
images, click the Import sample images button.
- In the dialog that pops up, enter a name for your layer adjust the size
of your tiles to match the device you're programming for. Then Click OK.
After you create a new tiled layer, drag and drop tiles on the grid to create
a level for your game.
- You can create sprites for your game by choosing Sprites from the drop-down
menu, then dragging an image from the images window at the bottom of the IDE.
You can use the Game Builder to animate your sprites and tiled layers. Game
Builder treats sprites as animated sequences, and you can edit and animate
multiple sprites simultaneously.
Next Steps
For more information about using the NetBeans Mobility Pack, see the following
resources: