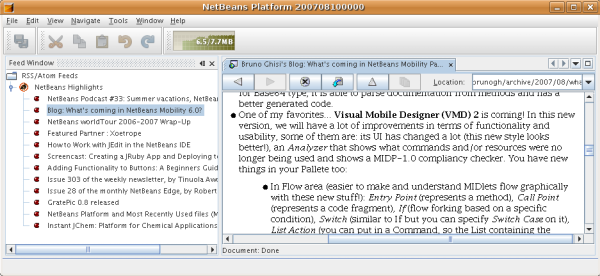
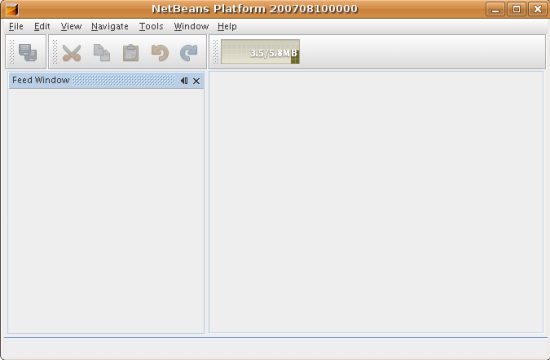
Welcome to the NetBeans Platform 6.0 Feed Reader tutorial. The Feed Reader that you build in this tutorial is a simple RSS/Atom feed browser, modeled after the Sage plug-in for Mozilla Firefox. It presents a tree of feeds with subnodes representing individual feed entries that you can open in a browser.
To illustrate the end result, here you see the Feed Reader that you will build in this tutorial, displaying a feed entry from the NetBeans Highlights feed:
|
|
You are not required to know anything about NetBeans Platform development to work on this tutorial. It would be helpful if you have some Java programming background, although even this is not essential. However, the following documents could be useful to read prior to beginning this tutorial, to give you useful background information:
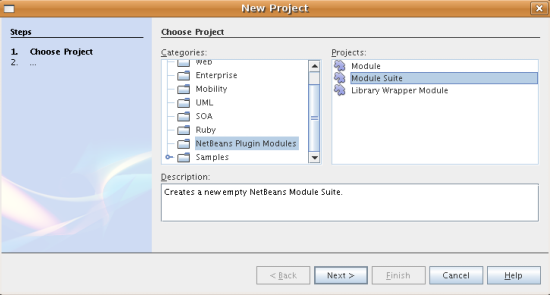
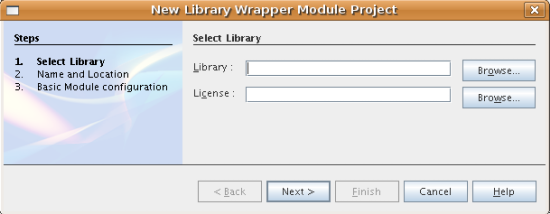
In NetBeans IDE, building an application on top of NetBeans starts with generating a large number of files which will serve as the foundation of your application. For example, the IDE provides a Module Project wizard, a Module Suite Project wizard, and a Library Wrapper Module Project wizard that set up all the basic files needed by plug-in modules and applications built on the NetBeans Platform.
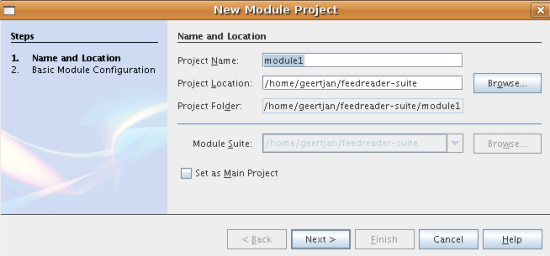
Click Next.
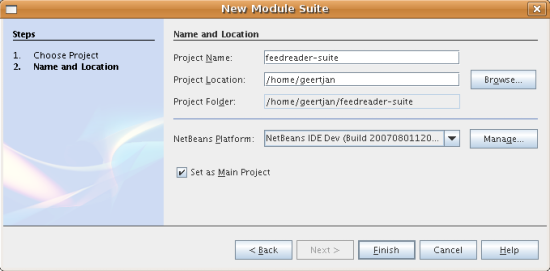
Click Finish.
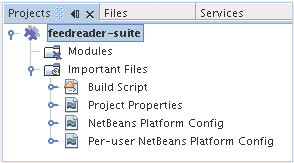
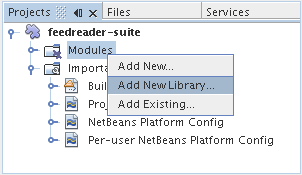
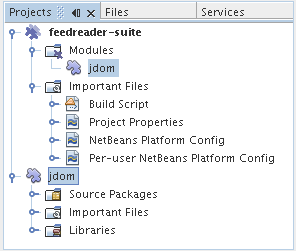
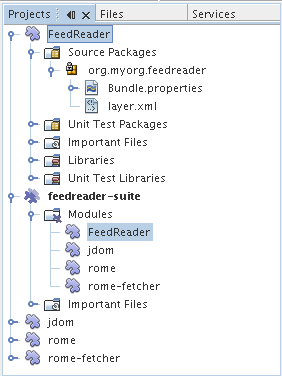
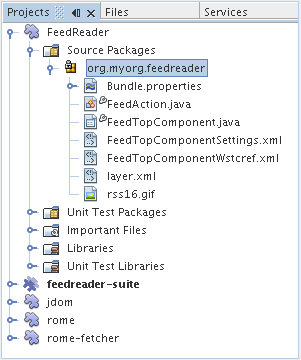
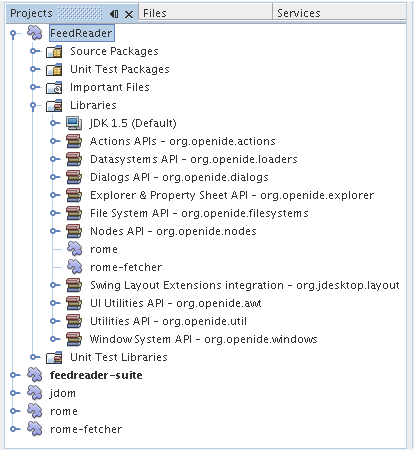
The IDE creates the feedreader-suite project, which looks as follows in the Projects window:
The project will contain the module project and library wrapper module projects that you will create in the following subsections.
When you do so, you should see the following:
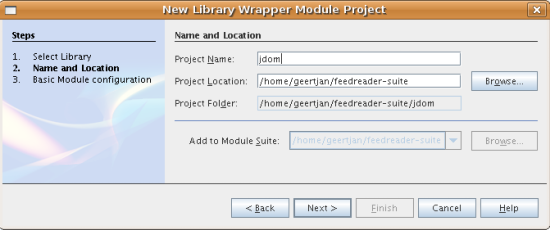
Note: The library wrapper module project will be stored within the module suite project. You could also store it somewhere else, but for versioning purposes it is a good idea to put it within the module suite project. Therefore, the feedreader-suite module suite project is selected in the Add to Module Suite drop-down.
Click Next.
Click Finish.
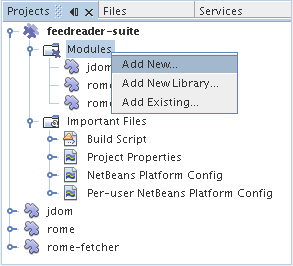
The new library wrapper module project opens in the IDE and displays in the Projects window. You should now see the following in the Projects window:
You now have a module suite project, with three library wrapper module projects, providing many useful Java classes that you will be able to make use of throughout this tutorial.
In this section, we create a project for the functionality that our application will provide. The project will make use of the classes made available by the library wrapper modules that we created in the previous section.
When you do so, you should see the following:
Click Finish.
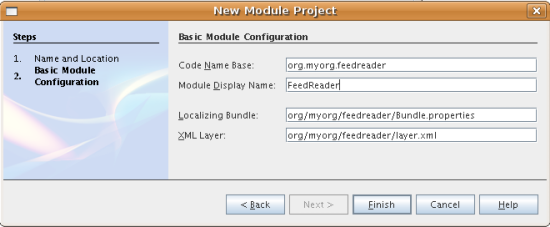
The IDE creates the FeedReader project. The project contains all of the module's sources and project metadata, such as the project's Ant build script. The project opens in the IDE. You can view its logical structure in the Projects window (Ctrl-1) and its file structure in the Files window (Ctrl-2). The Projects window should now show the following:
You have now created the source structure of your new application. In the next section, we will begin adding some code.
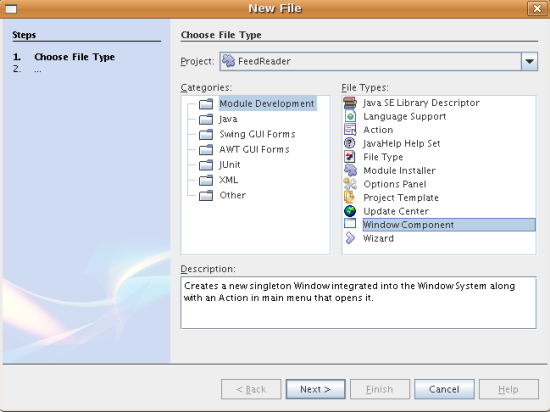
In this section you use the Window Component wizard to generate files that create a custom windowing component and an action to invoke it. The wizard also registers the action as a menu item in the layer.xml configuration file and adds entries for serializing the windowing component. Right after finishing this section, you are shown how to try out the files that the Window Component wizard generates for you.
Click Next.
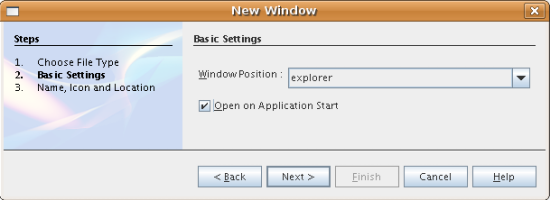
Click Next.
 ).
The GIF file will be shown in the menu item that
invokes the action. You should now see
the following:
).
The GIF file will be shown in the menu item that
invokes the action. You should now see
the following:
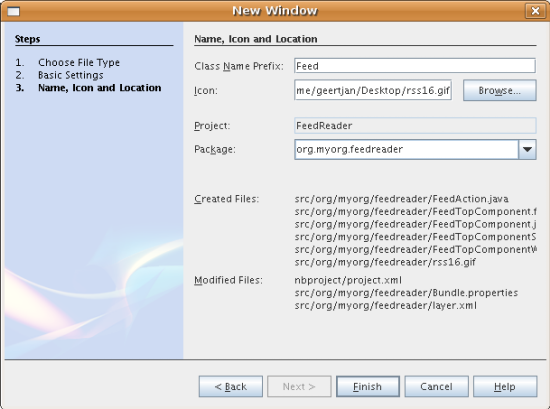
Click Finish.
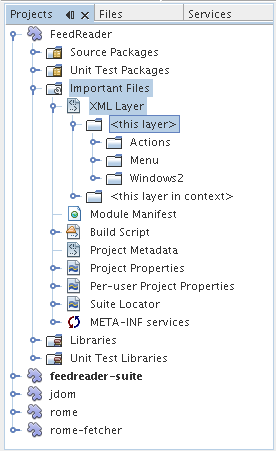
The following is now shown in the Projects window:
The IDE has created the following new files:
). It opens the Feed Window. Finally, three registration entries have been added to the layer.xml file.
This is what the entries in the layer.xml file do:
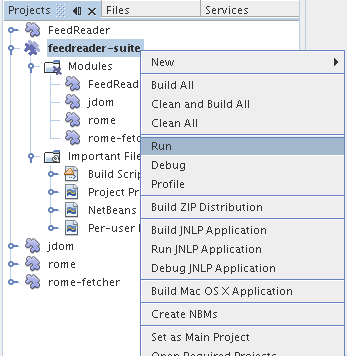
Without having typed a single line of code, you can already take your application for a spin. Trying it out means deploying the modules to the NetBeans Platform and then checking to see that the empty Feed Window displays correctly.
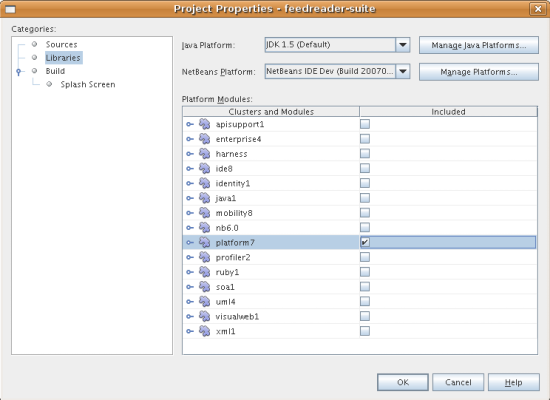
A list of 'clusters' is shown. Each cluster is a set of related modules. The only cluster we will need is the platform cluster, so unselect all other clusters, until you have only the platform cluster selected:
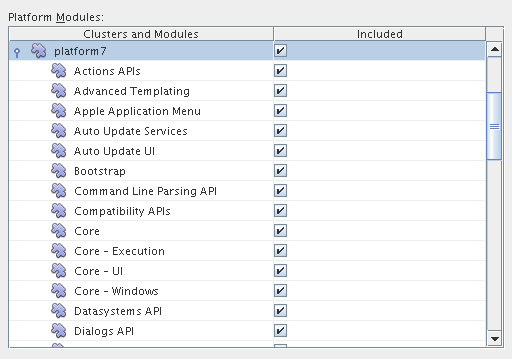
Expand the platform cluster and browse through the modules that it provides:
The platform modules provide the common infrastructure of Swing applications. Therefore, because we have included the platform cluster, we will not need to create 'plumbing' code for our application's infrastructure, such as its menu bar, windowing system, and bootstrapping functionality.
Click OK.
The application starts up. You see a splash screen. Then the application opens and displays the new Feed Window, as an explorer window, shown below:
Note: What you now have is an application consisting of the following modules:
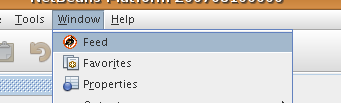
In the application's Window menu, you should see the new menu item, which you can use for opening the Feed window, if it is closed, as shown below:
As you can see, without having done any coding, we have a complete application. It doesn't do much yet, but the entire infrastructure exists and works as one would expect. Next, we begin using some of the NetBeans APIs, to add code to our application.
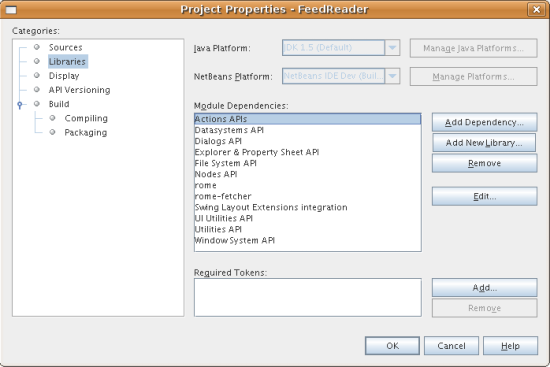
Now that you have laid the basis for your application, it's time to begin adding your own code. Before doing so, you need to specify the application's dependencies. Dependencies are modules that provide the NetBeans APIs that you will extend or implement. Then, you will use the New File wizard and the Source Editor to create and code the classes that make up the Feed Reader application.
The above library registrations were done for you by the Window Component wizard, earlier in this tutorial.
Actions API
Datasystems API
Dialogs API
Explorer and Property Sheet API
File System API
Nodes API
rome
rome-fetcher
You should now see the following:
Click OK to exit the Project Properties dialog box.
Now that we have set dependencies on the NetBeans API modules that we will use, let's also set dependencies between our library wrapper modules. For example, the Rome JAR makes use of classes from the JDom JAR. Now that these are wrapped in separate library wrapper modules, we need to specify the relationship between the JARs via the library wrapper module's Project Properties dialog box.
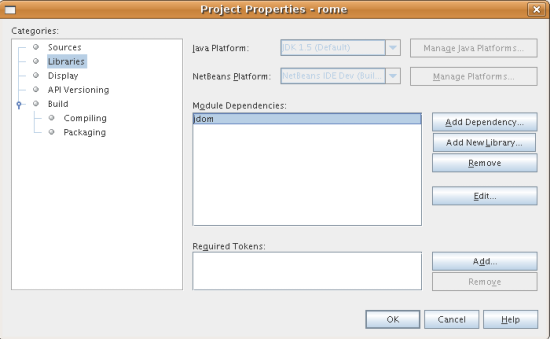
Click OK to exit the Project Properties dialog box.
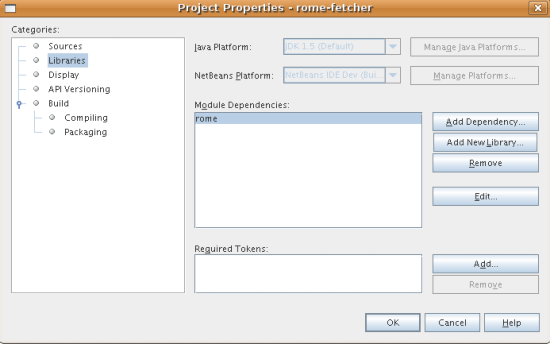
Because Rome already depends on JDom, you do not need to make Rome Fetcher dependent on JDom.
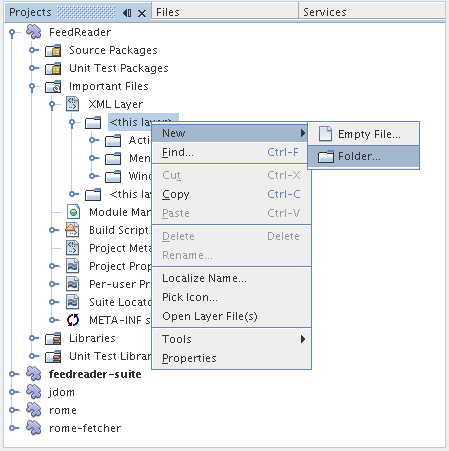
You will use the IDE's user interface to add a folder to the layer.xml file. The folder will contain our RSS feed objects. Later, you will add code to FeedTopComponent.java, which was created for you by the Window Component wizard, to view the content of this folder.
Next you create a simple POJO that encapsulates a URL and its associated Rome feed.
public class Feed implements Serializable {

    private static FeedFetcher s_feedFetcher
            = new HttpURLFeedFetcher(HashMapFeedInfoCache.getInstance());
    private transient SyndFeed m_syndFeed;
    private URL m_url;
    private String m_name;

    protected Feed() {
    }

    public Feed(String str) throws MalformedURLException {
        m_url = new URL(str);
        m_name = str;
    }

    public URL getURL() {
        return m_url;
    }

    public SyndFeed getSyndFeed() throws IOException {
        if (m_syndFeed == null) {
            try {
                m_syndFeed = s_feedFetcher.retrieveFeed(m_url);
                if (m_syndFeed.getTitle() != null) {
                    m_name = m_syndFeed.getTitle();
                }
            } catch (Exception ex) {
                throw new IOException(ex.getMessage());
            }
        }
        return m_syndFeed;
    }

    @Override
    public String toString() {
        return m_name;
    }

}
A lot of code is underlined, because you have not declared their packages. You do this in the next steps.
Take the following steps to reformat the file and declare its dependencies:
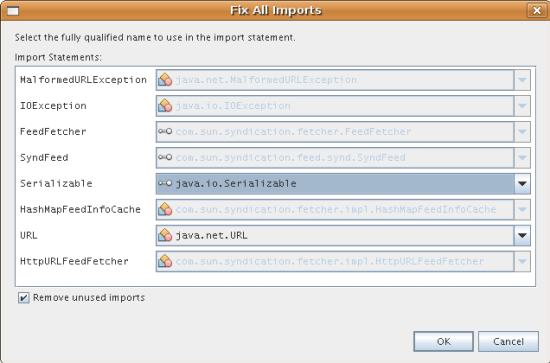
Click OK, and the IDE adds the following import statements to the class:
import com.sun.syndication.feed.synd.SyndFeed;
import com.sun.syndication.fetcher.FeedFetcher;
import com.sun.syndication.fetcher.impl.HashMapFeedInfoCache;
import com.sun.syndication.fetcher.impl.HttpURLFeedFetcher;
import java.io.IOException;
import java.io.Serializable;
import java.net.MalformedURLException;
import java.net.URL;
private final ExplorerManager manager = new ExplorerManager();
private final BeanTreeView view = new BeanTreeView();
setLayout(new BorderLayout());
add(view, BorderLayout.CENTER);
view.setRootVisible(true);
try {
    manager.setRootContext(new RssNode.RootRssNode());
} catch (DataObjectNotFoundException ex) {
    ErrorManager.getDefault().notify(ex);
}
ActionMap map = getActionMap();
map.put("delete", ExplorerUtils.actionDelete(manager, true));
associateLookup(ExplorerUtils.createLookup(manager, map));
Now a lot of code is underlined, because you have not declared their associated packages. You do this in the next steps.
Take the following steps to reformat the file and declare its dependencies:
import java.awt.BorderLayout;
import java.io.Serializable;
import javax.swing.ActionMap;
import org.openide.ErrorManager;
import org.openide.explorer.ExplorerManager;
import org.openide.explorer.ExplorerUtils;
import org.openide.explorer.view.BeanTreeView;
import org.openide.loaders.DataObjectNotFoundException;
import org.openide.util.NbBundle;
import org.openide.util.RequestProcessor;
import org.openide.util.Utilities;
import org.openide.windows.TopComponent;
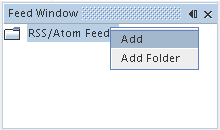
The top level node of our Feed Reader is provided by the RssNode class. The class extends FilterNode, which proxies the 'RssFeeds' node. Here we define a display name and we declare two menu items, 'Add' and 'Add Folder', as shown here:
Take the following steps to create this class:
public class RssNode extends FilterNode {

    public RssNode(Node folderNode) throws DataObjectNotFoundException {
        super(folderNode, new RssFolderChildren(folderNode));
    }

    @Override
    public Action[] getActions(boolean popup) {

        //Declare our actions
        //and pass along the node's data folder:
        DataFolder df = getLookup().lookup(DataFolder.class);
        return new Action[]{
            new AddRssAction(df),
            new AddFolderAction(df)
        };

    }

    public static class RootRssNode extends RssNode {

        //The filter node will serve as a proxy
        //for the 'RssFeeds' node, which we here
        //obtain from the NetBeans user directory:
        public RootRssNode() throws DataObjectNotFoundException {
            super(DataObject.find(Repository.getDefault().getDefaultFileSystem().
                    getRoot().getFileObject("RssFeeds")).getNodeDelegate());
        }

        //Set the display name of the node,
        //referring to the bundle file, and
        //a key, which we will define later:
        @Override
        public String getDisplayName() {
            return NbBundle.getMessage(RssNode.class, "FN_title");
        }

    }

}
Several red underline markings remain in the class, because we have not created our actions yet, and because the class that defines the node's children is currently also not created.
Next, we are concerned with the children of the "RSS/Atom Feeds" node. The children are either folders or they are feeds. That's all that happens in the code below.
Take the following steps to create this class:
public class RssFolderChildren extends FilterNode.Children {

    RssFolderChildren(Node rssFolderNode) {
        super(rssFolderNode);
    }

    @Override
    protected Node[] createNodes(Node key) {
        Node n = key;

        //If we can find a data folder, then we create an RssNode,
        //if not, we look for the feed and then create a OneFeedNode:
        try {
            if (n.getLookup().lookup(DataFolder.class) != null) {
                return new Node[]{new RssNode(n)};
            } else {
                Feed feed = getFeed(n);
                if (feed != null) {
                    return new Node[]{
                        new OneFeedNode(n, feed.getSyndFeed())
                    };
                } else {
                    // best effort
                    return new Node[]{new FilterNode(n)};
                }
            }
        } catch (IOException ioe) {
            Exceptions.printStackTrace(ioe);
        } catch (IntrospectionException exc) {
            Exceptions.printStackTrace(exc);
        }
        // Some other type of Node (gotta do something)
        return new Node[]{new FilterNode(n)};
    }

    /** Looking up a feed */
    private static Feed getFeed(Node node) {
        InstanceCookie ck = node.getCookie(InstanceCookie.class);
        if (ck == null) {
            throw new IllegalStateException("Bogus file in feeds folder: " + node.getLookup().lookup(FileObject.class));
        }
        try {
            return (Feed) ck.instanceCreate();
        } catch (ClassNotFoundException ex) {
            Exceptions.printStackTrace(ex);
        } catch (IOException ex) {
            Exceptions.printStackTrace(ex);
        }
        return null;
    }

}
Several red underline markings remain in the class, because we have not created our OneFeedNode class yet.
Here we are concerned with the container for the article nodes, as shown below for the 'NetBeans Highlights' node:
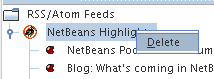
As can be seen, each of these nodes has a display name, retrieved from the feed, an icon, and a Delete menu item.
Take the following steps to create this class:
public class OneFeedNode extends FilterNode {

    OneFeedNode(Node feedFileNode, SyndFeed feed) throws IOException, IntrospectionException {
        super(feedFileNode,
                new FeedChildren(feed),
                new ProxyLookup(
                new Lookup[]{Lookups.fixed(
                        new Object[]{feed}),
                        feedFileNode.getLookup()
        }));
    }

    @Override
    public String getDisplayName() {
        SyndFeed feed = getLookup().lookup(SyndFeed.class);
        return feed.getTitle();
    }

    @Override
    public Image getIcon(int type) {
        return Utilities.loadImage("org/myorg/feedreader/rss16.gif");
    }

    @Override
    public Image getOpenedIcon(int type) {
        return getIcon(0);
    }

    @Override
    public Action[] getActions(boolean context) {
        return new Action[]{SystemAction.get(DeleteAction.class)};
    }

}
Several red underline markings remain in the class, because we have not created our FeedChildren class yet.
In this section, we add code that will provide nodes for each of the articles provided by the feed.
Take the following steps to create this class:
public class FeedChildren extends Children.Keys {

    private final SyndFeed feed;

    public FeedChildren(SyndFeed feed) {
        this.feed = feed;
    }

    @SuppressWarnings(value = "unchecked")
    @Override
    protected void addNotify() {
        setKeys(feed.getEntries());
    }

    public Node[] createNodes(Object key) {

        //Return new article-level nodes:
        try {
            return new Node[]{
                new EntryBeanNode((SyndEntry) key)
            };

        } catch (final IntrospectionException ex) {
            Exceptions.printStackTrace(ex);
            //Should never happen, no reason for it to fail above:
            return new Node[]{new AbstractNode(Children.LEAF) {
                @Override
                public String getHtmlDisplayName() {
                    return "" + ex.getMessage() + "";
                }
            }};
        }
    }
}
Several red underline markings remain in the class, because we have not created our EntryBeanNode class yet.
Finally, we deal with the lowest level nodes, those that represent articles provided by the feed.
To create this class, take the following steps:
public class EntryBeanNode extends FilterNode {

    private SyndEntry entry;

    @SuppressWarnings(value = "unchecked")
    public EntryBeanNode(SyndEntry entry) throws IntrospectionException {
        super(new BeanNode(entry), Children.LEAF,
                Lookups.fixed(new Object[]{
            entry,
            new EntryOpenCookie(entry)
        }));
        this.entry = entry;
    }

    /** Using HtmlDisplayName ensures any HTML in RSS entry titles are
     * /**properly handled, escaped, entities resolved, etc. */
    @Override
    public String getHtmlDisplayName() {
        return entry.getTitle();
    }

    /** Making a tooltip out of the entry's description */
    @Override
    public String getShortDescription() {
        return entry.getDescription().getValue();
    }

    /** Providing the Open action on a feed entry */
    @Override
    public Action[] getActions(boolean popup) {
        return new Action[]{SystemAction.get(OpenAction.class)};
    }

    @Override
    public Action getPreferredAction() {
        return (SystemAction) getActions(false) [0];
    }

    /** Specifying what should happen when the user invokes the Open action */
    private static class EntryOpenCookie implements OpenCookie {

        private final SyndEntry entry;

        EntryOpenCookie(SyndEntry entry) {
            this.entry = entry;
        }

        public void open() {
            try {
                URLDisplayer.getDefault().showURL(new URL(entry.getUri()));
            } catch (MalformedURLException mue) {
                Exceptions.printStackTrace(mue);
            }
        }

    }

}
Here we create the menu item for creating folders, that we declared earlier.
To create this class, take the following steps:
public class AddFolderAction extends AbstractAction {

    private DataFolder folder;

    public AddFolderAction(DataFolder df) {
        folder = df;
        putValue(Action.NAME, NbBundle.getMessage(RssNode.class, "FN_addfolderbutton"));
    }

    public void actionPerformed(ActionEvent ae) {
        NotifyDescriptor.InputLine nd =
                new NotifyDescriptor.InputLine(
                NbBundle.getMessage(RssNode.class, "FN_askfolder_msg"),
                NbBundle.getMessage(RssNode.class, "FN_askfolder_title"),
                NotifyDescriptor.OK_CANCEL_OPTION, NotifyDescriptor.PLAIN_MESSAGE);
        Object result = DialogDisplayer.getDefault().notify(nd);
        if (result.equals(NotifyDescriptor.OK_OPTION)) {
            final String folderString = nd.getInputText();
            try {
                DataFolder.create(folder, folderString);
            } catch (IOException ex) {
                Exceptions.printStackTrace(ex);
            }
        }
    }
}
In this section, we create the menu item that adds new feeds.
To create this class, take the following steps:
public class AddRssAction extends AbstractAction {

    private DataFolder folder;

    public AddRssAction(DataFolder df) {
        folder = df;
        putValue(Action.NAME, NbBundle.getMessage(RssNode.class, "FN_addbutton"));
    }

    public void actionPerformed(ActionEvent ae) {

        NotifyDescriptor.InputLine nd = new NotifyDescriptor.InputLine(
                NbBundle.getMessage(RssNode.class, "FN_askurl_msg"),
                NbBundle.getMessage(RssNode.class, "FN_askurl_title"),
                NotifyDescriptor.OK_CANCEL_OPTION,
                NotifyDescriptor.PLAIN_MESSAGE);

        Object result = DialogDisplayer.getDefault().notify(nd);

        if (result.equals(NotifyDescriptor.OK_OPTION)) {
            String urlString = nd.getInputText();
            URL url;
            try {
                url = new URL(urlString);
            } catch (MalformedURLException e) {
                String message = NbBundle.getMessage(RssNode.class, "FN_askurl_err", urlString);
                Exceptions.attachLocalizedMessage(e, message);
                Exceptions.printStackTrace(e);
                return;
            }
            try {
                checkConnection(url);
            } catch (IOException e) {
                String message = NbBundle.getMessage(RssNode.class, "FN_cannotConnect_err", urlString);
                Exceptions.attachLocalizedMessage(e, message);
                Exceptions.printStackTrace(e);
                return;
            }
            Feed f = new Feed(url);
            FileObject fld = folder.getPrimaryFile();
            String baseName = "RssFeed";
            int ix = 1;
            while (fld.getFileObject(baseName + ix, "ser") != null) {
                ix++;
            }
            try {
                FileObject writeTo = fld.createData(baseName + ix, "ser");
                FileLock lock = writeTo.lock();
                try {
                    ObjectOutputStream str = new ObjectOutputStream(writeTo.getOutputStream(lock));
                    try {
                        str.writeObject(f);
                    } finally {
                        str.close();
                    }
                } finally {
                    lock.releaseLock();
                }
            } catch (IOException ioe) {
                Exceptions.printStackTrace(ioe);
            }
    }

    private static void checkConnection(final URL url) throws IOException {
        InputStream is = url.openStream();
        is.close();
    }

}
FN_title=RSS/Atom Feeds
FN_addbutton=Add
FN_askurl_title=New Feed
FN_askurl_msg=Enter the URL of an RSS/Atom Feed
FN_askurl_err=Invalid URL: {0}|
FN_addfolderbutton=Add Folder
FN_askfolder_msg=Enter the folder name
FN_askfolder_title=New Folder
Now that you are at the end of the development cycle, while you are wrapping up the application, you are concerned with the following questions:
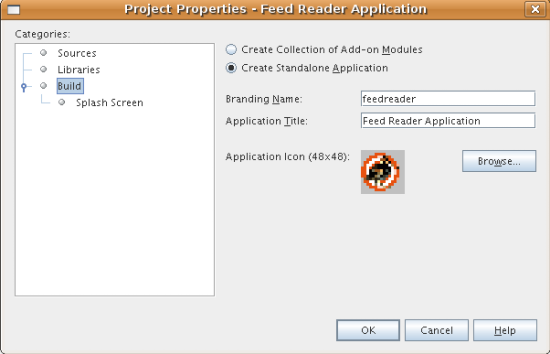
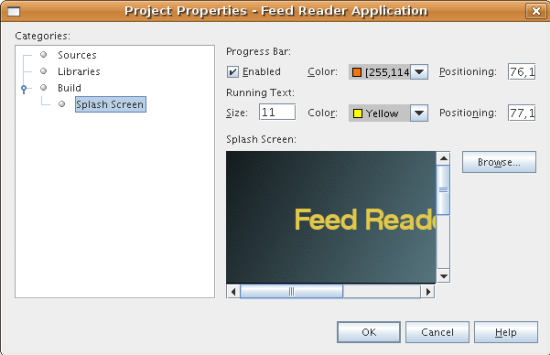
These questions relate to branding, the activity of personalizing an application built on top of the NetBeans Platform. The IDE provides a panel in the Project Properties dialog box of module suite projects to help you with branding.
). The icon will be displayed in the Help > About dialog box.You should now see the following:
You should now see the following:
<?xml version="1.0" encoding="UTF-8"?>
<!DOCTYPE filesystem PUBLIC "-//NetBeans//DTD Filesystem 1.1//EN" "http://www.netbeans.org/dtds/filesystem-1_1.dtd">
<!--
This is a `branding' layer.  It gets merged with the layer file it's branding.
In this case, it's just hiding menu items and toolbars we don't want.
-->
<filesystem>

	<!-- hide unused toolbars -->
	<folder name="Toolbars">
		<folder name="File_hidden"/>
		<folder name="Edit_hidden"/>
	</folder>

	<folder name="Menu">
		<folder name="File">
			<file name="org-openide-actions-SaveAction.instance_hidden"/>
			<file name="org-openide-actions-SaveAllAction.instance_hidden"/>
			<file name="org-netbeans-core-actions-RefreshAllFilesystemsAction.instance_hidden"/>
			<file name="org-openide-actions-PageSetupAction.instance_hidden"/>
			<file name="org-openide-actions-PrintAction.instance_hidden"/>
		</folder>
		<folder name="Edit_hidden"/>
		<folder name="Tools_hidden"/>
	</folder>

</filesystem>
The IDE uses an Ant build script to create a distribution of your application. The build script is created for you when you create the project.
When it is up and running, the Feed Reader application displays the RSS/Atom Feeds window, containing a node called RSS/Atom Feeds.
Congratulations! You have completed the FeedReader tutorial.