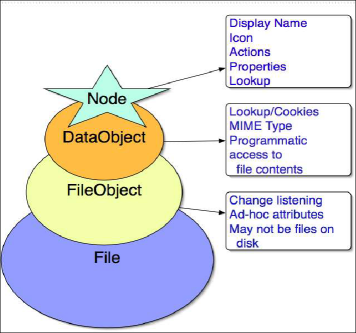
This tutorial shows you how to write a module that lets the IDE (or any other application built on the NetBeans Platform) recognize a new file type. File types that are recognized in the IDE have their own icons, menu items, and behavior. The "files" being shown are FileObjects—wrappers around java.io.File or, in the case of configuration files, typically wrappers around data stored in some other way, such as inside XML files in modules. What you actually see are Nodes, which provide functionality like actions and localized names to objects like files. In between Nodes and FileObjects are DataObjects. A DataObject is like a FileObject, except that it knows what kind of file is being shown, and there are usually different types of DataObject for files with different extensions and XML files with different namespaces. Each DataObject is provided by a different module, each implementing support for one or more file types—for example, the Image module makes it possible to recognize and open .gif and .png files.
A module that recognizes a file type installs a DataLoader—a factory for a file-type-specific DataObject. When a folder is expanded, the IDE asks each known DataLoader, "Do you know what this is?" The first one that says "Yes" creates the DataObject for the file. In order to actually display something for each file, the system calls DataObject.getNodeDelegate() for each DataObject and the Nodes are what you actually see in the IDE.
Below, the diagram on the left shows what each item mentioned above makes available:
In this tutorial, you create a module that installs a DataLoader for imaginary "Abc" files (.abc file extension). By default, a file with the "abc" extension is treated as any other file that the IDE does not recognize—it is treated as a text file and, as a result, the IDE provides the same functionality for Abc files as it does for text files. Once you have created the module, you will be shown how to enhance it with functionality that will be available to Abc files only. When you complete the development cycle, you can easily let others make use of your module—the IDE lets you create a binary that you can send to others, who can then install it through the Update Center.
|
|
For more information on working with NetBeans modules, see the NetBeans Development Project home on the NetBeans website. If you have questions, visit the NetBeans Developer FAQ or use the feedback link at the top of this page.
Before you begin, you need to install the following software on your computer:
In this section, we use a wizard to create the source structure that every NetBeans module requires. The source structure consists of certain folders in specific places and a set of files that are always needed. For example, every NetBeans module requires a 'nbproject' folder, which holds the project's metadata, and a layer.xml file, for declarative registration of items such as toolbar buttons and windows.
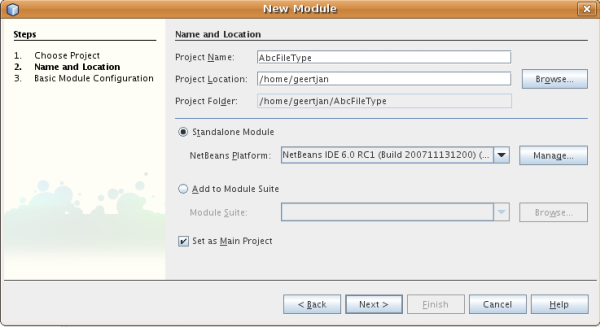
Click Next.
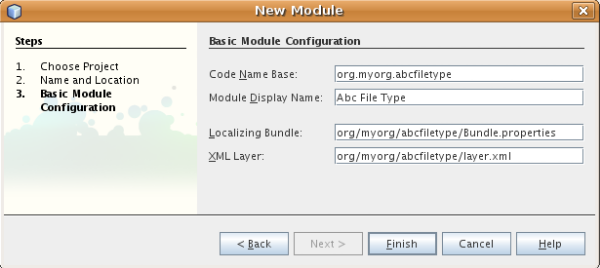
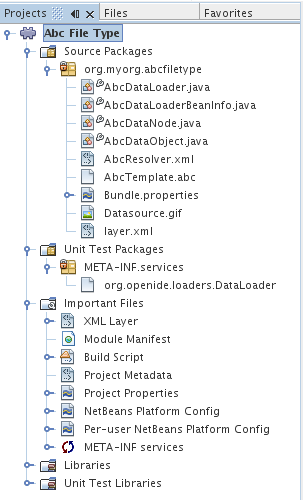
The IDE creates the Abc File Type project. The project contains all of your sources and project metadata, such as the project's Ant build script. The project opens in the IDE. You can view its logical structure in the Projects window (Ctrl-1) and its file structure in the Files window (Ctrl-2). For example, the Projects window should now look as follows:
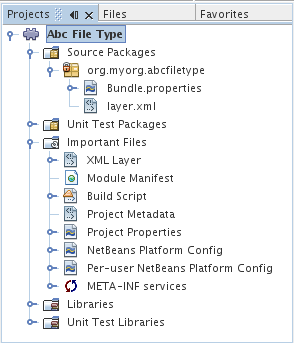
For basic information on each of the files above, see the Introduction to NetBeans Module Development.
In this section, we use a wizard to create the classes necessary for recognizing Abc files as being distinct from all other files. As discussed at the start of this tutorial, we need a data object and a data loader, as well as a MIME type resolver, and registration entries in the layer.xml file, to do so. The New File Type wizard will create all of these for us.
The File Recognition panel should now look as follows:
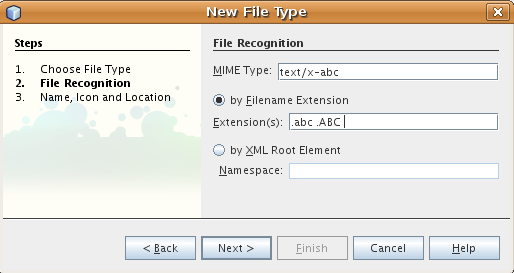
Note the following about the fields in the File Recognition panel:
Let's imagine that Abc files be case-sensitive. For this reason, you specify two MIME types in this tutorial—.abc and .ABC.
Click Next.

Note:You can use any icon. If you like, you can
click on this one and save it locally, and then
specify it in the wizard step above: 
The Projects window should now look as follows:
Each of the newly generated files is briefly introduced:
Now that the NetBeans Platform is able to distinguish Abc files from all other types of files, it is time to add features specifically for these types of files. In this section, we add a menu item on the right-click contextual menu of the file's node in the explorer windows, such as in the Projects window, and we enable the file to open into a window, instead of into an editor.
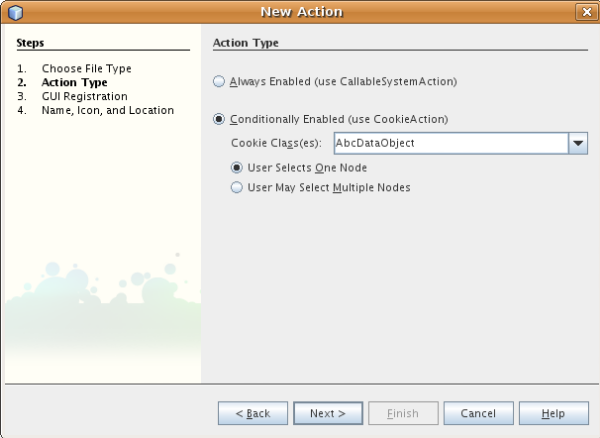
In this subsection, we use the New Action wizard to create a Java class that will perform an action for our file type. The wizard will also register the class in the layer.xml file such that the user will be able to invoke the action from the right-click contextual menu of the file type's node in an explorer window.
Click Next.
Next, Unselect Global Menu Item and then select File Type Contect Menu Item. In the Content Type drop-down list, select the MIME type you specified above in the New File Type wizard, as shown below:
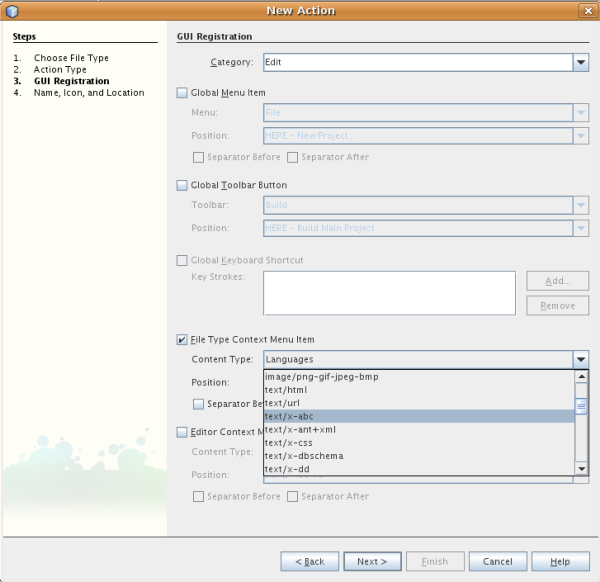
Notice that you can set the position of the menu item and that you can separate the menu item from the item before it and after it. Click Next.
protected void performAction(Node[] activatedNodes) {
AbcDataObject d = (AbcDataObject) activatedNodes[0].getCookie(AbcDataObject.class);
FileObject f = d.getPrimaryFile();
String displayName = FileUtil.getFileDisplayName(f);
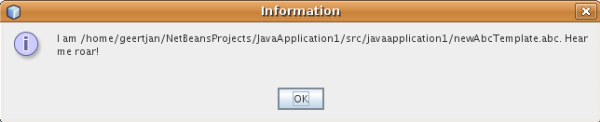
String msg = "I am " + displayName + ". Hear me roar!";
NotifyDescriptor nd = new NotifyDescriptor.Message(msg);
DialogDisplayer.getDefault().notify(nd);
}
Press Ctrl-Shift-I. The IDE automatically adds import statements to the top of the class. Some code is still underlined in red, to indicate that not all of the required packages are on the classpath. Right-click the project node, choose Properties, and click Libraries in the Project Properties dialog box. Click add at the top of the Libraries pane and add the Dialogs API.
In the MyAction.java class, press Ctrl-Shift-I again. The red underlining disappears because the IDE finds the required packages in the Dialogs API.
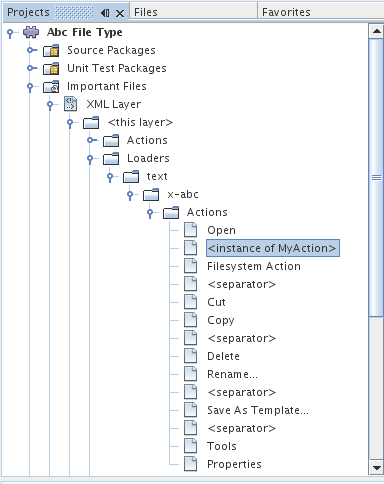
As you can see from the last two steps, the System Filesystem Browser can be used to quickly reorganize the sequence of the items that are registered in the System Filesystem.
By default, when the user opens a file of the type that we have defined in this tutorial, the file will open into a basic editor. However, sometimes you may want to create a visual representation of the file, and let the user drag and drop widgets onto the visual representation. The first step in creating such a user interface is to let the user open the file into a window. This subsection shows you how to do that.
public AbcDataObject(FileObject pf, AbcDataLoader loader)
        throws DataObjectExistsException, IOException {

    super(pf, loader);
    CookieSet cookies = getCookieSet();
    //cookies.add((Node.Cookie) DataEditorSupport.create(this, getPrimaryEntry(), cookies));
    cookies.add((Node.Cookie) new AbcOpenSupport(getPrimaryEntry()));

}
class AbcOpenSupport extends OpenSupport implements OpenCookie, CloseCookie {

    public AbcOpenSupport(AbcDataObject.Entry entry) {
        super(entry);
    }

    protected CloneableTopComponent createCloneableTopComponent() {
        AbcDataObject dobj = (AbcDataObject) entry.getDataObject();
        AbcTopComponent tc = new AbcTopComponent();
        tc.setDisplayName(dobj.getName());
        return tc;
    }

}
Now, when an Abc file is opened, the OpenSupport class handles the opening, such that it opens the file into the TopComponent instead of the basic editor that DataEditorSupport provides. The NetBeans Visual Library 6.0 Tutorial provides an example of what you can do to develop the TopComponent further.
The IDE uses an Ant build script to build and install your module. The build script is created for you when you create the project.
The module is built and installed in the target IDE. The target IDE opens so that you can try out your new module. The default target IDE is the installation used by the current instance of the IDE.

If you want to provide default code via the dummy template, add the code to the AbcTemplate.abc file that the New File Type wizard created for you.
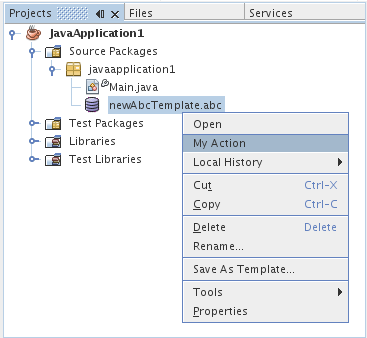
Notice that the Abc file has the icon you assigned to it in its module and that the list of actions defined in its layer.xml file is available from the right-click contextual menu:
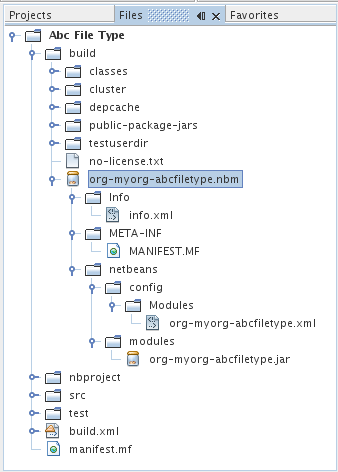
The NBM file is created and you can view it in the Files window (Ctrl-2):
For more information about creating and developing NetBeans modules, see the following resources:
|
Version
|
Date
|
Changes
|
| 1 | 25 August 2005 |
|
| 2 | 23 September 2005 |
|
| 3 | 28 September 2005 |
|
| 4 | 4 October 2005 |
|
| 4 | 4 November 2005 |
|
| 5 | 29 November 2005 |
|
| 6 | 21 April 2006 |
|
| 7 | 17 November 2007 |
|