This tutorial takes you through the basics of using NetBeans IDE to develop rich-client applications on top of the NetBeans Platform. When you develop applications on top of the NetBeans Platform, you are developing on top of the NetBeans IDE's core. All the modules belonging to the IDE that are not relevant to your application are excluded, but those that are useful are kept. By reusing features readily available in IDE's core, you save yourself a lot of time and energy.
This tutorial is designed to get you going as quickly as possible.
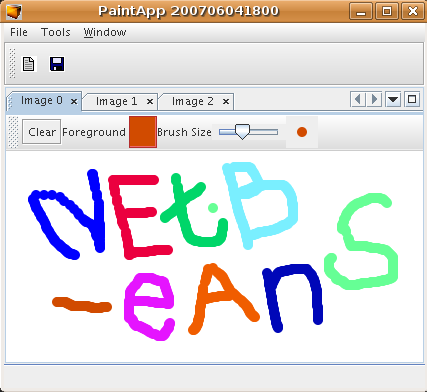
You will create and install a simple application on the NetBeans Platform. The application allows the user to
paint on the screen and save the results:
This initial version is far from a full fledged paint application, but it demonstrates a very simple case of creating an application on top of the NetBeans Platform.
Note that the NetBeans Module Quick Start Tutorial is a better tutorial for you if, instead of rich-client applications, you want to learn about NetBeans plug-in modules.
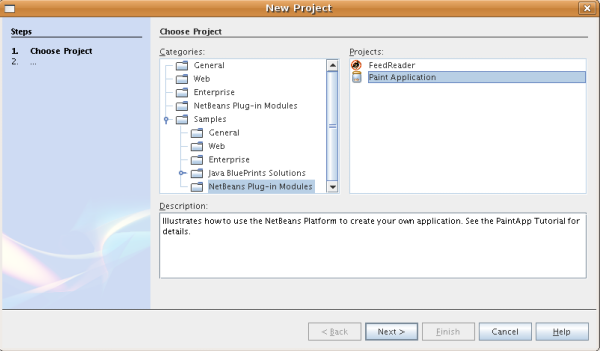
In this tutorial, we recreate an application that is a sample delivered with the IDE. To see the final product, or to troubleshoot problems while working through this tutorial, get the sample from the New Project wizard, in the location shown below:
For more information on working with the NetBeans Platform, see the NetBeans Development Project Home on the NetBeans website. If you have questions, visit the NetBeans Developer FAQ or use the feedback link at the bottom of this page.
In this section, you create the structure of your application. You first need to create a module suite project, which will represent your application. The application depends on a library, so you will create a library wrapper module project that will contain the library's JAR file. Finally, you create the module project that will contain your code.
A module suite is the equivalent of an application—it is a set of modules that work together to create specific results. It also lets you assign your own splashscreen (branding), application name, and the type and number of NetBeans modules you want to use. You can also take advantage of such actions as creating a ZIP distribution and building a Java WebStart (JNLP) application, which are important tools in making your application available to other users.
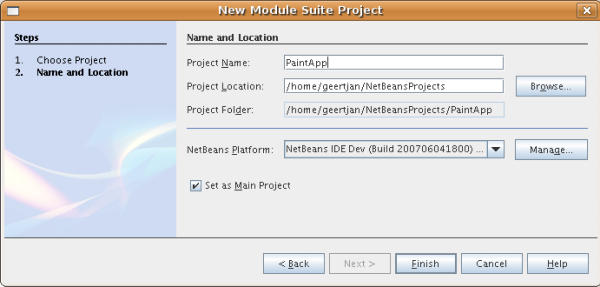
Click Finish.
The new module suite project opens in the IDE. It contains one node in the Project window. This node, the Modules node, is for manually adding module projects and library wrapper module projects to the module suite project. When you use the Module Project wizard or the Library Wrapper Module Project wizard, the module that you create can automatically be added to the module suite project.
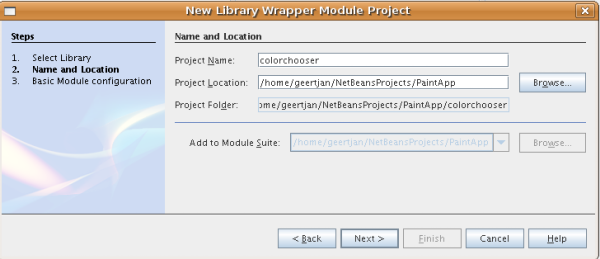
A library wrapper module is a module whose JAR file contains no code—it is just a pointer to a library. It turns the library into a NetBeans module, so that all the protections of the NetBeans classloader system apply to it—without modifying the original JAR file. Your application can then depend on the library just as if the library were just another NetBeans module. And, if new versions of the library become available, you can distribute them without needing to distribute anything except a single NetBeans Module (NBM) file for the wrapper library.
Note: One of the benefits of building on the NetBeans Platform is that its user interface is based on Swing—the standard user interface toolkit for Java. Since Swing has been around for a long time, there are a lot of Swing components you can reuse in your application. In this tutorial, you reuse an existing color chooser JavaBean (you can find the source for it in NetBeans CVS under contrib/coloreditor). The JAR file is called ColorChooser.jar. You can download the library here. Save it anywhere in your filesystem. Do the following to create a library wrapper module for the ColorChooser.jar file:
Click Next again, and then click Finish.
Now you need a module to contain the actual code you're going to write.
Click Finish.
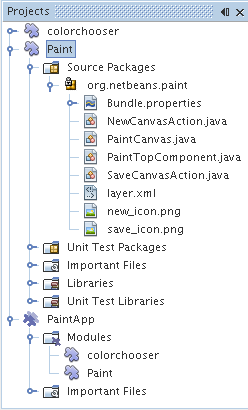
The IDE creates the Paint project. The project contains all of your sources and project metadata, such as the project's Ant build script. The project opens in the IDE. You can view its logical structure in the Projects window (Ctrl-1) and its file structure in the Files window (Ctrl-2). For example, the Projects window should look as follows:
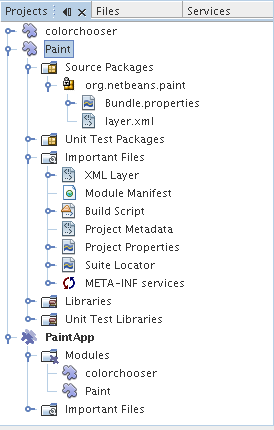
In addition to the localizing bundle and the XML layer, the project also includes the following important files:
You will not need to modify any of these files during this tutorial.
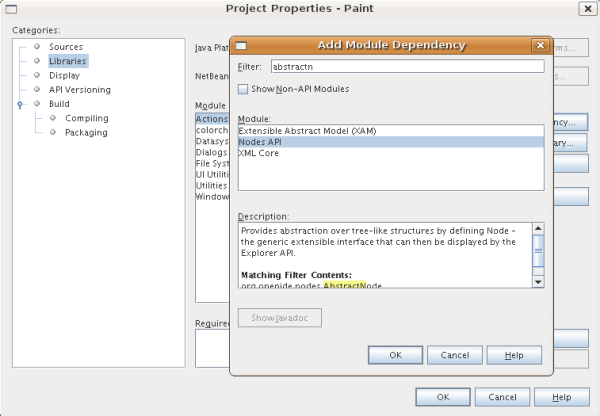
You will need to subclass several classes that belong to the NetBeans APIs. In addition, the project depends on the ColorChooser.jar file. All NetBeans APIs are implemented by plug-in modules, so completing both of these tasks really just means adding some plug-in modules to the list of plug-in modules that our plug-in module needs in order to run.
|
Class
|
API
|
Purpose
|
| ColorChooser | ColorChooser | Library wrapper module for the color chooser component you created |
| DataObject | Datasystems API | The NetBeans module containing the DataObject class |
| DialogDisplayer | Dialogs API | This allows the creation of user notification, a dialog's description and permits it to be displayed |
| AbstractFile | File System API | This provides a common API to access files in a uniform manner |
| AbstractNode | Nodes API | This serves as the main aparatus for visualisation of objects in NetBeans |
| StatusDisplayer | UI Utilities API | The StatusDisplayer class used to write the statusbar in the main window |
| WeakListeners | Utilities API | This contains the WeakListeners class |
| TopComponent | Window System API | This contains the TopComponent JPanel class |
The first column in the table above lists all the classes that you will subclass in this tutorial. In each case, start typing the class name in the Filter and watch the Module list narrow. Use the table's second column to pick the appropriate API (or, in the case of ColorChooser, the library) from the narrowed Module list and then click OK to confirm the choice:
The next step is to create the actual component on which the user can paint. Here, you use a pure Swing component—so, let's skip the details of its implementation and just provide the final version. The color chooser bean, which you created the library wrapper module for, is used in the source code for this panel—when you run the finished application, you will see it in the toolbar of the panel for editing images.
Now you'll write your first class that touches the NetBeans APIs. It is a TopComponent class. A TopComponent class is just a JPanel class which NetBeans' windowing system knows how to talk to—so it can be put inside a tabbed container inside the main window.
public class PaintTopComponent extends TopComponent implements ActionListener, ChangeListener {Notice the red line under the class declaration that you just entered. Position the cursor in the line and notice that a light bulb appears in the left margin. Click the light bulb (or press Alt-Enter), as shown below:

Select Implement all abstract methods. The IDE generates two method skeletons—actionPerformed() and stateChanged(). You fill these out later in this tutorial.
    private PaintCanvas canvas = new PaintCanvas(); //The component the user draws on
    private JComponent preview; //A component in the toolbar that shows the paintbrush size
private static int ct = 0; //A counter you use to provide names for new images public int getPersistenceType() {
return PERSISTENCE_NEVER;
}
public String preferredID() {
return "Image";
}The class should now look as follows:
public class PaintTopComponent extends TopComponent implements ActionListener, ChangeListener {
private PaintCanvas canvas = new PaintCanvas(); //The component the user draws on
private JComponent preview; //A component in the toolbar that shows the paintbrush size
private static int ct = 0; //A counter you use to provide names for new images
public PaintTopComponent() {
}
public void actionPerformed(ActionEvent arg0) {
throw new UnsupportedOperationException("Not supported yet.");
}
public void stateChanged(ChangeEvent arg0) {
throw new UnsupportedOperationException("Not supported yet.");
}
    public int getPersistenceType() {
        return PERSISTENCE_NEVER;
    }

    public String preferredID() {
        return "Image";
    }
}
In this section, we add code that initializes the user interface.
    public PaintTopComponent() {

        initComponents();

        String displayName = NbBundle.getMessage(
                PaintTopComponent.class,
                "UnsavedImageNameFormat",
                new Object[] { new Integer(ct++) }
        );

        setDisplayName(displayName);

    }
The code here is pretty simple. The first call is to a method you haven't written yet, initComponents(), which will add a toolbar and a PaintCanvas to your TopComponent. Because you haven't written the method yet, a red line appears underneath it here. As before, click the light bulb (or press Alt-Enter) and accept the suggestion:
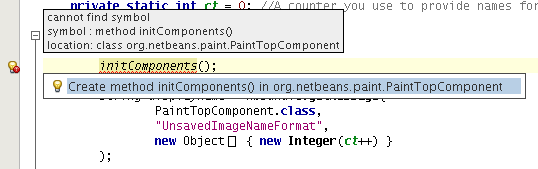
The initComponents() method skeleton is generated for you.
UnsavedImageNameFormat=Image {0}
This specifies the text that will be used to identify a new image file in the application prior to being saved by the user. For example, when a user clicks New Canvas for the first time in your completed application, a tab will appear above the Source Editor with the label, 'Image 0'. Make sure that you save the file before continuing.
In this section, we code the user interface of our application. We could also use the IDE's GUI Builder to visually design the layout.
    private void initComponents() {

        setLayout(new BorderLayout());
        JToolBar bar = new JToolBar();

        ColorChooser fg = new ColorChooser();
        preview = canvas.createBrushSizeView();

        //Now build our toolbar:

        //Make sure components don't get squished:
        Dimension min = new Dimension(32, 32);
        preview.setMaximumSize(min);
        fg.setPreferredSize(new Dimension(16, 16));
        fg.setMinimumSize(min);
        fg.setMaximumSize(min);

        JButton clear = new JButton(
          	    NbBundle.getMessage(PaintTopComponent.class, "LBL_Clear"));

        JLabel fore = new JLabel(
         	    NbBundle.getMessage(PaintTopComponent.class, "LBL_Foreground"));

        fg.addActionListener(this);
        clear.addActionListener(this);

        JSlider js = new JSlider();
        js.setMinimum(1);
        js.setMaximum(24);
        js.setValue(canvas.getDiam());
        js.addChangeListener(this);

        fg.setColor(canvas.getColor());

        bar.add(clear);
        bar.add(fore);
        bar.add(fg);
        JLabel bsize = new JLabel(
     	    NbBundle.getMessage(PaintTopComponent.class, "LBL_BrushSize"));

        bar.add(bsize);
        bar.add(js);
        bar.add(preview);

        JLabel spacer = new JLabel("   "); //Just a spacer so the brush preview
        //isn't stretched to the end of the
        //toolbar

        spacer.setPreferredSize(new Dimension(400, 24));
        bar.add(spacer);

        //And install the toolbar and the painting component:
        add(bar, BorderLayout.NORTH);
        add(canvas, BorderLayout.CENTER);

    }
Press Alt-Shift-F to generate the required import statements.
    public void actionPerformed(ActionEvent e) {

        if (e.getSource() instanceof JButton) {
           canvas.clear();
        } else if (e.getSource() instanceof ColorChooser) {
           ColorChooser cc = (ColorChooser) e.getSource();
           canvas.setPaint (cc.getColor());
        }

        preview.paintImmediately(0, 0, preview.getWidth(), preview.getHeight());

    }
    public void stateChanged(ChangeEvent e) {

        JSlider js = (JSlider) e.getSource();
        canvas.setDiam (js.getValue());
        preview.paintImmediately(0, 0, preview.getWidth(), preview.getHeight());

    }
    LBL_Clear = Clear
    LBL_Foreground = Foreground
    LBL_BrushSize = Brush Size
Make sure that you save the file before continuing.
In your new application, it would be a good idea to allow users to save the images they create. By including the following code into the PaintTopComponent class, this functionality will be activated.
    public void save() throws IOException {

        if (getDisplayName().endsWith(".png")) {
	    doSave(new File(getDisplayName()));
        } else {
	    saveAs();
        }

    }
    public void saveAs() throws IOException {

        JFileChooser ch = new JFileChooser();
        if (ch.showSaveDialog(this) == JFileChooser.APPROVE_OPTION && ch.getSelectedFile() != null) {

	    File f = ch.getSelectedFile();

	    if (!f.getPath().endsWith(".png")) {
	        f = new File(f.getPath() + ".png");
	    }

	    if (!f.exists()) {

	        if (!f.createNewFile()) {
		    String failMsg = NbBundle.getMessage(
		             PaintTopComponent.class,
			    "MSG_SaveFailed", new Object[] { f.getPath() }
	            );
		    JOptionPane.showMessageDialog(this, failMsg);
		    return;
	        }

	    } else {
	        String overwriteMsg = NbBundle.getMessage(
		    PaintTopComponent.class,
                    "MSG_Overwrite", new Object[] { f.getPath() }
	        );

	        if (JOptionPane.showConfirmDialog(this, overwriteMsg)
	        != JOptionPane.OK_OPTION) {
		    return;
	        }

	    }

	    doSave(f);

        }

    }
    private void doSave(File f) throws IOException {

        BufferedImage img = canvas.getImage();
        ImageIO.write(img, "png", f);
        String statusMsg = NbBundle.getMessage(PaintTopComponent.class,
            "MSG_Saved", new Object[] { f.getPath() });
        StatusDisplayer.getDefault().setStatusText(statusMsg);
        setDisplayName(f.getName());

} MSG_SaveFailed = Could not write to file {0}
MSG_Overwrite = {0} exists. Overwrite?
MSG_Saved = Saved image to {0}
Make sure that you save the file before continuing.
You use the NetBeans plug-in module file templates to create the basis of the module's functionality. When you use a file template, the IDE registers the item that you create in the layer.xml file. After using a wizard to create the file template, you use the NetBeans APIs to continue developing the module.
Note: Where you position the action is not important, as long as it is in the File menu and in the File toolbar.
You should now see the following:
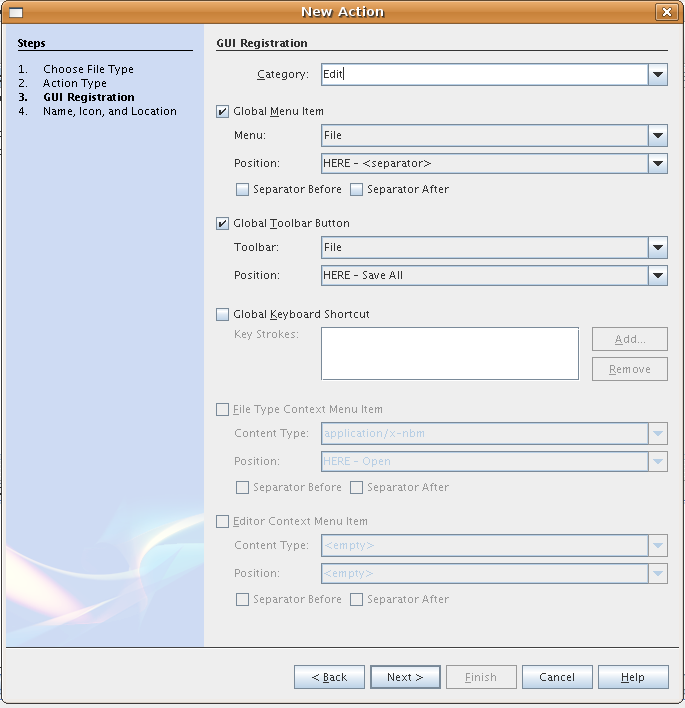
Click Next.
In Icon, paste this icon (right-click it here and then save it in the org.netbeans.paint folder):
![]()
The IDE creates NewCanvasAction.java in org.netbeans.paint and opens it in the Source Editor. This is what you should see (click on the links to see the related NetBeans API Javadoc):
    package org.netbeans.paint;

    import org.openide.util.HelpCtx;
    import org.openide.util.NbBundle;
    import org.openide.util.actions.CallableSystemAction;

    public final class NewCanvasAction extends CallableSystemAction {

       public void performAction() {
   	// TODO implement action body
       }

       public String getName() {
       	return NbBundle.getMessage(NewCanvasAction.class, "CTL_NewCanvasAction");
       }

       protected String iconResource() {
        return "org/netbeans/paint/new_icon.png";
       }

       public HelpCtx getHelpCtx() {
        return HelpCtx.DEFAULT_HELP;
       }

       protected boolean asynchronous() {
        return false;
       }

    }
As specified in the GUI Registration panel, the IDE registers the action class as a menu item and as a toolbar button in the layer.xml file.
    public void performAction() {

        PaintTopComponent tc = new PaintTopComponent();
	tc.open();
	tc.requestActive();

    }
What this does is simply to create a new instance of our image editing component, open it, so it appears in the main window, and activate it by sending keyboard focus to it and selecting its tab.
As in the previous section, we use the New Action wizard to create a menu item, this time for saving images.
Note: Where you position the action is not important, as long as it is in the File menu and in the File toolbar.
Click Next.
In Icon, paste this icon (right-click it here and then save it in the org.netbeans.paint folder):
![]()
The IDE creates SaveCanvasAction.java in org.netbeans.paint and opens it in the Source Editor.
    public void performAction() {

        TopComponent tc = TopComponent.getRegistry().getActivated();

        if (tc instanceof PaintTopComponent) {

	    try {
	       	((PaintTopComponent) tc).saveAs();
            } catch (IOException ioe) {
                ErrorManager.getDefault().notify (ioe);
            }

        } else {

            //Theoretically the active component could have changed
            //between the time the menu item or toolbar button was
            //pressed and when the action was invoked.  Not likely,
            //but theoretically possible
            Toolkit.getDefaultToolkit().beep();

        }

    }
Press Alt-Shift-F to generate the required import statements:
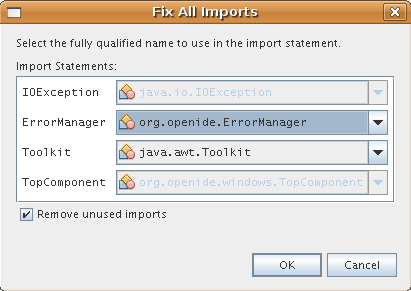
public final class SaveCanvasAction extends CallableSystemAction implements PropertyChangeListener {
A red line appears again. Press Alt-Enter to call up the light bulb and select the suggestion:

Again the red line appears. Repeat the process as before and accept the suggestion:

Fill out the generated propertyChange() method as follows:
    public void propertyChange(PropertyChangeEvent evt) {

        if (TopComponent.Registry.PROP_ACTIVATED.equals(evt.getPropertyName())){
	    updateEnablement();
        }

    }
When a red line appears, click Alt + Enter to allow the IDE to create an updateEnablement() method in the SaveCanvasAction class.
Next, define the updateEnablement() method:
    private void updateEnablement() {

        setEnabled(TopComponent.getRegistry().getActivated()
        instanceof PaintTopComponent);

    }
Finally, define the constructor:
    public SaveCanvasAction() {

        TopComponent.getRegistry().addPropertyChangeListener (
	    WeakListeners.propertyChange(this,
	    TopComponent.getRegistry()));

        updateEnablement();

    }
When a red line appears, click Alt + Enter to allow the IDE to import org.openide.util.WeakListeners.
The main code of interest is the adding of the property change listener. TopComponent.Registry is a registry of all opened TopComponents in the system—all the opened tabs. What we want to do is listen on it for changes, and enable and disable the action depending on what has focus.
Note: Rather than directly attaching a property change listener, you call WeakListeners.propertyChange(). What this does is generate a property change listener that weakly references your action. While in practice your action will live as long as the application is open, it's a good practice, and future-proofing, to use a weak listener if you're attaching a listener and there is no code that ever detaches it. Otherwise, you've got a potential memory leak—your action could never be garbage collected because the registry is holding a reference to it in its list of listeners.
This is what you should now see in the Projects window:
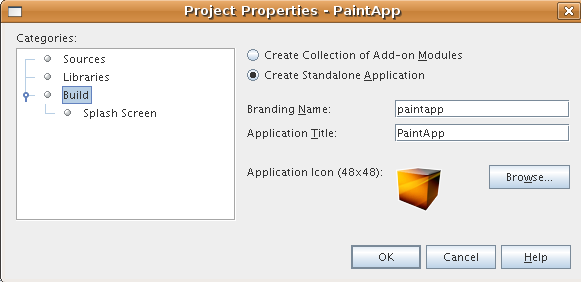
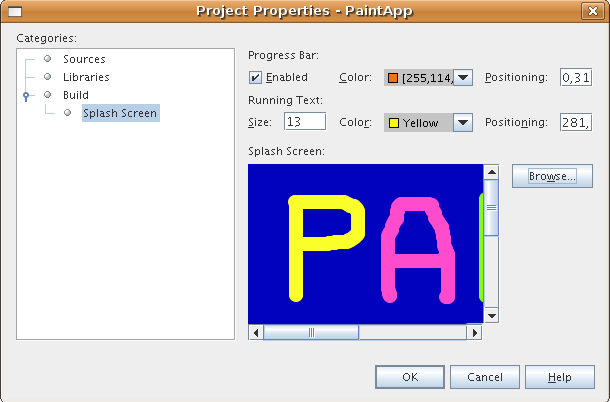
Of course, you want to create an application, not an IDE—so there are a couple of final steps you can perform to exclude the IDE's modules and user interface elements that you do not want or need. First you create a splash screen for your application, then you remove unneeded modules, and finally you create a ZIP distribution and a JNLP application.
Now, in the Paint module's layer.xml file, add the following tags within the Menu folder. These tags remove the GoTo and View menus, which your Paint application does not need.
<file name="GoTo_hidden"/>
<file name="View_hidden"/>
Alternatively, instead of adding the above tags manually, you can delete the folders within the <this layer in context> node of the layer.xml file. To do this, expand <this layer in context>, then expand the Menu Bar node. Choose Delete from the right-click menu of both the GoTo and View nodes.
Now it's time to choose the distribution medium. Right click the PaintApp node and choose Create ZIP Distribution to package the entire application, with all needed modules and files, as a zip file. You can also choose Build JNLP Application to create a JavaWebStart™ version of the application you can put on a web server and link to directly from a web page (you will need to set a correct URL—the generated descriptor uses file: protocol so you can test your web-startable distribution locally).
That's it! Your first complete application built on top of the NetBeans Platform is finished. Next stop: NetBeans Platform 6.0 Feed Reader Tutorial.